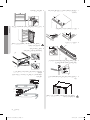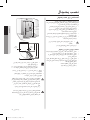
1
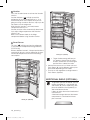
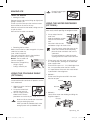
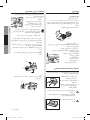
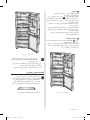
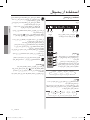
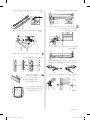
Refrigerator user manual English imagine the possibilities Thank you for purchasing a Samsung product. To receive a more complete service, please register your product at www.samsung.com/register Free Standing Appliance This product has been determined to be in compliance with the Low Voltage Directive (2006/95/EC), the Electromagnetic Compatibility Directive (2004/108/EC), RoHS Directive (2011/65/EU), Commission Delegated Regulation (EU) No 1060/2010 and the Eco-Design Directive (2009/125/EC) implemented by Regulation (EC) No 643/2009 of the European Union. (For products sold in European Countries only) For R-600a refrigerant models only (R-600a), (R-600a) a location exposed to direct sunlight and water (rain drops). • Do not install this appliance in a humid, oily or dusty location, in a location exposed to direct sunlight and water (rain drops). • Do not install this appliance in a location where gas may leak. - This may result in an electric shock or fire. • Do not stand on top of the appliance or place objects (such as laundry, lighted candles, lighted cigarettes, dishes, chemicals, metal objects, etc.) on the appliance. - This may result in an electric shock, fire, problems with the product, or injury. CAUTION CAUTION SIGNS FOR INSTALLATION • Keep ventilation opening in the appliance enclosure or mounting structure clear of obstruction. • Allow the appliance to stand for 2 hours after installation. • The installation or any service of this appliance is recommended by a qualified technician or service company. - Failing to do so may result in an electric shock, fire, explosion, problems with the product, or injury. WARNING • • - • • • • • SEVERE WARNING SIGNS FOR USING Do not touch the power plug with wet hands. This may result in an electric shock. Do not store articles on the top of the appliance. When you open or close the door, the articles may fall and cause personal injury and/or material damage. Do not put a container filled with water on the refrigerator. If spilled, there is a risk of fire or electric shock. Children should be supervised to ensure that they do not play with the appliance. Keep fingers out of “pinch point” areas : clearances between the doors and cabinet are necessarily small. Be careful when you open the doors when children are in the area. Do not let children hang on the door. If not, a serious injury may occur. There is a Risk of children entrapment. 04_ safety information • • • • • • • • • • • • • Do not let children enter inside of the refrigerator. Do not touch the inside walls of the freezer or products stored in the freezer with wet hands. This may cause frostbite. Bottles should be stored tightly together so that they do not fall out. Never put fingers or other objects into the dispenser hole. It may cause personal injury or material damage. Do not insert hands, feet or metal objects (such as chopsticks, etc.) into the bottom or the back of the refrigerator. This may result in an electric shock or injury. Any sharp edges may cause a personal injury Do not use or place any substances sensitive to temperature such as inflammable sprays, inflammable objects, dry ice, medicine, or chemicals near or inside of the refrigerator. Do not keep volatile or inflammable objects or substances (benzene, thinner, propane gas, alcohol, ether, LP gas and other such products etc.) in the refrigerator. This refrigerator is for storing food only. This may result in fire or explosion. This product is intended only for the storage of food in a domestic environment. Do not store pharmaceuticals products, scientific materials or temperature-sensitive products in the refrigerator. Products that require strict temperature controls must not be stored in the refrigerator. Do not place or use electrical appliance inside the refrigerator/freezer, unless they are of a type recommended by the manufacturer. If you smell pharmaceutical or smoke, pull out power plug immediately and contact your Samsung Electronics service center. Do not attempt to repair, disassemble, or modify the appliance yourself. Do not use any fuse(such as cooper, steel wire, etc.) other than the standard fuse. When repairing or reinstalling the appliance is required, contact your nearest service center. Failing to do so may result in an electric shock, fire, problems with the product, or injury. If any dust or water is in Refrigerator, pull out power plug and contact your Samsung Electronics service center. Otherwise there is a risk of fire. If gas leak is detected, avoid any naked flames DA68-02676B__REV(0.0).pdf 7/8/2555 12:14:08 • If the key is provided with refrigerator, the keys should be kept out of the reach of children and not in vicinity of the appliance. • The appliance might not operate consistently (possibility of defrosting of contents or temperature becoming too warm in the frozen food compartment) when sited for an extended period of time below the cold end of the range of temperatures for which the refrigerating appliance is designed. • Do not store food which spoils easily at low temperature, such as bananas, melons. • Your appliance is frost free, which means there is no need to manually defrost your appliance, as this will be carried out automatically. • Temperature rising during the defrost can comply with ISO requirement. But If you want to prevent an undue rise in the temperature of the frozen food while defrosting the appliance, please wrap the frozen food in several layers of newspaper. • Do not re-freeze frozen foods that have thawed completely. Any increase in temperature of frozen food during defrosting can shorten its storage life. • Contains fluorinated greenhouse gases covered by the Kyoto Protocol SAVING ENERGY TIPS - - - - - Install the appliance in a cool, dry room with adequate ventilation. Ensure that it is not exposed to direct sunlight and never put it near a direct source of heat (radiator, for example). Never block any vents or grilles on the appliance. Allow warm food to cool down before placing it in the appliance. Put frozen food in the refrigerator to thaw. You can then use the low temperatures of the frozen products to cool food in the refrigerator. Do not keep the door of the appliance open for too long when putting food in or taking food out. The shorter time for which the door is open, the less ice will form in the freezer. Clean the rear of the refrigerator regularly. Dust increases energy consumption. Do not set temperature colder than necessary. Ensure sufficient air exhaust at the refrigerator base and at the back wall of the refrigerator. Do not cover air vent openings. Allow clearance to the right, left, back and top when installing. This will help reduce power consumption and keep your energy bills lower. 25 mm We strongly recommend that the spaces between Freezer liner top and bottom line of top outlet should be empty to get the best performance for freezer compartment. Contents SETTING UP YOUR REFRIGERATOR ………………………………………………………… 07 OPERATING YOUR REFRIGERATOR ………………………………………………………… 11 TROUBLESHOOTING …………………………………………………………………………… 15 06_ safety information setting up your refrigerator GETTING READY TO INSTALL THE REFRIGERATOR 100 mm 1,850 mm or 1,700 mm • This refrigerator must be properly installed and located in accordance with the manual before it is used. • Use this appliance only for its intended purpose as described in this instruction manual. • We strongly recommend that any servicing be performed by a qualified individual. • Please dispose of the packaging material for this product in an environmentally friendly manner. 50 mm 123º • Pull the power plug out of the socket WARNING before changing the interior light of the refrigerator. - Otherwise, there is a risk of electric shock. Selecting the best location for the refrigerator • Select a location without direct exposure to sunlight. • Select a location with level (or nearly level) flooring. • Select a location with enough space for the refrigerator doors to open easily. • Allow sufficient space to install the refrigerator on a flat surface. - If your refrigerator is not level, the internal cooling system may not work correctly. - Overall space required in use. Refer to drawing and dimension as below. 1,320.5 mm at least 50 mm 600 mm at least 50 mm 1,223 mm 700 mm 1,085 mm • Allow sufficient space to the right, left, back and top for air circulation. This will help reduce power consumption and keep your energy bills lower. • Do not install the refrigerator where the temperature will go below 10 °C. • Please ensure that appliance can be moved freely in the event of maintenance & service. CAUTION CAUTION When installing, servicing, or cleaning behind the refrigerator, be sure to pull the unit straight out and push back in straight after finishing. Also, make sure your floor supports the full-load refrigerator. Otherwise, it may cause floor damage. Please tie up the extra length of the power cord at the back of the refrigerator so as not to be touched on the floor preventing the power cord from being crushed by the rollers upon relocation. setting up _07 01 SETTING UP Congratulations on the purchase of your Samsung Refrigerator. We hope you will enjoy the many state-of-the-art features and efficiencies that this new appliance has to offer. LEVELLING THE REFRIGERATOR If the front of the appliance is slightly higher than the rear, the door can be opened and closed more easily. Case 1) The appliance tilts down to the left. Turn the left adjusting leg in the direction of the arrow until the appliance is level. Case 2) The appliance tilts down to the right. Turn the right adjusting leg in the direction of the arrow until the appliance is level. < Case2 > < Case1 > SETTING UP THE REFRIGERATOR Now that you have your new refrigerator installed and in place, you are ready to set up and enjoy the full features and functions of the appliance. By completing the following steps, your refrigerator should be fully operational. If not, first check the power supply and electricity source or try the troubleshooting section at the back of this user guide. If you have any further questions, contact your Samsung Electronics service center. 1. Place the refrigerator in an appropriate location with reasonable clearance between the wall and the refrigerator. Refer to installation instructions in this manual. 2. Once the refrigerator is plugged in, make sure the interior light comes on when you open the doors. 3. Set the temperature control to the coldest temperature and wait for an hour. The freezer should get slightly chilled and the motor should run smoothly. 4. After powering the refrigerator, it will take a few hours to reach the appropriate temperature. Once the refrigerator temperature is sufficiently cool, you can store food and drink in the refrigerator. REVERSING THE DOOR (RL4003RBA**, RL4013J(S)BA**, RL4323**, RL4353**, RL4352**, ONLY) Before you reverse the refrigerator door, make sure to unplug the refrigerator. Samsung recommends that reversing of the door opening is only completed by Samsung approved Service providers. This will be on a chargeable basis and at the customers expense. Any damage caused while attempting to reverse the door opening is not covered under the appliance manufactures warranty. Any repairs requested due to this circumstance will be completed on a chargeable basis at the customers expense. 1. Before attempting to reverse the refrigerator doors ensure that the refrigerator is disconnected from the main electricity supply and all food stuffs are emptied from inside the appliance. 2. If the customer does not feel confident to follow instruction in the user manual, a Samsung qualified service engineer must be contacted to carry out this change. 3. Do not plug in Refrigerator just after door reverse finished process and wait for at least one hour. Required Tools Not provided Phillips Head Driver (+) Not provided 11 mm Wrench (for hinge shaft) 08_ setting up Flat Head Driver (-) 3/16 ” Allen Wrench (for middle hinge) 10 mm Socket Wrench (for bolts) Additional part Top Left Hinge Cover (Underneath the Top Cover) 1. Remove the Hinge Cover and detach the sensor from the right Hinge Cover. 7. Remove the freezer door from the Bottom hinge by carefully lifting the door straight up. (1) (2) 3. Remove Door Cover ( 1 ). (1) CAUTION The door is heavy, be careful not to injure yourself when removing the door. 8. Lay the refrigerator carefully. Switch the position of Bottom Hinge and Leg. before 4. Remove the Hinge and detach Hinge Case from the hinge. Pull the wires out from the Hinge Case. (Door display type only) after 5. Remove the fridge door from the Middle hinge by carefully lifting the door straight up. 9. Remove the screw on the bottom right side of the fridge and freezer door. Switch Door Stopper ( 1 ), Grommet ( 2 ) and Bracket ( 3 ) from the right to the left. (1) (2) (3) (3) (2) (1) CAUTION The door is heavy, be careful not to injure yourself when removing the door. setting up _09 01 SETTING UP 2. Remove bolts ( 1 ) and disconnect the wire ( 2 ). 6. Disassemble the Middle hinge. 10. Switch the position of Grommet and Cap screws. 15. Change the Wire door direction to opposite side and assemble the door cover. (1) CAUTION Be careful not to injure yourself during operation. 11. Carefully put the freezer door back on. Assemble the Middle hinge. 16. Connect wires(Door display type only) and Assemble the Hinge Cover. 12. Switch the Wire door direction to opposite side on fridge door. (Door display type only) CAUTION Be careful not to damage on wires when reversing the door. 17. Switch the handles from the to left the right. 13. Use 11 mm wrench to separate the Top hinge shaft. Flip the Top hinge and reattach the Top hinge shaft. CAUTION 14. Carefully put the Fridge door back on and assemble the hinge. • When disassemble the Cover slider door, carefully open with both hands and pull it out. (Ez handle model only) - There is a risk of broken. 18. Detach the Fridge and the Freezer door gaskets and then attach them after rotating them 180˚. 10_ setting up operating your refrigerator TYPE A 3 2 5 1 TYPE B Each time you press the button, a short beep will sound. 1 4 Fridge Press the Fridge button to set the fridge to desired temperature from the range between 1 °C and 7 °C. Default set temperature is set on 3 °C and each time you press the Fridge button, temperature will change in following order and temperature indicator will display the desired temperature. 3 °C 4 °C 2 °C 5 °C 5 1 2 3 4 1 °C 7 °C Press this button for 3 seconds to activate the Power Freeze function. Power Freeze indicator ( ) will light up and the refrigerator will speed up the time to needed to freeze products in the freezer. This function will be activated for 50 hours and freezer indicator will display -23 °C. This function switches off automatically. When the Power Freeze process is completed, the Power freeze indicator switches off and the freezer switches back to the previous temperature setting. When you use this function, the energy consumption will increase. To deactivate this function, press the Freezer button for 3 seconds. 6 °C If you need to freeze large amount of food stuff, activate Power Freeze function 20 hours before. 2 Freezer Press the Freezer button to set the freezer to desired temperature from the range between -15 °C and -23 °C. Default set temperature is set on -19 °C and each time you press the Freezer button, temperature will change in following order and temperature indicator will display the desired temperature. 3 Alarm Press this button to activate the Alarm function. Alarm indicator ( ) will light up and the refrigerator will alert you with alarm sound if the refrigerator door is kept open for longer than 2 minutes. To deactivate the Alarm function, press this button. -19 °C -20 °C -21 °C -22 °C -23 °C -18 °C -17 °C -16 °C -15 °C operating _11 02 OPERATING Fridge or Freezer temp indicator will blink when temperature in the fridge or freezer compartment goes up dramatically by storing warm food or frequent door opening. Fridge or Freezer temperature indicator will stop blinking when temperature in the fridge or freezer becomes normal. If temperature indicator does not stop blinking after several hours, please contact your service center. USING THE CONTROL PANEL 4 Vacation Press the Vacation button to activate the Vacation function. ) will light up and the Vacation indicator ( refrigerator will set the temperature to 15 °C to minimize the power consumption when you are going on a long vacation or business trip or you do not need to use the refrigerator. While Vacation function is activated, freezer compartment remains on. Vacation function will be automatically deactivated if you adjust fridge temperature while Vacation function is on. Make sure to remove foods in the fridge compartment before using Vacation function. 5 4 1 2 3 Smart Sensor This icon ( ) will light up when the refrigerator is activated with the optimized energy efficiency. (TYPE B Only) Without additional controls, it keeps food freshness automatically by many sensors detecting the inner and outside temperature and minimizes energy consumption. RL43*, (H : 1,850 mm) • To get the best energy efficiency of this product, please leave all selves, drawers and baskets on their original position like as above illustration. • Some of the feature such as Water tank and Fresh Room ( 4 ) can be different and may not be available depending on the model. • The fruits or the vegetables could get frozen in Fresh Room. (Optional) 2 3 3 ADDITIONAL SHELF (OPTIONAL) 44 RL40*, (H : 1,700 mm) 12_ operating To get more space in the freezer, you can remove Ice Maker ( 1 ), mini drawer ( 2 ) and drawer ( 3 ) (RL43 model only), then place the additional shelf (Optional) just above the bottom drawer. It does not affect thermal and mechanical characteristics. A declared storage volume of the freezer compartment is calculated with these parts removed. MAKING ICE CAUTION Do not lift up rear part of Folder shelf. TWIST ICE MAKER • Making Ice Cubes Water Level • Removing the Ice Cubes Make sure that the ice cube storage bin is in place under the ice cube tray. If not, slide it into place. Twist one of the levers firmly in the clockwise direction until the tray twists slightly. Result : The ice cubes fall into the storage bin. Remove the storage bin by: - Lifting it slightly - Pulling it towards you USING THE FOLDABLE SHELF (OPTIONAL) You can fold the foldable shelf if you need to accommodate taller containers or products on the shelf underneath. 1. Slightly lift up the shelf and slide it inward. 2. Lift up the tucked shelf towards the rear wall. 3. You can simply pull the folded shelf in reverse procedure to use the fully extended t d d shelf. h lf CAUTION Shelf can fall out, handle with care when using or cleaning the shelf. When you fold the Foldable shelf, make enough space to lift up foldable shelf. USING THE WATER DISPENSER (OPTIONAL) With the water dispenser, you can obtain chilled water easily without opening the refrigerator door. • Lift up and pull out the water tank. - Hold the handgrips on both sides to lift out the water tank. - Clean the inside of water tank before using it for the first time. For more space, empty the water off the water tank, remove the lid completely, place the water tank back and use it to store food. For water dispenser usage, do not put anything other than water in the water tank. • Fill the water tank with water, ensuring that it is in a stable position, allowing for the extended water supply outlet. - Fill with water up to 2.4 L. If it is filled higher than this, it may overflow when the lid is closed. - It is impossible to fill the tank with water while it is positioned in the refrigerator. • Method 1. - Fill the water lifting the round lid in the arrow direction to open. Round lid Water tank Dispenser cock • Method 2. - Please fill the water after holding and lifting the large lid to open it. Hand-grip operating _13 02 OPERATING Remove the ice cube tray by lifting up slightly and pulling it towards you. Fill the tray with water up to the maximum water level marked on the rear of the tray. Slide the tray back into the holder, taking care not to spill the water. Wait until the ice cubes are formed. • Close the refrigerator door after fitting the water tank. - Confirm that the dispenser cock is outside after closing the door. CAUTION Water tank Firmly grab the water tank with both hands and lift it up towards you gently to remove the water tanks. Fix water tank to the fridge door tightly. If not, water tank may not be operate correctly. Do not use the refrigerator without the water tank. If not, it may cause an efficiency problem. • Place a glass underneath the water outlet and push gently against the dispenser lever with your glass. Make sure the glass is in line with the dispenser to prevent the water from bouncing out. CAUTION Check that the locking device is set to “unlock”. Water can only be dispensed on this setting. Water tank may not be available depending on the model. Drawers Pull the drawers out fully then slightly lift it up to remove the drawers. • If the drawers get stuck to door, remove drawer by lifting up after remove shelves. Freezer Rail Drawer (Optional) Lift up the Rail Drawer until take off from the hook then pull the drawer out. • When put back the Rail l th Drawer, tuck the rail then place the R Railil D Drawer to the original position. Dispenser Lever LOCK UNLOCK REMOVING THE INTERIOR PARTS • Do not touch Steel Rail in the freezer with wet hands. - This may cause frostbite. • Be careful when you touch the Steel Rail. - This may cause a personal injury. CAUTION CLEANING THE REFRIGERATOR Shelves Gently lift up the shelves with both hands and pull it toward you. (Glass shelf/ Foldable shelf) CAUTION Do not put the shelves upside down or backwards. There is a risk of falling. WARNING CAUTION Do not use Benzene, Thinner or Clorox™ for cleaning. They may damage the surface of the appliance and can create a risk of fire. Do not spray the refrigerator with water while it is plugged in, as it may cause an electric shock. Do not clean the refrigerator with benzene, thinner or car detergent for risk of fire. Door guards Firmly grab the door guards with both hands and lift it up gently to remove the door guards. REPLACING THE LED LAMP When the interior or exterior LED lamp has gone out, do not disassemble the lamp cover and LED lamp by yourself. Please contact your service agents. 14_ operating troubleshooting SOLUTION The appliance is not operating at all or the temperature is too high. • • • • The food in the refrigerator is frozen. • Is the temperature control on the front panel set to the coldest temperature? • Is the surrounding temperature too low? There are unusual noises. • • • • • The front corners and sides of the appliance are warm and condensation starts to form. • Heat-proof pipes are installed in the front corners of the appliance to prevent condensation from forming. When the surrounding temperature rises, this may not always be effective. However, this is not abnormal. • In very humid weather, condensation may form on the outer surface of the appliance when the moisture in the air comes into contact with the cool surface of the appliance. You can hear a liquid bubbling in the appliance. • This is the refrigerant, which cools the inside of the appliance. There is a bad smell inside the appliance. • Is there any spoiled food inside of the refrigerator? • Make sure that strong smelling food (for example, fish) is wrapped so that it is airtight. • Clean out your refrigerator periodically and throw away any spoiled or suspect food. There is a layer of frost on the appliances walls. • Are the air outlet vents blocked by food stored inside the refrigerator? • Space the food out as much as possible to improve ventilation. • Is the door fully closed? Condensation forms on the inside wall of the appliance and around vegetables. • Food with a high water content is stored uncovered with a high humidity level or the door has been left open for a long time. • Store the food with a cover or in sealed containers. Check if the power plug is correctly connected. Is the temperature control on the front panel correctly set? Does sun shine on the appliance or are there any heat sources nearby? Is the back of the appliance too close to the wall? Check if the appliance is installed on a stable and even floor. Is the back of the appliance too close to the wall? Have any foreign objects fallen behind or under the appliance? Is the noise coming from the compressor in the appliance? A ticking sound occurs when the various accessories contract or expand. troubleshooting _15 03 TROUBLESHOOTING PROBLEM Ambient Room Temperature Limits This fridge/freezer is designed to operate in ambient temperatures specified by its temperature class marked on the rating plate. Class Symbol Ambient Temperature range (°C) Extended Temperate SN +10 to +32 Temperate N +16 to +32 Subtropical ST +16 to +38 Tropical T +16 to +43 Internal temperatures may be affected by such factors as the location of the fridge/freezer, ambient temperature and the frequency with which you open the door. Adjust the temperature as required to compensate for these factors. Contact SAMSUNG WORLD WIDE If you have any questions or comments relating to Samsung products, please contact the SAMSUNG customer care center. COUNTRY IRAN CALL 021-8255 WEB SITE www.samsung.com ﻣﺤﺪﻭدﻩ ﻫﺎی دﻣﺎی ﻣﺤﯿﻂ در اﺗﺎﻕ ﻣﺤﯿﻂ ﮐﻪ ﺗﻮﺳﻂ ﻃﺒﻘﻪ ﺑﻨﺪی دﻣﺎﺋﯽ ﮐﻪ در ﭘﻼﮎ درﺟﻪ ﺑﻨﺪی آﻥ ﻗﯿﺪ ﺷﺪﻩ ﮐﺎر ﮐﻨﺪ. اﯾﻦ ﯾﺨﭽﺎﻝ/ﻓﺮﯾﺰر ﻃﻮری ﻃﺮاﺣﯽ ﺷﺪﻩ ﮐﻪ در دﻣﺎﻫﺎی ﹶ ﻃﺒﻘﻪ ﺑﻨﺪی ﻋﻼﻣﺖ ﮔﺴﺘﺮﻩ دﻣﺎی ﻣﺤﯿﻂ )درﺟﻪ ﺳﺎﻧﺘﯽ ﮔﺮاد( ﻣﺘﻌﺎدﻝ ﲤﺪﯾﺪ ﺷﺪﻩ SN ١٠+ﺗﺎ +٣٢ ﻣﺘﻌﺎدﻝ N ١۶+ﺗﺎ +٣٢ ﻧﯿﻤﻪ ﺣﺎرﻩ ST ١۶+ﺗﺎ +٣٨ ﺣﺎرﻩ T ١۶+ﺗﺎ +۴٣ دﻣﺎﻫﺎی داﺧﻠﯽ ﳑﮑﻦ اﺳﺖ ﲢﺖ ﺗﺄﺛﯿﺮ ﻋﻮاﻣﻠﯽ از ﻗﺒﯿﻞ ﻣﺤﻞ ﯾﺨﭽﺎﻝ/ﻓﺮﯾﺰر ،دﻣﺎی ﻣﺤﯿﻂ ﻭ دﻓﻌﺎﺗﯽ ﮐﻪ در را ﺑﺎز ﻣﯽ ﮐﻨﯿﺪ ،ﻗﺮار ﮔﯿﺮﻧﺪ. دﻣﺎ را در ﺻﻮرت ﻟﺰﻭﻡ ﺑﺮای ﺟﺒﺮاﻥ اﯾﻦ ﻋﻮاﻣﻞ ﺗﻨﻈﯿﻢ ﮐﻨﯿﺪ. ﺣﻞ ﻣﺸﮑﻼﺕ ﻣﺸﮑﻞ ﺭﺍﻩ ﺣﻞ ﻏﺬﺍی ﺩﺍﺧﻞ ﯾﺨﭽﺎﻝ ﻣﻨﺠﻤﺪ ﺷﺪﻩ ﺍﺳﺖ. • • ﺁﯾﺎ ﮐﻨﺘﺮﻝ ﺩﻣﺎ ﺩﺭ ﺻﻔﺤﻪ ﺟﻠﻮﺋﯽ ﺭﻭی ﺳﺮﺩﺗﺮﯾﻦ ﺩﻣﺎ ﺗﻨﻈﯿﻢ ﺷﺪﻩ ﺍﺳﺖ؟ ﺁﯾﺎ ﺩﻣﺎی ﻣﺤﯿﻂ ﺯﯾﺎﺩی ﭘﺎﺋﯿﻦ ﺍﺳﺖ؟ ﺳﺮﻭﺻﺪﺍی ﻏﯿﺮﻋﺎﺩی ﻭﺟﻮﺩ ﺩﺍﺭﺩ. • • • • • ﮐﻨﺘﺮﻝ ﮐﻨﯿﺪ ﮐﻪ ﺩﺳﺘﮕﺎﻩ ﺭﻭی ﮐﻒ ﺍﺗﺎﻕ ﺛﺎﺑﺖ ﻭ ﻫﻢ ﺗﺮﺍﺯی ﻧﺼﺐ ﺷﺪﻩ ﺑﺎﺷﺪ. ﺁﯾﺎ ﭘﺸﺖ ﺩﺳﺘﮕﺎﻩ ﺯﯾﺎﺩی ﺑﻪ ﺩﯾﻮﺍﺭ ﻧﺰﺩﯾﮏ ﺍﺳﺖ؟ ﺁﯾﺎ ﺍﺷﯿﺎﺀ ﺧﺎﺭﺟﯽ ﺩﺭ ﭘﺸﺖ ﯾﺎ ﺯﯾﺮ ﺩﺳﺘﮕﺎﻩ ﺍﻓﺘﺎﺩﻩ ﺍﻧﺪ؟ ﺁﯾﺎ ﺳﺮﻭﺻﺪﺍ ﺍﺯ ﮐﻤﭙﺮﺳﻮﺭ ﺩﺳﺘﮕﺎﻩ ﻣﯽ ﺁﯾﺪ؟ ﺻﺪﺍی ﺗﯿﮏ ﺗﯿﮏ ﻫﻨﮕﺎﻣﯽ ﺍﯾﺠﺎﺩ ﻣﯽ ﺷﻮﺩ ﮐﻪ ﻣﻠﺤﻘﺎﺕ ﮔﻮﻧﺎﮔﻮﻥ ﻣﻨﻘﺒﺾ ﻭ ﻣﻨﺒﺴﻂ ﻣﯽ ﺷﻮﻧﺪ. ﮔﻮﺷﻪ ﻫﺎی ﺟﻠﻮ ﻭ ﮐﻨﺎﺭ ﺩﺳﺘﮕﺎﻩ ﮔﺮﻡ ﺑﻮﺩﻩ ﻭ ﺷﺮﻭﻉ ﺑﻪ ﺗﻘﻄﯿﺮ ﻣﯽﮐﻨﺪ. • ﻟﻮﻟﻪ ﻫﺎی ﺿﺪﮔﺮﻣﺎ ﺩﺭ ﮔﻮﺷﻪ ﻫﺎی ﺟﻠﻮی ﺩﺳﺘﮕﺎﻩ ﻧﺼﺐ ﺷﺪﻩ ﺍﻧﺪ ﺗﺎ ﺍﺯ ﺍﯾﺠﺎﺩ ﺗﻘﻄﯿﺮ ﺟﻠﻮﮔﯿﺮی ﺷﻮﺩ. ﻫﻨﮕﺎﻣﯿﮑﻪ ﺩﻣﺎی ﻣﺤﯿﻂ ﺑﺎﻻ ﻣﯽ ﺭﻭﺩ ،ﺍﯾﻨﮑﺎﺭ ﳑﮑﻦ ﺍﺳﺖ ﻫﻤﯿﺸﻪ ﻣﻮﺛﺮ ﻧﺒﺎﺷﺪ .ﺑﺎ ﺍﯾﻦ ﻭﺟﻮﺩ ،ﺍﯾﻦ ﻣﻮﺿﻮﻉ ﻋﺎﺩﯾﺴﺖ. ﺩﺭ ﻫﻮﺍی ﺑﺴﯿﺎﺭ ﻣﺮﻃﻮﺏ ،ﺗﻘﻄﯿﺮ ﳑﮑﻦ ﺍﺳﺖ ﺩﺭ ﺳﻄﺢ ﺧﺎﺭﺟﯽ ﺩﺳﺘﮕﺎﻩ ﺍﯾﺠﺎﺩ ﺷﻮﺩ ﻫﻨﮕﺎﻣﯿﮑﻪ ﺭﻃﻮﺑﺖ ﻫﻮﺍ ﺩﺭ ﲤﺎﺱ ﺑﺎ ﺳﻄﺢ ﺳﺮﺩ ﺩﺳﺘﮕﺎﻩ ﻗﺮﺍﺭ ﻣﯽ ﮔﯿﺮﺩ. ﻣﯽ ﺗﻮﺍﻧﯿﺪ ﺻﺪﺍی ﻗﻠﻘﻞ ﺁﺏ ﺩﺭ ﺩﺳﺘﮕﺎﻩ ﺭﺍ ﺑﺸﻨﻮﯾﺪ. • ﺍﯾﻦ ﺳﺮﺩﺳﺎﺯ ﺍﺳﺖ ﮐﻪ ﺩﺍﺧﻞ ﺩﺳﺘﮕﺎﻩ ﺭﺍ ﺳﺮﺩ ﻣﯽ ﮐﻨﺪ. ﺑﻮی ﻣﺘﻌﻔﻨﯽ ﺩﺭ ﺩﺍﺧﻞ ﺩﺳﺘﮕﺎﻩ ﺑﻪ ﻣﺸﺎﻡ ﻣﯽ ﺭﺳﺪ. • • • ﺁﯾﺎ ﻏﺬﺍﺋﯽ ﺩﺭ ﺩﺍﺧﻞ ﯾﺨﭽﺎﻝ ﺧﺮﺍﺏ ﺷﺪﻩ ﺍﺳﺖ؟ ﻣﻄﻤﺌﻦ ﺷﻮﯾﺪ ﻏﺬﺍﺋﯽ ﮐﻪ ﺑﻮی ﻗﻮی ﺩﺍﺭﺩ )ﺑﺮﺍی ﻣﺜﺎﻝ ،ﻣﺎﻫﯽ( ﺑﻪ ﻃﻮﺭ ﮐﯿﭗ ﭘﻮﺷﺎﻧﺪﻩ ﺷﺪﻩ ﺑﺎﺷﺪ. ﯾﺨﭽﺎﻝ ﺭﺍ ﺑﻪ ﻃﻮﺭ ﻧﻮﺑﺘﯽ ﲤﯿﺰ ﮐﺮﺩﻩ ﻭ ﻏﺬﺍﻫﺎی ﻓﺎﺳﺪ ﯾﺎ ﻣﺸﮑﻮک ﺭﺍ ﺩﻭﺭ ﺑﺮﯾﺰﯾﺪ. ﻻﯾﻪ ﺍی ﺍﺯ ﺷﺒﻨﻢ ﯾﺦ ﺯﺩﻩ ﺭﻭی ﺩﯾﻮﺍﺭﻩ ﻫﺎی ﺩﺳﺘﮕﺎﻩ ﺍﯾﺠﺎﺩ ﺷﺪﻩ ﺍﺳﺖ. • • • ﺁﯾﺎ ﺭﻭﺯﻧﻪ ﻫﺎی ﺧﺮﻭﺝ ﻫﻮﺍ ﺗﻮﺳﻂ ﻏﺬﺍﺋﯽ ﮐﻪ ﺩﺭ ﺩﺍﺧﻞ ﯾﺨﭽﺎﻝ ﻧﮕﻪ ﺩﺍﺷﺘﻪ ﺷﺪﻩ ﻣﺴﺪﻭﺩ ﺷﺪﻩ ﺍﻧﺪ؟ ﺩﺭ ﺑﯿﻦ ﻏﺬﺍﻫﺎ ﺗﺎ ﺣﺪ ﺍﻣﮑﺎﻥ ﻓﺎﺻﻠﻪ ﻗﺎﺋﻞ ﺷﻮﯾﺪ ﺗﺎ ﻫﻮﺍﮔﯿﺮی ﺑﻬﺒﻮﺩ ﭘﯿﺪﺍ ﮐﻨﺪ. ﺁﯾﺎ ﺩﺭ ﮐﺎﻣﻼ ﹰ ﺑﺴﺘﻪ ﺷﺪﻩ ﺍﺳﺖ؟ ﺗﻘﻄﯿﺮ ﺩﺭ ﺩﯾﻮﺍﺭﻩ ﺩﺍﺧﻠﯽ ﺩﺳﺘﮕﺎﻩ ﻭ ﺩﺭ ﺍﻃﺮﺍﻑ ﺳﺒﺰﯾﺠﺎﺕ ﺍﯾﺠﺎﺩ ﻣﯽ ﺷﻮﺩ. • • ﻏﺬﺍ ﺑﺎ ﻣﺤﺘﻮﺍی ﺁﺏ ﺯﯾﺎﺩ ﺑﻪ ﻃﻮﺭ ﺩﺭﺑﺎﺯ ﺑﺎ ﺳﻄﺢ ﺭﻃﻮﺑﺖ ﺯﯾﺎﺩ ﻗﺮﺍﺭ ﺩﺍﺩﻩ ﺷﺪﻩ ﯾﺎ ﺩﺭ ﺑﺮﺍی ﻣﺪﺕ ﻃﻮﻻﻧﯽ ﺑﺎﺯ ﮔﺬﺍﺷﺘﻪ ﺷﺪﻩ ﺍﺳﺖ. ﻏﺬﺍ ﺭﺍ ﺑﺎ ﭘﻮﺷﺶ ﯾﺎ ﺩﺭ ﻣﺤﻔﻈﻪ ﮐﯿﭗ ﻗﺮﺍﺭ ﺩﻫﯿﺪ. • • ﺣﻞ ﻣﺸﮑﻼﺕ _١۵ ٠٣ﺣﻞ ﻣﺸﮑﻼﺕ ﺩﺳﺘﮕﺎﻩ ﺍﺻﻼ ﹰ ﮐﺎﺭ ﳕﯽ ﮐﻨﺪ ﯾﺎ ﺩﻣﺎ ﺯﯾﺎﺩی ﺑﺎﻻﺳﺖ. • • • • ﮐﻨﺘﺮﻝ ﮐﻨﯿﺪ ﮐﻪ ﺩﻭﺷﺎﺧﻪ ﺑﻪ ﻃﻮﺭ ﺻﺤﯿﺢ ﻭﺻﻞ ﺷﺪﻩ ﺑﺎﺷﺪ. ﺁﯾﺎ ﮐﻨﺘﺮﻝ ﺩﻣﺎ ﺩﺭ ﺻﻔﺤﻪ ﮐﻨﺘﺮﻝ ﺩﺭﺳﺖ ﺗﻨﻈﯿﻢ ﺷﺪﻩ ﺍﺳﺖ؟ ﺁﯾﺎ ﺁﻓﺘﺎﺏ ﺑﺮ ﺭﻭی ﺩﺳﺘﮕﺎﻩ ﻣﯽ ﺗﺎﺑﺪ ﯾﺎ ﻫﯿﭽﮕﻮﻧﻪ ﻣﻨﺒﻊ ﺣﺮﺍﺭﺗﯽ ﺩﺭ ﻧﺰﺩﯾﮑﯽ ﻭﺟﻮﺩ ﺩﺍﺭﺩ؟ ﺁﯾﺎ ﭘﺸﺖ ﺩﺳﺘﮕﺎﻩ ﺯﯾﺎﺩی ﺑﻪ ﺩﯾﻮﺍﺭ ﻧﺰﺩﯾﮏ ﺍﺳﺖ؟ • - ﺩﺭ ﯾﺨﭽﺎﻝ ﺭﺍ ﭘﺲ ﺍﺯ ﻗﺮﺍﺭ ﺩﺍﺩﻥ ﻣﺨﺰﻥ ﺁﺏ ﺑﺒﻨﺪﯾﺪ. ﺗﺄﯾﯿﺪ ﮐﻨﯿﺪ ﮐﻪ ﺳﻮﭘﺎپ ﭘﺨﺶ ﮔﺮ ﺑﻌﺪ ﺍﺯ ﺑﺴﱳ ﺩﺭ ،ﺧﺎﺭﺝ ﺑﺎﺷﺪ. ﺍﺣﺘﯿﺎﻁ • ﻣﺨﺰﻥ ﺁﺏ ﻣﺨﺰﻥ ﺁﺏ ﺭﺍ ﺑﻪ ﺩﺭ ﯾﺨﭽﺎﻝ ﻣﺤﮑﻢ ﮐﻨﯿﺪ. ﺩﺭ ﻏﯿﺮ ﺍﯾﻨﺼﻮﺭﺕ ،ﳑﮑﻦ ﺍﺳﺖ ﮐﻪ ﻣﺨﺰﻥ ﺁﺏ ﺩﺭﺳﺖ ﮐﺎﺭ ﻧﮑﻨﺪ. ﺍﺯ ﯾﺨﭽﺎﻝ ﺑﺪﻭﻥ ﻣﺨﺰﻥ ﺁﺏ ﺍﺳﺘﻔﺎﺩﻩ ﻧﮑﻨﯿﺪ .ﺩﺭ ﻏﯿﺮ ﺍﯾﻨﺼﻮﺭﺕ ،ﳑﮑﻦ ﺍﺳﺖ ﻣﻮﺟﺐ ﻣﺸﮑﻼﺕی ﺩﺭ ﻋﻤﻠﮑﺮﺩ ﺩﺳﺘﮕﺎﻩ ﺷﻮﺩ. ﯾﮏ ﻟﯿﻮﺍﻥ ﺭﺍ ﺯﯾﺮ ﺧﺮﻭﺟﯽ ﺁﺏ ﻗﺮﺍﺭ ﺩﺍﺩﻩ ﻭ ﺑﺎ ﺁﻥ ﺑﻪ ﻃﻮﺭ ﻣﻼﯾﻢ ﺑﻪ ﺍﻫﺮﻡ ﭘﺨﺶ ﮔﺮ ﻓﺸﺎﺭ ﺑﯿﺎﻭﺭﯾﺪ. ﻣﻄﻤﺌﻦ ﺷﻮﯾﺪ ﮐﻪ ﻟﯿﻮﺍﻥ ﺑﺎ ﭘﺨﺶ ﮔﺮ ﻫﻤﺘﺮﺍﺯ ﺑﺎﺷﺪ ﺗﺎ ﺍﺯ ﭘﺎﺷﯿﺪﻥ ﺁﺏ ﺑﻪ ﺧﺎﺭﺝ ﺟﻠﻮﮔﯿﺮی ﺷﻮﺩ. ﺍﺣﺘﯿﺎﻁ ﮐﻨﺘﺮﻝ ﮐﻨﯿﺪ ﮐﻪ ﺍﺑﺰﺍﺭ ﻗﻔﻞ ﮐﺮﺩﻥ ﺭﻭی "ﺑﺎﺯ" ﺗﻨﻈﯿﻢ ﺷﺪﻩ ﺑﺎﺷﺪ. ﺁﺏ ﺭﺍ ﺗﻨﻬﺎ ﺩﺭ ﺍﯾﻦ ﺗﻨﻈﯿﻢ ﻣﯽ ﺗﻮﺍﻥ ﺧﺎﺭﺝ ﳕﻮﺩ. ﺍﻫﺮﻡ ﭘﺨﺶ ﮔﺮ ﺑﺎﺯ ﻗﻔﻞ ﺑﯿﺮﻭﻥ ﺁﻭﺭﺩﻥ ﻗﻄﻌﺎﺕ ﺩﺍﺧﻠﯽ ﻗﻔﺴﻪ ﻫﺎ ﺑﻪ ﺁﺭﺍﻣﯽ ﻗﻔﺴﻪ ﻫﺎ ﺭﺍ ﺑﺎ ﺩﻭ ﺩﺳﺖ ﮔﺮﻓﺘﻪ ﻭ ﺑﻪ ﺳﻤﺖ ﺧﻮﺩﺗﺎﻥ ﺑﮑﺸﯿﺪ) .ﻗﻔﺴﻪ ﺷﯿﺸﻪ ﺍی/ﻗﻔﺴﻪ ﺗﺎﺷﻮ( ﺍﺣﺘﯿﺎﻁ ﻗﻔﺴﻪ ﻫﺎ ﺭﺍ ﺑﺮﻋﮑﺲ ﯾﺎ ﺑﻪ ﺳﻤﺖ ﻋﻘﺐ ﻗﺮﺍﺭ ﻧﺪﻫﯿﺪ. ﺧﻄﺮ ﺍﻓﺘﺎﺩﻥ ﻭﺟﻮﺩ ﺩﺍﺭﺩ. ﻣﺨﺰﻥ ﺁﺏ ﺭﺍ ﺑﺎ ﻫﺮﺩﻭ ﺩﺳﺖ ﻣﺤﮑﻢ ﮔﺮﻓﺘﻪ ﻭ ﺑﺎ ﻣﻼﯾﻤﺖ ﺑﻪ ﻃﺮﻑ ﺧﻮﺩﺗﺎﻥ ﺑﻪ ﺑﺎﻻ ﺑﮑﺸﯿﺪ ﺗﺎ ﻣﺨﺰﻥ ﻫﺎی ﺁﺏ ﺑﺮﺩﺍﺷﺘﻪ ﺷﻮﺩ. ﻣﺨﺰﻥ ﺁﺏ ﳑﮑﻦ ﺍﺳﺖ ﺑﺴﺘﮕﯽ ﺑﻪ ﻣﺪﻝ ﻣﻮﺟﻮﺩ ﻧﺒﺎﺷﺪ. ﮐﺸﻮﻫﺎ ﮐﺸﻮﻫﺎ ﺭﺍ ﮐﺎﻣﻼ ﹰ ﺑﯿﺮﻭﻥ ﮐﺸﯿﺪﻩ ﺳﭙﺲ ﺑﺮﺍی ﺧﺎﺭﺝ ﮐﺮﺩﻥ ﻗﺪﺭی ﮐﺸﻮﻫﺎ ﺭﺍ ﺑﻠﻨﺪ ﮐﻨﯿﺪ. • ﺍﮔﺮ ﮐﺸﻮﻫﺎ ﺑﻪ ﺩﺭ ﮔﯿﺮ ﮐﺮﺩﻧﺪ، ﮐﺸﻮ ﺭﺍ ﭘﺲ ﺍﺯ ﺑﺮﺩﺍﺷﱳ ﻗﻔﺴﻪ ﻫﺎ ﺑﻪ ﺳﻤﺖ ﺑﺎﻻ ﺑﻠﻨﺪ ﮐﺮﺩﻩ ﻭ ﺧﺎﺭﺝ ﳕﺎﯾﯿﺪ. ﮐﺸﻮی ﺭﯾﻠﯽ ﻓﺮﯾﺰﺭ )ﺍﻧﺘﺨﺎﺑﯽ( ﮐﺸﻮی ﺭﯾﻠﯽ ﺭﺍ ﺁﻧﻘﺪﺭ ﺑﻠﻨﺪ ﮐﻨﯿﺪ ﺗﺎ ﺍﺯ ﻗﻼﺏ ﺟﺪﺍ ﺷﺪﻩ ﻭ ﺳﭙﺲ ﮐﺸﻮ ﺭﺍ ﺑﻪ ﺑﯿﺮﻭﻥ ﺑﮑﺸﯿﺪ. • ﻫﻨﮕﺎﻣﯿﮑﻪ ﮐﺸﻮی ﺭﯾﻠﯽ ﺭﺍ ﺳﺮﺟﺎﯾﺶ ﻣﯽ ﮔﺬﺍﺭﯾﺪ ،ﺭﯾﻞ ﺭﺍ ﺑﺎﻻ ﺯﺩﻩ ﻭ ﮐﺸﻮی ﺭﯾﻠﯽ ﺭﺍ ﺳﺮﺟﺎی ﺍﺻﻠﯽ ﺍﺵ ﻗﺮﺍﺭ ﺩﻫﯿﺪ. ﺍﺣﺘﯿﺎﻁ ﲤﯿﺰ ﮐﺮﺩﻥ ﯾﺨﭽﺎﻝ ﻫﺸﺪﺍﺭ ﻣﺤﺎﻓﻆ ﻫﺎی ﺩﺭ ﻣﺤﺎﻓﻆ ﻫﺎی ﺩﺭ ﺭﺍ ﺑﺎ ﺩﻭ ﺩﺳﺖ ﻣﺤﮑﻢ ﮔﺮﻓﺘﻪ ﻭ ﺑﺎ ﻣﻼﯾﻤﺖ ﺑﻠﻨﺪ ﮐﻨﯿﺪ ﺗﺎ ﻣﺤﺎﻓﻆ ﻫﺎی ﺩﺭ ﺑﺮﺩﺍﺷﺘﻪ ﺷﻮﻧﺪ. • • - ﺑﺎ ﺩﺳﺖ ﻫﺎی ﺧﯿﺲ ﺑﻪ ﺭﯾﻞ ﻓﻮﻻﺩی ﺩﺳﺖ ﻧﺰﻧﯿﺪ. ﺍﯾﻨﮑﺎﺭ ﳑﮑﻦ ﺍﺳﺖ ﻣﻮﺟﺐ ﺳﺮﻣﺎﺯﺩﮔﯽ ﺷﻮﺩ. ﻫﻨﮕﺎﻡ ﺩﺳﺖ ﺯﺩﻥ ﺑﻪ ﺭﯾﻞ ﻓﻮﻻﺩی ﻣﺮﺍﻗﺐ ﺑﺎﺷﯿﺪ. ﳑﮑﻦ ﺍﺳﺖ ﻣﻮﺟﺐ ﻣﺼﺪﻭﻣﯿﺖ ﺷﺨﺼﯽ ﺷﻮﺩ. ﺍﺣﺘﯿﺎﻁ ﺍﺯ ﺑﻨﺰﻥ ،ﺗﯿﻨﺮ ﯾﺎ ™ Cloroxﺑﺮﺍی ﲤﯿﺰ ﮐﺮﺩﻥ ﺍﺳﺘﻔﺎﺩﻩ ﻧﮑﻨﯿﺪ. ﳑﮑﻦ ﺍﺳﺖ ﺑﻪ ﺳﻄﺢ ﺩﺳﺘﮕﺎﻩ ﺁﺳﯿﺐ ﻭﺍﺭﺩ ﮐﺮﺩﻩ ﻭ ﻣﻮﺟﺐ ﺧﻄﺮ ﺁﺗﺸﺴﻮﺯی ﺷﻮﺩ. ﻫﻨﮕﺎﻣﯿﮑﻪ ﯾﺨﭽﺎﻝ ﺑﻪ ﭘﺮﯾﺰ ﺑﺮﻕ ﺯﺩﻩ ﺷﺪﻩ ﺭﻭی ﺁﻥ ﺁﺏ ﻧﭙﺎﺷﯿﺪ ﭼﻮﻥ ﳑﮑﻦ ﺍﺳﺖ ﻣﻮﺟﺐ ﺑﺮﻕ ﮔﺮﻓﺘﮕﯽ ﺷﻮﺩ .ﯾﺨﭽﺎﻝ ﺭﺍ ﺑﺎ ﺑﻨﺰﻥ ،ﺗﯿﻨﺮ ﯾﺎ ﺷﻮﯾﻨﺪﻩ ﺍﺗﻮﻣﺒﯿﻞ ﲤﯿﺰ ﻧﮑﻨﯿﺪ ﭼﻮﻥ ﺧﻄﺮ ﺁﺗﺸﺴﻮﺯی ﻭﺟﻮﺩ ﺩﺍﺭﺩ. ﺗﻌﻮﯾﺾ ﻻﻣﭗ led ﺯﻣﺎﻧﯿﮑﻪ ﻻﻣﭗ LEDﺩﺍﺧﻞ ﯾﺎ ﺧﺎﺭﺝ ﯾﺨﭽﺎﻝ ﺳﻮﺧﺖ ،ﺷﺨﺼﺎ ﹰ ﺩﺭﭘﻮﺵ ﻻﻣﭗ ﻭ ﻻﻣﭗ LEDﺭﺍ ﺑﺎﺯ ﻧﮑﻨﯿﺪ. ﻟﻄﻔﺎ ﹰ ﺑﺎ ﮐﺎﺭﮔﺰﺍﺭ ﺗﻌﻤﯿﺮﺍﺗﯽ ﺧﻮﺩ ﲤﺎﺱ ﺑﮕﯿﺮﯾﺪ. _١۴ﺍﺳﺘﻔﺎﺩﻩ ﺍﺳﺘﻔﺎﺩﻩ ﺍﺯ ﺁﺑﺮﯾﺰ )ﺍﻧﺘﺨﺎﺑﯽ( ﺗﻬﯿﻪ ﯾﺦ ﯾﺦ ﺳﺎﺯ ﺗﺎﺑﯿﺪﻧﯽ ﺑﺮﺍی ﺍﯾﺠﺎﺩ ﻓﻀﺎی ﺑﯿﺸﺘﺮ ،ﺁﺏ ﺩﺍﺧﻞ ﻣﺨﺰﻥ ﺁﺏ ﺭﺍ ﺧﻻﯽ ﮐﺮﺩﻩ، ﺩﺭﭘﻮﺵ ﺭﺍ ﮐﺎﻣﻼ ﹰ ﺑﺮﺩﺍﺷﺘﻪ ،ﻣﺨﺰﻥ ﺁﺏ ﺭﺍ ﺳﺮﺟﺎﯾﺶ ﻗﺮﺍﺭ ﺩﺍﺩﻩ ﻭ ﺍﺯ ﺁﻥ ﺑﺮﺍی ﻧﮕﻬﺪﺍﺭی ﻏﺬﺍ ﺍﺳﺘﻔﺎﺩﻩ ﳕﺎﯾﯿﺪ. ﺟﻬﺖ ﺍﺳﺘﻔﺎﺩﻩ ﺍﺯ ﺁﺑﺮﻳﺰ ﺗﻨﻬﺎ ﺁﻥ ﺭﺍ ﺑﺎ ﺁﺏ ﭘﺮ ﻧﻤﺎﻳﻴﺪ. ﺳﻄﺢ ﺁﺏ • ﺑﺮﺩﺍﺷﱳ ﺣﺒﻪ ﻫﺎی ﯾﺦ ﻣﻄﻤﺌﻦ ﺷﻮﯾﺪ ﮐﻪ ﻣﺤﻔﻈﻪ ﻧﮕﻬﺪﺍﺭی ﺣﺒﻪ ﻫﺎی ﯾﺦ ﺩﺭ ﺯﯾﺮ ﺳﯿﻨﯽ ﺣﺒﻪ ﻫﺎی ﯾﺦ ﻗﺮﺍﺭ ﺩﺍﺩﻩ ﺷﺪﻩ ﺑﺎﺷﺪ. ﺩﺭ ﻏﯿﺮ ﺍﯾﻨﺼﻮﺭﺕ ،ﺁﻧﺮﺍ ﺳﺮﺟﺎﯾﺶ ﺑﻠﻐﺰﺍﻧﯿﺪ. ﺍﻫﺮﻡ ﺭﺍ ﺩﺭ ﺟﻬﺖ ﻋﻘﺮﺑﻪ ﺳﺎﻋﺖ ﻣﺤﮑﻢ ﺗﺎﺑﺶ ﺩﻫﯿﺪ ﺗﺎ ﺳﯿﻨﯽ ﮐﻤﮑﯽ ﺗﺎﺑﯿﺪﻩ ﺷﻮﺩ. ﻧﺘﯿﺠﻪ :ﺣﺒﻪ ﻫﺎی ﯾﺦ ﺩﺭ ﻣﺤﻔﻈﻪ ﻧﮕﻬﺪﺍﺭی ﻣﯽ ﺍﻓﺘﻨﺪ. ﻣﺤﻔﻈﻪ ﻧﮕﻬﺪﺍﺭی ﺭﺍ ﺑﺪﯾﻦ ﺻﻮﺭﺕ ﺑﺮﺩﺍﺭﯾﺪ: ﻗﺪﺭی ﺑﻠﻨﺪ ﮐﻨﯿﺪ -ﺑﻪ ﺳﻤﺖ ﺧﻮﺩﺗﺎﻥ ﺑﮑﺸﯿﺪ • • - ﻣﺨﺰﻥ ﺁﺏ ﺭﺍ ﺑﺎ ﺁﺏ ﭘﺮ ﮐﺮﺩﻩ ،ﻣﻄﻤﺌﻦ ﺷﻮﯾﺪ ﮐﻪ ﺑﻪ ﻃﻮﺭ ﻣﺤﮑﻢ ﻗﺮﺍﺭ ﮔﺮﻓﺘﻪ ﺑﺎﺷﺪ ﻭ ﻓﻀﺎی ﮐﺎﻓﯽ ﺑﺮﺍی ﺧﺮﻭﺟﯽ ﺟﺮﯾﺎﻥ ﺁﺏ ﲤﺪﯾﺪ ﯾﺎﻓﺘﻪ ﺍﯾﺠﺎﺩ ﺷﺪﻩ ﺑﺎﺷﺪ. ﺑﻪ ﻣﯿﺰﺍﻥ ٢/٤ﻟﯿﺘﺮ ﺑﺎ ﺁﺏ ﭘﺮ ﮐﻨﯿﺪ .ﺍﮔﺮ ﺑﯿﺶ ﺍﺯ ﺍﯾﻦ ﭘﺮ ﺷﻮﺩ ،ﳑﮑﻦ ﺍﺳﺖ ﻫﻨﮕﺎﻡ ﺑﺴﱳ ﺳﺮﭘﻮﺵ ﺳﺮﺭﯾﺰ ﺷﻮﺩ. ﭘﺮ ﮐﺮﺩﻥ ﻣﺨﺰﻥ ﺁﺏ ﻫﻨﮕﺎﻣﯿﮑﻪ ﺩﺭ ﺩﺍﺧﻞ ﯾﺨﭽﺎﻝ ﻗﺮﺍﺭ ﺩﺍﺩﻩ ﺷﺪﻩ ﳑﮑﻦ ﻧﯿﺴﺖ. ﺭﻭﺵ .١ ﺩﺭﭘﻮﺵ ﮔﺮﺩ ﺭﺍ ﺑﺎ ﺑﻠﻨﺪ ﮐﺮﺩﻥ ﺁﻥ ﺩﺭ ﺟﻬﺖ ﭘﯿﮑﺎﻥ ﺑﺮﺩﺍﺷﺘﻪ ﻭ ﺑﺎ ﺁﺏ ﭘﺮ ﮐﻨﯿﺪ. ﺩﺭﭘﻮﺵ ﮔﺮﺩ ﺍﺳﺘﻔﺎﺩﻩ ﺍﺯ ﻗﻔﺴﻪ ﺗﺎﺷﻮ )ﺍﻧﺘﺨﺎﺑﯽ( ﺍﮔﺮ ﻧﯿﺎﺯ ﺩﺍﺭﯾﺪ ﻇﺮﻭﻑ ﯾﺎ ﻣﺤﺼﻮﻻﺕ ﺑﻠﻨﺪﺗﺮ ﺭﺍ ﺩﺭ ﺯﯾﺮ ﻗﻔﺴﻪ ﻗﺮﺍﺭ ﺩﻫﯿﺪ ،ﻣﯽ ﺗﻮﺍﻧﯿﺪ ﻗﻔﺴﻪ ﺗﺎﺷﻮ ﺭﺍ ﺟﻤﻊ ﳕﺎﺋﯿﺪ. .١ﮐﻤﯽ ﻗﻔﺴﻪ ﺭﺍ ﺑﻪ ﻃﺮﻑ ﺑﺎﻻ ﮐﺸﯿﺪﻩ ﻭ ﺑﻪ ﺳﻤﺖ ﺩﺍﺧﻞ ﺑﻠﻐﺰﺍﻧﯿﺪ. .٢ﻗﻔﺴﻪ ﺗﺎ ﺷﺪﻩ ﺭﺍ ﺑﻪ ﻃﺮﻑ ﺩﯾﻮﺍﺭﻩ ﭘﺸﺘﯽ ﺑﻠﻨﺪ ﮐﻨﯿﺪ. .٣ﺑﺮﺍی ﺍﺳﺘﻔﺎﺩﻩ ﺍﺯ ﻗﻔﺴﻪ ﺩﺭ ﻭﺿﻌﯿﺖ ﺑﺎﺯ ﻣﯽ ﺗﻮﺍﻧﯿﺪ ﻗﻔﺴﻪ ﺗﺎ ﺷﺪﻩ ﺭﺍ ﺑﻪ ﺭﻭﯾﻪ ﻣﻌﮑﻮﺱ ﺑﮑﺸﯿﺪ. ﺍﺣﺘﯿﺎﻁ ﺍﺣﺘﯿﺎﻁ ﻣﺨﺰﻥ ﺁﺏ ﺳﻮﭘﺎپ ﭘﺨﺶ ﮔﺮ • - ﺭﻭﺵ .٢ ﺩﺭﭘﻮﺵ ﮔﺮﺩ ﻭ ﺭﻭ ﯾ ﻪ ﻣ ﺤﺎﻓﻆ ﺭﺍ ﺍﺯ ﺩﺳﺘﮕ ﻴ ﺮﻩ ﺑﺮﺩﺍﺷﺘﻪ ﻭ ﻣﺤﻔﻈﻪ ﺭﺍ ﺑﺎ ﺁﺏ ﭘﺮ ﮐﻨﻴ ﺪ . ﺩﺳﺘﮕﯿﺮﻩ ﺩﺭ ﻫﻨﮕﺎﻡ ﺍﺳﺘﻔﺎﺩﻩ ﯾﺎ ﲤﯿﺰ ﮐﺮﺩﻥ ﺑﺎ ﺩﻗﺖ ﻋﻤﻞ ﮐﻨﯿﺪ ﺗﺎ ﻗﻔﺴﻪ ﺑﻪ ﺑﯿﺮﻭﻥ ﻧﯿﻔﺘﺪ. ﻫﻨﮕﺎﻡ ﺗﺎ ﮐﺮﺩﻥ ﻗﻔﺴﻪ ﺗﺎﺷﻮ ،ﺑﺮﺍی ﺑﻠﻨﺪ ﺷﺪﻥ ﻗﻔﺴﻪ ﺗﺎﺷﻮ ﺑﻪ ﺍﻧﺪﺍﺯﻩ ﮐﺎﻓﯽ ﻓﻀﺎ ﻗﺎﺋﻞ ﺷﻮﯾﺪ. ﻗﺴﻤﺖ ﻋﻘﺐ ﻗﻔﺴﻪ ﺗﺎﺷﻮ ﺭﺍ ﺑﻠﻨﺪ ﻧﮑﻨﯿﺪ. ﺍﺳﺘﻔﺎﺩﻩ _١٣ ٠٢ﺍﺳﺘﻔﺎﺩﻩ • ﺗﻬﯿﻪ ﺣﺒﻪ ﻫﺎی ﯾﺦ ﺳﻴﻨﯽ ﻳﺦ ﺭﺍ ﺑﻪ ﺁﺭﺍﻣﯽ ﺑﻪ ﺳﻤﺖ ﺑﺎﻻ ﺑﮑﺸﻴﺪ ﻭ ﺁﻥ ﺭﺍ ﺑﺮ ﺩﺍﺭ ﻳﺪ. ﺳﯿﻨﯽ ﺭﺍ ﺗﺎ ﺣﺪﺍﮐﺜﺮ ﺳﻄﺢ ﻋﻼﻣﺖ ﺯﺩﻩ ﺷﺪﻩ ﺩﺭ ﭘﺸﺖ ﺳﯿﻨﯽ ﭘﺮ ﺁﺏ ﮐﻨﯿﺪ. ﺳﯿﻨﯽ ﺭﺍ ﺑﻪ ﺩﺍﺧﻞ ﻧﮕﻬﺪﺍﺭﻧﺪﻩ ﺑﻠﻐﺰﺍﻧﯿﺪ ﻭ ﻣﺮﺍﻗﺐ ﺑﺎﺷﯿﺪ ﮐﻪ ﺁﺏ ﭘﺮﺍﮐﻨﺪﻩ ﻧﺸﻮﺩ. ﺻﺒﺮ ﮐﻨﯿﺪ ﺗﺎ ﺣﺒﻪ ﻫﺎی ﯾﺦ ﺍﯾﺠﺎﺩ ﺷﻮﻧﺪ. ﺑﺎ ﺍﺳﺘﻔﺎﺩﻩ ﺍﺯ ﭘﺨﺶ ﮔﺮ ﺁﺏ ،ﻣﯽ ﺗﻮﺍﻧﯿﺪ ﺍﺯ ﺁﺏ ﺧﻨﮏ ﺑﺪﻭﻥ ﺑﺎﺯ ﮐﺮﺩﻥ ﺩﺭ ﯾﺨﭽﺎﻝ ﺍﺳﺘﻔﺎﺩﻩ ﳕﺎﯾﯿﺪ. • ﻣﺨﺰﻥ ﺁﺏ ﺭﺍ ﺑﻪ ﺑﺎﻻ ﻭ ﺳﭙﺲ ﺑﻪ ﺑﯿﺮﻭﻥ ﺑﮑﺸﯿﺪ. ﺩﺳﺘﮕﯿﺮﻩ ﻫﺎ ﺭﺍ ﺑﺮﺍی ﺑﯿﺮﻭﻥ ﮐﺸﯿﺪﻥﻣﺨﺰﻥ ﺁﺏ ﺩﺭ ﻫﺮ ﺩﻭ ﻃﺮﻑ ﺑﮕﯿﺮﯾﺪ. ﻗﺒﻞ ﺍﺯ ﺍﺳﺘﻔﺎﺩﻩ ﺍﺯ ﻣﺨﺰﻥ ﺁﺏ ﺑﺮﺍی ﺍﻭﻟﯿﻦﺑﺎﺭ ،ﺩﺍﺧﻞ ﺁﻧﺮﺍ ﲤﯿﺰ ﳕﺎﯾﯿﺪ. ۴ ﻣﺮﺧﺼﯽ ﺩﮐﻤﻪ )Vacationﻣﺮﺧﺼﯽ( ﺭﺍ ﺑﺮﺍی ﻓﻌﺎﻝ ﮐﺮﺩﻥ ﻋﻤﻠﮑﺮﺩ )Vacationﻣﺮﺧﺼﯽ( ﻓﺸﺎﺭ ﺩﻫﯿﺪ. ﻧﺸﺎﻧﮕﺮ )Vacationﻣﺮﺧﺼﯽ( ) ( ﺭﻭﺷﻦ ﺷﺪﻩ ﻭ ﯾﺨﭽﺎﻝ ﺩﻣﺎ ﺭﺍ ﺭﻭی ١۵ﺩﺭﺟﻪ ﺳﺎﻧﺘﯽ ﮔﺮﺍﺩ ﺗﻨﻈﯿﻢ ﺧﻮﺍﻫﺪ ﮐﺮﺩ ﺗﺎ ﻣﺼﺮﻑ ﺑﺮﻕ ﻫﻨﮕﺎﻣﯿﮑﻪ ﺑﻪ ﻣﺮﺧﺼﯽ ﻃﻮﻻﻧﯽ ﯾﺎ ﻣﺴﺎﻓﺮﺕ ﺍﺩﺍﺭی ﻣﯽ ﺭﻭﯾﺪ ﯾﺎ ﻧﯿﺎﺯ ﺑﻪ ﺍﺳﺘﻔﺎﺩﻩ ﺍﺯ ﯾﺨﭽﺎﻝ ﻧﺪﺍﺭﯾﺪ ﺑﻪ ﺣﺪﺍﻗﻞ ﺑﺮﺳﺪ. ﺩﺭ ﺣﻻﺘﯽ ﮐﻪ ﻋﻤﻠﮑﺮﺩ )Vacationﻣﺮﺧﺼﯽ( ﻓﻌﺎﻝ ﺷﺪﻩ ،ﻣﺤﻔﻈﻪ ﻓﺮﯾﺰﺭ ﺭﻭﺷﻦ ﺑﺎﻗﯽ ﻣﯽ ﻣﺎﻧﺪ. ﻫﻨﮕﺎﻣﯿﮑﻪ ﺩﻣﺎی ﯾﺨﭽﺎﻝ ﺭﺍ ﺩﺭ ﺣﻻﯿﮑﻪ ﻋﻤﻠﮑﺮﺩ )Vacationﻣﺮﺧﺼﯽ( ﺭﻭﺷﻦ ﺍﺳﺖ ﺗﻐﯿﯿﺮ ﺩﻫﯿﺪ ،ﻋﻤﻠﮑﺮﺩ )Vacationﻣﺮﺧﺼﯽ( ﺑﻪ ﻃﻮﺭ ﺧﻮﺩﮐﺎﺭ ﻏﯿﺮﻓﻌﺎﻝ ﺧﻮﺍﻫﺪ ﺷﺪ. ﺣﺘﻤﺎ ﹰ ﻗﺒﻞ ﺍﺯ ﺍﺳﺘﻔﺎﺩﻩ ﺍﺯ ﻋﻤﻠﮑﺮﺩ )Vacationﻣﺮﺧﺼﯽ( ،ﻏﺬﺍﻫﺎ ﺭﺍ ﺍﺯ ﻣﺤﻔﻈﻪ ﯾﺨﭽﺎﻝ ﺧﺎﺭﺝ ﮐﻨﯿﺪ. ۵ ۴ ١ ٢ ﺳﻨﺴﻮﺭ ﻫﻮﺷﻤﻨﺪ ( ﻫﻨﮕﺎﻣﯿﮑﻪ ﮐﺎﺭﺁﺋﯽ ﺑﻬﯿﻨﻪ ﺷﺪﻩ ﯾﺨﭽﺎﻝ ﻓﻌﺎﻝ ﺷﺪﻩ ﺑﺎﺷﺪ ﺍﯾﻦ ﳕﺎﺩ ) ﺭﻭﺷﻦ ﺧﻮﺍﻫﺪ ﺷﺪ) .ﻓﻘﻂ ﻧﻮﻉ( B ﺍﯾﻦ ﻋﻤﻠﮑﺮﺩ ﺑﺎ ﺍﺳﺘﻔﺎﺩﻩ ﺍﺯ ﮐﻨﺘﺮﻝ ﻫﺎی ﺍﺿﺎﻓﯽ ﺗﻮﺳﻂ ﭼﻨﺪﯾﻦ ﺳﻨﺴﺘﻮﺭ ﺷﻨﺎﺳﺎﯾﯽ ﺩﻣﺎی ﺩﺍﺧﻠﯽ ﻭ ﺧﺎﺭﺟﯽ ،ﺑﻪ ﻃﻮﺭ ﺧﻮﺩﮐﺎﺭ ﺗﺎﺯﮔﯽ ﻏﺬﺍ ﺭﺍ ﺣﻔﻆ ﳕﻮﺩﻩ ﻭ ﻣﺼﺮﻑ ﺍﻧﺮژی ﺭﺍ ﮐﺎﻫﺶ ﻣﯽ ﺩﻫﺪ. ٣ *) ،RL43ﺍﺭﺗﻔﺎﻉ ١٨۵٠ :ﻣﯿﻠﯽ ﻣﺘﺮ( • • • ﺑﺮﺍی ﮐﺴﺐ ﺑﻬﺘﺮﯾﻦ ﺑﺎﺯﺩﻩ ﺍﻧﺮژی ﺍﺯ ﺍﯾﻦ ﻣﺤﺼﻮﻝ ،ﻟﻄﻔﺎ ﹰ ﻫﻤﻪ ﻗﻔﺴﻪ ﻫﺎ ،ﮐﺸﻮﻫﺎ ﻭ ﺳﺒﺪﻫﺎ ﺭﺍ ﺩﺭ ﻭﺿﻌﯿﺖ ﺍﻭﻟﯿﻪ ﺑﻪ ﺻﻮﺭﺕ ﳕﻮﺩﺍﺭ ﻓﻮﻕ ﻗﺮﺍﺭ ﺩﻫﯿﺪ. ﺑﺮﺧﯽ ﺍﺯ ﻭﯾﮋﮔﯽ ﻫﺎ ﺍﺯ ﻗﺒﯿﻞ ﻣﺨﺰﻥ ﺁﺏ ﻭ ﺍﺗﺎﻗﮏ ﺗﺎﺯﻩ ) ( ۴ﳑﮑﻦ ﺍﺳﺖ ﻣﺘﻔﺎﻭﺕ ﺑﻮﺩﻩ ﻭ ﺑﺴﺘﮕﯽ ﺑﻪ ﻣﺪﻝ ﻣﻮﺟﻮﺩ ﻧﺒﺎﺷﻨﺪ. ﻣﯿﻮﻩ ﯾﺎ ﺳﺒﺰﯾﺠﺎﺕ ﳑﮑﻦ ﺍﺳﺖ ﺩﺭ ﺍﺗﺎﻗﮏ ﺗﺎﺯﻩ ﯾﺦ ﺑﺰﻧﻨﺪ) .ﺍﻧﺘﺨﺎﺑﯽ( ﻗﻔﺴﻪ ﺍﺿﺎﻓﯽ )ﺍﺧﺘﯿﺎﺭی( ٢ *) ،RL40ﺍﺭﺗﻔﺎﻉ ١٧٠٠ :ﻣﯿﻠﯽ ﻣﺘﺮ( _١٢ﺍﺳﺘﻔﺎﺩﻩ ١ ﺑﺮﺍی ﺍﯾﺠﺎﺩ ﻓﻀﺎی ﺑﯿﺸﺘﺮ ﺩﺭ ﻓﺮﯾﺰﺭ ،ﻣﯽ ﺗﻮﺍﻧﯿﺪ ﯾﺦ ﺳﺎﺯ ) ،( ١ ﮐﺸﻮی ﮐﻮﭼﮏ ) ( ٢ﻭ ﮐﺸﻮ ) ) ( ٣ﻓﻘﻂ ﻣﺪﻝ (RL43ﺭﺍ ﺑﺮﺩﺍﺷﺘﻪ ﻭ ﻗﻔﺴﻪ ﺍﺿﺎﻓﯽ )ﺍﻧﺘﺨﺎﺑﯽ( ﺭﺍ ﺩﺭﺳﺖ ﺑﺎﻻی ﮐﺸﻮی ﲢﺘﺎﻧﯽ ﻗﺮﺍﺭ ﺩﻫﯿﺪ .ﺍﯾﻨﮑﺎﺭ ﺑﺮ ﺭﻭی ﺧﺼﻮﺻﯿﺎﺕ ﮔﺮﻣﺎﯾﯽ ﻭ ﻣﮑﺎﻧﯿﮑﯽ ﺗﺄﺛﯿﺮی ﻧﺪﺍﺭﺩ .ﻇﺮﻓﯿﺖ ﺫﺧﯿﺮﻩ ﺳﺎﺯی ﺍﻋﻼﻡ ﺷﺪﻩ ﻣﺤﻔﻈﻪ ﻓﺮﯾﺰﺭ ﺩﺭ ﺣﻻﺘﯽ ﻣﺤﺎﺳﺒﻪ ﺷﺪﻩ ﮐﻪ ﺍﯾﻦ ﻗﻄﻌﺎﺕ ﺧﺎﺭﺝ ﺷﺪﻩ ﺑﺎﺷﻨﺪ. ﺍﺳﺘﻔﺎﺩﻩ ﺍﺯ ﯾﺨﭽﺎﻝ ﺍﺳﺘﻔﺎﺩﻩ ﺍﺯ ﭘﻨﻞ ﮐﻨﺘﺮﻝ ﻧﻮﻉ A ١ ۴ ٢ ۵ ﻧﻮﻉ B ﻫﺮﺑﺎﺭ ﮐﻪ ﺍﯾﻦ ﺩﮐﻤﻪ ﺭﺍ ﻓﺸﺎﺭ ﻣﯽ ﺩﻫﯿﺪ، ﯾﮏ ﺑﯿﭗ ﮐﻮﺗﺎﻩ ﺑﻪ ﺻﺪﺍ ﺩﺭﺧﻮﺍﻫﺪ ﺁﻣﺪ. ١ ٣ ﺍﯾﻦ ﻋﻤﻠﮑﺮﺩ ﺑﺮﺍی ۵٠ﺳﺎﻋﺖ ﻓﻌﺎﻝ ﺷﺪﻩ ﻭ ﻧﺸﺎﻧﮕﺮ ﻓﺮﯾﺰﺭ ﺩﻣﺎی ﺩﺭﺟﻪ -٢٣ ﺩﺭﺟﻪ ﺳﺎﻧﺘﯽ ﮔﺮﺍﺩ ﺭﺍ ﻧﺸﺎﻥ ﺧﻮﺍﻫﺪ ﺩﺍﺩ. ﺍﯾﻦ ﻋﻤﻠﮑﺮﺩ ﺑﻪ ﻃﻮﺭ ﺧﻮﺩﮐﺎﺭ ﺧﺎﻣﻮﺵ ﺧﻮﺍﻫﺪ ﺷﺪ. ﻫﻨﮕﺎﻣﯿﮑﻪ ﻓﺮﺍﯾﻨﺪ ) Power Freezeﯾﺦ ﺯﺩﻥ ﭘﺮﻗﺪﺭﺕ( ﺧﺎﲤﻪ ﭘﯿﺪﺍ ﮐﺮﺩ، ﻧﺸﺎﻧﮕﺮ ) Power Freezeﯾﺦ ﺯﺩﻥ ﭘﺮﻗﺪﺭﺕ( ﺧﺎﻣﻮﺵ ﺷﺪﻩ ﻭ ﻓﺮﯾﺰﺭ ﺑﻪ ﺗﻨﻈﯿﻤﺎﺕ ﺩﻣﺎی ﻗﺒﻠﯽ ﺑﺮ ﻣﯽ ﮔﺮﺩﺩ. ﻫﻨﮕﺎﻣﯿﮑﻪ ﺍﺯ ﺍﯾﻦ ﻋﻤﻠﮑﺮﺩ ﺍﺳﺘﻔﺎﺩﻩ ﻣﯽ ﮐﻨﯿﺪ ،ﻣﺼﺮﻑ ﺍﻧﺮژی ﺍﻓﺰﺍﯾﺶ ﭘﯿﺪﺍ ﺧﻮﺍﻫﺪ ﮐﺮﺩ. ﺑﺮﺍی ﻏﯿﺮﻓﻌﺎﻝ ﮐﺮﺩﻥ ﺍﯾﻦ ﻋﻤﻠﮑﺮﺩ ،ﺩﮐﻤﻪ ) Freezerﻓﺮﯾﺰﺭ( ﺭﺍ ﺑﺮﺍی ٣ﺛﺎﻧﯿﻪ ﻓﺸﺎﺭ ﺩﻫﯿﺪ. ۵ ﯾﺨﭽﺎﻝ ﺩﮐﻤﻪ )Fridgeﯾﺨﭽﺎﻝ( ﺭﺍ ﺑﺮﺍی ﺗﻨﻈﯿﻢ ﯾﺨﭽﺎﻝ ﺭﻭی ﺩﻣﺎی ﺩﳋﻮﺍﻩ ﺍﺯ ١ﺗﺎ ٧ﺩﺭﺟﻪ ﺳﺎﻧﺘﯽ ﮔﺮﺍﺩ ﻓﺸﺎﺭ ﺩﻫﯿﺪ. ﺩﻣﺎی ﺍﺯ ﭘﯿﺶ ﺗﻨﻈﯿﻢ ﺷﺪﻩ ٣ﺩﺭﺟﻪ ﺳﺎﻧﺘﯽ ﮔﺮﺍﺩ ﺍﺳﺖ ﻭ ﻫﺮﺑﺎﺭ ﮐﻪ ﺩﮐﻤﻪ )Fridgeﯾﺨﭽﺎﻝ( ﺭﺍ ﻓﺸﺎﺭ ﻣﯽ ﺩﻫﯿﺪ ،ﺩﻣﺎ ﺑﻪ ﺗﺮﺗﯿﺐ ﺯﯾﺮ ﺗﻐﯿﯿﺮ ﮐﺮﺩﻩ ﻭ ﻧﺸﺎﻧﮕﺮ ﺩﻣﺎ ،ﻣﻘﺎﺩﯾﺮ ﺩﳋﻮﺍﻩ ﺭﺍ ﻧﺸﺎﻥ ﺧﻮﺍﻫﺪ ﺩﺍﺩ. ١ ﺍﮔﺮ ﻻﺯﻡ ﺍﺳﺖ ﮐﻪ ﻣﻘﺪﺍﺭ ﺯﯾﺎﺩی ﻏﺬﺍ ﺭﺍ ﻣﻨﺠﻤﺪ ﮐﻨﯿﺪ ،ﻋﻤﻠﮑﺮﺩ )Power Freezeﯾﺦ ﺯﺩﻥ ﭘﺮﻗﺪﺭﺕ( ﺭﺍ ٢٠ﺳﺎﻋﺖ ﻗﺒﻞ ﻓﻌﺎﻝ ﮐﻨﯿﺪ. ٢ ٣ ٣ ۴ ٣ﺩﺭﺟﻪ ٢ﺩﺭﺟﻪ ١ﺩﺭﺟﻪ ٧ﺩﺭﺟﻪ ﺳﺎﻧﺘﯽ ﮔﺮﺍﺩ ﺳﺎﻧﺘﯽ ﮔﺮﺍﺩ ﺳﺎﻧﺘﯽ ﮔﺮﺍﺩ ﺳﺎﻧﺘﯽ ﮔﺮﺍﺩ ۴ﺩﺭﺟﻪ ۵ﺩﺭﺟﻪ ۶ﺩﺭﺟﻪ ﺳﺎﻧﺘﯽ ﮔﺮﺍﺩ ﺳﺎﻧﺘﯽ ﮔﺮﺍﺩ ﺳﺎﻧﺘﯽ ﮔﺮﺍﺩ ٢ ﺍﯾﻦ ﺩﮐﻤﻪ ﺭﺍ ﺑﺮﺍی ﻓﻌﺎﻝ ﮐﺮﺩﻥ ﻋﻤﻠﮑﺮﺩ ) Power Freezeﯾﺦ ﺯﺩﻥ ﭘﺮﻗﺪﺭﺕ( ﺑﺮﺍی ٣ﺛﺎﻧﯿﻪ ﻓﺸﺎﺭ ﺩﻫﯿﺪ. ﻧﺸﺎﻧﮕﺮ ) Power Freezeﯾﺦ ﺯﺩﻥ ﭘﺮﻗﺪﺭﺕ( ) ( ﺭﻭﺷﻦ ﺷﺪﻩ ﻭ ﯾﺨﭽﺎﻝ ﺳﺮﻋﺖ ﻣﻨﺠﻤﺪ ﮐﺮﺩﻥ ﻣﺤﺼﻮﻻﺕ ﺩﺭ ﻓﺮﯾﺰﺭ ﺭﺍ ﺗﺴﺮﯾﻊ ﺧﻮﺍﻫﺪ ﮐﺮﺩ. ﺯﻧﮓ ﺍﺧﺒﺎﺭ ﺍﯾﻦ ﺩﮐﻤﻪ ﺭﺍ ﺑﺮﺍی ﻓﻌﺎﻝ ﮐﺮﺩﻥ ﻋﻤﻠﮑﺮﺩ ﺯﻧﮓ ﺍﺧﺒﺎﺭ ﻓﺸﺎﺭ ﺩﻫﯿﺪ. ( ﺭﻭﺷﻦ ﺷﺪﻩ ﻭ ﯾﺨﭽﺎﻝ ﺑﺎ ﺻﺪﺍی ﺯﻧﮓ ﻧﺸﺎﻧﮕﺮ ) Alarmﺯﻧﮓ ﺍﺧﺒﺎﺭ( ) ﺍﺧﺒﺎﺭ ﺑﻪ ﺷﻤﺎ ﻫﺸﺪﺍﺭ ﻣﯽ ﺩﻫﺪ ﮐﻪ ﺩﺭ ﯾﺨﭽﺎﻝ ﺑﺮﺍی ﺑﯿﺶ ﺍﺯ ٢ﺩﻗﯿﻘﻪ ﺑﺎﺯ ﻣﺎﻧﺪﻩ ﺍﺳﺖ. ﺑﺮﺍی ﻏﯿﺮﻓﻌﺎﻝ ﮐﺮﺩﻥ ﻋﻤﻠﮑﺮﺩ ) Alarmﺯﻧﮓ ﺍﺧﺒﺎﺭ( ،ﺍﯾﻦ ﺩﮐﻤﻪ ﺭﺍ ﻓﺸﺎﺭ ﺩﻫﯿﺪ. ﻓﺮﯾﺰﺭ ﺩﮐﻤﻪ )Freezerﻓﺮﯾﺰﺭ( ﺭﺍ ﺑﺮﺍی ﺗﻨﻈﯿﻢ ﻓﺮﯾﺰﺭ ﺭﻭی ﺩﻣﺎی ﺩﳋﻮﺍﻩ ﺍﺯ -١۵ﺗﺎ -٢٣ ﺩﺭﺟﻪ ﺳﺎﻧﺘﯽ ﮔﺮﺍﺩ ﻓﺸﺎﺭ ﺩﻫﯿﺪ. ﺩﻣﺎی ﺍﺯ ﭘﯿﺶ ﺗﻨﻈﯿﻢ ﺷﺪﻩ -١٩ﺩﺭﺟﻪ ﺳﺎﻧﺘﯽ ﮔﺮﺍﺩ ﺍﺳﺖ ﻭ ﻫﺮﺑﺎﺭ ﮐﻪ ﺩﮐﻤﻪ )Freezerﻓﺮﯾﺰﺭ( ﺭﺍ ﻓﺸﺎﺭ ﻣﯽ ﺩﻫﯿﺪ ،ﺩﻣﺎ ﺑﻪ ﺗﺮﺗﯿﺐ ﺯﯾﺮ ﺗﻐﯿﯿﺮ ﮐﺮﺩﻩ ﻭ ﻧﺸﺎﻧﮕﺮ ﺩﻣﺎ ،ﻣﻘﺎﺩﯾﺮ ﺩﳋﻮﺍﻩ ﺭﺍ ﻧﺸﺎﻥ ﺧﻮﺍﻫﺪ ﺩﺍﺩ. - ٢٣ﺩﺭﺟﻪ ﺳﺎﻧﺘﯽ ﮔﺮﺍﺩ - ٢٢ﺩﺭﺟﻪ ﺳﺎﻧﺘﯽ ﮔﺮﺍﺩ - ١۵ﺩﺭﺟﻪ ﺳﺎﻧﺘﯽ ﮔﺮﺍﺩ - ٢١ﺩﺭﺟﻪ ﺳﺎﻧﺘﯽ ﮔﺮﺍﺩ - ١۶ﺩﺭﺟﻪ ﺳﺎﻧﺘﯽ ﮔﺮﺍﺩ - ٢٠ﺩﺭﺟﻪ ﺳﺎﻧﺘﯽ ﮔﺮﺍﺩ - ١٧ﺩﺭﺟﻪ ﺳﺎﻧﺘﯽ ﮔﺮﺍﺩ - ١٩ﺩﺭﺟﻪ ﺳﺎﻧﺘﯽ ﮔﺮﺍﺩ - ١٨ﺩﺭﺟﻪ ﺳﺎﻧﺘﯽ ﮔﺮﺍﺩ ﺍﺳﺘﻔﺎﺩﻩ _١١ ٠٢ﺍﺳﺘﻔﺎﺩﻩ ﻧﺸﺎﻧﮕﺮ ﺩﻣﺎی ﯾﺨﭽﺎﻝ ﯾﺎ ﻓﺮﯾﺰﺭ ﻫﻨﮕﺎﻣﯿﮑﻪ ﺩﻣﺎی ﻣﺤﻔﻈﻪ ﯾﺨﭽﺎﻝ ﯾﺎ ﻓﺮﯾﺰﺭ ﺗﻮﺳﻂ ﻗﺮﺍﺭ ﺩﺍﺩﻥ ﻏﺬﺍی ﮔﺮﻡ ﯾﺎ ﺑﺎﺯ ﮐﺮﺩﻥ ﻣﮑﺮﺭ ﺩﺭ ﺑﻪ ﺷﺪﺕ ﺑﺎﻻ ﻣﯽ ﺭﻭﺩ ﭼﺸﻤﮏ ﺧﻮﺍﻫﺪ ﺯﺩ. ﻧﺸﺎﻧﮕﺮ ﺩﻣﺎی ﯾﺨﭽﺎﻝ ﯾﺎ ﻓﺮﯾﺰﺭ ﻫﻨﮕﺎﻣﯿﮑﻪ ﺩﻣﺎ ﺩﺭ ﯾﺨﭽﺎﻝ ﯾﺎ ﻓﺮﯾﺰﺭ ﻋﺎﺩی ﺷﻮﺩ ﺩﯾﮕﺮ ﭼﺸﻤﮏ ﻧﺨﻮﺍﻫﺪ ﺯﺩ. ﺍﮔﺮ ﭼﺸﻤﮏ ﺯﺩﻥ ﻧﺸﺎﻧﮕﺮ ﺩﻣﺎ ﺑﻌﺪ ﺍﺯ ﭼﻨﺪﯾﻦ ﺳﺎﻋﺖ ﻣﺘﻮﻗﻒ ﻧﺸﺪ ،ﻟﻄﻔﺎ ﹰ ﺑﺎ ﻣﺮﮐﺰ ﺗﻌﻤﯿﺮﺍﺕ ﲤﺎﺱ ﺑﮕﯿﺮﯾﺪ. .١٠ﻭﺿﻌﯿﺖ ﭘﻮﻟﮑﯽ ﻭ ﮐﻼﻫﮏ ﻫﺎی ﭘﯿﭻ ﺭﺍ ﺗﻐﯿﯿﺮ ﺩﻫﯿﺪ. .١۵ﺟﻬﺖ ﺳﯿﻢ ﺩﺭ ﺭﺍ ﺑﻪ ﺳﻤﺖ ﻣﻘﺎﺑﻞ ﺗﻐﯿﯿﺮ ﺩﺍﺩﻩ ﻭ ﭘﻮﺷﺶ ﺩﺭ ﺭﺍ ﺳﻮﺍﺭ ﮐﻨﯿﺪ. )(١ ﺍﺣﺘﯿﺎﻁ ﻣﺮﺍﻗﺐ ﺑﺎﺷﯿﺪ ﮐﻪ ﺩﺭ ﺣﯿﻦ ﮐﺎﺭ ﺑﻪ ﺧﻮﺩﺗﺎﻥ ﺁﺳﯿﺐ ﻭﺍﺭﺩ ﻧﮑﻨﯿﺪ. .١١ﺑﺎ ﺍﺣﺘﯿﺎﻁ ﺩﺭ ﻓﺮﯾﺰﺭ ﺭﺍ ﺳﺮﺟﺎﯾﺶ ﻗﺮﺍﺭ ﺩﻫﯿﺪ. ﻟﻮﻻی ﻣﯿﺎﻧﯽ ﺭﺍ ﺳﻮﺍﺭ ﮐﻨﯿﺪ. .١۶ﺳﯿﻢ ﻫﺎ ﺭﺍ ﻭﺻﻞ ﮐﻨﯿﺪ )ﻓﻘﻂ ﻧﻮﻉ ﳕﺎﯾﺶ ﺩﺭ( ﻭ ﭘﻮﺷﺶ ﻟﻮﻻ ﺭﺍ ﺳﻮﺍﺭ ﳕﺎﯾﯿﺪ. .١٢ﺟﻬﺖ ﺳﯿﻢ ﺩﺭ ﺭﺍ ﺑﻪ ﺳﻤﺖ ﻣﻘﺎﺑﻞ ﺑﺮ ﺭﻭی ﺩﺭ ﯾﺨﭽﺎﻝ ﺗﻐﯿﯿﺮ ﺩﻫﯿﺪ. ) ﻕﻑﻁ ﻧﻮﻉ ﳕﺎﯾﺶ ﺩﺭ( ﺍﺣﺘﯿﺎﻁ ﻣﺮﺍﻗﺐ ﺑﺎﺷﻴﺪ ﺩﺭ ﻫﻨﮕﺎﻥ ﻋﻮﺽ ﻧﻤﻮﺩﻥ ﺟﻬﺖ ﺩﺭﺏ ﺑﻪ ﺳﻴﻢ ﻫﺎ ﺁﺳﻴﺒﯽ ﻧﺮﺳﺪ. .١٧ﺩﺳﺘﮕﯿﺮﻩ ﻫﺎ ﺭﺍ ﺍﺯ ﭼﭗ ﺑﻪ ﺭﺍﺳﺖ ﺗﻐﯿﯿﺮ ﺩﻫﯿﺪ. .١٣ﺑﺎ ﺍﺳﺘﻔﺎﺩﻩ ﺍﺯ ﺁﭼﺎﺭ ١١ﻣﯿﻠﯽ ﻣﺘﺮی ﻣﯿﻠﻪ ﻟﻮﻻی ﺑﺎﻻﺋﯽ ﺭﺍ ﺟﺪﺍ ﮐﻨﯿﺪ. ﻟﻮﻻی ﺑﺎﻻﺋﯽ ﺭﺍ ﭼﺮﺧﺎﻧﺪﻩ ﻭ ﻣﯿﻠﻪ ﻟﻮﻻی ﺑﺎﻻﺋﯽ ﺭﺍ ﺩﻭﺑﺎﺭﻩ ﻭﺻﻞ ﳕﺎﺋﯿﺪ. .١۴ﺑﺎ ﺍﺣﺘﯿﺎﻁ ﺩﺭ ﯾﺨﭽﺎﻝ ﺭﺍ ﺳﺮﺟﺎﯾﺶ ﮔﺬﺍﺷﺘﻪ ﻭ ﻟﻮﻻ ﺭﺍ ﺳﻮﺍﺭ ﮐﻨﯿﺪ. • ﺍﺣﺘﯿﺎﻁ - ﻫﻨﮕﺎﻡ ﺳﻮﺍﺭ ﮐﺮﺩﻥ ﭘﻮﺷﺶ ﺩﺳﺘﮕﯿﺮﻩ ،ﺁﻧﺮﺍ ﺑﺎ ﻫﺮ ﺩﻭ ﺩﺳﺖ ﺑﺎ ﺍﺣﺘﯿﺎﻁ ﺑﺎﺯ ﳕﻮﺩﻩ ﻭ ﺑﻪ ﺑﯿﺮﻭﻥ ﺑﮑﺸﯿﺪ) .ﻓﻘﻂ ﻣﺪﻝ ﺍﺳﺘﻔﺎﺩﻩ (Ez ﺧﻄﺮ ﺷﮑﺴﺘﮕﯽ ﻭﺟﻮﺩ ﺩﺍﺭﺩ. .١٨ﺩﺭﺯﮔﯿﺮﻫﺎی ﺩﺭ ﯾﺨﭽﺎﻝ ﻭ ﻓﺮﯾﺰﺭ ﺭﺍ ﺑﺎﺯ ﮐﺮﺩﻩ ﻭ ﺳﭙﺲ ﺁﻧﻬﺎ ﺭﺍ ﭘﺲ ﺍﺯ ﮔﺮﺩﺍﻧﺪﻥ ﺑﻪ ﻣﯿﺰﺍﻥ ١٨٠ﺩﺭﺟﻪ ﻣﺘﺼﻞ ﮐﻨﯿﺪ. _١٠ﺭﺍﻩ ﺍﻧﺪﺍﺯی .١درﭘﻮش ﻟﻮﻻ را ﺑﺮداﺷﺘﻪ ﻭ ﺳﻨﺴﻮر را از درﭘﻮش ﻟﻮﻻی ﺳﻤﺖ راﺳﺖ ﺟﺪا ﮐﻨﯿﺪ. .۶ﻟﻮﻻی ﻣﯿﺎﻧﯽ را ﭘﯿﺎدﻩ ﮐﻨﯿﺪ. .٢ﭘﯿﭻ ) ( ١را ﺑﺮداﺷﺘﻪ ﻭ ﺳﯿﻢ ) ( ٢را ﻗﻄﻊ ﳕﺎﯾﯿﺪ. )(١ )(٢ .٣ﺳﺮﭘﻮش در ) ( ١را ﺑﺮدارﯾﺪ. اﺣﺘﯿﺎط )(١ در ﺳﻨﮕﯿﻦ اﺳﺖ ،دﻗﺖ ﳕﺎﺋﯿﺪ ﮐﻪ در ﻫﻨﮕﺎﻡ ﺑﯿﺮﻭﻥ آﻭردﻥ در ﯾﺨﭽﺎﻝ ﺑﻪ ﺧﻮدﺗﺎﻥ آﺳﯿﺐ ﻧﺮﺳﺎﻧﯿﺪ. .٨ﯾﺨﭽﺎﻝ را ﺑﺎ دﻗﺖ ﻗﺮار دﻫﯿﺪ. ﻭﺿﻌﯿﺖ ﻟﻮﻻ ﻭ ﭘﺎﯾﻪ ﭘﺎﺋﯿﻨﯽ را ﺗﻐﯿﯿﺮ دﻫﯿﺪ. ﻗﺒﻞ .۴ﻟﻮﻻ را ﺑﺮداﺷﺘﻪ ﻭ ﭘﻮﺷﺶ ﻟﻮﻻ را از ﻟﻮﻻ ﺟﺪا ﮐﻨﯿﺪ .ﺳﯿﻢ ﻫﺎ را از ﭘﻮﺷﺶ ﻟﻮﻻ ﺑﯿﺮﻭﻥ ﺑﮑﺸﯿﺪ) .ﻓﻘﻨﻂ ﻧﻮع ﳕﺎﯾﺶ در( ﺑﻌﺪ .۵در ﯾﺨﭽﺎﻝ را ﺑﺎ دﻗﺖ از ﻟﻮﻻی ﻣﯿﺎﻧﯽ ﺑﻪ ﻃﺮﻑ ﺑﺎﻻ ﺑﮑﺸﯿﺪ ﺗﺎ ﺑﯿﺮﻭﻥ ﺑﯿﺎﯾﺪ. .٩ﭘﯿﭻ ﻣﻮﺟﻮد در ﻗﺴﻤﺖ ﭘﺎﺋﯿﻦ ﻭ ﺳﻤﺖ راﺳﺖ در ﯾﺨﭽﺎﻝ ﻭ ﻓﺮﯾﺰر را ﺑﺎز ﳕﺎﺋﯿﺪ. ﻣﺘﻮﻗﻒ ﮐﻨﻨﺪﻩ در ) ،( ١ﭘﻮﻟﮑﯽ ) ( ٢ﻭ ﺑﺴﺖ ) ( ٣را از راﺳﺖ ﺑﻪ ﭼﭗ ﺗﻐﯿﯿﺮ دﻫﯿﺪ. )(١ )(٢ )(٣ )(٣ )(٢ )(١ اﺣﺘﯿﺎط در ﺳﻨﮕﯿﻦ اﺳﺖ ،دﻗﺖ ﳕﺎﺋﯿﺪ ﮐﻪ در ﻫﻨﮕﺎﻡ ﺑﯿﺮﻭﻥ آﻭردﻥ در ﯾﺨﭽﺎﻝ ﺑﻪ ﺧﻮدﺗﺎﻥ آﺳﯿﺐ ﻧﺮﺳﺎﻧﯿﺪ. راﻩ اﻧﺪازی _٠٩ ٠١راﻩ اﻧﺪازی .٧در ﻓﺮﯾﺰر را ﺑﺎ دﻗﺖ از ﻟﻮﻻی ﭘﺎﺋﯿﻨﯽ ﺑﻪ ﻃﺮﻑ ﺑﺎﻻ ﺑﮑﺸﯿﺪ ﺗﺎ ﺑﯿﺮﻭﻥ ﺑﯿﺎﯾﺪ. ﺗﺮاز ﮐﺮدﻥ ﯾﺨﭽﺎﻝ اﮔﺮ ﺟﻠﻮی دﺳﺘﮕﺎﻩ ﻗﺪری ﺑﺎﻻﺗﺮ از ﻋﻘﺐ آﻥ ﺑﺎﺷﺪ ،در را ﻣﯽ ﺗﻮاﻥ آﺳﺎﻥ ﺗﺮ ﺑﺎز ﻭ ﺑﺴﺘﻪ ﮐﺮد. ﻣﻮرد (١دﺳﺘﮕﺎﻩ ﺑﻪ ﺳﻤﺖ ﭼﭗ ﻣﺘﻤﺎﯾﻞ ﻣﯽ ﺷﻮد. ﭘﺎﯾﻪ ﺗﻨﻈﯿﻢ ﺳﻤﺖ ﭼﭗ را در ﺟﻬﺖ ﻋﻼﻣﺖ ﺟﻬﺖ دار ﺑﭽﺮﺧﺎﻧﯿﺪ ﺗﺎ دﺳﺘﮕﺎﻩ ﺗﺮاز ﺷﻮد. ﻣﻮرد (٢دﺳﺘﮕﺎﻩ ﺑﻪ ﺳﻤﺖ راﺳﺖ ﻣﺘﻤﺎﯾﻞ ﻣﯽ ﺷﻮد. ﭘﺎﯾﻪ ﺗﻨﻈﯿﻢ ﺳﻤﺖ راﺳﺖ را در ﺟﻬﺖ ﻋﻼﻣﺖ ﺟﻬﺖ دار ﺑﭽﺮﺧﺎﻧﯿﺪ ﺗﺎ دﺳﺘﮕﺎﻩ ﺗﺮاز ﺷﻮد. >ﻣﻮرد <٢ >ﻣﻮرد <١ ﮐﺎرﮔﺬاری ﯾﺨﭽﺎﻝ ﺣﺎﻻ ﮐﻪ ﯾﺨﭽﺎﻝ ﺟﺪﯾﺪ را ﺳﺮﺟﺎﯾﺶ ﻧﺼﺐ ﮐﺮدﻩ اﯾﺪ ،آﻣﺎدﻩ اﯾﺪ ﮐﻪ آﻧﺮا راﻩ ﺑﯿﺎﻧﺪازﯾﺪ ﻭ از ﻭﯾﮋﮔﯽ ﻫﺎ ﻭ ﻋﻤﻠﮑﺮدﻫﺎی ﮐﺎﻣﻞ آﻥ ﺑﻬﺮﻩ ﻣﻨﺪ ﺷﻮﯾﺪ. ﯾﺨﭽﺎﻝ ﺑﺎﯾﺴﺘﯽ ﺑﺎ اﺟﺮای ﻣﺮاﺣﻞ زﯾﺮ ﮐﺎﻣﻼ ﹰ راﻩ اﻧﺪازی ﺷﻮد. در ﻏﯿﺮ اﯾﻨﺼﻮرت ،ﻣﻨﺒﻊ ﻧﯿﺮﻭ ﻭ ﻣﻨﺒﻊ ﺑﺮﻕ را ﮐﻨﺘﺮﻝ ﮐﺮدﻩ ﯾﺎ ﺑﻪ ﺑﺨﺶ رﻓﻊ ﻣﺸﮑﻼت در ﭘﺸﺖ اﯾﻦ راﻫﻨﻤﺎی اﺳﺘﻔﺎدﻩ ﮐﺎرﺑﺮ ﻣﺮاﺟﻌﻪ ﮐﻨﯿﺪ. اﮔﺮ ﺳﻮاﻝ دﯾﮕﺮی دارﯾﺪ ،ﺑﺎ ﻣﺮﮐﺰ ﺗﻌﻤﯿﺮاﺗﯽ Samsung Electronicsﲤﺎس ﺑﮕﯿﺮﯾﺪ. .١ .٢ .٣ .۴ ﯾﺨﭽﺎﻝ را در ﻣﺤﻞ ﻣﻨﺎﺳﺐ ﻭ در ﻓﺎﺻﻠﻪ ﻗﺎﺑﻞ ﻗﺒﻮﻝ ﺑﯿﻦ دﯾﻮار ﻭ ﯾﺨﭽﺎﻝ ﻗﺮار دﻫﯿﺪ. ﺑﻪ دﺳﺘﻮراﻟﻌﻤﻞ ﻫﺎی ﻧﺼﺐ در اﯾﻦ دﻓﺘﺮﭼﻪ راﻫﻨﻤﺎ ﻣﺮاﺟﻌﻪ ﮐﻨﯿﺪ. ﻫﻨﮕﺎﻣﯿﮑﻪ ﯾﺨﭽﺎﻝ ﺑﻪ ﭘﺮﯾﺰ زدﻩ ﺷﺪ ،ﻣﻄﻤﺌﻦ ﺷﻮﯾﺪ ﮐﻪ ﭼﺮاغ داﺧﻠﯽ ﻫﻨﮕﺎﻣﯿﮑﻪ درﻫﺎ را ﺑﺎز ﻣﯽ ﮐﻨﯿﺪ ،رﻭﺷﻦ ﺷﻮد. ﮐﻨﺘﺮﻝ دﻣﺎ را رﻭی ﺳﺮدﺗﺮﯾﻦ دﻣﺎ ﻗﺮار دادﻩ ﻭ ﺑﺮای ﯾﮏ ﺳﺎﻋﺖ ﻣﻨﺘﻈﺮ ﺷﻮﯾﺪ. ﻓﺮﯾﺰر ﺑﺎﯾﺴﺘﯽ ﻗﺪری ﺳﺮد ﺷﺪﻩ ﻭ ﻣﻮﺗﻮر ﺑﻪ ﻃﻮر رﻭاﻥ ﮔﺮدش ﮐﻨﺪ. ﭘﺲ از رﻭﺷﻦ ﮐﺮدﻥ ﯾﺨﭽﺎﻝ ،ﭼﻨﺪ ﺳﺎﻋﺘﯽ ﻃﻮﻝ ﻣﯽ ﮐﺸﺪ ﺗﺎ ﺑﻪ دﻣﺎی ﻣﻨﺎﺳﺐ ﺑﺮﺳﺪ. ﻫﻨﮕﺎﻣﯿﮑﻪ دﻣﺎی ﯾﺨﭽﺎﻝ ﺑﻪ ﻗﺪر ﮐﺎﻓﯽ ﺧﻨﮏ ﺷﺪ ،ﻣﯽ ﺗﻮاﻧﯿﺪ ﻏﺬا ﻭ ﻧﻮﺷﯿﺪﻧﯽ را در داﺧﻞ ﯾﺨﭽﺎﻝ ﻗﺮار دﻫﯿﺪ. _٠٨راﻩ اﻧﺪازی ﺑﺮﻋﮑﺲ ﮐﺮدﻥ در )ﻓﻘﻂ RL4003RBA**، RL4013J(S)BA**، **(RL4323**، RL4353**، RL4352 ﻗﺒﻞ از ﺑﺮﻋﮑﺲ ﮐﺮدﻥ در ﯾﺨﭽﺎﻝ ،ﺣﺘﻤﺎ ﹰ ﯾﺨﭽﺎﻝ را از ﭘﺮﯾﺰ ﺑﮑﺸﯿﺪ. Samsungﺗﻮﺻﯿﻪ ﻣﯽ ﮐﻨﺪ ﮐﻪ ﺑﺮﻋﮑﺲ ﮐﺮدﻥ در ﯾﺨﭽﺎﻝ ﺗﻨﻬﺎ ﺗﻮﺳﻂ اراﺋﻪ ﮐﻨﻨﺪﮔﺎﻥ ﺧﺪﻣﺎﺗﯽ ﻣﺠﺎز Samsungاﳒﺎﻡ ﺷﻮد .اﯾﻨﮑﺎر در ﻣﻘﺎﺑﻞ درﯾﺎﻓﺖ دﺳﺘﻤﺰد اﳒﺎﻡ ﺷﺪﻩ ﻭ ﺑﻪ ﺧﺮج ﻣﺸﺘﺮی ﺧﻮاﻫﺪ ﺑﻮد. ﻫﺮﮔﻮﻧﻪ آﺳﯿﺒﯽ ﮐﻪ در ﻫﻨﮕﺎﻡ ﺑﺮﻋﮑﺲ ﮐﺮدﻥ در ﯾﺨﭽﺎﻝ اﯾﺠﺎد ﺷﻮد ﲢﺖ ﭘﻮﺷﺶ ﮔﺎراﻧﺘﯽ ﺳﺎزﻧﺪﮔﺎﻥ دﺳﺘﮕﺎﻩ ﳕﯽ ﺑﺎﺷﺪ. ﻫﺮﮔﻮﻧﻪ ﺗﻌﻤﯿﺮات درﺧﻮاﺳﺖ ﺷﺪﻩ ﺑﻪ ﻭاﺳﻄﻪ ﭼﻨﯿﻦ ﺷﺮاﯾﻄﯽ در ﻣﻘﺎﺑﻞ درﯾﺎﻓﺖ دﺳﺘﻤﺰد ﻭ ﺑﻪ ﺧﺮج ﻣﺸﺘﺮی اﳒﺎﻡ ﺧﻮاﻫﺪ ﺷﺪ. .١ﻗﺒﻞ از اﯾﻨﮑﻪ ﺳﻌﯽ ﮐﻨﯿﺪ درﻫﺎی ﯾﺨﭽﺎﻝ را ﺑﺮﻋﮑﺲ ﮐﻨﯿﺪ ،ﻣﻄﻤﺌﻦ ﺷﻮﯾﺪ ﮐﻪ ﯾﺨﭽﺎﻝ از ﻣﻨﺒﻊ ﺑﺮﻕ ﻗﻄﻊ ﺷﺪﻩ ﺑﺎﺷﺪ ﻭ ﻫﻤﻪ ﻏﺬاﻫﺎ را از داﺧﻞ دﺳﺘﮕﺎﻩ ﺧﺎﻟﯽ ﮐﻨﯿﺪ. .٢اﮔﺮ ﻣﺸﺘﺮی در ﭘﯿﺮﻭی از دﺳﺘﻮرات در اﯾﻦ دﻓﺘﺮﭼﻪ راﻫﻨﻤﺎی ﮐﺎرﺑﺮ اﺣﺴﺎس راﺣﺘﯽ ﳕﯽ ﮐﻨﺪ ،ﺑﺎﯾﺴﺘﯽ ﺑﺎ ﯾﮏ ﻣﻬﻨﺪس ﺗﻌﻤﯿﺮاﺗﯽ ﻣﺠﺮب Samsungﺑﺮای اﳒﺎﻡ اﯾﻦ ﺗﻐﯿﯿﺮات ﲤﺎس ﮔﺮﻓﺘﻪ ﺷﻮد. .٣درﺳﺖ ﺑﻌﺪ از اﯾﻨﮑﻪ رﻭاﻝ ﺑﺮﻋﮑﺲ ﮐﺮدﻥ در را ﲤﺎﻡ ﮐﺮدﯾﺪ ﯾﺨﭽﺎﻝ را ﺑﻪ ﭘﺮﯾﺰ ﻧﺰﻧﯿﺪ ﻭ ﺣﺪاﻗﻞ ﯾﮑﺴﺎﻋﺖ ﺻﺒﺮ ﮐﻨﯿﺪ. اﺑﺰارﻫﺎی ﻣﻮرد ﻧﯿﺎز اراﺋﻪ ﻧﺸﺪﻩ ﭘﯿﭻ ﮔﻮﺷﺘﯽ ﭼﻬﺎرﺳﻮ )(+ ﭘﯿﭻ ﮔﻮﺷﺘﯽ ﺗﯿﻐﻪ ﺗﺨﺖ )(- اراﺋﻪ ﻧﺸﺪﻩ آﭼﺎر ١١ﻣﯿﻠﯽ ﻣﺘﺮی )ﺑﺮای ﻣﯿﻠﻪ ﻟﻮﻻ( آﭼﺎر ﺳﺮﭘﯿﭻ ١٠ﻣﯿﻠﯽ ﻣﺘﺮی )ﺑﺮای ﭘﯿﭻ ﻫﺎ( ﻗﻄﻌﻪ اﺿﺎﻓﯽ آﭼﺎر ﺷﺶ ﺳﻮی /اﯾﻨﭻ )ﺑﺮای ﻟﻮﻻی ﻣﯿﺎﻧﯽ( ٣ ١۶ درﭘﻮش ﻟﻮﻻ در ﺳﻤﺖ ﭼﭗ ﺑﺎﻻ )زﯾﺮ ﺳﺮﭘﻮش ﻓﻮﻗﺎﻧﯽ( ﻧﺼﺐ ﯾﺨﭽﺎﻝ آﻣﺎدﻩ ﺷﺪﻥ ﺑﺮای ﻧﺼﺐ ﯾﺨﭽﺎﻝ ١٠٠ﻣﯿﻠﯽ ﻣﺘﺮ ﺧﺮﯾﺪ ﯾﺨﭽﺎﻝ Samsungرا ﺑﻪ ﺷﻤﺎ ﺗﺒﺮﯾﮏ ﻣﯽ ﮔﻮﺋﯿﻢ. اﻣﯿﺪﻭارﯾﻢ ﮐﻪ از ﺑﺴﯿﺎری ﻭﯾﮋﮔﯽ ﻫﺎ ﻭ ﮐﺎرآﺋﯽ ﻫﺎی ﺑﺴﯿﺎر ﭘﯿﺸﺮﻓﺘﻪ ای ﮐﻪ اﯾﻦ دﺳﺘﮕﺎﻩ ﺟﺪﯾﺪ ﻋﺮﺿﻪ ﻣﯽ ﮐﻨﺪ ﻟﺬت ﺑﺒﺮﯾﺪ. • اﯾﻦ ﯾﺨﭽﺎﻝ ﺑﺎﯾﺴﺘﯽ ﻗﺒﻞ از اﺳﺘﻔﺎدﻩ ﺑﺮﻃﺒﻖ دﻓﺘﺮﭼﻪ راﻫﻨﻤﺎی اﺳﺘﻔﺎدﻩ ﺑﻪ ﻃﻮر ﻣﻨﺎﺳﺐ ﻧﺼﺐ ﻭ ﻗﺮار دادﻩ ﺷﻮد. • از اﯾﻦ دﺳﺘﮕﺎﻩ ﻓﻘﻂ ﺑﺮای ﻣﻨﻈﻮری ﮐﻪ در اﯾﻦ دﻓﺘﺮﭼﻪ دﺳﺘﻮرات ﺗﻮﺿﯿﺢ دادﻩ ﺷﺪﻩ اﺳﺘﻔﺎدﻩ ﮐﻨﯿﺪ. • اﮐﯿﺪا ﹰ ﺗﻮﺻﯿﻪ ﻣﯽ ﮐﻨﯿﻢ ﮐﻪ ﻫﺮﮔﻮﻧﻪ ﺗﻌﻤﯿﺮات ﺗﻮﺳﻂ ﯾﮏ ﺷﺨﺺ ﻣﺠﺮب اﳒﺎﻡ ﺷﻮد. • ﻟﻄﻔﺎ ﹰ ﻣﻮاد ﺑﺴﺘﻪ ﺑﻨﺪی ﺑﺮای اﯾﻦ ﻣﺤﺼﻮﻝ را ﺑﻪ ﺻﻮرﺗﯽ دﻭر ﺑﺮﯾﺰﯾﺪ ﮐﻪ دﻭﺳﺘﺪار ﻣﺤﯿﻂ زﯾﺴﺖ ﺑﺎﺷﺪ. - ۵٠ﻣﯿﻠﯽ ﻣﺘﺮ ٧٠٠ﻣﯿﻠﯽ ﻣﺘﺮ ﻗﺒﻞ از ﺗﻌﻮﯾﺾ ﻻﻣﭗ داﺧﻞ ﯾﺨﭽﺎﻝ ،دﻭﺷﺎﺧﻪ را از ﭘﺮﯾﺰ ﺑﮑﺸﯿﺪ. در ﻏﯿﺮ اﯾﻨﺼﻮرت ﺧﻄﺮ ﺑﺮﻕ ﮔﺮﻓﺘﮕﯽ ﻭﺟﻮد دارد. ١٣٢٠/۵ﻣﯿﻠﯽ ﻣﺘﺮ • • • • - ١٢٢٣ﻣﯿﻠﯽ ﻣﺘﺮ اﻧﺘﺨﺎب ﺑﻬﺘﺮﯾﻦ ﻣﺤﻞ ﺑﺮای ﯾﺨﭽﺎﻝ ﻣﺤﻠﯽ را اﻧﺘﺨﺎب ﮐﻨﯿﺪ ﮐﻪ در ﻣﻌﺮض ﻧﻮر ﻣﺴﺘﻘﯿﻢ ﺧﻮرﺷﯿﺪ ﻧﯿﺴﺖ. ﻣﺤﻠﯽ را اﻧﺘﺨﺎب ﮐﻨﯿﺪ ﮐﻪ زﻣﯿﻦ ﺗﺮاز )ﯾﺎ ﺗﻘﺮﯾﺒﺎ ﹰ ﺗﺮاز( دارد. ﻣﺤﻠﯽ را اﻧﺘﺨﺎب ﮐﻨﯿﺪ ﮐﻪ ﺑﺮای ﺑﺎز ﮐﺮدﻥ آﺳﺎﻥ درﻫﺎی ﯾﺨﭽﺎﻝ ﺑﻪ اﻧﺪازﻩ ﮐﺎﻓﯽ ﺟﺎ دارد. ﻓﻀﺎی ﮐﺎﻓﯽ را ﺑﺮای ﻧﺼﺐ ﯾﺨﭽﺎﻝ رﻭی ﯾﮏ ﺳﻄﺢ ﺻﺎﻑ ﻗﺎﺋﻞ ﺷﻮﯾﺪ. اﮔﺮ ﯾﺨﭽﺎﻝ ﻫﻢ ﺗﺮاز ﻧﺒﺎﺷﺪ ،ﺳﯿﺴﺘﻢ ﺳﺮدﮐﻨﻨﺪﻩ داﺧﻠﯽ ﳑﮑﻦ اﺳﺖ ﺑﻪ ﻃﻮر ﺻﺤﯿﺢ ﮐﺎر ﻧﮑﻨﺪ. ﻓﻀﺎی ﮐﻠﯽ ﻻزﻡ در ﻫﻨﮕﺎﻡ اﺳﺘﻔﺎدﻩ. ﺑﻪ ﺗﺼﻮﯾﺮ ﻭ اﺑﻌﺎد زﯾﺮ ﻣﺮاﺟﻌﻪ ﳕﺎﯾﯿﺪ. ۶٠٠ﻣﯿﻠﯽ ﻣﺘﺮ ﻫﺸﺪار ٠١راﻩ اﻧﺪازی • ١٨۵٠ﻣﯿﻠﯽ ﻣﺘﺮ ﯾﺎ ١٧٠٠ﻣﯿﻠﯽ ﻣﺘﺮ ﺣﺪاﻗﻞ ۵٠ﻣﯿﻠﯽ ﻣﺘﺮ ﺣﺪاﻗﻞ ۵٠ﻣﯿﻠﯽ ﻣﺘﺮ ١٢٣درﺟﻪ ١٠٨۵ﻣﯿﻠﯽ ﻣﺘﺮ • • • ﻓﻀﺎی ﮐﺎﻓﯽ را در ﺳﻤﺖ راﺳﺖ ،ﭼﭗ ،ﭘﺸﺖ ﻭ ﺑﺎﻻ ﺑﺮای ﺟﺮﯾﺎﻥ ﻫﻮا ﻗﺎﺋﻞ ﺷﻮﯾﺪ. اﯾﻦ ﻣﻮﺿﻮع ﺑﻪ ﮐﺎﻫﺶ ﻣﺼﺮﻑ ﺑﺮﻕ ﮐﻤﮏ ﮐﺮدﻩ ﻭ ﻣﯿﺰاﻥ ﺑﺮﻕ ﻣﺼﺮﻓﯽ در ﻗﺒﺾ ﻫﺎی ﺑﺮﻕ ﺷﻤﺎ را ﮐﺎﻫﺶ ﺧﻮاﻫﺪ داد. ﯾﺨﭽﺎﻝ را در ﻣﺤﻠﯽ ﮐﻪ دﻣﺎ زﯾﺮ ١٠درﺟﻪ ﺳﺎﻧﺘﯽ ﮔﺮاد ﻣﯽ رﻭد ﻧﺼﺐ ﻧﮑﻨﯿﺪ. ﻟﻄﻔﺎ ﹰ ﻣﻄﻤﺌﻦ ﺷﻮﯾﺪ ﮐﻪ ﻣﯽ ﺗﻮاﻥ دﺳﺘﮕﺎﻩ را در ﻣﻮﻗﻊ ﺣﻔﻆ ﻭ ﻧﮕﻬﺪاری ﻭ ﺗﻌﻤﯿﺮ ﺑﻪ راﺣﺘﯽ ﺣﺮﮐﺖ داد. اﺣﺘﯿﺎط اﺣﺘﯿﺎط ﻫﻨﮕﺎﻡ ﻧﺼﺐ ،ﺗﻌﻤﯿﺮ ﯾﺎ ﲤﯿﺰ ﮐﺮدﻥ ﭘﺸﺖ ﯾﺨﭽﺎﻝ ،ﺣﺘﻤﺎ ﹰ دﺳﺘﮕﺎﻩ را ﺑﻪ ﻃﻮر ﻣﺴﺘﻘﯿﻢ ﺑﻪ ﺑﯿﺮﻭﻥ ﮐﺸﯿﺪﻩ ﻭ ﺑﻌﺪ از اﯾﻨﮑﻪ ﮐﺎرﺗﺎﻥ ﲤﺎﻡ ﺷﺪ ﺑﻪ ﻃﻮر ﻣﺴﺘﻘﯿﻢ ﺳﺮﺟﺎﯾﺶ ﹸﻫﻞ دﻫﯿﺪ .ﻫﻤﭽﻨﯿﻦ ﻣﻄﻤﺌﻦ ﺷﻮﯾﺪ ﮐﻒ اﺗﺎﻕ ،ﻭزﻥ ﯾﺨﭽﺎﻟﯽ ﮐﻪ ﮐﺎﻣﻼ ﹰ ﭘﺮ ﺷﺪﻩ را ﲢﻤﻞ ﻣﯽ ﮐﻨﺪ. در ﻏﯿﺮ اﯾﻨﺼﻮرت ،ﳑﮑﻦ اﺳﺖ ﺑﻪ ﮐﻒ اﺗﺎﻕ آﺳﯿﺐ ﻭارد ﺷﻮد. ﻟﻄﻔﺎ ﹰ ﻃﻮﻝ اﺿﺎﻓﯽ ﺳﯿﻢ ﺑﺮﻕ را ﺑﻪ ﭘﺸﺖ ﯾﺨﭽﺎﻝ ﺑﺒﻨﺪﯾﺪ ﺗﺎ ﺑﺎ ﮐﻒ اﺗﺎﻕ ﲤﺎس ﭘﯿﺪا ﻧﮑﺮدﻩ ﻭ از ﻟﻪ ﺷﺪﻥ ﺳﯿﻢ ﺑﺮﻕ ﺗﻮﺳﻂ ﻏﻠﺘﮏ ﻫﺎ در ﻫﻨﮕﺎﻡ ﺟﺎﺑﺠﺎﯾﯽ دﺳﺘﮕﺎﻩ ﺟﻠﻮﮔﯿﺮی ﺷﻮد. راﻩ اﻧﺪازی _٠٧ ﻧﮑﺎﺗﯽ در ﻣﻮرد ﺻﺮﻓﻪ ﺟﻮﯾﯽ در ﻣﺼﺮﻑ اﻧﺮژی - - - - - اﯾﻦ دﺳﺘﮕﺎﻩ را در ﯾﮏ اﺗﺎﻕ ﺧﻨﮏ ﻭ ﺧﺸﮏ ﻧﺼﺐ ﮐﻨﯿﺪ ﮐﻪ ﺑﻪ اﻧﺪازﻩ ﮐﺎﻓﯽ ﺗﻬﻮﯾﻪ ﻣﯽ ﺷﻮد. ﻣﻄﻤﺌﻦ ﺷﻮﯾﺪ ﮐﻪ در ﻣﻌﺮض ﻧﻮر ﻣﺴﺘﻘﯿﻢ ﺧﻮرﺷﯿﺪ ﻗﺮار دادﻩ ﻧﺸﺪﻩ ﻭ ﻫﺮﮔﺰ آﻧﺮا ﻧﺰدﯾﮏ ﯾﮏ ﻣﻨﺒﻊ ﻣﺴﺘﻘﯿﻢ ﮔﺮﻣﺎ )ﺑﺮای ﻣﺜﺎﻝ ﺷﻮﻓﺎژ( ﻗﺮار ﻧﺪﻫﯿﺪ. ﻫﺮﮔﺰ ﻣﻨﻔﺬﻫﺎی ﺗﻬﻮﯾﻪ ﯾﺎ ﻫﻮاﮐﺶ ﻫﺎی ﻣﺸﺒﮏ دﺳﺘﮕﺎﻩ را ﻣﺴﺪﻭد ﻧﮑﻨﯿﺪ. ﻗﺒﻞ از ﻗﺮار دادﻥ ﻏﺬای ﮔﺮﻡ در داﺧﻞ ﯾﺨﭽﺎﻝ ،ﺑﮕﺬارﯾﺪ ﺧﻨﮏ ﺷﻮد. ﻏﺬای ﻣﻨﺠﻤﺪ را ﺑﺮای آب ﺷﺪﻥ در ﯾﺨﭽﺎﻝ ﺑﮕﺬارﯾﺪ. ﺳﭙﺲ ﻣﯽ ﺗﻮاﻧﯿﺪ از دﻣﺎﻫﺎی ﭘﺎﯾﯿﻦ ﻣﺤﺼﻮﻻت ﻣﻨﺠﻤﺪ ﺑﺮای ﺧﻨﮏ ﮐﺮدﻥ ﻏﺬا در ﯾﺨﭽﺎﻝ اﺳﺘﻔﺎدﻩ ﮐﻨﯿﺪ. در دﺳﺘﮕﺎﻩ را ﻫﻨﮕﺎﻡ ﻗﺮار دادﻥ ﯾﺎ ﺧﺎرج ﮐﺮدﻥ ﻏﺬا ﺑﺮای ﻣﺪت ﻃﻮﻻﻧﯽ ﺑﺎز ﻧﮕﺬارﯾﺪ. ﻫﺮﭼﻪ در ﮐﻤﺘﺮ ﺑﺎز ﺑﺎﺷﺪ ،ﯾﺦ ﮐﻤﺘﺮی در ﻓﺮﯾﺰر اﯾﺠﺎد ﻣﯽ ﺷﻮد. ﭘﺸﺖ ﯾﺨﭽﺎﻝ را ﺑﻪ ﻃﻮر ﻣﺮﺗﺐ ﲤﯿﺰ ﮐﻨﯿﺪ. ﮔﺮد ﻭ ﻏﺒﺎر ﻣﺼﺮﻑ اﻧﺮژی را اﻓﺰاﯾﺶ ﻣﯽ دﻫﺪ. دﻣﺎ را ﺳﺮدﺗﺮ از ﻣﯿﺰاﻥ ﻻزﻡ ﺗﻨﻈﯿﻢ ﻧﮑﻨﯿﺪ. ﻣﻄﻤﺌﻦ ﺷﻮﯾﺪ ﮐﻪ ﻫﻮای ﮐﺎﻓﯽ از زﯾﺮ ﯾﺨﭽﺎﻝ ﻭ دﯾﻮارﻩ ﭘﺸﺘﯽ آﻥ ﺧﺎرج ﻣﯽ ﺷﻮد. رﻭزﻧﻪ ﻫﺎی ﻣﻨﻔﺬ ﻫﻮا را ﻧﭙﻮﺷﺎﻧﯿﺪ. ﻫﻨﮕﺎﻡ ﻧﺼﺐ ،ﻓﻀﺎی ﮐﺎﻓﯽ را در ﺳﻤﺖ راﺳﺖ ،ﭼﭗ ،ﭘﺸﺖ ﻭ ﺑﺎﻻ ﻗﺎﺋﻞ ﺷﻮﯾﺪ. اﯾﻦ ﻣﻮﺿﻮع ﺑﻪ ﮐﺎﻫﺶ ﻣﺼﺮﻑ ﺑﺮﻕ ﮐﻤﮏ ﮐﺮدﻩ ﻭ ﻣﯿﺰاﻥ ﺑﺮﻕ ﻣﺼﺮﻓﯽ در ﻗﺒﺾ ﻫﺎی ﺑﺮﻕ ﺷﻤﺎ را ﮐﻤﺘﺮ ﺧﻮاﻫﺪ ﮐﺮد. ﻓﻬﺮﺳﺖ ﻣﻨﺪرﺟﺎت ﻧﺼﺐ ﯾﺨﭽﺎﻝ ٠٧ . . . . . . . . . . . . . . . . . . . . . . . . . . . . . . . . . . . . . . . . . . . . . . . . . . . . . . . . . . . . . . . . . . . . . . . . . . . . . . . . . . . . . . . . . . . . . اﺳﺘﻔﺎدﻩ از ﯾﺨﭽﺎﻝ ١١ . . . . . . . . . . . . . . . . . . . . . . . . . . . . . . . . . . . . . . . . . . . . . . . . . . . . . . . . . . . . . . . . . . . . . . . . . . . . . . . . . . . . . . . . . ﺣﻞ ﻣﺸﮑﻼت ١۵ . . . . . . . . . . . . . . . . . . . . . . . . . . . . . . . . . . . . . . . . . . . . . . . . . . . . . . . . . . . . . . . . . . . . . . . . . . . . . . . . . . . . . . . . . . . . . _٠۶اﻃﻼﻋﺎت اﯾﻤﻨﯽ اﺣﺘﯿﺎط • • • - اﺟﺎزﻩ ﻧﺪﻫﯿﺪ ﮐﻪ رﻭزﻧﻪ ﻫﻮاﮔﯿﺮی در ﻣﺤﻔﻈﻪ دﺳﺘﮕﺎﻩ ﯾﺎ ﺳﺎﺧﺘﺎر ﺳﻮار ﮐﺮدﻥ ﻣﺴﺪﻭد ﺷﻮد. ﺑﮕﺬارﯾﺪ ﮐﻪ دﺳﺘﮕﺎﻩ ﭘﺲ از ﻧﺼﺐ ﺑﺮای ٢ﺳﺎﻋﺖ ﺑﻪ ﻃﻮر اﯾﺴﺘﺎدﻩ ﺑﺎﻗﯽ ﲟﺎﻧﺪ. ﺗﻮﺻﯿﻪ ﻣﯽ ﺷﻮد ﮐﻪ ﻧﺼﺐ ﯾﺎ ﻫﺮﮔﻮﻧﻪ ﺗﻌﻤﯿﺮ اﯾﻦ دﺳﺘﮕﺎﻩ ﺗﻮﺳﻂ ﺗﻌﻤﯿﺮﮐﺎر ﻣﺠﺮب ﯾﺎ ﺷﺮﮐﺖ ﺗﻌﻤﯿﺮاﺗﯽ اﳒﺎﻡ ﺷﻮد. ﻗﺼﻮر در اﳒﺎﻡ اﯾﻨﮑﺎر ﳑﮑﻦ اﺳﺖ ﻣﻨﺠﺮ ﺑﻪ ﺑﺮﻕ ﮔﺮﻓﺘﮕﯽ ،آﺗﺸﺴﻮزی، اﻧﻔﺠﺎر ،ﻣﺸﮑﻼﺗﯽ ﺑﺮای ﻣﺤﺼﻮﻝ ﯾﺎ ﻣﺼﺪﻭﻣﯿﺖ ﺷﻮد. ﻫﺸﺪار • • • • • • • • • • • • • • - ﻋﻼﺋﻢ اﺣﺘﯿﺎط ﺑﺮای ﻧﺼﺐ ﻋﻼﺋﻢ ﻫﺸﺪار ﺷﺪﯾﺪ ﺑﺮای اﺳﺘﻔﺎدﻩ ﺑﻪ دﻭﺷﺎﺧﻪ ﺑﺮﻕ ﺑﺎ دﺳﺖ ﻫﺎی ﺧﯿﺲ دﺳﺖ ﻧﺰﻧﯿﺪ. اﯾﻨﮑﺎر ﳑﮑﻦ اﺳﺖ ﻣﻨﺠﺮ ﺑﻪ ﺑﺮﻕ ﮔﺮﻓﺘﮕﯽ ﺷﻮد. اﺷﯿﺎء را ﺑﺮ رﻭی دﺳﺘﮕﺎﻩ اﻧﺒﺎر ﻧﮑﻨﯿﺪ. ﻫﻨﮕﺎﻣﯿﮑﻪ در را ﺑﺎز ﯾﺎ ﺑﺴﺘﻪ ﻣﯽ ﮐﻨﯿﺪ ،ﳑﮑﻦ اﺳﺖ ﮐﻪ اﺷﯿﺎء ﺑﯿﻔﺘﻨﺪ ﻭ ﻣﻮﺟﺐ ﻣﺼﺪﻭﻣﯿﺖ ﺷﺨﺼﯽ ﻭ/ﯾﺎ آﺳﯿﺐ اﻗﻼﻡ ﺷﻮد. ﻣﺤﻔﻈﻪ ای ﮐﻪ ﺑﺎ آب ﭘﺮ ﺷﺪﻩ را رﻭی ﯾﺨﭽﺎﻝ ﻗﺮار ﻧﺪﻫﯿﺪ. اﮔﺮ آب ﺑﻪ ﺑﯿﺮﻭﻥ ﺑﭙﺎﺷﺪ ،ﺧﻄﺮ آﺗﺸﺴﻮزی ﯾﺎ ﺑﺮﻕ ﮔﺮﻓﺘﮕﯽ ﻭﺟﻮد دارد. ﮐﻮدﮐﺎﻥ ﺑﺎﯾﺴﺘﯽ ﺳﺮﭘﺮﺳﺘﯽ ﺷﻮﻧﺪ ﺗﺎ اﻃﻤﯿﻨﺎﻥ ﺣﺎﺻﻞ ﺷﻮد ﮐﻪ ﺑﺎ دﺳﺘﮕﺎﻩ ﺑﺎزی ﳕﯽ ﮐﻨﻨﺪ. اﻧﮕﺸﺘﺎﻥ را از ﻧﻮاﺣﯽ "ﻧﻘﻄﻪ ﻓﺸﺮدﻩ ﺷﺪﻥ" دﻭر ﻧﮕﻪ دارﯾﺪ :ﻓﺎﺻﻠﻪ ﺑﯿﻦ درﻫﺎ ﻭ ﻗﻔﺴﻪ ﻟﺰﻭﻣﺎ ﹰ ﮐﻢ ﻣﯽ ﺑﺎﺷﺪ .ﻫﻨﮕﺎﻡ ﺑﺎز ﮐﺮدﻥ درﻫﺎ ﻫﻨﮕﺎﻣﯿﮑﻪ ﮐﻮدﮐﺎﻥ ﺣﻀﻮر دارﻧﺪ ﻣﺮاﻗﺐ ﺑﺎﺷﯿﺪ. اﺟﺎزﻩ ﻧﺪﻫﯿﺪ ﮐﻪ ﮐﻮدﮐﺎﻥ ﺑﻪ در آﻭﯾﺰاﻥ ﺷﻮﻧﺪ. در ﻏﯿﺮ اﯾﻨﺼﻮرت ﳑﮑﻦ اﺳﺖ ﻣﻮﺟﺐ ﻣﺼﺪﻭﻣﯿﺖ ﺟﺪی ﺷﻮد. ﺧﻄﺮ ﻣﺤﺒﻮس ﺷﺪﻥ ﮐﻮدﮐﺎﻥ ﻭﺟﻮد دارد. ﺑﻪ ﮐﻮدﮐﺎﻥ اﺟﺎزﻩ ﻧﺪﻫﯿﺪ ﮐﻪ داﺧﻞ ﯾﺨﭽﺎﻝ ﺷﻮﻧﺪ. دﯾﻮارﻩ ﻫﺎی داﺧﻞ ﻓﺮﯾﺰر ﯾﺎ ﻣﺤﺼﻮﻻﺗﯽ ﮐﻪ در ﻓﺮﯾﺰر ﮔﺬاﺷﺘﻪ ﺷﺪﻩ اﻧﺪ را ﺑﺎ دﺳﺖ ﻫﺎی ﺧﯿﺲ ﳌﺲ ﻧﮑﻨﯿﺪ. اﯾﻨﮑﺎر ﳑﮑﻦ اﺳﺖ ﻣﻮﺟﺐ ﺳﺮﻣﺎزدﮔﯽ ﺷﻮد. ﺑﻄﺮی ﻫﺎ ﺑﺎﯾﺴﺘﯽ ﺗﻨﮓ ﻫﻢ ﻗﺮار دادﻩ ﺷﻮﻧﺪ ﺗﺎ ﻧﯿﺎﻓﺘﻨﺪ. ﻫﺮﮔﺰ اﻧﮕﺸﺘﺎﻥ ﯾﺎ اﺷﯿﺎء دﯾﮕﺮ را در داﺧﻞ ﺳﻮراخ ﭘﺨﺶ ﮔﺮ ﻗﺮار ﻧﺪﻫﯿﺪ. اﯾﻨﮑﺎر ﳑﮑﻦ اﺳﺖ ﻣﻮﺟﺐ ﻣﺼﺪﻭﻣﯿﺖ ﺷﺨﺼﯽ ﯾﺎ آﺳﯿﺐ ﻭارد ﺷﺪﻥ ﺑﻪ ﻣﻮاد ﺷﻮد. دﺳﺖ ﻫﺎ ،ﭘﺎﻫﺎ ﯾﺎ اﺷﯿﺎء ﻓﻠﺰی )از ﻗﺒﯿﻞ ﻣﯿﻠﻪ ﻫﺎی ﭼﺎپ اﺳﺘﯿﮏ ﻭ ﻏﯿﺮﻩ( را در زﯾﺮ ﯾﺎ ﭘﺸﺖ ﯾﺨﭽﺎﻝ ﻭارد ﻧﮑﻨﯿﺪ. اﯾﻨﮑﺎر ﳑﮑﻦ اﺳﺖ ﻣﻨﺠﺮ ﺑﻪ ﺑﺮﻕ ﮔﺮﻓﺘﮕﯽ ﯾﺎ ﻣﺼﺪﻭﻣﯿﺖ ﺷﻮد. ﻫﺮﮔﻮﻧﻪ ﻟﺒﻪ ﺗﯿﺰ ﳑﮑﻦ اﺳﺖ ﻣﻮﺟﺐ ﻣﺼﺪﻭﻣﯿﺖ ﺷﺨﺼﯽ ﺷﻮد. ﻣﻮادی ﮐﻪ در ﻣﻘﺎﺑﻞ دﻣﺎ ﺣﺴﺎس ﻫﺴﺘﻨﺪ ،از ﻗﺒﯿﻞ اﻓﺸﺎﻧﻪ ﻫﺎی ﻗﺎﺑﻞ اﺷﺘﻌﺎﻝ ،اﺷﯿﺎء ﻗﺎﺑﻞ اﺷﺘﻌﺎﻝ ،ﯾﺦ ﺧﺸﮏ ،دارﻭ ﯾﺎ ﻣﻮاد ﺷﯿﻤﯿﺎﺋﯽ را در ﻧﺰدﯾﮏ ﯾﺨﭽﺎﻝ ﻗﺮار ﻧﺪﻫﯿﺪ .اﺷﯿﺎء ﯾﺎ ﻣﻮاد ﻓﺮار ﯾﺎ ﻗﺎﺑﻞ اﺷﺘﻌﺎﻝ )ﺑﻨﺰﻥ، ﺗﯿﻨﺮ ،ﮔﺎز ﭘﺮﻭﭘﺎﻥ ،اﻟﮑﻞ ،اﺗﺮ ،ﮔﺎز LPﻭ ﻣﺤﺼﻮﻻت ﻣﺸﺎﺑﻪ دﯾﮕﺮ ﻭ ﻏﯿﺮﻩ( را در ﯾﺨﭽﺎﻝ ﻧﮕﻪ داری ﻧﮑﻨﯿﺪ. اﯾﻦ ﯾﺨﭽﺎﻝ ﻓﻘﻂ ﺑﺮای ﻧﮕﻬﺪاری ﻏﺬا ﻣﯽ ﺑﺎﺷﺪ. اﯾﻨﮑﺎر ﳑﮑﻦ اﺳﺖ ﻣﻨﺠﺮ ﺑﻪ آﺗﺸﺴﻮزی ﯾﺎ اﻧﻔﺠﺎر ﺷﻮد. اﯾﻦ ﻣﺤﺼﻮﻝ ﻓﻘﻂ ﺑﻪ ﻣﻨﻈﻮر ﻧﮕﻬﺪاری ﻏﺬا در ﻣﺤﯿﻂ ﺧﺎﻧﮕﯽ ﻣﯽ ﺑﺎﺷﺪ. ﻣﺤﺼﻮﻻت دارﻭﺋﯽ ،ﻣﻮاد ﻋﻠﻤﯽ ﯾﺎ ﻣﺤﺼﻮﻻﺗﯽ ﮐﻪ در ﻣﻘﺎﺑﻞ دﻣﺎ ﺣﺴﺎس ﻫﺴﺘﻨﺪ را در ﯾﺨﭽﺎﻝ ﻧﮕﻪ ﻧﺪارﯾﺪ. ﻣﺤﺼﻮﻻﺗﯽ ﮐﻪ ﺑﻪ ﮐﻨﺘﺮﻝ ﺷﺪﯾﺪ دﻣﺎ ﻧﯿﺎز دارﻧﺪ ﻧﺒﺎﯾﺴﺘﯽ در اﯾﻦ ﯾﺨﭽﺎﻝ ﻧﮕﻬﺪاری ﺷﻮﻧﺪ. _٠۴اﻃﻼﻋﺎت اﯾﻤﻨﯽ • • • • • • • • • • • • • • • • ﻭﺳﺎﺋﻞ ﺑﺮﻗﯽ را در ﯾﺨﭽﺎﻝ/ﻓﺮﯾﺰر ﻗﺮار ﻧﺪادﻩ ﻭ از آﻧﻬﺎ اﺳﺘﻔﺎدﻩ ﻧﮑﻨﯿﺪ، ﻣﮕﺮاﯾﻨﮑﻪ از ﻧﻮﻋﯽ ﻫﺴﺘﻨﺪ ﮐﻪ ﺗﻮﺳﻂ ﺳﺎزﻧﺪﻩ ﺑﺮای اﯾﻨﮑﺎر ﺗﻮﺻﯿﻪ ﺷﺪﻩ ﺑﺎﺷﻨﺪ. اﮔﺮ ﺑﻮی دارﻭ ﯾﺎ دﻭد ﺑﻪ ﻣﺸﺎﻣﺘﺎﻥ ﻣﯽ رﺳﺪ ،ﻓﻮرا ﹰ دﻭﺷﺎﺧﻪ را ﮐﺸﯿﺪﻩ ﻭ ﺑﺎ ﻣﺮﮐﺰ ﺗﻌﻤﯿﺮاﺗﯽ Samsung Electronicsﲤﺎس ﺑﮕﯿﺮﯾﺪ. ﺳﻌﯽ ﻧﮑﻨﯿﺪ ﮐﻪ دﺳﺘﮕﺎﻩ را ﺧﻮدﺗﺎﻥ ﺗﻌﻤﯿﺮ ،اﻭراﻕ ﮐﺮدﻩ ﯾﺎ در آﻥ ﺗﻐﯿﯿﺮاﺗﯽ اﯾﺠﺎد ﮐﻨﯿﺪ. از ﻫﺮﮔﻮﻧﻪ ﻓﯿﻮز )از ﻗﺒﯿﻞ ﮐﻮﭘﺮ ،ﺳﯿﻢ ﻓﻮﻻدی ﻭ ﻏﯿﺮﻩ( ﺑﻪ ﻏﯿﺮ از ﻓﯿﻮر اﺳﺘﺎﻧﺪارد اﺳﺘﻔﺎدﻩ ﻧﮑﻨﯿﺪ. ﻫﻨﮕﺎﻣﯿﮑﻪ ﻧﯿﺎز ﺑﻪ ﺗﻌﻤﯿﺮ ﯾﺎ ﻧﺼﺐ ﻣﺠﺪد دﺳﺘﮕﺎﻩ اﺳﺖ ،ﺑﺎ ﻧﺰدﯾﮏ ﺗﺮﯾﻦ ﻣﺮﮐﺰ ﺗﻌﻤﯿﺮاﺗﯽ ﺧﻮد ﲤﺎس ﺑﮕﯿﺮﯾﺪ. ﻗﺼﻮر در اﳒﺎﻡ اﯾﻨﮑﺎر ﳑﮑﻦ اﺳﺖ ﻣﻨﺠﺮ ﺑﻪ ﺑﺮﻕ ﮔﺮﻓﺘﮕﯽ ،آﺗﺸﺴﻮزی، ﻣﺸﮑﻼﺗﯽ ﺑﺮای ﻣﺤﺼﻮﻝ ﯾﺎ ﻣﺼﺪﻭﻣﯿﺖ ﺷﻮد. اﮔﺮ ﻫﺮﮔﻮﻧﻪ ﮔﺮد ﻭ ﻏﺒﺎر ﯾﺎ آب در ﯾﺨﭽﺎﻝ ﻭﺟﻮد دارد ،دﻭﺷﺎﺧﻪ را ﮐﺸﯿﺪﻩ ﻭ ﺑﺎ ﻣﺮﮐﺰ ﺗﻌﻤﯿﺮات Samsung Electronicsﲤﺎس ﺑﮕﯿﺮﯾﺪ. در ﻏﯿﺮاﯾﻨﺼﻮرت ﺧﻄﺮ آﺗﺸﺴﻮزی ﻭﺟﻮد دارد. • در ﺻﻮرت ﻣﺸﺎﻫﺪﻩ ﻧﺸﺖ ﮔﺎز ،از ﻫﺮﮔﻮﻧﻪ ﺷﻌﻠﻪ ﺑﺎز ﯾﺎ ﻣﻨﺒﻊ ﺑﺎﻟﻘﻮﻩ اﺷﺘﻌﺎﻝ ﭘﺮﻫﯿﺰ ﮐﺮدﻩ ﻭ اﺗﺎﻗﯽ ﮐﻪ دﺳﺘﮕﺎﻩ در آﻥ ﻗﺮار دارد را ﺑﺮای ﭼﻨﺪ دﻗﯿﻘﻪ ﻫﻮاﮔﯿﺮی ﮐﻨﯿﺪ. از ﻭﺳﺎﺋﻞ ﻣﮑﺎﻧﯿﮑﯽ ﯾﺎ ﻫﺮرﻭش دﯾﮕﺮی ﺑﻪ ﻏﯿﺮ از رﻭش ﻫﺎﺋﯽ ﮐﻪ ﺗﻮﺳﻂ ﺳﺎزﻧﺪﻩ ﺗﻮﺻﯿﻪ ﺷﺪﻩ ﺑﺮای ﺗﺴﺮﯾﻊ رﻭاﻝ ﯾﺦ زداﺋﯽ اﺳﺘﻔﺎدﻩ ﻧﮑﻨﯿﺪ. ﺑﻪ ﻣﺪار ﺳﺮدﺳﺎز آﺳﯿﺐ ﻭارد ﻧﮑﻨﯿﺪ. ﻗﺒﻞ از ﺗﻌﻮﯾﺾ ﻻﻣﭗ ﻫﺎی داﺧﻞ ﯾﺨﭽﺎﻝ ،دﻭﺷﺎﺧﻪ را از ﭘﺮﯾﺰ ﺑﮑﺸﯿﺪ. در ﻏﯿﺮ اﯾﻨﺼﻮرت ﺧﻄﺮ ﺑﺮﻕ ﮔﺮﻓﺘﮕﯽ ﻭﺟﻮد دارد. اﮔﺮ در ﻫﻨﮕﺎﻡ ﻋﻮض ﮐﺮدﻥ ﭼﺮاغ ﺑﺎ ﻣﺸﮑﻼﺗﯽ رﻭﺑﺮﻭ ﺷﺪﯾﺪ ،ﺑﺎ ﮐﺎرﮔﺰار ﺗﻌﻤﯿﺮاﺗﯽ ﲤﺎس ﺑﮕﯿﺮﯾﺪ. اﮔﺮ ﻣﺤﺼﻮﻝ ﻣﺠﻬﺰ ﺑﻪ ﻻﻣﭗ LEDﻣﯽ ﺑﺎﺷﺪ ،ﺧﻮدﺗﺎﻥ ﻗﺎب ﻻﻣﭗ ﻭ ﻻﻣﭗ LEDرا اﻭراﻕ ﻧﮑﻨﯿﺪ. ﻟﻄﻔﺎ ﹰ ﺑﺎ ﮐﺎرﮔﺰار ﺗﻌﻤﯿﺮاﺗﯽ ﺧﻮد ﲤﺎس ﺑﮕﯿﺮﯾﺪ. ﺗﻨﻬﺎ از ﭼﺮاغ ﻫﺎی LEDﮐﻪ ﺗﻮﺳﻂ ﺳﺎزﻧﺪﻩ ﯾﺎ ﮐﺎرﮔﺰار ﺗﻌﻤﯿﺮاﺗﯽ اراﺋﻪ ﺷﺪﻩ اﺳﺘﻔﺎدﻩ ﮐﻨﯿﺪ. ﻣﻮاد ﻓﺮار از ﻗﺒﯿﻞ ﺣﺸﺮﻩ ﮐﺶ را ﺑﺮ رﻭی ﺳﻄﺢ دﺳﺘﮕﺎﻩ اﺳﭙﺮی ﻧﮑﻨﯿﺪ. ﻋﻼﻭﻩ ﺑﺮ اﯾﻨﮑﻪ ﺑﺮای اﻧﺴﺎﻥ ﻣﻀﺮ اﺳﺖ ،ﳑﮑﻦ اﺳﺖ ﻣﻨﺠﺮ ﺑﻪ ﺑﺮﻕ ﮔﺮﻓﺘﮕﯽ ،آﺗﺸﺴﻮزی ﯾﺎ ﻣﺸﮑﻼﺗﯽ ﺑﺮای ﻣﺤﺼﻮﻝ ﺷﻮد. از ﺳﺸﻮار ﺑﺮای ﺧﺸﮏ ﮐﺮدﻥ داﺧﻞ ﯾﺨﭽﺎﻝ اﺳﺘﻔﺎدﻩ ﻧﮑﻨﯿﺪ. ﯾﮏ ﺷﻤﻊ رﻭﺷﻦ را ﺑﺮای از ﺑﯿﻦ ﺑﺮدﻥ ﺑﻮی ﻣﺘﻌﻔﻦ در داﺧﻞ ﯾﺨﭽﺎﻝ ﻗﺮار ﻧﺪﻫﯿﺪ. اﯾﻨﮑﺎر ﳑﮑﻦ اﺳﺖ ﻣﻨﺠﺮ ﺑﻪ ﺑﺮﻕ ﮔﺮﻓﺘﮕﯽ ﯾﺎ آﺗﺸﺴﻮزی ﺷﻮد. ﺗﺎﻧﮏ آب ،ﺟﺎﯾﺨﯽ ﻭ ﻣﺤﻔﻈﻪ ﻫﺎی آب را ﻓﻘﻂ ﺑﺎ آب ﻗﺎﺑﻞ ﺷﺮب ﭘﺮ ﮐﻨﯿﺪ. - - - - Code No. DA68-02676B REV(0.3)