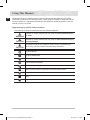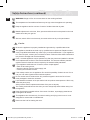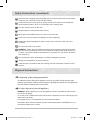
1
دستورالعمل های نصب و استفاده اجاق شیشه سرامیک CTR41RCC برای اجتناب از خطر حوادث یا آسیب وارد شدن به اجاق ،همه دستورالعمل ها را قبل از نصب یا استفاده از دستگاه مطالعه کنید .این دفترچه راهنما را برای مراجعه در آینده نگه دارید. این کتابچه راهنما از کاغذ 100درصد بازیابی شده تهیه شده است. 2014-03-13 �� 4:13:11 CTR41RCC_HAC_DG68-00287A-02_FA indd 1 CTR41RCC_HAC_DG68-00287A-02_FA indd 2 2014-03-13 �� 4:13:11 فهرست مندرجات استفاده از این راهنما 2 . . . . . . . . . . . . . . . . . . . . . . . . . . . . . . . . . . . . . . . . . . . . . . . . . . . . . . . . . . . FA دستورالعمل های ایمنی 3 . . . . . . . . . . . . . . . . . . . . . . . . . . . . . . . . . . . . . . . . . . . . . . . . . . . . . . . . . . دستورات به دور انداخنت 5 . . . . . . . . . . . . . . . . . . . . . . . . . . . . . . . . . . . . . . . . . . . . . . . . . . . . . . . . . . نصب اجاق 6 . . . . . . . . . . . . . . . . . . . . . . . . . . . . . . . . . . . . . . . . . . . . . . . . . . . . . . . . . . . . . . . . . دستورالعمل های ایمنی برای نصب کننده 6 . . . . . . . . . . . . . . . . . . . . . . . . . . . . . . . . . . . . . . . . . . . . . . اتصال به پریز 7 . . . . . . . . . . . . . . . . . . . . . . . . . . . . . . . . . . . . . . . . . . . . . . . . . . . . . . . . . . . . . نصب روی پیشخوان 7 . . . . . . . . . . . . . . . . . . . . . . . . . . . . . . . . . . . . . . . . . . . . . . . . . . . . . . . . . . قطعات و ویژگی ها 8 . . . . . . . . . . . . . . . . . . . . . . . . . . . . . . . . . . . . . . . . . . . . . . . . . . . . . . . . . . . . . حوزه های آشپزی و پانل کنترل8 . . . . . . . . . . . . . . . . . . . . . . . . . . . . . . . . . . . . . . . . . . . . . . . . . . . . . قطعات 9 . . . . . . . . . . . . . . . . . . . . . . . . . . . . . . . . . . . . . . . . . . . . . . . . . . . . . . . . . . . . . . . . ویژگی های کلیدی دستگاه 10 . . . . . . . . . . . . . . . . . . . . . . . . . . . . . . . . . . . . . . . . . . . . . . . . . . . . . خاموش کننده ایمنی 11 . . . . . . . . . . . . . . . . . . . . . . . . . . . . . . . . . . . . . . . . . . . . . . . . . . . . . . . . نشانگر حرارت باقیمانده 11 . . . . . . . . . . . . . . . . . . . . . . . . . . . . . . . . . . . . . . . . . . . . . . . . . . . . . . قبل از اینکه شروع کنید 12 . . . . . . . . . . . . . . . . . . . . . . . . . . . . . . . . . . . . . . . . . . . . . . . . . . . . . . . . متیز کردن اولیه 12 . . . . . . . . . . . . . . . . . . . . . . . . . . . . . . . . . . . . . . . . . . . . . . . . . . . . . . . . . . . . استفاده از اجاق. . . . . . . . . . . . . . . . . . . . . . . . . . . . . . . . . . . . . . . . . . . . . . . . . . . . . . . . . . . . . . استفاده از ظرف مناسب . . . . . . . . . . . . . . . . . . . . . . . . . . . . . . . . . . . . . . . . . . . . . . . . . . . . . . استفاده از سنسور های کنترل ملسی . . . . . . . . . . . . . . . . . . . . . . . . . . . . . . . . . . . . . . . . . . . . . . . . روشن کردن دستگاه . . . . . . . . . . . . . . . . . . . . . . . . . . . . . . . . . . . . . . . . . . . . . . . . . . . . . . . . . کنترل دما . . . . . . . . . . . . . . . . . . . . . . . . . . . . . . . . . . . . . . . . . . . . . . . . . . . . . . . . . . . . . . خاموش کردن دستگاه . . . . . . . . . . . . . . . . . . . . . . . . . . . . . . . . . . . . . . . . . . . . . . . . . . . . . . . . خاموش کردن حوزه آشپزی. . . . . . . . . . . . . . . . . . . . . . . . . . . . . . . . . . . . . . . . . . . . . . . . . . . . . . استفاده از قفل ایمنی کودک . . . . . . . . . . . . . . . . . . . . . . . . . . . . . . . . . . . . . . . . . . . . . . . . . . . . قفل کردن و باز کردن قفل پانل کنترل . . . . . . . . . . . . . . . . . . . . . . . . . . . . . . . . . . . . . . . . . . . . . . . . تایمر . . . . . . . . . . . . . . . . . . . . . . . . . . . . . . . . . . . . . . . . . . . . . . . . . . . . . . . . . . . . . . . . . تنظیم خاموش شدن ایمنی . . . . . . . . . . . . . . . . . . . . . . . . . . . . . . . . . . . . . . . . . . . . . . . . . . . . . تایمر شمارش معکوس . . . . . . . . . . . . . . . . . . . . . . . . . . . . . . . . . . . . . . . . . . . . . . . . . . . . . . . 12 12 13 14 14 15 15 16 17 18 18 19 متیز کردن و مراقبت 20 . . . . . . . . . . . . . . . . . . . . . . . . . . . . . . . . . . . . . . . . . . . . . . . . . . . . . . . . . . . . اجاق 20 . . . . . . . . . . . . . . . . . . . . . . . . . . . . . . . . . . . . . . . . . . . . . . . . . . . . . . . . . . . . . . . . . برای جلوگیری از آسیب وارد شدن به دستگاه 21 . . . . . . . . . . . . . . . . . . . . . . . . . . . . . . . . . . . . . . . . . . . . گارانتی و تعمیرات 22 . . . . . . . . . . . . . . . . . . . . . . . . . . . . . . . . . . . . . . . . . . . . . . . . . . . . . . . . . . . . پرسش و پاسخ های متداول و رفع مشکالت 22 . . . . . . . . . . . . . . . . . . . . . . . . . . . . . . . . . . . . . . . . . . . . تعمیرات 23 . . . . . . . . . . . . . . . . . . . . . . . . . . . . . . . . . . . . . . . . . . . . . . . . . . . . . . . . . . . . . . . داده های فنی 24 . . . . . . . . . . . . . . . . . . . . . . . . . . . . . . . . . . . . . . . . . . . . . . . . . . . . . . . . . . . . . . . 1 2014-03-13 �� 4:13:11 CTR41RCC_HAC_DG68-00287A-02_FA indd 1 استفاده از این راهنما FA لطفا ً برای مطالعه این دفترچه راهنمای کاربر وقت صرف کنید ،قبل از استفاده به اطالعات ایمنی که در این بخش گنجانده شده مخصوصا ً توجه کنید .این دفترچه راهنما را برای مراجعه در آینده نگه دارید .اگر مالکیت این دستگاه را به شخص دیگری منتقل می کنید ،لطفا ً فراموش نکنید که این دفترچه راهنما را به مالک جدید بدهید. عالئم و احتیاط های مهم ایمنی از عالئم زیر در منت این دفترچه راهنمای دارنده استفاده شده است: هشدار احتياط احتياط خطرات یا روش های غیرایمن ممکن است موجب آسیب شخصی شدید یا مرگ ِشود. خطرات یا روش های غیرایمن ممکن است موجب صدمه شخصی یا آسیب خفیف به دارایی ِشود. برای کاهش خطر آتشسوزی ،برق گرفتگی یا صدمه شخصی در هنگام استفاده از اجاق ،این احتیاط های ایمنی ساده را دنبال کنید. سعی نکنید. اوراق نکنید. دست نزنید. از دستورالعمل ها به طور صریح پیروی کنید. دوشاخه برق را از پريز ديوار بکشید. برای جلوگیری از برق گرفتگی مطمئن شوید که ماشین زمینی شده باشد. برای دریافت کمک با مرکز خدمات متاس بگیرید. تذکر مهم 2 2014-03-13 �� 4:13:13 CTR41RCC_HAC_DG68-00287A-02_FA indd 2 دستورالعمل های ایمنی جنبه های ایمنی این دستگاه با کلیه استانداردهای فنی و ایمنی پذیرفته شده سازگاری دارند .با این وجود ،ما به عنوان تولید کننده معتقدیم که وطیفه داریم شما را با دستورالعمل های ایمنی زیر نیز آشنا کنیم. هشدار FA هشدار این دستگاه برای استفاده توسط اشخاص (شامل کودکان) که توانایی جسمانی ،حسی یا فکری محدود دارند یا جتربه یا دانش کافی ندارند ساخته نشده ،مگراینکه توسط شخصی که مسئول ایمنی آنهاست نظارت یا دستوراتی را در رابطه با استفاده از دستگاه دریافت کرده باشند. از کودکان بایستی مراقبت کرد تا اطمینان حاصل شود که با دستگاه بازی منی کنند. اگر سیم برق اشکالی دارد ،بایستی با سیم یا قطعاتی که از سوی سازنده یا تعمیرکار مجاز موجود است تعویض شود. (فقط مدل نوع سیم کشی ثابت) اگر به سیم برق آسیب وارد شود ،بایستی توسط سازنده ،مأمور خدماتی یا اشخاص مجرب مشابه تعویض شود تا از هرگونه خطری جلوگیری شود( .فقط مدل نوع سیم برق) دستگاه بایستی امکان قطع برق ماشین بعد از نصب آن را بدهد .قطع برق ممکن است توسط دسترسی به دوشاخه یا با استفاده از یک سویچ در سیم کشی ثابت براساس مقرارت سیم کشی ایجاد شود. هشدار :اگر سطح ترک برداشته ،دستگاه را خاموش کنید تا از احتمال برق گرفتگی جلوگیری شود. دستگاه در حین استفاده داغ می شود .در هنگام دست زدن به املنت های حرارتی در داخل اجاق بایستی مراقب بود. هشدار :قطعات قابل دسترسی ممکن است در طول استفاده داغ شوند .فرزندانتان را باید دور نگه دارید. نباید برای متیز کردن محصول از متیزگر با بخار استفاده کرد. از متیزکننده های ساینده نامالیم یا تراش دهنده های فلزی تیز برای متیز کردن شیشه اجاق استفاده نکنید چون ممکن است موجب خراشیده شدن سطح شیشه شده و منجر به خردشدن شیشه شوند. دستگاه به منظور استفاده توسط تایمر خارجی یا سیستم کنترل از راه دور جداگانه منی باشد. هشدار :این دستگاه و بخش های قابل دسترسی آن در حین استفاده داغ می شوند. در هنگام دست زدن به املنت های حرارتی در داخل اجاق بایستی مراقب بود. کودکان زیر 8سال بایستی دور نگه داشته شوند مگر اینکه به طور مداوم حتت نظارت باشند. کودکان از سن 8سال به باال و اشخاصی که توانائی های محدود جسمانی یا روانی دارند یا فاقد جتربه یا آگاهی هستند می توانند از این دستگاه استفاده کنند در صورتیکه حتت نظارت بوده و دستوراتی در مورد استفاده ایمن دستگاه به آنها داده شود و از خطرات مربوطه آگاهی داشته باشند .کودکان نبایستی با دستگاه بازی کنند .متیز کردن و موارد حفظ و نگهداری توسط کاربر نبایستی بدون نظارت توسط کودکان اجنام شود. هشدار :آشپزی بدون حضور مراقب با چربی یا روغن ممکن است خطرناک بوده و منجر به آتشسوزی شود. هرگز سعی نکنید که آتش را با آب خاموش کنید ،بلکه دستگاه را خاموش کرده و سپس شعله را برای مثال با سرپوش یا پتوی ضدآتش بپوشانید. هشدار :خطر آتشسوزی :اقالم را روی سطوح آشپزی نگه ندارید. دمای سطوح قابل دسترسی ممکن است در هنگام استفاده از دستگاه زیاد باشد. 3 2014-03-13 �� 4:13:13 CTR41RCC_HAC_DG68-00287A-02_FA indd 3 دستوالعمل های ایمنی (ادامه) FA دستگاه و سیم آنرا در دسترس کودکان زیر 8سال قرار ندهید. اشیاء فلزی از قبیل کارد ،چنگال ،قاشق و در قابلمه را نبایستی روی سطح اجاق قرار داد چون ممکن است داغ شوند. پس از استفاده ،املانت اجاق را با استفاده از کنترل آن خاموش کرده و به ظرف یاب اتکا نکنید. احتياط احتیاط مطمئن شوید که یک تکنسین باجتربه دستگاه را به طور صحیح نصب و زمینی کرده باشد. این دستگاه تنها بایستی توسط پرسنل تعمیراتی مجرب تعمیر شود .تعمیرات اجنام شده توسط اشخاص غیرمتخصص ممکن است موجب مصدومیت یا درست کار نکردن آشدید شود .اگر دستگاه به تعمیر نیاز داشت ،با مرکز خدمات محلی خود متاس حاصل منائید .قصور در پیروی از دستورالعمل ها ممکن است منجر به آسیب شده و گارانتی را باطل کند. تراز کنید -از دستگاه های سوارشده تنها بعد از اینکه در قفسه یا محل کاری نصب شده باشند که با معیارهای مربوطه سازگاری دارند می توان استفاده کرد .اینکار محافظت کافی در مقابل متاس با یونیت های برقی که الزمه معیارهای اساسی ایمنی می باشد را تضمین می کند. اگر دستگاه درست کار نکرد یا نشانه های شکستگی ،ترک خوردگی یا جدا شدگی پیدا شد: همه حوزه های آشپزی را خاموش کنید؛ پریز برق اجاق را بکشید؛ و با مرکز خدمات محلی خود متاس بگیرید.اگر سطح آشپزی ترک برداشته ،دستگاه را خاموش کنید تا از احتمال برق گرفتگی جلوگیری شود .تا زمانیکه سطح شیشه ای تعویض نشده از اجاق استفاده نکنید. از اجاق برای گرم کردن ورقه آلومینیمی ،محصوالتی که در ورقه آلومینیمی پیچیده شده اند یا غذاهای منجمدی که در ظروف آلومینیمی بسته بندی شده اند استفاده نکنید. مایعات بین ته ظرف و اجاق ممکن است فشار بخار تولید کند .که ممکن است موجب پرش ظرف شود .همیشه مطمئن شوید که خوراک پز و ته ظرف خشک نگه داشته شوند. حوزه های آشپزی هنگامیکه آشپزی می کنید داغ خواهند شد .همیشه کودکان خردسال را از دستگاه دور نگه دارید. همه مواد بسته بندی را از دسترس کودکان دور نگه دارید چون مواد بسته بندی ممکن است برای کودکان خطرناک باشند. از این دستگاه فقط برای آشپزی و سرخ کردن عادی در محیط منزل استفاده شود .این دستگاه برای استفاده جتاری یا صنعتی منی باشد. هرگز از اجاق برای گرم کردن اتاق استفاده نکنید. هنگام اتصال وسائل برقی به پریزهای برق در نزدیک اجاق مراقب باشید .سیم های برق نبایستی در متاس با سطح آشپزی قرار گیرند. چربی و روغنی که زیاد گرم شده باشد به سرعت آتش می گیرد .هنگام آشپزی با چربی یا روغن برای مثال سرخ کردن سیب زمینی ،هرگز سطوح دستگاه را بی مراقب رها نکنید. 4 2014-03-13 �� 4:13:13 CTR41RCC_HAC_DG68-00287A-02_FA indd 4 دستوالعمل های ایمنی (ادامه) FA حوزه های آشپزی را بعد از استفاده خاموش کنید. همیشه صفحات کنترل را متیز و خشک نگه دارید. اقالم قابل احتراق را روی اجاق قرار ندهید ،اینکار ممکن است موجب آتشسوزی شود. در صورتیکه با بی دقتی از دستگاه استفاده شود ،خطر سوختگی وجود دارد. سیم های دستگاه های برقی نبایستی در متاس با سطح داغ اجاق یا ظروف خوراکپزی اجاق قرار گیرند. از اجاق برای خشک کردن لباس ها استفاده نکنید. هشدار :کاربرانی که کاشت ضربان ساز و دستگاه قلب فعال دارند بایستی هنگامیکه دستگاه روشن است قسمت باالتنه خود را در فاصله 30سانتی متر از حوزه های آشپزی سرد نگه دارند .اگر مطمئن نیستید ،بایستی با تولید کننده دستگاه یا پزشک خود مشورت کنید( .فقط مدل اجاق سرد) سعی نکنید که خودتان دستگاه را تعمیر ،اوراق یا تعدیل کنید. همیشه دستگاه را قبل از متیز کردن خاموش کنید. اجاق را برطبق دستورالعمل های متیز کردن و مراقبتی که در این دفترچه راهنما گنجانده شده متیز کنید. دستورات به دور انداخنت هشدار به دور انداخنت مواد بسته بندی همه مواد استفاده شده در بسته بندی دستگاه کامال ً قابل بازیافت هستند .قطعات اسفنج ورقه ای و سخت به طور مناسب عالمت زده شده اند .لطفا ً مواد بسته بندی و دستگاه های کهنه را با توجه به ایمنی و محیط زیست به دور بیاندازید. هشدار به دور انداخنت صحیح دستگاه قدیمی هشدار :قبل از به دور انداخنت دستگاه قدیمی ،کاری کنید که قابل استفاده نباشد تا نتوانند منشأ خطر شود. برای اینکار ،از یک تکنسین صالحیت دار بخواهید که دستگاه را از جریان برق قطع کرده و سیم برق را جدا کنید. این دستگاه را منی توان در زباله خانگی به دور انداخت. اطالعات مربوط به روزهای جمع آوری و محل های به دور اندازی زباله از بخش یا شورای محلی زباله تان موجود است. 5 2014-03-13 �� 4:13:13 CTR41RCC_HAC_DG68-00287A-02_FA indd 5 نصب اجاق FA هشدار مطمئن شوید که یک تکنسین صالحیت دار دستگاه جدید را نصب و زمینی کرده باشد. لطفا ً این دستورات را مراعات کنید .گارانتی هرگونه آسیبی که در نتیجه استفاده نادرست پیش می آید را پوشش نخواهد داد. داده های فنی در آخر این دفترچه راهنما ارائه شده است. دستورالعمل های ایمنی برای نصب کننده • در رابطه با محافظت در مقابل آتشسوزی ،این دستگاه با EN 60335 - 2 - 6سازگاری دارد .این نوع دستگاه را می توان در کنار قفسه بلند یا دیوار نصب کرد. • کشوها را منی توان در زیر اجاق جاسازی کرد. • نصب بایستی محافظت در مقابل ضربه را ضمانت کند. • یونیت آشپزخانه که دستگاه در آن جاسازی شده باید شرایط ثبات DIN 68930را برآورده کند. • برای محافظت در مقابل رطوبت ،همه سطوح بریده شده باید با درزگیر مناسب درزگیری شوند. • در سطوح کاری کاشی کاری شده ،محل های اتصال در ناحیه ای که اجاق روی آن قرار می گیرد باید کامال ً با مالط پر شوند. • در پیشخوان های سنگ طبیعی ،مصنوعی یا سرامیک ،فنرهای قزن قفلی باید با استفاده از رزین یا مخلوط چسب مصنوعی مناسب در محل چسبانده شوند. • مطمئن شوید که درزگیر به طور صحیح و بدون هرگونه شکافی بر روی سطح کاری قرار گرفته باشد .نباید از درزگیر سیلیکون اضافی استفاده کرد؛ اینکار جدا کردن را در هنگام تعمیر مشکل تر می کند. • اجاق باید در هنگام برداشنت از زیر به سمت خارج فشار داده شود. 6 2014-03-13 �� 4:13:13 CTR41RCC_HAC_DG68-00287A-02_FA indd 6 نصب اجاق (ادامه) اتصال به پریز FA قبل از اتصال ،ولتاژ اسمی دستگاه را کنترل کنید ،یعنی کنترل کنید که ولتاژ قید شده روی پالک مشخصات با ولتاژ برق موجود همخوانی داشته باشد .پالک مشخصات در سمت پائین اجاق قرار دارد. ولتاژ املانت گرمائی 230 ACولت است .این دستگاه سیمی دارد که شامل سیم زمین و دوشاخه زمینی است .دوشاخه باید به پریزی زده شود که به طور صحیح نصب و زمینی شده باشد. هشدار هنگامیکه اجاق به جریان برق متصل شده ،با روشن کردن حوزه های آشپزی روی درجه حداکثر به مدت کوتاه کنترل کنید که آماده استفاده شده اند. هنگامیکه اجاق برای اولین بار روشن می شود ،همه چراغ ها و قفل ایمنی کودک فعال می شوند. نصب روی پیشخوان شماره سریال قید شده در پالک درجه بندی دستگاه را قبل از نصب یادداشت کنید .این شماره در صورت نیاز به تعمیرات الزم بوده و پس از نصب دیگر قابل دسترسی نیست چون روی پالک درجه بندی اصلی در زیر دستگاه قرار دارد. به حداقل فضا و لزومات فواصل ایمنی مخصوصا ً توجه کنید. بست ها را قبل از سوار کردن اجاق بر روی بست ها در دو طرف با استفاده از پیچ های تأمین شده محکم کنید. 6ø 4x °90 حداقل 50میلی متر R3 273 حداقل 20 490 1± 1± 600 50 °90 4x 2ø 100 = 100 = 490 1± 7 2014-03-13 �� 4:13:15 CTR41RCC_HAC_DG68-00287A-02_FA indd 7 قطعات و ویژگی ها FA حوزه های آشپزی و پانل کنترل حوزه آشپزی مفرد 1800وات حوزه آشپزی مفرد 1200وات 183میلی متر 148میلی متر پانل کنترل سنسور کنترل "قفل" سنسور کنترل "روشن/خاموش" نشانگرها برای تنظیمات حرارتی و حرارت باقیمانده گزینشگرهای تنظیم حرارت نشانگر تایمر و سنسورهای کنترل 8 2014-03-13 �� 4:13:15 CTR41RCC_HAC_DG68-00287A-02_FA indd 8 قطعات و ویژگی ها (ادامه) قطعات 1 3 FA 2 اجاق شیشه سرامیک بست های نصب پیچ ها 9 2014-03-13 �� 4:13:15 CTR41RCC_HAC_DG68-00287A-02_FA indd 9 قطعات و ویژگی ها (ادامه) FA ویژگی های کلیدی دستگاه • سطح شیشه سرامیک برای آشپزی:این دستگاه حاوی یک سطح شیشه سرامیک برای آشپزی و چهار حوزه آشپزی واکنش سریع می باشد .املانت های گرم کننده پرقدرت تابشی اجاق مقدار زمان الزم برای گرم شدن حوزه ها را به طور محسوس کوتاه می کنند. • سنسورهای کنترل ملسی :نحوه استفاده از دستگاه توسط سنسورهای کنترل ملسی می باشد. • متیز کردن آسان :مزیت سطح شیشه سرامیک برای آشپزی و سنسورهای کنترل ،سهولت دسترسی به آنها برای متیز کردن است. متیز کردن سطح صیقلی و صاف آسان است. • سنسور روشن/خاموش :سنسور کنترل "روشن/خاموش" سویچ برق جداگانه ای را برای دستگاه فراهم می سازد .ملس این سنسور، جریان برق را به طور کامل روشن یا خاموش می کند. • نشانگرهای کنترل و عملکرد :منایشگرهای دیجیتال و چراغ های نشآنگر ،اطالعاتی را در مورد تنظیمات و عملکردهای فعال شده به اضافه حضور حرارت باقیمانده در حوزه های آشپزی مختلف ارائه می کنند. • خاموش کننده ایمنی :خاموش کننده ایمنی موجب می شود که حوزه های آشپزی بعد از مدتی و در صورتیکه تنظیم عوض نشده باشد به طور خودکار خاموش شوند. • نشانگر حرارت باقیمانده:اگر حوزه آشپزی آنقدر داغ است که خطر سوختگی وجود دارد ،یک مناد گرمای باقیمانده در صفحه منایش ظاهر می شود. منایشگرهای دیجیتال :چهار میدان منایش داده شده به چهار حوزه آشپزی اختصاص داده شده اند. این میدان ها اطالعات زیر را نشان می دهند: - دستگاه روشن شده است، - تا - حرارت باقیمانده، - تنظیمات حرارتی انتخاب شده، قفل کودک فعال شده است؛ و - پیغام خطا ،سنسور به مدت بیش از 10ثانیه ملس شده است. - پیغام خطا ،هنگامیکه اجاق به واسطه استفاده غیرعادی زیاد گرم شده است. 10 2014-03-13 �� 4:13:16 CTR41RCC_HAC_DG68-00287A-02_FA indd 10 قطعات و ویژگی ها (ادامه) خاموش کننده ایمنی FA اگر یکی از حوزه های آشپزی خاموش نشود یا تنظیم حرارت پس از مدت طوالنی تنظیم نشود ،آن حوزه آشپزی خاص خودش را به طور خودکار خاموش خواهد کرد. هرگونه حرارت باقیمانده توسط (یعنی "داغ") در منایشگر دیجیتال مربوط به حوزه های آشپزی خاص نشان داده خواهد شد. حوزه های آشپزی در مواقع زیر خودشان را خاموش می کنند. تنظیم آشپزی 2-1 پس از 6ساعت تنظیم آشپزی 4-3 پس از 5ساعت تنظیم آشپزی 6-5 پس از 3ساعت تنظیم آشپزی 9-7 پس از 1ساعت اگر اجاق به خاطر عملکرد غیرعادی زیادی گرم شود، و اجاق خاموش خواهد شد. منایش داده خواهد شد. اگر یک حوزه آشپزی یا بیشتر قبل از سپری شدن زمان نشان داده شده خاموش شود ،به بخش "رفع مشکالت" مراجعه کنید. دالیل دیگری که یک حوزه آشپزی خاموش خواهد شد اگر مایعات سر رفته و روی صفحه کنترل بریزند ،همه حوزه های آشپزی فورا ً خودشان را خاموش خواهند کرد. خاموش شدن خودکار هنگامیکه یک پارچه مندار را روی صفحه کنترل قرار می دهید نیز فعال خواهد شد .در هر دو مورد ،الزم خواهد بود که دستگاه را با استفاده از سنسور اصلی نیرو پس از اینکه مایعات یا پارچه برداشته شد ،دوباره روشن کرد . نشانگر حرارت باقیمانده هنگامیکه یک حوزه آشپزی خاص یا اجاق خاموش شود ،حضور گرمای باقیمانده توسط (یعنی "داغ") در صفحه منایش دیجیتال برای حوزه های آشپزی مربوطه نشان داده می شود .حتی بعد از اینکه حوزه آشپزی خاموش شود ،نشانگر حرارت باقیمانده تنها زمانی خاموش می شود که حوزه آشپزی سرد شده باشد. شما می توانید از حرارت باقیمانده برای آب کردن یخ یا گرم نگه داشنت غذا استفاده کنید. هشدار تا زمانیکه نشانگر حرارت باقیمانده روشن است ،خطر سوختگی وجود دارد. اگر جریان برق قطع شود ،عالمت خاموش شده و اطالعات در مورد حرارت باقیمانده دیگر موجود نخواهد بود .با این حال هنوز ممکن است خودتان را بسوزانید .اگر همیشه هنگامیکه در اطراف اجاق هستید مراقب باشید می توان از این موضوع پرهیز کرد. 11 2014-03-13 �� 4:13:16 CTR41RCC_HAC_DG68-00287A-02_FA indd 11 قبل از اینکه شروع کنید FA متیز کردن اولیه سطح شیشه سرامیک را با پارچه مندار و متیزکننده شیشه اجاق سرامیک پاک کنید. هشدار از متیزکننده های خورنده یا ساینده استفاده نکنید .ممکن است که سطح صدمه ببیند. استفاده از اجاق استفاده از ظرف مناسب تابه های بهتر نتایج بهتری را عرضه می کنند. • • تابه های خوب را می توانید با نگاه کردن به زیر آنها شناسائی کنید .زیر تابه بایستی تا حد ممکن ضخیم و صاف باشد. هنگام خرید تابه های جدید ،مخصوصا ً به قطر زیر آن توجه کنید .سازنده ها اغلب اوقات فقط قطر لبه باالئی را می دهند. • قابلمه هایی که زیر آلومینیمی یا مسی دارند ممکن است موجب رنگ رفتگی فلزی بر روی سطح شیشه سرامیک شوند .پاک کردن این رنگ رفتگی بسیار مشکل یا غیرممکن است. • از تابه هائی که از چدن ساخته شده اند یا زیر آنها آسیب دیده و لبه های ناصاف یا تیز دارند استفاده نکنید .اگر اینگونه تابه بر روی سطح بلغزد ،ممکن است موجب خراشیدگی دائم شود. • زیر تابه هنگامیکه سرد شد ،معموال ً به سمت داخل خم (فرو رفته) می شود .هرگز نبایستی به سمت خارج خم (محدب) شود. اگر مایلید از نوع خاصی تابه برای مثال دیگ زودپز ،تابه بخارپز یا واک استفاده کنید ،لطفا ً دسورالعمل های سازنده را مراعات کنید. • راهنمائی های صرفه جوئی در انرژی می توانید با مراعات نکات زیر در مصرف انرژی ارزشمند صرفه جوئی کنید. صحیح! اشتباه! 12 2014-03-13 �� 4:13:16 CTR41RCC_HAC_DG68-00287A-02_FA indd 12 استفاده از اجاق (ادامه) • همیشه قابلمه و تابه را قبل از روشن کردن حوزه آشپزی قرار دهید. FA • حوزه های آشپزی و زیر تابه کثیف مصرف نیرو را افزایش می دهد. • در صورت امکان ،در ظرف را به طور محکم روی تابه و قابلمه قرار دهید تا آنرا کامال ً بپوشاند. • حوزه های آشپزی را قبل از خامته مدت آشپزی خاموش کنید تا برای گرم نگه داشنت یا برای آب کردن یخ غذا از حرارت باقیمانده استفاده شود. • زیر تابه باید به همان اندازه حوزه آشپزی باشد. • استفاده از دیگ زودپز زمان آشپزی را تا حداکثر % 50کاهش می دهد. استفاده از سنسور های کنترل ملسی برای استفاده از سنسورهای کنترل ملسی ،صفحه مورد نظر را با نوک انگشت اشاره ملس کنید تا منایشگرهای مربوطه روشن یا خاموش شوند یا عملکرد مورد نظر فعال شود. مطمئن شوید که فقط یک صفحه سنسور را در هنگام استفاده از دستگاه ملس می کنید .اگر انگشت شما روی صفحه زیادی فشرده شود ،یک سنسور جانبی نیز ممکن است فعال شود. 13 2014-03-13 �� 4:13:16 CTR41RCC_HAC_DG68-00287A-02_FA indd 13 استفاده از اجاق (ادامه) FA روشن کردن دستگاه سنسور "قفل " را برای تقریبا ً 3ثانیه فشار دهید. دستگاه با استفاده از سنسور کنترل "روشن/خاموش سنسور "روشن/خاموش " را ملس کنید. منایشگرهای دیجیتال را نشان خواهند داد. " روشن می شود. پس از اینکه سنسور "روشن/خاموش " برای فعال کردن دستگاه بکار انداخته شد ،بایستی تنظیم حرارت در ظرف تقریبا ً 10ثانیه انتخاب شود .در غیر اینصورت ،دستگاه به دالیل ایمنی خودش را خاموش خواهد کرد. کنترل دما حوزه آشپزی مربوطه را ملس کنید. برای تنظیم و تغییر میزان نیرو ( تا ) برای آشپزی ،کلیدهای , فشرده می شود ،میزان نیرو روی تنظیم می شود. اولین باری که فشرده می شود ،میزان نیرو روی تنظیم می شود. اولین باری که برای کاهش آن استفاده کنید. برای افزایش تنظیم گرما و کلید از کلید 14 2014-03-13 �� 4:13:17 CTR41RCC_HAC_DG68-00287A-02_FA indd 14 استفاده از اجاق (ادامه) خاموش کردن دستگاه FA برای خاموش کردن کامل دستگاه ،از سنسور کنترل "روشن/خاموش سنسور "روشن/خاموش " را ملس کنید. " استفاده کنید. پس از خاموش کردن یک حوزه آشپزی یا کل سطح آشپزی ،حضور حرارت باقیمانده در صفحه منایش دیجیتال حوزه های آشپزی مربوطه به صورت (یعنی "داغ") نشان داده می شود. می باشد و می خواهید اگر تنظیم گرما در گرما صفر خواهد شد. یا برای تنظیم سریع تر ،انگشت خود را روی سنسور اگر بیش از یک سنسور برای بیش از 10ثانیه فشرده شود، مجدد ،سنسور "روشن/خاموش " را ملس کنید. اجاق را خاموش کنید ،سنسور را می توان یکبار دیگر ملس کرد و تنظیم نگه دارید تا اینکه مقدار الزم کسب شود. در منایشگر تنظیم گرما نشان داده خواهد شد .برای تنظیم خاموش کردن حوزه آشپزی برای خاموش کردن حوزه آشپزی ،تنظیم را با استفاده از تنظیم گرمای پانل کنترل به برگردانده و سنسورهای یا را ملس کنید. 15 2014-03-13 �� 4:13:18 CTR41RCC_HAC_DG68-00287A-02_FA indd 15 استفاده از اجاق (ادامه) FA استفاده از قفل ایمنی کودک می توانید از قفل ایمنی کودک برای محافظت در مقابل روشن کردن ناخواسته حوزه آشپزی و فعال کردن سطح آشپزی استفاده کنید .از سنسور کنترل قفل تنها زمانی می توان استفاده کرد که دستگاه خاموش باشد. روشن کردن قفل ایمنی کودک .1سنسور کنترل را برای تقریبا ً 3ثانیه فشار دهید. یک سیگنال آکوستیک به عنوان تأیید صدا خواهد کرد. تقریبا ً 3ثانیه .2هر کدام از سنسورهای کنترل تنظیم گرما را ملس کنید. روی صفحه منایش داده شده که نشان می دهد که قفل ایمنی کودک فعال شده است. 16 2014-03-13 �� 4:13:18 CTR41RCC_HAC_DG68-00287A-02_FA indd 16 استفاده از اجاق (ادامه) خاموش کردن قفل ایمنی کودک FA .1سنسور کنترل را برای تقریبا ً 3ثانیه ملس کنید. یک سیگنال آکوستیک به عنوان تأیید صدا خواهد کرد. تقریبا ً 3ثانیه قفل کردن و باز کردن قفل پانل کنترل در هر مرحله در طول آشپزی ،صفحه کنترل ،به غیر از سنسور کنترل "روشن/خاموش تنظیمات جلوگیری شود ،برای مثال وقتیکه صفحه را با پارچه پاک می کنید. " را می توان قفل کرد تا از تغییر ناخواسته .1سنسور کنترل را برای تقریبا ً 3ثانیه ملس کنید. چراغ نشانگر در سنسور کنترل قفل روشن خواهد شد .سنسورهای کنترل اکنون قفل شده اند. .2برای باز کردن قفل سنسور کنترل ،سنسور کنترل قفل را برای تقریب ِا 3ثانیه دوباره ملس کنید .چراغ نشانگر در سنسور کنترل قفل خاموش خواهد شد. تقریبا ً 3ثانیه 17 2014-03-13 �� 4:13:18 CTR41RCC_HAC_DG68-00287A-02_FA indd 17 استفاده از اجاق (ادامه) FA تایمر دو روش برای استفاده از تایمر وجود دارد: استفاده از تایمر برای خاموش کردن ایمن اگر یک مدت خاص برای حوزه آشپزی تنظیم شده باشد ،حوزه آشپزی هنگامیکه این مدت سپری شد خودش را خاموش خواهد کرد .از این قابلیت می توان برای چندین حوزه آشپزی به طور همزمان استفاده منود. استفاده از تایمر برای شمارش معکوس اگر حوزه آشپزی روشن شده باشد منی توان از تایمر شمارش معکوس استفاده کرد. تنظیم خاموش شدن ایمنی حوزه (های) آشپزی که برای آن می خواهید خاموش شدن ایمنی به کار گرفته شود را بایستی روشن کنید. .1با استفاده از سنسور کنترل تایمر ،حوزه آشپزی که برای آن زمان خاموش شدن ایمن تنظیم می شود را انتخاب کنید. پس از اینکه اولین حوزه آشپزی فعال انتخاب شد ،ملس کردن سنسور کنترل تایمر موجب چشمک زدن آهسته نشانگر مربوطه خواهد شد. در صفحه منایش تایمر نشان داده خواهد شد. حوزه آشپزی فعال بعدی توسط ملس کردن دوباره سنسور کنترل تایمر انتخاب می شود. برای تنظیم مدت مورد نظر استفاده کنید ،برای مثال 15دقیقه که بعد از آن حوزه یا .2از سنسورهای کنترل تنظیم تایمر آشپزی خودش را به طور خودکار خاموش خواهد کرد. حاال خاموش شدن ایمنی فعال شده است. 18 2014-03-13 �� 4:13:19 CTR41RCC_HAC_DG68-00287A-02_FA indd 18 استفاده از اجاق (ادامه) استفاده کنید. برای نشان دادن وقت باقی مانده برای هر یک از حوزه های آشپزی ،از سنسور کنترل تایمر نشانگر کنترل مربوطه شروع می کند به آهستگی چشمک بزند. مجددا ً تنظیم می شوند .پس از اینکه مدت معینی سپری شد، یا تنظیمات با استفاده از سنسورهای کنترل تنظیم تایمر حوزه آشپزی خودش را به طور خودکار خاموش می کند ،یک سیگنال آکوستیک به عنوان تأیید به صدا در می آید و منایشگر تایمر نشان می دهد. یا FA برای اجنام سریع تر تنظیمات ،هر یک از سنسورهای کنترل تنظیم تایمر شود. ابتدا ملس شود ،تنظیم زمان در 99دقیقه شروع خواهد شد؛ اگر سنسور کنترل تنظیم اگر سنسور کنترل تنظیم تایمر ابتدا ملس شود ،تنظیم زمان در 1دقیقه شروع خواهد شد. تایمر را ملس کنید تا اینکه مقدار مورد نظر کسب تایمر شمارش معکوس برای استفاده از تایمر شمارش معکوس ،بایستی دستگاه را روشن کرد ولی حوزه های آشپزی بایستی خاموش باشند. .1سنسور کنترل تایمر را ملس کنید. در صفحه منایش تایمر نشان داده خواهد شد. تنظیم کنید. یا .2دوره زمانی مورد نظر را با استفاده از سنسورهای کنترل تنظیم تایمر عملکرد تایمر شمارش معکوس فعال شده و مدت باقی مانده در صفحه منایش تایمر نشان داده می شود. برای تنظیم زمان باقیمانده ،سنسور کنترل زمان را ملس کرده و تنظیم را با استفاده از سنسورهای کنترل تنظیم تایمر تغییر دهید . یا تنظیمات توصیه شده برای پخنت خوراک های خاص مطالب توصیه شده در جدول زیر رهنمود عمومی هستند .تنظیمات حرارتی برای روش های آشپزی مختلف بستگی به چند متغیر دارند که شامل کیفیت ظرف مورد استفاده و نوع و مقدار خوراکی می شود که پخته می شود. تنظیمات سویچ روش آشپزی 9 گرم کردن تفت دادن سرخ کردن گرم کردن مقدار زیادی مایع ،جوشاندن رشته فرنگی ،سرخ کردن گوشت( ،قهوه ای کردن تاس کباب ،آرام پز کردن گوشت) 8 شدید سرخ کردن استیک ،راسته ،سیب زمینی سرخ کرده ،سوسیس ،پنکیک 6 سرخ کردن کتلت /گوشت با استخوان ،جگر ،ماهی ،شامی ،نیمرو جوشاندن آشپزی تا حداکثر 1/5لیتر مایع ،سیب زمینی ،سبزیجات 7 5 4 3 بخارپز کردن آرام پخنت جوشاندن 1 آب کردن 2 منونه هائی برای استفاده بخارپز کردن و آرام پخنت مقدار کمی سبزیجات ،کته و خوراک های شیری آب کردن کره ،نرم کردن ژالتین ،آب کردن شکالت تذکر • تنظیمات حرارتی که در جدول فوق ذکر شده صرفا ً به عنوان رهنمود و برای مراجعه شما ذکر شده اند. • الزم خواهد بود که تنظیمات حرارتی را براساس ظرف و خوراک های خاص تنظیم کنید. 19 2014-03-13 �� 4:13:19 CTR41RCC_HAC_DG68-00287A-02_FA indd 19 متیز کردن و مراقبت FA اجاق هشدار مواد متیزکننده نبایستی در متاس با سطح شیشه سرامیک گرم شده قرار گیرند .همه مواد متیزکننده را بایستی با مقدار کافی آب بعد از متیز کردن شست چون ممکن است هنگامیکه سطح داغ می شود اثرات خورنده داشته باشند .از هیچگونه متیزکننده قوی از قبیل افشانه های منقل و فر ،ابرهای ظرفشوئی یا شوینده های ساینده تابه استفاده نکنید. سطح شیشه سرامیک را بعد از هر استفاده و هنگامیکه هنوز قدری گرم است متیز کنید .اینکار از سوخته شدن موادی که روی سطح سرریز شده اند جلوگیری خواهد کرد .لکه ها ،اثر آب ،قطرات چربی و از رنگ رفتگی فلزی را با استفاده از متیزکننده شیشه سرامیک یا فوالد ضدزنگ که در فروشگاه ها موجود است پاک کنید. کثیف شدگی خفیف .1 .2 .3 .4 سطح شیشه سرامیک را با پارچه مندار پاک کنید. با پارچه نرم مبالید تا خشک شود .نبایستی باقیمانده مواد متیزکننده روی سطح باقی مباند. هفته ای یکبار متام سطح شیشه سرامیک را با متیزکننده شیشه سرامیک یا فوالد ضدزنگ که در فروشگاه ها موجود است، کامال ً متیز کنید. سطح شیشه سرامیک را با مقدار کافی آب متیز پاک کرده و با یک پارچه بدون کرک متیز مبالید تا خشک شود. کثیف شدگی مقاوم و سمج .1برای پاک کردن غذائی که سر رفته و سرریز شدگی های مقاوم و سمج ،از تراش شیشه استفاده کنید. .2تراش شیشه را با زاویه روی سطح شیشه سرامیک قرار دهید. .3کثیف شدگی را توسط تراشیدن با تیغه پاک کنید. تراش های شیشه و متیزکننده های شیشه سرامیک از فروشنده های ویژه موجود می باشند. 20 2014-03-13 �� 4:13:19 CTR41RCC_HAC_DG68-00287A-02_FA indd 20 متیز کردن و مراقبت (ادامه) کثافت مشکل .1شکر سوخته ،پالستیک ذوب شده ،ورقه آلومینیمی یا سایر مواد را با تراش شیشه و در حالیکه هنوز داغ است فورا ً پاک کنید. هشدار FA این خطر وجود دارد که هنگامیکه از تراش شیشه بر روی حوزه آشپزی داغ استفاده می کنید ،خودتان را بسوزانید: .2هنگامیکه اجاق خنک شد آنرا به طور عادی متیز کنید. اگر به حوزه آشپزی که بر روی آن چیزی ذوب شده فرصتی داده شده تا خنک شود .آنرا برای متیز کردن دوباره گرم کنید. خراشیدگی ها یا لکه های تیره ای که برای مثال توسط تابه ای که لبه های تیز داشته بر روی سطح شیشه سرامیک ایجاد شده را منی توان پاک کرد. با این وجود بر روی عملکرد اجاق تأثیری ندارند. برای جلوگیری از آسیب وارد شدن به دستگاه • از اجاق به عنوان سطح کاری یا برای نگهداری اقالم استفاده نکیند. • اگر روی اجاق تابه ای نیست یا تابه خالیست از حوزه آشپزی استفاده نکنید. • شیشه سرامیک در مقابل شوک دمائی بسیار محکم و مقاوم می باشد ولی غیرقابل شکسنت نیست .اگر شیئ بسیار تیز یا سخت روی اجاق بیافتد ،ممکن است به آن آسیب وارد شود. • از تابه هائی که از چدن ساخته شده اند یا زیر آنها آسیب دیده و لبه های ناصاف یا تیز دارند استفاده نکنید .اگر اینگونه تابه بر روی سطح بلغزد ،ممکن است موجب خراشیدگی شود. • تابه ها را روی چارچوب اجاق قرار ندهید .ممکن است موجب خراشیدگی و آسیب به جالکاری دستگاه شود. • از ریخته شدن مایعات اسیدی برای مثال سرکه ،آب لیمو و مواد جرم گیر بر روی چارچوب اجاق پرهیز کنید چون چنین مایعاتی ممکن است موجب لکه های مات شوند. • اگر شکر یا ترکیبی که حاوی شکر است با حوزه آشپزی متاس پیدا کرده و ذوب شود ،بایستی با تراش آشپزخانه و هنگامیکه هنوز داغ است فورا ً متیز شود .اگر امکان سرد شدن پیدا کند ،ممکن است در حین پاک کردن به سطح آسیب وارد کند. • همه اقالم و موادی که ممکن است ذوب شوند ،از قبیل پالستیک ،ورقه آلومینیمی و ورقه های فر را از سطح شیشه سرامیک دور نگه دارید .اگر چیزی از این نوع روی اجاق ذوب شود ،بایستی توسط تراش فورا ً پاک شود. 21 2014-03-13 �� 4:13:19 CTR41RCC_HAC_DG68-00287A-02_FA indd 21 گارانتی و تعمیرات FA پرسش و پاسخ های متداول و رفع مشکالت می توانید مشکالتی که در نتیجه خطای جزئی ایجاد می شوند را با کمک دستورالعمل های زیر خودتان رفع کنید .اگر دستورالعمل های زیر به هر مورد خاص مربوط منی شوند ،سعی نکنید که خودتان تعمیر کنید. هشدار تعمیر دستگاه تنها بایستی توسط تکنسین تعمیراتی مجرب اجنام شود .تعمیراتی که به طور درست اجنام نشده اند ممکن است منجر به خطرات قابل توجهی برای کاربر شوند .اگر دستگاه به تعمیر نیاز دارد ،لطفا ً با مرکز خدمات مشتریان متاس حاصل منائید. اگر حوزه های آشپزی کار منی کند چکار کنم؟ احتماالت زیر را در نظر بگیرید: • فیوز در جعبه فیوز سالم است .اگر فیوزها چندبار پریدند ،با تکسنین برق مجاز متاس حاصل منائید. • دستگاه به طور صحیح روشن شده است. • نشانگرهای کنترل در صفحه کنترل روشن شده اند. • حوزه آشپزی روشن شده است. • حوزه های آشپزی روی تنظیمات حرارتی مورد نظر گذاشته شده اند. اگر حوزه های آشپزی روشن منی شوند چکار کنم؟ احتماالت زیر را در نظر بگیرید: • بیش از 10ثانیه بین فعال شدن دکمه روشن/خاموش و روشن کردن حوزه آشپزی مورد نظر سپری شده است (به بخش "روشن کردن دستگاه" مراجعه منائید). • یک پارچه مندار یا مایعات بخشی از صفحه کنترل را پوشانده اند. اگر صفحه منایش به غیر از نشانگر حرارت باقیمانده به طور ناگهانی ناپدید شود چکار کنم؟ این موضوع ممکن است در نتیجه یکی از این دو احتمال باشد: • سنسور روشن/خاموش به طور اتفاقی فعال شده است. • یک پارچه مندار یا مایعات بخشی از صفحه کنترل را پوشانده اند. اگر پس از اینکه حوزه های آشپزی خاموش شدند ،حرارت باقیمانده در صفحه منایش نشان داده نشد چکار کنم؟ احتمال زیر را در نظر بگیرید: • از حوزه آشپزی به مدت کوتاهی استفاده شده و بنابراین به اندازه کافی داغ نشده است .اگر حوزه آشپزی داغ است ،لطفا ً با مرکز خدمات مشتریان متاس حاصل منائید. اگر حوزه آشپزی روشن یا خاموش منی شود چکار کنم؟ این موضوع می تواند به واسطه یکی از احتماالت زیر باشد: • یک پارچه مندار یا مایعات بخشی از صفحه کنترل را پوشانده اند. • قفل ایمنی کودک روشن است. اگر منایشگر روشن شده چکار کنم؟ مورد زیر را در نظر بگیرید: • یک پارچه مندار یا مایعات بخشی از صفحه کنترل را پوشانده اند .برای تنظیم مجدد ،سنسور کنترل "روشن/خاموش" را فشار دهید. 22 2014-03-13 �� 4:13:19 CTR41RCC_HAC_DG68-00287A-02_FA indd 22 گارانتی و تعمیرات (ادامه) FA هنگامیکه اجاق به رنگ قرمز نورانی نیست چه معنی می دهد؟ • دمای انتخاب شده برای حوزه آشپزی توسط سنسور تنظیم می شود که حوزه را به طور دوره ای روشن و خاموش می کند ،بنابراین حوزه آشپزی همیشه به رنگ قرمز نورانی نیست .اگر یک تنظیم پایین حرارتی را انتخاب کنید ،حرارت بیشتر به طور دوره ای روشن و خاموش خواهد شد تا اینکه تنظیمات باالتر را انتخاب کنید .حرارت در باالترین سطح حرارتی نیز روشن و خاموش می شود. اگر برای خطائی که در حین استفاده از دستگاه پیش آمده درخواست تعمیرات کنید ،ممکن است بازدید تکنسین خدمات مشتریان هزینه ای در بر داشته باشد حتی اگر در طول دوره گارانتی باشد. تعمیرات قبل از متاس برای دریافت کمک یا تعمیرات ،لطفا ً به بخش "رفع مشکالت" مراجعه منائید. اگر هنوز به کمک نیاز دارید ،لطفا ً دستورالعمل های زیر را دنبال کنید. آیا این موضوع یک خطای فنی است؟ در این صورت ،لطفا ً با مرکز خدمات مشتریان متاس حاصل منائید. همیشه برای در میان گذاشنت مشکل از قبل آماده شوید .اینکار روال شناسائی مشکل را تسهیل کرده و تصمیم در مورد لزوم بازدید از سوی خدمات مشتریان را آسان تر می کند. لطفا ً اطالعات زیر را در نظر بگیرید. • مشکل به چه صورتی می باشد؟ • مشکل حتت چه شرایطی پیش می آید؟ هنگامیکه متاس می گیرید ،لطفا ً مدل و شماره سریال دستگاه را بدانید .این اطالعات روی پالک مشخصات به صورت زیر ارائه شده است: • توصیف مدل • کد شماره سریال ( 15رقم) توصیه می کنیم که اطالعات را برای مراجعه آسان در اینجا یادداشت کنید. مدل: شماره سریال: در چه زمان حتی در طول دوره گارانتی متحمل هزینه می شوید؟ • • اگر با به کارگیری یکی از راه حل هائی که در بخش "رفع مشکالت" ارائه شد می توانستید خودتان مشکل را برطرف کنید. اگر تکنسین خدمات مشتریان بایستی چندین بار متاس بگیرد چون قبل از بازدید ،اطالعات مربوطه در اختیار وی قرار داده نشده و در نتیجه برای مثال ،بایستی چندین بار دیگر برای قطعات مراجعه کند .توسط آماده شدن برای متاس تلفنی به صورتیکه در باال توصیف شد در هزینه این مراجعات صرفه جوئی می کنید. 23 2014-03-13 �� 4:13:19 CTR41RCC_HAC_DG68-00287A-02_FA indd 23 داده های فنی FA ابعاد دستگاه عرض 288میلی متر عمق 505میلی متر ارتفاع 50میلی متر ابعاد الگوی پیشخوان عرض 273میلی متر عمق 490میلی متر شعاع گوشه 3میلی متر حلقه های آشپزی قطر موقعیت نيرو جلو 148میلی متر 1200وات عقب 183میلی متر 1800وات ولتاژ اتصال 230ولت ~ 50هرتز حداکثر نیروی بار متصل شده 3/0کیلو وات خالص 4/3کیلوگرم ناخالص 6/0کیلوگرم وزن : 24 2014-03-13 �� 4:13:19 CTR41RCC_HAC_DG68-00287A-02_FA indd 24 یادداشت FA 25 CTR41RCC_HAC_DG68-00287A-02_FA indd 25 2014-03-13 �� 4:13:19 www.samsung.com/ae/support (English) www.samsung.com/ae_ar/support (Arabic) www.samsung.com/eg/support www.samsung.com/n_africa/support www.samsung.com/pk/support www.samsung.com/n_africa/support www.samsung.com/Levant/support (English) www.samsung.com/iran/support www.samsung.com/n_africa/support www.samsung.com/sa/support www.samsung.com/sa_en/support (English) www.samsung.com/tr/support www.samsung.com/africa_en/support www.samsung.com/africa_fr/support www.samsung.com/support 800-SAMSUNG (726-7864) 800-SAMSUNG(726-7864) 183-2255 (183-CALL) 8000-4726 800-2255 (800-CALL) 08000-726786 16580 021 36 11 00 0800-Samsung (72678) 80-1000-12 0800-22273 06 5777444 18252273 021-8255 080 100 2255 920021230 444 77 11 0800-726-7864 0800-10077 0302-200077 8000 0077 800-00-0077 7095-0077 0800 545 545 0800 300 300 0685 88 99 00 9999 200 499999 1969 0860 SAMSUNG (726 7864) 8007260000 08 197 267 864 0211 350370 847267864 / 827267864 U.A.E OMAN KUWAIT BAHRAIN QATAR EGYPT ALGERIA PAKISTAN TUNISIA JORDAN SYRIA IRAN MOROCCO SAUDI ARABIA TURKEY NIGERIA GHANA Cote D’ Ivoire SENEGAL CAMEROON KENYA UGANDA TANZANIA RWANDA BURUNDI DRC SUDAN SOUTH AFRICA BOTSWANA NAMIBIA ZAMBIA MOZAMBIQUE DG68-00287A-02 CTR41RCC_HAC_DG68-00287A-02_FA indd 26 2014-03-13 �� 4:13:19 Installation and Operating Instructions Ceramic Glass Hob CTR41RCC To avoid the risk of accidents or damage to the hob, read all instructions before installing or using the appliance. Keep this manual for future reference. This manual is made with 100 % recycled paper. CTR41RCC_HAC_DG68-00287A-02_EN.indd 1 2014-03-13 �� 3:30:40 CTR41RCC_HAC_DG68-00287A-02_EN.indd 2 2014-03-13 �� 3:30:41 Contents Using This Manual . . . . . . . . . . . . . . . . . . . . . . . . . . . . . . . . . . . . . . . 2 Safety Instructions . . . . . . . . . . . . . . . . . . . . . . . . . . . . . . . . . . . . . . . 3 EN Disposal instructions . . . . . . . . . . . . . . . . . . . . . . . . . . . . . . . . . . . . . 5 Installing the Hob . . . . . . . . . . . . . . . . . . . . . . . . . . . . . . . . . . . . . . . 6 Safety instructions for the installer . . . . . . . . . . . . . . . . . . . . . . . . . . . . . 6 Connecting to the outlet . . . . . . . . . . . . . . . . . . . . . . . . . . . . . . . . . . . 7 Installing into the countertop . . . . . . . . . . . . . . . . . . . . . . . . . . . . . . . . 7 Parts and Features . . . . . . . . . . . . . . . . . . . . . . . . . . . . . . . . . . . . . . . 8 Cooking zones and control panel . . . . . . . . . . . . . . . . . . . . . . . . . . . . . . 8 Components . . . . . . . . . . . . . . . . . . . . . . . . . . . . . . . . . . . . . . . . . 9 The key features of your appliance . . . . . . . . . . . . . . . . . . . . . . . . . . . . 10 Safety shutoff . . . . . . . . . . . . . . . . . . . . . . . . . . . . . . . . . . . . . . . 11 Residual heat indicator . . . . . . . . . . . . . . . . . . . . . . . . . . . . . . . . . . 11 Before You Begin . . . . . . . . . . . . . . . . . . . . . . . . . . . . . . . . . . . . . . . 12 Initial cleaning . . . . . . . . . . . . . . . . . . . . . . . . . . . . . . . . . . . . . . . 12 Hob Use . . . . . . . . . . . . . . . . . . . . . . . . . . . . . . . . . . . . . . . . . . . . 12 Using suitable cookware . . . . . . . . . . . . . . . . . . . . . . . . . . . . . . . . . 12 Using the touch control sensors . . . . . . . . . . . . . . . . . . . . . . . . . . . . . . 13 Switching the appliance on . . . . . . . . . . . . . . . . . . . . . . . . . . . . . . . . 14 Temperature control . . . . . . . . . . . . . . . . . . . . . . . . . . . . . . . . . . . . 14 Switching the appliance off . . . . . . . . . . . . . . . . . . . . . . . . . . . . . . . . 15 Switching a cooking zone off . . . . . . . . . . . . . . . . . . . . . . . . . . . . . . . 15 Using the child safety lock . . . . . . . . . . . . . . . . . . . . . . . . . . . . . . . . . 16 Locking and unlocking the control panel . . . . . . . . . . . . . . . . . . . . . . . . . 17 Timer . . . . . . . . . . . . . . . . . . . . . . . . . . . . . . . . . . . . . . . . . . . 18 Setting the safety shutoff . . . . . . . . . . . . . . . . . . . . . . . . . . . . . . . . . 18 Countdown timer . . . . . . . . . . . . . . . . . . . . . . . . . . . . . . . . . . . . . 19 Cleaning and Care . . . . . . . . . . . . . . . . . . . . . . . . . . . . . . . . . . . . . . 20 Hob . . . . . . . . . . . . . . . . . . . . . . . . . . . . . . . . . . . . . . . . . . . . 20 To avoid damaging your appliance . . . . . . . . . . . . . . . . . . . . . . . . . . . . 21 Warranty and Service . . . . . . . . . . . . . . . . . . . . . . . . . . . . . . . . . . . . 22 FAQs and troubleshooting . . . . . . . . . . . . . . . . . . . . . . . . . . . . . . . . . 22 Service . . . . . . . . . . . . . . . . . . . . . . . . . . . . . . . . . . . . . . . . . . 23 Technical Data . . . . . . . . . . . . . . . . . . . . . . . . . . . . . . . . . . . . . . . . 24 1 CTR41RCC_HAC_DG68-00287A-02_EN.indd 1 2014-03-13 �� 3:30:41 Using This Manual EN Please take the time to read this owner’s manual, paying particular attention to the safety information contained in the following section, before using your appliance. Keep this manual for future reference. If transferring ownership of the appliance, please remember to pass the manual on to the new owner. Important safety symbols and precautions The following symbols are used in the text of this Owner’s Manual : WARNING Hazards or unsafe practices that may result in severe personal injury or death. CAUTION Hazards or unsafe practices that may result in minor personal injury or property damage. CAUTION To reduce the risk of fire, explosion, electric shock, or personal injury when using your hob, follow these basic safety precaution. Do NOT attempt. Do NOT disassemble. Do NOT touch. Follow directions explicitly. Unplug the power plug from the wall socket. Make sure the machine is grounded to prevent electric shock. Call the service center for help. Note Important 2 CTR41RCC_HAC_DG68-00287A-02_EN.indd 2 2014-03-13 �� 3:30:42 Safety Instructions The safety aspects of this appliance comply with all accepted technical and safety standards. However, as manufacturers we also believe it is our responsibility to familiarize you with the following safety instructions. WARNING EN Warning This appliance is not intended for use by persons (including children) with reduced physical, sensory or mental capabilities, or lack of experience and knowledge, unless they have been given supervision or instruction concerning use of the appliance by a person responsible for their safety. Children should be supervised to ensure that they do not play with the appliance. If the supply cord is defective, it must be replaced by a special cord or assembly available from the manufacturer or an authorised service agent. (Fixed wiring type model only) If the supply cord is damaged, it must be replaced by the manufacturer, its service agent or similarly qualified persons in order to avoid a hazard. (power cord type model only) Appliance should allow the disconnection of the appliance from the supply after installation. The disconnection may be achieved by having the plug accessible or by incorporating a switch in the fixed wiring in accordance with the wiring rules. WARNING: If the surface is cracked, switch off the appliance to avoid the possibility of electric shock. During use the appliance becomes hot. Care should be taken to avoid touching heating elements inside the hob. WARNING: Accessible parts may become hot during use. Young children should be kept away. A steam cleaner is not to be used to clean the product. Do not use harsh abrasive cleaners or sharp metal scrapers to clean the hob glass since they can scratch the surface, which may result in shattering of the glass. Appliance is not intended to be operated by means of an external timer or separate remote-control system. WARNING: The appliance and its accessible parts become hot during use. Care should be taken to avoid touching heating elements inside the hob. Children less than 8 years of age shall be kept away unless continuously supervised. This appliance can be used by children aged from 8 years and above and persons with reduced physical, sensory or mental capabilities or lack of experience and knowledge if they have been given supervision or instruction concerning use of the appliance in a safe way and understand the hazards involved. Children shall not play with the appliance. Cleaning and user maintenance shall not be made by children without supervision. WARNING: Unattended cooking on a hob with fat or oil can be dangerous and may result in fire. NEVER try to extinguish a fire with water, but switch off the appliance and then cover flame e.g. with a lid or a fire blanket. 3 CTR41RCC_HAC_DG68-00287A-02_EN.indd 3 2014-03-13 �� 3:30:42 Safety Instructions (continued) EN WARNING: Danger of fire: do not store items on the cooking surfaces. The temperature of accessible surfaces may be high when the appliance is operating. Keep the appliance and its cord out of reach of children less than 8 years. Metallic objects such as knives, forks, spoons and lids should not be placed on the hob surface since they can get hot. After use, switch off the hob element by its control and do not rely on the pan detector. CAUTION Caution Be sure the appliance is properly installed and grounded by a qualified technician. The appliance should be serviced only by qualified service personnel. Repairs carried out by unqualified individuals may cause injury or serious malfunction. If your appliance is in need of repair, contact your local service centre. Failure to follow these instructions may result in damage and void the warranty. Flush - mounted appliances may be operated only after they have been installed in cabinets and workplaces that conform to the relevant standards. This ensures sufficient protection against contact for electrical units as required by the essential safety standards. If your appliance malfunctions or if fractures, cracks or splits appear: - switch off all cooking zones; - disconnect the hob from the mains supply; and - contact your local service centre. If the cooktop cracks, turn the appliance off to avoid the possibility of electric shock. Do not use your hob until the glass surface has been replaced. Do not use the hob to heat aluminium foil, products wrapped in aluminium foil or frozen foods packaged in aluminium cookware. Liquid between the bottom of the pan and the hob can produce steam pressure. Which may cause the pan to jump. Always ensure that the hotplate and the base of the pan are kept dry. The cooking zones will become hot when you cook. Always keep small children away from the appliance. Keep all packaging materials well out of the reach of children, as packaging materials can be dangerous to children. This appliance is to be used only for normal cooking and frying in the home. It is not designed for commercial or industrial use. Never use the hob for heating the room. 4 CTR41RCC_HAC_DG68-00287A-02_EN.indd 4 2014-03-13 �� 3:30:42 Safety Instructions (continued) Take care when plugging electrical appliances into mains sockets near the hob. Mains leads must not come into contact with the cooktop. EN Overheated fat and oil can catch fire quickly. Never leave surface units unattended when preparing foods in fat or oil, for example, when cooking chips. Turn the cooking zones off after use. Always keep the control panels clean and dry. Never place combustible items on the hob, it may cause fire. There is the risk of burns from the appliance if used carelessly. Cables from electrical appliances must not touch the hot surface of the hob or hot cookware. Do not use the hob to dry clothes. WARNING : Users with Pacemakers and Active Heart Implants must keep their upper body at a minimum distance of 30 cm from induction cooking zones when turned on. If in doubt, you should consult the manufacturer of your device or your doctor. (Induction hob model only) Do not attempt to repair, disassemble, or modify the appliance yourself. Always turn the appliance off before cleaning. Clean the hob in accordance with the cleaning and care instructions contained in this manual. Disposal instructions WARNING Disposing of the packaging material All materials used to package the appliance are fully recyclable. Sheet and hard foam parts are appropriately marked. Please dispose of packaging materials and old appliances with due regard to safety and the environment. WARNING Proper disposal of your old appliance WARNING : Before disposing of your old appliance, make it inoperable so that it cannot be a source of danger. To do this, have a qualified technician disconnect the appliance from the mains supply and remove the mains lead. The appliance may not be disposed of in the household rubbish. Information about collection dates and public refuse disposal sites is available from your local refuse department or council. 5 CTR41RCC_HAC_DG68-00287A-02_EN.indd 5 2014-03-13 �� 3:30:42 Installing the Hob EN WARNING Be sure the new appliance is installed and grounded only by qualified personnel. Please observe this instruction. The warranty will not cover any damage that may occur as a result of improper installation. Technical data is provided at the end of this manual. Safety instructions for the installer • With respect to fire protection, this appliance corresponds to EN 60 335 - 2 - 6. This type of appliance may be installed with a high cupboard or wall on one side. • Drawers may not be fitted underneath the hob. • The installation must guarantee shock protection. • The kitchen unit in which the appliance is fitted must satisfy the stability requirements of DIN 68930. • For protection against moisture, all cut surfaces are to be sealed with a suitable sealant. • On tiled work surfaces, the joints in the area where the hob sits must be completely filled with grout. • On natural, artificial stone, or ceramic tops, the snap action springs must be bonded in place with a suitable artificial resin or mixed adhesive. • Ensure that the seal is correctly seated against the work surface without any gaps. Additional silicon sealant must not be applied; this would make removal more difficult when servicing. • The hob must be pressed out from below when removed. 6 CTR41RCC_HAC_DG68-00287A-02_EN.indd 6 2014-03-13 �� 3:30:42 Installing the Hob (Continued) Connecting to the outlet EN Before connecting, check that the nominal voltage of the appliance, that is, the voltage stated on the rating plate, corresponds to the available supply voltage. The rating plate is located on the lower casing of the hob. The heating element voltage is AC230 V~. This appliance is equipped with a cord that includes a grounding wire and a grounding plug. The plug must be plugged into an outlet that is properly installed and grounded. Once the hob is connected to the mains supply, check that all cooking zones are ready WARNING for use by briefly switching each on in turn at the maximum setting. When the hob is powered on for the first time, all displays light and the child safety lock is activated. Installing into the countertop Make a note of the serial number on the appliance rating plate prior to installation. This number will be required in the case of requests for service and is no longer accessible after installation, as it is on the original rating plate on the underside of the appliance. Pay special attention to the minimum space and clearance requirements. Secure the brackets at both sides with the provided screws before mounting the hob onto the brackets. x4 min. 50mm R3 273 +1 min. 20 490+1 600 50 90 x4 2 00 00 490 7 CTR41RCC_HAC_DG68-00287A-02_EN.indd 7 2014-03-13 �� 3:30:43 Parts and Features EN Cooking zones and control panel Single cooking zone 1800W Single cooking zone 1200 W Control panel Indicators for heat settings and residual heat Timer indicator and control sensors Heat setting selectors “Lock” control sensor “On/Off” control sensor 8 CTR41RCC_HAC_DG68-00287A-02_EN.indd 8 2014-03-13 �� 3:30:43 Parts and Features (Continued) Components 1 3 EN 2 Ceramic Glass Hob Installation Brackets Screws 9 CTR41RCC_HAC_DG68-00287A-02_EN.indd 9 2014-03-13 �� 3:30:43 Parts and Features (Continued) EN The key features of your appliance • Ceramic glass cooking surface: The appliance has a ceramic glass cooking surface and four rapid - response cooking zones. The hob’s powerful radiant heater elements significantly shorten the amount of time required for the zones to heat up. • Touch control sensors: Your appliance is operated using touch control sensors. • Easy cleaning: The advantage of the ceramic glass cooking surface and the control sensors is their accessibility for cleaning. The smooth, flat surface is easy to clean. • On / Off sensor: The “On / Off” control sensor provides the appliance with a separate mains switch. Touching this sensor switches the power supply on or off completely. • Control and function indicators: Digital displays and indicator lights provide information about settings and activated functions, as well as the presence of residual heat in the various cooking zones. • Safety shutoff: A safety shutoff ensures that all cooking zones switch off automatically after a period of time if the setting has not been changed. • Residual heat indicator: An icon for residual heat appears in the display if the cooking zone is so hot that there is a risk of burning. Digital displays: The four display fields are assigned to the four cooking zones. They show the following information: - the appliance has been switched on, - to selected heat settings, - residual heat, - the child lock is activated; and - error message, the sensor has been touched for longer than 10 seconds. - error message, when the Hob is overheated because of abnormal operation. 10 CTR41RCC_HAC_DG68-00287A-02_EN.indd 10 2014-03-13 �� 3:30:44 Parts and Features (Continued) Safety shutoff EN If one of the cooking zones is not switched off or the heat setting is not adjusted after an extended period of time, that particular cooking zone will automatically switch itself off. Any residual warmth will be indicated with (for “hot”) in the digital displays corresponding to the particular cooking zones. The cooking zones switch themselves off at the following times. Cooking setting 1-2 After 6 hours Cooking setting 3-4 After 5 hours Cooking setting 5-6 After 3 hours Cooking setting 7-9 After 1 hour If the Hob is overheated because of abnormal operation, And the Hob will be switched off. will be displayed. Should one or more of the cooking zones switch off before the indicated time has elapsed, see the section “Troubleshooting.” Other reasons why a cooking zone will switch itself off All cooking zones will immediately switch themselves off if liquid boils over and lands on the control panel. The automatic shutoff will also be activated if you place a damp cloth on the control panel. In both of these instances, the appliance will need to be switched on again using the main power sensor after the liquid or the cloth has been removed . Residual heat indicator When an individual cooking zone or the hob is turned off, the presence of residual heat is shown with an (for “hot”) in the digital display of the appropriate cooking zones. Even after the cooking zone has been switched off, the residual heat indicator goes out only after the cooking zone has cooled. You can use the residual heat for thawing or keeping food warm. As long as the residual heat indicator is illuminated, there is a risk of burns. WARNING If the power supply is interrupted, the symbol will go out and information about residual heat will no longer be available. However, it may still be possible to burn yourself. This can be avoided by always taking care when near the hob. 11 CTR41RCC_HAC_DG68-00287A-02_EN.indd 11 2014-03-13 �� 3:30:44 Before You Begin EN Initial cleaning Wipe the ceramic glass surface with a damp cloth and ceramic hob glass cleaner. Do not use caustic or abrasive cleaners. The surface could be damaged. WARNING Hob Use Using suitable cookware Better pans produce better results. • You can recognise good pans by their bases. The base should be as thick and flat as possible. • When buying new pans, pay particular attention to the diameter of the base. Manufacturers often give only the diameter of the upper rim. • Pots with aluminium or copper bases can cause metallic discolouration on the ceramic glass surface. The discolouration is very difficult or impossible to remove. • Do not use pans made of cast iron or which have damaged bases with rough edges or burrs. Permanent scratching can occur if these pan are slid across the surface. • When cold, pan bases are normally bowed slightly inwards (concave). They should never be bowed outwards (convex). • If you wish to use a special type of pan, for example, a pressure cooker, a simmering pan, or a wok, please observe the manufacturer’s instructions. Energy saving tips You can save valuable energy by observing the following points. Right! Wrong! 12 CTR41RCC_HAC_DG68-00287A-02_EN.indd 12 2014-03-13 �� 3:30:45 Hob Use (Continued) • • • • Always position pots and pans before switching on the cooking zone. Dirty cooking zones and pan bases increase power consumption. When possible, position the lids firmly on the pots and pans to cover completely. Switch the cooking zones off before the end of the cooking time to use the residual heat for keeping foods warm or for thawing. EN • The base of the pan should be the same size as the cooking zone. • Using a pressure cooker reduces cooking times by up to 50 % Using the touch control sensors To operate the touch control sensors, touch the desired panel with the tip of your pointed finger until the relevant displays illuminate or go out, or until the desired function is activated. Ensure that you are touching only one sensor panel when operating the appliance. If your finger is too flat on the panel, an adjacent sensor may be actuated as well. 13 CTR41RCC_HAC_DG68-00287A-02_EN.indd 13 2014-03-13 �� 3:30:45 Hob Use (Continued) EN Switching the appliance on Touch the “Lock ” sensor for approximately 3 seconds. The appliance is switched on using the “On / Off ” control sensor. Touch the “On / Off ” sensor. The digital displays will show . After the “On / Off ” sensor has been actuated to switch on your appliance, a heat setting must be selected within approximately 10 seconds. Otherwise, the appliance will switch itself off for safety reasons. Temperature control For setting and adjusting the power level ( to ) for cooking, touch the corresponding cooking zone’s , keys. The first time is pressed, the heat level is set to . The first time is pressed, the heat level is set to . Use the key to increase the heat setting and the key to decrease. 14 CTR41RCC_HAC_DG68-00287A-02_EN.indd 14 2014-03-13 �� 3:30:46 Hob Use (Continued) Switching the appliance off EN To completely switch off the appliance, use the “On / Off Touch the “On / Off ” sensor. ” control sensor. After switching off a single cooking zone or the entire cooking surface, the presence of residual heat will be indicated in the digital displays of the corresponding cooking zones in the form of an (for “hot”). If the heat setting is at and you want to turn the burner off, the sensor can be touched one additional time, and the heat setting will go to zero. For faster adjustment, keep your finger on the or sensor until the required value is obtained. If more than one sensor is pressed for longer than 10 seconds, will show in the heat setting display. To reset, touch the “On / Off ” sensor. Switching a cooking zone off To switch off a cooking zone, return the setting to and touch sensors or . by using the control panel’s heat setting 15 CTR41RCC_HAC_DG68-00287A-02_EN.indd 15 2014-03-13 �� 3:30:46 Hob Use (Continued) EN Using the child safety lock You can use the child safety lock to safeguard against unintentionally turning on a cooking zone and activating the cooking surface. The lock control sensor can be used only when the power is on. Switching the child safety lock on 1. Touch the control sensor for approximately 3 seconds. An acoustic signal will sound as confirmation. approx. 3 sec. 2. Touch any heat setting control sensor. will appear in the displays, indicating the child safety lock has been activated. 16 CTR41RCC_HAC_DG68-00287A-02_EN.indd 16 2014-03-13 �� 3:30:46 Hob Use (Continued) Switching the child safety lock off EN 1. Touch the control sensor for approximately 3 seconds. An acoustic signal will sound as confirmation. approx. 3 sec. Locking and unlocking the control panel At any stage during the cooking process, the control panel, with the exception of the “On / Off ” control sensor, can be locked in order to prevent the settings from being changed unintentionally, for example, by wiping over the panel with a cloth. 1. Touch the lock control sensor for approximately 3 seconds. The indicator light in the lock control sensor will illuminate. The control sensors are now locked. 2. To unlock the control sensor, touch the lock control sensor again for approximately 3 seconds. The indicator light in the lock control sensor will extinguish. approx. 3 sec. 17 CTR41RCC_HAC_DG68-00287A-02_EN.indd 17 2014-03-13 �� 3:30:46 Hob Use (Continued) EN Timer There are two ways to use the timer: Using the timer as a safety shutoff If a specific time is set for a cooking zone, the cooking zone will shut itself off once this period of time has elapsed. This function can be used for multiple cooking zones simultaneously. Using the timer to count down The countdown timer cannot be used if a cooking zone has been switched on. Setting the safety shutoff The cooking zone(s) for which you want to apply the safety shutoff must be switched on. 1. Using the timer’s control sensor , select the cooking zone for which the safety shutoff time is to be set. After the first active cooking zone is selected, touching the timer’s control sensor will cause the corresponding indicator to flash slowly. will appear in the timer display. The next active cooking zone is selected by touching the timer’s control sensor again . 2. Use the or timer setting control sensors to set the desired amount of time, for example, 15 minutes, after which the cooking zone will automatically switch itself off. The safety shutoff is now activated. 18 CTR41RCC_HAC_DG68-00287A-02_EN.indd 18 2014-03-13 �� 3:30:47 Hob Use (Continued) To display the time remaining for any of the cooking zones, use the timer’s control sensor . The corresponding control indicator will begin to blink slowly. The settings are reset using the or timer setting control sensors. After the set period of time has elapsed, the cooking zone automatically switches itself off, an acoustic signal sounds as confirmation and the timer display indicates. To make the settings more quickly, touch any of the or timer setting control sensors until the desired value is reached. If the timer setting control sensor is touched first, the time setting will begin at 99 minutes; if the timer setting control sensor is touched first, the time setting will begin at 1 minute. EN Countdown timer For the countdown timer to be used, the appliance must be switched on but all the cooking zones must be switched off. 1. Touch the timer’s control sensor . will appear in the timer display. 2. Set the desired period of time using the or timer setting control sensors. The countdown timer function is now activated and the remaining time appears in the timer display. To adjust the remaining time, touch the timer’s control sensor and change the setting using the or timer setting control sensors . Suggested settings for cooking specific foods The figures in the table below are guidelines. The heat settings required for various cooking methods depend on a number of variables, including the quality of the cookware being used and the type and amount of food being cooked. Switch Setting Cookingmethod 9 Warming Sautéing Frying Warming large amounts of liquid, boiling noodles, searing meat, (browning goulash,braising meat) 7 Intensive Frying Steak, sirloin, hash browns, sausages, pancakes / griddle cakes 6 Frying Schnitzel / chops, liver, fish, rissoles, fried eggs Boiling Cooking up to 1.5 l liquid, potatoes, vegetables 8 5 4 3 2 Steaming Stewing Boiling 1 Melting Examples for Use Steaming and stewing of small amounts of vegetables, boiling rice and milk dishes Melting butter, dissolving gelatine, melting chocolate Note • The heat settings indicated in the table above are provided only as guidelines for your reference. • You will need to adjust the heat settings according to specific cookware and foods. 19 CTR41RCC_HAC_DG68-00287A-02_EN.indd 19 2014-03-13 �� 3:30:47 Cleaning and Care EN Hob WARNING Cleaning agents must not come into contact with a heated ceramic glass surface: All cleaning agents must be removed with adequate amounts of clean water after cleaning because they can have a caustic effect when the surface becomes hot. Do not use any aggressive cleaners such as grill or oven sprays, scouring pads or abrasive pan cleaners. Clean the ceramic glass surface after each use when it is still warm to the touch. This will prevent spillage from becoming burnt onto the surface. Remove scales, watermarks, fat drippings and metallic discolouration with the use of a commercially available ceramic glass or stainless steel cleaner. Light Soiling 1. Wipe the ceramic glass surface with a damp cloth. 2. Rub dry with a clean cloth. Remnants of cleaning agent must not be left on the surface. 3. Thoroughly clean the entire ceramic glass cooking surface once a week with a commercially available ceramic glass or stainless steel cleaner. 4. Wipe the ceramic glass surface using adequate amounts of clean water and rub dry with a clean lint - free cloth. Stubborn Soiling 1. To remove food that has boiled over and stubborn splashes, use a glass scraper. 2. Place the glass scraper at an angle to the ceramic glass surface. 3. Remove soiling by scraping with the blade. Glass scrapers and ceramic glass cleaners are available from specialty retailers. 20 CTR41RCC_HAC_DG68-00287A-02_EN.indd 20 2014-03-13 �� 3:30:47 Cleaning and Care (Continued) Problem Dirt 1. Remove burnt-on sugar, melted plastic, aluminium foil or other materials with a glass scraper immediately and while still hot. WARNING EN There is a risk of burning yourself when the glass scraper is used on a hot cooking zone: 2. Clean the hob as normal when it has cooled down. If the cooking zone on which something has melted has been allowed to cool, warm it up again for cleaning. Scratches or dark blemishes on the ceramic glass surface, caused, for example, by a pan with sharp edges, cannot be removed. However, they do not impair the function of the hob. To avoid damaging your appliance • Do not use the hob as a work surface or for storage. • Do not operate a cooking zone if there is no pan on the hob or if the pan is empty. • Ceramic glass is very tough and resistant to temperature shock, but it is not unbreakable. It can be damaged by a particularly sharp or hard object dropping onto the hob. • Do not use pans made of cast iron or which have damaged bases with rough edges or burrs. Scratching may occur if these pans are slid across the surface. • Do not place pans on the hob frame. Scratching and damage to the finish may occur. • Avoid spilling acidic liquids, for example, vinegar, lemon juice and descaling agents, onto the hob frame, since such liquids can cause dull spots. • If sugar or a preparation containing sugar comes into contact with a hot cooking zone and melts, it should be cleaned off immediately with a kitchen scraper while it is still hot. If allowed to cool, it may damage the surface when removed. • Keep all items and materials that could melt, for example, plastics, aluminium foil and oven foils, away from the ceramic glass surface. If something of this nature melts onto the hob, it must be removed immediately with a scraper. 21 CTR41RCC_HAC_DG68-00287A-02_EN.indd 21 2014-03-13 �� 3:30:47 Warranty and Service EN FAQs and troubleshooting A fault may result from a minor error that you can correct yourself with the help of the following instructions. Do not attempt any further repairs if the following instructions do not help in each specific case. Repairs to the appliance are to be performed only by a qualified service technician. WARNING Improperly effected repairs may result in considerable risk to the user. If your appliance needs repair, please contact your customer service centre. What should I do if the cooking zones are not functioning? Check for the following possibilities: • The fuse in the house wiring (fuse box) is intact. If the fuses trip a number of times, call an authorised electrician. • The appliance is properly switched on. • The control indicators in the control panel are illuminated. • The cooking zone is switched on. • The cooking zones are set at the desired heat settings. What should I do if the cooking zones will not switch on? Check for the following possibilities: • A period of more than 10 seconds has elapsed between when the On / Off button was actuated and the desired cooking zone switches on (see the section “Switching the appliance on”). • The control panel is partially covered by a damp cloth or liquid. What should I do if the display except for suddenly disappears? the residual warmth indicator This could be a result of one of two possibilities: • The On / Off sensor was accidentally actuated. • The control panel is partially covered by a damp cloth or liquid. What should I do if, after the cooking zones have been switched off, residual warmth is not indicated in the display? Check for the following possibility: • The cooking zone was only briefly used and therefore did not become hot enough. If the cooking zone is hot, please call the customer service centre. What should I do if the cooking zone will not switch on or off? This could be due to one of the following possibilities: • The control panel is partially covered by a damp cloth or liquid. • The child safety lock is on. What should I do if the display is illuminated? Check for the following: • The control panel is partially covered by a damp cloth or liquid. To reset, press the “On / Off” control sensor. 22 CTR41RCC_HAC_DG68-00287A-02_EN.indd 22 2014-03-13 �� 3:30:47 Warranty and Service (Continued) What does it mean when the burner does not glow red? • The selected temperature of the cooking zone is maintained by a sensor that cycles the zone on and off, so the surface cooking area will not always glow red. If you select a low heat setting, the heat will cycle on and off more frequently than at higher settings. The heat also cycles on and off at the highest setting. If you request a service call because of an error made in operating the appliance, the visit from the customer service technician may incur a charge even during the warranty period. EN Service Before calling for assistance or service, please check the section “Troubleshooting.” If you still need help, follow the instructions below. Is it a technical fault? If so, please contact your customer service centre. Always prepare in advance for the discussion. This will ease the process of diagnosing the problem and also make it easier to decide if a customer service visit is necessary. Please take note of the following information. • What form does the problem take? • Under what circumstances does the problem occur? When calling, please know the model and serial number of your appliance. This information is provided on the rating plate as follows: • Model description • S / N code (15 digits) We recommend that you record the information here for easy reference. Model: Serial number: When do you incur costs even during the warranty period? • if you could have remedied the problem yourself by applying one of the solutions provided in the section “Troubleshooting,” • if the customer service technician has to make several service calls because he was not provided with all of the relevant information before his visit and as a result, for example, has to make additional trips for parts. Preparing for your phone call as described above will save you the cost of these trips. 23 CTR41RCC_HAC_DG68-00287A-02_EN.indd 23 2014-03-13 �� 3:30:47 Technical Data EN Appliance dimensions Width 288 mm Depth 505 mm Height 50 mm Worktop cut - out dimensions Width 273 mm Depth 490 mm Corner radius 3 mm Cooking rings Position Diameter Power Front 148 mm 1,200 W Rear 183 mm 1,800 W Connection voltage 230 V ~ 50 Hz Maximum connected load power 3.0 kW Weight : Net 4.3 kg Gross 6.0 kg 24 CTR41RCC_HAC_DG68-00287A-02_EN.indd 24 2014-03-13 �� 3:30:48 Memo EN 25 CTR41RCC_HAC_DG68-00287A-02_EN.indd 25 2014-03-13 �� 3:30:48 U.A.E OMAN KUWAIT BAHRAIN QATAR EGYPT ALGERIA PAKISTAN TUNISIA JORDAN SYRIA IRAN MOROCCO SAUDI ARABIA TURKEY NIGERIA GHANA Cote D’ Ivoire SENEGAL CAMEROON KENYA UGANDA TANZANIA RWANDA BURUNDI DRC SUDAN SOUTH AFRICA BOTSWANA NAMIBIA ZAMBIA MOZAMBIQUE 800-SAMSUNG (726-7864) 800-SAMSUNG(726-7864) 183-2255 (183-CALL) 8000-4726 800-2255 (800-CALL) 08000-726786 16580 021 36 11 00 0800-Samsung (72678) 80-1000-12 0800-22273 06 5777444 18252273 021-8255 080 100 2255 920021230 444 77 11 0800-726-7864 0800-10077 0302-200077 8000 0077 800-00-0077 7095-0077 0800 545 545 0800 300 300 0685 88 99 00 9999 200 499999 1969 0860 SAMSUNG (726 7864) 8007260000 08 197 267 864 0211 350370 847267864 / 827267864 www.samsung.com/ae/support (English) www.samsung.com/ae_ar/support (Arabic) www.samsung.com/eg/support www.samsung.com/n_africa/support www.samsung.com/pk/support www.samsung.com/n_africa/support www.samsung.com/Levant/support (English) www.samsung.com/iran/support www.samsung.com/n_africa/support www.samsung.com/sa/support www.samsung.com/sa_en/support (English) www.samsung.com/tr/support www.samsung.com/africa_en/support www.samsung.com/africa_fr/support www.samsung.com/support DG68-00287A-02 CTR41RCC_HAC_DG68-00287A-02_EN.indd 26 2014-03-13 �� 3:30:48