1
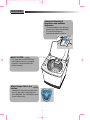
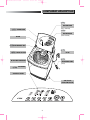
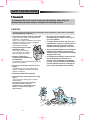
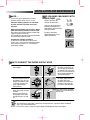
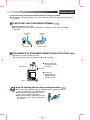
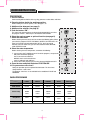
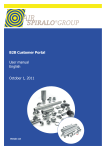
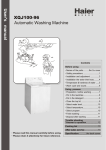
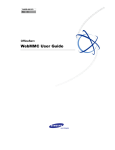
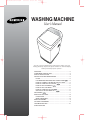
WA1346D0-GB-01665D
2/18/03 10:34 AM
Page 1
WASHING MACHINE
User’s Manual
“In order to prevent malfunctioning of the appliance, before using your
washing machine for the first time, please read this user manual carefully
and keep it at hand for future reference.”
FEATURES ................................................................................2
COMPONENT DESCRIPTION...................................................3
SAFETY INSTRUCTIONS..........................................................4
INSTALLATION AND MAINTENANCE ......................................5
PLACE ...................................................................................5
FOR WASHING MACHINES WITH DRAIN PUMP................5
HOW TO CONNECT THE WATER SUPPLY HOSE .............5
HOW TO CLEAN THE FILTER NET......................................6
HOW TO ADD DETERGENT.................................................6
HOW TO ADD SOFTENER ...................................................6
HOW TO CLEAN THE FILTER..............................................6
ONE-TOUCH ADJUSTABLE LEGS.......................................6
GROUNDING .............................................................................7
WASH INSTRUCTIONS.............................................................8
PROCEDURE ........................................................................8
WASH PROGRAMS ..............................................................8
WASH PROGRAMS...................................................................9
OPTIONAL PROGRAMS ...........................................................9
TROUBLESHOOTING .............................................................10
SPECIFICATIONS
WA1346D0-GB-01665D
2/18/03 10:34 AM
Page 2
FEATURES
Detergent dissolvent
dispenser and softener
dispenser
• The timely addition of the detergent
prevents your clothes from damage.
• The convenient dispenser
automatically adds the softener.
Softener
dispenser
MAGIC FILTER
• This magic filter ensures that all the
naps inside the drum are entrapped,
resulting in a perfect filtration and
efficient cleaning.
Water bumps fall on the
clothes.
• Two powerful cascades forcefully fall on
the very dirty clothes and gently push
them downward, thus removing the dirt in
a more effective way.
2
WA1346D0-GB-01665D
2/18/03 10:34 AM
Page 3
COMPONENT DESCRIPTION
WATER HOSE
(Blue = cold water)
DRAIN HOSE
WATER HOSE
(Red = hot water)
DOOR
DETERGENT BOX
PLUG
MAGIC FILTER
BLEACHER APERTURE
GROUNDING CABLE
(Green)
SOFTENER
CONTROL PANEL
ONE-TOUCH
ADJUSTABLE LEGS
3
WA1346D0-GB-01665D
2/18/03 10:34 AM
Page 4
SAFETY INSTRUCTIONS
Warning
To reduce the risk of fire, electric shock or personal injuries, when using your
machine follow the basic cautions, included in the following sections.
CAUTION
prevent risks, If the electric plug cable is damaged, ask the manufacturer, service center or authorized
• To
and trained personnel to replace it .
➢ Verify that the washing machine is grounded.
To prevent electric shock, when grounding the
equipment, use metal tubes.
Never user gas pipes or telephones lines for the
grounding connections as there is danger of
explosion or overvoltage due
to atmospheric discharge.
➢ During spinning do not place
hands in the drum.
As the drum is spinning at a
very high speed, the rotating
parts may injure your hands.
➢ Place the clothes in the
washing machine distributing
them uniformly.
If the clothes are not well distributed, there may
be noise and vibration.
➢ Do not use excessively hot water. (50°C or
higher).
The plastic parts may suffer deformation or
damage. In addition, the clothes may suffer
damage or color loss.
➢ Check the pockets before washing.
➢ Do not press the control panel with a sharp
object.
The result may be damage to the panel or
malfunctioning.
- If the power supply cable is damaged,
the technical service, specially
designated by the manufacturer, shall
replace it, as the process requires
special tooling.
4
➢ Do not store or use gasoline or other
flammable liquids or vapors close to this or
any other appliance.
➢ To relief pressure on hoses and valves and
minimize leaks, if a hose or valve breaks or is
damaged, close the water inlet cock each
time that the washing machine is not in use.
➢ Never operate this appliance if it is damaged,
malfunctioning, partially disassembled or
contains broken or missing parts, including a
damaged cable or key.
➢ To minimize the possibility of electric shock,
before attempting any maintenance or
cleaning action, unplugged the equipment
from the socket or disconnect the appliance
from the distribution panel by removing the
fuse or disconnecting the circuit switcher.
WA1346D0-GB-01665D
2/18/03 10:34 AM
Page 5
INSTALLATION AND MAINTENANCE
PLACE. . .
FOR WASHING MACHINES WITH
DRAIN PUMP
Leave a free space between the washing
machine and the wall of, at least, 10 cm.
Remove the hose cap,
connect the drain hose.
Place the washing machine on a leveled
and firm surface to prevent noise and
vibration.
Verify that the drain hose is
properly connected to the
drain outlet in the back of the
washing machine.
Adjust the adjustable legs to level it. Never
place the washing machine close to water.
Never place the washing machine in rooms with
vapors or exposed to the rain.
The humidity may destroy the electrical isolation
and lead to risk of electric shock.
hose cap
drain hose
Install the drain hose,
approximately 90~100cm
above ground level.
Avoid direct sunlight or heaters.
As direct heat may damage the plastic and
electric parts, never place the washing machine
close to ovens, furnaces, etc. Never place it
under direct sunlight.
HOW TO CONNECT THE WATER SUPPLY HOSE
1. Remove the water supply
hose adapter.
4. Connect the water supply hose to
the adapter. Push the part (c) of
the water supply hose downward.
The sound of a “click” means that
the part (c) has been released and
the hose remained automatically
connected to the adapter.
2. With a Philips screwdriver,
loosen the three screws of
the adapter. The, take the
adapter and hold the parts
(a) and (b) leaving 5-mm
space, approximately,
between them.
5. Connect the other end of
the water supply hose to
the water inlet valve
located in the back of the
machine. Fully screw the
hose in the right direction.
3. Connect the adapter to the
water cock firmly screwing
the bolts.
Next, turn the part (b) in
the direction of the arrow
and join the parts (a) and
(b).
If the water cock is threaded,
connect it to a hose fitting this
kind of cock.
NOTE
After finishing the connection, if water leaks through the hose, repeat the above-mentioned
steps. Use a conventional cock.
If the cock is square, remove the spacer before introducing the cock in the adapter.
5
WA1346D0-GB-01665D
2/18/03 10:34 AM
Page 6
HOW TO CLEAN THE FILTER NET
1. Pull and tug the
top of the filter.
2. Open the cover as
shown in the figure.
3. Clean the filter.
HOW TO ADD DETERGENT
1. Open the detergent
2.
4. Close the cover and insert the bottom of
the filter first in the basked and then push
the filter until hearing the sound of knock.
ONE-TOUCH ADJUSTABLE LEGS
dissolvent box pulling in the
direction of the arrow, as
shown in the scheme.
Add the proper quantity of
detergent in the box for one
wash to prevent overflow.
HOW TO CLEAN THE FILTER
1. Place a cloth under the filter of the washing machine
to prevent damping the ground.
2. Turn the filter cap to the left.
3. Take off the filter and remove the accumulated dirt.
4. Reassemble reversing the order of the above-
1.
Pull the control handle of
the adjustable leg
frontward and push aside,
which is located on the
right and left side in the
front.
2.
Adjust height.
3.
Following the adjustment,
pull once more the control
handle frontward and fix
the adjustable leg.
mentioned steps.
SEE IF THE MACHINE IS PLACED LEVEL BY
CHECKING THE POSITION OF THE WASHING TUB.
HOW TO ADD SOFTENER
• When adding the proper quantity of softener
(one dose) to the softener dispenser, it goes
automatically to the water of the last rinse.
❖ This operation cannot be performed if solely the
hot water is connected.
•
•
•
❖ In there is excess of software accumulated
above the baseline, it may not function properly.
6
Open the lid of the machine, pour water into the tub
up to the level just below the pulsator, and adjust
the legs so that the pulsator is positioned at the
center of the water as shown in the figure.
Place the machine more than 10cm away from the
wall.
Adjust the legs on feet for levelling .
WA1346D0-GB-01665D
2/18/03 10:34 AM
Page 7
GROUNDING
For your own safety, verify that the washing machine is properly grounded.
● If the appliance is properly grounded, in the event of electricity leakage, the danger of electric discharge
is prevented.
IF THE SOCKET HAS A GROUNDING TERMINAL
● No other grounding is necessary.
● When using the extension cable, if it does not have a dedicated socket, verify the grounding
connection.
Grounding
socket
Wall socket
Grounding
socket
Extension socket
IN THE ABSENCE OF GROUNDING CONNECTION IN THE SOCKET
● Connect to a metal or copper water cock.
● If the water cock is plastic, the grounding connection is ineffective.
● Roll the copper wire
2 or 3 times over the
water cock.
Metal water cock
Grounding
● Connect the
grounding wire to
copper and bury 75
cm under wet soil.
Copper
Avoid the following places for the grounding connection.
● Never connect the grounding cable to a telephone cable or a lightning rod as it is
extremely dangerous in case of thunderstorms.
● Never connect the grounding cable to a gas
tube as there is danger of explosion.
● When you cannot find a proper place to make
the connection, use the socket, connecting it to
the fuse box.
7
WA1346D0-GB-01665D
2/18/03 10:34 AM
Page 8
WASH INSTRUCTIONS
PROCEDURE
1. Sort the clothes.
Avoid washing delicate clothes with very dirty garments or color clothes with linen.
2. Place the clothes inside the washing machine.
Before loading check all the pockets, close all zippers, etc.
3. Add/Insert the detergent (see page 6).
4. Add/Insert the softener (see page 6).
5. Push the button “ON”.
The water level and temperature are determined automatically if you select
the program “FUZZY” and then press the button START/PAUSE.
6. Select the wash program or optional function (see page 8).
7. Select the water level.
Before selecting the water level, take into account the following points. When
you select the programs FUZZY, PRE-WASH, SPEEDY OR DELICATE, the
water level shall be selected automatically (AUTO), but if you want to
manually select the water level, you can select between HIGH, MEDIUM,
LOW and EXTRA LOW.
8. Select the water temperature
Before selecting the water temperature, remember the following:
1) you can select HOT, WARM and COLD for all the programs, except for the
DELICATE and WOOL programs.
HOT is hot wash and cold rinse.
WARM is warm wash and cold rinse.
COLD is cold wash and cold rinse.
2) For the DELICATE program you can select between WARM and COLD.
9. Close the door and push the button START/PAUSE
10. Do you want an extra rinse?
During the operation push the optional function button. The rinse times
change between 1 and 5 times.
The program “extra rinse” is not available for the condition of PAUSE and
WRINGER.
WASH PROGRAMS
DELICATE
FUZZY
HEAVY
SPEEDY
WOOL
Wash Time
18 min
20 min
5 min
6 min
6 min
Wash Action
Normal
Normal
Normal
Gentle
Gentle
HOT
HOT
HOT
Wash Temp
WARM
WARM
WARM
WARM
WARM
COLD
COLD
COLD
Deep Rinse
COLD
COLD
COLD
Spin time
6 min
6 min
3 min
8
COLD
COLD
WARM
WARM
COLD
COLD
1 min
1 min
WA1346D0-GB-01665D
2/18/03 10:34 AM
Page 9
WASH PROGRAMS
FUZZY program
DELICATE program
• The best wash program is selected automatically.
• The weight and level of the water are determined
automatically
❖ Turn the washing machine off at the completion
• The wash course is speedy. This program is
suitable for delicate garments such as lingerie.
• The weight and level of the water is determined
automatically; you can also select the level of
water of your preference.
❖ Turn the washing machine off at the
of the course.
HEAVY program
• This program is suitable for soiled or stained clothes.
• The weight and level of the water are determined
automatically. You can also select the level of
water of your preference.
❖ Turn the washing machine off at the completion
completion of the course.
SPEEDY program
• Saves time and power.
• This program is suitable for slightly dirty clothes.
• The quantity of laundry and the level of water
shall be determined automatically; nevertheless
you can select the level of water of your
preference.
❖ Disconnect the power supply cable at the
of the course.
WOOL program
• This program is suitable for wool.
• Solely the water levels High and medium are available.
❖ Disconnect the power supply cable at the
completion of the cycle.
completion of the cycle.
OPTIONAL PROGRAMS
RINSE AND SPIN ALONE
WASH ALONE
• When this function is selected, solely the rinse and
spin cycles are operating, without the wash function.
• By pushing the optional function button during the
operation you can change the rinse times. The rinse
duration may be changed between 1 and 5 times. In
this function you cannot change the spin time.
❖ Turn off the washing machine at the
• When you select this function, solely the wash
cycle is operating.
• By pushing the optional function button during the
wash, the wash term changes in 2-minutes slots.
• The wash time may be changed between 3 and 5 minutes.
• Load size and water level are determined
automatically.
❖ Turn off the washing machine at the
completion of the cycle.
completion of the cycle.
SPIN ALONE
RINSE ALONE
• When you select this function, solely the spinning
cycle is operating.
• By pushing the optional function button during
spinning, its duration changes. The spinning time
may be changed between 1 and 7 minutes.
• When you select this function, solely the rinse
cycle is operating.
• By pushing the optional function button during the
operation you can change the rinse times. The rinse
duration may be changed between 1 and 5 times.
❖ Turn off the washing machine at the
SOAK
completion of the cycle.
• By soaking the laundry, you can remove the
heavy dirt.
• You may select the soak cycle after selecting the
wash program.
• When you select the Soak program, the 5minutes cycle (1 minute of wash and 4 minutes of
pause) shall continue for 30 minutes before
starting the main program.
❖ Turn off the washing machine at the
DRIP DRY
• This function allows you to remove the clothes from
the machine while still wet, before the final spin.
• You may select the “drip dry” cycle after selecting
the main wash program.
• If you select the “drip dry” cycle, the cycle ends
before the final spin.
❖ Disconnect the power supply cable at the
completion of the cycle.
completion of the cycle.
DELAY START
• This function allows you to delay starting the program until its selection, for 3, 4.. 18 hours.
• By pushing the Delay start key, you can select the delay term in 3, 4... 18 hours and the washing machine
shall fulfill the wash program following the delay term.
9
WA1346D0-GB-01665D
2/18/03 10:34 AM
Page 10
TROUBLESHOOTING
THE WASHING MACHINE IS NOT
WORKING
Is the water cock open?
Is the washing machine plugged?
Is their power supply?
Is there enough water?
THE WASHING MACHINE DOES NOT
RECEIVE WATER
Is the water cock open?
Is there any water supply?
Are the water supply hose or the connection hose clogged?
Is the water cock frozen?
If after 60 minutes there is no water, an alarm shall be
activated, showing “7E” in the remaining time indicator.
THE WATER DOES NOT DRAIN
Does the drain hose point downward?
Is the drain hose frozen?
Is the drain hose clogged?
If after 15 minutes the water does not drain, an alarm
shall be activated, showing “E” in the remaining time
indicator.
THE WATER SUPPLY DOES NOT STOP
Close the water cock
Turn off the washing machine
Contact the service center
THE SPIN IS NOT WORKING
Are the clothes uniformly distributed inside the washing
machine?
Is the washing machine installed on a flat surface?
10
IN THE EVENT OF REQUESTING TECHNICAL SUPPORT
In the event of problems with this product, contact any technical support
center close to your home, indicating your name, address and telephone
number.
EXPORTED BY
SAMSUNG ELECTRONICS CO., LTD 416, MAETAN-3DONG, SUWON,
KOREA
SPECIFICATIONS
POWER CONSUMPTION
WASH
675W
WATER LEVEL
STANDARD
HIGH
MEDIUM
LOW
EXTRA LOW
100 l
85 l
70 l
46 l
DIMENSIONS
W640 X 698 X 1070mm
WEIGHT
51kg
WATER CONSUMPTION
240 l
WATER PRESSURE
0.05 ~ 0.78MPa
0.5 ~ 8.0kg•f/cm2
ROTATION SPEED OF
SPIN DRUM
700 rpm
WASHING TYPE
Stirring type
CONSUMPTION
675W
CODE NO : DC68-01665D-01