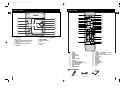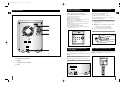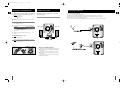
1
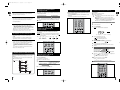
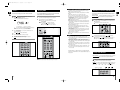
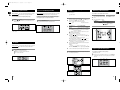
MM-A15
Micro Component Audio system
CD/MP3-CD/WMA-CD/CD-R/RW Playback
user manual
imagine the possibilities
Thank you for purchasing a Samsung product.
To receive a more complete service,
please register your product at
www.samsung.com/global/register
MM-A15(GB)-RDS-8.25
8/26/08
9:38
Page 2
Safety Warnings
Thank you for buying this
SAMSUNG micro component system.
Contents
Please take time to read these instructions.
They will allow you to operate your
system with ease and take full advantage
of its features.
CLASS 1 LASER PRODUCT
ENG
CLASS 1 LASER PRODUCT
KLASSE 1 LASER PRODUKT
LUOKAN 1 LASER LAITE
KLASS 1 LASER APPARAT
PRODUCTO LASER CLASE 1
This Compact Disc player is classified as a CLASS 1
LASER product.
Use of controls adjustments or performance of procedures
other than those specified herein may result in hazardous
radiation exposure.
CAUTION
CAUTION-INVISIBLE LASER RADIATION WHEN OPEN
AND INTER LOCKS DEFEATED, AVOID EXPOSURE TO
BEAM.
RISK OF ELECTRIC SHOCK.
DO NOT OPEN
CAUTION:
TO REDUCE THE RISK OF ELECTRIC SHOCK,
DO NOT REMOVE REAR COVER, NO USER
SERVICEABLE PARTS INSIDE, REFER SERVICING TO QUALIFIED SERVICE
PERSONNEL.
WARNING: TO REDUCE THE RISK OF FIRE OR
ELECTRIC SHOCK, DO NOT EXPOSE
THIS APPLIANCE TO RAIN OR MOISTURE.
CAUTION: TO PREVENT ELECTRIC SHOCK, MATCH
WIDE BLADE OF PLUG TO WIDE SLOT,
FULLY INSERT.
This symbol indicates that dangerous voltage constituting of a risk of electric shock is present within
this unit.
This symbol indicates that there are important operating and maintenance instructions in the owners
manual accompanying this unit.
CAUTION
Apparatus shall not be exposed to dripping or splashing and no objects filled with liquids,such as
vases,shall be placed on the apparatus.
The Mains plug is used as a disconnect device and shall stay readily operable at any time.
Wiring the Mains Power Supply Plug(UK Only)
SAFETY WARNINGS...................................................................................................................................................................................................... 2
INSTALLING YOUR MICRO COMPONENT SYSTEM
Front Panel View ........................................................................................................................................................................................................4
Remote Control ..........................................................................................................................................................................................................5
Rear Panel View ........................................................................................................................................................................................................6
Where to Install Your Micro Component System ......................................................................................................................................................7
Connecting your System to the Power Supply ..........................................................................................................................................................7
Inserting Remote Control Batteries ............................................................................................................................................................................7
Range of Operation of the Remote Control ..........................................................................................................................................................................7
Connecting to an External Source ............................................................................................................................................................................8
Speaker Connection ..................................................................................................................................................................................................8
Connecting the FM Aerial ..........................................................................................................................................................................................9
DEMO Function ........................................................................................................................................................................................................10
DIMMER Function ....................................................................................................................................................................................................10
DISPLAY Function....................................................................................................................................................................................................10
Setting the Clock ......................................................................................................................................................................................................10
MP3/WMA-CD/CD-PLAYER
To play the CD/MP3/WMA-CD ................................................................................................................................................................................11
Selecting a Track......................................................................................................................................................................................................11
To select the MP3/WMA-CD album and track ........................................................................................................................................................11
Searching for a Specific Music Passage on a CD ..................................................................................................................................................12
Function to skip through 10 tracks at a time ............................................................................................................................................................12
Repeating One or All Tracks on the Compact Discs ..............................................................................................................................................12
Last Memory Function..............................................................................................................................................................................................13
Programming the Order of Playback........................................................................................................................................................................13
Checking or Changing Programmed Tracks ............................................................................................................................................................14
USING USB
Playing USB ............................................................................................................................................................................................................14
Selecting a Track from USB Device ........................................................................................................................................................................15
To skip next 10 tracks ..............................................................................................................................................................................................15
To use high speed search........................................................................................................................................................................................16
To repeat ..................................................................................................................................................................................................................16
To use Last Memory function ..................................................................................................................................................................................16
TUNER
Searching for and Storing the Radio Stations ........................................................................................................................................................17
Selecting a Stored Station........................................................................................................................................................................................17
Improving Radio Reception ......................................................................................................................................................................................17
About RDS broadcasting..........................................................................................................................................................................................18
About RDS DISPLAY function..................................................................................................................................................................................18
PTY(Program Type) indication and PTY-SEARCH function ..................................................................................................................................19
IMPORTANT NOTICE
The mains lead on this equipment is supplied with a moulded plug incorporating a fuse. The value of the fuse is indicated on the pin face
of the plug and, if it requires replacing, a fuse approved to BS1362 of the same rating must be used.
Never use the plug with the fuse cover omitted. If the cover is detachable. If a replacement fuse cover is required, it must be of the same
colour as the pin face of the plug. Replacement covers are available from your dealer.
If the fitted plug is not suitable for the power points in your house or the cable is not long enough to reach a power point, you should obtain
a suitable safety approved extension lead or consult your dealer for assistance.
However, if there is no alternative to cutting off the plug, remove the fuse and then safely dispose of the plug. Do NOT connect the plug to
a mains socket as there is a risk of shock hazard from the bared flexible cord.
IMPORTANT
The wires in the mains lead are coloured in accordance with the following code:–
BLUE = NEUTRAL
BROWN = LIVE
OTHER FUNCTIONS
Timer Function..........................................................................................................................................................................................................20
Cancelling the Timer ................................................................................................................................................................................................20
EQ Function ............................................................................................................................................................................................................21
Selecting Sound Mode ..........................................................................................................................................................................................21
Treble level Function ..............................................................................................................................................................................................21
BASS level Function ..............................................................................................................................................................................................21
MUTE Function ........................................................................................................................................................................................................22
Setting the System to Switch off Automatically........................................................................................................................................................22
Connecting Headphones ..........................................................................................................................................................................................22
RECOMMENDATIONS FOR USE
Safety Precautions ..................................................................................................................................................................................................23
Cleaning Your Micro Component System ................................................................................................................................................................23
Precautions When Using Compact Discs ................................................................................................................................................................24
Before Contacting the After-Sales Service ..............................................................................................................................................................24
Technical Specifications ..........................................................................................................................................................................................25
USB Feature Supported Player ....................................................................................................................................................................................26
As these colours may not correspond to the coloured markings identifying the terminals in your plug, proceed as follows:–
The wire coloured BLUE must be connected to the terminal marked with the letter N or coloured BLUE or BLACK. The wire coloured
BROWN must be connected to the terminal marked with the letter L or coloured BROWN or RED.
WARNING:
DO NOT CONNECT EITHER WIRE TO THE EARTH TERMINAL WHICH IS MARKED WITH THE LETTER E OR BY
THE EARTH SYMBOL
, OR COLOURED GREEN OR GREEN AND YELLOW.
Symbols
2
Press
Push
Important
Note
3
ENG
MM-A15(GB)-RDS-8.25
8/26/08
9:38
Page 4
Front Panel View
Remote Control
ENG
ENG
CD
1
2
1
2
P.SOUND
MP3-CD/CD
TUNER
USB
AUX
3
4
PREVIOUS
/DOWN
TUNING
MODE
NEXT
/UP
DEMO
/DIMMER
5
6
6
7
8
9
9
7
TIMER
30
CANCEL
TIMER/CLOCK
PROGRAM/SET
SLEEP
TREB/BASS
REPEAT
MO/ST
DEMO
DIMMER
RDS DISPLAY
RDS PTY
29
28
27
26
25
24
+10
10
DISPLAY
11
STOP
12
8
31
USB
ON/OFF
5
11
10
AUX
POWER
3
4
15
14
13
12
TUNER
23
22
21
20
19
PAUSE
PLAY
USB/MP3-CD/CD
MUTE
1. TUNER
9. CD DOOR OPEN/CLOSE(
2. STANDBY/ON
10. SEARCH FUNCTION BUTTONS(UP)
3. MP3-CD/CD
11. DEMO/DIMMER
4.
5.
6.
7.
SEARCH FUNCTION BUTTONS(DOWN)
TUNING MODE OR STOP BUTTON
USB JACK
HEADPHONE JACK CONNECTOR
12. VOLUME CONTROL
8.
CD DOOR
15. USB
)
13
18
TUNING/
ALBUM
VOLUME
17
P.SOUND
EQ
TUNING
MODE
16
14
13. AUX
15
14. P.SOUND
1.
2.
3.
4.
5.
6.
7.
8.
9.
10.
11.
12.
13.
14.
15.
16.
CD
TUNER
POWER
TIMER/CLOCK
TIMER ON/OFF
SLEEP
DEMO
FM MO/STEREO
+10
DISPLAY
USB/MP3-CD/CD STOP
FAST-FORWARD/FAST BACK
VOLUME CONTROL
POWER SOUND
EQ
TUNING MODE
17.
18.
19.
20.
21.
22.
23.
24.
25.
26.
27.
28.
29.
30.
31.
MUTE
TUNING UP OR DOWN / ALBUM SKIP
USB/MP3-CD/CD PLAY
USB/MP3-CD/CD SKIP OR SEARCH
PAUSE
RDS DISPLAY
RDS PTY
DIMMER
REPEAT
TREB/BASS
PROGRAM/SET
OPEN/CLOSE
CANCEL
AUX
USB
Accessories
4
Remote Control
FM Antenna
User Manual
5
MM-A15(GB)-RDS-8.25
8/26/08
9:38
Page 6
Where to Install Your
Micro Component System
Rear Panel View
Inserting Remote Control Batteries
ENG
ENG
To take full advantage of your new micro component system,
follow these installation instructions before connecting the unit.
Install the system on a flat, stable surface.
Never place this unit on carpeting.
Never place this unit in an outdoor area.
Maintain an open space of approximately 6 inches (15 cm) on the sides
and rear of the system, for ventilation purposes.
Make sure that you have enough room to open the compact disc compartment easily.
Place the loudspeakers at a reasonable distance on either side of the
system to ensure good stereo sound.
Direct the loudspeakers towards the listening area.
For optimum performance, make sure that both speakers are placed at
an equal distance above the floor.
1
2
Insert or replace remote control batteries when you:
Purchase the micro component system
Find that the remote control is no longer operating correctly
When replacing the batteries, use a new set of batteries and never
mix alkaline and manganese batteries.
1
Place your thumb on the position marked
on the battery
compartment cover (rear of the remote control) and pull the cover in
the direction of the arrow.
2
Insert two AAA, LR03 or equivalent batteries, taking care to respect
the polarities:
+ on the battery against + in the battery compartment
– on the battery against – in the battery compartment
3
Replace the cover by sliding it back until it clicks into position.
3
Connecting your System to the
Power Supply
4
The main lead must be plugged into an appropriate socket.
Before plugging your system into a main socket, you must check the
voltage.
1. FM Aerial Connector Terminal
1
2
Range of Operation of the Remote Control
The remote control can be used up to approximately 23 feet/7 meters in
a straight line. It can also be operated at a horizontal angle of up to 30°
from the remote control sensor.
Plug the main lead into an appropriate socket.
Press the (
) button to switch your micro component system on.
2. AUX-Input
3. Loudspeaker Connector Terminals
4. Voltage
6
7
MM-A15(GB)-RDS-8.25
8/26/08
9:38
Page 8
Speaker Connection
Connecting to an External Source
Connecting the FM Aerial
ENG
ENG
The auxiliary input can be used to take advantage of the sound quality
of your micro component system when listening to other sources.
Examples: A television
A DVD player
A VCR
How to connect a COAXIAL TYPE aerial.
Main Speaker Connection: Connect the Speaker cords to the Main
Speaker jacks of System.
Connect a 75Ω antenna to the FM antenna terminal.
Plug the connector on the FM aerial supplied into the coaxial socket (75Ω) marked FM on the rear of the system.
Follow the instructions given on Page 17 to tune into a radio station, and determine the best position for the aerial.
If reception is poor, you may need to install an outdoor aerial.
To do so, connect an outdoor FM aerial to the FM socket on the rear of the system using a 75Ω coaxial cable (not supplied).
To connect to the external source, the source must have an audio
output.
1
Set the system to standby mode and disconnect it and the external
source from the main socket.
2
Connect the audio cable to the rear of the micro component system.
Connect the...
To the connector marked...
Red jack
White jack
R (right)
L (left)
(Right Speaker)
(Left Speaker)
For optimum sound quality, do not invert the right and left
channels.
3
Plug the system back into the main socket and press (
switch it on.
4
Select the AUX source by pressing AUX.
Result: AUX is displayed.
5
Switch the external source on.
) to
Example: You can watch a film and take advantage of stereo sound
provided that the original sound track is in stereo (as if you
were in a cinema).
Directions in Installing Speaker
Installation in a place near heating apparatus, under direct lay of
light or with high humidity may cause performance degradation
of the speaker.
Do not install on the wall or on a high place of pole or other
unstable place to prevent any safety accident caused by falling
of the speaker.
The speaker near the TV or computer monitor may influence the
quality of the screen display.
8
9
MM-A15(GB)-RDS-8.25
8/26/08
9:38
Page 10
DEMO Function
Selecting a Track
To play the CD/MP3/WMA-CD
Setting the Clock
ENG
ENG
You can view the various functions available on your system.
1
Press the DEMO button.
Result: The various functions available are listed in turn on the
display.
Your system is equipped with a clock which allows you to turn your
system on and off automatically.
You should set the clock:
When you first purchase the micro component system
After a power failure
After unplugging the unit
All these functions are described in detail in this booklet.
For instructions on how to use them, refer to the appropriate sections.
2
To cancel this function, press DEMO again.
SLEEP
TREB/BASS
REPEAT
MO/ST
DEMO
DIMMER
+10
RDS DISPLAY
RDS PTY
For each step, you have a few seconds to set the required options.
If you exceed this time, you must start again.
1
2
3
4
5
You can adjust the brightness of the VFD display depending on the
surrounding lighting conditions.
6
Your selection switches each time the button is pressed:
DIMMER(Dim) ➞ OFF(Bright).
SLEEP
TREB/BASS
REPEAT
MO/ST
DEMO
DIMMER
RDS DISPLAY
Continued use of irregular shape CDs (heart-shape, octagonal, etc.)
can damage the unit.
1
2
Select the CD function by pressing MP3-CD/CD(
3
Place your disc in the compartment, with the label on the disc facing
upwards.
4
Close the compartment by pressing the Open/Close (
again.
5
Press the MP3-CD/CD( ) button.
Your CD Player will take a few moments to scan through all the
tracks recorded on a particular MP3/WMA-CD
The English name of the song may be indicated on the display
only if directly downloaded from the PC or if the purchased
MP3/WMA-CD is sorted according to titles(directory).
(Other languages besides English may not be indicated.)
The English name of the track may not be indicated depending on
the characteristics of the MP3/WMA-CD.
).
Press TIMER/CLOCK twice.
Result: CLOCK is displayed.
Press PROGRAM/SET.
Result: The hour flashes.
To...
Press...
When the correct hour is displayed, press PROGRAM/SET.
Result: The minutes flash.
To...
Press...
Increase the minutes
Decrease the minutes
Press the DIMMER button.
+10
This unit has been designed to playback the CDs: Audio CD, CD Text,
CD-R, CD-RW and MP3/WMA,-CD.
Increase the hours
Decrease the hours
DIMMER Function
1
Switch the system on by pressing (
You can play 12 cm or 8 cm compact discs without an adapter.
RDS PTY
7
If you want to return the previous set, press CANCEL.
8
When the correct time is displayed, press PROGRAM/SET.
Result:
"TIMER" appears in the display.
The current time is now set.
You can display the time, even when you are using another function, by pressing TIMER/CLOCK once.
CD
DISPLAY Function
6
TUNER
AUX
USB
7
To start playback at the beginning of the...
Press...
Next track
once
Current track
once
Previous track
) button.
twice
Track of your choice
Press the Open/Close ( ) button.
Result: The compartment opens.
or
the
appropriate number
of times.
) button
SLEEP
TREB/BASS
REPEAT
MO/ST
DEMO
DIMMER
+10
RDS DISPLAY
RDS PTY
DISPLAY
PAUSE
STOP
PLAY
USB/MP3-CD/CD
MUTE
Adjust the volume according to needs with the following procedures.
Turn the VOLUME control of the main unit.
or
Press the VOLUME + or – button of the remote control.
The volume level can be adjust in(VOL MIN,VOL 1- VOL 29,and
VOL MAX).
To pause playback temporarily, press the MP3-CD/CD (
Press MP3-CD/CD (
8
You can select the track you wish to listen to, either when the compact disc player is stopped or when a disc is playing.
Press the STOP (
To select the MP3/WMA-CD album and
track
) button.
) again to continue playing the disc.
The album and track of the MP3/WMA-CD desired to listen may be
selected on stopping or during playbacks.
) button when you have finished.
Press and hold OPEN/CLOSE( ) button for 5 seconds, ”LOCK
door”will be displayed and the compartment doesn’t open. In this
way you must press and hold OPEN/CLOSE ( ) button for a
long time until “LOCK OFF” will be displayed, the compartment
can open.
1
2
To move the album, press the TUNING/ALBUM
/
button.
To move the track, press the
,
button.
Moves the track within the album.
If the
,
button is pressed more than the number of tracks
within the album, it moves to the next album.
POWER
CANCEL
You may check the total playing time and total playing tracks.
1
TIMER
This function works only with remote control.
7
TIMER/CLOCK
PROGRAM/SET
SLEEP
TREB/BASS
REPEAT
MO/ST
DEMO
DIMMER
+10
RDS DISPLAY
RDS PTY
ON/OFF
Press the DISPLAY button.
1
When playing the MP3 tracks ,press the DISPLAY button,display total playing MP3 tracks within 2 seconds.
P.SOUND
2 3,5,8
1,5,7
MP3-CD/CD
TUNER
USB
DISPLAY
2
AUX
STOP
When playing the CD tracks ,press the DISPLAY button,display
total playing CD tracks and total playing time within 2 seconds.
DISPLAY
PREVIOUS
/DOWN
PAUSE
STOP
TUNING
MODE
NEXT
/UP
DEMO
/DIMMER
6
PLAY
USB/MP3-CD/CD
1
8
PLAY
2
PAUSE
MUTE
TUNING/
ALBUM
VOLUME
USB/MP3-CD/CD
DISPLAY
4,6
PAUSE
TUNING/
ALBUM
VOLUME
STOP
PLAY
1
2,4
MUTE
P.SOUND
EQ
TUNING
MODE
4,6
USB/MP3-CD/CD
10
PSOUND
EQ
TUNING
MODE
11
MM-A15(GB)-RDS-8.25
8/26/08
9:38
Page 12
Searching for a Specific Music
Passage on a CD
ENG
What is WMA?
WMA means Windows Media Audio, the global standard for
audio signal compression technology.
When listening to a compact disc, you can quickly search for a specific music passage on a track.
To search through the tracks...
What is MP3?
MP3 means MPEG1 Layer 3, the global standard for audio
signal compression technology. It uses digital compression technology to compress original sound data by up to 12 times without
sound quality degradation.
Press and hold down...
Forwards
Backwards
for at least one second
for at least one second
It is recommended that you turn the volume down before using this
function.
DISPLAY
STOP
The unit will playback files created in MP3 format
(Mpeg1.Layer3) with *.mp3 as their extension,and some
WMA files with.WMA extension can’t be playback.
Playback will be impossible for the file of MP2 or 22KHz.
ID3*tags can be shown on the display in English.
*An MP3 file can contain file information called “ID3 Tag ” where
its album name, performer, rack title, etc. are recorded.
How many MP3 files can a CD-R or CD-RW disc record?
The maximum capacity of one CD-R or CD-RW disc is
740MB.
Normally, one MP3 file has a capacity of 4MB, therefore
approximately 180 files can be recorded on a single disc.
When CD playback is selected again after your CD player has been
stopped or turned off, this function allows playback from the start of the
track that you last listened to.
Press the PROGRAM/SET button while your MP3/WMA-CD is being
played back.
The LAST ON and LAST OFF may be repeatedly selected.
TIMER
TIMER/CLOCK
PROGRAM/SET
SLEEP
TREB/BASS
REPEAT
MO/ST
DEMO
DIMMER
+10
RDS DISPLAY
RDS PTY
You can decide:
DISPLAY
STOP
1
2
3
PAUSE
15 ➝ 20 ➝ 30 ➝ 40 ➝ 41 ➝ 42 ➝ 43
+10
+10
+10
MO/ST
DEMO
DIMMER
+10
RDS DISPLAY
RDS PTY
DISPLAY
PAUSE
STOP
(01 = Program no., -- -- = Track no. on the disc)
4
Select the required track by pressing:
to move back through the tracks
to move forward through the tracks
5
Press PROGRAM/SET to confirm your selection.
is displayed.
Result: The selection is stored and
6
7
To select other tracks, repeat Steps 4 to 5.
8
To...
Press...
Listen to the current track again
Listen to the previous track
Listen to the next track
Skip forwards or backwards
one or more tracks
once
twice
once
or
the appropriate
number of times
USB/MP3 CD/CD
Repeating One or All Tracks
on the Compact Discs
Kevin.jpg
Life.doc
Album 02
Album 04
Summer05.mp3
Summer06.mp3
Garden.mp3
Garden.mp3
2
Album 03
9
Press MP3-CD/CD (√) to listen to the track selection in the order programmed.
When press
button one time compact disc player is stopped,and
press
button again to cancel the selection.
Once if the compact disc player is stopped
10 If you want to cancel the set, press CANCEL.
You can repeat indefinitely:
A specific track on a compact disc.
All tracks on the compact disc selected.
1
Skipped
Kevin01.mp3
Kevin02.mp3
Kevin03.mp3
Kevin04.mp3
Press PROGRAM/SET.
Result: The following indications are displayed:
PLAY
PLAY
Playback sequence of albums and tracks
Album 01
Result:
Currentl set is cancelled.
If you open the compartment, the selection is cancelled.
To repeat...
Press Repeat on the remote
control one or more times until...
The current track indefinitely
All tracks
REPEAT 1 is displayed
REPEAT ALL is displayed
10
CANCEL
ON/OFF
Album 06
Kenny01.wav
Kenny02.wav
12
SLEEP
TREB/BASS
REPEAT
MO/ST
DEMO
DIMMER
+10
RDS DISPLAY
RDS PTY
TIMER/CLOCK
PROGRAM/SET
SLEEP
TREB/BASS
REPEAT
MO/ST
DEMO
DIMMER
+10
RDS DISPLAY
RDS PTY
ON/OFF
Water.mp3
Water.mp3
Skipped
3,5
TIMER
To cancel this function, press REPEAT again.
Album 05
Michael07.mp3
Michael08.mp3
button.
Load the selected CD.
Example: If you want to select track 43 during playback of track 15,
press the +10 button three times, and then press the
button three times.
In the case of an original CD-R(Recordable) recorded in
audio CD format, CD-RW(Rewritable) and editing by the
user, playback is processed on the respective
completed status. (The player may not be played back
according to the characteristics of the CD or recorded status.)
The CD-RW is comparably less reflexive than CD which
causes more time delay to read.
(E) CD-ROM drive
If the CD function is selected, stop the player by pressing
Press the +10 button briefly while playing back a
CD. The track 10 tracks after the current one will then be
played back.
Regarding the playback of CD-R/RW
In case of Window Explorer display.
The arrows indicates playback sequence of albums and
tracks.
Tracks with jpg, wav or doc only are not audio files and
therefore will be skipped.
ENG
The order of the track desired to listen
The track not desired to listen
A maximum of up to 24 order of tracks desired to listen may
be programmed.
Before selecting the track, the CD player should be stopped.
This function may be used simultaneously with the CD Repeat
function.
In the case of the MP3/WMA-CD, the PROGRAM/SET button
may be used as the LAST ON, LAST OFF function.
ON/OFF
PLAY
Function to skip through 10
tracks at a time
(This function is not available during playback of an MP3/WMA-CD.)
(This function is only available during playback of an MP3/WMA-CD.)
PAUSE
File Compatibility
Programming the Order of Playback
Last Memory Function
Album 07
Butterfly.mp3
Piano14.mp3
John15.mp3
1,2
4,8
DISPLAY
1, 9
STOP
PAUSE
4,8
PLAY
7
13
MM-A15(GB)-RDS-8.25
8/26/08
9:38
Page 14
Checking or Changing Programmed
Tracks
Please be aware of the followings before using USB.
Playing USB
ENG
You can check or change your selection of tracks at any time.
1
2
Press
You can play MP3/WMA files by connecting to various external USB
storage devices such as USB flash memory or HDD.
once if you have started listening to the selection.
1
2
Press PROGRAM/SET button twice.
Result: The following indications are displayed:
Connect the external USB storage device to your player.
Select USB function by using the USB button.
The first track of the first directory plays automatically.
To stop playing
Press the Stop (
) button to stop playing.
Press the Stop (
) button once to pause,
and press the button twice to stop completely.
(01 = Program no., – – = Track no. on the disc)
If you have already programmed 24 tracks, CH is displayed
instead of PG when you press PROGRAM/SET.
3
4
5
6
Press PROGRAM/SET one or more times until the track to be
changed is displayed.
Press
or
1
to select a different track.
Press PROGRAM/SET to confirm your change.
2
Press MP3-CD/CD (√) to start listening to the selection.
Result: The first track selected is played.
CD
TUNER
AUX
USB
USB
POWER
CANCEL
TIMER
2,3,5
PROGRAM/SET
TIMER/CLOCK
TIMER
TIMER/CLOCK
PROGRAM/SET
SLEEP
TREB/BASS
REPEAT
MO/ST
DEMO
DIMMER
+10
RDS DISPLAY
RDS PTY
ON/OFF
ON/OFF
SLEEP
4
TREB/BASS
REPEAT
MO/ST
DEMO
DIMMER
+10
RDS DISPLAY
RDS PTY
DISPLAY
1STOP
4
PAUSE
6
DISPLAY
Depending on the type of external USB storage device, it may not
work even if it’s connected to the player.
With external HDD, FAT format can be played, but not NTFS
format.
With USB 2.0 HDD, connect to a separate power source.
If it’s not connected to a separate power source, it may not work.
If memory of an external USB storage device is segmented
into several parts, MP3 files of only the first hard disk drive
can be played.
Regarding directories, up to fourth directory can be played.
DRM applied files are not played.
Digital Rights Management: Technology and service that protect the
profit and rights of copyright owners by disallowing unauthorized use
of digital contents.
Even if the file name ends with .mp3, the file does not play if actual
file format is MPEG layer 1 or 2.
Disconnect the external USB storage device only in safe
removal mode(“USB REMOVE” display ON/OFF). Otherwise,
internal file can be damaged.
Press the Stop (
) button more than 2 times to get into the
safe removal mode.
If you want to play files in the safe removal mode, disconnect
and reconnect the external USB storage device.
USB hub will not be recognized.
Directory names are shown up to 14 letters, and MP3 file names up
to 30 letters.
Delay
When selecting USB function, depending of the speed of the
external USB storage device, reading (READ-IN) internal information
can take several minutes.
When playing a USB device, recording or finding next track may
introduce some delay. Especially with a mass storage device such as
HDD, depending on the type and the number of files, the delay might
be several minutes.
Even with the external USB storage devices of same capacity,
depending on the speed of each product, the amount of operating time can vary.
If the external USB storage device supports only USB VER 1.1 and
the access speed is slow, the recording may not work well or noise
can be recorded.
Selecting a Track from USB Device
ENG
You can select a desired directory and an MP3 file during the play or
when it stopped.
Before you begin!
Connect the external USB storage device to your player.
Select USB function by using the USB button.
Press the TUNING/ALBUM
/
buttons to move the directory.
Each time you press the button, it will move to the directory before
or after and play.
This function works only in the remote control.
USB/MP3-CD/CD
MUTE
TUNING/
ALBUM
VOLUME
TUNING
MODE
EQ
P.SOUND
If you want to move the file, press the
,
button shortly.
It moves the file within the directory.
If you press the
,
button more times than the number of
the files in the directory, it will move over to the next directory.
DISPLAY
PAUSE
STOP
PLAY
PAUSE
STOP
PLAY
PLAY
• The USB function of this product does not support all USB
devices.For the information on the supported devices,pls see
the page 26.
To skip next 10 tracks
USB/MP3-CD/CD
Before you begin!
MUTE
Do not connect USB charging device to the USB connection port
of the player, because it may cause damage to the product.
Connect the external USB storage device to your player.
Select USB function by using the USB button.
Press the +10 button on the remote control shortly during the play.
A track that is 10 tracks after the current track plays.
Example: If you want to select 43rd track while 15th track is playing, press
the +10 button 3 times and then press the
button 3 times.
15 ➝ 20 ➝ 30 ➝ 40 ➝ 41 ➝ 42 ➝ 43
+10
+10
+10
MO/ST
DEMO
DIMMER
+10
RDS DISPLAY
RDS PTY
DISPLAY
14
PAUSE
15
MM-A15(GB)-RDS-8.25
8/26/08
9:38
Page 16
To use high speed search
Searching for and Storing the Radio
Stations
To use Last Memory function
Selecting a Stored Station
ENG
ENG
Before you begin!
Connect the external USB storage device to your player.
Select USB function by using the USB button.
You can search the part you want quickly during the play
Press the
,
button.
Whenever you press the button, you can search backward or forward quickly.
Before you begin!
Connect the external USB storage device to your player.
Select USB function by using the USB button.
Last Memory is a function that resumes playback from the last part of
the previous listening when the user reselects USB function again
after stopping the play or selecting another function.
Press the PROGRAM/SET button,
LAST ON and LAST OFF are repeatedly selected.
You can store up to:
You can listen to a stored radio station as follows:
15 FM stations
1
2
1
2
Switch the system on by pressing (
).
Select the required frequency band by pressing TUNER again on
the front panel or TUNER on the remote control.
Result: The appropriate indication is displayed:
FM
Frequency Modulation
3
Switch the system on by pressing (
Select the required frequency band by pressing TUNER on the front
panel.
Select the radio station as follows.
To listen to ...
Press ...
Stored station
1. the TUNING MODE button until
“PRESET” is displayed.
2.
or
button to select the
required program.
CANCEL
STOP
PLAY
3
TIMER
TIMER/CLOCK
PROGRAM/SET
SLEEP
TREB/BASS
REPEAT
Press TUNING MODE
One or more times until MANUAL
is displayed.
Automatically
One or more times until AUTO is
displayed.
PRESET function is explained in detail in the section
“ Selecting a Stored Station” on.
Manually
ON/OFF
USB/MP3-CD/CD
To search for a
station...
).
When you use the high speed search function, there is no
sound.
4
Select the station to be stored by:
or
Pressing
or
buttons on the front panel or
buttons on the remote control to increase or decrease the
frequency respectively.
1
P.SOUND
MP3-CD/CD
TUNER
PREVIOUS
/DOWN
TUNING
MODE
USB
AUX
2
3
3
NEXT
/UP
DEMO
/DIMMER
3
To scroll through the frequencies faster when
searching manually, hold down the
or
buttons.
The automatic search procedure may stop on a
frequency that does not correspond to a radio station. If
this happens, use the manual search mode.
To repeat
Before you begin!
5
Otherwise:
Pressing
or
buttons on the front panel or
or
buttons on the remote control to assign a program number .
Connect the external USB storage device to your player.
Select USB function by using the USB button.
6
Press the REPEAT button during the play.
REPEAT 1 : repeat play one track only.
REPEAT ALL : repeat play the entire directories.
1 ALL : repeat current folder.
SLEEP
TREB/BASS
REPEAT
MO/ST
DEMO
DIMMER
If you do not want to store the radio station found, revert to Step 4
and search for another station.
To store any other radio frequencies required, repeat Steps 3 to 5.
The PROGRAM function can be used to assign a new station to
an existing program number.
Improving Radio Reception
You can improve the quality of radio reception by:
Rotating the FM aerial
If reception from a specific FM radio station is poor, press MONO/ST.
to switch from stereo mode to mono. The quality of the sound will be
improved.
1 2
MP3-CD/CD
45
PREVIOUS
/DOWN
P.SOUND
TUNER
USB
TUNING
MODE
NEXT
/UP
AUX
TUNER
TUNER
TREB/BASS
REPEAT
MO/ST
DEMO
DIMMER
+10
RDS DISPLAY
RDS PTY
DEMO
/DIMMER
3
CD
SLEEP
45
AUX
2
USB
DISPLAY
PAUSE
POWER
CANCEL
TIMER
ON/OFF
SLEEP
TIMER/CLOCK
5
TREB/BASS
USB/MP3-CD/CD
PROGRAM/SET
REPEAT
45
MUTE
VOLUME
45
TUNING/
ALBUM
TUNING
16
17
MM-A15(GB)-RDS-8.25
8/26/08
9:38
Page 18
About RDS broadcasting
About RDS DISPLAY function
PTY(Program Type) indication and
PTY-SEARCH function
ENG
ENG
This unit has the RDS (Radio Data System) function, which enables for
the various information such as broadcasting station, radio text, time
and 30 types of programs (News, Rock, Classic, etc.) to be received
from the FM RDS station together with normal radio signal.
1
2
3
Press the (
) button.
Receive the FM radio.
See the radio receiving method on the page 17.
FM and frequency are shown on the display
If the received station transfers the RDS information, 'RDS'
appears automatically on the display.
Press the RDS Display button to select the desired RDS mode.
Whenever the button is pressed, RDS mode changes as follows.
PS NAME
RT
CT
About "PS NAME" MODE
Displays the name of broadcasting station.
Press the RDS DISPLAY button to select the PS NAME.
"PS NAME" appears on the display.
If the PS information is being received, the PS name (BBC, AFO, NDR,
etc.) is shown on the display.
If the PS information isn't received, the original FM frequency is shown.
Even though no RDS DISPLAY button is pressed, the reception
RDS may not operate correctly if the station tuned is not
transmitting RDS signal property or if the signal strength is weak.
Description on RDS function
1. PTY(Program Type) : Displays the type of programme
currently being broadcast
2. PS NAME(Program Service Name) : Indicates the name of
broadcasting station and is composed of 8 characters.
Press the RDS DISPLAY button to select the RT MODE.
"RT" appears on the display.
If the RT information is being received, the received information is
shown on the display.
If the RT information isn't received, the "NO RT" is shown.
On the display.
Program Type
NEWS
• News including an announced opinion and report
AFFAIRS
• Several matters including a current incident, documentary,
discussion and analysis.
INFO
• Information including weights and measures, returns and forecast, matters interesting the customer, medical information, etc.
SPORT
• Sports
EDUCATE
• Education
DRAMA
• Drama-Radio serial, etc.
CULTURE
• Culture-National or local culture including the religious problem,
social science, language, theatre,etc.
About 'RT' MODE
Displays the character transmitted from the broadcasting station.
SCIENCE
• Natural science and technology
VARIED
• Others-Speech, amusing program (quiz, game), interview,
comedy and satirical play, etc.
4. CT(Clock Time) : Decodes the real time clock from the FM
frequency.
POP M
• Pop music
ROCK M
• Rock music
M.O.R.M
• M.O.R- Comfortable music, occasionally vocal or piece
LIGHT M
• Light classical music- Classical music and instrumental
and chorus music
5. TA(Traffic Announcement) : When this symbol flashes it
shows that the traffic announcement is in progress.
About CT(Clock Time)
Sets the time of RDS clock.
To select the CT time, set the RDS DISPLAY button to CT MODE.
The CT information will take up to 2 minutes to be decoded
therefore the clock isn’t displayed immediately.
If there is no received CT information, "NO CT" is
displayed.
POWER
1
CLASSICS
• Heavy classical music-Orchestra music, symphony, chamber
music and opera
OTHER M
• Other music - Jazz, R&B country music
WEATHER
• Weather
FINANCE
• Finance
TIMER
TIMER/CLOCK
PROGRAM/SET
SLEEP
TREB/BASS
REPEAT
MO/ST
DEMO
DIMMER
+10
RDS DISPLAY
RDS PTY
3
DISPLAY
PAUSE
1
Receive the FM radio.
See the radio receiving method on the page 17.
The FM and frequency appear on the display.
If the
e received
station is transmitting the RDS information, “RDS”
r
lights up.
2
Press the PTY button.
The PTY MODE(NEWS, AFFAIRS, etc.) appears on the display.
or
button to select the desired PTY
MODE.
If the station is transmitting no PTY information, 'NO PTY' lights
on the display.
When the PTY MODE is selected(The PTY MODE is shown on
the display), press the PTY KEY once again to convert into
PTY-SEARCH MODE and auto-search the station sequentially.
If the PTY MODE received in the course of auto-search agrees
with the selected PTY MODE, the auto-search stops and the
PTY-SEARCH is finished.
If the PTY MODE which agrees with the PTY MODE selected in
the course of auto-search, isn't received, it is returned to the first
frequency at beginning the PTY SEARCH and the auto-search
and PTY SEARCH are suspended.
SLEEP
TREB/BASS
REPEAT
MO/ST
DEMO
DIMMER
+10
RDS DISPLAY
RDS PTY
DISPLAY
2
PAUSE
STOP
PLAY
USB/MP3-CD/CD
2
MUTE
CANCEL
ON/OFF
About PTY-SEARCH
Press the TUNING
Display
3. RT(Radio Text) : Decodes the text broadcast by a station (if
any) and is composed of maximum 64 characters.
Some stations may not transmit PTY, RT or CT
information therefore this may not be displayed in all
cases.
18
◆ The below 30 PTY information is shown on the display by pressing the Pty
button.
◆ The PTY Search is only applicable to preset stations.
◆ To stop searching any time during the process,press PTY SEARCH while
searching.
◆ There is a time limit in doing the followings steps.If the setting is cancelled
before you finish,start from step 1 again.
◆ When pressing the buttons on the primary remote control,make sure that
you have selected the FM station using the primary remote control.
of PS information ensues the PS name is displayed.
Current FM frequency
The RDS function is available only in FM broadcasting.
◆ The PTY information is composed of an identification symbol, which helps
the FM radio to recognize the program type of each FM station.
CHILDREN
• Children’s programmes
SOCIAL
• Social affairs
RELIGION
• Religion
TUNING/
ALBUM
VOLUME
PHONE IN
• Phone in
TRAVEL
• Travel
LEISURE
• Leisure
JAZZ
• Jazz Music
COUNTRY
• Country Music
NATION M
• National Music
OLDIES
• Oldies Music
FOLK M
• Folk Music
DOCUMENT
• Documentary
TEST
• Alarm Test
2
P.SOUND
EQ
TUNING
MODE
19
MM-A15(GB)-RDS-8.25
8/26/08
9:38
Page 20
Timer Function
Selecting Sound Mode
EQ Function
ENG
ENG
Your micro component system is equipped with a preset equalizer
that allows you to choose the most appropriate
balance between treble and bass frequencies, according to the type of
music you are listening to.
The timer enables you to switch the system on or off at
specific times.
Example: You wish to wake up to music every morning.
POWER
If you no longer want the system to be switched on or off
automatically, you must cancel the timer.
CANCEL
4
5
Switch the system on by pressing (
Press EQ button until the required option is selected.
1,9
Before setting the timer, check that the current time is correct.
For each step, you have a few seconds to set the required options.
If you exceed this time, you must start again.
1
2
3
TIMER
2
TIMER/CLOCK
ON/OFF
Result: Press the button repeatedly to select “EQ PASS➞POP ➞
ROCK ➞CLASSIC ➞JAZZ➞ S.BASS”.
PROGRAM/SET
7
TREB/BASS
MO/ST
DEMO
DIMMER
+10
RDS DISPLAY
RDS PTY
S.BASS Function : S.Bass function emphasizes the bass sound to produce the effect of explosion or booms.
).
Press TIMER/CLOCK until TIMER is displayed.
DISPLAY
Press PROGRAM/SET.
Result: ON TIME is displayed (instead of the equalizer symbols) for
a few seconds, followed by any switch-on time already set;
you can set the timer switch-on time.
PAUSE
STOP
USB/MP3-CD/CD
4,5,6,7
Treble Level Function
MUTE
4,5,6,7
Treble Control function stresses high tones providing thudding sound
effects.
1
2
Press TREB/BASS button until TREB 00 is displayed. Press
button to select from TREB -04 to TREB 04.
You can select the level of high tones you desire.
TIMER/CLOCK
PROGRAM/SET
1
2
Press TREB/BASS button until BASS 00 is displayed. Press
button to select from BASS -04 to BASS 04.
or
You can select the level of low tones you desire.
TIMER
TIMER/CLOCK
PROGRAM/SET
ON/OFF
ON/OFF
Cancelling the Timer
or
BASS function stresses low tones providing thudding sound effects.
SLEEP
TREB/BASS
REPEAT
SLEEP
TREB/BASS
REPEAT
MO/ST
DEMO
DIMMER
MO/ST
DEMO
DIMMER
+10
RDS DISPLAY
RDS PTY
+10
RDS DISPLAY
RDS PTY
You must also...
a Press PROGRAM/SET.
b Select a preset station by pressing
or
.
MP3/CD (compact disc)
Load a compact disc.
USB
connect usb.
Press PROGRAM/SET to confirm the timer.
Press (
Result:
BASS Level Function
TUNING/
ALBUM
VOLUME
or
button to adjust the volume level and press
Press
PROGRAM/SET.
Result: The source to be selected is displayed.
TUNER (radio)
TUNING
MODE
EQ
P.SOUND
PLAY
Set the timer switch-off time.
or
button.
a Set the hour by pressing
b Press PROGRAM/SET.
Result: The minutes flash.
c Set the minutes by pressing
or
button.
d Press PROGRAM/SET.
Result: VOL 10 is displayed, where 10 corresponds to the
volume already set.
or
button to select the source to be played when the
Press
system switches on.
TUNING
MODE
EQ
P.SOUND
Set the timer switch-on time.
or
button.
a Set the hour by pressing
b Press PROGRAM/SET.
Result: The minutes flash.
c Set the minutes by pressing
or
button.
d Press PROGRAM/SET.
Result: OFF TIME is displayed (instead of the equalizer symbols)
for a few seconds, followed by any switch-off time already
set; you can now set the timer switch-off time.
If you select...
8
9
Press P.SOUND button until the required option is selected. Each
time the P.SOUND button is pressed, “P.SOUND, OFF” is
selected or cancelled in this order.
3,4,5,6,7,8
REPEAT
SLEEP
TIMER
6
Your compact system is equipped with the function of Power
Sound.
The function of Power Sound amplifies bass and improves high
key or bass twice as much for you to appreciate powerful real
sound.
After having set the timer, it will start automatically as shown by the
TIMER indication on the display. If you no longer wish to use the
timer, you must cancel it.
DISPLAY
DISPLAY
PAUSE
STOP
PAUSE
STOP
PLAY
PLAY
You can stop the timer at any time (system on or in standby mode).
To...
Press TIMER ON/OFF...
Cancel the timer
Once.
Result:
Restart the timer
Twice.
Result:
) to set the system to standby mode.
is displayed to the right of the time, indicating that the
timer has been set. The system will switch on and off automatically at the required times.
TIMER
TIMER/CLOCK
PROGRAM/SET
SLEEP
TREB/BASS
REPEAT
MO/ST
DEMO
DIMMER
is no longer displayed.
is displayed again.
USB/MP3-CD/CD
USB/MP3-CD/CD
MUTE
MUTE
TUNING/
ALBUM
VOLUME
P.SOUND
EQ
TUNING
MODE
TUNING/
ALBUM
VOLUME
P.SOUND
EQ
TUNING
MODE
ON/OFF
ON/OFF
If the timer switch on and off times are identical, the word ERROR
is displayed.
20
21
MM-A15(GB)-RDS-8.25
8/26/08
9:38
Page 22
MUTE Function
Connecting Headphones
Cleaning Your Micro Component
System
Safety Precautions
ENG
ENG
You can turn the sound off temporarily on your system.
Example: You wish to answer a telephone call.
1
2
Press MUTE (
You can connect a set of headphones to your micro
component system so that you can listen to music or radio programmers without disturbing other people in the room. The earphones
must have a 3.5ø jack or an appropriate adapter.
The following diagrams illustrate the precautions to be taken when
using or moving your micro component system.
).
To switch the sound back on (at the same volume as before), press
MUTE again or the VOLUME buttons.
Connect the headphones to the PHONES jack on the top panel.
Result: The loudspeakers are no longer used to output the sound.
To obtain the best possible results from your micro component system, you must clean the following elements regularly:
The outer casing
The compact disc player
The cassette players (heads, rollers and drive capstans)
Always unplug the system from the wall outlet:
Before cleaning it
If you are not going to be using it for a long time
Prolonged use of headphones at a high volume may damage your
hearing.
PREVIOUS
/DOWN
USB/MP3-CD/CD
MUTE
TUNING/
ALBUM
VOLUME
P.SOUND
EQ
TUNING
MODE
NEXT
/UP
Outer Casing
Clean the outer casing regularly using a soft cloth and a light detergent. Do
not use abrasive powders, liquids or aerosol cleaners. Never let any liquids
get into the system.
DEMO
/DIMMER
Ambient operating conditions:
Ambient temperature
5°C-35°C
Humidity
10-75%
Do not expose the unit to direct sun
radiation or other heat sources.
This could lead to overheating and
malfunction of the unit.
TUNING
MODE
Compact Disc Player
1
Before playing a compact disc, clean it with a special CD cleaning
agent. Do not use the same cleaning agents as for vinyl LP records.
Carefully wipe the disc from the centre outward.
2
Regularly clean the player with a special cleaning disc (available from
your local dealer).
Setting the System to Switch off
Automatically
While listening to a compact disc or a cassette, you can set the
system to switch off automatically
Example: You wish to go to sleep to music.
1
Press SLEEP button until the option is selected .
Result: The following indications are displayed:
90 MIN
2
Press SLEEP one or more times to indicate how long the system
should continue playing before it switches off:
90 MIN
60 MIN
45 MIN
SLEEPOFF
15 MIN
30 MIN
Do not place potted plants or vases
on top of the unit. Moisture entering
the unit could lead to dangerous
electric shock and can cause
equipment damage. In such events
immediately disconnect the main
plug from the socket.
During thunderstorms, disconnect
the main plug from the socket.
Main voltage peaks due to lightning could damage the unit.
If you will not be using the remote control for a long time, remove
the batteries to prevent corrosion.
Although your system is very hard-wearing, it should not be used
in an excessively dusty environment or subjected to shocks or
extreme heat (close to heating appliances or in direct sunlight,
etc.).
If the unit emits an unpleasant odor when in use, unplug it from
the main supply and contact the after-sales service.
VOLUME
UP
At any time, you can:
Check the remaining time by pressing SLEEP.
Change the remaining time by repeating Steps 1 and 2.
3
DOWN
To cancel SLEEP function, press SLEEP until SLEEP OFF is display.
TIMER
TIMER/CLOCK
PROGRAM/SET
SLEEP
TREB/BASS
REPEAT
MO/ST
DEMO
DIMMER
Remove the batteries from the
remote control, if not used for any
extended period.
Leaking batteries can cause serious
damage to the remote control.
When using headphones, take care
not to listen at excessive volumes.
Extended use of headphones at
high volumes will lead to hearing
damage.
Do not place heavy items on the
main lead. Main cable damage can
lead to damage of the equipment (fire
hazard) and can cause electric
shock.
Do not remove any equipment panels.
The inside of the unit
contains live components, which
cause electric shock.
ON/OFF
22
23
MM-A15(GB)-RDS-8.25
8/26/08
9:38
Page 24
Precautions When Using Compact
Discs
Before Contacting the After-Sales
Service
Technical Specifications
ENG
ENG
Handle your compact discs with care. Always hold them by the edges to
avoid leaving fingerprints on the shiny surface.
When you have finished playing a compact disc, always put it back in its
case.
Do not fix paper to the discs and do not write on the label.
Clean them with a special-purpose cloth.
Store your compact discs in a clean place, out of direct sunlight, where
they will not be exposed to high temperatures.
Always use compact discs marked
.
It always takes a little time to become familiar with a new appliance.
If you have any of the problems listed below, try the solutions given.
They may save you the time and inconvenience of an unnecessary
service call.
SAMSUNG strives to improve its products at all times. Both the design specifications and these user instructions
are thus subject to change without notice.
RADIO
Problem
The system does not work
COMPACT
DIGITAL AUDIO
G
E
N
E
R
A
L
There is no sound
• The main lead is not correctly plugged into a
wall socket or the wall socket is not switched
on.
• The remote control batteries need replacing or
the polarity has not been respected.
• The
button has not been pressed.
• The volume has been completely turned down.
• The correct function (TUNER, MP3/WMACD/CD, AUX) has not been selected.
• You have connected a set of earphones.
• The loudspeaker wires have been
disconnected.
• The MUTE button has been pressed.
The Timer does not work
• The timer has been stopped by pressing
TIMER ON/OFF.
In case it does not work, even the
action is taken as above.
• Press the STOP ( )button for 5
seconds in power ‘OFF’(standby), then it is
returned the original position (RESET)
The compact disc player does not
start playing
C
D
R
A
D
I
O
Checks/Explanation
• The CD function has not been selected.
• The disc has been inserted face down or is
either dirty or scratched.
• The laser sensor is dirty or dusty.
• The system has not been installed on a flat,
horizontal surface.
• Condensation has formed in the player; leave
the system in a warm, airy room for at least
one hour.
FM
Signal/noise ratio
55 dB
Usable sensitivity
10 dB
Total harmonic distortion
0.8 %
COMPACT DISC PLAYER
Frequency range
20 Hz - 20 KHz (± 1 dB)
Signal/noise ratio
70 dB (at 1 KHz) with filter
Distortion
0.2 % (at 1 KHz)
Channel separation
45 dB
Disc sizes
Diameter: 120 or 80 mm. Thickness: 1.2 mm
AMPLIFIER
Output power(4 Ω)
2X7.5 Watts RMS (total harmonic distortion : 10%)
Channel separation
45 dB
Signal/noise ratio
72 dB
GENERAL
Reception is poor or no radio
stations are received at all
• The TUNER function has not been selected.
• The radio frequency has not been correctly
selected.
• The aerial has been disconnected or is not facing the right way. Turn it until you find the best
orientation.
• You are in a building that blocks radio waves;
you must use an outside aerial.
Power Consumption
60W
Weight
2.9Kg
Dimensions
170(W) x 212 (H) x 272(D) mm
If the above guidelines do not allow you to solve the problem, take a note
of:
The model and serial numbers, normally printed on the rear of the
system
Your warranty details
A clear description of the problem
Then contact your local dealer or SAMSUNG after-sales service.
24
25
MM-A15(GB)-RDS-8.25
8/26/08
9:38
Page 26
Contact SAMSUNG WORLD WIDE
USB Feature Supported Player
Digital Camera
Product
Finepix-A340
Finepix-F810
Finepix-F610
Finepix-f450
Finepix S7000
Finepix A310
KD-310Z
Finecam SL300R
Finecam SL400R
Finecam S5R
Finecam Xt
Dimage-Z1
Dimage Z1
Dimage X21
Coolpix4200
Coolpix4300
Coolpix 2200
Coolpix 3500
Coolpix 3700
Coolpix 4100
Coolpix 5200
Stylus 410 digital
300-digital
U300
X-350
C-760
C-5060
X1
U-mini
Lumix-FZ20
DMC-FX7GD
Lumix LC33
LUMIX DMC-F1
Optio-S40
Optio-S50
Optio 33LF
Optio MX
Digimax-420
Digimax-400
Sora PDR-T30
Coolpix 5900
Coolpix S1
Coolpix 7600
DMC-FX7
Dimage Xt
AZ-1
26
If
you have any questions or comments relating to Samsung products,
please contact the SAMSUNG customer care center.
USB Flash Disk
Company
Type
Fuji
Fuji
Fuji
Fuji
Fuji
Fuji
Konica
Kyocera
Kyocera
Kyocera
Kyocera
Minolta
Minolta
Minolta
Nikon
Nikon
Nikon
Nikon
Nikon
Nikon
Nikon
Olympus
Olympus
Olympus
Olympus
Olympus
Olympus
Olympus
Olympus
Panasonic
Panasonic
Panasonic
Panasonic
Pentax
Pentax
Pentax
Pentax
Samsung
Samsung
Toshiba
Nikon
Nikon
Nikon
Panasonic
Minolta
Olympus
Digital Camera
Digital Camera
Digital Camera
Digital Camera
Digital Camera
Digital Camera
Digital Camera
Digital Camera
Digital Camera
Digital Camera
Digital Camera
Digital Camera
Digital Camera
Digital Camera
Digital Camera
Digital Camera
Digital Camera
Digital Camera
Digital Camera
Digital Camera
Digital Camera
Digital Camera
Digital Camera
Digital Camera
Digital Camera
Digital Camera
Digital Camera
Digital Camera
Digital Camera
Digital Camera
Digital Camera
Digital Camera
Digital Camera
Digital Camera
Digital Camera
Digital Camera
Digital Camera
Digital Camera
Digital Camera
Digital Camera
Digital Camera
Digital Camera
Digital Camera
Digital Camera
Digital Camera
Digital Camera
Product
Cruzer Micro
Cruzer Mini
Cruzer Mini
SONY Micro Vault
FLEX DRIVE
AnyDrive
XTICK
Micro Mini
iFlash
LG
RiDATA
Company
Type
Sandisk
Sandisk
Sandisk
Sony
Serotech
A.L tech
LG
Iomega
Imation
XTICK(M)
EZDrive
USB 2.0 USB Flash Drive 128M
USB 2.0 128M
USB 2.0 256M
USB 2.0 64MB
USB 2.0 32MB
USB 2.0 128MB
USB 2.0 128M
USB 2.0 128M
USB 2.0 64M
USB 2.0 64M
USB 2.0 64M
MP3 Player
Product
Company
Type
Creative MuVo NX128M
Iriver H320
YH-920
YP-T7
YP-MT6
YP-T6
YP-53
YP-ST5
YP-T5
YP-60
YP-780
YP-35
YP-55
iAUDIO U2
iAUDIO G3
iAudio M3
SI-M500L
H10
YP-T5 VB
YP-53
Creative
Iriver
Samsung
Samsung
Samsung
Samsung
Samsung
Samsung
Samsung
Samsung
Samsung
Samsung
Samsung
Cowon
Cowon
Cowon
Sharp
Iriver
Samsung
Samsung
128 MB MP3 Player
20G HDD MP3 Player
20G HDD MP3 Player
MP3 Player
MP3 Player
MP3 Player
MP3 Player
MP3 Player
MP3 Player
MP3 Player
MP3 Player
MP3 Player
MP3 Player
MP3 Player
MP3 Player
HDD MP3 Player
256MB MP3 Player
MP3 Player
MP3 Player
256MB MP3 Player
USB External HDD
Product
CUTIE
MOMOBAY UX-2
Company
Type
Serotech
Dvico
POCKET HARD DISK DRIVE
USB 2.0
27
MM-A15(GB)-RDS-8.25
8/26/08
9:38
Page 28
Correct disposal of batteries in this produce
(Applicable in the European Union and other European countries with separate battery return systems.)
This marking shown on the battery,manual or packaging indicates that the batteries in this product should
not be disposed of with other household waste at the end of their working life.Where marked,the chemical
symbols Hg,Cd or Pb indicate that the battery contains mercury,cadmium or lead above the reference
levels in EC Directive 2006/66.If batteries are not properly disposed of,these substances can cause harm
to human health or the environment.
To protect natural resources and to promote material reuse,please separate batteries from other types of
waste and recycle them through your local,free battery return system.
Correct disposal of This Product(Waste Electrical & Electronic Equipment)
(Applicable in the European Union and other European countries with separate collection systems)
This marking shown on the product or its literature, indicates that it should not be disposed with other
household wastes at the end of its working life.
To prevent possible harm to the environment or human health from uncontrolled waste disposal, please
separate this from other types of wastes and recycle it responsibly to promote the sustainable reuse of
material resources.
Household users should contact either the retailer where they purchased this
product, or their local government office, for details of where and how they
can take this item for environmentally safe recycling.
Business users should contact their supplier and check the terms and conditions of the purchase contract.This product should not be mixed with other commercial wastes for disposal.
AH68-02147F