1
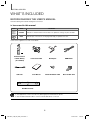
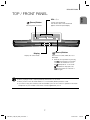
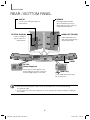
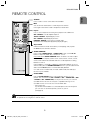
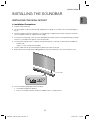
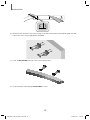
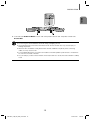
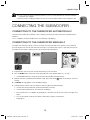
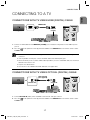
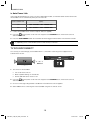
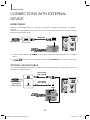
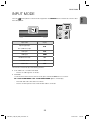
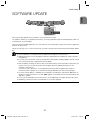
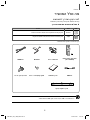
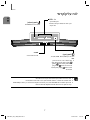
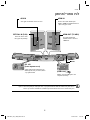
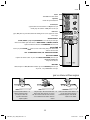
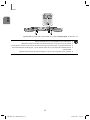
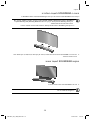
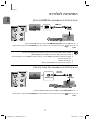
HW-J6001 User manual Curved Soundbar Imagine the possibilities Thank you for purchasing this Samsung product. To receive more complete service, please register your product at www.samsung.com/register HW-J6001_UM_SQ_ENG_0324.indd 1 2015-05-06 4:59:18 GETTING STARTED GETTING STARTED FEATURES Samsung Remote App Bluetooth Function Control your Soundbar in the palm of your hand with the Samsung Audio Remote App*. This convenient app is a control hub for basic controls like power, volume, and media controls, as well as custom settings like equaliser setting. You can connect a Bluetooth device to the Soundbar and enjoy music with high quality stereo sound, all without wires! LICENCES Surround Sound Expansion The Surround Sound Expansion feature adds depth and spaciousness to your listening experience. TV SoundConnect Connect your TV and Soundbar easily through Bluetooth with TV SoundConnect. The absence of trailing wires between the Soundbar and TV allows you to showcase the slim and sleek design of both systems, while maintaining a clean look in your living environment. Easily control the Soundbar and TV from a single TV remote. HDMI HDMI transmits video and audio signals simultaneously, and provides a clearer picture. The unit is also equipped with the ARC function which lets you listen to sound from your TV through the Soundbar via an HDMI cable. This function is only available if you connect the unit to an ARC compliant TV. Manufactured under licence from Dolby Laboratories. Dolby and the double-D symbol are trademarks of Dolby Laboratories. For DTS patents, see http://patents.dts.com. Manufactured under licence from DTS Licensing Limited. DTS, the Symbol, & DTS and the Symbol together are registered trademarks, and DTS 2.0 Channel is a trademark of DTS, Inc. © DTS, Inc. All Rights Reserved. The terms HDMI and HDMI High-Definition Multimedia Interface, and the HDMI Logo are trademarks or registered trademarks of HDMI Licensing LLC in the United States and other countries. USB Host Support You can connect and play music files from external USB storage devices such as MP3 players, USB flash memory, etc. using the Soundbar's USB HOST function. 2 HW-J6001_UM_SQ_ENG_0324.indd 2 2015-05-06 4:59:22 GETTING STARTED SAFETY INFORMATION TO REDUCE THE RISK OF ELECTRIC SHOCK, DO NOT REMOVE THE COVER (OR BACK). NO USER-SERVICEABLE PARTS ARE INSIDE. REFER SERVICING TO QUALIFIED SERVICE PERSONNEL. ENG SAFETY WARNINGS This symbol indicates “dangerous voltage” inside the product that presents a risk of electric shock or personal injury. CAUTION RISK OF ELECTRIC SHOCK DO NOT OPEN This symbol indicates important instructions accompanying the product. WARNING : To reduce the risk of fire or electric shock, do not expose this appliance to rain or moisture. CAUTION : TO PREVENT ELECTRIC SHOCK, MATCH WIDE BLADE OF PLUG TO WIDE SLOT, FULLY INSERT. • This apparatus shall always be connected to a AC outlet with a protective grounding connection. • To disconnect the apparatus from the mains, the plug must be pulled out from the mains socket, therefore the mains plug shall be readily operable. CAUTION • Do not expose this apparatus to dripping or splashing. Do not put objects filled with liquids, such as vases on the apparatus. • To turn this apparatus off completely, you must pull the power plug out of the wall socket. Consequently, the power plug must be easily and readily accessible at all times. 3 HW-J6001_UM_SQ_ENG_0324.indd 3 2015-05-06 4:59:22 GETTING STARTED PRECAUTIONS 68.6 mm 99.1mm 99.1mm 99.1mm Ensure that the AC power supply in your house complies with the power requirements listed on the identification sticker located on the back of your product. Install your product horizontally, on a suitable base (furniture), with enough space around it for ventilation (7~10 cm). Make sure the ventilation slots are not covered. Do not place the unit on amplifiers or other equipment which may become hot. This unit is designed for continuous use. To fully turn off the unit, disconnect the AC plug from the wall outlet. Unplug the unit if you intend to leave it unused for a long period of time. During thunderstorms thunderstorms, disconnect the AC plug from the wall outlet. Voltage peaks due to lightning could damage the unit. Do not expose the unit to direct sunlight or oth other heat sources. This could lead to overheating and cause the unit to malfunction. Protect the product from moisture (i.e. vases), and excess heat (e.g. a fireplace) or equipment creating strong magnetic or electric fields. Disconnect the power cable from the AC supply if the unit malfunctions. Your product is not intended for industrial use. It is for personal use only. Condensation may occur if your product has been stored in cold temperatures. If transporting the unit during the winter, wait approximately 2 hours until the unit has reached room temperature before using. The batteries used with this product contain chemicals that are harmful to the environment. Do not dispose of batteries in the general household trash. Do not dispose of batteries in a fire. Do not short circuit, disassemble, or overheat the batteries. There is a danger of explosion if the battery is incorrectly replaced. Replace only with the same or equivalent type. WARNING, DO NOT INGEST BATTERY, CHEMICAL BURN HAZARD, The remote control supplied with this product contains a coin/button cell battery. If the coin/button cell battery is swallowed, it can cause severe internal burns in just 2 hours and can lead to death. Keep new and used batteries away from children. If the battery compartment does not close securely, stop using the product and keep it away from children. If you think batteries might have been swallowed or placed inside any part of the body, seek immediate medical attention. 4 HW-J6001_UM_SQ_ENG_0324.indd 4 2015-05-06 4:59:22 GETTING STARTED CONTENTS ENG 2 GETTING STARTED 23 FUNCTIONS 2 Features 23 Input Mode 3 Safety Information 24 Bluetooth 6 What’s Included 27 Software Update 7 DESCRIPTIONS 28 TROUBLESHOOTING 7 Top / Front Panel 28 8 Rear / Bottom Panel 9 Remote Control Troubleshooting 29 APPENDIX 29 Specifications 11 INSTALLATION 11 Installing the Soundbar 11 Installing the Wall Mount 14 Attaching the Soundbar to your TV's Stand 14 Installing Soundbar to Free-Standing Figures and illustrations in this User Manual are provided for reference only and may differ from actual product appearance. 15 CONNECTIONS 15 Connecting the Subwoofer 17 Connecting to a TV 17 Connections with TV Using HDMI (Digital) Cable 17 Connections with TV Using Optical (Digital) Cable 18 TV SoundConnect 20 Connections with External Device 20 HDMI Cable 20 Optical or AUX Cable 21 USB 5 HW-J6001_UM_SQ_ENG_0324.indd 5 2015-05-06 4:59:22 GETTING STARTED WHAT’S INCLUDED BEFORE READING THE USER’S MANUAL Note the following terms before reading the user manual. + Icons used in this manual Icon Term Caution Note Definition Indicates a situation where a function does not operate or settings may be cancelled. Indicates tips or instructions on the page that help you operate a function. Check for the supplied accessories shown below. Remote Control / Lithium Battery (3V : CR2032) Power Cord : 2EA DC Adapter HDMI Cable USB Cable User Manual Holder-Fix Mount : 2EA Bracket-Wall : 2EA [ZW Wall Mount Guide ● The appearance of the accessories may differ slightly from the illustrations above. ● Use the dedicated USB cable to connect external USB devices to the unit. 6 HW-J6001_UM_SQ_ENG_0324.indd 6 2015-05-06 4:59:22 DESCRIPTIONS DESCRIPTIONS TOP / FRONT PANEL Controls the volume level. The numeric value of the volume level appears in the front panel display. (Power) Button Turns the power on and off. ENG VOL. - / + (Source) Button Display Selects the D.IN, AUX, HDMI, BT, TV, or USB input. Displays the current mode. ● While the unit is powered on, pressing (Source) button for more than the 3 seconds sets the button to act as (Mute) button. To cancel the the (Mute) button setup, press the (Source) button for more than 3 seconds again. ● When you plug in the AC cord, the power key will work in 4 to 6 seconds. ● When you turn on this unit, there will be a 4 to 5 second delay before it produces sound. ● If you want to enjoy the sound only from the Soundbar, you must turn off the TV's speakers in the Audio Setup menu of your TV. Refer to the owner's manual supplied with your TV. 7 HW-J6001_UM_SQ_ENG_0324.indd 7 2015-05-06 4:59:24 DESCRIPTIONS REAR / BOTTOM PANEL AUX IN HDMI IN Connect to the Analogue output of an external device. Inputs digital video and audio signals simultaneously using an HDMI cable. Use when connecting a supported external device. OPTICAL IN (D.IN) HDMI OUT (TV-ARC) Connect to the digital (optical) output of an external device. Outputs digital video and audio signals simultaneously using an HDMI cable. HDMI IN DC 14V AUX IN HDMI OUT (TV-ARC) OPTICAL IN 5V 0.5A LABEL DC14V DC 14V (Power Supply In) 5V 0.5A Connect the DC power adaptor to the power supply jack, and then connect the AC power adaptor plug to a wall outlet. (USB Port) Connect USB devices here to play files on the devices. ● When disconnecting the power cable of the AC power adaptor from a wall outlet, pull the plug. Do not pull the cable. ● Do not connect this unit or other components to an AC outlet until all connections between components are complete. 8 HW-J6001_UM_SQ_ENG_0324.indd 8 2015-05-06 4:59:26 DESCRIPTIONS REMOTE CONTROL ENG SOURCE Press to select a source connected to the Soundbar. Mute You can turn the volume down to 0 with the push of a button. Press again to restore the sound to the previous volume level. Repeat Press to set the Repeat function during music playback from a USB device. OFF - REPEAT : Cancells Repeat Playback. TRACK - REPEAT : Repeatedly play a track. ALL - REPEAT : Repeatedly play all tracks. RANDOM - REPEAT : Plays tracks in random order. (A track that has already been played may be played again.) Skip Forward If there is more than one file on the device you are playing, and you press the $ button, the next file is selected. SOUND CONTROL Press to select TREBLE, BASS, or AUDIO SYNC. Then, use the #,$ buttons to adjust the Treble, Bass volume from -6 to +6. Press and hold the SOUND CONTROL button for about 5 seconds to adjust the sound for each frequency band. 150Hz, 300Hz, 600Hz, 1.2KHz, 2.5KHz, 5KHz, 10KHz and SW are selectable and each can be adjusted to a setting between -6 and +6. If the Soundbar is connected to a digital TV and the video appears out of sync with the audio, press the SOUND CONTROL button to sync the audio with the video. Use the #,$ buttons to set the audio delay between 0 ms and 300 ms. In USB mode, TV mode, and BT mode, the Audio Sync function may not available. AUTO POWER Press the AUTO POWER button to turn the Anynet+ function on or off. (Default : Auto Power Link OFF, ON - ANYNET+ / OFF - POWER LINK or OFF - ANYNET+ / ON - POWER LINK). The Anynet+ function lets you control the Soundbar with the remote from an Anynet+ compatible Samsung TV. The Soundbar must be connected to the TV via an HDMI cable. * Auto Power Link Synchronizes the Soundbar to a connected Optical source via the Optical jack so it turns on automatically when you turn on your TV. (See page 18) ● Soundbar is a Samsung proprietary name. ● Operate the TV using the TV's remote control. 9 HW-J6001_UM_SQ_ENG_0324.indd 9 2015-05-06 4:59:28 DESCRIPTIONS Power Turns the Soundbar on and off. Volume Adjusts the volume level of the unit. Play / Pause Press the & button to pause a file temporarily. Press the & button again to play the selected file. Skip Back If there is more than one file on the device you are playing, and you press the # button, the previous file is selected. SOUND EFFECT You can select from 6 different sound modes - STANDARD (Original Sound), MUSIC, VOICE, SPORTS, CINEMA, and NIGHT MODE - depending on the content you want to listen to. Select the STANDARD mode if you want to enjoy the original sound. SOUND Surr.Sound adds depth and spaciousness to the sound. Pressing the SOUND button repeatedly cycles through the Surr.Sound settings : ON - SURROUND SOUND, OFF - SURROUND SOUND Bluetooth POWER Press the Bluetooth POWER button on the remote to turn the Bluetooth POWER On function on and off. See pages 19 and 25 for details. WOOFER Press the WOOFER button. Then, use the #,$ buttons to adjust the Subwoofer volume from -12, -6 to +6. INSTALLING THE BATTERY IN THE REMOTE CONTROL 1. Use a suitable coin to turn the remote control's battery cover counterclockwise to remove it as shown in the figure above. 2. Insert a 3V lithium battery. Keep the positive (+) pole facing up when inserting the battery. Put the battery cover on and align the '●' marks side by side as shown in the figure above. 3. Use a suitable coin to turn the remote control battery cover clockwise as far as it will go to fix it in place. 10 HW-J6001_UM_SQ_ENG_0324.indd 10 2015-05-06 4:59:28 INSTALLATION INSTALLATION INSTALLING THE SOUNDBAR ENG INSTALLING THE WALL MOUNT + Installation Precautions ● Install on a vertical wall only. ● For the installation, avoid a location with high temperature or humidity, or a wall that cannot sustain the weight of the set. ● Check the strength of the wall. If the wall is not strong enough to support the unit, reinforce the wall or install the unit on a different wall that can support the unit's weight. ● Purchase and use the fixing screws or anchors appropriate for the kind of wall you have (plaster board, iron board, wood, etc.). If possible, fix the support screws into wall studs. ● Purchase wall mounting screws according to the type and thickness of the wall you will mount the Soundbar on. - Diameter : M5 Length: L 35 mm or longer recommended. ● Connect cables from the unit to external devices before you install it on the wall. ● Make sure the unit is turned off and unplugged before you install it. Otherwise, it may cause an electric shock. 5 cm or more 1. Place the installation guide against the wall surface. • The installation guide must be level. • If the TV is mounted on the wall, install the Soundbar at least 5 cm below the TV. 11 HW-J6001_UM_SQ_ENG_0324.indd 11 2015-05-06 4:59:29 INSTALLATION Center Line Center Line 2. Mark the location where the screws will go through on the wall, and then remove the installation guide. Next, drill holes for the screws using an appropriately sized drill bit. 3. Fasten the Bracket-Wall (2EA) and screws to the marked locations. 4. Lift up the product after inserting the Bracket-Wall as shown. 12 HW-J6001_UM_SQ_ENG_0324.indd 12 2015-05-06 4:59:30 INSTALLATION ENG OPTICAL IN HDMI OUT (TV-ARC) 5V 0.5A AUX IN DC 14V HDMI IN 5. Insert and fasten Holder-Fix Mount into each hole on the product’s bottom side. The product is fixed to the Bracket-Wall. ● Do not hang onto the installed unit and avoid striking or dropping the unit. ● Secure the unit firmly to the wall so that it does not fall off. If the unit falls off, it may cause an injury or damage the product. ● When the unit is installed on a wall, please make sure that children do not pull any of the connecting cables, as it may cause it to fall. ● For the optimal performance of a wall mount installation, install the speaker system at least 5 cm below the TV, if the TV is mounted on the wall. ● For your safety, if you do not mount the unit on the wall, install it on a secure, flat surface where it is unlikely to fall. 13 HW-J6001_UM_SQ_ENG_0324.indd 13 2015-05-06 4:59:30 INSTALLATION ATTACHING THE SOUNDBAR TO YOUR TV'S STAND You can attach the Soundbar to your TV's stand if you have a Samsung TV that has a stand that is compatible with this Soundbar. ● This Soundbar is compatible with model JU6700, JU6500 and JU7500, 48 inch, 55 inch and 65 inch, JU6610 - 48 inch and 55 inch, 2015 Samsung curved TVs. Please visit the home page of Samsung Electronics (www.Samsung.com) to see a detailed list of the compatible models. ● This Soundbar cannot be installed to a non-compatible TV, in either form of TV mount or TV stand. 1. Align the Soundbar’s centre with the centre of the base of the TV, and then carefully push it onto the stand as far as it will go, as shown in the illustration. Be careful not to unbalance the TV. INSTALLING SOUNDBAR TO FREE-STANDING 1. Centre the Soundbar on the flat area in front of the TV. ● Install it on a level and firm surface. 14 HW-J6001_UM_SQ_ENG_0324.indd 14 2015-05-06 4:59:31 CONNECTIONS CONNECTIONS ENG ● Do not connect the power cord of this product or your TV to a wall outlet until all connections between components are complete. ● Before moving or installing this product, be sure to turn off the power and disconnect the power cord. CONNECTING THE SUBWOOFER CONNECTING TO THE SUBWOOFER AUTOMATICALLY The main unit and subwoofer should link (connect wirelessly) automatically when the main unit and subwoofer are turned on. • If it is completely connected, the blue LED in the subwoofer stops blinking. CONNECTING TO THE SUBWOOFER MANUALLY The Subwoofer's linking ID is preset at the factory and the main unit and subwoofer should link (connect wirelessly) automatically when the main unit and subwoofer are turned on. If the Link indicator does not light when the main unit and subwoofer are turned on, please set the ID by following the procedure below. POWER 1. Plug the power cords of the main unit and subwoofer into an AC wall outlet. 2. Press the ID SET button on the back of the subwoofer with a small, pointed object for 5 seconds. • The STANDBY indicator is turned off and the LINK indicator (Blue LED) blinks quickly. 3. While the main unit is powered off (in STANDBY mode), press and hold the seconds. (Mute) on the remote control for 5 4. The ID SET message appears on the Soundbar's display. 5. To finalise the link, turn the main unit’s power on while the subwoofer’s Blue LED blinks. • The main unit and the subwoofer should now be linked (connected). • The Link indicator (Blue LED) on the subwoofer should be on. • If the Link indicator is not solid blue, the linking process has failed. Turn off the main unit and start again from Step 2. • You can enjoy better sound from the wireless subwoofer by selecting a Sound Effect. (See page 10) 15 HW-J6001_UM_SQ_ENG_0324.indd 15 2015-05-06 4:59:31 CONNECTIONS ● Before moving or installing the product, be sure to turn off the power and disconnect the power cord. ● If the main unit is powered off, the wireless subwoofer will be in standby mode and the STANDBY LED on the upper side will come on after the Link indicator (Blue LED) blinks for 30 seconds. ● If you use a device that uses the same frequency (2.4GHz) as the Soundbar near the Soundbar, interference may cause some sound interruption. ● The transmission distance of the wireless signal between the main unit and subwoofer is about 10 meters, but may vary depending on your operating environment. If a steel-concrete or metallic wall is between the main unit and the wireless subwoofer, the system may not operate at all, because the wireless signal cannot penetrate metal. ● If the main unit doesn't make a wireless connection, follow steps 1-5 on the previous page to re-set the connection between the main unit and wireless subwoofer. ● The wireless receiving antenna is built into the wireless subwoofer. Keep the unit away from water and moisture. ● For optimal listening performance, make sure that the area around the wireless subwoofer location is clear of any obstructions. 16 HW-J6001_UM_SQ_ENG_0324.indd 16 2015-05-06 4:59:32 CONNECTIONS CONNECTING TO A TV ENG CONNECTIONS WITH TV USING HDMI (DIGITAL) CABLE HDMI Cable HDMI IN HDMI OUT (TV-ARC) HDMI OUT (TV-ARC) HDMI IN DC 14V AUX IN 5V 0.5A HDMI OUT (TV-ARC) OPTICAL IN 1. Connect an HDMI cable from the HDMI OUT (TV-ARC) jack on the back of the product to the HDMI IN jack on your TV. (Source) button on the top panel of Soundbar or the SOURCE button on remote control to select 2. Press the the D.IN mode. ● HDMI is an interface that enables the digital transmission of video and audio data with just a single connector. ● If the TV provides an ARC port, connect the HDMI cable to the HDMI IN (ARC) port. ● We recommend you use a coreless HDMI cable if possible. If you use a cored HDMI cable, use one whose diameter is less than 14 mm. ● Anynet+ must be turned on. ● This function is not available if the HDMI cable does not support ARC. CONNECTIONS WITH TV USING OPTICAL (DIGITAL) CABLE Optical Cable (not supplied) OPTICAL OUT OPTICAL IN HDMI IN DC 14V AUX IN OPTICAL IN HDMI OUT (TV-ARC) 5V 0.5A 1. Connect OPTICAL IN (Audio) on the Soundbar to the OPTICAL OUT jack of the TV. 2. Press the (Source) button on the top panel of Soundbar or the SOURCE button on remote control to select the D.IN mode. 17 HW-J6001_UM_SQ_ENG_0324.indd 17 2015-05-06 4:59:32 CONNECTIONS + Auto Power Link If you have connected the main unit to a TV with a digital optical cable, set the Auto Power function ON to have the Soundbar turn on automatically when you turn the TV on. AUTO POWER LINK Display ON OFF - ANYNET+ / ON - POWER LINK OFF ON - ANYNET+ / OFF - POWER LINK 1. Connect the Soundbar and a TV with an Optical cable (not supplied). (Source) button on the main unit’s top panel or the SOURCE button on the remote control to 2. Press the select the D.IN mode. 3. Press the AUTO POWER button on the remote control to toggle the Auto Power Link function on and off. ● Depending on the connected device, Auto Power Link may not function. TV SOUNDCONNECT You can enjoy TV sound through your Soundbar when it is connected to a Samsung TV that supports the TV SoundConnect function. Connect 1. Turn on the TV and Soundbar. • Turn on the menu of the TV. • Move to Speaker Settings on "Sound" tab. • Set the "Add New Device" menu to "On". (Source) button on the main unit’s top panel or the SOURCE button on the remote control to 2. Press the select the TV mode. 3. On the TV, a message asking whether to enable the TV SoundConnect function appears. 4. Select <Yes> to finish connecting the TV and Soundbar using the TV's remote control. 18 HW-J6001_UM_SQ_ENG_0324.indd 18 2015-05-06 4:59:34 CONNECTIONS ENG ● Switching the Soundbar’s mode from TV to another mode automatically terminates TV SoundConnect. ● To connect the Soundbar to another TV, the existing connection must be terminated. ● Terminate the connection to the existing TV, and then press the & button on the remote control for 5 seconds to connect to another TV. ● The TV SoundConnect (SoundShare) function is supported by some Samsung TVs released from 2012 on. Check whether your TV supports the TV SoundConnect (SoundShare) function before you begin. (For further information, refer to the TV’s user manual.). ● If your Samsung TV was released before 2014, check the SoundShare setting menu. ● If the distance between the TV and Soundbar exceeds 10 meters, the connection may not be stable or the audio may stutter. If this occurs, relocate the TV or Soundbar so that they are within operational range, and then re-establish the TV SoundConnect connection. ● TV SoundConnect Operational Ranges: - Recommended pairing range: within 2 meters. - Recommended operational range: within 10 meters. ● The Play/Pause, Next, and Prev buttons on the Soundbar or Soundbar's remote do not control the TV. + Using the Bluetooth POWER On function The Bluetooth POWER On function is available after you have successfully connected the Soundbar to a Bluetooth compatible TV using TV SoundConnect. When the Bluetooth POWER On function is ON, turning the connected TV on or off will turn the Soundbar's power on and off as well. 1. Connect the TV to your Soundbar using the TV SoundConnect function. 2. Press the Bluetooth POWER button on the Soundbar remote. ON - BLUETOOTH POWER appears on the Soundbar's display. • ON - BLUETOOTH POWER : The Soundbar turns on and off when you turn the TV on or off. • OFF - BLUETOOTH POWER : The Soundbar only turns off when you turn the TV off. ● This function is supported by some Samsung TVs released from 2013 on. 19 HW-J6001_UM_SQ_ENG_0324.indd 19 2015-05-06 4:59:35 CONNECTIONS CONNECTIONS WITH EXTERNAL DEVICE HDMI CABLE HDMI is the standard digital interface for connecting to TVs, projectors, DVD players, Blu-ray players, set top boxes, and more. HDMI prevents any degradation to the signal due to conversion to analogue and maintains the video and audio quality of the original digital source. HDMI Cable Digital Devices HDMI OUT HDMI IN HDMIIN HDMI IN DC 14V AUX IN OPTICAL IN HDMI OUT (TV-ARC) 5V 0.5A 1. Connect an HDMI cable from the HDMI IN jack on the back of the product to the HDMI OUT jack on your digital device. (Source) button on the top panel of Soundbar or the SOURCE button on remote control to select 2. Press the the HDMI mode. OPTICAL OR AUX CABLE This unit comes equipped with one optical in digital jack and one audio analogue in jack, giving you two ways to connect it to an External Devices. Optical Cable (not supplied) OPTICAL IN OPTICAL OUT BD / DVD player / Set-top box / Game console Audio Cable (not supplied) AUX OUT AUX IN 20 HW-J6001_UM_SQ_ENG_0324.indd 20 2015-05-06 4:59:35 CONNECTIONS + AUX Cable 1. Connect AUX IN (Audio) on the main unit to the AUDIO OUT jack of the Source Device. ENG 2. Press the (Source) button on the top panel of Soundbar or the SOURCE button on remote control to select the AUX mode. + Optical Cable 1. Connect OPTICAL IN (Audio) on the main unit to the OPTICAL OUT jack of the Source Device. 2. Press the (Source) button on the top panel of Soundbar or the SOURCE button on remote control to select the D.IN mode. USB You can play music files located on USB storage devices through the Soundbar. Display USB port HDMI IN DC 14V AUX IN OPTICAL IN 5V 0.5A HDMI OUT (TV-ARC) 5V 0.5A 1. Connect the USB device to the USB port on the back of the product. 2. Press the (Source) button on the main unit’s top panel or the SOURCE button on the remote control to select the USB mode. 3. USB appears on the display screen. • The Soundbar connection to the USB device is complete. • The Soundbar automatically turns off (Auto Power Off) if no USB device has been connected for more than 25 minutes. + Before you connect a USB device Be aware of the following: ● If the file name of a file or folder on a USB device exceeds 10 characters, it is not displayed on the Soundbar's display. ● This product may not be compatible with certain types of USB storage media. ● The Soundbar supports the FAT16 and FAT32 file systems. - The NTFS file system is not supported. ● Connect USB devices directly to the USB port of the product. Otherwise, you may encounter a USB compatibility problem. ● Do not connect multiple storage devices to the product via a multi-card reader. It may not operate properly. 21 HW-J6001_UM_SQ_ENG_0324.indd 21 2015-05-06 4:59:37 CONNECTIONS ● Digital camera PTP protocols are not supported. ● Do not remove the USB device while it is transferring files. ● DRM-protected music files (MP3, WMA) from commercial web sites cannot be played. ● External HDDs are not supported. ● Mobile phone devices are not supported. ● File Format Type Compatibility list: Extension Codec Sampling Rate Bit rate MPEG 1 Layer2 16KHz ~ 48KHz 80kbps~320kbps MPEG 1 Layer3 16KHz ~ 48KHz 80kbps~320kbps MPEG 2 Layer3 16KHz ~ 48KHz 80kbps~320kbps MPEG 2.5 Layer3 16KHz ~ 48KHz 80kbps~320kbps Wave_Format_MSAudio1 16KHz ~ 48KHz 56kbps~128kbps Wave_Format_MSAudio2 16KHz ~ 48KHz 56kbps~128kbps AAC 16KHz ~ 96KHz 48kbps~320kbps AAC-LC 16KHz ~ 96KHz *.mp3 *.wma 128kbps~192kbps *.aac 5.1ch 320kbps 48kbps~64kbps HE-AAC 24KHz ~ 96KHz 5.1ch 160kbps *.wav - 16KHz ~ 48KHz up to 3000kbps *.ogg OGG 1.1.0 16KHz ~ 48KHz 50kbps~500kbps *.flac FLAC 1.1.0, FLAC 1.2.1 16KHz ~ 96KHz up to 3000kbps ● If there are too many folders and files stored in the USB device, reading may take some time. 22 HW-J6001_UM_SQ_ENG_0324.indd 22 2015-05-06 4:59:38 FUNCTIONS FUNCTIONS INPUT MODE Input mode ENG Press the (Source) button on the main unit’s top panel or the SOURCE button on the remote control to select the mode you want. Display Optical Digital input D.IN ARC (HDMI OUT) input AUX input AUX HDMI input HDMI BLUETOOTH mode BT TV SoundConnect TV USB mode USB The unit turns off automatically in the following situations. ● D.IN / HDMI / BT / TV / USB / ARC Mode - If there is no audio signal for 25 minutes. ● AUX Mode To turn the Auto Power Down function ON or OFF, press and hold the & button for 5 seconds. ON - AUTO POWER DOWN / OFF - AUTO POWER DOWN appears on the display. - If the AUX cable is disconnected for 25 minutes. - If there is no KEY input for 8 hours when the AUX cable is connected. 23 HW-J6001_UM_SQ_ENG_0324.indd 23 2015-05-06 4:59:38 FUNCTIONS BLUETOOTH You can connect a Bluetooth device to the Soundbar and enjoy music with high quality stereo sound, all without wires! TO CONNECT THE SOUNDBAR TO A BLUETOOTH DEVICE Check if the Bluetooth device supports the Bluetooth compliant stereo headset function. Connect Bluetooth device 1. Press the (Source) button on the main unit’s top panel or the SOURCE button on the remote control to select the BT mode. • You will see BT READY on the front display of the Soundbar. 2. Select the Bluetooth menu on the Bluetooth device you want to connect. (Refer to the Bluetooth device's user manual.) 3. Select "[Samsung] Soundbar J-Series" from the list. • When the Soundbar is connected to the Bluetooth device, it will display [Bluetooth device name] BT on the front display. • The device name can only be displayed in English. An underline " _ " will be displayed if the name is not in English. • If the Bluetooth device has failed to pair with the Soundbar, delete the previous "[Samsung] Soundbar J-Series" found by the Bluetooth device and have it search for the Soundbar again. 4. Play music on the connected device. • You can listen to the music playing on the connected Bluetooth device over the Soundbar. • In BT mode, the Play / Pause / Next / Prev functions are not available. However, these functions are available in Bluetooth devices supporting AVRCP. 24 HW-J6001_UM_SQ_ENG_0324.indd 24 2015-05-06 4:59:39 FUNCTIONS ● ● ● ● ● If asked for PIN code when connecting a Bluetooth device, enter <0000>. Only one Bluetooth device can be paired at a time. The Bluetooth connection will be terminated when you turn the Soundbar off. The Soundbar may not perform Bluetooth search or connection correctly under the following circumstances: - If there is a strong electrical field around the Soundbar. - If several Bluetooth devices are simultaneously paired with the Soundbar. - If the Bluetooth device is turned off, not in place, or malfunctions. - Note that such devices as microwave ovens, wireless LAN adaptors, fluorescent lights, and gas stoves use the same frequency range as the Bluetooth device, which can cause electric interference. The Soundbar supports SBC data (44.1kHz, 48kHz). Connect only to a Bluetooth device that supports the A2DP (AV) function. You cannot connect the Soundbar to a Bluetooth device that supports only the HF (Hands Free) function. Once you have paired the Soundbar to a Bluetooth device, selecting "[Samsung] Soundbar J-Series" from the device's scanned devices list will automatically change the Soundbar to BT mode. Available only if the Soundbar is listed among the Bluetooth device’s paired devices. (The Bluetooth device and the Soundbar must have been previously paired at least once.) ENG ● ● ● ● ● Soundbar will appear in the Bluetooth device’s searched devices list only when the Soundbar is displaying BT READY. ● In the TV SoundConnect mode, the Soundbar cannot be paired to another Bluetooth device. BLUETOOTH POWER ON (BLUETOOTH POWER) When the Bluetooth POWER On function is on and the Soundbar is turned off, if a previously paired Bluetooth device tries to pair with the Soundbar, the Soundbar turns on automatically. 1. Press the Bluetooth POWER on the remote while the Soundbar is turned on. 2. ON - BLUETOOTH POWER appears on the Soundbar's display. TO DISCONNECT THE BLUETOOTH DEVICE FROM THE SOUNDBAR You can disconnect the Bluetooth device from the Soundbar. For instructions, see the Bluetooth device's user manual. ● The Soundbar will be disconnected. ● When the Soundbar is disconnected from the Bluetooth device, the Soundbar will display BT DISCONNECTED on the front display. TO DISCONNECT THE SOUNDBAR FROM THE BLUETOOTH DEVICE Press the SOURCE button on the remote control or the from BT to another mode or turn off the Soundbar. (Source) button on the product's top panel to switch ● The connected Bluetooth device will wait a certain amount of time for a response from the Soundbar before terminating the connection. (Disconnection time may differ, depending on the Bluetooth device) 25 HW-J6001_UM_SQ_ENG_0324.indd 25 2015-05-06 4:59:39 FUNCTIONS ● In Bluetooth connection mode, the Bluetooth connection will be lost if the distance between the Soundbar and the Bluetooth device exceeds 10 meters. ● The Soundbar automatically turns off after 25 minutes in the Ready state. + More About Bluetooth Bluetooth is a technology that enables Bluetooth-compliant devices to interconnect easily with each other using a short wireless connection. ● A Bluetooth device may cause noise or malfunction, depending on usage, when: - A part of your body is in contact with the receiving/transmitting system of the Bluetooth device or the Soundbar. - It is subject to electrical variation from obstructions caused by a wall, corner, or office partition. - It is exposed to electrical interference from same frequency-band devices including medical equipment, microwave ovens, and wireless LANs. ● Pair the Soundbar with the Bluetooth device while they are close together. ● The further the distance between the Soundbar and Bluetooth device, the worse the quality is. If the distance exceeds the Bluetooth operational range, the connection is lost. ● In poor reception areas, the Bluetooth connection may not work properly. ● The Bluetooth connection only works when it is close to the unit. The connection will be automatically cut off if the Bluetooth device is out of range. Even within range, the sound quality may be degraded by obstacles such as walls or doors. ● This wireless device may cause electric interference during its operation. USING SAMSUNG AUDIO REMOTE APP + Install Samsung Audio Remote App To control the product with your Smart Device and the Samsung Audio Remote app, download the Samsung Audio Remote App through Google Play store. Market search : Samsung Audio Remote ANDROID APP ON + Accessing the Samsung Audio Remote App After you install the Samsung Audio Remote app, follow the instructions in the app. ● The APP function only supports mobile phone Android devices running Android OS 3.0 or later. 26 HW-J6001_UM_SQ_ENG_0324.indd 26 2015-05-06 4:59:39 FUNCTIONS SOFTWARE UPDATE ENG HDMI IN DC 14V AUX IN OPTICAL IN 5V 0.5A HDMI OUT (TV-ARC) 5V 0.5A Samsung may offer updates for the Soundbar's system firmware in the future. If an update is offered, you can update the firmware by connecting a USB device with the firmware update stored on it to the USB port on your Soundbar. Note that if there are multiple update files, you must load them onto the USB device singly and use them to update the firmware one file at a time. Please visit samsung.com or contact the Samsung call centre to receive more information about downloading updates files. ● Insert a USB device containing the firmware update into the USB port on the main unit. ● Updating firmware may not work properly if audio files supported by the Soundbar are stored in the USB storage device. ● Do not disconnect the power or remove the USB device while updates are being applied. The main unit will turn off automatically after completing the firmware update. ● After the update, all settings are reset to their factory default settings. We recommend you write down your settings so that you can easily reset them after the update. Note that updating firmware resets the subwoofer connection too. If connection to the subwoofer is not re-established automatically after the update, refer to page 15. If the firmware fails to update, we recommend formatting the USB device in FAT16 and trying again. ● Once the software update is completed, turn off the product and then press and hold the ( & ) button on the remote control for more than 5 seconds. “INIT” appears on the display and the unit is powered off. The upgrade is complete. ● Do not format the USB device in the NTFS format. The Soundbar does not support the NTFS file system. ● Depending on the manufacturer, some USB devices may not be supported. 27 HW-J6001_UM_SQ_ENG_0324.indd 27 2015-05-06 4:59:40 TROUBLESHOOTING TROUBLESHOOTING TROUBLESHOOTING Before requesting service, please check the following. The unit will not turn on. • Is the power cord plugged into the outlet? Connect the power plug to the outlet. A function does not work when the button is pressed. • Is there static electricity in the air? Disconnect the power plug and connect it again. Sound is not produced. • Is the Mute function on? Press the • Is the volume set to minimum? Adjust the Volume. (Mute) button to cancel the function. The remote control does not work. • Are the batteries drained? Replace with new batteries. • Is the distance between the remote control and main unit too far? Move closer to the unit. The TV SoundConnect (TV pairing) failed. • Does your TV support TV SoundConnect? TV SoundConnect is supported by some Samsung TVs released from 2012 on. Check your TV to see if it supports TV SoundConnect. • Is your TV firmware the latest version? Update your TV with the latest firmware. • Does an error occur when connecting? Contact the Samsung call centre. • Reset the TV mode and connect again. Press and hold the & button for 5 seconds to reset the TV SoundConnect connection. The red LED on the subwoofer blinks and the subwoofer is not producing sound. • Your subwoofer may not be connected to the main body of the product. Try to connect your subwoofer again. (See Page 15) The subwoofer drones and vibrates noticeably. • Try to adjust the vibration of your subwoofer. Press the WOOFER button on your remote control to adjust its value (between -12, -6 to +6.). 28 HW-J6001_UM_SQ_ENG_0324.indd 28 2015-05-06 4:59:41 APPENDIX APPENDIX SPECIFICATIONS ENG Model name HW-J6001 USB Weight GENERAL AMPLIFIER Dimensions (W x H x D) 5V / 0.5A Main Unit 2.7 kg Subwoofer (PS-WJ6001) 6.8 kg Main Unit 1078 x 47.5 x 129 mm Subwoofer (PS-WJ6001) 452 x 335 x 154 mm Operating Temperature Range +5°C to +35°C Operating Humidity Range 10 % to 75 % Rated Output Main Unit Power Subwoofer (PS-WJ6001) 22W/CH x 6, 4ohm, THD=10%, 1KHz 168W, 3ohm, THD=10%, 100Hz S/N Ratio (Analogue Input) 65 dB Separation (1kHz) 65 dB * S/N ratio, distortion, separation, and usable sensitivity are based on measurements using AES (Audio Engineering Society) guidelines. * Nominal specification - Samsung Electronics Co., Ltd reserves the right to change the specifications without notice. - Weight and dimensions are approximate. - For the power supply and Power Consumption, refer to the label attached to the product. a Open Source Licence Notice - To send inquiries and requests regarding open sources, contact Samsung via Email ([email protected]). 29 HW-J6001_UM_SQ_ENG_0324.indd 29 2015-05-06 4:59:41 HW-J6001 מדריך למשתמש Curved Soundbar דמיינו את האפשרויות תודה שרכשתם מוצר זה מתוצרת .Samsung לקבלת שירות מלא יותר ,רשמו את המוצר שברשותכם באתר www.samsung.com/register AH68-02833V-00 4:57:25 2015-05-06 AH68-02833V-00 HW-J6001_SQ_HEB_0506.indd 1 התחלה התחלה מאפיינים היישום Samsung Remote פונקציית Bluetooth שלט על ה Soundbar-מכף ידך באמצעות היישום Samsung * .Audio Remoteיישום נוח זה הינו רכזת בקרה לבקרות בסיסיות כגון הפעלה ,עוצמת קול ובקרות מדיה ,וכן הגדרות מותאמות אישית כגון הגדרות אקולייזר. ניתן לחבר למכשיר ה Soundbar-התקן Bluetoothכדי ליהנות ממוזיקה המושמעת בסטריאו באיכות גבוהה ,באופן אלחוטי בלבד! הרחבת צליל Surround התכונה 'הרחבת צליל 'Surroundמוסיפה תחושת עומק ומרחב לחוויית ההאזנה. רישיון מיוצר תחת רישיון Dolby .Dolby Laboratoriesוסמל הD- הכפולה הם סמלים מסחריים של .Dolby Laboratories TV SoundConnect חבר את הטלוויזיה וה Soundbar-בקלות דרך Bluetoothעם .TV SoundConnectהיעדר כבלים המשתרכים בין ה Soundbar-לטלוויזיה מאפשר להציג את העיצוב הדק והמלוטש של שתי המערכות תוך שמירה על מראה נקי בסביבת המגורים .שלוט בקלות על ה Soundbar-והטלוויזיה משלט רחוק אחד. לפטנטים של ,DTSראה .http://patents.dts.comמיוצר תחת רישיון מ ,DTS Licensing Limited. DTS-הסמל ,וDTS- והסמל יחדיו ,הם סימנים מסחריים רשומים ,וDTS 2.0- Channelהוא סימן מסחרי של .Inc. © DTS, Inc ,DTSכל הזכויות שמורות. HDMI HDMIמשדר אותות וידאו ושמע בו-זמנית ומספק תמונה ברורה יותר. המכשיר מצויד גם בפונקציית ARCשמאפשרת להאזין לצליל מהטלוויזיה ב Soundbar-באמצעות כבל .HDMIפונקציה זו זמינה רק כאשר מחברים את המכשיר לטלוויזיה תואמת .ARC המונחים HDMIוHDMI High-Definition Multimedia- ,Interfaceוכן הלוגו של ,HDMIהם סימנים מסחריים או סימנים מסחריים רשומים של HDMI Licensing LLCבארצות הברית ובמדינות אחרות. תמיכה בחיבור USB באפשרותכם לחבר ולהשמיע קובצי מוסיקה מהתקני אחסון USB חיצוניים כגון נגני ,MP3זיכרון הבזק USBוכו' ,באמצעות פונקציית ה USB HOST-של .Soundbar 2 4:57:41 2015-05-06 HW-J6001_SQ_HEB_0506.indd 2 התחלה מידע אודות בטיחות HEB הוראות בטיחות לצמצום הסיכון להתחשמלות ,אין להוריד את המכסה )או הדופן האחורית(. המכשיר אינו כולל חלקים שניתנים לתיקון על-ידי המשתמש .לתיקון ושירות ,פנו לטכנאי שירות מוסמך. סמל זה מציין "מתח מסוכן" שקיים בתוך המכשיר ועלול לגרום להתחשמלות או לפציעה. זהירות סכנת התחשמלות לא לפתוח סמל זה מציין הוראות חשובות הנלוות למכשיר. אזהרה :לצמצום הסיכון לשריפה או להתחשמלות ,אין לחשוף מכשיר זה לגשם או ללחות. זהירות :למניעת התחשמלות ,יש להתאים את הפין הרחב של התקע לחריץ הרחב בשקע ולהכניסו עד הסוף. • יש לוודא כי מתקן זה יחובר כל העת לשקע זרם חליפין עם הגנת חיבור הארקה. • כדי לנתק את המכשיר מהחשמל ,יש לשלוף את התקע משקע החשמל ,לכן על שקע החשמל להיות זמין לשימוש בכל עת. זהירות • אין לחשוף את המכשיר לטפטוף או להתזה של נוזלים .אין להניח על המכשיר כלים מלאים בנוזלים ,כגון אגרטלים. • לכיבוי מוחלט של המכשיר ,עליכם להוציא את התקע שלו משקע החשמל .לכן ,על התקע להיות זמין ונגיש בכל זמן. 3 4:57:42 2015-05-06 HW-J6001_SQ_HEB_0506.indd 3 התחלה אמצעי זהירות 68.668.6 mm מ"מ 99.1mm מ"מ 99.1 99.1mm מ"מ 99.1 99.1mm 99.1מ"מ ודאו כי מקור זרם החשמל בביתכם עונה על דרישות המתח שמצוינות במדבקת הזיהוי שבגב המכשיר .התקינו את המכשיר בצורה אופקית על בסיס מתאים )רהיט( ,כשיש מספיק רווח סביבו לאוורר 7~10ס"מ .יש לוודא כי פתחי האוורור אינם חסומים .אין להניח את המכשיר על גבי מגברים או מוצרים אחרים שעשויים להתחמם .מכשיר זה מיועד לשימוש ממושך .כדי לכבות את המכשיר לחלוטין ,נתקו את כבל החשמל מתקע החשמל .נתקו את המכשיר מהחשמל אם אתם מתכוונים לא להשתמש בו למשך תקופה ארוכה. מהשקע .קפיצות מ יש להוציא את תקע זרם החילופין מהשקע מתח כתוצאה מברקים עלולות לגרום נזק למכשיר. אין לחשוף את המכשיר באופן ישיר לאור יום או למקו למקורות חום אחרים .חשיפה כזו עלולה לגרום להתחממות יתר ולתקלות במכשיר. הגנו על המכשיר מפני נוזלים )למשל ,אל תקרבו אליו אגרטלים( ,חום גבוה )מאח בוערת ,למשל( או ציוד היוצר שדה מגנטי או חשמלי חזק .נתקו את כבל החשמל משקע החשמל אם המכשיר ניזוק .המוצר שלכם לא נועד לשימוש תעשייתי. מוצר זה נועד לשימוש אישי בלבד.עיבוי עלול להיווצר במידה והמכשיר אוחסן בטמפרטורה נמוכה .אם מובילים את המכשיר בחורף ,יש להמתין כשעתיים עד שטמפרטורת המכשיר תגיע לטמפרטורת החדר לפני השימוש. הסוללות המשמשות במכשיר זה מכילות כימיקלים מזיקים לסביבה .אין להשליכן יחד עם האשפה הביתית. אין להשליך סוללות לאש .אין לקצר או לפרק את הסוללות או לגרום להן להתחממות יתר .קיימת סכנת התפוצצות אם הסוללה מוחלפת באופן שגוי .החלף את הסוללה באותו סוג או בסוג שווה ערך בלבד. אזהרה ,אין לבלוע את הסוללה ,סכנת כווייה כימית ]השלט רחוק שהגיע עם[ מוצר זה מכיל סוללת כפתור .במקרה של בליעת סוללת הכפתור ,היא עלולה לגרום לכוויות פנימיות תוך שעתיים ולהוביל למוות .יש לשמור סוללות חדשות וישנות הרחק מהישג ידם של ילדים .אם תא הסוללה לא נסגר כהלכה ,הפסק להשתמש במוצר ושמור אותו הרחק מילדים .אם אתה סבור שייתכן שסוללות נבלעו או הושמו בתוך חלק כלשהו של הגוף ,פנה מיד לקבלת טיפול רפואי. 4 4:57:42 2015-05-06 HW-J6001_SQ_HEB_0506.indd 4 התחלה תוכן עניינים 2 מאפיינים 23 מצב כניסה 3 מידע אודות בטיחות 24 Bluetooth 6 מה כולל המכשיר 27 עדכון תוכנה 7 תיאור 28פתרון בעיות 7 לוח עליון/קדמי 8 לוח אחורי/תחתון 9 שלט רחוק 28 פתרון בעיות 29נספח 29 11התקנה 11 HEB 2 התחלה 23פונקציות מפרטים התקנת התקנת Soundbar 11 התקנת מתקן התלייה 14 חיבור ה Soundbar-למעמד הטלוויזיה 14 התקנת Soundbarלמעמד חופשי תרשימים ואיורים במדריך למשתמש זה ניתנים לצורכי עיון בלבד וייתכן שיהיו שונים ממראה המוצר בפועל. 15חיבורים 15 חיבור הסאבוופר 17 התחברות לטלוויזיה 17 חיבורים לטלוויזיה באמצעות כבל ) HDMIדיגיטלי( 17 חיבורים לטלוויזיה באמצעות כבל אופטי )דיגיטלי( 18 TV SoundConnect 20 חיבורים להתקן חיצוני 20 כבל HDMI 20 כבל אופטי או AUX 21 USB 5 4:57:42 2015-05-06 HW-J6001_SQ_HEB_0506.indd 5 התחלה מה כולל המכשיר לפני העיון במדריך למשתמש קראו את המושגים שלהלן לפני קריאת המדריך למשתמש. _ סמלים הנמצאים בשימוש במדריך סמל הגדרה מונח זהירות מציין מקרים שבהם הפונקציה אינה פועלת או שההגדרות בוטלו. הערה מציין המלצות או הוראות בעמוד שעוזרות לתפעול כל פונקציה. בדקו אם האביזרים שלהלן מצורפים למכשיר. שלט רחוק /סוללת ליתיום )(3V : CR2032 כבל חשמל 2 :כ"א מתאם DC כבל HDMI כבל USB מדריך למשתמש מחזיק לקיבוע תלייה 2 :כ"א תלייה על הקיר 2 :כ"א [ZW מדריך להתקנה על הקיר ● עיצוב האביזרים עשוי להיות שונה מהאביזרים המוצגים באיורים שלעיל. ● השתמשו כבל ה USB-הייעודי לחיבור התקני USBחיצוניים למכשיר. 6 4:57:43 2015-05-06 HW-J6001_SQ_HEB_0506.indd 6 תיאור תיאור לוח עליון/קדמי HEB VOL. -/+ כוונון עוצמת הקול. נערך הנומרי של עוצמת הקול מופיע בתצוגת הלוח הקדמי. לחצן )הפעלה( מפעיל ומכבה את .Soundbar תצוגה לחצן )מקור( מציג את המצב הנוכחי. בוחר את הקלט ,TV ,BT ,HDMI ,AUX ,D.IN USB ● בעת הפעלת היחידה ,לחיצה על הלחצן )מקור( למשך למעלה משלוש שניות )השתק(. תגרום ללחצן לפעול כלחצן לביטול הגדרת הלחצן )השתק( לחץ שוב על הלחצן )מקור( למשך למעלה שלוש שניות. ● לאחר חיבור כבל המתח ,לחצן ההפעלה יעבוד תוך ארבע עד שש שניות. ● לאחר שתפעילו את המכשיר ,ההשמעה תשתהה למשך 4עד 5שניות לפני שיושמעו צלילים. ● אם ברצונך לשמוע צליל מה Soundbar-בלבד ,עליך לכבות את הרמקולים של הטלוויזיה דרך התפריט Audio Setup )הגדרות שמע( .עיינו בהוראות השימוש המסופקות עם הטלוויזיה שלכם. 7 4:57:45 2015-05-06 HW-J6001_SQ_HEB_0506.indd 7 תיאור לוח אחורי/תחתון HDMI IN AUX IN מקבל אותות שמע ווידאו דיגיטליים בו-זמנית באמצעות כבל .HDMIהשתמש לחיבור התקן חיצוני נתמך. חיבור אל היציאה האנלוגית של התקן חיצוני. )OPTICAL IN (D.IN )HDMI OUT (TV-ARC מחבר ליציאה הדיגיטלית )אופטית( של התקן חיצוני. שולח אותות שמע ווידאו דיגיטליים בו-זמנית באמצעות כבל .HDMI HDMI IN DC 14V AUX IN 5V 0.5A HDMI OUT )(TV-ARC OPTICAL IN תווית DC 14V )כניסת אספקת חשמל( 5V 0.5A )יציאת (USB חברו התקני USBכאן לצורך השמעת קבצים שעל ההתקנים. DC14V חבר את מתאם החשמל לשקע אספקת החשמל ,ולאחר מכן חבר את תקע מתאם החשמל לשקע בקיר. ● בעת ניתוק כבל החשמל של מתאם החשמל מהשקע בקיר ,אחזו בתקע עצמו .אין למשוך את הכבל כדי לנתקו. ● אין לחבר מכשיר זה או רכיבים אחרים שלו אל שקע החשמל עד להשלמת כל החיבורים בין הרכיבים. 8 4:57:46 2015-05-06 HW-J6001_SQ_HEB_0506.indd 8 תיאור שלט רחוק HEB SOURCE לחץ כדי לבחור מקור המחובר ל.Soundbar- השתק ניתן להנמיך את עוצמת הקול לאפס בלחיצת כפתור. לחצו שנית כדי לחזור אל עוצמת הקול הקודמת שהושמעה. חזור ניתן להגדיר את הפונקציה חזור במהלך השמעה מהתקן .USB : OFF - REPEATמבטל את ההשמעה החוזרת. : TRACK - REPEATהשמעת הרצועה שוב ושוב. : ALL - REPEATהשמעת כל הרצועות שוב ושוב. : RANDOM - REPEATהשמעת הרצועות בסדר אקראי. )ניתן להשמיע שוב רצועה שכבר הושמעה(. דילוג קדימה אם יש יותר מקובץ אחד על ההתקן שממנו אתה משמיע ואתה לוחץ על הלחצן ,$ הקובץ הבא ייבחר. SOUND CONTROL לחץ כדי לבחור BASS ,TREBLEאו .AUDIO SYNCלאחר מכן השתמש בלחצנים $ ,#כי לכוונן את עוצמת הטרבל ,בס בין -6לבין .+6 לחץ והחזק את הלחצן SOUND CONTROLלמשך כחמש שניות כדי לכוונן את הצליל עבור כל פס תדרים,KHz 10 ,KHz 5 ,KHz 2.5 ,KHz 1.2 ,Hz 600 ,Hz 300 ,Hz 150 . ו SW-ניתנים לבחירה וניתן לכוונן כל אחד מהם אלו בין -6ו.+6 - אם Soundbarמחובר לטלוויזיה דיגיטלית והווידאו לא מסונכרן עם השמע ,לחץ על לחצני ה SOUND CONTROL-גדי לסנכרן את השמע עם הווידאו .השתמש בלחצני $ ,# כדי להגדיר את זמן השהיית השמע בין 0אלפיות שנייה ל 300-אלפיות שנייה .במצב ,USB מצב טלוויזיה ומצב ,BTייתכן שהפונקצייה Audio Syncלא תפעל. AUTO POWER לחץ על הלחצן AUTO POWERכדי להפעיל או לכבות את הפונקציה .Anynet+ )ברירת מחדל OFF - POWER LINK / ON - ANYNET+ ,Auto Power Link OFF :או .(ON - POWER LINK / OFF - ANYNET+הפונקציה Anynet+מאפשרת לך לשלוט על ה Soundbar-באמצעות השלט מטלוויזית Samsungתואמת .Anynet+על הSoundbar- להיות מחובר לטלוויזיה באמצעות כבל .HDMI * Auto Power Link מסנכרן את ה Soundbar-למקור אופטי מחובר באמצעות השקע האופטי כדי שהוא יופעל באופן אוטומטי כשתפעיל את הטלוויזיה) .ראו עמוד (18 ● Soundbarהוא שם קנייני של .Samsung ● הפעל את הטלוויזיה באמצעות השלט רחוק שלה. 9 4:57:48 2015-05-06 HW-J6001_SQ_HEB_0506.indd 9 תיאור הפעלה מפעיל ומכבה את .Soundbar עוצמת קול ויסות עוצמת הקול של המכשיר. הפעלה/השהיה לחץ על הלחצן & כדי להשהות זמנית את השמעת הקובץ. לחץ שוב על הלחצן & כדי להשמיע את הקובץ שנבחר. דילוג לאחור אם יש יותר מקובץ אחד על ההתקן שממנו אתה משמיע ואתה לוחץ על הלחצן ,#הקובץ הקודם ייבחר. SOUND EFFECT ניתן לבחור מבין 6מצבי צליל ) STANDARD -צליל מקורי(,VOICE ,MUSIC , ,CINEMA ,SPORTSו - NIGHT MODE-בהתאם לסוג המקור שממנו תרצה ליהנות. בחרו את המצב STANDARDאם ברצונכם ליהנות מהצליל המקורי. SOUND צליל סראונד מוסיף עומק ועושר לצליל .לחיצה על לחצן מהגדרות צליל הסראונד: OFF - SURROUND SOUND ,ON - SURROUND SOUND SOUNDבאופן רציף מעגלי Bluetooth POWER לחץ על הלחצן Bluetooth POWERבשלט רחוק כדי להפעיל ולכבות את הפונקציה .Bluetooth POWER On ראו עמוד 19כמו כן .25 WOOFER לחץ על הלחצן .WOOFERלאחר מכן השתמש בלחצנים $ ,#כדי לכוונן את עוצמת הקול של ה Subwoofer-בין -6 ,-12לבין .+6 התקנת סוללות בשלט הרחוק .1השתמש במטבע כמתאים די לסובב את מכסה השלט רחוק נגד כיוון תנועת מחוגי השעון על-מנת להסירו כמתואר באיור למעלה. .2בכנס סוללת ליתיום .3Vהקפד שהקוטב החיובי ) (+יפנה כלפי מעלה בעת הכנסת הסוללה .החזר את מכסה הסוללה ויישר את הסימנים '●' אלא מול אלא כמתואר באיור למעלה. .3השתמש במטבע מתאים כדי לסובב את מכסה הסוללות של השלט רחוק עם כיוון תנועת מחוגי השעון עד שיתקבע במקומו. 10 4:57:49 2015-05-06 HW-J6001_SQ_HEB_0506.indd 10 התקנה התקנה התקנת התקנת SOUNDBAR HEB התקנת מתקן התלייה _ אמצעי זהירות בעת ההתקנה ● התקינו על קיר אנכי בלבד. ● הימנע מהתקנה במיקום בעל טמפרטורה או לחות גבוהים ,או על קיר שאינו יכול לשאת את משקל המכשיר. ● בדקו את חוזק הקיר .אם הקיר אינו חזק מספיק לצורך תליית המכשיר ,חזקו את הקיר או התקינו את המכשיר על קיר אחר המסוגל לתמוך במשקל המכשיר. ● רכוש והשתמש בבורגי קיבוע המתאימים לסוג הקיר שעליו אתה רוצה לתלות את המכשיר )גבס ,מתכת ,עץ וכו'(. אם ניתן ,הבריגו את בורגי הקיבוע לדיבלים בקיר. ● קנה ברגים להרכבה על הקיר בהתאם לסוג ועובי הקיר שעליו תתקין את ה.Soundbar- - קוטרM5 : - אורך :מומלץ 35 Lמ"מ ומעלה ● חברו כבלים מהמכשיר להתקנים חיצוניים לפני התקנתו על הקיר. ● ודאו שהמכשיר כבוי ומנותק מהחשמל לפני שאתם מתקינים אותו .הדבר עלול לגרום להתחשמלות. 5ס"מ או יותר .1מקם את מנחה ההתקנה על הקיר. • על מחה ההתקנה להיות מפולס. • אם הטלוויזיה מותקנת על הקיר ,התקן את ה Soundbar-לפחות 5ס"מ מתחת לטלוויזיה. 11 4:57:50 2015-05-06 HW-J6001_SQ_HEB_0506.indd 11 התקנה Center Line Center Line .2סמן בעט על הקיר את מיקום מעבר הברגים ,ולאחר מכן הסר את מנחה ההתקנה .לאחר מכן ,קדח חורים עבור הברגים באמצעות מקדח בקוטר המתאים. .3הדק את התלייה על הקיר ) 2כ"א( ואת הברגים למיקומים המסומנים. .4הרם את המוצר לאחר הכנסת התלייה על הקיר כמתואר. 12 4:57:50 2015-05-06 HW-J6001_SQ_HEB_0506.indd 12 התקנה HEB 5V 0.5A HDMI OUT )(TV-ARC OPTICAL IN AUX IN HDMI IN DC 14V .5הכנס והדק את מחזיק לקיבוע תלייה לתוך כל .חור בתחתית המוצר .המוצר מקובע אל התלייה על הקיר. ● ● ● ● ● אין להיתלות על היחידה המותקנת ויש להיזהר שלא תקבל מכה או תיפול. יש לחבר את היחידה היטב לקיר כדי שלא תיפול .נפילת היחידה עלולה לגרום לפציעה או לנזק למוצר. אם המכשיר מותקן על קיר ,הקפידו שילדים לא ימשכו בכבלים המחוברים אליו מכיוון שהדבר עלול לגרום לנפילת המכשיר. לביצועים אופטימליים של התקנה על הקיר ,אם הטלוויזיה מותקנת על הקיר ,התקן את מערכת הרמקולים לפחות 5ס"מ מתחת לטלוויזיה. לבטיחותך ,אם אינך מתקיןן את היחידה על הקיר ,התקן אותה על משוח ישר שהיא לא עשויה ליפול ממנו. 13 4:57:51 2015-05-06 HW-J6001_SQ_HEB_0506.indd 13 התקנה חיבור ה SOUNDBAR-למעמד הטלוויזיה ניתן לחבר את ה Soundbar-למעמד הטלוויזיה אם יש לך טלוויזיית Samsungבעלת מעמד התואם ל Soundbar-זה. ● Soundbarזה תואם לדגמים JU6500 ,JU6700ו 48 ,JU7500-אינץ' 55 ,אינץ' ו 65-אינץ' 48 - JU6610 ,אינץ' ו55- אינץ' Samsung 2015 ,טלוויזיות קמורות .בקר בדף הבית של (www.Samsung.com) Samsung Electronicsכדי לראות רשימה מלאה של הדגמים התואמים. ● לא ניתן להתקין Soundbarזה לטלוויזיות שאינן תואמות ,או במבנה מתלה הטלוויזיה או מעמד הטלוויזיה. .1יישר את מרכז ה Soundbar-עם המרכז של הבסיס של הטלוויזיה ,ולאחר מכן דחוף אותו על על המעמד עד הסוף כמתואר באיור. היזהר שהטלוויזיה לא תיפול. התקנת SOUNDBARלמעמד חופשי .1מרכז את ה Soundbar-באזור השטוח שבחזית הטלוויזיה. ● התקן אותו על משטח ישר ויציב 14 4:57:52 2015-05-06 HW-J6001_SQ_HEB_0506.indd 14 חיבורים חיבורים ● אין לחבר את כבל החשמל של מוצר זה או של הטלוויזיה לשקע החשמל עד להשלמת כל החיבורים בין הרכיבים. ● לפני העברה או התקנה של מוצר זה ,יש להקפיד לכבות אותו ולנתק את כבל המתח. HEB חיבור הסאבוופר חיבור אוטומטי לסאבוופר על היחידה הראשית והסאבוופר להתחבר )חיבור אלחוטי( כאשר מפעילים את היחידה הראשית והסאבוופר. ● אם הוא מחובר לחלוטין ,נורית ה LED-הכחולה בסאבוופר תפסיק להבהב. חיבור ידני לסאבוופר מזהה ההתקשרות של הסאבוופר מוגדר על-ידי היצרן ,וההתקשרות )חיבור אלחוטי( בין היחידה הראשית לסאבוופר צריכה להתבצע באופן אוטומטי בעת הפעלתם .אם המחוון Linkלא נדלק בעת הפעלת היחידה הראשית והסאבוופר ,הגדר את המזהה באופן הבא. השלם תהליך זה תוך 30שניות לאחר תחילת ההבהוב של המחוון 'קישור' בסאבוופר. POWER .1חברו את המכשיר ואת הסאבוופר לחשמל. .2לחצו על הלחצן ID SETבגב הסאבוופר בעזרת חפץ קטן וחד למשך 5שניות. • המחוון STANDBYיכבה והמחוון ) LINKנורית כחולה( יהבהב במהירות. .3כאשר היחידה הראשית כבויה )במצב ,(STANDBYלחץ והחזק את )השתק( בשלט רחוק למשך חמש שניות. .4ההודעה ID SETתופיע על תצוגת ה.Soundbar- .5כדי לסיים את הקישור ,הפעל את היחידה הראשית כאשר הנורית הכחולה של הסאבוופר מהבהבת. • כעת היחידה הראשית והסאבוופר אמורים להיות מקושרים )מחוברים(. • המחוון קישור )נורית כחולה( על גבי הסאבוופר צריכה להיות דלוק. • אם המחוון קישור לא מאיר בכחול ,תהליך הקישור נכשל .כבה את היחידה הראשית והתחל שוב משלב .2 • תוכלו ליהנות מצליל משופר מהסאבוופר האלחוטי על-ידי בחירת אפקט הצליל) .ראו עמוד (10 15 4:57:52 2015-05-06 HW-J6001_SQ_HEB_0506.indd 15 חיבורים ● ● ● ● ● לפני העברה או התקנה של המוצר ,יש להקפיד לכבות אותו ולנתק את כבל המתח. אם היחידה הראשית כבויה ,הסאבוופר האלחוטי יהיה במצב המתנה והנורית 'המתנה' בצד העליון תידלק לאחר שהמחוון 'קישור' )נורית כחולה( תהבהב למשך 30שניות. אם אתה משתמש בהתקן העושה שימוש באותו התדר ) (2.4GHzשל ה Soundbar-בקרבת ה ,Soundbar-עלולה להיווצר הפרעה. מרחק השידור של האות האלחוטי בין היחידה הראשית לסאבוופר הוא בערך 10מטר אבל עשוי להשתנות בהתאם לסביבת ההפעלה. אם יש קיר בטון-פלדה או קיר מתכת בין המכשיר לבין הסאבוופר האלחוטי ,המערכת עשויה לא לפעול בכלל מכיוון שהאות האלחוטי לא יכול לחדור דרך מתכת. אם היחידה המרכזית אינה מייצרת חיבור אלחוטי ,עקוב אחר שלבים 5-1בדף הקודם על מנת להגדיר מחדש את החיבור בין היחידה המרכזית והסאבוופר האלחוטי. ● אנטנת הקליטה האלחוטית מובנית בתוך הסאבוופר האלחוטי .יש להרחיק את המכשיר ממים ומלחות. ● למיטוב חוויית ההאזנה ,ודאו שהאזור שמסביב לסאבוופר האלחוטי נקי ממכשולים. 16 4:57:53 2015-05-06 HW-J6001_SQ_HEB_0506.indd 16 חיבורים התחברות לטלוויזיה HEB חיבורים לטלוויזיה באמצעות כבל ) HDMIדיגיטלי( כבל HDMI HDMI IN HDMI OUT )(TV-ARC HDMI OUT )(TV-ARC HDMI IN DC 14V AUX IN 5V 0.5A HDMI OUT )(TV-ARC OPTICAL IN .1חבר כבל HDMIמהכניסה ) HDMI OUT (TV-ARCשבגב המוצר ליציאה HDMI INשבטלוויזיה שלך. .2לחץ על הלחצן .D.IN ● ● ● ● ● )מקור( בלוח העליון של היחידה הראשית או על הלחצן SOURCEבשלט רחוק כדי לבחור את מצב HDMIהנו ממשק המאפשר את השידור הדיגיטלי של וידאו וקבצי שמע באמצעות חיבור אחד בלבד. אם יש לטלוויזיה יציאת ,ARCחבר את כבל ה HDMI-ליציאה ).HDMI IN (ARC מומלץ במידת האפשר להשתמש בכבל HDMIללא ליבה .אם נעשה שימוש בכבל HDMIעם ליבה ,השתמש באחד בעל ליבה של פחות מ 14-מ"מ. יש להפעיל את .Anynet+ פונקציה זו אינה זמינה אם כבל ה HDMI-לא תומך ב.ARC- חיבורים לטלוויזיה באמצעות כבל אופטי )דיגיטלי( כבל אופטי )לא מצורף( OPTICAL OUT OPTICAL IN HDMI IN DC 14V AUX IN 5V 0.5A HDMI OUT )(TV-ARC OPTICAL IN .1חבר את ) OPTICAL INשמע( ב Soundbar-לשקע OPTICAL OUTשל הטלוויזיה. .2לחץ על הלחצן .D.IN )מקור( בלוח העליון של היחידה הראשית או על הלחצן SOURCEבשלט רחוק כדי לבחור את מצב 17 4:57:53 2015-05-06 HW-J6001_SQ_HEB_0506.indd 17 חיבורים _ Auto Power Link אם חיברת את היחידה הראשית לטלוויזיה באמצעות כבל אופטי ,הגדר את הפונקציה Auto Powerלהיות מופעלת על-מנת שה Soundbar-יופעל באופן אוטומטי כאשר מפעילים את הטלוויזיה. AUTO POWER LINK תצוגה פעיל ON - POWER LINK / OFF - ANYNET+ כבוי OFF - POWER LINK / ON - ANYNET+ .1חבר את ה Soundbar-והטלוויזיה בכבל 'אופטי') .לא מצורף( .2לחץ על הלחצן .D.IN )מקור( בלוח העליון של היחידה הראשית או על הלחצן SOURCEבשלט רחוק כדי לבחור את מצב .3לחץ על הלחצן AUTO POWERבשלט רחוק כדי להפעיל או לכבות את הפונקציה .Auto Power Link ● בהתאם להתקן המחובר ,ייתכן ש Auto Power Link-לא תפעל. TV SOUNDCONNECT ניתן ליהנות מצליל הטלוויזיה דרך ה Soundbar-שמחובר לטלוויזיית Samsungשתומכת בפונקציה .TV SoundConnect חבר .1הפעל את הטלוויזיה ואת ה.Soundbar- • הפעלאתהתפריטשלהטלוויזיה. • עבורל'הגדרותרמקול' בכרטיסייה" צליל". • הגדראתהתפריט "הוסףהתקןחדש" למצב "מופעל". .2לחץ על הלחצן .TV )מקור( בלוח העליון של היחידה הראשית או על הלחצן SOURCEבשלט רחוק כדי לבחור את מצב .3בטלוויזיה תופיע הודעה השואלת אם להפעיל את הפונקציה .TV SoundConnect .4בחר >כן< כדי לסיים את חבור הטלוויזיה וה Soundbar-באמצעות השלט רחוק של הטלוויזיה. 18 4:57:56 2015-05-06 HW-J6001_SQ_HEB_0506.indd 18 חיבורים ● ● ● ● ● HEB ● העברת המצב של Soundbarמטלוויזיה למצב אחר תסיים באופן אוטומטי את .TV SoundConnect ● כדי לחבר את ה Soundbar-לטלוויזיה אחרת ,יש לסיים את החיבור הקיים. ● סיים את החיבור לטלוויזיה הקיימת ,ולאחר מכן לחץ על הלחצן & בשלט רחוק למשך יותר מחמש שניות כדי להתחבר לטלוויזיה אחרת. הפונקציה (SoundShare) TV SoundConnectנתמכת על-ידי חלק מטלוויזיות Samsungשהושקו משנת .2012בדוק אם הטלוויזיה שלך תומכת בפונקציה (SoundShare) TV SoundConnectלפני שאתה מתחיל) .למידע נוסף ,עיין במדריך למשתמש של הטלוויזיה(. אם טלוויזיית Samsungהושקה לפני ,2014בדוק בתפריט ההדרות של .SoundShare אם המרחק בין הטלוויזיה לבין Soundbarעולה על 10מטר ,ייתכן שהחיבור לא יהיה יציב או השמע עלול לגמגם .במקרה כזה ,מקם מחדש את הטלוויזיה או ה Soundbar-כך שהם יימצאו בטווח הפעולה ,ולאחר מקן הקם מחדש את החיבור של .TV SoundConnect טווח פעולה של :TV SoundConnect טווח ההפעלה המומלץ לצימוד :עד 2מטר טווח פעולה מומלץ :עד 10מטרהלחצנים 'הפעל/השהה'' ,הבא' ו'הקודם' ב Soundbar-או בשלט רחוק של ה Soundbar-לא שולטים על הטלוויזיה. _ שימוש בפונקציה Bluetooth POWER On הפונקציה Bluetooth POWER Onזמינה אחרי חיבור מוצלח של ה Soundbar-לטלוויזיה תואמת Bluetoothבאמצעות TV .SoundConnectכאשר הפונקציה Bluetooth POWER Onמופעלת ,הפעלה או כיבוי של הטלוויזיה תפעיל או תכבה גם את ה.Soundbar- .1חבר את הטלוויזיה ל Soundbar-באמצעות הפונקציה .TV SoundConnect .2לחץ על לחצן Bluetooth POWERבשלט רחוק של ה " ON - BLUETOOTH POWER " .Soundbar-יופיע בתצוגה של ה.Soundbar- • Soundbar : ON - BLUETOOTH POWERיופעל ויכובה יחד עם הטלוויזיה. • Soundbar : OFF - BLUETOOTH POWERייכבה רק כשתכבה את הטלוויזיה. ● פונקציה זו נתמכת על-ידי חלק מטלוויזיות Samsungשהושקו משנת 2013ואילך. 19 4:57:57 2015-05-06 HW-J6001_SQ_HEB_0506.indd 19 חיבורים חיבורים להתקן חיצוני כבל HDMI HDMIהוא ממשק דיגיטלי סטנדרטי לחיבור מכשירים כגון טלוויזיות ,מקרנים ,נגני ,DVDנגני ,Blu-rayממירים ועוד. בגלל ש HDMI-משדר את איכות האות הדיגיטלי המקסימלי ,ניתן ליהנות מווידאו ושמע מעולים כפי שנוצרו במקור הדיגיטלי. כבל HDMI HDMI OUT HDMI IN התקנים דיגיטליים HDMIIN HDMI IN DC 14V AUX IN 5V 0.5A HDMI OUT )(TV-ARC OPTICAL IN .1חבר כבל HDMIמהכניסה HDMI INשבגב המוצר ליציאה HDMI OUTשבמכשיר החשמלי שלך. .2לחץ על הלחצן .HDMI )מקור( בלוח העליון של היחידה הראשית או על הלחצן SOURCEבשלט רחוק כדי לבחור את מצב כבל אופטי או AUX היחידה מגיעה עם שקע דיגיטלי אופטי אחד ושקע שמע אנלוגי אחד כך שיש שתי דרכים לחבר אותה להתקנים חיצוניים. כבל אופטי )לא מצורף( OPTICAL IN OPTICAL OUT כבל שמע )לא מצורף( AUX OUT נגן /DVD/BD ממיר אינטראקטיבי/ מסוף משחקים AUX IN 20 4:57:57 2015-05-06 HW-J6001_SQ_HEB_0506.indd 20 חיבורים _ כבל AUX .1חבר את ) AUX INשמע( ביחידה הראשית לשקע AUDIO OUTשל התקן המקור. .2לחץ על הלחצן .AUX HEB )מקור( בלוח העליון של היחידה הראשית או על הלחצן SOURCEבשלט רחוק כדי לבחור את מצב _ כבל אופטי .1חבר את ) OPTICAL INשמע( ביחידה הראשית לשקע OPTICAL OUTשל התקן המקור. )מקור( בלוח העליון של היחידה הראשית או על הלחצן SOURCEבשלט רחוק כדי לבחור את מצב .2לחץ על הלחצן .D.IN USB ניתן להשמיע קובצי מוזיקה השמורים על התקני אחסון USBדרך ה.Soundbar- תצוגה יציאת USB HDMI IN DC 14V AUX IN 5V 0.5A HDMI OUT )(TV-ARC OPTICAL IN 5V 0.5A .1חבר את התקן ה USB-ליציאת ה USB-של המוצר. .2לחץ על הלחצן .USB )מקור( בלוח העליון של היחידה הראשית או על הלחצן SOURCEבשלט רחוק כדי לבחור את מצב USB .3יופיע במסך. • חיבור ה Soundbar-להתקן ה USB-הושלם. • המערכת נכבית באופן אוטומטי ) (Auto Power Offאם לא מחובר אליה התקן USBבמשך יותר מ 25-דקות. _ לפני חיבור התקן USB שימו לב לנתונים הבאים: ● אם שם הקובץ בהתקן ה USB-ארוך מ 10-תווים ,הוא לא מוצג ב.Soundbar- ● ייתכן שמכשיר זה לא יהיה תואם לסוגים מסוימים של התקני אחסון .USB ● המכשיר תומך במערכות קבצים מסוג FAT16ו.FAT32- - מערכת הקבצים NTFSאינה נתמכת. ● חברו את התקן ה USB-ישירות אל כניסת ה USB-שבמכשיר .אחרת ,ייתכן שתיווצר בעיית תאימות של התקן ה.USB- ● אין לחבר אל המוצר התקני אחסון מרובים באמצעות קורא כרטיסים משולב .הוא עשוי שלא לפעול כהלכה. 21 4:57:59 2015-05-06 HW-J6001_SQ_HEB_0506.indd 21 חיבורים . של מצלמות דיגיטליותPTP ● המכשיר אינו תומך בפרוטוקולי . בזמן שהוא מעביר קבציםUSB-● אין לנתק את התקן ה .( שהתקבלו מאתר מסחריWMA ,MP3) DRM ● המכשיר אינו מנגן קובצי מוסיקה בהגנת .● המכשיר אינו תומך בכוננים קשיחים חיצוניים .● המכשיר אינו תומך בטלפונים ניידים :● רשימת תאימות קצב סיבית טווח דגימה קודק kbps 320 ~ kbps 80 KHz 48 ~ KHz 16 MPEG 1 Layer2 kbps 320 ~ kbps 80 KHz 48 ~ KHz 16 MPEG 1 Layer3 kbps 320 ~ kbps 80 KHz 48 ~ KHz 16 MPEG 2 Layer3 kbps 320 ~ kbps 80 KHz 48 ~ KHz 16 MPEG 2.5 Layer3 kbps 128 ~ kbps 56 KHz 48 ~ KHz 16 Wave_Format_MSAudio1 kbps 128 ~ kbps 56 KHz 48 ~ KHz 16 Wave_Format_MSAudio2 kbps 320 ~ kbps 48 KHz 48 ~ KHz 16 AAC KHz 96 ~ KHz 16 AAC-LC KHz 96 ~ KHz 24 HE-AAC kbps 3000 עד KHz 48 ~ KHz 16 - wav.* kbps 500 ~ kbps 50 KHz 48 ~ KHz 16 OGG 1.1.0 ogg.* kbps 3000 עד KHz 96 ~ KHz 16 FLAC 1.2.1 ,FLAC 1.1.0 flac.* kbps 192 ~ kbps 128 kbps 320 ch 5.1 kbps 64 ~ kbps 48 kbps 320 ch 5.1 הרחבה mp3.* wma.* aac.* . הקריאה עשויה להימשך זמן מה,USB-● אם יש יותר מדי תיקיות וקבצים שמורים בהתקן ה 22 HW-J6001_SQ_HEB_0506.indd 22 2015-05-06 4:58:00 פונקציות פונקציות מצב כניסה מצב כניסה כניסה דיגיטלית אופטית קלט )ARC (HDMI OUT HEB לחץ על הלחצן רוצה. )מקור( שבלוח העליון של היחידה הראשית או על הלחצן SOURCEבשלט רחוק כדי לבחור את המצב שאתה תצוגה D.IN כניסת AUX AUX כניסת HDMI HDMI מצב BLUETOOTH BT TV SoundConnect TV מצב USB USB המכשיר נכבה באופן אוטומטי במקרים הבאים: ● מצב ARC/USB/TV/BT/HDMI/D.IN - אם אין אות שמע במשך 25דקות. ● מצב AUX די להפעיל או לכבות את הפונקציה Auto Power Downלחץ והחזק את הלחצן & למשך 5שניות. OFF - AUTO POWER DOWN / ON - AUTO POWER DOWNיופיע בתצוגה. - אם כבל ה AUX-מנותק למשך 25דקות. - אם לא מתקבל קלט KEYבמשך שמונה שעות בזמן שכבל AUXמחובר. 23 4:58:00 2015-05-06 HW-J6001_SQ_HEB_0506.indd 23 פונקציות BLUETOOTH ניתן לחבר למכשיר ה Soundbar-התקן Bluetoothכדי ליהנות ממוזיקה המושמעת בסטריאו באיכות גבוהה ,באופן אלחוטי בלבד! לחיבור ה SOUNDBAR-להתקן BLUETOOTH בדקו אם התקן ה Bluetooth-תומך בפונקציית אוזניות הסטריאו תואמת ה.Bluetooth- חבר התקן Bluetooth .1לחץ על הלחצן .BT • )מקור( בלוח העליון של היחידה הראשית או על הלחצן SOURCEבשלט רחוק כדי לבחור את מצב תוצג ההודעה BT READYבתצוגה הקדמית של ה.Soundbar- .2בחרו בתפריט Bluetoothשבהתקן ה Bluetooth-שאותו תרצו לחבר) .עיינו במדריך למשתמש של התקן ה(Bluetooth- .3בחרו באפשרות " "[Samsung] Soundbar J-Seriesמתוך הרשימה. • כאשר ה Soundbar-מחובר למכשיר ,Bluetoothהוא יציג ]שם מכשיר BT [Bluetoothבלוח הקדמי. • ניתן להציג את שם המוצר רק באנגלית .יוצג קו תחתון " _ " אם השם אינו באנגלית. • אם צימוד התקן ה Bluetooth-ל Soundbar-נכשל ,מחקו את ה "[Samsung] Soundbar J-Series"-הקודם שמצא התקן ה Bluetooth-ובצעו חיפוש חדש עבור .Soundbar .4השמיעו מוסיקה בהתקן המחובר. • באפשרותכם להאזין למוסיקה המושמעת בהתקן ה Bluetooth-המחובר על גבי המערכת .Soundbar • במצב ,BTהפונקציות הפעלה/השהייה/הבא/הקודם אינן זמינות .אולם ,פונקציות אלה זמינות במכשירי Bluetoothהתומכים ב.AVRCP- 24 4:58:01 2015-05-06 HW-J6001_SQ_HEB_0506.indd 24 פונקציות ● ● ● ● ● ● ● HEB ● ● ● ● אם תופיע בקשה לקוד PINבעת חיבור מכשיר ,Bluetoothהזן >.<0000 ניתן לצמד התקן Bluetoothאחד בלבד בכל פעם. חיבור Bluetoothיסתיים כאשר Soundbarיועבר למצב כבוי. ייתכן שה Soundbar-לא יבצע חיפוש או חיבור Bluetoothכהלכה בתנאים הבאים: אם קיים שדה חשמלי חזק מסביב ל.Soundbar- אם מספר התקני Bluetoothמוצמדים בו-זמנית ל.Soundbar- אם התקן ה Bluetooth-כבוי ,אינו נמצא במקומו או שיש בו תקלה. שימו לב שישנם התקנים כגון מיקרוגלים ,מתאמי LANאלחוטיים ,מנורות פלואורסנט ותנורי גז המשתמשים באותו טווחתדרים שבו משתמש התקן ה ,Bluetooth-והעשויים לגרום להפרעות חשמליות. ה Soundbar-תומך בנתוני .(kHz 48 ,kHz 44.1) SBC יש לחבר התקן Bluetoothהתומך בפונקציית (AV) A2DPבלבד. לא ניתן לחבר את ה Soundbar-להתקן Bluetoothהתומך בפונקציית ) HFללא התערבות המשתמש( בלבד. לאחר צימוד ה Soundbar-להתקן ,Bluetoothבחירה של ' '[Samsung] Soundbar J-Seriesמרשימת ההתקנים הסרוקים של ההתקן תשנה באופן אוטומטי את ה Soundbar -למצב .BT זמין רק אם Soundbarמופיע ברשימת המכשירים המוצמדים של מכשיר ה.Bluetooth- )על מכשיר ה Bluetooth-וה Soundbar-לבצע הצמדה מראש לפחות פעם אחד(. Soundbarיופיע ברשימת המכשירים שנסרקו של מכשיר ה Bluetooth-רק כאשר Soundbarמציג .BT READY במצב ,TV SoundConnectלא ניתן להצמיד את ה Soundbar-למכשיר Bluetoothאחר. (BLUETOOTH POWER) BLUETOOTH POWER ON כאשר הפונקציה Bluetooth Power Onמופעלת וה Soundbar-כבוי ,אם התקן Bluetoothשהיה מוצמד בעבר ינסה לבצע הצמדה ל ,Soundbar-ה Soundbar-יופעל באופן אוטומטי. .1לחץ על Bluetooth POWERבשלט רחוק כאשר ה Soundbar-מופעל. ON - BLUETOOTH POWER .2יופיע בתצוגת ה.Soundbar- לניתוק התקן ה BLUETOOTH-מהSOUNDBAR- באפשרותכם לנתק את התקן ה Bluetooth-מ .Soundbar-לקבלת הוראות יש לעיין במדריך למשתמש של התקן ה.Bluetooth- ● Soundbarינותק. ● כאשר Soundbarמנותק מהתקן ה ,Bluetooth device-בתצוגה הקדמית של Soundbarיופיע .BT DISCONNECTED לניתוק SOUNDBARמהתקן הBLUETOOTH- לחץ על הלחצן SOURCEשבשלט רחוק או על הלחצן כדי לכבות את ה.Soundbar- )מקור( בלוח העליון של המוצר כדי לעבור ממצב BTלמצב אחר או ● התקן ה Bluetooth-המחובר ימתין זמן מסוים לתגובה מ Soundbar-לפני סיום החיבור) .זמן הניתוק עשוי להשתנות בהתאם להתקן ה(.Bluetooth- 25 4:58:01 2015-05-06 HW-J6001_SQ_HEB_0506.indd 25 פונקציות ● במצב חיבור ,Bluetoothחיבור ה Bluetooth-יאבד אם המרחק בין ה Soundbar-והתקן ה Bluetooth-עולה על הטווח האפשרי 10מטר. ● Soundbarייכבה באופן אוטומטי לאחר 25דקות במצב מוכן. _ עוד על Bluetooth Bluetoothהיא טכנולוגיה שמאפשרת להתקנים תואמי Bluetoothלהתחבר בקלות אלה עם אלה באמצעות חיבורים אלחוטיים קצרים. ● התקן Bluetoothעשוי לגרום לרעשים או לתקלות ,בהתאם לאופן השימוש ,כאשר: חלק מגופכם נוגע במערכת הקליטה/שידור של התקן ה Bluetooth-או ה.Soundbar- השידורים מההתקן נחסמים על-ידי מכשולים כגון קיר ,פינה או מחיצות משרדיות. שידורי ההתקן משובשים על-ידי הפרעות חשמליות מהתקנים המשדרים באותו טווח תדרים ,כגון מכשירים רפואיים,מיקרו-גלים ו LAN-אלחוטי. ● צמדו את ה Soundbar-עם התקן ה Bluetooth-תוך שמירת מרחק קצר. ● ככל שהמרחק בין ה Soundbar-לבין התקן ה Bluetooth-גדול יותר ,איכות הקליטה תהיה גרועה יותר. אם המרחק יהיה גדול מטווח הפעולה של התקן ה ,Bluetooth-החיבור יתנתק. ● באזורים בעלי איכות קליטה ירודה ,ייתכן שחיבור ה Bluetooth-לא יפעל כהלכה. ● חיבור ה Bluetooth-פועל כהלכה רק כאשר הוא נמצא בקרבת המערכת .החיבור יתנתק באופן אוטומטי כאשר ההתקן יוצב מחוץ לטווח הפעולה .גם בתוך טווח הפעולה ,ייתכן שאיכות הקול תיפגע בשל מכשולים כגון קירות או דלתות. ● התקן אלחוטי זה עשוי לגרום להפרעות חשמליות במהלך הפעלתו. שימוש ביישום SAMSUNG AUDIO REMOTE _ התקן את היישום Samsung Audio Remote כדי לשלוט על המוצר באמצעות ההתקן החכם והיישום ,Samsung Audio Remoteהורד את היישום Samsung Audio Remote דרך החנות .Google Play חיפוש שוק Samsung Audio Remote : ANDROID APP ON _ גישה ליישום Samsung Audio Remote לאחר התקנת היישום ,Samsung Audio Remoteעקוב אחר ההוראות שביישום. ● הפונקציה APPתומכת רק בטלפונים ניידים מסוג Androidהמריצים Android OS 3.0ומעלה. 26 4:58:01 2015-05-06 HW-J6001_SQ_HEB_0506.indd 26 פונקציות עדכון תוכנה HEB HDMI IN DC 14V AUX IN 5V 0.5A HDMI OUT )(TV-ARC OPTICAL IN 5V 0.5A Samsungעשויה להציע בעתיד עדכונים לקושחת המערכת של .Soundbar במידה ומוצע עדכון ,ניתן לעדכן את הקושחה על-ידי חיבור התקן USBעם עדכון הקושחה ליציאת ה USB-של ה.Soundbar- שימו לב שאם קיימים קובצי עדכון מרובים ,עליך לטעון כל אחד בנפרד להתקן ה USB-ולהשתמש בו. בקר באתר Samsung.comאו צור קשר עם מרכז התמיכה של Samsungכדי לקבל מידע נוסף על הורדת קובצי עדכונים. ● הכנס התקן USBהמכיל את שדרוג הקושחה ליציאת ה USB-ביחידה הראשית. ● ייתכן ששדרוג הקושחה לא יפעל כהלכה אם קובצכי שמע הנתמכים על-ידי ה Soundbar-שמורים בהתקן אחסון ה.USB- ● ● ● ● ● אין לכבות את המכשיר או לנתק את התקן ה USB-בעת החלת עדכונים .היחידה הראשית תכבה באופן אוטומטי לאחר שעדכון הקושחה יסתיים. לאחר העדכון ,כל ההגדרות יתאפסו להגדרות היצרן.היחידה הראשית תכבה באופן אוטומטי לאחר שעדכון הקושחה יסתיים. שים לב שעדכון הקושחה מאפס גם את חיבור הסאבוופר .אם החיבור לסאבוופר לא מתבצע באופן אוטומטי לאחר העדכון, עיין בעמוד .15אם עדכון הקושחה נכשל ,אנו ממליצים לפרמט את התקן ה USB-שוב ב FAT16-ולנסות שוב. לאחר השלמה של עדכון התוכנה ,כבה את המוצר ולאחר מכן לחץ והחזק את הלחצן ) & ( בשלט רחוק למשך יותר 5 שניות "INIT" .יופיע בתצוגה והיחידה תכובה .העדכון הושלם. אין לפרמט את כונן ה USB-בפורמט .NTFSה Soundbar-אינו תומך במערכת הקבצים .NTFS ייתכן שהתקן ה USB-אינו נתמך ,בהתאם ליצרן. 27 4:58:02 2015-05-06 HW-J6001_SQ_HEB_0506.indd 27 פתרון בעיות פתרון בעיות פתרון בעיות בטרם תפנו לקבלת שירות ,בדקו את הפרטים שלהלן. המכשיר אינו נדלק. • האם כבל החשמל מחובר לשקע? חברו את כבל החשמל לשקע. פונקציה מסוימת אינה פועלת בעת לחיצה על הלחצן. • האם ישנו חשמל סטטי באוויר? נתקו את כבל החשמל וחברו אותו שוב. לא נשמעים צלילים. • האם פונקציית ה-השתק פועלת? לחצו על הלחצן • האם עוצמת הקול מוגדרת לעוצמה הנמוכה ביותר? כוונן את עוצמת השמע. )השתק( כדי לבטל את הפונקציה. השלט רחוק אינו פועל. • האם הסוללות מרוקנות? החליפו את הסוללות בסוללות חדשות. • האם המרחק בין השלט רחוק לבין המכשיר גדול מדי? התקרבו למכשיר. צימוד ) TV SoundConnectצימוד לטלוויזיה( נכשל. • האם הטלוויזיה שלך תומכת ב?TV SoundConnect- TV SoundConnect נתמך בחלק מטלוויזיות Samsung שהושקו אחרי .2012בדוק אם הטלוויזיה שלך תומכת בTV- .SoundConnect • האם הקושחה של הטלוויזיה מהגרסה האחרונה? עדכנו את הטלוויזיה לגרסת הקושחה העדכנית ביותר. • האם אירעה תקלה בעת ההתחברות? צור קשר עם מרכז התמיכה של .Samsung • אתחלו את מצב TVוהתחברו שוב. לחץ לחיצה ארוכה על הלחצן & למשך חמש שניות כדי לאפס את חיבור .TV SoundConnect נורית ה LED-האדומה בסאבוופר מהבהבת והסאבוופר אינו משמיע צליל. • ייתכן שהסאבוופר אינו מחובר ליחידה הראשית של המוצר. נסה לחבר שוב את הסאבוופר) .ראו עמוד (15 הסאבוופר מזמזם ורוטט באופן ניכר. • נסה לכוונן את רעידות הסאבוופר. לחץ על הלחצן WOOFERבשלט רחוק כדי לכוונן את ערכו )בין -6 ,-12לבין .(+6 28 4:58:03 2015-05-06 HW-J6001_SQ_HEB_0506.indd 28 נספח נספח מפרטים HEB שם דגם HW-J6001 USB משקל כללי מידות )רוחב xגובה x עומק( המכשיר 2.7ק"ג סאבוופר )(PS-WJ6001 6.8ק"ג המכשיר 129 x 47.5 x 1078מ"מ סאבוופר )(PS-WJ6001 154 x 335 x 452מ"מ טווח הטמפרטורה בפעולה °C +5עד °C +35 טווח אחוזי הלחות בפעולה % 10עד % 75 דירוג צריכת חשמל מגבר A 0.5 / V 5 המכשיר 22ואט/ערוץ 1 ,% 10 = THD ,OHM 4 ,6 xקילוהרץ סאבוופר )(PS-WJ6001 168ואט 100 ,% 10 = THD ,OHM 3 ,הרץ יחס אות לרעש )קלט אנלוגי( 65דציבלים הפרדה ) 1קילוהרץ( 65דציבלים * הערכים של יחס אות לרעש ,עיוות ,הפרדה ורגישות שימושית מבוססים על המידות שנקבעו על פי הקווים מנחים של ארגון AES ).(Audio Engineering Society * מפרט נומינלי - Samsung Electronics Co., Ltdשומרת את הזכות לשנות את המפרטים ללא התרעה. - המשקל והמידות המצוינים הם משוערים. - לקבלת מידע אודות אספקה וצריכת חשמל ,עיינו בתווית המודבקת על-גבי המכשיר. aהודעת רשיון קוד פתוח - לשאלות ובקשות בנוגע למקור פתוח ,צור קשר עם Samsungבדוא"ל ).([email protected] 29 4:58:03 2015-05-06 HW-J6001_SQ_HEB_0506.indd 29 © 2015 Samsung Electronics Co., Ltd. All rights reserved. Contact SAMSUNG WORLD WIDE If you have any questions or comments relating to Samsung products, please contact the SAMSUNG customer care centre. . כל הזכויות שמורותSamsung Electronics Co.,Ltd 2015 © SAMSUNG WORLD WIDE יצירת קשר עם .SAMSUNG אנא צרו קשר עם מרכז שירות הלקוחות של,Samsung אם יש לכם שאלות או הערות הנוגעות למוצרי Web Site www.samsung.com/support www.samsung.com/africa_en/support www.samsung.com/africa_fr/support www.samsung.com/support HW-J6001_SQ_HEB_0506.indd 30 Contact Centre Area Africa ` SOUTH AFRICA BOTSWANA NAMIBIA ZAMBIA MAURITIUS REUNION MOZAMBIQUE NIGERIA 0860 SAMSUNG (726 7864) 8007260000 08 197 267 864 0211 350370 23052574020 262508869 847267864 / 827267864 0800-726-7864 0800-10077 GHANA 0302-200077 8000 0077 COTE D’IVOIRE 800-00-0077 SENEGAL 7095-0077 CAMEROON 0800 545 545 KENYA 0800 300 300 UGANDA 0800 755 755 / TANZANIA 0685 889 900 9999 RWANDA 200 BURUNDI 499999 DRC 1969 SUDAN Web Site Contact Centre Area Middle East ` www.samsung.com/eg/support www.samsung.com/n_africa/support www.samsung.com/iran/support www.samsung.com/sa/support www.samsung.com/sa_en/support (English) www.samsung.com/pk/support www.samsung.com/n_africa/support www.samsung.com/ae/support (English) www.samsung.com/ae_ar/support (Arabic) www.samsung.com/tr/support www.samsung.com/Levant/support (English) www.samsung.com/n_africa/support 08000-7267864 16580 021 36 11 00 021-8255 EGYPT ALGERIA IRAN 8002474357 SAUDI ARABIA 0800-Samsung (72678) 80-1000-12 800-SAMSUNG (800 - 726 7864) 800-SAMSUNG (800 - 726 7864) 183-CALL (183-2255) 8000-GSAM (8000-4726) 800-CALL (800-2255) 444 77 11 0800-22273 06 5777444 18252273 080 100 22 55 PAKISTAN TUNISIA U.A.E OMAN KUWAIT BAHRAIN QATAR TURKEY JORDAN SYRIA MOROCCO 2015-05-06 4:58:03