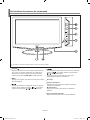
1
LCD TV
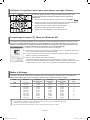
Contact SAMSUNG WORLD-WIDE
If you have any questions or comments relating to Samsung products,
please contact the SAMSUNG customer care centre.
Comment contacter Samsung dans le monde
Si vous avez des suggestions ou des questions concernant les produits
Samsung, veuillez contacter le Service Consommateurs Samsung.
Country
Customer Care Center
Web Site
BELGIUM
02 201 2418
www.samsung.com/be
CZECH REPUBLIC
844 000 844
www.samsung.com/cz
DENMARK
38 322 887
www.samsung.com/dk
FINLAND
09 693 79 554
www.samsung.com/fi
FRANCE
08 25 08 65 65 (€ 0,15/Min)
www.samsung.com/fr
GERMANY
01805 - 121213 (€ 0,12/Min)
www.samsung.de
HUNGARY
06 40 985 985
www.samsung.com/hu
ITALIA
199 153 153
www.samsung.com/it
LUXEMBURG
02 261 03 710
www.samsung.lu
NETHERLANDS
0900 20 200 88 (€ 0.10/Min)
www.samsung.com/nl
NORWAY
231 627 22
www.samsung.com/no
POLAND
0 801 801 881
www.samsung.com/pl
PORTUGAL
80 8 200 128
www.samsung.com/pt
RUSSIA
8-800-200-0400
www.samsung.ru
SLOVAKIA
0850 123 989
www.samsung.com/sk
SPAIN
902 10 11 30
www.samsung.com/es
SWEDEN
08 585 367 87
www.samsung.com/se
U.K
0870 242 0303
www.samsung.com/uk
UKRAINE
8-800-502-0000
www.samsung.com/ur
LE26R73BD
LE26R74BD
LE32R73BD
LE32R74BD
LE37R74BD
LE40R73BD
LE40R74BD
Owner’s Instructions
Before operating the unit,
please read this manual thoroughly,
and retain it for future reference.
ON-SCREEN MENUS
PC DISPLAY
PICTURE IN PICTURE (PIP)
TELETEXT
This device is a Class B digital apparatus.
Register your product at www.samsung.com/global/register
BN68-01007C-00
BN68-01007C-X0Cover.indd 1
2006-02-06 ¿ÀÈÄ 1:27:30
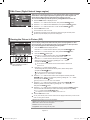
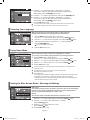
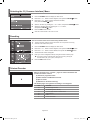
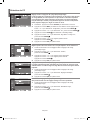
Precautions When Displaying a Still Image
A still image may cause permanent damage to the TV screen.
• Do not display a still image on the LCD panel for more than 2 hours as it can cause screen image retention.
This image retention is also known as "screen burn".
To avoid such image retention, reduce the degree of brightness and contrast of the screen when displaying a still image.
• Watching the LCD TV in 4:3 format for a long period of time may leave traces of borders displayed on the left, right and center of the screen caused by the difference of light emission on the screen.
Playing a DVD or a game console may cause a similar effect to the screen.
Damages caused by the above effect are not covered by the Warranty.
•Displaying still images from Video games and PC for longer than a certain period of time may produce partial after-images.
To prevent this effect, reduce the ‘brightness’ and ‘contrast’ when displaying still images.
Précautions à prendre lors de l'affichage d'une image fixe
Une image fixe peut causer des dommages irrémédiables à l'écran du téléviseur.
• N'affichez pas une image fixe sur l'écran LCD plus de 2 heures. Cela pourrait provoquer une rémanence de l'image à
l'écran. Cette rémanence de l'image est également appelée "brûlure de l'écran".
Pour éviter une telle rémanence de l'image à l'écran, réduisez la luminosité et le contraste de l'écran lorsque vous laissez
une image fixe affichée.
• Regarder l'écran LCD du téléviseur en format 4:3 pendant une longue période peut laisser des traces de
bordures à gauche, à droite et au centre de l'écran, à cause de la différence d'émission de lumière sur
l'écran. La lecture d'un DVD ou l'utilisation d'une console de jeu peut avoir un effet similaire sur l'écran.
Les dommages provoqués par les effets qui précèdent ne sont pas couverts par la garantie.
•L'affichage d'images fixes de jeux vidéo et d'ordinateurs pendant plus longtemps qu'une période spécifique peut provoquer
des rémanences. Pour éviter cela, réduisez la "luminosité" et le "contraste" lors de l'affichage d'images fixes.
Still.indd 1
2006-01-24 ¿ÀÀü 10:33:56
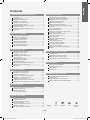
English
Contents
Connecting and Preparing Your TV
uSING The DTV FeATuRe
List of Parts..............................................................................
Installing the Stand..................................................................
Installing the Wall Mount Kit............................................... Viewing the Control Panel.......................................................
Viewing the Connection Panel.................................................
Viewing the Remote Control....................................................
Installing Batteries in the Remote Control...............................
Switching On and Off...............................................................
Placing Your Television in Standby Mode...............................
Plug & Play..............................................................................
2
2
2
3
4
6
6
7
7
7
Setting the Channels
Storing Channels Automatically............................................... 8
Storing Channels Manually...................................................... 8
Setting the Channel Manager.................................................. 9
Activating the Child Lock.................................................... 9
Sorting the Stored Channels...................................................10
Assigning Channels Names....................................................10
Fine Tuning Channel Reception..............................................10
LNA (Low Noise Amplifier).......................................................11
Setting the Picture
Changing the Picture Standard...............................................11
Adjusting the Custom Picture..................................................11
Changing the Colour Tone.......................................................11
Resetting the Picture Settings to the Factory Defaults......................................................................12
Changing the Picture Size.......................................................12
Freezing the Current Picture...................................................12
Digital Noise Reduction...........................................................12
DNIe Demo (Digital Natural Image engine).............................13
Viewing the Picture In Picture (PIP)........................................13
PIP Settings.............................................................................14
Setting the Sound
Changing the Sound Standard........................................... 14
Adjusting the Sound Settings............................................. 14
Connecting Hheadphones.................................................. 14
Setting the TruSurround XT (SRS TSXT).......................... 15
Adjusting the Volume Automatically................................... 15
Selecting the Internal Mute................................................ 15
Listening to the Sound of the Sub Picture......................... 15
Resetting the Sound Settings to the Factory Defaults....... 16
Previewing the DTV Menu System..........................................19
Updating the Channel List Automatically.................................19
Updating the Channel List Manually.................................. 20
Editing Your Favourite Channels.............................................20
Selecting Channel Manager....................................................21
Displaying Programme Information.........................................22
Viewing the EPG (Electronic Programme Guide)
Information...............................................................................22
Using the Scheduled List.........................................................23
Setting the Default Guide........................................................23
Viewing All Channels and Favourite Channels.......................24
Choosing Your Language........................................................24
Adjusting the Translucency Level...................................... 25
Setting up the Parental Lock...................................................25
Setting the Subtitle..................................................................26
Selecting the Preferred Language
(Subtitle or Audio)....................................................................26
Viewing Product Information....................................................26
Checking the Signal Information.............................................26
Upgrading the Software (Option).............................................27
Viewing Common Interface.....................................................27
Selecting the CI (Common Interface) Menu............................28
Resetting..................................................................................28
Using the Teletext Feature
Teletext Decoder................................................................ 28
Displaying the Teletext Information.................................... 29
Selecting a Specific Teletext Page..................................... 29
Using Fastext to Select a Teletext Page............................ 30
Setting the PC
Setting up Your PC Software (Based on Windows XP).................................................... 30
Display Modes.................................................................... 30
Setting the PC.................................................................... 31
Recommendations For Use
Using the Anti-Theft Kensington Lock................................ 32
Troubleshooting: Before Contacting Service Personnel................................ 32
Technical and Environmental Specifications . ................... 33
Setting the Time
Setting and Displaying the Current Time........................... 16
Setting the Sleep Timer...................................................... 16
Switching the Television On and Off Automatically................................................... 16
Setting the Others
Choosing Your Language................................................... 17
Using Game Mode............................................................. 17
Setting the Blue Screen Mode / Selecting the Melody ........................................................ 17
Using the Energy Saving Feature...................................... 18
Selecting the Source.......................................................... 18
Editing the Input Source Names........................................ 18
Symbol
Press
Important
Note
One-Touch
Button
English-
BN68-01007C-00Eng.indd 1
2006-03-03 ¿ÀÈÄ 3:02:55
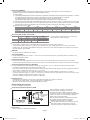
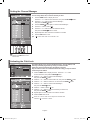
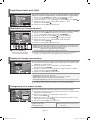
List of Parts
Please make sure the following items are included with your LCD TV. If any items are missing, contact your dealer.
M4 X L16
Remote Control &
Batteries (AAA x 2)
Owner’s Instructions
Power Cord
Cover-Bottom
Warranty card
Stand Screw X 4
Service Network Card
Stand
Safety Guide
Cleaning Cloth
Registration Cards
Warranty card / Service Network Card / Safety Guide / Registration Cards (Not available in all locations)
The stand and stand screw may not be included depending on the model.
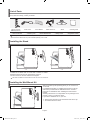
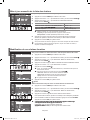
Installing the Stand
<2>
<3>
1.Place the TV faced down on a soft cloth or cushion on a table.
2.Put the stand into the hole at the bottom of the TV.
3.Insert screw into the hole indicated and tighten.
The stand is installed for models with the screen size of 40 inch and above.
Installing the Wall Mount Kit
Wall mount items (sold separately) allow you to mount the TV
on the wall.
For detailed information on installing the wall mount, see the
instructions provided with the Wall Mount items. Contact a
technician for assistance when installing the wall mounted
bracket.
Samsung Electronics is not responsible for any damage to the
product or injury to yourself or others if you elect to install the TV on your own.
emove the stand and cover the bottom hole with a cap
R
and fasten with two screws.
English-
BN68-01007C-00Eng.indd 2
2006-03-03 ¿ÀÈÄ 3:02:57
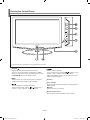
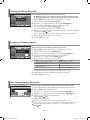
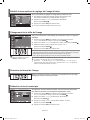
Viewing the Control Panel
The product colour and shape may vary depending on the model.
SOURCE
Toggles between all the available input sources
(TV, Ext.1, Ext.2, AV, S-Video, Component, PC, HDMI,
DTV). In the on-screen menu, use this button as you use
the ENTER
button on the remote control.
MENU
Press to see an on-screen menu of your TV’s features.
In case of DTV mode, the DTV menu appears.
Press to decrease or increase the volume.
In the on-screen menu, use the
buttons as you
use the 3 and 4 buttons on the remote control.
Press to change channels. In the on-screen menu, use the
buttons as you
use the 5 and 6 buttons on the remote control.
(Without the Remote Control, you can turn on the TV by
using the Channel buttons.)
Speakers
Power Indicator
Blinks and turns off when the power is on and lights up in
stand-by mode.
(Power)
Press to turn the TV on and off.
Remote Control Sensor
Aim the remote control towards this spot on the TV.
English-
BN68-01007C-00Eng.indd 3
2006-03-03 ¿ÀÈÄ 3:02:58
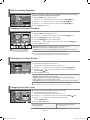
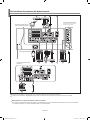
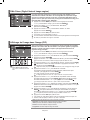
Viewing the Connection Panel
[Side Panel Jacks]
[Rear Panel Jacks]
(32 inch, 37 inch, 40 inch)
(26 inch model does not have the side panel jacks.)
Power Input
[Rear Panel Jacks]
(26 inch)
Whenever you connect an external device to your TV, make sure that power on the unit is turned off. When connecting an external device, match the colour of the connection terminal to the cable.
Connecting an Aerial or Cable Television Network
To view television channels correctly, a signal must be received by the set from one of the following sources:
-An outdoor aerial / A cable television network / A satellite network
English-
BN68-01007C-00Eng.indd 4
2006-03-03 ¿ÀÈÄ 3:02:59
Connecting HDMI/DVI
-Supports connections between HDMI-connection-enabled AV devices (Set-Top Boxes, DVD players, AV receivers and digital TVs).
-No additional Audio connection is needed for an HDMI to HDMI connection.
What is HDMI?
- “High Definition Multimedia interface” allows the transmission of high definition digital video data and multiple channels of digital audio (5. 1 channels).
- The HDMI/DVI terminal supports DVI connection to an extended device with the appropriate cable (not supplied). The difference between HDMI and DVI is that the HDMI device is smaller in size, has the HDCP
(High Bandwidth Digital Copy Protection) coding feature installed, and supports multi - channel digital audio.
You should use the DVI-to-HDMI cable or DVI-HDMI Adapter for the connection, and the "R - AUDIO - L" terminal on DVI for sound output.
- When connecting this product via HDMI or DVI to a Set Top Box, DVD Player or Games Console etc, make sure that it has been set to a compatible video output mode as shown in the table below. Failure to observe this may result in picture distortion, image breakup or no picture. Supported modes for DVI or HDMI
50 Hz
60 Hz
Component
480i
X
X
O
480p
O
O
O
576i
X
X
O
576p
O
X
O
720p
O
O
O
1080i
O
O
O
- Do not attempt to connect the HDMI/DVI connector to a PC or Laptop Graphics Card. (This will result in a blank screen being displayed)
Connecting Set-Top Box, VCR or DVD
Connector
Video
Input
Audio (L/R)
Output
Video + Audio (L/R)
Only TV or DTV output is available.
Output you can choose.
RGB
EXT 1
EXT 2
- Inputs or outputs for external devices, such as VCR, DVD, video game device or video disc players.
Connecting External A/V Devices
-Connect RCA or S-VIDEO cable to an appropriate external A/V device such as VCR, DVD or Camcorder.
-Connect RCA audio cables to "R - AUDIO - L" on the rear of your set and the other ends to corresponding audio out connectors on the A/V device.
-Headphone may be connected to the headphone output ( ) on the rear of your set. While the headphone is connected, the sound from the built-in speakers will be disabled.
SERVICE
-Service connection for qualified service engineer.
Connecting AUDIO
-Connect RCA audio cables to "R - AUDIO - L" on the rear of your set and the other ends to corresponding audio in connectors on the Amplifier or DVD Home Theater.
Connecting Computer
-Connect the D- Sub cable (optional) to "PC (PC IN)" on the rear of your set and the other end to the Video Card of your computer. -Connect the stereo audio cable (optional) to "AUDIO (PC IN)" on the rear of your set and the other end to "Audio Out" of the sound card on your computer.
Connecting Component Devices (DTV/DVD)
-Connect component video cables (optional) to component connector ("PR", "PB", "Y") on the rear of your set and the other ends to corresponding component video out connectors on the DTV or DVD.
-If you wish to connect both the Set-Top Box and DTV (or DVD), you should connect the Set-Top Box to the DTV (or DVD) and connect the DTV (or DVD) to component connector ("PR", "PB", "Y") on your set.
-The PR, PB and Y connectors on your component devices (DTV or DVD) are sometimes labeled Y, B-Y and R-Y or Y, Cb and Cr.
-Connect RCA audio cables (optional) to "R - AUDIO - L" on the rear of your set and the other ends to corresponding audio out connectors on the DTV or DVD.
-This LCD TV displays its optimum picture resolution in 720p mode. - This LCD TV displays its maximum picture resolution in 1080i mode.
Kensington Lock
- The Kensington lock (optional) is a device used to physically fix the system when used in a public place. - If you want to use a locking device, contact the dealer where you purchased the TV. - The place of the Kensington Lock may be different depending on its model.
DIGITAL AUDIO OUT (OPTICAL)
- Connect to a Digital Audio Component.
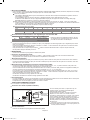
Connecting CI (Common Interface) CARD
TV Rear Panel
- When not inserting "CI CARD" in some channels,
"Scrambled Signal" is displayed on the screen.
- The pairing information containing a telephone number, CI CARD ID, Host ID, and other information will be displayed
Please insert in about 2~3 minutes. If an error message is displayed, the card as
please contact your service provider.
shown
- When the channel information configuration has finished, CI CARD
the message "Updating Completed" is displayed, indicating that the channel list is now updated.
You must obtain a CI CARD from a local cable service provider.
Remove the CI CARD by carefully pulling it out with your hands since dropping the CI CARD may cause damage to it.
Service Port
- Service connection for qualified service engineer.
English-
BN68-01007C-00Eng.indd 5
2006-03-03 ¿ÀÈÄ 3:03:00
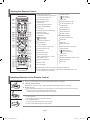
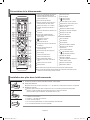
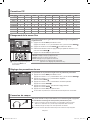
Viewing the Remote Control
Selects
a target device to be controlled by the Samsung remote control
(TV, DVD, STB, CABLE, VCR)
Television Standby button
Number buttons for direct channel access
Automatic Power-off
P
: Next channel
P : Previous channel
Exit the OSD
C
ontrol the cursor in the menu
One/Two-digit channel selection
Use to see information on the current broadcast
display "Channel Manager" It
on the screen.
Picture size selection
Selects the TV and DTV mode directly
VCR/DVD Functions
Rewind, Stop, Play/Pause, Fast/Forward
Volume increase
Volume decrease
T
emporary sound switch-off
Menu display and change confirmation
Digital
subtitle display
Sound mode selection
SRS TSXT selection
Teletext Functions
Exit from the teletext display
Teletext index
Teletext hold
Teletext size selection
Electronic Program Guide (EPG) display
Teletext mode selection (LIST/FLOF)
Picture-In-Picture On / Off
Teletext sub page
Picture freeze
: Teletext next page
P
P : Teletext previous page
Picture effect selection
ound effect selection
S
Adjusts 5 separate devices - TV, DVD,
STB, CABLE, or VCR.
Teletext cancel
Teletext reveal
Alternately select Teletext, Double, or Mix.
vailable source selection
A
Fastext topic selection
Previous channel
Teletext store
DTV menu display
The performance of the remote control may be affected by bright light.
T
his is a special remote control for the visually impaired, and has Braille points on the
Power, Channel and Volume buttons.
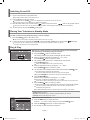
Installing Batteries in the Remote Control
1. Lift the cover at the back of the remote control upward as shown in the figure.
2. Install two AAA size batteries.
Make sure to match the "+" and "–" ends of the batteries with the diagram inside the compartment.
3. R
eplace the cover.
R
emove the batteries and store them in a cool, dry place if you won’t be using the remote control for a long time.
The remote control can be used up to about 23 feet from the TV. (Assuming typical TV usage, the batteries last for about one year.)
If the remote control doesn’t work, check the following:
1. Is the TV power on?
2. Are the plus and minus ends of the batteries reversed?
3. Are the batteries drained?
4. Is there a power outage, or is the power cord unplugged?
5. Is there a special fluorescent light or neon sign nearby?
English-
BN68-01007C-00Eng.indd 6
2006-03-03 ¿ÀÈÄ 3:03:03
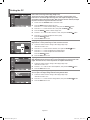
Switching On and Off
The mains lead is attached to the rear of your set.
1. Plug the mains lead into an appropriate socket.
The standby indicator lights up on the front of the set.
2. Press the button on the front of the set.
You also can press the POWER
button or the TV/DTV button on the remote control to turn the TV on.
The programme that you were watching last is reselected automatically.
3. P
ress the numeric button (0~9) or channel up/down ( / ) button on the remote control or button on the right side of the set.
When you switch the set on for the very first time, you will be asked to choose language in which the menus are to be displayed.
4. To switch your set off, press the POWER
button again.
Placing Your Television in Standby Mode
Your set can be placed in standby mode in order to reduce the power consumption. The standby mode can be useful when
you wish to interrupt viewing temporarily (during a meal, for example).
1. Press the POWER
button on the remote control.
The screen is turned off and a red standby indicator appears on the front of your set.
2. To switch your set back on, simply press the POWER
, numeric buttons (0~9), TV/DTV button or channel up/down ( / ) button again.
Do
not leave your set in standby mode for long periods of time (when you are away on holiday, for example). It is best to unplug the set from the mains and aerial. Plug & Play
When the TV is initially powered on, several basic settings proceed automatically
and subsequently. The following settings are available.
1. Press the POWER button on the remote control.
The message "Démarrer Plug & Play" is displayed with "OK" selected.
2. Select the appropriate language by pressing the or button.
Press the ENTER button to confirm your choice.
3. The message "Check antenna input." is displayed with "OK" selected.
Press the ENTER button.
Please check that the antenna cable is connected correctly.
4. Select the appropriate country by pressing the or button.
Press the ENTER button to confirm your choice.
5. T
he "Auto Store" menu is displayed with the "Start" selected. Press the ENTER
button.
The channel search will start and end automatically.
After all the available channels are stored, the "Clock Set" menu appears. button at any time to interrupt the memorization process.
Press the ENTER
6. P
ress the ENTER button.
Select the "Hour" or "Minute" by pressing the or button.
Set the "Hour" or "Minute" by pressing the or button.
You can also set the hour and minute by pressing the number buttons on the remote control.
7. P
ress the ENTER button to confirm your setting. The DTV channel scan menu appears and the DTV channel is automatically updated.
If the DTV channel is updated, the Source in the source list of the Input menu is automatically changed to DTV.
For detailed descriptions about DTV channel update, refer to page 27 of this manual.
Language: Select your language.
Country: Select your country.
Auto Store: A
utomatically scans for and stores channels available in the local area.
Clock Set: Sets the current time for the TV clock.
If you want to reset this feature...
1. Press the MENU button to display the menu.
Press the or button to select "Setup", then press the ENTER
2. Press the ENTER
button.
button again, to select "Plug & Play".
3. The message to "Start Plug & Play" is displayed.
English-
BN68-01007C-00Eng.indd 7
2006-03-03 ¿ÀÈÄ 3:03:04
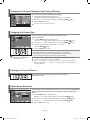
- Storing Channels Automatically
- Storing Channels Manually
Storing Channels Automatically
You can scan for the frequency ranges available to you (and availability depends on your country).
Automatically allocated programme numbers may not correspond to actual or desired programme numbers.
However, you can sort numbers manually and clear any channels you do not wish to watch.
1. Press the MENU button to display the menu. Press the or button to select "Channel", then press the ENTER
2. Press the ENTER
button.
button to select "Country".
3. Select the appropriate country by pressing the or button. Press the ENTER
4. Press the or button to select "Auto Store", then press the ENTER
5. P
ress the ENTER
button to confirm your choice.
button.
button.
The TV will begin memorizing all of the available channels.
Press the ENTER
button at any time to interrupt the memorization process and return to the "Channel" menu.
6. After all the available channels are stored, the "Sort" menu appears.
Storing Channels Manually
You can store up to 100 channels, including those received via cable networks.
When storing channels manually, you can choose:
Whether or not to store each of the channels found.
The programme number of each stored channel which you wish to identify.
1. Press the MENU button to display the menu. Press the or button to select "Channel", then press the ENTER
button.
2. Press the or button to select "Manual Store", then press the ENTER
3. Press the ENTER
button.
button to select "Programme".
4. To assign a programme number to a channel, find the correct number by pressing the or button and then press the ENTER button.
You can also set a programme number by pressing number buttons on the remote control.
5. Press the or button to select "Colour System", then press the ENTER
button.
6. Select the colour standard required by pressing the or button then, press the ENTER
7. Press the or button to select "Sound System", then press the ENTER
8. Select the sound standard required by pressing the or button, then press the ENTER
button.
button.
If there is an abnormal sound or no sound, re-select the sound system required.
button.
9. If you know the number of the channel to be stored, press the or button to select "Channel". Press the ENTER
Select C (Air channel) or S (Cable channel) by pressing the or button. Press the button to select channel. Select the required number by pressing the or button and then press the ENTER button.
button.
Channel mode: P (Programme mode), C (Air channel mode), S (Cable channel mode)
You can also set a channel number by pressing number buttons on the remote control.
10.If you do not know the channel numbers, press the or button to select "Search". Press the ENTER button. Search by pressing the or button and then press the ENTER
11.Press the or button to select "Store". Press the ENTER
button.
button to select "OK".
12.Repeat steps 3 to 11 for each channel to be stored.
Programme: Selects a program number for the channel.
Colour System: Sets the colour supporting system.
Sound System: Sets the sound supporting system.
Channel: Selects a channel. Search: Scans for the frequency value for the channel.
Store: Saves your settings.
English-
BN68-01007C-00Eng.indd 8
2006-03-03 ¿ÀÈÄ 3:03:05
Setting the Channel Manager
Set the channels according to your preference.
You can easily delete, add, or lock the channel you want.
1.
Press the MENU button to display the menu. Press the or button to select "Channel", then press the ENTER
2.
Press the or button to select "Channel Manager", then press the ENTER
button.
3.
Press the ENTER
4.
Press the button to select "
5.
Press the or button to select the undesired channel, then press the ENTER
button to cancel.
6.
Repeat steps 5 for each channel to be selected or canceled
7.
button again, to select "Channel Manager".
".
Press the EXIT button to exit.
"
button.
" is active when "Child Lock" is selected to "On".
You can select these options by simply
pressing the CH MGR button on the
remote control.
Activating the Child Lock
This feature allows you to prevent unauthorized users, such as children, from
watching unsuitable programmes by muting out video and audio.
Child Lock cannot be released using the buttons on the side.
Only the remote control can release the Child Lock setting, so keep the remote
control away from children.
1. Press the MENU button to display the menu. Press the or button to select "Channel", then press the ENTER button.
2. Press the or button to select "Channel Manager", then press the ENTER button.
3. Press the or button to select "Child Lock", then press the ENTER
4. Press the or button to select "On" or "Off". Press the ENTER
button.
button.
5. Press the or button to select "Channel Manager", then press the ENTER button.
6. Press the button to select " " line.
7. Press the or button to select the channels you want to lock, then press the ENTER button.
8. Repeat steps 7 for each channel to be locked or unlocked.
9. Press the EXIT button to exit.
Select "On" or "Off" in "Child Lock" to easily turn the channels which selected on " " to be active or inactive.
English-
BN68-01007C-00Eng.indd 9
2006-03-03 ¿ÀÈÄ 3:03:06
Sorting the Stored Channels
You can exchange the numbers of two channels, in order to:
Modify the numeric order in which the channels have been automatically stored.
G
ive easily remembered numbers to the channels that you watch most often.
1. Press the MENU button to display the menu. Press the or button to select "Channel", then press the ENTER button.
2. Press the or button to select "Sort", then press the ENTER
button.
3. Select the channel number that you wish to change by pressing the
or button repeatedly. Press the ENTER button.
The selected channel number and name are moved to right side.
4. P
ress the or button to move to the position in which you would like to change and
then press the ENTER button.
The selected channel is exchanged with the one previously stored to the chosen number.
5. Repeat steps 3 to 4 for another channel to be sorted.
6. Press the EXIT button to exit.
Assigning Channels Names
Channel names will be assigned automatically when channel information is broadcast.
These names can be changed, allowing you to assign new names.
1. Press the MENU button to display the menu. Press the or button to select "Channel", then press the ENTER button.
2. Press the or button to select "Name", then press the ENTER
button.
3. If necessary, select the channel to be assigned to a new name by pressing the or button. Press the ENTER button.
The selection bar is displayed around the name box.
4. To...
Then...
Select a letter, number or symbol
Press the or button
Move on the next letter
Press the button
Move back the previous letter
Press the button
Confirm the name
Press the ENTER
button
he characters available are :
T
Letters of the alphabet (A~Z) / Numbers (0~9) / Special characters ( -, space)
5. Repeat steps 3 to 4 for each channel to be assigned to a new name.
6. Press the EXIT button to exit.
Fine Tuning Channel Reception
Use fine tuning to manually adjust a particular channel for optimal reception.
1. Use the number buttons to directly select the channel that you want to fine tune.
2. Press the MENU button to display the menu. Press the or button to select "Channel", then press the ENTER
3. Press the or button to select "Fine Tune", then press the ENTER
button.
button.
4. Press the or button to adjust the fine tuning. Press the ENTER button.
5. Press the EXIT button to exit.
ine tuned channels that have been saved are marked with an asterisk "*" on the F
right-hand side of the channel number in the channel banner. And the channel number turns red.
To reset the fine-tuning, select "Reset" by pressing the or button and then press the ENTER �������
button.
English-10
BN68-01007C-00Eng.indd 10
2006-03-03 ¿ÀÈÄ 3:03:07
LNA (Low Noise Amplifier)
If the TV is operating in a weak-signal area, the LNA function can improve the reception
(a low-noise preamplifier boosts the incoming signal).
1. Press the MENU button to display the menu. Press the or button to select "Channel", then press the ENTER
2. Press the or button to select "LNA", then press the ENTER
button.
button.
3. Press the or button to select "On" or "Off". Press the ENTER
button.
4. Press the EXIT button to exit.
Changing the Picture Standard
You can select the type of picture which best corresponds to your viewing requirements.
1. Press the MENU button to display the menu. Press the or button to select "Picture", then press the ENTER
2. Press the ENTER
button again, to select "Mode".
3. Press the ENTER
button again, to select "Mode".
button.
4. P
ress the or button to select the desired picture effect. Press the ENTER
button.
5. Press the EXIT button to exit.
Dynamic: Selects the picture for high-definition in a bright room.
Standard: Selects the picture for optimum display in a normal environment.
Movie: Selects the picture for comfortable display in a dark room.
Custom: S
elect to view your favorite display settings. (Refer to "Adjusting the Custom Picture")
ou can also press the P.MODE
Y
button on the remote control to
select one of the picture settings.
The Picture mode must be adjusted separately for each input source.
You can return to the factory defaults picture settings by selecting the "Reset".
(Refer to "Resetting the Picture Settings to the Factory Defaults" on page 12)
Adjusting the Custom Picture
Your set has several settings which allow you to control picture quality.
1. To select the desired picture effect, follow the "Changing the Picture Standard" instructions number 1 to 4.
2. Press the or button to select a particular item. Press the ENTER
button.
3. Press the or button to decrease or increase the value of a particular item. Press the ENTER button.
4. Press the EXIT button to exit.
Contrast: Adjusts the lightness and darkness between objects and the background.
Brightness: Adjusts the brightness of the whole screen.
Sharpness: Adjusts the outline of objects to either sharpen them or make them more dull.
Colour: Adjusts the colours, making them lighter or darker.
Tint (NTSC only): Adjusts the colour of objects, making them more red or green for a more natural look.
The adjusted values are stored according to the selected Picture mode.
In PC Mode, Only “Contrast”, “Brightness” and “Colour” can be adjusted
Changing the Colour Tone
You can select the most comfortable colour tone to your eyes.
1. To select the desired picture effect, follow the "Changing the Picture Standard" instructions number 1 to 4.
2. Press the or button to select "Colour Tone", then press the ENTER
button.
3. Press the or button to select the desired colour tone setting.
Press the ENTER button.
4. Press the EXIT button to exit.
Cool2:Makes the colour temperature bluer than "Cool1" menu. Warm1: Makes whites reddish.
Cool1: Makes whites bluish.
Warm2: Makes the colour temperature redder than
Normal:Keeps whites white.
"Warm1" menu.
The adjusted values are stored according to the selected Picture mode.
English-11
BN68-01007C-00Eng.indd 11
2006-03-03 ¿ÀÈÄ 3:03:09
Resetting the Picture Settings to the Factory Defaults
You can return to the factory defaults picture settings.
1. To select the desired picture effect, follow the "Changing the Picture Standard" instructions number 1 to 4 on page 11.
2. Press the or button to select "Reset", then press the ENTER
button.
3. Press the EXIT button to exit.
The "Reset" will be set for each picture mode.
Changing the Picture Size
You can select the picture size which best corresponds to your
viewing requirements.
1.
Press the MENU button to display the menu. Press the or button to select "Picture", then press the ENTER
2.
Press the or button to select "Size", then press the ENTER
3.
Select the required option by pressing the or button.
Press the ENTER
button.
4.
Press the EXIT button to exit.
button.
button.
Auto Wide: Automatically adjusts the picture size to the "16:9" aspect ratio.
16:9: Adjusts the picture size to 16:9 appropriate for DVDs or wide broadcasting.
Zoom: Magnifies the 16:9 wide picture (in the vertical direction) to fit the screen size.
4:3: This is the default setting for a video movie or normal broadcasting.
You can select these options by
simply pressing the P.SIZE button
on the remote control.
“Auto Wide” function is available only in “TV”, “Ext1”, “Ext2”, “AV”, and “S-Video” mode.
In PC Mode, only "16:9" and "4:3" mode can be adjusted.
Select by pressing the or buttons. Use the or button to move the picture up and down. After selecting , use the or button to magnify or reduce the picture size in the vertical direction.
Freezing the Current Picture
Press the STILL button to freeze a moving picture into a still one.
Press again to cancel.
Digital Noise Reduction
If the broadcast signal received by your TV is weak, you can activate the Digital Noise
Reduction feature to help reduce any static and ghosting that may appear on the
screen.
1. Press the MENU button to display the menu. Press the or button to select "Picture", then press the ENTER
button.
2. Press the or button to select "Digital NR", then press the ENTER
3. Press the or button to select "On" or "Off". Press the ENTER
button.
button.
4. Press the EXIT button to exit.
English-12
BN68-01007C-00Eng.indd 12
2006-03-03 ¿ÀÈÄ 3:03:11
DNIe Demo (Digital Natural Image engine)
Samsung’s new technology brings you more detailed images with contrast and white
enhancement. A new image compensation algorithm gives viewers brighter and
clearer images. DNIe technology will match every signal to your eyes.
You can see how DNIe improves the picture by setting DNIe Demo mode to On.
1. Press the MENU button to display the menu. Press the or button to select "Picture", then press the ENTER
button.
2. Press the or button to select "DNIe Demo", then press the ENTER
3. Press the or button to select "On" or "Off". Press the ENTER
button.
button.
4. Press the EXIT button to exit.
These functions don’t work in PC mode.
The DNle Demo is designed to show the difference between the regular and DNIe pictures.
By default, the product displays the picture with DNle applied.
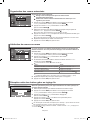
Viewing the Picture In Picture (PIP)
You can display a sub picture within the main picture of set programme or video
input. In this way, you can watch the picture of set programme or video input from
any connected equipment while watching the main picture.
Press the PIP button on the remote
control repeatedly to activate or
deactivate the "PIP".
1.
Press the MENU button to display the menu. Press the or button to select "Picture", then press the ENTER
2.
Press the or button to select "PIP", then press the ENTER
3.
Press the ENTER
button again. Press the or button to select "On", then press ENTER
4.
Press the or button to select "Source",then press ENTER
button. Select a source of the sub picture by pressing the or button and press the ENTER
button.
button.
button.
button.
If the PIP is activated, the size of the main picture turns to “16:9”.
he sub picture can serve different source selections based on what the main T
picture is set to.
5.
Press the or button to select "Swap".
To interchange the main picture and the sub picture, select "Swap" option and press the ENTER
button.
The main picture and the sub picture are interchanged.
If main picture is in "PC" mode, "Swap" is not available.
6. P
ress the or button to select "Size" of the sub picture and then press the ENTER button. Select a size of the sub picture by pressing the or button and then press the ENTER button.
If main picture is in "PC" mode, "Size" is not available.
7. Press the or button to select "Position", then press the ENTER button. Select the position of the sub picture by pressing the or button and then press the ENTER button.
8. P
ress the or button to select "Programme" and then press the ENTER button.
You can select the channel that you want to view through sub picture by pressing the or button. Press the ENTER button.
The "Programme" can be active when the sub picture is set to TV.
9. Press the EXIT button to exit.
You may notice that the picture in the PIP window becomes slightly unnatural when you use the main
screen to view a game or karaoke.
Source: Used to select a source of the sub picture.
Swap: Used to interchange the main picture and the sub picture.
Size: Used to select a size of the sub picture.
Position: Used to move the sub picture.
Programme: Used to Change the sub picture.
English-13
BN68-01007C-00Eng.indd 13
2006-03-03 ¿ÀÈÄ 3:03:12
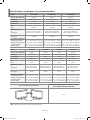
PIP Settings
O: PIP operates, X: PIP doesn’t operate
Main
Sub
TV
Ext.1
Ext.2
AV
S-Video
Component
PC
HDMI
DTV
TV
X
X
X
X
X
X
O
O
X
Ext.1
X
X
X
X
X
X
O
O
X
Ext.2
X
X
X
X
X
X
O
O
X
AV
X
X
X
X
X
X
O
O
X
S-Video
X
X
X
X
X
X
X
O
X
Component
X
X
X
X
X
X
X
O
X
PC
X
X
X
X
X
X
X
X
X
HDMI
O
O
O
O
O
O
X
X
X
DTV
X
X
X
X
X
X
X
X
X
Changing the Sound Standard
You can select the type of the special sound effect to be used when watching
a given broadcast.
1.
Press the MENU button to display the menu. Press the or button to select "Sound", then press the ENTER
2.
Press the ENTER
3.
Select the required sound effect by pressing the or button repeatedly and then
press the ENTER
button.
4.
Press the EXIT button to exit.
button.
button again, to select "Mode".
Standard: Selects the normal sound mode.
Music: Emphasizes music over voices.
Movie: Provides live and full sound for movies.
Speech: Emphasizes voices over other sounds.
Custom: S
elects your custom sound settings. (Refer to "Adjusting the Sound Settings")
ou can also select these options
Y
by simply pressing the S.MODE
button on the remote control.
Adjusting the Sound Settings
The sound settings can be adjusted to suit your personal preferences.
1. Press the MENU button to display the menu. Press the or button to select "Sound", then press the ENTER
button.
2. Press the or button to select "Equalizer", then press the ENTER
button.
3. P
ress the or button to select a particular item.
Press the ENTER button.
4. Press the or button to reach the required setting. Press the ENTER button.
5. Press the EXIT button to exit.
If you make any changes to these settings, the Sound Mode is automatically switched to "Custom".
Connecting Hheadphones
You can connect a set of headphones to your set if you wish to watch a
TV programme without disturbing the other people in the room.
When you insert the head set jack into the corresponding port, you can operate only
“Internal Mute” and “Sound Select” (in PIP mode) in Sound menu.
Prolonged use of headphones at a high volume may damage your hearing.
You will not receive sound from the speakers when you connect headphones to the system.
English-14
BN68-01007C-00Eng.indd 14
2006-03-03 ¿ÀÈÄ 3:03:13
Setting the TruSurround XT (SRS TSXT)
TruSurround XT is a patented SRS technology that solves the problem of playing 5.1
multichannel content over two speakers.
TruSurround delivers a compelling,virtual surround sound experience through any twospeaker playback system, including internal television speakers. It is fully compatible with
all multichannel formats.
1. Press the MENU button to display the menu. Press the or button to select “Sound”, then press the ENTER button.
2. Press the or button to select “SRS TSXT”, then press the
ENTER
button.
3. Press the or button to select “On” or “Off”. Press the ENTER
button.
4. Press the EXIT button to exit.
symbol are trademarks of TruSurround XT, SRS and
SRS Labs, Inc. TruSurround XT technology is incorporated under
license from SRS Labs, Inc.
ou can also set these options
Y
simply by pressing the SRS button
on remote control.
Adjusting the Volume Automatically
Each broadcasting station has its own signal conditions, and so it is not easy for you
to adjust the volume every time the channel is changed. This feature allows you to
automatically adjust the volume of the desired channel by lowering the sound
output when the modulation signal is high or by raising the sound output when the
modulation signal is low.
1. Press the MENU button to display the menu. Press the or button to select "Sound", then press the ENTER
button.
2. Press the or button to select "Auto Volume", then press the ENTER
3. Press the or button to select "On" or "Off". Press the ENTER
button.
button.
4. Press the EXIT button to exit.
Selecting the Internal Mute
If you want to hear the sound through separate speakers, cancel the internal amplifier.
1. Press the MENU button to display the menu. Press the or button to select "Sound", then press the ENTER
button.
2. Press the or button to select "Internal Mute", then press the ENTER
3. Press the or button to select "On" or "Off". Press the ENTER
button.
button.
4. Press the EXIT button to exit.
When
"Internal Mute" is set to "On’, the Sound menus except for "Sound Select" (in PIP mode) cannot be adjusted.
Listening to the Sound of the Sub Picture
During the PIP features activation, you can listen to the sound of the sub picture.
1. Press the MENU button to display the menu. Press the or button to select "Sound", then press the ENTER
button.
2. Press the or button to select "Sound Select", then press the ENTER
3. Press the or button to select "Sub". Press the ENTER
button.
button.
4. Press the EXIT button to exit.
Main: Used to listen to the sound of the main picture.
Sub: Used to listen to the sound of the sub picture.
You can select this option when the "PIP" is set to "On". (refer to page 13)
English-15
BN68-01007C-00Eng.indd 15
2006-03-03 ¿ÀÈÄ 3:03:14
Resetting the Sound Settings to the Factory Defaults
If Game Mode is On, the Reset Sound function is activated. Selecting the Reset
function after setting the equalizer resets the equalizer setting to the factory defaults.
1. Press the MENU button to display the menu. Press the or button to select "Sound", then press the ENTER
button.
2. Press the or button to select "Reset", then press the ENTER
button.
3. Press the EXIT button to exit.
You can select this option when the "Game Mode” is set to "On".
Setting and Displaying the Current Time
You can set the TV’s clock so that the current time is displayed when you press the
INFO button. You must also set the time if you wish to use the
automatic On/Off timers.
1.
Press the MENU button to display the menu. Press the or button to select "Setup", then press the ENTER
2.
Press the or button to select "Time", then press the ENTER
3.
Press the ENTER
4.
5.
button to select "Clock Set".
To...
Press the...
Move to "Hour" or "Minute"
or button.
Set the "Hour" or "Minute"
or button.
Press the ENTER
button.
button.
button.
Press the EXIT button to exit.
If you disconnect the power cord, you have to set the clock again.
Y
ou can also set hour and minute by pressing the number buttons on the remote control.
Setting the Sleep Timer
You can select a time period of between 30 and 180 minutes after which the
television automatically switches to standby mode.
Press the SLEEP button on the
1.
Press the MENU button to display the menu. Press the or button to select "Setup", then press the ENTER
2.
Press the or button to select "Time", then press the ENTER
3.
Press the or button to select "Sleep Timer", then press the ENTER
4.
Press the or button repeatedly until the desired time appears (Off, 30, 60, 90, 120, 150, 180). Press the ENTER
button.
5.
Press the EXIT button to exit.
button.
button.
button.
The TV automatically switches to standby mode when the timer reaches 0.
remote control repeatedly until the
appropriate time interval appears.
Switching the Television On and Off Automatically
You can set the On/Off timers so that the set will:
Switch on automatically and tune to the channel of your choice at the time you select.
Switch off automatically at the time you select.
The first step is to set the television’s clock.
1. Press the MENU button to display the menu. Press the or button to select "Setup", then press the ENTER button.
2. Press the or button to select "Time", then press the ENTER
button.
3. Press the or button to select "On Timer", then press the ENTER
button.
English-16
BN68-01007C-00Eng.indd 16
2006-03-03 ¿ÀÈÄ 3:03:16
4. Press the or button to adjust "Hour", then press the button to move to the next step. Set other items using the same method as above. When finished, press the ENTER button to return.
5. Press the or button to select "Off Timer", then press the ENTER
button.
6. Press the or button to adjust "Hour", then press the button to move to the next step. Set other items using the same method as above. When finished, press the ENTER button to return.
7. Press the EXIT button to exit.
You can also set hour and minute by pressing the number buttons on the remote control.
The "Activation" setting must be set to "Yes" in order for the timers to work.
Choosing Your Language
When you start using your set for the first time, you must select the
language which will be used for displaying menus and indications.
1.
Press the MENU button to display the on-screen menu.
Press the or button to select "Setup", then press the ENTER
button.
2.
Press the or button to select "Language", then press the ENTER
3.
Select a particular language by pressing the or button repeatedly.
Press the ENTER
button.
button.
You can choose one of 5 languages.
4.
Press the EXIT button to exit.
Using Game Mode
When connecting to a game console such as PlayStationTM or XboxTM,
you can enjoy a more realistic gaming experience by selecting game menu.
1. Press the MENU button to display the menu. Press the or button to select “Setup”, then press the ENTER
button.
2. Press the or button to select “Game Mode”, then press the ENTER
3. Press the or button to select “On” or “Off”. Press the ENTER
button.
button.
4. Press the EXIT button to exit.
To disconnect the game console and connect another external device, cancel game mode in the picture menu.
If you display the TV menu in Game mode, the screen shakes slightly.
Game Mode is not available in TV mode.
If Game Mode is On:
• Picture Mode and Sound Mode are automatically changed to Custom and users cannot change the mode.
• Sound Mode in the Sound menu is deactivated. Adjust the sound using the equalizer.
• The Reset Sound function is activated. Selecting the Reset function after setting the equalizer
resets the equalizer setting to the factory defaults.
Setting the Blue Screen Mode / Selecting the Melody
Blue Screen:
If no signal is being received or the signal is very weak, a blue screen automatically
replaces the noisy picture background. If you wish to continue viewing the poor
picture, you must set the "Blue Screen" mode to "Off".
Melody:
You can hear melody sound when the television is powered on or off.
1. Press the MENU button to display the menu. Press the or button to select "Setup", then press the ENTER
button.
2. Press the or button to select "Blue Screen" or "Melody". Press the ENTER button.
3. Press the or button to select "On" or "Off". Press the ENTER button.
4. Press the EXIT button to exit.
English-17
BN68-01007C-00Eng.indd 17
2006-03-03 ¿ÀÈÄ 3:03:17
Using the Energy Saving Feature
This function adjusts the brightness of the TV so as to reduce power consumption.
When you watching TV at night, set the "Energy Saving " mode option to "High" so
as to reduce the dazzling of your eyes as well as the power consumption.
1. Press the MENU button to display the on-screen menu.
Press the or button to select "Setup", then press the ENTER
button.
2. Press the or button to select "Energy Saving", then press the ENTER
button.
3. Select the required option (Off, Low, Medium, High) by pressing the or button.
Press the ENTER button.
4. Press the EXIT button to exit.
Selecting the Source
You can select among external sources connected to your TV’s input jacks.
1.
Press the MENU button to display the menu.
Press the ENTER
button, to select "Input".
2.
Press the ENTER
3.
button again, to select "Source List".
hen no external device is connected to your set, only "TV", "Ext.1", "Ext.2" are W
activated in the "Source List". "AV", "S-Video", "Component", "PC", "HDMI", "DTV" are
activated only when they are connected to your set.
Select the required device by pressing the or button. Press the ENTER
button.
Press
the SOURCE button on the remote control to toggel between all the available source. TV mode can be selected by pressing the TV/DTV button, number buttons(0~9), and the
P / button on the remote control. But it cannot be selected using the SOURCE button. Editing the Input Source Names
Name the device connected to the input jacks to make your input source
selection easier.
1. Press the MENU button to display the menu. Press the ENTER button, to select "Input".
2. Press the or button to select "Edit Name", then press the ENTER
button.
3. Press the or button to select the device that you wish to edit. Press the ENTER button.
4. Press the or button to select the required device.
Press the ENTER button.
5. Press the EXIT button to exit.
English-18
BN68-01007C-00Eng.indd 18
2006-03-03 ¿ÀÈÄ 3:03:18
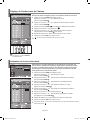
Previewing the DTV Menu System
To help you navigate around the on-screen menu system and adjust the
various settings available, refer to the following illustration.
Available in the Digital TV mode.
Press the D.MENU button.
Guide
Now & Next Guide
Full Guide
Scheduled List
Default Guide
Now/Next, Full Guide
Preference
OSD Language
Translucency Level
Parental Lock
English, Deutsch, Italiano, Français, Svenska
High, Medium, Low, Opaque
Parental Rating Change PIN
Feature
Subtitle
Subtitle Language
Audio Language
On, Off
Channel
Auto Store
Manual Store
Edit Favourite Channels
Channel Manager
System
Product Information
Signal Information
Software Upgrade
Common Interface
Reset
Application Info
CI Menu
Module Information
Smart card information
Language
Software Download
The sub-items of the CI Menu may vary depending on the CAM model.
You can select these options by simply
pressing the D.MENU button on the
remote control.
Updating the Channel List Automatically
You can update the channel list when the broadcaster adds new Services or if
you move the TV to a new location.
1.
Press the D.MENU button to display the DTV menu.
2.
Press the or button to select "Channel", then press the ENTER
3.
Press the ENTER
4.
When it has finished, the number of scanned services will be displayed.
5.
button.
button again, to select "Auto Store".
The existing favourite channel list will not be deleted when the channel list is updated.
To stop the scan before it has finished, press the ENTER
button with "STOP" selected.
Press the EXIT button to exit.
If the signal status is poor, the “No Service found! Check the aerial connection” message is displayed.
English-19
BN68-01007C-00Eng.indd 19
2006-03-03 ¿ÀÈÄ 3:03:20
Updating the Channel List Manually
You can specify the channel or frequency for a fast channel search.
1.
Press the D.MENU button to display the DTV menu.
2.
Press the or button to select "Channel", then press the ENTER
3.
Press the or button to select "Manual Store", then press the ENTER
4.
To...
or button
Set the "Channel", or "Bandwidth"
or button
Set the "Frequency"
Numeric button (0~9)
• Channel: Channel “21” to “68” in sequence are displayed in UK.
• Frequency: The frequency available in the Channel group is displayed.
• Bandwidth: The available bandwidths are 7 and 8 MHz.
5.
Press the red button to start the scan for digital services.
When it has finished,channels are updated in the channel list.
6.
Press the EXIT button to exit.
button.
Then...
Move to "Channel", "Frequency", or "Bandwidth"
button.
You can input by pressing the button on the remote control.
You can not change only Frequency and when changing a channel, the Frequency will be automatically changed.
Editing Your Favourite Channels
You can edit your favourite channels using the four colour buttons.
1.
Press the D.MENU button to display the DTV menu.
2.
Press the or button to select "Channel", then press the ENTER
3.
Press the or button to select "Edit Favourite Channels", then press the ENTER
button.
4.
Press the red button to display all currently stored channels.
5.
Press the or button to select a channel you want. Press the ENTER
button.
A "★" icon is shown next to the selected channel and the channel will be added to the favourite channel list. button again.
• To undo, press the ENTER
• Select All: Select all channels currently displayed.
• Select None: Deselect all selected channels.
• Preview: Displays (a) currently selected channel(s).
The Favorite Channels settings have been completed.
5.
Press the EXIT button to exit.
button.
Add
You can use this function when one or more favourite channels have been selected.
1.
Press the D.MENU button to display the DTV menu.
2.
Press the or button to select "Channel", then press the ENTER
3.
Press the or button to select "Edit Favourite Channels", then press the ENTER
button.
4.
Press the red button in the "Edit Favourite Channels" menu.
To add more channels, refer to the step 5 on the previous description.
7.
If you want to check the channel to be stored, press D.MENU button. button.
Press the EXIT button to exit.
• ������������������������������������������������������������������������
��������������������������������������������������������������������������
To add all channels to the favourite channel list, press the red button.
�������������������������������������������������
• �����������������������������������������������
To remove all channels, press the green button.
��• Preview : Displays (a) currently selected channel(s).
������������
• ����������
Press the CH MGR button to display the favourite channel manager.
English-20
BN68-01007C-00Eng.indd 20
2006-03-03 ¿ÀÈÄ 3:03:22
Move
1.
Press the D.MENU button to display the DTV menu.
2.
Press the or button to select "Channel", then press the ENTER
3.
Press the or button to select "Edit Favourite Channels", then press the ENTER
button.
4.
Select the required channel using the or button.
5.
Press the green button.
button.
A " " icon is displayed on the left side of the channel name.
6.
Press the or button to select the channel that you want to move, and press the green or ENTER
button.
7.
Press the EXIT button to exit.
Preview
1.
In the "Edit Favourite Channels" menu, select the channel to be previewed by pressing the or button.
2.
Press the yellow button.
The selected channel is displayed on the screen.
Delete
1.
In the "Edit Favourite Channels" menu, select the channel to be deleted from the favourite channels list by pressing the or button.
2.
Press the blue button.
The selected channel and number will be deleted.
To add a deleted channel back in to the favourite channel list, see "Add" on page 20.
Selecting Channel Manager
You can exclude the channels you have chosen from the channels you have scanned.
When you scan through the stored channels, those you have chosen to skip are not
displayed. All channels that you do not specifically choose to skip are displayed
during scanning.
You can select these options by
simply pressing the CH MGR button
on the remote control.
1.
Press the D.MENU button to display the DTV menu.
2.
Press the or button to select "Channel", then press the ENTER
3.
Press the or button to select "Channel Manager". Press the ENTER
4.
Press the yellow button to toggle between your favourite channels and all channels.
5.
Press the red or green button to display the previous or next channel manager page.
6.
Press the or button to select a channel to be tuned. Press the ENTER
button.
7.
button.
button.
Your favourite channels are only displayed if they were previously set in the " Editing Your Favourite Channels" menu (refer to page 20~21).
The channel number, name and an icon are displayed in the top left corner while changing
the channel. The channel number and name are displayed if the channel is one of the all
channels, and a icon if the channel is one of the favourite channels.
Press the blue or CH MGR button to exit from the channel manager.
English-21
BN68-01007C-00Eng.indd 21
2006-03-03 ¿ÀÈÄ 3:03:24
Displaying Programme Information
While viewing a channel, additional information about the current programme may be
displayed.
1.
2.
While viewing a programme, press the INFO (
) button.
The programme information is displayed.
To exit from banner information, press the INFO (
) button.
Viewing the EPG (Electronic Programme Guide) Information
The EPG (Electronic Programme Guide) information is provided by the
broadcasters. Programme entries may appear blank or out of date as a result of the
information broadcast on a given channel. The display will dynamically update as
soon as new information becomes available.
ow & Next Guide
N
For the six channels indicated in the left-hand column, displays the Current
programme and the Next programme information.
ull Guide
F
Displays the programme information as time ordered One hour segments.
Two hours of programme information is displayed which may be scrolled
forwards or backwards in time.
1.
Press the D.MENU button to display the DTV menu.
2.
Press the ENTER
3.
Press the or button to select "Now & Next Guide" or "Full Guide". Press the ENTER
button.
4.
button, to select "Guide".
You can also display the guide menu simply by pressing the GUIDE button.
To...
Then...
Watch a programme in the EPG list
• Select a programme by pressing the 5, 6, 3, 4 button.
• Press the ENTER
button.
If the next program is selected, it is scheduled with the clock icon displayed. If the ENTER
button is pressed again, the scheduling is canceled with the clock
icon gone. For details about scheduling programmes, refer to the next page.
View programme information
• Select a programme of your choice by pressing the 5, 6, 3, 4 button.
• Press the INFO (
) button when the programme of your choice is highlighted.
Toggle between the "Now & Next Guide" or "Full Guide"
• Press the red button repeatedly.
Display the "Favourites" and the "All
Channels" list
• Press the green button repeatedly.
Scrolls backwards quickly (2 hours).
• Press the yellow button repeatedly.
Scrolls forward quickly (2 hours).
• Press the blue button repeatedly.
Exit the guide
• Press the EXIT button.
The programme title is on the upper part of the screen center. Please click on INFO (
) button for the detailed information. Channel Number, Running Time, Status Bar, Parental Level, Video Quality Information(HD/SD), Sound Modes, Subtitle or Teletext, Languages of Subtitle or Teletext, and brief summary of the highlighted programme are included on the detailed information. "..." will be appeared if the summary is long.
Six channels are displayed. To scroll between channels, move to a channel using the or button. To display page by page, use the P
or
button.
English-22
BN68-01007C-00Eng.indd 22
2006-03-03 ¿ÀÈÄ 3:03:26
Using the Scheduled List
If you make a scheduled viewing list of programs you may like to see,
the channel will be automatically switched to the scheduled program at the
scheduled time even if you are watching another program.
1.
Press the D.MENU button to display the DTV menu.
2.
Press the ENTER
3.
Press the or button to select "Scheduled List", then press the ENTER
4.
Press the red button.
The channel will be switched to the scheduled program.
5.
Press the ENTER
6.
7.
button, to select "Guide".
button.
button to select an item and adjust with the 3 or 4 button .
You can also set hour and minute by pressing the number buttons on the remote control.
• Channel: Set the channel.
• Time: Set the time.
• Date: Set Year, Month and Day.
• Frequency: Set the frequency. ("Once", "Daily", or "Weekly")
After setting the schedule, Press the red button.
Press the EXIT button to exit.
The Scheduled list may be displayed in the EPG menu.
• Save: Save the adjusted schedule.
• Cancle: Cancel the adjusted schedule.
• Add Programme: Add a new schedule.
• Edit: Re-adjust the selected schedule.
• Delete: Delete the selected schedule.
Setting the Default Guide
You can preset the default guide style.
1.
Press the D.MENU button to display the DTV menu.
2.
Press the ENTER
3.
Press the or button to select "Default Guide", then press the ENTER
4.
Select "Now/Next" or "Full Guide" using the 5 or 6 button, and press the ENTER
button.
5.
Press the EXIT button to exit.
button, to select "Guide".
button.
ou can select these options Y
by simply pressing the GUIDE button on the remote control.
English-23
BN68-01007C-00Eng.indd 23
2006-03-03 ¿ÀÈÄ 3:03:28
Viewing All Channels and Favourite Channels
In the EPG menu, you can display all channels or favourite channels.
1.
Press the D.MENU button to display the DTV menu.
2.
Press the ENTER
3.
Select the your required guide ("Now & Next Guide" or "Full Guide") by pressing the or button.
4.
Press the ENTER
5.
Press the green button.
All the channel lists and the favorite channel lists will be toggled.
6.
Select a programme of your choice by pressing the , 6, 3, or 4 button.
7.
Press the INFO (
8.
When the Edit Favourite Channels list has not been set up:
��• "The favourites list is empty. Would you like to choose your favourites now?" message is displayed.
• Select “Yes”.
The "Edit Favourite Channels" menu is displayed.
If you select “No”, all channels will remain unchanged.
• ������������������������������������������������������������������
To edit the favourite channels, refer to page 20 for more details.
button again, to select "Guide".
button.
) button to display information about the highlighted programme.
9 . Press the EXIT button to exit.
"All Channels" is the list of channels that have been scanned by the channel list update. All channels are displayed in the all channel mode.
"Favourites" (favourite channels) is the list of channels that has been set in the "Edit Favourite Channels" menu (refer to page 20).
Choosing Your Language
When you start using your set for the first time, you must select the language which
will be used for displaying menus and indications.
1.
Press the D.MENU button to display the DTV menu.
2.
Press the or button to select "Preference", then press the ENTER
button.
3.
Press the or button to select "OSD Language", then press the ENTER
button.
4.
Select a particular language by pressing the or button repeatedly.
Press the ENTER
button.
5.
Press the EXIT button to exit.
You can choose one of five languages.
English-24
BN68-01007C-00Eng.indd 24
2006-03-03 ¿ÀÈÄ 3:03:29
Adjusting the Translucency Level
You can set the translucency of the menu.
1.
Press the D.MENU button to display the DTV menu.
2.
Press the or button to select "Preference", then press the ENTER
3.
Press the or button to select "Translucency Level", then press the ENTER
button.
4.
Select the required option ("High", "Medium", "Low", or "Opaque") by pressing the or button, and press the ENTER
button to change the setting.
5.
Press the EXIT button to exit.
button.
Setting up the Parental Lock
This feature allows you to prevent unauthorized users, such as children, from
watching unsuitable programmes by a 4-digit PIN (Personal Identification Number)
code that is defined by the user. The on-screen menu will instruct you to assign a
PIN code (you can change it later, if necessary).
1.
Press the D.MENU button to display the DTV menu.
2.
Press the or button to select "Preference", then press the ENTER
3.
Press the or button to select "Parental Lock.", then press the ENTER
4.
The "Enter PIN" is displayed.
5.
Enter your current 4-digit PIN code by using the numeric buttons (0~9).
The options available in the "Parental Lock" group are displayed with the "Parental Rating" selected.
6.
Press the ENTER
7.
Press the or button to select the age rating you want to lock out.
Press the ENTER
button.
8.
If you want to change the PIN code,select "Change PIN" by pressing the or button. Press the ENTER
button.
9.
button.
button.
The default PIN code for a new TV set is 0000.
If you enter an invalid PIN code,the "Invalid PIN code. Please try again." message is displayed.
button.
The "Enter New PIN" is displayed.
Enter your new PIN code by using the numeric buttons (0~9).
The "Confirm New PIN" is displayed.
10. Re-enter your new PIN code to confirm by using the numeric buttons (0~9).
The Your PIN code has been changed successfully message is displayed.
11. Press the ENTER
button.
12. Press the EXIT button to exit.
If you forget the PIN code, press the remote control buttons in the following sequence, which
resets the PIN to 0-0-0-0: POWER (Off), MUTE, 8, 2, 4, POWER (On).
English-25
BN68-01007C-00Eng.indd 25
2006-03-03 ¿ÀÈÄ 3:03:31
Setting the Subtitle
You can activate and deactivate the subtitles.
1.
Press the D.MENU button to display the DTV menu.
2.
Press the or button to select "Feature", then press the ENTER
3.
Press the ENTER
4.
Select "On" by pressing the or button. Press the ENTER
5.
Press the EXIT button to exit.
button.
button again, to select "Subtitle".
button.
Selecting the Preferred Language (Subtitle or Audio)
You can change the default value for subtitle and audio languages.
Displays the language information for the incoming stream.
1.
Press the D.MENU button to display the DTV menu.
2.
Press the or button to select "Feature", then press the ENTER
3.
Press the or button to select "Subtitle Language" or "Audio Language". Press the ENTER
button.
4.
Select the required option by pressing the or button, and press the ENTER
button to change the setting.
5.
Press the EXIT button to exit.
button.
English is the default in cases where the selected language is unavailable in the broadcast.
While viewing a programme, the subtitle can be selected.
While viewing a programme, audio languages can be selected.
Viewing Product Information
You can view your product information. For service or repair, please contact a
Samsung approved dealer.
1.
Press the D.MENU button to display the DTV menu.
2.
Press the or button to select "System", then press the ENTER
3.
Press the ENTER
4.
button.
button again, to select "Product Information".
The Product Information menu is selected.
- Software Version, Firmware Version
Press the EXIT button to exit.
Checking the Signal Information
You can get information about the signal status.
1.
Press the D.MENU button to display the DTV menu.
2.
Press the or button to select "System", then press the ENTER
3.
Press the or button to select "Signal Information", then press the ENTER
button.
4.
Press the EXIT button to exit.
button.
If the signal status is poor, the "No signal." message is displayed.
English-26
BN68-01007C-00Eng.indd 26
2006-03-03 ¿ÀÈÄ 3:03:33
Upgrading the Software (Option)
To keep your product up-to-date with new Digital Television features then software
upgrades are periodically broadcast as part of the normal Television signal.
It will automatically detect these signals and display the software upgrade banner.
You are given the option to install the upgrade.
pgrade Now
U
If you select "Upgrade Now", the "iDTV" immediately installs the new upgrade and then
restarts.
pgrade Later
U
If you select "Upgrade Later", the upgrade is postponed until the next restart or channel
change some 90 minutes later, when the upgrade dialog appears again.
on’t Upgrade
D
If you select "Don’t Upgrade", the "iDTV" does not perform the upgrade and the
software upgrade banner is not displayed again.
The upgrade is still stored internally, to subsequently upgrade to the new version then
the following sequence of steps are performed.
1.
Press the D.MENU button to display the DTV menu.
2.
Press the or button to select "System", then press the ENTER
3.
Press the or button to select "Software Upgrade", then press the ENTER
button.
4.
To switch to an alternative version, press the red button.
Press the blue button to reset, activate the upgrade and restart.
5.
Press the EXIT button to exit.
button.
Viewing Common Interface
This contains information on CAM inserted in the CI slot and displays it.
1.
Press the D.MENU button to display the DTV menu.
2.
Press the or button to select "System", then press the ENTER
3.
Press the or button to select "Common Interface", then press the ENTER
button.
4.
Press the ENTER
5.
Press the EXIT button to exit.
button.
button to display the information for your application.
The Application Info inserting is about the CI CARD.
You can install the CAM anytime whether the TV is ON or OFF.
1. Purchase the CI CAM module by visiting your nearest dealer or by phone.
2. Insert the CI CARD into the CAM in the direction of the arrow until it fits.
3. Insert the CAM with the CI CARD installed into the common interface slot.
(Insert the CAM in the direction of the arrow, right up to the end so that it is parallel with the slot.)
4. Check if you can see a picture on a scrambled signal channel.
English-27
BN68-01007C-00Eng.indd 27
2006-03-03 ¿ÀÈÄ 3:03:34
Selecting the CI (Common Interface) Menu
This enables the user to select from the CAM-provided menu.
1.
Press the D.MENU button to display the DTV menu.
2.
Press the or button to select "System", then press the ENTER
3.
Press the or button to select "Common Interface", then press the ENTER
button.
button.
4.
Select to "CI Menu" by pressing the or button, and press the ENTER
5.
Select the required option by pressing the or button, and press the ENTER
button.
6.
Press the EXIT button to exit.
button.
Select the CI Menu based on the menu PC Card.
Resetting
You can reset the values stored to the factory default values.
The Reset operation deletes all channel information and user preferences returning all values to their default factory state.
1.
Press the D.MENU button to display the DTV menu.
2.
Press the or button to select "System", then press the ENTER
3.
Press the or button to select "Reset", then press the ENTER
4.
The "Enter PIN" screen will appear.
5.
Enter your current 4-digit PIN code by using the numeric buttons (0~9).
6.
Press the EXIT button to exit.
button.
button.
The warning message is displayed.All values will be reset by pressing the coloured buttons (red, green, yellow, and blue)in turn.
Teletext Decoder
Most set channels carry " teletext ", pages of written information that
provide information such as:
Television programme times.
News bulletins and Weather forecasts.
S
ports results.
Subtitles for the hard of hearing.
The teletext pages are organized according to six categories:
Part
Contents
A
Selected page number.
B
Broadcasting station identity.
C
Current page number or search status.
D
Date and time.
E
Text.
F
Status information.
English-28
BN68-01007C-00Eng.indd 28
2006-03-03 ¿ÀÈÄ 3:03:36
Displaying the Teletext Information
You can display teletext information at any time, but signal reception must be good.
Otherwise:
Information may be missing.
Some pages may not be displayed.
To activate the teletext mode and display the contents page:
1.
Using the P
(
teletext service.
2.
Press the TTX/MIX (
) or P
(
) button, select the channel providing the ) button to activate the teletext mode.
he contents page is displayed. It can be redisplayed at any time by pressing the T
MENU (
) button.
3.
Press the TTX/MIX (
) button again.
he actual broadcast will be displayed with “Teletext”, “Double”, and “Mix” in order T
on the screen.
4.
Press the TV/DTV button to exit from the Text display.
If any broken character appears while Text is being viewed, make sure that the Text language is identical with the language in the "Setup" menu mode. If both languages are different, select the
same language with the Text language on the "Setup" menu.
Selecting a Specific Teletext Page
Press the number buttons on the remote control to enter the page number directly:
1. Enter the three-digit page number listed in the contents by pressing the
corresponding numeric buttons.
2. If the selected page is linked with several secondary pages, the secondary pages
are displayed in sequence. To freeze the display on a given page, press the PIP ( ) . Press the PIP ( ) button again to resume.
3. Using the various display options:
To display...
Press the...
Both teletext information and the normal broadcast
TTX/MIX (
Hidden text (answers to quiz games, for example)
INFO (
)
The normal screen
INFO (
)
A secondary page, by entering its 4-digit number
PRE-CH (
The next page
The previous page
P
P
Double-size letters in the:
Upper half of the screen Lower half of the screen
P.MODE (
Once Twice
Normal screen
Three times
(
(
)
)
)
)
)
English-29
BN68-01007C-00Eng.indd 29
2006-03-03 ¿ÀÈÄ 3:03:37
Using Fastext to Select a Teletext Page
The various topics included in the teletext pages are colour-coded, and can be
selected by pressing the coloured buttons on the remote control.
1.
Display the teletext contents page by pressing the TTX/MIX (
2.
Press the coloured button corresponding to the topic that you wish to select (The
available topics are listed on the status information line).
3.
Press the Red button to display the previous page.
Press the Green button to display the next page.
4.
Press the TV/DTV button to exit from the Text display.
) button.
Setting up Your PC Software (Based on Windows XP)
The Windows display-settings for a typical computer are shown below. The actual screens on your PC may be
different depending upon your particular version of Windows and your particular video card. Even if your actual
screens look different, the same, basic set-up information will apply in almost all cases.
(If not, contact your computer manufacturer or Samsung Dealer.)
1. First, click on "Control Panel" on the Windows start menu.
2. W
hen the control panel window appears, click on "Appearance and Themes" and a display dialog-box will appear.
3. W
hen the control panel window appears, click on "Display" and a display dialog-box will appear.
4. N
avigate to the "Settings" tab on the display dialog-box. The correct size setting (resolution): Optimum- 1360 X 768
If a vertical-frequency option exists on your display settings dialog box, the correct value is "60" or "60 Hz". Otherwise, just click "OK" and exit the dialog box.
Display Modes
Both screen position and size will vary depending on the type of PC monitor and its resolution.
The resolutions in the table are recommended. (All resolutions between the supported limits are supported)
Mode
Resolution
Horizontal
Frequency (kHz)
Vertical
Frequency (Hz)
Pixel Clock
Frequency (MHz)
Sync Polarity
(H/V)
IBM
640 x 480
720 x 400
31.469
31.469
59.940
70.087
25.175
28.322
- / -
-/+
VESA
640 x 480
640 x 480
800 x 600
800 x 600
800 x 600
1024 x 768
1024 x 768
1024 x 768
1360 x 768
37.861
37.500
37.879
48.077
46.875
48.364
56.476
60.023
47.712
72.809
75.000
60.317
72.188
75.000
60.000
70.069
75.029
60.015
31.500
31.500
40.000
50.000
49.500
65.000
75.000
78.750
85.800
- / -
- / -
+ /+
+ /+
+ /+
- / -
- / -
+ /+
+ /+
The interface mode is not supported.
The set might operate abnormally if a non-standard video format is selected.
DVI does not support PC function.
Separate and Composite modes are supported. SOG is not supported.
English-30
BN68-01007C-00Eng.indd 30
2006-03-03 ¿ÀÈÄ 3:03:37
Setting the PC
Coarse and Fine Tuning of the Image (Image Lock):
The purpose of picture quality adjustment is to remove or reduce picture noise.
If the noise is not removed by Fine-tuning alone, then adjust the frequency as best
as possible (coarse) and Fine-tune again. After the noise has been reduced, re-adjust
the picture so that it is aligned on the center of screen.
1.
Preset: Press the SOURCE button to select PC mode.
2.
Press the MENU button to display the menu. Press the or button to select "Setup", then press the ENTER
3.
Press the or button to select "PC", then press the ENTER
4.
Press the ENTER
5.
Press the or button to select "Coarse" or "Fine", then press the ENTER
6.
Press the or button to adjust the screen quality. Press the ENTER
button.
7.
Press the EXIT button to exit.
button.
button.
button to select "Image Lock".
button.
Changing the Image Position (Position):
Adjust the PC’s screen positioning if it does not fit the TV screen.
1.
Follow the "Coarse and Fine Tuning of the Image (Image Lock)" instructions number 1 to 3.
2.
Press the or button to select "Position", then press the ENTER
3.
Press the or button to adjusting the Vertical-Position. Press the or button to adjust the Horizontal-Position. Press the ENTER
button.
4.
Press the EXIT button to exit.
button.
Adjusting the PC Screen Automatically (Auto Adjustment):
Auto adjustment allows the PC screen of set to self-adjust to the incoming PC video
signal. The values of fine, coarse and position are adjusted automatically.
1.
Follow the "Coarse and Fine Tuning of the Image (Image Lock)" instructions number 1 to 3.
2.
Press the or button to select "Auto Adjustment", then press the ENTER
3.
Press the EXIT button to exit.
button.
Initializing the Image Settings (Image Reset):
You can replace all image settings with the factory default values.
1.
Follow the "Coarse and Fine Tuning of the Image (Image Lock)" instructions number 1 to 3.
2.
Press the or button to select "Image Reset", then press the ENTER
3.
Press the EXIT button to exit.
button.
English-31
BN68-01007C-00Eng.indd 31
2006-03-03 ¿ÀÈÄ 3:03:39
Using the Anti-Theft Kensington Lock
The Kensington lock is a device used to physically fix the system when using it in a public place.
The locking device has to be purchased separately. The appearance and locking method may differ from the illustration
depending on the manufacturer. Please refer to the manual provided with the Kensington lock for proper use.
1.Insert the locking device into the
Kensington slot on the LCD TV
(Figure 1), and turn it in the locking
direction (Figure 2).
Cable
Figure 2
2.Connect the Kensington lock cable.
3.Fix the Kensington lock to a desk
or a heavy stationary object.
Figure 1
<Optional>
The place of the Kensington Lock may be different depending on its model.
Troubleshooting: Before Contacting Service Personnel
No sound or picture
Check that the mains lead has been connected to a wall socket.
Check that you have pressed the POWER
buttons on the front of the set.
Check the picture contrast and brightness settings.
Check the volume.
Normal picture but no sound
Check the volume.
Check whether the MUTE button has been pressed on the remote control.
Check if "Internal Mute" is off
No picture or black and white
picture
Adjust the colour settings.
Check that the broadcast system selected is correct.
Sound and picture interference
Try to identify the electrical appliance that is affecting the set and move it further away.
Plug your set into a different mains socket.
Blurred or snowy picture, distorted sound
Check the direction, location and connections of your aerial. This interference is often due to the use of an indoor aerial.
Remote control malfunctions
Replace the remote control batteries. Clean the upper edge of the remote control (transmission window).
Check the battery terminals.
"Check signal cable." message is displayed.
Check that the signal cable is firmly connected to the PC or video sources. Check that the PC or video sources are turned on.
On PC mode, "Not Supported
Mode." message is displayed.
Check the maximum resolution and the frequency of the video adaptor.
Compare these values with the data in the Display Modes.
The TFT LCD panel uses a panel consisting of sub pixels (3,133,440) which require sophisticated technology to produce. However, there may be few bright or dark pixels on the screen. These pixels will have no impact on the performance of the product.
English-32
BN68-01007C-00Eng.indd 32
2006-03-03 ¿ÀÈÄ 3:03:39
Technical and Environmental Specifications
LE26R73BD
Model Name
Screen Size (Diagonal)
Power Supply
Sound
Output
Dimension (WxDxH)
Body
With stand
Weight
With stand
Environmental Considerations
Operating Temperature
Operating Humidity
Storage Temperature
Storage Humidity
Model Name
Screen Size (Diagonal)
Power Supply
Power Consumption
PC Resolution
Sound
Output
Dimension (WxDxH)
Body
With stand
Weight
With stand
LE40R73BD
26 inch
32 inch
40 inch
AC220-240V 50 Hz
AC220-240V 50 Hz
AC220-240V 50 Hz
Power Consumption
PC Resolution
LE32R73BD
120 W
152 W
190 W
1360 x 768 @ 60 Hz
1360 x 768 @ 60 Hz
1360 x 768 @ 60 Hz
5WX2
10 W X 2
10 W X 2
675.0 X 75.0 X 475.5 mm
675.0 X 215.5 X 530.0 mm
800.0 X 80.0 X 548.5 mm
800.0 X 252.0 X 603.0 mm
991.5 X 87.0 X 658.5 mm
991.5 X 326.0 X 713.0 mm
10.55 kg
15.45 kg
24.0 kg
10 °C to 40 °C (50 °F to 104 °F) 10 °C to 40 °C (50 °F to 104 °F) 10 °C to 40 °C (50 °F to 104 °F)
10 % to 80 %, non-condensing 10 % to 80 %, non-condensing 10 % to 80 %, non-condensing
-20 °C to 45 °C (-4 °F to 113 °F) -20 °C to 45 °C (-4 °F to 113 °F) -20 °C to 45 °C (-4 °F to 113 °F)
5 % to 95 %, non-condensing
5 % to 95 %, non-condensing
5 % to 95 %, non-condensing
LE26R74BD
LE32R74BD
LE37R74BD
LE40R74BD
26 inch
32 inch
37 inch
40 inch
AC220-240V 50 Hz
AC220-240V 50 Hz
AC220-240V 50 Hz
AC220-240V 50 Hz
120 W
152 W
170 W
190 W
1360 x 768 @ 60 Hz
1360 x 768 @ 60 Hz
1360 x 768 @ 60 Hz
1360 x 768 @ 60 Hz
5WX2
10 W X 2
10 W X 2
10 W X 2
675.0 x 75.0 x 475.5 mm
675.0 x 215.5 x 530.0 mm
800.0 x 80.0 x 548.5 mm
800.0 x 252.0 x 603.0 mm
923.0 x 87.0 x 618.5 mm
923.0 x 326.0 x 676.5 mm
991.5 x 87.0 x 658.5 mm
991.5 x 326.0 x 713.0 mm
10.55 kg
15.45 kg
22.8 kg
24.0 kg
10 °C to 40 °C (50 °F to 104 °F)
10 % to 80 %, non-condensing
-20 °C to 45 °C (-4 °F to 113 °F)
5 % to 95 %, non-condensing
10 °C to 40 °C (50 °F to 104 °F)
10 % to 80 %, non-condensing
-20 °C to 45 °C (-4 °F to 113 °F)
5 % to 95 %, non-condensing
10 °C to 40 °C (50 °F to 104 °F)
10 % to 80 %, non-condensing
-20 °C to 45 °C (-4 °F to 113 °F)
5 % to 95 %, non-condensing
Environmental Considerations
10 °C to 40 °C (50 °F to 104 °F)
Operating Temperature
10 % to 80 %, non-condensing
Operating Humidity
-20 °C to 45 °C (-4 °F to 113 °F)
Storage Temperature
5 % to 95 %, non-condensing
Storage Humidity
LE26R73BD/LE26R74BD/LE32R73BD/LE32R74BD/
LE37R74BD/LE40R73BD/LE40R74BD
Stand Swivel (Left / Right)
Yes
-20˚ ~ 20˚
Design and specifications are subject to change without prior notice.
English-33
BN68-01007C-00Eng.indd 33
2006-03-03 ¿ÀÈÄ 3:03:40
This page is intentionally
left blank.
BN68-01007C-00Eng.indd 34
2006-03-03 ¿ÀÈÄ 3:03:40
Table des matières
UTILISATION DE LA FONCTION DTV
Aperçu du système de menu DTV..........................................19
Mise à jour automatique de la liste des chaînes.....................19
Mise à jour manuelle de la liste des chaînes..................... 20
Modification de vos chaînes favorites.....................................20
Sélection du Gestionnaire des tâches.....................................21
Affichage des informations sur l’émission...............................22
Affichage des informations du guide électronique des programmes (EPG)...........................................................22
Utilisation de la liste de programmation..................................23
Réglage du guide par défaut...................................................23
Affichage de toutes les chaînes ou des chaînes favorites......24
Choix de la langue...................................................................24
Réglage du niveau de transparence.................................. 25
Configuration du verrouillage parental....................................25
Réglage des sous-titres...........................................................26
Sélection de la langue favorite (sous-titres ou audio).............26
Affichage d’informations sur le produit....................................26
Vérification des informations sur le signal...............................26
Mise à jour du logiciel (option)................................................27
Affichage de l’interface commune...........................................27
Sélection du menu CI (Interface commune)............................28
Réinitialisation..........................................................................28
Liste de pièces.........................................................................
Installation du support.............................................................
Installation du kit de montage mural.................................. Présentation du panneau de commande................................
Présentation du panneau de branchement.............................
Présentation de la télécommande...........................................
Installation des piles dans la télécommande...........................
Mise en marche et arrêt..........................................................
Mode de mise en veille de votre télévision.............................
Plug & Play..............................................................................
2
2
2
3
4
6
6
7
7
7
REGLAGE DES CANAUX
Mémorisation automatique des chaînes.................................. 8
Mémorisation manuelle des chaînes....................................... 8
Réglage de Gestionnaire de Chaînes..................................... 9
Activation de la sécurité enfant.......................................... 9
Organisation des canaux mémorisés......................................10
Attribution de noms aux canaux..............................................10
Réception nette des chaînes grâce au réglage fin..................10
Amplificateur faible bruit (LNA)................................................11
REGLAGE DE L’IMAGE
Modification de l’image standard.............................................11
Réglage de l’image personnalisée..........................................11
Changement de la nuance couleur.........................................11
Rétablir les paramètres de réglage de l’image d’usine...........12
Changement de la taille de l’image.........................................12
Sélection du format de l’image................................................12
Réduction du bruit numérique.................................................12
DNle Démo (Digital Natural Image engine).............................13
Affichage de l’Image dans l’image (PIP).................................13
Paramètres PIP.......................................................................14
REGLAGE DU SON
Changement de la norme Son........................................... 14
Réglage des paramètres du son........................................ 14
Connexion du casque........................................................ 14
Paramétrage de la technologie TruSurround XT (SRS TSXT)....................................................................... 15
Réglage automatique du volume....................................... 15
Sélection du mode Silence Int........................................... 15
Ecoute du son accompagnant l’image secondaire............ 15
Rétablir les paramètres de son par défaut........................ 16
Français
CONNEXION ET PREPARATION DE VOTRE TELEVISEUR
UTILISATION DE LA FONCTION TELETEXTE
Décodeur télétexte............................................................. 28
Affichage des informations Télétexte................................. 29
Sélection d’une page télétexte spécifique......................... 29
Utilisation du système Fastext pour sélectionner une page télétexte............................................................. 30
REGLAGE DU PC
Paramétrage du logiciel PC (Basé sur Windows XP)........ 30
Modes d’affichage.............................................................. 30
Sélection du PC................................................................. 31
RECOMMANDATIONS D’UTILISATION
Utilisation du verrouillage Kensington antivol.................... 32
Résolution des problèmes avant de contacter le personnel qualifié pour le dépannage............ 32
Spécifications techniques et environnementales............... 33
REGLAGE DE L’HEURE
Réglage et affichage de l’heure......................................... 16
Réglage de la minuterie de mise en veille......................... 16
Marche et arrêt automatique du téléviseur........................ 16
REGLAGE DES AUTRES OPTIONS
Choix de la langue............................................................. 17
Utilisation de Game Mode.................................................. 17
Réglage du mode d’écran bleu / Sélection de mélodie .... 17
Utilisation de la fonction d’économie d’énergie.................. 18
Sélection de la source........................................................ 18
Modification du nom d’une source d’entrée....................... 18
Symboles
Appuyer
Important
Remarque
Bouton
d’accès rapide
Français-
BN68-01007C-00Fre.indd1
2006-03-03¿ÀÈÄ3:20:47
Liste de pièces
Veuillez vous assurer que les composants suivants sont bien inclus avec votre téléviseur LCD.
Le cas échéant, contactez votre revendeur.
M4 X L16
Télécommande et Cordon d’alimentation
batteries (AAA x 2)
Instructions d’utilisation
Panneau inférieur
Carte de garantie
Vis pour le socle X 4
Carte réseau de service
Socle
Chiffon de nettoyage
Guide de sécurité
Cartes d’enregistrement
Carte de garantie / Carte réseau de service / Guide de sécurité / Cartes d’enregistrement (N’est pas disponible dans toutes les agences).
Selon le modèle, il se peut que le socle et les vis ne soient pas inclus.
Installation du support
<2>
<3>
1.Placez la télévision face posée sur un chiffon doux ou un coussin sur une table.
2.Insérez le socle dans le trou situé sous le téléviseur.
3.Insérez la vis dans le trou indiqué et serrez-la.
Selon le modèle, il se peut que le socle et les vis ne soient pas inclus.
Installation du kit de montage mural
Les accessoires de montage mural (vendus séparément) vous
permettent de fixer votre téléviseur au mur.
Pour plus d’informations sur l’installation du kit de montage
mural, reportez-vous aux instructions fournies avec les
composants du kit.
Faites appel à un technicien pour obtenir de l’assistance lors
de l’installation du support mural.
Samsung Electronics n’est pas responsable de tout dommage au produit ou toute blessure sur vous-même ou une autre personne si vous choisissez d’installer le téléviseur vous-même.
Enlevez le support, bouchez l’orifice de la base et fermez à l’aide de deux vis.
Français-
BN68-01007C-00Fre.indd2
2006-03-03¿ÀÈÄ3:20:48
Présentation du panneau de commande
La couleur et la forme du produit peuvent varier en fonction du modèle.
SOURCE
Bascule entre toutes les sources d’entrée disponibles. (TV,
Ext.1, Ext.2, AV, S-Vidéo, Composant, PC, HDMI, DTV).
Dans le menu à l’écran, utilisez ce bouton de la même
manière que le bouton ENTER
de la télécommande.
Pour changer de canal. Dans le menu à l’écran, utilisez les
boutons
de la même manière que les boutons et
de la télécommande. (Vous pouvez allumer votre téléviseur sans votre télécommande à l’aide de ces boutons.)
MENU
Appuyez sur ce bouton pour afficher le menu des fonctions Enceintes
de votre téléviseur.
Voyant d’alimentation
Clignote puis s’arrête lorsque le téléviseur est allumé.
Appuyez pour diminuer ou augmenter le volume. Dans le
S’allume en mode Veille.
menu à l’écran, utilisez les boutons
de la même
(Alimentation)
manière que les boutons et
de la télécommande.
Appuyez sur ce bouton pour allumer ou éteindre le téléviseur.
Capteur de la télécommande
Dirigez la télécommande vers ce point du téléviseur.
Français-
BN68-01007C-00Fre.indd3
2006-03-03¿ÀÈÄ3:20:48
Présentation du panneau de branchement
[Prises du panneau latéral]
(Le modèle 26 pouce n’est pas équipé
de prises de panneau latéral.)
[Prises du panneau arrière]
(32 pouce/37 pouce/40 pouce)
Entrée del’alimentation
[Prises du panneau arrière]
(26 pouce)
Lorsque vous raccordez un appareil externe au téléviseur, assurez-vous que l’appareil est arrêté.
Lorsque vous connectez un périphérique externe, faites correspondre les couleurs du terminal de connexion et du câble.
Branchement à un réseau de télévision câblé ou hertzien
Afin d’afficher correctement les canaux de télévision, un signal doit être reçu par le téléviseur/moniteur depuis l’une des sources suivantes: - Une antenne extérieure / Un réseau de télévision câblée / Un réseau satellite
Français-
BN68-01007C-00Fre.indd4
2006-03-03¿ÀÈÄ3:20:49
Branchement HDMI/DVI
-Prend en charge les connexions entre des périphériques audio/vidéo compatibles HDMI (boîtiers décodeurs, lecteurs DVD, récepteurs AV et moniteurs).
-Aucune connexion audio supplémentaire n’est requise pour une connexion HDMI - HDMI.
Qu’est-ce que l’HDMI ?
- “High Definition Multimedia interface” permet la transmission de données vidéo numériques haute définition et plusieurs canaux de son numérique (5.1 canaux).
- La borne HDMI/DVI gère les connexions DVI vers un périphérique étendu avec le câble approprié (non fourni). La différence entre HDMI et DVI est que le périphérique HDMI est plus petit, est équipé de la fonction de codage HDCP (High Bandwidth Digital Copy Protection), et gère le son numérique multicanal.
Utilisez le câble DVI vers HDMI ou le raccord DVI-HDMI pour cette connexion, et le terminal “R - AUDIO - L” DVI pour la sortie audio.
- Lorsque vous connectez ce produit à un décodeur, un lecteur DVD, une console de jeu, etc. via HDMI ou DVI, veillez à le définir dans un mode compatible avec une sortie vidéo, comme illustré dans le tableau ci-dessous. Dans le cas contraire, vous risquez une distorsion, rupture ou absence d’image.
Modes pris en charge pour DVI ou HDMI
480i
480p
576i
576p
720p
1080i
50 Hz
X
O
X
O
O
O
60 Hz
X
O
X
X
O
O
Composant
O
O
O
O
O
O
- N’essayez pas de relier le connecteur HDMI/DVI à un PC ou une carte graphique pour ordinateur portable. (Cela afficherait un écran vide)
Branchement d’un boîtier décodeur, d’un magnétoscope ou d’un lecteur DVD
Entrée
Sortie
Connector
Video
Audio (L/R)
Video + Audio (L/R)
RGB
- Entrées ou sorties pour périphériques externes, tels que Seule la sortie TV ou DTV est disponible. des magnétoscopes, des lecteurs DVD, des consoles de
Sortie que vous pouvez sélectionner. jeux vidéo ou des lecteurs de vidéodisques.
Branchement de périphériques audio/vidéo externes
EXT 1
EXT 2
-Connectez le câble RCA (en option) ou S-VIDEO (en option) à un périphérique A/V externe approprié tel qu’un magnétoscope,un lecteur DVD ou un caméscope.
-Connectez les câbles audio RCA (en option) au connecteur “R - AUDIO – L” situé à l’arrière de votre poste et aux connecteurs de sortie audio correspondants sur le périphérique A/V.
-Vous pouvez brancher un casque à la prise casque ( ) située à l’arrière du téléviseur/moniteur. Lorsque le casque est branché, les haut parleurs intégrés n’émettent plus de son.
MAINTENANCE
-Connexion de maintenance pour ingénieur de maintenance qualifié.
Connexion de périphériques audio
-Branchez les câbles audio RCA au connecteur “R - AUDIO - L” situé à l’arrière de votre poste et aux connecteurs d’entrée audio correspondants sur le système de cinéma à domicile avec amplificateur ou lecteur DVD.
Branchement Ordinateur
-Connectez le câble D-Sub (en option) au connecteur “PC (PC IN)” situé à l’arrière de votre poste et à la carte vidéo de votre ordinateur.
-Connectez le câble audio stéréo (en option) au connecteur “AUDIO (PC IN)” situé à l’arrière de votre poste et au connecteur “Audio Out” de la carte son de votre ordinateur.
Branchement des périphériques composants (moniteur/lecteur DVD)
-Connectez les câbles vidéo composante (en option) au connecteur composante (“PR”, “PB”, “Y”) situé à l’arrière de votre poste et aux connecteurs de sortie vidéo composante correspondants sur le DTV/lecteur DVD.
-Si vous souhaitez brancher en même temps le boîtier décodeur et le moniteur (ou le lecteur DVD), branchez ces appareils ensemble puis connectez le moniteur (ou le lecteur DVD) au connecteur composante (“PR”, “PB”, “Y”) sur votre poste.
-Les connecteurs Y, PR et PB des périphériques composants (moniteur ou lecteur DVD) sont parfois appelés Y, B-Y et RY ou Y, Cb et Cr.
-Connectez les câbles audio RCA (en option) au connecteur “R - AUDIO - L” situé à l’arrière de votre poste et aux connecteurs de sortie audio correspondants sur le moniteur ou le lecteur DVD.
-Ce téléviseur LCD affiche une image optimale en mode 720p.
-Ce téléviseur LCD affiche une résolution d’image optimale en mode 1080i.
Verrou Kensington
- Le verrou Kensington (en option) est un dispositif utilisé pour fixer physiquement le système dans le cas d’une utilisation dans un endroit public. - Pour utiliser un dispositif de verrouillage, contactez le revendeur de votre téléviseur.
- L’emplacement du “verrou Kensington” peut varier en fonction du modèle.
SORTIE AUDIO NUMERIQUE (OPTIQUE)
- A connecter à un composant audio numérique
Connexion de la Carte CI (Common Interface)
euillez insérer la
V
carte comme le
montre l’illustration
CARTE CI
Panneau arrière du téléviseur
- Si vous n’insérez pas la carte CI, il peut arriver que, sur certaines chaînes, le message “Scrambled Signal” (Signal brouillé) s’affiche à l’écran.
- Les informations de couplage, contenant un numéro de téléphone, un ID de carte CI, un ID hôte et d’autres informations, s’affichent après 2 à 3 minutes. Si un message d’erreur s’affiche, consultez votre fournisseur de service.
- Lorsque la configuration des informations sur les chaînes est terminée, le message “Updating Completed” (Mise à jour terminée) s’affiche. Ceci indique que la liste des chaînes a été mise à jour.
Vous devez vous procurer une carte CI chez un fournisseur local
de services câblés. Retirez la carte CI avec le plus grand soin, car
une chute pourrait l’endommager.
Port de maintenance
- Connexion de maintenance pour ingénieur de maintenance qualifié.
Français-
BN68-01007C-00Fre.indd5
2006-03-03¿ÀÈÄ3:20:50
Présentation de la télécommande
électionne le périphérique de destination
S
à régler à l’aide de la télécommande
Samsung (Téléviseur, lecteur DVD, STB,
câble, magnétoscope)
Bouton de veille du téléviseur
Ecran de menu DTV
Arrêt automatique
P
: Chaîne suivante
P : Canal précédent
Boutons numériques d’accès direct aux
chaînes Sélection des effets visuels
Permet de quitter le menu à l’écran
Sélection de canaux à 1 ou 2 chiffres
Affiche les informations sur la diffusion en cours
Il affiche “Gestionnaire de Chaînes” à
l’écran.
électionne directement le téléviseur et le
S
mode DTV
Fonctions du magnétoscope/DVD
Retour rapide, Arrêt, Lecture/Pause et
Avance rapide.
Augmenter le volume
Réduire le volume
A
rrêt temporaire du son
Affichage des menus et confirmation des
modifications
Ecran du guide électronique des
programmes (EPG)
Marche/Arrêt Image dans image (PIP)
Gel de l’image
Sélection des effets visuels
élection des effets sonores
S
ègle 5 périphériques distincts R
Téléviseur, lecteur DVD, STB, câble ou
VCR
Sélection de la source d’entrée
Canal précédent
Déplacement du curseur dans le menu
S
élection de la taille de l’image
A
ffichage des sous-titres numériques
Sélection du mode audio
Sélection SRS TSXT
Fonctions télétexte
Sortir du Télétexte
Index Télétexte
Pause Télétexte
Sélection de la taille du Télétexte
élection du mode Télétexte S
(LISTE/FLOF)
Page secondaire Télétexte
: Page Télétexte suivante
P
P : Page Télétexte précédente
Annulation du Télétexte
Affichage du Télétexte
Vous pouvez également sélectionner
Teletext, Double, ou Mix.
Sélection de sujets Fastext
Mémorisation Télétexte
Une lumière intense peut affecter le bon fonctionnement de la télécommande.
C
eci est une télécommande spéciale destinée aux malvoyants. Elle dispose de points
Braille sur les boutons Power, Channel et Volume.
Installation des piles dans la télécommande
1. Soulevez le panneau à l’arrière de la télécommande, comme illustré.
2. P
lacez deux piles AAA.
Assurez-vous de faire correspon dre les pôles “+” et “-” des piles avec le schéma situé à l’intérieur du compartiment.
3. R
eplacez le couvercle.
R
etirez les piles et stockez-les dans un endroit frais et sec si vous n’utilisez pas la télécommande pendant
longtemps. La télécommande peut être util isée jusqu’à environ 7 mètres de la télévision. (Pour une utilisation type de la télévision, les piles durent environ un an.)
i la télécommande ne fonctionne pas, vérifiez ce qui suit:
S
1. La télévision est-elle allumée?
2. Les pôles (+ / -) des piles sont-ils inversés?
3. Les piles sont-elles usagées?
4. Y a-t-il une coupure d’alimentation ou le cordon d’alimentation est-il débranché ?
5. Y a-t-il une lampe fluorescente ou un néon à proximité?
Français-
BN68-01007C-00Fre.indd6
2006-03-03¿ÀÈÄ3:20:51
Mise en marche et arrêt
Le câble relié au secteur est fixé à l’arrière du téléviseur/moniteur.
1. Relier le câble principal à la prise appropriée.
L’indicateur de veille situé à l’avant du téléviseur s’allume.
2. Appuyez sur le bouton
à l’avant du téléviseur.
Vous pouvez également appuyer sur le bouton POWER
ou le bouton TV/DTV de la télécommande pour allumer le téléviseur.
Le dernier programme que vous avez regardé est automatiquement re-sélectionné.
3. A
ppuyez sur les boutons numériques (0~9) ou sur les boutons canal ( / ) de la télécommande, ou sur le bouton
droite du téléviseur.
situé sur la
Lorsque vous allumez le téléviseur pour la première fois, vous devrez choisir la langue dans laquelle vous souhaitez que les menus s’affichent.
4. Pour éteindre votre téléviseur, appuyez de nouveau sur le bouton POWER
.
Mode de mise en veille de votre télévision
Ce mode permet de réduire la consommation électrique. Le mode veille peut être utile lorsque vous souhaitez éteindre
temporairement (pendant un repas par exemple).
1. Appuyez sur le bouton POWER de la télécommande.
L’écran s’éteint et un indicateur de veille rouge s’allume à l’avant de votre téléviseur.
2. Pour mettre votre téléviseur sous tension, appuyez simplement sur le bouton POWER , les boutons numériques (0~9),
le bouton TV/DTV ou les boutons up/down ( / ) de sélection de chaîne.
Ne laissez pas le téléviseur/moniteur en mode attente pendant de longues périodes (lorsque vous êtes en vacances par exemple). Il est conseillé de débrancher le téléviseur du secteur et de l’antenne.
Plug & Play
Lorsque le téléviseur est allumé pour la première fois, plusieurs réglages de base
sont à faire l’un après l’autre. Ils vous sont automatiquement présentés.
Les réglages suivants sont disponibles.
1. Appuyez sur le bouton POWER de la télécommande.
Le message “Démarrer Plug & Play” s’affiche lorsque “OK” est sélectionné.
2. Sélectionnez la langue appropriée à l’aide de la touche ou .
Appuyez sur le bouton ENTER pour confirmer votre choix.
3. Le message “Vérifier I’entrée de I’antenne.”, la touche “OK” est alors sélectionnée. Appuyez sur le bouton ENTER .
Vérifiez que le câble de l’antenne est correctement branché.
4. Sélectionnez la pays appropriée à l’aide de la touche ou .
Appuyez sur le bouton ENTER pour confirmer votre choix.
5. L e menu “Mémorisation Auto” s’affiche. La commande “Démarrer” est sélectionnée.
Appuyez sur le bouton ENTER .
La recherche des chaînes débute et s’arrête automatiquement. Lorsque toutes les chaînes
disponibles ont été enregistrées, le menu “Réglage Horloge” s’affiche.
Appuyez sur le bouton ENTER à tout moment pour interrompre le processus de mémorisation.
6. A
ppuyez sur le bouton ENTER .
Sélectionnez l’ “heure” ou les “minutes” à l’aide de la touche ou .
Validez l’ “heure” ou les “minutes” à l’aide de la touche ou .
Vous pouvez également régler les heures et les minutes en appuyant sur les touches
numériques de la télécommande.
7. A
ppuyez sur le bouton ENTER pour confirmer votre choix. Le menu de balayage du
canal DTV s’affiche et le canal DTV est automatiquement mis à jour.
Si les chaînes DTV sont mises à jour, la Source de la liste source du menu d’entrée est automatiquement transformée en DTV.
Pour de plus amples détails concernant la mise à jour des chaînes DTV, consultez la page 27 de ce manuel.
Langue: Sélectionnez votre langue.
Pays: Sélectionnez votre pays.
Mémorisation Auto: Recherche et mémorise automatiquement les chaînes disponibles dans la zone locale.
Réglage Horloge: Règle l’heure de l’horloge du téléviseur selon l’heure actuelle.
Pour réinitialiser cette fonction…
1. Appuyez sur le bouton MENU pour afficher le menu. Appuyez sur le bouton ou pour sélectionner “Configuration”, puis sur la touche ENTER .
2. Appuyez de nouveau sur le bouton ENTER
pour sélectionner “Plug & Play”.
3. Le message de “démarrage du mode Plug & Play” s’affiche.
Français-
BN68-01007C-00Fre.indd7
2006-03-03¿ÀÈÄ3:20:52
- Mémorisation automatique des chaînes
- Mémorisation manuelle des chaînes
Mémorisation automatique des chaînes
Vous pouvez chercher les plages de fréquences disponibles par balayage (leur disponibilité dépend de votre pays). Il est
possible que les numéros de programmes alloués automatiquement ne correspondent pas aux numéros de programmes
souhaités ou actuels. Vous pouvez toutefois organiser les numéros manuellement et effacer les chaînes que vous ne
souhaitez pas regarder.
1. Appuyez sur le bouton MENU pour afficher le menu. Appuyez sur le bouton ou pour sélectionner “Canal”, puis sur la touche ENTER
2. Appuyez sur le bouton ENTER
.
pour sélectionner “Pays”.
3. Sélectionnez la pays appropriée à l’aide de la touche ou . Appuyez sur le bouton ENTER
pour confirmer votre choix.
4. Appuyez sur le bouton ou pour sélectionner “Mémorisation Auto”, puis sur la touche ENTER
5. A
ppuyez sur le bouton ENTER
.
.
Le téléviseur commence la mémorisation de toutes les chaînes disponibles.
Appuyez sur le bouton ENTER
à tout moment pour interrompre le processus de mémorisation et retourner au menu “Canal”.
6. Lorsque toutes les chaînes disponibles ont été enregistrées, le menu “Tri des canaux” s’affiche.
Mémorisation manuelle des chaînes
Vous pouvez mémoriser jusqu’à 100 chaînes, y compris celles reçus via les réseaux câblés.
Lors de la mémorisation manuelle des chaînes, vous pouvez choisir :
De mémoriser ou non chaque chaîne trouvée.
Le numéro du programme qui vous servira à identifierchaque chaîne mémorisée.
1. Appuyez sur le bouton MENU pour afficher le menu. Appuyez sur le bouton ou pour sélectionner “Canal”, puis sur la touche ENTER
.
2. Appuyez sur le bouton ou pour sélectionner “Mémorisation Manuelle”, puis sur la touche ENTER
3. Appuyez sur le bouton ENTER
.
pour sélectionner “Programme”.
4. Pour attribuer un numéro de programme à un canal, vous pouvez trouver le chiffre correspondant en appuyant sur le bouton ou puis appuyez sur le bouton ENTER .
Vous pouvez également afficher un programme en appuyant sur les boutons numériques de la télécommande.
5. Appuyez sur le bouton ou pour sélectionner “Système de Couleur”, puis sur la touche ENTER
.
6. Sélectionnez les couleurs normalisées voulues en appuyant de façon répétée sur la touche ou , puis sur la touche ENTER
7. Appuyez sur le bouton ou pour sélectionner “Système Sonore”, puis sur la touche ENTER
8. Sélectionnez la norme audio voulue en appuyant de façon répétée sur la touche ou , puis sur la touche ENTER
.
.
S’il n’y a aucun son ou si le son est anormal, re-sélectionnez la norme Son requise.
.
9. S
i vous connaissez le numéro de la chaîne à enregistrer, appuyez sur le bouton ou pour sélectionner “Canal”. Appuyez
sur le bouton ENTER . Sélectionnez C (Chaîne par voie hertzienne) ou S (Chaîne câblée) en appuyant sur le bouton ou .
Appuyez sur la touche pour sélectionner la chaîne. Sélectionnez le numéro de votre choix en appuyant sur le bouton ou
puis appuyez sur le bouton ENTER .
Mode des chaînes : P (Mode Programme), C (Mode chaîne par voie hertzienne), S (Mode chaîne câblée)
Vous pouvez également choisir une chaîne en appuyant sur la touche correspondante de la télécommande.
10.Si vous ne connaissez pas les numéros des chaînes, appuyez sur le bouton ou pour sélectionner “Recherche”. Appuyez sur le bouton ENTER . Effectuez la recherche à l’aide des boutons ou , puis appuyez sur le bouton ENTER
11.Appuyez sur le bouton ou pour sélectionner “Mémoriser”. Appuyez sur le bouton ENTER
.
pour sélectionner “OK”.
12.Répétez les étapes 3 à 11 pour chaque canal à mémoriser.
Programme: Sélectionne un numéro de programme pour la chaîne.
Système de Couleur: Définit la norme de couleur.
Système Sonore: Définit la norme audio.
Canal: Sélectionne une chaîne.
Recherche: Recherche la valeur de fréquence de la chaîne.
Mémoriser: Enregistre vos réglages.
Français-
BN68-01007C-00Fre.indd8
2006-03-03¿ÀÈÄ3:20:53
Réglage de Gestionnaire de Chaînes
Réglez les chaînes selon vos préférences.
Vous pouvez aisément supprimer, ajouter ou verrouiller la chaîne de votre choix.
1. Appuyez sur le bouton MENU pour afficher le menu. Appuyez sur le bouton ou pour sélectionner “Canal”, puis sur la touche ENTER .
2. Appuyez sur le bouton ou pour sélectionner “Gestionnaire de Chaînes”, puis sur la touche ENTER .
3. Appuyez sur le bouton ENTER
pour sélectionner “Gestionnaire de Chaînes”.
4. Appuyez sur le bouton pour sélectionner “
”.
5. Appuyez sur le bouton ou pour sélectionner la chaîne à supprimer, puis appuyez sur le bouton ENTER
pour l’annuler.
6. Répétez les étapes 5 pour chaque chaîne à sélectionner ou à annuler.
7. Appuyez sur le bouton EXIT pour quitter le menu.
“
” est activé lorsque “Verrouillage enfant” est défini sur “Activé”.
Vous pouvez sélectionner ces options
en appuyant sur le bouton CH MGR de
votre télécommande.
Activation de la sécurité enfant
Cette fonction vous permet d’empêcher que des utilisateurs non autorisés, tels
que des enfants, regardent des programmes inappropriés en désactivant la vidéo
et l’audio. La sécurité enfant ne peut pas être désactivée à l’aide des boutons du
panneau latéral. La télécommande étant le seul moyen de désactiver la sécurité
enfant, gardez-la hors de portée des enfants.
1. Appuyez sur le bouton MENU pour afficher le menu. Appuyez sur le bouton ou pour sélectionner “Canal”, puis sur la touche ENTER .
2. Appuyez sur le bouton ou pour sélectionner “Gestionnaire de Chaînes”, puis sur la touche ENTER .
3. Appuyez sur le bouton ou pour sélectionner “Verrouillage Parental”, puis sur la touche ENTER .
4. Appuyez sur le bouton ou pour sélectionner “Marche” ou ”Arrêt”.
Appuyez sur le bouton ENTER .
5. Appuyez sur le bouton ou pour sélectionner “Gestionnaire de Chaînes”, puis sur la touche ENTER .
6. Appuyez sur le bouton pour sélectionner la ligne “ ”.
7. Appuyez sur le bouton ou pour sélectionner les chaînes à verrouiller, puis appuyez sur le bouton ENTER .
8. Répétez les étapes 7 pour chaque chaîne à verrouiller ou à déverrouiller.
9. Appuyez sur le bouton EXIT pour quitter le menu.
Sélectionnez “Marche” ou “Arrêt” dans “Verrouillage enfant” pour activer ou désactiver les chaînes sélectionnées comme “ ”.
Français-
BN68-01007C-00Fre.indd9
2006-03-03¿ÀÈÄ3:20:53
Organisation des canaux mémorisés
Organisation des canaux mémorisés:
Changer l’ordre numérique dans lequel ces chaînes ont été automatiquement mémorisées.
A
ttribuer des numéros facilement mémorisables aux chaînes que vous
regardez le plus souvent.
1. Appuyez sur le bouton MENU pour afficher le menu. Appuyez sur le bouton ou pour sélectionner “Canal”, puis sur la touche ENTER .
2. Appuyez sur le bouton ou pour sélectionner “Tri des canaux”, puis sur la touche ENTER .
3. Sélectionnez le numéro de la chaîne à modifier en appuyant de façon répétée sur la touche ou . Appuyez sur le bouton ENTER .
Le numéro de la chaîne sélectionnée et le nom passent au côté droit.
4. A
ppuyez sur le bouton ou pour déplacer la chaîne à l’emplacement souhaité, puis
appuyez sur le bouton ENTER .
La chaîne sélectionnée est échangée avec celle mémorisée auparavant avec le numéro choisi.
5. Répétez les étapes 3 à 4 pour classer une autre chaîne.
6. Appuyez sur le bouton EXIT pour quitter le menu.
Attribution de noms aux canaux
Les noms de chaînes sont attribués automatiquement lorsque les informations des
chaînes sont émises. Ces noms peuvent être changés, vous autorisant à attribuer de
nouveaux noms.
1. Appuyez sur le bouton MENU pour afficher le menu. Appuyez sur le bouton ou pour sélectionner “Canal”, puis sur la touche ENTER .
2. Appuyez sur le bouton ou pour sélectionner “Nom station”, puis sur la touche ENTER .
3. Si nécessaire, sélectionnez la chaîne à renommer à l’aide de la touche ou . Appuyez sur le bouton ENTER .
La barre de sélection s’affiche autour de la zone de nom.
4. Pour...
Sélectionner une lettre un nombre ou un symbole
Alors...
Appuyez sur le bouton ou
Passer à la lettre suivante
Appuyez sur le bouton
Revenir à la lettre précédente
Appuyez sur le bouton
Confirmer le nom
Appuyez sur le bouton ENTER
.
es caractères disponibles sont :
L
Les lettres de l’alphabet (A~Z) / Les nombres (0~9) / Les caractères spéciaux ( -, space)
5. Répétez les étapes 3 et 4 pour chaque canal à ajouter ou à supprimer.
6. Appuyez sur le bouton EXIT pour quitter le menu.
Réception nette des chaînes grâce au réglage fin
Utilisez la syntonisation précise pour régler manuellement une chaîne spécifique en
vue d’une réception optimale.
1. Utilisez le pavé numérique pour sélectionner directement la chaîne à régler.
2. Appuyez sur le bouton MENU pour afficher le menu. Appuyez sur le bouton ou pour sélectionner “Canal”, puis sur la touche ENTER .
3.
4.
5.
Appuyez sur le bouton ou pour sélectionner “Réglage fin”, puis sur la touche ENTER .
Appuyez sur le bouton ou pour effectuer une syntonisation précise. Appuyez sur le bouton ENTER .
Appuyez sur le bouton EXIT pour quitter le menu.
es chaînes réglées et mémorisées sont repérées par un astérisque “*” placé à droite de leur numéro
L
dans la bannière des chaînes. Le numéro de la chaîne devient rouge.
Pour réinitialiser le réglage, sélectionnez “Réinitial”. à l’aide de la touche ou , puis appuyez sur
la touche ENTER .
Français-10
BN68-01007C-00Fre.indd10
2006-03-03¿ÀÈÄ3:20:54
Amplificateur faible bruit (LNA)
Si le téléviseur fonctionne dans une zone où le signal est faible, la fonction LNA peut
améliorer la réception (un préamplificateur de bruit faible renforce le signal entrant).
1. Appuyez sur le bouton MENU pour afficher le menu. Appuyez sur le bouton ou pour sélectionner “Canal”, puis sur la touche ENTER .
2. Appuyez sur le bouton ou pour sélectionner “LNA”, puis sur la touche ENTER .
3. Appuyez sur le bouton ou pour sélectionner “Marche” ou ”Arrêt”.
Appuyez sur le bouton ENTER .
4. Appuyez sur le bouton EXIT pour quitter le menu.
Modification de l’image standard
Vous pouvez sélectionner le type d’image qui correspond le mieux à vos exigences d’affichage.
1. Appuyez sur le bouton MENU pour afficher le menu. Appuyez sur le bouton ou pour sélectionner “Image”, puis sur la touche ENTER .
2. Appuyez de nouveau sur le bouton ENTER pour sélectionner “Mode”.
3. Appuyez de nouveau sur le bouton ENTER pour sélectionner “Mode”.
4. Appuyez sur le bouton ou pour sélectionner l’effet visuel désiré. Appuyez sur le bouton ENTER .
5. Appuyez sur le bouton EXIT pour quitter le menu.
ous pouvez également appuyer
V
sur le bouton P.MODE de la
télécommande pour sélectionner
l’une des configurations d’image.
Dynamique: Sélectionne l’affichage des images en haute définition, pour une pièce claire.
Standard: Sélectionne l’affichage des images de manière optimale, pour un environnement normal.
Cinéma: Sélectionne l’affichage des images dans des conditions optimales pour une pièce sombre.
Personnalisé: Permet de consulter vos paramètres d’affichage favoris.
(Reportez-vous à “Réglage de l’image personnalisée”)
Le mode Image doit être réglé séparément pour chaque source d’entrée.
Vous pouvez rétablir les paramètres d’image par défaut (usine) en appuyant sur “Réinitialiser”. (Reportez-vous à “Rétablir les paramètres de réglage de l’image d’usine.” page 12)
Réglage de l’image personnalisée
Votre téléviseur dispose de plusieurs réglages qui vous permettent de contrôler la qualité de l’image.
1. Pour sélectionner l’effet visuel souhaité, observez les instructions 1 à 4 dans la section “Modification de l’image standard”.
2. Appuyez sur le bouton ou pour sélectionner un élément particulier.
Appuyez sur le bouton ENTER .
3. Appuyez sur le bouton ou pour augmenter ou diminuer la valeur d’un élément particulier. Appuyez sur le bouton ENTER .
4. Appuyez sur le bouton EXIT pour quitter le menu.
Contraste: Règle le degré de luminosité (clair/sombre) entre les objets et l’arrière-plan.
Luminosité: Règle la luminosité de l’écran entier.
Netteté: Règle le contour des objets afin d’augmenter ou de diminuer leur netteté.
Couleur: Règle les couleurs afin de les éclaircir ou de les assombrir.
Teinte (NTSC uniquement): Ajuste la couleur des objets, les rendant plus rouges ou plus verts, pour les rendre plus naturels.
Les valeurs configurées sont stockées en fonction du mode d’image sélectionné.
En mode PC, seuls “Contraste”, “Luminosité” et “Couleur” peuvent être réglés.
Changement de la nuance couleur
Vous pouvez sélectionner la nuance de couleur qui vous convient le mieux.
1. Pour sélectionner l’effet visuel souhaité, observez les instructions 1 à 4 dans la section “Modification de l’image standard”.
2. Appuyez sur le bouton ou pour sélectionner “Nuance Coul.”, puis sur la touche ENTER .
3. Appuyez sur le bouton ou pour sélectionner le paramètre de nuance de couleur
désiré. Appuyez sur le bouton ENTER .
4. Appuyez sur le bouton EXIT pour quitter le menu.
Froide2:Rend la température des couleurs plus bleue que le menu “Froide1”. Chaude1: Rend le blanc rougeâtre.
Froide1: Rend le blanc bleuâtre.
Chaude2: Rend la température des couleurs plus rouge que le
Normal: Garde le blanc intact.
menu “Chaude1”.
Les valeurs configurées sont stockées en fonction du mode d’image sélectionné.
Français-11
BN68-01007C-00Fre.indd11
2006-03-03¿ÀÈÄ3:20:55
Rétablir les paramètres de réglage de l’image d’usine.
Vous pouvez rétablir les réglages de l’image définis par défaut en usine.
1. Pour sélectionner l’effet visuel souhaité, observez les instructions 1 à 4 dans la section “Modification de l’image standard” à la page 11.
2. Appuyez sur le bouton ou pour sélectionner “Réinitialiser”, puis sur la touche ENTER .
3. Appuyez sur le bouton EXIT pour quitter le menu.
La fonction “Réinitialiser” réinitialise chaque mode d’image.
Changement de la taille de l’image
Vous pouvez sélectionner la taille d’image qui correspond le mieux à vos exigences
d’affichage.
1. Appuyez sur le bouton MENU pour afficher le menu. Appuyez sur le bouton ou pour sélectionner “Image”, puis sur la touche ENTER .
2. Appuyez sur le bouton ou pour sélectionner “Taille”, puis sur la touche ENTER
.
3. S
électionnez l’option voulue en appuyant sur le bouton ou .
Appuyez sur le bouton ENTER .
4. Appuyez sur le bouton EXIT pour quitter le menu.
Vous pouvez également choisir ces
options en appuyant sur la touche
P.SIZE de la télécommande.
16/9 auto: Ajuste automatiquement le format d’image selon le rapport d’aspect “16:9”.
16:9: Règle le format d’image en mode 16:9, approprié pour un DVD ou une diffusion en format large.
Zoom: Agrandit l’image au format 16/9 (dans le sens vertical) à la taille de l’écran.
4:3: Il s’agit du réglage par défaut pour un film sur vidéo ou une diffusion normale.
La fonction “16/9 auto” n’est disponible que dans les modes “TV”, “Ext “, “Ext2”, “AV” et “S-Vidéo”.
En mode PC, seul les modes “16:9” et “4:3” peuvent être réglés.
Sélectionnez à l’aide de la touche ou . Utilisez les touches ou pour monter ou
descendre l’image. Après avoir sélectionné , utilisez les touches ou pour agrandir ou
réduire le format de l’image dans le sens vertical.
Sélection du format de l’image
Appuyez sur le bouton STILL pour transformer une image mouvante en une image
fixe. Appuyez de bouton nouveau pour annuler.
Réduction du bruit numérique
Si le signal reçu par votre téléviseur est faible, vous pouvez activer cette fonction
pour réduire les parasites et les réverbérations apparaissant à l’écran.
1. Appuyez sur le bouton MENU pour afficher le menu. Appuyez sur le bouton ou pour sélectionner “Image”, puis sur la touche ENTER .
2. Appuyez sur le bouton ou pour sélectionner “NR numérique”, puis sur la touche ENTER .
3. Appuyez sur le bouton ou pour sélectionner “Marche” ou ”Arrêt”.
Appuyez sur le bouton ENTER .
4. Appuyez sur le bouton EXIT pour quitter le menu.
Français-12
BN68-01007C-00Fre.indd12
2006-03-03¿ÀÈÄ3:20:56
DNle Démo (Digital Natural Image engine)
La nouvelle technologie de Samsung vous apporte des images plus détaillées avec une
amélioration des contrastes et des blancs. Le nouvel algorithme de compensation d’images
vous donne une image plus lumineuse et plus claire. La technologie DNIe adaptera tous les
signaux à votre vue, quels qu’ils soient. Vous pouvez apprécier l’amélioration de l’image par la
technologie DNIe en activant le mode “DNle Démo”.
1. Appuyez sur le bouton MENU pour afficher le menu. Appuyez sur le bouton ou pour sélectionner “Image”, puis sur la touche ENTER .
2. Appuyez sur le bouton ou pour sélectionner “DNIe Démo”, puis sur la touche ENTER .
3. Appuyez sur le bouton ou pour sélectionner “Marche” ou “Arrêt”.
Appuyez sur le bouton ENTER .
4. Appuyez sur le bouton EXIT pour quitter le menu.
Ces fonctions ne sont pas disponibles en mode PC.
La fonction DNle Démo est destinée à illustrer la différence avant et après application de la technologie DNle.
Par défaut, le produit affiche les images en mode DNle.
Affichage de l’Image dans l’image (PIP)
Vous pouvez afficher une image secondaire dans l’image principale du programme
télévisé ou de l’entrée vidéo. De cette manière, vous pouvez regarder le programme
télévisé ou l’entrée vidéo depuis n’importe quel équipement branché tout en
regardant l’image principale.
1. Appuyez sur le bouton MENU pour afficher le menu. Appuyez sur le bouton ou pour sélectionner “Image”, puis sur la touche ENTER .
2. Appuyez sur le bouton ou pour sélectionner “PIP”, puis sur la touche ENTER
.
3. Appuyez sur le bouton ENTER . Appuyez sur le bouton ou pour sélectionner “Marche”, puis sur la touche ENTER
Si la fonction PIP est activée, la taille de l’image principale est définie sur “16:9”.
Appuyez plusieurs fois sur le
bouton PIP de la télécommande
pour activer ou désactiver le mode
“PIP”.
.
4. A
ppuyez sur le bouton ou pour sélectionner “Source”, puis sur la touche ENTER
. Sélectionnez la Source de l’image secondaire en appuyant sur le bouton ou
puis appuyez sur le bouton ENTER .
L’image secondaire peut provenir de différentes sources, selon le réglage de l’image principale.
5. A
ppuyez sur le bouton ou pour sélectionner “Intervertir”. Pour intervertir l’image principale et l’image secondaire, sélectionnez l’option
“Intervertir”, puis appuyez sur le bouton ENTER .
L’image principale et l’image secondaire permutent.
Si l’image principale est en mode “PC”, l’option “Intervertir” n’est pas accessible.
6. A
ppuyez sur le bouton ou pour sélectionner le paramètre “Taille” de l’image
secondaire puis appuyez sur le bouton ENTER Sélectionnez la taille de l’image
secondaire à l’aide du bouton ou puis appuyez sur le bouton ENTER .
Si l’image principale est en mode “PC”, l’option “Taille” n’est pas accessible.
7. A
ppuyez sur le bouton ou sélectionner “Position”, puis sur la touche ENTER .
Sélectionnez la Source de l’image secondaire en appuyant sur le bouton ou puis
appuyez sur le bouton ENTER .
8. A
ppuyez sur le bouton ou pour sélectionner “Programme”, puis sur la touche
ENTER . Vous pouvez sélectionner le canal que vous souhaitez voir en image
secondaire en appuyant sur le bouton ou . Appuyez sur le bouton ENTER .
Le “Programme” peut être actif lorsque l’image secondaire est définie sur TV.
9. A
ppuyez sur le bouton EXIT pour quitter le menu.
Il est possible que l’image affichée dans la fenêtre PIP soit légèrement déformée lorsque vous
utilisez la fenêtre principale pour diffuser un jeu vidéo ou du karaoké.
Source: Permet de sélectionner la source de l’image secondaire.
Intervertir: Pour faire alterner l’image principale et l’image secondaire.
Taille: permet de sélectionner la taille de l’image secondaire.
Position: Permet de déplacer l’image secondaire.
Programme: Permet de déplacer l’image secondaire.
Français-13
BN68-01007C-00Fre.indd13
2006-03-03¿ÀÈÄ3:20:56
Paramètres PIP
O: PIP activé, X: PIP désactivé
Principal
Secondaire
TV
Ext.1
Ext.2
AV
S-Vidéo
Composant
PC
HDMI
DTV
TV
X
X
X
X
X
X
O
O
X
Ext.1
X
X
X
X
X
X
O
O
X
Ext.2
X
X
X
X
X
X
O
O
X
AV
X
X
X
X
X
X
O
O
X
S-Vidéo
X
X
X
X
X
X
X
O
X
Composant
X
X
X
X
X
X
X
O
X
PC
X
X
X
X
X
X
X
X
X
HDMI
O
O
O
O
O
O
X
X
X
DTV
X
X
X
X
X
X
X
X
X
Changement de la norme Son
Vous pouvez sélectionner le type d’effet sonore souhaité lorsque vous regardez un
programme donné.
1. Appuyez sur le bouton MENU pour afficher le menu. Appuyez sur le bouton ou pour sélectionner “Son”, puis sur la touche ENTER
2. Appuyez de nouveau sur le bouton ENTER
.
pour sélectionner “Mode”.
3. S
électionnez l’effet sonore voulu en appuyant de façon répétée sur la touche ou ,
puis sur la touche ENTER .
4. Appuyez sur le bouton EXIT pour quitter le menu.
Standard: Sélectionne le mode audio normal.
Musique: Privilégie la musique par rapport à la voix.
Cinéma: Fournit un son riche et vif pour les films.
Parole: Privilégie la voix par rapport aux autres sons.
Personnalisé: Sélectionne vos réglages audio personnalisés.
(Reportez-vous à “Réglage des paramètres du son”)
ous pouvez egalement selectionner
V
ces options en appuyant simplement
sur le bouton S.MODE de la telecommande.
Réglage des paramètres du son
Les paramètres du son peuvent être réglés selon vos préférences personnelles.
1. Appuyez sur le bouton MENU pour afficher le menu. Appuyez sur le bouton ou pour sélectionner “Son”, puis sur la touche ENTER
.
2. Appuyez sur le bouton ou pour sélectionner “Egaliseur”, puis sur la touche ENTER .
3. A
ppuyez sur le bouton ou pour sélectionner un élément particulier.
Appuyez sur le bouton ENTER .
4. A
ppuyez sur le bouton ou pour effectuer le réglage souhaité.
Appuyez sur le bouton ENTER .
5. Appuyez sur le bouton EXIT pour quitter le menu.
Si vous modifiez ces paramètres, le mode audio bascule automatiquement sur “Personnalisé”.
Connexion du casque
Vous pouvez connecter un casque à votre téléviseur, si vous souhaitez regarder un programme
sur votre téléviseur sans déranger les autres personnes présentes dans la pièce.
Lorsque vous insérez le jack de casque dans le port correspondant, seules les fonctions
“Silence Int.” et “Sélection du son” (en mode PIP) sont disponibles dans le menu Son.
L’utilisation prolongée du casque à fort volume peut altérer votre audition.
Aucun son n’est émis depuis les enceintes lorsque vous connectez le casque à l’appareil.
Français-14
BN68-01007C-00Fre.indd14
2006-03-03¿ÀÈÄ3:20:57
Paramétrage de la technologie TruSurround XT (SRS TSXT)
ous pouvez également paramétrer
V
ces options en appuyant sur la touche SRS de la télécommande.
La technologie TruSurround XT est une technologie SRS brevetée qui répond au
problème de lecture des contenus multicanaux 5.1 sur deux haut-parleurs. La
technologie TruSurround garantit un son surround virtuel d’une exceptionnelle qualité
sur tout système de lecture à deux haut-parleurs, dont les haut-parleurs du téléviseur.
Cette technologie est entièrement compatible avec tous les formats multicanaux.
1. Appuyez sur le bouton MENU pour afficher le menu. Appuyez sur le bouton ou pour sélectionner “Son”, puis sur la touche ENTER .
2. Appuyez sur le bouton ou pour sélectionner “SRS TSXT”, puis sur la touche ENTER .
3. Appuyez sur le bouton ou pour sélectionner “Marche” ou ”Arrêt”.
Appuyez sur le bouton ENTER .
4. Appuyez sur le bouton EXIT pour quitter le menu.
TruSurround XT, SRS et le symbole
sont des marques de SRS
Labs, Inc. La technologie TruSurround XT est intégrée sous licence de
SRS Labs, Inc.
Réglage automatique du volume
Chaque station de radiodiffusion possède ses propres conditions d’émission de
signal. Il vous faut alors régler le volume à chaque fois que vous changez de chaîne.
Cette fonction vous permet de régler automatiquement le volume de la chaîne retenue
en réduisant la puissance sonore lorsque le signal de modulation est élevé ou en
l’augmentant lorsque le signal de modulation est faible.
1. Appuyez sur le bouton MENU pour afficher le menu. Appuyez sur le bouton ou pour sélectionner “Son”, puis sur la touche ENTER .
2. Appuyez sur le bouton ou pour sélectionner “Volume auto”, puis sur la touche ENTER .
3. Appuyez sur le bouton ou pour sélectionner “Marche” ou ”Arrêt”.
Appuyez sur le bouton ENTER .
4. Appuyez sur le bouton EXIT pour quitter le menu.
Sélection du mode Silence Int.
Pour écouter le son sur des haut-parleurs différents, supprimez l’amplificateur interne.
1. Appuyez sur le bouton MENU pour afficher le menu. Appuyez sur le bouton ou pour sélectionner “Son”, puis sur la touche ENTER .
2. Appuyez sur le bouton ou pour sélectionner “Silence Int.”, puis sur la touche ENTER .
3. Appuyez sur le bouton ou pour sélectionner “Marche” ou ”Arrêt”.
Appuyez sur le bouton ENTER .
4. Appuyez sur le bouton EXIT pour quitter le menu.
S
i le mode “Silence Int.” est sur “Marche”, vous ne pouvez pas régler les menus Sound (Son), à
l’exception de Sound Select “Sélection du son” (en mode PIP).
Ecoute du son accompagnant l’image secondaire
Lorsque la fonction PIP est activée, vous pouvez écouter le son accompagnant
l’image secondaire.
1. Appuyez sur le bouton MENU pour afficher le menu. Appuyez sur le bouton ou pour sélectionner “Son”, puis sur la touche ENTER
2. Appuyez sur le bouton ou pour sélectionner “Sélection du son”, puis sur la touche ENTER .
3. Appuyez sur le bouton ou pour sélectionner “Secondaire”.
Appuyez sur le bouton ENTER .
4. Appuyez sur le bouton EXIT pour quitter le menu.
.
Principal: Permet d’écouter le son accompagnant l’image principale.
Secondaire: Permet d’écouter le son accompagnant l’image secondaire.
Vous pouvez sélectionner cette option lorsque la fonction “PIP” est activée “Marche”. (voir page 13)
Français-15
BN68-01007C-00Fre.indd15
2006-03-03¿ÀÈÄ3:20:58
Rétablir les paramètres de son par défaut
Si le mode Jeu est activé, la fonction Réinitialiser le son est disponible. Sélectionner la
fonction Réinitialiser après avoir réglé l’égaliseur rétablit ses paramètres par défaut.
1. Appuyez sur le bouton MENU pour afficher le menu. Appuyez sur le bouton ou pour sélectionner “Son”, puis sur la touche ENTER .
2. Appuyez sur le bouton ou pour sélectionner “Réinitial.”, puis sur la touche ENTER .
3. Appuyez sur le bouton EXIT pour quitter le menu.
Vous pouvez sélectionner cette option lorsque la fonction “Mode Jeu” est activée “Marche”.
Réglage et affichage de l’heure
Vous pouvez régler l’horloge du téléviseur de telle sorte que l’heure actuelle s’affiche
lorsque vous appuyez sur le bouton “INFO”. Vous devez également régler l’heure si
vous souhaitez utiliser les minuteries de mise sous/hors tension.
1. Appuyez sur le bouton MENU pour afficher le menu. Appuyez sur le bouton ou pour sélectionner “Configuration”, puis sur la touche ENTER .
2. Appuyez sur le bouton ou pour sélectionner “Horloge”, puis sur la touche ENTER .
3. Appuyez sur le bouton ENTER
pour sélectionner “Réglage Horloge”.
4.
Pour...
Appuyez sur le...
Passer aux “Heure” ou aux “Minute”
bouton ou .
Réglez les “Heure” ou les “Minute”
bouton ou .
Appuyez sur le bouton ENTER
.
5. Appuyez sur le bouton EXIT pour quitter le menu.
Si vous débranchez le cordon d’alimentation, vous devrez de nouveau régler l’horloge.
Vous pouvez également régler les heures et les minutes en appuyant sur les touches numériques
de la télécommande.
Réglage de la minuterie de mise en veille
Vous pouvez sélectionner une durée comprise entre 30 et 180 minutes à l’issue de
laquelle le téléviseur passera automatiquement en mode veille.
1. Appuyez sur le bouton MENU pour afficher le menu. Appuyez sur le bouton ou pour sélectionner “Configuration”, puis sur la touche ENTER .
2. Appuyez sur le bouton ou pour sélectionner “Horloge”, puis sur la touche ENTER .
3. Appuyez sur le bouton ou pour sélectionner “Veille”, puis sur la touche ENTER .
4. Appuyez plusieurs fois sur le bouton ou jusqu’à ce que l’heure désirée apparaisse. (Arrêt, 30, 60, 90, 120, 150, 180). Appuyez sur le bouton ENTER
.
5. Appuyez sur le bouton EXIT pour quitter le menu.
Le téléviseur passe automatiquement en mode veille lorsque la minuterie atteint 0.
Appuyez à plusieurs reprises sur le
bouton SLEEP de la télécommande,
jusqu’à ce quel’intervalle désiré
s’affiche.
Marche et arrêt automatique du téléviseur
Vous pouvez activer ou désactiver la minuterie afin que:
Le téléviseur s’allume automatiquement et se positionne sur la chaîne de votre choix au moment que vous avez choisi.
Le téléviseur s’éteigne automatiquement au moment que vous avezchoisi.
La première étape consiste à régler l’horloge du téléviseur.
1. Appuyez sur le bouton MENU pour afficher le menu. Appuyez sur le bouton ou pour sélectionner “Configuration”, puis sur la touche ENTER .
2. Appuyez sur le bouton ou pour sélectionner “Horloge”, puis sur la touche ENTER
.
3. Appuyez sur le bouton ou pour sélectionner “Minuterie ON”, puis sur la touche ENTER .
Français-16
BN68-01007C-00Fre.indd16
2006-03-03¿ÀÈÄ3:20:59
4.
5.
6.
7.
Appuyez sur le bouton ou pour “Heure”, puis appuyez sur le bouton pour passer à l’étape suivante. Effectuez les autres paramétrages à l’aide de la même méthode que celle ci-dessus. Lorsque vous avez terminé, appuyez sur le bouton ENTER .
Appuyez sur le bouton ou pour sélectionner “Minuterie OFF”, puis sur la touche ENTER .
Appuyez sur le bouton ou pour “Heure”, puis appuyez sur le bouton pour passer à l’étape suivante. Effectuez les autres paramétrages à l’aide de la même méthode que celle ci-dessus. Lorsque vous avez terminé, appuyez sur le bouton ENTER .
Appuyez sur le bouton EXIT pour quitter le menu.
Vous pouvez également régler les heures et les minutes en appuyant sur les touches numériques de la télécommande.
Le paramètre “Activation” doit être réglé sur “Oui” pour que les minuteries fonctionnent.
Choix de la langue
Lorsque vous utilisez le téléviseur pour la première fois, vous devez sélectionner la
langue utilisée pour afficher les menus et les indications.
1. Appuyez sur le bouton MENU pour afficher le menu affiché à l’écran. Appuyez sur le bouton ou pour sélectionner “Configuration”, puis sur la touche ENTER .
2. Appuyez sur le bouton ou pour sélectionner “Langue”, puis sur la touche ENTER
.
3. S
électionnez la langue voulue en appuyant de façon répétée sur la touche ou .
Appuyez sur le bouton ENTER .
Vous pouvez choisir parmi 5 langues.
4. Appuyez sur le bouton EXIT pour quitter le menu.
Utilisation de Mode Jeu
Si vous connectez une console de jeu PlayStationTM ou XboxTM, vous pouvez profiter
d’une expérience ludique encore plus réaliste en sélectionnant le menu Jeu.
1. Appuyez sur le bouton MENU pour afficher le menu affiché à l’écran. Appuyez sur le bouton ou pour sélectionner “Configuration”, puis sur la touche ENTER .
2. Appuyez sur le bouton ou pour sélectionner “Mode Jeu”, puis sur la touche ENTER .
3. Appuyez sur le bouton ou pour sélectionner “Marche” ou ”Arrêt”.
Appuyez sur le bouton ENTER .
4. Appuyez sur le bouton EXIT pour quitter le menu.
Pour déconnecter la console de jeu et connecter un autre périphérique externe, annulez le Mode Jeu dans le menu Image.
Si vous affichez le menu TV dans le Mode Jeu, l’écran tremble légèrement.
Mode Jeu n’est pas disponible en mode TV.
Si le mode Jeu est activé
• Les modes Image et Son sont automatiquement définis sur Personnalisé. Les utilisateurs ne peuvent pas changer de mode.
• Le mode Son du menu Son est désactivé. Réglez le son à l’aide de l’égaliseur.
• La fonction Réinitialiser les paramètres de son est activée. Sélectionner la fonction Réinitialiser après avoir réglé l’égaliseur rétablit ses paramètres par défaut.
Réglage du mode d’écran bleu / Sélection de mélodie
Ecran Bleu:
Si aucun signal n’est reçu ou si le signal est très faible, un écran bleu remplace
automatiquement l’arrière-plan de l’image parasité. Pour continuer malgré tout à
afficher l’image de mauvaise qualité, vous devez “Arrêt” l’option “Ecran Bleu”.
Mélodie:
Vous pouvez entendre des mélodies lorsque la télévision est allumée ou éteinte.
1. Appuyez sur le bouton MENU pour afficher le menu affiché à l’écran. Appuyez sur le bouton ou pour sélectionner “Configuration”, puis sur la touche ENTER .
2. A
ppuyez sur le bouton ou pour sélectionner “Ecran Bleu” ou ”Mélodie”.
Appuyez sur le bouton ENTER .
3. Appuyez sur le bouton ou pour sélectionner “Marche” ou ”Arrêt”.
Appuyez sur le bouton ENTER .
4. Appuyez sur le bouton EXIT pour quitter le menu.
Français-17
BN68-01007C-00Fre.indd17
2006-03-03¿ÀÈÄ3:21:00
Utilisation de la fonction d’économie d’énergie
Cette fonction règle la luminosité du téléviseur afin de réduire la consommation d’énergie.
Lorsque vous regardez la télévision le soir, réglez l’option du mode “Mode éco.” sur
“Elevé” afin de réduire l’éblouissement ainsi que la consommation.
1. Appuyez sur le bouton MENU pour afficher le menu. Appuyez sur le bouton ou pour sélectionner “Configuration”, puis sur la touche ENTER .
2. Appuyez sur le bouton ou pour sélectionner “Mode éco.”, puis sur la touche ENTER .
3. Sélectionnez l’option souhaitée à l’aide du bouton ou : Arrêt, Bas, Moyen, Elevé.
Appuyez sur le bouton ENTER button.
4. Appuyez sur le bouton EXIT pour quitter le menu.
Sélection de la source
Vous pouvez sélectionner l’une des sources externes connectées aux prises d’entrée
de votre téléviseur.
1.
Appuyez sur le bouton MENU pour afficher le menu.
Appuyez sur le bouton ENTER
pour sélectionner “Entrée”.
2.
Appuyez de nouveau sur le bouton ENTER
3.
pour sélectionner “Liste source”.
uand aucun périphérique externe n’est relié à votre poste, seules les options “TV”, “Ext.1”,
Q
“Ext.2” sont activées dans “Liste source”. Les options “AV”, “S-Vidéo”, “Composant”, “PC” et
“HDMI”, “DTV” ne sont activées qu’en cas de connexion à votre poste.
Sélectionnez le périphérique requis en appuyant à plusieurs reprises sur le bouton ou . Appuyez sur le bouton ENTER .
Appuyez
sur le bouton SOURCE pour sélectionner la source d’entrée requise. Le mode TV peut être
sélectionné à l’aide du bouton TV/DTV, des boutons numériques (0~9) ou du bouton P / de la
télécommande. Il ne peut pas être sélectionné à l’aide du bouton SOURCE.
Modification du nom d’une source d’entrée
Donnez un nom aux appareils connectés aux prises d’entrée, de manière à faciliter la
sélection des sources d’entrée.
1. Appuyez sur le bouton MENU pour afficher le menu.
Appuyez sur le bouton ENTER
pour sélectionner “Entrée”.
2. Appuyez sur le bouton ou pour sélectionner “Modif. Nom”, puis sur la touche ENTER .
3. Appuyez sur le bouton ou pour sélectionner l’appareil à modifier.
Appuyez sur le bouton ENTER .
4. Appuyez sur le bouton ou pour sélectionner l’appareil désiré.
Appuyez sur le bouton ENTER .
5. Appuyez sur le bouton EXIT pour quitter le menu.
Français-18
BN68-01007C-00Fre.indd18
2006-03-03¿ÀÈÄ3:21:01
Aperçu du système de menu DTV
Pour savoir comment naviguer dans le système de menus sur écran et
ajuster les différents réglages disponibles, reportez-vous à l’illustration
suivante.
Disponible en mode TV numérique.
Appuyez sur le bouton “D.MENU”.
Guide
Guide Main/Après
Guide Complet
Liste en annexe
Par défaut
Prés./Suiv., Guide Complet
Préférence
Langue OSD
Niceau de transparence
Verrouillage parental
English, Deutsch, Français, Italiano, Svenska
Elevé, Moyen, Bas, Opaque
Classement parental
Modifier PIN
Caractéristique
Sous-titres
Langue des sous-titres
Langue audio
Mar., Arr.
Canal
Mémorisation Auto
Mémorisation Manuelle
Modif. les canaux favoris
Gestionnaire de chaînes
Système
Information produit
Informations de signal
Mise à niveau du logiciel
Interface commune
Réinit.
Infos sur l’application
CI Menu
Module Information
Smart card information
Language
Software Download
Les éléments secondaires du menu CI peuvent varier en fonction du modèle de CAM.
Vous pouvez sélectionner ces options
en appuyant sur le bouton D.MENU de
votre télécommande.
Mise à jour automatique de la liste des chaînes
Vous pouvez mettre à jour la liste des chaînes lorsque votre opérateur ajoute de
nouveaux services, ou si vous déménagez.
1. Appuyez sur le bouton D.MENU pour afficher le menu DTV.
2. Appuyez sur le bouton ou pour sélectionner “Canal”, puis sur la touche ENTER
3. Appuyez sur le bouton ENTER
pour sélectionner “Mémorisation Auto”.
4. Au terme de l’opération, le nombre de services trouvés s’affiche.
5.
.
La liste des chaînes favorites existante est supprimée lorsque la liste des chaînes est mise à jour.
après avoir Pour arrêter la recherche avant la fin, appuyez sur le bouton ENTER
sélectionné “Arrêter”.
Appuyez sur le bouton EXIT pour quitter le menu.
Si le signal est de mauvaise qualité, le message “Aucun service trouvé ! Vérifiez la connexion de l’antenne” s’affiche.
Français-19
BN68-01007C-00Fre.indd19
2006-03-03¿ÀÈÄ3:21:01
Mise à jour manuelle de la liste des chaînes
Vous pouvez spécifier la chaîne ou la fréquence pour une recherche de chaînes rapide.
1.
Appuyez sur le bouton D.MENU pour afficher le menu DTV.
2.
Appuyez sur le bouton ou pour sélectionner “Canal”, puis sur la touche ENTER
3.
Appuyez sur le bouton ou pour sélectionner “Mémorisation Manuelle”, puis sur la touche ENTER .
4.
Pour...
5.
Appuyez sur le bouton rouge pour lancer la recherche de services numériques.
Au terme de l’opération, les chaînes sont mises à jour dans la liste de chaînes.
6.
.
Alors...
Passer aux “Canal”, “Fréquence” ou aux “Bande passante”
bouton ou
Réglez les ��������������������������������
“Canal”�������������������������
, ou les ����������������
“Bande passante”
bouton ou
Réglez les “Fréquence”
Bouton numérique (0~9)
• Canal: Les chaînes “21” et “68” sont affichées successivement.
• Frequency: la fréquence disponible dans le groupe de chaînes s’affiche.
• Bande passante: Les bandes passantes disponibles sont de 7 et 8 MHz.
Appuyez sur le bouton EXIT pour quitter le menu.
Vous pouvez effectuer une entrée en appuyant sur les touches numériques de la télécommande.
Il est impossible de modifier uniquement la fréquence ; lorsque vous modifiez une chaîne, la fréquence est modifiée automatiquement.
Modification de vos chaînes favorites
Vous pouvez modifier vos chaînes favorites à l’aide des quatre boutons de couleur.
1.
Appuyez sur le bouton D.MENU pour afficher le menu DTV.
2.
Appuyez sur le bouton ou pour sélectionner “Canal”, puis sur la touche ENTER
3.
Appuyez sur le bouton ou pour sélectionner “Modif. les canaux favoris.”, puis sur la touche ENTER .
4.
Appuyez sur le bouton rouge pour afficher l’ensemble des chaînes actuellement stockées.
5.
ppuyez sur le bouton ou pour sélectionner une chaîne.
A
Appuyez sur le bouton ENTER .
6.
.
L’icône “★” est affichée près de la chaîne sélectionnée, et cette dernière sera ajoutée à la liste des chaînes favorites.
Pour annuler, appuyez une nouvelle fois sur le bouton ENTER
.
•�� Sélect. tout: Sélectionne toutes les chaînes actuellement affichées.
•�� Sélect. aucun: Désélectionne toutes les chaînes sélectionnées.
•�� Aperçu: Affiche la ou les chaînes actuellement sélectionnées.
Le réglage des chaînes favorites est terminé.
Appuyez sur le bouton EXIT pour quitter le menu.
Ajouter
Utilisez cette fonction lorsqu’au moins une chaîne favorite est sélectionnée.
1.
Appuyez sur le bouton D.MENU pour afficher le menu DTV.
2.
Appuyez sur le bouton ou pour sélectionner “Canal”, puis sur la touche ENTER
3.
Appuyez sur le bouton ou pour sélectionner “Modif. les canaux favoris.”, puis sur la touche ENTER .
4.
Appuyez sur le bouton rouge dans le menu “Modif. les canaux favoris.”.
Pour ajouter d’autres chaînes, reportez-vous à l’étape 5 de la description précédente.
5.
Si vous souhaitez consulter la chaîne à mémoriser, appuyez sur le bouton D.MENU. Appuyez sur le bouton EXIT pour quitter le menu.
.
• ����������������������������������������������������������������������������������������������
������������������������������������������������������������������������������������������������
Pour ajouter toutes les chaînes à la liste des chaînes favorites, appuyez sur le bouton rouge.
����������������������������������������������������������������
• ��������������������������������������������������������������
Pour supprimer toutes les chaînes, appuyez sur le bouton vert.
��• Prévisualiser: Affiche les chaînes actuellement sélectionnées.
������������������������
• ����������������������
Appuyez sur le bouton CH MGR pour afficher le gestionnaire de chaînes favorites.
Français-20
BN68-01007C-00Fre.indd20
2006-03-03¿ÀÈÄ3:21:03
Déplacement
Modif. les canaux favoris
1.
Appuyez sur le bouton D.MENU pour afficher le menu DTV.
2.
Appuyez sur le bouton ou pour sélectionner “Canal”, puis sur la touche ENTER
3.
Appuyez sur le bouton ou pour sélectionner “Modif. les canaux favoris.”, puis sur la touche ENTER .
4.
Sélectionnez la chaîne désirée à l’aide du bouton ou .
5.
Appuyez sur le bouton vert.
.
Une icône “ ” s’affiche à gauche du nom de la chaîne.
6.
Appuyez sur le bouton ou pour sélectionner la chaîne que vous voulez déplacer, puis appuyez sur le bouton vert ou le bouton ENTER .
7.
Appuyez sur le bouton EXIT pour quitter le menu.
Aperçu
Modif. les canaux favoris
1.
Dans le menu “Modif. les canaux favoris.”, sélectionnez la chaîne que vous voulez prévisualiser à l’aide du bouton ou .
2.
Appuyez sur le bouton jaune.
La chaîne sélectionnée s’affiche à l’écran.
Suppression
Modif. les canaux favoris
1.
Dans le menu “Modif. les canaux favoris.”, sélectionnez la chaîne à supprimer de la liste des chaînes favorites à l’aide du bouton ou .
2.
Appuyez sur le bouton bleu.
La chaîne sélectionnée et son numéro sont supprimés.
Pour ajouter une chaîne supprimée à la liste des chaînes favorites, consultez la section “Ajouter” à la page 20.
Sélection du Gestionnaire des tâches
Vous pouvez exclure les chaînes que vous avez choisies parmi celles que vous
avez balayées. Lors du balayage des chaînes mémorisées, celles que vous avez
choisi d’ignorer ne s’affichent pas. Toutes les chaînes que vous ne choisissez pas
spécifiquement d’ignorer s’affichent lors du balayage.
Vous pouvez sélectionner ces
options en appuyant sur le bouton
CH MGR de votre télécommande.
1.
Appuyez sur le bouton D.MENU pour afficher le menu DTV.
2.
Appuyez sur le bouton ou pour sélectionner “Canal”, puis sur la touche ENTER
3.
Appuyez sur le bouton ou pour sélectionner “Gestionnaire de Chaînes”, puis sur la touche ENTER .
4.
Appuyez sur le bouton jaune pour passer de vos chaînes favorites aux autres chaînes.
5.
Appuyez sur le bouton rouge ou vert pour afficher la page précédente ou suivante du gestionnaire de chaînes.
6.
Appuyez sur le bouton ou pour sélectionner une chaîne à régler.
Appuyez sur le bouton ENTER .
7.
.
Vos chaînes favorites ne sont affichées que si elles ont été préalablement définies dans le menu “Modification de vos chaînes favorites” (reportez-vous à la page 20~21).
Le numéro de la chaîne, le nom et l’icône sont affichés dans l’angle en haut à gauche de l’écran lorsque vous changez la chaîne. Le numéro de la chaîne et le nom sont affichés si la chaîne fait partie de toutes les chaînes ; et une icône s’affiche si elle fait partie des chaînes favorites.
Pour fermer le gestionnaire de chaîne, appuyez sur le bouton bleu ou sur CH MGR.
Français-21
BN68-01007C-00Fre.indd21
2006-03-03¿ÀÈÄ3:21:05
Affichage des informations sur l’émission
Lorsque vous regardez une chaîne, des informations supplémentaires au sujet de
l’émission en cours peuvent s’afficher.
1.
2.
Lorsque vous regardez un programme, appuyez sur le bouton INFO (
).
Les informations sur l’émission s’affichent.
Pour masquer les informations, appuyez sur le bouton INFO (
).
Affichage des informations du guide électronique des programmes (EPG)
Les informations du guide électronique des programmes (EPG) sont fournies par les
chaînes. Il peut arriver que les entrées relatives à une émission soient vides ou obsolètes,
en raison des informations diffusées par une chaîne précise. L’affichage est mis à jour de
manière dynamique à mesure que de nouvelles informations sont disponibles.
uide Maintenant & Après
G
Pour les six chaînes indiquées dans la colonne de gauche, des informations sont
affichées au sujet de l’émission en cours et de la prochaine émission.
uide Complet
G
Affiche les informations de programme dans l’ordre par segments d’une heure. Des
informations sur deux heures de programme sont affichées et peuvent être parcourues
en avançant ou en remontant dans le temps.
1.
Appuyez sur le bouton D.MENU pour afficher le menu DTV.
2.
Appuyez sur le bouton ENTER
3.
4.
, pour sélectionner “Guide”.
Appuyez sur le bouton ou pour sélectionner “Guide Maintenant & Après” ou “Guide Complet”. Appuyez sur le bouton ENTER .
Vous pouvez également accéder au guide du menu en appuyant sur le bouton GUIDE.
Pour...
Alors...
Permet de regarder une émission via
la liste du guide électronique des programmes
• Sélectionnez une émission en appuyant sur le bouton 5, 6, 3, 4.
• Appuyez sur le bouton ENTER
.
Si le programme suivant est sélectionné, l’icône Horloge s’affiche. Si vous pressez de nouveau le bouton ENTER �������������������������������������������������������������
la programmation est supprimée et l’icône Horloge disparaît. Pour de plus amples détails concernant la programmation, reportez-vous à la page suivante.
Affiche des informations au sujet de
l’émission
• Sélectionnez un programme de votre choix à l’aide
du bouton 5, 6, 3, 4.
• Appuyez sur le bouton INFO (
) lorsque
l’émission de votre choix est mise en surbrillance.
Alternez entre les guides “Guide des
émissions en cours et suivantes” ou
“Guide complet”.
• Appuyez plusieurs fois sur le bouton rouge.
Affiche la liste des “Chaînes favorites” et
la liste de “Toutes les chaînes”
• Appuyez plusieurs fois sur le bouton vert.
Fait défiler rapidement vers l’arrière (2 heures). • Appuyez plusieurs fois sur le bouton jaune.
Fait défiler rapidement vers l’avant (2 heures).
• Appuyez plusieurs fois sur le bouton bleu.
Quitte le guide
• Appuyez sur le bouton EXIT.
e titre de l’émission s’affiche au centre de la partie supérieure de l’écran. L
Appuyez sur le bouton INFO (
) pour afficher des informations détaillées. Ces informations détaillées sont les suivantes : numéro de chaîne, durée, barre
d’état, niveau de contrôle parental, informations sur la qualité vidéo (HD/SD), modes
audio, sous-titres ou télétexte, langue des sous-titres ou du télétexte, et informations
succinctes sur l’émission mise en surbrillance. “...” s’affiche si le résumé est trop long.
ix chaînes sont affichées. S
Pour faire défiler les chaînes, accédez à une chaîne à l’aide du bouton ou . Pour afficher une page à la fois, utilisez le bouton P
ou .
Français-22
BN68-01007C-00Fre.indd22
2006-03-03¿ÀÈÄ3:21:06
Utilisation de la liste de programmation
Si vous créez une liste de programmation des émissions que vous aimeriez regarder,
la chaîne de l’émission programmée est activée automatiquement à l’heure définie,
même si vous en regardez une autre.
1.
Appuyez sur le bouton D.MENU pour afficher le menu DTV.
2.
Appuyez sur le bouton ENTER
3.
Appuyez sur le bouton ou pour sélectionner “Liste de annexe”, puis sur la touche ENTER .
4.
Appuyez sur le bouton rouge.
La chaîne de l’émission programmée est activée.
5.
Appuyez sur les bouton ENTER
ou pour régler.
6.
Après avoir effectué la programmation, appuyez sur le bouton rouge.
7.
Appuyez sur le bouton EXIT pour quitter le menu.
, pour sélectionner “Guide”.
pour sélectionner un élément et sur les boutons Vous pouvez également régler les heures et les minutes en appuyant sur les touches numériques de la télécommande.
• Canel: Définit la chaîne.
• Horloge: Définit l’heure.
• Date: Définit l’année, le mois et le jour.
• Fréquence: Définit la fréquence (“Une fois”, “Tous les jours” ou “Toutes les semaines”)
La liste de programmation peut être affichée dans le menu EPG.
• Sauvegarder: Sauvegarde la programmation modifiée.
• Annuler: Annule la programmation modifiée.
• Ajouter programme: Ajoute une nouvelle programmation.
• Modifier: Modifie la programmation sélectionnée.
• Supprimer: Supprime la programmation sélectionnée.
Réglage du guide par défaut
Vous pouvez prédéfinir le style du guide par défaut.
1.
Appuyez sur le bouton D.MENU pour afficher le menu DTV.
2.
Appuyez sur le bouton ENTER
3.
Appuyez sur le bouton ou pour sélectionner “Par défaut”, puis sur la touche ENTER .
4.
5.
Sélectionnez “Prés./Suiv.” ou “Guide Complet” à l’aide du bouton ou , puis appuyez sur le bouton ENTER .
Appuyez sur le bouton EXIT pour quitter le menu.
, pour sélectionner “Guide”.
Vous pouvez sélectionner ces
options en appuyant sur le bouton
GUIDE de votre télécommande.
Français-23
BN68-01007C-00Fre.indd23
2006-03-03¿ÀÈÄ3:21:08
Affichage de toutes les chaînes ou des chaînes favorites
Dans le menu EPG, vous pouvez afficher toutes les chaînes ou vos chaînes favorites.
1.
Appuyez sur le bouton D.MENU pour afficher le menu DTV.
2.
Appuyez sur le bouton ENTER
3.
Sélectionnez le guide désiré (“Guide Maintenant & Après” ou “Guide Complet”) en appuyant sur le bouton ou le bouton .
4.
Appuyez sur le bouton ENTER
5.
6.
Appuyez sur le bouton vert.
La liste de toutes les chaînes et celle des chaînes favorites s’affichent en alternance.
Sélectionnez l’émission de votre choix en appuyant sur le bouton , 6, 3, ou 4.
7.
Appuyez sur le bouton INFO (
l’émission en surbrillance.
8.
Si la liste des chaînes favorites n’a pas été définie:
��• Le message “La liste des favoris est vide. Voulez-vous choisir vos favoris maintenant ?” s’affiche.
• Choisissez “Oui”.
Le menu “Chaînes favorites” s’affiche.
Si vous choisissez “Non”, les chaînes ne sont pas modifiées.
• ������������������������������������������������������������������
To edit the favourite channels, refer to page 20 for more details.
pour sélectionner “Guide”.
.
) pour afficher des informations au sujet de 9 . Appuyez sur le bouton EXIT pour quitter le menu.
La liste “Toutes les chaînes” contient les chaînes recherchées lors de la mise à jour de la liste des chaînes. Dans ce mode, toutes les chaînes sont affichées.
La liste “Favourites” (Chaînes favorites) contient les chaînes qui ont été choisies dans le menu “Chaînes favorites” (voir page 20).
Choix de la langue
Lorsque vous utilisez le téléviseur pour la première fois, vous devez sélectionner la
langue utilisée pour afficher les menus et les indications.
1.
Appuyez sur le bouton D.MENU pour afficher le menu DTV.
2.
Appuyez sur le bouton ou pour sélectionner “Préférence”, puis sur la touche ENTER .
3.
Appuyez sur le bouton ou pour sélectionner “Langue OSD”, puis sur la touche ENTER .
4.
Sélectionnez la langue voulue en appuyant de façon répétée sur la touche ou .
Appuyez sur le bouton ENTER .
5.
Appuyez sur le bouton EXIT pour quitter le menu.
Vous pouvez choisir parmi 5 langues.
Français-24
BN68-01007C-00Fre.indd24
2006-03-03¿ÀÈÄ3:21:10
Réglage du niveau de transparence
Vous pouvez régler la transparence du menu.
1.
Appuyez sur le bouton D.MENU pour afficher le menu DTV.
2.
Appuyez sur le bouton ou pour sélectionner “Préférence”, puis sur la touche ENTER .
3.
Appuyez sur le bouton ou pour sélectionner “Niceau de transparence”, puis sur la touche ENTER .
4.
Sélectionnez l’option (“Elevé”, “Moyen”, “Bas” ou “Opaque”) désirée à l’aide des boutons ou , puis appuyez sur le bouton ENTER
pour modifier le réglage.
5.
Appuyez sur le bouton EXIT pour quitter le menu.
Configuration du verrouillage parental
Cette fonction permet d’empêcher certains utilisateurs, par exemple des enfants,
de regarder des émissions inappropriées, en les protégeant à l’aide d’un code de 4
chiffres défini par l’utilisateur. Le menu à l’écran vous invitera à définir un code (que vous pourrez éventuellement modifier par la suite).
1.
Appuyez sur le bouton D.MENU pour afficher le menu DTV.
2.
Appuyez sur le bouton ou pour sélectionner “Préférence”, puis sur la touche ENTER .
3.
Appuyez sur le bouton ou pour sélectionner “Verrouillage parental”, puis sur la touche ENTER .
4.
Le “Saisir Code PIN” s’affiche.
5.
Entrez votre code actuel à l’aide des touches numériques (0~9).
Les options disponibles dans le groupe “Verrouillage parental” s’affichent et l’option “Classement parental” est alors sélectionnée.
6.
Appuyez sur le bouton ENTER
7.
Appuyez sur ou pour sélectionner la classe d’âge que vous souhaitez bloquer.
Appuyez sur le bouton ENTER .
8.
Si vous voulez modifier le code, choisissez “Modifier PIN” en appuyant sur le bouton ou . Appuyez sur le bouton ENTER .
9.
Le code par défaut d’un nouveau téléviseur est 0000.
Si vous entrez un code non valide, le message “Code non valide”. “Veuillez réessayer” s’affiche.
.
Le “Entrer Nouveau Code PIN” s’affiche.
Entrez votre nouveau code à l’aide des touches numériques (0~9).
Le “Confirmer Nouveau Code PIN” s’affiche.
10. Entrez de nouveau votre nouveau code, afin de le confirmer, à l’aide des touches numériques (0~9).
Le message “Votre code a été modifié” s’affiche.
11. Appuyez sur le bouton ENTER
.
12. Appuyez sur le bouton EXIT pour quitter le menu.
S
i vous avez oublié le code, appuyez sur les boutons de la télécommande dans l’ordre suivant, ce
qui remet le code à 0-0-0-0 : POWER (Off), MUTE, 8, 2, 4, POWER (On).
Français-25
BN68-01007C-00Fre.indd25
2006-03-03¿ÀÈÄ3:21:11
Réglage des sous-titres
Caractéristique
Vous pouvez activer ou désactiver les sous-titres.
1.
Appuyez sur le bouton D.MENU pour afficher le menu DTV.
2.
Appuyez sur le bouton ou pour sélectionner “Caractéristique”, puis sur la touche ENTER .
3.
Appuyez sur le bouton ENTER
4.
Sélectionnez “Mar.” en appuyant sur le bouton ou . Appuyez sur le bouton ENTER .
5.
Appuyez sur le bouton EXIT pour quitter le menu.
pour sélectionner “sous-titres”.
Sélection de la langue favorite (sous-titres ou audio)
Vous pouvez modifier la langue par défaut des sous-titres et de l’audio. Affiche les informations sur la langue du flux entrant.
1.
Appuyez sur le bouton D.MENU pour afficher le menu DTV.
2.
Appuyez sur le bouton ou pour sélectionner “Caractéristique”, puis sur la touche ENTER .
3.
Appuyez sur le bouton ou pour sélectionner “Langue des sous-titres” ou “Langue audio”. Appuyez sur le bouton ENTER .
4.
Sélectionnez l’option désirée à l’aide des boutons ou , puis appuyez sur le bouton ENTER
pour modifier le réglage.
5.
Appuyez sur le bouton EXIT pour quitter le menu.
L’anglais est la langue par défaut si la langue sélectionnée n’est pas disponible dans l’émission regardée.
Lorsque vous regardez une émission, vous pouvez activer les sous-titres.
Lorsque vous regardez une émission, vous pouvez choisir la langue de l’audio.
Affichage d’informations sur le produit
Informations produit
Vous pouvez afficher les informations relatives à votre appareil. Pour un entretien ou
une réparation, contactez un revendeur agréé Samsung.
1.
Appuyez sur le bouton D.MENU pour afficher le menu DTV.
2.
Appuyez sur le bouton ou pour sélectionner “Système”, puis sur la touche ENTER .
3.
Appuyez sur le bouton ENTER
4.
pour sélectionner “Informations produit”.
Le menu Informations produit est sélectionné.
- Version logicielle, Version micrologicielle, Version matérielle
Appuyez sur le bouton EXIT pour quitter le menu.
Vérification des informations sur le signal
Vous pouvez obtenir des informations sur l’état du signal.
1.
Appuyez sur le bouton D.MENU pour afficher le menu DTV.
2.
Appuyez sur le bouton ou pour sélectionner “Système”, puis sur la touche ENTER .
3.
Appuyez sur le bouton ou pour sélectionner “Informations de signal”, puis sur la touche ENTER .
4.
Appuyez sur le bouton EXIT pour quitter le menu.
Si le signal reçu est de mauvaise qualité, le message “Aucun signal” s’affiche.
Français-26
BN68-01007C-00Fre.indd26
2006-03-03¿ÀÈÄ3:21:12
Mise à jour du logiciel (option)
Pour disposer des fonctions de télévision numérique les plus récentes sur votre
appareil, des mises à jour logicielles sont diffusées régulièrement avec le signal de
télévision normal. L’appareil détecte automatiquement ces mises à jour et affiche un
message d’avertissement. Vous pouvez dans ce cas décider d’installer la mise à jour.
ettre à jour maintenant
M
Si vous choisissez “Mettre à jour maintenant”, l’ “iDTV” installe immédiatement la
nouvelle mise à jour puis redémarre.
ettre à jour plus tard
M
Si vous choisissez “Mettre à jour plus tard”, la mise à jour est reportée au prochain
redémarrage ou au prochain changement de chaîne. Après 90 minutes, le message de
mise à jour s’affiche de nouveau.
e pas mettre à jour
N
Si vous choisissez “Ne pas mettre à jour”, l’ “iDTV” n’installe pas la mise à jour. Le
message de mise à jour n’est plus affiché. La mise à jour est toujours stockée sur
l’appareil, de manière à être exécutée quand la procédure suivante sera utilisée.
1.
Appuyez sur le bouton D.MENU pour afficher le menu DTV.
2.
Appuyez sur le bouton ou pour sélectionner “Système”, puis sur la touche ENTER .
3.
Appuyez sur le bouton ou pour sélectionner “Mise à niveau du logiciel”, puis sur la touche ENTER .
4.
Pour passer à une autre version, appuyez sur le bouton rouge.
Appuyez sur le bouton bleu pour réinitialiser l’appareil, activer la mise à jour et redémarrer.
5.
Appuyez sur le bouton EXIT pour quitter le menu.
Affichage de l’interface commune
Infos sur l’application
Cette fonction affiche les informations stockées sur le module CAM inséré dans le
logement CI.
1.
Appuyez sur le bouton D.MENU pour afficher le menu DTV.
2.
Appuyez sur le bouton ou pour sélectionner “Système”, puis sur la touche ENTER .
3.
Appuyez sur le bouton ou pour sélectionner “Interface commune”, puis sur la touche ENTER .
4.
Appuyez sur le bouton ENTER
5.
Appuyez sur le bouton EXIT pour quitter le menu.
pour afficher les informations de votre application.
Les informations sur l’application stockée sur la carte CI sont affichées.
Vous pouvez insérer le module CAM à tout moment, que le téléviseur soit allumé ou éteint.
1. Procurez-vous un module CI CAM auprès de votre revendeur.
2. Insérez la carte CI dans le module CAM conformément aux indications de la flèche.
3. Insérez le module CAM, contenant la carte CI, dans le logement pour interface commune.
(Insérez le module CAM dans le sens de la flèche, en l’enfonçant jusqu’à ce qu’elle soit parallèle au logement.)
4. Vérifiez si l’appareil affiche bien une image d’une chaîne brouillée.
Français-27
BN68-01007C-00Fre.indd27
2006-03-03¿ÀÈÄ3:21:13
Sélection du menu CI (Interface commune)
L’utilisateur peut effectuer une sélection dans le menu figurant sur le module CAM.
1.
Appuyez sur le bouton D.MENU pour afficher le menu DTV.
2.
Appuyez sur le bouton ou pour sélectionner “Système”, puis sur la touche ENTER .
3.
Appuyez sur le bouton ou pour sélectionner “Interface commune”, puis sur la touche ENTER .
4.
Sélectionnez le guide “CI Menu” en appuyant sur le bouton ou , puis appuyez sur le bouton ENTER .
5.
Sélectionnez l’option désirée à l’aide des boutons ou , puis appuyez sur le bouton ENTER .
6.
Appuyez sur le bouton EXIT pour quitter le menu.
Sélectionnez le menu CI figurant sur la carte PC.
Réinitialisation
Vous pouvez rétablir les réglages d’usine de tous les paramètres.
La réinitialisation entraîne la suppression des informations sur toutes les chaînes et des préférences de l’utilisateur, de manière à rétablir tous les réglages d’usine.
1.
Appuyez sur le bouton D.MENU pour afficher le menu DTV.
2.
Appuyez sur le bouton ou pour sélectionner “Système”, puis sur la touche ENTER .
3.
Appuyez sur le bouton ou pour sélectionner “Réinit.”, puis sur la touche ENTER .
4.
L’écran “Saisir Code PIN” s’affiche.
5.
Entrez votre code actuel à l’aide des touches numériques (0~9).
6.
Appuyez sur le bouton EXIT pour quitter le menu.
Un message d’avertissement s’affiche. Si vous appuyez successivement sur les boutons de couleur (rouge, vert, jaune et bleu), toutes les valeurs sont réinitialisées.
Décodeur télétexte
La plupart des chaînes du téléviseur possèdent des pages “télétexte”
fournissant des informations telles que :
Les horaires des programmes télévisés.
Bulletins d’informations et prévisions météo.
Des résultats sportifs.
Des sous-titres pour les malentendants.
Les pages télétextes sont organisées en six catégories
Part
Table des matières
A
Numéro de la page sélectionnée.
B
Identité de la chaîne émettrice.
C
Numéro de page actuelle ou état de recherche.
D
Date et heure.
E
Texte.
F
Informations sur l’état.
Français-28
BN68-01007C-00Fre.indd28
2006-03-03¿ÀÈÄ3:21:13
Affichage des informations Télétexte
Vous pouvez afficher des informations télétexte à tout moment, mais la réception du
signal doit être bonne. Dans le cas contraire:
Des informations peuvent manquer.
Des pages peuvent ne pas être affichées.
Pour activer le mode télétexte et afficher les informations télétexte:
1.
A l’aide du bouton P
service télétexte.
2.
Appuyez sur le bouton TTX/MIX (
(
) ou P
(
) sélectionnez la chaîne fournissant le
) pour activer le mode Télétexte.
a page de sommaire s’affiche. Vous pouvez l’afficher de nouveau à tout moment en
L
appuyant sur le bouton MENU (
).
3.
Appuyez de nouveau sur la touche TTX/MIX (
).
La diffusion en cours affiche tour à tour “Teletext”, “Double” et “Mix” à l’écran.
4.
Appuyez sur le bouton TV/DTV pour quitter l’affichage de texte.
S
i des caractères bizarres apparaissent lors de l’affichage d’un texte, vérifiez que la langue du
texte est identique à celle définie dans le mode menu “Configuration”. En cas de différence, sélectionnez la même langue que celle du menu “Configuration”.
Sélection d’une page télétexte spécifique
Appuyez sur les touches numériques de la télécommande pour entrer directement le
numéro de page:
1. Entrez le numéro de page à trois chiffres figurant dans la table des matières en
appuyant sur les boutons numériques correspondants.
2. Si la page sélectionnée est liée à plusieurs pages secondaires, celles-ci sont
affichées par séquence. Pour figer l’affichage sur une page donnée, appuyez sur
le bouton PIP ( ) . Appuyez de nouveau sur le bouton PIP ( ) pour reprendre.
3. Utilisation des diverses options d’affichage:
Pour afficher...
Appuyez sur...
A la fois les informations télétexte et le programme normal
TTX/MIX (
Le texte caché (réponses de jeux par exemple)
INFO (
)
L’écran normal
INFO (
)
Une page secondaire, en entrant son En saisissantles 4
PRE-CH (
La page suivante
La page précédente
P
P
Les lettres de taille double dans la :
Moitié supérieure de l’écran
Moitié inférieure de l’écran
P.MODE ( )
��������
Une fois
���������
Deux fois
Écran
������������
normal
����������
Trois fois
(
(
)
)
)
)
Français-29
BN68-01007C-00Fre.indd29
2006-03-03¿ÀÈÄ3:21:14
Utilisation du système Fastext pour sélectionner une page télétexte
Les différents sujets inclus dans les pages du Télétexte disposent d’un code
de couleur et peuvent être sélectionnés à l’aide des boutons colorés de la
télécommande.
1.
Affichez les informations du Télétexte en appuyant sur le bouton TTX/MIX (
2.
Appuyez sur le bouton coloré correspondant au sujet que vous voulez sélectionner ;
(les sujets disponibles sont listés sur la ligne d’informations d’état).
3.
Appuyez sur le bouton rouge pour afficher la page précédente.
Appuyez sur le bouton vert pour afficher la page suivante.
4.
Appuyez sur le bouton TV/DTV pour quitter l’affichage de texte.
).
Paramétrage du logiciel PC (Basé sur Windows XP)
Les paramètres d’affichage de Windows pour un ordinateur courant sont affichés ci-dessous. Les écrans sur votre
PC seront probablement différents, selon votre version de Windows et votre carte vidéo. Même si vos écrans sont
différents, des informations de configuration de base identiques seront applicables dans pratiquement tous les cas.
(Si ce n’est pas le cas, contactez le fabricant de votre ordinateur ou un revendeur Samsung.)
1. Cliquez sur “Control Panel” dans le menu Démarrer de Windows.
2. L
orsque vous êtes sur l’écran du panneau de configuration, cliquez su “Appearance and Themes”
et une boîte de dialogue Propriétés de l’affichage apparaît.
3. L
orsque vous êtes sur l’écran du panneau de configuration cliquez sur “Display” et une boîte de
dialogue Propriétés de l’affichageapparaît.
4. A
llez sur l’onglet “Settings” dans la boîte de dialogue. Propriétés de l’affichage. Réglage correct de la taille (résolution) : Optimale - 1360 X 768
Si votre boîte de dialogue des paramètres d’affichage comporte une option de fréquence verticale,
la valeur correcte est “60” ou “60 Hz”. Sinon cliquez sur “OK” et quit tez la boîte de dialogue.
Modes d’affichage
La position et la taille de l’écran varient en fonction du type et de la résolution du moniteur du PC. Les résolutions du
tableau sont recommandées (toutes les résolutions comprises dans les limites sont prises en charge).
Mode
Résolution
Fréquence
horizontale (kHz)
Fréquence
verticale (Hz)
Fréquence
d’horloge (MHz)
Polarité
(H/V)
IBM
640 x 480
720 x 400
31,469
31,469
59,940
70,087
25,175
28,322
- / -
-/+
VESA
640 x 480
640 x 480
800 x 600
800 x 600
800 x 600
1024 x 768
1024 x 768
1024 x 768
1360 x 768
37,861
37,500
37,879
48,077
46,875
48,364
56,476
60,023
47,712
72,809
75,000
60,317
72,188
75,000
60,000
70,069
75,029
60,015
31,500
31,500
40,000
50,000
49,500
65,000
75,000
78,750
85,800
- / -
- / -
+ /+
+ /+
+ /+
- / -
- / -
+ /+
+ /+
Le mode entrelacé n’est pas pris en charge.
Il est possible que le téléviseur fonctionne anormalement si un format vidéo non standard est sélectionné.
Le mode DVI ne prend pas en charge la fonction PC.
Les modes séparé et composite modes sont pris en charge. SOG n’est pas pris en charge.
Français-30
BN68-01007C-00Fre.indd30
2006-03-03¿ÀÈÄ3:21:15
Sélection du PC
Réglage de base et réglage fin de l’image (Verrouillage Image) :
Le but du réglage de la qualité de l’image est d’éliminer ou de réduire le bruit parasite
de l’image (défauts). Si le bruit parasite n’est pas éliminé en effectuant uniquement
une syntonisation fine, réglez la fréquence du mieux que vous pouvez (approximative) puis effectuez à nouveau une syntonisation plus fine. Une fois le bruit parasite
réduit, réajustez l’image pour l’aligner au centre de l’écran.
1.
Présélection : Appuyez sur le bouton SOURCE pour sélectionner le mode PC.
2.
Appuyez sur le bouton MENU pour afficher le menu affiché à l’écran. Appuyez sur le bouton ou pour sélectionner “Configuration”, puis sur la touche ENTER .
3.
Appuyez sur le bouton ou pour sélectionner “PC”, puis sur la touche ENTER
4.
Appuyez sur le bouton ENTER
5.
Appuyez sur le bouton ou pour sélectionner “Regl. Base” ou “Regl. Prec”, puis sur la touche ENTER .
6.
Appuyez sur le bouton ou pour régler la qualité de l’écran. Appuyez sur le bouton ENTER .
7.
Appuyez sur le bouton EXIT pour quitter le menu.
.
pour sélectionner “Verrouillage Image”.
Changement de la position de l’image (Position) :
Réglez la position de l’écran du PC si elle n’est pas adaptée à l’écran du téléviseur.
1.
Suivez les instructions 1 à 3 de “Réglage de base et réglage fin de l’image (Verrouillage Image)”.
2.
Appuyez sur le bouton ou pour sélectionner “Position”, puis sur la touche ENTER .
3.
Appuyez sur le bouton ou pour régler la position horizontale.
Appuyez sur le bouton ou pour régler la position verticale.
Appuyez sur le bouton ENTER .
4.
Appuyez sur le bouton EXIT pour quitter le menu.
Réglage automatique de l’écran PC (Réglage Automatique) :
Le réglage automatique permet l’autoréglage de l’écran du PC par rapport au signal
vidéo PC entrant. Les valeurs Regl. Prec, Regl. Base et Position sont réglées automatiquement.
1.
Suivez les instructions 1 à 3 de “Réglage de base et réglage fin de l’image (Verrouillage Image)”.
2.
Appuyez sur le bouton ou pour sélectionner “Réglage Automatique”, puis sur la touche ENTER .
3.
Appuyez sur le bouton EXIT pour quitter le menu.
Initialisation des réglages d’image (Réinitialiser Image) :
Vous pouvez ramener tous les réglages d’image à leur valeur par défaut.
1.
Suivez les instructions 1 à 3 de “Réglage de base et réglage fin de l’image (Verrouillage Image)”.
2.
Appuyez sur le bouton ou pour sélectionner “Réinitialiser Image”, puis sur la touche ENTER .
3.
Appuyez sur le bouton EXIT pour quitter le menu.
Français-31
BN68-01007C-00Fre.indd31
2006-03-03¿ÀÈÄ3:21:15
Utilisation du verrouillage Kensington antivol
Le verrou Kensington est un dispositif permettant de fixer le système lorsqu’il est utilisé dans un lieu public. Le dispositif
de verrouillage doit être acheté séparément. Il se peut que l’apparence et la mé thode de verrouillage soient différents de
l’illustration en fonction du fabricant. Veuillez vous reporter au manuel fourni avec le verrou Kensington pour une utilisation
adéquate.
1.Kensington sur le téléviseur à
écran LCD (Figure ) et faites- le
tourner dans le sens du verrouillage (Figure 2).
Câble
Figure 2
2.Branchez le câble du verrou
Kensington.
Figure 1
3.Fixez le verrou Kensington sur un
bureau ou un objet solide et stable.
<en option>
L’emplacement du “verrou Kensington” peut varier en fonction du modèle.
Résolution des problèmes avant de contacter le personnel qualifié pour le dépannage
Aucune image ou aucun son
Vérifiez que la prise est bien branchée à une prise murale.
Assurez-vous que vous avez appuyé sur les boutons POWER
Vérifiez les paramètres de contraste et de luminosité.
Vérifiez le volume.
Image normale mais aucun son
Vérifiez le volume.
Vérifiez si le bouton MUTE de la télécommande a été touché.
Vérifiez que l’option “Silence Int.” est désactivée.
Aucune image ou une image en
noir et blanc
Réglez les paramètres de couleur.
Vérifiez que le système d’émission sélectionné est correct.
Interference du son et de l’image
Essayez d’identifier l’appareil électrique qui perturbe le téléviseur et éloignez-le.
Branchez le téléviseur sur une autre prise.
Image neigeuse ou floue,
son déformé
Vérifiez l’orientation, l’emplacement et les connexions de votre antenne.
Cette interférence est souvent due à l’utilisation d’une antenne intérieure.
Dysfonctionnements de la
télécommande
Remplacez les piles de la télécommande.
Nettoyez la partie supérieure de la télécommande (zone d’émission des signaux).
Vérifiez les connecteurs des piles.
Le message “Vérifier le signal du
câble.” s’affiche.
Assurez-vous que le câble de signal est bien branché au PC ou aux sources vidéo.
Assurez-vous que les sources vidéo ou le PC sont allumés.
à l’avant du téléviseur.
En mode PC, le message Vérifiez la résolution maximale et la fréquence de l’adaptateur vidéo.
“Mode non pris en charge” s’affiche. Comparez ces valeurs aux données des modes d’affichage.
Le panneau LCD TFT est doté de sous-pixels (3.133.440)exigeant le déploiement d’une technologie sophistiquée.
Il se peut cependant que quelques pixels clairs ou foncés apparaissent sur l’écran. Ces pixels n’auront aucune incidence sur
les performances du produit.
Français-32
BN68-01007C-00Fre.indd32
2006-03-03¿ÀÈÄ3:21:16
Spécifications techniques et environnementales
Modèle
Taille de l’écran (Diagonale)
Alimentation
LE26R73BD
LE32R73BD
LE40R73BD
26 pouce
32 pouce
40 pouce
AC220-240V 50 Hz
AC220-240V 50 Hz
AC220-240V 50 Hz
Consommation
120 W
152 W
190 W
PC Résolution
1360 x 768 @ 60 Hz
1360 x 768 @ 60 Hz
1360 x 768 @ 60 Hz
5WX2
10 W X 2
10 W X 2
675,0 x 75,0 x 475,5 mm
675,0 x 215,5 x 530,0 mm
800,0 x 80,0 x 548,5 mm
800,0 x 252,0 x 603,0 mm
991,5 x 87,0 x 658,5 mm
991,5 x 326,0 x 713,0 mm
10,55 kg
15,45 kg
24,0 kg
Son
Sortie
Dimension (L x P x H)
TV
Avec support
Poids
Avec support
EnvConsidérations environnementales
10 °C ~ 40 °C (50 °F ~ 104 °F) 10 °C ~ 40 °C (50 °F ~ 104 °F) 10 °C ~ 40 °C (50 °F ~ 104 °F)
Température de fonctionnement
Humidité au cours du fonctionnement 10 % ~ 80 %, sans condensation 10 % ~ 80 %, sans condensation 10 % ~ 80 %, sans condensation
-20 °C ~ 45 °C (-4 °F ~ 113 °F) -20 °C ~ 45 °C (-4 °F ~ 113 °F) -20 °C ~ 45 °C (-4 °F ~ 113 °F)
Température de stockage
5 % ~ 95 %, sans condensation 5 % ~ 95 %, sans condensation 5 % ~ 95 %, sans condensation
Humidité de stockage
LE26R74BD
Modèle
Taille de l’écran (Diagonale)
Alimentation
LE32R74BD
LE37R74BD
LE40R74BD
26 pouce
32 pouce
37 pouce
40 pouce
AC220-240V 50 Hz
AC220-240V 50 Hz
AC220-240V 50 Hz
AC220-240V 50 Hz
Consommation
120 W
152 W
170 W
190 W
PC Résolution
1360 x 768 @ 60 Hz
1360 x 768 @ 60 Hz
1360 x 768 @ 60 Hz
1360 x 768 @ 60 Hz
5WX2
10 W X 2
10 W X 2
10 W X 2
675,0 x 75,0 x 475,5 mm
675,0 x 215,5 x 530,0 mm
800,0 x 80,0 x 548,5 mm
800,0 x 252,0 x 603,0 mm
923,0 x 87,0 x 618,5 mm
923,0 x 326,0 x 676,5 mm
991,5 x 87,0 x 658,5 mm
991,5 x 326,0 x 713,0 mm
10,55 kg
15,45 kg
22,8 kg 24,0 kg
Son
Sortie
Dimension (L x P x H)
TV
Avec support
Poids
Avec support
EnvConsidérations environnementales
10 °C ~ 40 °C (50 °F ~ 104 °F) 10 °C ~ 40 °C (50 °F ~ 104 °F) 10 °C ~ 40 °C (50 °F ~ 104 °F) 10 °C ~ 40 °C (50 °F ~ 104 °F)
Température de fonctionnement
Humidité au cours du fonctionnement 10 % ~ 80 %, sans condensation 10 % ~ 80 %, sans condensation 10 % ~ 80 %, sans condensation 10 % ~ 80 %, sans condensation
-20 °C ~ 45 °C (-4 °F ~ 113 °F) -20 °C ~ 45 °C (-4 °F ~ 113 °F) -20 °C ~ 45 °C (-4 °F ~ 113 °F) -20 °C ~ 45 °C (-4 °F ~ 113 °F)
Température de stockage
5 % ~ 95 %, sans condensation 5 % ~ 95 %, sans condensation 5 % ~ 95 %, sans condensation 5 % ~ 95 %, sans condensation
Humidité de stockage
LE26R73BD/LE26R74BD/LE32R73BD/LE32R74BD/
LE37R74BD/LE40R73BD/LE40R74BD
Socle orientable (Gauche/Droite)
Oui
-20˚ ~ 20˚
Le design et les spécifications peuvent changer sans préavis.
Français-33
BN68-01007C-00Fre.indd33
2006-03-03¿ÀÈÄ3:21:16
Cette page est laissée
intentionnellement en
blanc.
BN68-01007C-00Fre.indd34
2006-03-03¿ÀÈÄ3:21:16
Correct Disposal of This Product (Waste Electrical & Electronic Equipment)
(Applicable in the European Union and other European countries with separate collection systems)
This marking shown on the product or its literature, indicates that it should not be disposed with other
household wastes at the end of its working life. To prevent possible harm to the environment or human
health from uncontrolled waste disposal, please separate this from other types of wastes and recycle it
responsibly to promote the sustainable reuse of material resources. Household users should contact either
the retailer where they purchased this product, or their local government office, for details of where and
how they can take this item for environmentally safe recycling. Business users should contact their supplier
and check the terms and conditions of the purchase contract. This product should not be mixed with other
commercial wastes for disposal.
Comment éliminer ce produit (déchets d’équipements électriques et électroniques)
(Applicable dans les pays de l’Union Européen et aux autres pays européens disposant de systémes de
collecte sélective)
Ce symbole sur le produit ou sa documentation indique qu’il ne doit pas être éliminé en fin de vie avec les
autres déchets ménagers. L’élimination incontrôlée des déchets pouvant porter préjudice à l’environnement
ou à la santé humaine, veuillez le séparer des autres types de déchets et le recycler de façon responsable. Vous favoriserez ainsi la réutilisation durable des ressources matérielles. Les particuliers sont
invités à contacter le distributeur leur ayant vendu le produit ou à se renseigner auprès de leur mairie
pour savoir où et comment ils peuvent se débarrasser de ce produit afin qu’il soit recyclé en respectant
l’environnement. Les entreprises sont invitées à contacter leurs fournisseurs et à consulter les conditions
de leur contrat de vente. Ce produit ne doit pas être éliminé avec les autres déchets commerciaux.
Wee-fre.indd 1
2006-01-24 ¿ÀÀü 10:22:29