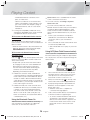
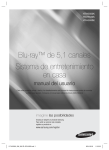
1
HT-H5500K
HT-H5530HK
HT-H5530K
HT-H5550K
HT-H5550WK
5.1CH Blu-ray™
Home Entertainment System
user manual
imagine the possibilities
Thank you for purchasing this Samsung product.
To receive more complete service,
please register your product at
www.samsung.com/register
HT-H5500K_30HK_30K_50K_50WK-M.E.Asia-ENG_0327.indd 1
2014-03-27
2:47:06
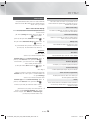
Safety Information
This symbol indicates that high voltage is
present inside. It is dangerous to make
any kind of contact with any internal part
of this product.
CAUTION
RISK OF ELECTRIC SHOCK DO NOT OPEN
CAUTION: TO REDUCE THE RISK OF ELECTRIC SHOCK, DO
NOT REMOVE THE COVER (OR BACK). THERE ARE NO USER
SERVICEABLE PARTS INSIDE. REFER ALL SERVICING TO
QUALIFIED PERSONNEL.
• The slots and openings in the cabinet and in the back
or bottom are provided for necessary ventilation. To
ensure reliable operation of this apparatus, and to
protect it from overheating, these slots and openings
must never be blocked or covered.
- Do not place this apparatus in a confined space,
such as a bookcase, or built-in cabinet, unless
proper ventilation is provided.
- Do not place this apparatus near or over a radiator
or heat register, or where it is exposed to direct
sunlight.
- Do not place vessels (vases etc.) containing water
on this apparatus. A water spill can cause a fire or
electric shock.
• Do not expose this apparatus to rain or place it near
water (near a bathtub, washbowl, kitchen sink, or
laundry tub, in a wet basement, or near a swimming
pool, etc.). If this apparatus accidentally gets wet,
unplug it and contact an authorized dealer immediately.
• This apparatus uses batteries. In your community,
there might be environmental regulations that require
you to dispose of these batteries properly. Please
contact your local authorities for disposal or recycling
information.
• Do not overload wall outlets, extension cords or
adaptors beyond their capacity, since this can result in
fire or electric shock.
• Route power-supply cords so that they are not likely to
be walked on or pinched by items placed on or against
them. Pay particular attention to cords at the plug end,
at wall outlets, and the point where they exit from the
apparatus.
• To protect this apparatus from a lightning storm, or
when it is left unattended and unused for long periods
of time, unplug it from the wall outlet and disconnect
the antenna or cable system. This will prevent damage
to the set due to lightning and power line surges.
• Before connecting the AC power cord to the DC
adaptor outlet, make sure the voltage designation of
the DC adaptor corresponds to the local electrical
supply.
• Never insert anything metallic into the open parts
of this apparatus. Doing so may create a danger of
electric shock.
This symbol indicates that important
literature concerning operation and
maintenance has been included with this
product.
• To avoid electric shock, never touch the inside of this
apparatus. Only a qualified technician should open this
apparatus.
• Make sure to plug the power cord in until it is firmly
seated. When unplugging the power cord from a wall
outlet, always pull on the power cord's plug. Never
unplug by pulling on the power cord. Do not touch the
power cord with wet hands.
• If this apparatus does not operate normally - in
particular, if there are any unusual sounds or smells
coming from it - unplug it immediately and contact an
authorized dealer or service centre.
• Maintenance of Cabinet.
- Before connecting other components to this
product, be sure to turn them off.
- If you move your product suddenly from a cold place
to a warm place, condensation may occur on the
operating parts and lens and cause abnormal disc
playback. If this occurs, unplug the product, wait for
two hours, and then connect the plug to the power
outlet. Then, insert the disc, and try to play back
again.
• Be sure to pull the power plug out of the outlet if the
product is to remain unused or if you are leaving the
house for an extended period of time (especially when
children, elderly, or disabled people will be left alone in
the house).
- Accumulated dust can cause an electric shock, an
electric leakage, or a fire by causing the power cord
to generate sparks and heat or the insulation to
deteriorate.
• Contact an authorized service centre for information
if you intend to install your product in a location with
heavy dust, high or low temperatures, high humidity,
chemical substances, or where it will operate 24 hours
a day such as in an airport, a train station, etc. Failing
to do so may lead to serious damage of your product.
• Use only a properly grounded plug and wall outlet.
- An improper ground may cause electric shock or
equipment damage. (Class l Equipment only.)
• To turn this apparatus off completely, you must
disconnect it from the wall outlet. Consequently, the
wall outlet and power plug must be readily accessible
at all times.
• Do not allow children to hang on the product.
2 - English
HT-H5500K_30HK_30K_50K_50WK-M.E.Asia-ENG_0327.indd 2
2014-03-27
2:47:25
WARNING :
• TO PREVENT THE SPREAD OF FIRE,
KEEP CANDLES AND OTHER ITEMS
WITH OPEN FLAMES AWAY FROM THIS
PRODUCT AT ALL TIMES.
CLASS 1 LASER PRODUCT
This product is classified as a CLASS 1 LASER product.
Use of controls, adjustments or performance of
procedures other than those specified herein may result
in hazardous radiation exposure.
CAUTION :
• INVISIBLE LASER RADIATION WHEN OPEN AND
INTERLOCKS DEFEATED, AVOID EXPOSURE TO
BEAM.
CLASS 1
KLASSE 1
LUOKAN 1
KLASS 1
PRODUCTO
LASER PRODUCT
LASER PRODUKT
LASER LAITE
LASER APPARAT
LÁSER CLASE 1
3D Precautions
IMPORTANT HEALTH AND SAFETY INFORMATION FOR
3D PICTURES.
Read and understand the following safety information
before using the 3D function.
• Some viewers may experience discomfort while viewing
3D TV such as dizziness, nausea, and headaches.
If you experience any such symptom, stop viewing 3D
TV, remove the 3D Active Glasses, and rest.
• Watching 3D images for an extended period of time
may cause eye strain. If you feel eye strain, stop
viewing 3D TV, remove your 3D Active Glasses, and
rest.
• A responsible adult should frequently check on children
who are using the 3D function.
If there are any reports of tired eyes, headaches,
dizziness, or nausea, have the child stop viewing 3D
TV and rest.
• Do not use the 3D Active Glasses for other purposes
(such as general eyeglasses, sunglasses, protective
goggles, etc.)
• Do not use the 3D function or 3D Active Glasses while
walking or moving around. Using the 3D function or 3D
Active Glasses while moving around may cause you to
bump into objects, trip, and/or fall, and cause serious
injury.
• If you want to enjoy 3D content, connect a 3D device
(3D compliant AV receiver or TV) to the product’s HDMI
OUT port using a high-speed HDMI cable. Put on 3D
glasses before playing the 3D content.
• The product outputs 3D signals only through an HDMI
cable connected to the HDMI OUT port.
• The video resolution in 3D play mode is fixed to the
resolution of the original 3D video. You can not change
the resolution.
• Some functions such as BD Wise, screen size
adjustment, and resolution adjustment may not operate
properly in 3D play mode.
• You must use a high-speed HDMI cable for proper
output of the 3D signal.
• Stay at least three times the width of the screen from
the TV when watching 3D images. For example, if
you have a 46 inch screen, stay 3.5 meters from the
screen.
• Place the 3D video screen at eye level for the best 3D
picture.
• When the product is connected to some 3D devices,
the 3D effect may not function properly.
• This product does not convert 2D content into 3D.
• "Blu-ray 3D" and "Blu-ray 3D" logo are trademarks of
the Blu-ray Disc Association.
Safety Information
• Store the accessories (battery, etc.) in a location safely
out of the reach of children.
• Do not install the product in an unstable location such
as a shaky self, a slanted floor, or a location exposed
to vibration.
• Do not drop or strike the product. If the product is
damaged, disconnect the power cord and contact a
service centre.
• To clean this apparatus, unplug the power cord from
the wall outlet and wipe the product using a soft,
dry cloth. Do not use any chemicals such as wax,
benzene, alcohol, thinners, insecticide, air fresheners,
lubricants, or detergent. These chemicals can damage
the appearance of the product or erase the printing on
the product.
• Do not expose this apparatus to dripping or splashing.
Do not put objects filled with liquids, such as vases on
the apparatus.
• Do not dispose of batteries in a fire.
• Do not plug multiple electric devices into the same wall
socket. Overloading a socket can cause it to overheat,
resulting in a fire.
• There is danger of an explosion if you replace the
batteries used in the remote with the wrong type of
battery. Replace only with the same or equivalent type.
3 - English
HT-H5500K_30HK_30K_50K_50WK-M.E.Asia-ENG_0327.indd 3
2014-03-27
2:47:27
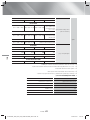
Contents
GETTING STARTED
PLAYING CONTENT
5
Accessories
26 Switching the Source Device
5
Speaker Components
26 Playing Commercial Discs
7
Front Panel
26 Playing a Disc with User Recorded Content
7
Rear Panel
27 Playing Files on a USB Device
8
Remote Control
28 Controlling Video Playback
29 Playing a Pre-Recorded Commercial Audio Disc
CONNECTIONS
9
30 Controlling Music Playback
Connecting the Speakers
12 Attaching the Toroidal Ferrite Core to the Power
Cord of the Wireless Receiver Module (SWA6000)
31 Playing Photo Contents
32 Listening to the Radio
32 Using Karaoke
13 Connecting to a TV and External Devices
33 Using Bluetooth
14 Connecting to a Network Router
35 Using the Special Effects Remote Control
Buttons
SETTINGS
NETWORK SERVICES
15 The Initial Settings Procedure
16 The Home Screen at a Glance
36 Using BD-LIVE™
16 Accessing the Settings Screen
36 Using DLNA
17 Settings Menu Functions
36 Apps
20 Network Setup
37 Using Opera TV Store
23 Wi-Fi Direct
38 Screen Mirroring
24 Upgrading Software
25 Setting Up DLNA
APPENDIX
39 Additional Information
40 Disk and Format Compatibility
45 Troubleshooting
48 Specifications
50 Licences
Figures and illustrations in this User Manual are provided for reference only and may differ from actual
product appearance.
An administration fee may be charged if either
a. an engineer is called out at your request and there is no defect in the product (i.e. where you
have failed to read this user manual)
b. you bring the unit to a repair centre and there is no defect in the product (i.e. where you have
failed to read this user manual).
The amount of such administration charge will be advised to you before any work or home visit is
carried out.
4 - English
HT-H5500K_30HK_30K_50K_50WK-M.E.Asia-ENG_0327.indd 4
2014-03-27
2:47:29
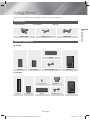
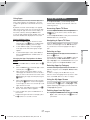
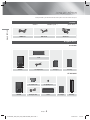
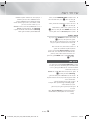
Getting Started
Check the box for the accessories and speaker components listed or shown below.
Accessories
• Remote Control
• User Manual
FM Antenna
Getting Started
Power Cable
• Batteries
HDMI Cable
Speaker Components
HT-H5500K
Centre
Front x 2
Surround x 2
Speaker Cable x 6
Subwoofer
HT-H5530HK
Front x 2
Surround x 2
Screw (5x20) x 8
Stand Base x 2
Centre
Speaker Cable x 6
Subwoofer
5 - English
HT-H5500K_30HK_30K_50K_50WK-M.E.Asia-ENG_0327.indd 5
2014-03-27
2:47:32
Getting Started
HT-H5530K
Front x 2
Stand x 2
Screw (5x20) x 8
Speaker Cable x 6
Centre
Surround x 2
Stand Base x 2
Subwoofer
HT-H5550K/HT-H5550WK
HT-H5550WK only
(For Power cord)
Screw (5x20) x 16
Speaker Cable x 6
Centre
Toroidal Ferrite Core
HT-H5550WK only
Front x 2/
Surround x 2
Stand x 4
Subwoofer
Stand Base x 4
Wireless Receiver
Module (SWA-6000)
6 - English
HT-H5500K_30HK_30K_50K_50WK-M.E.Asia-ENG_0327.indd 6
2014-03-27
2:47:42
Front Panel
DISPLAY ICONS
NFC
FUNCTION
STOP
PLAY/PAUSE
OPEN/
CLOSE
VOLUME
CONTROL
POWER
Getting Started
DISPLAY
MIC 1
DISC TRAY
✎
✎
✎
✎
✎
✎
REMOTE CONTROL SENSOR
MIC 2
5V 0.5A
MIC JACK
USB
When the product is on, do not let children touch the product's surface. It will be hot.
To upgrade the product's software through the USB jack, you must use a USB flash drive.
When the product displays the Blu-ray Disc menu, you cannot start the movie by pressing the
/6 button
on the product or the remote. To play the movie, you must select Play Movie or Start in the disc menu, and
then press the E button.
If you are using the Internet or are playing content from a USB device on your TV through the home cinema,
you cannot select the BD/DVD mode with the FUNCTION button. To select the BD/DVD mode, exit the
Internet or stop the content you are playing on the TV, and then select the BD/DVD mode.
Plug the microphone jack before using Karaoke function.
To use the NFC function, tag the compatible Bluetooth source device to the
on the top of the product
(See page 34).
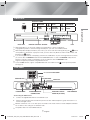
Rear Panel
* In case of HT-H5550WK
AUX IN
COOLING FAN
* FM ANTENNA
HDMI OUT
SURROUND
SURROUND
POWER CORD
SPEAKER OUTPUT
CONNECTORS
EXTERNAL DIGITAL
AUDIO IN (OPTICAL)
LAN TERMINAL
* Connecting the FM Antenna
1.
Connect the supplied FM antenna to the FM ANT Jack.
2.
Slowly move the antenna wire around until you find a location where reception is good, then fasten it to a
wall or other rigid surface.
✎
Maintain a minimum of 10 cm of clear space on all sides of the home cinema to ensure adequate ventilation.
Do not obstruct the cooling fan or ventilation holes.
This product does not receive AM broadcasts.
✎
7 - English
HT-H5500K_30HK_30K_50K_50WK-M.E.Asia-ENG_0327.indd 7
2014-03-27
3:03:09
Getting Started
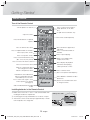
Remote Control
Tour of the Remote Control
Turn the product on and off.
FUNCTION
VOLUME
Adjust the volume.
MUTE
-
+
1
2
3
4
5
6
7
8
Press to select Home Cinema's
mode. (BD/DVD, D. IN, AUX,
etc.).
To open and close the disc tray.
Cut off the sound temporarily.
Press numeric buttons to operate
options.
9
DISC MENU
TITLE MENU
Press to view the disc menu.
0
POPUP
Press to skip backwards or forwards.
Press to play a disc or files.
Press to stop a disc or files.
Press to use the karaoke function
(Mic. vol., Echo, Key Cotrol).
Press to move to the Home screen.
KARAOKE
HOME
REPEAT
Allows you to repeat a title,
chapter, track or disc.
TOOLS
INFO
Press to use the Tools menu.
Select on-screen menu items
and change menu values.
Return to the previous menu.
EXIT
RETURN
TUNER
MEMORY MO/ST
These buttons are used both for
menus on the product and also
several Blu-ray Disc functions.
Use to enter the Popup menu/
Title menu.
Press to search backwards or
forwards.
Press to pause playing.
A
B
TV SOUND DPS/EQ
C
Press to direct audio signal to home
cinema speaker or TV speaker.
(See page 35)
Press to exit the menu.
Use to set a preset radio frequency.
D
TUNING
DOWN
Use to display the playback
information when playing
a Blu-ray/DVD disc or files.
UP
Select MONO or STEREO for radio
broadcasts.
Search for active FM stations and
to change channels.
Select the desired DSP/EQ audio
mode.
Installing batteries in the Remote Control
✎
✎
✎
Make sure to match the "+" and "–" ends of the batteries with
the diagram inside the compartment.
Assuming typical usage, the batteries last for about one year.
Battery size: AAA
The remote control can be used up to approximately 7 meters
from the product in a straight line.
8 - English
HT-H5500K_30HK_30K_50K_50WK-M.E.Asia-ENG_0327.indd 8
2014-03-27
2:47:56
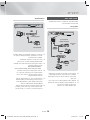
Connections
This section describes various methods of connecting the product to other external components.
Before moving or installing the product, be sure to turn off the power and disconnect the power cord.
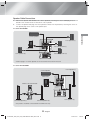
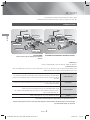
Connecting the Speakers
Subwoofer
Centre
Subwoofer
Front (R)
Front (R)
Surround (R)
Product
Front (L)
Surround (R)
Front (L)
Surround (L)
Surround (L)
* HT-H5500K/HT-H5530HK/HT-H5530K/
HT-H5550K
Connections
Product
Centre
Wireless
Receiver Module
* HT-H5550WK
Surround speakers must be connected to the
wireless receiver module.
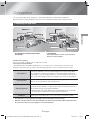
Position of the product
Place it on a stand or cabinet shelf, or under the TV stand.
Selecting the Listening Position
The listening position should be located about 2.5 to 3 times the TV's screen size away from the TV. For
example, if you have a 46 inch screen, locate the listening position 2.92 to 3.50 meters from the screen.
Front Speakers
Place these speakers in front of your listening position, facing inwards (about
45°) toward you. Place the front speakers so that their tweeters will be at the
same height as your ear. Align the front face of the front speakers with the front
face of the centre speaker or place them slightly in front of the centre speakers.
Centre Speaker
It is best to install the Centre Speaker at the same height as the front speakers.
You can also install it directly over or under the TV.
Surround Speakers
Place these speakers to the side of your listening position. If there isn't enough
room, place these speakers so they face each other. Position them about 60 to
90cm above your ear, facing slightly downward.
* Unlike the front and centre speakers, the surround speakers are used mainly
for sound effects. Sound will not come from them all the time.
Subwoofer
The position of the subwoofer is not so critical. Place it anywhere you like.
* The appearance of your speakers may differ from the illustrations in this manual.
* Match the speaker cables to the coloured label on the back of the speaker, and then plug them into
the jack of the same colour. See page 11 for exact instructions.
9 - English
HT-H5500K_30HK_30K_50K_50WK-M.E.Asia-ENG_0327.indd 9
2014-03-27
2:48:01
Connections
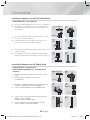
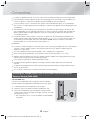
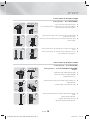
Installing the Speakers on the Half Tallboy Stand
* HT-H5530HK only - Front Speakers
1.
2.
Turn the Stand Base upside-down and connect it to the Speaker.
3.
If you want to adjust the height of the speaker, loosen a screw
on the rear of the speaker base first.
4.
Pull up the speaker in the arrow direction. (Be careful as an
excessive force may result in a physical damage.)
5.
Fit the speaker in a height adjusting a hole, and then use a screw
to fasten a speaker.
6.
This is appearance of after the speaker is installed and height
adjusted. To adjust height of other speakers, follow the step 3 ~ 5.
Use the driver to combine the screws on the 3 marked holes.
Installing a speaker is finished. Follow the same steps to install
other speakers.
1
Stand Base
2
Speaker
3
4
5
6
or
Installing the Speakers on the Tallboy Stand
* HT-H5530K only - Front Speakers
* HT-H5550K/HT-H5550WK only - Front/Surround
Speakers
1.
Turn the Stand Base upside-down and connect it to the
Stand.
2.
Use the driver to combine the screws on the
3 marked holes.
3.
Straighten a supplied speaker wire to the gravity direction
and put in the hole on the centre of Stand Base.
4.
Connect the upper Speaker to the assembled Stand.
1
Stand Base
2
Stand
3
4
Speaker
Stand
5.
Insert a screw clockwise into the hole on the rear of the
speaker using a screwdriver.
And then connect a speaker cable.
6.
This is the appearance after the speaker is installed.
Follow this steps to install other speaker.
5
6
10 - English
HT-H5500K_30HK_30K_50K_50WK-M.E.Asia-ENG_0327.indd 10
2014-03-27
2:48:05
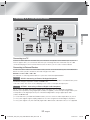
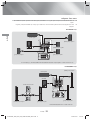
Speaker Cable Connections
1.
Match each speaker cable bundle to the correct speaker by matching the colour coded plug on each
bundle to the coloured sticker on the bottom of each speaker.
2.
Connect the speaker wire plugs from each speaker to the back of the product by matching the colours of
the speaker plugs to the colours of the speaker jacks.
In case of HT-H5500K
Front Speaker (L)
SURROUND
SURROUND
Connections
Centre Speaker
Surround Speaker (L)
Subwoofer
Front Speaker (R)
Surround Speaker (R)
SURROUND
SURROUND
* Refer to page 5~6 for the speakers of HT-H5530HK/HT-H5530K/HT-H5550K.
In case of HT-H5550WK
Centre Speaker
Front Speaker (L)
Subwoofer
Wireless Receiver Module
Front Speaker (R)
Surround Speaker (L)
Surround Speaker (R)
* This product should be connected with the SWA-6000 only.
11 - English
HT-H5500K_30HK_30K_50K_50WK-M.E.Asia-ENG_0327.indd 11
2014-03-27
2:48:23
Connections
✎
✎
✎
✎
✎
If you place a speaker near your TV set, the screen colour may be distorted because of the magnetic field.
Place the wireless receiver module at the rear of the listening position. If the wireless receiver module is too
close to the product, sound from the speakers may be disrupted because of interference.
If you use a device such as a microwave oven, wireless LAN Card, Bluetooth device, or any other device
that uses the 2.4/5.8GHz frequencies near the product, sound from the speakers may be disrupted because
of interference.
The maximum transmission distance from the product to the wireless receiver module is about 10m, but
may vary depending on your operating environment. If a steel-concrete wall or metallic wall is between the
product and the wireless receiver module, the system may not operate at all, because the radio waves
cannot penetrate metal.
If the product doesn't make a wireless connection, you need to run an ID Set between the product and
wireless receiver module. With the product turned off, press "0""1""3""5" on the remote control. Turn
on the wireless receiver module. Then, press and hold the "ID SET" button on the back of the wireless
receiver module for 5 seconds, and then turn the product on.
| CAUTION |
If you want to install the speakers on the wall, fasten screws or nails (not provided) firmly to the wall wherever
you want to hang a speaker, and then, using the hole in the rear of each speaker, carefully hang each
speaker on a screw or nail.
Do not let children play with or near the speakers. They could get hurt if a speaker falls.
When connecting the speaker wires to the speakers, make sure that the polarity (+/–) is correct.
Keep the subwoofer speaker out of reach of children to prevent children from inserting their hands or alien
substances into the duct (hole) of the subwoofer speaker.
Do not hang the subwoofer on the wall using the duct (hole).
The wireless receiving antenna is built into the wireless receiver module. Keep it away from water and
moisture.
For optimal listening performance, make sure that the area around the wireless receiver module location is
clear of any obstructions.
In 2-CH mode, you will hear no sound from the wireless surround speakers.
Attaching the Toroidal Ferrite Core to the Power Cord of the Wireless
Receiver Module (SWA-6000)
* HT-H5550WK only
If you attach a Toroidal ferrite core to the power cord of the wireless
receiver module, it will help prevent RF interference from radio signals.
1.
Pull the fixing tab of the Toroidal ferrite core to open it.
2.
Make two loops in the wireless receiver module power cord.
3.
Attach the Toroidal ferrite core to the wireless receiver module
power cord as shown in the figure on the right, and then close it by
pressiing it until it clicks.
• Attach the ferrite core as close to the Wireless Receiver Module
as possible.
12 - English
HT-H5500K_30HK_30K_50K_50WK-M.E.Asia-ENG_0327.indd 12
2014-03-27
2:48:26
Connecting to a TV and External Devices
SURROUND
SURROUND
Red
W
White
Method 1
External Devices
Connections
R
Method 2
AUDIO OUT
OPTICAL OUT
HDMI IN
Connecting to a TV
Connect an HDMI cable from the HDMI OUT jack on the back of the product to the HDMI IN jack on your TV.
If the TV supports ARC, you can hear the audio from your TV through the home cinema with only this cable
connected. See page 18 in this manual and the section on ARC in your TV's user's manual for details.
Connecting to External Devices
To select the correct mode for an external device after you have connected the device, press the FUNCTION
button. Each time you press the button, the mode changes in this order :
BD/DVD D. IN AUX FM BT
Two methods of connecting external devices to your home cinema are explained below.
Method 1 AUX IN : Connecting an External Analogue Component
Using an RCA audio cable (not supplied), connect the AUDIO IN jack on the product to the AUDIO OUT jack on
the external analogue component. Select the AUX mode.
• Be sure to match the colours on the cable plugs to the colours on the input and output jacks.
Method 2 OPTICAL : Connecting an External Digital Audio Component
Use to connect the digital audio output of digital signal components such as Cable Boxes and Satellite
Receivers (Set-Top-Boxes): Using a digital optical cable (not supplied), connect the Optical Digital Audio In jack
on the product to the Digital Optical Out jack of the external digital device using a digital optical cable.
Select the D. IN mode.
✎
✎
✎
To see video from your Cable Box/Satellite receiver, you must connect its video output directly to your TV.
This system supports Digital sampling frequencies of 32 kHz or higher from external digital components.
This system supports only DTS and Dolby Digital audio. MPEG audio, a bitstream format, is not supported.
13 - English
HT-H5500K_30HK_30K_50K_50WK-M.E.Asia-ENG_0327.indd 13
2014-03-27
3:03:44
Connections
Connecting to a Network Router
Wireless Network
You can connect your product to your network router
using one of the methods illustrated below.
Wired Network
SURROUND
SURROUND
Wireless IP sharer
Broadband modem
(with integrated router)
Broadband
service
Broadband
service
Or
✎
Router
Broadband
service
✎
✎
Broadband
modem
✎
✎
✎
✎
Your router or your Internet Service Provider's
policies may prevent the product from accessing
Samsung's software update server. If this occurs,
contact your Internet Service Provider (ISP) for
more information.
DSL users, please use a router to make a network
connection.
To use the DLNA function, you must connect your
PC to your network as shown in the illustrations
above.
The connection can be wired or wireless.
✎
✎
If your wireless IP router supports DHCP, this
product can use a DHCP or static IP address to
connect to the wireless network.
Set your wireless IP router to Infrastructure mode.
Ad-hoc mode is not supported.
The product supports only the following wireless
security key protocols:
- WEP (OPEN/SHARED), WPA-PSK (TKIP/AES),
WPA2-PSK (TKIP/AES)
Select a channel on the wireless IP router that is
not currently being used. If the channel set for
the wireless IP router is currently being used by
another device nearby, it will result in interference
and communication failure.
In compliance with the newest Wi-Fi certification
specifications, Samsung home cinemas do not
support WEP, TKIP, or TKIP-AES (WPS2 Mixed)
security encryption in networks running in the
802.11n mode.
Wireless LAN, by its nature, may cause
interference, depending on the operating
conditions (AP performance, distance, obstacles,
interference by other radio devices, etc).
14 - English
HT-H5500K_30HK_30K_50K_50WK-M.E.Asia-ENG_0327.indd 14
2014-03-27
2:48:31
Settings
4:3 Pan-Scan - For older, standard screen,
analogue TVs. Displays 4:3 pictures in full screen
and 16:9 pictures in Pan-Scan format that fills
the screen, but cuts off the left and right sides of
the picture and enlarges the middle vertically.
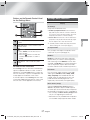
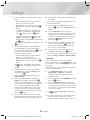
The Initial Settings Procedure
• The Home menu will not appear if you do not
configure the initial settings.
• The OSD (On Screen Display) may change in
this product after you upgrade the software
version.
• The access steps may differ depending on the
menu you selected.
1.
✎
The Network screen appears.
- Before you begin, confirm that the product is
connected to your router.
- Set to wired or wireless depending on your
network environment.
- If you have a network with static IP addresses,
we suggest you select Skip by pressing the
BLUE (D) button.
If you skip network setup here or the setup does
not work correctly, you can set up the product's
network connection later. (See page 20)
2.
Press the ▲▼ buttons to select the desired
language, and then press the E button.
Initial Settings | Network
3.
Press the E button to start function setup.
Select your network type.
Network Type
Initial Settings
Wireless
㾎
TV Aspect and Network will be set.
Each setting may be changed later under "Settings"
Settings
Turn on your TV after connecting the product,
and then turn on the product. When you turn
on the product for the first time, the product
automatically displays the Initial Settings
Language screen.
5.
Wired
Connect
Network cable connected.
Start
a Previous
4.
6.
The product verifies the network connection
and then connects to the network. When it is
done, press the E button. The "Initial settings
completed." screen appears, and then the
Home screen appears.
✎
If you want to display the Initial Settings screen
again and make changes, select the Reset
option. (See page 20)
If you use an HDMI cable to connect the product
to an Anynet+ (HDMI-CEC)-compliant Samsung
TV and 1.) You have set the Anynet+ (HDMI-CEC)
feature to On in both the TV and the product and
2.) You have set the TV to a language supported
by the product, the product will select that
language as the preferred language automatically.
" Select
The TV Aspect screen appears. Press the ▲▼
buttons to select a TV aspect ratio, and then
press the E button.
You have four choices:
16:9 Original - For widescreen TVs. Displays
widescreen pictures in their original 16:9 format
and 4:3 pictures (the old, standard format) in 4:3
pillar box format with black bars on the left and
right.
16:9 Full - For widescreen TVs. Displays
widescreen pictures in their original 16:9 format
and expands 4:3 pictures to fill the 16:9 screen.
4:3 Letter Box - For older, standard screen,
analogue TVs. Displays 4:3 pictures in full screen
and 16:9 pictures in letter box format that retains
the 16:9 aspect ratio but puts black bars above
and below the picture.
✎
15 - English
HT-H5500K_30HK_30K_50K_50WK-M.E.Asia-ENG_0327.indd 15
2014-03-27
2:48:36
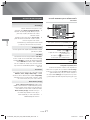
Settings
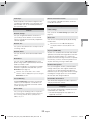
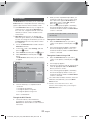
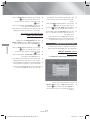
The Home Screen at a Glance
1
8 Function
2
Play disc
Photos
Videos
Music
Use for switching to an external device, and
for radio and mode switching for a Bluetooth
connection. You can use the remote control’s
FUNCTION button and the main unit’s
button
for mode switching.
9 Settings
Set various functions to suit your personal
preferences.
Blu-ray
App 1
App 2
App 3
✎
App 4 Opera TV More
Store
3
Screen Change Function Settings
Mirroring Device
To play or view video, photo, music files located
on your PC, you must connect your home
cinema and PC to a home network and you
must download, install, and configure the DLNA
software on your PC. (See page 25)
45 6 7 8 9
Accessing the Settings Screen
1 Play disc
1.
The disc currently in the tray is displayed.
Press E to start playing the disc.
Select Settings on the Home screen, and then
press E. The Settings screen appears.
Settings
2 Photos/Videos/Music
Play photos, videos, or music content from Disc,
USB, PC, or mobile devices.
3 Apps
Access various for pay or free-of-charge
applications.
4 Opera TV Store
Makes the Web-based App for TV available for
use.
Display
3D Settings
Audio
TV Aspect Ratio
: 16:9 Original
Network
BD Wise
: Off
System
Resolution
: Auto
Language
Movie Frame (24 fps)
: Off
Security
HDMI Colour Format
: Auto
General
HDMI Deep Colour
: Off
Support
Progressive Mode
: Auto
2.
To access the menus, sub-menus, and options
on the Settings screen, please refer to the
remote control illustration. (See page 17)
✎
If you leave the product in the stop mode for more
than 5 minutes without using it, a screen saver
will appears on your TV. If the product is left in the
screen saver mode for more than 20 minutes, the
power automatically turns off.
5 More
A list of useful and popular apps we recommend.
6 Screen Mirroring
Set up the wireless mirroring function between
the home cinema and a smart phone or tablet.
7 Change Device
Displays a list of external devices connected to the
main unit. Switch to the desired device.
16 - English
HT-H5500K_30HK_30K_50K_50WK-M.E.Asia-ENG_0327.indd 16
2014-03-27
2:48:40
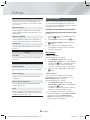
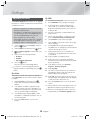
Buttons on the Remote Control Used
for the Settings Menu
KARAOKE
1
HOME
Display
REPEAT
3D Settings
TOOLS
INFO
3
2
Settings Menu Functions
EXIT
RETURN
4
TUNER
HOME Button : Press to move to the Home
screen.
2
RETURN Button : Press to return to the
previous menu.
3
E (ENTER) / DIRECTION Button :
• Press ▲▼◄► to move the cursor or
select an item.
• Press the E button to activate the
currently selected item or confirm a
setting.
✎
Carefully read the health and safety information
before viewing 3D content. (See page 3)
Settings
1
Set up the 3D related functions.
3D Blu-ray Playback Mode: Select whether to
play a Blu-ray Disc with 3D contents in 3D Mode.
If you move to the Home menu while in 3D mode,
the product will switch to 2D automatically.
Screen Size: Enter the size of the TV attached to
the product. The product will automatically adjust
the 3D output to the screen size of the TV.
TV Aspect Ratio
4
Lets you adjust the output of the product to the
screen size of your TV. (See page 39)
BD Wise
BD Wise is Samsung’s latest inter-connectivity
feature. When you connect a Samsung product
and a Samsung TV with BD Wise to each other
via HDMI, and BD Wise is on in both the product
and TV, the product outputs video at the video
resolution and frame rate of the Blu-ray/DVD Disc.
EXIT Button : Press to exit the current
menu.
Detailed Function Information
Each Settings function, menu item, and individual
option is explained in detail on-screen. To view an
explanation, use the ▲▼◄► buttons to select the
function, menu item, or option. The explanation will
usually appear on the bottom of the screen.
A short description of each Settings function starts
on this page. Additional information on some of the
functions is also in the Appendix of this manual.
Resolution
Lets you set the output resolution of the HDMI
video signal to BD Wise, Auto, 1080p, 1080i,
720p, 576p/480p. The number indicates the
number of lines of video per frame. The i and
p indicate interlaced and progressive scan,
respectively. The more lines, the higher quality.
Movie Frame (24 fps)
Setting the Movie Frame (24 fps) feature to
Auto lets the product adjust its HDMI output to
24 frames per second automatically for improved
picture quality if attached to a 24Fs compatible TV.
• You can enjoy the Movie Frame (24 fps) feature
only on a TV supporting this frame rate.
• Movie Frame is only available when the product
is in the HDMI 1080p output resolution modes.
17 - English
HT-H5500K_30HK_30K_50K_50WK-M.E.Asia-ENG_0327.indd 17
2014-03-27
2:48:43
Settings
HDMI Colour Format
Speaker Selection
Lets you set the colour space format for the HDMI
output to match the capabilities of the connected
device (TV, monitor, etc).
Lets you select which speakers you want active,
either the TV's speakers or the home cinema's
speakers.
HDMI Deep Colour
Audio Return Channel
Lets you set the product to output video from the
HDMI OUT jack with Deep Colour. Deep Colour
provides more accurate colour reproduction with
greater colour depth.
Lets you direct the sound from the TV to the Home
Cinema speakers. Requires an HDMI connection
and an Audio Return Channel (ARC) compatible
TV.
• If Audio Return Channel is set to on and you
are using an HDMI cable to connect the product
to the TV, digital optical input will not work.
• If Audio Return Channel is set to Auto and you
are using an HDMI cable to connect the product
to the TV, ARC or digital optical input is selected
automatically.
Progressive Mode
Lets you improve picture quality when viewing
DVDs.
Audio
Karaoke scoring
Digital Output
This feature rates your singing ability and gives you
a score for each song you sing.
My karaoke
Set the volume of the vocals when using the
karaoke feature.
Original Vocals: Volume is set to the level of the
original sound.
Reduce Vocals: Volume is set to a level lower than
that of the original sound.
Speaker Settings
Lets you adjust the following speaker settings and
turn the test tone on and off so you can test the
speakers.
Level: Lets you adjust the relative loudness of
each speaker from 6dB to -6dB. For example, if
you like deep bass, you can increase the loudness
of the subwoofer by 6dB.
Distance: Lets you adjust the relative distance
of each speaker from the listening position up to
9 meters. The farther the distance, the louder the
speaker will be.
Test Tone: Lets you run the Test Tone function so
you can test your adjustments. Setting Test Tone
to On turns the Test Tone on. Setting it to Off turns
it off.
Lets you set the Digital Output to match the
capabilities of the AV receiver you’ve connected to
the product. For more details, please refer to the
digital output selection table. (See page 44)
Dynamic Range Control
Lets you apply dynamic range control to Dolby
Digital, Dolby Digital Plus, and Dolby TrueHD audio.
Auto: Automatically controls the dynamic range
of Dolby TrueHD audio, based on information in
the Dolby TrueHD soundtrack. Also turns dynamic
range control off for Dolby Digital and Dolby Digital
Plus.
Off: Leaves the dynamic range uncompressed,
letting you hear the original sound.
On: Turns dynamic range control on for all three
Dolby formats. Quieter sounds are made louder
and the volume of loud sounds is reduced.
Downmixing Mode
Lets you select the multi-channel downmix method
that is compatible with your stereo system. You
can choose to have the product downmix to
Normal Stereo or to Surround Compatible.
18 - English
HT-H5500K_30HK_30K_50K_50WK-M.E.Asia-ENG_0327.indd 18
2014-03-27
2:48:45
Audio Sync
BD-Live Internet Connection
When the product is attached to a digital TV, lets
you adjust the audio delay so that the audio syncs
with the video. You can set the delay between 0
and 300 milliseconds.
Lets you allow or prohibit an Internet connection
for the BD-Live service.
System
Initial Settings
Network
Lets you re-run the Initial Settings procedure. (See
page 15)
Network Settings
Quick start
You can turn on the power quickly by decreasing
the boot time.
✎
Network Test
Lets you test the Internet Protocol setup to see if it
is working correctly.
Anynet+ (HDMI-CEC)
Network Status
Lets you check the current network and Internet
status.
Wi-Fi Direct
Lets you connect a Wi-Fi Direct device to the
product using a peer-to-peer network, without the
need for a wireless router.
Note that if the product is connected to a wireless
network, it may be disconnected when you use
Wi-Fi Direct. (See page 23)
✎
If this function is set to On, Standby power
consumption will be increased. (About 12W ~
20W)
Settings
Lets you configure the network connection so
you can enjoy various features such as Internet
services or DLNA Wi-Fi functionality, and perform
software upgrades.
Text files, such as files with a .TXT or .DOC
extension, will not display when you are using the
Wi-Fi Direct function.
Anynet+ is a convenient function that offers linked
operations with other Samsung products that have
the Anynet+ feature and lets you control those
products with one Samsung TV remote. To operate
this function, you must connect this product to an
Anynet+ Samsung TV using a HDMI cable.
BD Data Management
Lets you manage the contents you downloaded
through a Blu-ray disc that supports the BD-Live
service. You can view the information about the
USB device you are using for BD Live data storage
including the storage space. You can also delete
BD Live data and change the device.
Screen Mirroring
DivX® Video On Demand
The Screen Mirroring function lets you view the
screen of your smart phone or smart device on
the TV you have connected to the home cinema
system. (See page 38)
View DivX® VOD Registration Codes to purchase
and play DivX® VOD contents.
Device Name
Lets you select the language you prefer for the OnScreen Menu, disc menu, etc.
• The selected language will only appear if it is
supported on the disc.
Lets you assign an identifying name to the product.
You use this name to identify the product when you
are connecting external devices (smart phones,
tablets, etc.) to it.
Language
19 - English
HT-H5500K_30HK_30K_50K_50WK-M.E.Asia-ENG_0327.indd 19
2014-03-27
2:48:47
Settings
Network Setup
Security
The default PIN is 0000. Enter the default PIN to
access the security function if you haven't created
your own PIN.
BD Parental Rating
Prevents playback of Blu-ray Discs with a rating
equal to or above a specific age rating unless you
enter the PIN.
DVD Parental Rating
Prevents playback of DVDs with a rating above a
specific numerical rating unless you enter the PIN.
When you connect this product to a network, you
can use network based applications and functions
such as BD-LIVE and upgrade the product's software
through the network connection.
Configuring Your Network Connection
To begin configuring your network connection, follow
these steps:
1.
In the Home screen, select Settings, and then
press the E button.
2.
Select Network, and then press the E button.
3.
Select Network Settings, and then press the
E button.
4.
Go to the instructions for Wired networks
starting below or the instructions for Wireless
networks. (See page 21)
Change PIN
Changes the 4-digit PIN used to access security
functions.
Wired Network
General
Time Zone
Lets you specify the time zone that is applicable to
your area.
After following Steps 1 to 3 above:
Wired – Automatic
1.
In the Network Settings screen, change
Network Type to Wired. Then, select Connect
and press the E button. The product detects
the wired connection, verifies the network
connection, and then connects to the network.
For more information about this function see page
24.
2.
When it is done, highlight OK, and then press
E button.
Contact Samsung
Support
Software Upgrade
Provides contact information for assistance with
your product.
Terms of Service Agreement
View the general disclaimer regarding third party
contents and services.
Wired - Manual
If you have a static IP address or the automatic
procedure does not work, you'll need to set the
Network Settings values manually.
After following Steps 1 to 3 above:
1.
In the Network Settings screen, change
Network Type to Wired. Then, select Connect
and press the E button.
The product searches for a network, and then
displays the connection failed message.
Reset
Reverts all settings to their defaults except for the
network. Requires that you enter your security PIN.
The default security PIN is 0000.
✎
If it is possible to connect the home cinema to
your network wirelessly, select Change Network
at this point, change the Network Type to
Wireless, and then go to the instructions for
wireless networks. (See page 21)
20 - English
HT-H5500K_30HK_30K_50K_50WK-M.E.Asia-ENG_0327.indd 20
2014-03-27
2:48:48
Network Settings
Wired network connection failed.
MAC Address
IP Address
Subnet Mask
Gateway
DNS Server
XX:XX:XX:XX:XX:XX
0. 0. 0. 0
0. 0. 0. 0
0. 0. 0. 0
0. 0. 0. 0
1.
IP auto setting failed. Try the following to set up the IP automatically, or set up the IP manually
by selecting IP Settings.
- Ensure that the DHCP server is enabled on the wireless network, then unplug and plug the wireless
network in again.
- Contact your internet service provider for more info.
Change Network
IP Settings
a Previous
Wireless - Automatic
Follow the Steps 1 to 3 in "Configuring Your Network
Connection". (See page 20)
Retry
d Skip
Network Settings
Close
< Move
In the Network Settings screen, change
Network Type to Wireless. The product
searches for and then displays a list of the
available networks.
Select your network type.
Network Type
" Select
Wireless
Wireless network
Use the ◄► buttons to select IP Settings,
and then press the E button. The IP Settings
screen appears.
Select the IP setting field, and then set it to
Enter manually.
4.
Select a parameter to enter (IP Address, for
example), and then press E. Use the number
keypad on your remote control to enter the
numbers for the parameter. You can also enter
numbers using the ▲▼ buttons. Use the ◄►
buttons on the remote control to move from
entry field to entry field within a parameter. When
done with one parameter, press the E button.
WPS(PBC)
5.
Press the ▲ or ▼ button to move to another
parameter, and then enter the numbers for that
parameter following the instructions in Step 4.
6.
Repeat Steps 4 and 5 until you have filled in all
parameters.
7.
You can connect your BD
Home Theater to the
internet. Please select which
wireless network to use
MIC
KIMING_VTOWER
3.
✎
㾎 si-ap
You can get the network parameter values from
your Internet provider.
When finished entering all the parameter values,
select Return ('), and then press the E
button. The home cinema verifies the network
connection and then connects to the network.
Wireless Network
You can set up a wireless network connection in three
ways:
- Wireless Automatic
- Wireless Manual
- WPS(PBC)
Before you configure the wireless network
connection, disconnect any wireless network devices
currently connected to the product or, if applicable,
the product's current wired connection.
Search
m Move
" Select
' Return
2.
Select the desired network, and then press the
E button.
3.
On the Security screen, enter your network's
security code or pass phrase.
Enter numbers directly using the number buttons
on your remote control. Enter letters by selecting
a letter with ▲▼◄► buttons, and then pressing
E button.
4.
When finished, select Done, and then press the
E button. The product verifies the network
connection and then connects to the network.
✎
Settings
2.
You should be able to find the security code or
pass phrase on one of the set up screens you
used to set up your router or modem.
Wireless - Manual
If you have a static IP address or the Automatic
procedure does not work, you'll need to set the
Network Settings values manually.
Follow the Steps 1 to 3 in "Configuring Your Network
Connection". (See page 20)
1.
In the Network Settings screen, change
Network Type to Wireless. The product
searches for and then displays a list of the
available networks.
2.
Scroll through the list, select the desired network
or Add Network, and then press the E button.
3.
If you selected a network in Step 2, go to Step 6.
If you selected Add Network, go to Step 4.
21 - English
HT-H5500K_30HK_30K_50K_50WK-M.E.Asia-ENG_0327.indd 21
2014-03-27
2:48:50
Settings
4.
Enter your wireless network or wireless router's
name.
• Enter numbers directly using the number
buttons on your remote control.
• Enter letters by selecting a letter with the
▲▼◄► buttons, and then pressing the E
button.
• To display capital letters (or redisplay lower
case letters if capital letters are displayed),
, and then press the E button.
select
• To display symbols and punctuation, select
123#&, and then press the E button. To
redisplay letters, select 123#&, and then press
the E button.
When finished, select Done, and then press the
E button.
5.
6.
On the Security method screen that appears,
use the ▲▼ buttons to select the network's
Security method, and then press the E button.
On the next screen, enter your network's
security code or pass phrase.
• Enter numbers directly using the number
buttons on your remote control.
• Enter letters by selecting a letter with the
▲▼◄► buttons, and then pressing the E
button.
When finished, select Done, and then press
the E button. The product searches for the
network.
The Network connection fail screen appears.
Use ◄► buttons to select IP Settings, and
then press the E button.
7.
Select the IP setting field, and then set it to
Enter manually.
8.
Select a network parameter to enter (IP
Address, for example), and then press E
button. Use the number keypad on your remote
control to enter the numbers for the parameter.
You can also enter numbers using the ▲▼
buttons. Use the ◄► buttons on the remote
control to move from entry field to entry field
within a parameter. When done with one value,
press the E button.
9.
Press the ▲ or ▼ button to move to another
parameter, and then enter the numbers for that
parameter following the instructions in Step 8.
10. Repeat Steps 8 and 9 until you have filled in all
parameters.
✎
You can get the Network parameter values from
your Internet provider.
11. When finished, select Return ('), and then
press the E button. The Security Key screen
appears.
12. On the Security Key screen, enter your
network's Security Code or Pass Phrase. Enter
numbers directly using the number buttons on
your remote control. Enter letters by selecting
a letter with the ▲▼◄► buttons, and then
pressing the E button.
13. When finished, select Done at the right of the
screen, and then press the E button. The
product verifies the network connection and
then connects to the network.
14. After the home cinema verifies the network,
select OK, and then press the E button.
✎
You can also begin the Manual Network setup by
going to Settings > Network > Network Status.
WPS(PBC)
One of the easiest ways to set up the wireless
network connection is using the WPS(PBC) function.
If your wireless router has a WPS(PBC) button, follow
these steps:
Follow the Steps 1 to 3 in "Configuring Your Network
Connection". (See page 20)
1.
In the Network Settings screen, change
Network Type to Wireless. The product
searches for and then displays a list of the
available networks.
2.
Scroll the list down, select WPS(PBC), and then
press the E button.
3.
Press the WPS(PBC) button on your router
within two minutes. Your product automatically
acquires all the network settings values it needs
and connects to your network after the network
connection is verified.
4.
When it is done, highlight OK, and then press
the E button.
✎
For a WPS connection, set your wireless router’s
security encryption to AES. WEP security
encryption does not support a WPS connection.
22 - English
HT-H5500K_30HK_30K_50K_50WK-M.E.Asia-ENG_0327.indd 22
2014-03-27
2:48:52
2.
Wi-Fi Direct
The Wi-Fi Direct function allows you to connect WiFi Direct devices to the product and each other using
a peer-to-peer network, without a wireless router.
✎
3.
• The PBC and PIN procedures connect devices
automatically.
Through the Product Using PBC
1.
Select the Wi-Fi Direct device you want to
connect to this product, and then press the E
button.
2.
The Connecting pop-up appears, followed by
the Connected pop-up. When it closes, you
should see the device listed on the Wi-Fi Direct
screen as connected.
2.
In the Home screen, select Settings, and then
press the E button.
3.
Select Network, and then press the E button.
4.
Select Wi-Fi Direct, and then press the E
button.
The Wi-Fi Direct devices that you can connect
to appear.
Through the Product Using a PIN
1.
Select the Wi-Fi Direct device you want to
connect to this product, and then press the E
button.
Settings
2.
The PIN pop-up appears.
3.
Note the PIN code in the pop-up, and then enter
it into the appropriate field in the Wi-Fi Direct
device you want to connect.
4.
The Connecting pop-up appears, followed by
the Connected pop-up. When it closes, you
should see the device listed on the Wi-Fi Direct
screen as connected.
Display
Wi-Fi Direct
AudioDevice Name : HT-H5500K
Select your Wi-Fi Direct device to connect to.
Network
AndroidXXXXXXX
System
Not Connected
Language
Refresh
Close
Security
General
✎
Support
5.
✎
You have three ways to complete the Wi-Fi
connection:
• Through the Wi-Fi device.
• Through the product using PBC.
• Through the product using a PIN.
Settings
Some Wi-Fi Direct devices may not support the
DLNA function if connected via Wi-Fi Direct. If
this is the case, change the network connection
method you used to connect the device to the
home cinema.
✎ Wi-Fi Direct transmissions can interfere with
Bluetooth signals. Before you use the Bluetooth
function, we strongly recommend that you turn off
the Wi-Fi Direct function on any device in which
it is currently on.
1. Turn on the Wi-Fi Direct device and activate its
Wi-Fi Direct function.
When you have completed the procedure, you
should see a pop-up on your TV screen saying
that a device that supports Wi-Fi Direct has
requested to connect. Select OK, and then
press the E button to accept.
The Connecting pop-up appears, followed by
the Connected pop-up. When it closes, you
should see the device listed on the Wi-Fi Direct
screen as connected.
The current wired or wireless network connection
will be disconnected when you use the Wi-Fi
Direct function.
Text files, such as files with a .TXT or .DOC
extension, will not display when you are using the
Wi-Fi Direct function.
Each is covered below.
Through the Wi-Fi Device
1.
On the Wi-Fi device, follow the device's
procedure for connecting to another Wi-Fi
Direct device. See the device's user manual for
instructions.
23 - English
HT-H5500K_30HK_30K_50K_50WK-M.E.Asia-ENG_0327.indd 23
2014-03-27
2:48:54
Settings
By USB
Upgrading Software
The Software Upgrade menu allows you to upgrade
the product’s software for performance improvements
or additional services.
• Never turn the product off or back on manually
during the update process.
• The update is complete when the product turns
off after restarting. Press the POWER button to
turn on the updated product for your use.
• Samsung Electronics takes no legal
responsibility for product malfunction caused by
an unstable Internet connection or consumer
negligence during a software upgrade.
1.
In the Home menu, select Settings, and then
press the E button.
2.
Select Support, and then press the E button.
3.
Select Software Upgrade, and then press the
E button.
4.
Select one of the following methods:
• By Online
• By USB
• Auto Upgrade Notification
5.
✎
1.
Visit www.samsung.com.
2.
Click SUPPORT on the top right of the page.
3.
Enter the product's model number into the
search field. As you enter the model number, a
drop down will display products that match the
model number.
4.
Left click your product's model number in the
drop down list.
5.
On the page that appears, scroll down to and
then click Firmware Manuals & Downloads.
6.
Click Firmware in the centre of the page.
7.
Click the ZIP icon in the File column on the right
side of the page.
8.
Click Send in the first pop-up that appears.
Click OK in the second pop-up to download and
save the firmware file to your PC.
9.
Unzip the zip archive to your computer. You
should have a single folder with the same name
as the zip file.
10. Copy the folder to a USB flash drive.
11. Make sure no disc is inserted in the product,
and then insert the USB flash drive into the USB
port of the product.
Press the E button.
Directions for each method begin below.
If you want to cancel the upgrade while the
upgrade software is downloading, press the E
button.
12. In the product’s menu, go to Settings >
Support > Software Upgrade.
13. Select By USB.
By Online
14. The home cinema searches for the software on
the USB drive. When it finds the software, the
Update Request pop-up appears.
Your product must be connected to the Internet to
use the By Online function. Remove all discs before
you begin.
15. Select OK. The home cinema turns off, turns on,
and then begins the upgrade. When the upgrade
is done, the home cinema turns off.
1.
Select By Online, and then press the E
button. The Connecting to Server message
appears.
16. Press the POWER button to turn on the home
cinema.
2.
If an update is available, a popup message
appears asking if you want to upgrade. If you
select Yes, the product turns off automatically,
turns on, and then begins the upgrade.
✎
3.
The update progress popup appears. When
the update is completed, the product turns off
automatically again.
4.
Press the POWER button to turn on the
product.
✎
There should be no disc in the product when you
upgrade the software using the USB Host jack.
When the software upgrade is done, check the
software details in the Software Upgrade menu.
24 - English
HT-H5500K_30HK_30K_50K_50WK-M.E.Asia-ENG_0327.indd 24
2014-03-27
2:48:57
Auto Upgrade Notification
6.
Click the Software tab.
If your product is connected to the network and you
set Auto Upgrade Notification on, the product will
notify you if a new software version is available with a
pop-up message.
7.
On the software tab, click the EXE icon on the
right side of the DLNA line.
8.
In the first pop-up that appears, click Send. In
the second pop-up, click Save File.
1.
Turn on the product.
9.
2.
In the Software Upgrade menu, set Auto
Upgrade Notification to On.
If there is a new software version available, the
product will notify you with a pop-up message.
Find the DLNA install file on your disk, and then
double click the file.
10. In the pop-up that appears, click Run, and then
follow the directions that appear on your screen.
To upgrade the firmware, select Yes. The
product turns off automatically, turns on, and
then begins the upgrade.
4.
The update progress popup will appear. When
the update is complete, the product will turn off
automatically again.
5.
Press the POWER button to turn on the
product.
Download the DLNA Installation/Instruction manual
from the same Software Tab by clicking the
corresponding PDF file symbol in the File column on
the right. The file, in PDF format, will download and
open. Follow the directions to install and setup DLNA.
You can view and/or save the file.
✎
To use DLNA with your smart phone, you need to
connect your home cinema and smart phone to
the same network.
Settings
3.
Setting Up DLNA
DLNA enables you to play music, video, and photo
files located in your PC using this product. To use
DLNA, you must connect the product to your PC via
the network (See page 14) and install the SAMSUNG
PC Share Manager on the PC.
To Download the DLNA Software
To use DLNA with your PC, you must install DLNA
software on your PC. You can download the PC
software and get detailed instructions for using DLNA
from the Samsung.com website.
1.
Go to www.samsung.com.
2.
Click SUPPORT at the top of the page.
3.
Enter the product's model number into the
search field. As you enter the model number, a
drop down will display products that match the
model number.
4.
Left click your product's model number in the
drop down list.
5.
On the page that appears, scroll down to and
then click Firmware Manuals & Downloads.
25 - English
HT-H5500K_30HK_30K_50K_50WK-M.E.Asia-ENG_0327.indd 25
2014-03-27
2:48:58
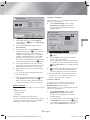
Playing Content
Your home cinema can play content located on
Blu-ray/DVD/CD discs, USB devices, PCs, smart
phones, tablets, and in Apps.
To play content located on your PC or a mobile
device, you must connect the PC or mobile device
and the product to your network. To play content on
your PC, you must also download and install DLNA
network software or already have DLNA network
software on your PC.
✎
PCs running Windows 7 and Windows 8 have
DLNA software (Play To) built in.
Switching the Source Device
If two or more external devices are connected to
the main unit, you can use any of the three methods
described below to change the source device.
Method 1
From the Home screen, use the ▲▼◄► buttons to
move to Change Device, and then press E.
The Change Device popup window will appear. Use
the ▲▼ buttons to move to the desired device, and
then press E.
Method 2
If you move to Photos, Videos, Music or other filebased contents, a list of folders and files will appear.
Press the RED (A) button to display the Change
Device popup window, use the ▲▼ buttons to move
to the desired device, and then press E.
Method 3
When a device is connected for the first time, a
popup window appears on which you can change
the source device by using the ◄► buttons.
3.
Press the button to close the disc tray.
Playback starts automatically.
4.
If playback does not start automatically, press
the 6 button on the remote.
Disc Storage & Management
• Holding Discs
- Fingerprints or scratches on
a disc may reduce sound and
picture quality or cause skipping.
- Avoid touching the surface of a disc where data
has been recorded.
- Hold the disc by the edges so that fingerprints
will not get on the surface.
- Do not stick paper or tape on the disc.
• Cleaning Discs
- If you get fingerprints or dirt on a
disc, clean it with a mild detergent
diluted in water and wipe with a soft
cloth.
- When cleaning, wipe gently from the inside to the
outside of the disc.
- Disc Storage
Do not keep in direct sunlight.
Keep in a cool ventilated area.
Keep in a clean protective jacket and store
vertically.
Playing a Disc with User Recorded
Content
You can play multimedia files you have recorded on
Blu-ray, DVD, or CD discs.
1.
Playing Commercial Discs
1.
Press the button to open the disc tray.
2.
Place a disc gently into the disc tray with the
disc’s label facing up.
Place a user recorded disc into the disc tray with
the disc’s label facing up, and then close the
tray.
2.
Use the ▲▼◄► buttons to select the type
of content you want to view or play - Photos,
Videos, or Music - and then press the E
button.
OR
2-1. Select Play disc from the Home screen. The
Play disc screen appears. Use the ▲▼ buttons
to select the desired content type, Photos,
Videos, or Music.
26 - English
HT-H5500K_30HK_30K_50K_50WK-M.E.Asia-ENG_0327.indd 26
2014-03-27
2:49:00
3.
A screen appears listing the contents of the disc.
Depending on how the contents are arranged,
you will see either folders, individual files, or
both.
3.
4.
If necessary, use the ▲▼◄►buttons to select a
folder, and then press the E button.
5.
5.
Use the ▲▼◄► buttons to select a file to view
or play, and then press the E button.
6.
6.
Press the RETURN button one or more times to
exit a current screen, exit a folder, or to return to
the Home screen.
Press the EXIT button to return directly to the
Home Screen.
7.
Go to pages 28~32 for instructions that explain
how to control playback of videos, music, and
pictures on a disc.
Method 1 : If you connect a USB device while
the product is turned on
The "New device connected." pop-up appears.
Play disc
Photos
Videos
you connect a USB device
1.
Turn the product on.
2.
Press Change Device and select a USB device.
3.
Use the ◄► buttons to select Photos, Videos,
or Music on the Home screen, and then press
the E button.
4.
There are two methods you can use to play or view
multimedia files located on a USB device through
your product.
1.
Method 2 : If the product is turned on after
Music
New device connected.
USB DISK
Photos
If necessary, use the ▲▼◄► buttons to select
a folder, and then press the E button.
5. Select a file to view or play, and then press the
E button.
6. Press the RETURN button to exit a folder or the
EXIT button to return to the Home screen.
7. Go to pages 28~32 for instructions that explain
how to control playback of videos, music, and
pictures on a USB device.
✎ If you insert a disc when playing a USB device
or phone, the device mode changes to "Disc"
automatically.
✎ If your cellular phone is DLNA compatible, you
can play contents without connecting a USB
cable. (See page 36)
Playing Content
Playing Files on a USB Device
4.
If necessary, use the ▲▼◄► buttons to select
a folder, and then press the E button.
Select a file to view or play, and then press the
E button.
Press the RETURN button to exit a folder or the
EXIT button to return to the Home screen.
Go to pages 28~32 for instructions that explain
how to control playback of videos, music, and
pictures on a USB device.
Videos
Blu-ray
Music
App 1
✎
2.
App 2
App 3
App 4 Opera TV More
Store
Screen Change Function Settings
Mirroring Device
If the pop-up does not appear, go to Method 2.
Use the ▲▼ buttons to select Photos, Videos,
or Music and then press the E button.
Depending on how the contents are arranged,
you will see either folders, individual files, or
both.
27 - English
HT-H5500K_30HK_30K_50K_50WK-M.E.Asia-ENG_0327.indd 27
2014-03-27
2:49:02
Playing Content
Controlling Video Playback
2 Using the disc menu, title menu, popup
menu, and title list
You can control the playback of video content located
on a Blu-ray/DVD disc, USB device, mobile device,
or PC. Depending on the disc or contents, some of
the functions described in this manual may not be
available.
Buttons on the Remote Control used
for Video Playback
DISC MENU
TITLE MENU
0
POPUP
2
1
DISC MENU
During playback, press this button to display the
Disc menu.
TITLE MENU
During playback, press this button to display the
Title menu.
• If your disc has a playlist, press the GREEN (B)
button to go to the playlist.
POPUP MENU
KARAOKE
HOME
During playback, press this button to display the
Popup menu.
REPEAT
3
3 Repeat Playback
1 Playback related buttons
1.
During playback, press the REPEAT button
on the remote control.
The product does not play sound in Search, Slow,
or Step mode.
• To return to normal speed playback, press the
6 button.
2.
Press the ▲▼ buttons to select Off, Title,
Chapter, All or Repeat A-B, and then press
the E button.
6
Starts playback.
5
Stops playback.
7
Pauses playback.
Repeat A-B
1.
Press the E button at the point where you
want repeat play to start (A).
2.
Press the E button at the point where you
want repeat play to stop (B).
During playback, press the 3 or
button.
Each time you press the 3 or button, the playback speed will
change.
3.
To return to normal play, press the REPEAT
button again.
Slow
Motion
Play
In pause mode, press the button.
Each time you press the button,
the playback speed will change.
✎
Step
Motion
Play
In pause mode, press the 7
button.
Each time you press the 7 button,
a new frame appears.
Skip
Motion
Play
During playback, press the 1 or
2 button.
Each time you press the 1 or
2 button, the disc moves to the
previous or next chapter or file.
Fast
Motion
Play
4.
✎
✎
✎
✎
Press the E button.
Depending on the disc, the screen may not
display all repeat options.
The screen may not display Chapter or Title
immediately. Continue to press the ▲▼ buttons
until your choice is inside the applicable field.
To return to normal play, press the REPEAT
button again, press the ▲▼ buttons to select
Off, and then press the E button.
The screen may not display Repeat A-B
immediately. Continue to press the ▲▼ buttons
until Repeat A-B is inside the applicable field.
You must set point (B) at least 5 seconds of
playing time after point (A).
28 - English
HT-H5500K_30HK_30K_50K_50WK-M.E.Asia-ENG_0327.indd 28
2014-03-27
2:49:05
Using the TOOLS Menu
Subtitle
During playback, press the TOOLS button.
Lets you set the desired subtitle language.
Title
Angle
If there is more than one title on a disk or device,
lets you move to or select a desired title.
To view a scene from another angle. The Angle
option displays the number of angles available to
view (1/1, 1/2, 1/3, etc.).
Playing Time
Lets you go to a specific playback point. Use the
numeric buttons to input the playback point.
Repeat Mode
BONUSVIEW Video
BONUSVIEW Audio
Lets you set the desired Bonusview option.
Menu selections that appear only while a file
Lets you repeat a specific title, chapter, or marked
section.
plays
Full Screen
Lets you adjust the audio delay so that the audio
syncs with the video. You can set the delay from
0 to 300 milliseconds.
Lets you set the desired full screen size. You
can select Original, Mode1 (larger), and Mode2
(largest).
Picture Settings
Information
Lets you set the picture mode.
Mode
- User : Lets you adjust the Brightness,
Contrast, Colour, and Sharpness functions
manually.
- Dynamic : Choose this setting to increase
sharpness.
- Normal : Choose this setting for most viewing
applications.
Select to view video file information.
- Movie : This is the best setting for watching
movies.
Menu selections that appear only when a
BD/DVD disc plays
✎
Playing Content
Audio Sync
Depending on the disc or storage device, the
Tools menu may differ. All options may not be
displayed.
Creating a Video Playlist
You can create a playlist of video files in a way that
is nearly identical to the way you create a playlist of
music files. See page 30 for instructions.
Playing a Pre-Recorded
Commercial Audio Disc
1.
Chapter
Lets you move to a chapter that you want to
watch.
Audio
Lets you set the desired audio language.
Insert an Audio CD (CD-DA) or an MP3 Disc into
the disc tray.
• For an Audio CD (CD-DA), the first track will
be played automatically. Tracks on a disc
are played in the order in which they were
recorded on the disc.
• For an MP3 disc, press the ◄► buttons to
select Music, then press the E button.
29 - English
HT-H5500K_30HK_30K_50K_50WK-M.E.Asia-ENG_0327.indd 29
2014-03-27
2:49:07
Playing Content
Pl li
Playlist
Repeat Mode
4
Fast Play (Audio CD [CD-DA] only) :
During playback, press the 3 or button.
Each time you press the 3 or button,
the playback speed will change.
5
7 button : Pauses a track.
6
6 button : Plays the currently selected
track.
0/16
Tools
TRACK 001
Track
Rip
Karaoke Recording
> Move
00:00/00:00
< Adjust
' Return
TRACK 004
04:02
TRACK 005
03:43
TRACK 006
03:40
Repeating Tracks
" Pause
CD
2.
Select
Tools
' Return
To play a particular track, use the ▲▼ buttons on
the remote to select the track, and then press the
E button.
✎
You can set the product to repeat tracks.
1.
During music playback, press the TOOLS
button.
2.
Use ◄► button to select Off, Track or One, All
or Shuffle in Repeat Mode, and then press the
E button.
For more information about playing music, see
Controlling Music Playback below.
Creating a Music Playlist
Controlling Music Playback
1.
If playing music from a commercial CD or DVD,
press the 5 or RETURN button. The Music
List Screen appears. If you are creating a playlist
from music on a user created disk or USB
device, access the Music list as described on
page 26 or 27.
2.
Press the ▲▼◄► buttons to move to a desired
file, and then press the YELLOW (C) button
to select it. Repeat this procedure to select
additional files.
3.
If you want to select all files, press the TOOLS
button, use the ▲▼ buttons to select Select All,
and then press E. If you want to deselect all
files, press the TOOLS button, select Deselect
All, and then press E.
You can control the playback of music content
located on a DVD, CD, USB, mobile device, or
PC. Depending on the disc or contents, some of
the functions described in this manual may not be
available.
Buttons on the Remote Control used
for Music Playback
1
1
2
3
4
5
6
7
8
DISC MENU
9
TITLE MENU
0
POPUP
2
3
1
4
Music
㾎
O
O
5
6
Number buttons : During Playlist playback,
press the desired track number. The
selected track is played.
TRACK 001
1 files selected
TRACK 001
TRACK 002
05:57
04:27
TRACK 003
TRACK 004
04:07
03:41
TRACK 005
TRACK 006
03:17
03:35
TRACK 007
TRACK 008
03:47
03:49
TRACK 009
TRACK 010
03:53
2
Skip : During playback, press the 1 or
2 button to move to the previous or next
music track.
3
5 button : Stops a track.
CD
a Change Device
1/2 Page
03:45
Select
Tools
() Jump to Page
' Return
30 - English
HT-H5500K_30HK_30K_50K_50WK-M.E.Asia-ENG_0327.indd 30
2014-03-27
2:49:09
4.
To remove a file from the Playlist, move to the
file, and then press the YELLOW (C) button.
✎
5.
Press the E button to play the selected files.
The Playlist screen appears.
✎
6.
To go to the Music List, press the 5 or
RETURN button.
7.
✎
✎
To go back to the Playlist, press the E button.
You can create a playlist with up to 99 tracks on
Audio CDs (CD-DA).
If you go to the Music List from the Playlist, and
then return to the Playlist, the Playlist will start
playing again from the beginning.
Ripping encodes music in the .mp3 format at
192kbps.
On the Track list screen, you can choose Select
All or Deselect All.
- Use Select All to select all tracks, and then
press the E button. This cancells your
individual track selections.
- Use Deselect All to deselect all selected tracks
at once.
Playing Photo Contents
You can play photo contents located on a DVD, USB,
mobile device, or PC.
Ripping
Insert a USB device into the USB jack on the
front of the product.
2.
With the Playback screen displayed, use the ▲▼
buttons to select a track, and then press the
YELLOW (C) button. A check appears to the left
of the track.
3.
Repeat Step 2 to select and check additional
tracks.
4.
To remove a track from the list, move to the
track, and then press the YELLOW (C) button
again. The check on the track is removed.
5.
When done, press the TOOLS button.
The Tools menu appears.
6.
Use the ▲▼ buttons to select Rip, and then
press the E button. The Rip screen appears.
7.
Use the ▲▼ buttons to select the device to
store the ripped files on, and then press the E
button.
Do not disconnect the device while ripping is in
progress.
8. If you want to cancel ripping, press the E
button and then select Yes. Select No to
continue ripping.
When ripping is complete, the "Ripping
completed." message appears.
This function is not available for DTS Audio CDs.
This function may not be supported by some
discs.
Start / Stop Slide Show
Select to play/pause the slide show.
Slide Show Speed
Select to adjust the slide show speed.
Background Music
Select to listen to music while viewing a slide show.
Select to enlarge the current picture.
(Enlarge up to 4 times)
Rotate
Select to rotate a picture. (This will rotate the
picture either clockwise or counter clockwise.)
Information
Shows the picture information including the name
and size, etc.
✎
10. Press the E button to go back to the Playback
screen.
✎
✎
During playback, press the TOOLS button.
Zoom
✎
9.
Using the Tools Menu
Playing Content
1.
✎
Depending on the disc or storage device, the
Tools menu may differ. All options may not be
displayed.
To enable the background music function, the
photo file must be in the same storage media as
the music file. However, the sound quality can be
affected by the bit rate of the MP3 file, the size of
the photo, and the encoding method.
31 - English
HT-H5500K_30HK_30K_50K_50WK-M.E.Asia-ENG_0327.indd 31
2014-03-27
2:49:13
Playing Content
• After you press the TUNER MEMORY button,
NUMBER disappears from the display and the
station is stored in memory.
Creating a Photo Playlist
You can create a photo playlist in nearly the same
way you create a music playlist. See page 30 for
instructions. Select photo files instead of music files.
5.
To preset another station, repeat steps 2 to 4.
• To tune in to a preset station, press the
TUNING UP, DOWN button.
Listening to the Radio
Using Karaoke
• To listen to the radio, you must connect the
supplied FM antenna.
You can enjoy the Karaoke with music.
1.
Connect the microphone on the front of the
product.
2.
In the Home menu, select the Settings, and
then press the E button.
3.
Select the Audio, and then press the E
button.
4.
Select My karaoke, and then press the E
button.
• You can check the Karaoke score and adjust
the volume of playback music's vocal.
• Your Karaoke score is automatically displayed
if Karaoke scoring is set to On and a
microphone is connected. If you don't want to
see the score, set Karaoke scoring to Off.
• If you want to decrease the volume of the
vocals in the original sound, select Reduce
Vocals in My karaoke settings.
Operating the Radio with the Remote Control
1.
Press the FUNCTION button to select FM.
2.
Tune to the desired station.
• Preset Tuning 1 : Press the 5 button to
select PRESET, and then press the TUNING
UP, DOWN button to select a preset station.
- Before you can tune to preset stations, you
must add preset stations to the product's
memory. See Presetting Stations below.
• Manual Tuning : Press the 5 button to
select MANUAL, and then press the TUNING
UP, DOWN button to tune in to a lower or
higher frequency.
• Automatic Tuning : Press the 5 button to
select MANUAL, and then press and hold the
TUNING UP, DOWN button to automatically
search the band.
Setting Mono/Stereo
Recording
You can make a recording of karaoke with music.
Press the MO/ST button.
• Each time you press the button, the sound
switches between STEREO and MONO.
• In a poor reception area, select MONO for a clear,
interference-free broadcast.
1.
During the playback, press the TOOLS button to
select Karaoke Recording, and then press E
button.
2.
Press 5 button if you want to finish recording.
3.
When recording is done, KARAOKE folder is
created in the USB storage driver and saved as
the form of KARAOKE.mp3.
To save recording file, USB storage driver must be
inserted.
Recording file is shown if you re-entry to Photos,
Videos, and Music.
If you hear strange noises (squealing or howling)
while using the Karaoke feature, move the
microphone away from the speakers. Turning
down the microphone's volume or the speaker
volume is also effective.
Presetting Stations
Example : Presetting FM 89.10 into memory.
1.
Press the FUNCTION button to select FM.
✎
2.
Press the TUNING UP, DOWN button to select
<89.10>.
✎
3.
Press the TUNER MEMORY button.
• NUMBER flashes on the display.
Press the TUNER MEMORY button again.
• Press the TUNER MEMORY button before
NUMBER disappears from the display on its
own.
✎
4.
32 - English
HT-H5500K_30HK_30K_50K_50WK-M.E.Asia-ENG_0327.indd 32
2014-03-27
2:49:14
✎
✎
✎
The microphone does not operate in the D. IN,
AUX, FM and BT mode.
The karaoke scoring displays the score
automatically when the Karaoke scoring is set to
On and a microphone is connected. Disconnect
the microphone if you do not want to display the
score.
The mic becomes available 10 seconds after the
Home menu appears on the screen.
To Connect the Home Cinema to a Bluetooth
Device
Connect
Using Bluetooth
Bluetooth device
You can use a Bluetooth device to enjoy music with
high quality stereo sound, all without wires!
What is Bluetooth?
1.
Press the FUNCTION button on the remote
control to display the BT message.
2.
Select the Bluetooth menu on the Bluetooth
device you want to connect. For instructions,
refer to the Bluetooth device's manual.
3.
Select the Stereo headset menu on the
Bluetooth device.
• You will see a list of devices.
4.
Select "[HTS]HXXXXX" from the searched list.
• When the Home Cinema is connected to the
Bluetooth device, the device name of the
connected Bluetooth device, followed by the
name of home cinema will appear on the front
display of home cinema.
5.
Play music on the connected device.
• You can listen to the music playing on the
connected Bluetooth device over the Home
Cinema system.
✎
The Home Cinema only supports Middle
Quality SBC data (up to 237kbps@48kHz),
and does not support High Quality SBC data
([email protected]).
The AVRCP feature is supported. It's functionality
will differ, depending on the specifications of the
connected device.
Connect only to a Bluetooth device that supports
the A2DP Profile.
Only one Bluetooth device can be paired at a
time.
The search or connection functions may not work
properly in the following cases:
- If there a strong electric field near or around the
home cinema.
- If several Bluetooth devices are simultaneously
paired with product.
✎
✎
✎
✎
Playing Content
Bluetooth is a technology that enables Bluetoothcompliant devices to interconnect with each other
easily using a short, wireless connection.
• A Bluetooth device may hum or malfunction:
- When a part of your body is in contact with the
receiving/transmitting system of the Bluetooth
device or the Home Cinema.
- When it is subject to electrical variation from
obstructions caused by a wall, corner, or office
partitioning.
- When it is exposed to electrical interference from
same frequency-band devices including medical
equipment, microwave ovens, and wireless
LANs.
• Pair the Home Cinema with the Bluetooth device
while the two are close together.
• The further the distance is between the Home
Cinema and the Bluetooth device, the worse the
quality is.
If the distance exceeds the Bluetooth operational
range, the connection is lost.
• In poor reception-sensitivity areas, the Bluetooth
connection may not work properly.
• The Home Cinema has an effective reception range
of up to 10 meters in all directions if there are no
obstacles. The connection will be automatically
cut off if the device is out of this range. Even within
this range, the sound quality may be degraded by
obstacles such as walls or doors.
• This wireless device may cause electrical
interference. during its operation.
Before you begin, confirm that the Bluetooth device
supports the Bluetooth compliant stereo headset
function.
33 - English
HT-H5500K_30HK_30K_50K_50WK-M.E.Asia-ENG_0327.indd 33
2014-03-27
2:49:16
Playing Content
- If the Bluetooth device is turned off, not in
place, or malfunctions.
- Note that such devices as microwave ovens,
wireless LAN adapters, fluorescent lights, and
gas stoves use the same frequency range as
the Bluetooth device, and can cause electric
interference.
✎
For the good compatibility of Bluetooth or any
other devices like Mobile Phone, we recommend
you update the device's lastest version.
To Disconnect the Bluetooth Device from the
Home Cinema
You can disconnect the Bluetooth device from the
Home Cinema. For instructions, refer to the Bluetooth
device's manual.
• When the Home Cinema is disconnected from the
Bluetooth device, the Home Cinema will display
DISCONNECTED on the front display.
Bluetooth Device
Press the (
) button on the front panel of the Home
Cinema to switch from BT to another mode or turn
off the Home Cinema.
• Except when you disconnect the Home Cinema
by changing functions, the connected Bluetooth
device will wait a certain time for a response
from the Home Cinema before terminating the
connection. (Disconnection time may differ,
depending on the Bluetooth device.)
✎
Quick start function is available when AC Power
Cord is connected to AC Source.
✎
To use this function, set Settings > System >
Quick start to On.
✎
To use this function, Bluetooth connection
between the Home cinema and your smart device
should have been established before. In other
words, the Home cinema should be found from
the list of known Bluetooth devices of your smart
device.
1. Connect your smart device to the product
via Bluetooth. (For information on Bluetooth
connections, refer to your smart device’s
manual.)
2.
Once connected, the home cinema will turn itself
on automatically in BT mode.
• Select the desired music to play on your smart
device.
Using NFC (Near Field Communication)
To Disconnect the Home Cinema from the
✎
✎
In Bluetooth connection mode, the Bluetooth
connection will be lost if the distance between the
Home Cinema System and the Bluetooth device
exceeds 10 meters. When the Bluetooth device
comes back into effective range or you restart the
Bluetooth device, you have to pair the device and
home cinema again to reconnect.
In Bluetooth mode, the screen saver will start if
the Bluetooth device stays in the Ready state for
5 minutes. To reconnect the Bluetooth device,
turn off the screen saver, and then connect the
device. To turn off the screen saver, press any
button on the remote control (the Volume button,
a number button, etc.)
Connect your NFC compatible device via Bluetooth to
the Home Cinema using this simple set-up procedure.
You can play music from the smart phone through the
Home Cinema.
1.
Turn on the NFC function on the smart phone
and make sure the screen lock function on the
smart phone is off. The smart phone's NFC
function will not work if screen lock is on.
2.
Gently touch the NFC logo
on the top of the
Home Cinema with the NFC supported device.
3.
A pop-up asking whether to proceed with the
Bluetooth connection appears on the smart
phone. Select 'Yes'.
• When the connection is complete, the
'connected' message appears.
4.
To disconnect the NFC device, touch the device
to the Home Cinema's top panel again.
• To connect another NFC device while the first
smart phone is still connected, touch that
device to the Home Cinema's top panel. The
Home Cinema will disconnect the first smart
phone and connect to the second smart
phone.
Using the Bluetooth Power On
When the home cinema is turned off, connecting
your smart device to the product via a Bluetooth
connection can turn the home cinema on.
34 - English
HT-H5500K_30HK_30K_50K_50WK-M.E.Asia-ENG_0327.indd 34
2014-03-27
2:49:18
The NFC function is built into Android devices
running Android OS 4.1 Jellybean or later.
- If your device is running an Android OS earlier than
Android OS 4.1 Jellybean, you must download
the 'Samsung NFC Connection' application from
Android market to use the NFC function.
✎
The position of the NFC antenna differs on smart
phones. Check where the NFC antenna is located
before connecting. Refer to the user manual
of your mobile phone to check the antenna’s
location before making the connection.
If your smart phone is covered with a thick case,
the connection may not succeed.
NFC connection works even when the Home
Cinema is turned off, if Quick start is set to On.
However, NFC connection will work only after the
Home Cinema is turned on if the power cord had
been disconnected and reconnected.
✎
✎
✎
✎
✎
4.
Press the TV SOUND button again to turn
TV SOUND off.
• When TV SOUND is off, TV audio outputs
through the speakers of the connected
Anynet+ TV.
Use TV SOUND:
1) When you want to listen to the TV's audio
through the home cinema speakers.
2) When you want to listen to the audio from a
USB device plugged into the TV through the
home cinema speakers.
TV SOUND ON/OFF support specifications:
Anynet+
(HDMI-CEC)
Setting
The
is a trademark or
registered trademark of NFC
Note2
Forum, Inc. in the United States
and in other countries.
S3/S4
NFC tagging for Bluetooth
connection cannot be established
Note3
while powering on and off.
NFC tagging for Bluetooth
connection will not work while the battery
indicator is blinking.
ON
OFF
No Operation
Using the Special Effects Remote
Control Buttons
TV Sound ON
TV Sound OFF
HTS Speaker
Output
HTS Speaker
Mute
TV Speaker
Mute
TV Speaker
Output
HTS Speaker
Output
HTS Speaker
Mute
TV Speaker
Output
TV Speaker
Output
HTS Speaker
Output
HTS Speaker
Mute
TV Speaker
Output
TV Speaker
Output
Playing Content
✎
DSP/EQ
DSP/EQ
TV SOUND
TV SOUND
If you have a TV that supports Anynet+ (HDMICEC), the TV SOUND button lets you direct the
TV's audio to the Home Cinema Speakers or the TV
Speakers. To use, follow these steps:
1.
Connect an HDMI cable to the TV and home
cinema. (See page 13)
2.
Set Anynet+ (HDMI-CEC) On in the home
cinema and TV.
3.
Press the TV SOUND button on the remote
control. TV SOUND ON flashes on the display
on the front panel, and then changes to D. IN.
• When TV SOUND is on, TV audio outputs
through the Home Cinema speakers.
You can enjoy various sound mode.
DSPOFF : Select for normal listening.
CINEMA : Reproduces realistic and powerful
sound for movie sources.
MUSIC : Suitable for whole music sources.
GAME : Suited for playing video games and
produces powerful sound.
M-STEREO (Multi Stereo) : Produces
surround sound for 2 channel input sources.
POWER BASS : Reinforce bass sound effect.
LOUD : Improves bass sound characteristics
according to output level.
NIGHT : Optimizes to night by compress
dynamic range (soft sound).
LOCAL EQ : It provides a unique EQ curve for
fitting to local music.
35 - English
HT-H5500K_30HK_30K_50K_50WK-M.E.Asia-ENG_0327.indd 35
2014-03-27
2:49:21
Network Services
Using BD-LIVE™
3.
On your home cinema, select Change Device.
4.
Use the ▲% button to select your PC in the
Device List.
1.
Connect the product to the network.
(See page 14)
5.
Select the kind of file you want to view or play,
Photos, Videos, or Music and then press E.
2.
Configure the network settings.
(See pages 20~22)
6.
Once the product is connected to your network, you
can enjoy various movie-related service contents
available on BD-LIVE compliant discs.
Use the ▲%◄► button to select the folder with
the kind of files you selected, and then press E.
The File List is displayed.
7.
Select the file you want to view or play, and then
press E.
1.
✎
You can create Playlists from files on your PC in
the same way you create playlists from files on
USB devices and discs.
With a few exceptions, you can control the
playback of files on your PC in the same fashion
you control the playback of files on USB devices
and discs.
You can also access files on your PC by first
selecting Photos, Videos, or Music on the Home
screen, and then selecting your PC from the
device list that appears.
Attach a USB memory stick to the USB jack on
the front of the product, and then use BD Data
Management to check its remaining memory.
The memory device must have at least 1GB
of free space to accommodate the BD-LIVE
services.
2.
Select Settings on the Home screen, and then
press the E button.
3.
Select System, and then press the E button.
4.
Select BD Data Management, and then press
the E button.
5.
Select Change Device, and then press the E
button.
6.
Select USB DISK, and then press the E
button.
7.
Insert a Blu-ray Disc that supports BD-LIVE.
8.
Select an item from the list of BD-LIVE service
contents provided by the disc manufacturer.
✎
The way you use BD-LIVE and the provided
contents may differ, depending on the disc
manufacturer.
Using DLNA
DLNA lets you access and play files located on your
PC through your home cinema.
Follow the directions in the DLNA user's guide to set
up DLNA on your PC and to tag folders and files you
want to share with the home cinema.
To access and play files located on your PC after you
have setup DLNA, follow these steps:
1.
Turn on your PC, your TV, and the home cinema.
2.
Make sure the DLNA Shared server is running
on your PC.
✎
✎
Apps
Your home cinema offers an extensive collection of
news, movies, weather, and other content you can
download directly to and enjoy on your home cinema.
First, check the network and make sure the home
cinema is connected to the Internet. Your home
cinema must be connected to the Internet to use the
Apps feature.
The apps offered through the Apps feature work
much like their on-line versions or, if different, are easy
to use.
The apps require you to create accounts before you
can use them. Although you can create an account
at most of these sites through your home cinema, it is
easier and quicker to create an account by visiting the
sites on line using a PC, laptop, or tablet with Internet
access. Note that in some cases, you will need to
use the home cinema and a PC, laptop, or tablet to
establish an account. The main difference between
the regular on-line versions and the versions you can
access through your home cinema is that with the
home cinema versions, you use your remote to enter
letters and numbers as opposed to a keyboard.
36 - English
HT-H5500K_30HK_30K_50K_50WK-M.E.Asia-ENG_0327.indd 36
2014-03-27
2:49:24
Using Apps
Using Opera TV Store
The first time you access any one of the apps, the
home cinema displays two agreements. You must
accept both agreements to download and use any
apps.
By default, the home cinema displays four popular
apps on the Home screen. You can view more apps
and change the apps the home cinema displays on
the Home screen by selecting the More button.
To start an app, highlight the app, double click it, and
then follow the directions displayed on the screen.
At the Opera TV Store, you will find high-quality
Internet video streaming, social network, and music
streaming services.
Accessing Opera TV Store
To access Opera TV Store, select the Opera TV
Store button on the Home screen, and then press
the E button.
To exit the Opera TV Store screen, press the EXIT or
RETURN button on your remote.
Viewing Additional Apps
1.
Select the More button on the Home screen,
and then press the E button. The More Apps
screen appears displaying a bank of apps.
To view additional apps, move the highlight
to the right or left until another group of apps
appears.
3.
To exit the More Apps screen, select Close or
press the RETURN button or EXIT button on
your remote.
Changing the Apps Displayed on the Home
Screen
1.
Select the More button, and then press the E
button.
2.
Select the Edit button on the More Apps screen,
and then press the E button.
3.
Apps that the home cinema displays on the
Home page are marked with a check. Deselect
apps you want to remove from the Home screen
by highlighting each app, and then pressing the
E button.
4.
Select apps by highlighting each app, and then
pressing the E button. A check mark appears
on each app you select. You can have up to four
apps selected at a time.
5.
When done, select OK, and then press the E
button. The Home screen re-appears.
✎
To exit an application, press the EXIT button on
your remote.
To delete the login information for all Apps, press
the 5 button for 5 seconds or more.
✎
When the Opera TV Store screen appears, it displays
a bank of assorted apps. Use the ▲%◄► buttons
on your remote to move the highlight from app to
app.
Selecting an App
Move the highlight to the app you want, and then
press the E button.
In the pop-up that appears, select OPEN to open the
app immediately or ADD TO MY APPS to add the
app to My Apps. Press the RETURN button on your
remote to go back to the Opera TV Store screen.
Network Services
2.
Navigating in Opera TV Store
Selecting Apps by Category
To make searching for apps easier, you can view
apps by categories such as Popular, Watch, Listen,
Play, etc.
To select a category, use the ▲ button on your
remote to move the highlight to the top of the screen.
Then, use the◄► buttons to select a category.
Using the My Apps Screen
To access the My Apps screen, highlight MY APPS,
and then press the E button. The My Apps screen
appears displaying all the apps you have saved with
the My Apps designation.
Deleting Apps from My Apps
1.
Highlight the MENU button on the top of the My
Apps screen, and then press the E button on
your remote.
37 - English
HT-H5500K_30HK_30K_50K_50WK-M.E.Asia-ENG_0327.indd 37
2014-03-27
2:49:25
Network Services
2.
Select REMOVE APPS in the menu, and then
press the E button. A red rectangle appears
around one of the apps.
3.
Move the rectangle to the app you want to
delete, and then press the E button.
4.
Repeat this process to delete additional apps.
5.
When finished, select DONE, and then press the
E button.
6.
Press the RETURN button to go back to the
Main screen.
• The Home Cinema can connect to devices
that support AllShare Cast. Note that all
devices that have AllShare Cast may not
be fully supported, depending on the
manufacturer. For further information on
mobile connection support, refer to the
manufacturer’s web site.
• Bluetooth transmissions can interfere with
the Screen Mirroring signal. Before using
the Screen Mirroring function, we strongly
recommend that you turn off the Bluetooth
function on your smart phone or smart device.
Searching for Apps
1.
Select SEARCH at the top of the screen, and
then press the E button.
2.
To search quickly for popular items, click one of
the popular search tabs at the top of the screen.
3.
To search for an app by name, enter the app
name using the onscreen keyboard. Opera TV
Store will search as you type and display apps
with names that match the letters you enter.
• To cancel a current search, press the
RETURN button on your remote or select
BACK on the screen, and then press E.
Screen Mirroring
Screen Mirroring lets you display the screen of a
smart phone or other compatible device on the TV
screen using Miracast™ technology. Manual Screen
Mirroring does not require a cable or a wireless router.
1.
From the Home screen, use the ◄► buttons to
select Screen Mirroring, and then press E.
2.
Launch AllShare Cast on your smart phone or
device.
3.
On your device, find the name of the home
cinema system in the list of available devices,
and then select it.
4.
The TV displays a connecting message (for
example, Connecting to Android_92gb...) and
then displays the connected message.
5.
In a few moments, the screen of your device
appears on the TV screen.
• When you are using the Screen Mirroring
function, video stuttering or audio dropouts
may occur, depending on your environment.
38 - English
HT-H5500K_30HK_30K_50K_50WK-M.E.Asia-ENG_0327.indd 38
2014-03-27
2:49:27
Appendix
Additional Information
Digital Output
Notes
Connections
HDMI OUT
• Certain HDMI output resolutions may not work,
depending on your TV.
• You must have an HDMI connection to enjoy videos
with 3D technology.
• A long HDMI cable may cause screen noise. If this
occurs, set HDMI Deep Colour to Off in the menu.
Settings
3D Settings
TV Aspect Ratio
• Depending on the disc type, some aspect ratios
may not be available.
• If you select an aspect ratio and option which is
different than the aspect ratio of your TV screen, the
picture might appear to be distorted.
• If you select 16:9 Original, your TV may display 4:3
Pillarbox (black bars on the sides of the picture).
BD Wise (Samsung Products only)
• When BD Wise is on, the Resolution setting
automatically defaults to BD Wise and BD Wise
appears in the Resolution menu.
• If the product is connected to a device that does
not support BD Wise, you cannot use the BD Wise
function.
• For proper operation of BD Wise, set the BD Wise
option in both the product and the TV to On.
BD-Live Internet Connection
• The Internet connection may be restricted while you
are using BD-LIVE contents.
Anynet+ (HDMI-CEC)
• Depending on your TV, certain HDMI output
resolutions may not work. Please refer to the user
manual of your TV.
• This function is not available if the HDMI cable does
not support CEC.
• If your Samsung TV has an Anynet+ logo, then it
supports the Anynet+ function.
Appendix
• For some 3D discs, to stop a movie during 3D
playback, press the 5 button once. The movie
stops and the 3D mode option is de-activated.
To change a 3D option selection when you are
playing a 3D movie, press the 5 button once. The
Blu-ray menu appears. Press the 5 button again,
then select 3D Settings in the Blu-ray menu.
• Depending on the content and the position of the
picture on your TV screen, you may see vertical
black bars on the left side, right side, or both sides.
• Be sure to select the correct Digital Output or you
will hear no sound or just loud noise.
• If the HDMI device (AV receiver, TV) is not
compatible with compressed formats (Dolby Digital,
DTS), the audio signal outputs as PCM.
• Regular DVDs do not have BONUSVIEW audio and
Navigation Sound Effects.
• Some Blu-ray Discs do not have BONUSVIEW
audio and Navigation Sound Effects.
• This Digital Output setup does not affect the
analogue (L/R) audio or HDMI audio output to your
TV.
It affects the optical and HDMI audio output when
your product is connected to an AV receiver.
• If you play MPEG audio soundtracks, the audio
signal outputs as PCM regardless of your Digital
Output selections (PCM or Bitstream).
• Digital Output can be activated when Speaker
Selection is set to TV Speaker.
BD Data Management
• In the external memory mode, disc playback may
be stopped if you disconnect the USB device in the
middle of playback.
• Only those USB devices formatted in the FAT file
system (DOS 8.3 volume label) are supported.
We recommend you use USB devices that support
the USB 2.0 protocol with 4 MB/sec or faster read/
write speeds.
• The Resume Play function may not work after you
format the storage device.
• The total memory available to BD Data
Management may differ, depending on conditions.
DivX® Video On Demand
• For more information about DivX(R) VOD, visit
“http://vod.divx.com”.
39 - English
HT-H5500K_30HK_30K_50K_50WK-M.E.Asia-ENG_0327.indd 39
2014-03-27
2:49:30
Appendix
Speaker Settings
Playing JPEG files
• When Speaker Selection is set to TV Speaker,
audio is produced by the TV speakers.
• You can’t enlarge the subtitle and PG graphics in
the full screen mode.
HDMI audio
Playing Content
• When HDMI audio is output to the TV speakers, it is
automatically down-mixed to 2 channels.
Audio Return Channel
• When Anynet+ (HDMI-CEC) is Off, the Audio
Return Channel function is not available.
• Using an HDMI cable not certified for ARC (Audio
Return Channel) may cause a compatibility problem.
• The ARC function is only available if an ARCcompliant TV is connected.
Playback
Using the TOOLS button while playing pictures
• If the home cinema is connected to a BD Wise
compliant TV that has BD Wise On, the Picture
Settings menu will not appear.
• The Background Music function will not work
unless the music file and the photo file are located
on the same storage media. Also, sound quality can
be impacted by the bit rate of the MP3 music file,
the size of the photos, and the encoding method.
Disk and Format Compatibility
Playing Video files
Disc types and content your Product
can Play
• Video files with high bit rates of 20Mbps or more
strain the product’s capabilities and may stop
playing during playback.
Media
Selecting the Audio Language
• The ◄► indicator will not appear on the screen
if the BONUSVIEW section does not contain any
BONUSVIEW audio settings.
• The languages available through the Audio
Language function depend on the languages that
are encoded on the disc. This function or certain
languages may not be available.
• Some Blu-ray Discs may allow you to select either
the PCM or Dolby Digital audio English soundtrack.
Disc Type
Blu-ray Disc BD-ROM or BD-RE/-R
disc recorded in the BD3D Blu-ray Disc RE format.
DVD-VIDEO,
DVD-RW,
DVD-R,
DVD+RW,
DVD+R
DVD-VIDEO, recorded
DVD+RW/DVD-RW(V)/
DVD-R/+R discs that
have been recorded and
finalised, or a USB storage
media containing DivX,
MKV, MP4 contents.
MUSIC
CD-RW/-R,
DVD-RW/-R,
BD-RE/-R
Music recorded on CDRW/-R, DVD-RW/-R, BDRE/-R discs or a USB
storage media containing
MP3 or WMA contents.
PHOTO
CD-RW/-R,
DVD-RW/-R,
BD-RE/-R
Photos recorded on CDRW/-R, DVD-RW/-R, BDRE/-R discs or a USB
storage media containing
JPEG contents.
VIDEO
Selecting the Subtitle Language
• Depending on the Blu-ray Disc / DVD, you may be
able to change the subtitle language in the Disc
Menu. Press the DISC MENU button.
• This function depends on the selection of subtitles
that are encoded on the disc and may not be
available on all Blu-ray Discs/DVDs.
• Information about the main feature BONUSVIEW
mode will also appear if the Blu-ray Disc has a
BONUSVIEW section.
• This function changes both the primary and
secondary subtitles at the same time.
• The total number of primary and secondary
subtitles, respectively, is displayed.
Details
✎
The product may not play certain CD-RW/-R and
DVD-R because of the disc type or recording
conditions.
40 - English
HT-H5500K_30HK_30K_50K_50WK-M.E.Asia-ENG_0327.indd 40
2014-03-27
2:49:33
✎
✎
✎
✎
✎
If a DVD-RW/-R disc has not been recorded properly
in DVD video format, it will not be playable.
Your product will not play content that has been
recorded on a DVD-R at a bit rate that exceeds 10
Mbps.
Your product will not play content that has been
recorded on a BD-R or USB device at a bit rate that
exceeds 30 Mbps.
Playback may not work for some types of discs, or
when you use specific operations, such as angle
change and aspect ratio adjustment. Information
about the discs is written in detail on the disc box.
Please refer to this if necessary.
When you play a BD-J title, loading may take longer than
a normal title or some functions may perform slowly.
Logos of Discs the Product can Play
Blu-ray Disc
3D Blu-ray Disc
BD-LIVE
Dolby
DTS
Java
PAL broadcast system in U.K,
France, Germany, etc.
DivX
Disc Types your Product cannot Play
✎
✎
✎
✎
• DVD-RAM
• Super Audio CD
(except CD layer)
• 3.9 GB DVD-R Disc for
Authoring.
This product may not respond to all operating
commands because some Blu-ray Disc, DVD, and
CD discs allow specific or limited operation and
provide only certain features during playback.
Please note that this is not a defect in the product.
Samsung cannot guarantee that this product will
play every disc bearing the Blu-ray Disc, DVD, or CD
logo because disc formats evolve, and problems and
errors may occur during the creation of Blu-ray Disc,
DVD, and CD software and/or the manufacture of
discs.
Please contact the SAMSUNG Customer Care
Centre at, if you have questions or encounter difficulty
when playing Blu-ray Disc, DVD, or CD discs in this
product. Also, refer to rest of this user manual for
additional information on playback restrictions.
Some commercial discs and DVD discs purchased
outside your region may not play on this product.
Appendix
• HD DVD
• DVD-ROM/PD/MV-Disc,
etc
• DVD-RW(VR mode)
• CVD/CD-ROM/CDV/
CD-G/CD-I/LD
(CD-Gs play audio only,
not graphics.)
Region Code
Both products and discs are coded by region. These
regional codes must match for a disc to play. If the codes
do not match, the disc will not play.
The Region Number for this product is displayed on the
rear panel of the product.
Disc
Type
Blu-ray
Disc
Region
Code
Area
A
North America, Central America,
South America, Korea, Japan,
Taiwan, Hong Kong and South
East Asia.
B
Europe, Greenland, French
territories, Middle East, Africa,
Australia and New Zealand.
C
India, China, Russia, Central
and South Asia.
41 - English
HT-H5500K_30HK_30K_50K_50WK-M.E.Asia-ENG_0327.indd 41
2014-03-27
2:49:34
Appendix
1
The U.S., U.S. territories and
Canada
2
Europe, Japan, the Middle East,
Egypt, Africa, Greenland
3
Taiwan, Korea, the Philippines,
Indonesia, Hong Kong
4
Mexico, South America,
Central America, Australia,
New Zealand, Pacific Islands,
Caribbean
5
Russia, Eastern Europe, India,
North Korea, Mongolia
6
China
DVDVIDEO
✎
If the Region number of a Blu-ray Disc/DVD does
not correspond to the Region number of this
product, the product cannot play the disc.
AVCHD (Advanced Video Codec High
Definition)
• This product can play back AVCHD format discs.
These discs are normally recorded and used in
camcorders.
• The AVCHD format is a high definition digital video
camera format.
• The MPEG-4 AVC/H.264 format compresses images
with greater efficiency than the conventional image
compressing format.
• Some AVCHD discs use the "x.v.Colour" format. This
product can play back AVCHD discs that use the
"x.v.Colour" format.
• "x.v.Colour" is a trademark of Sony Corporation.
• "AVCHD" and the AVCHD logo are trademarks of
Matsushita Electronic Industrial Co., Ltd. and Sony
Corporation.
✎
✎
✎
✎
Some DivX, MKV and MP4 format discs may not play,
depending on their video resolution and frame rate.
Supported Formats
Notes on the USB connection
• Your product supports USB storage media, MP3
players, digital cameras, and USB card readers.
• The product does not support folder or file names
longer than 128 characters.
• Some USB/digital camera devices may not be
compatible with the product.
• Your product supports the FAT 16, FAT 32, and NTFS
file systems.
• Connect USB devices directly to the product’s USB
port. Connecting through a USB cable may cause
compatibility problems.
• Inserting more than one memory device into a
multi-card reader may cause the reader to operate
improperly.
• The product does not support the PTP (Peer to Peer)
protocol.
• Do not disconnect a USB device while it is transferring
or recording data.
• The bigger the image resolution, the longer the image
takes to display.
• This product cannot play MP3 files with DRM (Digital
Rights Management) downloaded from commercial
sites.
• Your product only supports video that is under 30fps
(frames per second).
• Your product only supports USB Mass Storage Class
(MSC) devices such as thumb drives and USB HDD.
(HUB is not supported.)
• Certain USB HDD Devices, multi-card readers and
thumb drives may not be compatible with this product.
• If some USB devices require excessive power, they
may be limited by the circuit safety device.
• If playback from a USB HDD is unstable, provide
additional power by plugging the HDD into a wall
socket. If the problem continues, contact the USB
HDD manufacturer.
• SAMSUNG is not responsible for any data file damage
or data loss.
Some AVCHD format discs may not play, depending
on the recording conditions.
AVCHD format discs need to be finalised.
"x.v.Colour" offers a wider colour range than normal
DVD camcorder discs.
42 - English
HT-H5500K_30HK_30K_50K_50WK-M.E.Asia-ENG_0327.indd 42
2014-03-27
2:49:39
Video File Support
File Extension
Container
Video Codec
Audio Codec
*.avi
AVI
DivX 3.11/4/5/6
MP4v3
H.264 BP/MP/HP
Resolution
MP3, Dolby Digital, DTS,
WMA, PCM
*.mkv
MKV
VC-1 AP, DivX 5/6
H.264 BP/MP/HP
MP3, Dolby Digital, DTS
*.wmv
WMV (wmv9)
VC-1 AP, VC-1 SM
WMA
*.mp4
MP4
MP4 (mp4v)
H.264 BP/MP/HP
AAC
*.mpg / *.mpeg
PS
MPEG1
MPEG2
H.264 BP/MP/HP
MP1, 2
Dolby Digital, DTS
1920x1080
Limitations
-
Even when a file is encoded by a supported codec listed above, the file might not play if its content has a problem.
Normal playback is not guaranteed if the file’s container information is wrong or the file itself is corrupted.
Files having a higher bit rate/frame rate than standard may stutter during sound/video playback.
The Seek (skip) function is not available if the file’s index table is damaged.
Appendix
Video decoder
- Supports up to H.264 Level 4.1 and AVCHD
- Does not support H.264 FMO/ASO/RS and VC1 SP/MP/AP L4
- MPEG4 SP, ASP : Below 1280 x 720 : 60 frames max
Above 1280 x 720 : 30 frames max
- Does not support GMC 2 or higher
Audio decoder
- Supports WMA 7, 8, 9 and STD
- Does not support WMA sampling rate of 22050Hz mono.
- AAC: Max sampling rate: 96Khz (8, 11, 12, 16, 22,24, 32,44.1, 48, 64, 88.2, 96) Max bit rate: 320kbps
Supported DivX subtitle file formats
- *.ttxt, *.smi, *.srt, *.sub, *.txt
Music File Support
File Extension
Container
Audio Codec
*.mp3
MP3
MP3
-
WMA
* Sampling rates (in kHz) - 8, 11, 16, 22, 32, 44.1, 48
* Bit rates - All bit rates from 5kbps to 384kbps
*.wma
WMA
Support Range
Picture File Support
File Extension
Type
*.jpg / *.jpeg / *.jpe
JPEG
*.png
PNG
Resolution
15360x8640
43 - English
HT-H5500K_30HK_30K_50K_50WK-M.E.Asia-ENG_0327.indd 43
2014-03-27
2:49:44
Appendix
Digital Output Selections
Setup
Bitstream
(Unprocessed)
PCM
Connection
PCM
Audio
Stream on
Blu-ray Disc
Up to PCM 7.1ch
Dolby Digital
Plus
Dolby Digital Plus
Dolby TrueHD
Dolby TrueHD
Up to PCM 5.1ch
DTS re-encoded
Re-encoded
Dolby Digital *
PCM 2ch
PCM 2ch
PCM 2ch
Dolby Digital
Dolby Digital
Dolby Digital
DTS
DTS
DTS
DTS
DTS-HD High
Resolution
Audio
DTS-HD High
Resolution Audio
DTS-HD Master
Audio
DTS-HD Master
Audio
PCM 2ch
Dolby Digital
Up to PCM 5.1ch
DTS
Definition for
Blu-ray Disc
PCM
Dolby Digital
PCM
Audio
Stream on
DVD
Bitstream
(Re-encoded
Dolby D)
HDMI supported AV receiver
Dolby Digital
DTS
Bitstream
(Re-encoded DTS)
Any
Decodes the
main feature
Decodes the main
audio and
Outputs only the
feature audio and
BONUSVIEW
main feature audio
Decodes the main
audio stream
stream so that your BONUSVIEW audio
feature audio and
stream together
together into
AV receiver can
BONUSVIEW audio
into PCM audio and PCM audio and
decode the audio
stream together
adds Navigation
adds Navigation
bitstream.
into PCM audio and
You will not hear
Sound Effects, then Sound Effects,
adds Navigation
BONUSVIEW audio
re-encodes the
then re-encodes
Sound Effects.
or Navigation Sound PCM audio into DTS the PCM audio
Effects.
bitstream.
into Dolby Digital
bitstream or
PCM.
If the Source Stream is 2ch or mono, "Re-encoded Dolby D" Setting are not applied. Output will be PCM 2ch.
Blu-ray Discs may include three audio streams :
- Main Feature Audio : The audio soundtrack of the main feature.
- BONUSVIEW audio : An additional soundtrack such as the director or actor’s commentary.
- Navigation Sound Effects : When you choose some menu navigation options, Navigation Sound Effects may sound.
Navigation Sound Effects are different on each Blu-ray Disc.
44 - English
HT-H5500K_30HK_30K_50K_50WK-M.E.Asia-ENG_0327.indd 44
2014-03-27
2:49:45
Resolution according to the output mode
Blu-ray Disc/E-contents/Digital Contents playback
DVD playback
HDMI Mode
Output
Setup
BD Wise
E-contents/
Digital contents
HDMI Mode
Blu-ray Disc
Resolution of Blu-ray
Disc
1080p@60F
480i
Auto
Max. Resolution of TV input
1080p@60F
1080p@60F
Max. Resolution of TV input
-
1080p
-
1080p
Movie Frame : Auto (24Fs)
1080p@24F
-
1080i
1080i
1080i
720p
720p
720p
576p/480p
576p/480p
576p/480p
Troubleshooting
Symptom
Check/Remedy
You cannot eject the disc.
• Is the power cord plugged securely into the outlet?
• Turn off the power, and then turn it back on.
Playback does not start.
• Check the region number of the Blu-ray/DVD disc.
Blu-ray/DVD disc purchased from abroad may not be playable.
• CD-ROMs and DVD-ROMs cannot be played on this product.
• Make sure that the rating level is correct.
Playback does not start
immediately when you
press the 6/7 button.
• Are you using a deformed disc or a disc with scratches on the surface?
• Wipe the disc clean.
No sound.
• The home cinema does not play sound during fast playback, slow playback,
and step motion playback.
Appendix
Refer to the table below when this product does not function properly. If the problem you are experiencing is not listed
below or if the instructions below do not help, turn off the product, disconnect the power cord and contact the nearest
authorized dealer or Samsung Electronics Service Centre.
• Are the speakers connected properly? Is the speaker setup correctly customized?
• Is the disc severely damaged?
You can only hear sound
from a few speakers, but
not all 6.
•
•
•
•
On certain Blu-ray/DVD discs, sound is output from the front speakers only.
Check if the speakers are connected properly.
Adjust the volume.
When playing audio from a CD, the radio, or a TV, the unit outputs sound to the
front speakers only.
45 - English
HT-H5500K_30HK_30K_50K_50WK-M.E.Asia-ENG_0327.indd 45
2014-03-27
2:49:47
Appendix
Symptom
Check/Remedy
Dolby Digital 5.1 CH
Surround Sound is not
produced.
• Is there "Dolby Digital 5.1 CH" mark on the disc? Dolby Digital 5.1 CH Surround
Sound is produced only if the disc is recorded with 5.1 channel sound.
• Is the audio language correctly set to Dolby Digital 5.1-CH in the information
display?
The remote control does
not work.
• Are you operating the remote within its operational range and within the
properangle relative to the sensor?
• Are the batteries drained?
• Have you selected the mode (TV/BD) functions of the remote control (TV or BD)
correctly?
• The disc is rotating but
there is no picture.
• Picture quality is poor
and the picture is
shaking.
•
•
•
•
Audio language and
subtitles do not work.
• The Audio Language and subtitle functions will not work if the disc does not
contain multiple language sound tracks or subtitles.
The menu screen does
not appear even when you
select the menu function.
• Are you using a disc that does not contain menus?
The aspect ratio cannot be
changed.
• You can play 16:9 Blu-ray/DVD discs in 16:9 Full mode, 4:3 Letter Box mode, or 4:3
Pan-Scan mode, but 4:3 Blu-ray/DVD discs are played in 4:3 mode only. Refer to
the Blu-ray Disc jacket, and then select the appropriate function.
• The product is not
working.
(Example: The power
goes off or you hear a
strange noise.)
• The Product is not
working normally.
• Press and hold the remote control's 5 button for 5 seconds in STANDBY mode.
This will reset the unit.
- Using the RESET function will erase all stored settings.
Do not use this function unless necessary.
You have forgotten the
rating level password.
• With no disc in the product, press and hold the product's 5 button for longer
than 5 seconds. INIT appears on the display and all settings will return to their
default values.
- Using the RESET function will erase all stored settings.
Do not use this function unless necessary.
Can't receive radio
broadcasts.
• Is the antenna connected properly?
• If the antenna's input signal is weak, install an external FM antenna in an area with
good reception.
There is no sound when
you try to listen to TV audio
through the home cinema
speakers.
• If you press the ^ button while listening to TV audio using the D. IN or AUX
functions, the Blu-ray/DVD disc functions are turned on and the TV audio is
muted.
Is the TV power on?
Are the video cables connected properly?
Is the disc dirty or damaged?
A poorly manufactured disc may not be playable.
46 - English
HT-H5500K_30HK_30K_50K_50WK-M.E.Asia-ENG_0327.indd 46
2014-03-27
2:49:48
Symptom
Check/Remedy
"Not Available" appears on
screen.
• The features or action cannot be completed at this time because:
1. The Blu-ray/DVD disc's software restricts it.
2. The Blu-ray/DVD disc's software doesn’t support the feature (e.g., angles)
3. The feature is not available at the moment.
4. You’ve requested a title or chapter number or search time that is out of range.
If the HDMI output is set to
a resolution your TV cannot
support (for example,
1080p), you may not see a
picture on your TV.
• Press and hold the 5 button on front panel for more than 5 seconds with no disc
in the product. All settings will revert to their factory settings.
No HDMI output.
• Check the connection between the TV and the HDMI jack of the product.
• Check if your TV supports 576p/480p/720p/1080i/1080p HDMI input resolution.
Abnormal HDMI output
appears on the screen.
• If random noise appears on the screen, it means that TV does not support HDCP
(High-bandwidth Digital Content Protection).
DLNA function
• DLNA shows only Photo, Music, and Movie files. It does not display other kinds of
files.
Video plays intermittently.
• Check if the network is stable.
• Check if the network cable is properly connected and if the network is overloaded.
The DLNA connection
between the TV and PC is
unstable.
• IP addresses under the same subnetwork should be unique, otherwise IP collision
can cause an unstable connection.
• Check if you have a firewall enabled.
If so, disable the firewall function.
Appendix
You can see folders shared
through DLNA, but cannot
see the files.
BD-LIVE
The home cinema cannot
connect to the BD-LIVE
server.
• Test whether the network connection is active by using the Network Status
function.
• Check whether a USB memory device is connected to the product.
• The memory device must have at least 1GB of free space to accommodate the
BD-LIVE service.
You can check the available size in BD Data Management. (See page 39)
• See if the BD-Live Internet Connection option is set to Allow(All).
• If all above fails, contact the contents provider or update to the latest firmware.
When using the BD-LIVE
service, an error occurs.
• The USB memory device must have at least 1GB of free space to accommodate
the BD-LIVE service.
You can check the available size in BD Data Management. (See page 39)
✎
When the factory default settings are restored, all stored user BD data is deleted.
47 - English
HT-H5500K_30HK_30K_50K_50WK-M.E.Asia-ENG_0327.indd 47
2014-03-27
2:49:50
Appendix
Specifications
General
FM Tuner
Weight
1.90 kg
Dimensions
430.0 (W) x 55.0 (H) x 224.0 (D) mm
Operating Temperature
Range
+5°C to +35°C
Operating Humidity
Range
10 % to 75 %
Signal/noise ratio
55 dB
Usable sensitivity
12 dB
Total harmonic distortion
1.0 %
Video
1080p, 1080i, 720p, 576p/480p
Audio
PCM multichannel audio, Bitstream audio, PCM audio
HDMI
Front speaker output
165W x 2 (3)
Centre speaker output
170W (3)
Surround speaker output
165W x 2 (3)
Subwoofer speaker output 170W (3)
Amplifier
Analogue input : 20Hz~20kHz (±3dB)
Frequency response
Digital input : 20Hz~40kHz (±4dB)
S/N Ratio
70dB
Channel separation
60dB
Input sensitivity
(AUX) 500mV
5.1ch speaker system
Speaker system
Front
Speaker
Surround
Centre
Subwoofer
Impedance
3
3
3
3
Frequency range
200Hz ~ 20kHz
200Hz ~ 20kHz
200Hz ~ 20kHz
50Hz ~ 200Hz
Output sound pressure
level
84dB/W/M
84dB/W/M
84dB/W/M
84dB/W/M
Rated input
165W
165W
170W
170W
Maximum input
330W
330W
340W
340W
48 - English
HT-H5500K_30HK_30K_50K_50WK-M.E.Asia-ENG_0327.indd 48
2014-03-27
2:49:51
HT-H5500K
95.0 x 146.0 x 74.0
95.0 x 116.0 x
74.0
227.0 x 95.0 x
74.0
220.6 x 380.6 x
364.7
HT-H5530HK
Dimensions (W x H x D)
(Unit : mm)
95.0 x 502.8 (Max:
610.8) x 74.5 (Stand
base: 234.0 x 16.3 x
171.7)
95.0 x 116.0 x
74.0
227.0 x 95.0 x
74.0
220.6 x 380.6 x
364.7
HT-H5530K
95.0 x 1113.0 x 74.0
95.0 x 116.0 x
(Stand base: 276.0 x
74.0
23.0 x 189.0)
Speaker
227.0 x 95.0 x
74.0
220.6 x 380.6 x
364.7
HT-H5550K/HT-H5550WK
95.0 x 1113.0 x 74.0
(Stand base: 276.0 x 23.0 x 189.0)
227.0 x 95.0 x
74.0
220.6 x 380.6 x
364.7
HT-H5500K
0.44
0.40
1.58
0.40
0.56
6.50
HT-H5530HK
0.56
6.50
Weights (Unit : kg)
2.94
0.40
0.56
Appendix
HT-H5530K
6.50
HT-H5550K/HT-H5550WK
2.94
✎
✎
✎
✎
✎
2.94
0.56
6.50
Network speeds equal to or below 10Mbps are not supported.
Samsung Electronics Co., Ltd reserves the right to change the specifications without notice.
Weight and dimensions are approximate.
Design and specifications are subject to change without prior notice.
For the power supply and Power Consumption, refer to the label attached to the product.
SWA-6000 (HT-H5550WK only)
Weight
1.1 kg
Dimensions (W x H x D)
76.2 x 228.6 x 152.4 mm
Operating Temperature Range
+5°C to +35°C
Operating Humidity Range
10% ~ 75%
Output
165W x 2 CH
Frequency range
20Hz~20KHz
S/N Ratio
65dB
49 - English
HT-H5500K_30HK_30K_50K_50WK-M.E.Asia-ENG_0327.indd 49
2014-03-27
2:49:53
Appendix
Licences
Manufactured under license from Dolby Laboratories. Dolby and the double-D symbol are
trademarks of Dolby Laboratories.
For DTS patents, see http://patents.dts.com. Manufactured under license from DTS
Licensing Limited. DTS, DTSHD, the Symbol, & DTS and the Symbol together are
registered trademarks, and DTS-HD Master Audio | Essential is a trademark of DTS, Inc.
© DTS, Inc. All Rights Reserved.
ABOUT DIVX VIDEO: DivX® is a digital video format created by DivX, LLC, a subsidiary of Rovi
Corporation. This is an official DivX Certified® device that has passed rigorous testing to verify
that it plays DivX video. Visit divx.com for more information and software tools to convert your
files into DivX videos.
ABOUT DIVX VIDEO-ON-DEMAND: This DivX Certified® device must be registered in order to play purchased DivX
Video-on-Demand (VOD) movies. To obtain your registration code, locate the DivX VOD section in your device setup
menu. Go to vod.divx.com for more information on how to complete your registration.
DivX Certified® to play DivX® video up to HD 1080p, including premium content.
DivX®, DivX Certified® and associated logos are trademarks of Rovi Corporation or its subsidiaries and are used
under licence.
Covered by one or more of the following U.S. patents : 7,295,673; 7,460,668; 7,515,710; 7,519,274
DLNA®, the DLNA Logo and DLNA CERTIFIED® are trademarks, service marks, or
certification marks of the Digital Living Network Alliance.
The terms HDMI and HDMI High-Definition Multimedia Interface, and the HDMI Logo are
trademarks or registered trademarks of HDMI Licensing LLC in the United States and other
countries.
Oracle and Java are registered trademarks of Oracle and/or its affiliates. Other names may be trademarks
of their respective owners.
This item incorporates copy protection technology that is protected by U.S. patents and other intellectual property
rights of Rovi Corporation. Reverse engineering and disassembly are prohibited.
Blu-ray Disc™, Blu-ray™, and the logos are trademarks of Blu-ray Disc Association.
This product uses Cinavia technology to limit the use of unauthorized copies of some commercially-produced film and
videos and their soundtracks. When a prohibited use of an unauthorized copy is detected, a message will be displayed
and playback or copying will be interrupted.
More information about Cinavia technology is provided at the Cinavia Online Consumer Information Centre at http://
www.cinavia.com. To request additional information about Cinavia by mail, send a postcard with your mailing address
to: Cinavia Consumer Information Centre, P.O. Box 86851, San Diego, CA, 92138, USA."
This product incorporates proprietary technology under licence from Verance Corporation and is protected by U.S.
Patent 7,369,677 and other U.S. and worldwide patents issued and pending as well as copyright and trade secret
protection for certain aspects of such technology. Cinavia is a trademark of Verance Corporation. Copyright 20042010 Verance Corporation. All rights reserved by Verance. Reverse engineering or disassembly is prohibited.
- Open Source Licence Notice
In the case of using open source software, Open Source Licences are available on the product menu.
50 - English
HT-H5500K_30HK_30K_50K_50WK-M.E.Asia-ENG_0327.indd 50
2014-03-27
2:49:54
HT-H5500K
HT-H5530HK
HT-H5530K
HT-H5550K
HT-H5550WK
™5.1CH Blu-ray
מערכת בידור ביתית
מדריך למשתמש
דמיינו את האפשרויות
תודה שרכשתם מוצר זה מתוצרת .Samsung
לקבלת שירות טוב יותר,
רשמו את המוצר שלכם בכתובת
www.samsung.com/register
AH68-02691R-00
2:50:52
2014-03-27
HT-H5500K_30HK_30K_50K_50WK-SQ-HEB_0327.indd 1
מידע בנושא בטיחות
זהירות
סמל זה מעיד על מתח גבוה בפנים .מסוכן
לגעת בכל חלק פנימי שהוא של מכשיר זה.
סכנת התחשמלות לא לפתוח
זהירות :להקטנת סכנת ההתחשמלות ,אסור להוריד את המכסה )או הדופן
האחורית( .המכשיר אינו כולל חלקים שניתנים לתיקון על-ידי המשתמש.
לכל תיקון ושירות ,פנו לטכנאי מוסמך.
•
•
•
•
•
•
•
•
החריצים והפתחים בגב המארז ובתחתיתו מאפשרים את
האוורור הדרוש .כדי להבטיח הפעלה אמינה של מכשיר זה
וכדי להגן עליו מפני חימום יתר ,אסור לחסום או לכסות חריצים
ופתחים אלה.
אסור להציב את המכשיר בחלל סגור ,כגון ארון ספרים אונישה בנויה ,אלא אם כן דואגים לאוורור מתאים.
אסור להציב את המכשיר ליד או על רדיאטור או מפזר חוםוגם לא במקום שחשוף לשמש ישירה.
אסור להניח על המכשיר כלים המכילים מים )כגון אגרטלים(.מים שנשפכו עלולים לגרום שריפה או התחשמלות.
אסור לחשוף את המכשיר לגשם ואסור להציג אותו בקרבת מים
)ליד אמבטיה ,ליד כיור רחצה ,מטבח או כביסה ,במרתף לח,
ליד בריכת שחייה וכדומה( .אם המכשיר נרטב בטעות ,נתקו
אותו מהחשמל והתקשרו מיד למפיץ מורשה.
מכשיר זה צורך סוללות .ייתכן שבמקום מגוריכם נקבעו תקנות
סביבתיות להשלכה מסודרת של הסוללות .צרו קשר עם
הרשויות המקומיות למידע על השלכה או מחזור.
אסור ליצור עומס שהוא מעבר ליכולתם של שקעי החשמל
בקירות ,הכבלים המאריכים והמתאמים .עומס יתר עלול לגרום
שריפה או התחשמלות.
סדרו את כבלי הזנת המתח באופן שיקטין את הסיכוי שידרכו
עליהם ,או שחפצים שיונחו או יושענו עליהם ימעכו אותם.
הקדישו תשומת לב מיוחדת לכבלים במקום החיבור שלהם
לתקע ,בשקעים בקירות ובנקודת היציאה שלהם מהמכשיר.
כדי להן על המכשיר מפני ברקים ,וכשהמכשיר עומד ללא
השגחה וללא שימוש במשך זמן רב ,נתקו אותו משקע החשמל
ונתקו גם את האנטנה או מערכת הכבלים .פעולות אלה ימנעו
נזקים למכשיר ממכות ברק ונחשולי מתח.
לפני חיבור כבל החשמל ) (ACלשקע מתאם ה ,DC-ודאו
שהמתח המצוין על גבי מתאם ה ,DC-מתאים לרשת החשמל
המקומית.
אסור להכניס כל חפץ מתכתי שהוא לחלקים הפתוחים של
המכשיר .פעולה כזו מסוכנת ועלולה לגרום התחשמלות.
סמל זה מציין שמוצר זה כולל תיעוד חשוב
בנוגע להפעלה ותחזוקה.
•
•
•
•
•
•
•
•
•
2
2:50:56
2014-03-27
כדי למנוע התחשמלות ,אל תגעו בחלקים הפנימיים של מכשיר
זה .רק טכנאי מוסמך רשאי לפתוח את המכשיר.
הקפידו להכניס את תקע החשמל היטב לשקע .הקפידו לאחוז
בתקע כשאתם מוציאים את הכבל מהשקע .אסור למשוך בכבל
עצמו כדי להוציא אותו מהשקע .אסור לגעת בכבל החשמל
בידיים רטובות.
אם המכשיר אינו פועל כרגיל -ובפרט אם הוא משמיע קולות
או פולט ריחות חריגים -נתקו אותו מיד מהחשמל ופנו למפיץ
מורשה או למרכז שירות.
תחזוקת גוף המכשיר.
לפני שאתם מחברים למכשיר זה רכיבים אחרים ,ודאושכיביתם אותם.
העברת המכשיר מסביבה קרה לסביבה חמה באופן פתאומיעלולה לגרום לעיבוי על החלקים הפעילים ועל העדשה
ולשבש את הפעלת התקליטורים .במקרה כזה ,נתקו את
המכשיר ,המתינו שעתיים ולאחר מכן חברו את התקע לשקע
החשמל .לאחר מכן הכניסו את התקליטור ונסו להפעיל אותו
פעם נוספת.
הקפידו להוציא את כבל החשמל מהשקע אם אינכם מתכוונים
להשתמש במוצר או עוזבים את הבית לזמן רב )במיוחד אם
ילדים ,קשישים או אנשים עם מוגבלות נשארים לבד בבית(.
עקב הצטברות של אבק ,עלולים להיווצר ניצוצות וחוםבכבל החשמל והבידוד עלול להיפגם .אלה עלולים לגרום
התחשמלות ,זליגה חשמלית או שריפה.
פנו למרכז שירות מורשה לקבלת מידע ,אם אתם מתכוונים
להתקין את המוצר במקום שיש בו הרבה אבק ,טמפרטורות
גבוהות או נמוכות ,לחות גבוהה או חומרים כימיים ,או כשהוא
אמור לפעול 24שעות ביממה ,כמו למשל בשדה תעופה,
בתחנת רכבת וכו' .אי ביצוע הנחיה זו עלול לגרור נזק חמור
למוצר.
השתמשו אך ורק בתקעים ובשקעים עם הארקה הולמת.
הארקה לא תקינה עלולה לגרום התחשמלות ונזק למוצר.)ציוד Class lבלבד(.
כדי לכבות את המכשיר כיבוי מוחלט ,יש לנתק אותו משקע
החשמל שבקיר .משום כך יש לאפשר גישה נוחה לשקע ולתקע
בכל עת.
אסור לאפשר לילדים להיתלות על המוצר.
-עברית
HT-H5500K_30HK_30K_50K_50WK-SQ-HEB_0327.indd 2
•
•
•
•
•
•
•
אזהרה:
• כדי למנוע שריפה ,הרחיקו נרות ופריטים
אחרים עם אש גלויה ממוצר זה בכל עת.
מוצר לייזר מסוג CLASS 1 LASER
מוצר זה מוגדר כמוצר .CLASS 1 LASER
כל שימוש בפקדים ,התאמה או ביצוע הליך שאינו מתואר כאן עשוי
לגרום לחשיפה לקרינה מסוכנת.
זהירות:
• קרינת קרן לייזר בלתי-נראית לעין כאשר נפתח .יש להימנע
מהחשיפה לקרן.
LASER PRODUCT
LASER PRODUKT
LASER LAITE
LASER APPARAT
LÁSER CLASE 1
CLASS 1
KLASSE 1
LUOKAN 1
KLASS 1
PRODUCTO
3
2:50:58
2014-03-27
מידע בריאותי ובטיחותי חשוב בנוגע לתוכני תלת-ממד.
יש לקרוא ולהבין את הוראות הבטיחות הבאות לפני שתשתמשו
בפונקציית התלת-ממד.
• אנשים מסוימים עשויים לחוות אי-נוחות בזמן צפייה בתכני
תלת-ממד .תחושה זו עשויה לכלול סחרחורות ,בחילה וכאבי
ראש.
אם אתם חווים סימפטום אחד או יותר ,יש להפסיק את הצפייה
בתכני התלת-ממד ,להסיר את משקפי ה ,3D Active-ולנוח
מעט.
• צפייה בתכני תלת-ממד במשך פרקי זמן ארוכים עלולה לגרום
לעייפות בעיניים .אם מרגישים מאמץ בעיניים ,יש להפסיק את
הצפייה בתכני התלת-ממד ,להסיר את משקפי ה3D Active-
ולנוח מעט.
• על מבוגר אחראי לפקח על ילדים הצופים בתכני תלת-ממד
ולבדוק מה שלומם לעיתים קרובות.
אם קיימות תלונות על עייפות בעיניים ,כאבי ראש ,סחרחורות
או בחילה ,יש להפסיק את הצפייה בתכני התלת-ממד ולומר
לילד לנוח.
• אין להשתמש במשקפי ה 3D Active-למטרות אחרות )כגון
משקפיים רגילים ,משקפי שמש ,משקפי מגן וכו'(.
• אין להשתמש בפונקציית התלת-ממד או במשקפי ה3D Active-
בזמן הליכה או תנועה .אם תשתמשו בפונקציית התלת-ממד
או במשקפי ה 3D Active-בזמן תנועה אתם עלולים להיתקל
בחפצים ,למעוד ו/או ליפול ,ולהיפצע פציעה חמורה.
• כדי להפעיל תוכני תלת-ממד ,חברו התקן תלת-ממד )מקלט AV
או טלוויזיה התומכים בתלת-ממד( ליציאת ה HDMI OUT-של
המכשיר באמצעות כבל HDMIבמהירות גבוהה .הרכיבו את
משקפי התלת-ממד לפני צפייה בשידורי תלת-ממד.
• המכשיר משדר אותות תלת-ממד אך ורק באמצעות כבל HDMI
המחובר ליציאה .HDMI OUT
• במצב הפעלה של תוכני תלת-ממד ,רזולוציית הווידאו קבועה
ונגזרת מהרזולוציה של הווידאו התלת-ממדי המקורי .לא ניתן
לשנות את הרזולוציה.
• ייתכן שחלק מהפונקציות ,כגון BD Wiseאו הגדרת גודל המסך
או הרזולוציה ,לא יפעלו במצב הפעלה של תוכני תלת-ממד.
• עליכם להשתמש בכבל HDMIבמהירות גבוהה כדי לקבל פלט
תקין של אות ה.3D-
• יש לשבת במרחק השווה לשלוש פעמים רוחב המסך לפחות
בזמן צפייה בתכני תלת-ממד .לדוגמה ,אם יש לכם מסך בגודל
46אינץ' ,עליכם לשבת במרחק של 3.5מטר מהטלוויזיה.
• יש לקבוע את מסך התלת-ממד בגובה העיניים לקבלת תמונת
תלת-ממד מיטבית.
• אם המכשיר מחובר למספר מכשירי תלת-ממד ,אפקט התלת-
ממד עשוי שלא לפעול כהלכה.
• מכשיר זה לא ממיר תמונה דו-ממדית לתמונה תלת-ממדית.
• " "Blu-ray 3Dוהסמל של " "Blu-ray 3Dהם סימנים מסחריים
של .Blu-ray Disc Association
מידע בנושא בטיחות
•
יש לאחסן את האביזרים )סוללה וכו'( במקום בטוח ,הרחק
מהישג ידם של ילדים.
אסור להתקין את המוצר במקום לא יציב ,כגון מדף רופף או
רצפה לא ישרה ,או במקום שחשוף לרעידות.
אסור להפיל או להכות את המוצר .אם המוצר ניזוק ,נתקו את
כבל החשמל ופנו למרכז שירות.
כדי לנקות את המכשיר ,נתקו את כבל החשמל מהשקע בקיר
ונגבו את המוצר בעזרת בד רך ויבש .אין להשתמש בכימיקלים
כגון שעווה ,בנזין ,אלכוהול ,טינר ,חומרי הדברה ,מטהרי אוויר,
חומרי סיכה ודטרגנטים .כימיקלים אלה עלולים לפגוע במראה
המוצר או למחוק את הכיתוב שעל גבי המוצר.
אין לחשוף את המכשיר לטפטוף או להתזה של נוזלים .אין
להניח על המכשיר כלים מלאים בנוזלים ,כגון אגרטלים.
אסור להשליך את הסוללות לאש.
אין לחבר מספר מכשירים חשמליים לאותו השקע .עומס על
השקע עשוי לגרום לחימום יתר של המכשירים ולגרום לשריפה.
קיימת סכנת התפוצצות אם מחליפים את הסוללות של השלט
בסוג שאינו נכון .החליפו לסוללות מאותו סוג או מסוג שקול
בלבד.
אמצעי זהירות בנוגע לתלת-ממד
-עברית
HT-H5500K_30HK_30K_50K_50WK-SQ-HEB_0327.indd 3
תוכן העניינים
הפעלת תוכן
תחילת העבודה
5
אביזרים
26החלפת התקן המקור
5
רכיבי הרמקולים
26הפעלת תקליטורים מסחריים
7
הלוח הקדמי
26הפעלת תקליטור עם תוכן שהמשתמש צרב
7
הלוח האחורי
27הפעלת קבצים מהתקן USB
8
שליטה מרחוק
28שליטה בהפעלת וידאו
9
חיבור הרמקולים
29השמעת תקליטור שמע מסחרי מוקלט מראש
חיבורים
30שליטה בהשמעת מוסיקה
31הפעלת תוכן תמונות
12חיבור ליבת הפריט הטורואידית לכבל החשמל של מודול
הרסיבר האלחוטי )(SWA-6000
32האזנה לרדיו
13חיבור לטלוויזיה ולהתקנים חיצוניים
32שימוש בקריוקי
14חיבור לנתב רשת
33השימוש בBluetooth-
35שימוש בלחצני השלט רחוק לאפקטים המיוחדים
הגדרות
שירותי רשת
15תהליך קביעת ההגדרות הראשוני
36שימוש בBD-LIVE™ -
16מסך הבית במבט חטוף
16גישה למסך ההגדרות
36שימוש בDLNA -
17פונקציות תפריט ההגדרות
36יישומים
20הגדרת רשת
37שימוש בOpera TV Store-
Wi-Fi Direct 23
38שיקוף מסך
25הגדרת DLNA
39מידע נוסף
24שדרוג תוכנה
נספח
40תאימות תקליטורים ופורמטים
45פתרון בעיות
48מפרטים
50רישיונות
צורות ואיורים במדרך למשתמש זה ניתנים לעיון בלבד וייתכן שישתנו בנוגע למראה המוצר.
ייתכן שתחויבו בעמלה באחד מהמקרים הבאים:
א .ביצעתם קריאת טכנאי ואין פגם במכשיר )כלומר ,לא קראתם כראוי מדריך למשתמש זה(
ב .הבאתם את המכשיר למרכז תיקון ואין פגם במכשיר )כלומר ,לא קראתם כראוי מדריך למשתמש זה(.
גובה העמלה יימסר לכם לפני תחילת כל עבודה על המכשיר /לפני ביקור הבית.
4
2:51:00
2014-03-27
-עברית
HT-H5500K_30HK_30K_50K_50WK-SQ-HEB_0327.indd 4
תחילת העבודה
בדקו שכל האביזרים ורכיבי הרמקולים הרשומים או מוצגים להלן ,נמצאים בקופסה.
אביזרים
• מדריך למשתמש
כבל חשמל
כבל HDMI
אנטנת FM
תחילת העבודה
• שליטה מרחוק
• סוללות
רכיבי הרמקולים
HT-H5500K
מרכזי
קדמי 2 x
כבל רמקול 6 x
היקפי 2 x
סאבוופר
HT-H5530HK
קדמי 2 x
היקפי 2 x
בורג )8 x (5x20
בסיס מעמד 2 x
מרכזי
כבל רמקול 6 x
5
2:51:02
2014-03-27
סאבוופר
-עברית
HT-H5500K_30HK_30K_50K_50WK-SQ-HEB_0327.indd 5
תחילת העבודה
HT-H5530K
קדמי 2 x
מעמד 2 x
בורג )8 x (5x20
כבל רמקול 6 x
מרכזי
היקפי 2 x
בסיס מעמד 2 x
סאבוופר
HT-H5550K/HT-H5550WK
HT-H5550WKבלבד
)עבור כבל חשמל(
בורג )16 x (5x20
כבל רמקול 6 x
מרכזי
סאבוופר
בסיס מעמד 4 x
ליבת פריט טורואידית
HT-H5550WKבלבד
קדמי /2 x
היקפי 2 x
מעמד 4 x
6
2:51:12
2014-03-27
רסיבר אלחוטי
מודול )(SWA-6000
-עברית
HT-H5500K_30HK_30K_50K_50WK-SQ-HEB_0327.indd 6
הלוח הקדמי
הסמלים בתצוגה
NFC
פתיחה/סגירה
בקרת עוצמת
שמע
הפעלה
תחילת העבודה
פונקציה
עצירה
הפעלה/השהיה
תצוגה
5V 0.5A
שקע המיקרופון
USB
fl
fl
fl
MIC 2
MIC 1
חיישן שלט רחוק
מגש תקליטורים
אין לתת לילדים לגעת במשטח המכשיר כאשר הוא מופעל .הוא יהיה חם.
יש להשתמש בזיכרון USBנייד כדי לשדרג את תוכנת המכשיר באמצעות שקע ה.USB-
6/במכשיר
כאשר המכשיר מציג את תפריט תקליטור ה ,Blu-ray-לא ניתן להפעיל את הסרט על ידי לחיצה על הלחצן
או בשלט רחוק .להפעלת הסרט ,עליכם לבחור ב-הפעל סרט או ב-התחל בתפריט התקליטור ,ולאחר מכן ללחוץ על הלחצן
.E
אם אתם גולשים באינטרנט או מפעילים תוכן מהתקן USBבטלוויזיה באמצעות הקולנוע הביתי ,לא תוכלו לבחור במצב
BD/DVDבאמצעות הלחצן .FUNCTIONכדי לבחור במצב ,BD/DVDצאו מהאינטרנט או הפסיקו את הפעלת התוכן
בטלוויזיה ,ולאחר מכן בחרו במצב .BD/DVD
חברו את המיקרופון לשקע המתאים לפני שימוש בפונקציית הקריוקי.
בחלקו העליון של המכשיר )ראו עמוד .(34
כדי להשתמש בפונקציה ,NFCחברו את התקן המקור התואם ל Bluetooth-אל
fl
fl
fl
הלוח האחורי
* עבור HT-H5550WK
כניסת AUX
מאוורר צינון
* אנטנת FM
יציאת HDMI
SURROUND
SURROUND
חיבור LAN
חיבורי יציאת רמקולים
כניסת שמע דיגיטלית
חיצונית )אופטית(
כבל חשמל
* חיבור אנטנת FM
.1
חברו את אנטנת ה FM-המסופקת לשקע .FM ANT
.2
הזיזו לאט את חוט האנטנה בכיוונים שונים עד שתמצאו מקום שבו הקליטה טובה .לאחר מכן חברו אותו לקיר או למשטח
קשיח אחר.
fl
שמרו על מרווח של 10ס"מ לפחות בכל צד של מערכת הקולנוע הביתי כדי להבטיח אוורור מספיק .אין לחסום את מאוורר
הצינון או את חורי האוורור.
fl
מכשיר זה אינו קולט שידורי .AM
7
2:51:22
2014-03-27
-עברית
HT-H5500K_30HK_30K_50K_50WK-SQ-HEB_0327.indd 7
תחילת העבודה
שליטה מרחוק
סקירת השלט רחוק
לחצו לבחירת מצב מערכת הקולנוע
הביתי BD/DVD ,D. IN ,AUX) .וכו'(.
להפעלה וכיבוי של המכשיר.
FUNCTION
לפתיחה וסגירה של מגש התקליטורים.
VOLUME
MUTE
+
-
3
2
1
6
5
4
8
7
כווננו את עוצמת השמע.
נתקו את השמע באופן זמני.
9
כניסה לתפריט המוקפץ/תפריט
הכותר.
לחצו לחיפוש קדימה או אחורה.
DISC MENU
TITLE MENU
0
POPUP
לחצו להשהיית ההפעלה.
מאפשר חזרה על כותר ,פרק ,רצועה
או תקליטור.
הציגו פרטי ההפעלה במהלך הפעלת
תקליטור DVD/Blu-rayאו קבצים.
REPEAT
KARAOKE
HOME
INFO
TOOLS
EXIT
RETURN
לחצו על לחצני הספרות לתפעול
האפשרויות.
לחצו להצגת תפריט התקליטור.
לחצו למעבר קדימה או אחורה בין רצועות/
פרקים.
לחצו להפעלת תקליטור או קבצים.
לחצו לעצירת ההפעלה של התקליטור
או קבצים.
לחצו לשימוש בפונקציית הקריוקי
)עוצמת מיקרופון ,אקו ,בקרת מקשים(.
לחצו למעבר למסך הבית.
לחצו לשימוש בתפריט הכלים.
בחרו בפריטי התפריטים המופיעים על
המסך ושנו את ערכי התפריטים.
לחצו ליציאה מהתפריט.
השתמשו להגדרת תדר רדיו קבוע
מראש.
בחרו באפשרות MONOאו STEREO
לשידורי רדיו.
TUNER
MEMORY MO/ST
C
D
TUNING
UP
B
A
TV SOUND DPS/EQ
DOWN
לחזרה לתפריט הקודם.
לחצנים אלה משמשים הן לתפריטים
במכשיר והן למספר פונקציות של
תקליטורי .Blu-ray
לחצו להפניית אות השמע לרמקול של
הקולנוע הביתי או לרמקול של הטלוויזיה.
)ראו עמוד (35
חפשו תחנות FMפעילות והחליפו
ערוצים.
בחרו במצבי שמע DSP/EQהרצויים.
התקנת סוללות בשלט הרחוק
fl
הקפידו להתאים את הקצוות " "+ו "–"-של הסוללה אל הסימנים
המתאימים בתא הסוללה.
fl
fl
בהנחה של שימוש רגיל ,אורך חיי הסוללות הוא כשנה.
ניתן להשתמש בשלט הרחוק עד לטווח של כ 7-מטרים בקו ישר.
8
2:51:26
גודל סוללהAAA :
2014-03-27
-עברית
HT-H5500K_30HK_30K_50K_50WK-SQ-HEB_0327.indd 8
חיבורים
סעיף זה מפרט שיטות שונות לחיבור המכשיר לרכיבים חיצוניים.
לפני העברה או התקנה של המוצר ,הקפידו לכבות אותו ולנתק אותו מהחשמל.
קדמי )ימין(
היקפי )ימין(
מרכזי
מרכזי
קדמי )ימין(
סאבוופר
היקפי )ימין(
מכשיר
סאבוופר
מכשיר
חיבורים
חיבור הרמקולים
קדמי )שמאל(
קדמי )שמאל(
היקפי )שמאל(
מודול
רסיבר אלחוטי
* HT-H5500K/HT-H5530HK/HT-H5530K/HT-H5550K
היקפי )שמאל(
* HT-H5550WK
יש לחבר את הרמקולים ההיקפיים למודול הרסיבר
האלחוטי.
מיקום המכשיר
יש למקם את המכשיר על מעמד או מדף ,או מתחת למעמד הטלוויזיה.
בחירת מיקום ההאזנה
מרחק מיקום ההאזנה מהטלוויזיה צריך להיות בערך פי 2.5עד פי 3מגודל מסך הטלוויזיה .לדוגמה ,אם ברשותכם טלוויזיית 46
אינץ' ,מקמו את עמדת ההאזנה בין 2.92ל 3.50-מטרים מהמסך.
רמקולים קדמיים
מקמו את הרמקולים האלה מול עמדת ההאזנה שלכם ,וכלפי פנים )בערך בזווית של (45°
אליכם .מקמו את הרמקולים הקדמיים כך שהטוויטרים שלהם יהיו בגובה האוזן שלכם .ישרו
את חזית הרמקולים הקדמיים עם חזית הרמקול המרכזי או מקמו אותם מעט לפני הרמקולים
המרכזיים.
רמקול מרכזי
מומלץ להתקין את הרמקול המרכזי בגובה זהה לזה של הרמקולים הקדמיים .ניתן להתקינו
גם מעל או מתחת לטלוויזיה.
רמקולים היקפיים
מקמו את הרמקולים הללו לצד עמדת האזנה שלכם .אם אין מספיק מקום ,הציבו אותם זה
מול זה .מקמו אותם בערך 60עד 90ס''מ מעל לאוזן ,בהטיה קלה למטה.
* בניגוד לרמקולים הקדמיים והמרכזי ,הרמקולים ההיקפיים משמשים בעיקר לאפקטי צליל.
לא יישמע מהם צליל כל הזמן.
סאבוופר
מיקומו של הסאבוופר אינו קריטי .כל מקום שתרצו יתאים.
* הרמקולים שלכם עשויים להיראות אחרת מהרמקולים שבאיורים במדריך זה.
* התאימו את כבלי הרמקולים לתוויות הצבעוניות שבגב הרמקולים ולאחר מכן חברו כל אחד מהם לשקע בצבע המתאים.
פנו לעמוד 11לקבלת הוראות מדויקות.
9
2:51:30
2014-03-27
-עברית
HT-H5500K_30HK_30K_50K_50WK-SQ-HEB_0327.indd 9
חיבורים
התקנת הרמקולים על המעמד הבינוני
* HT-H5530HKבלבד -רמקולים קדמיים
.1
.2
מעמד בסיס
1
הפכו את בסיס המעמד וחברו אותו לרמקול.
2
השתמשו במברג כדי להבריג את הברגים ב 3-החורים המסומנים .חזרו על
אותם צעדים להתקנת הרמקולים הנוספים.
רמקול
.3
אם ברצונכם לכוונן את גובה הרמקול ,שחררו תחילה את הבורג בחלקו
האחורי של בסיס הרמקול.
.4
משכו את הרמקול כלפי מעלה בכיוון החץ) .הפעלת כוח רב מדי עלולה לגרום
לפגיעה גופנית(.
.5
כוונו את גובה הרמקול לפי החורים ולאחר מכן הדקו את הרמקול בעזרת
הבורג.
.6
כך נראה הרמקול אחרי התקנה וכיוון גובה .כדי לכוון את הגובה של שאר
הרמקולים ,חזרו על השלבים 3עד .5
4
3
6
5
או
התקנת הרמקולים על המעמד הגבוה
* HT-H5530Kבלבד -רמקולים קדמיים
* HT-H5550K/HT-H5550WKבלבד -רמקולים קדמיים/
היקפיים
.1
הפכו את בסיס המעמד וחברו אותו למעמד.
.2
השתמשו במברג כדי להבריג את הברגים
ב 3-החורים המסומנים.
.3
ישרו את כבל הרמקול המצורף לכיוון הקרקע והכניסו אותו לחור
שבמרכז המעמד.
.4
חברו את הרמקול העילי למעמד המורכב.
.5
הכניסו בורג לחור שבגב הרמקול והדקו אותו בכיוון השעון בעזרת
מברג.
כעת חברו את כבל הרמקול.
.6
כך נראה הרמקול לאחר ההתקנה.
בצע שלבים אלה להתקנת רמקול נוסף.
1
מעמד בסיס
2
מעמד
3
4
רמקול
מעמד
10
2:51:33
2014-03-27
5
6
-עברית
HT-H5500K_30HK_30K_50K_50WK-SQ-HEB_0327.indd 10
חיבורי כבלי הרמקולים
.1
שייכו כל חבילת כבלים של רמקול לרמקול הנכון על ידי התאמת צבע התקע בכל חבילה למדבקה הצבעונית בתחתית כל
רמקול.
.2
חברו את התקעים של כל אחד מהרמקולים ללוח האחורי של המכשיר תוך הקפדה על התאמת הצבעים בין התקעים
לשקעים.
חיבורים
עבור HT-H5500K
רמקול מרכזי
רמקול קדמי )שמאל(
SURROUND
רמקול היקפי )שמאל(
SURROUND
סאבוופר
רמקול קדמי )ימין(
רמקול היקפי )ימין(
SURROUND
SURROUND
* כדי לראות את חיבורי הרמקולים עבור ,HT-H5530HK/HT-H5530K/HT-H5550Kעיין בעמודים .6-5
עבור HT-H5550WK
רמקול קדמי )שמאל(
רמקול מרכזי
סאבוופר
מודול רסיבר אלחוטי
רמקול קדמי )ימין(
רמקול היקפי )ימין(
רמקול היקפי )שמאל(
* יש לחבר מכשיר זה לדגם SWA-6000בלבד.
11
2:51:52
2014-03-27
-עברית
HT-H5500K_30HK_30K_50K_50WK-SQ-HEB_0327.indd 11
חיבורים
fl
fl
במידה ומיקמתם רמקול בסמיכות למקלט הטלוויזיה שלכם ,ייתכן ויוצר עיוות בצבע כתוצאה מהשדה המגנטי.
מקמו את מודול הרסיבר האלחוטי מאחורי עמדת ההאזנה .אם מודול הרסיבר האלחוטי נמצא קרוב מדי למכשיר ,ייתכן
שהפרעות ישבשו את השמע מהרמקולים.
fl
שימוש בהתקנים בקרבת המכשיר ,כגון תנורי מיקרוגל ,כרטיסי LANאלחוטי ,התקן Bluetoothוהתקנים אחרים הפועלים
בתדרים ,2.4/5.8GHzעלול לגרום להפרעות שישבשו את השמע מהרמקולים.
fl
מרחק השידור המקסימלי בין המכשיר למודול הרסיבר האלחוטי הוא כ 10-מטרים ,אך הוא עשוי להשתנות בהתאם לסביבת
ההפעלה .אם יש קיר בטון-פלדה או קיר מתכת בין המכשיר לבין מודול הרסיבר האלחוטי ,ייתכן שהמערכת לא תפעל בכלל,
כי גלי הרדיו אינם יכולים לעבור דרך מתכת.
fl
אם לא מתבצע חיבור אלחוטי ,עליכם להפעיל ) ID Setהגדרת מזהה( בין המכשיר לבין מודול הרסיבר האלחוטי .כאשר
המכשיר כבוי ,לחצו על " "5""3""1""0בשלט רחוק .הפעילו את מודול הרסיבר האלחוטי .לאחר מכן לחצו על הלחצן
) ID SETהגדרת מזהה( שבגב מודול הרסיבר האלחוטי למשך 5שניות ולאחר מכן הפעילו את המכשיר.
| זהירות |
_
אם ברצונכם להתקין את הרמקולים על הקיר ,חברו היטב ברגים או מסמרים )לא כלולים( לקיר במקומות שבהם ברצונכם
לתלות את הרמקולים .לאחר מכן היעזרו בחור שבגב כל רמקול כדי לתלות את הרמקול על בורג או מסמר.
_
אין לאפשר לילדים לשחק עם הרמקולים או בסמיכותם .הם עלולים להיפגע בעת נפילת הרמקול.
_
בחיבור כבלי הרמקול לרמקולים ,וודאו כי הקוטביות ) (-/+נכונה.
_
הרחיקו את הסאבוופר מהישג ידם של ילדים ,כך שלא יוכלו להכניס את ידיהם או חפצים אחרים לתוך הביב )חור( של
המכשיר.
_
אין לתלות את הסאבוופר על הקיר באמצעות הביב )חור(.
_
אנטנת הקליטה האלחוטית מובנית בתוך מודול הרסיבר האלחוטי .יש להרחיק אותה ממים ומלחות.
_
למיטוב חוויית ההאזנה ,ודאו שהאזור שמסביב למודול הרסיבר האלחוטי נקי ממכשולים.
_
במצב ,2-CHלא תשמעו צליל מהרמקולים ההיקפיים האלחוטיים.
חיבור ליבת הפריט הטורואידית לכבל החשמל של מודול הרסיבר האלחוטי )(SWA-6000
* HT-H5550WKבלבד
חיבור ליבת פריט טורואידית לכבל החשמל של מודול הרסיבר האלחוטי יסייע למנוע
הפרעות מאותות רדיו.
.1
משכו בתפס ליבת הפריט הטורואידית כדי לפתוח אותה.
.2
עשו לולאה כפולה בכבל החשמל של מודול הרסיבר האלחוטי.
.3
חברו את ליבת הפריט הטורואידית לכבל החשמל של מודול הרסיבר האלחוטי
כפי שמוצג באיור שמימין ולאחר מכן סגרו אותה בלחיצה עד שתישמע נקישה.
• חברו את ליבת הפריט קרוב ככל האפשר למודול הרסיבר האלחוטי.
12
2:51:54
2014-03-27
-עברית
HT-H5500K_30HK_30K_50K_50WK-SQ-HEB_0327.indd 12
חיבור לטלוויזיה ולהתקנים חיצוניים
SURROUND
שיטה 2
HDMI IN
W
לבן
שיטה 1
AUDIO OUT
OPTICAL OUT
R
אדום
חיבורים
SURROUND
התקנים חיצוניים
חיבור לטלוויזיה
חברו כבל HDMIמהשקע HDMI OUTשבגב המכשיר לשקע HDMI INשל הטלוויזיה .אם הטלוויזיה תומכת ב ,ARC-חיבור כבל
זה מספיק כדי לשמוע דרך הקולנוע הביתי את השמע מהטלוויזיה .לפרטים ,עיינו בעמוד 18במדריך זה ובפרק על ARCבמדריך
למשתמש של הטלוויזיה.
חיבור להתקנים חיצוניים
כדי לבחור את המצב הנכון להתקן חיצוני אחרי שחיברתם את ההתקן ,לחצו על הלחצן .FUNCTIONבכל פעם שתלחצו על
הלחצן ,המצב ישתנה בסדר הבא:
BD/DVD D. IN AUX FM BT
שתי שיטות של חיבור התקנים חיצוניים לקולנוע הביתי מוסברות להלן.
שיטה :AUX IN 1חיבור רכיב אנלוגי חיצוני
באמצעות כבל שמע ) RCAלא כלול( ,חברו את השקע AUDIO INבמכשיר לשקע AUDIO OUTברכיב האנלוגי החיצוני.
בחרו את מצב .AUX
• ודאו להתאים את הצבעים בתקעי הכבלים לצבעים בשקעי הכניסה והיציאה.
שיטה ) OPTICAL 2אופטי( :חיבור רכיב שמע דיגיטלי חיצוני
לחיבור יציאת שמע דיגיטלית של רכיבי אותות דיגיטליים כגון ממירי כבלים ורסיברים לווייניים )ממירים אינטראקטיביים( :באמצעות
כבל דיגיטלי אופטי )לא כלול( ,חברו את השקע Optical Digital Audio Inבמכשיר אל השקע Digital Optical Outבהתקן
הדיגיטלי החיצוני.
בחרו את מצב .D. IN
fl
fl
fl
לצפייה דרך ממיר הכבלים או הרסיבר הלווייני ,עליכם לחבר את יציאת הווידאו שלו ישירות לטלוויזיה.
מערכת זו תומכת בתדרי דגימה דיגיטליים של 32 kHzומעלה מרכיבים דיגיטליים חיצוניים.
המערכת תומכת בשמע DTSו Dolby Digital-בלבד .שמע ,MPEGפורמט זרם סיביות ,אינו נתמך.
13
2:51:56
2014-03-27
-עברית
HT-H5500K_30HK_30K_50K_50WK-SQ-HEB_0327.indd 13
חיבורים
רשת אלחוטית
חיבור לנתב רשת
באפשרותכם לחבר את המכשיר אל נתב הרשת באמצעות
אחת מהשיטות המתוארות להלן.
רשת קוויות
SURROUND
SURROUND
שיתוף IPאלחוטי
מודם פס-רחב
)עם נתב משולב(
שירות פס
רחב
שירות פס רחב
או
נתב
שירות פס
רחב
פס רחב
מודם
fl
העבירו את נתב ה IP-האלחוטי שלכם למצב
) Infrastructureתשתית( .מצב אד הוק אינו נתמך.
fl
המכשיר תומך בפרוטוקולים הבאים בלבד עבור מפתחות
אבטחה לרשתות אלחוטיות:
),WEP(OPEN/SHARED)WPA-PSK(TKIP/AES), WPA2-PSK(TKIP/AES
fl
יש לבחור בנתב האלחוטי בערוץ שאינו נמצא כעת
בשימוש .במקרה שהערוץ שהוגדר עבור נתב הIP-
האלחוטי נמצא בשימוש על ידי מכשיר אחר ,ייגרמו
הפרעות ותקלות בתקשורת.
בהתאם למפרטי אישורי ה Wi-Fi-החדשים ,מערכות
הקולנוע הביתי של Samsungאינן תומכות בהצפנת
אבטחה מסוג TKIP ,WEPאו )TKIP-AES (WPS2
Mixedברשתות הפועלות במצב .802.11n
LANאלחוטי מטבעו עלול לגרום להפרעות ,בהתאם
לתנאי השימוש )ביצועי נקודת גישה ,מרחק ,מכשולים,
הפרעות הנגרמות על ידי מכשירי רדיו אחרים וכדמה(.
fl
הנתב או מדיניות ספק שירותי האינטרנט עשויים למנוע
מהמכשיר גישה לשרת עדכון התוכנה של .Samsung
במקרה כזה ,פנו לספק שירותי האינטרנט שלכם לקבלת
מידע נוסף.
fl
fl
fl
משתמשי ,DSLהשתמשו בנתב כדי ליצור חיבור רשת.
כדי להשתמש בפונקציית ,DLNAיש לחבר את המחשב
אל הרשת כפי שמתואר באיורים לעיל.
ניתן להשתמש בחיבור קווי או אלחוטי.
fl
14
2:51:59
fl
אם נתב ה IP-האלחוטי שלכם תומך ב ,DHCP-באפשרות
מכשיר זה להשתמש ב DHCP-או בכתובת IPקבועה כדי
להתחבר לרשת האלחוטית.
2014-03-27
-עברית
HT-H5500K_30HK_30K_50K_50WK-SQ-HEB_0327.indd 14
הגדרות
- 4:3 Pan-Scanלטלוויזיות אנלוגיות ישנות עם מסך
סטנדרטי .מציג תמונות 4:3במסך מלא ותמונות 16:9
בפורמט Pan-Scanהממלא את המסך ,אך חותך את
הצדדים הימני והשמאלי של התמונה ומגדיל את האמצע
אנכית.
תהליך קביעת ההגדרות הראשוני
.1
אחרי חיבור המכשיר לטלוויזיה ,הפעילו את הטלוויזיה
ולאחר מכן הפעילו את המכשיר .בהפעלה הראשונה של
המכשיר ,המכשיר מציג אוטומטית את המסך Initial
Settingsלהגדרת השפה.
.2
לחצו על הלחצנים ▲▼ כדי לבחור את השפה הרצויה,
ולאחר מכן לחצו על הלחצן .E
.3
לחצו על הלחצן Eכדי להתחיל בהגדרת פונקציות.
.5
fl
המסך Networkיופיע.
לפני תחילת העבודה ,ודאו שהמכשיר מחובר לנתב. בחרו קווי או אלחוטי בהתאם לסביבת הרשת. אם יש לכם רשת עם כתובות IPסטטיות ,אנו מציעיםלבחור Skipבאמצעות הלחצן הכחול ).(D
אם תדלגו על הגדרת הרשת בשלב זה או אם הגדרת
הרשת לא תפעל כראוי ,תוכלו להגדיר את חיבור הרשת
של המכשיר מאוחר יותר) .ראו עמוד (20
Initial Settings | Network
הגדרות
• תפריט הבית לא יופיע ללא קביעת ההגדרות
הראשוניות.
• התצוגה שעל-גבי המסך עשויה להשתנות במכשיר זה
לאחר שדרוג גרסת התוכנה.
• שלבי הגישה עשויים להשתנות בהתאם לתפריט
שנבחר.
Select your network type.
Initial Settings
Wireless
Wired
TV Aspect and Network will be set.
"Each setting may be changed later under "Settings
Network Type
㾎
התחבר
Network cable connected.
Start
.6
" Select
.4
a Previous
המסך TV Aspectמופיע .לחצו על הלחצנים ▲▼ כדי
לבחור יחס גובה-רוחב לטלוויזיה ולאחר מכן לחצו על
הלחצן .E
לרשותכם עומדות ארבע אפשרויות:
- 16:9 Originalלטלוויזיות עם מסך רחב .מציג
תמונות מסך רחב בפורמט 16:9המקורי שלהן ,ותמונות
) 4:3הפורמט הסטנדרטי הישן( בפורמט 4:3עם פסים
שחורים מימין ומשמאל )".("pillar box
- 16:9 Fullלטלוויזיות עם מסך רחב .מציג תמונות
מסך רחב בפורמט 16:9המקורי שלהן ,ומרחיב תמונות
4:3עד שהן ממלאות את מסך ה.16:9-
- 4:3 Letter Boxלטלוויזיות אנלוגיות ישנות עם מסך
סטנדרטי .מציג תמונות 4:3במסך מלא בפורמט 16:9
letter boxהשומר על יחס גובה-רוחב 16:9אך מוסיף
פסים שחורים מעל ומתחת לתמונה.
15
2:52:03
2014-03-27
המכשיר יאמת את חיבור הרשת ולאחר מכן יתחבר
לרשת .בסיום הפעולה ,לחצו על הלחצן .Eמופיע
המסך ") "Initial settings completed.הגדרות
ראשוניות הושלמו( ,ולאחר מכן מסך הבית.
fl
אם ברצונכם להציג שוב את המסך Initial Settingsכדי
לבצע שינויים ,בחרו באפשרות ) .Resetראו עמוד (20
fl
אם אתם משתמשים בכבל HDMIלחיבור המכשיר
לטלוויזיה מתוצרת Samsungהתומכת בAnynet+-
) (HDMI-CECוגם (.1העברתם את התכונה
) Anynet+ (HDMI-CECלמצב פועל במכשיר ובטלוויזיה
וגם (.2הגדרתם את הטלוויזיה לשפה הנתמכת ע"י
המכשיר ,המכשיר יבחר בשפה זו כשפה המועדפת באופן
אוטומטי.
-עברית
HT-H5500K_30HK_30K_50K_50WK-SQ-HEB_0327.indd 15
הגדרות
מסך הבית במבט חטוף
Function 8
2
Music
1
Videos
Play disc
Photos
למעבר להתקן חיצוני ,ולרדיו והחלפת מצבים עם חיבור
.Bluetoothלהחלפת מצבים יש להשתמש בלחצן
FUNCTIONבשלט רחוק ובלחצן
של היחידה
המרכזית.
Settings 9
הגדירו מגוון פונקציות בהתאם להעדפותיכם האישיות.
fl
כדי להפעיל קובצי וידאו ,תמונה או מוסיקה מהמחשב,
צריך לחבר את מערכת הקולנוע הביתי ואת המחשב
לרשת ביתית ,וצריך להוריד ,להתקין ולהגדיר במחשב את
תוכנת ה) .DLNA-ראו עמוד (25
Blu-ray
Settings
Screen Change Function
mirroring Device
Opera TV Moreיישום 4
Store
יישום 3
45 6 7 8 9
יישום 2
גישה למסך ההגדרות
יישום 1
בחרו Settingsבמסך הבית ולאחר מכן לחצו על .E
המסך Settingsיופיע.
.1
3
Play disc 1
Settings
התקליטור שנמצא כעת במגש ,מוצג.
לחצו על Eכדי להפעיל את התקליטור.
3D Settings
Display
TV Aspect Ratio
Audio
: Off
BD Wise
Network
: Auto
Resolution
System
: Off
)Movie Frame (24 fps
Language
: Auto
HDMI Colour Format
Security
: Off
HDMI Deep Colour
General
: Auto
Progressive Mode
Support
: 16:9 Original
Photos/Videos/Music 2
הפעילו תוכני וידאו ,תמונות או מוסיקה מתקליטור,
מהתקן ,USBממחשב או מהתקנים ניידים.
3יישומים
גישה ליישומים בתשלום או ללא תשלום.
Opera TV Store 4
לשימוש ביישום מבוסס-הרשת לטלוויזיה.
.2
כדי לגשת לתפריטים ,תפריטי המשנה ולאפשרויות
במסך ,Settingsפנה לאיור השלט רחוק) .ראו עמוד
(17
fl
אם המכשיר נשאר במצב עצירה למשך יותר מ 5-דקות
ללא שימוש ,יופיע בטלוויזיה שומר מסך .אם המכשיר
נשאר במצב שומר מסך למשך יותר מ 20-דקות ,הוא
יכבה באופן אוטומטי.
More 5
רשימת המלצות על יישומים שימושיים ונפוצים.
Screen Mirroring 6
הגדירו פונקציית שיקוף אלחוטי בין מערכת הקולנוע
הביתי ובין טלפונים חכמים או טאבלטים.
Change Device 7
להצגת רשימה של התקנים חיצוניים המחוברים ליחידה
המרכזית .עברו להתקן המבוקש.
16
2:52:06
2014-03-27
-עברית
HT-H5500K_30HK_30K_50K_50WK-SQ-HEB_0327.indd 16
לחצנים בשלט הרחוק המשמשים לתפריט
ההגדרות
פונקציות תפריט ההגדרות
Display
REPEAT
HOME
KARAOKE
INFO
TOOLS
EXIT
RETURN
1
3
4
2
1
הלחצן ) HOMEבית( :לחצו למעבר ללחצן הבית.
2
הלחצן ) RETURNחזרה( :לחצו לחזרה לתפריט
הקודם.
3
הלחצן ) Eאישור( /כיוונים:
• לחצו על ▲▼◄► כדי להזיז את הסמן או
כדי לבחור פריט.
• לחצו על הלחצן Eכדי להפעיל את
הפריט שנבחר או כדי לאשר הגדרה.
4
הלחצן ) EXITיציאה( :לחצו ליציאה מהתפריט
הנוכחי.
הגדירו את פונקציות התלת-ממד השונות.
:3D Blu-ray Playback Mode בחרו אם להפעיל
תקליטור Blu-rayעם תוכן 3Dבמצב .3Dאם תעברו
לתפריט הבית במצב ,3Dהמכשיר יעבור באופן
אוטומטי למצב .2D
:Screen Size הזינו את גודל הטלוויזיה המחוברת
למכשיר .המכשיר יתאים את פלט התלת-ממד באופן
אוטומטי לגודל המסך של הטלוויזיה.
flלפני הצפייה בתוכן תלת-ממד ,קראו בתשומת לב
את המידע הבריאותי והבטיחותי) .ראו עמוד (3
הגדרות
3D Settings
TV Aspect Ratio
מאפשר להתאים את פלט המכשיר לגודל המסך הטלוויזיה
שלכם) .ראו עמוד (39
BD Wise
מידע מפורט על הפונקציות
כל הפונקציות ,פריטי התפריט והאפשרויות השונות של
Settingsמוסברים במפורט על גבי המסך .כדי להציג הסבר,
השתמשו בלחצנים ▲▼◄► לבחירת פונקציה ,פריט תפריט
או אפשרות .ההסבר יופיע בדרך כלל בתחתית המסך.
תיאור קצר של כל פונקציה של Settingsמתחיל בעמוד זה.
מידע נוסף על חלק מהפונקציות נמצא גם בנספח של מדריך
זה.
BD Wiseהוא תכונת הקישוריות ההדדית החדשה של
.Samsungכאשר אתם מחברים זה לזה מכשיר וטלוויזיה
מתוצרת Samsungעם טכנולוגיית BD Wiseבאמצעות
כבל ,HDMIוכאשר האפשרות BD Wiseמופעלת
במכשיר ובטלוויזיה ,פלט השידור של המכשיר זהה לזה
של תקליטור ה Blu-ray/DVD-מבחינת הרזולוציה וקצב
הפריימים.
Resolution
מאפשר לכם להגדיר את רזולוציית הפלט של אות הווידאו
HDMIלBD Wise, Auto, 1080p, 1080i, 720p, -
.576p/480pהמספר מייצג את מספר שורות הווידאו לכל
תמונה .האותיות iו p-מציינות שזירה וסריקה מתקדמת,
בהתאמה .כשיש יותר קווים ,האיכות גבוהה יותר.
)Movie Frame (24 fps
הגדרת התכונה ) Movie Frame (24 fpsלAuto-
)אוטומטי( מאפשרת למכשיר להתאים את פלט הHDMI-
ל 24-מסגרות לשנייה באופן אוטומטי ולשפר את איכות
התמונה כשהמכשיר מחובר לטלוויזיה תואמת .24Fs
• ניתן ליהנות מהתכונה )Movie Frame (24 fps
רק עם טלוויזיה התומכת בקצב מסגרות זה.
• תמונה בסרט זמינה רק כשהמכשיר במצב
רזולוציית פלט .HDMI 1080p
17
2:52:09
2014-03-27
-עברית
HT-H5500K_30HK_30K_50K_50WK-SQ-HEB_0327.indd 17
הגדרות
HDMI Colour Format
Speaker Selection
מאפשר להגדיר את פורמט טווח הצבעים עבור פלט
ה ,HDMI-כך שיתאים ליכולות ההתקן המחובר )טלוויזיה,
מסך מחשב וכו'(.
מאפשר לכם לבחור איזה רמקולים יהיו פעילים ,הרמקולים
של הטלוויזיה או הרמקולים של הקולנוע הביתי.
Audio Return Channel
HDMI Deep Colour
מאפשר לקבוע שהמכשיר ישדר פלט וידאו עם תכונות צבע
עמוק של דרך שקע ה-ﻟﻮﻥ צבע עמוק של .HDMIמאפשר
שחזור צבע מדויק יותר עם עומק צבע גדול יותר.
Progressive Mode
מאפשר לשפר את איכות התמונה בעת הצפייה בתקליטורי
.DVD
Audio
Karaoke scoring
Digital Output
להערכת יכולת השירה שלכם ולקבלת ציון על כל שיר
ששרתם.
מאפשר להגדיר את Digital Outputבהתאם ליכולות של
מקלט ה AV-שחיברתם למכשיר .לפרטים נוספים ,יש לעיין
בטבלת בחירת היציאה הדיגיטלית) .ראו עמוד (44
My karaoke
להגדרת עוצמת הקול של השירה בעת שימוש בפונקציית
הקריוקי.
:Original Vocals עוצמת הקול מכוונת לגובה הצליל
המקורי.
:Reduce Vocals עוצמת הקול מכוונת לגובה נמוך יותר
מהצליל המקורי.
Speaker Settings
מאפשר לכוון את הגדרות הרמקולים הבאות ולהפעיל
ולכבות את צליל הניסיון על מנת לבדוק את הרמקולים.
:Level מאפשר לכוון את העוצמה היחסית של כל רמקול
מ 6dB-ל .-6dB-לדוגמה ,אם אתם אוהבים בס עמוק,
תוכלו להגביר את עוצמת הסאבוופר ב.6dB-
:Distance מאפשר לכוון את המרחק היחסי של כל רמקול
מעמדת ההאזנה עד 9מטר .ככל שהמרחק יהיה גדול יותר,
כך עוצמת הרמקול תהיה גבוהה יותר.
:Test Tone מאפשר להפעיל את הפונקציה Test Tone
כדי לבדוק את הכוונונים .הגדרת Test ToneלOn-
מפעילה את .Test Toneהגדרתו ל Off-מכבה אותו.
18
2:52:12
מאפשר להפנות את הצליל מהטלוויזיה לרמקולים של
הקולנוע הביתי .דרושים חיבור HDMIוטלוויזיה תואמת
) Audio Return Channelערוץ החזרת שמע – .(ARC
• אם Audio Return Channelמופעל ואתם משתמשים
בכבל HDMIלחיבור המכשיר לטלוויזיה ,הקלט האופטי
הדיגיטלי לא יפעל.
• אם Audio Return Channelמוגדר למצב Auto
ואתם משתמשים בכבל HDMIלחיבור המכשיר
לטלוויזיה ARC ,או הקלט האופטי הדיגיטלי נבחרים
באופן אוטומטי.
2014-03-27
Dynamic Range Control
מאפשר להפעיל בקר טווח דינמי עבור שמע מסוג Dolby
Dolby Digital Plus ,Digitalו.Dolby TrueHD-
:Auto שולט בטווח הדינמי של שמע Dolby TrueHD
באופן אוטומטי ,בהסתמך על מידע שנמצא בפס הקול
.Dolby TrueHDכמו כן מכבה את בקרת הטווח הדינמי
עבור Dolby Digitalו.Dolby Digital Plus-
:Off מותיר את הטווח הדינמי ללא דחיסה ומאפשר לך
לשמוע את הצליל המקורי.
:On מפעיל בקרת טווח דינמי עבור כל שלושת הפורמטים
של .Dolbyצלילים שקטים יותר מוגברים והעצמה של
צלילים רמים יותר מונמכת.
Downmixing Mode
מאפשר לבחור את שיטת הכיווץ הרב-ערוצית התואמת
למערכת הסטריאו שלכם .באפשרותכם לבחור כיווץ
ל Normal Stereo-או ל.Surround Compatible-
-עברית
HT-H5500K_30HK_30K_50K_50WK-SQ-HEB_0327.indd 18
Audio Sync
BD-Live Internet Connection
כאשר המכשיר מחובר לטלוויזיה דיגיטלית ,פונקציה זו
מאפשרת לכוון את השהיית השמע כך שהשמע יסתנכרן
לווידאו .באפשרותכם להגדיר את ההשהיה בין 0ל300-
אלפיות שנייה.
מאפשר להרשות או לאסור על השירות BD-Liveלהתחבר
לאינטרנט.
System
Initial Settings
Network
מאפשר להריץ מחדש את תהליך הגדרת Initial
) .Settingsראו עמוד (15
Network Test
Quick start
ניתן להדליק את המכשיר במהירות על ידי קיצור משך
האתחול.
לבדיקה אם הגדרת פרוטוקול האינטרנט שלכם נכונה.
flכשפונקציה זו מוגדרת כ ,On-צריכת החשמל במצב
המתנה תגדל) .בערך (12W – 20W
Network Status
)Anynet+ (HDMI-CEC
לבדיקת סטטוס הרשת והאינטרנט העדכני.
Anynet+היא פונקציה נוחה המציעה הפעלה מקושרת
עם מכשירי Samsungאחרים בעלי התכונה Anynet+
ומאפשרת לשלוט במכשירים אלה באמצעות שלט טלוויזיה
Samsungאחד .על מנת להפעיל פונקציה זו ,יש לחבר
את המכשיר אל טלוויזיית Anynet+של Samsung
באמצעות כבל .HDMI
Wi-Fi Direct
לחיבור התקן Wi-Fi Directלמכשיר באמצעות רשת
עמית-לעמית ,ללא צורך בנתב אלחוטי.
שימו לב שאם המכשיר מחובר לרשת אלחוטית ,הוא עשוי
להתנתק בעת שימוש ב) .Wi-Fi Direct-ראו עמוד (23
flקובצי טקסט ,כגון קבצים עם סיומת .TXTאו ,.DOC
לא יוצגו בעת שימוש בפונקציה .Wi-Fi Direct
הגדרות
Network Settings
להגדרת תצורת חיבור הרשת כך שתוכלו ליהנות מתכונות
שונות כגון שירותי אינטרנט או פונקציונליות DLNA Wi-Fi
ולבצע שדרוגי תוכנה.
BD Data Management
מאפשר לנהל את התוכן שהורדתם באמצעות תקליטור
Blu-rayהתומך בשירות .BD-Liveניתן להציג את פרטי
התקן ה USB-שאתם משתמשים בו לאחסון נתוני BD
,Liveכולל שטח האחסון .כמו כן ,ניתן למחוק נתוני BD
Liveולהחליף את ההתקן.
Screen Mirroring
הפונקציה Screen Mirroringמאפשרת להציג את
מסך הטלפון החכם או ההתקן החכם שלכם בטלוויזיה
שחיברתם למערכת הקולנוע הביתי) .ראו עמוד (38
DivX® Video On Demand
Device Name
צפו בקוד הרישום DivX® VODעל מנת לרכוש ולהפעיל
תוכן .DivX® VOD
מאפשר להקצות שם מזהה למכשיר .השתמשו בשם זה
לזיהוי המכשיר בעת חיבור התקנים חיצוניים )טלפונים
חכמים ,טאבלטים וכו'( אליו.
Language
מאפשר לבחור את השפה המועדפת עליכם עבור התפריט
שעל גבי המסך ,תפריטי תקליטורים ,וכן הלאה.
• השפה שנבחרה תופיע רק אם היא נתמכת
בתקליטור.
19
2:52:13
2014-03-27
-עברית
HT-H5500K_30HK_30K_50K_50WK-SQ-HEB_0327.indd 19
הגדרות
הגדרת רשת
Security
ברירת המחדל של קוד ה PIN-היא .0000הכניסו את
קוד ברירת המחדל כדי לגשת לפונקציית האבטחה אם לא
יצרתם קוד PINמשלכם.
אם תחברו מכשיר זה לרשת ,תוכלו להשתמש בפונקציות
וביישומים מבוססי-רשת כגון BD-LIVEולשדרג את תוכנת
המכשיר דרך חיבור הרשת.
BD Parental Rating
קביעת תצורת חיבור הרשת
למניעת הפעלה של תקליטורי Blu-rayבעלי הגבלת גיל
מסוימת ללא הזנה של קוד ה.PIN-
כדי להתחיל בקביעת תצורת חיבור הרשת ,פעלו על פי
הצעדים הבאים:
DVD Parental Rating
.1
למניעת הפעלה של תקליטורי DVDבעלי דירוג מספרי
מסוים ללא הזנה של קוד ה.PIN-
.2
בחרו באפשרות ,Networkולאחר מכן לחצו על הלחצן
.E
שנה קוד PIN
.3
לשינוי קוד ה PIN-בן 4הספרות המשמש לגישה
לפונקציות האבטחה.
בחרו באפשרות ,Network Settingsולאחר מכן לחצו
על הלחצן .E
.4
עיין בהוראות עבור רשתות קוויות המתחילות להלן או
בהוראות עבור רשתות אלחוטיות) .ראו עמוד (21
General
במסך הבית ,בחרו באפשרות ,Settingsולאחר מכן
לחצו על הלחצן .E
רשת קוויות
Time Zone
מאפשר להגדיר את אזור הזמן המתאים לאזורכם.
קווי -אוטומטי
לאחר שפעלת לפי שלבים 1עד 3שלעיל:
.1
Support
במסך ,Network Settingsשנו את Network Type
ל .Wired-לאחר מכן ,בחרו Connectולחצו על הלחצן
.Eהמכשיר יזהה את החיבור הקווי ,יאמת את חיבור
הרשת ולאחר מכן יתחבר לרשת.
Software Upgrade
לקבלת מידע נוסף על פונקציה זו ,עיין בעמוד .24
בסיום ,בחרו את האפשרות ,OKולאחר מכן לחצו על
הלחצן .E
.2
Contact Samsung
פרטים ליצירת קשר לקבלת סיוע בתפעול המכשיר.
לעיון בכתב ויתור האחריות הכללי בנוגע לתכנים
ולשירותים של ספקים חיצוניים.
אם הוקצתה לכם כתובת IPקבועה או שהתהליך האוטומטי
לא הושלם בהצלחה ,יהיה צורך להגדיר את ערכי Network
Settingsבאופן ידני.
לאחר שפעלת לפי שלבים 1עד 3שלעיל:
Terms of Service Agreement
Reset
קווי -ידני
.1
במסך ,Network Settingsשנו את Network Type
ל .Wired-לאחר מכן ,בחרו Connectולחצו על הלחצן
.E
המכשיר יחפש רשת ולאחר מכן תוצג הודעה שהחיבור
נכשל.
fl
אם אפשר לחבר את הקולנוע הביתי לרשת באופן
אלחוטי ,בחרו Change Networkבשלב זה ,שנו את
Network Typeל Wireless-ולאחר מכן עברו להוראות
עבור רשתות אלחוטיות) .ראו עמוד (21
להחזרת כל ההגדרות למצב ברירת המחדל ,מלבד הרשת.
תידרשו להזין את קוד ה PIN-שלכם .קוד PINברירת
המחדל הוא .0000
20
2:52:15
2014-03-27
-עברית
HT-H5500K_30HK_30K_50K_50WK-SQ-HEB_0327.indd 20
Network Settings
Wired network connection failed.
XX:XX:XX:XX:XX:XX
0. 0. 0. 0
0. 0. 0. 0
0. 0. 0. 0
0. 0. 0. 0
MAC Address
IP Address
Subnet Mask
Gateway
DNS Server
אלחוטי -אוטומטי
פעלו לפי שלבים 1עד 3בסעיף "קביעת תצורת חיבור
הרשת") .ראו עמוד (20
במסך ,Network Settingsשנו את Network Type
ל .Wireless-המכשיר מחפש ולאחר מכן מציג רשימה
של הרשתות הזמינות.
.1
IP auto setting failed. Try the following to set up the IP automatically, or set up the IP manually
by selecting IP Settings.
- Ensure that the DHCP server is enabled on the wireless network, then unplug and plug the wireless
network in again.
- Contact your internet service provider for more info.
Close
" Select
< Move
Retry
d Skip
IP Settings
Network Settings
Select your network type.
Change Network
Wireless
a Previous
Network Type
.2
לחצו על הלחצנים ◄► כדי לבחור ,IP Settings
ולאחר מכן לחצו על הלחצן .Eהמסך IP Settings
יופיע.
.3
בחרו את השדה IP Settingוהגדירו אותו לEnter-
.manually
.4
בחרו פרמטר להזנה )לדוגמה ,(IP Address ,ולאחר
מכן לחצו על .Eהשתמשו בלחצני הספרות שעל-גבי
השלט רחוק כדי להזין את המספרים לפרמטר .ניתן
להזין מספרים גם באמצעות הלחצנים ▲▼ .השתמשו
בלחצנים◄► שעל גבי השלט רחוק כדי לעבור בין
שדות הזנה בתוך פרמטר .לאחר שסיימתם עם פרמטר
אחד ,לחצו על הלחצן .E
.5
לחצו על הלחצן ▲ או ▼ למעבר לפרמטר אחר ,ולאחר
מכן הזינו את המספרים לאותו פרמטר בהתאם
להוראות בשלב .4
.6
חזרו על שלבים 4ו 5-עד למילוי כל הפרמטרים.
fl
את ערכי הפרמטרים של הרשת תוכלו לקבל מספק
האינטרנט שלכם.
.7
רשת אלחוטית
ניתן להגדיר חיבור רשת אלחוטית באחת משלוש דרכים:
אלחוטי אוטומטי אלחוטי ידני )WPS(PBCלפני הגדרת חיבור הרשת האלחוטית ,נתקו התקני רשת
אלחוטית המחוברים כעת למכשיר ,או את החיבור הקווי של
המכשיר.
21
2:52:16
You can connect your BD
Home Theater to the
internet. Please select which
wireless network to use
MIC
KIMING_VTOWER
Search
בסיום הזנת כל ערכי הפרמטרים ,בחרו (') Return
ולאחר מכן לחצו על הלחצן .Eהקולנוע הביתי יאמת
את חיבור הרשת ולאחר מכן יתחבר לרשת.
2014-03-27
㾎 si-ap
' Return
" Select
)WPS(PBC
m Move
.2
בחרו ברשת הרצויה ,ולאחר מכן לחצו על הלחצן .E
.3
במסך ,Securityהזינו את קוד האבטחה או את ביטוי
הסיסמה של הרשת שלכם.
הזינו מספרים ישירות באמצעות לחצני הספרות
של השלט הרחוק .הזינו אותיות על ידי בחירת אות
באמצעות הלחצנים ▲▼◄► ,ולאחר מכן לחיצה על
הלחצן .E
.4
בסיום ,בחרו Doneולאחר מכן לחצו על הלחצן .E
המכשיר יאמת את חיבור הרשת ולאחר מכן יתחבר
לרשת.
fl
תוכלו למצוא את קוד האבטחה או הסיסמה שלכם באחד
ממסכי ההגדרות שבהם השתמשתם להתקנת הנתב או
המודם.
הגדרות
Wireless network
אלחוטי -ידני
אם הוקצתה לכם כתובת IPקבועה או שהתהליך האוטומטי
לא הושלם בהצלחה ,יהיה צורך להגדיר את ערכי Network
Settingsבאופן ידני.
פעלו לפי שלבים 1עד 3בסעיף "קביעת תצורת חיבור
הרשת") .ראו עמוד (20
.1
במסך ,Network Settingsשנו את Network Type
ל .Wireless-המכשיר מחפש ולאחר מכן מציג רשימה
של הרשתות הזמינות.
.2
עברו על הרשימה ,בחרו את הרשת הרצויה או Add
Networkולאחר מכן לחצו על הלחצן .E
.3
אם בחרתם רשת בשלב ,2עברו לשלב .6
אם בחרתם ,Add Networkעברו לשלב .4
-עברית
HT-H5500K_30HK_30K_50K_50WK-SQ-HEB_0327.indd 21
הגדרות
.4
הזינו את שם הרשת האלחוטית או הנתב האלחוטי
שלכם.
• הזינו מספרים ישירות באמצעות לחצני הספרות שעל
גבי השלט הרחוק.
• הזינו אותיות על ידי בחירת אות באמצעות הלחצנים
▲▼◄► ,ולאחר מכן לחיצה על הלחצן .E
• להצגת אותיות רישיות )או לחזרה לאותיות קטנות אם
מוצגות אותיות רישיות( ,בחרו
ולאחר מכן לחצו
על הלחצן .E
• להצגת סמלים וסימני פיסוק ,בחרו & 123#ולאחר
מכן לחצו על הלחצן .Eלהצגה חוזרת של אותיות,
בחרו & 123#ולאחר מכן לחצו על הלחצן.E
בסיום ,בחרו Doneולאחר מכן לחצו על הלחצן .E
.5
במסך סוג האבטחה שיופיע ,השתמשו בלחצנים ▲▼
כדי לבחור את סוג האבטחה של הרשת ולאחר מכן לחצו
על הלחצן .Eבמסך הבא ,הזינו את קוד או סיסמת
האבטחה של הרשת שלכם.
• הזינו מספרים ישירות באמצעות לחצני הספרות שעל
גבי השלט הרחוק.
• הזינו אותיות על ידי בחירת אות באמצעות הלחצנים
▲▼◄► ,ולאחר מכן לחיצה על הלחצן .E
בסיום ,בחרו Doneולאחר מכן לחצו על הלחצן .E
המכשיר מחפש את הרשת.
.6
יופיע המסך 'חיבור הרשת נכשל' .לחצו על הלחצנים
◄► כדי לבחור ,IP Settingsולאחר מכן לחצו על
הלחצן .E
.7
בחרו את השדה IP Settingוהגדירו אותו לEnter-
.manually
.8
בחרו פרמטר רשת להזנה )לדוגמה,(IP Address ,
ולאחר מכן לחצו על הלחצן .Eהשתמשו בלחצני
הספרות שעל-גבי השלט רחוק כדי להזין את המספרים
לפרמטר .ניתן להזין מספרים גם באמצעות הלחצנים
▲▼ .השתמשו בלחצנים◄► שעל גבי השלט רחוק כדי
לעבור בין שדות הזנה בתוך פרמטר .לאחר שסיימתם
עם ערך אחד ,לחצו על הלחצן .E
.9
לחצו על הלחצן ▲ או ▼ למעבר לפרמטר אחר ,ולאחר
מכן הזינו את המספרים לאותו פרמטר בהתאם
להוראות בשלב .8
22
2:52:18
2014-03-27
.10חזרו על שלבים 8ו 9-עד למילוי כל הפרמטרים.
fl
את ערכי הפרמטרים של הרשת תוכלו לקבל מספק
האינטרנט שלכם.
.11בסיום ,בחרו (') Returnולאחר מכן לחצו על הלחצן
.Eהמסך Security Keyיופיע.
.12במסך ,Security Keyהזינו את קוד או סיסמת
האבטחה של הרשת .הזינו מספרים ישירות באמצעות
לחצני הספרות שעל גבי השלט הרחוק .הזינו אותיות על
ידי בחירת אות באמצעות הלחצנים ▲▼◄► ,ולאחר
מכן לחיצה על הלחצן .E
.13בסיום ,בחרו באפשרות Doneבצדו הימני של המסך,
ולאחר מכן לחצו על הלחצן .Eהמכשיר יאמת את
חיבור הרשת ולאחר מכן יתחבר לרשת.
.14לאחר שהקולנוע הביתי יאמת את הרשת ,בחרו OK
ולאחר מכן לחצו על הלחצן .E
fl
באפשרותכם להתחיל את הגדרת הרשת באופן ידני גם
על ידי מעבר ל-
.Settings > Network > Network Status
)WPS(PBC
אחת הדרכים הפשוטות ביותר להתקנת חיבור רשת אלחוטית
היא באמצעות הפונקציה ) .WPS(PBCאם בנתב האלחוטי
שברשותכם קיים לחצן ) ,WPS(PBCפעלו לפי ההוראות
הבאות:
פעלו לפי שלבים 1עד 3בסעיף "קביעת תצורת חיבור
הרשת") .ראו עמוד (20
.1
במסך ,Network Settingsשנו את Network Type
ל .Wireless-המכשיר מחפש ולאחר מכן מציג רשימה
של הרשתות הזמינות.
.2
גללו במורד הרשימה ,בחרו ) WPS(PBCולחצו על
הלחצן .E
.3
תוך שתי דקות ,לחצו על הלחצן ) WPS(PBCשבשלט
הרחוק .המכשיר מקבל באופן אוטומטי את כל ערכי
הגדרות הרשת הדרושות ומתחבר לרשת לאחר אימות
חיבור הרשת.
.4
בסיום ,בחרו את האפשרות ,OKולאחר מכן לחצו על
הלחצן .E
fl
עבור חיבור ,WPSהגדירו את הצפנת האבטחה של
הנתב האלחוטי ל .AES-הצפנת האבטחה WEPאינה
תומכת בחיבור .WPS
-עברית
HT-H5500K_30HK_30K_50K_50WK-SQ-HEB_0327.indd 22
.2
פונקציית ה Wi-Fi Direct-מאפשרת לחבר התקני Wi-Fi
Directאל המכשיר וזה אל זה באמצעות רשת עמית-לעמית,
ללא נתב אלחוטי.
fl
התקני Wi-Fi Directמסוימים עשויים שלא לתמוך
בפונקציה DLNAכשהם מחוברים באמצעות Wi-Fi
.Directבמקרה כזה ,שנו את שיטת חיבור הרשת שבה
אתם משתמשים לחיבור ההתקן למערכת הקולנוע הביתי.
flשידורי Wi-Fi Directעשויים להפריע לאותות
.Bluetoothלפני השימוש בפונקציה ,Bluetoothאנו
ממליצים מאוד לכבות את הפונקציה Wi-Fi Directבכל
התקן שבו היא מופעלת.
.1הפעילו את התקן ה Wi-Fi Direct-והפעילו את
פונקציית ה.Wi-Fi Direct-
.2
במסך הבית ,בחרו באפשרות ,Settingsולאחר מכן
לחצו על הלחצן .E
.3
בחרו באפשרות ,Networkולאחר מכן לחצו על הלחצן
.E
.4
בחרו באפשרות ,Wi-Fi Directולאחר מכן לחצו על
הלחצן .E
התקני ה Wi-Fi Direct-שבאפשרותכם לחבר יופיעו.
.3
• תהליכי ה PBC-וה PIN-מחברים את ההתקנים באופן
אוטומטי.
באמצעות המכשיר על ידי PBC
.1
בחרו בהתקן ה Wi-Fi Direct-שברצונכם לחבר אל
המכשיר ,ולאחר מכן לחצו על הלחצן .E
.2
החלון המוקפץ מתחבר יופיע ,ולאחריו החלון המוקפץ
חובר .לאחר שייסגר ,יוצג ההתקן במסך הWi-Fi-
Directכמחובר.
באמצעות המכשיר על ידי קוד PIN
.1
בחרו בהתקן ה Wi-Fi Direct-שברצונכם לחבר אל
המכשיר ,ולאחר מכן לחצו על הלחצן .E
.2
חלון ה PIN-המוקפץ יופיע.
.3
שימו לב לקוד ה PIN-שבחלון המוקפץ ,ולאחר מכן הזינו
אותו אל השדה המתאים בהתקן הWi-Fi Direct-
שברצונכם לחבר.
.4
החלון המוקפץ מתחבר יופיע ,ולאחריו החלון המוקפץ
חובר .לאחר שייסגר ,יוצג ההתקן במסך הWi-Fi-
Directכמחובר.
Settings
Wi-Fi Direct
Display
AudioDevice Name : HT-H5500K
Select your Wi-Fi Direct device to connect to.
Network
Not Connected
Refresh
Close
AndroidXXXXXXX
System
fl
חיבור הרשת הקווי או האלחוטי הנוכחי ינותק עם השימוש
בפונקציה .Wi-Fi Direct
fl
קובצי טקסט ,כגון קבצים עם סיומת .TXTאו ,.DOCלא יוצגו
בעת שימוש בפונקציה .Wi-Fi Direct
Language
Security
General
הגדרות
Wi-Fi Direct
עם סיום התהליך ,יופיע חלון מוקפץ על מסך הטלוויזיה
המודיע כי התקן התומך ב Wi-Fi Direct-מבקש
להתחבר .בחרו באפשרות ,OKולאחר מכן לחצו על
הלחצן Eכדי לאשר.
החלון המוקפץ מתחבר יופיע ,ולאחריו החלון המוקפץ
חובר .לאחר שייסגר ,יוצג ההתקן במסך הWi-Fi-
Directכמחובר.
Support
.5
לרשותך עומדות שלוש דרכים להשלמת חיבור ה:Wi-Fi-
• באמצעות התקן ה.Wi-Fi-
• באמצעות המכשיר עם .PBC
• באמצעות המכשיר עם קוד .PIN
כל אחת מהן מתוארת להלן.
באמצעות התקן הWi-Fi-
.1
בהתקן ה ,Wi-Fi-פעלו לפי תהליך ההתקן להתחברות
להתקן Wi-Fi Directאחר .לקבלת הוראות עיין
במדריך למשתמש של ההתקן.
23
2:52:20
2014-03-27
-עברית
HT-H5500K_30HK_30K_50K_50WK-SQ-HEB_0327.indd 23
הגדרות
) By USBבאמצעות (USB
שדרוג תוכנה
התפריט Software Upgradeמאפשר לשדרג את התוכנה
של המכשיר לשיפור הביצועים ולשירותים נוספים.
• אין לכבות או להפעיל בחזרה את המכשיר באופן ידני
במהלך עדכון.
• העדכון יושלם כשהמכשיר יופעל מחדש ולאחר מכן
יכבה .לחצו על לחצן ההפעלה להפעלת המכשיר
המעודכן.
• Samsung Electronicsאינה לוקחת על עצמה כל
אחריות משפטית על תקלה במוצר שתיגרם בשל חיבור
אינטרנט לא יציב או רשלנות מצד המשתמש במהלך
שדרוג התוכנה.
.1
במסך הבית ,בחרו באפשרות ,Settingsולאחר מכן
לחצו על הלחצן .E
.2
בחרו באפשרות ,Supportולאחר מכן לחצו על הלחצן
.E
.3
בחרו באפשרות ,Software Upgradeולאחר מכן לחצו
על הלחצן .E
.4
בחרו אחת מהשיטות הבאות:
• ) By Onlineבאופן מקוון(
• ) By USBבאמצעות (USB
• ) Auto Upgrade Notificationהודעת שדרוג
אוטומטית(
.5
לחצו על הלחצן .E
ההוראות לכל שיטה מתחילות להלן.
fl
.3
הזינו את מספר הדגם של המכשיר בשדה החיפוש .עם
הזנת מספר הדגם ,תופיע רשימה נפתחת שתציג את
המכשירים שתואמים למספר הדגם.
.4
לחצו לחיצה שמאלית בעכבר על מספר הדגם של
מכשירכם ברשימה הנפתחת.
.5
בדף שיופיע ,גללו מטה ולאחר מכן לחצו על
.Firmware Manuals & Downloads
.6
לחצו על Firmwareבמרכז הדף.
.7
לחצו על הסמל ZIPבעמודת הקובץ בצדו הימני של
הדף.
.8
לחצו על Sendבחלון המוקפץ הראשון .לחצו על OK
בחלון המוקפץ השני כדי להוריד ולשמור את קובץ
הקושחה במחשב.
.9
חלצו את הקבצים מקובץ ה zip-למחשב .יש לוודא כי
קיימת תיקייה אחת בעלת שם זהה לקובץ ה.zip-
.10העתיקו את הקובץ לזיכרון USBנייד.
.12בתפריט המכשיר ,עברו ל-
.Settings > Support > Software Upgrade
.13בחרו באפשרות .By USB
) By Onlineבאופן מקוון(
כדי להשתמש בפונקציה ,By Onlineהמכשיר צריך להיות
מחובר לאינטרנט .לפני תחילת העבודה יש להוציא את כל
התקליטורים.
.1
בחרו באפשרות ,By Onlineולאחר מכן לחצו על הלחצן
.Eההודעה "התחברות לשרת" תופיע.
.2
אם קיים עדכון זמין ,תופיע הודעה מוקפצת שבה תישאלו
אם ברצונכם לבצע שדרוג .אם תבחרו ,Yesהמכשיר
יכבה באופן אוטומטי ,יופעל מחדש ,והשדרוג יתחיל.
.3
מופיעה הודעה מוקפצת על מצב התקדמות העדכון .עם
תום העדכון ,המכשיר יכבה שוב באופן אוטומטי.
.4
לחצו על לחצן ההפעלה להפעלת המכשיר.
24
2:52:23
.2
לחצו על SUPPORTבחלקו הימני העליון של הדף.
.11ודאו כי לא הוכנס תקליטור למכשיר ולאחר מכן חברו את
זיכרון ה USB-הנייד לשקע ה USB-של המכשיר.
אם ברצונכם לבטל את השדרוג במהלך הורדת תוכנת
השדרוג ,לחצו על הלחצן .E
2014-03-27
.1
בקרו בכתובת .www.samsung.com/bluraysupport
.14הקולנוע הביתי יחפש את התוכנה בכונן ה .USB-כאשר
הוא ימצא את התוכנה ,יופיע החלון המוקפץ בקשת
עדכון.
.15בחרו .OKהקולנוע הביתי יכבה באופן אוטומטי ,יופעל
מחדש ,והשדרוג יתחיל .כשהשדרוג יסתיים ,הקולנוע
הביתי יכבה.
.16לחצו על לחצן ההפעלה להפעלת הקולנוע הביתי.
fl
ודאו כי אין תקליטור במכשיר בעת שדרוג התוכנה
באמצעות שקע ה.USB-
fl
עם תום שדרוג התוכנה ,בדקו את פרטי התוכנה בתפריט
.Software Upgrade
-עברית
HT-H5500K_30HK_30K_50K_50WK-SQ-HEB_0327.indd 24
.7
.8
בחלון המוקפץ הראשון ,לחצו על .Sendבחלון המוקפץ
השני ,לחצו על .Save File
.1
הפעילו את המכשיר.
.9
.2
בתפריט ,Software Upgradeהעבירו את Auto
Upgrade Notificationלמצב .On
אם קיימת גרסה חדשה זמינה של התוכנה ,תופיע
הודעה מוקפצת במכשיר.
אתרו את קובץ ההתקנה של DLNAעל הדיסק הקשיח,
ולאחר מכן לחצו עליו לחיצה כפולה.
.10בחלון שיקפוץ ,לחצו על ,Runולאחר מכן פעלו לפי
ההוראות המופיעות על המסך.
.3
כדי לשדרג את הקושחה ,בחרו באפשרות .Yesהמכשיר
יכבה באופן אוטומטי ,יופעל מחדש ,והשדרוג יתחיל.
.4
תופיע הודעה מוקפצת על התקדמות העדכון .עם תום
העדכון ,המכשיר ייכבה שוב באופן אוטומטי.
.5
לחצו על לחצן ההפעלה להפעלת המכשיר.
) Auto Upgrade Notificationהודעת שדרוג
אוטומטית(
אם המכשיר מחובר לרשת והפעלתם את הפונקציה Auto
,Upgrade Notificationהמכשיר יציג הודעה מוקפצת
כאשר גרסה חדשה של התוכנה תהיה זמינה.
הורידו את מדריך ההתקנה/הוראות של DLNAמאותה
כרטיסיית תוכנה על ידי לחיצה על סמל קובץ ה PDF-המתאים
בעמודת הקבצים שמימין .הקובץ ,בפורמט ,PDFירד ויפתח.
פעלו בהתאם להוראות ההתקנה וההגדרה של .DLNAניתן
לצפות ו/או לשמור את הקובץ.
fl
כדי להשתמש ב DLNA-עם הטלפון החכם ,יש לחבר את
הקולנוע הביתי ואת הטלפון החכם לאותה רשת.
הגדרות
.6
לחצו על הכרטיסייה .Software
בכרטיסיית התוכנה ,לחצו על הסמל EXEשמימין לשורה
.DLNA
הגדרת DLNA
הפונקציה DLNAמאפשרת להפעיל קובצי מוסיקה ,וידאו
ותמונות המאוחסנים במחשב באמצעות מכשיר זה .כדי
להשתמש ב ,DLNA-עליכם לחבר את המוצר למחשב
באמצעות הרשת )ראו עמוד (14ולהתקין את SAMSUNG
PC Share Managerבמחשב.
כדי להוריד את תוכנת DLNA
כדי להשתמש ב DLNA-עם המחשב ,יש להתקין בו את
תוכנת .DLNAניתן להוריד את תוכנת המחשב ולקבל הוראות
מפורטות לגבי השימוש ב DLNA-באתר .Samsung.com
.1
בקרו בכתובת .www.samsung.com
.2
לחצו על SUPPORTבחלקו העליון של הדף.
.3
הזינו את מספר הדגם של המכשיר בשדה החיפוש .עם
הזנת מספר הדגם ,תופיע רשימה נפתחת שתציג את
המכשירים שתואמים למספר הדגם.
.4
לחצו לחיצה שמאלית בעכבר על מספר הדגם של
מכשירכם ברשימה הנפתחת.
.5
בדף שיופיע ,גללו מטה ולאחר מכן לחצו על Firmware
.Manuals & Downloads
25
2:52:24
2014-03-27
-עברית
HT-H5500K_30HK_30K_50K_50WK-SQ-HEB_0327.indd 25
הפעלת תוכן
הקולנוע הביתי שלכם יכול לנגן תוכן המאוחסן בתקליטורי
,Blu-ray/DVD/CDבהתקני ,USBבמחשבים ,בטלפונים
חכמים ,בטאבלטים וביישומים.
כדי להפעיל תוכן המאוחסן במחשב או בהתקן נייד ,עליכם
לחבר את המחשב או ההתקן הנייד ואת המכשיר לרשת .כדי
להפעיל תוכן מהמחשב ,עליכם גם להוריד ולהתקין את תוכנת
הרשת ,DLNAאו שתוכנת רשת DNLAתהיה כבר מותקנת
במחשב.
.4
אם ההפעלה אינה מתחילה באופן אוטומטי ,לחצו על
הלחצן 6בשלט.
אחסון וניהול תקליטורים
כשעוברים ל Photos, Videos, Music-או תוכן אחר
מקבצים ,תופיע רשימה של קבצים ותיקיות .לחצו על הלחצן
האדום ) (Aכדי להציג את החלון המוקפץ ,Change Device
בעזרת הלחצנים ▲▼ עברו להתקן המבוקש ,ולאחר מכן לחצו
על .E
• אחיזת תקליטורים
טביעות אצבעות ושריטות עלהתקליטור עשויות להפחית את איכות
השמע והתמונה או לגרום לקפיצות.
הימנעו מלגעת במשטח התקליטור שבו התבצעההכתיבה.
אחזו את התקליטור בקצותיו כך שלא תותירו עליוטביעות אצבעות.
אין להדביק נייר או נייר דבק על התקליטור.• ניקוי תקליטורים
אם הותרתם טביעות אצבעות או לכלוךעל גבי התקליטור ,נקו אותו באמצעות
חומר ניקוי עדין מדולל במים ונגבו
באמצעות מטלית רכה.
בעת הניקוי ,נגבו בעדינות מפניםהתקליטור כלפי חוץ.
אחסון תקליטורים אין להניח את התקליטורים תחת שמש ישירה.
שמרו את התקליטורים במקום קריר ומאוורר.
שמרו את התקליטורים באריזת מגן נקייה ואחסנו
במאונך.
כשמחברים התקן בפעם הראשונה ,מופיע חלון מוקפץ שניתן
לשנות בו את התקן המקור באמצעות הלחצנים ◄►.
הפעלת תקליטור עם תוכן שהמשתמש
צרב
fl
מחשבים עם Windows 7או Windows 8כוללים תוכנת
.(Play To) DLNA
החלפת התקן המקור
אם שני התקנים או יותר מחוברים ליחידה המרכזית ,ניתן
להשתמש בכל אחת מהשיטות המתוארות להלן כדי להחליף
התקן מקור.
שיטה 1
במסך הבית ,עברו אל Change Deviceבעזרת הלחצנים
▲▼◄► ,ולאחר מכן לחצו על .E
החלון המוקפץ Change Deviceיופיע .השתמשו בלחצנים
▲▼ כדי לעבור להתקן הרצוי ולאחר מכן לחצו על .E
שיטה 2
שיטה 3
באפשרותכם להפעיל קובצי מולטימדיה שהקלטתם על גבי
תקליטורי ,Blu-ray, DVDאו .CD
הפעלת תקליטורים מסחריים
.1
לחצו על הלחצן כדי לפתוח את מגש התקליטורים.
.2
הניחו בעדינות תקליטור בתוך המגש כאשר תווית
התקליטור כלפי מעלה.
2014-03-27
.1
הכניסו תקליטור שהוקלט על ידי משתמש למגש
התקליטורים כאשר תוויתו פונה כלפי מעלה ,ולאחר מכן
סגרו את המגש.
.2השתמשו בלחצנים ▲▼◄► כדי לבחור בסוג התוכן
שברצונכם להציג או להפעיל Photos, Videos -או
- Musicולאחר מכן לחצו על הלחצן .E
או
.2-1בחרו ב Play disc-במסך הבית .המסך Play disc
יופיע .בעזרת הלחצנים ▲▼ בחרו את סוג התוכן
המבוקש Photos, Videos ,או .Music
26
2:52:26
.3
לחצו על הלחצן כדי לסגור את מגש התקליטורים.
ההפעלה תתחיל באופן אוטומטי.
-עברית
HT-H5500K_30HK_30K_50K_50WK-SQ-HEB_0327.indd 26
במידת הצורך ,השתמשו בלחצנים ▲▼◄► כדי לבחור
תיקייה ,ולאחר מכן לחצו על הלחצן .E
בחרו קובץ להצגה או להפעלה ולאחר מכן לחצו על
הלחצן .E
לחצו על הלחצן RETURNכדי לצאת מתיקייה או לחצו
על הלחצן EXITלחזרה למסך הבית.
עברו לעמודים 28עד 32לקבלת הוראות המסבירות איך
להפעיל סרטוני וידאו ,מוסיקה ותמונות מהתקן .USB
.3
.3
מסך המציג את תוכני התקליטור יופיע .בהתאם לאופן
שבו מסודרים התכנים ,יוצגו תיקיות ,קבצים בודדים או
שניהם.
.4
.4
במידת הצורך ,השתמשו בלחצנים ▲▼◄► כדי לבחור
תיקייה ,ולאחר מכן לחצו על הלחצן .E
.5
.5
השתמשו בלחצנים ▲▼◄► כדי לבחור בקובץ להצגה
או הפעלה ,ולאחר מכן לחצו על הלחצן .E
.6
.6
לחצו על הלחצן RETURNפעם אחת או מספר פעמים
כדי לעזוב את המסך הנוכחי ,כדי לצאת מתיקייה ,או כדי
לחזור למסך הבית.
לחצו על הלחצן EXITכדי לחזור ישר למסך הבית.
שיטה :2כשמדליקים את המכשיר אחרי
.7
עברו לעמודים 28עד 32לקבלת הוראות המסבירות איך
להפעיל סרטוני וידאו ,מוסיקה ותמונות מתקליטור.
.1
הפעילו את המכשיר.
.2
לחצו על Change Deviceובחרו התקן .USB
.3
ישנן שתי שיטות להפעלה או הצגה של קובצי מולטימדיה
הממוקמים על גבי התקן USBבאמצעות המכשיר שלכם.
השתמשו בלחצנים ◄► כדי לבחור Photos, Videos
או Musicבמסך הבית ,ולאחר מכן לחצו על הלחצן
.E
.4
שיטה :1כשמחברים התקן USB
.5
במידת הצורך ,השתמשו בלחצנים ▲▼◄► כדי לבחור
תיקייה ,ולאחר מכן לחצו על הלחצן .E
בחרו קובץ להצגה או להפעלה ולאחר מכן לחצו על
הלחצן .E
לחצו על הלחצן RETURNכדי לצאת מתיקייה או לחצו
על הלחצן EXITלחזרה למסך הבית.
עברו לעמודים 28עד 32לקבלת הוראות המסבירות איך
להפעיל סרטוני וידאו ,מוסיקה ותמונות מהתקן .USB
הפעלת קבצים מהתקן USB
כשהמכשיר דולק
.1
.6
החלון המוקפץ New Device Connected.יופיע.
.7
Music
Videos
Play disc
Photos
New device connected.
USBקסיד
fl
אם תכניסו תקליטור בזמן הפעלת התקן USBאו טלפון,
ישתנה מצב ההתקן ל) Disc-תקליטור( באופן אוטומטי.
fl
אם הטלפון הסלולרי שלכם תואם ,DLNAתוכלו להפעיל
תכנים ללא צורך בחיבור כבל ) .USBראו עמוד (36
הפעלת תוכן
שמחברים את התקן הUSB-
Photos
Videos
Blu-ray
Music
Settings
Screen Change Function
mirroring Device
Opera TV Moreיישום 4
Store
יישום 3
יישום 2
יישום 1
flאם החלון המוקפץ לא מופיע ,עברו לשיטה .2
.2השתמשו בלחצנים ▲▼ כדי לבחור Photos, Videos
או ,Musicולאחר מכן לחצו על הלחצן .Eבהתאם
לאופן שבו התוכן מאורגן ,יוצגו תיקיות ,קבצים בודדים
או שניהם.
27
2:52:28
2014-03-27
-עברית
HT-H5500K_30HK_30K_50K_50WK-SQ-HEB_0327.indd 27
הפעלת תוכן
שליטה בהפעלת וידאו
באפשרותכם לשלוט בהפעלת תוכן וידאו המאוחסן על גבי
תקליטור ,Blu-ray/DVDהתקן ,USBהתקן נייד או מחשב.
בהתאם לתקליטור או לתוכן ,חלק מהפונקציות המתוארות
במדריך זה עשויות לא להיות זמינות.
לחצנים על גבי השלט רחוק המשמשים
להפעלת וידאו
TITLE MENU
2
POPUP
במהלך ההפעלה ,לחצו על לחצן זה כדי להציג את תפריט
התקליטור.
במהלך ההפעלה ,לחצו על לחצן זה כדי להציג את תפריט
הכותר.
• אם התקליטור מכיל רשימת השמעה ,לחצו על
הלחצן הירוק ) (Bכדי לעבור אל רשימת ההשמעה.
0
1
REPEAT
DISC MENU
TITLE MENU
DISC MENU
HOME
2השימוש בתפריט התקליטור ,תפריט הכותר,
התפריט המוקפץ ,ורשימת הכותרים
POPUP MENU
במהלך ההפעלה ,לחצו על לחצן זה כדי להציג את
התפריט המוקפץ.
KARAOKE
3
3הפעלה חוזרת
1לחצנים הקשורים להפעלה
המכשיר אינו משמיע קול במצבים Search, Slowאו
.Step
• כדי לחזור למהירות הפעלה רגילה ,לחצו על
הלחצן .6
6
להפעלת התקליטור.
5
לעצירת ההפעלה.
7
להשהיית ההפעלה.
הפעלה
בהילוך מהיר
במהלך ההפעלה ,לחצו על הלחצן 3
או .
בכל פעם שתלחצו על הלחצן 3או ,
מהירות ההפעלה תשתנה.
הפעלה
בהילוך איטי
במצב השהיה ,לחצו על הלחצן .
בכל פעם שתלחצו על הלחצן ,
מהירות ההפעלה תשתנה.
הפעלה פריים
אחר פריים
במצב השהיה ,לחצו על הלחצן .7
בכל פעם שתלחצו על הלחצן ,7יופיע
פריים חדש.
הפעלה
בדילוג
במהלך ההפעלה ,לחצו על הלחצן 1
או .2
בכל פעם שתלחצו על הלחצן 1או 2
,התקליטור יעבור לפרק הקודם או הבא
בקובץ.
28
2:52:30
2014-03-27
.1
במהלך ההפעלה ,לחצו על הלחצן REPEAT
שבשלט.
.2
לחצו על הלחצנים ▲▼ כדי לבחור
Off, Title, Chapter, Allאו Repeat A-B
ולאחר מכן לחצו על הלחצן .E
Repeat A-B
.1
לחצו על הלחצן Eבנקודה שבה ברצונכם
להתחיל את ההפעלה החוזרת ).(A
.2
לחצו על הלחצן Eבנקודה שבה ברצונכם
לעצור את ההפעלה החוזרת ).(B
.3
כדי לחזור להפעלה רגילה ,לחצו שוב על הלחצן
.REPEAT
.4
לחצו על הלחצן .E
fl
בהתאם לתקליטור ,המסך עשוי שלא להציג את כל
אפשרויות ההפעלה החוזרת.
fl
המסך עשוי שלא להציג את האפשרויות Chapterאו
Titleבאופן מיידי .המשיכו ללחוץ על הלחצנים ▲▼
עד שבחירתכם תהיה בתוך השדה המתאים.
fl
לחזרה להפעלה רגילה ,לחצו שוב על הלחצן
,REPEATלחצו על הלחצנים ▲▼ כדי לבחור Off
ולאחר מכן לחצו על הלחצן .E
fl
ייתכן שהמסך לא יציג מייד את האפשרות Repeat
.A-Bהמשיכו ללחוץ על הלחצנים ▲▼ עד
שהאפשרות Repeat A-Bתהיה בתוך השדה
המתאים.
fl
יש לקבוע את נקודה ) (Bלפחות 5שניות לאחר נקודה
).(A
-עברית
HT-H5500K_30HK_30K_50K_50WK-SQ-HEB_0327.indd 28
השימוש בתפריט הכלים
Subtitle
במהלך ההפעלה ,לחצו על הלחצן .TOOLS
להגדרת שפת הכתוביות הרצויה.
Title
Angle
אם יש יותר מכותר אחד בתקליטור או בהתקן ,פונקציה זו
מאפשרת לבחור בכותר המבוקש או לעבור אליו.
לצפייה בסצנה מזווית אחרת .האפשרות ) Angleזווית(
מציגה את מספר הזוויות הזמינות לצפייה ),1/3 ,1/2 ,1/1
וכו'(.
Playing Time
BONUSVIEW Video
למעבר לנקודת הפעלה ספציפית .הזינו את הנקודה
הרצויה בעזרת לחצני הספרות.
BONUSVIEW Audio
להגדרת אפשרות ה Bonusview-הרצויה.
Repeat Mode
אפשרויות בחירה המוצגות בתפריטים רק תוך כדי
לחזרה על כותר ,על פרק או על קטע מסומן.
הפעלה של קובץ
לכוונון השהיית השמע ,כדי שהשמע יסתנכרן לווידאו .ניתן
להגדיר השהיה בין
0ל 300-אלפיות שנייה.
Picture Settings
Full Screen
להגדרת גודל המסך המלא הרצוי .ניתן לבחור Original,
) Mode1גדול יותר( ,ו) Mode2-הכי גדול(.
Information
להגדרת מצב התמונה.
Mode
:Userלכוונון ידני של הפונקציות ,Brightness, Contrast, Colourו.Sharpness-
:Dynamicבחרו בהגדרה זו להגברת החדות. :Normalבחרו בהגדרה זו עבור רוב יישומיהצפייה.
:Movieזוהי ההגדרה הטובה ביותר עבור צפייהבסרטים.
אפשרויות בחירה המוצגות בתפריטים רק כאשר
בחרו להצגת מידע על קובץ הווידאו.
fl
תפריט הכלים עשוי להשתנות בהתאם לתקליטור או
להתקן האחסון .ייתכן שלא כל האפשרויות יוצגו.
יצירת רשימת הפעלה של סרטים
ניתן ליצור רשימת הפעלה של קובצי וידאו כמעט באותה צורה
שבה יוצרים רשימת השמעה של קובצי מוסיקה .פנו לעמוד
30לקבלת הוראות.
השמעת תקליטור שמע מסחרי מוקלט
מראש
מופעל תקליטור BD/DVD
.1
Chapter
למעבר לפרק שברצונכם לצפות בו.
Audio
להגדרת שפת השמע הרצויה.
29
2:52:33
2014-03-27
הפעלת תוכן
Audio Sync
הכניסו תקליטור שמע ) (CD-DAאו תקליטור MP3
למגש התקליטורים.
• עבור תקליטור שמע ) ,(CD-DAהרצועה הראשונה
תופעל באופן אוטומטי .רצועות בתקליטור ופעלות
בסדר שבו הן הוקלטו על-גבי התקליטור.
• בתקליטורי ,MP3לחצו על הלחצנים ◄► כדי לבחור
באפשרות ,Musicולאחר מכן לחצו על הלחצן .E
-עברית
HT-H5500K_30HK_30K_50K_50WK-SQ-HEB_0327.indd 29
הפעלת תוכן
4
השמעה מהירה )תקליטור שמע ][CD-DA
בלבד(:
במהלך ההפעלה ,לחצו על הלחצן 3או .
בכל פעם שתלחצו על הלחצן 3או ,מהירות
ההפעלה תשתנה.
5
לחצן : 7השהיית רצועה.
Pl li
Playlist
0/16
Tools
Track
TRACK 001
Repeat Mode
Rip
Karaoke Recording
' Return
< Adjust
> Move
04:02
TRACK 004
03:43
TRACK 005
03:40
TRACK 006
6
00:00/00:00
לחצן : 6להפעלת הרצועה שנבחרה.
השמעה חוזרת של רצועות
' Return
Tools
" Pause
Select
CD
.2
כדי להשמיע רצועה מסוימת ,השתמשו בלחצנים ▲▼
בשלט רחוק כדי לבחור ברצועה ,ולאחר מכן לחצו על
הלחצן .E
fl
לקבלת מידע נוסף על השמעת מוסיקה ,עיינו בסעיף
"שליטה בהשמעת מוסיקה" להלן.
באפשרותכם להגדיר במוצר השמעה חוזרת של רצועות.
.1
תוך כדי השמעת המוסיקה ,לחצו על הלחצן .TOOLS
.2
בעזרת הלחצנים ◄► בחרו Off, Trackאו One, All
או Shuffleב ,Repeat Mode-ולאחר מכן לחצו על
הלחצן .E
יצירת רשימת השמעה
שליטה בהשמעת מוסיקה
.1
תוך כדי השמעת מוסיקה מתקליטור CDאו DVD
מסחרי ,לחצו על הלחצן 5או .RETURNמופיע מסך
רשימת המוסיקה .אם אתם יוצרים רשימת השמעה
מקובצי מוסיקה שנמצאים בתקליטור שנוצר על ידי
משתמש או בהתקן ,USBפתחו את רשימת המוסיקה
בהתאם להוראות בעמוד 26או .27
.2
בעזרת הלחצנים ▲▼◄► עברו לקובץ הרצוי ,ולאחר
מכן לחצו על הלחצן הצהוב ) (Cכדי לבחור אותו .חזרו
על תהליך זה כדי לבחור קבצים נוספים.
.3
אם ברצונכם לבחור את כל הקבצים ,לחצו על הלחצן
) TOOLSכלים( ,בעזרת הלחצנים ▲▼ בחרו בSelect-
Allולאחר מכן לחצו על .Eאם ברצונכם לבטל את
בחירת כל הקבצים ,לחצו על הלחצן ,TOOLSבחרו
ב Deselect All-ולאחר מכן לחצו על .E
ניתן לשלוט בהפעלת תכני מוסיקה הנמצאים על גבי ,DVD
,USB ,CDהתקן נייד או מחשב .בהתאם לתקליטור או לתוכן,
חלק מהפונקציות המתוארות במדריך זה עשויות לא להיות
זמינות.
לחצני השלט המשמשים להשמעת מוסיקה
3
2
1
6
5
4
9
8
TITLE MENU
4
POPUP
1
7
DISC MENU
0
5
6
2
3
1
לחצני הספרות :במהלך הפעלת רשימת השמעה,
לחצו על מספר הרצועה הרצויה .הרצועה הנבחרת
מופעלת.
2
דילוג :במהלך ההשמעה ,לחצו על הלחצנים 1
או 2כדי לעבור לדף הקודם או הבא של רשימת
ההשמעה.
3
לחצני : 5לעצירת רצועה.
30
2:52:34
2014-03-27
1/2 Page
' Return
TRACK 001
1 files selected
Music
TRACK 002
TRACK 001
04:27
05:57
TRACK 004
TRACK 003
03:41
04:07
TRACK 006
TRACK 005
03:35
03:17
TRACK 008
TRACK 007
03:49
03:47
TRACK 010
TRACK 009
03:45
03:53
() Jump to Page
Tools
Select
a Change Device
㾎
CD
-עברית
HT-H5500K_30HK_30K_50K_50WK-SQ-HEB_0327.indd 30
.4
כדי להסיר קובץ מ ,Playlist-גשו לקובץ ולחצו על הלחצן
הצהוב ).(C
fl
ההעתקה מתקליטור מקודדת את המוסיקה בפורמט
.mp3בקצב של .192kbps
.5
לחצו על הלחצן Eכדי להשמיע את הקבצים שנבחרו.
המסך Playlistיופיע.
כדי לעבור לרשימת המוסיקה ,לחצו על הלחצן 5או על
הלחצן .RETURN
fl
.7
כדי לחזור ל) Playlist-רשימת ההשמעה( ,לחצו על
הלחצן .E
fl
במסך רשימת הרצועות ניתן לבחור Select Allאו
.Deselect All
השתמשו ב Select All-כדי לבחור את כל הרצועותולאחר מכן לחצו על הלחצן .Eאפשרות זו תבטל את
הבחירה ברצועות בודדות.
השתמשו ב Deselect All-כדי לבטל בבת אחת אתבחירת כל הרצועות.
ניתן ליצור בתקליטור שמע ) (CD-DAרשימת השמעה
שכוללת עד 99רצועות.
fl
אם עוברים מהמסך Playlistלרשימת המוסיקה ולאחר
מכן חוזרים ל ,Playlist-השמעת המוסיקה תתחיל מחדש
מתחילת ה.Playlist-
העתקה מתקליטור
ניתן להציג תוכן תמונות הנמצא על גבי תקליטור ,DVDהתקן
,USBהתקן נייד או מחשב.
השימוש בתפריט הכלים
.1
הכניסו התקן USBלשקע ה USB-שבחזית המכשיר.
.2
במסך ההשמעה ,השתמשו בלחצנים ▲▼ כדי לבחור
רצועה ,ולאחר מכן לחצו על הלחצן הצהוב ) .(Cסימן
אישור יופיע משמאל לרצועה.
במהלך ההפעלה ,לחצו על הלחצן .TOOLS
Start / Stop Slide Show
להפעלה/השהיה של מצגת שקופיות.
.3
חזרו על שלב 2כדי לבחור ולסמן רצועות נוספות.
Slide Show Speed
.4
כדי להסיר רצועה מהרשימה ,עברו אל הרצועה ,ולאחר
מכן לחצו שוב על הלחצן הצהוב ) .(Cסימון הרצועה
יוסר.
לשינוי מהירות מצגת השקופיות.
Background Music
.5
בסיום הפעולה ,לחצו על הלחצן .TOOLS
התפריט Toolsיופיע.
להוספת מוזיקת רקע למצגת שקופיות.
.6
בעזרת הלחצנים ▲▼ בחרו ב ,Rip-ולאחר מכן לחצו על
הלחצן .Eהמסך Ripיופיע.
.7
בעזרת הלחצנים ▲▼ בחרו את ההתקן שבו ברצונכם
לאחסן את הקבצים שהועתקו ,ולאחר מכן לחצו על
הלחצן .E
flאין לנתק את ההתקן במהלך ההעתקה.
.8אם ברצונכם לבטל את ההעתקה ,לחצו על הלחצן E
ולאחר מכן בחרו .Yesבחרו Noלהמשך ההעתקה.
.9
בסיום ההעתקה ,תופיע ההודעה
") "Ripping is Completed.ההעתקה הושלמה(.
.10לחצו על הלחצן Eכדי לחזור למסך ההשמעה.
fl
fl
Zoom
להגדלת התמונה הנוכחית.
)הגדלה עד פי (4
Rotate
לסיבוב התמונה) .התמונה תסתובב בכיוון השעון או נגד
כיוון השעון(.
Information
הצגת מידע על התמונה ,כולל שם ,גודל וכדומה.
fl
התפריט Toolsעשוי להשתנות בהתאם לתקליטור או
להתקן האחסון .ייתכן שלא כל האפשרויות יוצגו.
fl
להפעלת פונקציית מוזיקת הרקע ,יש לאחסן את קובץ
התמונה באותו אמצעי אחסון של קובץ המוסיקה .עם
זאת ,ייתכן שאיכות השמע תושפע מקצת הסיביות של
קובץ ה ,MP3-מגודל התמונה ומשיטת הקידוד.
פונקציה זו אינה זמינה לתקליטורי שמע מסוג .DTS
ייתכן שתקליטורים מסוימים אינם תומכים בפונקציה זו.
31
2:52:38
הפעלת תוכן תמונות
2014-03-27
הפעלת תוכן
.6
-עברית
HT-H5500K_30HK_30K_50K_50WK-SQ-HEB_0327.indd 31
הפעלת תוכן
• לאחר שתלחצו על הלחצן ,TUNER MEMORY
הכיתוב הספרות ייעלם מהתצוגה והתחנה תישמר
בזיכרון.
יצירת רשימת תמונות להצגה
ניתן ליצור רשימת תמונות להצגה בדומה ליצירה של רשימת
השמעה של מוסיקה .פנו לעמוד 30לקבלת הוראות .בחרו
קובצי תמונה במקום קובצי מוסיקה.
לשמירת תחנה נוספת בזיכרון ,חזרו על צעדים 2עד .4
• כדי להאזין לתחנה שמורה ,לחצו על הלחצן
.TUNING UP, DOWN
.5
האזנה לרדיו
•
שימוש בקריוקי
כדי להאזין לרדיו עליכם לחבר את אנטנת הFM-
שקיבלתם.
באפשרותכם ליהנות מקריוקי עם מוסיקה.
הפעלת הרדיו באמצעות השלט
.1
לחצו על הלחצן FUNCTIONעד לבחירת .FM
.2
התחברו לתחנה המבוקשת.
• קביעת תחנות מראש :1לחצו על הלחצן 5כדי
לבחור ב ,PRESET-ולאחר מכן לחצו על הלחצן
TUNING UP, DOWNלבחירת תחנה מוגדרת
מראש.
ניתן לבחור תחנה שמורה רק אחרי שמוסיפיםתחנות שמורות לזיכרון המכשיר .ראו "שמירת
תחנות" להלן.
• כוונון ידני :לחצו על הלחצן 5כדי לבחור
ב ,MANUAL-ולאחר מכן לחצו על הלחצן
TUNING UP, DOWNלבחירת תדר נמוך או
גבוה יותר.
• כוונון אוטומטי :לחצו על הלחצן 5כדי לבחור
ב ,MANUAL-ולאחר מכן לחצו והחזיקו את הלחצן
TUNING UP, DOWNלחיפוש אוטומטי ברצועת
התדרים.
הגדרת מונו/סטריאו
לחצו על הלחצן .MO/ST
• בכל לחיצה על הלחצן ,הצליל מתחלף בין STEREO
ו.MONO-
• באזור עם עצמת קליטה חלשה ,בחרו ב MONO-לשידור
צלול ונטול הפרעות.
שמירת תחנות
דוגמה :הוספת התחנה FM 89.10לזיכרון.
.1
לחצו על הלחצן FUNCTIONעד לבחירת .FM
.2
בעזרת הלחצן TUNING UP, DOWNבחרו >.<89.10
.3
לחצו על הלחצן .TUNER MEMORY
• הכיתוב הספרות מהבהב על המסך.
לחצו שוב על הלחצן .TUNER MEMORY
• לחצו על הלחצן TUNER MEMORYלפני
ש-הספרות ייעלם בעצמו מהמסך.
.4
32
2:52:40
2014-03-27
.1
חברו את המיקרופון לחלק הקדמי של המכשיר.
.2
במסך הבית ,בחרו באפשרות ,Settingsולאחר מכן
לחצו על הלחצן .E
.3
בחרו באפשרות ,Audioולאחר מכן לחצו על הלחצן
.E
.4
בחרו באפשרות ,My karaokeולאחר מכן לחצו על
הלחצן .E
• ניתן לעיין בציוני הקריוקי ולכוון את עוצמת הקול של
השירה.
• ציוני הקריוקי מוצגים אוטומטית כשהאפשרות
Karaoke scoringמוגדרת ל On-ויש מיקרופון
מחובר .אם אינכם מעוניינים בתצוגת הציון ,כוונו את
האפשרות Karaoke scoringלמצב .Off
• אם ברצונכם להחליש את עוצמת הקול של השירה
במקור ,בחרו ב Reduce Vocals-בפונקציה My
.karaoke
הקלטה
ניתן להקליט קריוקי עם מוסיקה.
.1
תוך כדי ההשמעה ,לחצו על הלחצן TOOLSובחרו
,Karaoke Recordingולאחר מכן לחצו על הלחצן
.E
לחצו על הלחצן 5כדי לסיים את ההקלטה.
.3
בסיום ההקלטה תיווצר בכונן האחסון מסוג USBתיקייה
בשם KARAOKEוהקובץ יישמר בפורמט
.KARAOKE.mp3
.2
fl
כדי לשמור את הקובץ המוקלט ,יש להכניס כונן אחסון
מסוג .USB
fl
הקובץ המוקלט יוצג בכניסות הבאות ל-
,Photos,Videosו.Music -
fl
הרחיקו את המיקרופון מהרמקולים אם אתם שומעים
קולות מוזרים )צווחות או יבבות( בעת שימוש בפונקציית
הקריוקי .כמו כן ,מומלץ להנמיך את עוצמת השמע של
המיקרופון או של הרמקול.
-עברית
HT-H5500K_30HK_30K_50K_50WK-SQ-HEB_0327.indd 32
fl
fl
fl
המיקרופון אינו פועל במצבים D. IN, AUX, FMו.BT-
לחיבור קולנוע ביתי להתקן Bluetooth
ציוני הקריוקי מוצגים אוטומטית כשהאפשרות Karaoke
Scoringמוגדרת ל On-ויש מיקרופון מחובר .נתקו את
המיקרופון אם אין ברצונכם להציג את הציון.
המיקרופון נעשה זמין 10שניות אחרי הופעת תפריט
הבית על גבי המסך.
התחבר
השימוש בBluetooth-
ניתן להשתמש בהתקן Bluetoothכדי ליהנות ממוסיקה
המושמעת בסטריאו באיכות גבוהה ,באופן אלחוטי לגמרי!
התקן Bluetooth
מה זה ?Bluetooth
Bluetoothהיא טכנולוגיה שמאפשרת להתקנים תואמי
Bluetoothלהתחבר בקלות אלה עם אלה באמצעות חיבורים
אלחוטיים קצרים.
• התקן Bluetoothעשוי להשמיע קולות זמזום או לפעול
באופן לא תקין:
כאשר חלק מגופכם נוגע במערכת שמשדרת אל התקןה Bluetooth-או אל מערכת הקולנוע הביתי או שמקבלת
מהם שידורים.
כאשר השידורים מההתקן נחסמים על ידי מכשולים כגוןקיר ,פינה או מחיצות משרדיות.
כאשר שידורי ההתקן משובשים על ידי הפרעותחשמליות מהתקנים המשדרים באותו טווח תדרים ,כגון
מכשירים רפואיים ,מיקרוגלים ורשתות LANאלחוטיות.
• בצעו צימוד של הקולנוע הביתי להתקן ה Bluetooth-כאשר
הם קרובים אחד אל השני.
• כשהמרחק בין הקולנוע הביתי לבין התקן הBluetooth-
גדול ,האיכות נמוכה יותר.
אם המרחק עולה על טווח הפעולה של התקן
ה ,Bluetooth-החיבור יתנתק.
• באזורים בעלי איכות קליטה ירודה ,ייתכן שחיבור
ה Bluetooth-לא יפעל כהלכה.
• לקולנוע הביתי יש טווח קליטה יעיל של עד 10מטרים לכל
הכיוונים ללא מכשולים .החיבור יתנתק באופן אוטומטי
כאשר ההתקן יוצב מחוץ לטווח הפעולה .גם בתוך טווח
הפעולה ,ייתכן שאיכות הקול תיפגע בשל מכשולים כגון
קירות או דלתות.
• התקן אלחוטי זה עשוי לגרום להפרעות חשמליות במהלך
הפעלתו.
33
2:52:41
2014-03-27
.1
לחצו על הלחצן FUNCTIONבשלט של המכשיר כדי
להציג את ההודעה .BT
.2
בחרו בתפריט Bluetoothבהתקן ה Bluetooth-שאותו
תרצו לחבר .לקבלת הוראות יש לעיין במדריך למשתמש
של התקן ה.Bluetooth-
.3
בחרו את התפריט של אוזניות הסטריאו בהתקן
ה.Bluetooth-
• תוצג בפניכם רשימת התקנים.
.4
בחרו " "[HTS]-HXXXXXמהרשימה.
• כאשר הקולנוע הביתי מחובר להתקן ה,Bluetooth-
שם ההתקן של התקן ה Bluetooth-המחובר ,ואחריו
שם הקולנוע הביתי ,יופיעו בתצוגה הקדמית של
הקולנוע הביתי.
.5
השמיעו מוסיקה בהתקן המחובר.
• באפשרותכם להאזין למוסיקה המושמעת בהתקן
ה Bluetooth-המחובר על גבי מערכת הקולנוע
הביתי.
fl
הקולנוע הביתי תומך בנתוני Middle Quality SBCבלבד
)עד ל ,(237kbps@48kHz-ואינו תומך בנתוני High
).Quality SBC ([email protected]
fl
התכונה AVRCPאינה נתמכת .פונקציונליות התכונה
תשתנה ,בהתאם למפרטי ההתקן המחובר.
fl
fl
יש לחבר רק להתקן Bluetoothהתומך בפרופיל .A2DP
fl
הפעלת תוכן
לפני שתתחילו ,ודאו שהתקן ה Bluetooth-תומך בפונקציית
אוזניות הסטריאו התואמת ה.Bluetooth-
ניתן לבצע צימוד של התקן Bluetoothאחד בלבד בכל
פעם.
פונקציות החיפוש או החיבור עשויות לא לפעול כהלכה
במקרים הבאים:
אם קיים שדה חשמלי חזק ליד או בקרבת הקולנועהביתי.
אם יש צימוד של מספר התקני Bluetoothבו-זמניתלמכשיר.
-עברית
HT-H5500K_30HK_30K_50K_50WK-SQ-HEB_0327.indd 33
הפעלת תוכן
אם התקן ה Bluetooth-כבוי ,אינו נמצא במקומו אושיש בו תקלה.
שימו לב שישנם התקנים כגון מיקרוגלים ,מתאמי LANאלחוטיים ,מנורות פלואורסנט ותנורי גז המשתמשים
באותו טווח תדרים שבו משתמש התקן ה,Bluetooth-
והעשויים לגרום להפרעות חשמליות.
fl
כדי להשיג תאימות Bluetoothטובה בהתקנים נוספים,
כגון טלפונים ניידים ,אנו ממליצים לעדכן את ההתקן
לגרסה האחרונה.
לניתוק התקן ה Bluetooth-מהקולנוע הביתי
באפשרותכם לנתק את התקן ה Bluetooth-מהקולנוע
הביתי .לקבלת הוראות יש לעיין במדריך למשתמש של התקן
ה.Bluetooth-
• כאשר הקולנוע הביתי מנותק מהתקן ה ,Bluetooth-יופיע
הכיתוב DISCONNECTEDעל התצוגה הקדמית של
הקולנוע הביתי.
לניתוק הקולנוע הביתי מהתקן הBluetooth-
( בלוח הקדמי של הקולנוע הביתי כדי
לחצו על הלחצן )
לעבור ממצב BTלמצב אחר או כדי לכבות את הקולנוע
הביתי.
• פרט למקרה שבו אתם מנתקים את הקולנוע הביתי על ידי
שינוי פונקציות ,התקן ה Bluetooth-ימתין זמן מה לתגובה
מהקולנוע הביתי לפני סיום החיבור) .זמן הניתוק עשוי
להשתנות בהתאם להתקן ה(.Bluetooth-
fl
במצב חיבור ,Bluetoothחיבור ה Bluetooth-יתנתק אם
המרחק בין מערכת הקולנוע הביתי והתקן הBluetooth-
עולה על 10מטרים .כאשר התקן הBluetooth-
יחזור לטווח אפקטיבי או שתפעילו מחדש את התקן
ה , Bluetooth-תצטרכו לבצע שוב צימוד של ההתקן
והקולנוע הביתי כדי להתחבר מחדש.
fl
במצב ,Bluetoothשומר המסך יופעל אם התקן
ה Bluetooth-נשאר במצב Readyלמשך
5דקות .כדי לחבר מחדש את התקן ה ,Bluetooth-כבו
את שומר המסך ולאחר מכן חברו את ההתקן .כדי לכבות
את שומר המסך ,לחצו על לחצן כלשהו על גבי השלט
הרחוק )לחצן עוצמת הקול ,ספרה וכו'(.
fl
הפונקציה Quick startזמינה כשכבל החשמל )(AC
מחובר לרשת החשמל.
fl
כדי להשתמש בפונקציה זו ,הגדירו את
Settings > System > Quick startל.On-
flכדי להשתמש בפונקציה זו ,יש להקים תחילה חיבור
Bluetoothבין הקולנוע הביתי ובין ההתקן החכם .במילים
אחרות ,הקולנוע הביתי צריך להופיע ברשימת התקני
ה Bluetooth-המוכרים בהתקן החכם.
.1חברו את ההתקן החכם למכשיר באמצעות .Bluetooth
)למידע על חיבורי ,Bluetoothעיין במדריך של ההתקן
החכם(.
.2
שימוש בNear Field) NFC-
- Communicationתקשורת שדה קרוב(
פעלו לפי תהליך ההגדרה הפשוט המתואר להלן כדי לחבר
את ההתקן תואם ה NFC-שלכם לקולנוע הביתי באמצעות
.Bluetoothניתן להשמיע מוסיקה מהטלפון החכם באמצעות
הקולנוע הביתי.
.1
הפעילו את פונקציית ה NFC-בטלפון החכם ובדקו
שפונקציית נעילת המסך בטלפון החכם כבויה .פונקציית
ה NFC-של הטלפון החכם לא תפעל את נעילת המסך
מופעלת.
.2
באמצעות ההתקן התומך ב ,NFC-געו בעדינות בלוגו
בחלקו העליון של הקולנוע הביתי.
הNFC-
.3
במכשיר החכם יופיע חלון מוקפץ שישאל אתכם
אם ברצונכם להמשיך בחיבור ה .Bluetooth-בחרו
באפשרות 'כן'.
• כשהחיבור יושלם ,תופיע ההודעה 'מחובר'.
.4
כדי לנתק את התקן ה ,NFC-געו פעם נוספת בלוח
העליון של הקולנוע הביתי.
• כדי לחבר התקן NFCנוסף כשהטלפון החכם עדיין
מחובר ,געו באמצעות התקן זה בלוח העליון של
הקולנוע הביתי .הקולנוע הביתי יתנתק תחילה
מהטלפון החכם ויתחבר לטלפון החכם השני.
הפעלה באמצעות Bluetooth
כשהקולנוע הביתי מכובה ,חיבור ההתקן החכם למכשיר דרך
חיבור Bluetoothיכלול להדליק את הקולנוע הביתי.
34
2:52:43
2014-03-27
כשהקולנוע הביתי יהיה מחובר ,הוא ידליק את עצמו
אוטומטית במצב .BT
• בחרו בהתקן החכם את המוסיקה שברצונכם
להשמיע.
-עברית
HT-H5500K_30HK_30K_50K_50WK-SQ-HEB_0327.indd 34
fl
מיקום אנטנת ה NFC-שונה בכל טלפון חכם .בדקו
איפה נמצאת אנטנת ה NFC-לפני שתתחברו .לפני
ההתחברות ,עיינו במדריך למשתמש של הטלפון הנייד
ואתרו את המיקום.
fl
אם יש לטלפון החכם כיסוי עבה ,ייתכן שהחיבור לא
יצליח.
fl
חיבור ה NFC-עובד גם כשהקולנוע הביתי כבוי ,אם
הפונקציה Quick startנמצאת ב .On-עם זאת ,חיבור
ה NFC-יעבוד לאחר הדלקת הקולנוע הביתי ,אם כבל
החשמל נותק וחובר מחדש.
fl
הוא סימן מסחרי או סימן
הסימן
מסחרי רשום של NFC Forum, Inc.
בארצות הברית ובמדינות נוספות.
fl
לא ניתן להגדיר תיוג של NFCעבור
חיבור Bluetoothתוך כדי הפעלת
המכשיר וכיבויו.
fl
תיוג ה NFC-עבור חיבור Bluetooth
לא יפעל בזמן שנורית המחוון של
הסוללה מהבהבת.
השתמשו ב:TV SOUND-
(1
כשברצונכם להאזין לטלוויזיה באמצעות
הרמקולים של הקולנוע הביתי.
כשברצונכם להאזין לשמע מהתקן USB
המחובר לטלוויזיה באמצעות הרמקולים של
הקולנוע הביתי.
מפרט התמיכה ב TV SOUND-פועל/כבוי:
(2
ANYNET+
)(HDMI-CEC
הגדרה
Note2
פועל
S3/S4
Note3
כבוי
שימוש בלחצני השלט רחוק לאפקטים
המיוחדים
לא מתפקד
TV SOUND
TV SOUND
אם הטלוויזיה שלכם תומכת ב-
) ,Anynet+ (HDMI-CECהלחצן TV SOUNDמאפשר
להפנות את השמע מהטלוויזיה לרמקולים של הקולנוע
הביתי או לרמקולים של הטלוויזיה .לשימוש ,בצעו את
הפעולות הבאות:
הרמקולים
של הטלוויזיה
ב"השתק"
קול מהרמקולים
של הטלוויזיה
קול מהרמקולים
של הקולנוע הביתי
הרמקולים של
הקולנוע הביתי
ב"השתק"
קול מהרמקולים
של הטלוויזיה
קול מהרמקולים
של הטלוויזיה
קול מהרמקולים
של הקולנוע הביתי
הרמקולים של
הקולנוע הביתי
ב"השתק"
קול מהרמקולים
של הטלוויזיה
קול מהרמקולים
של הטלוויזיה
DSP/EQ
.1
.2
Anynet+ (HDMI-CEC) Onבקולנוע הביתי
ובטלוויזיה.
.3
לחצו על הלחצן TV SOUNDבשלט.
ההודעה TV SOUND ONתהבהב על גבי
הלוח הקדמי ולאחר מכן תוחלף ב.D. IN-
• כש TV SOUND-מופעל ,הקול מהטלוויזיה מושמע
דרך הרמקולים של הקולנוע הביתי.
35
2:52:46
קול מהרמקולים
של הקולנוע הביתי
הרמקולים של
הקולנוע הביתי
ב"השתק"
DSP/EQ
חברו כבל HDMIלטלוויזיה ולקולנוע הביתי) .ראו
עמוד (13
2014-03-27
TV Soundפועל
TV Soundכבוי
הפעלת תוכן
fl
פונקציית ה NFC-כלולה בהתקני Androidעם Android
OS 4.1 Jellybeanואילך.
אם מערכת ההפעלה בהתקן ה Android-שלכםמוקדמת יותר מ ,Android OS 4.1 Jellybean-עליכם
להוריד את היישום ''Samsung NFC Connection
מ ,Android Market-ורק לאחר מכן תוכלו להשתמש
בפונקציית ה.NFC-
.4
לחצו על הלחצן TV SOUNDפעם נוספת כדי
לכבות את .TV SOUND
• כש TV SOUND-כבוי ,הקול מהטלוויזיה
מושמע דרך הרמקולים של הטלוויזיה ,התומכת
ב.Anynet+-
עומד לרשותכם מגוון מצבי קול.
: DSPOFF להאזנה רגילה.
: CINEMA לשחזור צליל מציאותי וחזק בסרטים.
: MUSIC מתאים לכל מקורות המוסיקה.
: GAME מתאים למשחקי וידאו ומפיק צליל חזק.
: (Multi Stereo) M-STEREO מפיק צליל
היקפי למקורות בעלי 2ערוצים.
: POWER BASS לחיזוק אפקט הבס.
: LOUD לשיפור מאפייני הבס בהתאם לעוצמת
הקול.
: NIGHT לאופטימיזציה בלילה באמצעות דחיסת
טווח דינמי )צלילים שקטים(.
: LOCAL EQ לעקומת EQייחודית בהתאם
למוסיקה המקומית.
-עברית
HT-H5500K_30HK_30K_50K_50WK-SQ-HEB_0327.indd 35
שירותי רשת
.3
במערכת הקולנוע הביתי ,בחרו .Change Device
.4
בחרו את המחשב שלכם מתוך רשימת ההתקנים
באמצעות הלחצנים ▲▼.
.1
לחבר את המכשיר לרשת.
)עיינו בעמוד (14
.5
בחרו את סוג הקובץ שברצונכם להפעילPhotos, ,
Videosאו Musicולאחר מכן לחצו על .E
.2
לקבוע את הגדרות הרשת.
)עיינו בעמודים 20עד (22
.6
בחרו תיקייה המכילה קבצים מהסוג שבחרתם באמצעות
הלחצנים ▲▼_ +ולאחר מכן לחצו על .Eרשימת
הקבצים תוצג.
.7
בחרו את הקובץ שברצונכם להציג או להשמיע ,ולאחר
מכן לחצו על .E
fl
ניתן ליצור רשימות הפעלה של קבצים מהמחשב באותו
אופן שבו יוצרים רשימות הפעלה של קבצים מתקליטורים
ומהתקני .USB
fl
ניתן גם לשלוט בהפעלה של קבצים מהמחשב באותו
אופן שבו שולטים בהפעלת קבצים מתקליטורים ומהתקני
,USBלמעט כמה יוצאים מן הכלל.
fl
כמו כן ,תוכלו לגשת לקבצים במחשב אם תבחרו
Photos, Videosאו Musicבמסך הבית ,ולאחר
מכן תבחרו את המחשב שלכם מתוך רשימת ההתקנים
שתוצג.
שימוש בBD-LIVE™ -
מרגע שהמכשיר מחובר לרשת שלכם ,תוכלו ליהנות ממגוון
תכנים של שירותי סרטים הזמינים על גבי תקליטורים תואמי
.BD-LIVE
.1
חברו התקן זיכרון מסוג USBלשקע ה USB-שבחזית
המוצר ובדקו את נפח הזיכרון שנותר בו בעזרת
האפשרות .BD Data Managementעל-מנת לאפשר
שימוש בשירותי ,BD-LIVEעל התקן הזיכרון להכיל
לפחות 1GBשל שטח פנוי.
.2
בחרו באפשרות Settingsבמסך הבית ,ולאחר מכן
לחצו על הלחצן .E
.3
בחרו באפשרות ,Systemולאחר מכן לחצו על הלחצן
.E
.4
בחרו באפשרות ,BD Data Managementולאחר מכן
לחצו על הלחצן .E
.5
בחרו באפשרות ,Change Deviceולאחר מכן לחצו על
הלחצן .E
.6
בחרו באפשרות דיסק ,USBולאחר מכן לחצו על הלחצן
.E
.7
הכניסו תקליטור Blu-rayשתומך ב.BD-LIVE-
.8
בחרו פריט מרשימת התכנים של שירות BD-LIVE
המסופקת על ידי יצרן התקליטור.
fl
אופן השימוש שלכם ב BD-LIVE-ובתכנים שסופקו עשוי
להשתנות בהתאם לייצרן התקליטור.
שימוש בDLNA -
DLNAמאפשר לגשת לקבצים שמאוחסנים במחשב ולהפעיל
אותם באמצעות מערכת הקולנוע הביתי.
התקינו את DLNAבמחשב ותייגו את הקבצים ואת התיקיות
שברצונכם לשתף עם מערכת הקולנוע הביתי לפי ההוראות
במדריך למשתמש של .DLNA
כדי לגשת לקבצים המאוחסנים במחשב ולהפעיל אותם לאחר
התקנת ,DLNAבצעו את הפעולות הבאות:
.1
הפעילו את המחשב ,את הטלוויזיה ואת מערכת הקולנוע
הביתי.
.2
ודאו שהשרת DLNA Sharedפועל במחשב.
36
2:52:49
2014-03-27
יישומים
הקולנוע הביתי מציע שפע של תוכני חדשות ,סרטים ,מזג
אוויר ועוד ,וניתן להוריד אותם ישירות לקולנוע הביתי ולצפות
בהם .ראשית ,בדקו את הרשת וודאו שהקולנוע הביתי מחובר
לאינטרנט .כדי להשתמש בתכונת היישומים ,הקולנוע הביתי
צריך להיות מחובר לאינטרנט.
היישומים הזמינים באמצעות תכונת היישומים פועלים בדומה
לגרסאות המקוונות המקבילות .כשהם פועלים אחרת ,הם
קלים לשימוש.
עליכם ליצור חשבון ,ורק לאחר מכן תוכלו להשתמש ביישומים.
ברוב האתרים ניתן ליצור חשבון דרך הקולנוע הביתי ,אבל קל
ומהיר יותר לעשות זאת באינטרנט דרך מחשב ,מחשב נישא
או טאבלט .שימו לב שבמקרים מסוימים תצטרכו להשתמש
גם בקולנוע הביתי וגם במחשב ,מחשב נישא או טאבלט
כדי להגדיר חשבון .ההבדל העיקרי בין הגרסאות המקוונות
הרגילות והגרסאות שניתן להפעיל דרך הקולנוע הביתי הוא
שבגרסאות הקולנוע הביתי תשתמשו בשלט כדי להזין אותיות
ומספרים ,ולא במקלדת.
-עברית
HT-H5500K_30HK_30K_50K_50WK-SQ-HEB_0327.indd 36
שימוש ביישומים
שימוש בOpera TV Store-
הצגת יישומים נוספים
.1
בחרו בלחצן Moreבמסך הבית ,ולאחר מכן לחצו על
הלחצן .Eהמסך יישומים נוספים יופיע ויציג מאגר
יישומים.
.2
כדי להציג יישומים נוספים ,העבירו את הסמן המדגיש
ימינה או שמאלה עד שתוצג קבוצת יישומים חדשה.
.3
כדי לצאת ממסך היישומים הנוספים ,בחרו Closeאו
לחצו על הלחצן RETURNאו על EXITבשלט.
החלפת היישומים המוצגים במסך הבית
.1
בחרו בלחצן ,Moreולאחר מכן לחצו על הלחצן .E
.2
בחרו בלחצן Editבמסך היישומים הנוספים ,ולאחר מכן
לחצו על הלחצן .E
.3
היישומים שהקולנוע הביתי מציג במסך הבית מסומנים.
בטלו את סימון היישומים שברצונכם להסיר ממסך הבית
על ידי בחירה של כל אחד מהיישומים ולאחר מכן לחיצה
על הלחצן .E
.4
בחרו יישומים על ידי הדגשה של כל יישום ולאחר מכן
לחיצה על הלחצן .Eכל יישום שתבחרו ,יסומן .ניתן
לבחור ארבעה יישומים לכל היותר.
.5
בסיום ,בחרו ,OKולאחר מכן לחצו על הלחצן .Eמסך
הבית יוצג שוב.
fl
fl
בOpera TV Store-ניתן למצוא שירותים באיכות גבוהה
לסטרימינג וידאו מהאינטרנט ,לרשתות חברתיות ולסטרימינג
של מוסיקה.
כניסה לOpera TV Store-
כדי להיכנס ל Opera TV Store-בחרו בלחצן Opera TV
Storeבמסך הבית ,ולאחר מכן לחצו על הלחצן .E
כדי לצאת מהמסך ,Opera TV Storeלחצו על הלחצן EXIT
או RETURNבשלט.
ניווט בOpera TV Store-
כשהמסך Opera TV Storeמופיע ,הוא מציג מאגר של
יישומים מגוונים .בעזרת הלחצנים ▲▼_ +בשלט ,העבירו
את הסמן המדגיש מיישום ליישום.
בחירת יישום
הזיזו את הסמן המדגיש ליישום המבוקש ,ולאחר מכן לחצו על
הלחצן .E
בחלון המוקפץ שיופיע ,בחרו OPENכדי לפתוח את היישום
מיד או ADD TO MY APPSכדי להוסיף את היישום לMy-
.Appsלחצו על הלחצן RETURNבשלט כדי לחזור למסך
.Opera TV Store
שירותי רשת
בכל פעם שפותחים יישום לראשונה ,הקולנוע הביתי מציג
שני הסכמים .יש לקבל את שני ההסכמים ורק לאחר מכן ניתן
להוריד כל יישום ולהשתמש בו.
כברירת מחדל ,הקולנוע הביתי מציג ארבעה יישומים
פופולריים במסך הבית .ניתן להציג יישומים נוספים ולהחליף
את היישומים במסך הבית בעזרת הלחצן .More
כדי להפעיל יישום ,לחצו עליו פעמיים ולאחר מכן פעלו לפי
ההוראות המוצגות על גבי המסך.
בחירת יישומים לפי קטגוריה
לחיפוש יישומים קל יותר ,ניתן להציג יישומים לפי קטגוריות,
כגון Popular, Watch, Listen, Playוכו'.
כדי לבחור קטגוריה ,לחצו על הלחצן ▲ בשלט כדי להעביר
את הסמן המדגיש לראש המסך.
לאחר מכן בחרו קטגוריה בעזרת הלחצנים ◄►.
שימוש במסך My Apps
כדי להיכנס למסך ,My Appsבחרו את ,MY APPSולאחר
מכן לחצו על הלחצן .Eהמסך My Appsיופיע ,ויציג את
כל היישומים ששמרתם בעבר כיישומי .My Apps
כדי לצאת מיישום לחצו על הלחצן EXITבשלט.
כדי למחוק את פרטי הכניסה לכל היישומים ,לחצו על
הלחצן 5במשך 5שניות לפחות.
מחיקת יישומים מMy Apps-
.1
37
2:52:51
2014-03-27
בחרו את הלחצן MENUבחלקו העליון של המסך My
,Appsולאחר מכן לחצו על הלחצן Eבשלט רחוק.
-עברית
HT-H5500K_30HK_30K_50K_50WK-SQ-HEB_0327.indd 37
שירותי רשת
.2
בחרו באפשרות REMOVE APPSבתפריט ,ולאחר
מכן לחצו על הלחצן .Eריבוע אדום מוצג סביב אחד
מהיישומים.
.3
הזיזו את הריבוע ליישום שאתם רוצים למחוק ,ולאחר
מכן לחצו על הלחצן .E
.4
חזרו על תהליך זה כדי למחוק יישומים נוספים.
.5
בסיום ,בחרו DONEולאחר מכן לחצו על הלחצן .E
.6
לחצו על הלחצן RETURNכדי לחזור למסך הראשי.
• הקולנוע הביתי יכול להתחבר להתקנים התומכים
ב .AllShare Cast-שימו לב שייתכן שהתמיכה
בהתקנים התומכים ב AllShare Cast-לא תהיה
מלאה ,בהתאם ליצרן .למידע נוסף על תמיכה בחיבור
נייד ,עיינו באתר האינטרנט של היצרן.
• שידורי Bluetoothעשויים להפריע לאות הScreen-
.Mirroringלפני השימוש בפונקציה Screen
,Mirroringאנו ממליצים מאוד לכבות את הפונקציה
Bluetoothבטלפון החכם או בהתקן החכם.
חיפוש יישומים
.1
בסיום ,בחרו באפשרות SEARCHבחלקו העליון של
המסך ,ולאחר מכן לחצו על הלחצן .E
.2
לחיפוש מהיר של פריטים פופולריים ,לחצו על אחת
מכרטיסיות החיפוש הפופולריות בחלקו העליון של
המסך.
.3
כדי לחפש יישום לפי שם ,הזינו את שם היישום
באמצעות המקלדת המוצגת על גבי המסך.
הפונקציה Opera TV Storeתחפש תוך כדי ההזנה
יישומים המתאימים לאותיות שכבר הוזנו ,ותציג אותם.
• כדי לבטל את החיפוש הנוכחי ,לחצו על הלחצן
RETURNבשלט או בחרו BACKבמסך ,ולאחר מכן
לחצו על .E
שיקוף מסך
הפונקציה Screen Mirroringמאפשרת להציג מסך של
טלפון חכם או של התקן תואם אחר על גבי מסך הטלוויזיה
באמצעות טכנולוגיית ™ .Miracastשיקוף מסך ידני אינו
דורש כבל או נתב אלחוטי.
.1
במסך הבית ,בעזרת הלחצנים ◄► עברו אל Screen
,Mirroringולאחר מכן לחצו על .E
.2
הפעילו את AllShare Castבטלפון החכם או בהתקן.
.3
חפשו בהתקן את שם הקולנוע הביתי ברשימת ההתקנים
הזמינים ובחרו אותו.
.4
הטלוויזיה תציג הודעת התחברות )לדוגמה,
(Connecting to Android_92gb...ולאחר מכן תציג
הודעה על השלמת החיבור.
.5
בתוך כמה רגעים מסך ההתקן יופיע על גבי מסך
הטלוויזיה.
• בעת שימוש בפונקציה ,Screen Mirroringייתכנו
קפיצות בווידאו או הפסקות שמע ,בהתאם לסביבה
שלכם.
38
2:52:52
2014-03-27
-עברית
HT-H5500K_30HK_30K_50K_50WK-SQ-HEB_0327.indd 38
נספח
מידע נוסף
Digital Output
•
הערות
•
חיבורים
יציאת HDMI
•
•
בהתאם לטלוויזיה שברשותכם ,ייתכן שרזולוציות פלט
HDMIמסוימות לא יפעלו.
כדי ליהנות מסרטי וידאו בטכנולוגיית ,3Dעליכם
להשתמש בחיבור .HDMI
כבל HDMIארוך עלול לגרום להפרעות במסך.
במקרה כזה ,העבירו את HDMI Deep Colour
למצב Offבתפריט.
•
•
•
Settings
3D Settings
•
•
•
בתקליטורי 3Dמסוימים יש ללחוץ על הלחצן 5פעם
אחת כדי לעצור את הסרט במהלך הפעלה ב.3D-
הסרט ייעצר ואפשרות מצב ה 3D-תכבה.
כדי לשנות בחירת אפשרות 3Dבעת הפעלת סרט
בתלת ממד ,לחצו פעם אחת על הלחצן .5תפריט
ה Blu-ray-מופיע .לחצו פעם נוספת על הלחצן 5
,ולאחר מכן בחרו ב 3D Settings-מתפריט הBlu--
.ray
בהתאם לתוכן המוצג ולמיקום התמונה במסך
הטלוויזיה ,ייתכן שפסים שחורים יופיע בצדי המסך.
BD-Live Internet Connection
•
)Anynet+ (HDMI-CEC
•
TV Aspect Ratio
•
•
•
•
בהתאם לסוג התקליטור ,ייתכן שיחסי גובה-רוחב
מסוימים לא יהיו זמינים.
אם תבחרו יחס גובה-רוחב השונה מיחס הגובה-רוחב
של מסך הטלוויזיה ,ייתכן שהתמונה תהיה מעוותת.
אם תבחרו באפשרות ,16:9 Originalייתכן שיחס
הגובה-רוחב שיוצג על גבי המסך יהיה 4:3 Pillarbox
)פסים שחורים בצדי התמונה(.
•
•
•
•
•
כאשר BD Wiseמופעל ,הגדרת Resolution
)רזולוציה( עוברת אוטומטית ל BD Wise-כברירת
מחדל ,ו BD Wise-מופיע בתפריט .Resolution
אם המכשיר שברשותכם מחובר להתקן שאינו תומך
ב ,BD Wise-לא תוכלו להשתמש בפונקציה BD
.Wise
להפעלה תקינה של ה ,BD Wise-העבירו את
אפשרות BD Wiseשל המכשיר ושל הטלוויזיה
למצב .On
•
•
39
2:52:54
במצב זיכרון חיצוני ,ניתוק התקן ה USB-במהלך
הפעלת התקליטור עלול לגרום להפסקת ההפעלה.
המכשיר תומך רק בהתקני USBשאותחלו במערכת
הקבצים ) FATתווית אמצעי אחסון .(DOS 8.3
מומלץ להשתמש בהתקני USBהתומכים בפרוטוקול
USB 2.0ובעלי מהירות קריאה/כתיבה של 4 MB
לשנייה ומעלה.
ייתכן שפונקציית ההפעלה Resumeלא תפעל לאחר
פרמוט התקן האחסון.
ייתכן שיהיו שינויים בנפח הכולל הזמין לBD Data-
,Managementבהתאם לתנאים.
DivX® Video On Demand
•
2014-03-27
בהתאם לטלוויזיה שברשותכם ,ייתכן שרזולוציות פלט
HDMIמסוימות לא יפעלו .עיינו במדריך של הטלוויזיה
שברשותכם.
פונקציה זו אינה זמינה אם כבל ה HDMI-לא תומך
ב.CEC-
אם בטלוויזיית Samsungשברשותך מופיע הסמל
,Anynet+משמעות הדבר היא שהיא תומכת
בפונקציית .Anynet+
BD Data Management
) BD Wiseמוצרי Samsungבלבד(
•
ייתכן שתחול הגבלה על חיבור האינטרנט בעת
השימוש בתכני .BD-LIVE
נספח
•
•
הקפד לבחור ערך נכון ב ,Digital Output-אחרת לא
יישמע צליל או שיישמע רעש חזק.
אם התקן ה) HDMI-מקלט ,AVטלוויזיה( אינו תואם
לפורמטים הדחוסים ) ,(DTS ,Dolby Digitalאות
השמע מופק כ.PCM-
תקליטורי DVDרגילים אינם כוללים אפקטי צליל
BONUSVIEWשל שמע וניווט.
תקליטורי Blu-rayמסוימים אינם כוללים אפקטי צליל
BONUSVIEWשל שמע וניווט.
הגדרת Digital Outputלא משפיעה על השמע
האנלוגי ) (L/Rאו על פלט שמע ה HDMI-לטלוויזיה.
היא משפיעה על פלט השמע HDMIועל פלט השמע
האופטי כאשר המכשיר מחובר למקלט .AV
כשמפעילים רצועות שמע מסוג ,MPEGאות השמע
מפיק PCMללא קשר לבחירה של Digital Output
) PCMאו .(Bitstream
האפשרות Digital Outputניתנת להפעלה כאשר
האפשרות Speaker Selectionנמצאת במצב TV
.Speaker
לקבלת מידע נוסף על ,DivX(R) VODבקרו באתר
.http://vod.divx.com
-עברית
HT-H5500K_30HK_30K_50K_50WK-SQ-HEB_0327.indd 39
נספח
Speaker Settings
•
הפעלת קובצי JPEG
כאשר האפשרות Speaker Selectionנמצאת במצב
,TV Speakerהשמע מופק באמצעות הרמקולים של
הטלוויזיה.
שמע HDMI
•
לא ניתן להגדיל את הכתוביות ואת סמל השגחת
ההורים במצב של מסך מלא.
•
הפעלת תוכן
שימוש בלחצן TOOLSבעת הפעלת תמונות
כאשר שמע HDMIיוצא לרמקולים של הטלוויזיה ,הוא
מכווץ באופן אוטומטי לשני ערוצים.
אם הקולנוע הביתי מחובר לטלוויזיה תואמת BD
Wiseשבה BD Wiseמופעל ,התפריט Picture
Settingsלא יופיע.
הפונקציה Background Musicלא תפעל אלא אם
קובץ המוסיקה וקובץ התמונה יימצאו על אותה מדיית
אחסון .בנוסף ,ייתכן שאיכות השמע תושפע מקצב
הסיביות של קובץ המוסיקה ,MP3מגודל התמונה
ומשיטת הקידוד.
•
Audio Return Channel
•
•
•
•
כאשר הפונקציה ) Anynet+ (HDMI-CECבמצב
,Offהפונקציה Audio Return Channelאינה
זמינה.
השימוש בכבל HDMIשאינו מאושר עבור ) ARCערוץ
החזרת שמע( עשוי לגרום לבעיות תאימות.
הפונקציה ARCזמינה רק כאשר מחוברת טלוויזיה
תואמת .ARC
תאימות תקליטורים ופורמטים
השמעה
סוגי תקליטורים ותכנים שהמכשיר יכול
להפעיל
הפעלת קובצי וידאו
•
קובצי וידאו בעלי קצב סיביות גבוה של 20מגה-ביט
לשנייה או יותר עלולים להכביד על המכשיר ולהביא
לעצירת פעולת ההפעלה.
מדיה
בחירת שפת השמע
•
•
•
תקליטור Blu-ray
תקליטור 3D
Blu-ray
המחוון ◄► לא יוצג על המסך אם המקטע
BONUSVIEWאינו מכיל הגדרות שמע של
.BONUSVIEW
זמינות שפות באמצעות פונקציית שפת השמע תלויה
בשפות המקודדות בתקליטור .פונקציה זו או שפות
מסוימות עשויות לא להיות זמינות.
ייתכן שתקליטורי Blu-rayמסוימים יאפשרו בחירה
בפסקול שמע באנגלית מסוג PCMאו .Dolby Digital
וידאו
•
•
•
•
בהתאם לתקליטור ה ,Blu-ray / DVD-ייתכן שיהיה
באפשרותכם להחליף את שפת הכתוביות בתפריט
התקליטור .לחצו על הלחצן .DISC MENU
פונקציה זו תלויה במבחר הכתוביות המקודדות
בתקליטור וייתכן שלא תהיה זמינה בכל תקליטורי
ה.DVD/Blu-ray-
כמו כן ,אם תקליטור ה Blu-ray-כולל מקטע
,BONUSVIEWיוצג מידע על מצב BONUSVIEW
של הסרט הראשי.
פונקציה זו משנה את הכתוביות הראשיות והמשניות
בו-זמנית.
מספר הכתוביות הראשיות והמשניות מוצג ,בהתאמה.
fl
40
2:52:57
2014-03-27
DVD-VIDEO,
DVD-RW,
DVD-R,
DVD+RW,
DVD+R
BD-ROMאו BD-RE/-R
שהוקלט בפורמט .BD-RE
DVD+RW/ ,DVD-VIDEO
DVD-RW(V)/DVD-R+R
מוקלטים שהוקלטו וגובשו
סופית ,או אמצעי אחסון מסוג
USBהמכיל תוכני ,DivX
.MP4 ,MKV
מוסיקה
מוסיקה שהוקלטה על גבי
תקליטורים מסוג CD-RW/-R,
CD-RW/-R,
DVD-RW/-R, BD-RE/-R
DVD-RW/-R,
או אמצעי אחסון מסוג USB
BD-RE/-R
המכיל תכנים מסוג MP3או
.WMA
תמונות
תמונות שנשמרו על גבי
,CD-RW/-Rתקליטורים מסוג CD-RW/-R,
DVD-RW/-R, BD-RE/-R DVD-RW/-R,
או אמצעי אחסון מסוג USB
BD-RE/-R
המכיל תכנים מסוג .JPEG
בחירת שפת הכתוביות
•
סוג התקליטור
פרטים
ייתכן שהמכשיר לא יפעיל תקליטורי CD-RW/-RוDVD-R-
מסוימים בגלל סוג התקליטור או תנאי ההקלטה.
-עברית
HT-H5500K_30HK_30K_50K_50WK-SQ-HEB_0327.indd 40
fl
אם תקליטור DVD-RW/-Rלא הוקלט כראוי בפורמט DVD
וידאו ,לא ניתן יהיה להפעיל אותו.
fl
המכשיר שלכם לא יפעיל תכנים שהוקלטו על גבי תקליטורי
DVD-Rבקצב סיביות גדול מ 10-מגה-ביט לשנייה.
fl
המכשיר שלכם לא יפעיל תכנים שהוקלטו על גבי תקליטורי
BD-Rאו התקני USBבקצב סיביות גדול מ 30-מגה-ביט
לשנייה.
fl
ייתכן שלא ניתן יהיה להפעיל סוגים מסוימים של תקליטורים
או שלא ניתן יהיה להפעיל תקליטורים בעת ביצוע פעולות
מסוימות ,כגון שינוי זווית או כיוון יחס גובה-רוחב .מידע
על התקליטורים מפורט על-גבי אריזת התקליטור .עיינו בו
במקרה הצורך.
fl
בעת הפעלת כותר מסוג ,BD-Jייתכן שהטעינה תהיה ממושכת
יותר מהרגיל או שביצוע חלק מהפונקציות יהיה איטי יותר.
סמלי תקליטורים הניתנים להפעלה במכשיר
זה
תקליטור 3D Blu-ray
תקליטור Blu-ray
Dolby
BD-LIVE
סוגי תקליטורים שהמכשיר לא יכול להפעיל
•
•
•
DTS
מערכת השידור PALבבריטניה,
צרפת ,גרמניה ,וכו'.
fl
מכשיר זה עשוי שלא להגיב לכל פקודות ההפעלה מכיוון
שתקליטורי Blu-ray, DVDו CD-מסוימים מאפשרים שימוש
בפונקציות מסוימות בלבד בזמן ההפעלה.
יש לציין כי לא מדובר בתקלה במכשיר.
fl
אין באפשרותה של Samsungלהבטיח שמכשיר זה ינגן
כל תקליטור הנושא את הסמל DVD ,Blu-rayאו CDכי
הפורמטים של התקליטורים מתפתחים ,ובעיות ושגיאות
עלולות לקרות בעת היצירה של תוכנת תקליטורי ,Blu-ray
DVDו CD-ו/או בעת הייצור של תקליטורים.
fl
פנו למרכז שירות הלקוחות של SAMSUNGאם יש לכם
שאלות או אם נתקלתם בקשיים בהפעלת תקליטורי ,Blu-ray
DVDאו CDבמכשיר זה .ניתן גם לעיין בהמשך מדריך זה
לקבלת מידע נוסף על הגבלות הפעלה.
fl
ייתכן שלא ניתן יהיה להפעיל במכשיר זה תקליטורים
מסחריים מסוימים ותקליטורי DVDמסוימים שנרכשו מחוץ
לאזור מגוריך.
41
2:52:58
DivX
קוד אזורי
הן המכשיר והן התקליטורים מקודדים לפי אזור .על קודים אזוריים
אלה להיות תואמים כדי שניתן יהיה להפעיל את התקליטור .אם
הקודים אינם תואמים ,התקליטור לא יפעל.
המספר האזורי של מכשיר זה מפורט בלוח האחורי של המוצר.
סוג
התקליטור
תקליטור
Blu-ray
2014-03-27
Java
נספח
•
•
HD DVD
MV-/PD/DVD-ROM
,Discוכו'
) DVD-RWמצב (VR
/CDV/CD-ROM/CVD
LD/CD-I/CD-G
)תקליטורי CD-G
מפעילים שמע בלבד,
לא גרפיקה(.
•
•
DVD-RAM
Super Audio CD
)למעט תקליטורים
בעלי שכבת (CD
תקליטורי DVD-R
בנפח 3.9 GB
לצריבה.
קוד אזורי
שטח
A
צפון אמריקה ,מרכז אמריקה ,דרום
אמריקה ,קוריאה ,יפן ,טייוואן ,הונג
קונג ודרום מזרח אסיה.
B
אירופה ,גרינלנד ,שטחים השייכים
לצרפת ,המזרח התיכון ,אפריקה,
אוסטרליה וניו זילנד.
C
הודו ,סין ,רוסיה ,מרכז אסיה ודרום
אסיה.
-עברית
HT-H5500K_30HK_30K_50K_50WK-SQ-HEB_0327.indd 41
נספח
fl
1
ארצות הברית ,שטחים השייכים
לארצות הברית וקנדה
ייתכן שתקליטורים מסוימים בפורמט DivX, MKVו MP4-לא
יפעלו בגלל רזולוציית הווידאו וקצב המסגרות שלהם.
פורמטים נתמכים
הערות על חיבור USB
2
אירופה ,יפן ,המזרח התיכון ,מצרים,
אפריקה ,גרינלנד
•
•
3
טייוואן ,קוריאה ,הפיליפינים,
אינדונזיה ,הונג קונג
•
•
•
DVDVIDEO
4
5
6
מקסיקו ,דרום אמריקה ,מרכז
אמריקה ,אוסטרליה ,ניו זילנד ,איי
האוקיינוס השקט ,האיים הקריביים
רוסיה ,מזרח אירופה ,הודו ,קוריאה
הצפונית ,מונגוליה
•
•
•
•
•
סין
•
fl
אם מספר האזור של תקליטור DVD/Blu-rayאינו תואם
למספר האזור של מכשיר זה ,המכשיר לא יוכל להפעיל
את התקליטור.
•
•
AVCHD (Advanced Video Codec High
)Definition
ניתן להפעיל תקליטורים בפורמט AVCHDבאמצעות מכשיר
זה .תקליטורים מסוג זה בדרך כלל מוקלטים ומשמשים
במצלמות וידאו.
הפורמט AVCHDהוא פורמט של מצלמות וידאו דיגיטליות
בהפרדה גבוהה.
באפשרות הפורמט MPEG-4 AVC/H.264לדחוס תמונות
ביעילות רבה יותר בהשוואה לפורמט הרגיל של דחיסת תמונות.
תקליטורי AVCHDמסוימים עושים שימוש בפורמט
" ."x.v.Colorמכשיר זה יכול להפעיל תקליטורי AVCHD
שעושים שימוש בפורמט "."x.v.Colour
" "x.v.Colourהוא סמל מסחרי של חברת .Sony Corporation
" "AVCHDוהלוגו של AVCHDהם סמלים מסחריים של
Matsushita Electronic Industrial Co., Ltd.ושל Sony
.Corporation
•
•
•
•
•
•
fl
ייתכן שפורמטים מסוימים של AVCHDלא יפעלו ,בהתאם
לתנאי ההקלטה.
fl
fl
יש לחתום תקליטורים בפורמט .AVCHD
•
•
הפורמט " "x.v.Colorמציע טווח צבעים רחב יותר בהשוואה
לתקליטורי DVDרגילים של מצלמות וידאו.
42
2:53:03
•
מכשיר זה תומך באמצעי אחסון מסוג ,USBבנגני ,MP3
במצלמות דיגיטליות ובקוראי כרטיסי זיכרון מסוג .USB
מכשיר זה אינו תומך בתיקיות ובקבצים ששמם חורג מ128-
תווים.
ייתכן שהתקן USBמסוים/מצלמה דיגיטלית מסוימת לא יהיו
תואמים למכשיר.
מכשיר זה תומך במערכות הקבצים FAT 16, FAT 32ו.NTFS-
יש לחבר את התקני ה USB-ישירות ליציאת ה USB-של
המכשיר .חיבור דרך כבל אחר עלול ליצור בעיות בתאימות
.USB
ייתכן שהכנסה של מעל להתקן זיכרון אחד לקורא כרטיסים
מרובים תגרום לקורא הכרטיסים לפעול באופן לא תקין.
מכשיר זה אינו תומך בפרוטוקול – Peer to Peer) PTPעמית-
לעמית(.
אין לנתק התקן USBתוך כדי העברה או שמירה של נתונים.
כשהרזולוציה של התמונה גדולה ,זמן ההמתנה עד סיום הצגת
התמונה ארוך.
לא ניתן להפעיל באמצעות מכשיר זה קובצי MP3עם DRM
)ניהול זכויות דיגיטלי( אשר הורדו מאתר מסחרי.
מכשיר זה תומך בווידאו בקצב פריימים נמוך מ) 30fps-פריימים
לשנייה( בלבד.
מכשיר זה תומך רק בהתקני USBשל מחלקת אחסון גבוה
) (MSCכגון כונני אצבע וכונני דיסק קשיח ) .USBאין תמיכה
ב(.HUB-
התקני כונני דיסק קשיח ,USBקוראי כרטיסים וכונני אצבע
מסוימים עשויים לא להתאים למכשיר זה.
התקן USBהדורש הספק רב מדי עשוי להיות מוגבל על ידי
התקן אבטחת המעגלים.
במקרה שהפעלתו של כונן דיסק קשיח USBאינה יציבה ,ספק
לו הספק נוסף על ידי חיבורו של הכונן אל השקע בקיר .במידה
שהבעיה נמשכת ,יש לפנות אל יצרן כונן הדיסק הקשיח .USB
SAMSUNGאינה אחראית על כל אובדן נתונים או על נזק
כלשהו לקובץ נתונים.
2014-03-27
-עברית
HT-H5500K_30HK_30K_50K_50WK-SQ-HEB_0327.indd 42
תמיכה בקובצי וידאו
Resolution
)רזולוציה(
סיומת קובץ
גורם מכיל
Codecוידאו
Codecשמע
*.avi
AVI
DivX 3.11/4/5/6
MP4v3
H.264 BP/MP/HP
MP3, Dolby Digital, DTS,
WMA, PCM
*.mkv
MKV
VC-1 AP, DivX 5/6
H.264 BP/MP/HP
MP3, Dolby Digital, DTS
*.wmv
)WMV (wmv9
VC-1 AP, VC-1 SM
WMA
*.mp4
MP4
)MP4 (mp4v
H.264 BP/MP/HP
AAC
*.mpg / *.mpeg
PS
MPEG1
MPEG2
H.264 BP/MP/HP
MP1, 2
Dolby Digital, DTS
1080x1920
-
מפענח וידאו
נספח
הגבלות
גם כאשר הקובץ מקודד באמצעות Codecנתמך הנזכר לעיל ,ייתכן שלא ניתן יהיה להפעילו אם יש בעיה בתוכן שלו.
הפעלה תקינה של הקובץ אינה מובטחת אם פרטי הגורם המכיל שלו שגויים או שהקובץ עצמו פגום.
קבצי שמע/וידאו בעלי קצב סיביות או קצב פריימים גבוה מהרגיל עלולים להיתקע קצת במהלך הפעלתם.
הפונקציה – Skip) Seekדילוג( אינה זמינה אם טבלת האינדקס של הקובץ פגומה.
תומך ב H.264-עד דרגה 4.1ובAVCHD- אינו תומך ב H.264 FMO/ASO/RS-ובVC1 SP/MP/AP L4- : ASP ,MPEG4 SP -מתחת ל 60 : 720 x 1280-פריימים מקסימום
מעל 30 : 720 x 1280פריימים מקסימום
-אין תמיכה ב GMC 2-ומעלה
מפענח שמע
תומך ב WMA 7, 8, 9-ובSTD- אינו תומך בקצב דגימת WMAשל 22050Hzמונו. :AAC -קצב דגימה מקסימלי (96, 88.2, 64, 48, 44.1, 32 ,24 ,22 ,16 ,12 ,11 ,8) 96Khz :קצב סיביות מקסימלי320kbps :
תומך בפורמטי DivXשל קובצי כתוביות
.*ttxt, *.smi, *.srt, *.sub, *.txt -
תמיכה בקובצי מוסיקה
סיומת קובץ
גורם מכיל
Codecשמע
טווח התמיכה
*.mp3
MP3
MP3
-
*.wma
WMA
WMA
* קצב דגימה )בקילו-הרץ( 48 ,44.1 ,32 ,22 ,16 ,11 ,8 -
* קצב סיביות -כל קצבי מ 5kbps-עד 384kbps
תמיכה בקובץ תמונה
סיומת קובץ
סוג
*.jpg / *.jpeg / *.jpe
JPEG
*png.
PNG
) Resolutionרזולוציה(
8640x15360
43
2:53:07
2014-03-27
-עברית
HT-H5500K_30HK_30K_50K_50WK-SQ-HEB_0327.indd 43
נספח
בחירות היציאה הדיגיטלית
הגדרה
Bitstream
)לא מעובד(
PCM
חיבור
מקלט AVתומך HDMI
PCM
הזרמת שמע
בתקליטור
Blu-ray
הזרמת שמע
בתקליטור
DVD
הגדרה של
תקליטור
Blu-ray
Bitstream
) DTSמקודד מחדש(
Bitstream
) Dolby Dמקודד
מחדש(
PCM
עד PCM 7.1ch
Dolby Digital
Dolby Digital
Dolby Digital
Plus
Dolby Digital Plus
Dolby TrueHD
Dolby TrueHD
DTS
עד PCM 5.1ch
DTS
שמע ברזולוציה
גבוהה DTS-HD
שמע ברזולוציה גבוהה
DTS-HD
DTS-HD Master
Audio
DTS-HD Master
Audio
PCM
DTSמקודד מחדש
PCM 2ch
Dolby Digital
Dolby Digital
מקודד מחדש *
PCM 2ch
PCM 2ch
PCM 2ch
Dolby Digital
Dolby Digital
Dolby Digital
DTS
DTS
DTS
עד PCM 5.1ch
DTS
כלשהו
מפענח זרמי שמע של
הסרט הראשי ושל
BONUSVIEWאל
שמע PCMומוסיף
אפקטי שמע של ניווט.
משדר את זרמי השמע
של הסרט הראשי
בלבד ,כך שמקלט
ה AV-שלכם יוכל
לפענח את זרם סיביות
השמע.
לא תשמעו שמע
BONUSVIEWולא
אפקטי צליל של ניווט.
מפענח זרמי
שמע של הסרט
מפענח את זרמי השמע
הראשי ושל
של הסרט הראשי ושל
BONUSVIEW
BONUSVIEWאל
אל שמע PCM
שמע PCMומוסיף
ומוסיף אפקטי צליל
אפקטי צליל של ניווט,
של ניווט ,ולאחר
ולאחר מכן מקודד
מכן מקודד מחדש
מחדש את שמע
את שמע הPCM-
ה PCM-לזרם סיביות
לזרם סיביות
.DTS
Dolby digitalאו
.PCM
כאשר זרם המקור הוא בעל שני ערוצים או מונו ,ההגדרות " "Re-encoded Dolby Dאינן חלות .הפלט יהיה .PCM 2ch
ייתכן שתקליטורי Blu-rayיכללו שלושה זרמי שמע:
שמע הסרט הראשי :הפסקול של הסרט הראשי. שמע :BONUSVIEWרצועת שמע נוספת כגון פרשנות של הבמאי או של השחקן. אפקטי צליל של ניווט :הבחירה באפשרויות ניווט בתפריט עשויה להיות מלווה באפקטי צליל של ניווט .אפקטי צליל של ניווט משתניםמתקליטור Blu-rayאחד למשנהו.
44
2:53:09
2014-03-27
-עברית
HT-H5500K_30HK_30K_50K_50WK-SQ-HEB_0327.indd 44
רזולוציה לפי מצב הפלט
הפעלת תקליטורי /Blu-rayתכנים אלקטרוניים /תכנים דיגיטליים
הפעלת DVD
מצב HDMI
פלט
הגדרה
BD Wise
תקליטור Blu-ray
תכנים אלקטרוניים/
תכנים דיגיטליים
רזולוציית תקליטור
הBlu-ray-
1080p@60F
מצב HDMI
480i
Auto
רזולוציה מקסימלית של קלט הטלוויזיה
רזולוציה מקסימלית של קלט
הטלוויזיה
1080p@60F
1080p@60F
-
1080p
-
1080p
)Movie Frame : Auto (24Fs
1080p@24F
-
1080i
1080i
1080i
720p
720p
720p
576p/480p
576p/480p
576p/480p
עיינו בטבלה להלן כאשר מכשיר זה אינו פועל כראוי .אם הבעיה אינה מופיעה בתיאור ,ואם ההוראות להלן אינן עוזרות ,כבו את המכשיר,
נתקו את הכבל החשמלי ,וצרו קשר עם המפיץ המורשה הקרוב או עם מרכז השירות של . Samsung
הבעיה
בדיקה/תיקון
אינכם יכולים להוציא את
התקליטור.
•
•
האם הכבל החשמלי מחובר בבטחה לשקע?
בצעו כיבוי ולאחר מכן הדלקה של המכשיר.
ההשמעה אינה מתחילה.
•
•
•
בדקו אל מספר האזור של תקליטור ה.Blu-ray/DVD-
כנראה שלא ניתן יהיה להפעיל תקליטורי Blu-ray/DVDשנרכשו בחו''ל .
לא ניתן להפעיל במכשיר זה תקליטורי CD-ROMו.DVD-ROM-
ודאו כי רמת הדירוג נכונה.
ההשמעה אינה מתחילה
מיד עם הלחיצה על הלחצן
.6/7
•
•
האם הנכם משתמשים בתקליטור מעוות או בתקליטור עם שריטות חיצוניות?
נקו את התקליטור.
אין צליל.
•
הקולנוע הביתי אינו משמיע צלילים במהלך הפעלה מהירה ,הפעלה איטית והפעלה
מסוג פריים אחר פריים.
•
•
האם הרמקולים מחוברים כהלכה? האם הגדרת הרמקולים מותאמת אישית?
האם התקליטור ניזוק באופן קשה?
•
•
•
•
בתקליטורי Blu-ray/DVDמסוימים ,הצליל מופק מהרמקולים הקדמיים בלבד.
בדקו שהרמקולים מחוברים כראוי.
כווננו את עוצמת השמע.
בעת הפעלת שמע מתקליטור ,מהרדיו או מהטלוויזיה ,היחידה מעבירה את הקול
לרמקולים הקדמיים בלבד.
ניתן לשמוע קול רק ממספר קטן
של רמקולים ולא מכל השישה.
45
2:53:10
2014-03-27
נספח
פתרון בעיות
-עברית
HT-H5500K_30HK_30K_50K_50WK-SQ-HEB_0327.indd 45
נספח
בדיקה/תיקון
הבעיה
צליל היקפי מסוג Dolby
Digitalבעל 5.1ערוצים אינו
מופק.
•
•
האם מופיע הסימון " "Dolby Digital 5.1 CHעל התקליטור? צליל היקפי מסוג Dolby
Digitalבעל 5.1ערוצים מופק רק כשהתקליטור מוקלט עם צליל בעל 5.1ערוצים.
האם שפת השמע מוגדרת נכון ל Dolby Digital -בעל 5.1ערוצים על גבי צג המידע?
השלט רחוק אינו פועל.
•
•
•
האם אתם מפעילים את השלט הרחוק בתוך טווה הפעולה שלו ובזווית המתאימה ביחס
לחיישן?
האם הסוללות מרוקנות?
האם בחרתם את פונקציות המצב ) (TV/BDשל השלט הרחוק ) TVאו (BDכהלכה?
•
•
•
•
האם הטלוויזיה פועלת?
האם הכבלים של הווידאו מחוברים כהלכה?
האם התקליטור מלוכלך או פגום?
לא ניתן להשמיע תקליטור שלא יוצר טוב.
שפת השמע והכתוביות אינם
עובדים.
•
שפת השמע והכתוביות אינם עובדים אם התקליטור אינו כולל פסקול או כתוביות בשפות
שונות.
מסך התפריט אינו מופיע גם
כאשר בוחרים בפונקציית
התפריט.
•
האם אתה משתמש בתקליטור שאינו כולל תפריטים?
לא ניתן לשנות את יחס הגובה/
רוחב.
•
ניתן להפעיל תקליטורי 16:9 Blu-ray/DVDבמצבי 4:3 Letter Box ,16:9 Fullאו 4:3
,Pan-Scanאך תקליטורי 4:3 Blu-ray/DVDמופעלים במצב 4:3בלבד .עיינו בעטיפת
המגן של תקליטור ה Blu-ray-ולאחר מכן בחרו בפונקציה המתאימה.
•
•
•
•
התקליטור מסתובב
אבל אין תמונה.
איכות התמונה גרועה
והתמונה רועדת.
המכשיר אינו פועל.
)לדוגמה :המכשיר כבה
או שנשמע רעש מוזר(.
המכשיר אינו פועל
באופן תקין.
שכחתם את סיסמת רמת
הדירוג.
לחצו על הלחצן 5בשלט למשך 5שניות כאשר אתם במצב .STANDBYפעולה זו
•
תאפס את היחידה.
הפונקציה RESETתמחק את כל ההגדרות השמורות.אין להשתמש בפונקציה זו אלא אם יש צורך.
כאשר אין תקליטור במכשיר ,לחצו על הלחצן 5במכשיר למשך יותר מ 5-שניות.
•
INITיופיע על הצג וכל ההגדרות יחזרו לערכי ברירת המחדל.
הפונקציה RESETתמחק את כל ההגדרות השמורות.אין להשתמש בפונקציה זו אלא אם יש צורך.
אין אפשרות לקלוט שידורי רדיו.
•
•
האם האנטנה מחוברת כהלכה?
אם עוצמת אות שידור האנטנה חלשה ,התקינו אנטנת FMחיצונית באזור קליטה טובה.
לא שומעים קול כשמנסים
להאזין לטלוויזיה באמצעות
הרמקולים של הקולנוע הביתי.
•
אם תלחצו על הלחצן ^ בעת האזנה לשמע של טלוויזיה באמצעות הפונקציות D. INאו
AUXפונקציות תקליטור ה Blu-ray/DVD-יופעלו ושמע הטלוויזיה יושתק.
46
2:53:12
2014-03-27
-עברית
HT-H5500K_30HK_30K_50K_50WK-SQ-HEB_0327.indd 46
בדיקה/תיקון
הבעיה
" "Not Availableמופיע על
המסך.
•
אין אפשרות להשלים את התכונות או הפעולה כעת כיוון ש:
.1תוכנת תקליטור ה Blu-ray/DVD-מגבילה זאת.
.2וכנת תקליטור ה Blu-ray/DVD-אינה תומכת בתכונה )לדוגמה ,זוויות(
.3התכונה אינה זמינה כעת.
.4ביקשתם מספר פרק או שעת חיפוש מחוץ לטווח.
אם הפלט מסוג HDMIמוגדר
לרזולוציה שאינה נתמכת על
ידי מכשיר הטלוויזיה )לדוגמא
,(1080pייתכן שלא תופיע
תמונה על-גבי מסך הטלוויזיה.
•
לחצו על הלחצן 5בלוח הקדמי במשך למעלה מ 5-שניות כאשר אין תקליטור בתוך
המכשיר .כל ההגדרות יחזרו לערכי הגדרות היצרן.
אין פלט .HDMI
•
•
בדקו את החיבור שבין מכשיר הטלוויזיה לבין שקע ה HDMI-של המוצר.
בדקו אם מכשיר הטלוויזיה תומך ברזולוציות קלט HDMIבגדלים
.576p/480p/720p/1080i/1080p
פלט HDMIלא תקין מוצג על
גבי המסך.
•
אם מופיע רעש אקראי על-גבי המסך ,פירוש הדבר הוא שהטלוויזיה אינה תומכת
בפרוטוקול .(High-bandwidth Digital Content Protection) HDCP
ניתן לראות תיקיות משותפות
באמצעות ,DLNAאך לא ניתן
לראות את הקבצים.
•
פונקציית DLNAמציגה רק קובצי תמונות ,מוסיקה וסרטים .היא אינה מציגה סוגי קבצים
אחרים.
סרטון הווידאו מוצג לסירוגין.
•
•
בדקו אם הרשת פועלת באופן יציב.
בדקו אם כבל הרשת מחובר כראוי ואם יש עומס יתר ברשת.
חיבור ה DLNA-בין הטלוויזיה
למחשב אינו יציב.
•
על כתובות ה IP-תחת אותה רשת משנה להיות ייחודיות ,אחרת התנגשויות IPעלולות
לגרום לחיבור לא יציב.
בדקו אם חומת האש מופעלת.
אם כן ,השביתו את פונקציית חומת האש.
•
נספח
פונקציית DLNA
BD-LIVE
הקולנוע הביתי לא מצליח
להתחבר לשרת ה.BD-LIVE-
•
•
•
בדקו אם חיבור הרשת פעיל באמצעות הפונקציה .Network Status
בדקו אם התקן זיכרון USBמחובר למכשיר.
על-מנת לאפשר שימוש בשירות ,BD-LIVEגודל השטח הפנוי בהתקן הזיכרון חייב להיות
לפחות .1GB
ניתן לבדוק את גודל הזיכרון הזמין ב) .BD Data Management-ראו עמוד (39
בדקו אם האפשרות BD-Live Internet Connectionמוגדרת כ.Allow(All)-
אם כל המצוין לעיל לא פתר את הבעיה ,צרו קשר עם ספק התוכן או התקינו את עדכון
הקושחה האחרון.
•
על-מנת לאפשר שימוש בשירות ,BD-LIVEגודל השטח הפנוי בהתקן זיכרון הUSB-
חייב להיות לפחות .1GB
ניתן לבדוק את גודל הזיכרון הזמין ב) .BD Data Management-ראו עמוד (39
•
•
בעת שימוש בשירות ,BD-LIVE
מתרחשת שגיאה.
fl
שחזור הגדרות ברירת המחדל של היצרן גורם למחיקת כל נתוני ה BD-המאוחסנים של המשתמש.
47
2:53:13
2014-03-27
-עברית
HT-H5500K_30HK_30K_50K_50WK-SQ-HEB_0327.indd 47
נספח
מפרטים
משקל
1.90ק"ג
ממדים
) 430.0רוחב( ) 55.0 xגובה( ) 224.0 xעומק( מ"מ
טווח הטמפרטורה בפעולה
+5 C°עד +35 C°
טווח אחוזי הלחות בפעולה
10%עד 75%
יחס אות/רעש רקע
55דציבלים
כללי
טיונר FM
רגישות שימושית
12דציבלים
עיוות הרמוני כולל
1.0%
וידאו
576p/480p ,720p ,1080i ,1080p
שמע
שמע רב-ערוצי ,PCMשמע בזרם סיביות ,שמע PCM
פלט הרמקול הקדמי
)=165W x 2 (3
HDMI
פלט הרמקול המרכזי
)=170W(3
פלט רמקול ההיקפי
)=165W x 2 (3
פלט הסאבוופר
)=170W(3
מגבר
קלט אנלוגי20Hz – 20kHz (±3dB) :
תגובת תדרים
קלט דיגיטלי20Hz – 40kHz (±4dB) :
יחס אות לרעש
70dB
הפרדת ערוץ
60dB
רגישות קלט
)500mV (AUX
מערכת רמקולים בעלת 5.1ערוצים
מערכת רמקולים
חזית
רמקול
היקפי
2:53:15
מרכזי
עכבה
=3
=3
=3
=3
טווח תדרים
200Hz – 20kHz
200Hz – 20kHz
200Hz – 20kHz
50Hz – 200Hz
דרגת הלחץ של צליל הקלט
84dB/W/M
84dB/W/M
84dB/W/M
84dB/W/M
קלט מדורג
165W
165W
170W
170W
קלט מקסימלי
330W
330W
340W
340W
48
2014-03-27
סאבוופר
-עברית
HT-H5500K_30HK_30K_50K_50WK-SQ-HEB_0327.indd 48
HT-H5500K
74.0 × 116.0 × 95.0
74.0 × 146.0 × 95.0
364.7 × 380.6 × 220.6 74.0 × 95.0 × 227.0
HT-H5530HK
502.8 x 95.0
)מקס'74.5 x (610.8 :
)מעמד בסיסx 234.0 :
מידות )רוחב xגובה xעומק( (171.7 x 16.3
)יחידת מידה :מ"מ(
74.0 × 116.0 × 95.0
364.7 × 380.6 × 220.6 74.0 × 95.0 × 227.0
HT-H5530K
74.0 × 1113.0 × 95.0
)מעמד בסיסx 276.0 :
(189.0 x 23.0
74.0 × 116.0 × 95.0
364.7 × 380.6 × 220.6 74.0 × 95.0 × 227.0
HT-H5550K/HT-H5550WK
רמקול
74.0 x 1113.0 x 95.0
)מעמד בסיס(189.0 x 23.0 x 276.0 :
364.7 × 380.6 × 220.6 74.0 × 95.0 × 227.0
HT-H5500K
0.44
0.40
1.58
0.40
0.56
6.50
HT-H5530HK
0.56
6.50
משקלים )יחידה :ק"ג(
2.94
0.40
2.94
2.94
0.56
6.50
HT-H5550K/HT-H5550WK
fl
fl
fl
fl
fl
6.50
מהירויות רשת שוות או נמוכות מ 10-מגה סיביות לשנייה אינן נתמכות.
Samsung Electronics Co., Ltdשומרת את הזכות לשנות את המפרטים ללא התרעה.המשקל והמידות המצוינים הם משוערים.
עיצוב והמפרט הטכני כפופים לשינויים ללא הודעה מראש.
לקבלת מידע על אספקה וצריכת חשמל ,עיינו בתווית המודבקת על-גבי המכשיר.
HT-H5550WK) SWA-6000בלבד(
משקל
1.1ק"ג
מידות )רוחב xגובה xעומק(
152.4 x 228.6 x 76.2מ"מ
טווח הטמפרטורה בפעולה
+5 C°עד +35 C°
טווח אחוזי הלחות בפעולה
75% ~ 10%
פלט
165W x 2 CH
טווח תדרים
20Hz – 20KHz
יחס אות לרעש
65dB
49
2:53:16
0.56
נספח
HT-H5530K
2014-03-27
-עברית
HT-H5500K_30HK_30K_50K_50WK-SQ-HEB_0327.indd 49
נספח
רישיונות
מיוצר תחת רישיון Dolby Laboratories. Dolbyוסמל ה D-הכפולה הם סמלים מסחריים של Dolby
.Laboratories
לפטנטים של ,DTSראה .http://patents.dts.comמיוצר תחת רישיון מDTS Licensing Limited.-
,DTSHD ,DTSהסמל ,ו DTS-והסמל יחדיו ,הם סימנים מסחריים רשומים ,וDTS-HD Master-
Audio | Essentialהוא סימן מסחרי של DTS, Inc. © DTS, Inc.כל הזכויות שמורות.
על DIVX® :VIDEO DivXהינו פורמט וידאו דיגיטלי שנוצר על ידי ,DivX, LLCחברת בת של חברת Rovi
.Corporationזהו התקן ® DivX Certifiedרשמי ,שעמד בבדיקות מחמירות המוודאות שהוא מפעיל וידאו
.DivXבקרו באתר www.divx.comלקבלת מידע נוסף ולקבלת כלי תוכנה להמרת הקבצים לווידאו .DivX
על וידאו על-פי דרישה של :DIVXיש לרשום מכשיר זה הנושא את האישור ® DivX Certifiedעל מנת
להפעיל סרטים בווידאו על-פי דרישה ) (VODבפורמט .DivXכדי לקבל את קוד הרישום שלכם ,אתרו את החלק הנוגע לDivX VOD-
בתפריט ההגדרות של המכשיר .בקרו באתר vod.divx.comלקבלת מידע נוסף על השלמת הרישום.
DivX® Certifiedלהפעלת וידאו ® DivXעד ,HD 1080pכולל תוכן משופר.
® DivX® Certified ,DivXוסמלים משויכים הם סימנים מסחריים של Rovi Corporationאו של חברות הבת שלה ונעשה בהם שימוש תחת רישיון.
מכוסה תחת אחד או יותר מהפטנטים האמריקאים הבאים7,519,274 ;7,515,710 ;7,460,668 ;7,295,673 :
® ,DLNAהלוגו של DLNAו DLNA CERTIFIED®-הם סימנים מסחריים ,סימני שירות ,או סימני הסמכה
של .Digital Living Network Alliance
המונחים HDMIו ,HDMI High-Definition Multimedia Interface-וכן הלוגו של ,HDMIהם סימנים
מסחריים או סימנים מסחריים רשומים של HDMI Licensing LLCבארצות הברית ובמדינות אחרות.
Oracleו Java-הם סימנים מסחריים רשומים של חברת Oracleו/או חברות מסונפות אליה .שמות נוספים עשויים להוות
סימנים מסחריים השייכים לבעליהם החוקיים.
פריט זה כולל טכנולוגיה להגנה מפני העתקה המוגנת תחת חוק הפטנטים באמריקה וזכויות הקניין הרוחני של חברת Rovi
.Corporationהנדסה לאחור או פירוק אסורים בהחלט.
™ Blu-ray™ ,Blu-ray Discוהסמלים הם סימנים מסחריים של .Blu-ray Disc Association
מוצר זה משתמש בטכנולוגית Cinaviaכדי להגביל את השימוש בהעתקים בלתי חוקיים של סרטים בהפקה מסחרית ופסי הקול שלהם.
כאשר מזוהה שימוש אסור של עותק בלתי חוקי ,תוצג הודעה וההפעלה או ההעתקה ייפסקו.
מידע נוסף אודות טכנולוגיית Cinaviaמסופק במרכז המידע לצרכן של Cinaviaבכתובת .http://www.cinavia.comלקבלת מידע נוסף
אודות Cinaviaבדואר ,שלחו גלויה עם כתובת הדואר שלכם לכתובתCinavia Consumer Information Centre, P.O. Box 86851, :
“.San Diego, CA, 92138, USA
מוצר זה משלב טכנולוגיה קניינית תחת רישיון מטעם תאגיד Veranceוהוא מוגן על ידי פטנט אמריקאי 7,369,677ופטנטים אמריקאים
ועולמיים אחרים שהתקבלו או שהם עומדים ותלויים ,כמו גם על ידי הגנה על זכויות יוצרים וסודות מסחריים עבור הבטים מסוימים
של טכנולוגיה כזו Cinavia .הוא סמל מסחרי של תאגיד .Veranceזכויות יוצרים 2010 - 2004תאגיד .Veranceכל הזכויות שמורות
ל .Verance-חל איסור לבצע הנדסה לאחור או פירוק המוצר.
הודעת רישיון קוד פתוחבמקרה של שימוש ביישומי קוד פתוח ,רישיונות קוד פתוח זמינים בתפריט המוצר.
50
2:53:18
2014-03-27
-עברית
HT-H5500K_30HK_30K_50K_50WK-SQ-HEB_0327.indd 50
Contact SAMSUNG WORLD WIDE
If you have any questions or comments relating to Samsung products, please contact the SAMSUNG customer
care centre.
SAMSUNG WORLD WIDE יצירת קשר עם
.SAMSUNG צרו קשר עם מרכז שירות הלקוחות של,Samsung אם יש לכם שאלות או הערות הנוגעות למוצרי
Contact Centre
Web Site
www.samsung.com/ae/support (English)
www.samsung.com/ae_ar/support (Arabic)
www.samsung.com/eg/support
www.samsung.com/n_africa/support
www.samsung.com/pk/support
www.samsung.com/n_africa/support
www.samsung.com/Levant/support (English)
www.samsung.com/Levant/support (English)
www.samsung.com/iran/support
www.samsung.com/n_africa/support
www.samsung.com/sa/support
www.samsung.com/sa_en/support (English)
www.samsung.com/tr/support
HT-H5500K_30HK_30K_50K_50WK-SQ-HEB_0327.indd 51
Area
800-SAMSUNG (726-7864)
800-SAMSUNG(726-7864)
183-2255 (183-CALL)
8000-4726
800-2255 (800-CALL)
08000-726786
16580
021 36 11 00
0800-Samsung (72678)
80-1000-12
0800-22273
06 5777444
18252273
021-8255
080 100 2255
Middle East `
U.A.E
OMAN
KUWAIT
BAHRAIN
QATAR
EGYPT
ALGERIA
PAKISTAN
TUNISIA
JORDAN
SYRIA
IRAN
MOROCCO
920021230
SAUDI ARABIA
444 77 11
TURKEY
2014-03-27
2:53:20