1
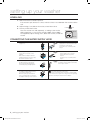
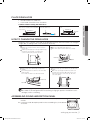
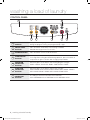
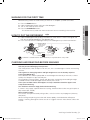
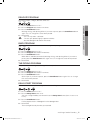
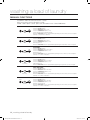
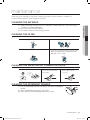
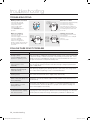
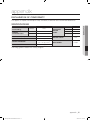
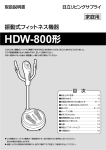
WA70Q3 Washing Machine user manual imagine the possibilities Thank you for purchasing this Samsung product. To receive more complete service, please register your product at www.samsung.com/hk WA70Q3-DC68-02566D-EN-00.indd 1 2009-4-30 14:05:09 features • Tub Drying Course Keeps mildew from breeding and infecting. • Fuzzy Control Fuzzy control operates with best washing course by sensing the wash load like artificial intelligence. • Stainless Steel Diamond Drum This lozenge design like diamond, can loosen water flow, prevent laundry damage. • Magic Filter As one of Samsung’s patents, the unique magic filter ensures that all the lint inside the tubcan be collected and better cleaning results are delivered. • Delay Start When you have something to do, you can use this course. The washing is finished by the time you reserved. You’d better give the clothes an airing to keep them from being crushed. • The washing and spinning time can be adjusted, and rinsing times can be selected According to the laundry dirty degree, and texture, adjusting washing and spinning time and rinsing times (detail re. P12). 2_ features WA70Q3-DC68-02566D-EN-00.indd 2 2009-4-30 14:05:09 safety information Throughout this manual, you’ll see Warning and Caution notes. These warnings, cautions, and the important safety instructions that follow do not cover all possible conditions and situations that may occur. It’s your responsibility to use common sense, caution, and care when installing, maintaining, and operating your washing machine. Samsung is not liable for damages resulting from improper use. IMPORTANT SAFETY SYMBOLS AND PRECAUTIONS What the icons and signs in this user manual mean: WARNING CAUTION WARNING CAUTION Hazards or unsafe practices that may result in severe personal injury or death. Hazards or unsafe practices that may result in minor personal injury or property damage. • If the plug (power supply cord) is damaged, it must be replaced by the manufacturer or its service agent or a similarly qualified person in order to avoid a hazard. • Use standard reliable alternating current ground socket(3 pin socket). - An electric shock may take place,when it is damaged or creepage. • Do not put heavy things on power supply cord and force it. - An electric shock or a fire may take place. • Do not use damaged plug or socket; don’t use several appliances together with a socket. - An electric shock or a fire may take place. • Do not pull the cord off or touch it with moist hands. When pull the cord off,must take hold of the plug, do not pull cord directly. - An electric shock or a fire may take place. • Ventilate immediately without touching the power plug if gas is leaking. - An explosion or a fire may take place. Please open the window ventilation,immediately. • Do not put a candle light or cigarette light on the washer. - A fire may take place. • Do not put laundry stained with gasoline, benzene, or alcohol in the washer, and keep the materials away from the washer. - An explosion or a fire may take place. • During spinning, don’t put your hands in the spinning tub. - It may hurt your hands. If it does not stop within 15 seconds after you open the lid, call service agent immediately. • This appliance is not intended for use by young children or infirm persons unless they have been adequately supervised by a responsible person to ensure that they can use the appliance safely. - Young children should be supervised to ensure that they do not play with the appliance. • No user-serviceable parts inside. Refer any servicing to qualified service personnel. - Otherwise this may cause a mechanical error, electric shock, fire or physical damage. - The product warranty does not cover problems resulting from disassembling the product by customer. • Please unplug the power supply cord when you do not use it. - Prevent lightning strike. • If the washer makes strange noise, smell or smoke, unplug it promptly and call service agent. • Do not use hot water in washing (exceed 50°C.) - Plastic parts may be deformed or damaged, and laundry may be deformed,shrunk or faded. • Do not open the door and touch the laundry, before the spin basket stopping, absolutely. - It’s still dangerous, even the spinning speed is slow, please take care of your children, carefully. • Do not wash the waterproof poncho or laundry etc. - It cause abnormal vibration to hurt you, when it is spinning. • Do not touch control panel with sharp things. - It may cause error and An electric shock may take place. • When cleaning, don’t spray water to the parts of the washer directly. - It may make its life span shorten. Also An electric shock or fire may take place. • Use the new hose-sets and old hose-sets should not be reused. safety information _3 WA70Q3-DC68-02566D-EN-00.indd 3 2009-4-30 14:05:10 contents SETTING UP YOUR WASHER 5 5 6 6 7 7 7 Description of parts Selecting a location Levelling Connecting the water supply hose Place drain hose How to change the drain hose Assembling sound absorption panel WASHING A LOAD OF LAUNDRY 8 9 9 9 10 10 12 Control panel Washing for the first time How to put the detergent Checking and readying before washing Washing step Washing program Manual functions MAINTENANCE 13 13 13 13 Cleaning the exterior Cleaning the filter Cleaning the water supply connector filter Cleaning the detergent drawer TROUBLESHOOTING 14 14 Troubleshooting Follow case is not problem APPENDIX 15 15 Declaration of conformity Specifications 5 8 13 14 15 4_ contents WA70Q3-DC68-02566D-EN-00.indd 4 2009-4-30 14:05:10 setting up your washer DESCRIPTION OF PARTS Carefully unpack your washing machine, and make sure you’ve received all of the parts shown below. If your washing machine was damaged during shipping, or if you do not have all of the parts, contact Samsung Customer Service or your Samsung dealer. 01 SETTING UP YOUR WASHER LID WATER SUPPLY HOSE DETERGENT BOX SPIN BASKET GUIDE WATER POWER CORD FILTER SOUND ABSORPTION PANEL PULSATOR CONTROL PANEL WATER DRAIN HOSE ADJUSTABLE LEGS 使用说明书 MANUAL BOOK SOUND ABSORPTION PANEL WATER SUPPLY HOSE SELECTING A LOCATION Before you install the washing machine, make sure the location: • Maintain at least 10cm between the washer and the wall. • Place the washer on a sturdy flat surface. • Avoid direct sunlight or heaters. • Never install the washer near water. • There is a cushion bottom, protecting washer in the transportation,in the packing box.When install and use the washer ,must remove the cushion bottom, otherwise, noise may take place. setting up your washer _5 WA70Q3-DC68-02566D-EN-00.indd 5 2009-4-30 14:05:10 setting up your washer LEVELLING 1. Select the washer installation position. If the washer is placed near to corner, maintain at least 10cm between the washer and the wall. 2. Adjust the legs, front, below the washer, to level the washer. 3. The way to level the washer. Loosen Press the washer two side separately, according to the washer diagonal direction, to check if the washer wobble. If the wobble has happened, adjust the legs, front, below the washer, to level the washer. Lock Diagonal Diagonal CONNECTING THE WATER SUPPLY HOSE 1. Remove the adaptor from the water supply hose. 5. Connect the other end of the water supply hose to the inlet water valve at the back of the washer. Screw the hose clockwise all the way in. 2. First, using a “+” type screw driver, loosen the four screws on the adaptor. Next, take the adaptor and turn part(b) following the arrow for gap about 5mm between them. 5-1.Connect the other end of the water supply hose to the inlet water valve at the top of the washer. Screw the hose clockwise all the way in. 3. Connect adaptor to the water tap by tightening the screws firmly. Then, turn part (b) following the arrow and put (a) and (b)together. Ifthe water tap is a screw type, assemble a water supply hose that fits to the tap as shown. 4. Connect the water supply hose to the adaptor. Pull down the part (c) of the water supply hose . When the part (c)is released, the hose is automatically connected to the adaptor making a ‘click’ sound. a b c After completing connection, if water leaks from the hose,then repeat the same steps. Use the most conventional type of faucet for water supply In case the faucet is square or too big, remove the spacing ring before inserting the faucet into the adaptor. 6_ setting up your washer WA70Q3-DC68-02566D-EN-00.indd 6 2009-4-30 14:05:29 PLACE DRAIN HOSE • • Decide the drain hose direction Put the end of the drain hose into flume. Cautions when inserting the drain hose: Be careful to drain water out at the end of the drain hose. The doorsill shouldn’t be more than 5cm. Less than 3 m Less than 3 m Less�than 5 cm HOW TO CHANGE THE DRAIN HOSE The drain hose is normally connected on the left side of the machine. Consumers can change it to right side, according to the actual situation,if necessary. 1. 1 2 3 Remove the screw, then take off the back cover. Remove the screw, then take off the hole cap on the left side. Hold the positioning boss in the right side hole cap, then braek out,rotate 90°, according to the counterclockwise direction,then take off it. 2.Take down the drain hose. 1 Open the holder, fixxing the drain hose. 2 Take off the drain hose from drain hole, carefully. 1 Drain hose 1 Holder 01 SETTING UP YOUR WASHER Don’t exceed more than 3m when the drain hose is used by connecting whth other hoses. 2 Drain hole 2 3 Cap Cap 3.Change the drain hose direction. 1 Make the drain hose drill through the drain hole, carefully. 2 Put the fixing position of drain hose into the holder, and fix it tightly. Do not make the drain hose distorted, knoted. 1 Holder 2 Fixing position 4. 1 2 3 Install the back cover. Cover the hole cap on the drain hole, then fix it with screw. Make hole cap through the drain hose,and cover into drain hole and rotate 90°,make the hole cap and positioning boss on the hole cap, fix on the case shell, tightly. 1 Drain hose Drain hole 2 3 Cap Cap Before changing, the power supply must be cut off (Prevent an electric shock) Be careful not to damage the drain hose during changing its position. If the drain hose is damage, it will occur leaking. ASSEMBLING SOUND ABSORPTION PANEL 1. Put a blanket or other soft cloth under the washer, then put down the washer. 2. Insert the sound absorption panel into the assembling slot ,in the bottom of washer. Front Back setting up your washer _7 WA70Q3-DC68-02566D-EN-00.indd 7 2009-4-30 14:05:40 washing a load of laundry CONTROL PANEL 1 2 7 6 5 4 3 1 DIGITAL GRAPHIC DISPLAY Display the runnning program and error messages. During the program running, the programe lamp is light. 2 DELAY START BUTTON Press this button when delay start washing is needed. Delayed time ranges from 3 to 18 hours. 3 POWER BUTTON Press this button to turn on/off the washer. 4 START/PAUSE BUTTON Use to pause and restart the operation. To change the washing procedure during operation, press this button to stop,and once again to restart after changing the procedure. 5 PROGRAM SELECTION BUTTON With every press of this button, the washing program changes. FUZZYQUICKDELICATEBABYTUB DRYINGFUZZY 6 FUNCTION SELECTION BUTTON With every press of this button, the function changes. WASH+RINSE+SPINSOAK+WASH+RINSE+SPINWASHRINSE SPINWASH+RINSERINSE+SPINWASH+RINSE+SPIN 7 WATER LEVEL SELECTION BUTTON According to the wash load, select the water level. HIGHMAXIMUMHIGHMEDIUMLOWMEDIUMHIGH 8_ washing a load of laundry WA70Q3-DC68-02566D-EN-00.indd 8 2009-4-30 14:05:42 WASHING FOR THE FIRST TIME Before washing clothes for the first time, you must run a complete cycle without clothes. Press the Power button. Open the detergent drawer and insert a little detergent. Turn on the water tap of the washer. Press the Start/Pause button. This will remove any water from the manufacturer’s test run remaining in the machine. HOW TO PUT THE DETERGENT 1. Open the detergent box by pulling in the direction of the arrow as shown in the figure and then put the powder detergent in the detergent box. 2. Put in one-time amount of detergent evenly so the detergent may not brim over the box. Detergent Device Put the detergent in proportion to water level 02 WASHING A LOAD OF LAUNDRY 1. 2. 3. 4. Softener Device Softener baseline If softener is stored over the above base line, it may flow down at any time. CHECKING AND READYING BEFORE WASHING Must follow the checkpoints in order to avoid laundry damages. Take out personal belongings from pockets. Check the pockets, take out airpins and coins, etc, that cause damages to clothes and washing machine. Those garments having big volume and light weight must use the laundry net(to be purchased additionally). The underwear with metal may be pulled out and damage other laundry or inner tub, so these laundry must be put into special laundry net. Those garments, fine wool fabric, laundry with decoration having big volume and light weight would be twisted, and be damaged. Use the laundry net to wash. These jeans or work clothes with zippers or clasps should be closed the zippers and clasps before washing. Turn inside out for those nappy clothes before washing. If clothes is easy nappy, separate them for washing, otherwise Other clothes may pick up those dirty matters (dirt, thread). Not washable laundry Do not wash and spin the laundry with gasoline, coal oil, alcohol or any impregnant (a fire may take place). When washing and spinning the clothes with feater, speedy, the inside feather will expose exterior costuming, damage the clothes. So do not suggest that wash these kind of colthes with washer. washing a load of laundry _9 WA70Q3-DC68-02566D-EN-00.indd 9 2009-4-30 14:05:42 washing a load of laundry WASHING STEP Washing step: 1. Open the water tap. 2. Open the washer lid. 3. Put the clothes into washing tub loosely, one by one, don’t overload. 4. Pull open the detergent drawer, put suited detergent. 5. Close the washer lid. 6. Press the Power button. 7. Press Program button, repeatedly, to select needful washing program: Fuzzy,Quick,Delicate,Baby,Tub Drying,... 8. Press Start/Pause button, the washer begin to run. After washing finishing: 1. Close the water tap. 2. Pull off the power plug of washer. 3. Open the washer lid. 4. Take out clothes. WASHING PROGRAM Before starting washing, check the following: Connect the water supply hose to the water tap. Leave a tap open. Plug the power cord in. Make sure to lay down the drain hose. FUZZY PROGRAM Selects the best washing course automatically. Power Start Pause 1. Press the Power button to “On”. 2. Press the Start/Pause button. Water level is selected automatically. Washing rinsing, and spinning follow. If you want to pause, press the Start/Pause button again. You can change the course when paused. 3. Close the lid. QUICK PROGRAM If you want to wash those frequently used towels or less dirty laundry time. Because washing is speedy, it is good for light or less stained laundry. Power Program Start Pause 1. Press the Power button to “On”. 2. Press the Program select button once. 3. Press the Start/Pause button. Water level is selected automatically. Washing rinsing, and spinning follow. If you want to pause, press the Start/Pause button again. You can change the course when paused. 4. Close the lid. 10_ washing a load of laundry WA70Q3-DC68-02566D-EN-00.indd 10 2009-4-30 14:05:43 DELICATE PROGRAM Washable sweater, cardigan, delicate clothes etc. Power Program Start Pause Washing rinsing, and spinning follow. If you want to pause, press the Start/Pause button again. You can change the course when paused. 4. Close the lid. - You can only select cold water. - The last spin operates lightly to prevent wrinkles. - Use the detergent indicated in the laundry. CAUTION BABY PROGRAM This course can keep the children’s skin from being hurt by detergent. Power Program Start Pause 02 WASHING A LOAD OF LAUNDRY 1. Press the Power button to “On”. 2. Press the Program select button two times. 3. Press the Start/Pause button. 1. Press the Power button to “On”. 2. Press the Program select button three times. 3. Press the Start/Pause button. Water level is selected automatically.Washing rinsing, and spinning follow. If you want to pause, press the Start/Pause button again. You can change the course when paused. 4. Close the lid. TUB DRYING PROGRAM Keep mildew from breeding and infecting within the spin tub. Power Program Start Pause 1. Press the Power button to “On”. 2. Press the Program select button four times. 3. Press the Start/Pause button. Start to spin. If you want to pause, press the Start/Pause button again. You can change the course when paused. 4. Close the lid. DELAY START PROGRAM Select this course when you have to go out or do something else. Power Program Delay Start Start Pause 1. Press the Power button to “On”. 2. Press the Delay Start button once. You may change the delay start time with use the Delay Start button.(from 3 hours to 18 hours) 3. Press the Start/Pause button. Put the proper amount of detergent into the detergent box. 4. Close the lid. The washing finishes by the time you reserved. washing a load of laundry _11 WA70Q3-DC68-02566D-EN-00.indd 11 2009-4-30 14:05:43 washing a load of laundry MANUAL FUNCTIONS Possible to select the function for each course. Ex) If you want to wash in the quick course : Power - Select quick course - press function button once - Start/Hold button Power Function Start Pause SOAK, WASH, RINSE, SPIN Press the Power button. Press the Function button once. Press the Start/Pause button once. Soak, washing, rinsing, spinning follow. When the Function button is pressed during working, the rinse times can be changed to between 1 and 5 times in duration. Start Pause WASH ONLY Press the Power button. Press the Function button twice. Press the Start/Pause button once. Washing goes on. When the Function button is pressed during washing, the wash time can be changed. Start Pause RINSE ONLY Press the Power button. Press the Function button three times. Press the Start/Pause button once. Rinsing goes on. When the Function button is pressed during rinsing, the rinse times can be changed to between 2 to 5 times in duration. Start Pause SPIN ONLY Press the Power button. Press the Function button four times. Press the Start/Pause button once. Spinning goes on. When the Function button is pressed during spinning, the spin time can be changed. Start Pause WASH AND RINSE Press the Power button. Press the Function button five times. Press the Start/Pause button once. Washing, rinsing follow. When the Function button is pressed during working, the rinse times can be changed to between 1 to 5 times in duration. Start Pause RINSE AND SPIN Press the Power button. Press the Function button six times. Press the Start/Pause button once. Rinsing, spinning follow. When the Function button is pressed during working, the rinse times can be changed to between 2 to 5 times in duration. once Power Function twice Power Function three times Power Function four times Power Function five times Power Function six times 12_ washing a load of laundry WA70Q3-DC68-02566D-EN-00.indd 12 2009-4-30 14:05:43 maintenance Keeping your washing machine clean improves its performance, wards off unnecessary repairs, and lengthens its life. CLEANING THE EXTERIOR CLEANING THE FILTER Clean the filter net often to keep the washer clean. 1. Push the upper part of the Magic filter and pull in. 2. Open the cover as shown in the figure. 3. Clean the Magic filter. 4. Close the cover and insert the lower part of the 03 MAINTENANCE 1. Wipe the washing machine surfaces, including the control panel, with a soft cloth using a nonabrasive household detergent. 2. Use a soft cloth to dry the surfaces. 3. Do not pour water onto the washing machine. filter in the basket first and then push the filter with “click” sound. CLEANING THE WATER SUPPLY CONNECTOR FILTER 1. Pull out the filter and wash well. 2. Pull in the filter and connect the hose to the inlet water valve tightly. 3. Check if there is a leakage. Note to tighten up the connector. CLEANING THE DETERGENT DRAWER 1. Pull out the detergent drawer, and uptilt it, take down the detergent drawer. 2. Wash the detergent drawer with clean water. 3. After cleaning, install the detergent drawer to washer. maintenance _13 WA70Q3-DC68-02566D-EN-00.indd 13 2009-4-30 14:05:44 troubleshooting TROUBLESHOOTING Washing machine won’t work Is the water tap opened? Is the washer plugged in? Is the power cut off? Is there enough water? Is the fuse broken? Is the Start/Pause button pressed? Water dose not drain Is the drain hose down?(No pump) Is the drain hose frozen? Is the drain hose clogged? If the water dose not drain in 15 minutes, a buzzer will sound, and the remaining time indicator will show “5E”. Water is not supplied Is the water tap opened? Is the water cut off? Is the water supply hose or hose connection clogged? Is the water tap frozen? If water is not supplied in 4 minutes, a buzzer will sound, and the remaining time indicator will show “4E”. Spinning does not work Is the laundry spread out evenly in the washer? Is the washer set on a sturdy flat surface? Is the lid colsed? FOLLOW CASE IS NOT PROBLEM CASE CAUSE Change to Rinse course,suddenly, when the washer is in spinning course. When the laundry is unbalanced, the washer will change to rinse course automatically, to adjust the laundry to a balanced situation, automatically, then resume spin. If this unbalanced situation sitll happened, after above is runed ,the buzzer will sound, you can open the washer door and put the laundry level. The water is not supplied, and the pulsator rotate repeatedly After selecting the washing program and press “Start/Pause” button, the washer will detect the laundry quantity and select water level, through rotating the pulsator,then begin to supply water. When the spinning is beginning, the spinning tub rotate discontinuity When spinning is beginning, the spinning tub start to spin slowly, then change quick. This is a discontinuous spinning course, to avoid residual lather. Start to supply water, in the washing course Micom will detect water level momently in the washing and rinse course, if the water level is lower, the washer will start to supply water, automatically. Before drain action, the pulsator will rotate gently,cont inuous,repeatedly It will prevent the laundry unbalanced(if the laundry unbalanced,the abnormal noise may take place). the local place on control panel gently heat. If the power cord still plug in, the local place on control panel will gently heat. This is a normal situation, don’t worry about it. If you pull off the power cord plug, this situation will disappear, automatically. It’s different between display time and actual time Every program actual running time is different from the PCB designing clock, because the water pressure and power voltage and frequency is different in different area. 14_ troubleshooting WA70Q3-DC68-02566D-EN-00.indd 14 2009-4-30 14:05:45 appendix DECLARATION OF CONFORMITY This appliance complies with European safety standards, EC directive 93/68 and EN Standard 60335. SPECIFICATIONS POWER CONSUMPTION DIMENSIONS(mm) WEIGHT WATER PRESSURE WASHING TYPE WA70Q3 5.0kg WASH 330W SPIN 230W W530xD540xH840 27kg 0.05~0.78 MPa (0.5 ~ 8.0 kg . f/cm2) STANDARD WATER LEVEL WATER USAGE SPIN SPEED MAXIMUM 48L HIGH 35L MEDIUM 27L LOW 20L 05 APPENDIX MAX. MASS OF DRY CLOTH IN kg 120L 715rpm Stirring Type The energy grade is tested in the “Fuzzy” program. appendix _15 WA70Q3-DC68-02566D-EN-00.indd 15 2009-4-30 14:05:45 QUESTIONS OR COMMENTS? Country CALL OR VISIT US ONLINE AT HONG KONG 3698-4698 www.samsung.com/hk Code No. DC68-02566D_EN WA70Q3-DC68-02566D-EN-00.indd 16 2009-4-30 14:05:45