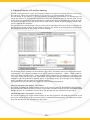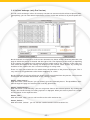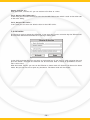
1
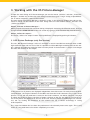
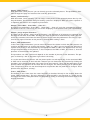
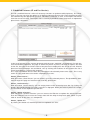
ture Mana
XS Picture-Manager v3.0
and you get the maximum performance
Table of contents
Table of contents .............................................................................2
Copyright ........................................................................................3
Software license agreement ................................................................3
1. Introduction .................................................................................6
2. Installation ..................................................................................6
2.1 System requirements .....................................................................6
2.2 Installation of the software ..............................................................6
3. Working with the XS Picture-Manager .................................................7
3.1 OPI Picture Exchange (only Pro Version) ...............................................7
3.2 Modified Pictures (LE and Pro Version) .................................................9
3.3 Missing Pictures (LE and Pro Version) .................................................10
3.4 Suffixes exchange (only Pro Version) .................................................13
3.5 Presettings ................................................................................15
3.6 Activation .................................................................................16
4. Contact .....................................................................................17
-2-
Copyright
Every duplication of this manual and the corresponding software is only permitted according to the
rights described in the licence contract. The rights to this manual and the software are owned by
XS-Solutions GmbH, Eckenerstr. 14/1, 74081 Heilbronn.
Quark, QuarkXTensions and XTensions are trademarks of Quark, Inc. and all applicable affiliated companies, Reg. U.S. Pat. & Tm. Off. and in many other countries. The Quark logo, the XTensions logo
and The Art of Communication are trademarks of Quark, Inc. and all applicable affiliated companies.
These and all other named trademarks are owned by the corresponding owner or manufacturer; they
are named solely for information purposes and to describe a function of the XS Picture-Manager
XTension. The use of these trademarks does not constitute any trademark infringement.
Publisher
XS-Solutions GmbH · Eckenerstr. 14/1 · 74081 Heilbronn
eMail [email protected] · Internet http://www.xs-solutions.de
Software license contract
This is a legally valid contract between you and the company XS-Solutions GmbH in Flein. By using
the software described in this contract, you herewith declare that you agree to the provisions of the
following licence contract. Please therefore read the following text through exactly. If you do not
agree with the provisions of this contract, you are not entitled to continue using the software.
1. Subject of the contract
The subject of the contract is the computer program saved on the data carrier or downloaded from
the internet, together with all enclosed program descriptions and any other corresponding written
material, which is referred to in its entirety below as software. XS-Solutions GmbH draws your attention to the fact that according to state of the art IT engineering, it is currently not possible to produce computer software in such a way that it will run without any errors in all applications and combinations.
2. Licence
The licensor is XS-Solutions GmbH with headquarters in Flein (Germany). The licensor herewith gives
you the right to use the enclosed software including all corresponding components, regardless of
whether these are saved on a disk, CD-ROM or any other data carrier. You only acquire the licence to
use the software, but not to the source code itself. The licensor remains owner of all property rights
or any other rights to the software. Your right to use the software is defined according to this licence contract. All copies of this software are also subject to this agreement.
3. Copyright
The licensor is owner of all property rights, copyright, trademark rights and any other protected
rights to the software. You acknowledge the software as being protected by copyright. Furthermore,
on purchasing the software, you only acquire ownership of the physical data carrier on which the
software was supplied, together with the right to use the software within the limits of this contract.
Any acquisition of any further rights to the software is precluded. The licensor reserves in particular
all publication, processing and utilisation rights to the software. The software can also contain products by third-party manufacturers. The corresponding provisions in this case are to be found in the
relevant read-me files.
-3-
4. Use and restrictions
The licensor herewith grants you the right to install and use the software on the hard disk of a computer of your choice. You are not entitled to save and use the software on several computers at the
same time. You are also entitled to produce a machine-readable copy of the software for backup purposes, insofar as you ensure that the information referring to copyright and any other protected
rights contained on the original are also copied on the backup copy of the software. All other rights
to the software are reserved. You may only sell or assign the software to a third party when the third
party assumes all rights and obligations arising from this licence contract in your stead and you
destroy all copies of the software in your possession. You undertake to refrain from
(i)
decompiling the software, reverse developing or disassembling it or bringing it in
any other way into a form perceptible to other persons,
(ii) modifying, adapting or translating the software, or producing works derived entirely
or partially from the software,
(iii) selling the software or making it available free of charge or for a fee
to third parties for their use insofar as this is not permitted according
to the provisions of this contract or mandatory statutory regulations,
(iv) transferring the software via a network or data transfer channel to another computer,
insofar as this is not permitted according to point 3.
5. Duplication
The software and corresponding written material is protected by copyright. Insofar as the software
is not equipped with copying protection, you are allowed to make one sole copy of the software
exclusively for backup or archiving purposes.
6. Passing on and hiring out
You may only pass the software on in its full entirety and with simultaneous transfer of the right of
use, on condition that the person taking over the software agrees to abide by the conditions of the
contract. Any transfer of the program by data export is not allowed in any form. In the case of passing the software on, you are obliged to destroy all duplicates in any form in a complete, irreversible manner. You are not allowed to hire out the software, i.e. to allow third parties to use the software for a fee.
7. Guarantee
Errors in the software cannot be precluded entirely, particularly when the errors occur in third party
programs being used. The licensor only assumes any guarantee within the scope of the statutory regulations. The statute of limitations applies six months after delivery of the software. The guarantee
service to be provided consists of repairs or replacement delivery, at the licensor's exclusive discretion. If the repairs and/or replacement delivery also fail, you can demand a reduction in the licence
fees or you can withdraw from the contact, at your choice. No guarantee is assumed for software
which has been modified, supplemented or damaged, unless the error had not been caused by the
modification, supplement or damage.
8. Compensation
The licensor rules out any guarantee for the software. The licensor is not subject to any guarantee
obligation or any liability if failure of the software or hardware was caused by an accident, misuse
or faulty application, incorrect handling, unsuitable operating equipment, modifications or supplements to the program, third-party intervention or natural wear. The licensor is in particular not liable for any collateral damage, in particular damage resulting from lost profits, operating interruptions, loss of business information, data loss or other financial losses resulting from use of the software or the inability to use the software, even when the licensor has been informed of the possibility of damage.
-4-
A contractual or noncontractual obligation to compensation on the part of the licensor, his employees or agents, only exists insofar as the damage was caused by gross negligence or wilful intent. Any
further mandatory statutory liability remains unaffected. No liability is assumed at all for any data
loss. Neither is liability assumed for any damage caused by faulty performance of the software which
could have been prevented by regular, prompt review of the matters being processed. Insofar as
claims to compensation do not lapse at an earlier point in time according to the statutory regulations, all compensation claims lapse at the latest two years after performing the faulty service, apart
from claims arising from unlawful acts and according to the product liability law.
9. Completeness
This licence contract contains the entire agreement between the parties with regard to the licence
and replaces all corresponding former verbal or written agreements. Alterations and additions to this
contract must be made in writing.
10. Subsidiary agreements
If any one provision of this contract should be invalid, this does not effect the validity of the remaining provisions.
-5-
1. Introduction
Thank you very much for buying the Quark XTension XS Picture-Manager. With this XTension you receive a tool which helps you to administer your pictures, search for missing pictures, administer the fileendings, update modified pictures and the exchange between OPI-high-resolution-data and layoutdata. After a short period of use you will find out, that this XTension will increase the efficiency of
your everyday work. Monotone works are done by the XTension. All you need to do is to start the process of a complex picture search by a click. The rest is done by the XTension XS Picture-Manager. The
following text discribes briefly the most important functions and features of the XS Picture-Manager.
• exchange layout-data to OPI-high-resolution-data with free choice of the OPI-Folder and
OPI-Suffix (Pro Version)
• fast searching, finding and assigning of pictures, which are no longer discoverably because of
data-renaming or a new structure of the folder hierarchy (LE/Pro Version)
• remove and add file suffixes
• creation of indices of folder, volumes, whole fileservers, to accelerate the search for pictures
(LE/Pro Version)
• intelligent comparison algorithms to allocate missing pictures (LE/Pro Version)
• display of the progress of all functions (LE/Pro Version)
2. Installation
2.1 System requirements
To run the XS Picture-Manager the following requirements must be considered:
• Apple Power Macintosh-Computer
• Apple System Software Version 8.5 or higher
• QuarkXPress Version 4.0 or higher
The memory requirement depends on the size of the current document and on the number and size
of the indices opened at a time.
2.2 Installation of the software
To install the XTension just copy the XTension into the XTension-folder of QuarkXPress. After a restart
of QuarkXPress the XTension works. The registration process of the XTension is done while
QuarkXPress is starting. If you have entered a valid activation key the added functions of the XTension
can be called through the utilities menu of QuarkXPress or you can use the extra tab in the usage dialog of QuarkXPress.
The XTension runed in demo-mode has all the features of the full version. The only difference is that
you cannot save/print QuarkXPress documents.
-6-
3. Working with the XS Picture-Manager
To open the main dialog of XS Picture-Manager you use the menue „Utilities“ and then „XS PictureManager“. Another way to show the main dialog is to use the original “usage” dialog of QuarkXPress.
For an easier navigation a tab has been added.
The main dialog of XS Picture-Manager is divided in 6 tabs. In the following chapters the tabs are described in detail. At the bottom of the main dialog there are two buttons named „Activate“ and
„Collect for output“.
Button „Activate XS Picture-Manager“:
When you push this button the activation dialog is displayed. Activating the XTension means, that you
change from the DEMO-VERSION to the full version by typing a valid Activation-Key into the dialog.
Button „Collect for output“:
The dialog „Collect for output“ known from QuarkXPress is displayed by pushing this button.
3.1 OPI Picture Exchange (only Pro Version)
The tab „OPI Picture Exchange“ offers all functions to swich from OPI-low-resolution-data to OPIhigh-resolution-data and vice versa. Now it is possible to collect OPI-high-resolution-data for the output, although only OPI-low-resolution-data has been placed in the document. A single click changes
the data and collects for the output.
In the picture list all pictures are displayed independent from their status. For each picture the absolute pathname, the original filename of the HRES read from the finder comment (only if the current
picture is a lres and the pathname is stored in the finder comment, see Helios software), the page
on which the picture is placed, the date of import, the date of the file, the type of file and the status of the picture are displayed in one line on the list. Pictures placed on masterpages are considered, too. By clicking the headlines of the columns the list is sorted accordingly in raising
order/sequence.
The larger field below the list shows the pathname of the selected picture once again. This is very
useful for long pathnames to be shown completely at a time.
-7-
Button „Show picture“:
With the button „Show picture“ you can directly go to the selected picture. The QuarkXPress document changes the page and activates the according picture box.
Button „Load manually“:
With the button „Load manually“ you can assign a new picture to the selected picture box. By clikking the button, the standard dialog for loading a picture is displayed. When you select a picture it
is imported and shown in the respective picture box.
Buttons „Show HRES“, Show LRES“, „Show all“:
By clicking on the buttons „Show HRES“, „Show LRES“, „Show all“ only the corresponding pictures
are shown in the list. In this way you can set the displaying of the pictures after your requirements.
Buttons „Assign original Filename“:
By clicking on the button „Assign original Filename“, the filenames of all pictures are replaced with
the original filenames of the HRES. Currently the original filename is determined by reading the content of the comment field from the finder. A Helios Server stores the pathname in this field. If a picture has no original filename or the picture is already HRES nothing is done.
Frame „LRES-Foldername“:
In the frame „LRES-Foldername“ you can enter the name of the folder in which the LRES pictures are
saved by the OPI server. By clicking the buttons “HRES“ or „LRES“ you can instruct the XTension to
replace each picture in the document by the appropriate HRES or LRES. The XTension does not only
change the pathnames of the pictures, it also reimportes the HRES or LRES. The result is, that the
previews in the document are updated.
This procedure can take a while and depends on the number of pictures in the document. The progress is shown by a bar on the lower right side of the dialog.
It is to be noted that the pictures and the picture paths are exchanged only if the associated HRES
or LRES can be accessed on the hard-disk. However you can deactivate this function by clicking the
checkbox „only change pathnames if the new file can be accessed“. Then also the pathnames of the
pictures which are not found on the hard-disk are changed. The found pictures get an updated preview. The pictures which are not found keep their old preview but the pathname is changed. These
pictures have the status „missing“.
Frame „LRES-Suffix“:
The buttons in this frame have the same functions as described already in the chapter about the
frame „LRES-Foldername“. The only difference is that the LRES is not searched in a folder, but by
the help of the Suffix. LRES pathnames are computed by adding or removing the entered suffix to the
original pathname.
-8-
3.2 Modified Pictures (LE and Pro Version)
The tab „modified Pictures“ offers all necessary functions to update modified pictures. The advantage is, that you can start the update of all displayed pictures by one click. Then the XTension updates automatically the appropriate pictures. The status „modified“ is used, if the import date differs
from the current file date. The import date is saved by QuarkXPress when the picture is imported or
placed into a document.
In the list all pictures of the current document with the state „modified“ are displayed. For each picture the absolute pathname, the page on which the picture is placed, the date of import, the date
of the file, the type of file and the state of the picture are displayed in one line on the list. Pictures
placed on the masterpages are considered, too. By clicking the headlines of the columns the list is
sorted accordingly in raising order/sequence.
The larger field below the list shows the pathname of the selected picture once again. This is very
useful for long pathnames to be shown completely at a time.
Button „Show Picture“:
With the button „Show Picture“ you can directly go to the selected picture. The QuarkXPress document changes the page and activates the according picture box.
Button „Load manually“:
With the button „Load manually“ you can assign picture to the selected picture box. By clicking the
button, the standard dialog for loading a picture is displayed. When you select a picture it is imported and shown in the respective picture box.
Button „Update selection“:
With the button „Update selection“ you can instruct the XTension to update the selected picture.
Then the XTension tries to access the image data with the help of the picture path. When it is possible to access to the data, it is reimported.
Button „Update all“:
By clicking this button all modified pictures are updated at a time.
-9-
3.3 Missing Pictures (LE and Pro Version)
The tab „missing Pictures“ offers all necessary functions to search for missing pictures. You can either search in indices you created before or you search in a indicated folder structure.
The advantage of the indices is, that the search is accelerated considerably. For example you can
create the index of a whole picture volume at a time and afterwards you can use this index for the
search for missing pictures in several documents. Another possibility is to process the indices of archived pictures on one or more CDs which can be used later to search for other pictures without putting the CD into the computer.
The file search has the advantage, that you can easily and quickly search for pictures in a certain folder structure without creating an index before.The user can search for missing pictures and let them
be reimported because of the variety of search methods.
The different search methods can be selected in the frame „Automatic search and assignment of missing pictures“. The following methods are on hand: “identical filenames“, „HRES“, “LRES in OPI-folders” and „LRES with OPI-Suffix“. These methods can be spezified by the options of „use unikat“ and
“use first”. Along with the flag field „type check“ you can define one for all possible search methods,
whether a type check should be applied or not. A type check means, that the type of the found picture is compared with the type of the searched picture.
The significance and function of the methods are described subsequently:
Identical filenames with option „use unikat“:
The search is looking for images named exactly as the missing picture. The picture is only reimported automatically when the active indices or the folder structure search can only find exactly one
possible picture. It is important to know that also the OPI-files are considered in the search.
Identical filenames with option „use first“:
The search is looking for images named exactly as the missing picture. The first picture found in the
the active indices or the folder structure search is reimported automatically. It is important to know
that also the OPI-files are considered in the search.
- 10 -
HRES with option „use unikat“:
The search is looking for images named exactly as the missing picture and which are not situated in
one of the folders named in the frame “LRES-Foldername“. The picture is only reimported automatically when the active indices or the folder structure search can only find exactly one possible picture.
HRES with with option „use first“:
The search is looking for images named exactly as the missing picture and which are not situated in
one of the folders named in the frame „LRES-Foldername“. The first picture found in the the active
indices or the folder structure search is reimported automatically.
LRES in OPI-Folder with option „use unikat“:
The search is looking for images named exactly as the missing picture and which are situated in one
of the folders named in the frame „LRES-Foldername“. The picture is only reimported automatically when the active indices or the folder structure search can only find exactly one possible picture.
LRES in OPI-Folder with option „use first“:
The search is looking for images named exactly as the missing picture and which are situated in one
of the folders named in the frame „LRES-Foldername“. The first picture found in the the active indices or the folder structure search is reimported automatically.
LRES with OPI-Suffix with option „use unikat“:
The search is looking for images named exactly as the missing picture but without the ending that is
given in the folder „LRES-Suffix“. The picture is only reimported automatically when the active indices or the folder structure search can only find exactly one possible picture.
LRES with OPI-Suffxix with option „use first“:
The search is looking for images named exactly as the missing picture but without the ending that is
given in the folder „LRES-Suffix“.The first picture found in the the active indices or the folder structure search is reimported automatically.
Now that all possible searching procedures and their specializations were now described, the single
dialog elements are described more precisely following.
In the picture list on the lefthand side all pictures occuring in the current document are displayed.
They are all set on the status „missing“. For each picture the absolute pathname, the page on which
the picture is situated and the type of file are shown on the list. Pictures placed on the master pages
are considered, too. By clicking the headlines of the columns the list is sorted accordingly in raising
order.
In the picture list on the righthand side the pictures which have been found with the active indicies
according to the selected picture on the left are shown.
There are two larger spaces below the lists which show the pathnames of the pictures once again.
This is very useful for long pathnames to be shown completely at a time.
Button „Show Picture“:
With the button „Show Picture“ you can directly go to the selected picture. The QuarkXPress document changes the page and activates the according picture box.
Button „Load manually“:
With the button „Load manually“ you can assign new data to the selected picture. By clicking the
button, the standard dialog for loading a picture is displayed. When you select a picture it is imported and shown in the respective box.
- 11 -
Button „Reimport selection“:
Using the button „Reimport selection“ you can assign the picture on the right side which was found
by the indices to the picture selected on the left side. The XTension tries to access to the data of the
picture. If this is possible the picture is imported, the pathname is replaced and the preview is updated. When it is not possible a report shows that the access to the pathname of the picture in the
index is impossible. Now you can either mount the corresponding volume or insert a CD containing
the picture and repeat the procedure.
After reimporting the picture status is set „OK“ and it vanishes from the list with the missing pictures.
Button „Start Index Search“:
With the button „Start Index Search“ the automatical index search is started. The XTension is trying
to find all missing pictures corresponding to the search methods and activated indicies. In case that
a picture is found in the index and all search criteria are correct, it is reimported and its preview is
updated. The progress of this process is shown by a bar on the lower right side.
Button „Start Folder Search“:
With the button „Start Folder Search“ the automatical folder search is started. This process corresponds exactly to the index search described above with the only difference, that is not searched in
the active indices but in the selected folder. After choosing a root-folder a temporary index is created and then the XTension searches for the missing pictures according to the selected search method.
- 12 -
3.4 Suffixes exhange (only Pro Version)
The tab „Suffix exchange“ offers all necessary functions to remove and add suffixes of picture paths.
Consequently, you can now remove superfluous suffixes or add new suffixes to all picture paths easily.
On the lefthand list all pictures of the current document are shown with the absolute pathname, the
page on which the picture is situated and the type of file. The displaying of the ending is depending
on the settings for separators and maximum suffixes length made in the „Settings“ frame. Only suffixes which correspond to the settings are displayed in the column called suffixes. By clicking the
headlines of the columns the list is sorted accordingly in raising order.
There is a lager space below the list which shows the pathname of the picture once again. This is
very useful for long pathnames to be shown completely at a time.
On the righthand list all the suffixes are shown which are excluded from the process. The exclusion
function can be activated/deactivated in the „Settings“ frame.
Button „Show picture“:
With the button „Show Picture“ you can directly go to the selected picture. The QuarkXPress document changes the page and activates the according picture box.
Button „Load manually“:
With the button „Load manually“ you can assign new data to the selected picture. By clicking the
button, the standard dialog for loading a picture is displayed. When you select a picture it is imported and shown in the respective box.
Button „New“:
With the button „New“ you can add a suffix to the suffix-exclusion-list.
Button „Delete“:
With the button „Delete“ you can remove a suffix from the suffix-exclusion-list.
- 13 -
Field “separator“:
In this field the separator (only one mark) is entered. It is used to indicate suffixes. The separator
devides the filename from the suffix. Normally a dot is placed here. The dot is the standard separator between filename and suffix. It is also possible to enter any other mark if you should be using
other separators because of the great flexibility of the XTension.
Field “max. Suffix length“:
In this field the maximum suffix length (including the separator) is entered. Only suffixes which are
shorter than or equal to the setting are indicated as suffixes. To indicate the suffixes usually used by
DOS-software a 4 has to be entered here (1 separator + 3 marks for the ending = 4).
Option “consider suffixes in the exclusion-list “:
With this option it is possible to determine whether the suffixes shown in the exclusion-list are considered by the functions „remove suffixes“ and „add suffixes“ or not.
Button “Remove suffixes”:
With this button the process that deletes all suffixes is started. All indicated suffixes of picture paths
from the current document are removed. Depending on the settings, the suffixes from the exclusionlist are either removed or not. Suffixes in general are also removed when the picture path does not
refer to an existing document.
Button “Add suffixes”:
With this button it is possible to add the ending entered next to this button to all picture paths of
the current document. Depending on the settings, the suffixes from the exclusion-list are either
added or not. The whole ending has to be entered next to the button ( separator + additional marks).
- 14 -
3.5 Presettings
The Presetting tab offers all necessary functions to administrate indices and to set the default values
for the LRES-Foldername and LRES-Suffix.
In the list all created indices are displayed. For each index the indexname, the root-folder and files
count, the creation time and the mode are displayed in one line of the list. The indices are displayed in alphabetical order.
Button „New“:
With the button “New” you can create a new index. First you will be asked for the root folder. After
that you can enter the name of the new index. Then the creation process of the index is starting. All
folders will be traversed and the files in the folders will be stored in the index. At the end the index
will be optimized for faster searching and stored on disk. Finally the new index is displayed in the
list.
Button „Delete“:
With the button “Delete” you can remove the selected index.
Button „Update“:
With the button “Update” the content of the index will be updated. This means, the folder hierarchy is traversed again and all file information will be updated. All new added files since the last update will be added to the index.
Button „Activate“:
With the button “Activate” the mode of the selected index can be set to “active”. Only activated
indices are used by the missing picture search process.
Button „Deactivate all“:
With the button „deactivate all“ you can deactivate all indices at a time.
Button „Deactivate“:
With the button “Deactivate” the mode of the selected index can be set to “deactivate”. Deactivated
indices are not used by the missing picture search process.
- 15 -
Button „Activate all“:
With the button „Activate all“ you can activate all indices at a time.
Field „Default LRES-Foldername“:
In this field you can enter the default value for the LRES-Foldername which is used on the other tabs
of the main dialog.
Field „Default LRES-Suffix“:
In this field you can enter the default value for the LRES-Suffix.
3.6 Activation
This dialog is used to register the XTension. If you enter the correct activation key the XTension will
be activated. Otherwise the XTension is running in demo mode.
In the field Activation-Key you can enter an activation key. If you enter a valid activation key and
press the button “Activate” the XTension will be activated. After a restart of QuarkXPress all functions can be used.
With the button “Demo” you can run the XTension in demo mode. All features can be used in demo
mode. But you can not save or print any document. The demo mode will not expire.
- 16 -
4. Contact
If you have and questions or problems please send us an email.
Address
XS-Solutions GmbH
Eckenerstr. 14/1
74081 Heilbronn
Germany
eMail [email protected]
Internet http://www.xs-solutions.de
- 17 -