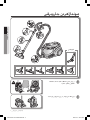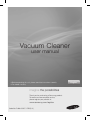
1
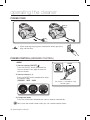
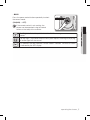
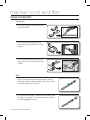
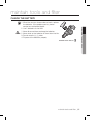
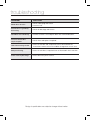
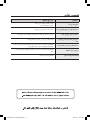
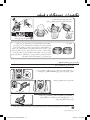
Vacuum Cleaner user manual ✻ Before operating this unit, please read the instructions carefully. ✻ For indoor use only. imagine the possibilities Thank you for purchasing a Samsung product. To receive a more complete service, please register your product at www.samsung.com/register Code No. DJ68-00467J REV(0.0) English safety information SAFETY INFORMATION • WARNING it for your reference. • WARNING Before operating the appliance, please read this manual thoroughly and retain Because these following operating instructions cover various models, the characteristics of your vacuum cleaner may differ slightly from those described in this manual. CAUTION/WARNING SYMBOLS USED WARNING CAUTION Indicates that a danger of death or serious injury exists. Indicates that a risk of personal injury or material damage exists. OTHER SYMBOLS USED Represents something you must NOT do. Represents something you must follow. Indicates that you must disconnect the power plug from the socket. 2_ safety information safety information IMPORTANT SAFEGUARDS 1. Read all instructions carefully. Before switching on, make sure that the voltage of your electricity supply is the same as that indicated on the rating plate on the bottom of the cleaner. 2. WARNING : Do not use the vacuum cleaner when rug or floor is wet. Do not use to suck up water. 3. Close supervision is necessary when any appliance is used by or near children. Do not allow the vacuum cleaner to be used as a toy. Do not allow the vacuum cleaner to run unattended at any time. Use the vacuum cleaner only for its intended use as described in these instructions. 4. Do not use the vacuum cleaner without a dust bin. Empty the dust bin before it is full in order to maintain the best efficiency. 5. Do not use the vacuum cleaner to pick up matches, live ashes or cigarette butts. Keep the vacuum cleaner away from stoves and other heat sources. Heat can deform and discolour the plastic parts of the unit. 6. Avoid picking up hard, sharp objects with the vacuum cleaner as they may damage the cleaner parts. Do not stand on the hose assembly. Do not put weight on the hose. Do not block the suction or the exhaust port. 7. Switch the vacuum cleaner off on the body of the machine before unplugging from the electrical outlet. Disconnect the plug from the electrical outlet before emptying the dust bin. To avoid damage, please remove the plug by grasping the plug itself, not by pulling on the cord. 8. This appliance is not intended for use by persons (including children) with reduced physical, sensory or mental capabilities, or lack of experience and knowledge, unless they have been given supervision or instruction concerning use of the appliance by a person responsible for their safety. 9. Children should be supervised to ensure that they do not play with the appliance. 10. T he plug must be removed from the socket outlet before cleaning or maintaining the appliance. 11. The use of an extension cord is not recommended. 12. If your vacuum cleaner is not operating correctly, switch off the power supply and consult an authorized service agent. 13. If the supply cord is damaged, it must be replaced by the manufacturer or its service agent or a similarly qualified person in order to avoid a hazard. 14. D on’t carry the vacuum cleaner by holding the hose. Use the handle on the vacuum cleaner set. 15. Unplug the cleaner when not in use. Turn off the power switch before unplugging. safety information _3 contents assembling the cleaner 05 Assembling the Cleaner operating the cleaner 06 06 Power cord Power control maintain tools and filter 08 09 11 12 14 14 Using accessory Maintain floor tools Emptying the dust bin Cleaning the dust pack Cleaning the motor protection filter Cleaning the outlet filter 15 Change the battery 05 06 08 troubleshooting 16 4_ contents assembling the cleaner 01 ASSEMblING ThE clEANER OPTION • Please do not press the button of dust bin handle when carrying machine. • For storage, park the floor nozzle. assembling the cleaner _5 operating the cleaner POWER cORD CAUTION • When removing the plug from the electrical outlet, grasp the plug, not the cord. POWER cONTROl (INFRARED CONTROL) - hOse sender ) 1. Vacuum cleaner ON/OFF( Press the ON/OFF button to operate the vacuum cleaner. Press again to stop the vacuum cleaner. 2. Vacuum cleaner (-,+) Press the MODE button repeatedly to select the correct mode. (ON) MIN → MID → MAX handle control The cleaner is controlled by using infrared signals. 3. Using Auto mode Press the Auto button to operate the vacuum cleaner automatically. Don’t cover the handle sender when you use a handle control button. 6_ operating the cleaner - bOdY Press the power control button repeatedly to select the correct mode. (ON(MAX) → OFF) POWER CONTROL The IR light indicates the part that receives the infra-red signal from the handle control. The filter light is illuminated when the dust pack requires checking or emptying. An audio signal will also sound. This indicates that the automatic suction mode is selected. The level of suction is indicated by the LED display. operating the cleaner _7 02 OPERATING ThE clEANER If the remote control is not working, the cleaner can be operated using the control button on the body of the machine. maintain tools and filter USING AccESSORY Accessory • Push the accessory on to the end of the hose handle. • To use the dusting tool, push the accessory on to the end of the hose handle. • To use the upholstery tool, push the accessory on to the end of the hose handle. Pipe • Adjust the length of the telescopic pipe by sliding the length control button located in the center of the telescopic pipe back and forth. • To check for blockages, separate the telescopic pipe and adjust to shorten. This allows for easier removal of waste clogging the tube. 8_ maintain tools and filter maintain tools and filter MAINTAIN FlOOR TOOlS Elbow Extending Tube (Option) 1 2 3 4 5 3 Way Brush (Option) Carpet Cleaning Floor Cleaning • Adjust the inlet lever according to the floor surface. • Remove waste matter completely if the inlet is blocked. 2-Step Brush (Option) Carpet Cleaning Floor Cleaning • Adjust the inlet lever according to the floor surface. • Remove waste matter completely if the inlet is blocked. Parquet Master Brush (Option) • Vacuum dust in wide area at once. • Remove waste matter completely if the inlet is blocked. maintain tools and filter _9 03 MAINTAIN TOOlS AND FIlTER 1. Connect the elbow extending tube to connecting part for hose knob and telescopic pipe. 2. Fit the telescopic pipe to the lower part of the elbow extending tube. 3. Press the PUSH button. 4. With the PUSH button pressed, the elbow extending tube is folded. 5. Using the elbow extending tube allows hard to reach areas (e.g. under furniture)to be cleaned without having to kneel down. maintain tools and filter Parquet Brush (Option) • Vacuum dust in wide area at once. • Remove waste matter completely if the inlet is blocked. Blanket Brush(Option) 1 2 Turbine For picking up pet hair and fibre on upholstery and bed linen. 3 Brush 1. Remove waste matter completely when inlet is blocked. 2. Turn the lock button to ( ), and remove. 3. To reassemble, align the cover to the front of the main body and close. After closing the cover, ensure that the lock button is turned to the ( ) position. CAUTION Use for bedclothes only. Be cautious not to damage brush during unclogging. Super turbine brush (Option) For improved pickup of pet hair and fibre on carpets. 1 2 3 4 5 6 Frequent vacuuming of hair or pet fur may cause a falling-off of the rotation due to matters tangled around the drum. In this case, clean the drum with care. 1. Turn the lock button to unlock position use the like coin( ). 2. Remove the guide air use the like coin. 3. Remove waste matter such as dust and hair tangled around the brushbar using scissors. 4. Remove dust inside the brush housing using a dry duster or crevice tool. 5. Assemble the guide air. 6. Turn the lock button to lock position use the like coin( ). CAUTION Please be careful not to damage the brush. 10_ maintain tools and filter maintain tools and filter Power Pet Plus Brush (Option) 2 3 4 5 6 For improved pickup of pet hair and fibre on carpets. Frequent vacuuming of hair or pet fur may cause a falling-off of the rotation due to matters tangled around the drum. In this case, clean the drum with care. 1. Push the Open button of the transparent screen cover to separate the cover. 2. Remove the brushbar from the transparent screen. 3. Remove waste matter such as dust and hair tangled around the brushbar using scissors. 4. Remove dust inside the brush housing using a dry duster or crevice tool. 5. Insert brushbar into rotating belt and assemble. 6. Click the transparent screen cover back into place to reassemble. EMPTYING ThE DUST bIN 1 2 3 Once dust reaches the dust full mark, empty the dust bin. Take the dust bin out by pressing the button. Separate the dust bin cover. 4 5 6 Throw the dust away in the bin. After emptying the dust bin, remove the obstacles like hair, fur on the cap of the dust bin. Before use, push the dust bin into the main body and press the cover dust of the vacuum cleaner until you hear the “click” sound. maintain tools and filter _11 03 MAINTAIN TOOlS AND FIlTER 1 maintain tools and filter - Empty into a plastic bag. (recommended for asthma/allergy sufferers) You may rinse the dust bin with cold water. Option When emptying any vacuum cleaner it is difficult to avoid exposure to dust. To minimize this risk, Please ensure that you encase the dust pot in a large bag to empty it and close the bag as tightly as possible round the pot. Remove the pot and close the bag as tightly and quickly as possible and dispose of this immediately. it is advisable to wear disposable gloves and a face mask while emptying the cleaner. If at all possible, ask a non allergy sufferer to empty the dust pot when required. clEANING ThE DUST PAcK WHEN TO CLEAN THE DUST PACK • The lamp will turn red when suction is reduced. If the light comes on, please clean the dust pack. • Turn the vacuum power to ‘MAX’. Body Control Handle Control • If the filter check indicator turns red with the inlet floating 10cm above flat floor, clean the dust pack. When suction is noticeably reduced continuously, please cleaning the dust pack. 12_ maintain tools and filter CLEANING THE DUST PACK 2 3 Remove the dust bin and dust pack as shown. Remove the fixed frame of the dust pack cover. Remove the sponge and filter from the dust pack. 4 5 6 Wash the sponge and the filter of the dust pack with water. Let the sponge and filter dry in the shade for more than 12 hours. Put the sponge and filter into the dust pack. 7 8 Before reassembly, align the dust pack cover and dust pack correctly. Put the assembled dust pack into the main body. Make sure the filter is completely dry before putting it back into the vacuum cleaner. Allow 12 hours for it to dry. maintain tools and filter _13 03 MAINTAIN TOOlS AND FIlTER 1 maintain tools and filter clEANING ThE MOTOR PROTEcTION FIlTER • Take out both the dust bin and the dust pack. • Remove the motor protection filter from the mian body. Shake and tap the dust from it and put back in machine. clEANING ThE OUTlET FIlTER 1 2 3 Remove the dust bin and HEPA Filter as shown. Clean the HEPA Filter. Let the HEPA Filter dry in the shade for more than 12 hours. 4 Put assemble HEPA Filter into the main body. Make sure the filter is completely dry before putting it back into the vacuum cleaner. Allow 12 hours for it to dry. 14_ maintain tools and filter maintain tools and filter chANGE ThE bATTERY CAUTION 1. Never disassemble or recharge the batteries. 2. Never heat up the batteries or throw them into fire. 3. Do not reverse (+), (-) poles. 4. Dispose of the batteries property. BATTERY TYPE : AAA Size maintain tools and filter _15 03 maintain tools and filter 1. When the vacuum cleaner does not work, replace the batteries. If the problem persists, please contact our authorized dealer. 2. Use 2 batteries of size AAA. troubleshooting PROBLEM SOLUTION Motor does not start • Check cable, pulg and socket. • Leave to cool. Suction force is gradually decreasing • Check for blockage and remove. Cord does not rewind fully • Pull the cord out 2-3m and push down the cord rewind button. Vacuum cleaner does not pick up dirt • Check hose and replace if required. Low or decreasing suction • Please check filter and, if required, clean as illustrated in the instructions. if filters are out of condition change them to new ones. Body overheating • Please check filters, If required clean as illustrated in the instruction. Static electicity discharge • Please decrease power suction. Design & specification are subject to change without notice. عیب یابی مشکل روش رفع اشكال موتور کار منی کند • کابل ،دو شاخه و سوکت را بررسی کنید. • بگذارید دستگاه خنک شود. قدرت مکندگی به تدریج کاهش می یابد. • محل انسداد را پیدا کرده و آن را رفع منایید. سیم به درستی جمع منی شود. • سیم را 2تا 3متر بیرون بکشید و سپس تکمه جمع کننده سیم را فشار دهید. جارو برقی خاک را به درستی جمع منی کند. • لوله خرطومی را بررسی و در صورت نیاز آنرا تعویض کنید. قدرت مکش کم و یا رو به کاهش است. • لطفا فیلتر را چک کرده و در صورت نیاز بر طبق دستورالعمل های مربوطه آن را متیز منائید. چنانچه فیلتر ها کهنه شده اند ،آن ها را تعویض منائید. داغ شدن بدنه دستگاه • لطفا فیلتر ها را چک کرده و در صورت نیاز بر طبق دستورالعمل مربوطه آن ها را متیز مائید. تخلیه الکتریسیته ساکن. • لطفا قدرت مکش را کم کنید. 2009.9.15 9:9:57 AM DJ68-00474J-0911-PERSIAN.indd 16 نگهداری دستگاه و فیلتر روش تعویض باتری دستگاه .2از 2عدد باتری سایز AAAاستفاده شود. تنبيه .1لهرگز باتری ها را باز نکرده و اقدام به شارژ آنها ننمایید. .2هرگز باتری ها را گرم نکرده و آنها را در داخل آتش نیاندازید. .3قطب های ( )+و ( )-باتری را جابجا نکنید. .4باتری ها را به نحو صحیح دور بیاندازید. نوع باتری :سایز AAA نگه داری دستگاه و فیلتر 3 .1زمانیکه دستگاه جارو برقی کار نمی کند ،نسبت به تعویض باتری های آن اقدام نمایید .چنانچه ایراد همچنان باقی بود ،لطفا با نماینده مجاز ما تماس بگیرید. نگه داری دستگاه و فیلتر _15 2009.9.15 9:9:57 AM DJ68-00474J-0911-PERSIAN.indd 15 نگهداری دستگاه و فیلتر روش ﲤﻴﺰ ﻛردن فﻴلتر مﺤافﻆ موتور • فيلتر محافظ موتور را از جارو برقي خارج منائيد. • فیلتر محافظ موتور را از بدنه اصلی دستگاه جدا منایید .گرد و غبار را از آن آهسته ضربه زده و بتكانيد و آن را برگردانده در داخل دستگاه قرار دهيد. روش ﲤﻴﺰ ﻛردن فﻴلتر خروجﻲ 2 1 بر طبق شکل ،کیسه آشغال و فیلتر HEPAرا بردارید. فیلتر HEPAرا تمیز کنید. 3 صبر کنید که فیلتر HEPAدر سایه و بمدت بیش از 21ساعت خشک گردد. 4 جهت جایگذاری مجدد ،فیلتر HEPAرا در داخل بدنه اصلی دستگاه قرار دهید. قبل از قرار دادن مجدد فیلتر در داخل دستگاه ،از خشک بودن کامل آن اطمینان حاصل بفرمایید 21 .ساعت صبر کنید تا فیلتر کامال خشک گردد. _14نگه داری دستگاه و فیلتر 2009.9.15 9:9:56 AM DJ68-00474J-0911-PERSIAN.indd 14 رابغ و درگ هظفحم ندرك زيمت شور 1 محفظه آشغال و محفظه گرد وغبار را چنانكه نشان داده شده خارج منائيد. 4 قاب ثابت روکش کیسه آشغال را بردارید. 5 اسفنﺞ و فيلتر محفظه گرد و غبار را با آب منائيد شستشو. 7 قبل از جایگذاری مجدد ،روکش کیسه آشغال و خود کیسه را با هم میزان کنید. اسفنﺞ و محفظه گرد و غبار را بيش از 12ساعت بگذاريد در سايه خشﻚ شود. 8 اسفنﺞ و فیلتر را از کیسه آشغال جدا سازید. 6 نگه داری دستگاه و فیلتر 3 2 3 اسفنﺞ را داخل محفظه گرد و غبار قرار دهيد. محفظه گرد و غبار نصب شده را داخل بدنه اصلي قرار دهيد. پيش از قرار دادن مجدد فيلتر در داخل جارو برقي ،مطمئن شويد كه فيلتر كامال خشﻚ شده است. 12ساعت جهت خشﻚ شدن آن زمان دهيد. نگه داری دستگاه و فیلتر _13 2009.9.15 9:9:51 AM DJ68-00474J-0911-PERSIAN.indd 13 نگهداری دستگاه و فیلتر ديئامن يلاخ يكيتسالپ هسيك ﻚي لخاد(جهت افراد مبتال به آسم /آلرژي توصيه مي شود) شما قادر به شسنت محفظه آشغال با آب سرد مي باشيد. انتخاب ها در هنگام تخلیه محفظه آشغال هر نوع دستگاه جارو برقی ،قرار نگرفتن در معرﺽ گرد وخاک بسیار مشکل است .بمنظور کاهش دادن اثر این خطر ،از قرار دادن محفظه آشغال در یک کیسه بزرگ و تخلیه در آن اطمینان حاصل نمایید. سپس درب کیسه را تا حد امکان محکم ببندید .محفظه آشغال را پس از تخلیه برداشته و آنگاه درب کیسه را تا حد امکان محکم و بسرعت بسته و دور بیاندازید. توصیه می شود که در هنگام تخلیه دستگاه جارو برقی از دستکش های یک بار مصرﻑ و ماسک صورت استفاده بفرمایید .در صورت امکان ،از شخصی که ناراحتی های حساسیتی ندارد ،بخواهید که کار تخلیه را انجام دهید. روش تمیز کردن کیسه آشغال زمان متيز كردن محفظه گرد و غبار • در زمان کاهش یافتن قدرت مکش ،نور چراﻍ مربوطه به رنگ قرمز روش می شود .در صورت روشن شدن چراﻍ ،لطفا کیسه آشغال را تمیز نمایید. • دكمه جارو را تا 'حد ماكزﳝم' بچرخانيد کنترل روی بدنه دستگاه كنترل روي دسته • در هنگامیکه چراﻍ نشانگر چک فیلتر در حالیکه سری تمیز کننده را در 01سانتیمتری باالی کف زمین گرفته اید ،به رنگ قرمز روشن گردید ،کیسه آشغال را تمیز کنید. در زمانیکه قدرت مکش بطور قابل مالحظه و بصورت مکرر کاهش می یابد ،لطفا کیسه آشغال را تمیز نمایید. _12نگه داری دستگاه و فیلتر 2009.9.15 9:9:43 AM DJ68-00474J-0911-PERSIAN.indd 12 نگهداری دستگاه و فیلتر 1 2 3 4 5 6 نگه داری دستگاه و فیلتر 3 برس پالس قدرتمند مخصوﺹ موی حیوانات (انتخابی) جهت استفاده بهینه در خصوﺹ مرتب کردن موی حیوانات خانگی و همچنین پرز های فرش استفاده مکرر دستگاه در موارد مرتب کردن موی حیوانات خانگی و همچنین پرز های فرش باعﺚ عدم چرخش موتور بر اثر گیر کردن مو دور درام دستگاه خواهد شد .در این مواقع ،درام دستگاه را با دقت متیز منائید. . 1بمنظور جدا کردن روکش ،دکمه باز کردن روکش شیشه ای صفحه را فشار دهید. . 2میله برس را از روکش شیشه ای صفحه جدا سازید. . 3با استفاده از یک قیچی ،مواد زائد مانند گرد و خاک و مو های چسبیده به اطراﻑ میله برس را برطرﻑ نمایید. . 4با استفاده از سری تمیز کننده کناره ها و یا یک غبار روب خشک ،گرد و خاک داخل محفظه برس را پاک کنید. . 5میله برس را در داخل تسمه چرخش قرار داده و آن را سوار کنید. . 6روکش شیشه ای صفحه را در جای خود قرار داده و فشار دهید تا صدای کلیک مانند شنیده شده و جا افتد. روش خالﻲ ﻛردن مﺤﻔﻈه ﺁشﻐال 1 2 3 بمحض اینکه گرد وخاک به سطح نهائی رسید ،محفظه آشغال را خالی کنید. فظه آشغال را با فشردن دكمه بيرون بكشيد. درپوش محفظه آشغال را جدا منائيد. 5 6 4 گرد وخاک را از داخل محفظه بزدایید. قبل از استفاده ،محفظه آشغال پس از خالی کردن محظه آشغال ،مواد را در داخل بدنه اصلی دستگاه قرار زائد مانند مو و کرک های روی درپوش داده و روکش جارو برقی را بسته و محفظه را برطرﻑ نمایید. تا هنگام شنیده شدن یک صدای کلیک مانند ،فشار دهید. نگه داری دستگاه و فیلتر _11 2009.9.15 9:9:32 AM DJ68-00474J-0911-PERSIAN.indd 11 نگهداری دستگاه و فیلتر برس اصلی پارکت (انتخابی) • گرد و غبار بخش وسیعی را به یک باره تمیز می کند. • در صورت انسداد لوله ورودی ،مواد گرفته شده را بطور کامل خارج سازید. فرشاﺓ البطاطين (اختيارية) 2 1 جهت مکش موی حیوانات خانگی و نﺦ های روی مبلمان و رو تختی. توربین 3 برس .1در مواقع گرفتگی منفذ ورودی ،مواد زائد را بطور کامل بردارید. ( چرخانده و بردارید. .2دکمه قفل را به سمت حالت ) .3جهت وصل مجدد ،درپوش را در جلوی بدنه اصلی تنظیم کرده و سپس آن را ببندید .پس از بسنت درپوش ،از چرخانده شدن دکمه ( اطمینان حاصل بفرمائید. قفل به سمت حالت ) اخطار فقط برای ملحفه تخت خواب استفاده شود .در زمان برطرﻑ کردن گرفتگی برس ،دقت کنید که آسیبی به آن وارد نشود. برس توربین دار سوپر (انتخابی) 1 2 3 4 5 6 جهت بهبود مکش موی حیوانات خانگی و نﺦ های روی فرش. مکش مکرر مو و پشم حیوانات خانگی ممکن است باعﺚ کاهش بازده چرخشی درام دستگاه به علت گرفتگی و چسبیدن این مواد به آن گردد .در این حالت ،درام دستگاه را با دقت تمیز کنید. . 1با استفاده از یک سکه ) ( ،دکمه قفل کردن را چرخانده و در وضعیت باز قرار دهید. . 2با استفاده از یک سکه ،راهنمای عبور هوا را بردارید. . 3با استفاده از یک قیچی ،مواد زائد مانند گرد و خاک و مو های چسبیده به اطراﻑ میله برس را برطرﻑ نمایید. . 4با استفاده از سری تمیز کننده کناره ها و یا یک غبار روب خشک ،گرد و خاک داخل محفظه برس را پاک کنید . 5.ركب دليل الهواء. . 5راهنمای عبور هوا را جایگذاری کنید. . 6با استفاده از یک سکه ) ( ،دکمه قفل کردن را چرخانده و در وضعیت قفل قرار دهید. اخطار مراقب باشید تا برس آسیب نبیند. _10نگه داری دستگاه و فیلتر 2009.9.15 9:9:20 AM DJ68-00474J-0911-PERSIAN.indd 10 نگهداری دستگاه و فیلتر نگه داری قﻄﻌات کﻒ زانوئی لوله اضافی (انتخابی) 3 .1زانوئی لوله را به قسمت اتصال شستی شلنگ و لوله تلسکوپی وصل نمایید. .2لوله تلسکوپی را به قسمت پایین زانوئی لوله چفت نمایید. .3دکمه فشاری ( )PUSHرا فشار دهید. .4در همان حالی که دکمه فشاری ( )PUSHرا فشار می دهید ،زانوئی لوله خم می گردد. .5با استفاده از زانوئی لوله قادر خواهید بود مناطقی را که دسترسی به آن ها دشوار است (مانند زیر مبلمان) را بدون نیاز به زانو زدن تمیز کنید. نگه داری دستگاه و فیلتر 3 1 2 4 5 برس 3کاره (انتخابی) متیز کردن فرش متیز کردن کف • اهرم ورودی را بر اساس سطح کف تنظیم کنید. • در صورت انسداد مجرای ورودی ،ماده زائد را خارج کنید. برس 2مرحله اي (انتخابي) متیز کردن فرش متیز کردن کف • اهرم ورودی را بر اساس سطح کف تنظیم کنید. • در صورت انسداد مجرای ورودی ،ماده زائد را خارج کنید. برس اصلی پارکت (انتخابی) • گرد و غبار بخش وسیعی را به یک باره تمیز می کند. • در صورت انسداد لوله ورودی ،مواد گرفته شده را بطور کامل خارج سازید. نگه داری دستگاه و فیلتر _9 2009.9.15 9:9:12 AM DJ68-00474J-0911-PERSIAN.indd 9 نگهداری دستگاه و فیلتر استﻔاده اﺯ وسایل جانﺒی لوازم جانبی • ابزار جانبی را به قسمت انتهائی دسته شلنگ خرطومی فشار دهید. • جهت استفاده از ابزار غبار روب ،آن را به قسمت انتهائی دسته شلنگ خرطومی فشار دهید. • جهت استفاده از ابزار تمیز کننده مبلمان ،آن را به قسمت انتهائی دسته شلنگ خرطومی فشار دهید. لوله • لوله تلسکوپی را با دکمه کنترل طول که در مرکز لوله تلسکوپی قرار دارد ،به جلوو عقب ببرید تا بلندی آن تنظیم شود. • برای بررسی انسداد ،لوله تلسکوپی را جدا و تنظیم کنید تا کوتاه شود. این کار برطرﻑ کردن انسداد لوله را آسان تر می کند. _8نگه داری دستگاه و فیلتر 2009.9.15 9:9:3 AM DJ68-00474J-0911-PERSIAN.indd 8 کنترل قدرت مکش در صورت عدم کارکرد دستگاه کنترل از راه دور ،می توانید از دکمه کنترل واقع بر روی بدنه دستگاه جارو برقی استفاده و عملکرد را کنترل نمایید. چراﻍ IRنشاندهنده نقطه ای است که دستگاه سیگنال های مادون قرمز ارسالی از کنترل دسته را دریافت می دارد. در هنگام نیاز به تخلیه و یا بازدید کیسه آشغال ،چراﻍ فیلتر روشن خواهد شد .همچنین یک صدای آالرم بگوش خواهد رسید. کار کردن با جاروبرقی 2 بدنه دستگاهبمنظور انتخاب حالت مناسب ،دکمه کنترل قدرت مکش را بطور مکرر فشار دهید. ))روشن(ﺣداکﺜر <-خاموش( این نشانگر آن است که حالت مکش خودکار انتخاب شده است .سطح مکش توسط یک نشانگر ال ایی دی، نشان داده می شود. کار کردن با جاروبرقی _7 2009.9.15 9:8:56 AM DJ68-00474J-0911-PERSIAN.indd 7 کار کردن با جاروبرقی سیم برﻕ احتیاط • به هنگام کشیدن دو شاخه از پریز برق ،دو شاخه را دردست گرفته و خارج کنید و سیم را نکشید. کنترل قدرت مکش )کنترل مادون قرمﺰ( لوله خرﻃومی» .1روشن/خاموش کردن« ( ) دستگاه جارو برقی تغییر حالت دهنده دسته جهت شروع کار کردن با دستگاه جارو برقی ،دکمه »روشن/ خاموش« ( )ON/OFFرا فشار دهید. جهت خاتمه کار دستگاه جارو برقی ،دکمه »روشن/خاموش« ( )ON/OFFرا مجددا فشار دهید. .2دستگاه جارو برقی ()+ ، - بمنظور انتخاب حالت مناسب ،دکمه »تعیین حالت« ( )MODEرا طور مکرر فشار دهید. )تشﻐﻴل( الﺤد اﻷدنﻰ <-متوسﻂ <-الﺤد اﻷقﺼﻰ کنترل روی دسته کنترل دستگاه جارو برقی توسط سیگنال های مادون قرمز انجام می گردد. .33روش استفاده از حالت خودکار جهت کار کرد دستگاه جارو برقی در حالت خودکار ،دکمه خودکار را فشار دهید. در هنگام استفاده از دکمه کنترل روی دسته ،تغییر حالت دهنده دسته را توسط روکش نپوشانید. _6کار کردن با جاروبرقی 2009.9.15 9:8:54 AM DJ68-00474J-0911-PERSIAN.indd 6 مونتاژکردن جاروبرقی 1 مونتاژکردن جاروبرقی گزینشی • در زمان حمل دستگاه ،دكمه دسته محفظه آشغال را فشار ندهيد. • برای نگه داری لوله را بر روی جاروبرقی قرار دهید. مونتاژکردن جاروبرقی _5 2009.9.15 9:8:49 AM DJ68-00474J-0911-PERSIAN.indd 5 فهرست مونتاژ کردن جارو برقی 5 مونتاژ کردن جاروبرقی 5 کار کردن با جارو برقی 6 نگه داری دستگاه و فیلتر 8 6 سیم برق 18 کنترل توان 8 استفاده از لوازم جانبی 9 نگه داری قطعات کف 11 روش خالي كردن محفظه آشغال 1 2 14 14 روش متيز كردن فيلتر محافظ موتور روش متيز كردن فيلتر خروجي 15 روش تعویض باتری روش متيز كردن محفظه گرد و غبار عیب یابی 16 _فهرست 2009.9.15 9:8:43 AM DJ68-00474J-0911-PERSIAN.indd 4 اطالعات ایمنی احتیاط های مهم .1این دستورالعمل را به دقت بخوانید .قبل از روشن کردن دستگاه ،مطئمن شوید که ولتاژ ذخیره الکتریسیته همان است که روی صفحه درجه بندی جارو برقی نشان می دهد. .2هشدار :زماني كه فرش يا كف زمني مرطوب است از دستگاه استفاده نفرمائيد. جهت مكش آب از دستگاه استفاده نفرمائيد. .3وقتی وسیله ای نزدیک بچه هاست نظارت شدید الزم است .اجازه ندهید جارو برقی به عنوان اسباب بازی استفاده شود .اجازه ندهید جاروبرقی در هر زمان آزادانه استفاده شود .جاروبرقی را همانگونه که این دستورالعمل توصیف شده ،فقط برای استفاده منظور شده ،استفاده کنید. .4بدون محفظه آشغال از دستگاه جارو برقي استفاده نفرمائيد .جهت حفظ بهترين كارائي محفظه آشغال را پيش از پر شدن خالي منائيد. .5جاروبرقی از برای برداشنت کبریت ،خاکستر یا ته سیگار استفاده نکنید .جاروبرقی را دور از اجاق و منابع گرمایی دیگر نگه دارید. گرما می تواند قسمت های پالستیکی دستگاه را تغییر شکل و تغییر رنگ دهد. .6از برداشنت اشیای تیز و سخت با جارو برقی اجتناب کنید .زیرا ممکن است به اجزای جاروبرقی آسیب وارد کنند .اشیاء سنگین را روی لوله قرار ندهید .ورودی مکش را مسدود نکنید. .7جاروبرقی را از روی دستگاه خاموش کنید قبل از اینکه دو شاخه را از پریز برق بکشید .برای متیز کردن کیسه جاروبرقی اول دوشاخه را از پریز برق بکشید .لطفا سیم را با فشار دادن تکمه مربوطه به سیم جمع کنید و آن را باد دست جمع نکنید. .8طراحی کاربرد این دستگاه برای استفاده افرادی که دارای کمبود توانائی های بدنی ،حسی و یا ذهنی می باشند (شامل کودکان) و همچنین افراد فاقد جتربه و آگاهی کافی ،اجنام نشده است .این گونه افراد می تواند حتت نظارت و راهنمائی شخصی که مسئولیت حفاظت از ایمنی آنان را برعهده دارد ،و پس از تفهیم کامل نحوه کاربرد ،به استفاده از دستگاه بپردازند. .9جهت اطمينان از اين كه كودكان با دستگاه بازي نكنند بايد مورد نظارت واقع شوند. .10قبل از متیز کردن یا نگه داری دستگاه دو شاخه باید از برق کشیده شود. .11استفاده از سیم اضافی توصیه منی شود. .12در صورتیکه جاروبرقی شما به درستی کار منی کند منبع برق را قطع کرده و با یک آژانس خدماتی مجاز مشورت کنید. .13اگر سیم منبع آسیب دیده ،باید توسط تولید کننده یا آزانس خدمات آن یا شخص شایسته تعویض شود تا از خطر جلوگیری شود. .14جاروبرقی را با نگه داشنت لوله حمل نکنید .از دسته روی دستگاه استفاده کنید. .15در هنگام عدم استفاده ،دوشاخه دستگاه را از پريز برق خارج مناييد .قبل از اينكار دستگاه را خاموش كنيد. معلومات السالمة _3 2009.9.15 9:8:43 AM DJ68-00474J-0911-PERSIAN.indd 3 اطالعات ایمنی اطالعات ایمنی اخطار اخطار •قبل از کار کردن دستگاه ،لطفا متام این دفترچه راهنما را بخوانید و آنرا برای رجوع نگهداری کنید. •خصوصیات جارو برقی شما ممکن است کمی از آنچه که در این دفترچه راهنما توصیف شده ،تفاوت داشته باشد زیرا این دستورالعمل ها مدل های مختلف را شامل می شود. نشانه های اخطار استفاده شده اخطار احتیاط خطر مرگ یا صدمه جدی. خطر ضدمه شخصی یا آسیب جسمی. نشانه های دیگر است فاده شده نشانگر کاری است که نباید اجنام دهید. نشانگر کاری است که باید رعایت کنید. نشانگر آن است که باید دوشاخه را از پریز بکشید. _ 2اطالعات ایمنی 2009.9.15 9:8:43 AM DJ68-00474J-0911-PERSIAN.indd 2 جاروبرقی دفترچه راهنمای کاربر ✻ قبل از کار کردن با این دستگاه ،لطفا دستورالعمل ها را به دقت بخوانید. ✻ فقط برای استفاده خانگی فارسی .امکانات را تصور کنید از اینکه محصول سامسونگ را برای خرید انتخاب کرده اید ،متشکریم .لطفا برای دریافت خدمات بیشتر ،محصولتان را در www.samsung.com/registerثبت کنید )Code No. DJ68-00467J REV(0.0 2009.9.15 9:8:42 AM DJ68-00474J-0911-PERSIAN.indd 1