1
DJ68-00093D
1/30/02 10:44 AM
Page 1
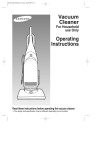
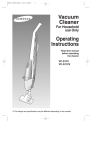
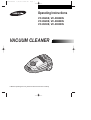
Operating Instructions
VC-8926E, VC-8926EN
VC-8928E, VC-8928EN
VC-8930E, VC-8930EN
VACUUM CLEANER
❈ Before operating this unit, please read the instructions carefully.
DJ68-00093D
1/30/02 10:44 AM
Page 2
FEATURES
Features include indicator and automatic cord rewind.
NOTE : Not all models have the same features.
IMPORTANT SAFEGUARDS
1. Read all instructions carefully. Before switching on, make sure that the voltage of your electricity supply is the same as that indicated on the rating plate on the bottom of the cleaner.
2. WARNING: Do not use the vacuum cleaner when rug or floor is wet.
3. Close supervision is necessary when any appliance is used by or near children. Do not allow the vacuum cleaner to be used as a toy. Do not allow the vacuum cleaner to run unattended at any time. Use
the vacuum cleaner only for its intended use as described in these instructions.
4. Do not use the vacuum cleaner without a dust bag. Change the dust bag before it is full in order to
maintain the best efficiency.
5. Do not use the vacuum cleaner to pick up matches,live ashes or cigarette butts. Keep the vacuum
cleaner away from stoves and other heat sources. Heat can deform and discolour the plastic parts of
the unit.
6. Avoid picking up hard,sharp objects with the vacuum cleaner as they may damage the cleaner parts.
Do not stand on the hose assembly. Do not put a weight on the hose. Do not block the suction or the
exhaustion part.
7. Switch the vacuum cleaner off at the machine before unplugging from the electrical outlet. Grasp the
plug to disconnect cord from electrical outlet before changing the dust bag.
8. The use of an extension cord is not recommended.
9. If your vacuum cleaner is not operating correctly,switch off the power supply and consult an authorized service agent.
10. Do not attempt to replace a damaged power supply cord. Only the manufacturer or qualified service
personnel can replace power cords. Serious injury may result.
WARNING
1. Do not use to suck up water.
2. Do not immerse in water for cleaning
3. The hose should be checked regularly and must not be used if damaged.
EN-1
DJ68-00093D
1/30/02 10:44 AM
Page 3
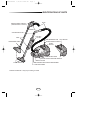
IDENTIFICATIONS OF PARTS
HOSE *
REMOTE POWER CONTROL *
(REMOTE CONTROL TYPE ONLY)
HANDLE *
SUCTION REGULATOR *
CYCLONIC
FILTER *
TUBE *
CORD REWIND BUTTON
TRANSPARENT TUBE *
POWER CONTROL SWITCH *
ON/OFF
BUTTON
FLOOR NOZZLE *
Features marked with
AUTO BUTTON
TOOL STORAGE COVER
BUTTON FOR SUCTION HOSE REMOVAL
DUST COVER
CLAMPER FOR DUST BAG COMPARTMENT
CARRYING HANDLE
* may vary according to model.
EN-2
DJ68-00093D
1/30/02 10:44 AM
Page 4
ASSEMBLING THE VACUUM-CLEANER READY FOR USE
1) Connect the suction hose to the suction tube.
2) Adjust the suction tube(depending on model).
EXTENDING : Holding the narrow part of
the telescopic tube with one
hand, push the handle in the
opposite direction with your
other hand.
➁ SHORTENING : Holding the narrow part of
the telescopic tube with
one hand, pull the handle
towards it using the other hand.
OPTION
NOTE : Adjustable telescopic tube is not
available with all models.
OPTION : Connect the suction tubes together.
4) Open the hose connection cover.
3) Connect the nozzle to the suction tube.
5) Connect the body connector to the body of the
cleaner.
EN-3
DJ68-00093D
1/30/02 10:45 AM
Page 5
POWER CORD
1) PULLING OUT : The power cord is long enough to
drawn out for convenience.
2) REWINDING : When you have finished cleaning,disconnect the plug from the electrical outlet
and simply press the cord rewind button
lightly with your toe.
NOTE : When removing the power cord from the electrical outlet,grasp the plug,not the cord.
ON/OFF SWITCH
You can start or stop your vacuum cleaner by pressing the
on/off switch lightly with your toe.
POWER CONTROL(VARIABLE CONTROL TYPE ONLY)
The vacuuming power can be adjusted to suit any situation with electrical power control.
MIN = For delicate fabrics, e.g. net curtains.
ECO = Economy setting for normally soiled carpets.
MAX = For hard floors and heavily soiled carpets.
1) For slider control types
Slide the controller to upwards or downwards to adjust the power output.
Model with controller on the body of cleaner
Model with controller on the handle
2) For button control types
Press (+)button to heighten the power.
Press (-)button to lower the power.
Model with controller on the body of cleaner
Model with controller on the handle
EN-4
DJ68-00093D
1/30/02 10:45 AM
Page 6
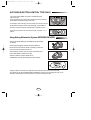
AUTO MODE (BUTTON CONTROL TYPE ONLY)
If you press AUTO MODE, the power is automatically set at
1200~1300 watt.
This mode reduces the suction power fluctuation which is caused by
the fluctuation of airflow quantity to the motor.
For example, when dust bag is full, the quantity of air to the motor will
be decreased and power will be down followingly. AUTO MODE, in
this case, increases the power automatically for sufficient suction.
If you want to go back to the normal control type, just press "+" or "-"
buttons.
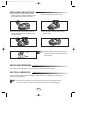
Using Exbug Elimination System (DEPENDING ON MODEL)
It is best to use the Mite Killing cycle immediately after you have finished
your cleaning.
Ensure machine is plugged in and the power point is switched on.
Disconnect the hose from the cleaner by pressing in the two buttons on the hose end and lift the hose out.
Close the hose connection cover on the top of the cleaner until
tone is heard. Make sure that it is fully shut.
Switch the cleaner on and the cleaner will run.
The Mite Killer cycle will automatically stop when complete.
Unplug the cleaner, rewind the cord, open the hoses connection cover and re-connect the hose.
Your cleaner can be used immediately after the Mite Killer cycle stop or by interrupting the cycle. To do
this,switch cleaner off,open the hose connection cover and re-connect the hose.
EN-5
DJ68-00093D
1/30/02 10:45 AM
Page 7
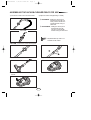
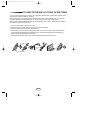
USING THE ACCESSORIES
Open the tool storage cover upwards.
CREVICE
Crevice tool for radiators, crevices,
corners, between cushions.
DUSTING
Dusting brush for furniture,
shelves, books, etc.
UPHOLSTERY
Upholstery brush for cushions
and drapery.
PARK POSITION
Located in the top rear side of the vacuum cleaner,there is
a nozzle support that can be used to park the nozzle during
pauses in cleaning
TRANSPORTING AND STORING THE VACUUM CLEANER
For easy storage and transportation, this vacuum cleaner has a
clip system built into body, which will keep the wand, hose and
nozzle in an upright position.
EN-6
DJ68-00093D
1/30/02 10:45 AM
Page 8
REPLACING THE DUST BAG
1) To open the dust cover of the dust bag compartment, press the clamper upwards(the clamper is located at the front of the dust cover).
2) Remove the dust bag from the cleaner
3) After removing the used dust bag, insert the
cardboard bag collar of the new dust bag into
its original position.
4) Press the dust cover down gently until the
clamper relocks.
NOTE : Used dust bags can be sealed by removing
the film from the paper and sticking over the
suction opening.
FOR CLOTH FILTER BAG
After using,if the cloth filter bag is full of dust, clean the cloth filter bag and use it again.
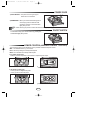
DUST-FULL INDICATOR
If the “Dust-Full” indicator switch changes to “RED” while you are cleaning, the dust bag is
full and must be replaced.
NOTE : If the “Dust-Full” indicator continues to display “RED” even after changing the dust
bag, turn the cleaner off and check whether the hose, tube or nozzle is clogged.
EN-7
DJ68-00093D
1/30/02 10:45 AM
Page 9
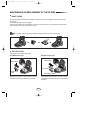
CYCLONIC FILTER (ONLY CYCLONIC FILTER TYPES)
You can use a dust bag in your cleaner for a long time thanks to the Cyclonic Filter system and it
maintain the maximum cleaning efficiency.
The larger particle of dust filtered from Cyclonic Filter remain in Dust Barrel when suctioned air
and dust revolves in the Cyclonic Filter. So the dust bag contains only smaller ones.
When the Dust Barrel is filled with dust up to the indicating line, it needs disposing and cleaning.
Dust Barrel can be cleaned in water.
1. Turn the Dust Barrel to the left and pull it.
2. Disconnect the Cyclonic Filter from extension wand and handle.
3. Remove thread and hair tangled around the net.
4. After cleaning the Dust Barrel and Cyclonic Filter, connect the Cyclonic Filter with extension
wand and handle(washed part should be dried in the shade throughly before assembling.)
5. Push and turn the Dust Barrel to the right.
Adjust indicating marks each other carved on Dust Barrel and Cyclonic Filter.
CYCLONIC
FILTER
CREVICE
TOOL
DUST BARREL
EN-8
DJ68-00093D
1/30/02 10:45 AM
Page 10
MAINTENANCE OR REPLACEMENT OF THE FILTERS
INLET FILTER
The secondary filter, located behind the grille in the back of dust bag compartment, protects the motor from
dirt particles.
Do not allow the filter to become clogged.
Suction power reduction or motor damage may result. If filter becomes dirty, pull off the grille and lift out filter.
After cleaning the secondary filter attach it in place.
NOTE : The filters must be completely dried before being replaced in the dust compartment.
OUTLET FILTER
Open the dust cover and lift off the grille.
For HEPA Filter Type
For Micro Filter Type
Grille Filter
HEPA Filter
Micro Filter
Preliminary
Filter
Preliminary Filter
Grasp filter and pull it out with preliminary filter.
After cleaning preliminary filter, reposition new filter
and preliminary filter by reversing this procedure.
Grasp grille filter and pull it out with preliminary filter.
After cleaning preliminary filter, reposition new filter
compartment and preliminary filter by reversing this
procedure.
EN-9
DJ68-00093D
1/30/02 10:45 AM
Page 11
USAGE OF FLOOR NOZZLE
FOR RUG / FLOOR SELECTOR
Before use make sure that the position of the selector is in the right position for the type of surface to be
cleaned.
Select the carpet indicator ➀ when cleaning carpets.
Select flat surface indicator ➁ when cleaning the floors, tiles, etc.
FOR UNIVERSAL BRUSH
Use the floor nozzle for cleaning all surfaces.
NOTE: For optimum efficiency, clean floor brush with crevice tool.
TRANSPARENT TUBE
Transparent tube prevent the tube and hose
from being clogged by obstacle like as socks
and clothes.
When transparent tube is clogged.
Separate the nozzle from the tube. Remove
the alien substance with a stick from it. After
cleaning it, reassemble the nozzle to the tube.
EN-10
DJ68-00093D
1/30/02 10:45 AM
Page 12
TROUBLE SHOOTING
PROBLEM
CAUSE
REMEDY
Motor does not start.
No power supply.
Check cable, plug and
socket.
Suction force is gradually
decreasing.
Filter, nozzle, suction hose
or tube is blocked.
Remove the object.
Cord does not rewind fully.
Check that the cord is not
twisted or wound unevenly.
Pull the cord out 2~3m &
push down the cord rewind
button.
EN-11
ﲢﺮى اﳋﻠﻞ واﺻﻼﺣﻪ
اﳊﻞ
اﻟﺴﺒﺐ
pK«Ë fÐUI« qOuð h׫
اﳌﺸﻜﻠﺔ
ÆWMJ*« v« qB¹ —UOð błu¹ ô
—uðu*« qLF¹ ô
ÆÍ—«b'« —UO²« Ãd&' v«
UIzUŽ U¾Oý ‰“«
ÂuÞdš Ë√ ¨W¼uH« Ë√ ¨ …UHB*«
jHA« …u) i&HMð
œËb' jHA« »u³½« Ë√ jHA«
UO−¹—bð
—U²'« ≥ ≠ ≤ ‡Ð pK« V×Ý«
Íu²K' dOž pK« Ê« s' bBQð
—UO²« pKÝ qšb¹ ô
—“Ë tOKŽ jG{«Ë ×U)« v«
dOž qJAÐ —dCÐ »UB' Ë√
‰Ušœù« U'U9
ÆpK«
ÆÈu²'
8900-ARB
12
1/2/02, 2:16 AM
اﺳﺘﺨﺪام ﻓﻮﻫﺔ اﻷرض
اﻷرض/زر اﺧﺘﻴﺎر اﻟﺴﺠﺎدة
ŸuM U³ÝUM' ÷—_«Ø…œU−« —UO²š« —e `O×B« l{u« s' bBQð ¨WOzUÐdNJ« WMJ*« qOGAð q³)
ÆtHOEMð b¹dð Íc« `D«
Æ…œU−« nOEM² ± …œU−« dýR' d²š«
Æa« ÆÆÆ bO'«dI«Ë ÷—_« nOEM² ≤ ÷—_« dýR' d²š«
ﻟﻠﻔﺮﺷﺎة اﻟﻌﺎﻣﺔ
ÆŸ«u½_« lOLł s' ÷—_« nOEM² ÷—_« W¼u Âb&²Ý«
Æ‚uIý «– …«œ√ WDÝ«uÐ ÷—_« …Uýd nÒE½ ¨…¡UHB qC√ vKŽ ‰uB×K :ﻣﻼﺣﻈﺔ
اﻷﻧﺒﻮب اﻟﺸﻔﺎف
s' ÂuÞd)«Ë »u³½_« lM1 ·UHA« »u³½_«
ÆfÐö*«Ë »—«u'« q¦' ¡UOý_UÐ UL¼bÝ
.ﻓﻲ ﺣﺎﻟﺔ ﺳﺪ اﻷﻧﺒﻮب اﻟﺸﻔﺎف
¡wA« ‰“« Æ»u³½_« s' W¼uH« qB«
¨tHOEMð bFÐ Æ VOC) WDÝ«uÐ tM' V¹dG«
Æ»u³½_« l' W¼uH« lOL& bŽ«
±∞≠AR
8900-ARB
11
1/2/02, 2:16 AM
اﻟﺼﻴﺎﻧﺔ أو اﺳﺘﺒﺪال اﳌﺼﺎﻓﻲ
▼
ﻣﺼﻔﺎة اﻟﺪﺧﻮل
UOzeł s' —uðu*« wL% ¨—U³G« lLł fOB …dO−Š nKš w WJ³A« ¡«—Ë …œułu' W¹u½U¦« …UHB*«
Æ—U³G«
ÆU¼bÐ …UHBLK `Lð ô
V×Ý« ¨W&ÝË …UHB*« X½UB «–≈ Æ—uðu*« w —d{ À«bŠ≈ Ë√ jHA« …u) ÷UH&½« v« ÍœR¹ b) d'_«
ÆUN½UJ' v« U¼bŽ« ¨W¹u½U¦« …UHB*« nOEMð bFÐ Æ…UHB*« Ãdš«Ë WJ³A«
Æ—U³G« lLł fOB …dO−ł v« UNðœUŽ≈ q³) U'U9 wUB*« nOH& s' bÐ ô :ﻣﻼﺣﻈﺔ
▼
ﻣﺼﻔﺎة اﳋﺮوج
ÆWJ³A« V×Ý«Ë —U³G« lLł fOB …dO−Š ¡UDž `²«
ﻟﻨﻮع ﻣﺼﻔﺎة
ﻟﻨﻮع اﳌﺼﻔﺎة اﻟﺪﻗﻴﻘﺔ
…UHB*« WJ³ý
…UHB'
…UHB*«
WIO)b«
W¹bON9 …UHB'
W¹bONL²« …UHB*«
l' ×U)« v« UN³×Ý«Ë …UHB*« WJ³ý p'«
ÆW¹bONL²« …UHB*«
…UHB*« bŽ« ¨W¹bONL²« …UHB*« nOEMð bFÐ
vKŽ ULN½UJ' v« W¹bONL²« …UHB*«Ë …b¹b'«
Æ «¡«dłù« Ác¼ fJŽ VOðdð
…UHB*« l' ×U)« v« UN³×Ý«Ë …UHB*« p'«
ÆW¹bONL²«
…UHB*« bŽ« ¨W¹bONL²« …UHB*« nOEMð bFÐ
vKŽ ULN½UJ' v« W¹bMNL²« …UHB*«Ë …b¹b'«
Æ «¡«dłù« Ác¼ fJŽ VOðdð
π≠AR
8900-ARB
10
1/2/02, 2:16 AM
اﳌﺼﻔﺎة اﺨﻤﻟﺮوﻃﻴﺔ
Ác¼Ë WOÞËd<« …UHB*« ÂUE½ qCHÐ WK¹uÞ …b* WOzUÐdNJ« WMJ*« w —U³ž fOB «b&²Ý« pMJ1
ÆnOEM²K …¡ UHB qCQÐ kH²%
bMŽ —U³G« ¡UŽË w vI³ð WOÞËd<« …UHB*« ‰öš s' UN²OHBð X9 w²« —U³G« s' d³B_« UOze'«
ÆjI dH_« —U³G« vKŽ Íu²×¹ —U³G« fOJ ÆWOÞËd<« …UHB*« w —U³G« —Ëb¹Ë ¡«uN« ’UB²'«
ÆnOEM²«Ë —U³G« m¹dHð s' bÐ ô ¨œb;« Èu²*« v« qB¹ v²Š —U³GUÐ —U³G« ¡UŽË ¡q' bMŽ
Æ¡U*UÐ —U³G« ¡UŽË nOEMð p²J1
Æt³×Ý«Ë —UO« v« —U³G« ¡UŽË —Ëœ
Ò Æ±
Æi³I*«Ë b¹bL²« …—uÝU' s' WOÞËd<« …UHB*« qB« Æ≤
Æ…UHBLK WJ³A« ‰uŠ pÐUA²*« dFA«Ë jO)« ‰“« Æ≥
i³I*«Ë b¹bL²« …—uÝU' w WOÞËd<« …UHB*« VB
Ò — WOÞËd<« …UHB*«Ë —U³G« ¡UŽË nOEMð bFРƥ
©ÆUN½UJ' v« …UHB*« …œUŽ≈ q³) U'U9 qE« w tHOH& s' bÐ ô tKž - Íc« ¡e'«®
Æ5LO« v« Á—Ëœ
Ò Ë —U³G« ¡UŽË lœ« Ƶ
ÆWOÞËd<« …UHB*«Ë —U³G« ¡UŽË vKŽ WÐu²J*« …—Uýù« W'öŽ qB j³{«
…UHB'
WOÞËd&'
«– …«œ√
‚dIý
—U³G« ¡UŽË
∏≠AR
8900-ARB
9
1/2/02, 2:16 AM
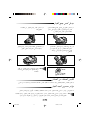
ﺗﺒﺪﻳﻞ ﻛﻴﺲ ﺟﻤﻊ اﻟﻐﺒﺎر
WMJ*« s' —U³G« lLł fOB V×Ý« ©≤
ÆWzUÐdNJ«
…dO−Š ¡UDž `²H vKŽ_« v« ÂeK*« V×Ý« ©±
ÂU'√ vKŽ œułu' ÂeK*« ®Æ—U³G« lLł fOB
©Æ—U³G« lLł fOB …dO−Š ¡UDž
—U³G« lLł fOB …dO−Š ¡UDž vKŽ jG{« ©¥
ÆÂeK*« ‚öž« …œUŽ≈ r²ð v²Š WÝöÐ
¨qLF²*« —U³G« lLł fOB W«“≈ bFÐ ©≥
s' …«uI*« W)—u« s' fOJ« W)U¹ qšœ«
tH)u' v« b¹b'« —U³G« lLł fOB
ÆwK_«
‰öš s' —U³G« lLł fOB r²š sJ1
Wײ v« t²O³¦ðË tM' rKOH« W«“«
ÆjHA«
:ﻣﻼﺣﻈﺔ
ﻟﻜﻴﺲ اﳌﺼﻔﺎة ﻣﻦ اﻟﻘﻤﺎش
ÆÈdš« …d' t'b&²Ý«Ë WOýULI« …UHB*« fOB nE½ ¨t'«b&²Ý« bFÐ —U³GUÐ U¾K²2 fOJ« ÊUB «–«
ﻣﺆﺷﺮ ﻣﺴﺘﻮى ﻛﻤﻴﺔ اﻟﻐﺒﺎر
Æ—U³G« fOB q¹b³ð ÷dH¹Ô ¨ WMJ*UÐ nOEM²« ¡UMŁ√ ¢dLŠ√ ¢—U³G« WOLB Èu²'¢ dýR' Êu `³√ «–«
WMJ*« n)Ë« ¨—U³G« fOB q¹b³ð s' rždUÐ ULz«œ ¢dLŠ√¢ —U³G« WOLB Èu²' dýR' ÊUB «–«
Æô Â√ …œËb' W¼uH« Ë√ »u³½ô« Ë√ ¨ ÂuÞd)« ÊUB «–« ULŽ h×«Ë qLF« sŽ WOzUÐdNJ«
∑≠AR
8900-ARB
8
1/2/02, 2:17 AM
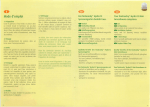
: ﻣﻼﺣﻈﺔ
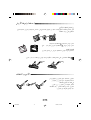
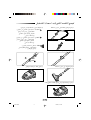
اﺳﺘﺨﺪام اﳌﻠﺤﻘﺎت
ÆvKŽ_« v« «Ëœ_« kHŠ …dO−Š ¡UDž `²«
ﻏﺒﺎر
ﺗﻨﺠﻴﺪ
nOEM² bO−M²« …Uýd
ÆdzU²«Ë bzUÝu«
nOEM² —U³G« …Uýd
ÆÆÆ V²J« ¨ ·ud« ¨ÀUŁ_«
Æa«
ﺷﻘﻮق
nOEM² ‚uIý «– …«œ√
¨ÊUB—_« ¨‚uIA« ¨—u²¹œ«—
Æ5ðœUÝu« 5Ð
اﻟﻮﻗﻮفNﻣﻮﻗ
¨WMJ*« s' WOHK)« WŠuKUÐ WOzUÐdNJ« WMJ*« n)
WMJ*« ·u)u t'«b&²Ý« sJ1 œUMÝ≈ W¼u „UM¼Ë
ÆqLF« sŽ X)R*« n)u²« ¡UMŁ√
ﻧﻘﻞ اﳌﻜﻨﺴﺔ اﻟﻜﻬﺮﺑﺎﺋﻴﺔ وﺣﻔﻈﻬﺎ
WMJ*« Ác¼ ¨qN« UNKI½Ë WMJ*« kHŠ qŠ√ s'
YOŠ ¨r'« w wKš«b« p³A*« ÂUEMÐ …œËe' WOzUÐdNJ«
ÆW¼uH«Ë ¨ÂuÞd)«Ë »u³½ú rOI²*« n)u*UÐ kH²×¹
∂≠AR
8900-ARB
7
1/2/02, 2:17 AM
(اﻟﻮﺿﻌﻴﺔ اﻷوﺗﻮﻣﺎﺗﻴﻜﻴﺔ )ﻧﻮع زر اﻟﺘﺤﻜﻢ ﻓﻘﻂ
W)UD« j³{ r²¹ ¨WOJOðU'uðË_« WOF{u« —“ vKŽ jGC« WUŠ w
w «dOG²« iH&ð WOF{u« Ác¼ Æ◊«Ë ±≥∞∞≠±≤∞∞ UOJOðU'uðË√
Æ„d;« v« dO¹ Íc« ¡«uN« WOLB «dOGð sŽ W& UM« jHA« …u)
WOLB iH&Mð ¨—U³GUÐ —U³G« fOB ¡ö²'« bMŽ ¨‰U¦*« qO³Ý vKŽ
j³{ bMŽË ¨jHA« …u) ÷UH&½« v« ÍœR¹ U2 „d;« v« ¡«uN«
UOJOðU'uðË√ W)UD« œ«œeð WU(« Ác¼ w ¨WOJOðU'uðË_« WOF{u«
ÆwUJ« jHAK
ÆjI ¢≠¢ —“ Ë√ ¢´¢ —“ vKŽ jG{« ¨ÍœUF« rJײ« v« …œuF« œ—√
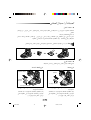
(ﻛﻴﻔﻴﺔ اﺳﺘﺨﺪام ﻧﻈﺎم ﻗﺘﻞ اﳊﺸﺮات )ﺣﺴﺐ اﳌﻮدﻳﻞ
¡UN²½« bFÐ «—u «dA(« q²) WHOþË Â«b&²Ý« qC_« s'
ÆWMJ*UÐ nOEM²«
ÆWMJ*« qOGAðË —UO²« Ãd&' v« fÐUI« qË s' bBQð
w s¹—e« vKŽ jGCUÐ WOzUÐdNJ« WMJ*« s' ÂuÞd)« qB«
ÆÂuÞd)« Ãdš«Ë ÂuÞd)« ·dÞ
lLð v²Š WMJ*« vKŽ√ w œułu*« ÂuÞd)« qOuð ¡UDž oKž«
ÆÂUJŠSÐ ¡UDG« ‚öž≈ s' bBQð Æ‚öžù« u
Æ «dA«ö²) vKŽ WOzUÐdNJ« WMJ*« qLF²'Ë WMJ*« qGý
ÆUOzUIKð ¡UN²½ô« bMŽ «dA(« q²) WHOþË n)u²ð
qOuð bŽ«Ë ÂuÞd)« qOuð ¡UDž `²«Ë ¨—UO²« pKÝ n
Ò Ë ¨—UO²« Ãd&' s' WMJ*« fÐU) qB«
ÆWHOþu« Ác¼ qLŽ ¡UMŁ√ Ë√ «dA(« q²) WHOþË n)uð bFÐ «—u WMJ*« «b&²Ý« pMJ1Ë ÆÂuÞd)«
ÆÂuÞd)« qOuð bŽ«Ë ÂuÞd)« qOuð ¡UDž `²«Ë ¨qLF« sŽ WMJ*« n)Ë« ¨«c¼ qł√ s'
µ≠AR
8900-ARB
6
1/2/02, 2:17 AM
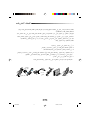
ﺳﻠﻚ اﻟﺘﻴﺎر اﻟﻜﻬﺮﺑﺎﺋﻲ
:( ﺳﺤﺐ ﺳﻠﻚ اﻟﺘﻴﺎر اﻟﻜﻬﺮﺑﺎﺋﻲ١
t³×Ý wHJ¹ YO×Ð q¹uÞ wzUÐdJ« —UO²« pKÝ
ÆqN« qOGA²K
s' fÐUI« Ÿe½« ¨nOEM²« s' ¡UN²½ô« bMŽ
n —“ vKŽ jG{«Ë Í—«b'« —UO²« Ãd&'
ÆWH&Ð ÂbI« l³√ WDÝ«uÐ pK«
:( ّﻟﻔﻪ٢
Æ—UO²« pKÝ ôË tð«– fÐUI« p'« ¨Í—«b'« —UO²« Ãd&' s' wzUÐdNJ« —UO²« pKÝ V×Ý bMŽ :ﻣﻼﺣﻈﺔ
اﻹﻳﻘﺎف/زر اﻟﺘﺸﻐﻴﻞ
jGCUÐ WOzUÐdNJ« WMJ*« ·UI¹≈ Ë√ qOGAð pMJ1
ÆWH&Ð ÂbI« l³QÐ ·U¹ù«ØqOGA²« —“ vKŽ
(اﻟﺘﺤﻜﻢ ﻓﻲ ﻗﻮة اﻟﺸﻔﻂ )ﻧﻮع اﻟﺘﺤﻜﻢ ﻓﻲ ﻗﻮات اﻟﺸﻔﻂ اﺨﻤﻟﺘﻠﻔﺔ ﻓﻘﻂ
ÆjHA« …u) —“ WDÝ«uÐ p{dG U³ÝUM' WOzUÐdNJ« WMJLK jHA« …u) qFł pMJ1
dzU²« WJ³ý q¦' ¨ WIO)d« WAL)_« nOEM² Ω ©v½œ_«® MIN
aÝu« W¹œUF« …œU−K W¹œUB²)ô« …uI« j³{ Ω ©ÍœUB²)ô«® ECO
ÆaÝu« …b¹bA« …œU−«Ë VKB« ÷—_« nOEM² Ω ©vB)_«® MAX
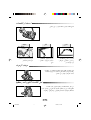
( ﺑﺎﻟﻨﺴﺒﺔ ﻟﻨﻮ ع اﻟﺘﺤﻜﻢ ﻓﻲ ﻗﻮة اﻟﺸﻔﻂ ﺑﺎﻧﺰﻻق١
Æ…uI« j³C qHÝ_« Ë√ vKŽ_« v« rJײ« …«œ√ o“«
i³I*« w rJײ« …«œ√ «– q¹œu*« ■
WMJ*« rł w rJײ« …«œ√ «– q¹œu*« ■
( ﺑﺎﻟﻨﺴﺒﺔ ﻟﻨﻮع زر اﻟﺘﺤﻜﻢ٢
Æ…uI« ld ©´® —“ vKŽ jG{«
Æ…uI« iH) ©≠® —“ vKŽ jG{«
i³I*« w rJײ« …«œ√ «– q¹œu*« ■
WMJ*« rł w rJײ« …«œ√ «– q¹œu*« ■
¥≠AR
8900-ARB
5
1/2/02, 2:17 AM
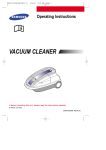
ﲡﻤﻴﻊ اﳌﻜﻨﺴﺔ اﻟﻜﻬﺮﺑﺎﺋﻴﺔ اﺳﺘﻌﺪادا ﻟﻠﺘﺸﻐﻴﻞ
ÆjHA« »u³½√ v« jHA« ÂuÞdš q ©±
©q¹œu*« VŠ® jHA« »u³½√ j³{« ©≤
»u³½_« s' oOC« ¡e'« p'« :اﻟﺘﻤﺪﻳﺪ
lœ«Ë …bŠ«Ë bOÐ wÐuJOK²«
oOC« ¡e'« ÁU&UÐ i³I*«
ÆÈdš√ b¹ WDÝ«uÐ
١
»u³½_« s' oOC« ¡e'« p'√ :اﻟﺘﻘﺼﻴﺮ
V×Ý«Ë …bŠ«Ë bOÐ wÐuJOK²«
oOC« ¡e'« u×½ i³I*«
ÆÈdš√ b¹ WDÝ«uÐ
٢
Í—UO²šô«
»u³½_« «b&²Ý« sJ1 ô :ﻣﻼﺣﻈﺔ
w j³CK qÐUI« wÐuJOK²«
Æ ö¹œu*« lOLł
ÆUF' jHA« VOÐU½√ q :اﺧﺘﻴﺎري
Æ ÂuÞd)« WKOuð ¡UDž `²« ©¥
ÆjHA« »u³½√ v« W¼uH« q ©≥
ÆWOzUÐdNJ« WMJ*« rł v« r'« WKOuð q ©µ
≥≠AR
8900-ARB
4
1/2/02, 2:17 AM
اﻷﺟﺰاءNﺗﻌﺮﻳ
¿ ÂuÞdš
¿bFÐ sŽ rJײUÐ jHA« …u) rJ%
©jI bFÐ sŽ rJײ« Ÿu½®
i³I'
¿ jHA« …u) rEM'
wŽUMDô« qIF« —“
¿ »u³½√
pK« n —“
…u) w rJײ« ÕU²H'
¿jHA«
ØqOGA²« —“
·UI¹ù«
WOÞËd&' …UHB'
«Ëœ_« kHŠ …dO−Š ¡UDž
jHA« ÂuÞdš W«“ù —“
—U³G« lLł …dO−Š ¡UDž
—U³G« lLł fOB …dO−( ÂeK'
¿ ÷—_« W¼u
qIM« i³I'
≤≠AR
8900-ARB
3
1/2/02, 2:17 AM
▼
Æq¹œu' VŠ …du²' ¿ ‡Ð WLKF*« U¹«e*«
اﳌﺰاﻳﺎ
ÆwJOðU'uðËô« pK« nË dýR*« vKŽ Íu²% U¹«e*«
ÆU¹«e*« fHMÐ …œËe' XO ö¹œu*« lOLł :ﻣﻼﺣﻈﺔ
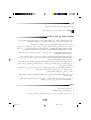
ﺗﻌﻠﻴﻤﺎت ﻫﺎﻣﺔ ﻣﻦ أﺟﻞ اﻟﺴﻼﻣﺔ
p wzUÐdNJ« —UO²« Ãd&' WO²u s' bBQ𠨓UN'« qOGAð q³) ÆW¹UMFÐ ULOKF²« lOLł √d)« Ʊ
ÆWOzUÐdNJ« WMJ*« ÷—√ w …—bI*«
W)UD« WŠu w 5³' ULF' WO²uH« fH½
Ò
ÆqK³*« œU−« Ë√ WKK³*« ÷—_« vKŽ WOzUÐdNJ« WMJ*« Âb&²ð ô ∫tO³Mð Æ≤
rN `Lð ô ƉUHÞ_« s' V¹d) Ë√ q³) s' “UNł Í√ «b&²Ý« WUŠ w »uKD' b¹bA« ·«dýù« Æ≥
‰öš X)Ë Í√ w W¹–UÐdNJ« WMJ*« qOGA²Ð r `Lð ô ÆW³FKUB WOzUÐdNJ« WMJ*« «b&²ÝUÐ
ÆqOGA²K ULOKF²« Ác¼ w WMO³*« ÷«džú WOzUÐdNJ« WMJ*« Âb&²Ý« ÆpÐUOž
—U³GUÐ tzö²'« q³) —U³ž lLł fOB dÒOž Æ—U³ž lLł fOB ÊËbÐ WOzUÐdNJ« WMJ*« Âb&²ð ô Æ¥
Æ…¡UHB qCQÐ ÿUH²Šô« qł√ s'
kHŠ« ÆdzU−« »UIŽ« Ë√ «dL'« Ë√ »UI¦« Ê«bOŽ ◊UI²ô WOzUÐdNJ« WMJ*« Âb&²ð ô Ƶ
t¹uAð v« ÍœRð b) …—«d(« ÆÈdš_« …—«d(« —œUB'Ë W¾b²« …eNł√ sŽ «bOFÐ WOzUÐdNJ« WMJ*«
Æ“UN'« s' WOJO²Ýö³« ¡«eł_« Êu q¹u%Ë
—d{ À«bŠ≈ v« ÍœRð b) UN½ô WOzUÐdNJ« WMJ*« WDÝ«uÐ …œU(«Ë W³KB« ¡UOýô« ◊UI²« VM& Æ∂
qšb' bð ôË ÆÂuÞd)« vKŽ qI¦« lCð ôË Æ ÂuÞd)« vKŽ WMJ*« n)uð ô ÆWMJ*« ¡«eł√ w
Æ¡«uN« Ãd&' Ë√ jHA«
fÐUI« p'«Ë ÆÍ—«b'« —UO²« Ãd&' s' fÐUI« Ÿe½ q³) qLF« sŽ WOzUÐdNJ« WMJ*« n)Ë« Æ∑
Æ—U³G« lLł fOB q¹b³ð q³) —UO²« Ãd&' s' fÐUI« Ÿe½ bMŽ
wU{ù« pK« «b&²Ý« tÐ vu*« s' fO Æ∏
qOBuÐ qBð«Ë qLF« sŽ WOzUÐdNJ« WMJ*« n)Ë« ¨wG³M¹ ULB WOzUÐdNJ« WMJ*« qLFð r «–≈ Æπ
Æh²<« U'b)«
’U)« wMH« Ë√ l½UB« q³) s' tK¹b³ð sJ1Ë Æ—dCÐ »UB*« —UO²« pKÝ q¹b³ð ‰ËU% ô Ʊ∞
ÆdODš Õdł À«bŠ≈ v« ÍœR¹ b) d'_« ÆjI W½UOBK
ﺗﻨﺒﻴﻪ
Æ¡U*« ’UB²'« Âb&²ð ô Ʊ
ÆUNHOEM² ¡U*« w WMJ*« lCð ô Æ≤
ÆtO —d{ ÀËbŠ WUŠ w ÂUšb²Ý« ÂbŽ s' bÐ ôË U¹—Ëœ ÂuÞd)« h× s' bÐ ô Æ≥
±≠AR
8900-ARB
2
1/2/02, 2:17 AM
DJ68-00093D(AR)
1/30/02 10:47 AM
Page 1
DJ68-00093D REV(0.3)