1
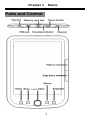
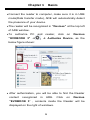
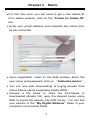
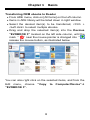
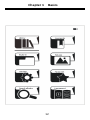
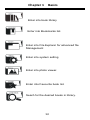
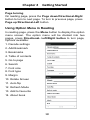
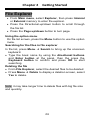
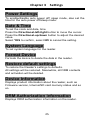
Evobook3 USER MANUAL EVOBOOK 3 User Manual Safety Precautions On Battery Charge the battery only in temperature that ranges from 0 to 35 degree Celsius. Do not charge reader if the battery is found damaged or leaking. On Operation Never subject reader to extremes of light, temperature, moisture or vibration. Do not use or store reader in a location subject: A. Extreme high temperature, such as in a sun-heated car B. Direct sunlight C. High humidity or places with corrosive substances D. Sub-zero condition, especially during winter. . On micro SD card After inserting a micro SD card, if the reader has no response, please take out and insert again. Do not remove micro SD card or turn off reader during data writing or reading to prevent damage to data and to the reader. Make sure the micro SD card is unlocked before writing or deleting data in the micro SD card. Backup your files and data before formatting the micro SD card. Please format the micro SD card in FAT. i EVOBOOK 3 User Manual Contents SAFETY PRECAUTIONS ........................................... I CONTENTS ................................................................ II CHPATER 1 BASICS ............................................. 1 PARTS AND CONTROL ......................................... 1 POWER ON AND OFF THE READER ....................... 2 CHARGING THE READER ..................................... 3 IMPORTING CONTENTS ........................................ 4 IMPORTING DRM CONTENTS .............................. 5 HOME SCREEN .................................................. 10 MAIN MENU ..................................................... 11 ONSCREEN KEYBOARD ...................................... 14 CHPATER 2 GETTING STARTED........................ 15 READING BOOKS ............................................... 16 VIEWING PHOTOS.............................................. 22 FILE E XPLORER ................................................ 24 CHPATER 3 SETTINGS ..................................... 24 POWER SETTINGS ............................................. 25 DATE & TIME ................................................... 25 SYSTEM LANGUAGE ......................................... 25 ii EVOBOOK 3 User Manual FORMAT DEVICE .............................................. 25 RESTORE DEFAULT SETTINGS ............................ 25 DEVICE INFORMATION ...................................... 25 DRM AUTHORIZATION INFORMATION ............... 25 CHPATER 4 TROUBLESHOOTING ................... 25 CHPATER 5 APPENDIX ..................................... 26 MAINTENANCE ................................................. 27 PRODUCT SPECIFICATIONS ................................ 27 CERTIFICATION INFORMATION .................. ERROR! BOOKMARK NOT DEFINED. COPYRIGHTS AND TRADEMARK NOTICE ... ERROR! BOOKMARK NOT DEFINED. DISPOSAL AND RECYCLING INFORMATION ERROR! BOOKMARK NOT DEFINED. DISCLAIMER . ERROR! BOOKMARK NOT DEFINED. iii Chapter 1 Basics Parts and Control 1 Chapter 1 Basics Clip slot – to insert the clip button for protective cover. Power button – press and hold for 3 seconds to turn on/off. Press and hold for 3 seconds to restart. Enter button – : the directional buttons, press up/ down/ left/ right to move cursor. – Enter button: Press to confirm or cancel. Home button – press to return to home screen. Menu button – press to display option menu. Return button – press once to return to previous menu, press and hold to return to Main menu. Keyboard button – press to display/hide the keyboard. Micro USB jack – for data transfer and emergency charging. Power On and Off the Reader Press and hold the Power button for 3 seconds to turn on reader. It may take a few moments for reader to turn on and load the content. If Reader does not turn on, charging is required. To turn off reader, press and hold the Power button for 3 2 Chapter 1 Basics Seconds again. Charging the Reader You need to charge the reader prior to using it for the first time or when battery power is low. Charge the reader using AC adapter with output 5V, 1.5A. Charging through PC may not be able to fully charge the reader due to the low output charg ing current from PC USB port. Please turn the reader to standby mode to shorten the charging process. It will take about 4 hours to fully charge the reader in standby mode . When the reader enters into standby mode, press the Power button to wake up the reader. The battery status is displayed at the bottom left corner. The status is shown as below: Low battery Charging 3 Battery full Chapter 1 Basics Importing contents From Computer The Reader supports USB Mass Storage Device function. To import contents (ebooks, photo etc) into the reader, connect the reader to PC via the supplied USB cable. Upon successful connection to PC, the reader will enter USB mode and all operation will be halted. Go to [My Computer], double click on the reader’s disk to open. Perform the file management operation like USB device. From memory card This unit supports micro SD card up to 32GB. To insert a memory card Insert the card correctly with the contact pin facing downwards as illustrated below. Pushing the card in, then you should hear a click when the reader is seated correctly. You may damage the card and the reader if micro SD card is not inserted correctly. To remove micro SD card, push the card once again until it contact the back of the slot. 4 Chapter 1 Basics When the card is inserted or removed, it will take several seconds to load. Please avoid inserting or ejecting the card when other operation is running as this may cause the system hang. Do not remove the card if the content inside the card is being played. This will halt the operation of the reader and cause the reader to restart. Importing DRM Contents The Reader supports Adobe DRM contents. Adobe Digital Editions (ADE) is required. Installing Adobe Digital Editions (ADE) The ADE installer is preloaded into the computer. Make sure your computer is connected to internet. Double click on the ADE installer file to start the installation. Alternatively, you can download the installer from http://www.adobe.com/products/digital-editions/download.e du.html. Authorizing PC and Reader Authorizing your PC and reader with an authorization ID enables you to easily transfer Adobe DRM protected items between your ADE library and this device. Launch the Adobe Digital Editions (ADE). 5 Chapter 1 Basics Connect the reader to computer, make sure it is in USB mode(Data transfer mode), ADE will automatically detect the presence of your device. The reader will be recognized in “Devices” at the top left of ADE window. To authorize PC and “EVOBOOK 3” reader, click on Devices Authorize Device, as the below figure shown: After authorization, you will be able to find the Reader content recognized in ADE. Click on Devices “EVOBOOK 3” , contents inside the Reader will be displayed on the right of windows. 6 Chapter 1 Basics For first time user, you will need to get a free adobe ID from adobe website, click on the “Create an Adobe ID” link. Enter your email address and complete the online form as per instructed. Upon registration, return to the ADE window. Enter the user name and password, click on “Authorize device”. You can now start downloading or buying ebooks from online Ebook stores supporting Adobe DRM. Choose a file folder to store the Purchased or downloaded ebooks link, open the desired books using ADE to import the ebooks into ADE library. You can find your ebooks in the “My Digital Editions” folder in your computer’s documents folder. 7 Chapter 1 Basics Transferring DRM ebooks to Reader From ADE menu, click on [All Items] on the left column. Items in ADE library will be listed down in right window. Select the desired item(s) to be transferred, <Ctrl> + <Left click> to select multiple ebooks. Drag and drop the selected item(s) into the Devices “EVOBOOK 3” located on the left side column, until the mark “ ” near the mouse pointer is changed into “ , release the mouse button, as illustrated below. You can also right click on the selected items, and from the Edit menu, choose “Copy “EVOBOOK 3”. 8 to Computer/Device” Chapter 1 Basics The transfer is in process, as illustrated below. When the books are transferred successfully, they all will be stored in [Digital Editions] folder of EVOBOOK 3 reader’s disk. Notes For using ADE Each ADE ID supports only 6 devices, this includes the master device (the reader) and the slave device ( Micro SD card). When the reader is restored to default settings, ALL DRM activation record and data (including DRM books purchased) will be erased from the reader. You are required to authorize the device with your ADE ID again. When the number of authorized device has exceeded the allowable amount, you will come across the following error message: 9 Chapter 1 Basics To request for extension and reset of your ADE ID, go to http://helpx.adobe.com/digital-editions.html for more information. Home screen When the reader is turned on, it will enter the Home screen. Select the desired book to open. Selected item will be underlined. Press the Home button anytime to return to the Home screen. 10 Chapter 1 Basics 1. Now Reading -display last read book. Press the Enter button to open the last read page. 2. Reading history -The recently read ebooks will be saved into Reading history, you can also read books from Reading history. 3. Battery Indicator -Indicate battery status during operation. 4. Time & Date -display current time and date, you can set this from the [Settings]. 5. Newly added -display the just added books. Main menu On the home screen, press the Menu button to display the Main menu. Press the Directional buttons to select the desired item, then press the Enter button to enter. To exit from Main menu, press the Return button to exit. 11 Chapter 1 Basics 12 Chapter 1 Basics Enter into book library Enter into Bookmarks list. Enter into File Explorer for advanced file Management Enter into system setting Enter into photo viewer. Enter into Favourite book list. Seach for the desired books in library. 13 Chapter 1 Basics View the user manual. Onscreen keyboard Use the onscreen keyboard as shown below to enter text. To enter text, use the directional buttons to select the text on screen keyboard, then press the Enter button at the panel. A. Numeric/punctuation/ symbol key B. Input method key C. Space key 14 Chapter 1 Basics D. Backspace key E. Enter key F. Done key 15 Chapter 2 Getting Started Reading books Book library From Main menu, select Library to enter book library. In the book library, select a book to start reading. Use the Directional-up/down button to scroll the e-book list. Press the Page up/down button to turn page. From option menu, select View by to change view mode(List/Thumbnail mode). Supports EPUB, PDF, TXT, FB2, PDB formats. Viewing Favorite books Press the Menu button, then select Favorites to display the favorite books. Sorting the book list On the book library, books are sorted by author, title, recently read, newly added. Press the Menu button, then select Sort by to choose a sorting method. Select the desired book to start reading. Search for books in the library Use search feature to search for your desired books in the library. From Main menu, select Search to display a search bar and the keyboard. Type the book name by using the directional buttons and Enter button at the panel, then the press the Keyboard button to confirm and press OK to start searching. 16 Chapter 2 Getting Started Reading books Books transferred to Reader will be saved in the device. Reader supports eBooks in txt, pdf, epub,pdb, fb2, html, rtf, mobi format. From home screen or book library, use the Directional buttons to move the cursor to select book and press the Enter button to open. 17 Chapter 2 Getting Started Page turning On reading page, press the Page down/Directional-Right button to turn to next page. To turn to previous page, press Page up/Directional-Left button. Using Option Menu in Reading In reading page, press the Menu button to display the option menu screen. The option menu will be divided into two pages, press Directional- Left/Right button to turn page, Options available: 1. Decode settings 2. Add Bookmark 3. Bookmarks 4. Table of contents 5. Go to page 6. Search 7. Font size 8. Font type 9. Margin 10. Rotate Screen 11. Auto flip 12. Refresh Mode 13. Add to favourite 14. About book 18 Chapter 2 Getting Started Decode settings From option menu, select Decode settings to convert into normal display when there is error code, choose book code available according to preference and region. Add Bookmark From option menu, select Add Bookmark to add bookmark for the current bookpage. And the icon will appear on the top right corner.q Bookmarks From option menu, select Bookmarks to enter Bookmark List of the current book. Table of contents From Option menu, select Table of contents to show the ebook’s table of contents. Go to page You can jump to pages using the Go to Page option. In the Option Menu, select Go to Page. In Go to Page menu, type page number by the onscreen keyboard, then press the Enter button. Search From option menu, select Search to search for the desired words through the current ebook. Enter the the desired words by using the directional buttons and Enter button at the panel, then the press the Keyboard button to confirm and press OK to start searching. Font Size From option menu, select Font size to adjust font size. 19 Chapter 2 Getting Started There are 6 font sizes available: Small, Medium, Large, X-Large, XX-Large, XXX-Large. Select the desired font size, then press Enter button to adjust the font size. It will take several seconds for the fonts to be resized. Font type From option menu, select Font type to set the font type of the reading ebook. Options available: Default font, Serif. Select the desired option, then press the Enter button to confirm. Margin From option menu, select Margin to set page margin. Options available: Small, Media, Large. Select the desired option, then press the Enter button to confirm. Rotating Screen From option menu, select Rotate screen to rotate the display orientation To return to original orientation, press Return once again. Auto Flip From option menu, select Auto Flip to set Auto Flip mode. The auto flip duration available are: Disabled, 5 Seconds, 15 Seconds, 30 Seconds, 1 Minute. Select the desired option, then press the Enter button to confirm. Refresh mode From option menu, select Refresh mode to set refresh mode, options available are: Full refresh, Refresh every 3 pages, Refresh every 5 pages, Exit. Select the desired option, then press the Enter button to confirm. 20 Chapter 2 Getting Started Add to Favourites You can add books to your Favorite List. In Option menu, move the cursor to Add to Favorites to add current book into Favorite List. The icon will appear on the top left corner. To view books in Favourite List, from Main menu, select Favourites. To sort books in Favourite list, press the Menu button to select sorting method. To remove book from Favorite: From reading page, press the Menu button and select Delete Favorite from the Option Menu. About the book From option menu, select About the book to display the book information, such as book title, name, author, publisher etc. About the bookmark Adding Bookmark When reading, turn to the desired page, from option menu, select Add bookmark to add bookmark for the current bookpage. And the icon will appear on the top right corner. Reading from Bookmark From Main menu, select Bookmarks to enter Bookmark List. In the Bookmark List screen, select the desired book bookmarked, then select the page bookmarked. 21 Chapter 2 Getting Started Deleting Bookmark You can choose any of the following methods to delete bookmark. On Bookmark list screen, move the cursor to select the desired items to be deleted, then press the Menu button to show a option menu, select Delete. Viewing photos From Main menu, select Pictures, and enter into the Photo viewer. In photo Library, press the Menu button to sort photo list, search for photo files and set viewing mode. Use the Directional-up/down button to navigate through the files/folders. Press the Page up/down button to turn page. Start to view photo In photo library, move the cursor to the desired photo, then press the Enter button on the selected photo to view a full screen display. In full screen mode, press the Directional buttons / Page up/down button to view previous and next picture. Using the option menu In full screen mode, press the Menu button to display the option menu. Zoom in/out Picture To zoom in picture, in full screen mode, press Menu Zoom to change different zoom level. To return to original size, press the Return button and resume normal operation. 22 Chapter 2 Getting Started Rotate the picture You can rotate the picture according to your view. In full screen mode, press Menu Rotate. Each time you press the Rotate button, the picture will be rotated by 90 degrees. Information In full screen mode, press Menu Information to display the information about photo name,dimension, file type. Slideshow In full screen mode, press Menu Slideshow to start. From the drop down menu, select slide time to adjust slideshow duration. To stop slideshow, press Menu SlideshowOff. Press Return button to return to photo list. 23 Chapter 2 Getting Started File Explorer From Main menu, select Explorer, then press Internal or External memory to enter file explorer. Press the Directional-up/down button to scroll through the file list. Press the Page up/down button to turn page. Using the option menu On file list screen, press the Menu button to use the option menu. Searching for the files in file explorer In file list, press Menu Search to bring up the onscreen keyboard. Type the book name by using the directional buttons and Enter button at the panel, then the press the Keyboard button to confirm and press OK to start searching. Deleting the file From File Explorer, select the desired files to be deleted Press Menu Delete to display a deletion screen, select Yes to delete. Note: it may take longer time to delete files with big file size and quantity. 24 Chapter 3 Settings Power Settings To enable/disable auto power off/ sleep mode, also set the time for the auto power off/sleep mode. Date & Time To set the clock and date, time Press the Directional-left/right button to move the cursor. Press the Directional-up/down button to adjust the desired value. Select YES to confirm, select NO to cancel the setting. System Language To set system language for the reader. Format Device Formats the device to delete the data in the reader. Restore default settings To restore the Reader’s settings to defaults. All settings will be restored. Meanwhile, all DRM contents and activation will be deleted. Device Information Displays product information about the reader, such as Firmware version, Internal/SD card memory status and so on. DRM Authorization information Displays DRM authorization information on the reader. 25 Chapter 4 Troubleshooting The Reader is not responding or can’t be turned on. Reset the reader by pressing and holding the power button for 6 seconds. The reader will be forced shutdown if it is on and you are required to restart the reader again. Battery has been fully depleted. Please charge the reader via USB or USB AC Adapter. Battery Life seems short o The operating temperature is below 5 C. this is due to the characteristics of battery and not a malfunction The battery is not used for prolonged period. Please recharge the battery of the reader again The battery is not fully charged. Please charge the reader for 4 hours. The battery needs to be replaced. Please consult the authorized dealer for service. A Book cannot be read Copyright protected books cannot be read on any device other than the authorized one. Check if the book has expired. Check if the book format is supported by the reader. The reader cannot be operated during USB connection The reader cannot be operated while it is connected to PC. Eject the reader from computer to resume operation. To use the reader while charging, click on the [Safely Remove Hardware] icon located on the left lower corner to disconnect data connection with computer. After the reader is safely removed, computer will only charge the reader and you can now resume normal operation. 26 Maintenance If reader does get wet, turn off reader immediately. Wait for reader to dry completely before turning on again. Clean the screen with a soft cloth; be careful not to wipe it with anything abrasive. When carrying your reader in bag, keep reader in the protecting case supplied to avoid scratches. If reader needs service, please consult the authorized dealer through the contact information provided in the warranty card. Faulty service may void the warranty. Product Specifications Display 800x600 pixels 2 Brightness: 200cd/m Storage memory Built in memory: 4 GB (FAT format) Supports Micro SD card up to 16GB (FAT32 format) Media File Format supported Ebook: EPUB, PDF, TXT, FB2, PDB Photo: JPEG,BMP,GIF,PNG Connectivity Data transfer: USB 2.0 High Speed Audio: 3.5mm audio jack Power: USB jack Miscellaneous Clock / Date Real time battery indication Battery life Reading – up to 40 hours Standby time- 30 days Charging Power supply: 5.0V, 1.5A Duration: 4 hours (approx) Minimum system requirement (USB Mass Storage) Windows: XP, Vista, Win 7, Mac: 10.0 and above Linux Physical properties Dimension: 168.4X 117.5X 7.9(mm)(approx.) Weight: 206.8g ※ Design and specifications are subject to change without prior notice