1
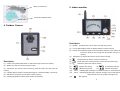
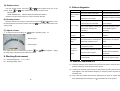
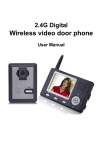
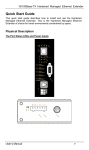
Contents 2.4GHz Digital Wireless Video Door Phone User Manual Thank you for purchasing our product. Please carefully read this User Manual (in particular, precautions for 1. 2. 3. 4. 5. 6. 7. 8. 9. 10. 11. 12. Introduction ………………………………………………………….2 Features………………………………………………………………2 Packing list……………………………………………………………2 Outdoor Camera……………………………………………………..4 Indoor Monitor ……………………………………………………….5 Installation Instruction ………………………………………………6 Operation Instructions……………………………………………… 9 Working Environment………………………………………………12 Failure diagnosis……………………………………………………13 Machine maintenance………………………………………………13 Notices ……………………………………………………………… 14 Technical Support……………………………………………………14 safety) before using the product and follow instructions exactly on how to install and use the product. In order to better fulfill the outstanding function of this product, please read User Manual carefully to grasp the correct way of installation and operation. 1 1. Introduction This system operates in the 2.4GHz radio band for wireless transmission of digital audio and video signals. It can be used in apartments, villas, hotels, offices, public buildings etc. With a fashionable and fresh outlook, the view is clear and sharp. The outdoor camera is easy to install while the indoor monitor does not require any communication wire. You can use the system where the wireless signal can reach, such as dining room, living room, balcony, kitchen and so on. So this is an ideal safety product for modern families. 2. Features (1) This system applies 2.4GHz digital frequency hopping and encryption technology. Transmission distance in open terrain is up to 300meters, robust anti-interference (2) Outdoor camera integrates a wide-angle lens, with clear night vision; (3) (4) (3) The indoor monitor uses a high-definition 3.5 inch digital display screen and monitor. Input: and high degree of confidentiality; Indoor monitor, Please refer to page 5 and 6 Power adapter for indoor monitor AC 100-240V 50/60Hz Output: DC 5V/500MA USB Cable Length: 80cm The door can be unlocked by wireless control; (4) Hands free call and talk function; (5) Indoor monitor take pictures automatically or manually, 160 pictures can be stored and browse, can up to 1000 pictures (based memory); (6) Standby mode is supported for indoor monitor with adjustable volume; (7) MiniUSB interface is provided for indoor monitor with replacement rechargeable Lithium battery; (8) One outdoor camera can support up to 4pcs indoor monitors and vice versa; (9) Compliant with FCC, CE, RoHS standards. 3. Packing list (1) (2) Outdoor camera, Please refer to page 4 Power adapter for outdoor camera Input: AC 100-240V 50/60Hz Output: DC 12V/1A Wire Length: 150cm 2 (5) (6) (7) (8) Lithium battery Screws and expansion bolts for the installation of outdoor camera Wiring of electric lock (Option) User manual 3 Wiring of electric lock 5. Indoor monitor Screws and expansion bolts 4. Outdoor Camera Description: (1) Speaker (To transfer the voice of visitor and “ding dong” sound) (2) 3.5 inch digital display screen (To display images of outdoor camera) (3) Antenna (To transfer the signal of voice and unlock operation to the outdoor camera, receive the signal of voice, image and call operation from the outdoor camera) (4) (5) Microphone (To transfer the owner's voice to outdoor camera) : Monitor button (To monitor outdoor circumstance) Description: (6) (1) Camera Lens (CMOS 300k pixels, to capture the image of visitor and outdoor) (7) (2) Speaker (To hear the voice from indoor monitor) (8) : (Reduce the volume) (9) (3) (10) : (Browse next picture) (11) ‘Call’ Button (To call the indoor monitor by press this button and auto boot the : Unlock button (To control the outdoor camera and open the E-lock) : Talk button (Talk to the outdoor camera) : (Increased the volume) : (Browse last picture) camera) (12) LED 1: Indicating light (if the light on, it stands for power on, otherwise power off) (4) Indicating light (It stands for working state if light on, otherwise standby or power off) (13) LED 2: Indicating light (the light is red when charging, turn to blue after the fully (5) Microphone (To transfer voice of visitor to indoor monitor) (6) Infrared light (Enable to identify visitor in dark circumstance) 4 charge, that did not in the charger if the light is off) (14) : Take a picture 5 Back view of indoor monitor: (Picture 1) (1) Battery lid (2) ON/OFF (Power switch) (3) MiniUSB for charge (4) Lithium battery (Picture 2) (To cover the battery) (3.7V 1350mAh Lithium battery) (5) Bracket (To fix indoor monitor on the desk) (6) Two slots (To fix the indoor monitor on the wall, closet or likewise) 6. Installation (1) Installation method of outdoor camera (Picture 3) (Picture 4) The outdoor camera should be installed at the shielded position to be free from direct shinning of strong light and raining. The height for installation is recommended to be 1.5m~1.7m for camera to focus on the best monitoring range. If wiring needs to go through wall, the plug shall be first wrapped with tape so as to avoid the sand or dirt going into the plug thus resulting in malfunction. Before install outdoor camera, please plug off the power supply cord, and plug the power supply cord after installation. (Picture 5) (1) Take out the screw from outdoor camera. (Please refer to the picture 1) 6 7 (2) Take out the bottom frame from the outdoor camera. (Please refer to the picture 2) Settings of delay locking (3) Connect outdoor camera to power adapter, electric lock, wiring needs to go through the bottom frame. (Please refer to ‘Connect power adapter and electric lock’) A.Last for 800ms (Default) (4) Let the wires go through the wall from the centre hole, Fix the bottom frame of the * Locks that unlocked by power on (Connect to Normal Open); outdoor camera on to the wall or door with four screws and expansion bolts if needed. * Locks that unlocked by Power off (Connect to Normal Close); (Please refer to the picture 3) * When unlocked, relay close (open) for 0.8s; (5) Hang the outdoor camera to the hook which is on the top of the bottom frame and fasten them. Push the bottom of outdoor camera slightly, will see two screw holes at B.Last for 4s the bottom. (Please refer to the picture 4) * Locks that unlocked by power on (Connect to Normal Open); (6) Tighten the screw to the second hole at the bottom of outdoor camera. (Please refer * Locks that unlocked by Power off (Connect to Normal Close); to the picture 5) * When unlocked, relay close (open) for 4s; (2) Connect power adapter and electric lock C.Last for 8s * Locks that unlocked by power on (Connect to Normal Open); * Locks that unlocked by Power off (Connect to Normal Close); * When unlocked, relay close (open) for 8s; 7. Operation Instructions Follow the manual instruction to install the electric controlled lock, turn on the outdoor camera , and turn on the indoor monitor. Detailed operation is as follows: (1) Indoor monitor turn on/off Turn the power switch to “ON”, then the screen shows the welcome page for one second. After that, the light on the above will shine, and the bell rings “Ding Dong, Ding Dong”. On the top left corner, there is a signal of communication message. The max is level 6. If without signal, please follow the “Failure Diagnosis” part of this manual instruction. There is also signal of battery on the top right corner. The max is level 4. Null means the battery is emptied. 8 9 Schematic diagram of unlock: Lock signal Signal bar Unlock signal Talking state Battery bar If the user doesn't press button, he can hear the voice of visitor, while the visitor cannot hear any sounds of inside. (3) Monitor Turn the power switch to “OFF” then power off and the LED1 off. For one camera with one monitor or several cameras system, if there is no calling from the outdoor camera, and the indoor monitor is in standby mode. User can press the (2) Talk, Unlock button once to wake up the indoor monitor; press The visitor presses the “call” button of the camera, all monitors will sound “Ding dong, Ding dong” and show the image of visitor. A. Press and monitor the outdoor as long as you like, monitor signal will display on the screen. Press button of one monitor to speak to visitor before unlocking. Other button again to quit and close the screen. For several cameras with one monitor, or several monitors system. Under monitor mode, monitors can see the image but not hear sound of the visitor. If you want to allow other press monitor to talk, press the system has); button to close the current dialogue, then another monitor press button to speak to visitor. Only one monitor for each dialogue. When under tallking state, press button to release the door lock, the unlock signal shows on the screen, when release Press button, the unlock signal will disappear. button to turn off the screen and enter standby mode, or it will turn into standby mode automatically after 30 seconds. B. If do not want to receive the visitor after seeing the video, no operation or press the button to turn off the screen and then enter into standby mode. Indoor monitor enter into the standby mode after 30 seconds if no operation. 10 button again to enter monitor mode button to take turns to show the image from the CAM1, CAM2, CAM3, CAM4( if At the last camera, press button again to quit and close the screen. (4) Take picture When it’s monitoring, pressing button to take pictures, one press for one picture, then quit the picture mode If the user isn't in or no any operation, all indoor monitors save the image of outdoor automatically after 10 seconds and enter into the standby mode after 30 seconds. The indoor monitor can keep 1,000pcs pictures at most, will replace first picture if exceed available memory when take a new picture. 11 (5) Delete picture First turn off the monitor, then press monitor, press and and button together, then turn on the 9. Failure diagnosis Defect button still the screen display two lines of text: ’DELETE OK LEASE POWER OFF’, Fail to start the After that all pictures have been deleted. product Please turn off the monitor, then turn on the monitor that will work. , button, adjusting range: 0-7 Monitor signal If the power adaptor correctly get Re-insert the plug to make through the 100-240V AC power adaptor get AC electricity? electricity. Speaking state If the volume is adjusted to be the To adjust the volume to be no voice least? suitable The image is If the indoor device is close to Keep the devices off these flashing or fluorescent lamps, mobile phone things which has magnetic noise which has magnetic wave? wave If the outdoor camera doesn't To connect the outdoor connect the power? camera power The indoor and the ‘Ding Dong’ at the same time to select the volume. 8. Working Environment (1) Working temperature: -15°C—+55°C (2) , button together , ringing Charge the Lithium-on battery power adaptor Volume signal B To adjust the volume of ‘Ding Dong’ by press If the power of Lithium-on correctly plug into miniUSB? (7) Adjust volume , Turn the switch to the ON Re-connect the devices and Fail to charge viewing mode. A To adjust the volume of talk by the If turn the switch to the "ON"? If the plug of power adaptor button to view button or after 10seconds to quit the stored pictures of the outdoor screen, then press Operation batteries is not enough? (6) Browse picture The indoor monitor can store up to 1000 pictures. Press the Diagnosis monitor no signal If the outdoor camera is far away from the indoor monitor? Keep the distance in 60 meters within (stopped by multi-wall) If there is other strong magnetic Put the indoor device out of space bother? the strong magnetic space 10. Machine Maintenance Working humidity: ≤85% (1) Keep the clearance of the surface and use the soft dry cloth to clean the dust of the product, Please turn off the power of indoor device. (2) If there is the hard dirty which cannot be cleaned with dry cloth, please use the soft towel dipped in the neutral diluted detergent to clean the product and then clean it with dried cloth. (3) Don't clean the product with benzene, diluted liquid or petrol etc organic liquid for 12 these will damage the outside part or vary the outside color of the product. 13 (4) The product should be placed where is stable, windy, air-dry, non-sunshine, non-strong magnetic and non-dusty. 11. Notices (1) New product must be charged more than 5 hours for first two times to activate the Li-ion battery, after that charge 2~3 hours every time, Up to 120 hours of standby time. (2) Please don’t cover anything on the Microphone or speaker when there is conversation. (3) Please always use the specified electric source power supplier adaptor, or that with the same type (same standard voltage and electric current). Using the adaptor unspecified may lead to the damage of the circuit and component of the product. 12. Technical Support (1) We insist tracking service through before selling, selling and after selling, please carefully read user manual before installation; (2) Please strictly follow the user manual before you install and test this product. If there is any question, please contact our tech support and customer service; Remark: (1) Damage Requiring Service – Unplug this equipment from the power source and refer servicing to qualified service personnel under the following conditions: a. when the power supply cord or plug is damaged; b. if liquid has been spilled or objects have fallen into the unit; c. if the product has been exposed to rain or water; d. if the product has been dropped or otherwise damaged; e. if the product exhibits a distinct change in performance (2) Servicing – Do not attempt to service this product yourself as opening or removing covers may expose you to dangerous voltage or other hazards. Refer all servicing to qualified service personnel. 14