1
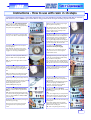
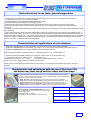
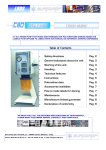
LDDS
POLY DISPENSER GUUIDA
L’UTENTE
SER PER
GUIDE
ELECTRONIC AUTOMATIC DISPENSER WITH 4 FUNCTIONS THAT ALLOW TO MAKE THOUSANDS
POLYURETHANE DOMED LABELS IN FEW HOURS .
Table of Contents
•
Safety directions
Pag 2
•
Starting of the unit
Pag 3
•
Technical features
Pag 4
•
Instructions
Pag 5
•
Poliurethan data
Pag 6
•
Accessories availables
Pag 7
•
How to doming labels
Pag 7
•
Maintenance
Pag 8
•
Manufacture limited guarantee
Pag 8
•
Declaration of conformity
Pag 8
TO ENJOY FULLY ALL THE FEATURES AND FUNCTIONS OF YOUR PRODUCT,
PLEASE READ THIS OWNER MANUAL CAREFULLY AND COMPLETELY
Euro Drop Sas: Via Sella, 12 - 20094 Corsico (Milano) - Italy.
Phone: 0039.02 45 86 72 72 - Fax: 02 45 86 16 65 - E-mail: [email protected]
LDDS
POLY DISPENSER
Safety directions
ATTENTION!: With the use of electric tools and to avoid contacts with electric power, injures and danger of fire, the following safety directions must always be observed.
Read and observe these indications before using the unit and keep these directions with care.
1.
Keep your working place in order: Disorder on the working place may cause accidents.
2.
Environmental conditions: Don’t expose electric tools to the rain. Don’t use electric tools in wet or damp environments.
Be sure to provide a good illumination. Don’t use electric tools near inflammable liquids or gas.
3.
Avoid electrification: Avoid contacts with grounded objects, for ex. Tubes, radiators, refrigerators.
4.
Keep children away: Don’t let third persons touch the tool or the cable, keep them far from the working place.
5.
Put your tools in a safe place: Put your tool in a dry and safe place in order to not be accessible by children.
6.
Don’t overload your tool: You’ll work better and safer using the rating plate’s power.
7.
Choice of the tool: Don’t use low power tools or accessories requiring high power. Don’t use tools for work and purpose for
which they haven’t been designed.
8.
Work-clothes: During working, always dress properly, avoiding the use of loose-fitting clothes or too large sleeves.
9.
Use safety glasses: Always use protective glasses. If the work produces dust, use a mask.
10. Pay attention to the cable: Don’t lift the tool by the cable and don’t use it to pull off the plug from the outlet. Protect the cable
from high temperatures, oils, edges.
11. Fasten the piece to be worked: Be sure that the piece to be worked is fastened and fixed. During working, always keep the tool
with both hands.
12. Avoid unsafe positions: Be sure to stay in a safe position, in order to mantain a good balance.
13. Take care of your tools: In order to work in a safe way, sharpen and clean your tools, follow the prescriptions concerning
maintenance and replacement of worn tools. Often control the cable and, in case of damages, have qualified people change it.
Regularly check the extension cables and change them if they are damaged; handgrips and controls must be kept dry and clean.
14. Changing of working tools: Before repairing or replacing the tools, (for example saw-blades, points or worn tools), always unplug
the unit.
15. Don’t leave service keys on the unit: Before using the tool be sure that service keys are taken away.
16. Avoid accidental startings: Before you put the plug in the power outlet be always sure that the switch is off.
17. Don’t use the unit in open places: The unit must be used indoor and in well lighted places.
18. Always pay attention while working: While working, don’t be distracted. A lack of attention can cause accidents. In presence of
other people in the working place, we recommend to maintain a suitable distance from the operator and the unit.
19. Always check that the tool is not damaged: Before using the unit, check with attention its efficiency and the perfect working of
safety devices and if necessary of damaged parts. Check the efficiency of movable parts, that there are no clamped parts, no
broken parts, that all other parts are correctly assembled and that all conditions that could influence the correct efficiency of the
unit are optimal. Safety devices or damaged parts must be repaired or replaced by a Technical Assistance Service if not
otherwise indicated in the use and maintenance handbook.
20. Attention!: For your safety use only tools or accessories indicated in the direction for use or offered in proper catalogues.
The use of different accessories or tools, or not indicated in the direction for use or in the catalogue, may cause accidents.
21. Have qualified personnel replace the tools: This electric unit comply with the safety directions in force. The repair of electric
tools must be done only by authorised assistance service.
KEEP THESE DIRECTIONS WITH CARE
PAG 2
LDDS
POLY DISPENSER
Starting of the unit
This machine should be installed in a lab and it should be used only from authorised people.
Unpack carefully and check if all the items are included (see pag 4).
Put the machine on a stable flat table
1) Connect the cable head plug of the
electric fling cable to the proper
socket.
7) Fix the needle LDA1 with cap in the
syringe LDA2 .
2) Fix the Syringe holder.
8) Fix the tube VMA5 in the
aluminium syringes connector LDA3 .
3) Put the blue tube blue ( biggest )
into the air tube socket (L) on the unit
9) Put the syringe LDA3 in the
syringes holder tower.
We suggest to put a disposable container below the syringe in order to
avoid accidentally fall drops of resin
on the table
4) Put the blue tube blue ( biggest ) in
the internal side of the syringes holder
tower.
10) Connect air to the dispenser using
the fast plug included.
You should check if your compressor is
equipped with a filter for humidity.
If not you should buy and put between the
compressor and dispenser.
5) fix the flex tube LDA5 in the external side of the syringes holder tower.
11) Check if the table is plain.
Also the shelves where labels will dry
should be perfect flat.
6) Fix the syringe LDA2 in the aluminium syringes connector LDA3 .
12) Fix the label sheet on the shelf
LDA9 using a magnetic strips or profiles.
PAG 3
LDDS
POLY DISPENSER
Technical features
AIR EXTRACTION
AIR OUTLET
I
H
PRESSURE REGULATOR
PRESSURE GAUGE
B
C
FREE POURING
L
A
AIR TUBE SOCKET
FUSE
24 V CONTROL
E
FUSE
220 V CONTROL
D
DOMING TIMER
SINGLE TIMED POURING
F
G
PAUSE TIMER
AUTOMATIC CONTINUOS TIMED POURING
Art. E36 Electronic automatic dispenser
Working
Electronic-pneumatic
Alimentation
220 V single-phase
Absorbed current
24 Watt
Max pressure during operations
3 Atm
Components
24 V
Dimension
W. 34 cm - D. 28
Weight
cm - H. 51 cm
Kg 7
Articles included with the unit and spare parts
100 X
needle
LDA1
Assort.
20 X
syringe
LDA2
60 cc.
1X
connector
LDA3
60 cc.
20 X
joint
LDA4
60 cc.
1X
balance
LDA6
PAG 4
LDDS
POLY DISPENSER
Instructions - How to use with resin in 16 steps
Poliurethans should keep in a room with minimun 20° C. if is not possible you should pre-heat at 30°-40° for minimun
30 minutes. Use the VMA2 only one time. Before using protect hands and eyes avoiding any skin contacts.
1) Turn on the free doming function
(A) . In this function you’ll be able to
control the resin flow simply adjusting
the pressure regulator(B).
9) Push the foot pedal and you’ll get
one single timed pouring.
2) Unlock the pressure regulator (B) ,
now you can add or release pressure.
10) We suggest you to put a piece of
disposable carton near the dispenser
and experince on the carton tryng to
find the perfect quantity adjusting
doming timer(E) and pressure regulator(B). When the right quantity is fixed
you can enjoy with the automatic.
3) Check the pressure on the pressure gauge (C)
Pay attention to never cross 3 atm.
If you need a big flow we suggest we
suggest to use a big needle LDA1.
11) Turn on the Automatic
continues timed pouring (G) .
4) Pour the resin, prepared with the
poly mix C80, in the syringe LDA2.
NB. To chose the right resin mix see
page 6 .
5) Push the foot pedal in order to
obtain a pouring which it will allow you
to follow the edge of the irregular label.
For example if you have 100 labels on
a sheet you have to push 100 times
and you’ll get same quantity of the
resin in all the labels
NB. This is the most relaxing and the
most fast function to dome regular
shaped label series.
12) Regulate the pause time (F) and
you’ll only move between labels keeping pushed the foot-pedal.
For example if you have 100 labels you
push only one’s the foot pedal and you
will get the same dome in all the labels
13) Your skill it will be to move in the
middle od the label fast enought for
the setted pause time.
NB. If the label is rounded and regular
shaped you should doming with this
6) Doming keeping the syringe vertical.
NB.This free doming function is useful
to doming letters or very irregular
labels using the resin mix
T823/K863 (see page 6).
14 The resin will dry in few hours.
It depends by the room temperature
(see pag 6)
NB For more productivity we suggest
to use the syringe LDA20 with
capacity 120 gr. And cure labels
using our oven fast dry C20.
7) Turn on the Single timed pouring
(D) if you have to dome regular label
series .
15) To work with the anti-drop
function you should open the air outlet
(H) turning left.
NB. This single timed doming function
is useful to doming legular labels using
the mix 813/K863 or T823/K863.
(see page 6)
NB.
If you are a beginner you could pratice
without the resin but only tring to pick
up a piece of paper with the needle.
8) Regulate the time of the pouring on
the doming timer (E).
16) now regulate the air extraction (I)
turning left.
You’ll work always with the needle
clean because when you release the
pedal it start sucking air.
NB. Use it only during the doming.
Each time you’ll push the foot pedal
you’ll get the same quantity of the
resin.
PAG 5
LDDS
POLY DISPENSER
Instructions how to use resin: general suggestions
- The cans of resin must be preserved in environments with temperature than at least 22 °Cs. If this is not possible it becomes necessary
to preheat the products to 30° - 40° Cs for at least 30 minutes.
- Before beginning the job protect himself/herself/themselves hands and eyes.
- The table for the doming and the ledges have to perfectly be in plain.
- Work and Preserve the products with least temperature of 22°C with inferior damp to 50% (condition of a normal room with a heater).
The cleaning of the utensils and the accessories used for weighing, to mix and to dose the products is conclusive factor for the good result
of
the doming.
- Periodically check that the spatula VMA4 of the mixer C80 is correctly positioned, in the case that stirs it is necessary to stare at her/it with the special
key in endowment.
- Avoid to make two following mixtures in the same container VMA1: problems can be created on the surface of the resin, what withdrawals, peel of
orange and also defective drying. - Check around 10 minutes after the doming that bubbles of air don't stay; in case are present blazes the labels. The
blaze has to be rapid and brought closer. - If they had to reappear bubbles of air in a second time these they are entirely imputable to an incompatibility
with the used supports or with the adverse conditions of the environment of job. - Wait 24 hours before sending to the customers. Use appropriated
silicon no stick papers to overlap the sheets with the resined labels.
Characteristics and applications of resin mixtures
- RESIN T813 / HARDNER K863: very fluid, good flexibility, very good flow used to dome regular shape adesive labels.
- RESIN T823 / HARDNER K863: fluid, good flexibility, very good flow used to dome irregular shaped adesive graphics(letters big logos).
- RESIN T825 / HARDNER K865 : fluid, very good flexibility, use for thermo adesive labels only.
Ratio of catalysis resin / hardner, for all the products it is 1-1 Example: Resin T823 gr. 100 - Hardner K863 gr.100
- ADITIVE F510 it increases flexibility if added 5-10% to resin T813 or T825 used for very curved applications only.
Example: Resin T823 gr. 100 aditive F510 gr. 5 - Hardner K863 gr.100
Baking time in the oven (at 35° - 40°): 2 / 3 hours.
Curing time room temperature (at 20-25°): 6/8 hours.
Pot life (100 grs. Resin + 100 grs. hardner to 22° around): 25 / 30 minutes.
Attention: if they are mixed among them greater quantity of resin / hardner or if you work with a room temperature very elevated , the pot life
decreases.
Characteristics and advantages with the use of the Oven C20,
the bases easy level set up and the others dust free trays.
Regulable bases and superimposable dust free trays that mantains labels dust free reducing
waste cost. It allows a easy level set up and a easy fix of the label sheet by using magnetic strip
or profiles or by using remount spray adhesive.
Art. LDA9 Dust free superimposable tray it can be used in the oven C20 or with Bases
Art. LDA17 Thermozincate base cm 82x27x8 with 6 regulable feet It allows easy level set up.
Art. LDA18 Dust free superimposable tray cm 82x27 with 6 feet. Use with LDA17 base
Art. LDA37 Thermozincate base cm 82x52x8 with 6 regulable feet It allows easy level set up.
Art. LDA38 Dust free superimposable tray cm 82x52 with 10 feet. Use with LDA37 base.
Alimentation
Art. oven fast dry domed labels C20 dedicated to
cure domed labels it increase production speed and it
reduces waste cost.
It’s Equipped with 10 shelves
It’s Equipped with adjustable feet for flat results
Energy consumption
220 V - 50 Hz monofase
W 650
Internal dimension
larg. 40 cm X prof. 25
cm x h. 30 cm
External dimension
larg. 46 cm X prof. 28
cm x h. 42 cm
weigth 10 LDA9 included
Kg. 20
PAG 6
LDDS
POLY DISPENSER
Accessory avaiables for the Poly dispenser E36
Art. LDA1-50 needle for syringes
box 50 pieces each size.
Art. LDA1-500 needle for syringes
pack 500 pieces each size.
Art. LDA2 syringe capacity 60 cc
box 50 pieces
Art. LDA2-350 syringe capacity 60 cc
box 350 pieces
Art. LDA20 syringe capacity 120 cc
box 30 pieces
Art. LDA20-200 syringe capacity 120 cc
box 200 pieces
Art. LDA3/60CC aluminium connector for
syringes 60 cc
Art. LDA4/60 CC
joint for syringes 60 cc
Art. LDA3/120CC aluminium connector for
syringes 120 cc
Art. LDA4/120 CC
joint for syringes 120 cc
Art. LDA5 flex tube to connect LDA3 to the
vertical syringe holder.
Art. LDA6 digital balance division 1gr
Weigth 0 - 2 kg of resin
Art. LDA12 digital igrometer with time to
check room humidity condition and to check
production time.
Art. LDA8 bubble remover
Art. LDA13 Remount Adesive Spray Can
400 ml to a A Post-it type of adhesive which
will not give a permanent bond Allows for
lifting and mounting numerous times wi-
Art. LDA14 application tape for domed kiss
cutted graphics. It allows combination of
graphics over-lay.
SIZE AVAIABLE: exterior diameter:
mm. 0,90 - 1,10 - 1,20 - 1,60 - 1,80
SIZE AVAIABLE: exterior diameter:
mm. 0,90 - 1,10 - 1,20 - 1,60 - 1,80
How to make labels for doming
Polyurethane resins are dispensed as a liquid and cure to a crystal clear polyurethane
dome. Due to the nature of the liquid resin, following these guidelines will make application
more efficient and economical.
Guidelines:
1. Even if our resin are very compatible with inks we suggest you to test each time you change
ink, substrates or printers before production runs. Do not use paper as a substrate.
2. We suggest a permanent back adhesive.
3. Making the graphic leave a minimum of 1mm between pieces .Remember especially if you
are a beginner working on A4 it’s easier than with bigger layout.
4. Kiss cut and weed sheets.
5. Do not cut through release liner.
6. If emboss is necessary, try to keep as low as possible.
7. Round corners where possible.
8. Avoid sharp angles on inside cuts..
9. Use double sided release liner.
10. After peeled the matrix you should pass a flat heavy on the sheet to fix labels down on liner.
11. Best way to fix label sheet on the shelves are using magnets or Remount Spray Adhesive.
12. Use the appropriate resin for the label type ( see pag 6).
PAG 7
LDDS
POLY DISPENSER
Periodical maintenance by the operator
ALL THE MAINTENANCE OPERATIONS MUST BE MADE WHEN THE UNIT IS SWITCHED OFF, DISCONNECTED
FROM THE MAINS.
TEST PERIODICALLY THE MAINS SUPPLY CABLE CONDITIONS. IF IT WILL APPEAR DAMAGED, HAVE QUALIFIED
PEOPLE CHANGE IT.
PERIODICALLY TEST THE FILTER OF THE COMPRESSOR,
KEEP CLEAN THE MACHINE ESPECIALLY THE DOMING TIMER (E) AND THE PAUSE TIMER (F)
PERIODICALLY TEST SYRINGE JOINT LDA4 WITHOUT THE RESIN AND CHANGE IT IF NECESSARY.
Declaration of conformity
DIRECTIVE 89/392/EEC AND FOLLOWING MODIFICATIONS
EURO DROP SAS
VIA SELLA, 12
20094 CORSICO – (MILANO) / ITALIA
DECLARE UNDER OUR EXCLUSIVE RESPONSIBILITY THAT THE PRODUCT:
POLY-DISPENSER E36
MATR. N°
TO WHICH THIS DECLARATION IS REFERRED IS IN CONFORMITY WITH WHAT IS ESTABLISHED BY THE
DIRECTIVES:
EN50081-1, EN55014, EN50082-1, EN292,
89/392/EWG MODIFIED, 93/68/EWG and 91/368 EWG and 93/44EWG,
EMV89/336/EWG MODIFIED 92:31:EWG
CORSICO (Milano)
(Product Eng. office)
Manufacturer’s limited guarantee
LIMITED GUARANTEE: EURO DROP SAS GUARANTEES THAT THE UNIT IS FREE FROM DEFECTS OF MATERIAL
AND PROCESSING FOR ONE YEAR FROM THE PURCHASING DATE.
THE GUARANTEE IS VALID ONLY IF THE PRODUCT WAS BOUGHT SOUND FROM EURO DROP SAS.
THIS GUARANTEE ISN’T VALID IF THE PRODUCT WAS USED IN AN ILLICIT WAY, IF WAS ALTERED, CHANGED OR
REPAIRED BY PERSONNEL NOT AUTHORIZED FROM EURO DROP SAS.
IN THE CASE THAT THE PRODUCT SHOWS, IN ONE YEAR FROM THE PURCHASING, DEFECTS OF MATERIAL OR
PROCESSING, IT MUST BE SENT TO EURO DROP SAS, WITH TRANSPORT EXPENSES PAID, ENCLOSING NAME,
ADDRESS, THE PURCHASING DATE’S PROOF AND A SHORT DESCRIPTION OF THE NOTICED DEFECT.
EURO DROP SAS AT ITS DISCRETION WILL CARRY OUT THE REPAIR OR THE CHANGE OF THE DEFECTIVE
PRODUCT WITHOUT ANY EXPENSE BY THE PURCHASER. POSSIBLE REPAIRS OR CHANGES ARE GUARANTEED,
AS DESCRIBED ABOVE, FOR THE REST OF THE ORIGINAL GUARANTEE TIME. THE GUARANTEE IS LIMITED TO THE
REPAIR AND CHANGE OF THE DEFECTIVE PRODUCT.
(THERE ARE NO OTHER IMPLICIT OR EXPLICIT GUARANTEES. MOREOVER N.A. WILL NOT BE RESPONSIBLE FOR
CASUAL, CONSEQUENTIAL OR SPECIAL DAMAGES, FOR COSTS OR EXPENSES FOR REPAIR OR REPLACEMENT
AS ABOVE DESCRIBED).
PAG 8