1
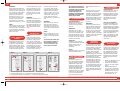
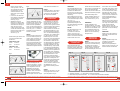
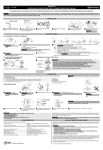
Owners manual_ 5_gesamt.qxd 03.05.2005 21:39 Uhr Seite 1
OWNERS MANUAL
WP Suspension shock absorbers ROAD & TRACK
01 - 2005 - Art. no.: 5300.0082.
Your WP Suspension dealer
www.wpsuspension.com
www.wpsuspension.com
Owners manual_ 5_gesamt.qxd 03.05.2005 21:39 Uhr Seite 3
GB
GB
All of WP Suspension advanced suspension products are
adapted to the brand and
model. This means that
length, travel spring actions
and damping characteristics,
are tested individually just for
the motorcycle that you have
decided to fit with WP
Suspension.
INTRODUCTION
Safety Signals
Important information concerning safety is distinguished in
this manual by the following
notations. The safety alert
means: Caution ! Your safety is
involved.
WARNING !
Failure to follow warning
instruction could result in
severe or fatal injury to anyone
working with, inspecting or
using the suspension,or to
bystanders.
CAUTION !
Caution indicates that special
precautions must be taken to
avoid damage to the suspension.
NOTE !
This indicates information that
is of importance with regard to
procedures.
BEFORE
INSTALLATION
WARNING !
Installing a shockabsorber that
is not approved by the vehicle
manufacturer, may affect the
stability of your vehicle. WP
Suspension B.V. cannot be
held responsible for any perso-
nal injury or damage whatsoever that may occur after fitting
the shock absorber. Contact a
WP Suspension dealer or other
qualified person for advice. WP
Suspension B.V. can not be
held responsible for any form
of damage to shock absorber
or vehicle, or injury to qualified
person for advice. WP
Suspension B.V. can not be
held responsible for any form
of damage to shock absorber
or vehicle, or injury to persons,
if the instructions for fitting and
maintenance are not followed
exactly. Similarly, the warranty
will become null and void if the
instructions are not adhered to.
WARNING !
Pleasy study and make certain
that you fully understand all the
mounting instructions and the
owner’s manual before handling this shock absorber. If you
have any questions regarding
proper installation procedures,
contact a WP Suspension dealer or other qualified person.
TUNING THE
SUSPENSION
All motorcycles are designed
with a suspension geometry
that includes height and fork
angle. The changing of components can affect this and it is
therefore essential that both
the rear and the front ends
match each other. Changing to
WP Suspension gives optimum
performance only when both
the front and the rear suspensions interact properly. It is
of the greatest importance that
the front and rear loaded
height are within the specified
values. See section: Setting the
spring preload.
SETTINGS
Basic setting
Always ensure that the basic
setting made by WP
Suspension is correct (see
mounting instruction).
It is adapted to the make and
model and for a rider of average weight.
Everything must harmonize
There are WP Suspension front
fork springs, they are specifically adapted to the shock
absorber recommended to
your motor-cycle. Incorrect
spring action can give a fork
angle that is too steep or too
flat. This in turn will give a tendency for oversteering or
understeering, wich could seriously affect the handling of the
motorcycle.
SETTING THE
SPRING PRELOAD
1. Measuring:
Preload on the spring/springs
is very important, because it
affects the height of the motorcycle and the fork angle.
Consequently, handling characteristics can be changed,
even negatively. Proceed as
follows (it will be much easier if
done by two persons):
• Place the motorcycle on a
smooth surface.
• Lift up the rear to a fully
extended position.
• Measure the distance, from
the lower edge of the rear
mudguard or from a point
marked by a piece of tape,
immediately above the rear
wheel axle, to the wheel
axle. (Fig. 1)
• Make a similar measurement
on the front axle, eg, from
the bottom of the upper
triple clamp to the front
wheel axle. The fork must
also be fully extended.
• Allow the motorcycle (withoutrider) to apply load on
the springs and repeat the
measuring procedure.
(Fig. 2)
• Then take the same measu
rements with the rider and
equipment on the motorcycle. It is important that the
rider has a correct riding
posture, so that the weight
is balanced on the front and
rear wheel in the same way
as when riding. (Fig. 3)
The measurements may not
differ from the following sizes.
Without rider: (A-B)
Rear:
5 –10 mm
Front:
25 – 30 mm
With rider: (A-C)
Rear:
30 – 40 mm
Front:
35 – 50 mm
front fork springs are available
for almost all motorcycles.
These in combination with WP
Suspension shock absorbers,
contribute to superior road holding qualities.
Fig. 3
2. Adjusting:
Adjust the preload with the
lock retainer on the shock absorber or by hydraulic preloading (Fig. 4). Use an Allen key
to loosen the Allen bolt in the
lock retainer and adjust the
retainer to the position using
the special tool (Fig. 5, 6 + 7).
Lock the Allen bolt again after
adjusting. For hydraulic preloading, increase by turning clockwise and reduce by turning
anticlockwise. (Fig. 4)
NOTE !
Do not over tighten the Allen
bolt in the lock retainer.
On a shock absorber that has
hydraulic setting the basic
position can be adjusted. Such
changes should be attended to
by an WP Suspension authorized service workshop.
Fig. 1
Fig. 4
Fig. 2
FRONT FORK
SPRINGS
To optimize the road holding
qualities of a motorcycle the
front fork must match the rear
suspension. WP Suspension
NOTE !
Remember to change the fluid
in the front fork at least once
every year. We recommend
using WP Suspension front
fork oil.
SETTING THE
DAMPING
The adjusting possibilities of
the WP Suspension shock
absorbers facilitate very fine
settings. You can optimize
adjustments to suit your own
weight and equipment, your
individuel way of riding and the
condition of the road.
To be able to improve the road
holding qualities it is of the outmost importance that you fully
understand the functioning of
the shock absorber. Then you
can learn by trial and error how
they affect the motorcycle.
Depending on the model, there
are adjustments for rebound
damping, compression highspeed damping, compression
low-speed damping and
adjustment for the length of the
shock absorber.
The damping can be set with
the special tool that is included
with the shock absorber. By
turning clockwise they increase
the damping and anticlockwise
they reduce it. The adjustments
have definite positions with a
noticeable “click ”, so it is easy
to count to the correct setting.
NOTE !
Always count the “clicks” back
from fully closed !
WP Suspension B.V. All rights reserved. Any printing or unauthorized use without the written permission of WP Suspension B.V. is prohibited.
WP Suspension B.V. All rights reserved. Any printing or unauthorized use without the written permission of WP Suspension B.V. is prohibited.
www.wpsuspension.com
www.wpsuspension.com
Owners manual_ 5_gesamt.qxd 03.05.2005 21:39 Uhr Seite 5
GB
D
WARNING !
Rebound damping affects the
characteristics the most, do not
ride with the rebound damping
fully closed ! The setting adjustment screw of the rebound
damping is at the bottom on
the piston rod. (Fig. 5, 6 + 7).
The compression high-speed
and the compression lowspeed damping can be adjusted at the reservoir (Fig. 5 + 6).
NOTE !
When making new adjustments
it is easiest to go back to fully
closed, and then count forward
to the new setting. The adjustment screws should not be screwed in too hard.
SETTING THE
SHOCK ABSORBER
LENGTH
Sensitivity of the steering can
be adjusted by altering the
length of the shock absorber,
without affecting other characteristics. The length is adjusted
using the nut (size 22) down
and the threaded clevis at the
Fig. 5
end of the piston rod. (Fig. 8)
The shock absorber can be
adjusted up to a length that
may never be more than to
where the groove cut in the
thread becomes just visible.
(Fig. 8 – E)
WARNING !
If the shock absorber has an
adjustable end eye/bracket,
this must not be threaded out
more than that the groove is
fully visible beneath the lock
nut. Make sure that the lock
nut is tightened after adjustment.
Alle Federungs-Produkte von
WP Suspension sind für eine
bestimmte Marke und Modell
ausgelegt. Deshalb sind
Länge, Federaktion und
Dämpfungs-Charakteristiken
individuell auf Ihr MotorradModell zugeschnitten.
WARNING !
Never alter the gas pressure.
Special purpose charging
equipment and acces to nitrogen is required. The gas pressure should normally never be
altered.
Sicherheitshinweise
Wichtige Informationen über
Sicherheit sind in diesem
Handbuch wie folgt gekennzeichnet:
NOTE !
Regular maintenance and inspection contribute to the prevention of functional disturbances.
SETTING YOUR
MOTORCYCLE
NOTE !
Always begin with the basic
setting recommended by WP
Suspension. Always make
notes, adjust in small steps
and make only one adjustment
at a time. Adjustments should
be made with two clicks at a
time. By utilizing the adjustment possibilities you can test
by trial and error, and learn
Fig. 6
how they affect your motorcycle. Always begin by test
riding the motorcycle with all
adjustments at their delivery
setting. Choose a short run of
varying character, ie, long and
sharp bends, hard and soft
bumps. Keep the same run
and adjust only one setting at a
time.
By choosing the quality and
the customising options of
WP Suspension products,
you are choosing for optimum safety and comfort.
Fig. 7
EINLEITUNG
WARNUNG !
Versäumen Sie nie dieser
Warnung Folge zu leisten, dieses kann zu ernsthaften oder
tödlichen Verletzungen führen.
Das gilt für Fahrer, als auch für
Personen, die an der Federung
arbeiten oder für Dritte.
VORSICHT !
Signalisiert, dass spezielle
Vorsichtsmaßnahmen getroffen
werden müssen, um das
Federbein nicht zu beschädigen.
NOTIZ !
Zeigt Informationen, die wichtig
für die Handhabung sind.
Fig. 8
VOR DEM EINBAU
B
C
B
C
E
D
D
D
E
A
A
A
A = Rebound adjustment B = Low-speed compression adjustment
C = High-speed compression adjustment D =Allen bolt spring lock retainer
WARNUNG !
Der Einbauen eines, nicht
durch den Hersteller freigegebenen Federbeins, kann die
Stabilität Ihres Fahrzeuges
beeinflussen. Die Firma WP
Suspension haftet nicht für
Schäden oder Verletzungen,
die durch den Einbau des
Federbeins verursacht wurden.
Lassen Sie Ihre WP Produkte
von einer Fachwerkstatt einbauen oder fragen Sie eine
dafür qualifizierte Person um
Rat.
WP Suspension ist nicht verantwortlich für Schäden an
Federbeinen, Fahrzeugen oder
Personen, die durch nicht fachgerechte Montage/Wartung
entstanden sind. Mit einer nicht
fachgerechten Wartung oder
Montage erlischt der GarantieAnspruch.
WARNUNG !
Bevor Sie Veränderungen an
Ihrem Federbein durchführen,
bitte wir Sie, das Handbuch
ausführlich zu lesen. Vergewissern Sie sich, dass Sie alle
Punkte im Handbuch richtig
verstanden haben. Falls Fragen
auftreten, stellen Sie diese bitte
einem WP Suspension
Händler.
EINSTELLUNGEN
Grundeinstellung
Versichern Sie sich, dass die
Grundeinstellung von WP
Suspension korrekt ist (siehe
Montageinstruktionen). Diese
ist eingestellt auf die Marke,
das Modell und auf einen
Fahrer mit Durchschnittsgewicht.
Alles muss Harmonieren
Es gibt WP Gabelfedern, die
spezifisch auf ein FederbeinModell angepasst sind und für
ein Motorrad-Modell empfohlen
werden. Falsche Federhärte
kann zu einem zu steilen oder
zu flachen Gabelwinkel führen.
Dieses führt wiederum zu
Unter- oder Übersteuern, was
starke Auswirkungen auf das
Handling des Motorrades
haben kann.
FEDERUNG
EINSTELLEN
Die Konstruktion eines Motorrades beruht auf einer geometrischen Federung, einschließlich Höhe und Gabelwinkel.
Der Austausch von Komponenten kann diese Geometrie
beeinflussen, es ist daher
äußerst wichtig, dass Front und
Heck des Motorrades aufeinander abgestimmt sind. Der
Einbau eines WP Suspension
Produktes gibt nur dann ein
optimales Resultat, wenn die
Front- und Heck-Federung
richtig miteinander arbeitet.
Es ist äußerst wichtig, dass die
vorn und hinten gemessenen
Höhen innerhalb der spezifizierten Toleranzgrenzen liegen.
Siehe: Federvorspannung einstellen.
FEDERVORSPANNUNG
EINSTELLEN
Die Vorspannung der Feder/
Federn ist sehr wichtig, weil es
die Höhe des Motorrades und
den Gabelwinkel beeinflusst.
Der Handlingcharakter kann
zum Positiven als auch zum
Negativen verändert werden
Einstellungen sind einfacher
mit zwei Personen durchzuführen.
• Stellen Sie das Motorrad auf
eine ebene Oberfläche.
• Heben Sie die Hinterseite
hoch, bis sie ganz ausgefedert ist.
• Messen Sie die Distanz,
z.B.: von der Unterseite des
Kotflügels, oder von einem
markierten Punkt, über die
hintere Radachse, bis zu
der Radachse (Fig. 1).
WP Suspension B.V. All rights reserved. Any printing or unauthorized use without the written permission of WP Suspension B.V. is prohibited.
Alle Rechte sind WP Suspension vorbehalten. Kopieren oder Drucken ohne schriftliche Zustimmung von WP Suspension ist verboten.
www.wpsuspension.com
www.wpsuspension.com
Owners manual_ 5_gesamt.qxd 03.05.2005 21:39 Uhr Seite 7
D
D
• Messen Sie die Vorderachse genauso, z.B.: von
der Unterseite der oberen
Achsaufnahme, bis zur
vorderen Radachse. Die
Gabel muss ganz ausgefedert sein.
• Lassen Sie das Motorrad
(ohne Fahrer) vom Ständer
und wiederholen Sie die
Messung (Fig. 2).
• Wiederholen Sie die
Messung ein weiteres Mal
mit Fahrer und Gepäck auf
dem Motorrad. Wichtig ist,
dass der Fahrer in der
richtigen Fahrposition sitzt,
so dass das Gewicht aufgeteilt ist auf das Vorder- und
Hinterrad (reale Fahrsituation, Fig. 3).
Die Abmessungen sollten nicht
von den folgenden Daten
abweichen:
Ohne Fahrer: (A-B)
hinten: 5 –10 mm
vorn:
25 – 30 mm
Mit Fahrer: (A-C)
hinten: 30 – 40 mm
vorn:
35 – 50 mm
zeichneten Fahrverhalten bei.
Fig. 3
NOTIZ !
Denken Sie daran, dass Gabelöl mindestens einmal im Jahr
zu wechseln. Wir empfehlen
WP Suspension-Gabelöl.
2. Justieren
Justieren Sie die Vorspannung
mit dem Federteller auf dem
Federbein oder mit der hydraulischen Vorspannung (Fig. 4)
Nutzen Sie das Spezialwerkzeug, um die InnensechskantSchraube in dem Federteller zu
lösen (Fig. 5, 6 + 7) und den
Federteller in die gewünschte
Position zu drehen.
NOTIZ !
Achten Sie darauf, die Schraube in der Federvorspannung
nicht zu stark anzuziehen. An
einem Federbein mit hydraulischer Federvorspannung
kann die Grundeinstellung geändert werden. Diese Veränderung sollte durch eine Fachwerkstatt durchgeführt werden.
Fig. 4
Fig. 1
GABELFEDERN
Fig. 2
Um das Handling auf der
Straße zu optimieren, müssen
Gabel und Federbeine aufeinander abgestimmt sein. WP
Gabelfedern sind für die
meisten Motorrad-Modelle
erhältlich. Diese, zusammen
mit WP Suspension Federbeinen tragen zu einem ausge-
EINSTELLEN DES
FEDERBEINS
Die Federbeine von WP Suspension können sehr fein eingestellt werden. Sie können
optimal auf Ihr eigenes Gewicht
und das Gewicht des Gepäcks/
Sozius eingestellt werden.
Zudem können Ihr Fahrstil und
die Straßenverhältnisse in der
Einstellung berücksichtigt werden. Um die Straßenhaftung zu
verbessern, ist es äußerst wichtig, die Funktionen von dem
Federbein genau zu kennen.
Sie können durch Ausprobieren
lernen, welche Auswirkungen
die einzelnen Funktionen auf
das Motorrad haben. Abhängig
von dem Modell, können Sie
folgendes verstellen. Z.B: Zugstufendämpfung, High Speed/
Low Speed Druckstufendämpfung und Federbein-Länge. Die
Dämpfung kann eingestellt werden mit Hilfe eines mitgelieferten Werkzeuges. Das Verstellen
der Verstellschraube im Uhrzeigersinn erhöht die Dämpfung, während sie beim Drehen
gegen den Uhrzeigersinn vermindert wird. Die Einstellungen
haben klar definierte Positionen, die mit einem hörbaren
“Klick” einrasten. Dadurch wird
das Mitzählen bis zur gewünschten Einstellung erleichtert.
NOTIZ !
Zählen Sie die “Klicks” von der
Ausgangsposition (Schraube
ganz reingedreht, Fig. 4).
Alle Rechte sind WP Suspension vorbehalten. Kopieren oder Drucken ohne schriftliche Zustimmung von WP Suspension ist verboten.
www.wpsuspension.com
WARNUNG !
Die Zugstufendämpfung hat
große Auswirkungen auf den
Charakter des Motorrades.
Fahren Sie nie mit einer komplett geschlossenen Zugstufendämpfung !
Die Einstellschraube von der
Rebound-Dämpfung ist unten
an der Kolbenstange zu finden
(Fig. 5, 6 + 7).
Die Druckstufe High/Low
Speed-Dämpfung kann am
Ausgleichsbehälter eingestellt
werden (Fig. 5 + 6).
NOTIZ !
Bei Neueinstellungen ist es
einfacher, ganz zu zu
schrauben und dann die
“Klicks” nach bis zur gewünschten Neueinstellung zu
zählen. Schrauben Sie die Einstellschraube nie zu fest.
FEDERBEINLÄNGE
EINSTELLEN
Die Empfindlichkeit beim
Lenken kann durch die Federbeinlänge variiert werden. Die
anderen Fahrwerksmerkmale
Fig. 5
B
werden damit nicht beeinflusst.
Die Länge kann eingestellt werden mit der Einstellmutter
(Größe 22) und dem Halter am
Ende der Kolbenstange (Fig.8).
Die Federbeinlänge kann
soweit verändert werden, bis
die Rille im Gewinde immer
noch sichtbar ist (Fig. 8 – E).
WARNUNG !
Hat das Federbein eine
Längenverstellung, schrauben
Sie diese nie so weit raus, dass
die Rille unter der Mutter nicht
mehr vollständig sichtbar ist.
Versichern Sie sich, dass die
Mutter nach der Verstellung
festgemacht ist.
MOTORRAD
EINSTELLEN
NOTIZ !
Fangen Sie immer mit der WP
Suspension Grundeinstellung
an. Machen Sie zu jedem
Schritt Notizen. Verstellen Sie
in kleinen Stufen und führen
Sie die Einstellungen eine nach
Fig. 6
C
B
der anderen durch. Verstellen
Sie mittels zwei “Klicks”. Beim
Testen der Einstellungen können Sie ausprobieren, welche
Auswirkungen diese auf das
Motorrad haben. Fangen Sie
immer mit einer Probefahrt an,
bei der alle Einstellungen in
der ausgelieferten Grundeinstellung sind.
Wählen Sie eine kurze Strecke
mit verschiedenen Merkmalen,
z.B. lange und scharfe Kurven,
große und kleine Hügel.
Wiederholen Sie dann die
gleiche Strecke und ändern Sie
jedes Mal nur eine Einstellung
pro Fahrt.
WARNUNG !
Ändern Sie nie den Gasdruck.
Füllgeräte und Stickstoff sind
dazu nötig.
NOTIZ !
Regelmäßige Wartungen und
Inspektionen verhindern
Funktionsstörungen.
Wählen Sie die Qualitätsprodukte von WP Suspension und
damit Sicherheit und Komfort.
Fig. 7
Fig. 8
C
E
D
D
D
E
A
A
A
A = Zugstufe einstellen B = Druckstufe Low-Speed einstellen
C = Druckstufe High-Speed einstellen D = Innensechskant-Schraube Federteller
Alle Rechte sind WP Suspension vorbehalten. Kopieren oder Drucken ohne schriftliche Zustimmung von WP Suspension ist verboten.
www.wpsuspension.com