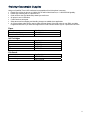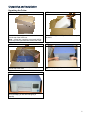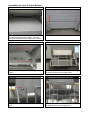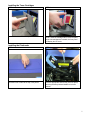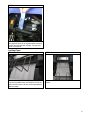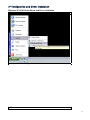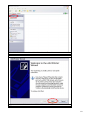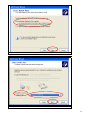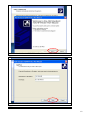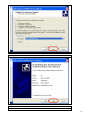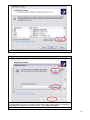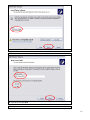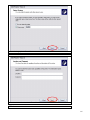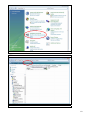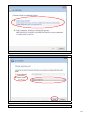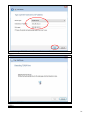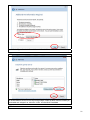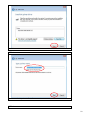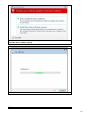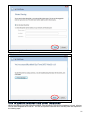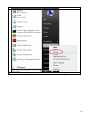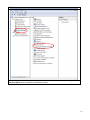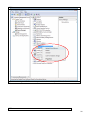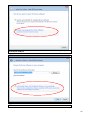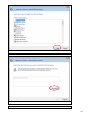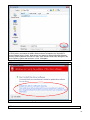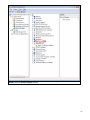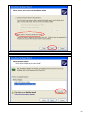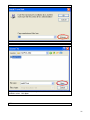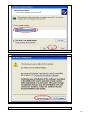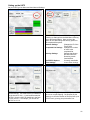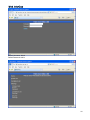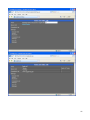
1
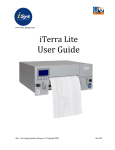
www.isys‐group.com iTerra IJ875 User Guide iSys - The Imaging Systems Group Inc. © Copyright 2009 Rev 005 1 Table of Contents Ordering Consumable Supplies Unpacking and Installation Unpacking the Printer Assembling the Input & Output Baskets Installing the Toner Cartridges Installing the Printheads Loading Paper IP Configuration and Driver Installation 4 5 5 6 7 7 8 Windows XP Add Printer Wizard and Driver Installation Windows Vista Driver Installation 9 9 18 USB to Ethernet Windows Vista Driver Installation 26 USB to Ethernet Windows XP Driver Installation 33 Setting up the IJ875 with the USB Ethernet Adapter Setting up your computer Setting up the IJ875 38 38 42 Printer Control Panel Overview 43 Web Interface 44 Top of Form Calibration 48 Specs/ Features and Benefits 49 Troubleshooting 49 Limitation of Liability 50 iTerra IJ875 Warranty 51 iSys is an ISO 9001 Registered Firm 2 Thank you for selecting the iTerra IJ875. iSys will make every effort to assist you with operation of your new printer. It is our sincere desire that your ownership experience meets your highest expectations. This user guide is provided to help you easily install and operate your new printer. It contains important information on the features and functions of the iTerra IJ875. Need Help? If you require additional assistance or information, please contact the iSys Technical Support team at: iSys - The Imaging Systems Group Inc. 911 28th Street N.E. Calgary, AB T2A 7X1 Canada Toll Free in North America: 1-800-415-4797 Phone: (403) 204-5200 Fax: (403) 204-1971 E-mail: [email protected] THE INFORMATION CONTAINED IN THIS DOCUMENT IS SUBJECT TO CHANGE WITHOUT NOTICE. EXCEPT AS PROVIDED BY LOCAL LAW, THE IMAGING SYSTEMS GROUP INC. (ISYS) MAKES NO WARRANTY OF ANY KIND WITH REGARD TO THIS MATERIAL, INCLUDING, BUT NOT LIMITED TO THE IMPLIED WARRANTIES OF MERCHANTABILITY AND FITNESS FOR A PARTICULAR PURPOSE. ISYS SHALL NOT BE LIABLE FOR ERRORS CONTAINED HEREIN OR FOR INCIDENTAL OR CONSEQUENTIAL DAMAGES IN CONNECTION WITH THE FURNISHING, PERFORMANCE OR USE OF THIS MATERIAL. WARNING: A WARNING indicates the potential for personal injury. CAUTION: A CAUTION indicates the potential for damage to the IJ875. NOTE: A NOTE indicates special attention is required. This symbol indicates an area of possible concern due to static discharge into the circuitry. When you see this symbol in the manual, please observe proper precautions to minimize damage to circuitry. 3 Ordering Consumable Supplies Using non-Qualified iTerra IJ875 media and consumables will void the printer’s warranty. • Reach iSys toll-free by phone at 1-866-415-4797 within North America, or 1-403-204-5200 globally. • Reach iSys media by fax at 1-403-204-1971 • Order online at the iSys Media Shop www.isys-media.com • All prices in are in US dollars. • Credit Cards are accepted. • Sales tax as well as shipping and handling charges are added where applicable. • An iSys purchase order can be used to order products directly if the order value is over $500, excluding freight and taxes and if you have been approved for credit. Please contact iSys for a purchase order form. Paper Media Coated Fanfold Paper Non-Coated Fanfold Paper iSys Part Number IJ-SCFF1000 IJ-NCFF1000 Ink Cartridges Color Black Cyan Magenta Yellow iSys Part Number IJ875-BK IJ875-CY IJ875-MG IJ875-YW Printheads Color Black and Yellow Cyan and Magenta iSys Part Number IJ875-PHBY IJ875-PHCM 4 Unpacking and Installation Unpacking the Printer STEP 1 STEP 2 Open the box and remove the accessories box from the top of the IJ875 box. *Note – A small box containing accessories will lay on the top of the Styrofoam that contains the IJ875. Remove the top piece of Styrofoam from the top of the IJ875. STEP 3 STEP 4 Remove the piece of protective plastic wrapping from the top of the IJ875 Using two people, gently remove the IJ875 from the box. STEP 5 Place the IJ875 on a table. (Store the box and printer packaging in case future shipping is required) 5 Assembling the Input & Output Baskets STEP 1 STEP 2 Place the plate under the printer; the holes must align with the back legs of the printer. *Note: the plate must be parallel with the edge of the surface. Locate the front output basket screws. STEP 3 STEP 4 Align the holes on the output basket with the screws. The output basket should be attached to the front of the printer as shown in the image above. STEP 5 STEP 6 Align the input basket holes to the hooks on the plate. The input basket should be attached to the front of the plate as shown in the image above. 6 Installing the Toner Cartridges STEP 1 STEP 2 Push the black latch down to open the toner door. Match the color of the cartridge to the slot in the printer. Insert the cartridge until it clicks into place. As the ink cartridges are inserted, the front panel will display the ink levels. Installing the Printheads STEP 1 STEP 2 Push the black latch down to open the hinged printhead cover located at the top of the printer. Lift the blue cover and press the printheads firmly into their appropriate slots so they click into place, returning the blue printhead handle to its lower position. 7 STEP 3 Once all of the printheads are in place, return the blue printhead cover to its original position ensuring that the hook and the latch engage. You may now power on the printer. Loading Paper STEP 1 STEP 2 Start on a face up, non I-mark sheet of paper, press the form feed button and feed the end of the paper into the printer until the printer automatically takes the paper. Place the bundle of fanfold paper into the input basket. 8 IP Configuration and Driver Installation Windows XP Add Printer Wizard and Driver Installation STEP 1 Go to Windows Start h Settings h Printers and Faxes STEP 2 9 Select Add a Printer on the left hand side of the window h Press Next STEP 3 Welcome to the Add Printer Wizerd h Press Next STEP 4 10 Select Local printer attached to this computer h Press Next STEP 5 Select Create a new port: Type of port h Standard TCP/IP Port h Press Next STEP 6 11 Welcome to the Add Standard TCP/IP Printer Port Wizard h Press Next STEP 7 Enter your IP into the box h Press Next STEP 8 12 Under Device Type h Select Standard h Generic Network Card h Press Next STEP 9 STEP 10 Completing the Add Standard TCP/IP Printer Port Wizard h Press Finish 13 Select Have Disk STEP 11 Select Browse h Select the IJ875 Driver. From the driver installation disk select the .inf h If you downloaded the driver from the iSys Group website, locate the driver from the location you downloaded and unzipped it to; select the .inf file. h Press Ok h Press Next STEP 12 14 Select the iSys iTerra IJ875 Printer h Press Next STEP 13 Enter the printer name h Select Yes if you would like the IJ875 to be your default printer or No if you do not h Press Next STEP 14 15 Select a sharing option h Press Next STEP 15 Enter a location and a comment h Press Next STEP 16 16 Select Yes or No to print a test page h Press Next STEP 17 Completing the Add Printer Wizard h Press Finish Windows Vista Driver Installation STEP 1 17 Go to the Windows Start button h Control Panel STEP 2 18 Select Printer under Hardware and Sound STEP 3 Select Add a printer STEP 4 19 Select Add a local printer STEP 5 Create a new port h Select type of port: Standard TCP/IP Port h Press Next STEP 6 20 Select Device type: TCP/IP Device h Enter the IP address h Press Next STEP 7 Detecting the TCP/IP Port STEP 8 21 Select Device Type: Standard: Generic Network Card h Press Next STEP 9 Select Have Disk h Select Browse h From the driver installation disk select the .inf file h If you downloaded the driver from the iSys Group website, locate the driver from the location you downloaded and unzipped it to; select the .inf file. h Press Ok h Press Next STEP 10 22 Press Next STEP 11 Type a name for the printer h Press Next STEP 12 23 During installation a window will appear asking you to verify the driver publisher h Press Install this driver software anyway STEP 13 Installing Printer STEP 14 24 Choose a sharing option h Press Next STEP 15 You’ve successfully added the printer h You may print a test page h Press Finish USB to Ethernet Windows Vista Driver Installation When first plugging in the USB to Ethernet adapter, Vista will alert the user that new hardware is found. Allowing Vista to find a compatible driver will fail. The user is required to install the driver manually which will explained in the following steps. 25 STEP 1 Left click the Start button h Right click on the Computer tab h Left click on the Manage item 26 STEP 2 Within the left panel, click on Device Manager. Notice under Other devices, a device labeled Apple USB Ethernet Adapter has an exclamation mark beside its name. 27 STEP 3 Right click on the Apple USB Ethernet Adapter and left click on the Update Driver Software… STEP 4 28 Allowing windows to automatically search for a driver will fail. Select Browse my computer for the driver software. STEP 5 Click Let me pick from a list of device drivers on my computer STEP 6 29 Click Next STEP 7 Click Have Disk STEP 8 30 Navigate to the location of the driver to install. If installing the driver from the CD included with the IJ875 printer, the location the USB to Ethernet drivers a located in the ‘iSys USB To Ethernet Adapter Drivers’ folder. Note there a four folders for different Microsoft Windows operating systems(Windows XP 32bit, XP 64bit, Vista 32bit and Vista 64bit). Navigate to the correct operating system and select the *.inf file. Click Open STEP 9 Click Install this driver software anyway STEP 10 31 Going back into the Device Manager will now have a new device labeled iSys USB2.0 to Fast Ethernet Adapter under the Network adapter devices. 32 USB to Ethernet Windows XP Driver Installation You will need to know the location of the driver that you will install. If you use the CD provided with the IJ875 printer it will be in the ‘USB to Ethernet Drivers’ folder. There are four drivers provided for the different Microsoft operating systems each within an associated folder name. If you downloaded the driver from the iSys website you need to unzip the file and remember the location of the driver. STEP 1 When the USB dongle is inserted, Window XP will alert you that new hardware is found and you be presented with two options. Select Install from a list or specific location and click on the Next button. STEP 2 33 Select Don’t search. I will choose the driver to install. STEP 3 Click the Have Disk button 34 STEP 4 Click Browse STEP 5 Navigate to the location of the driver, once you’re in a folder with a driver the *.inf file will be available to select. Click Open STEP 6 35 Select the iSys USB2.0 to Fast Ethernet Adapter and click the Next Button. STEP 7 A dialog window warning will appear, click Continue Anyway STEP 8 36 Once that the driver is installed, click Finish 37 Setting up the IJ875 with the USB Ethernet Adapter Two separate steps are required to set up the USB Ethernet Adapter 1. Setting up your computer 2. Setting up the IJ875 Setting up your computer STEP 1 Open Network Connections. Click Start h Click Run STEP 2 Enter the command h control netconnections into the text box h Select OK h This will open the Network Connections window STEP 3 38 The USB Ethernet Adapter will be displayed as Local Area Connection, possibly with a number appended at the end, (such as Local Area Connection 2 or Local Area Connection 3, etc). h Right-click on the USB Ethernet Adapter and choose properties. h Select Internet Protocol (TCP/IP) and click on Properties. STEP 4 39 Here, you are able to change your IP address, subnet mask, gateway, and DNS settings for the USB Ethernet Adapter. To start, first click on the Use the following IP address radio button. Now you should be able to change your IP address, subnet mask, and gateway. Type in an IP that is is completely different from the IP you use for your work or home networks, e.g. 4.1.1.1, and type in a subnet mask, e.g. 255.0.0.0. You can leave the Default gateway and DNS fields blank. Press OK. STEP 5 40 In the Advanced menu, select Advanced Settings. STEP 6 If the USB Ethernet Adapter is above your main adapter, move the USB Ethernet Adapter priority down by selecting it and clicking on the down arrow. Click OK. 41 Setting up the IJ875 On your IJ875, go into Menu and then Network Settings IJ875 Main Menu Modify the IP so it is part of the subnet of your Ethernet dongle. This means that if your Ethernet dongle has an IP of 4.1.1.1 and a subnet mask of 255.0.0.0, then the IJ875 IP should be in the form of 4.xxx.xxx.xxx. For example, you can set the IJ875 IP to 4.1.1.2. IJ875 Menu – Select Network Settings Pressing on Settings from the Main Menu will bring you to the Settings Menu. Here you have the option to view and change the security options or the completed list options. Network Settings Changes the IP of the iTerra IJ875. Completed List Settings Changes the number of items in the completed list. Security Settings Settings that allow or prevent users from accessing certain functionalities. Set PDF/PS Options Currently unavailable. Filter Settings Access Filter Settings The Filter Settings allows you to specify whether or not to turn on plot flipping. The purpose of plot flipping is so that the bottom of the plot lines up to the TOF mark, printing the plot bottom first. 42 Printer Control Panel Overview • Main Screen o Menu Settings • Network Settings o Modify IP o Modify Subnet • Completed List Settings o Change Pressed • Security Settings o Modify Allowed Access Page 1 o Modify Allowed Access Page 2 o Modify Allowed Access Page 3 • Filter Settings Maintenance • TOF Calibration o Started TOF Calibration Display Board Firmware Display Printer Firmware Print Test Plots o Queue Menu Queue List Completed List • Pressed Move to Queue ‐ Select Number of Copies o Online Form Feed Manual Advance 43 Web Interface Default Username: Admin Default Password: Admin 44 45 46 47 Top of Form Calibration 1. 2. 3. 4. Press Start. You will now see a number for sensor output. Insert paper until the sensor is above the white space. Manually adjust the gain by pressing either Increase Gain or Decrease Gain until the sensor is below 45 for white space. 5. Insert the paper in more until the sensor is above the I-mark. Manually adjust the gain until the sensor detects 180 or higher for the I-mark. 6. Press Stop and Save. Manual calibration Calibrate TOF lets you calibrate the Top of Form. You can adjust the gain by pressing the Increase Gain or Decrease Gain buttons. The target numbers are as follows: Sensor Detects Sensor Output Target Whitespace Less than 45 Top of Form Greater than 180 48 Specs/ Features and Benefits Printer Specifications Print Technology Plotter Carriage Width Maximum Plot Width Print Resolution Maximum Plot Speed Consumables Sheet Sizes Connectivity Interfaces Warranty Drivers Options Data Format Power Requirements Measurements (W x D x H) Weight Operating Temperature Operating Humidity Certification Color Inkjet 8.75” 8.5” Continuous Mode 300 Dpi or 600 Dpi Up To 3.75” Per Second (color) Fanfold Paper, Ink Cartridges, Printheads 8.75 up to 300 feet USB 2.0, 10/100 Network 6 Months Windows XP, Vista (32, 64 bit versions) Output and Input Media Basket PCL3GUI 100-240 V, 50-60 Hz, 135 Watts 22.5” x 17” x 8.75” 42 lbs (19kgs) without baskets 41°F - 104°F (5°C - 40°C) 20% - 80% RH Non-Condensing Humidity FCC CLASS A, CE, cTUVus S Features Benefits Automatic Top of Form Jobs consistently start on the correct fanfold sheet or title page Non-stop imaging User is aware of ink levels at all times Easy to operate, fast learning curve Allow your job to continue to plot right where it left off Requires minimal space High resolution and fast printing speeds Reduces replacement costs Easy to use color LCD touch screen Select and print jobs right from your USB memory key Control job queue at the printer, Store jobs on the hard disk, Send job once, print many Built rugged enough for field use Continuous Media Feed Ink Level Display User Friendly Replaceable Ink Cartridges on the Fly Small Footprint Performance and Speed Large Separate Ink Cartridges 5“ Color Display USB Enabled Print and File Queue Processing Mobile Troubleshooting Problems with Poor Quality Printing If the vertical lines are not alligned properly, you may need to do a pen allignment on your printer. If the plot leaves strips where there ink should have printed it is possible that a pen nozzle is plugged. You may need to run the pen clean from the menu on the LCD panel. 49 Limitation of Liability The Imaging Systems Group’s total liability to the purchaser, or to any third party, for damages from any and all causes whatsoever, regardless of the form of action, whether in contract or in tort, including negligence, and any infringement of proprietary rights or any misappropriation or unlawful use of any proprietary rights or property of any third party shall, in the aggregate, be limited to purchase price actually paid by the purchaser for the product relating to the damages. The limitation of liability provisions of this agreement reflect an informed voluntary allocation of the risks (known and unknown) that may exist in connection with the provisions of the goods and services provided hereunder by The Imaging Systems Group Inc., and that such voluntary risk allocation represents a fundamental part of the agreement reached between The Imaging Systems Group Inc. and the purchaser. The Imaging Systems Group Inc. shall not be liable for any special, direct or indirect, incidental, consequential, exemplary, punitive or any similar or other damages of any nature suffered by the purchaser whatsoever including, without limitation, loss of use or lack of availability of the purchaser facilities, including its computer resources and any stored data, loss of profits or revenue, or other commercial loss, or any claim for contribution or indemnity in respect of any claims against the purchaser, regardless of whether The Imaging Systems Group Inc. has been advised of the possibility of such damages. The Imaging Systems Group Inc. 911 28 Street NE Calgary, Alberta, Canada T2A 7X1 Phone: 1-403-204-5200 Fax: 1-403-204-1971 Toll Free: 1-866-415-4797 e-mail: [email protected] www.isys-group.com 50 iTerra IJ875 Warranty iSys - The Imaging Systems Group Inc. (iSys) warrants the iTerra IJ875 Color Inkjet Printer (Product) to be free from defects in materials and workmanship and will remedy any such defect according to the terms of this Limited Warranty. iSys warrants the Product to be free from defects in material and workmanship occurring under normal usage, within the normal operating range and duty cycles specified. If the iSys Customer Service Representative Department receives notice of such defects during the warranty period, iSys at its option, and within a reasonable time, will repair or replace the defective Product. A certified iSys service representative shall perform repairs, and such repairs, at the option of iSys, may be performed at the customer site, a dealer site, a service depot or the factory. Replacement Product, at the option of iSys, may be either new or equivalent in performance to new. Delivery is defined by a signed and dated receipt from the original carrier or iSys dealer delivering the Product, or down time for the repair and replacement. iSys does not warrant the operation of the Product to be uninterrupted or error free. iSys assumes no liability for and holds itself harmless against any claims of consequential costs or damages which may arise from interruption or error in the operation of the Product. iSys does not warrant defects, malfunctions and/or failures, which in its opinion, result from conditions of improper use, abuse, neglect, operation outside the published environmental specifications, improper site preparation and maintenance, the use of unqualified or unauthorized media (papers, films, toners, inks, fusers or belts), inadequate preventative maintenance, unauthorized modifications or unauthorized maintenance. Such conditions shall render this warranty void and otherwise release iSys from its liability under this Product warranty. Consumables are non-warranty items. All product returned to factory must be accompanied by an RMA number, obtained by calling the iSys Service Department at 403.204.5200. Shipping and handling charges to vendor for repair are the sole responsibility of the customer. iSys will cover shipping charges on the return of the repaired unit for the term of the warranty as stated above. Shipping will consist of Standard Shipment level or Best Effort. Accelerated or Premium Shipping Service is available but costs will be fully born by customer. Any international duties and taxes payable on transporting the repaired unit across international borders will be the responsibility of the customer. The iTerra IJ875 Color Inkjet Printer is a Canadian made product and therefore falls under the import/export laws of NAFTA. iSys is willing to license the software for the iTerra IJ875 to you only upon the condition that you accept all of the terms contained in this agreement. By using this software, you accept the terms of the agreement. "Software" means iTerra IJ875 machine readable materials (including, but not limited to, libraries, source files, header files, and data files), any updates or error corrections provided by iSys, and any user manuals, programming guides and other documentation provided to you by iSys. Software is confidential and copyrighted. Title to Software and all associated intellectual property rights is retained by iSys and/or its licensors. Unless enforcement is prohibited by applicable law, you may not modify, decompile, or reverse Software. To the extent not prohibited by law, in no event will iSys or its licensors be liable for any lost revenue, profit or data, or for special, indirect, consequential, incidental or punitive damages, however caused regardless of the theory of liability, arising out of or related to the use of or inability to use software, even if iSys has been advised of the possibility of such damages. iSys will make no attempt to recover data stored on any memory device within the IJ875 printer. iSys will make no guarantees that the licensed software included with the IJ875 will operate error free. iSys will not be responsible with any such occurrence whatsoever for any software not supplied by iSys. A written receipt for the Product, showing the date of purchase, dealer’s name, and both the model and serial numbers of the Product must accompany any request or claim for work to be performed under this Limited Warranty. Additional information on obtaining service under this Limited Warranty or for obtaining Extended Warranty coverage contact iSys – The Imaging Systems Group directly at 866.415.iSys (4797) or at 403.204.5200. iSys will repair, or at its option replace, at no charge, any defective component(s) of the Product within six months from the date of purchase. The Print Engine Component is considered a consumable item and is only warranted to 60,000 cut sheets or 55,000 feet. This Limited Warranty extends to the original purchaser only. This Limited Warranty does not extend to consumable items. TO THE EXTENT ALLOWED BY LOCAL LAW, THIS WARRANTY IS EXCLUSIVE AND NO OTHER WARRANTY OR CONDITION, WHETHER WRITTEN OR ORAL, IS EXPRESSED OR IMPLIED AND THE IMAGING SYSTEMS GROUP INC. SPECIFICALLY DISCLAIMS ANY IMPLIED WARRANTIES INCLUDING, BUT NOT LIMITED TO, WARRANTIES OF MERCHANTABILITY, FITNESS FOR A PARTICULAR PURPOSE AND QUALITY SATISFACTION. THE WARRANTY TERMS CONTAINED HEREIN, EXCEPT TO THE EXTENT LAWFULLY PREMITTED, DO NOT EXCLUDE, RESTRICT OR MODIFY AND ARE IN ADDITION TO APPLICABLE STATUTORY RIGHTS. USE OF THE PRODUCT CONSTITUTES ACCEPTANCE OF THIS WARRANTY. Corporate Headquarters: iSys – The Imaging Systems Group In 911-28th Street NE Calgary AB T2A 7 www.isys-group.com 51