1
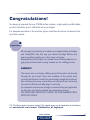
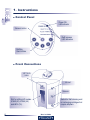
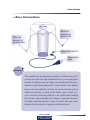
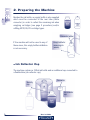
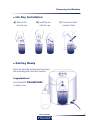
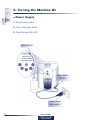
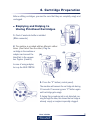
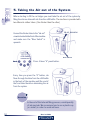
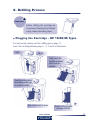
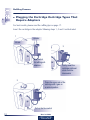
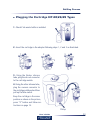
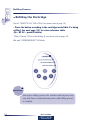
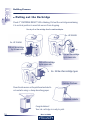
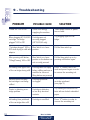
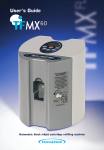
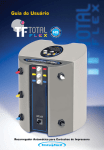
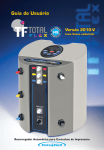
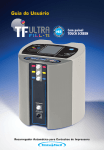
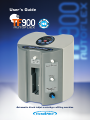
User’s Guide
Automatic black inkjet cartridge refilling machine
Congratulations!
You have just acquired the new TF900AutoFlex machine, a high quality and affordable
product that allows you to refill black ink jet cartridges.
For adequate operation of the machine, please read the instructions contained in this
operation manual.
Important!
We strongly recommend you to always use original empty cartridges
and ‘Ready2Fill’ inks, this way you extend cartridge lifetime and
improve printing quality even after many recharges.
Remanufactured cartridges can contain traces of bad quality ink, clogging the printhead and causing troubles on the refilling process.
WARNING!!!
This device has a cartridge refilling system that pushes ink directly
through the print head. Some inks available on the market have
viscosity that hinders the ink from penetrating through the printhead,
thus straining the pump, connections and internal hoses, lessening
the machine lifetime and affecting it’s warranty.
For adequate operation we strongly reccomend using our pigmented
ink that was specially formulated and exhaustively tested.
DYE BASED INKS ABSOLUTELY CANNOT BE USED! WARRANTY WILL
SIMPLY BE VOIDED!
P.S.: This Manual guide is frequently updated. The updated version can be downloaded at the following
link: www.tintafacil.com.br/manual_TF900AutoFlex_HS_English.pdf
User’s Guide
3
1. Instructions
●
Control Panel
Power ON
LED indicator
Vacuum button
Refill process
LED indicators
Refilling
Start buttons
●
Front Connections
HP 15/45
ink in
Ink out
Vacuum
Slot for refilling HP models:
51640 (40), 51645 (45)
and 6615 (15).
4
Switch for Self-cleaning and/
or recharging cartridges that
require adapters.
User’s Guide
Instructions
●
Rear Connections
Black tube
connector for
black ink refill
White tube
connector for
ink waste bottle
Power Switch ON/OFF
Power source
cable
Attention!
This machine was developed exclusively for professional use. If
you are not an ink cartridge remanufacturer or you are using this
machine to refill your own cartridges, you must know that the provided ink is high density pigmented. In case of leaks or ink spilling,
we are not responsible for ink stains on woven materials such as
clothes and carpets, or furniture like tables, chairs, shelfs, etc.,
as it’s removal is extremely difficult, so be careful when handling
the machine, and preferably use it always on appropriate place,
if possible with latex gloves. In case of contact with eyes, wash
abundantly with water and request medical assistance.
User’s Guide
5
2. Preparing the Machine
Besides the ink bottle, an empty bottle is also supplied
which must be connected to the rear tube (white
connector) in order to collect the remaining ink when
emptying cartridges (see page 9 procedure) and/or
refilling HP20/26/29 cartridge types.
Connector (white)
If the machine will not be used in any of
these cases, this empty bottle installation
is not necessary.
●
Empty bottle for
remaining ink
(waste).
Ink Collector Cap
The machine contains a 250ml ink bottle and an additional cap connected to
a flexible tube (ink collector cap).
Connector
Security
cap
Ink collector
cap
6
User’s Guide
Preparing the Machine
●
Ink Cap Installation
A)Remove the
security cap.
●
B)Install the ink
collector cap.
C)Connect the black
connector tube.
Getting Ready
Place the ink bottle as illustrated and insert
the exceeding tube inside the machine.
Congratulations!
Your Ready2Fill TF900AUTOFLEX
is ready to use.
User’s Guide
7
3. Turning the Machine On
●
Power Supply
1. Plug the power cable.
2. Turn on the power switch.
3. Check if power LED is ON.
Power ON LED
Power Switch
(ON/OFF)
Power source
plug insertion
8
User’s Guide
4. Cartridge Preparation
Before refilling cartridges, you must be sure that they are completly empty and
unclogged.
Emptying and Helping to
Unclog Printhead Cartridges
●
1. Check if waste ink bottle is installed.
(White connector)
2. The machine is provided with two diferents caliber
tubes. (One thicker than the other). Plug the
cartridge in the machine or
adaptor and connect the
(A)
tube(thin) to the vacuum
luer. Figures (A and B).
(B)
In case of using adaptor,
turn up the BLUE SWITCH.
3. Press the “V” button (control panel).
The machine will vacuum the cartridge ink during
30 seconds. If necessary press “V” button again
until cartridge gets empty.
If during this procedure ink is not detected running through the tube, this shows that cartridge is
already empty or maybe irreparably clogged.
User’s Guide
9
5. Taking the Air out of the System
Before starting to fill the cartridges you must take the air out of the system by
filling the silicone tube with ink from the refill bottle. The machine is provided with
two diferents caliber tubes. (One thicker than the other)
Connect the thicker tube to the “ink out”
conector located in the front of the machine
and make sure the “Blue Switch” is
upwards.
Ink out connector
Blue Switch
Press 4 times “A” panel button.
Every time you press the “A” button, ink
flows through the tube from the refill bottle
in the back of the machine until the end of
the front tube therefore eliminating the air
from the system.
Atention
In the end of this tube ink filling process, a small quantity
of ink may leak. We recommend you to use a plastic cup
(or similar) in order to avoid ink mess.
10
User’s Guide
6. Refilling Process
Important!
Before refilling the cartridge we
recommend cleaning the printhead
using a damp absorbing paper.
●
Plugging the Cartridge - HP 15/40/45 Types
For best results, please read the refilling tips on page 17.
Insert the cartridge following steps 1, 2, 3 and 4 as illustrated..
Ink in
Ink out
Firstly, insert the
cartridge printhead
which must be
upwards
1
2
Press the bottom side of
the cartridge until it gets
on a vertical position
4
3
Blue switch must be down
User’s Guide
Position of the puggled
cartridge (Vertical)
11
Refilling Process
Plugging the Cartridge Cartridge Types That
Require Adaptors
●
For best results, please read the refilling tips on page 17.
Insert the cartridge in the adaptor following steps 1, 2 and 3 as illustrated.
1
Adaptor
Ink out
2
Blue Switch
for refilling with
adaptors
3
Press the upper side of the
cartridge until it gets on
a vertical position
Pull up the blue switch
12
Firstly, insert the
cartridge printhead
which must be
downwards
User’s Guide
Refilling Process
Plugging the Cartridge HP 20/26/29 Types
●
1. Check if ink waste bottle is installed.
2. Insert the cartridge in the adaptor following steps 1, 2 and 3 as illustrated.
1
2
3
3. Using the thicker silicone
tube, plug the ink out connector
to the cartridge nozzle.
4. Using the other silicone tube,
plug the vacuum connector to
the cartridge printhead and then
pull up the blue switch.
Keep the cartridge in the same
position as shown in the picture,
press “E” button and follow instructions on page 16.
Pull up
User’s Guide
13
Refilling Process
●
Refilling the Cartridge
Check if “READY TO FILL” LED is ON.(if not, please refer to page 18).
- Press the button according to the cartridge model that it’s being
refilled. See next page(15) for cross-reference table.
(Ex.: HP 92 - press B botton)
“Filling / Priming” LED must be blinking (if not, please refer to page 18).
Wait until “CARTRIDGE READY” LED blinks.
Attention!
During the refilling process the machine internal pump may
stop and then is reactivated many times untill refilling process
is complete.
14
User’s Guide
Refilling Process
Understanding the Refilling Process and Buttons Function
In the inkjet cartridge market you will find many different cartridge types with variable ink
capacities ranging from 5 to 40 ml.
The TF900AutoFlex machine has 7 different programs which can be activated by pressing
buttons A, B, C, D, E, V and Blue Switch depending on the cartridge type or operation. See the
following cross reference table to help finding the correct button that must be activated:
Cross Reference Table
Button
Function / Cartridge Types
Aproximatly 1ml ink is pumped. (Used to take the air out of the tubes by filling it with ink(page
10) and/or when operator wants to add more ink into the cartridge after filling).
Automatic refilling for cartridge models HP 21 / 74 / 92, Lex 17 and Canon PG-40.
Automatic refilling for cartridge models HP 21 / 27 / 94 / 98 and Lex 16.
Automatic refilling for cartridge models HP 56 / 74XL / 96 and Canon BC02.
Automatic refilling for cartridge models HP 15 / 20 / 26 / 29 / 40 / 45 and Lex 50 / 70.
Vacuum activation (3 seconds at the ink out connector and simoutaneously 10 seconds at the
vacuum connector). Used for emptying the cartridge and/or priming cartridges that exhibits
ink leak from printhead when overfilled. On both cases, Blue Switch must be upward.
Blue Switch
In lower position: Machine is ready to fill HP 15 / 40 / 45 cartridge types.
In upper position: Machine is ready to fill cartridges that require adapters.
When pressed down, activates Self-cleaning pumping ink towards the bottles (automatic
stop after 7 seconds).
P.S.: Pressing B, C, D and E buttons the refilling process is automatic, after its activation,
just wait until “CARTRIDGE READY” blinks.
User’s Guide
15
Refilling Process
●
Pulling out the Cartridge
Check if “CARTRIDGE READY” LED is blinking. Pull out the cartridge maintaining
it in vertical position to avoid ink excess from dropping.
How to pull out the cartridge from the machine/adaptor
Ex.: HP 20/26/29
Ex.: HP 15/40/45
Pull out the cartridge
by its lower side.
Pull out the cartridge
by its lower side.
Pull out the cartridge
by its upper side.
Ex.: All the other cartridge types
Cartridge Printhead
Clean the ink excess on the printhead and electrical contacts using a damp absorbing paper.
Electrical contacts
Congratulations!
Your ink cartridge is ready to print.
16
User’s Guide
8 - Refilling Tips
●
Very Important
1. Always recharge your cartridge as soon as it gets empty. Never leave the
cartridge empty for a long period of time to avoid dry ink from clogging the
printhead, damaging the cartridge or affecting print quality.
2. In case of leaks or ink spilling, we are not responsible for ink stains on woven
materials such as clothes and carpets, or furniture like tables, chairs, shelfs,
etc., as it’s removal is extremely difficult, so be careful when handling the
machine, and preferably use it always on appropriate place, if possible with
latex gloves. In case of contact with eyes, wash abundantly with water and
request medical assistance.
3. Before refilling the cartridge we recommend cleaning the printhead using
a damp absorbing paper in order to remove dried ink clogs.
4. After refilling, clean the ink excess on the printhead and electrical contacts
using a damp absorbing paper. The electrical contacts are responsible for
cartridge communication with the printer, when they are dirty the printer
can reject the cartridge accusing that it has a problem (printer LEDs could
blink).
5. Be careful when handling the cartridges. Kicks or falls, even light ones can
damage the electrical cartridge parts, making it useless.
User’s Guide
17
9 - Troubleshooting
PROBLEM
“Power On” LED is OFF.
POSSIBLE CAUSE
There is no energy
supplying the machine.
SOLUTION
Check power source or power
source cable.
When plugging HP15/40/45 Cartridge was not
correctly plugged
cartridge “Cartridge
(HP15/40/45 only).
plugged” LED is OFF.
Try plugging again the cartridge.
“Cartridge plugged” LED is Blue Switch is in lower
OFF when trying to refill with position.
adaptor.
Pull the blue switch up.
Pull the blue switch up or try
After pressing refill button, Blue Switch is in lower
“Filling/Priming” LED is OFF. position or the button was pressing refill button again.
not correctly pressed.
Ink leaking from upper side Cartridge was not empty
of the cartridge during refill. before refilling and now is
overfilled or incorrect
filling button was pressed
18
Press “V” button, wait 5 seconds and press it again in order
to remove the exceeding ink.
Machine works normally
but cartridge is not being
refilled.
Cartridge printhead
is clogged.
Try to apply vacuum on the
cartridge printhead.
(see page 9)
Printer is detecting a cartridge problem.
Cartridge is defective
or has dirty electrical
contacts.
Try cleaning the electrical contacts with an alcohol embedded
paper.
Ink leaking from printhead
of the cartridge after refill.
Cartridge is overfilled.
Press “V” button, in order to
remove the exceeding ink.
User’s Guide