1
User's Guide
REFERENCE
86 A2 45FD 01
extreme computing
SLURM V2.2
extreme computing
SLURM V2.2
User's Guide
Software
July 2010
BULL CEDOC
357 AVENUE PATTON
B.P.20845
49008 ANGERS CEDEX 01
FRANCE
REFERENCE
86 A2 45FD 01
The following copyright notice protects this book under Copyright laws which prohibit such actions as, but not limited
to, copying, distributing, modifying, and making derivative works.
Copyright © Bull SAS 2010
Printed in France
Trademarks and Acknowledgements
We acknowledge the rights of the proprietors of the trademarks mentioned in this manual.
All brand names and software and hardware product names are subject to trademark and/or patent protection.
Quoting of brand and product names is for information purposes only and does not represent trademark misuse.
The information in this document is subject to change without notice. Bull will not be liable for errors
contained herein, or for incidental or consequential damages in connection with the use of this material.
Table of Contents
Preface ............................................................................................................................ix
Chapter 1.
SLURM Overview..................................................................................... 1
1.1
SLURM Key Functions......................................................................... 1
1.2
SLURM Components .......................................................................... 2
1.3
SLURM Daemons............................................................................... 2
1.3.1
SLURMCTLD ............................................................................................................. 2
1.3.2
SLURMD .................................................................................................................. 4
1.3.3
SlurmDBD (SLURM Database Daemon) ........................................................................ 4
1.4
Scheduler Types ................................................................................ 5
1.5
The slurm.conf configuration file .......................................................... 6
1.6
SCONTROL – Managing the SLURM Configuration ................................ 7
Chapter 2.
Installing and Configuring SLURM............................................................. 9
2.1
Installing SLURM ............................................................................... 9
2.2
Configuring SLURM on the Management Node...................................... 9
2.2.1
Create and Modify the SLURM configuration file .......................................................... 9
2.2.2
Setting up a slurmdbd.conf file ................................................................................. 14
2.2.3
MySQL Configuration.............................................................................................. 15
2.2.4
Setting up a topology.conf file.................................................................................. 15
2.2.5
Final Configuration Steps......................................................................................... 16
2.2.6
Completing the Configuration of SLURM on the Management Node Manually ............... 16
2.3
Configuring SLURM on the Reference Node ........................................ 17
2.3.1
Using the slurm_setup.sh Script ................................................................................. 17
2.3.2
Manually configuring SLURM on the Reference Nodes ................................................ 19
2.3.3
Starting the SLURM Daemons on a Single Node ......................................................... 20
2.4
Check and Start the SLURM Daemons on Compute Nodes..................... 20
2.5
Configuring Pam_Slurm Module ........................................................ 21
2.6
Installing and Configuring Munge for SLURM Authentication (MNGT) ..... 21
2.6.1
Introduction ............................................................................................................ 21
2.6.2
Creating a Secret Key ............................................................................................. 22
Preface
iii
2.6.3
Starting the Daemon ................................................................................................ 23
2.6.4
Testing the Installation.............................................................................................. 23
Chapter 3.
Administrating Cluster Activity with SLURM ............................................. 25
3.1
The SLURM Daemons ...................................................................... 25
3.2
Starting the Daemons ...................................................................... 25
3.3
SLURMCTLD (Controller Daemon) ...................................................... 26
3.4
SLURMD (Compute Node Daemon) ................................................... 27
3.5
SLURMDBD (Slurmd Database Daemon) ............................................. 28
3.6
Node Selection .............................................................................. 28
3.7
Logging......................................................................................... 28
3.8
Corefile Format .............................................................................. 29
3.9
Security ......................................................................................... 29
3.10
SLURM Cluster Administration Examples ............................................. 29
Chapter 4.
SLURM High Availability......................................................................... 33
4.1
SLURM High Availability .................................................................. 33
4.1.1
SLURM High Availability using Text File Accounting .................................................... 33
4.1.2
SLURM High Availability using Database Accounting .................................................. 34
4.2
Starting SLURM High Availability ...................................................... 35
4.3
Restoring SLURM High Availability following a Primary Management Node
crash ............................................................................................ 36
Chapter 5.
iv
Managing Resources using SLURM.......................................................... 37
5.1
SLURM Resource Management Utilities............................................... 37
5.2
MPI Support................................................................................... 37
5.3
SRUN ........................................................................................... 39
5.4
SBATCH (batch).............................................................................. 40
5.5
SALLOC (allocation) ........................................................................ 41
5.6
SATTACH....................................................................................... 42
5.7
SACCTMGR................................................................................... 43
SLURM V2.2 - User's Guide
5.8
SBCAST ......................................................................................... 44
5.9
SQUEUE (List Jobs) .......................................................................... 45
5.10
SINFO (Report Partition and Node Information) ................................... 46
5.11
SCANCEL (Signal/Cancel Jobs) ........................................................ 47
5.12
SACCT (Accounting Data) ................................................................ 48
5.13
STRIGGER ...................................................................................... 49
5.14
SVIEW........................................................................................... 50
5.15
Global Accounting API..................................................................... 51
Chapter 6.
Tuning Performances for SLURM Clusters................................................. 55
6.1
Configuring and Sharing Consumable Resources in SLURM ................... 55
6.2
SLURM and Large Clusters ................................................................ 55
6.2.1
Node Selection Plug-in (SelectType) .......................................................................... 55
6.2.2
Job Accounting Gather Plug-in (JobAcctGatherType) ................................................... 55
6.2.3
Node Configuration ................................................................................................ 56
6.2.4
Timers.................................................................................................................... 56
6.2.5
TreeWidth parameter .............................................................................................. 56
6.2.6
Hard Limits............................................................................................................. 56
6.3
SLURM Power Saving Mechanism ...................................................... 56
6.3.1
Configuring Power Saving ....................................................................................... 57
6.3.2
Fault tolerance ........................................................................................................ 59
Chapter 7.
Troubleshooting SLURM .......................................................................... 61
7.1
SLURM does not start ....................................................................... 61
7.2
SLURM is not responding.................................................................. 61
7.3
Jobs are not getting scheduled........................................................... 62
7.4
Nodes are getting set to a DOWN state ............................................. 62
7.5
Networking and Configuration Problems............................................. 63
7.6
More Information ............................................................................ 64
Glossary........................................................................................................................ 65
Index............................................................................................................................. 67
Preface
v
vi
SLURM V2.2 - User's Guide
List of figures
Figure
Figure
Figure
Figure
1-1.
1-2.
4-1.
5-1.
SLURM Simplified Architecture ........................................................................................ 2
SLURM Architecture - Subsystems..................................................................................... 3
SLURM High Availability using Text File Accounting......................................................... 34
MPI Process Management With and Without Resource Manager ...................................... 38
List of tables
Table 1-1.
Table 1-2.
Table 1-3.
Role Descriptions for SLURMCTLD Software Subsystems ..................................................... 3
SLURMD Subsystems and Key Tasks................................................................................. 4
SLURM Scheduler Types ................................................................................................. 5
Preface
vii
Preface
Note
The Bull Support Web site may be consulted for product information, documentation,
downloads, updates and service offers:
http://support.bull.com
Scope and Objectives
A resource manager is used to allocate resources, to find out the status of resources, and to
collect task execution information. Bull Extreme Computing platforms use SLURM, an opensource, scalable resource manager.
This guide describes how to configure, manage, and use SLURM.
Intended Readers
This guide is for Administrators and Users of Bull Extreme Computing systems.
Prerequisites
This manual applies to SLURM versions from version 2.2, unless otherwise indicated.
mportant
The Software Release Bulletin contains the latest information for your delivery.
This should be read first. Contact your support representative for more
information.
Preface
ix
x
SLURM V2.2 - User's Guide
Chapter 1. SLURM Overview
Merely grouping together several machines on a network is not enough to constitute a real
cluster. Resource Management software is required to optimize the throughput within the
cluster, according to specific scheduling policies.
A resource manager is used to allocate resources, to find out the status of resources, and to
collect task execution information. From this information, the scheduling policy can be
applied. Bull Extreme Computing platforms use SLURM, an Open-Source, scalable resource
manager.
1.1
SLURM Key Functions
As a cluster resource manager, SLURM has three key functions. Firstly, it allocates exclusive
and/or non-exclusive access to resources (Compute Nodes) to users for some duration of
time so they can perform work. Secondly, it provides a framework for starting, executing,
and monitoring work (normally a parallel job) on the set of allocated nodes. Finally, it
arbitrates conflicting requests for resources by managing a queue of pending work.
Optional plug-ins can be used for accounting, advanced reservation, backfill scheduling,
resource limits by user or bank account, and sophisticated multifactor job prioritization
algorithms.
Users interact with SLURM using various command line utilities:
See
•
SRUN to submit a job for execution
•
SBCAST to transmit a file to all nodes running a job
•
SCANCEL to terminate a pending or running job
•
SQUEUE to monitor job queues
•
SINFO to monitor partition and the overall system state
•
SACCTMGR to view and modify SLURM account information. Used with the slurmdbd
daemon
•
SACCT to display data for all jobs and job steps in the SLURM accounting log
•
SBATCH for submitting a batch script to SLURM
•
SALLOC for allocating resources for a SLURM job
•
SATTACH to attach to a running SLURM job step.
•
STRIGGER used to set, get or clear SLURM event triggers
•
SVIEW used to display SLURM state information graphically. Requires an XWindows
capable display
•
SREPORT used to generate reports from the SLURM accounting data when using an
accounting database
•
SSTAT used to display various status information of a running job or step
The man pages for the commands above for more information.
Chapter 1. SLURM Overview.
1
System administrators perform privileged operations through an additional command line
utility, SCONTROL.
The central controller daemon, SLURMCTLD, maintains the global state and directs
operations. Compute nodes simply run a SLURMD daemon (similar to a remote shell
daemon) to export control to SLURM.
1.2
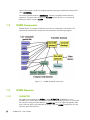
SLURM Components
SLURM consists of two types of daemons and various command-line user utilities. The
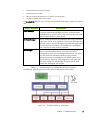
relationships between these components are illustrated in the following diagram:
Figure 1-1. SLURM Simplified Architecture
1.3
1.3.1
SLURM Daemons
SLURMCTLD
The central control daemon for SLURM is called SLURMCTLD. SLURMCTLD is multi –
threaded; thus, some threads can handle problems without delaying services to normal jobs
that are also running and need attention. SLURMCTLD runs on a single management node
(with a fail-over spare copy elsewhere for safety), reads the SLURM configuration file, and
maintains state information on:
2
SLURM V2.2 - User's Guide
•
Nodes (the basic compute resource)
•
Partitions (sets of nodes)
•
Jobs (or resource allocations to run jobs for a time period)
•
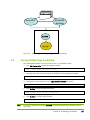
Job steps (parallel tasks within a job).
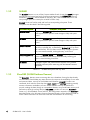
The SLURMCTLD daemon in turn consists of three software subsystems, each with a specific
role:
Software Subsystem
Role Description
Node Manager
Monitors the state and configuration of each node in the cluster.
It receives state-change messages from each Compute Node's
SLURMD daemon asynchronously, and it also actively polls these
daemons periodically for status reports.
Partition Manager
Groups nodes into disjoint sets (partitions) and assigns job limits
and access controls to each partition. The partition manager also
allocates nodes to jobs (at the request of the Job Manager) based
on job and partition properties. SCONTROL is the (privileged)
user utility that can alter partition properties.
Job Manager
Accepts job requests (from SRUN or a metabatch system), places
them in a priority-ordered queue, and reviews this queue
periodically or when any state change might allow a new job to
start. Resources are allocated to qualifying jobs and that
information transfers to (SLURMD on) the relevant nodes so the
job can execute. When all nodes assigned to a job report that
their work is done, the Job Manager revises its records and
reviews the pending-job queue again.
Table 1-1.
Role Descriptions for SLURMCTLD Software Subsystems
The following figure illustrates these roles of the SLURM Software Subsystems.
Figure 1-2. SLURM Architecture - Subsystems
Chapter 1. SLURM Overview.
3
1.3.2
SLURMD
The SLURMD daemon runs on all the Compute Nodes of each cluster that SLURM manages
and performs the lowest level work of resource management. Like SLURMCTLD (previous
subsection), SLURMD is multi-threaded for efficiency; but, unlike SLURMCTLD, it runs with
root privileges (so it can initiate jobs on behalf of other users).
SLURMD carries out five key tasks and has five corresponding subsystems. These
subsystems are described in the following table.
SLURMD Subsystem
Description of Key Tasks
Machine Status
Responds to SLURMCTLD requests for machine state information and
sends asynchronous reports of state changes to help with queue
control.
Job Status
Responds to SLURMCTLD requests for job state information and
sends asynchronous reports of state changes to help with queue
control.
Remote Execution
Starts, monitors, and cleans up after a set of processes (usually
shared by a parallel job), as decided by SLURMCTLD (or by direct
user intervention). This can often involve many changes to processlimit, environment-variable, working-directory, and user-id.
Stream Copy Service
Handles all STDERR, STDIN, and STDOUT for remote tasks. This may
involve redirection, and it always involves locally buffering job
output to avoid blocking local tasks.
Job Control
Propagates signals and job-termination requests to any SLURMmanaged processes (often interacting with the Remote Execution
subsystem).
Table 1-2.
1.3.3
SLURMD Subsystems and Key Tasks
SlurmDBD (SLURM Database Daemon)
The SlurmDBD daemon stores accounting data into a database. Storing the data directly
into a database from SLURM may seem attractive, but requires the availability of user name
and password data, not only for the SLURM control daemon (slurmctld), but also user
commands which need to access the data (sacct, sreport, and sacctmgr). Making possibly
sensitive information available to all users makes database security more difficult to
provide, sending the data through an intermediate daemon can provide better security and
performance (through caching data) and SlurmDBD provides such services. SlurmDBD is
written in C, multi-threaded, secure and fast. The configuration required to use SlurmDBD is
described further in this document. Storing information directly into the database would be
similar. More information can be found in the LLNL documentation for accounting.
4
SLURM V2.2 - User's Guide
1.4
Scheduler Types
The system administrator for each machine can configure SLURM to invoke one of several
alternative local job schedulers. To determine which scheduler SLURM is currently invoked
on any machine, execute the following command:
scontrol show config |grep SchedulerType
where the returned string will have one of the values described in the following table.
Returned String
Value
builtin
Description
A first-in-first-out scheduler. SLURM executes jobs strictly in the order
in which they were submitted (for each resource partition), unless
those jobs have different priorities. Even if resources become
available to start a specific job, SLURM will wait until there is no
previously-submitted job pending (which sometimes confuses
impatient job submitters).
This is the default.
backfill
Modifies strict FIFO scheduling to take advantage of resource
islands that may appear as earlier jobs complete. SLURM will start
jobs submitted later out of order when resources become available,
and if doing so does not delay the execution time in place for any
earlier-submitted job. To increase the job's chances of benefiting
from such backfill scheduling:
(1)
Specify reasonable time limits (the default is the same time
limit for all jobs in the partition, which may be too large), and
(2)
wiki
Avoid requiring or excluding specific nodes by name.
Uses the Maui Scheduler, with a sophisticated set of internal
scheduling algorithms. This choice can be configured in several
ways to optimize job throughput. Details are posted on a support
web site at the following URL:
http://supercluster.org/maui
gang
Gang scheduling involves time-slicing for parallel jobs. Jobs that
share resources in the same partition will be suspended and
resumed in turn so that all jobs make progress. Usually these will
be threads belonging to the same process, but they may also be
from different processes. Gang scheduling is used so that if two
threads or processes communicate with each other, they will be
ready to communicate at the same time. The slurm.conf parameter,
SchedulerTimeSlice, controls the duration of the gang scheduler
time slices.
hold
Hold scheduling places all new jobs in a file. If the file exists, it will
hold all the jobs otherwise SLURM defaults to the built-in FIFO as
described in the builtin section.
Table 1-3.
SLURM Scheduler Types
Chapter 1. SLURM Overview.
5
1.5
The slurm.conf configuration file
The SLURM configuration file, slurm.conf, is an ASCII file that describes the following:
•
•
•
•
•
General SLURM configuration information
The nodes to be managed
Information about how those nodes are grouped into partitions
Various scheduling parameters associated with those partitions.
Various accounting parameters associated with the type of accounting used.
The SLURM configuration file includes a wide variety of parameters. This configuration file
must be available on each node of the cluster.
The slurm.conf file should define at least the configuration parameters as defined in the
examples provided and any additional ones that are required. Any text following a ‘#’ is
considered a comment. The keywords in the file are not case sensitive, although the
argument usually is (e.g., "SlurmUser=slurm" might be specified as "slurmuser=slurm"). Port
numbers to be used for communications are specified as well as various timer values.
A description of the nodes and their grouping into partitions is required. A simple node
range expression may be used to specify a range of nodes to avoid building a
configuration file with a large numbers of entries. The node range expression can contain
one pair of square brackets with a sequence of comma separated numbers and/or ranges
of numbers separated by a "-" (e.g. "linux[0-64,128]", or "lx[15,18,32-33]").
Node names can have up to three name specifications: NodeName is the name used by
all SLURM tools when referring to the node, NodeAddr is the name or IP address SLURM
uses to communicate with the node, and NodeHostname is the name returned by the
/bin/hostname -s command. Only NodeName is required (the others default to the same
name), although supporting all three parameters provides complete control over the naming
and addressing the nodes.
Nodes can be in more than one partition, with each partition having different constraints
(permitted users, time limits, job size limits, etc.). Each partition can thus be considered a
separate queue. Partition and node specifications use node range expressions to identify
nodes in a concise fashion. An annotated example configuration file for SLURM is provided
with this distribution in /etc/slurm/slurm.conf.example. Edit this configuration file to suit the
needs of the user cluster, and then copy it to /etc/slurm/slurm.conf.
Configuration Parameters
Refer to the slurm.conf man page, using the command below, for configuration details,
options, parameter descriptions, and configuration file examples.
Example:
$ man slurm.conf
6
SLURM V2.2 - User's Guide
1.6
SCONTROL – Managing the SLURM Configuration
SCONTROL manages available nodes (for example, by "draining" jobs from a node or
partition to prepare it for servicing). It is also used to manage the SLURM configuration and
the properties assigned to nodes, node partitions and other SLURM-controlled system
features.
Notes
•
Most SCONTROL options and commands can only be used by System Administrators.
Some SCONTROL commands report useful configuration information or manage job
checkpoints, and any user can benefit from invoking them appropriately.
•
The option 'Shared=YES or NO' in job level is related with the permission of sharing a
node, whereas the option 'Shared= YES, NO or FORCE' in partition level is related
with the permission of sharing a specific resource (which means node, socket, core or
even thread).
NAME
SCONTROL - Used to view and modify SLURM configuration and state.
SYNOPSIS
SCONTROL
[OPTIONS...] [COMMAND...]
DESCRIPTION
SCONTROL is used to view or modify the SLURM configuration including: job, job step,
node, partition, reservation, and overall system configuration. Most of the commands can
only be executed by user root. If an attempt to view or modify configuration information is
made by an unauthorized user, an error message will be printed and the requested action
will not occur. If no command is entered on the execute line, SCONTROL will operate in
an interactive mode and prompt for input. It will continue prompting for input and
executing commands until explicitly terminated. If a command is entered on the execute
line, SCONTROL will execute that command and terminate. All commands and options
are case-insensitive, although node names and partition names are case-sensitive (node
names "LX" and "lx" are distinct). All commands and options can be abbreviated to the
extent that the specification is unique.
OPTIONS
For options, examples and details please refer to the man page.
Example:
$ man scontrol
Chapter 1. SLURM Overview.
7
8
SLURM V2.2 - User's Guide
Chapter 2. Installing and Configuring SLURM
This chapter describes how to install and configure SLURM on the Management node and
on the Reference Node.
2.1
Installing SLURM
If not already installed, install SLURM on the Management Node and on the Reference
Nodes as described in the Installation and Configuration Guide related to your software.
2.2
2.2.1
Configuring SLURM on the Management Node
Create and Modify the SLURM configuration file
A SLURM configuration file must be created using the parameters that describe the cluster.
The /etc/slurm/slurm.conf.example file can be used as a template to create the
/etc/slurm/slurm.conf file for the cluster.
The slurm.conf file can be created manually from the template described above, OR the
tool found at /usr/share/doc/slurm-<current-release>/html/configurator.html can be used
to help define the necessary parameters. This tool is an HTML file that, when loaded into a
browser (e.g. FireFox), will generate a slurm.conf file in text format using the parameters
supplied by the user. The generated file can be saved, or cut/pasted into a text editor if the
configuration details need to be modified.
Whether generated manually, or by the configurator.html tool, the slurm.conf file must
contain the following information:
1.
The name of the machine where the SLURM control functions will run. This will be the
Management Node, and will be set as shown in the example below.
ClusterName=<clustername>
ControlMachine=<basename>
ControlAddr=<basename>
2.
The SlurmUser and the authentication method for the communications:
−
Using munge (recommended):
SlurmUser=slurm
AuthType=auth/munge
−
Or using no authentication (not recommended):
SlurmUser=slurm
AuthType=auth/none
3.
The type of switch or interconnect used for application communications.
SwitchType=switch/none
4.
# used with Ethernet and InfiniBand
Any port numbers, paths for log information and SLURM state information. If they do
not already exist, the path directories must be created on all of the nodes. If these are
not set, all logging information will go to the scontrol log.
SlurmctldPort=6817
SlurmdPort=6818
Chapter 2. Installing and Configuring SLURM
9
SlurmctldLogFile=/var/log/slurm/slurmctld.log
SlurmdLogFile=/var/log/slurm/slurmd.log.%h
StateSaveLocation=/var/log/slurm/log_slurmctld
SlurmdSpoolDir=/var/log/slurm/log_slurmd/
5.
Provide scheduling, resource requirements and process tracking details:
SelectType=select/linear
SchedulerType=sched/backfill
# we recommend using the backfill
scheduler
ProctrackType=proctrack/linuxproc
6.
Activate the mechanism used to automatically preempt jobs:
−
PreemptMode: Configure to CANCEL, CHECKPOINT, SUSPEND or REQUEUE
depending on the desired action for low priority jobs.
•
•
•
•
−
CANCEL will always cancel the job.
CHECKPOINT will checkpoint (if possible) or kill low priority jobs.
Checkpointed jobs are not automatically restarted.
REQUEUE will requeue (if possible) or kill low priority jobs. Requeued jobs
are permitted to be restarted on different resources.
SUSPEND will suspend and automatically resume the low priority jobs.
The SUSPEND option must be used with the GANG option (for example:
"PreemptMode=SUSPEND,GANG").
PreemptType: Configure to the desired mechanism used to identify which jobs can
preempt other jobs.
•
•
•
preempt/none indicates that jobs will not preempt each other (default).
preempt/partition_prio indicates that jobs from one partition can preempt
jobs from lower priority partitions.
preempt/qos indicates that jobs from one Quality Of Service (QOS) can
preempt jobs from a lower QOS.
−
Priority: Configure the partition's Priority setting relative to other partitions to
control the preemptive behavior when PreemptType=preempt/partition_prio. If
two jobs from two different partitions are allocated to the same resources, the job
in the partition with the greater Priority value will preempt the job in the partition
with the lesser Priority value. If the Priority values of the two partitions are equal
then no preemption will occur. The default Priority value is 1.
−
Shared: Configure the partition's Shared setting to FORCE for all partitions in
which job preemption is to take place. The FORCE option supports an additional
parameter that controls how many jobs can share a resource
(FORCE[:max_share]). By default the max_share value is 4. In order to preempt
jobs (and not gang schedule them), always set max_share to 1. To allow up to 2
jobs from this partition to be allocated to a common resource (and gang
scheduled), set Shared=FORCE:2.
To enable preemption after making the configuration changes described above, restart
SLURM if it is already running. Any change to the plugin settings in SLURM requires a
full restart of the daemons. If you just change the partition Priority or Shared setting,
this can be updated with scontrol reconfig.
10
SLURM V2.2 - User's Guide
Example: configuration of preemption with suspend/resume into slurm.conf:
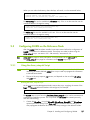
…..
PreemptMode=suspend,gang
PreemptType=preempt/partition_prio
…..
PartitionName=Low Priority=10 Nodes=dev[87-89] Default=YES State=UP
Shared=FORCE:1
PartitionName=High Priority=100 Nodes=dev[87-89] MaxTime=Infinite
State=UP Shared=FORCE:1
7.
Enable the topology plugin parameter according to the characteristics of your systems
network, to allow SLURM to allocate resources to jobs in order to minimize network
contention and optimize execution performance. Different plugins exist for hierarchical
or three-dimensional torus networks. The basic algorithm is to identify the lowest level
switch in the hierarchy that can satisfy a job's request and then allocate resources on
its underlying leaf switches using a best-fit algorithm. Use of this logic requires a
configuration setting of:
TopologyPlugin=topology/tree (for hierarchical networks) or
TopologyPlugin=topology/3d_torus (for 3D torus networks)
TopologyPlugin=topology/none (default)
The description of your systems network topology should be given in a separate file
called topology.conf as presented in section 2.2.3 MySQL Configuration.
8.
Provide accounting requirements. The path directories must be created on all of the
nodes, if they do not already exist. For Job completion:
SLURM can be configured to collect accounting information for every job and job step
executed. Accounting records can be written to a simple text file or a database.
Information is available about both currently executing jobs and jobs that have already
terminated. The sacct command can report resource usage for running or terminated
jobs including individual tasks, which can be useful to detect load imbalance between
the tasks. The sstat command can be used to status only currently running jobs. It also
can give you valuable information about imbalance between tasks. The sreport
command can be used to generate reports based upon all jobs executed in a
particular time interval.
There are three distinct plugin types associated with resource accounting. We
recommend the first option, and will give examples for this type of configuration. More
information can be found in the official SLURM documentation. Presently job
completion is not supported with the SlurmDBD, but can be written directly to a
database, script or flat file. If you are running with the accounting storage, you may
not need to run this since it contains much of the same information. You may select
both options, but much of the information is duplicated. The SLURM configuration
parameters (in slurm.conf) associated with these plugins include:
•
AccountingStorageType controls how detailed job and job step information is
recorded. You can store this information in a text file, MySQL or PostgreSQL
database, optionally using SlurmDBD for added security.
•
JobAcctGatherType is operating system dependent and controls what
mechanism is used to collect accounting information. Supported values are
jobacct_gather/aix, jobacct_gather/linux and jobacct_gather/none (no
information collected).
Chapter 2. Installing and Configuring SLURM
11
•
JobCompType controls how job completion information is recorded. This can
be used to record basic job information such as job name, user name,
allocated nodes, start time, completion time, exit status, etc. If the preservation
of only basic job information is required, this plugin should satisfy your needs
with minimal overhead. You can store this information in a text file, MySQL or
PostgreSQL database
For accounting, we recommend using the mysql database along with the slurmDBD
daemon.
9.
Provide the paths to the job credential keys. The keys must be copied to all of the
nodes.
Note: If using MUNGE, these keys are ignored.
JobCredentialPrivateKey=/etc/slurm/private.key
JobCredentialPublicCertificate=/etc/slurm/public.key
10. Provide the cryptographic signature tool to be used when jobs are created. You may
use openssl or munge. Munge is recommended:
CryptoType=crypto/openssl
# default is crypto/munge
Or:
AuthType=auth/munge
CryptoType=crypto/munge
Note
The crypto/munge default setting is recommended by Bull, and requires the munge plugin
to be installed.
See section 2.6 Installing and Configuring Munge for SLURM Authentication (MNGT).
11. Provide Compute Node details. Example :
NodeName=bali[10-37] Procs=8 State=UNKNOWN
12. Provide information about the partitions. MaxTime is the maximum wall-time limit for
any job in minutes. The state of the partition may be UP or DOWN.
PartitionName=global Nodes=bali[10-37] State=UP Default=YES
PartitionName=test Nodes=bali[10-20] State=UP MaxTime=UNLIMITED
PartitionName=debug Nodes=bali[21-30] State=UP
13. In order that Nagios monitoring is enabled inside Bull System Manager – HPC Edition,
the SLURM Event Handler mechanism has to be active. This means that the following
line in the SLURM.conf file on the Management Node has to be uncommented, or
added if it does not appear there.
SlurmEventHandler=/usr/lib/clustmngt/slurm/slurmevent
Note
If the value of the ReturnToService parameter in the slurm.conf is set to 0, then when a
node that is down is re-booted, the Administrator will have to change the state of the node
manually with a command similar to that below, so that the node appears as idle and
available for use:
$ scontrol update NodeName=bass State=idle Reason=test
To avoid this, set the ReturnToService parameter to 1 in the slurm.conf file.
12
SLURM V2.2 - User's Guide
See
•
The slurm.conf man page for more information on all the configuration parameters,
including the ReturnToService parameter, and those referred to above.
•
https://computing.llnl.gov/linux/slurm/documentation.html for an example of the
configurator.html tool for SLURM version 2.1.0.and the parameters that it includes.
•
For the mysql accounting database configuration parameters shown below refer to
https://computing.llnl.gov/linux/slurm/accounting.html
slurm.conf file example
ClusterName=incare
ControlMachine=incare
#ControlAddr=
#BackupController=
#BackupAddr=
#
SlurmUser=slurm
#SlurmdUser=root
#SlurmUID=
#SlurmGroup=
#SlurmGID=
#SlurmHome=
SlurmctldPort=6817
SlurmdPort=6818
#AuthType=auth/munge
StateSaveLocation=/var/log/slurm/slurm_state
SlurmdSpoolDir=/var/log/slurm/slurm_spool
SlurmctldPidFile=/var/run/slurmctld.pid
SlurmdPidFile=/var/run/slurmd.pid
ProctrackType=proctrack/linuxproc
#PluginDir=
CacheGroups=0
#FirstJobId=
ReturnToService=0
#MaxJobCount=
#PlugStackConfig=
#PropagatePrioProcess=
#PropagateResourceLimits=
#PropagateResourceLimitsExcept=
#Prolog=
#Epilog=
#SrunProlog=
#SrunEpilog=
#TaskProlog=
#TaskEpilog=
#TaskPlugin=
#TrackWCKey=no
#TreeWidth=50
#
# TIMERS
SlurmctldTimeout=300
SlurmdTimeout=300
InactiveLimit=0
MinJobAge=300
KillWait=30
Waittime=0
#
# SCHEDULING
#SchedulerType=sched/backfill
#SchedulerType=sched/builtin
SelectType=select/linear
FastSchedule=1
#PriorityType=priority/multifactor
Chapter 2. Installing and Configuring SLURM
13
#PriorityDecayHalfLife=14-0
#PriorityUsageResetPeriod=14-0
#PriorityWeightFairshare=100000
#PriorityWeightAge=1000
#PriorityWeightPartition=10000
#PriorityWeightJobSize=1000
#PriorityMaxAge=1-0
#
# LOGGING
CryptoType=crypto/openssl
SlurmctldDebug=5
SlurmctldLogFile=/var/log/slurm/slurmctld.log
SlurmdDebug=5
SlurmdLogFile=/var/log/slurmd.log
JobCompType=jobcomp/none
#JobCompLoc=
#
# ACCOUNTING
########
my sql
AccountingStorageEnforce=limits
AccountingStorageLoc=slurm_acct_db
AccountingStorageType=accounting_storage/slurmdbd
AccountingStoragePort=8544
#AccountingStoragePass=slurm
JobAcctGatherType=jobacct_gather/linux
JobAcctGatherFrequency=30
#NodeName=linux[1-32] Procs=1 State=UNKNOWN
#PartitionName=debug Nodes=linux[1-32] Default=YES MaxTime=INFINITE
State=UP
NodeName=incare[193,194,196-198,200,204,206] Procs=4 State=UNKNOWN
PartitionName=debug Nodes=incare[193,194,196-198,200,204,206]
Default=YES MaxTime=INFINITE State=UP
2.2.2
Setting up a slurmdbd.conf file
You will need to provide a slurmdbd.conf to configure your database used for accounting.
You will need to configure the init.d to have the slurmdbd start at boot time. An example of
this file can be found under /etc/slurm/slurmdbd.conf.example. An example is also shown
below.
slurmdbd.conf
#
# Example slurmdbd.conf file.
#
# See the slurmdbd.conf man page for more information.
#
# Archive info
#ArchiveJobs=yes
#ArchiveDir="/tmp"
#ArchiveSteps=yes
#ArchiveScript=
#JobPurge=12
#StepPurge=1
#
# Authentication info
AuthType=auth/munge
#AuthInfo=/var/run/munge/munge.socket.2
#
# slurmDBD info
14
SLURM V2.2 - User's Guide
DbdAddr=localhost
DbdHost=localhost
DbdPort=7031
SlurmUser=slurm
MessageTimeout=300
#DebugLevel=4
#DefaultQOS=normal,standby
LogFile=/var/log/slurm/slurmdbd.log
PidFile=/var/run/slurmdbd.pid
PluginDir=/usr/lib/slurm
#PrivateData=accounts,users,usage,jobs
#TrackWCKey=yes
#
# Database info
StorageType=accounting_storage/mysql
StorageHost=localhost
StoragePort=1234
StoragePassword=password
StorageUser=slurm
StorageLoc=slurm_acct_db
2.2.3
MySQL Configuration
While SLURM will create the database automatically you need to make sure the
StorageUser is given permissions in MySQL to do so. As the mysql user, grant privileges to
that user using a command such as (you need to be root):
GRANT ALL ON StorageLoc.* TO 'StorageUser'@'StorageHost';
Example:
− with a default password:
mysql@machu~]$ mysql
mysql> grant all on slurm_acct_db.* TO 'slurm'@'localhost';
−
or with a specified password:
mysql> grant all on slurm_acct_db.* TO 'slurm'@'localhost'
-> identified by 'passwd' with grant option;
2.2.4
Setting up a topology.conf file
In order to configure your systems network topology you will need to activate the necessary
plugin into the slurm.conf file as explained in section 2.2.1 step 7, and provide a
topology.conf. This is an ASCII file which describes the cluster's network topology for
optimized job resource allocation. The file location can be modified at system build time
using the DEFAULT_SLURM_CONF parameter. Otherwise, the file will always be located in
the same directory as the slurm.conf file. Please use the man page to get more complete
information. An example of this file is shown below.
Example
$ man topology.conf
Chapter 2. Installing and Configuring SLURM
15
toplogy.conf Examplpe
##################################################################
# SLURMs network topology configuration file for use with the
# topology/tree plugin
##################################################################
SwitchName=s0 Nodes=dev[0-5]
SwitchName=s1 Nodes=dev[6-11]
SwitchName=s2 Nodes=dev[12-17]
SwitchName=s3 Switches=s[0-2]
2.2.5
Final Configuration Steps
After the SLURM RPMs have been installed, and all the necessary parameters for the cluster
have been defined in the slurm.conf file, a few steps remain before the configuration of
SLURM is complete on the Management Node. These steps can either be done later using
the slurm_setup.sh script which configures both the Reference Nodes and the Management
Node - see section 2.3.1 OR manually now - see section 2.2.6.
2.2.6
Completing the Configuration of SLURM on the Management Node
Manually
These manual steps must be carried out before SLURM is started on any of the cluster nodes
Note
The files and directories used by SLURMCTLD must be readable or writable by the user
SlurmUser (the SLURM configuration files must be readable; the log file directory and state
save directory must be writable).
Create a SlurmUser
The SlurmUser must be created before SLURM is started. The SlurmUser will be referenced
by the slurmctld daemon. Create a SlurmUser on the Compute, Login/IO or Login
Reference nodes with the same uid gid (106 for instance):
groupadd -g 106 slurm
useradd -u 106 -g slurm slurm
mkdir -p /var/log/slurm
chmod 755 /var/log/slurm
The gid and uid numbers do not have to match the one indicated above, but they have to
be the same on all nodes in the cluster.
The user name in the example above is slurm, another name can be used, however it has
to be the same on all nodes in the cluster.
Configure the SLURM job credential keys as root
Unique job credential keys for each job should be created using the openssl program.
These keys are used by the slurmctld daemon to construct a job credential, which is sent to
the srun command and then forwarded to slurmd to initiate job steps.
mportant
16
openssl must be used (not ssh-keygen) to construct these keys.
SLURM V2.2 - User's Guide
When you are within the directory where the keys will reside, run the commands below:
cd /etc/slurm
openssl genrsa -out private.key 1024
openssl rsa -in private.key -pubout -out public.key
The Private.Key file must be readable by SlurmUser only. If this is not the case then use the
commands below to change the setting.
chown slurm.slurm /etc/slurm/private.key
chmod 600 /etc/slurm/private.key
The Public.Key file must be readable by all users. If this is not the case then use the
commands below to change the setting.
chown slurm.slurm /etc/slurm/public.key
chmod 644 /etc/slurm/public.key
2.3
Configuring SLURM on the Reference Node
After the SLURM RPMs have been installed, some steps remain before the configuration of
SLURM is complete on the Reference Nodes. These steps can either be done using the
slurm_setup.sh script - see section 2.3.1 OR manually - see section 2.3.2.
See
2.3.1
slurm.conf man page for more information on the parameters of the slurm.conf file,
and slurm_setup.sh man page for information on the SLURM setup script.
Using the slurm_setup.sh Script
Notes
•
The slurm.conf file must have been created on the Management Node and all the
necessary parameters defined BEFORE the script is used to propagate the information
to the Reference Nodes.
•
The use of the script requires root access, and depends on the use of the ssh, pdcp
and pdsh tools.
Running the slurm_setup.sh script
As the root user on the Management Node, execute the script, supplying the names of the
Login and Compute Reference Nodes to be configured, for example:
/etc/slurm/slurm_setup.sh –n login0,compute0
The SLURM setup script is found in /etc/slurm/slurm_setup.sh and is used to automate and
customize the installation process. The script reads the slurm.conf file created previously
and does the following:
1.
Creates the SlurmUser, using the SlurmUID, SlurmGroup, SlurmGID, and SlurmHome
optional parameter settings in the slurm.conf file to customize the user and group. It
also propagates the identical Slurm User and Group settings to the reference nodes.
Chapter 2. Installing and Configuring SLURM
17
2.
Validates the pathnames for log files, accounting files, scripts, and credential files. It
then creates the appropriate directories and files, and sets the permissions. For user
supplied scripts, it validates the path and warns if the files do not exist. The directories
and files are replicated on both the Management Node and reference nodes.
3.
Creates the job credential validation private and public keys on the Management and
reference nodes.
4.
If auth/munge is selected as the authorization type (AuthType) in the slurm.conf file, it
validates the functioning of the munge daemon and copies the munge key file from the
Management to the reference nodes.
5.
Copies the slurm.conf file from the Management Node to the reference nodes.
Additional slurm_setup.sh script options
The following additional options are available:
slurm_setup.sh -n <reference node list> [-p <slurm user password>]
[-b <slurm base pathname>] [-v] [-u] [-f] [-d]
Options
-n, -N
Comma separated list of Reference Nodes, not including the node on
which the script was invoked. After running the script on the local node,
the script and other files will be copied to the Reference Nodes and
SLURM configured there as well.
-p <slurm user password>
Optional. If there is a need to create a Logon for the slurmuser user
name, a password can be specified that will be applied for slurmuser
on all the nodes of the cluster.
-b <slurl base pathname>
Optional. If SLURM is installed in a directory other than the /usr
default, the path to the install directory should be specified here, (e.g.
/opt/slurm). This also affects the location of the SLURM configuration
file: if -b is not specified, the SLURM configuration file will be accessed
using the default /etc/slurm/slurm.conf path. If -b is specified, the
configuration file will be accessed at
<base_pathname>/etc/slurm.conf.
18
-v
Verbose option. If set, additional progress messages will appear when
the script is executed.
-u
Use-existing-values option; used to suppress warning messages when
the script finds that the SlurmUser, SlurmGroup or Job Credential files
already exist. If this option is not used, a Warning message will
appear when the above items already exist on the ‘initiating node’, and
the user will be asked if he wishes to proceed and run the script on the
‘reference nodes’. Not compatible with the Force (-f) option.
-f, -F
Force option. If slurmuser or slurmgroup already exist on any of the
nodes, this option may be used to force the deletion and recreation of
the user name and group name. Not compatible with the Use-existingvalues (-u) option.
SLURM V2.2 - User's Guide
-d
Note
2.3.2
Debug option. If set, parameters and variable names are displayed
when the script is executed to help debugging.
Skip the next section, which describes how to complete the configuration of SLURM
manually, if the slurm_setup.sh script has been used successfully.
Manually configuring SLURM on the Reference Nodes
If there is a problem with the SLURM setup script, then SLURM can be configured manually
on the Reference Nodes. The following steps are necessary to complete the configuration of
SLURM:
1.
Create a SlurmUser
The SlurmUser must be created before SLURM is started. SlurmUser will be referenced
by the slurmctld daemon. Create a SlurmUser on the Compute, Login/IO or Login
Reference nodes with the same uid gid (106 for instance):
groupadd -g 106 slurm
useradd -u 106 -g slurm slurm
mkdir -p /var/log/slurm
chmod 755 /var/log/slurm
The gid and uid numbers do not have to match the one indicated above, but they have
to be the same on all the nodes in the cluster.
The user name in the example above is slurm, another name can be used, however it
has to be the same on all the nodes in the cluster.
2.
Copy the SLURM configuration file on to the reference nodes
Copy the following files from the Management Node to the Compute, and combined
Login/IO or dedicated Login Reference Nodes.
Note
−
/etc/slurm/slurm.conf
−
public.key (using the same path as defined in the slurm.conf file)
−
private.key (using the same path as defined in the slurm.conf file)
The public key must be on the KSIS image deployed to ALL the Compute Nodes otherwise
SLURM will not start.
3.
Check SLURM daemon directory
Check that the directory used by the SLURM daemon (typically /var/log/slurm) exists
on the Compute, combined Login/IO or dedicated Login Reference Nodes.
4.
Check access rights
Check that all the directories listed in the slurm.conf file exist and that they have the
correct access rights for the SLURM user. This check must be done on the Management
Node, the combined Login/IO or dedicated Login and Compute Reference Nodes.
The files and directories used by SLURMCTLD must have the correct access rights for
the SLURM user. The SLURM configuration files must be readable; the log file directory
and state save directory must be writable.
Chapter 2. Installing and Configuring SLURM
19
2.3.3
Starting the SLURM Daemons on a Single Node
If for some reason an individual node needs to be rebooted, one of the commands below
may be used.
/etc/init.d/slurm start
or
service slurm start
or
/etc/init.d/slurm startclean
Note
2.4
or
service slurm startclean
The startclean argument will start the daemon on that node without preserving saved state
information (all previously running jobs will be purged and the node state will be restored
to the values specified in the configuration file).
Check and Start the SLURM Daemons on Compute Nodes
Check to see if the Slurmctld daemon has started on the Management Node and the
Slurmd daemon has started on the Compute Node by using the commands below.
Note: you need to be root user to run these commands.
1.
Check the daemons have started:
scontrol show node --all
2.
If NOT then start the daemons using the commands below:
−
For the Management Node:
service slurm start
−
For the Compute Nodes:
service slurm start
3.
Verify that the daemons have started by running the scontrol command again.
scontrol show node --all
4.
If you are using the mysql slurm accounting, check to make sure the slurmdbd has
been started.
−
For the Management Node:
service slurmdbd start
−
To verify it is running use the command
service slurmdbd status
20
SLURM V2.2 - User's Guide
2.5
Configuring Pam_Slurm Module
This section describes how to use the pam_slurm module. This module restricts access to
Compute Nodes in a cluster where Simple Linux Utility for Resource Management (SLURM)
is in use. Access is granted to root, any user with a SLURM-launched job currently running
on the node, or any user who has allocated resources on the node according to the SLURM
database.
Use of this module is recommended on any Compute Node where it is desirable to limit
access to just those users who are currently scheduled to run jobs.
For /etc/pam.d/ style configurations where modules reside in /lib/security/, add the
following line to the PAM configuration file for the appropriate service(s) (for example
/etc/pam.d/system-auth):
account
required
/lib/security/pam_slurm.so
If it is necessary to always allow access for an administrative group (for example wheel),
stack the pam_access module ahead of pam_slurm:
account
account
sufficient
required
/lib/security/pam_access.so
/lib/security/pam_slurm.so
Then edit the pam_access configuration file (/etc/security/access.conf):
+:wheel:ALL
-:ALL:ALL
When access is denied because the user does not have an active job running on the node,
an error message is returned to the application:
Access denied: user foo (uid=1313) has no active jobs.
This message can be suppressed by specifying the no_warn argument in the PAM
configuration file.
2.6
Installing and Configuring Munge for SLURM Authentication
(MNGT)
2.6.1
Introduction
This software component is required if the authentication method for the communication
between the SLURM components is munge (where AuthType=auth/munge). On most
platforms, the munged daemon does not require root privileges. If possible, the daemon
must be run as a non-privileged user. This can be controlled by the init script as detailed in
the 2.6.3 Starting the Daemon section below.
See
http://home.gna.org/munge/ for additional information about munge software
By default, the munged daemon uses the following system directories:
•
/etc/munge/
This directory contains the daemon's secret key. The recommended permissions for it
are 0700.
Chapter 2. Installing and Configuring SLURM
21
•
/var/lib/munge/
This directory contains the daemon's PRNG seed file. It is also where the daemon
creates pipes for authenticating clients via file-descriptor-passing. If the file-descriptorpassing authentication method is being used, this directory must allow execute
permissions for all; however, it must not expose read permissions. The recommended
permissions for it are 0711.
•
/var/log/munge/
This directory contains the daemon's log file. The recommended permissions for it are
0700.
•
/var/run/munge/
This directory contains the Unix domain socket for clients to communicate with the
daemon. It also contains the daemon's PID file. This directory must allow execute
permissions for all. The recommended permissions for it are 0755.
These directories must be owned by the user that the munged daemon will run as. They
cannot allow write permissions for group or other (unless the sticky-bit is set). In addition,
all of their parent directories in the path up to the root directory must be owned by either
root or the user that the munged daemon will run as. None of them can allow write
permissions for group or other (unless the sticky-bit is set).
2.6.2
Creating a Secret Key
A security realm encompasses a group of hosts having common users and groups. It is
defined by a shared cryptographic key. Credentials are valid only within a security realm.
All munged daemons within a security realm must possess the same secret key.
By default, the secret key resides in /etc/munge/munge.key. This location can be
overridden using the munged command-line, or via the init script as detailed in the section
Starting the Daemon below.
A secret key can be created using a variety of methods:
•
Use random data from /dev/random or /dev/urandom:
$ dd if=/dev/random bs=1 count=1024 >/etc/munge/munge.key
or
$ dd if=/dev/urandom bs=1 count=1024 >/etc/munge/munge.key
•
Enter the hash of a password:
$ echo -n "foo" | sha1sum | cut -d' ' -f1 >/etc/munge/munge.key
•
Enter a password directly (not recommended):
$ echo "foo" >/etc/munge/munge.key
This file must be given 0400 permissions and owned by the munged daemon user.
22
SLURM V2.2 - User's Guide
2.6.3
Starting the Daemon
Start the daemon by using the init script (/etc/init.d/munge start). The init script sources
/etc/sysconfig/munge, if present, to set the variables recognized by the script.
The OPTIONS variable passes additional command-line options to the daemon; for
example, this can be used to override the location of the secret key (--key-file) or set the
number of worker threads (--num-threads). If the init script is invoked by root, the USER
variable causes the daemon to execute under the specified username; the ‘daemon’ user is
used by default.
2.6.4
Testing the Installation
Perform the following steps to verify that the software has been properly installed and
configured:
1.
Generate a credential on stdout:
$ munge -n
2.
Check if a credential can be decoded locally:
$ munge -n | unmunge
3.
Check if a credential can be decoded remotely:
$ munge -n | ssh <host> unmunge
4.
Run a quick benchmark:
$ remunge
5.
If problems are encountered, verify that the munged daemon is running:
/etc/init.d/munge status
Also, check the log file (/var/log/munge/munged.log) or try running the daemon in
the foreground:
/usr/sbin/munged --foreground
Some error conditions can be overridden by forcing the daemon:
/usr/sbin/munged --force
Chapter 2. Installing and Configuring SLURM
23
24
SLURM V2.2 - User's Guide
Chapter 3. Administrating Cluster Activity with SLURM
3.1
The SLURM Daemons
SLURM consists of two types of daemons.
•
SLURMCTLD is sometimes called the "controller" daemon. It orchestrates SLURM
activities, including queuing of job, monitoring node states, and allocating resources
(nodes) to jobs. There is an optional backup controller that automatically assumes
control in the event that the primary controller fails. The primary controller resumes
control when it is restored to service. The controller saves its state to disk whenever
there is a change. This state can be recovered by the controller at startup time. State
changes are saved so that jobs and other states can be preserved when the controller
moves (to or from a backup controller) or is restarted.
Note that files and directories used by SLURMCTLD must be readable or writable by
the user SlurmUser (the SLURM configuration files must be readable; the log file
directory and state save directory must be writable).
3.2
•
The SLURMD daemon executes on all Compute nodes. It resembles a remote shell
daemon which exports control to SLURM. Because SLURMD initiates and manages user
jobs, it must execute as the user root.
•
The SLURMDBD daemon executes on the management node. It is used to write data to
the slurm accouting database.
Starting the Daemons
The SLURM daemons are initiated at node startup time, provided by the /etc/init.d/slurm
script. If needed, the /etc/init.d/slurm script can be used to check the status of the
daemon, start, startclean or stop the daemon on the node. There is an example of the an
init.d for the slurmdbd dameon under /etc/init.d/slurmdbd.
Once a valid configuration has been set up and installed, the SLURM controller,
SLURMCTLD and SLURMDBD, should be started on the primary and backup control
machines, and the SLURM Compute Node daemon, SLURMD, should be started on each
compute server. The SLURMD daemons need to run as root for production use, but may be
run as a user for testing purposes (obviously no jobs should be running as any other user in
the configuration). The SLURM controller, SLURMCTLD, must be run as the configured
SlurmUser (see the configuration file). The SLURMDBD must be run as the configured
SlurmUser as well and has it’s own configuration file.
For testing purposes it may be prudent to start by just running SLURMCTLD, SLURMD and
SLURMDBD on one node. By default, they execute in the background. Use the -D option for
each daemon to execute them in the foreground and logging will be done to the terminal.
The -v option will log events in more detail with more v's increasing the level of detail (e.g. vvvvvv). One window can be used to execute slurmctld -D -vvvvvv, whilst slurmd -D –vvvvv
is executed in a second window. A third window can be used to verify the slurmdbd is
running correctly using the same commands, slurmdbd –Dvvvvv. Errors such as ‘Connection
refused’ or ‘Node X not responding’ may be seen when one daemon is operative and the
other is being started. However, the daemons can be started in any order and proper
communications will be established once both daemons complete initialization. A third
Chapter 3. Administrating Cluster Activity with SLURM
25
window can be used to execute commands such as, srun -N1 /bin/hostname, to confirm
functionality.
Another important option for the daemons is -c to clear the previous state information.
Without the -c option, the daemons will restore any previously saved state information:
node state, job state, etc. With the -c option all previously running jobs will be purged and
the node state will be restored to the values specified in the configuration file. This means
that a node configured down manually using the SCONTROL command will be returned to
service unless also noted as being down in the configuration file. In practice, SLURM
restarts with preservation consistently.
The /etc/init.d/slurm and slurmdbd scripts can be used to start, startclean or stop the
daemons for the node on which it is being executed.
3.3
SLURMCTLD (Controller Daemon)
NAME
SLURMCTLD - The central management daemon of SLURM.
SYNOPSIS
slurmctld [OPTIONS...]
DESCRIPTION
SLURMCTLD is the central management daemon of SLURM. It monitors all other SLURM
daemons and resources, accepts work (jobs), and allocates resources to those jobs. Given
the critical functionality of SLURMCTLD, there may be a backup server to assume these
functions in the event that the primary server fails.
OPTIONS
-c
Clear all previous SLURMCTLD states from its last checkpoint. If not specified,
previously running jobs will be preserved along with the state of DOWN,
DRAINED and DRAINING nodes and the associated reason field for those
nodes.
-D
Debug mode. Execute SLURMCTLD in the foreground with logging to stdout.
-f <file>
Read configuration from the specified file. See NOTE under ENVIRONMENT
VARIABLES below.
-h
Help; print a brief summary of command options.
-L <file>
Write log messages to the specified file.
-v
Verbose operation. Using more than one v (e.g., -vv, -vvv, -vvvv, etc.)
increases verbosity.
-V
Print version information and exit.
ENVIRONMENT VARIABLES
The following environment variables can be used to override settings compiled into
SLURMCTLD.
26
SLURM V2.2 - User's Guide
SLURM_CONF
The location of the SLURM configuration file. This is overridden by explicitly naming a
configuration file in the command line.
Note
3.4
It may be useful to experiment with different SLURMCTLD-specific configuration parameters
using a distinct configuration file (e.g. timeouts). However, this special configuration file
will not be used by the SLURMD daemon or the SLURM programs, unless each of them is
specifically told to use it. To modify communication ports, the location of the temporary file
system, or other parameters used by other SLURM components, change the common
configuration file, slurm.conf.
SLURMD (Compute Node Daemon)
NAME
SLURMD - The Compute Node daemon for SLURM.
SYNOPSIS
slurmd [OPTIONS...]
DESCRIPTION
SLURMD is the Compute Node daemon of SLURM. It monitors all tasks running on the
compute node, accepts work (tasks), launches tasks, and kills running tasks upon request.
OPTIONS
-c
Clear system locks as needed. This may be required if SLURMD terminated
abnormally.
-D
Run SLURMD in the foreground. Error and debug messages will be copied to
stderr.
-M
Lock SLURMD pages into system memory using mlockall to disable paging of
the SLURMD process. This may help in cases where nodes are marked
DOWN during periods of heavy swap activity. If the mlockall system call is
not available, an error will be printed to the log and SLURMD will continue as
normal.
-h
Help; print a brief summary of command options.
-f <file>
Read configuration from the specified file. See NOTE below.
-L <file>
Write log messages to the specified file.
-v
Verbose operation. Using more than one v (e.g., -vv, -vvv, -vvvv, etc.)
increases verbosity.
-V
Print version information and exit.
ENVIRONMENT VARIABLES
The following environment variables can be used to override settings compiled into
SLURMD.
Chapter 3. Administrating Cluster Activity with SLURM
27
SLURM_CONF
The location of the SLURM configuration file. This is overridden by explicitly naming a
configuration file on the command line.
Note
3.5
It may be useful to experiment with different SLURMD-specific configuration parameters
using a distinct configuration file (e.g. timeouts). However, this special configuration file
will not be used by the SLURMD daemon or the SLURM programs, unless each of them is
specifically told to use it. To modify communication ports, the location of the temporary file
system, or other parameters used by other SLURM components, change the common
configuration file, slurm.conf.
SLURMDBD (Slurmd Database Daemon)
NAME
slurmdbd - Slurm Database Daemon.
SYNOPSIS
slurmdbd [OPTIONS...]
DESCRIPTION
slurmdbd provides a secure enterprise-wide interface to a database for Slurm. This is
particularly useful for archiving accounting records.
OPTIONS
3.6
-D
Debug mode. Execute slurmdbd in the foreground with logging to stdout.
-h
Help; print a brief summary of command options.
-v
Verbose operation. Using more than one v (e.g., -vv, -vvv, -vvvv, etc.)
increases verbosity.
-V
Print version information and exit.
Node Selection
The node selection mechanism used by SLURM is controlled by the SelectType
configuration parameter. If you want to execute multiple jobs per node, but apportion the
processors, memory and other resources, the cons_res (consumable resources) plug-in is
recommended. If you tend to dedicate entire nodes to jobs, the linear plug-in is
recommended.
3.7
Logging
SLURM uses the syslog function to record events. It uses a range of importance levels for
these messages. Be certain that your system's syslog functionality is operational.
28
SLURM V2.2 - User's Guide
3.8
Corefile Format
SLURM is designed to support generating a variety of core file formats for application
codes that fail (see the --core option of the srun command).
3.9
Security
Unique job credential keys for each site should be created using the openssl program
openssl must be used (not ssh-keygen) to construct these keys. An example of how to do
this is shown below.
Specify file names that match the values of JobCredentialPrivateKey and
JobCredentialPublicCertificate in the configuration file. The JobCredentialPrivateKey file
must be readable only by SlurmUser. The JobCredentialPublicCertificate file must be
readable by all users. Both files must be available on all nodes in the cluster. These keys
are used by slurmctld to construct a job credential, which is sent to srun and then
forwarded to slurmd to initiate job steps.
> openssl genrsa -out /path/to/private/key 1024
> openssl rsa -in /path/to/private/key -pubout -out /path/to/public/key
3.10
SLURM Cluster Administration Examples
SCONTROL may be used to print all system information and modify most of it.
Only a few examples are shown below. Please see the SCONTROL man page for full
details. The commands and options are all case insensitive.
•
Print detailed state of all jobs in the system.
adev0: scontrol
scontrol: show job
JobId=475 UserId=bob(6885) Name=sleep JobState=COMPLETED
Priority=4294901286 Partition=batch BatchFlag=0
AllocNode:Sid=adevi:21432 TimeLimit=UNLIMITED
StartTime=03/19-12:53:41 EndTime=03/19-12:53:59
NodeList=adev8 NodeListIndecies=-1
ReqProcs=0 MinNodes=0 Shared=0 Contiguous=0
MinProcs=0 MinMemory=0 Features=(null) MinTmpDisk=0
ReqNodeList=(null) ReqNodeListIndecies=-1
JobId=476 UserId=bob(6885) Name=sleep JobState=RUNNING
Priority=4294901285 Partition=batch BatchFlag=0
AllocNode:Sid=adevi:21432 TimeLimit=UNLIMITED
StartTime=03/19-12:54:01 EndTime=NONE
NodeList=adev8 NodeListIndecies=8,8,-1
ReqProcs=0 MinNodes=0 Shared=0 Contiguous=0
MinProcs=0 MinMemory=0 Features=(null) MinTmpDisk=0
ReqNodeList=(null) ReqNodeListIndecies=-1
•
Print the detailed state of job 477 and change its priority to zero. A priority of zero
prevents a job from being initiated (it is held in "pending" state).
adev0: scontrol
Chapter 3. Administrating Cluster Activity with SLURM
29
scontrol: show job 477
JobId=477 UserId=bob(6885) Name=sleep JobState=PENDING
Priority=4294901286 Partition=batch BatchFlag=0
more data removed....
scontrol: update JobId=477 Priority=0
•
Print the state of node adev13 and drain it. To drain a node, specify a new state of
DRAIN, DRAINED, or DRAINING. SLURM will automatically set it to the appropriate
value of either DRAINING or DRAINED depending on whether the node is allocated
or not. Return it to service later.
adev0: scontrol
scontrol: show node adev13
NodeName=adev13 State=ALLOCATED CPUs=2 RealMemory=3448 TmpDisk=32000
Weight=16 Partition=debug Features=(null)
scontrol: update NodeName=adev13 State=DRAIN
scontrol: show node adev13
NodeName=adev13 State=DRAINING CPUs=2 RealMemory=3448 TmpDisk=32000
Weight=16 Partition=debug Features=(null)
scontrol: quit
Later
adev0: scontrol
scontrol: show node adev13
NodeName=adev13 State=DRAINED CPUs=2 RealMemory=3448 TmpDisk=32000
Weight=16 Partition=debug Features=(null)
scontrol: update NodeName=adev13 State=IDLE
•
Reconfigure all SLURM daemons on all nodes. This should be done after changing the
SLURM configuration file.
adev0: scontrol reconfig
•
Print the current SLURM configuration. This also reports if the primary and secondary
controllers (slurmctld daemons) are responding. Use the ping command to see the state
of the controllers.
adev0: scontrol show config
Configuration data as of 2010-03-12T08:28:17
AccountingStorageBackupHost = (null)
AccountingStorageEnforce = associations,limits
AccountingStorageHost
= bones
AccountingStorageLoc
= N/A
AccountingStoragePass
= (null)
AccountingStoragePort
= 8544
AccountingStorageType
= accounting_storage/slurmdbd
AccountingStorageUser
= N/A
AuthType
= auth/munge
BackupAddr
= (null)
BackupController
= (null)
BatchStartTimeout
= 10 sec
BOOT_TIME
= 2010-01-27T07:35:33
CacheGroups
= 0
CheckpointType
= checkpoint/none
ClusterName
= startrek
CompleteWait
= 0 sec
30
SLURM V2.2 - User's Guide
ControlAddr
= bones
ControlMachine
= bones
CryptoType
= crypto/munge
DebugFlags
= (null)
DefMemPerCPU
= UNLIMITED
DisableRootJobs
= NO
EnforcePartLimits
= NO
Epilog
= (null)
EpilogMsgTime
= 2000 usec
EpilogSlurmctld
= (null)
FastSchedule
= 0
FirstJobId
= 1
GetEnvTimeout
= 2 sec
HealthCheckInterval
= 0 sec
HealthCheckProgram
= (null)
InactiveLimit
= 0 sec
JobAcctGatherFrequency = 30 sec
JobAcctGatherType
= jobacct_gather/linux
JobCheckpointDir
= /var/slurm/checkpoint
JobCompHost
= localhost
JobCompLoc
= slurm_acct_db
JobCompPass
= (null)
JobCompPort
= 8544
JobCompType
= jobcomp/mysql
JobCompUser
= slurm
JobCredentialPrivateKey = (null)
JobCredentialPublicCertificate = (null)
JobFileAppend
= 0
JobRequeue
= 1
KillOnBadExit
= 0
KillWait
= 30 sec
Licenses
= (null)
MailProg
= /bin/mail
MaxJobCount
= 5000
MaxMemPerCPU
= UNLIMITED
MaxTasksPerNode
= 128
MessageTimeout
= 10 sec
MinJobAge
= 300 sec
MpiDefault
= none
MpiParams
= (null)
NEXT_JOB_ID
= 2015
OverTimeLimit
= 0 min
PluginDir
= /usr/lib64/slurm
PlugStackConfig
= /etc/slurm/plugstack.conf
PreemptMode
= OFF
PreemptType
= preempt/none
PriorityType
= priority/basic
PrivateData
= none
ProctrackType
= proctrack/linuxproc
Prolog
= (null)
PrologSlurmctld
= (null)
PropagatePrioProcess
= 0
PropagateResourceLimits = ALL
PropagateResourceLimitsExcept = (null)
ResumeProgram
= (null)
ResumeRate
= 300 nodes/min
ResumeTimeout
= 60 sec
ResvOverRun
= 0 min
ReturnToService
= 0
SallocDefaultCommand
= (null)
SchedulerParameters
= (null)
SchedulerPort
= 7321
SchedulerRootFilter
= 1
SchedulerTimeSlice
= 30 sec
SchedulerType
= sched/builtin
SelectType
= select/cons_res
SelectTypeParameters
= CR_CORE
Chapter 3. Administrating Cluster Activity with SLURM
31
SlurmUser
= slurm(200)
SlurmctldDebug
= 9
SlurmctldLogFile
= /var/slurm/logs/slurmctld.log
SlurmSchedLogFile
= (null)
SlurmSchedLogLevel
= 0
SlurmctldPidFile
= /var/slurm/logs/slurmctld.pid
SlurmctldPort
= 6817
SlurmctldTimeout
= 120 sec
SlurmdDebug
= 3
SlurmdLogFile
= /var/slurm/logs/slurmd.log.%h
SlurmdPidFile
= /var/slurm/logs/slurmd.pid
SlurmEventHandler
= /opt/slurm/event_handler.sh
SlurmEventHandlerLogfile = /var/slurm/ev-logfile
SlurmEventHandlerPollInterval = 10
SlurmdPort
= 6818
SlurmdSpoolDir
= /var/slurm/slurmd.spool
SlurmdTimeout
= 300 sec
SlurmdUser
= root(0)
SLURM_CONF
= /etc/slurm/slurm.conf
SLURM_VERSION
= 2.1.0
SrunEpilog
= (null)
SrunProlog
= (null)
StateSaveLocation
= /var/slurm/slurm.state
SuspendExcNodes
= (null)
SuspendExcParts
= (null)
SuspendProgram
= (null)
SuspendRate
= 60 nodes/min
SuspendTime
= NONE
SuspendTimeout
= 30 sec
SwitchType
= switch/none
TaskEpilog
= (null)
TaskPlugin
= task/affinity
TaskPluginParam
= (null type)
TaskProlog
= (null)
TmpFS
= /tmp
TopologyPlugin
= topology/none
TrackWCKey
= 0
TreeWidth
= 50
UsePam
= 0
UnkillableStepProgram
= (null)
UnkillableStepTimeout
= 60 sec
WaitTime
= 0 sec
Slurmctld(primary/backup) at bones/(NULL) are UP/DOWN
•
Shutdown all SLURM daemons on all nodes.
adev0: scontrol shutdown
32
SLURM V2.2 - User's Guide
Chapter 4. SLURM High Availability
4.1
SLURM High Availability
SLURM High Availability is achieved by utilizing capabilities that allow a system to
continue to deliver services after arbitrary components of the system have failed. Each
functional component of a fault tolerant system has a backup component that is capable of
supplying the services of the failed component at least for a short period of time.
Continuous automated monitoring within the system is required to ensure prompt detection
of a component failure. When a failure is detected, the workload must be taken over by
the backup or backups without manual intervention. Notification of the failure to site
and/or remote personnel is very important so that prompt action can be taken so that the
source of the error can be analyzed and corrected. Once the problem with a failed
component has been resolved, it is imperative that the system operator brings the
component back online quickly, without system interruption, so that component redundancy
can be restored.
4.1.1
SLURM High Availability using Text File Accounting
To use the native failover mechanism of SLURM, we must define a SLURM backup
controller.
The SLURM controller, slurmctld, will periodically save the status of the job into a directory
so that the status may be recovered after a fatal system error. When using a backup
controller, the file system in which this directory resides should be shared between the
Primary Node (ControlMachine) and the Back-up Node (BackupController). A gfs2 mount
point is used. The location where job accounting logs are to be written must also be
defined in this shared directory.
The /gfs2shared/slurmdata shared file system is used.
Configure SLURM High Availability as follows:
1.
Create the gfs2 SLURM file system using the HA_MGMT:SLURM label
For example:
mkfs.gfs2 -j 2 -t HA_MGMT:SLURM /dev/sdm
2.
Create mount point on both Management Nodes:
pdsh -w mngt0,mngt1 "mkdir -p /gfs2shared/slurmdata"
3.
Disable the automatic start-up of SLURM on both Management Nodes:
pdsh -w mngt0,mngt1 "chkconfig slurm off"
4.
The SLURM configuration file located in /etc/slurm/ has to be identical on both
Management Nodes and must contain the lines below.
ControlMachine=mngt0
ControlAddr=mngt0
BackupController=mngt1
Chapter 4. SLURM High Availability
33
BackupAddr=mngt1
SlurmUser=slurm
StateSaveLocation=/gfs2shared/slurmdata
5.
If necessary, modify the slurm.conf file according to your system and copy the
modified /etc/slurm/slurm.conf on to all Compute Nodes and Management Nodes.
'StateSaveLocation’
slurmctld
primary
slurmctld
Accounting
Figure 4-1. SLURM High Availability using Text File Accounting
4.1.2
SLURM High Availability using Database Accounting
Configuring slurmctld for High Availability using database accounting is identical to the
configuration required for text file accounting, as documented in section 4.1.1. There are
no changes required to the slurmdbd configuration to support High Availability.
SLURM provides a built-in caching capability as a redundancy mechanism in the event
that communication with the database is lost. When communication with either the
slurmdbd or the mysqld is lost, the SLURM controller caches accounting information. One
of the key components in this approach is the usage of the directory designated by the
SLURM.conf control argument 'StateSaveLocation'. If the SlurmCTLD is unable to
communicate with the SlurmDBD, it utilizes an internal cache until SlurmDBD is returned to
service or until the cache is filled. Observations show that there is space in this cache for
approximately 5000 simple jobs.
The repository for this information within the directory is designated as the
'StateSaveLocation'. SlurmCTLD also writes data to this storage upon system shutdown
and recovers it when the system is started back up. When communication between
SlurmCTLD and SlurmDBD is restored the cached data is transferred to SlurmDBD so that
the MySQL database can be updated.
34
SLURM V2.2 - User's Guide
'StateSaveLocation’
slurmctld
slurmctldbackup
slurmdbd
mysql
Figure 5-2. SLURM High Availability using Database Accounting
4.2
Starting SLURM High Availability
Each Management Node must start cluster services in a predefined order.
1.
Start HA Cluster Suite on both Management Nodes:
pdsh -w mngt0,mngt1 "storioha -c start"
2.
Manually mount the shared file system for SLURM on both Management Nodes:
pdsh -w mngt0,mngt1 "mount LABEL=HA_MGMT:SLURM /gfs2shared/slurmdata"
3.
Change the owner properties for the /gfs2shared/slurmdata file system:
chown –R slurm:root /gfs2shared/slurmdata
4.
Start SLURM on both Management Nodes:
pdsh -w mngt0,mngt1 "service slurm start"
5.
Start SLURM on all the Compute Nodes
pdsh -w Compute_Nodes[1-x] "service slurm start"
Note
For users of Database accounting slurmdbd will be started when the node boots with no
extra steps.
Chapter 4. SLURM High Availability
35
4.3
Restoring SLURM High Availability following a Primary
Management Node crash
SLURM High Availability has to be restored following the crash of the Primary Management
Node, and SLURM is running on the Secondary Management Node. This is done as
follows:
1.
Restart HA Cluster Suite on the Primary Node:
storioha -c start
2.
Wait a few seconds and check that HA Cluster Suite is available by using the clustat
command.
3.
Mount the SLURM shared storage on the Primary Management Node, by running the
command below:
mount LABEL=HA_MGMT:SLURM /gfs2shared/slurmdata
4.
Launch SLURM on the Primary Management Node:
service slurm start
5.
36
Wait a minute and check that SLURM is running on both Management Nodes.
SLURM V2.2 - User's Guide
Chapter 5. Managing Resources using SLURM
5.1
SLURM Resource Management Utilities
As a cluster resource manager, SLURM has three key functions. Firstly, it allocates exclusive
and/or non-exclusive access to resources (Compute Nodes) to users for a time period so
that they can perform work. Secondly, it provides a framework for starting, executing, and
monitoring work (normally a parallel job) on the set of allocated nodes. Finally, it arbitrates
conflicting requests for resources by managing a queue of pending work.
Users interact with SLURM through various command line utilities:
•
SRUN to submit a job for execution
•
SBATCH for submitting a batch script to SLURM
•
SALLOC for allocating resources for a SLURM job
•
SATTACH to attach to a running SLURM job step
•
STRIGGER used to set, get or clear SLURM event triggers
•
SBCAST to transmit a file to all nodes running a job
•
SCANCEL to terminate a pending or running job
•
SQUEUE to monitor job queues
•
SINFO to monitor partition and the overall system state
•
SACCTMGR to view and modify SLURM account information. Used with the slurmdbd
daemon
•
SACCT to display data for all jobs and job steps in the SLURM accounting log
•
SVIEW used to display SLURM state information graphically. Requires an XWindows
capable display
•
Global Accounting API for merging the data from a LSF accounting file and the SLURM
accounting file into a single record
mportant
Note
5.2
SLURM does not work with PBS Professional Resource Manager and should only
be installed on clusters which do not use PBS PRO.
There is only a general explanation of each command in the following sections. For
complete and detailed information, please refer to the man pages. For example, man srun.
MPI Support
The PMI (Process Management Interface) is provided by Bullx MPI to launch processes on a
cluster and provide services to the MPI interface. For example, a call to pmi_get_appnum
returns the job id. This interface uses sockets to exchange messages.
In Bullx MPI, this mechanism uses the MPD daemons running on each Compute Node.
Daemons can exchange information and answer the PMI calls.
Chapter 5. Managing Resources using SLURM
37
SLURM replaces the Process Management Interface with its own implementation and its
own daemons. No MPD is needed and when a PMI request is sent (for example
pmi_get_appnum), a SLURM extension must answer this request.
The following diagrams show the difference between the use of PMI with and without a
resource manager that allows process management.
Figure 5-1. MPI Process Management With and Without Resource Manager
Bullx MPI jobs can be launched directly by the srun command. SLURM's none MPI plug-in
must be used to establish communications between the launched tasks. This can be
accomplished either using the SLURM configuration parameter MpiDefault=none in
slurm.conf or srun's --mpi=none option. The program must also be linked with SLURM's
implementation of the PMI library so that tasks can communicate host and port information
at startup. (The system administrator can add this option to the mpicc and mpif77
commands directly, so the user will not need to bother). Do not use SLURM's MVAPICH
plug-in for Bullx MPI.
$ mpicc -L<path_to_slurm_lib> -lpmi ...
$ srun -n20 --mpi=none a.out
38
SLURM V2.2 - User's Guide
Notes
5.3
•
Some Bullx MPI functions are not currently supported by the PMI library integrated with
SLURM.
•
Set the environment variable PMI_DEBUG to a numeric value of 1 or higher for the PMI
library to print debugging information.
SRUN
SRUN submits jobs to run under SLURM management. SRUN can submit an interactive job
and then persist to shepherd the job as it runs. SLURM associates every set of parallel tasks
("job steps") with the SRUN instance that initiated that set.
SRUN options allow the user to both:
•
Specify the parallel environment for job(s), such as the number of nodes used, node
partition, distribution of processes among nodes, and total time.
•
Control the behavior of a parallel job as it runs, such as redirecting or labeling its
output or specifying its reporting verbosity.
NAME
srun - run parallel jobs
SYNOPSIS
srun [OPTIONS] executable [args...]
DESCRIPTION
Run a parallel job on cluster managed by SLURM. If necessary, srun will first create a
resource allocation in which to run the parallel job.
OPTIONS
Please refer to the man page for more details on the options, including examples of use.
Example
$ man srun
Chapter 5. Managing Resources using SLURM
39
5.4
SBATCH (batch)
NAME
SBATCH – Submit a batch script to SLURM
SYNOPSIS
sbatch [OPTIONS] SCRIPT [ARGS…]
DESCRIPTION
sbatch submits a batch script to SLURM. The batch script may be linked to sbatch using its
file name and the command line. If no file name is specified, sbatch will read in a script
from standard input. The batch script may contain options preceded with #SBATCH before
any executable commands in the script.
sbatch exits immediately after the script has been successfully transferred to the SLURM
controller and assigned a SLURM job ID. The batch script may not be granted resources
immediately, and may sit in the queue of pending jobs for some time, before the required
resources become available.
When the batch script is granted the resources for its job allocation, SLURM will run a
single copy of the batch script on the first node in the set of allocated nodes.
OPTIONS
Please refer to the man page for more details on the options, including examples of use.
Example
$ man sbatch
40
SLURM V2.2 - User's Guide
5.5
SALLOC (allocation)
NAME
SALLOC - Obtain a SLURM job allocation (a set of nodes), execute a command, and then
release the allocation when the command is finished.
SYNOPSIS
salloc [OPTIONS] [<command> [command_args]]
DESCRIPTION
salloc is used to define a SLURM job allocation, which is a set of resources (nodes),
possibly with some constraints (e.g. number of processors per node). When salloc obtains
the requested allocation, it will then run the command specified by the user. Finally, when
the user specified command is complete, salloc relinquishes the job allocation.
The command may be any program the user wishes. Some typical commands are xterm, a
shell script containing srun commands, and srun.
OPTIONS
Please refer to the man page for more details on the options, including examples of use.
Example
$ man salloc
Chapter 5. Managing Resources using SLURM
41
5.6
SATTACH
NAME
sattach - Attach to a SLURM job step.
SYNOPSIS
sattach [OPTIONS] <jobid.stepid>
DESCRIPTION
sattach attaches to a running SLURM job step. By attaching, it makes available the I/O
streams for all the tasks of a running SLURM job step. It is also suitable for use with a
parallel debugger like TotalView.
OPTIONS
Please refer to the man page for more details on the options, including examples of use.
Example
$ man sattach
42
SLURM V2.2 - User's Guide
5.7
SACCTMGR
NAME
sacctmgr - Used to view and modify SLURM account information.
SYNOPSIS
sacctmgr [OPTIONS] [COMMAND]
DESCRIPTION
sacctmgr is used to view or modify SLURM account information. The account information is
maintained within a database with the interface being provided by slurmdbd (SLURM
Database daemon). This database serves as a central storehouse of user and computer
information for multiple computers at a single site. SLURM account information is recorded
based upon four parameters that form what is referred to as an association.
These parameters are user, cluster, partition, and account:
− user is the login name.
− cluster is the name of a SLURM managed cluster as specified by the ClusterName
parameter in the slurm.conf configuration file.
− partition is the name of a SLURM partition on that cluster.
− account is the bank account for a job.
The intended mode of operation is to initiate the sacctmgr command, add, delete, modify,
and/or list association records then commit the changes and exit.
OPTIONS
Please refer to the man page for more details on the options, including examples of use.
Example
$ man sacctmgr
Chapter 5. Managing Resources using SLURM
43
5.8
SBCAST
sbcast is used to copy a file to local disk on all nodes allocated to a job. This should be
executed after a resource allocation has taken place and can be faster than using a single
file system mounted on multiple nodes.
NAME
sbcast - transmit a file to the nodes allocated to a SLURM job.
SYNOPSIS
sbcast [-CfpsvV] SOURCE DEST
DESCRIPTION
sbcast is used to transmit a file to all nodes allocated to the SLURM job which is currently
active. This command should only be executed within a SLURM batch job or within the shell
spawned after the resources have been allocated to a SLURM. SOURCE is the name of the
file on the current node. DEST should be the fully qualified pathname for the file copy to be
created on each node. DEST should be on the local file system for these nodes.
Note
Parallel file systems may provide better performance than sbcast.
OPTIONS
Please refer to the man page for more details on the options, including examples of use.
Example
$ man sbcast
44
SLURM V2.2 - User's Guide
5.9
SQUEUE (List Jobs)
SQUEUE displays (by default) the queue of running and waiting jobs (or "job steps"),
including the JobId (used for SCANCEL), and the nodes assigned to each running job.
However, SQUEUE reports can be customized to cover any of the 24 different job
properties, sorted according to the most important properties. It also displays the job ID
and job name for every job being managed by the SLURM control daemon (SLURMCTLD).
The status and resource information for each job (such as time used so far, or a list of
committed nodes) are displayed in a table whose content and format can be set using the
SQUEUE options.
NAME
SQUEUE - view information about jobs located in the SLURM scheduling queue.
SYNOPSIS
squeue
[OPTIONS...]
DESCRIPTION
SQUEUE is used to view job and job step information for jobs managed by SLURM.
OPTIONS
Please refer to the man page for more details on the options, including examples of use.
Example
$ man squeue
Chapter 5. Managing Resources using SLURM
45
5.10
SINFO (Report Partition and Node Information)
SINFO displays a summary of status information on SLURM-managed partitions and nodes
(not jobs). Customizable SINFO reports can cover the node count, state, and name list for
a whole partition, or the CPUs, memory, disk space, or current status for individual nodes
as specified. These reports can assist in planning job submittals and avoiding hardware
problems. The SINFO output is a table whose content and format can be controlled using
the SINFO options.
NAME
SINFO - view information about SLURM nodes and partitions.
SYNOPSIS
sinfo [OPTIONS...]
DESCRIPTION
SINFO is used to view partition and node information for a system running SLURM.
OPTIONS
Please refer to the man page for more details on the options, including examples of use.
Example
$ man sinfo
46
SLURM V2.2 - User's Guide
5.11
SCANCEL (Signal/Cancel Jobs)
SCANCEL cancels a running or waiting job, or sends a specified signal to all processes on
all nodes associated with a job (only job owners or their administrators can cancel jobs).
SCANCEL may also be used to cancel a single job step instead of the whole job.
NAME
SCANCEL - Used to signal jobs or job steps that are under the control of SLURM.
SYNOPSIS
scancel [OPTIONS...] [job_id[.step_id]] [job_id[.step_id]...]
DESCRIPTION
SCANCEL is used to signal or cancel jobs or job steps. An arbitrary number of jobs or job
steps may be signaled using job specification filters or a space-separated list of specific job
and/or job step IDs. A job or job step can only be signaled by the owner of that job or
user root. If an attempt is made by an unauthorized user to signal a job or job step, an
error message will be printed and the job will not be signaled.
OPTIONS
Please refer to the man page for more details on the options, including examples of use.
Example
$ man scancel
Chapter 5. Managing Resources using SLURM
47
5.12
SACCT (Accounting Data)
NAME
SACCT - displays accounting data for all jobs and job steps in the SLURM job accounting
log.
SYNOPSIS
sacct options
DESCRIPTION
Accounting information for jobs invoked with SLURM is logged in the job accounting log
file.
The SACCT command displays job accounting data stored in the job accounting log file in
a variety of forms for your analysis. The SACCT command displays information about jobs,
job steps, status, and exit codes by default. The output can be tailored with the use of the -fields= option to specify the fields to be shown.
For the root user, the SACCT command displays job accounting data for all users, although
there are options to filter the output to report only the jobs from a specified user or group.
For the non-root user, the SACCT command limits the display of job accounting data to
jobs that were launched with their own user identifier (UID) by default. Data for other users
can be displayed with the --all, --user, or --uid options.
Note
Much of the data reported by SACCT has been generated by the wait3() and getrusage()
system calls. Some systems gather and report incomplete information for these calls;
SACCT reports values of 0 for this missing data. See the getrusage man page for your
system to obtain information about which data are actually available on your system.
OPTIONS
Please refer to the man page for more details on the options, including examples of use.
Example
$ man sacct
48
SLURM V2.2 - User's Guide
5.13
STRIGGER
NAME
strigger - Used to set, get or clear SLURM trigger information.
SYNOPSIS
strigger --set [OPTIONS...]
strigger --get [OPTIONS...]
strigger --clear [OPTIONS...]
DESCRIPTION
strigger is used to set, get or clear SLURM trigger information. Triggers include events such
as a node failing, a job reaching its time limit or a job terminating.
These events can cause actions such as the execution of an arbitrary script. Typical uses
include notifying system administrators regarding node failures and terminating a job when
its time limit is approaching.
Trigger events are not processed instantly, but a check is performed for trigger events on a
periodic basis (currently every 15 seconds). Any trigger event which occur within that
interval will be compared against the trigger programs set at the end of the time interval.
The trigger program will be executed once for any event occurring in that interval with a
hostlist expression for the nodelist or job ID as an argument to the program. The record of
those events (e.g. nodes which went DOWN in the previous 15 seconds) will then be
cleared. The trigger program must set a new trigger before the end of the next interval to
insure that no trigger events are missed. If desired, multiple trigger programs can be set for
the same event.
mportant
This command can only set triggers if run by the user SlurmUser unless SlurmUser
is configured as root user. This is required for the slurmctld daemon to set the
appropriate user and group IDs for the executed program. Also note that the
program is executed on the same node that the slurmctld daemon uses rather
than on an allocated Compute Node. To check the value of SlurmUser, run the
command:
scontrol show config | grep SlurmUser
OPTIONS
Please refer to the man page for more details on the options, including examples of use.
Example
$ man strigger
Chapter 5. Managing Resources using SLURM
49
5.14
SVIEW
NAME
sview - Graphical user interface to view and modify SLURM state.
Note
This command requires an XWindows capable display.
SYNOPSIS
sview
DESCRIPTION
sview can be used to view the SLURM configuration, job, step, node and partition state
information. Authorized users can also modify select information.
The primary display modes are Jobs and Partitions, each with a selection tab. There is also
an optional map of the nodes on the left side of the window that will show the nodes
associated with each job or partition. Left-click on the tab of the display you would like to
see. Right-click on the tab in order to control which fields will be displayed.
Within the display window, left-click on the header to control the sort order of entries (e.g.
increasing or decreasing) in the display. You can also left-click and drag the headers to
move them right or left in the display. If a JobID has an arrow next to it, click on that arrow
to display or hide information about that job’s steps. Right-click on a line of the display to
get more information about the record.
There is an Admin Mode option, which permits the root user to modify many of the fields
displayed, such as node state or job time limit. In the mode, a SLURM Reconfigure Action is
also available. It is recommended that Admin Mode be used only while modifications are
actively being made. Disable Admin Mode immediately after the changes to avoid making
unintended changes.
OPTIONS
Please refer to the man page for more details on the options, including examples of use.
Example
$ man sview
See
50
https://computing.llnl.gov/linux/slurm/documentation.html for more information.
SLURM V2.2 - User's Guide
5.15
Global Accounting API
Note
The Global Accounting API only applies to clusters which use SLURM and the Load Sharing
Facility (LSF) batch manager from Platform Computing together.
Both the LSF and SLURM products can produce an accounting file. The Global Accounting
API offers the capability of merging the data from these two accounting files and presenting
it as a single record to the program using this API.
Perform the following steps to call the Global Accounting API:
1.
After SLURM has been installed (assumes /usr folder), build the Global Accounting API
library by going to the /usr/lib/slurm/bullacct folder and executing the following
command:
make –f makefile-lib
This will build the library libcombine_acct.a. This makefile-lib assumes that the SLURM
product is installed in the /usr folder, and LSF is installed in /app/slurm/lsf/6.2. If this
is not the case, the SLURM_BASE and LSF_BASE variables in the makefile-lib file must
be modified to point to the correct location.
2.
After the library is built, add the library /usr/lib/slurm/bullacct/libcombine_acct.a to
the link option when building an application that will use this API.
3.
In the user application program, add the following:
//
//
for new accounting record
assumes Slurm is installed under the opt/slurm folder
#include "/usr/lib/slurm/bullacct/combine_acct.h"
// define file pointer for LSF and Slurm log file
FILE *lsb_acct_fg = NULL;
// file pointer for LSF accounting log file
FILE *slurm_acct_fg = NULL; // file pointer for Slurm log file
int status, jobId;
struct CombineAcct newAcct; // define variable for the new records
// call cacct_init routine to open lsf and slurm log file,
// and initialize the newAcct structure
status = cacct_init(&lsb_acct_fg, &slurm_acct_fg, &newAcct);
//
//
//
//
//
//
//
//
if the status returns 0 imply no error,
all log files are opened successfully.
then call get_combine_acct_info rountine to get the
combine accounting record.
//
//
//
//
//
//
//
//
//
//
//
the calling sequence is
int get_combine_acct_info(File *lsb_acct_fg,
File *slurm_acct_fg,
int
jobId,
CombineAcct *newAcct);
where:
lsb_acct_fg is the pointer to the LSF accounting log file
slurm_acct_fg is the pointer to the Slurm accounting log file
jobid is the job Id from the LSF accounting log file
newAcct is the address of the variable to hold the new record
information.
This routine will use the input LSF job ID to locate the LSF accounting
information in the LSF log file, then get the SLURM_JOBID and locate the
SLURM accounting information in the SLURM log file.
This routine will return a zero to indicate that both records are found
Chapter 5. Managing Resources using SLURM
51
//
//
//
and processed successfully, otherwise one or both records are in error
and the content in the newAcct variable is undefined.
For example:
//
to get the combine acct information for a specified jobid(2010)
jobId = 2010;
status = get_combine_acct_info(lsb_acct_fg,
slurm_acct_fg,
jobId,
&newAcct);
//
to display the record call display_combine_acct_record routine.
display_combine_acct_record(&newAcct);
// when finished accessing the record, the user must close the log files and
// the free memory used in the newAcct variable by calling cacct_wrapup
// routine.
// For example:
//
if (lsb_acct_fg != NULL)
// if open successfully before
cacct_wrapup(&lsb_acct_fg, &slurm_acct_fg, &newAcct);
//
//
//
//
if an extra combine account variable is needed , the user can define
the new variable and call init_cacct_rec to initialize the record
and call free_cacct_ptrs to free the memory used in the new variable.
For example:
//
to define variable for the new record
struct CombineAcct otherAcct;
//
before using the variable otherAcct do:
init_cacct_rec(&otherAcct);
//
//
when done do the following to free the memory used by the otherAcct
variable.
free_cacct_ptrs(&otherAcct);
The new record contains the combined accounting information as follows:
/* combine LSF and SLURM acct log information */
struct CombineAcct {
/* part one is the LSF information */
char
char
time_t
int
int
long
int
time_t
time_t
time_t
time_t
char
char
char
char
char
char
char
char
char
char
char
52
evenType[50];
versionNumber[50];
eventTime;
jobId;
userId;
options;
numProcessors;
submitTime;
beginTime;
termTime;
startTime;
userName[MAX_LSB_NAME_LEN];
queue[MAX_LSB_NAME_LEN];
*resReq;
*dependCond;
*preExecCmd;
/* the command string to be pre_executed */
fromHost[MAXHOSTNAMELEN];
cwd[MAXFILENAMELEN];
inFile[MAXFILENAMELEN];
outFile[MAXFILENAMELEN];
errFile[MAXFILENAMELEN];
jobFile[MAXFILENAMELEN];
SLURM V2.2 - User's Guide
int
char
int
char
int
double
char
char
struct
char
char
numAskedHosts;
**askedHosts;
numExecHosts;
**execHosts;
jStatus;
hostFactor;
jobName[MAXLINELEN];
command[MAXLINELEN];
lsfRusage LSFrusage;
*mailUser;
*projectName;
int
int
char
char
int
int
int
char
char
char
char
int
char
int
char
exitStatus;
maxNumProcessors;
*loginShell;
/* login shell specified by user */
*timeEvent;
idx;
/* array idx, must be 0 in JOB_NEW */
maxRMem;
maxRswap;
inFileSpool[MAXFILENAMELEN]; /* spool input file */
commandSpool[MAXFILENAMELEN]; /* spool command file */
*rsvId;
*sla;
/* The service class under which the job runs. */
exceptMask;
*additionalInfo;
exitInfo;
*warningAction;
/* warning action, SIGNAL | CHKPNT |
command, NULL if unspecified */
warningTimePeriod;
/* warning time period in seconds,
-1 if unspecified */
*chargedSAAP;
*licenseProject;
/* License Project */
slurmJobId;
/* job id from slurm */
int
char
char
int
/* job status */
/* user option mail string */
/* the project name for this job, used
for accounting purposes */
/* job status */
/* part two is the SLURM info minus the duplicated infomation from LSF */
long
char
int
int
int
double
int
int
double
int
int
double
int
int
char
char
int
int
int
int
char
priority;
partition[64];
gid;
blockId;
numTasks;
aveVsize;
maxRss;
maxRssTaskId;
aveRss;
maxPages;
maxpagestaskId;
avePages;
minCpu;
minCpuTaskId;
stepName[NAME_SIZE];
stepNodes[STEP_NODE_BUF_SIZE];
maxVsizeNode;
maxRssNodeId;
maxPagesNodeId;
minCpuTimeNodeId;
*account;
/*
/*
/*
/*
/*
/*
/*
/*
/*
/*
/*
/*
/*
/*
/*
/*
/*
/*
/*
/*
/*
priority */
partition node */
group ID */
Block ID */
nproc */
ave vsize */
max rss */
max rss task */
ave rss */
max pages */
max pages task */
ave pages */
min cpu */
min cpu task */
step process name */
step node list */
max vsize node */
max rss node */
max pages node */
min cpu node */
account number */
};
Chapter 5. Managing Resources using SLURM
53
54
SLURM V2.2 - User's Guide
Chapter 6. Tuning Performances for SLURM Clusters
6.1
Configuring and Sharing Consumable Resources in SLURM
SLURM, using the default node allocation plug-in, allocates nodes to jobs in exclusive
mode, which means that even when all the resources within a node are not utilized by a
given job, another job will not have access to these resources.
Nodes possess resources such as processors, memory, swap, local disk, etc. and jobs
consume these resources. The SLURM exclusive use default policy may result in inefficient
utilization of the cluster and of node resources.
SLURM provides a Consumable Resource plug-in which supports CPUs, Sockets, Cores,
and Memory being configured as consumable resources. For 1.3+ SLURM versions
consumable resources may be shared among jobs by the use of the per-partition shared
setting.
See
6.2
https://computing.llnl.gov/linux/slurm/documentation.html for details regarding the
configuration and sharing of consumable resources for SLURM.
SLURM and Large Clusters
This section contains SLURM administrator information specifically for clusters containing
1,024 nodes or more. Virtually all SLURM components have been validated (through
emulation) for clusters containing up to 65,536 Compute Nodes. Obtaining good
performance at this scale requires some tuning and this section provides some basic
information with which to get started.
6.2.1
Node Selection Plug-in (SelectType)
While allocating individual processors within a node is great for smaller clusters, the
overhead of keeping track of the individual processors and memory within each node adds
a significant overhead. For best scalability, it is recommended that the consumable
resource plug-in select/cons_res is used and NOT select/linear.
6.2.2
Job Accounting Gather Plug-in (JobAcctGatherType)
Job accounting relies on the slurmstepd daemon to sample data periodically on each
Compute Node. The collection of this data will take compute cycles away from the
application, inducing what is known as system noise. For large parallel applications, this
system noise can impact application scalability.
For optimal application performance, it is best to disable job accounting,
jobacct_gather/none. Consider the use of the job completion records parameter,
JobCompType, for accounting purposes, as this entails far less overhead.
If job accounting is required, configure the sampling interval to a relatively large size (e.g.
JobAcctGatherFrequency=300). Some experimentation may also be required to deal with
collisions on data transmission.
Chapter 6. Tuning Performances for SLURM Clusters
55
6.2.3
Node Configuration
SLURM can track the amount of memory and disk space available for each Compute Node
and use it for scheduling purposes; however this will entail an extra overhead. Optimize
performance by specifying the expected configuration using the parameters that are
available (RealMemory, Procs, and TmpDisk). If the node is found to have fewer resources
than the configured amounts, it will be marked as DOWN and not be used. Also, the
FastSchedule parameter should be set.
While SLURM can easily handle a heterogeneous cluster, configuring the nodes using the
minimal number of lines in the slurm.conf file will make administration easier and result in
better performance.
6.2.4
Timers
The configuration parameter SlurmdTimeout determines the interval at which slurmctld
routinely communicates with slurmd. Communications occur at half the SlurmdTimeout
value. If a Compute Node fails, the time of failure is identified and jobs are no longer
allocated to it. Longer intervals decrease system noise on Compute Nodes (these requests
are synchronized across the cluster, but there will be some impact on applications). For
large clusters, SlurmdTimeoutl values of 120 seconds or more are reasonable.
6.2.5
TreeWidth parameter
SLURM uses hierarchical communications between the slurmd daemons in order to
increase parallelism and improve performance. The TreeWidth configuration parameter
controls the fanout of messages. The default value is 50, meaning each slurmd daemon can
communicate with up to 50 other slurmd daemons and up to 2500 nodes can be contacted
with two message hops. The default value will work well for most clusters. Optimal system
performance can usually be achieved if TreeWidth is set to the square root of the number
of nodes in the cluster for systems having no more than 2500 nodes, or the cube root for
larger systems.
6.2.6
Hard Limits
The srun command automatically increases its open file limit to the hard limit in order to
process all the standard input and output connections to the launched tasks. It is
recommended that you set the open file hard limit to 8192 across the cluster.
6.3
SLURM Power Saving Mechanism
The information in this section applies to version 2.0.0 of SLURM. Newer revisions of this
information may be found in the SLURM installation under /doc/slurmN.N.N/html/power_save.html (or power_save.shtml).
SLURM provides an integrated power saving mechanism for idle nodes. Nodes that remain
idle for a configurable period of time can be placed in a power saving mode. The nodes
will be restored to normal operation once work is assigned to them. Beginning with version
2.0.0, nodes can be fully powered down. Earlier releases of SLURM do not support the
powering down of nodes; they only support the reduction of their performance and thus
their power consumption. For example, power saving can be accomplished using a
56
SLURM V2.2 - User's Guide
cpufreq governor that can change CPU frequency and voltage (note that the cpufreq driver
must be enabled in the Linux kernel configuration). Of particular note is the fact that SLURM
can power nodes up or down at a configurable rate, to prevent rapid changes in power
demands. For example, without SLURM’s support to increase power demands in a gradual
fashion, starting a 1000 node job on an idle cluster could result in an instantaneous surge,
in the order of multiple megawatts, in the power demand.
6.3.1
Configuring Power Saving
A great deal of flexibility is offered in terms of when, and how, idle nodes are put into or
removed from power save mode. The following configuration parameters are available:
•
SuspendTime: Nodes becomes eligible for power saving mode after being idle for this
number of seconds. The configured value should not exceed the time to suspend and
resume a node. A negative number disables power saving mode. The default value is 1 (disabled).
•
SuspendRate: Maximum number of nodes to be placed into power saving mode per
minute. A value of zero results in no limits being imposed. The default value is 60. Use
this to prevent rapid drops in power requirements.
•
ResumeRate: Maximum number of nodes to be removed from power saving mode per
minute. A value of zero results in no limits being imposed. The default value is 300.
Use this to prevent rapid increases in power requirements.
•
SuspendProgram: Program to be executed to place nodes into power saving mode.
The program executes as SlurmUser (as configured in slurm.conf). The argument to the
program will be the names of nodes to be placed into power saving mode (using
SLURM's hostlist expression format).
•
ResumeProgram: Program to be executed to remove nodes from power saving mode.
The program executes as SlurmUser (as configured in slurm.conf). The argument to the
program will be the names of nodes to be removed from power saving mode (using
SLURM's hostlist expression format). This program may use the scontrol show node
command to insure that a node has booted and the slurmd daemon started. If the
slurmd daemon fails to respond within the configured SlurmTimeout value, the node
will be placed in a DOWN state and the job requesting the node will be requeued.
For reasons of reliability, ResumeProgram may execute more than once for a node
when the slurmctld daemon crashes and is restarted.
•
SuspendTimeout: Maximum time permitted (in seconds) between when a node suspend
request is issued, and when the node shutdown is complete. When the time specified
has expired the node must be ready for a resume request to be issued as needed for a
new workload. The default value is 30 seconds.
•
ResumeTimeout: Maximum time permitted (in seconds) between when a node resume
request is issued and when the node is actually available for use. Nodes which fail to
respond in this time-frame may be marked DOWN and the jobs scheduled on the
node requeued. The default value is 60 seconds.
•
SuspendExcNodes: List of nodes that will never be placed in power saving mode. Use
SLURM's hostlist expression format. By default, no nodes are excluded.
•
SuspendExcParts: List of partitions that will never be placed in power saving mode.
Multiple partitions may be specified using a comma separator. By default, no nodes
are excluded.
Chapter 6. Tuning Performances for SLURM Clusters
57
Note that SuspendProgram and ResumeProgram execute as SlurmUser on the node where
the slurmctld daemon runs (Primary and Backup server nodes). Use of sudo may be
required for SlurmUser to power down and restart nodes. If you need to convert SLURM's
hostlist expression into individual node names, the scontrol show hostnames command may
prove useful. The commands used to boot or shut down nodes will depend upon the cluster
management tools that are available.
SuspendProgram and ResumeProgram are not subject to any time limits. They should
perform the required action, ideally verify the action (e.g. node boot and the start of the
slurmd daemon so that the node is no longer non-responsive to slurmctld) and terminate.
Long running programs will be logged by slurmctld, but not aborted.
#!/bin/bash
# Example SuspendProgram
hosts=`scontrol show hostnames $1`
for host in "$hosts"
do
sudo node_shutdown $host
done
#!/bin/bash
# Example ResumeProgram
hosts=`scontrol show hostnames $1`
for host in "$hosts"
do
sudo node_startup $host
done
Subject to the various rates, limits and exclusions, the power save code follows the logic
below:
1.
Identify nodes which have been idle for at least the SuspendTime.
2.
Execute SuspendProgram using an argument of the idle node names.
3.
Identify the nodes which are in power save mode (a flag in the node's state field), but
have been allocated to jobs.
4.
Execute ResumeProgram with an argument of the allocated node names.
5.
Once the slurmd responds, initiate the job and/or job steps allocated to it.
6.
If the slurmd fails to respond with the value configured for the SlurmdTimeout, the node
will be marked DOWN and the job requeued if possible.
7.
Repeat indefinitely.
The slurmctld daemon will periodically (every 10 minutes) log how many nodes are in
power save mode using messages of this sort:
[May 02 15:31:25] Power save mode 0 nodes
...
[May 02 15:41:26] Power save mode 10 nodes
...
[May 02 15:51:28] Power save mode 22 nodes
Using these logs you can easily see the effect of SLURM's power saving support. You can
also configure SLURM with programs that perform no action using SuspendProgram and
ResumeProgram, in order to assess the potential impact of power saving mode before
enabling it.
58
SLURM V2.2 - User's Guide
6.3.2
Fault tolerance
For the slurmctld daemon to terminate gracefully, it should wait up to SuspendTimeout or
ResumeTimeout interval (whichever is larger), for any spawned SuspendProgram or
ResumeProgram to terminate before the daemon terminates. If the spawned program does
not terminate within that time period, the event will be logged and slurmctld will exit in
order to permit another slurmctld daemon to be initiated. Synchronization problems could
also occur if, and when, the slurmctld daemon crashes (a rare event), and is restarted.
In either event, the newly initiated slurmctld daemon (or the backup server) will recover
saved node state information that may not accurately describe the actual node state. In the
case of a failed SuspendProgram, the negative impact is limited to the power consumption
being increased. No special action is currently in place so that SuspendProgram is
executed multiple times in order to insure the nodes remain in a reduced power mode. The
case of a failed ResumeProgram call is more serious as the node could be placed into a
DOWN state and/or jobs could fail. In order to minimize this risk, when the slurmctld
daemon is started and the node which should be allocated to a job fails to respond, the
ResumeProgram will be executed (possibly for a second time).
Chapter 6. Tuning Performances for SLURM Clusters
59
60
SLURM V2.2 - User's Guide
Chapter 7. Troubleshooting SLURM
This chapter describes some problems that may occur on SLURM software, and how to fix
them.
7.1
SLURM does not start
Check that all the RPMs have been installed on the Management Node by running the
command below.
rpm –qa | grep slurm
The following RPMs should be listed:
slurm-x.x.xx-x.Bull
pam_slurm-x.x- x.x.xx-.x.Bull
slurm-munge- x.x.xx-x.Bull
slurm-auth-none- x.x.xx-x.Bull
slurm-devel- x.x.xx-x .Bull
Note
7.2
The version numbers depend on the release and are indicated by the letter x above.
SLURM is not responding
1.
Run the command scontrol ping to determine if the primary and backup controllers are
responding.
2.
If they respond, then there may be a Network or Configuration problem – see section
7.5 Networking and Configuration Problems.
3.
If there is no response, log on to the machines to rule out any network problems.
4.
Check to see if the slurmctld daemon is active by running the following command:
ps -ef | grep slurmctld
a.
If slurmctld is not active, restart it as the root user using the following command.
service slurm start
b.
Check the SlurmctldLogFile file in the slurm.conf file for an indication of why it
failed.
c.
If slurmctld is running but not responding (a very rare situation), then kill and
restart it as the root user using the following commands:
service slurm stop
service slurm start
d.
If it hangs again, increase the verbosity of debug messages by increasing
SlurmctldDebug in the slurm.conf file, and restart. Again, check the log file for an
indication of why it failed.
Chapter 7. Troubleshooting SLURM
61
5.
If SLURM continues to fail without an indication of the failure mode, stop the service,
add the controller option "-c" to the /etc/slurm/slurm.sh script, as shown below, and
restart.
service slurm stop
SLURM_OPTIONS_CONTROLLER=”-c”
service slurm start
Note
7.3
All running jobs and other state information will be lost when using this option.
Jobs are not getting scheduled
1.
This is dependent upon the scheduler used by SLURM. Run the following command to
identify the scheduler.
scontrol show config | grep SchedulerType
See section 1.4 Scheduler Types for details on the scheduler types.
2.
For any scheduler, the priorities of jobs can be checked using the following command:
scontrol show job
7.4
Nodes are getting set to a DOWN state
1.
Check to determine why the node is down using the following command:
scontrol show node <name>
This will show the reason why the node was set as down and the time when this
happened. If there is insufficient disk space, memory space, etc. compared to the
parameters specified in the slurm.conf file, then either fix the node or change
slurm.conf.
For example, if the temporary disk space specification is TmpDisk=4096, but the
available temporary disk space falls below 4 GB on the system, SLURM marks it as
down.
2.
If the reason is ‘Not responding’, then check the communication between the
Management Node and the DOWN node by using the following command:
ping <address>
Check that the <address> specified matches the NodeAddr values in the slurm.conf
file. If ping fails, then fix the network or the address in the slurm.conf file.
3.
62
Login to the node that SLURM considers to be in a DOWN state and check to see if
the slurmd daemon is running using the following command:
SLURM V2.2 - User's Guide
ps -ef | grep slurmd
4.
If slurmd is not running, restart it as the root user using the following command:
service slurm start
5.
Check SlurmdLogFile file in the slurm.conf file for an indication of why it failed.
a.
If slurmd is running but not responding (a very rare situation), then kill and restart
it as the root user using the following commands:
service slurm stop
service slurm start
6.
If the node is still not responding, there may be a Network or Configuration problem –
see section 7.5 Networking and Configuration Problems.
7.
If the node is still not responding, increase the verbosity of debug messages by
increasing SlurmdDebug in the slurm.conf file, and restart. Again, check the log file for
an indication of why it failed.
8.
If the node is still not responding without an indication as to the failure mode, stop the
service, add the daemon option "-c" to the /etc/slurm/slurm.sh script, as shown
below, and restart.
service slurm stop
SLURM_OPTIONS_DAEMONS=”-c”
service slurm start
Note
7.5
All running jobs and other state information will be lost when using this option.
Networking and Configuration Problems
1.
Use the following command to examine the status of the nodes and partitions:
sinfo --all
2.
Use the following commands to confirm that the control daemons are up and running
on all nodes:
scontrol ping
scontrol show node
3.
Check the controller and/or slurmd log files (SlurmctldLog and SlurmdLog in the
slurm.conf file) for an indication of why a particular node is failing.
4.
Check for consistent slurm.conf and credential files on the node(s) experiencing
problems.
Chapter 7. Troubleshooting SLURM
63
5.
If the problem is a user-specific problem, check that the user is configured on the
Management Node as well as on the Compute Nodes. The user does not need to be
able to login, but his user ID must exist. User authentication must be available on every
node. If not, non-root users will be unable to run jobs.
6.
Verify that the security mechanism is in place, see Chapter 3 for more information on
SLURM and security.
7.
Check that a consistent version of SLURM exists on all of the nodes by running one of
the following commands:
sinfo -V
or
rpm -qa | grep slurm
If the first two digits of the version number match, it should work fine. However,
version 1.1 commands will not work with version 1.2 daemons or vice-versa.
Errors can result unless all these conditions are true.
8.
Each node must be synchronized to the correct time. Communication errors occur if the
node clocks differ.
Execute the following command to confirm that all nodes display the same time:
pdsh -a date
To check a group of nodes, use the following command:
pdsh w <node list> date
A matter of a few seconds is inconsequential, but SLURM is unable to recognize the
credentials of nodes that are more than 5 minutes out of synchronization. See the
Installation and Configuration Guide for information on setting node times using the
NTP protocol.
7.6
More Information
For more information on SLURM Troubleshooting see
http://www.llnl.gov/linux/slurm/slurm.html
64
SLURM V2.2 - User's Guide
Glossary
A
API
Application Programmer Interface
L
LSF
Load Sharing Facility
M
MPI
Message Passing Interface
P
PDSH
Parallel Distributed Shell
PMI
Process Management Interface
R
RPM
RPM Package Manager
S
SLURM
Simple Linux Utility for Resource Management – an
open source, highly scalable cluster management
and job scheduling system.
SSH
Secure Shell
Glossary
65
66
SLURM V2.2 - User's Guide
Index
/
/etc/init.d/slurm script, 25
/gfs2shared/slurmdata file system, 35
A
Authentication, 12, 21
C
Command Line Utilities, 37
Commands
sacct, 1, 37, 48
sacctmgr, 1, 37, 43
salloc, 1, 37, 41
sattach, 1, 37, 42
sbatch, 1, 37, 40
sbcast, 1, 37, 44
scancel, 1, 37, 47
scontrol, 2, 7
sinfo, 46
sinfo, 1, 37
squeue, 1, 37, 45
sreport, 1
srun, 1, 37, 39
sstat, 1
strigger, 1, 37, 49
sview, 1, 37, 50
Compute node daemon, 25
Files
slurm.conf, 6
slurmdbd.conf, 14
Functions, 1
G
Global Accounting API, 37, 51
H
HA Cluster Suite, 35
Hard Limit, 56
High Availability, 33
J
Job Accounting, 55
JobAcctGatherType parameter, 55
JobCredentialPrivateKey, 29
JobCredentialPublicCertificate, 29
L
large clusters, 55
LSF, 51
M
MPI Support, 37
Controller daemon, 25
Munge
installation, 12, 21
cpufreq governor, 57
munged daemon, 21
CPUs as Consumable Resources, 55
N
D
NodeAddr, 6
Daemons
munged, 21
SLURMCTLD, 2, 25, 26
SLURMD, 4, 25, 27
SlurmDBD, 4, 25, 28
NodeHostname, 6
Default Node Allocation, 55
P
Draining a node, 30
pam_slurm module, 21
F
NodeName, 6
O
oppensl, 16, 29
Power saving, 56
FastSchedule parameter, 56
R
Fault tolerance, 59
resource manager, 1
Index86 A2 45FD 01
67
ResumeProgram parameter, 57, 59
SLURMD daemon, 4, 25, 27
ResumeRate parameter, 57
SlurmDBD daemon, 4, 25, 28
ResumeTimeout parameter, 57, 59
slurmdbd.conf file, 14
S
SlurmdTimeout parameter, 56
sacct command, 1, 37, 48
Slurmstepd, 55
sacctmgr command, 1, 37, 43
SlurmUser, 16
salloc command, 1, 37, 41
squeue command, 1, 37, 45
sattach command, 1, 37, 42
sreport command, 1
sbatch command, 1, 37, 40
srun command, 1, 37, 39, 56
sbcast command, 1, 37, 44
sstat command, 1
scancel command, 1, 37, 47
strigger command, 1, 37, 49
Scheduler Types, 5
backfill, 5
builtin, 5
gang, 5
hold, 5
wiki, 5
SuspendExecNodes parameter, 57
scontrol command, 2, 7
Scontrol examples, 29
Secret Key, 22
security, 16, 29
SelectType configuration parameter, 28
SelectType parameter, 55
sinfo command, 1, 37, 46
slurm.conf file, 6
slurm.conf file example, 13
slurm_setup.sh Script, 17
slurmctld daemon, 59
SLURMCTLD daemon, 2, 25, 26
68
SLURM V2.2 - User's Guide
SuspendExecParts parameter, 57
SuspendProgram parameter, 57, 59
SuspendRate parameter, 57
SuspendTime parameter, 57
SuspendTimeout parameter, 57, 59
sview command, 1, 37, 50
syslog, 28
T
testing configuration, 20
Timers for Slurmd and Slurmctld daemons, 56
topology.conf file, 15
TreeWidth paramter, 56
troubleshooting, 61
U
using openssl, 16
BULL CEDOC
357 AVENUE PATTON
B.P.20845
49008 ANGERS CEDEX 01
FRANCE
REFERENCE
86 A2 45FD 01