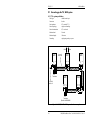
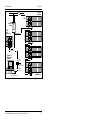
1
Local Instrument Network Installation
LIN/ALIN
LIN/ALIN INSTALLATION AND USER GUIDE
User Guide
EUROTHERM
LIN/ALIN INSTALLATION AND USER GUIDE
About
Title
Part Number
Issue (Date)
Intially
Supplied With
LIN/ALIN Installation and User Guide
HA 082 429 U005
2 (09/1998)
N/A
LIN/ALIN INSTALLATION AND USER GUIDE
© 2005
All rights are strictly reserved. No part of this document may be reproduced, modified, or transmitted in any form by
any means, nor may it be stored in a retrieval system other than for the purpose to act as an aid in operating the
equipment to which the document relates, without the prior written permission of the manufacturer.
The manufacturer pursues a policy of continuous development and product improvement. The specifications in this
document may therefore be changed without notice. The information in this document is given in good faith, but is
intended for guidance only. The manufacturer will accept no responsibility for any losses arising from errors in this
document.
LIN/ALIN INSTALLATION AND USER GUIDE
LIN/ALIN INSTALLATION AND USER GUIDE
LIST OF CHAPTERS
SECTION
TITLE
ISSUE
Contents ...................................................................................................................... 2
Chapter 1 LIN Installation ......................................................................................... 2
Chapter 2 ALIN Installation ...................................................................................... 2
Chapter 3 LIN Redundancy ....................................................................................... 2
Chapter 4 LIN/ALIN Fault-finding ........................................................................... 2
Index ........................................................................................................................... 2
EFFECTIVITY
This manual refers to the LIN and ALIN Local Instrument Networks.
NOTES
1
Sections maybe up-dated independently and so may be at different issues.
2
The Title page, and the manual as a whole, always take the issue number of the most recently
up-issued section.
All registered and unregistered trademarks are properties of their respective holders.
HA082429U005
Issue 2 Sep 98
Page i
LIN/ALIN INSTALLATION AND USER GUIDE
Contents
Contents
LIN/ALIN INSTALLATION & USER GUIDE
LIN/ALIN local instrument network Installation & User guide
Chapter 1
LIN INSTALLATION
1
2
3
4
5
6
Chapter 2
page
The LIN ...................................................................................... 1-1
LIN layout ................................................................................... 1-2
2.1 Stubs .................................................................................. 1-2
2.2 Cable routing ..................................................................... 1-2
2.3 Cable earthing .................................................................... 1-3
LIN cables ................................................................................... 1-3
3.1 Maximum cable lengths ..................................................... 1-3
3.2 Cable connectors & terminations ....................................... 1-4
Wiring in confined spaces .......................................................... 1-5
4.1 Type 2002 cable ................................................................. 1-5
4.2 Assembling type 2002 LIN cables ..................................... 1-6
Testing the LIN ........................................................................... 1-7
5.1 LIN installation: trouble-shooting checklist ..................... 1-8
LIN specifications ....................................................................... 1-9
ALIN INSTALLATION
1 Introducing the ALIN ................................................................. 2-1
2 ALIN cabling systems ................................................................ 2-1
2.1 Connecting up the 78Ω ALIN system ............................... 2-2
2.1.1 78Ω system specification .......................................... 2-2
2.1.2 Example T640/T221 ALIN network ........................ 2-3
2.2 Connecting up the 100Ω ALIN system ............................. 2-3
2.2.1 100Ω system specification (no active hubs) ............. 2-3
2.2.2 100Ω cabling ............................................................ 2-4
2.2.3 Examples of T103/303 ALIN networks ................... 2-6
2.2.4 RJ45 (S9572) 100Ω ALIN hub installation details .. 2-8
2.2.5 Active Hub installation
— MODHUB or AI Series hub .................. 2-9
LIN/ALIN Installation & User Guide HA 082 429 U005 Issue 2
Contents-1
Contents
2.3
Connecting up the 120Ω ALIN system ............................. 2-9
2.3.1 120Ω system specification ........................................ 2-9
2.3.2 120Ω cabling .......................................................... 2-10
2.3.3 Example of a T102/302 ALIN network .................. 2-10
2.3.4 BNO twin-ax (S9571) 120Ω ALIN hub
installation details .......................................... 2-11
2.4 Cable routing & earthing ................................................. 2-12
2.5 Interconnecting different ALIN systems ......................... 2-12
2.5.1 Connecting T640s to existing T640/T221 78Ω
ALIN installations ........................................ 2-12
2.5.2 Connecting T102/302s to existing T640/T221
78Ω ALIN installations ............................... 2-12
2.5.3 Connecting T103/303s to existing T640/T221
78Ω ALIN installations .............................. 2-12
2.5.4 Connecting T640s to existing T102/302
120Ω ALIN hub installations ..................... 2-13
2.5.5 Connecting T103/303s to existing T102/302
120Ω ALIN hub installations ................... 2-13
2.6 ALIN cabling components ............................................... 2-14
3 ALIN troubleshooting ............................................................... 2-15
3.1 Testing the ALIN before use ........................................... 2-15
3.2 ALIN installation: troubleshooting checklist .................. 2-16
Chapter 3
LIN REDUNDANCY
1 Redundant networks ................................................................... 3-1
2 LIN hardware .............................................................................. 3-1
2.1 LIN channel switching ....................................................... 3-1
2.2 LIN fault detection ............................................................. 3-2
2.3 LIN fault clearing .............................................................. 3-2
2.4 Hardware fault detection .................................................... 3-2
3 LIN operating modes .................................................................. 3-3
3.1 Automatic operation configuration .................................... 3-4
3.2 Forced operation configuration .......................................... 3-4
4 Broadcasting on the LIN ............................................................. 3-6
4.1 Multiple broadcasters ......................................................... 3-6
4.2 Power-up actions ............................................................... 3-7
Contents-2
LIN/ALIN Installation & User Guide HA 082 429 U005 Issue 2
Contents
Chapter 4
LIN/ALIN FAULT-FINDING
1
2
3
4
5
6
7
Overview of fault-finding on the LIN ........................................ 4-1
1.1 Layer structure of the LIN ................................................. 4-1
1.2 Fault-finding procedure outline ......................................... 4-1
1.3 Problems with LIN systems ............................................... 4-3
1.4 Symbols used in the diagnostic block tables ..................... 4-3
Setting up the test node ............................................................... 4-4
2.1 Configuring the test node’s resident diagnostic blocks ..... 4-4
2.2 Caching remote diagnostic blocks in the test node ............ 4-5
Initial checks on the Physical & MAC layers ............................. 4-6
3.1 Polling the LIN .................................................................. 4-7
3.1.1 Using ‘Poll LIN’ in LINtools VIEW ........................ 4-7
3.1.2 Using ‘Poll LIN’ in LINfiler ..................................... 4-7
3.2 Node numbers & database names ...................................... 4-7
3.3 T221 bridges ...................................................................... 4-8
3.4 Checking the Physical layer using the LRA block ............ 4-8
3.5 Checking the LIN MAC layer
using the LIN_DIAG block ............................... 4-9
3.6 Checking the ALIN MAC layer
using the ALINDIAG block ............................ 4-10
Tracing suspected cable/hardware faults .................................. 4-12
4.1 Identifying the LIN A connector ..................................... 4-12
‘Live’ cable checks using LIN_DIAG & LRA blocks ............. 4-14
Checking a suspect node ........................................................... 4-14
6.1 Disconnecting nodes from the LIN .................................. 4-16
6.2 BNC centre-pins .............................................................. 4-16
6.3 DC resistance measurements ........................................... 4-16
6.4 Time-domain reflectometry (TDR) ................................. 4-17
6.4.1 Testing RJ45/ALIN cable
using the Fluke® 652 LAN CableMeter ...... 4-17
6.4.2 Important instructions applicable to TDR testing ... 4-18
Measurements on ALIN signals ............................................... 4-18
7.1 Measuring signals at ALIN hubs ..................................... 4-18
7.2 Measuring signals at terminated ALIN cables (non-hub) 4-19
7.3 Diagnostic indications of ALIN signal measurements .... 4-19
7.4 Signal asymmetry in ALIN waveforms ........................... 4-21
LIN/ALIN Installation & User Guide HA 082 429 U005 Issue 2
Contents-3
Contents
8 Checking the higher LIN/ALIN layers ..................................... 4-22
8.1 Checking the LLC layer ................................................... 4-22
8.2 Checking the Network layer ............................................ 4-23
8.3 Checking the Application layer ....................................... 4-23
Index
Contents-4
LIN/ALIN Installation & User Guide HA 082 429 U005 Issue 2
LIN Installation
Ch1 §1
Chapter 1
LIN INSTALLATION
This chapter tells you about the LIN (Local Instrument Network) and how to install it.
The main topics covered are:
■ The LIN (§1)
■ LIN layout (§2)
■ LIN cables (§3)
■ Wiring in confined spaces (§4)
■ Testing the LIN (§5)
■ LIN specifications (§6)
1
THE LIN
The LIN (Local Instrument Network) is a token-passing masterless network running at
1Mbaud, allowing peer-to-peer communications and file transfer. Ch4 §1.1 explains the
‘layer structure’ of the LIN.
STATION*
BNC LIN
75Ω
terminator
Minimum
radius bend
Vacant node
STATION
Stress-relief
loop
BNC
female/female/male
F-adaptor
BNC
female/female/female
T-piece for LIN stub
BNC male
connector
STATION
LIN cable
75Ω
BNC LIN
75Ω
terminator
Earth
point
STATION
BNC 75Ω
female/female
earthed DIN rail
mounted connector
*Stub connection to node not recommended
Figure 1-1
LIN layout schematic
LIN/ALIN Installation & User Guide HA 082 429 U005 Issue 2
1-1
LIN Installation
Ch1 §2.2
2
LIN LAYOUT
Figure 1-1 schematises a simple 5-node single LIN layout. In practice a redundant pair of
LINs would be used if possible. Basically a LIN is one piece of coaxial cable with a BNC
75Ω terminator at each end. Nodes are introduced by inserting 3-way connectors at any
points in the cable. The preferred connector is a female/female/male ‘F’-adaptor, but female/male/female ‘T’-pieces can also be used. Note that additional connectors can be inserted in the cable in any positions and be left vacant to act as spare nodes for future expansion.
2.1 Stubs
Instrument stations are best connected directly to the adaptor at each node. If direct connection is not possible a short ‘stub’ of cable may be used between station and node.
Stubs should not be used unless absolutely unavoidable! To minimise degradation of
performance stubs should not be longer than 1 metre. Additionally, multiple stubs must be
separated by at least ten times the average stub length, as exemplified schematically in
Figure 1-2.
STATION
STATION
1m
STATION
1m
10m
1m
10m
Figure 1-2 Separation of multiple stubs — example
Where the stressing of connectors is a possibility in a stub cable, we recommend forming
stress-relief loops (shown in Figure 1-1). For these and any other bends in the cable the
manufacturer’s minimum bend radius must be observed — usually around 8cm.
A T-piece making a stub connection to the LIN is external to the conduit and should therefore be independently secured to a surface. For this, releasable wire clamps or wire cradles and clips fixed to the surface, or alternatively Phoenix BNC-BNC TS32 DIN-rail
mounted connectors, may be used.
2.2
Cable routing
For optimum performance the LIN cable should ideally lie in its own conduit or trunking.
Connections must be made outside the trunking and must be supported, preferably on DIN
rail. The LIN should not for any significant distance run parallel with cables carrying high
voltage switching transients or high frequency signals, e.g. thyristor drive signals for heaters, motors etc. If the LIN cable has to cross other cables the crossing should be made at
right-angles wherever possible. Where the LIN cable passes close to possible sources of
1-2
LIN/ALIN Installation & User Guide HA 082 429 U005 Issue 2
LIN Installation
Ch1 §3.1
interference it should be enclosed in special conductive conduit and earthed to minimise
the risk of network interruptions. With a redundant pair of LIN cables, each should ideally
take a different physical path, for security. Sections of the two cables need not be the
same length. Refer to EMC Installation Guidelines for Eurotherm Process Automation
Systems Products (Part No. HG 083 635 U001) for recommendations on cabling.
2.3
Cable earthing
For safety reasons, the LIN cable sheath should be earthed at 100m intervals and wherever
it passes through cubicle walls, bulkheads, etc. This can be done using earthed female/
female bulkhead adaptors, mounted on TS32 DIN rails. When separate network cable
earth points are used the resistance between these points should not exceed 2Ω.
3
LIN CABLES
The LIN transfer medium is coaxial cable of 75Ω characteristic impedance, able to handle
configurations of up to 32 nodes at a nominal maximum cable length of 1000 metres. For
full performance characteristics Eurotherm Process Automation recommends cables and
connectors compatible with Belden 9114 or 9118 standards. However, in situations where
a more flexible cable is required for wiring in confined spaces (such as cubicles), limited
amounts of a lower-specification cable — type 2002 — may be used. Please refer to §4,
Wiring in confined spaces.
3.1 Maximum cable lengths
The LIN is subject to a maximum permitted overall cable length depending on its attenuation, as shown in Table1-1. Equivalent approximate attenuation values are given for the
range of operating frequencies often quoted in catalogues. The table can be extrapolated
for lengths exceeding 1000m — possible with very low-loss cables. Note that the values
in the table apply also when fewer than 32 stations are connected. This is because although a theoretical de-rating is possible it is usually negligible, and is not advisable in
case expansion in the number of connected nodes becomes necessary.
Cable Attenuation (dB/100m) Quoted @
1MHz
10MHz
100MHz
1000MHz
0.6
1.2
2.4
6
12
24
60
2
4
8
20
40
80
200
7
13
26
66
132
265
662
23
44
88
220
440
880
2190
Max. Permitted
Cable Length
(metres)
1000
500
250
100
50
25
10
Table 1-1 LIN cable attenuation versus maximum cable length
LIN/ALIN Installation & User Guide HA 082 429 U005 Issue 2
1-3
LIN Installation
Ch1 §3.2
3.2 Cable connectors & terminations
A summary of LIN cables and connector types that may be required for a LIN installation
is given in Table 1-2. Note that complete lengths of cable can be made to order by Eurotherm Process Automation. It is strongly recommended that with a redundant pair of LIN
cables, each LIN is distinguished by having colour-coded BNC connector sleeves. For
consistency, Eurotherm Process Automation recommends as standard using red for LIN A
and blue for LIN B. When ordering a fully assembled LIN cable or any of the connectors
S9505-1/005 to 007 you can specify a sleeve colour; the default is black.
Component
EPA [Mfg’s] PN
Notes
Preferred boot colours:
LIN A red, LIN B blue
LIN 75Ω GENERAL PURPOSE
75Ω LIN cable (black)
[Belden 9114]
LIN cable 10m
S9505-1/010
LIN cable 150m reel
S9505-1/011
LIN cable 300m reel
S9505-1/012
BNC female/female earthed support bracket
S9505-1/002
BNC 75Ω connector, female/female earthed single
S9505-1/013
DIN-rail mounting
BNC 75Ω connector, female/female Isolated single
S9505-1/014
DIN-rail mounting
LIN cable assembly
S9505-1/ASS/xxx
Specify length and colour code
75Ω BNC male clamp/solder plug
S9505-1/015
Preferred connector for Belden 9114
75Ω BNC male twist-on plug
S9505-1/005
For Belden 9114
Connector sleeve
DQ 080934/xxx
Various colours for twist-on
Cable stripping tool
S9517-1/JA081967
For twist-on type connectors
Cable stripping tool — replacement blades
JA082975
LIN 75Ω FLEXIBLE
Preferred boot colours:
LIN A red, LIN B blue
75Ω LIN flexible cable (white)
[BICC, LDW Cables 2002]
To BT Specification CW1229
75Ω LIN flexible cable (cut length)
S9505-4/001/xxx
Specify length
75Ω BNC male crimp plug
S9505-4/002
Strain relief boots
S9505-4/003
Crimp tool for 2002
S9505-4/004
Cable stripping tool for 2002
S9505-4/005
Various colours
Table 1-2 continued …
1-4
LIN/ALIN Installation & User Guide HA 082 429 U005 Issue 2
LIN Installation
Ch1 §4.1
… Table 1-2 continued
Component
EPA [Mfg’s] PN
Notes
75Ω BNC terminator
S9505-1/001
Many suitable manufacturers
75Ω BNC female-female-female ‘T’
S9505-1/003
Stub cable connection
75Ω BNC female-male-female ‘T’
S9505-1/004
Direct node connection
75Ω BNC female-male-female ‘F’
S9505-1/008
Direct node connection
75Ω BNC female-male-female ‘Y’
[Wadsworth 350-3210]
Direct node connection
LIN ACCESSORIES
Table 1-2
LIN cable components
NOTE. Connections and terminations should be made to high standards and we
recommend the use of solder connectors. Crimp connectors are also recommended, particularly with stranded cores. ‘Twist on’ type connectors may also be
used — especially for solid-core cables. These are of one-piece construction and
are simple to fit, but note that they can sometimes loosen if not carefully assembled according to the manufacturer’s instructions. For consistency and reliability
we strongly recommend using the special LIN cable wire stripping tool to make
the twist-on connections (see Table 1-2).
4
WIRING IN CONFINED SPACES
4.1 Type 2002 cable
For wiring the LIN inside confined spaces such as cubicles, a more flexible cable than
Belden 9114 may sometimes be required. We strongly recommend type number 2002 coaxial cable, which conforms to BT specification CW1229. This cable is not intended to
replace the preferred Belden 9114 coaxial cable, and should be used only in situations
where the 9114 is unsuitable owing to its stiffness and larger bend radius. The minimum
bend radius for 2002 cable is around 25mm.
The 2002 cable can be safely used up to a maximum total length of 100m without degrading the performance of the LIN, or reducing the total transmission distance of 1000m,
when used in conjunction with 9114 cable. For reasons of reliability, if you intend to assemble your own LIN cables we strongly recommend that you:
■ use only EPAL-approved components and assembly tools, obtained through us or from
approved suppliers. Table 1-3 lists the necessary components and EPAL part numbers.
■ carry out the assembly in the way detailed below in §4.2, Assembling type 2002 LIN
cables.
LIN/ALIN Installation & User Guide HA 082 429 U005 Issue 2
1-5
LIN Installation
Ch1 §4.2
Component
EPA [Mfg’s] PN
Notes
75Ω LIN flexible cable (white)
[BICC, LDW Cables 2002]
To BT Specification CW1229
75Ω LIN flexible cable (cut length)
S9505-4/001/xxx
Specify length (xxx metres)
75Ω BNC male crimp straight plug
S9505-4/002
Crimps to 2002 cable
Strain relief boot
S9505-4/003/colour
Specify colour
Crimp tool for 2002
S9505-4/004
Hex, for 5-6mm cables
Cable stripping tool for 2002
S9505-4/005
Quick cut-&-strip
Table 1-3 Type 2002 LIN cable components
4.2 Assembling type 2002 LIN cables
Please refer to Figure 1-3. To fix a BNC straight plug to the end of a length of 2002-type
cable, carry out the following instructions:
1 Strip the end of the cable to the dimensions shown in Figure 1-3a, using the cablestripping tool. (Follow the instructions supplied by the manufacturer for the use of
this tool. In particular, ensure that the maximum cutting depths have been set so as not
to damage the conductors.) If necessary, trim the stripped inner conductor to the correct length by hand.
2 Check that the outer conductor braid has been evenly cut by the tool and is not twisted.
Trim it and even it up as required.
3 Pass the strain-relief boot and then the ferrule onto the cable.
4 Fit the centre contact over the stripped inner conductor and crimp it on using the BNC
crimp tool (Figure 1-3b).
5 Loosen the outer conductor braid, then push the plug body fully home onto the cable
under the loosened braid.
6 Slide the ferrule over the braid and secure it to the plug body using the crimp tool.
7 Finally, push the strain-relief boot over the completed plug assembly (Figure 1-3c).
1-6
LIN/ALIN Installation & User Guide HA 082 429 U005 Issue 2
LIN Installation
Ch1 §5
Ferrule
Centre contact
Strain-relief boot
Plug body
11.0
7.5
a
15.0
b
Crimping area
c
Crimping area
Figure 1-3 Assembly of type 2002 cable
5
TESTING THE LIN
Care is needed to achieve a high standard of LIN cabling, because any faults in the cables
or connections degrade the performance of the control system. For example, intermittent
loss of communications can cause excessive numbers of ‘re-tries’ and so effectively slow
down the control action. LIN cable installations should therefore be resistance-tested before use for intermittent, resistive, and open circuit connections. Remember that
LIN_DIAG (and other) function blocks can be included in control strategies to help diagnose and pinpoint sources of communications problems. Eurotherm Process Automation
Limited strongly recommend the use of time-domain reflectometry (TDR) to test and validate all LIN installations. Our Customer Services Division will be happy to carry out this
work — please contact them for details of price and availability.
LIN/ALIN Installation & User Guide HA 082 429 U005 Issue 2
1-7
LIN Installation
Ch1 §5.1
If you suspect that your network is malfunctioning you can refer to Chapter 4 of this handbook, LIN/ALIN fault-finding. This details how to pinpoint cable and connector faults, and
gives some outline guidance on tracing higher-level software problems. Some instructions
for using TDR are also given in §6.4 of Chapter 4.
§5.1 following presents a trouble-shooting and ‘fault-avoidance’ checklist that should be
observed when installing/checking LINs.
5.1
LIN installation: trouble-shooting checklist
❏ The LIN redundancy algorithm works by detecting differences between the signals on
the two LIN cables. Thus, if redundant cables are being used it is essential that both
are connected to all instruments.
❏ The LIN cabling must be carefully and correctly made with approved components and
with a 75Ω terminator fitted to each end of the cable. If terminators are not fitted, the
instruments may communicate only intermittently.
❏ Each instrument must have a unique node address on the LIN, and no address must be
set to 00 or FF (hex). If an instrument is connected to the LIN with a non-unique address, one or other of the instruments concerned will show a permanently illuminated
Comms Fail light.
❏ After an instrument’s node address has been changed, the instrument must be powered
off and on, and if possible, all instruments on the LIN segment which ‘know’ about it
should also be reset.
❏ When a database name is changed after being run in an instrument, or a new database
with a different name is run, reset all other instruments on the LIN segment that
‘knew’ about the previous database. This allows them to forget the old database name
and associate the new name with that node.
❏ The root block name (e.g. T100 or T640 block) in a database defines the database
name and must be unique across a network. Any reference to this database from a remote instrument must match the database name and node address exactly.
❏ Connections between real blocks must not be duplicated in their cached images. Do
not forget to delete duplicated connections if a database is copied and cached.
❏ Although you can connect between either real blocks or their cached images, faster
comms are achieved by connecting between the real blocks. It is also more efficient to
connect from a cached block into a real block than the other way round.
❏ Ensure that cached block types match the real block types exactly. E.g. if the real
block is a PID, ensure that the cached block is also a PID.
❏ Ensure that cached block names match the real block names exactly. This type of mismatch is the usual cause of software alarms.
❏ Do not leave cached blocks existing without their matching real blocks, e.g. after deleting a database. This slows down communications as well as causing software
alarms.
1-8
LIN/ALIN Installation & User Guide HA 082 429 U005 Issue 2
LIN Installation
Ch1 §6
❏ Check for software alarms in all databases. Track down the causes of any alarms and
eliminate them.
❏ Check the DB_DIAG block for consistent values. The number of Teatts (To External
ATTachments) should match the number of Featts (From External ATTachments) between real and cached databases.
❏ Check the LIN_DIAG block to ensure that Tot_fail, Xmt_blok, and Xmt_Urun are not
incrementing. If they are, a cabling fault is indicated.
6
LIN SPECIFICATIONS
Cable type:
coaxial.
Connectors:
BNC 75Ω.
Line impedance:
Network topology:
Network terminations:
Maximum load:
Maximum length:
Grounding:
LIN/ALIN Installation & User Guide HA 082 429 U005 Issue 2
75Ω nominal.
single, non-branching.
75Ω at each end.
32 nodes.
1000 metres.
For safety, at 100m intervals.
1-9
[This page intentionally blank]
ALIN Installation
Chapter 2
Ch2 §2
ALIN INSTALLATION
This chapter tells you about the ALIN (Arcnet Local Instrument Network) and how to install it. The main topics covered are:
■ Introducing the ALIN (§1)
■ ALIN cabling systems (§2)
■ ALIN troubleshooting (§3)
1
INTRODUCING THE ALIN
The ALIN (Arcnet Local Instrument Network) is a single, non-branching token-passing
masterless network running at 2.5Mbaud, allowing peer-to-peer communications and file
transfer. It is intended for use within a suite of cubicles only. For long-distance communications — up to a kilometre — the LIN system may be used, connected to ALIN via the
T221 bridge. Alternatively, the ALIN may be extended beyond 100m by using a fibre optic Mod-Hub (PN S9574), which is the preferred method.
ALIN and LIN have identical protocols, allowing communications between T600 series
instruments and T1000, T100, T2001, and Maxi-Vis systems, via the T221 bridge. The
bridge performs buffering, signal level and format conversion, and co-ordinates token rotation on the networks.
2
ALIN CABLING SYSTEMS
There are three types of cabling system currently in use:
■ 78Ω system. This was used initially for T640 Integrated Loop Processor & T221
LIN/ALIN Bridge installations, connected via rear-panel screw terminals, and is described in §2.1. Note that the 100Ω system is now preferred.
■ 100Ω system. This is used for T103/303 Unit Controller/Supervisor networks,
connected either via an S9572 ALIN hub or (more usually) ‘daisychained’. It can also
be used for connecting T640s to the network, and is described in §2.2.
■ 120Ω system. This was used in the older T102/302 Unit Controller/Supervisor
networks, connected via twin-ax BNO connectors and an S9571 ALIN hub. See §2.3.
Although not the ideal configuration, it is possible — subject to certain restrictions — to
interconnect the different cabling systems successfully. See §2.5 for information.
Table 2-1 in §2.6 lists ALIN cabling components recommended for use in all types of
ALIN installation.
LIN/ALIN Installation & User Guide HA 082 429 U005 Issue 2
2-1
Ch2 §2.1.1
ALIN Installation
2.1 Connecting up the 78Ω ALIN system
2.1.1 78Ω system specification
Cable type:
shielded twisted pair.
Connectors:
ferrules.
Line impedance:
82Ω nominal (78Ω).
Network topology:
single, non-branching.
Network terminations:
82Ω at each end.
Maximum load:
20 nodes.
Maximum length:
100 metres.
Grounding:
single point ground per system.
LIN A
T640
Gnd A B
20 21 22
82Ω
Terminator
To earthed
metalwork
Screened
ALIN cable
LIN B
T221
T640
Gnd A B
20 21 22
Gnd A B
20 21 22
T640
T640
Gnd A B
20 21 22
Gnd A B
20 21 22
82Ω
Terminator
(Part No. LA082586U00
Figure 2-1 T640/T221 78Ω ALIN layout schematic — example
2-2
LIN/ALIN Installation & User Guide HA 082 429 U005 Issue 2
ALIN Installation
Ch2 §2.2.1
2.1.2 Example T640/T221 ALIN network
Figure 2-1 schematises a simple 5-node T640/T221 ALIN layout.
Basically, the ALIN is one piece of twisted pair cable with an 82Ω terminator at each end.
(The standard 82Ω-value is close enough to the cable’s characteristic impedance for practical purposes.) Instrument stations are connected directly to the cable via screw terminals
20 (screen), 21 (phase A), and 22 (phase B). Bootlace ferrules are strongly recommended.
Phases A and B must be consistently connected and not ‘crossed’ between nodes. Do not
use ‘stubs’ of cable. Refer to the T640 Product Manual (Part No. HA 082 468 U999) for
general information on T640 connections and wiring.
Cable types. For full performance characteristics Eurotherm Process Automation recommends cables and connectors compatible with Belden 9272 (twin axial) standards.
These have losses of no more than 2dB/100m @ 1MHz. Screened cable should be used
wherever possible, even for short runs (<10m), e.g. between instruments within the same
cubicle. Cable with ~0.5 to 1 twists per cm can be used, with an attenuation of no more
than 10dB/100m @ 1MHz (nominal). See Table 2-1 in §2.6 for a list of the recommended
cables and accessories.
Earthing. The ALIN cable sheath should ideally be earthed at a single point only. If
separate network cable earth points are used the resistance between these points should not
exceed 2Ω. Refer to EMC Installation Guidelines for Eurotherm Process Automation Systems Products (Part No. HG 083 635 U001) for recommendations on cabling and earthing.
NOTE. The ALIN ground terminal (screw terminal 20) is not internally connected. Its purpose is only to provide continuity between lengths of cable screen,
as shown in Figure 2-1, and it must therefore be connected to earthed metalwork
at one point.
2.2 Connecting up the 100Ω ALIN system
2.2.1 100Ω system specification (no active hubs)
Cable type:
Category 5, four twisted pairs, foil shielded.
Connectors:
RJ45 (T103/303), ferrules (T640/T221)
Line impedance:
100Ω nominal.
Network topology:
single non-branching (daisychain); star (S9572 ALIN hub).
Network terminations:
100Ω at each end of daisychain segment (none for ALIN
hub).
Maximum node count:
daisychain, 16 nodes; hub, 12 nodes. (T103/303 with duplex/redundant processors (T920/921) count as two nodes.)
Maximum segment length:
100 metres. (3 metre max. drops with hub.)
Minimum node separation:
2 metres (If impossible to keep to minimum, up to 6 nodes
may be grouped together.)
LIN/ALIN Installation & User Guide HA 082 429 U005 Issue 2
2-3
Ch2 §2.2.2
ALIN Installation
Node positioning:
With two or more nodes, avoid positioning nodes at 23m
and 57m from a terminator. These positions can cause signal reflections that interfere with the true signals.)
Stub connections:
Not to be used.
Signal strength:
With large node counts (12 - 16) all signals must exceed
5V peak-to-peak.
Signal asymmetry:
With large node counts (12 - 16) signal asymmetry must
not exceed 10% at a terminator, for reliable operation.
(See Ch4 §7.4.)
Grounding:
RJ45: via sockets; ferrules: single point ground.
2.2.2 100Ω cabling
The following points must be observed:
■ Components. Consult Table 2-1 in §2.6 for a list of cables and cabling components.
■ RJ45 plug. Figure 2-2 shows the wiring of the RJ45 plug. Note that in the standard RJ45-to-RJ45 cable (Order No. S9508-5/2RJ45) all eight ways are wired to make
a ‘universal’ cable capable of connecting serial as well as ALIN systems. The ALIN
system uses only pin 4 (blue wire — ALIN phase A), and pin 5 (white/blue wire —
ALIN phase B), and the cable screen. The remaining wires do not connect to the
ALIN system.
Socke
8
RJ45
Universal cable
4− pair screened twisted
pair 100Ω Category 5
Order No.
S9508-5/2RJ45
1
Lock tag
Plug shroud bonded to cable scree
Cable screen = chassis
1= 422:RX– [485:Data–] (white/orange
2= 422:RX+ [485:Data+] (orange)
3= 0V (white/green)
4= ALIN phase A (blue)
5= ALIN phase B (white/blue)
6= 0V (green)
7= TX 422– (white/brown)
8= TX 422+ (brown)
Figure 2-2 RJ45 connector wiring for 100Ω ALIN systems
2-4
LIN/ALIN Installation & User Guide HA 082 429 U005 Issue 2
ALIN Installation
Ch2 §2.2.2
NOTE. If you are wiring your own connectors, be sure to fit the correct RJ45
plug for the type of cable in use. Stranded cables require a different plug type
from solid-core cables, although the plugs look the same superficially. See Table
2-1, §2.6, for EPA part numbers.
■ Earthing. No special earthing arrangements need be made for the ALIN cabling
itself, as earthing is carried out via the ALIN connector sockets on the nodes.
If runs are required between buildings, fibre optic hubs should be used to isolate the
signals and the earths. See §2.2.5.
■ Bends. Ensure a minimum bend radius for Category 5 cable of not less than 6cm.
■ Markers & ties. Do not overtighten identification markers, cable ties, or cable
supports on Category 5 cable. Crushing the outer jacket can change the characteristic
impedance and cause interfering reflections.
■ Unshielded cable. Ensure that the amount of cable left unshielded (i.e. in connections to screw terminals) is minimised, and is always less than 3cm per connection.
LIN/ALIN Installation & User Guide HA 082 429 U005 Issue 2
2-5
ALIN Installation
Ch2 §2.2.3
LIN A
LIN B
T103 Unit
Controller
CPUs
T221
LIN/ALIN
Bridge
A
B
S9508-5/2RJ45
S9508-5/1RJ45
T303
Unit
Supervisor
ALIN
HUB
Portable PC
Workstation
(LINtools)
S9572
S9508-5/2RJ45
S9508-5/2RJ45
S9565 PCALIN (RJ45)
≤3m
I/O MODULES
Figure 2-3 ALIN network example using 100Ω star configuration via ALIN hub
2.2.3 Examples of T103/303 ALIN networks
Figure 2-3 schematises an ALIN network interconnecting T103/303s (Unit Controller/Supervisor), a T221 (LIN/ALIN Bridge), and a PC workstation via an S9572 ALIN hub.
Note that the maximum drop length per node is 3 metres. See §2.2.4 for the S9572 ALIN
hub installation details. Figure 2-4 shows the equivalent network connected in a ‘daisychain’ configuration. This needs no hub, but terminators must be used at each end of the
chain.
Refer to the T103/303 Unit Controller/Supervisor Handbook, within the T103/303 Unit
Controller/Supervisor Product Manual (Part No. HA 083 671 U999), for more information on these configurations.
2-6
LIN/ALIN Installation & User Guide HA 082 429 U005 Issue 2
ALIN Installation
Ch2 §2.2.3
LIN A
LIN B
T103 Unit
Controller
CPUs
A
T303
Unit
Supervisor
S9508-5/1RJ45
S9508-5/1RJ45
B
S9508-5/2RJ45
T221
LIN/ALIN
Bridge
S9508-5/2RJ45
Portable PC
Workstation
(LINtools)
LA 250481
(RJ45 bus box)
LA 249397
(100Ω terminator)
S9508-5/2RJ45
(short stub)
I/O MODULES
S9565 PCALIN (RJ45)
LA 249397
Figure 2-4 ALIN network example using 100Ω daisychain configuration
LIN/ALIN Installation & User Guide HA 082 429 U005 Issue 2
2-7
ALIN Installation
Ch2 §2.2.4
2-off 5mm mounting
holes on case back
2-off 4.8mm
mounting holes on
bracket
12-off RJ45
sockets
1
113
170
159
145
C/L
8
50
95
6-off cover
fixing screws
Label carrier
49
Removable
panel-mounting bracket
2-off
bracket
studs
Figure 2-5 S9572 100Ω ALIN hub dimensions (mm)
2.2.4 RJ45 (S9572) 100Ω ALIN hub installation details
Figure 2-5 shows dimensions and installation details for the RJ45-based 100Ω ALIN hub
(Order No. S9572). Use of a hub configuration is recommended where integrity of the
ALIN network is considered to be at risk.
Direct mounting. The hub may be bolted directly (minus the mounting bracket) to a
chassis or panel via the pair of 5mm mounting holes in the back of the case. These are accessed by unscrewing the six cover-fixing screws and removing the cover plus integral
RJ45 sockets.
Mounting via the removable bracket. Alternatively, you can attach the hub via
the same 5mm holes to the pair of studs on the mounting bracket, and then bolt the bracket
plus hub to a panel via the pair of 4.8mm mounting holes.
DIN-rail mounting. Another method is to bolt a pair of DIN rail clips (Part No. FI
083 283) either directly to the hub using the 5mm holes, or to the hub plus bracket using
the 4.8mm holes, then clip the assembly onto a DIN rail.
2-8
LIN/ALIN Installation & User Guide HA 082 429 U005 Issue 2
ALIN Installation
Ch2 §2.3.1
2.2.5 Active Hub installation — MODHUB or AI Series hub
The following specifications apply to any ALIN segment connected to an active hub.
Network terminations:
MODHUB terminates a segment. Terminate opposite end
of segment with 100Ω.
AI Series hub can be fitted anywhere in a segment. Terminate both ends of segment with 100Ω.
Maximum node count:
8 nodes per segment. (For segments outside a cabinet, include hub in the node count. Within a cabinet, exclude hub
from node count.)
Maximum segment length:
122 metres (twisted pair bus).
100 metres (twisted pair star)
915, 1825, or 2740 metres (fibre optic cable, depending on
fibre grade used).
Minimum node separation:
2 metres. (Short segments with less than four nodes inside
a cabinet need not maintain 2m separation.)
Hub interconnection:
Active hubs must not be connected to passive hubs.
If two MODHUBs are connected together in a segment,
there must be no other nodes in that segment. If more
nodes are required, AI Series hubs must be used, but see
following Note.
NOTE. For reliable operation of ARCNET nodes in a twisted pair bus segment,
MODHUBs should terminate only one end the segment. Distributed star topologies with a MODHUB directly connected to another MODHUB are unreliable.
AI Series hubs can provide reliable comms when used at both ends of a twisted
pair bus with terminators fitted.
2.3 Connecting up the 120Ω ALIN system
2.3.1 120Ω system specification
Cable type:
shielded twisted pair.
Connectors:
BNO twin-ax.
Line impedance:
120Ω nominal.
Network topology:
ALIN hub ‘star’.
Network terminations:
None (terminations performed by the hub).
Maximum load:
11 BNO nodes plus 1 test node (see §§ 2.5.4 & 2.5.5).
Maximum length:
3 metres per node.
Grounding:
earth stud or via sockets; ferrules: single point ground.
LIN/ALIN Installation & User Guide HA 082 429 U005 Issue 2
2-9
ALIN Installation
Ch2 §2.3.3
2.3.2 120Ω cabling
Consult Table 2-1 in §2.6 for a list of cables and cabling components. Note that in the
120Ω BNO twin-ax system, the sockets on the nodes and hub carry ALIN phase A, and
the pins carry ALIN phase B.
Earthing. No special earthing arrangements need be made for the ALIN cabling itself,
as earthing is carried out via the ALIN connector sockets on the nodes.
2.3.3 Example of a T102/302 ALIN network
Figure 2-6 schematises an ALIN network interconnecting T102/302s (Unit Controller/Supervisor), and a T221 (LIN/ALIN Bridge) via an S9571 ALIN hub. Note that the maximum drop length per node is 3 metres. No terminators are required.
LIN A
LIN B
T102 Unit
Controller
CPUs
T221
LIN/ALIN
Bridge
A
B
S9508-4/2BNC
S9508-4/1BNC
T302 Unit
Supervisor
S9508-4/2BNC
ALIN
HUB
S9571
up to 3m
I/O MODULES
Figure 2-6 ALIN hub network example — 120Ω system
2-10
LIN/ALIN Installation & User Guide HA 082 429 U005 Issue 2
ALIN Installation
Ch2 §2.3.4
Refer to the T102/302 Unit Controller/Supervisor Installation & User Guide, within the
T102/302 Product Manual (Part No. HA 083 208 U999), for more information on these
configurations.
2.3.4 BNO twin-ax (S9571) 120Ω ALIN hub installation details
Figure 2-7 shows dimensions and installation details for the BNO-based 120Ω ALIN hub
(Order No. S9571). The RJ11 socket on the hub may be used to attach a computer terminal via an Arcnet card, for configuring nodes on the ALIN; use a standard RJ11-to-RJ11
cable (one may have been supplied with the Arcnet card). The M4 earth stud can be used
as a safety earth point.
See §2.2.4 for details of panel-mounting and DIN-rail mounting the hub.
2-off 5mm mounting
holes on case back
2-off 4.8mm
mounting holes
on bracket
Removable
panel-mounting
bracket
16-off BNO
twin-ax sockets
113
159
145
170
C/L
8
50
95
6-off cover
fixing screws
Earth stud M4
49
RJ11
socket
Label carrier
14
2-off
bracket
studs
Figure 2-7 S9571 120Ω ALIN hub dimensions (mm)
LIN/ALIN Installation & User Guide HA 082 429 U005 Issue 2
2-11
Ch2 §2.5.3
2.4
ALIN Installation
Cable routing & earthing
For optimum performance the ALIN cable should ideally lie in its own conduit or trunking. Connections must be made outside the trunking and must be supported, preferably on
DIN rail. The ALIN should not for any significant distance run parallel with cables carrying high voltage switching transients or high frequency signals, e.g. thyristor drive signals
for heaters, motors etc.
If the ALIN cable has to cross other cables the crossing should be made at right-angles
wherever possible. Where the ALIN cable passes close to possible sources of interference
it should be enclosed in special conductive conduit, earthed to minimise the risk of network interruptions.
Refer to the Eurotherm Process Automation publication EMC Installation Guidelines for
Eurotherm Process Automation Systems Products (Part No. HG 083 635 U001) for recommendations on cabling, earthing, and EMC compliance.
2.5 Interconnecting different ALIN systems
Ideally, for best results, the cable characteristic impedance throughout an ALIN system
should be the same. However, it is possible — subject to certain restrictions — to interconnect the different cabling systems successfully. In general, a ‘daisychained’ ALIN segment should be terminated with a resistance at each end of value consistent with the cable
impedance. This minimises unwanted signal reflections. A small mismatch in cable impedance is tolerable provided that the main length is compatible with the terminators and
is long compared to the cable of non-consistent impedance.
The following sections give examples of acceptable ‘mixed’ ALIN systems, and also advice on extending existing installations.
2.5.1 Connecting T640s to existing T640/T221 78Ω ALIN installations
For this you should continue with the existing 78Ω cable and terminators (as described in
§2.1).
2.5.2 Connecting T102/302s to existing T640/T221 78Ω ALIN installations
Please refer to Eurotherm Process Automation for advice on any particular installation.
2.5.3 Connecting T103/303s to existing T640/T221 78Ω ALIN installations
For this we recommend that you rewire the system as far as possible with 100Ω Category
5 cable and terminators in daisychain configuration (see Table 2-1 in §2.6 for a list of
components). Existing 78Ω cabling may be retained provided that its length is small compared to the total length of the new 100Ω cable, and in any case is not longer than a few
metres. A 100Ω terminator must be fitted at each end of the chain.
2-12
LIN/ALIN Installation & User Guide HA 082 429 U005 Issue 2
ALIN Installation
Ch2 §2.5.5
2.5.4 Connecting T640s to existing T102/302 120Ω ALIN hub installations
Connect the T640s to spare channels on the S9571 ALIN hub (shown in Figure 2-6 in
§2.3.3) up to a maximum of 12. Use 120Ω BNO-to-ferrules cabling (Order No. S9508-4/
1BNC) respecting the maximum drop length of 3 metres.
2.5.5 Connecting T103/303s to existing T102/302 120Ω
ALIN hub installations
Connect the T103/303s to spare channels on the S9571 ALIN hub (shown in Figure 2-6 in
§2.3.3) up to a maximum of 12. Use 100Ω Category 5 cable fitted with a twin-ax BNO
connector at the hub end and an RJ45 plug at the T103/303 end (special order item — contact factory). Respect the maximum drop length of 3 metres.
LIN/ALIN Installation & User Guide HA 082 429 U005 Issue 2
2-13
Ch2 §2.6
ALIN Installation
2.6 ALIN cabling components
Table 2-1 lists the cabling and cabling components you may need for ALIN installations of
all types. For information on components not in the table, or special orders, contact the
factory.
Component
EPA [Mfg’s] PN
ALIN 78Ω SHIELDED TWISTED PAIR
Notes
Original T640/T221 system
78Ω ALIN cable (blue)
CM083043
78Ω ALIN cable assembly — 2 x ferrules
S9508-1/2FER/xxx
Specify length
78Ω ALIN cable assembly — 1 x BNO, ferrules
S9508-1/1BNC/xxx
Specify length
82Ω terminator
LA 082586U001
Standard 78Ω installation
ALIN 120Ω SHIELDED TWISTED PAIR
T102/302, S9571 hub BNO system
120Ω ALIN cable (blue)
CM083025
120Ω BNO male clamp/solder connector
CI083589
120Ω BNO terminator
CI249472
120Ω cable assembly, BNO to ferrules
S9508-4/1BNC/xxx
xxx - length (m). Hub to T221 bridge
120Ω cable assembly, BNO to BNO
S9508-4/2BNC/xxx
xxx - length (m). Hub to T102/302s
ALIN 100Ω FOIL SHIELDED CAT 5 CABLE
Twin-ax BNO connector
T103/303 RJ45 system, also T640
Cable —
Cat 5 Patch Systems Cable (4 pairs) (white)
CM248894
Preferred
Cat 5 Patch Systems Cable (4 pairs) (white)
CM250448
Stranded, for flexible runs
Cat 5 Patch Cord type FTP (4 pairs) (grey)
[BICC H9670], [Farnell Elec. Services 407283G]
Cat 5 Patch Cable type FTP (4 pairs) (grey)
[MOHAWK M55162], [Farnell Components 473-261]
Plugs —
8-position line, stranded shielded plug
CI248893
For stranded cable (RJ11/RJ45
adapter only)
8-position line, solid wire shielded plug
CI250449
For solid core cable
EPA MANUFACTURED 100Ω CAT 5 CABLES
2 x RJ45 connectors
S9508-5/2RJ45/xxx
1 x RJ45 connector, ferrules
S9508-5/1RJ45/xxx
2 x ferrules
S9508-5/2FER/xxx
xxx - length (metres)
Table 2-1 continued …
2-14
LIN/ALIN Installation & User Guide HA 082 429 U005 Issue 2
Ch2 §3.1
ALIN Installation
… Table 2-1 continued
Component
EPA [Mfg’s] PN
Notes
RJ11 to RJ45 crossover adapter (stranded cable)
S9508-5/RJ11-45X/xxx/-
For active hubs (uses 6-way RJ11 plug
C1250403)
RJ11 to RJ45 direct adapter (stranded cable)
S9508-5/RJ11-45D/xxx/-
For SMC Arcnet card (uses 6-way
RJ11 plug C1250403)
Unassembled cable
S9508-5/-/xxx
PRE-MADE 100Ω CAT 5 CABLES
Mod-Tap shielded twisted pair line cords 1m
[Farnell Elec. Services 406883H] Type no 45MA-2-010-8A
Mod-Tap shielded twisted pair line cords 2m
[Farnell Elec. Services 406884F]
Shielded cable assembly 4ft
[AMP 557827-2]
Shielded cable assembly 8ft
[AMP 557827-4]
Shielded cable assembly 12ft
[AMP 557827-5]
Shielded Modular Cables 1m
[VIDEK 8961-1]
Shielded Modular Cables 2m
[VIDEK 8961-2]
Shielded Modular Cables 10m
[VIDEK 8961-10]
Modular plug professional handtool
[AMP 20231652-1]
Preferred
100Ω terminator RJ45
LA 249397
Compatible with RJ45 system
100Ω terminator, terminal mounting
LA 246779UK10
Compatible with RJ45 system
Table 2-1
3
Type no 45MA-2-020-8A
ALIN cable components
ALIN TROUBLESHOOTING
3.1
Testing the ALIN before use
Care is needed to achieve a high standard of ALIN cabling, because any faults in the cables or connections will degrade the performance of the control system. For example, intermittent loss of communications can cause excessive numbers of ‘re-tries’ and so effectively slow down the control action. ALIN cable installations should therefore be resistance-tested before use for intermittent, resistive, and open circuit connections. Remember
that ALIN_DIAG (and other) function blocks can be included in control strategies to help
diagnose and pinpoint sources of communications problems. Eurotherm Process Automation Limited strongly recommend the use of time-domain reflectometry (TDR) to test and
validate all ALIN installations. Our Customer Services Division will be happy to carry
out this work — please contact them for details of price and availability.
LIN/ALIN Installation & User Guide HA 082 429 U005 Issue 2
2-15
Ch2 §3.2
ALIN Installation
If you suspect that your network is malfunctioning you can refer to Chapter 4 of this handbook, LIN/ALIN fault-finding. This details how to pinpoint cable and connector faults, and
gives some outline guidance on tracing higher-level software problems. Some instructions
for using TDR are also given in §6.4 of Chapter 4.
§3.2 following presents a troubleshooting and ‘fault-avoidance’ checklist that should be
observed when installing/checking ALINs.
3.2 ALIN installation: troubleshooting checklist
❏ The ALIN cabling must be carefully and correctly made with approved components
and with an appropriate terminator fitted to each end of the cable (in non-hub configurations). If terminators are omitted, the instruments may communicate only intermittently. Note that hub configurations must not have terminators fitted.
❏ Each instrument must have a unique node address on the ALIN, and no address must
be set to 00 or FF (hex).
❏ After an instrument’s node address has been changed, the instrument must be powered
off and on, and if possible, all instruments on the ALIN segment which ‘know’ about
it should also be reset.
❏ When a database name is changed after being run in an instrument, or a new database
with a different name is run, reset all other instruments on the ALIN segment that
‘knew’ about the previous database. This allows them to ‘forget’ the old database
name and associate the new name with that node.
❏ The root block name (e.g. T600 block) in a database defines the database name and
must be unique across a network. Any reference to this database from a remote instrument must match the database name and node address exactly.
❏ Connections between real blocks must not be duplicated in their cached images. Do
not forget to delete duplicated connections if a database is copied and cached.
❏ Although you can connect between either real blocks or their cached images, faster
comms are achieved by connecting between the real blocks. It is also more efficient to
connect from a cached block into a real block than the other way round.
❏ Ensure that cached block types match the real block types exactly. E.g. if the real
block is a PID, ensure that the cached block is also a PID.
❏ Ensure that cached block names match the real block names exactly. This type of mismatch is the usual cause of software alarms.
❏ Do not leave cached blocks existing without their matching real blocks, e.g. after deleting a database. This slows down communications as well as causing software
alarms.
❏ Check for software alarms in all databases. Track down the causes of any alarms and
eliminate them.
❏ Check the DB_DIAG block for consistent values. The number of Teatts (To External
ATTachments) should match the number of Featts (From External ATTachments) between real and cached databases.
2-16
LIN/ALIN Installation & User Guide HA 082 429 U005 Issue 2
LIN Redundancy
Ch3 §2.1
Chapter 3 LIN REDUNDANCY
1 REDUNDANT NETWORKS
A redundant network is a group of instruments that are all connected together by both their
A and B LIN channels, and that can all support both the LIN channels in hardware and
software. Even if one of the instruments is not connected on both channels, or does not
have the necessary hardware or software, then the network is not a redundant network.
(LIN channels are described in §2.)
The aim of this chapter is to explain the concept of LIN redundancy and how the LIN redundancy algorithm operates. Much of the discussion in this chapter involves the parameters of the LRA (LIN redundancy algorithm) block, and you should refer to the LIN
Blocks Reference Manual (Part No. HA 082 375 U003) for specific details of this block.
The LRA block, when run in a control database, allows you to control the mode of operation of the LIN and also determine its status.
However, the redundancy algorithm runs whether or not an LRA block is present, and so
the block need not be included in a control strategy for automatic mode (the default) LIN
operation, and if monitoring is not required.
2
LIN HARDWARE
Each station on a redundant LIN has two communications channels — LIN A and LIN B.
The hardware is designed so that a station always transmits on both LIN channels, but listens to only one. The main purpose of the LIN redundancy algorithm — monitored and
controlled via the LRA block — is to decide which of the two channels to listen to.
2.1 LIN channel switching
Switching LIN channels means changing which channel, LIN A or LIN B, a station is listening to (receiving on) — with the least disturbance to communications. To keep down
network disruption, a station switches LIN channel only when no transmissions are being
made to the station via the channel being disconnected. Physically, switching is via a
solid-state switch and takes only microseconds to operate. There is no need for a station
to disconnect itself from the LIN during LIN channel switching.
The channel a station is currently listening to is reported by the LRA block’s Using parameter, which can indicate LIN_A, LIN_B, or DISCONN (if both channels are disconnected).
LIN/ALIN Installation & User Guide HA 082 429 U005 Issue 2
3-1
Ch3 §2.4
2.2
LIN Redundancy
LIN fault detection
LIN faults — breaks in the cable, short-circuits, severe RFI, etc. — are detected by a hardware comparator module that continuously compares the signals on the two LIN channels,
A and B, which should ideally be identical. A fault is defined as having occurred if these
signals differ for more than 10 microseconds. (This time margin allows for skew between
signals on different channels, due to different cable lengths for example.) When an error
occurs, bits flag the LIN fault and indicate which channel was the quiet (i.e. faulty) one,
via the corresponding LRA block parameter — FaultOnA or FaultOnB.
2.3
LIN fault clearing
Detecting the clearance of a cable fault is more complicated than detecting its occurrence.
In Figure 3-1, James will detect the break in LIN B whenever any one of Henry, Thomas,
or Gordon transmits. But the comparators in the other three stations see the fault only
when James transmits. So, before deciding that a fault has cleared the algorithm must allow enough time for all nodes to have transmitted. Normally this time is measured by the
number of tokens received and is about one second. When, for some reason, tokens are
not being received the time is set at about two seconds.
Henry
Thomas
Gordon
James
LIN A
LIN B
Figure 3-1
LIN cable fault example
2.4 Hardware fault detection
Faults in the instrument’s internal LIN electronics — chips, components, PCBs, etc. — are
detected by the self-test module, which makes use of a station’s ability to disconnect itself
from the LIN and ‘listen to itself talking’. Each channel is self-tested at power-up. If both
channels fail, the test is repeated periodically. Otherwise, if it can transmit and receive on
at least one channel, the station connects itself to the LIN and no further self-testing occurs.
Note that self-test is an active test and so is not performed with the node connected to the
LIN, which could disrupt communications elsewhere on the network. Self-test failures are
reported in the LRA block, via the FailTstA and FailTstB parameters.
3-2
LIN/ALIN Installation & User Guide HA 082 429 U005 Issue 2
LIN Redundancy
3
Ch3 §3
LIN OPERATING MODES
The LIN can operate in four modes supported directly by the LIN redundancy algorithm
— AUTO, FORCE_A, FORCE_B, or FREEZE — with an additional qualifying bit called
HoldMode. A further LRA block parameter — the Active bit — determines if the station
may be able ‘actively’ to force its own operating mode and HoldMode state on other LIN
stations, or ‘passively’ accept the mode broadcast by others. The LRA block’s Mode parameter indicates the station’s current operating mode.
■ AUTO. In AUTO mode, automatic LIN channel switching occurs, i.e. the algorithm
decides which is the channel to listen to (A or B) and automatically connects the station to the chosen channel. The switching algorithm is biased towards LIN A. That is,
with either no LIN cable faults or both A and B faulty (as detected by the comparator
module), it is LIN A that is connected to.
NOTE. The LIN works at maximum efficiency when all nodes are in their default state, i.e. AUTO mode, HoldMode and Active FALSE. (The Active parameter is explained below.)
■ FORCE_A, FORCE_B. While in FORCE_A (or B) mode, the LIN switching algorithm is disabled and LIN A (or LIN B, respectively) is selected as the listening channel, regardless of any faults detected.
■ FREEZE. While in FREEZE mode the LIN switching algorithm is disabled and the
station continues listening via the LIN channel currently connected to.
■ Active bit. Stations with FALSE Active parameters are ‘passive’ non-broadcasters
whose operating modes are forced to follow the mode regularly broadcast by an ‘active’ (Active = TRUE) station.
■ HoldMode bit. The purpose of the HoldMode parameter is to specify the mode a
passive station falls back to when no station is broadcasting, or if the currently broadcasting station goes offline. With HoldMode FALSE, a passive station falls back to (or
stays at) AUTO if it has not received a broadcast during the 30-second NO_MASTER
timeout. With HoldMode TRUE, it retains its current mode.
The effects on operating mode of the HoldMode and Active parameters at station
power-up, and subsequently, are shown schematically in Figure 3-2 and 3-3.
NOTE. LIN broadcasting is explained in §4.
LIN/ALIN Installation & User Guide HA 082 429 U005 Issue 2
3-3
Ch3 §3.2
LIN Redundancy
Station Up & Running
No
Station Active?
Yes
Local Mode Change?
Yes
Start Broadcasting
New Mode at 1Hz
for 5 secs Then
Once Every 5 secs
No
Am I Broadcasting?
No
Broadcast
Received In The Last
NO_MASTER Secs
(30)?
Yes
HoldMode TRUE?
No
Yes
No
Broadcast
Received In The Last
BACKUP_TAKEOVER
Secs (12 - 15)?
No
Broadcast
Received Since I Started
Broadcasting?
No
Yes
Yes
Yes
Retain
Current
Mode
Fall Back To
(or Retain)
AUTO Mode
Adopt/Retain Most
Recently Broadcast
Mode,
Not Broadcasting
Adopt Mode
Held In LRA
Block &
Broadcast
Every 5 secs
Continue
Broadcasting
Cycle
Figure 3-2 Operation of LIN redundancy algorithm — station up & running
3.1 Automatic operation configuration
AUTO is the default operating mode of the LIN redundancy algorithm, even when no database or LRA block is running. To monitor the state of the LIN, however, an LRA block
must be run in the control database, with its Active input FALSE. In this configuration, all
stations on the LIN switch automatically between LIN A and LIN B if a fault occurs —
i.e. they operate in AUTO mode.
3.2 Forced operation configuration
To force all stations on the network to use a particular LIN channel, a database containing
an LRA block with its Active input TRUE should be run. The operation of all the stations
can then be forced by selecting FORCE_A, FORCE_B, or FREEZE in the ‘active’ station.
This broadcasts its current mode to the other stations, ensuring that they adopt the same
mode.
3-4
LIN/ALIN Installation & User Guide HA 082 429 U005 Issue 2
LIN Redundancy
Ch3 §3.2
POWER-UP
AUTO Adopted,
Not Broadcasting
Broadcast
Received Within
BACKUP_TAKEOVER
(12 - 15 sec)
?
No
Yes
No
Remain in AUTO
Mode,
Not Broadcasting
Yes
No
No
LRA Block
Present?
Yes
Broadcast
Received?
No
Yes
No
LRA Block
Active?
Yes
HoldMode TRUE?
Yes
Remain
In Auto Mode,
Not
Broadcasting
Database
Running?
Broadcast
Received Within
NO_MASTER Time
(30 sec) from
Power-On?
No
Adopt
Mode Held in
LRA Block at
dBase Startup
& Broadcast
This
Yes
Adopt
Broadcasted
Mode
Adopt
Mode Held in
LRA Block at
dBase
Startup
Figure 3-3 Operation of LIN redundancy algorithm — station power-up
When there are no LRA blocks having TRUE Active fields, it is possible to control the operation of an individual station (or stations). This can be done by including an LRA block
— with its Active field FALSE — in the station’s database. After setting HoldMode
TRUE, writing to the station’s Mode field selects which LIN channel it must listen to.
(These actions are schematised in Figure 3-2, and explained in more detail in §4.)
LIN/ALIN Installation & User Guide HA 082 429 U005 Issue 2
3-5
Ch3 §4.1
4
LIN Redundancy
BROADCASTING ON THE LIN
‘Broadcasting’ refers to the messages controlled by the LIN redundancy algorithm built
into each station, which determine the operating mode to be adopted by all nodes on the
LIN. These LRA broadcasts are distinct from the actual data transmitted over the LIN —
parameter values, etc.
Only a station running a database containing an LRA block with its Active field set TRUE
— an ‘active’ station — is potentially able to broadcast its operating mode (AUTO,
FORCE_A, FORCE_B, or FREEZE) and HoldMode state to all the other stations on the
LIN. It will be prevented from broadcasting, however, if another active station ‘gets in
first’. As there can be no confirmation of a broadcast, the message is repeated periodically
(every five seconds) — which also provides a way for new stations on the LIN to adopt
the correct operating mode with the minimum of delay.
Broadcasting allows an operator at one station to control the operating mode of the whole
LIN, without the need for a large number of cached blocks. When an operator changes the
LIN mode at any active station, the station broadcasts its new mode and HoldMode state at
the accelerated rate of once per second for the first five seconds, reverting to the normal
repeat rate of one broadcast every five seconds. This has the effect of allowing the station
to ‘dictate’ its new operating mode to all other stations on the LIN, whether they are active
or not. How the algorithm makes this happen is shown schematically in Figure 3-2.
4.1 Multiple broadcasters
Although there can be several active stations on the LIN, the algorithm allows only one of
them to broadcast at a time — normally the station where the mode was last changed. If
this station goes offline, another station may take over after a timeout specified by
BACKUP_TAKEOVER. To reduce the chance of two stations trying to take over simultaneously, the timeout value is different for each LIN station address, in the range 12 to
about 15 seconds. The station with the shortest BACKUP_TAKEOVER value is the first
one to ‘notice’ that broadcasting has stopped and so is the first to start broadcasting the
mode held in its LRA block. The other slower-to-respond stations are then forced to adopt
this mode, and are also inhibited from making their own broadcasts. Please refer to Figure
3-2.
NOTE. The BACKUP_TAKEOVER times are calculated as:
12 + (0.01 × Network Address [decimal]) seconds.
E.g. The node at address FE hex (254 dec.) has a timeout of 12 + 2.54 = 14.54 s.
3-6
LIN/ALIN Installation & User Guide HA 082 429 U005 Issue 2
LIN Redundancy
Ch3 §4.2
4.2 Power-up actions
These actions are schematised in Figure 3-3. When a node is powered up it initialises to
AUTO mode, not broadcasting. If it then receives a broadcast within its
BACKUP_TAKEOVER timeout it simply adopts the broadcasted mode and HoldMode
state, and continues in this mode until the situation changes (as was shown in Figure 3-2).
What happens if the newly powered-up station does not quickly receive a broadcast depends on several factors, as shown in Figure 3-3. After power-up, the station ends up in
one of the four illustrated running states (circled in the Figure).
LIN/ALIN Installation & User Guide HA 082 429 U005 Issue 2
3-7
[This page intentionally blank]
Ch4 §1.2
LIN/ALIN fault-finding
Chapter 4
LIN/ALIN FAULT-FINDING
This chapter tells you how to trace faults in a LIN/ALIN network. It deals mainly with the
low-level physical network, i.e. the cables and connectors, rather than with higher-level
software problems. Outline guidance is given on these higher-level problems, but for the
detailed information needed you are referred to the LIN Blocks Reference Manual (in the
LIN Product Manual, Part No. HA 082 375 U999).
Note that, in general, references in this chapter to the ‘LIN’ refer to both the LIN and the
ALIN networks unless otherwise stated.
The main topics covered in this chapter are:
■ Overview of fault-finding on the LIN (§1)
■ Setting up the test node (§2)
■ Initial checks on the Physical & MAC layers (§3)
■ Tracing suspected cable/hardware faults (§4)
■ ‘Live’ cable checks using LIN_DIAG & LRA blocks (§5)
■ Checking a suspect node (§6)
■ Measurements on ALIN signals (§7)
■ Checking the higher LIN/ALIN layers (§8)
1
OVERVIEW OF FAULT-FINDING ON THE LIN
1.1
Layer structure of the LIN
The LIN and ALIN are complex systems in total, but can be broken down into simpler
‘layers’, each layer being essential to correct operation. Figure 4-1 schematises these layers and summarises their functions.
The upper layers rely on the lower layers working correctly for their normal operation.
Therefore the only way to deal with LIN/ALIN faults is layer by layer, finding and fixing
any lower layer (physical) problems first, then moving on up through the layers. It is particularly important to test all nodes on a physical segment, and to test all physical segments.
1.2 Fault-finding procedure outline
Initial tests on the layers are made by inspecting the values in the diagnostic blocks (DIAG
category) that should have been included in the databases running in each node on the network. Figure 4-1 indicates some of the block types that can help diagnose faults in each
layer.
LIN/ALIN Installation & User Guide HA 082 429 U005 Issue 2
4-1
Ch4 §1.2
LIN/ALIN fault-finding
LIN_DEXT
EDB_DIAG
APPLICATION
DB_DIAG
LIN_DIAG
SUM_DIAG
ALINDIAG
LIN_DIAG
ALINDIAG
LRA
Top Layer
Database resources
in LIN nodes —
EDBs, Featts, Teatts,
blocks, connections
NETWORK
Routing of messages
around the logical
segments of the network
LLC
(Logical Link Control)
Provision & allocation of
dedicated channels for
comms with other nodes:
block caching, file transfers
MAC
(Media Access Control)
Token Ring formation &
control. Message
transactions.
PHYSICAL
Bottom Layer
Cables, connectors,
physical circuits,
LIN Redundancy
Algorithm
LIN cables
Figure 4-1 Layer structure of the LIN — showing functions and applicable DIAG blocks
Note that the SUM_DIAG block is a very useful ‘summary’ block and contains fields that
tell you something about all the layers in the network. The meanings of these fields are
described in the LIN Blocks Reference Manual
NOTE. Always check diagnostic blocks for software alarms before using the
data they show. When inspecting diagnostic block parameter values, keep the LIN
network undisturbed — i.e. do not add or remove nodes, perform filing transfers,
start and stop databases on nodes, and so on.
Sometimes different fields in a given block are useful in different layers. For example, the
righthand column of parameters in the LIN_DIAG block is useful for diagnosing LLClayer problems, and the block’s lefthand parameters help with the MAC layer — as suggested in the figure.
Inspecting these diagnostic blocks is best done by adding an independent dedicated test
node to the network — e.g. a PC running T500 LINtools VIEW. You can then inspect all
the remote nodes on the network via diagnostic blocks cached in the test node. Note that
you can also inspect the test node’s own set of local diagnostic blocks. As a diagnostic
tool you can also, via LINtools VIEW facility, poll the entire network from the test node to
see if any remote nodes are not being recognised, and are therefore suspect.
4-2
LIN/ALIN Installation & User Guide HA 082 429 U005 Issue 2
Ch4 §1.4
LIN/ALIN fault-finding
If these diagnostics indicate a cable fault, physical checks are then made on the cabling
and connector systems. Fault-finding flow charts and associated tables are given in this
chapter to help you work through the tests on the lower layers.
When you are satisfied that you have traced and fixed all significant lower-layer faults,
you can go on to inspect the running of each of the upper layers of the LIN, via their associated diagnostic blocks. How to do this is outlined in §8.
1.3 Problems with LIN systems
Most problems found with a LIN configuration prove to be one or more of the following:
■ Cable and connector problems
■ LIN node number clashes
■ LIN node name clashes
■ Incorrect EDB name and node number in cached blocks
■ Incorrect block name in cached blocks
■ Exhausting database resources (EDBs, Featts and Teatts)
To track down the faults in your system, perform the checks described in this chapter thoroughly and in the order given. Do not skip checks. Do not assume anything. Record your
readings and the time they were made for each network node. You can use records for a
given node to compare its readings from one day to the next. This process can highlight
values that are changing and help to trace intermittent problems.
1.4 Symbols used in the diagnostic block tables
In this chapter, tables are used where possible to summarise the values you will see in the
diagnostic block fields, and what they mean. Table 4-1 contains an example table entry.
Parameter
Normal value
Comment
ErrCount
n
n++ indicates cable fault
Table 4-1 Example of a diagnostic block table entry
■ The Parameter column shows the field name in the block you will be checking.
Note that any parameters not shown in the table have been omitted deliberately because they have little relevance to the test being performed. (You can look these up in
the LIN Blocks Reference Manual if you want to know more about them.)
■ The Normal value column indicates what the field should show in the normal operation of a healthy system. Table 4-2 explains the symbols used to represent values.
LIN/ALIN Installation & User Guide HA 082 429 U005 Issue 2
4-3
Ch4 §2.1
LIN/ALIN fault-finding
Symbol…
Means…
0
Zero
n
A non-zero number that is not incrementing. It may be large or small
n++
A number that is incrementing
text
The textual value of a bit (TRUE/FALSE) or of a menu field
NN
A valid LIN node number (01≤NN≤FE)
ABCD
A 16-bit hexadecimal word. Important bits in the word are discussed
X/Y
[X, Y = one of the above symbols]
X is the expected ideal, but Y is often seen and is normally OK
X+–
[X = n or NN] A value that is changing in an unspecified way
Table 4-2 Symbols used to represent observed parameter values
■ The Comment column indicates the scope of the information the reading gives, or
what problem you may have if the ‘Normal’ value is not displayed.
2
SETTING UP THE TEST NODE
Ideally the test node will be LINtools’ VIEW facility running in a PC fitted with a PCLIN
card. A T1000 can also be used but does not have the useful Poll LIN facility (described
in §3.1). The VIEW option is dealt with in this chapter, but you can create equivalent diagnostic displays on the T1000 — refer to the Tactician T1000 Product Manual (Part No.
HA 080 194 U999).
NOTE. If you are unfamiliar with the LINtools VIEW facility, you should refer
to the T500 LINtools Product Manual (Part No. HA 082 377 U999). Chapter 9 of
the LINtools User Guide — Monitoring remote databases — describes VIEW.
2.1 Configuring the test node’s resident diagnostic blocks
In LINtools VIEW, the PCLIN card automatically builds and names a set of diagnostic
blocks when it starts running. To inspect them in the database monitor worksheet, select
the T100 Library and MAKE a DIAG block with the specified template. Leave the Dbase
field as <local> for these resident blocks. To get the block to update you must enter its
correct ‘standard’ diagnostic block name in the Block field. Table 4-3 lists the most useful
DIAG blocks you will need to monitor, with their standard names. You should use these
standard names for all databases on the network. The suffix ‘nn’ in each block name must
be set equal to the PCLIN card’s network node number in hex. This can be seen as the last
two digits of the PC_MON block name in the top left corner of the monitor worksheet,
e.g. PCMON_80. The card’s node number (and card number) is specified by the NODE
environment variable, which is found in the LT.INI file.
NOTE. The PCLIN card, like any other node, must have a unique node number.
4-4
LIN/ALIN Installation & User Guide HA 082 429 U005 Issue 2
Ch4 §2.2
LIN/ALIN fault-finding
DIAG template
Function
Standard block name
SUM_DIAG
Summary diagnostics block
SDIAG_nn
LRA
LIN redundancy algorithm block
LRA_nn
LIN_DIAG
LIN diagnostics block
LDIAG_nn
ALINDIAG
ALIN MAC/LLC diagnostics block
ALIND_nn
DB_DIAG
Database diagnostics block
DDIAG_nn
EDB_DIAG
External database diagnostics block
EDIAG_nn
LIN_DEXT
LIN high-level diagnostics extension block
LDEXT_nn
Table 4-3
Standard DIAG block names (nn = hex node number)
2.2 Caching remote diagnostic blocks in the test node
It helps at this stage to have to hand a simplified sketch of the LIN networks on the system, showing the allocation of nodes to physical LIN segments. The sketch need not show
connectors, redundant LIN, etc., but each node should be labelled with its type (e.g.
T100), its LIN address (e.g. 4E hex), and database name (e.g. T100_4E).
If your strategies do not contain suitable diagnostic blocks (i.e. at least those in Table 4-3),
you should include them before starting the fault-finding procedure.
On the VIEW worksheet, create sets of DIAG blocks for all nodes on the network you
want to monitor, as described in §2.1. Name them using the standard diagnostic block
names, and ensure that their suffixes correspond to the remote node numbers. To get them
to update, enter the correct remote database names in their Dbase fields.
NOTE 1. T2001 — The T2001 uses PCLIN in a similar way to VIEW with respect to diagnostic blocks, and PCLIN cards in T2001s also have a set of diagnostic blocks built on board automatically at startup. But these diagnostics cannot be
seen at the T2001 because no templates exist there to create the blocks in the
T2001 database. The diagnostic blocks may be cached out of the PCLIN card and
inspected at your test node. In this case the PCLIN node number is defined in the
T2001 ENVIRONMENT. Refer to the T2001 Product Manual (Part No. HA 081
373 U999) for further information.
NOTE 2. T3000 — Via your T3000 Workstation displays, you can view some of
the diagnostic blocks automatically generated in PCLIN/PCALIN cards installed
in the SCADA node PC. Your T3000 Reference Manual & User Guide, within the
Tactician T3000 Product Manual Volume 1 (Part No. HA 083 566 U999), gives
full details of how to set this up.
If you cannot cache the blocks from a node for any reason (e.g. owing to a resource problem relating to cached blocks), remember that most instruments support an engineering
inspect mode — either via a front-panel display or a serial data configuration port —
where the diagnostics can be viewed.
LIN/ALIN Installation & User Guide HA 082 429 U005 Issue 2
4-5
Ch4 §3
3
LIN/ALIN fault-finding
INITIAL CHECKS ON THE PHYSICAL & MAC LAYERS
Figure 4-2 is a flowchart guiding you through the initial checks on the lower layers of the
network, to see if there are any cable or hardware faults likely. The following sections are
to be read in conjunction with the flowchart.
Run LINtools VIEW in the test node
and look for all expected nodes on
the LIN. Use the Poll LIN feature
(see §3.1)
Node(s)
‘missing’?
YES
Check that all nodes — including the test node —
have unique node numbers & database names,
including every PCLIN card. See §3.2
NO
If using T221 bridge: check that the addressing
rules have been observed and are appropriate to
the protocols in use by your instruments. See §3.3
Rectify any problems & run Poll LIN again
NO
Node(s) still
‘missing’?
YES
Cable &/or hardware faults highly probable
Permanent cable &/or
hardware faults unlikely,
but intermittent faults
possible
Check physical layer — LIN only
Via cached blocks in the test node (or locally
via a node’s ‘inspect’ mode), check the LRA
DIAG block (§3.4) for all LIN nodes in turn,
starting with the ‘missing’ node(s)
Check MAC layer
Via cached blocks in the test node (or locally),
check the LIN_DIAG block (§3.5) for all nodes in
turn, starting with the ‘missing’ node(s).
For ALIN check the ALINDIAG block (§3.6)
Cable &/or hardware problems
unlikely
NO
Cable
problems
confirmed?
YES
Check LLC layer
(See §8)
Pinpoint cable/hardware faults
(See §4)
Figure 4-2 Fault-finding the physical layer
4-6
LIN/ALIN Installation & User Guide HA 082 429 U005 Issue 2
LIN/ALIN fault-finding
3.1
Ch4 §3.2
Polling the LIN
3.1.1 Using ‘Poll LIN’ in LINtools VIEW
One of the advantages of using LINtools VIEW is that you can use its ‘Poll LIN’ feature
to look for all expected nodes on the network. You can often get a complete list of nodes
even when other problems exist (e.g. cached block configuration problems).
To access Poll LIN, select the ‘??’ softkey, query any block on the monitor worksheet,
then query its Dbase field to pop up a menu of options including Poll LIN. Click on ‘Poll
LIN’ to pop up a further menu, then click on Re-poll to start polling. The LIN address
currently being polled is shown at the bottom right of the screen above the function key
definitions. At the end of the polling process a list of all detected nodes appears below the
‘Re-poll’ item.
NOTE. When a set of addresses is polled that share a most significant LIN address hex digit with a T221 bridge, the rate of polling can decrease dramatically.
It speeds up again after this range of addresses has been polled.
3.1.2 Using ‘Poll LIN’ in LINfiler
You can also poll the LIN or ALIN via the LINfiler utility (part of the LINtools suite). To
do this, highlight the Dev field on a LINfiler column already attached to a LIN or ALIN
device, press <Enter>, then press the <Tab> key. After a few moments searching, all the
nodes found are listed with their associated databases. Refer to Chapter 10 of the T500
LINtools User Guide (Part No. HA 082 377 U005) for full details.
3.2 Node numbers & database names
If all expected nodes cannot be found by polling the LIN, check that all nodes have unique
node numbers and database names (including every PCLIN card). LIN node numbers and
database names can be specified in several ways for different node types:
■ DIP switches are often used to set instrument node numbers, and the header (root)
block name in the corresponding database specifies the database name
■ In T1000s, the node number is specified in SETUP via the UTIL softkey
■ In T2001 systems, look at parameters in the Loadable Modules.
■ For PCLIN cards, check ‘nn’ in the PCMON_nn header block of VIEW, and also the
NODE parameter in the LT.INI file
■ For T3000, access the LIN I/O Driver Configuration Window, select a card, and press
Card Info. to see its database name and node number.
LIN/ALIN Installation & User Guide HA 082 429 U005 Issue 2
4-7
Ch4 §3.4
LIN/ALIN fault-finding
3.3 T221 bridges
Note that the T221 bridge participates in two token rings — one on the LIN and one on the
ALIN. Check that the addressing rules have been observed and are appropriate to the protocol in use by your instruments. In particular, for communications between LIN instruments using the older LIN protocol (LIN) and ALIN instruments, the ALIN node addresses must share the same leading hex digit as the bridge address. E.g. to communicate
with ALIN instrument addresses 40 to 4F, the bridge address must also be in the range 40
to 4F. Also, no LIN nodes should share the same leading hex digit as the bridge uses. Different rules apply to LIN instruments using the newer extended LIN protocol (XLIN).
NOTE. XLIN protocol is now standard for all instruments communicating via
LIN/ALIN. For the T100, T1000, T231, & T241, XLIN was adopted at v5/1.
There are also limits on the number of bridges that messages are allowed to pass through
between communicating instruments (‘hops’). Refer to the T221 LIN/ALIN Bridge User
Guide (Part No. HA 082 716 U005) for full details on network operation.
3.4 Checking the Physical layer using the LRA block
This block reports the results of the LIN-related parts of the Power On Self Test (POST),
and the status of the LIN Redundancy Algorithm (LRA) and its decision about which cable to use.
NOTE. Remember to check for software alarms before drawing conclusions
from the data shown by diagnostic blocks. Also, keep the LIN network undisturbed while inspecting fields.
Table 4-4 lists the LRA block parameters that you should inspect together with their expected values and comments. Refer to the LIN Blocks Reference Manual if you need further information on the LRA block.
Parameter
Normal value
Comment
FailTstA
FALSE[1]
TRUE then run POST (see product manuals)
FailTstB
FALSE
TRUE
TRUE then run POST (see product manuals)
In single cable systems (Only LIN A fitted)
FaultOnA[3]
FALSE[2]
TRUE = fault with cabling, connectors, or node no.
FaultOnB
FALSE[2]
TRUE
TRUE = fault with cabling, connectors, or node no.
In single cable systems (Only LIN A fitted)
Using[3]
LIN_A
Should be stable, not swapping to LIN_B.
LIN_B = cable/hardware fault on LIN A
Alarms.LIN_A[4]
FALSE
TRUE = cable or self-test fault on LIN channel A
Alarms.LIN_B[4]
FALSE
TRUE = cable or self-test fault on LIN channel B
[1]
[3]
Table 4-4 Significant LRA block parameters for physical layer fault-finding (see Figure 4-2)
4-8
LIN/ALIN Installation & User Guide HA 082 429 U005 Issue 2
LIN/ALIN fault-finding
Ch4 §3.5
NOTES to Table 4-4:
[1] If FailTstA and FailTstB are FALSE, there may still be a problem with the BNC connectors or dry joints associated with the BNC connectors that are mounted on the instrument.
[2] FaultOnA and FaultOnB being FALSE does not imply that both are healthy. Both
may have failed, or simply not be connected, or have other cable errors (including incorrectly-fitted terminators).
[3] The FaultOnA and FaultOnB flags (and hence Using) are the most sensitive indicator
of cable faults in the diagnostics and should therefore be carefully monitored when cable faults are suspected. It is often sufficient to physically ‘wiggle’ all connectors and
cables on a system whilst observing these flags to find bad connections.
[4] In dual redundant LIN system you can set the priority of the LIN_A and LIN_B alarms
to a value that causes them to latch (e.g. Priority 11) so that any problem is flagged as
having occurred when the block is next examined.
3.5
Checking the LIN MAC layer using the LIN_DIAG block
In LIN systems you use the LIN_DIAG blocks cached from each node to further investigate possible cable/hardware problems. (For ALIN networks, use the similar ALINDIAG
block instead — see §3.6.)
Note that this test involves the block’s lefthand column of parameters only. The righthand
column parameters are used to diagnose LLC-layer faults (§8.1).
NOTE. It is not possible to check this block for a software alarm because it does
not have one. Consequently, make sure that you have entered the correct block
name, database name, and node address when looking at a cached LIN_DIAG
block. If you cannot see any of the parameter fields changing, double-check the
entered names and numbers.
Table 4-5 lists the LIN_DIAG block parameters that you should inspect together with their
expected values and comments. Refer to the LIN Blocks Reference Manual if you need
further information.
NOTE. You must distinguish between counts in the diagnostics that have been
incrementing in the past, and counts that are happening as your perceived problem
is occurring. This is particularly important with intermittent problems where you
know errors have happened in the past, or when you know you have caused errors
by disconnecting cables or nodes from the LIN during your tests. If a counter that
should not be incrementing in normal operation currently has a non-zero value,
this does not necessarily mean that a current problem exists.
LIN/ALIN Installation & User Guide HA 082 429 U005 Issue 2
4-9
Ch4 §3.6
LIN/ALIN fault-finding
Parameter
Normal value
Comment
MACstate
IDLE
98% of time, fleetingly changing to other states. The
bridge may show other than IDLE more than 90%
ThisNode[1]
NN
NN+– = node h/w or s/w faults
NextNode[1]
NN
NN+– = duplicate node numbers on the network, cable,
connector, or LIN node h/w faults.
FF = this is the only node
PrevNode[1]
NN
See NextNode
XmtFault
0/n
Rep_pass[2]
0/n
Who_fol
0/n
Rep_who
0/n
n++ = cable, connector, LIN node no, or h/w faults
Sol_any
0/n
Tot_fail
0/n
Xmt_back
n++
n++ is OK if not too rapid
Xmt_blok
0
Low n is normally OK, but n++ may be a LIN node h/w
fault in one of the LIN nodes — not necessarily this one.
Xmt_Urun
0
n or n++ = LIN node h/w fault
Table 4-5 Significant LIN_DIAG block parameters for physical layer fault-finding (see Fig 4-2)
NOTES to Table 4-5:
[1] It is possible to verify that the token ring is correctly formed by examining the
ThisNode, NextNode and PrevNode values in all LIN_DIAG blocks on the LIN segment and drawing the ring layout. Note that the LIN forms the logical token ring in
descending node number order, e.g. F1=>CD=>13=>03=>F1 etc. Thus, if you believe
a node may be entering and leaving the token ring, you must look at the error counters
in what should be the PrevNode to confirm this.
[2] The Rep_pass counter is sensitive to cable faults and should therefore be carefully
monitored when they are suspected. It is often sufficient to physically ‘wiggle’ all
connectors and cables on a system while observing this counter to find bad connections.
3.6 Checking the ALIN MAC layer using the ALINDIAG block
This test applies only to ALIN systems, and involves only the block’s lefthand column of
parameters. The righthand column parameters are used to diagnose ALIN LLC-layer
faults (§8.1).
Table 4-6 lists the ALINDIAG block parameters that you should inspect. Refer to the LIN
Blocks Reference Manual if you need further information.
4-10
LIN/ALIN Installation & User Guide HA 082 429 U005 Issue 2
Ch4 §3.6
LIN/ALIN fault-finding
Parameter
Normal value
Comment
MACstate
IDLE
98% of time, fleetingly changing to other states.
In T221 Bridges this may be less, say 90%
ThisNode[1]
NN
NN+– = node h/w or s/w faults
NextNode
00
This field does not update and always = 00
PrevNode
NN
NN+– = duplicate node numbers on the network, cable,
connector, or ALIN node h/w faults.
FF = this is the only node
DiagStat
07
If this value is not ‘07’, look for the DiagStat.MyRecon
flag showing fleetingly TRUE (you probably have a cable
fault connector problem or ALIN address error). The
MyRecon flag is quite a good indicator of transient problems but it must be watched while the problem occurs.
ChipRst[2]
n
TxAbort
n
[1]
[2]
TxFAbort[2]
n
MyRecon
n
Recon[2]
n
[2]
n++ = cable, connector, ALIN node no, or h/w faults
Table 4-6 Significant ALINDIAG block parameters for physical layer fault-finding (see Fig 4-2)
NOTE to Table 4-6:
[1] It is possible to verify that the token ring is correctly formed by examining the
ThisNode and PrevNode values in all ALINDIAG blocks on the ALIN segment and
drawing the ring layout. Note that the ALIN forms the logical token ring in ascending
node number order, e.g. A3=>A4=>A5=>A3 etc. Thus, if you believe a node may be
entering and leaving the token ring, you must look at the error counters in what should
be the PrevNode to confirm this.
[2] Zeroing these five counters — by setting the write-only ClearCnt parameter TRUE —
makes any future changes to the counts more noticeable. Note that these counters are
absent or non-functioning in early ALIN instruments. You can verify their working by
trying a reset using ClearCnt; if nothing happens you should ignore them.
LIN/ALIN Installation & User Guide HA 082 429 U005 Issue 2
4-11
Ch4 §4.1
LIN/ALIN fault-finding
4 TRACING SUSPECTED CABLE/HARDWARE FAULTS
Experience has shown that most cable faults are due to one or more of the following:
■ Missing terminator(s)
■ Wrong terminator impedance
■ Wrong cable type
■ Wrong ‘T’- or ‘F’-piece impedance
■ Failure to use approved tool(s) to make connections and assemblies
■ Use of cable stubs (which should be avoided if at all possible)
■ Cable deformation caused by bends tighter than the minimum safe bend radius.
Figure 4-3 is a flowchart guiding you through the initial non-disruptive checks on the network cabling, which may help to pinpoint or eliminate some faults found in the previous
tests. Do not skip these basic checks. If necessary you may have to proceed to further
more intrusive tests (§§ 5, 6, and 7) to find the faults.
The following sections are to be read in conjunction with the flowchart.
4.1
Identifying the LIN A connector
Table 4-7 will help you to identify the LIN A connectors on equipment, when checking for
LIN phase continuity. For further information consult the specific equipment’s Product
Manual.
Product
LIN A connector position
T100
BNC connector nearest the backplane
T221
BNC connector is labelled
T231
BNC connector nearest the backplane
T241
BNC connector nearest the backplane
T1000
BNC connector is labelled
PCLIN
BNC connector at top of card, adjacent to serial port
QLIN
BNC connector at top of each subsystem
Table 4-7
4-12
Location of LIN A connector
LIN/ALIN Installation & User Guide HA 082 429 U005 Issue 2
Ch4 §4.1
LIN/ALIN fault-finding
g
p
Obtain drawings
Obtain an accurate & detailed drawing of all LIN nodes on system,
showing all connectors, node numbers, & database names.
From Figure 4-2
Check LIN phase continuity
(Refer to Table 4-7 if necessary to identify LIN connectors.)
Single cable installations — ensure that LIN A connects to LIN A
throughout. ALIN — ensure that phases A & B are not crossed.
Dual cable installations — ensure that LIN A connects to LIN A,
and LIN B to LIN B throughout. If redundancy is used, it must be
used throughout a complete physical segment.
Re-poll LIN
(§3.1)
All nodes
present?
YES
YES
Any faults found
& corrected?
NO
NO
YES
Re-poll LIN
All nodes present?
Check terminators
LIN — Verify 75Ω terminators at each end of cable.
No BNC connector should be plugged directly into any node
without an F- or T-piece (unless a cable stub is being used)
ALIN — Verify 78Ω/100Ω/120Ω terminators to match cable. Not
used with hub. (See Ch2 Table 2-1)
YES
Any faults found
& corrected?
NO
NO
Check cable stubs
LIN — Avoid stubs if at all possible. If used, they must be ≤1m
long and preferably separated by 10 times the stub length.
ALIN — Do not use stubs.
YES
Re-poll LIN
All nodes present?
YES
Any faults found
& corrected?
NO
NO
Check cable spec
Ensure that the specified cable type is used, depending on
location, i.e. inside or outside cubicles, and that the cable length is
within spec. Refer to Chs 1 & 2 for recommendations.
YES
Re-poll LIN
All nodes present?
YES
Any faults found
& corrected?
NO
NO
Check number of nodes
Ensure that the maximum number of nodes (LIN =30 at 1000m;
ALIN =16 at 100m) has not been exceeded.
YES
Re-poll LIN
All nodes present?
No cable &/or hardware
problems likely
Check LLC layer
(See §8.1)
YES
Any faults found
& corrected?
NO
NO
Proceed to ‘live’ cable tests
(See §5)
Figure 4-3 Tracing suspected cable/hardware faults
LIN/ALIN Installation & User Guide HA 082 429 U005 Issue 2
4-13
Ch4 §6
5
LIN/ALIN fault-finding
‘LIVE’ CABLE CHECKS USING LIN_DIAG & LRA BLOCKS
The flowchart in Figure 4-4 guides you through a non-disruptive test on the ‘live’ network
cables and connectors, which you should do next if the checks in §4 have indicated any
cabling problems. This test should pinpoint individual nodes with faulty cabling.
When you discover a faulty node, you go on to use the chart in §6 on the node in question
(disconnected), then return to Figure 4-4 to continue live checking.
From Figure 4-3
Set up diagnostics on test node
Create mimic on T1000 test node, or use the PNTS
facility in VIEW, to monitor simultaneously the LIN_DIAG
blocks’ Rep_pass fields in all nodes on the network.
For redundant cable installations, also monitor
simultaneously all LRA blocks’ Using, FaultOnA, &
FaultOnB fields.
Stress cables & terminators on single node
[Start at one end of the LIN cable]
For a given node, ‘wiggle’ its cables & connectors while
observing Rep_pass, and any LIN status LEDs supported.
For redundant installations, test the cable in use (indicated
by LRA) also observing Using/FaultOnA/FaultOnB.
Check next
node along
NO
Fault detected
on node?
YES
From Fig 4-5
Proceed to detailed
cable/connector inspection
(See Figure 4-5)
Figure 4-4
6
‘Live’ cable testing
CHECKING A SUSPECT NODE
Use the flowchart in Figure 4-5 to check an individual suspect node. §§ 6.1 to 6.3 are to
be read in conjunction with the chart. §6.4 gives information on time-domain reflectometry (not covered in the chart).
4-14
LIN/ALIN Installation & User Guide HA 082 429 U005 Issue 2
Ch4 §6
LIN/ALIN fault-finding
Disconnect the suspect node (§6.1)
NOTE: This may disrupt the plant!
In dual redundant installations, test one LIN at a time
(starting with the LIN not being used, as indicated by
LRA block — check in all nodes)
From Figure 4-4
Check cable connector assembly
Check connectors at node for correct fitting by dismantling
as far as possible. Unscrew screw-in types and check that
cable is cut correctly and that no braid strands are shorting
between inner and outer. Check for ‘dry’ solder joints.
YES
Re-poll LIN
(§3.1)
All nodes
present?
YES
Any faults found
& corrected?
NO
NO
Check BNC socket centre-pins — cable & node
Check that BNC centre pin has not been pushed back into
connector preventing it fully engaging T-piece
(See §6.2)
YES
Re-poll LIN
All nodes
present?
YES
Any faults found
& corrected?
NO
NO
Check T-piece or F-piece
Verify that no internal pins are damaged or missing or have
been pushed back into the connector.
Check that the insulation is undamaged.
Use resistance meter to verify that the T-piece has
continuity through centre conductor to all three ports, and is
not shorted to screen
YES
Re-poll LIN
All nodes
present?
YES
Any faults found
& corrected?
NO
NO
Check cables for short- or open-circuits (§6.3)
NOTE: All T221 bridges must be physically disconnected.
Use resistance meter to measure resistance between cable
inner and outer, in both directions from the node.
‘Wiggling’ connectors may show up intermittent faults.
Re-poll LIN
All nodes
present?
YES
No cable &/or hardware
problems likely
Check LLC layer
(See §8.1)
Short-/opencircuit in
cable.
Locate and
remedy
NO
Resistance close to
expected value?
YES
NO
Cable/connector faults associated with this node unlikely
Check next node along
Return to Figure 4-4
Figure 4-5 Cable/connector checks on suspect node
LIN/ALIN Installation & User Guide HA 082 429 U005 Issue 2
4-15
Ch4 §6.3
6.1
LIN/ALIN fault-finding
Disconnecting nodes from the LIN
These tests may not be possible in a running system because they involve disconnecting
nodes from the LIN — which could disrupt the plant. But if there are bad connections in
your LIN you will have at some stage to disrupt it. Provided you have properly carried
out all the checks given in the previous sections, you will already have isolated the bad
connections and so will not need to disconnect healthy nodes and cause unnecessary disruption.
In dual redundant LIN installations you can often disconnect one LIN at a time to do these
tests, but you must be sure that the other LIN is working and be prepared for alarms and
comms loss if the single LIN has intermittent problems. The use of the LRA block should
allow you to establish which LIN is being used and then the other may be disconnected for
inspection first.
NOTE.
6.2
Remember to check the LRA block in all nodes.
BNC centre-pins
Some BNC connectors have a long taper and others have a much shorter taper at the end
of a straight pin (see Figure 4-6).
In general the short taper type has a better chance of fully engaging in the ‘T’-piece and is
less likely to give a poor fit. The long taper type can give problems especially if it was not
fitted far enough forward initially.
Short taper
Long taper
Figure 4-6
BNC centre-pin types
6.3 DC resistance measurements
For these DC resistance measurements you must switch off all connected nodes, and also
physically disconnect any T221 bridges from the portion of cable under test — not just
switch them off. This is because an internal circuit DC resistance of <2Ω is permanently
across a bridge’s LIN connector and would effectively short-circuit the readings. All other
instruments have built-in relays that automatically isolate their LIN connectors at powerdown, and so need not be disconnected.
In the absence of cable/connector faults the resistance reading should approximately equal
the value of the LIN terminator (75Ω) at the far end, plus the resistance of the intervening
cabling. Allow a total of 230Ω per km for Belden 9114 cable (the sum of the core and
shield resistances in series). You can neglect the contact resistances of the BNC connectors, which should be only ~8mΩ per node position for correctly-mated and properly-assembled connectors. Higher values indicate connector problems.
4-16
LIN/ALIN Installation & User Guide HA 082 429 U005 Issue 2
LIN/ALIN fault-finding
Ch4 §6.4.1
NOTE. This steady-state DC test may not show up problems that the 1MHz LIN
carrier will find, and so success is not conclusive.
6.4 Time-domain reflectometry (TDR)
Use of a time-domain reflectometer — e.g. the Fluke® 652 LAN CableMeter, Fluke Corporation — can be a valuable addition to the resistance tests described in §6.3 to check out
the LIN or ALIN cabling. In TDR, signals are injected into the cable under test which
travel at known speeds and are reflected back to the meter by discontinuities. Time measurements made by the meter, together with cable data input by the user, allow it to compute and display various cable characteristics, e.g. distance to a fault.
TDR can test twisted pair cables for interconnects, shorts, opens, reversed wires, and
crossed pairs. It can measure the length of twisted pair and coaxial cables, and test for any
pair anomalies, shorts, or opens. Counts of noise impulses (spikes) above a selectable
threshold on idle cable segments can also be made.
Our Customer Services Division will be happy to carry out TDR testing for you if required. Please contact us for details of this facility.
6.4.1 Testing RJ45/ALIN cable using the Fluke® 652 LAN CableMeter
Refer to the Fluke® 652 LAN CableMeter user manual for full instructions on how to
carry out cable tests. The following are additional instructions for testing RJ45/ALIN cable, to be read in conjunction with the Fluke manual.
The preprogrammed RJ45 cable type data stored in the 652 meter is unsuitable for testing
the Category 5 cable currently used in Eurotherm’s ALIN systems. The 652 expects at
least two of the four pairs of cores to be connected, whereas ALIN cable uses only one
pair (blue and white/blue).
Before carrying out ALIN testing, do the following:
1 Use a suitable adapter to interface the BNC connector on the 652 to the ALIN cable
(phase A is the blue core, and phase B the white/blue core).
2 Set the 652’s rotary knob to ‘CUSTOM CABLE’.
3 Use the menu-driven display to select connector type BNC, characteristic impedance
93Ω, and NVP approximately 65%. (The NVP may vary with manufacturer.)
4 With a known length (≥15 metres) of unterminated Category 5 cable, calibrate the 652
meter. (Re-specify the NVP value if this is found to be incorrect.)
5 The 652 meter is now ready for use.
LIN/ALIN Installation & User Guide HA 082 429 U005 Issue 2
4-17
Ch4 §7.1
LIN/ALIN fault-finding
6.4.2 Important instructions applicable to TDR testing
Please observe the following points:
■ Remove power from the cable system when TDR testing
■ Disconnect T920/T921 CPUs from their T103/T303 backplanes during testing
■ Avoid testing short lengths of cable (<8 metres). These can yield anomalous results.
■ Note that a T103/T303 node adds an equivalent of approximately 25cm to the length
of the bus. As the resolution of the 652 instrument is 1 metre, including a T103/T303
node could add an apparent 1 metre to the displayed bus length.
■ Note that the Eurotherm cable currently in use should have a characteristic impedance
of 100Ω ±15%.
7 MEASUREMENTS ON ALIN SIGNALS
Measuring the values of the ALIN signals in both hub- and non-hub systems can help locate cabling problems, particularly crossed A-B connections.
7.1 Measuring signals at ALIN hubs
The ALIN signal level at the exit of a hub is typically 13.5V peak-to-peak with four nodes
attached to the hub. Adding more nodes reduces the signal level, but it should never fall
below 7V peak-to-peak. The threshold for the ALIN receivers is 4.5V peak-to-peak.
Measure the signal across a port of the hub using an oscilloscope in differential mode. To
do this, two ’scope probes are required. Connect the ground clips of both ’scope leads to
the ground stud of the hub. Connect channel 1 to ALIN phase B and channel 2 to ALIN
phase A.
Set the ’scope to ADD and channel 2 to INVERT, so that you are measuring the phase B
minus phase A signal. (Using a differential measurement eliminates common-mode noise
and avoids corrupting the ALIN signal by loading it with the ’scope’s capacitance.)
NOTE. In older-style ALIN hubs with twin BNC connectors, the socket is phase
A and the pin phase B. For hubs fitted with 8-way RJ45 sockets, phase A is on
pin 4 (blue wire), and phase B is on pin 5 (white/blue wire). To access the hub
sockets easily you can use an appropriately-wired plug, and clip the ’scope probes
to its leads. (A suitable plug and cable for RJ45 hubs can be ordered via Order
No. S9508-5/1RJ45.)
Using a 10× probe should not be necessary, but the same probe type must be used on both
channels. The triggering of the ’scope off channel 1 should be straightforward, especially
if no caching of data is occurring (i.e. no data changes) or other network activity, e.g. file
transfers, start/stop DB, etc.
4-18
LIN/ALIN Installation & User Guide HA 082 429 U005 Issue 2
Ch4 §7.3
LIN/ALIN fault-finding
7.2 Measuring signals at terminated ALIN cables (non-hub)
For ALIN cabling that is not via a hub, but simply terminated at each end of the cable, the
signal level is normally higher at around 20V peak-to-peak. Also, the rising edge from the
bottom half of the trace to 0V should be faster and ‘cleaner’ with less overshoot.
It is best to measure the differential signal at one end of the ALIN cable, so that the signal
from the furthest node has to travel the full cable length. For RJ45 connector systems you
can use a 3-way RJ45 adapter (Part No. LA 250481) connected to an ALIN socket on the
node (e.g. via cable Order No. S9508-5/2RJ45). Plug the terminator — or the cable to the
next node — into the second adapter socket and the ’scope probes into the third socket via
a suitably-wired RJ45 plug (see the NOTE in §7.1).
7.3 Diagnostic indications of ALIN signal measurements
■ A possible explanation for the signal level being significantly less than these values —
apart from a serious hardware fault — is that you are using terminators on your cabling as well as a hub. These must not be used with a hub-based system.
■ The normal display expected is a series of relatively short (up to 50µs typically) discrete blocks of activity separated by quiet (0V) periods of similar duration. Figure 4-7
shows a typical display for an example 5-node system. The variation in block signal
level is mostly due to the different attenuations suffered by the signals from nodes at
various distances from the measurement point.
Five nodes
5V
50µs
Figure 4-7 ALIN signal — example showing five nodes
If you see relatively long ‘flashes’ right across the ’scope screen (signals of ~3ms),
these could be ‘reconfiguration bursts’, which mean the network is being reconfigured.
This may indicate that a node has been connected with the A and B phases crossed. If
you suspect this, try disconnecting nodes until the flashing stops.
LIN/ALIN Installation & User Guide HA 082 429 U005 Issue 2
4-19
Ch4 §7.3
LIN/ALIN fault-finding
‘1’s
‘0’s
5V
1µs
Figure 4-8 ALIN signal — detail of single node showing ‘1’s and ‘0’s
NOTE. Data-caching causes some flickering, but the bursts of activity are much
shorter than reconfiguration bursts.
■ Figure 4-8 shows one of the blocks from a single node in more detail — the structure
of the ‘1’ and ‘0’ signals is visible. Figure 4-9 shows an individual ‘1’ ALIN signal.
Verify that the dipulses start with rising edges, as shown in the figures. (The connections to the hub or ALIN cable should be made exactly as described here for this test,
i.e. you must be measuring the B minus A signal.) If your signals do not start with a
rising edge it may indicate a crossed A-B connection somewhere.
‘1’
5V
0.1µs
Figure 4-9
4-20
ALIN signal — detail of individual ‘1’ dipulse
LIN/ALIN Installation & User Guide HA 082 429 U005 Issue 2
Ch4 §7.4
LIN/ALIN fault-finding
7.4 Signal asymmetry in ALIN waveforms
Under certain circumstances, when large numbers of nodes are grouped at unfavourable
nodal points on a bus (as described in Chapter 2), communications failures result. These
failures are due to reflections, caused by impedance mismatches, which interfere with the
signals and make them asymmetric.
Figure 4-10 shows an ALIN signal which has asymmetry. i.e. in the dipulses, the amplitude of the positive peak (height above zero) is different from the amplitude of the negative peak (depth below zero). Ideally they should be identical for a given dipulse, but an
asymmetry of up to 10% has proved to be acceptable.
+8V
5.88
0V
7.32
–8V
time
Figure 4-10 ALIN signal showing asymmetry
The asymmetry of a dipulse is defined as the ratio of this amplitude difference to the peakto-peak dipulse voltage, expressed as a percentage. The modulus of the amplitude difference is used, so that the asymmetry is always positive:
Asymmetry = (|positive peak amplitude – negative peak amplitude |/peak-to-peak voltage) * 100%.
The example in the figure shows — for the rightmost dipulse — a peak-to-peak of 13.2V,
a positive peak amplitude of 5.88V, and a negative peak amplitude of 7.32V. This gives an
asymmetry value of about 11%, which exceeds the recommended maximum value and is
therefore at risk of causing communications failures.
LIN/ALIN Installation & User Guide HA 082 429 U005 Issue 2
4-21
Ch4 §8.1
8
LIN/ALIN fault-finding
CHECKING THE HIGHER LIN/ALIN LAYERS
You use diagnostic blocks cached in your test node (or locally) to check the health of the
LLC, Network, and Application layers. For details on what the parameters of these blocks
mean, please refer to the DIAG function blocks chapter in the LIN Blocks Reference
Manual.
The following sections outline the approach to be used and the diagnostic blocks involved.
8.1
Checking the LLC layer
The LLC (Logical Link Control) layer is used by a LIN node to provide a dedicated communications channel through which it can always be contacted by other nodes, and also to
allocate dedicated comms channels that will be used for caching database blocks and performing file transfers.
The LLC layer is the third layer to be considered when fault-finding. You use the LLC diagnostic primarily to establish that sufficient channels exist for the required communications. This is done by checking that some spare channels exist, which implies that the
node has sufficient capacity. Note that the number of channels (SAPs) in use should be
static in a healthy running system. This is because all nodes are caching all the blocks
they require, no file transfers are occurring, and hence all required channels are allocated.
You monitor the righthand column of parameters in the LIN_DIAG block (for the LIN),
and in the ALINDIAG block (for the ALIN) in these checks. Ignore the lefthand columns
when investigating the LLC layer. Although they are presented in different templates, the
LLC layers (and those above) are identical in the LIN and the ALIN. Consequently the
LLC tests are the same for both networks.
Table 4-8 summarises the parameters to be monitored in both LIN_DIAG and ALINDIAG
blocks.
NOTE. Remember that you can also look at the SUM_DIAG block for summary
diagnostic information on this and all the other layers. In particular, the LLC parameter gives information on LIN and ALIN buffer exhaustion (i.e. SAPsfree,
Tx_Free, or Rx_Free becoming zero).
4-22
LIN/ALIN Installation & User Guide HA 082 429 U005 Issue 2
Ch4 §8.3
LIN/ALIN fault-finding
Parameter
Normal value
LLCstate
UP
Comment
SAPsfree
n
0 may mean too many EDBs or filing channels, which
can stop cached blocks updating or cause filing failure.
n+– can mean filing in operation, or network changing
(detectable in the MAC test — §§ 3.5 & 3.6)
SAPsbusy
n
2 means no allocated SAPs in use.
n should equal 2+ no. of EDBs in use (found from
DB_DIAG block’s Edb field).
n+– means filing or changing network
Tx_free
Rx_free
n
n
≥SAPsfree
≥SAPsfree
Table 4-8 Significant LIN_DIAG/ALINDIAG block parameters for LLC layer fault-finding
8.2 Checking the Network layer
(This section not available)
8.3 Checking the Application layer
This layer of the LIN consists of the resources within the databases in the network nodes
— EDBs, Featts, Teatts, function blocks, connections, etc.
You monitor the DB_DIAG, EDB_DIAG, and LIN_DEXT diagnostic blocks, cached in
your test node, to check the health of the Application layer. The SUM_DIAG block’s
EDB parameter also gives you fault status information on EDBs. Refer to the LIN Blocks
Reference Manual for detailed information about these resources and diagnostic blocks.
The following is a summary of what the blocks tell you.
■ DB_DIAG block. This block indicates the resources being used by a LIN or ALIN
database (in the left column) and the corresponding maximum resource levels available to the database (right column). If any of the left-column parameter values exceed
their maximum values in the right column, the database configuration (blocks, wires,
etc.) is too big and must be simplified. If any are nearly or exactly equal to their maximum values, this could indicate a problem that needs investigation. Note that in a
steady system no values should be changing in this block.
■ EDB_DIAG block. This block reports the status of the connections to and from
any remote database on the LIN or ALIN. It helps diagnose problems with blocks
cached into a node (Teatts) and out of a node (Featts). You would normally look at the
EDB_DIAG block together with the DB_DIAG block at each end of a connection, i.e.
where the problem block is local and where it is cached.
NOTE.
counts.
Running LINtools VIEW may be seen to add to the EDB and Featt
LIN/ALIN Installation & User Guide HA 082 429 U005 Issue 2
4-23
Ch4 §8.3
LIN/ALIN fault-finding
■ LIN_DEXT block. This block collects high-level statistics on LIN operation, complementing the low-level function of the LIN_DIAG block. Two of its parameters in
particular can flag serious faults: wkUknwln (count of wellknown service unrecognised messages received) and dbUknwln (count of database service unrecognised messages received). If either of these counts are non-zero there may be either a software
incompatibility, or alternatively your device may not be recognising a network service
that is new to it (e.g. time broadcasts). If you think you have a real problem you
should contact Eurotherm.
■ SUM_DIAG block. The EDB parameter of this block hunts through EDBs and
displays fault status information on the first EDB it discovers with a problem. Such
faults as Teatt alarms (local cached blocks not being updated), Featt alarms (local
node not sending cached block updates), incomplete attachments, disconnected EDBs,
among others, are indicated.
4-24
LIN/ALIN Installation & User Guide HA 082 429 U005 Issue 2
Index
Index
Symbols - A
LIN/ALIN INSTALLATION & USER GUIDE
Symbols
‘1’ and ‘0’ signals ........................... 4-20
100Ω
ALIN hub ...................................... 2-8
ALIN system, connecting up ............ 2-3
ALIN systems
RJ45 connector wiring ................ 2-4
cabling ......................................... 2-4
system .......................................... 2-1
system specification ....................... 2-3
120Ω
ALIN hub installation .................... 2-11
ALIN system, connecting up ............ 2-9
cabling ....................................... 2-10
system .......................................... 2-1
system specification ....................... 2-9
2002 cable ...................................... 1-5
78Ω
ALIN layout schematic (example) ..... 2-2
ALIN system, connecting up ............ 2-2
system .......................................... 2-1
system specification ....................... 2-2
9114 cable ...................................... 1-3
9118 cable ...................................... 1-3
A
Active
bit ................................................ 3-3
hub installation .............................. 2-9
station .......................................... 3-6
AI Series hub .................................... 2-9
ALIN
120Ω hub dimensions .................. 2-11
cable ......................................... 2-12
cable components (table) .............. 2-15
cabling components ..................... 2-14
cabling systems ............................. 2-1
ground terminal ............................. 2-3
hub 100Ω .................................... 2-8
hub dimensions ............................. 2-8
hub network example (120Ω) ........ 2-10
LIN/ALIN Installation & User Guide Issue 2
hubs ........................................... 4-18
installation .................................... 2-1
trouble-shooting checklist ........... 2-16
introducing ................................... 2-1
layout schematic (example) ............. 2-2
MAC layer .................................. 4-10
MAC/LLC diagnostics block ............ 4-5
measurements on signals .............. 4-18
measuring signals at hubs ............. 4-18
measuring signals at
terminated cables ..................... 4-19
network example (100Ω star) .......... 2-6
network example using
100Ω daisychain ....................... 2-7
signal (five nodes example) ........... 4-19
signal asymmetry in waveforms ..... 4-21
signal, individual ‘1’ dipulse ......... 4-20
signal measurements
diagnostic indications ............... 4-19
signal showing '1' & '0' ............... 4-20
signal showing asymmetry ............ 4-21
systems, interconnecting different ... 2-12
systems, ‘mixed’ .......................... 2-12
troubleshooting ............................ 2-15
ALIND_nn ......................................... 4-5
ALINDIAG ................................. 4-5, 4-9
ALINDIAG block
checking ALIN MAC layer ............ 4-10
parameters for physical layer
fault-finding ............................. 4-11
Application layer, checking .............. 4-23
Arcnet .............................................. 2-1
Asymmetry
ALIN signal ................................. 4-21
in ALIN signal waveforms ............. 4-21
Attenuation ................................ 1-3, 2-3
AUTO mode ..................................... 3-3
Automatic operation configuration ....... 3-4
Index-1
Index
B-D
B
BACKUP_TAKEOVER ......................... 3-6
Belden
9114 cable ................................ 4-16
standards ............................... 1-3, 2-3
Bend radius ...................................... 1-2
BNC
75Ω terminator .............................. 1-2
centre-pin types ........................... 4-16
centre-pins .................................. 4-16
connector .......................... 4-12, 4-18
BNO twin-ax ................................... 2-11
Bridges ............................................. 4-8
Broadcasting on the LIN ..................... 3-6
Buffering ........................................... 2-1
Bulkhead adaptors ............................. 1-3
C
Cable
assembly of type 2002 ................... 1-7
attenuation .................................... 2-3
attenuation v. maximum length ........ 1-3
components .................................. 1-5
components ALIN ........................ 2-15
connections ................................. 2-12
connectors & terminations ............... 1-4
crossing ........................................ 1-2
earth points ............................ 1-3, 2-3
fault example (LIN) ......................... 3-2
faults .................. 1-9, 2-15, 3-2, 4-10
lengths ......................................... 3-2
LIN ............................................... 1-3
‘live’ checks ................................ 4-14
losses ........................................... 2-3
low-loss ........................................ 1-3
made to order ............................... 1-4
maximum length ..................... 1-3, 1-5
maximum lengths ........................... 1-3
routing & earthing ................. 1-2, 2-12
screened ....................................... 2-3
solid-core ...................................... 1-5
stripping tool ................................. 1-6
‘stub’ ..................................... 1-2, 2-3
testing, 'live' ................................ 4-14
testing RJ45/ALIN ........................ 4-17
type 2002 .................................... 1-5
type 2002 assembly ...................... 1-6
Index-2
type 2002 components .................. 1-6
unshielded .................................... 2-5
wire stripping tool .......................... 1-5
Cable/connector
checks on suspect node ................ 4-15
Cable/hardware faults ..................... 4-12
tracing suspected ......................... 4-13
Cabling
100Ω ........................................... 2-4
120Ω ......................................... 2-10
components, ALIN ....................... 2-14
systems, ALIN ................................ 2-1
Cached
blocks ................................. 1-8, 2-16
images ................................ 1-8, 2-16
Caching remote diagnostic blocksnode 4-5
Characteristic impedance ................... 1-3
Colour-coded BNC connector sleeves ... 1-4
Comms Fail light ................................ 1-8
Communications
channels ....................................... 3-1
intermittent loss of ........................ 2-15
long-distance ................................. 2-1
Conduit ................................... 1-2, 2-12
Connections ............................. 1-2, 2-12
duplicated .................................... 1-8
stub .............................................. 1-2
Connector
identifying the LIN A .................... 4-12
Connectors ................................ 1-3, 2-3
3-way ........................................... 1-2
crimp ........................................... 1-5
DIN-rail mounted ........................... 1-2
stressing ....................................... 1-2
types ............................................ 1-4
Cubicles .................................... 1-5, 2-1
D
Data transmitted over the LIN .............. 3-6
Database
diagnostics block ........................... 4-5
name ........................... 1-8, 2-16, 4-7
DB_DIAG .......................................... 4-5
block .......................... 1-9, 2-16, 4-23
DC resistance measurements ............. 4-16
DDIAG_nn ........................................ 4-5
De-rating .......................................... 1-3
LIN/ALIN Installation & User Guide Issue 2
Index
DIAG
block names, standard ................... 4-5
category ....................................... 4-1
Diagnostic
block table entry example ............... 4-3
blocks .......................................... 4-1
caching remote blocks .................... 4-5
indications in ALIN signal
measurements .......................... 4-19
DIN rail ................................... 1-2, 2-12
mounting ...................................... 2-8
DIN-rail
mounted connectors ....................... 1-2
Dipulse .................................. 4-20, 4-21
Duplicated connections ....................... 1-8
E
Earth points cable .............................. 1-3
Earthing ........................... 1-3, 2-5, 2-12
ALIN ............................................ 2-3
EDB_DIAG ........................................ 4-5
block .......................................... 4-23
EDBs ..................................... 4-23, 4-24
EDIAG_nn ........................................ 4-5
Engineering inspect mode ................... 4-5
External database diagnostics block .... 4-5
F
‘F’-adaptor ........................................ 1-2
Fault detection ................................... 3-2
Fault-finding ...................................... 4-1
on the LIN, overview ...................... 4-1
physical layer ................................ 4-6
procedure outline ........................... 4-1
Featts ............................. 1-9, 2-16, 4-23
FORCE_A (or B) mode ........................ 3-3
Forced operation configuration ............ 3-4
FREEZE mode .................................... 3-3
Frequencies, operating ....................... 1-3
H
Hardware fault detection .................... 3-2
High frequency signals .............. 1-2, 2-12
High voltage switching transients 1-2, 2-12
HoldMode bit .................................... 3-3
Hub
AI Series ....................................... 2-9
LIN/ALIN Installation & User Guide Issue 2
D - L
dimensions .................................... 2-8
interconnection .............................. 2-9
network example (120Ω) .............. 2-10
Hubs .............................................. 4-18
I
Instrument stations ....................... 1-2, 2-3
Interconnecting different ALIN systems 2-12
Intermittent problems .......................... 4-9
L
Layer structure ................................... 4-1
of the LIN ...................................... 4-2
LDEXT_nn .......................................... 4-5
LDIAG_nn ......................................... 4-5
LIN ........................................... 1-1, 1-4
automatic channel switching ........... 3-3
broadcasting ................................. 3-6
cable components .......................... 1-5
cable fault example ........................ 3-2
cables .......................................... 1-3
channel-switching .......................... 3-1
checking MAC layer ...................... 4-9
diagnostics block ........................... 4-5
dual redundant installations ......... 4-16
electronics .................................... 3-2
electronics faults ............................ 3-2
fault clearing ................................. 3-2
hardware ...................................... 3-1
high-level diagnostics extn. block ..... 4-5
installation .................................... 1-1
layer structure ......................... 4-1, 4-2
layout ........................................... 1-2
layout schematic ............................ 1-1
node address ....................... 1-8, 2-16
nodes ........................................... 1-2
operating modes ........................... 3-3
polling .......................................... 4-7
redundancy ................................... 3-1
redundancy algorithm .................... 1-8
station power-up ........................ 3-5
station up & running ................... 3-4
redundancy algorithm (LRA) ............ 4-8
redundancy algorithm block ..... 3-1, 4-5
specifications ................................ 1-9
station address .............................. 3-6
status ............................................ 3-1
Index-3
Index
L - R
systems, problems with ................... 4-3
trouble-shooting .................... 1-8, 2-16
type 2002 cable components .......... 1-6
LIN A
connector identifying .................... 4-12
LIN A and LIN B ................................ 3-1
LIN/ALIN layers
checking higher ........................... 4-22
LIN_DEXT ......................................... 4-5
block .......................................... 4-24
LIN_DIAG ......................................... 4-5
block ..................................... 4-2, 4-9
block, parameters for physical
layer fault ............................... 4-10
function blocks ............................ 2-15
LINfiler
using ‘Poll LIN’ .............................. 4-7
LINtools VIEW ................................... 4-2
using ‘Poll LIN’ .............................. 4-7
Listening channel ............................... 3-3
LLC layer
checking ..................................... 4-22
problems ...................................... 4-2
Logical Link Control layer .................. 4-22
Long-distance communications ............. 2-1
Low-loss cables .................................. 1-3
LRA ........................................... 4-5, 4-8
block ..................................... 3-1, 4-8
block, physical layer parameters ..... 4-8
broadcasts .................................... 3-6
LRA_nn ............................................. 4-5
4-9
2-5
2-1
3-1
2-9
3-6
N
Network
address ........................................ 3-6
layer checking ............................. 4-23
Nn ................................................... 4-4
NO_MASTER timeout ......................... 3-3
Node ............................................... 1-3
Index-4
O
Operating mode
control of ...................................... 3-6
station’s current ............................. 3-3
P
Parameter values ............................... 3-6
Passive non-broadcasters .................... 3-3
PCLIN ............................................ 4-12
card ............................................. 4-4
Physical & MAC layers, initial checks ... 4-6
Physical layer
checking using LRA block ................ 4-8
fault-finding ................................... 4-6
Poll LIN ............................................ 4-7
Polling
the entire network .......................... 4-2
the LIN ......................................... 4-7
POST ............................................... 4-8
Power On Self Test (POST) .................. 4-8
Power-up .......................................... 3-3
actions ......................................... 3-7
Protocols ........................................... 2-1
Q
QLIN .............................................. 4-12
M
MAC layer ................................. 4-2,
Markers & ties ...................................
Maxi-Vis ...........................................
Mode of operation of the LIN ..............
MODHUB .........................................
Multiple broadcasters .........................
address ............................... 1-8, 2-16
checking a suspect ....................... 4-14
disconnecting from the LIN ............ 4-16
LIN ............................................... 1-2
numbers & database names ............ 4-7
R
Re-tries ........................................... 2-15
Reconfiguration bursts ...................... 4-19
Redundancy ...................................... 3-1
Redundant
networks ....................................... 3-1
pair of LINs ................................... 1-2
Remote instrument ..................... 1-8, 2-16
Resistance
measurements ............................. 4-16
testing ........................................ 2-15
RFI ................................................... 3-2
LIN/ALIN Installation & User Guide Issue 2
Index
RJ45
(S9572) 100Ω ALIN hub installation 2-8
connector wiring for 100Ω
ALIN systems ............................. 2-4
RJ45 sockets ................................... 4-18
RJ45/ALIN cable ............................. 4-17
Root block ...................................... 2-16
name ........................................... 1-8
Running states ................................... 3-7
S
S9571 120Ω ALIN hub dimensions ... 2-11
S9572 100Ω ALIN hub dimensions ..... 2-8
Safety .............................................. 1-3
SAPs .............................................. 4-22
Screened cable ................................. 2-3
SDIAG_nn ........................................ 4-5
Self-test
at power-up .................................. 3-2
module ......................................... 3-2
Short-circuits ...................................... 3-2
Signal level and format conversion ...... 2-1
Skew between signals ........................ 3-2
Sleeve colour .................................... 1-4
Software alarms ................ 1-9, 2-16, 4-2
Solid-core cables ............................... 1-5
Specification
100Ω system ................................. 2-3
120Ω system ................................. 2-9
78Ω system ................................... 2-2
LIN ............................................... 1-9
Stations ............................................ 1-3
on a redundant LIN ........................ 3-1
power-up ...................................... 3-3
Stranded cores .................................. 1-5
Stress-relief loops ............................... 1-2
Stressing of connectors ....................... 1-2
Stubs ................................................ 1-2
of cable ........................................ 2-3
separation of multiple ..................... 1-2
SUM_DIAG ....................................... 4-5
block ................................... 4-2, 4-24
Summary diagnostics block ................. 4-5
Switching
algorithm ...................................... 3-3
LIN channels ................................. 3-1
LIN/ALIN Installation & User Guide Issue 2
R-T
Symbols ........................................... 4-4
used in diagnostic tables ................ 4-3
T
T-piece ............................................. 1-2
T100 ....................................... 2-1, 4-12
T1000 ..................................... 2-1, 4-12
T102/302 ALIN, example ................ 2-10
T102/302s, connecting ................... 2-12
T103/303 ALIN, examples ................. 2-6
T103/303s, connecting ................... 2-12
T103/T303 .................................... 4-18
T2001 ....................................... 2-1, 4-5
T221 bridge .... 2-1, 4-7, 4-8, 4-12, 4-16
T231 .............................................. 4-12
T241 .............................................. 4-12
T3000 .............................................. 4-5
T500 LINtools VIEW .......................... 4-2
T600 series instruments ...................... 2-1
T640/T221 ALIN, example ................ 2-3
T640s, connecting .................. 2-12, 2-13
TDR ......................................... 1-7, 4-17
testing, important instructions ......... 4-18
Teatts ............................. 1-9, 2-16, 4-23
Terminators ..................................... 4-19
Test node .......................................... 4-2
resident diagnostic blocks ............... 4-4
setting up ...................................... 4-4
Testing the LIN cable .......................... 1-7
Time-domain reflectometry .................. 1-7
Time-domain reflectometry (TDR) ........ 4-17
Timeout value .................................... 3-6
Token ............................................... 3-2
ring ............................ 4-8, 4-10, 4-11
rotation ........................................ 2-1
Tot_fail ............................................. 1-9
Trouble-shooting .............................. 2-16
Trouble-shooting checklist ................... 1-8
Trunking .................................. 1-2, 2-12
TS32 DIN rails .................................. 1-3
Twist on connectors ............................ 1-5
Index-5
W-X
Index
W
Wire
clamps ......................................... 1-2
stripping tool ................................. 1-5
Wiring in confined spaces .................. 1-5
X
XLIN protocol .................................... 4-8
Xmt_blok .......................................... 1-9
Xmt_Urun .......................................... 1-9
Index-6
LIN/ALIN Installation & User Guide Issue 2