1
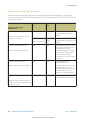
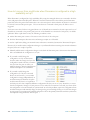
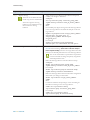
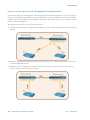
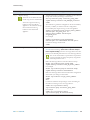
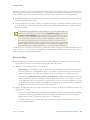
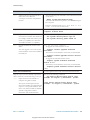
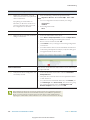
Troubleshooting Palo Alto Networks Panorama™ Administrator’s Guide Version 6.0 Copyright © 2007-2015 Palo Alto Networks Contact Information Corporate Headquarters: Palo Alto Networks 4401 Great America Parkway Santa Clara, CA 95054 www.paloaltonetworks.com/company/contact-us About this Guide This guide describes how to set up and use Panorama for centralized management; it is intended for administrators who want the basic framework to quickly set up the Panorama virtual appliance or the M-100 appliance for centralized administration of Palo Alto Networks firewalls. If you have a M-100 appliance, this guide takes over after you complete rack mounting your M-100 appliance. For more information, refer to the following sources: For instructions on configuring the features on the firewall, go to PAN-OS Administrator's Guide. The Palo Alto Networks Administrator's Guide will also help you with Panorama configuration items that are similar to the firewall and are not covered in this guide. For information on the additional capabilities and for instructions on configuring the features on the firewall, refer to https://www.paloaltonetworks.com/documentation. For access to the knowledge base, discussion forums, and videos, refer to https://live.paloaltonetworks.com. For contacting support, for information on the support programs, or to manage your account or devices, refer to https://support.paloaltonetworks.com. For the latest release notes, go to the software downloads page at https://support.paloaltonetworks.com/Updates/SoftwareUpdates. To provide feedback on the documentation, please write to us at: [email protected]. Palo Alto Networks, Inc. www.paloaltonetworks.com © 2007–2015 Palo Alto Networks, Inc. Palo Alto Networks is a registered trademark of Palo Alto Networks. A list of our trademarks can be found at http://www.paloaltonetworks.com/company/trademarks.html. All other marks mentioned herein may be trademarks of their respective companies. Revision Date: August 26, 2015 2 • Panorama 6.0 Administrator’s Guide Copyright © 2007-2015 Palo Alto Networks Palo Alto Networks Troubleshooting This section addresses the following Panorama issues: Why does the template commit fail? Why is Panorama running a File System Integrity check? Is there a separate connection for forwarding logs to Panorama? Why does the log storage capacity for the collector group read 0 MB? Why is Panorama in a suspended state? Where do I view task completion status? What ports are used by Panorama? How do I modify the maximum number of images that can be downloaded? How do I recover from a split brain when Panorama is configured in a high availability set up? How do I replace Panorama or a managed device in the event of a hardware failure/RMA? When and why does the metadata need to be regenerated for a RAID pair? Palo Alto Networks Panorama 6.0 Administrator’s Guide • 177 Copyright © 2007-2015 Palo Alto Networks Troubleshooting Why does the template commit fail? A template commit could fail because of the following reasons: Capability mismatch: When configuring a template, the following options are available: multiple virtual systems capability, VPN mode, and operational mode. – If the check box for multiple virtual systems capability is selected, a template commit failure will occur when you push the template to devices that are not capable of or enabled for multiple virtual systems functionality. To resolve the error, edit the template in the Panorama > Templates tab, and clear the check box for Virtual systems. – If VPN-related configuration options are pushed to devices that are hard coded to disallow VPN configuration. To resolve the error, edit the template in the Panorama > Templates tab, and enable the check box for VPN Disable Mode. – If the operational mode enabled on the device and that on the template are different. For example, if the managed device is enabled for FIPS mode and the template is defined for normal mode. To resolve the error, edit the template in the Panorama > Templates tab and verify that the Operational mode selection is correct. The managed device is not enabled for receiving template and device group changes from Panorama. This happens when the ability to receive template and device groups configuration changes has been disabled on the firewall. To resolve the error, access the web interface of the device, select Device > Setup, edit the Panorama Settings, and click the Enable Device and Network Template and Enable Panorama Policy and Objects buttons. Why is Panorama running a File System Integrity check? Panorama periodically performs a file system integrity check (FSCK) to prevent corruption of the Panorama system files. This check occurs after eight reboots or at a reboot that occurs 90 days after the last FSCK was executed. If Panorama is running a FSCK, the web interface and SSH login screens will display a warning to indicate that an FSCK is in progress. You cannot log in until this process completes. The time to complete this process varies by the size of the storage system; depending on the size, it can take several hours before you can log back in to Panorama. To view the progress on the FSCK, set up console access to Panorama and view the status. 178 • Panorama 6.0 Administrator’s Guide Copyright © 2007-2015 Palo Alto Networks Palo Alto Networks Troubleshooting Is there a separate connection for forwarding logs to Panorama? No, Panorama uses TCP port 3978 for connecting to the firewalls. For PAN-OS 4.x the SSL connection from the firewall to Panorama connects over TCP port 3978. This is a bi-directional connection where the logs are forwarded from the firewall to Panorama; and configuration changes are pushed from Panorama to the managed devices. Context switching commands are sent over the same connection. For PAN-OS 5.0 and later, and only in a Distributed Log Collection architecture with dedicated Log Collectors, the firewalls manage two SSL connections. One connection is for Panorama management, and the other connection is to the Log Collector. Both connections use the same port: TCP port 3978. Why does the log storage capacity for the collector group read 0 MB? The log storage capacity for the Collector Group might display as 0MB if the disk pairs are not enabled for logging. You must select the Log Collector and enable the disk pairs for logging in the Panorama > Managed Collectors tab; for instructions, see Step 8 in the Add a Log Collector to Panorama section. To verify that the disks are enabled and available for log storage, select Panorama > Managed Collectors tab and verify that the Log Collector displays as Connected and that the Configuration Status displays as In sync. Why is Panorama in a suspended state? If Panorama is in a suspended state, check for the following conditions: Verify that the serial number on each Panorama virtual appliance is unique. If the same serial number is used to create two or more instances of Panorama, all instances using the same serial number will be suspended. Verify that you have set the HA priority setting on one peer as Primary and the other as Secondary. If the priority setting is identical on both peers, the Panorama peer with a higher numerical value in serial number is placed in a suspended state. Verify that both Panorama HA peers are running the same Panorama version (major and minor version number). Where do I view task completion status? Use the Task Manager link in the bottom right-side corner of the Panorama web interface to view the success or failure of a task. It also includes a detailed message to help debug an issue. For details, see View Task Completion History. Palo Alto Networks Panorama 6.0 Administrator’s Guide • 179 Copyright © 2007-2015 Palo Alto Networks Troubleshooting What ports are used by Panorama? In order to make sure that Panorama is able to communicate with the managed device(s), managed log collector(s) and with its peer in an HA configuration, use the following table to verify the ports that you must open on your network: Communicating Devices & Ports Used (5.0 and 5.1) Ports Used (6.0) Description 28 28 For HA connectivity and synchronization if encryption is enabled. Direction of Connection Establishment Panorama and Panorama (HA) Direction: Each peer initiates its own connection to the other Panorama and managed firewalls 28769 and 28260 (5.1) 28260 and 28769 and 49160 (5.0) 28769 For HA connectivity and synchronization if encryption is not enabled. 3978 3978 A bi-directional connection where the logs are forwarded from the firewall to Panorama; and configuration changes are pushed from Panorama to the managed devices. Context switching commands are sent over the same connection. 3978 3978 For management and log collection/reporting. Direction: Initiated by the firewall Panorama and Log Collector Used for communication between the default log collector on a Panorama in Panorama mode, and for communicating with log collectors in a DLC architecture. Direction: Initiated by the log collector Log Collector to Log Collector 49190 28270 For distributing blocks and all binary data between log collectors. Direction: Each log collector initiates a connection to the other log collectors in the collector group 180 • Panorama 6.0 Administrator’s Guide Copyright © 2007-2015 Palo Alto Networks Palo Alto Networks Troubleshooting How do I modify the maximum number of images that can be downloaded? On Panorama, you can download (or manually upload) software images and content updates for centrally managing updates on the managed devices and for local use on Panorama. The images/updates required for local use on Panorama are PAN-OS images and content updates for Antivirus, Applications or Application and Threats, and WildFire. The images/updates required for managed devices are PAN-OS images, content updates for Antivirus, Applications or Application and Threats, WildFire, and GlobalProtect; URL database (Bright Cloud or PAN-DB). The amount of space available to store these images is not user configurable, and when 90% of the alloted storage space on Panorama is reached, you are alerted to free up space (delete stored images) for new downloads/uploads. The maximum number of images is a global setting that applies to all the images and content stored on Panorama, and can only be configured using the CLI. The default value is 5 images of each type; you cannot set a count by image/content type. Managing storage space allocated for images on Panorama • Modify the maximum number of images stored Access the CLI on Panorama and enter the following on Panorama. command: set max-num-images count x , where x can be a number between 2 and 64. • View the number of images that are stored on Panorama. Enter the following CLI command: • Delete images to free up space on Panorama. Use the following commands: show max-num_images You can perform this task using the web interface • To delete software images by filename or version: or the CLI. delete software image <filename> delete software version <version_number> • To delete content updates: delete content update <filename> Palo Alto Networks Panorama 6.0 Administrator’s Guide • 181 Copyright © 2007-2015 Palo Alto Networks Troubleshooting How do I recover from a split brain when Panorama is configured in a high availability set up? When Panorama is configured in a high availability (HA) setup, the managed devices are connected to both the active and passive Panorama HA peers. When the connection between the active and the passive Panorama peers fails, before the passive Panorama takes over as the active peer it checks whether any device is connected to both the active and the passive peer. If even one device is connected to both peers, the failover is not triggered. In the rare event that a failover is triggered when a set of firewalls are connected to the active peer and a set of firewalls are connected to the passive peer, but none of the firewalls are connected to both peers, it is called a split brain. When a split brain occurs, the following conditions occur: neither Panorama peer is aware of the state nor the HA role of the other peer. both the Panorama peers become active and manage a unique set of firewalls. To resolve a split brain, debug your network issues and restore connectivity between the Panorama HA peers. However, if you need to make configuration changes to your firewalls without restoring the connection between the peers, here are a couple of options: Manually add the same configuration changes on the both the Panorama peers. This ensures that when the link is reestablished the configuration is in sync. If you need to add/change the configuration at only one Panorama location, make the changes and sync the configuration (make sure that you initiate the sync from the peer on which you made the changes) when the link between the Panorama peers is re-established. If you need to add/change the configuration for only the connected devices at each location, you can make configuration changes independently on each Panorama peer. Because the peers are disconnected, there is no replication and each peer now has completely different configuration file (they are out of sync). Therefore, to ensure that the configuration changes on each peer are not lost when the connection is restored, you cannot allow the configuration to be automatically re-synchronized. To solve this problem, export the configuration from each Panorama peer and manually merge the changes using an external diff and merge tool. After the changes are integrated, you can import the unified configuration file on the primary Panorama and then synchronize the imported configuration file with the peer. 182 • Panorama 6.0 Administrator’s Guide Copyright © 2007-2015 Palo Alto Networks Palo Alto Networks Troubleshooting How do I replace Panorama or a managed device in the event of a hardware failure/RMA? How do I recover the logs from an M-100 appliance in Log Collector mode? How do I recover logs from an M-100 appliance in Panorama mode? How do I recover logs from Panorama (VM or M-100) that is not deployed in HA? How do I replace a managed device with a replacement device (RMA of the firewall)? How do I recover the logs from an M-100 appliance in Log Collector mode? If you need to replace an M-100 appliance in Log Collector mode (Dedicated Log Collector), you can migrate the logs it collected from firewalls by moving its RAID disks to a new M-100 appliance. This enables you to recover logs after a system failure on the M-100 appliance. This procedure applies whether the Panorama management server that manages the Dedicated Log Collector is a Panorama virtual appliance or an M-100 appliance in Panorama mode. Migrate Logs to a New M-100 Appliance in Log Collector Mode Step 1 Perform initial setup of the new M-100 appliance in Log Collector mode. 1. 2. 3. 4. Rack mount the M-100 appliance. Refer to the M-100 Appliance Hardware Reference Guide for instructions. Perform Initial Configuration of the M-100 appliance. Register Panorama. Transfer licenses as follows: a. Log in to the Customer Support Portal. b. Select the Assets tab and click the Spares link. c. Click the Serial Number of the new M-100 appliance. d. Click Transfer Licenses. e. Select the old M-100 appliance and click Submit. 5. 6. 7. Activate/Retrieve the Licenses. Install Content and Panorama Software Updates. Set Up the M-100 Appliance in Log Collector Mode. Palo Alto Networks Panorama 6.0 Administrator’s Guide • 183 Copyright © 2007-2015 Palo Alto Networks Troubleshooting Migrate Logs to a New M-100 Appliance in Log Collector Mode (Continued) Step 2 On the Panorama management server, 1. add the new Log Collector as a managed collector. For all steps with commands that require a device serial number, you must type the entire serial number; 2. pressing the Tab key won’t complete a partial serial number. Configure the Log Collector as a managed collector using the Panorama web interface or using the following CLI commands: configure set log-collector <LC_serial_number> deviceconfig system hostname <LC_hostname> exit Verify that the Log Collector is connected to Panorama and that the status of its disk pairs is present/available. show log-collector serial-number <log-collector_SN> 3. The disk pairs will display as disabled at this stage of the restoration process. Commit your changes to Panorama. Don’t commit the changes to the Collector Group just yet. configure commit exit Step 3 Remove the RAID disks from the old Log 1. Collector. 2. Power off the old Log Collector by pressing the Power button until the system shuts down. Remove the disk pairs. For details, refer to the disk replacement procedure in the M-100 Appliance Hardware Reference Guide. Step 4 Prepare the disks for migration. 1. Insert the disks into the new Log Collector. For details, refer to the disk replacement procedure in the M-100 Appliance Hardware Reference Guide. You must maintain the disk pair association. Although you can place a disk pair from slot A1/A2 on the old appliance into slot B1/B2 on the new appliance, you must keep the disks together in the same slot; otherwise, Panorama might not restore the data successfully. Enable the disk pairs by running the following CLI command for each pair: Generating the metadata for each disk pair rebuilds the indexes. Therefore, depending on the data size, this process can take a long time to complete. To expedite the process, you can launch multiple CLI sessions and run the metadata regeneration command in each 2. session to complete the process simultaneously for every pair. For details, see When and why does the metadata need to be regenerated for a RAID pair? 3. request system raid add <slot> force no-format For example: request system raid add A1 force no-format request system raid add A2 force no-format The force and no-format arguments are required. The force argument associates the disk pair with the new Log Collector. The no-format argument prevents reformatting of the drives and retains the logs stored on the disks. Generate the metadata for each disk pair. request metadata-regenerate slot <slot_number> For example: request metadata-regenerate slot 1 184 • Panorama 6.0 Administrator’s Guide Copyright © 2007-2015 Palo Alto Networks Palo Alto Networks Troubleshooting Migrate Logs to a New M-100 Appliance in Log Collector Mode (Continued) Step 5 Migrate the logs. 1. You must use the Panorama CLI for this step, not the web interface. You must assign the new Log Collector to the Collector Group that contains the old Log Collector. Assign the new Log Collector to the Collector Group and commit your changes to Panorama. configure set log-collector-group <collector_group_name> logfwd-setting collectors <new_LC_serial_number> commit exit 2. For each disk pair, migrate the logs from the old Log Collector to the new Log Collector and attach the disk pair to the new Log Collector. request log-migration from <old_LC_serial_number> old-disk-pair <log_disk_pair> to <new_LC_serial_number> new-disk-pair <log_disk_pair> For example: request log-migration from 003001000010 old-disk-pair A to 00300100038 new-disk-pair A Step 6 Reconfigure the Collector Group. 1. 2. Use the web interface to assign the new Log Collector to the firewalls that forward logs (Panorama > Collector Groups > Device Log Forwarding). Give the new Log Collector the same priority in the firewall preference lists as the old Log Collector. You use the web interface to perform this step because no CLI command can change the priority assignments of firewall preference lists. Delete the old Log Collector from the Collector Group. configure delete log-collector-group <group_name> logfwd-setting collectors <old_LC_serial_number> For example: delete log-collector-group DC-Collector-Group logfwd-setting collectors 003001000010 3. Delete the old Log Collector from the Panorama configuration and commit your changes to Panorama. delete log-collector <old_LC_serial_number> commit exit 4. Commit the Collector Group changes so that the managed firewalls can send logs to the new Log Collector. commit-all log-collector-config log-collector-group <collector_group_name> For example: commit-all log-collector-config log-collector-group DC-Collector-Group Palo Alto Networks Panorama 6.0 Administrator’s Guide • 185 Copyright © 2007-2015 Palo Alto Networks Troubleshooting How do I recover logs from an M-100 appliance in Panorama mode? If you need to replace an M-100 appliance in Panorama mode (Panorama management server), you can migrate the logs it collected from firewalls by moving its RAID disks to a new M-100 appliance, but only if Panorama is deployed in a high availability (HA) configuration. Moving the disks enables you to recover logs after a system failure on the M-100 appliance. This migration procedure covers the following scenarios: One Panorama in the pair is configured as a managed Log Collector and is receiving logs from the managed firewalls. Both Panorama peers are managed Log Collectors that belong to one Collector Group (Note that this is not a recommended deployment). Each Panorama is configured as a managed collector and assigned to separate Collector Groups (Log Collector Group1 and Log Collector Group2). 186 • Panorama 6.0 Administrator’s Guide Copyright © 2007-2015 Palo Alto Networks Palo Alto Networks Troubleshooting Restore Logs from an M-100 appliance in Panorama Mode (and in an HA set up) Step 1 Forward any logs on the SSD of the old Enable Log Forwarding to External Destinations. M-100 appliance to an external destination if you want to preserve them. The SSD stores only the System and Config logs that Panorama and Log Collectors generate. You cannot move the SSD between M-100 appliances. Step 2 Remove the RAID disks from the old M-100 appliance. 1. 2. Step 3 Perform initial setup of the new M-100 appliance. 1. 2. 3. 4. Power off the old M-100 appliance by pressing the Power button until the system shuts down. Remove the disk pairs. For details, refer to the disk replacement procedure in the M-100 Appliance Hardware Reference Guide. Rack mount the M-100 appliance. Refer to the M-100 Appliance Hardware Reference Guide for instructions. Perform Initial Configuration of the M-100 appliance. Register Panorama. Transfer licenses as follows: a. Log in to the Customer Support Portal. b. Select the Assets tab and click the Spares link. c. Click the Serial Number of the new M-100 appliance. d. Click Transfer Licenses. e. Select the old M-100 appliance and click Submit. 5. 6. 7. Activate/Retrieve the Licenses. Install Content and Panorama Software Updates. Set the HA priority. The new M-100 appliance must have the same priority as the HA peer you are replacing. Palo Alto Networks Panorama 6.0 Administrator’s Guide • 187 Copyright © 2007-2015 Palo Alto Networks Troubleshooting Restore Logs from an M-100 appliance in Panorama Mode (and in an HA set up) (Continued) Step 4 Prepare the disks for migration. 1. Generating the metadata for each disk pair rebuilds the indexes. Therefore, depending on the data size, this process can take a long time to complete. To expedite the process, you can launch multiple CLI sessions and run the metadata regeneration command in each 2. session to complete the process simultaneously for every pair. For details, see When and why does the metadata need to be regenerated for a RAID pair? 3. Insert the disks into the new M-100 appliance. For details, refer to the disk replacement procedure in the M-100 Appliance Hardware Reference Guide. You must maintain the disk pair association. Although you can place a disk pair from slot A1/A2 on the old appliance into slot B1/B2 on the new appliance, you must keep the disks together in the same slot; otherwise, Panorama might not restore the data successfully. Enable the disk pairs by running the following CLI command for each pair: request system raid add <slot> force no-format For example: request system raid add A1 force no-format request system raid add A2 force no-format The force and no-format arguments are required. The force argument associates the disk pair with the new appliance. The no-format argument prevents reformatting of the drives and retains the logs stored on the disks. Generate the metadata for each disk pair. request metadata-regenerate slot <slot_number> For example: request metadata-regenerate slot 1 4. Synchronize the configuration of the M-100 appliance HA peers. request high-availability sync-to-remote running-config Step 5 Configure the local Log Collector on the 1. new M-100 appliance. For all steps with commands that require a device serial number, you must type the entire serial number; pressing the Tab key won’t complete a partial serial number. Don’t enable the disks on the new M-100 appliance at this point. When you successfully migrate the logs, Panorama automatically enables the disks. Configure the local Log Collector as a managed collector using the Panorama web interface or using the following CLI commands: configure set log-collector <log-collector_SN> deviceconfig system hostname <log-collector-hostname> exit 2. Verify that the local Log Collector is connected to Panorama and that the status of its disk pairs is present/available. show log-collector serial-number <log-collector_SN> 3. The disk pairs will display as disabled at this stage of the restoration process. Commit your changes to Panorama. Don’t commit the changes to the Collector Group just yet. configure commit 188 • Panorama 6.0 Administrator’s Guide Copyright © 2007-2015 Palo Alto Networks Palo Alto Networks Troubleshooting Restore Logs from an M-100 appliance in Panorama Mode (and in an HA set up) (Continued) Step 6 Migrate the logs. 1. You must use the Panorama CLI for this step, not the web interface. You must assign the local Log Collector of the new M-100 appliance to the Collector Group that contains the local Log Collector of the old M-100 appliance. Add the new local Log Collector as a member of the Collector Group and commit your changes to Panorama. set log-collector-group <collector_group_name> logfwd-setting collectors <SN_managed_collector> commit 2. The old local Log Collector still appears in the list of members, because you didn’t yet delete it from the configuration. For each disk pair, migrate the logs to the new appliance. request log-migration from <old_LC_serial_number> old-disk-pair <log_disk_pair> to <new_LC_serial_number> new-disk-pair <log_disk_pair> For example: request log-migration from 003001000010 old-disk-pair A to 00300100038 new-disk-pair A 3. Commit the changes to Panorama. commit Step 7 Reconfigure the Collector Group. 1. 2. Use the web interface to assign the new Log Collector to the firewalls that forward logs (Panorama > Collector Groups > Device Log Forwarding). Give the new Log Collector the same priority in the firewall preference lists as the old Log Collector. You use the web interface to perform this step because no CLI command can change the priority assignments of firewall preference lists. Delete the old Log Collector from the Collector Group. delete log-collector-group <group_name> logfwd-setting collectors <old_LC_serial_number> For example: delete log-collector-group DC-Collector-Group logfwd-setting collectors 003001000010 3. Delete the old Log Collector from the Panorama configuration and commit your changes to Panorama. delete log-collector <old_LC_serial_number> commit exit 4. Commit the Collector Group changes so that the managed firewalls can send logs to the new Log Collector. commit-all log-collector-config log-collector-group <collector_group_name> For example: commit-all log-collector-config log-collector-group DC-Collector-Group Palo Alto Networks Panorama 6.0 Administrator’s Guide • 189 Copyright © 2007-2015 Palo Alto Networks Troubleshooting How do I recover logs from Panorama (VM or M-100) that is not deployed in HA? If a system failure occurs on a Panorama server that is managing one or more dedicated Log Collectors and the Panorama server is not deployed in a high availability (HA) configuration, use this procedure to restore the configuration on the replacement Panorama and regain access to the logs on the managed Log Collectors. To manage data, Panorama maintains a ring file that maps the segments and partitions used for storing logs on the Log Collector. This ring file is stored to the internal SSD on an M-100 appliance or on the internal disk of the Panorama virtual appliance that manages the Log Collector(s). When Panorama is not configured in HA and a system failure occurs, the ring file cannot be automatically recovered. Therefore, when you replace Panorama, in order to access the logs on the managed Collectors, you must restore the ring file. As a best practice, Palo Alto Networks recommends deploying Panorama in an HA configuration. When deployed in HA, the primary Panorama peer that manages the log collector(s) stores the ring file to its internal storage (SSD of an M-100 or the internal disk of the Panorama VM). This ring file is then automatically synced to the secondary/passive Panorama peer and the ability to access logs on the managed log collector(s) is maintained automatically. Restore the configuration and logs from Panorama Step 1 Perform initial setup of the new M-100 appliance. 1. 2. 3. 4. Rack mount the M-100 appliance. Refer to the M-100 Appliance Hardware Reference Guide for instructions. Perform Initial Configuration of the M-100 appliance. Register Panorama. Transfer licenses as follows: a. Log in to the Customer Support Portal. b. Select the Assets tab and click the Spares link. c. Click the Serial Number of the new M-100 appliance. d. Click Transfer Licenses. e. Select the old M-100 appliance and click Submit. 5. 6. 7. Step 2 Activate/Retrieve the Licenses. Install Content and Panorama Software Updates. Set the HA priority. The new M-100 appliance must have the same priority as the HA peer you are replacing. Restore the configuration from the old Restore the configuration from the old Panorama server to the new Panorama to the replacement Panorama. server. Panorama > Setup > Operations. This task assumes that you have followed 1. Select 2. Click Import named Panorama configuration snapshot, the recommendation to back up and Browse to locate the saved file, and click OK. export your Panorama configuration in order to recover from a system failure. 3. Click Load named Panorama configuration snapshot and select the version you just imported. 4. Click Commit and in the Commit Type select Panorama. Click OK. 190 • Panorama 6.0 Administrator’s Guide Copyright © 2007-2015 Palo Alto Networks Palo Alto Networks Troubleshooting Restore the configuration and logs from Panorama (Continued) Step 3 Verify that connection to the managed collector(s) is restored. Select Panorama > Managed Collectors and check that the managed collectors are connected. If the managed collectors don’t appear, this indicates that you do not have the most recent Panorama configuration. Your configuration snapshot was taken before the managed Log Collector/Collector Group configuration was implemented on Panorama. For reconfiguring the managed Log Collector/Collector Group configuration, see Step 5. Step 4 Fetch the ring file to restore access to the 1. logs stored on the managed collector. 2. Access the CLI on Panorama. Enter the following command to fetch the ring file: request fetch ring from log-collector <serial_number> For example: request fetch ring from log-collector 009201000343 3. Commit your changes to the Collector Group. commit-all log-collector-config log-collector-group <log_collector_group_name> Palo Alto Networks Panorama 6.0 Administrator’s Guide • 191 Copyright © 2007-2015 Palo Alto Networks Troubleshooting Restore the configuration and logs from Panorama (Continued) Step 5 Add the default local managed collector. 1. Required if the managed collector configuration is missing on Panorama. Access the CLI on the managed collector and enter the following commands to view the last entries in the log. These command allow you to verify the name of the managed collector that you must define on Panorama. a. Enter the command: request fetch ring from log-collector <serial_number> The following error will display: Server error: Failed to fetch ring info from <serial_number> b. Enter the command: less mp-log ms.log The following error will display: Dec04 11:07:08 Error: pan_cms_convert_resp_ring_to_file(pan_ops_cms.c: 3719): Current configuration does not contain group CA-Collector-Group The error message indicates that the missing Collector Group has the name CA-Collector-Group. 2. Create the Collector Group on Panorama, and add the managed collector as a member of this Collector Group. set log-collector-group CA-Collector-Group set log-collector-group CA-Collector-Group logfwd-setting collector 009201000343 3. 4. Commit the changes to Panorama. Do not commit to Collector group at this point. Fetch the fetch the ring file from the Log Collector using the command: request fetch ring from log-collector <serial_number> 5. Commit the changes to the Collector Group. commit-all log-collector-config log-collector-group <log_collector_group_name> How do I replace a managed device with a replacement device (RMA of the firewall)? (Use this process to replace a Return Merchandise Authorization (RMA) device) To minimize the effort required to restore the configuration on a managed device on a Return Merchandise Authorization (RMA), you can replace the serial number of the old device with that of the new/replacement device on Panorama. To then restore the configuration on the replacement device, you can either import a device state that you have previously generated and exported from the device or you can use Panorama to 192 • Panorama 6.0 Administrator’s Guide Copyright © 2007-2015 Palo Alto Networks Palo Alto Networks Troubleshooting generate a partial device state for managed devices running PAN-OS v5.0 and later versions. The partial device state that you create replicates the configuration of the managed devices with a few exceptions for Large Scale VPN (LSVPN) setups. It is created by combining two facets of the configuration on a managed device: Centralized configuration managed by Panorama: Panorama maintains a snapshot of the shared policies and templates pushed from Panorama. Local configuration on the device: When a configuration change is committed, each device sends a copy of its local configuration file to Panorama. This file is stored on Panorama and is used to compile the partial device state bundle. In an LSVPN setup, the partial device state bundle that you generate on Panorama is not the same as the version that you can export using the Export device state operation from the Device > Setup > Operations tab on the firewall. If you have manually run the device state export or have scheduled an XML API script to export the file to a remote server, you can use the exported device state in your device replacement workflow below. If you have not exported the device state, the device state that you generate in this workflow will not include the dynamic configuration information, such as the certificate details and registered devices, that is required to restore the complete configuration of a device functioning as an LSVPN portal. See Before you Begin for more information. The device state is not stored on Panorama; it is generated on request using the CLI commands listed in Restore the Configuration on the New Device. By replacing the serial number and importing the device state, you can resume managing the device using Panorama. Before you Begin The managed device (that was replaced) must have been on PAN-OS v5.0.4 and later version. Panorama cannot generate the device state for devices running older PAN-OS versions. Make note of the following details on the old device: – Serial number: You will need to enter the serial number on the Support portal to transfer the licenses from the old device to your replacement device. You will also enter this information on Panorama, to replace all references to the older serial number with the serial number of the replacement device. – (Recommended) PAN-OS version and the content database version: Installing the same software and content database versions, including the URL database vendor allows you to create the same state on the replacement device. If you decide to install the latest version of the content database, you may notice differences because of updates and additions to the database. To verify the versions installed on the device, access the device system logs stored on Panorama. Prepare the replacement device for deployment. Before you import the device state bundle and restore the configuration, you must: – Verify that the replacement device is of the same model and is enabled for similar operational capability. Consider the following operational features: does it need to be enabled for multi- virtual systems, support jumbo frames, or enabled to operate in CC or FIPS mode? – Configure network access, transfer the licenses, and install the appropriate PAN-OS version and the content database version. Palo Alto Networks Panorama 6.0 Administrator’s Guide • 193 Copyright © 2007-2015 Palo Alto Networks Troubleshooting You must use the Panorama CLI to complete this device replacement process. This CLI-based workflow is available for the superuser and panorama-admin user roles. If you have an LSVPN configuration, and are replacing a Palo Alto Networks firewall deployed as a satellite device or as an LSVPN portal, the dynamic configuration information that is required to restore LSVPN connectivity will not be available when you restore the partial device state generated on Panorama. If you have been following the recommendation to frequently generate and export the device state for devices in an LSVPN configuration, use the device state that you have previously exported from the device itself instead of generating one on Panorama. If you have not manually exported the device state from the device, and need to generate a partial device state on Panorama, the missing dynamic configuration impacts the device replacement process as follows: – If the device you are replacing is a portal device that is explicitly configured with the serial number of the satellite devices (Network > GlobalProtect > Portals > Satellite Configuration), when restoring the device configuration, although the dynamic configuration is lost, the portal device will be able to authenticate the satellite devices successfully. The successful authentication will populate the dynamic configuration information and LSVPN connectivity will be reinstated. – If you are replacing a satellite device, the satellite device will not be able to connect and authenticate to the portal. This connection failure occurs either because the serial number was not explicitly configured on the device (Network > GlobalProtect > Portals > Satellite Configuration) or because although the serial number was explicitly configured, the serial number of the replaced device does not match that of the old device. To restore connectivity, after importing the device state bundle, the satellite administrator must log in to the device and enter the credentials (username and password) for authenticating to the portal. When this authentication occurs, the dynamic configuration required for LSVPN connectivity is generated on the portal. However, if the device was configured in a high availability configuration, after restoring the configuration, the device will automatically synchronize the running configuration with its peer and attain the latest dynamic configuration required to function seamlessly. Restore the Configuration on the New Device Use the following workflow to restore the device configuration. Restore the Device Configuration Tasks on the new firewall: Use the CLI for a more streamlined workflow. Step 1 Use a serial port connection or an SSH connection to add an IP address, a DNS server IP address, and to verify that the device can access the Palo Alto Networks updates server. Perform initial configuration and verify network connectivity. For instructions, refer to the PAN-OS Administrator’s Guide. 194 • Panorama 6.0 Administrator’s Guide Copyright © 2007-2015 Palo Alto Networks Palo Alto Networks Troubleshooting Restore the Device Configuration (Continued) Step 2 (Optional) Set the operational mode to match that on the old device. A serial port connection is required for this task. 1. 2. 3. Enter the following CLI command to access maintenance mode on the device: debug system maintenance-mode To boot into the maintenance partition, enter maint during the boot sequence. Select the operational mode as Set FIPS Mode or Set CCEAL 4 Mode from the main menu. Step 3 Retrieve the license(s). Enter the following command to retrieve your licenses: request license fetch Step 4 (Optional) Match the operational state of Enter the commands that pertain to your device settings: the new device with that of the old device. set system setting multi-vsys on For example, enable multi-virtual system set system setting jumbo-frame on (multi-vsys) capability for a device that was enabled for multi-vsys capability. Step 5 Upgrade the PAN-OS version on the device. Enter the following commands: 1. To upgrade the content database version: request content upgrade download You must upgrade to the same OS and <xxx-xxxx> content database version that installed on 2. To install the content database version that you downloaded: the old device. request content upgrade install version <xxx-xxxx> 3. To upgrade the PAN-OS software version: request system software download version 5.x.x 4. To install the content database version that you downloaded: request system software install version 5.x.x Tasks on the Panorama CLI: You cannot perform these tasks on the Panorama web interface. (Skip this step if you have manually exported the device state from your firewall, and go to Step 8) Enter one of the following commands: scp export device-state device <new serial#> to <login> @ <serverIP>: <path> or, tftp export device-state device <new serial#> to <login> @ <serverIP>: <path> Step 6 Export the device state bundle to a computer using SCP or TFTP. The export command generates the device state bundle as a tar zipped file and exports it to the specified location. This device state will not include the LSVPN dynamic configuration (satellite information and certificate details). Palo Alto Networks Panorama 6.0 Administrator’s Guide • 195 Copyright © 2007-2015 Palo Alto Networks Troubleshooting Restore the Device Configuration (Continued) Step 7 Replace the serial number of the old 1. Enter the following command in operational mode: device with that of the new replacement replace device old <old SN#> new <new device on Panorama. SN#> 2. Go in to configuration mode and commit your changes. By replacing the serial number on configure Panorama you allow the new device to commit connect to Panorama after you restore 3. Exit configuration mode. the configuration on the device. exit Tasks on the new firewall: You can use the firewall web interface to perform these tasks. Step 8 1. 2. Import the device state and commit the changes on the device. 3. 4. 5. Access the web interface of the device. Select Device > Setup > Operations and click the Import Device State link in the Configuration Management section. Browse to locate the file and click OK. Click Commit to save you changes to the running configuration on the device. To confirm that the device state restored includes the references to Panorama pushed polices and objects, verify that a little green icon appears beside the device name. Tasks on Panorama: You can now use the Panorama web interface to access and manage the replaced firewall. Step 9 1. Verify that the device configuration was successfully restored. 2. 3. Access the Panorama web interface and select Panorama > Managed Devices. Verify that the Connected column for the replaced firewall has a check mark icon. To synchronize the firewall with Panorama, click Commit, for the Commit Type select Device Group, select the device group that contains the firewall, select the Include Device and Network Template check box, then click OK. After replacing the device, if you need to generate reports for a period that spans the duration when the old device was functional and after you installed the replacement device, you must generate a separate query for each device’s serial number because replacing the serial number on Panorama does not overwrite the information in the logs. 196 • Panorama 6.0 Administrator’s Guide Copyright © 2007-2015 Palo Alto Networks Palo Alto Networks Troubleshooting When and why does the metadata need to be regenerated for a RAID pair? When a system failure occurs on the M-100 appliance and you need to physically replace the disks from one appliance to another, regenerating the metadata is necessary. The metadata is required to locate logs on the disk; when a user issues a log query, the query consults this metadata to access the requested log data. You need to issue this command for every RAID disk pair configured in your M-100 appliance. The length of time required to regenerate the meta-data depends on the size of the RAID disks; on average, it takes an hour to regenerate meta-data for every 100 GB. When you run the command the current CLI session is locked-up till the command is fully executed. Therefore, if you are replacing 4 RAID pairs, you can launch 4 CLI sessions and issue the command independently in each session to complete the meta-data regeneration process simultaneously for all the pairs/ slots in about 10 hours for 4TB of log data. When the metadata is being regenerated, the collector group to which these disks belong is not available yet and the disk pair is not available for any logging and reporting operations (writes/queries). You can, however, perform other tasks such as handling new device connections or managing configuration changes on the managed devices. All other collector groups managed by this Panorama, which are not a part of this RMA process, can perform the assigned logging and reporting functionality as normal. Palo Alto Networks Panorama 6.0 Administrator’s Guide • 197 Copyright © 2007-2015 Palo Alto Networks Troubleshooting 198 • Panorama 6.0 Administrator’s Guide Copyright © 2007-2015 Palo Alto Networks Palo Alto Networks