1
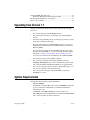
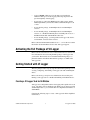
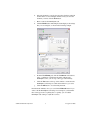
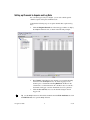
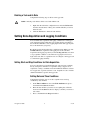
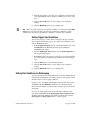
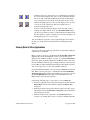
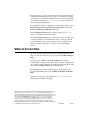
VI Logger User Guide
Version 2.0
VI Logger provides you with the necessary software tools to define and
execute datalogging tasks. With VI Logger, you can view real-time data in
graphs, browse and manage historical data in graphs, and export data to
view in Web browsers and other applications. You can control datalogging
tasks in LabVIEW and use LabVIEW to analyze historical data.
This user guide addresses concepts and procedures for the Lite and Full
packages of VI Logger. The Lite package of VI Logger provides basic
datalogging and acquisition tools for NI-DAQmx devices. The Full
package of VI Logger includes additional features for NI-DAQmx,
Traditional NI-DAQ, and FieldPoint devices. You can complete the
procedures in this user guide with either package of VI Logger. Refer to the
Purchasing the Full Package of VI Logger section for more information
about features in the Full package.
Contents
Upgrading from Version 1.1 ................................................................... 2
System Requirements.............................................................................. 2
Activating the Full Package of VI Logger .............................................. 3
Getting Started with VI Logger .............................................................. 3
Creating a VI Logger Task for NI-DAQmx .................................... 3
Setting up Channels to Acquire and Log Data ................................ 6
Running a Task ................................................................................ 7
Modifying a Task............................................................................. 7
Duplicating a Task ........................................................................... 7
Deleting a Task and its Data ............................................................ 8
Setting Data Acquisition and Logging Conditions ................................. 8
Setting Start and Stop Conditions for Data Acquisition .................. 8
Setting Start Conditions for Datalogging......................................... 9
Viewing and Printing Data...................................................................... 10
Viewing Data during Acquisition and Logging............................... 10
Viewing Data from Previous Task Runs ......................................... 10
Viewing Data in VI Logger Graphs................................................. 12
Viewing Data in Other Applications ............................................... 13
Printing Data .................................................................................... 14
Using LabVIEW with VI Logger ............................................................14
Generating Example VIs from VI Logger Tasks .............................14
Purchasing the Full Package of VI Logger..............................................15
Where to Go from Here ...........................................................................16
Upgrading from Version 1.1
VI Logger version 2.0 contains the following changes from VI Logger
version 1.1:
•
You can use VI Logger with NI-DAQmx devices.
•
You can use the Lite package of VI Logger only with NI-DAQmx
devices.
•
You must activate the Full package of VI Logger if you want to use all
the features available in VI Logger.
•
If you are using VI Logger with NI-DAQmx devices, you can use a
simplified user interface instead of the Measurement & Automation
Explorer (MAX).
•
You can generate example VIs in LabVIEW from VI Logger tasks.
You must have LabVIEW 7.1 or later to view and run these example
VIs. Refer to the Generating Example VIs from VI Logger Tasks
section for more information about running tasks within LabVIEW.
•
You can view VI Logger data in Microsoft Excel.
•
You can use the VI Logger Get Channel Attributes VI on the
VI Logger Advanced palette to retrieve channel name, physical unit,
and scaling maximum and minimum attributes for logged channels.
•
You can save task data in remote databases. In the Full package, you
can associate a database with a particular task.
•
If you want to run VI Logger tasks in LabVIEW, you must use
LabVIEW 7.1 or later.
System Requirements
VI Logger has the following system requirements:
VI Logger User Guide
•
Windows 2000/XP.
•
A minimum of a Pentium III or later or Celeron 600 MHz or equivalent
processor, but National Instruments recommends a Pentium 4 or
equivalent processor.
•
A minimum of 256 MB of RAM and a screen resolution of
800 × 600 pixels. National Instruments recommends 512 MB of RAM
and a screen resolution of 1,024 × 768 pixels.
2
ni.com
•
At least 200 MB of disk space for the VI Logger installation.
Additional disk space for datalogging and storage depends on the
speed and quantity of datalogging.
•
To use VI Logger Help, the MAX interactive help system, and the
NI Example Finder, you must have Microsoft Internet Explorer 5.0
or later.
•
To use the Lite package, an NI-DAQmx device and NI-DAQmx
software.
•
To use the Full package, an NI-DAQmx device and NI-DAQmx
software, or a Traditional NI-DAQ device and DAQ 7.0 or later, or a
FieldPoint I/O module and FieldPoint 4.0 or later.
•
To use the Full package, you must purchase VI Logger 2.0, obtain a
serial number, and activate the software.
Refer to the National Instruments Web site at ni.com for the most current
information about NI hardware devices that VI Logger supports.
Activating the Full Package of VI Logger
Refer to the Activation Instructions for National Instruments Software for
more information about activating the Full package of VI Logger after
you install it. The instructions are included with the Full package as a
printed document and with the Full and Lite packages as a PDF on the
VI Logger CD.
Getting Started with VI Logger
This user guide provides a step-by-step introduction through the process of
creating, configuring, and running a VI Logger task with an NI-DAQmx
device.
Refer to the VI Logger Help for more information about creating and
running a VI Logger task on a Traditional NI-DAQ or FieldPoint device.
Creating a VI Logger Task for NI-DAQmx
VI Logger uses configurable tasks for datalogging and acquisition. You can
create, customize, and save multiple tasks. When you use VI Logger with
an NI-DAQmx device, you can work either in a simplified user interface or
within MAX.
Complete the following steps to create a VI Logger task in the simplified
user interface.
© National Instruments Corporation
3
VI Logger User Guide
1.
From the Start menu, select Programs»National Instruments»
VI Logger»VI Logger (NI-DAQmx) to launch VI Logger.
2.
In the configuration tree, right-click VI Logger Tasks and select
Create New to display the Create New dialog box.
3.
Select Using NI-DAQmx and click the Finish button. A new VI
Logger task named My VI Logger Task 1 appears in the configuration
tree and its settings display in the Task Attributes view of the VI
Logger window, as shown in the following example.
4.
Right-click the task name in the configuration tree and select Rename
task from the shortcut menu. Enter the task name you want to use.
5.
In the Acquisition Settings section, click the Create new button to
create an NI-DAQmx task. The DAQ Assistant launches and guides
you through the following steps to create and configure an NI-DAQmx
task.
a.
Note
VI Logger User Guide
Click the Analog Input option to display analog input types.
Click a measurement type, such as Voltage, to select it.
You can use only analog input tasks with VI Logger.
4
ni.com
b.
Select the channels to scan for data. Press the <Ctrl> key and click
channel names to select multiple channels. After you select the
channels you want, click the Next button.
c.
Enter a name for the NI-DAQmx task.
d.
Click the Finish button. The DAQ Assistant displays task settings
that you can configure, as shown in the following example.
e.
From the Task Timing tab, click the Continuous radio button to
select a continuous acquisition mode. This configures the
NI-DAQmx task so you can stop a VI Logger task manually.
f.
Click the Test button at the top of the window to ensure that the
NI-DAQmx task settings are valid and work the way you want.
g.
Click the OK button to close the DAQ Assistant.
From the Task Attributes view, you can click the Edit task button if you
want to edit the NI-DAQmx task settings. For example, if you determine
that a VI Logger task is acquiring data too quickly, you can edit the
NI-DAQmx task settings to adjust the scan rate.
© National Instruments Corporation
5
VI Logger User Guide
Setting up Channels to Acquire and Log Data
For each VI Logger task you configure, you can select which specific
channels acquire and log data within that task.
Complete the following steps to set up the channels that acquire and log
data.
1.
Click the DAQmx Channels tab of the VI Logger window to display
the DAQmx Channels view, as shown in the following example.
2.
The Channel column displays the channels you created in the DAQ
Assistant for the NI-DAQmx device. To enable logging for each
channel, place a checkmark in the Log Enabled? checkbox in the
column next to each channel name. If a checkbox does not contain a
checkmark, VI Logger scans the channel but does not log the data.
3.
Click the Save task button to save the channel settings in the VI
Logger task.
Use the DAQ Assistant to add or delete channels. From the Task Attributes tab, click
the Edit Task button to open the DAQ Assistant.
Tip
VI Logger User Guide
6
ni.com
Running a Task
Complete the following steps to run a VI Logger task.
Tip
Running a task automatically saves the task.
1.
From the configuration tree, click the VI Logger task you want to run.
2.
Click the Run task button.
3.
Let the task run for several seconds to acquire data.
4.
Click the Real Time Data tab to view the data in a graph. Refer to the
Viewing Data during Acquisition and Logging section for more
information about viewing data while a task runs.
If you set a stop condition for a task, it stops acquiring and logging
automatically. If you do not specify stop conditions for a task, the task
runs until you manually click the Stop task button. Refer to the Setting
Start and Stop Conditions for Data Acquisition section for more
information about setting stop conditions.
5.
Click the Stop task button.
6.
Click the Save task button to save the current VI Logger task
configuration.
Modifying a Task
You can edit configuration settings for a VI Logger task you previously
created and saved. In the configuration tree, expand VI Logger Tasks.
Click a task name to display the tabbed VI Logger window for that task.
You can edit stop and start conditions, logging conditions, or export settings
using the procedures in this manual or in the VI Logger Help. Click the
Save task button or run the task to save it.
Duplicating a Task
To save time when you are configuring more than one task, you can
duplicate a task and then modify its settings. Complete the following steps
to duplicate a task.
1.
Right-click the task in the configuration tree and select Duplicate task
from the shortcut menu to display the Duplicate a VI Logging task
dialog box.
2.
Enter a task name in the New task name text box.
3.
Click the OK button.
The duplicate task appears under VI Logger Tasks in the configuration
tree.
© National Instruments Corporation
7
VI Logger User Guide
Deleting a Task and its Data
Complete the following steps to delete a VI Logger task.
Caution
Deleting a task deletes all data associated with the task.
1.
Right-click the task in the configuration tree and select Delete task
from the shortcut menu. A dialog box confirms whether you want to
delete the task.
2.
Click the Yes button to delete the task and data.
Setting Data Acquisition and Logging Conditions
You can define data acquisition and logging conditions for a VI Logger
task. Acquisition begins when VI Logger acquires the data and displays
data in the Real Time Data view. Logging begins when VI Logger logs the
data to the destination you specify.
By default, logging begins when data acquisition begins. When you click
the Run task button, acquisition and logging start at the same time.
Acquisition and logging stop when you click the Stop task button or when
a stop acquisition condition occurs. However, logging does not have to
begin at the same time as acquisition. You can configure a VI Logger task
to control datalogging manually.
Setting Start and Stop Conditions for Data Acquisition
You can control the ways in which VI Logger starts and stops acquiring
data by setting dates and times for acquisition, using a trigger to start
acquisition, or using a combination of both in which the hardware searches
for a trigger after a specific start time occurs. Acquisition occurs on all the
channels included in a specific VI Logger task.
Setting Date and Time Conditions
Complete the following steps to set data acquisition start and stop
conditions by date and time.
VI Logger User Guide
1.
In the Time Condition section of the Task Attributes tab, place a
checkmark in the Start at checkbox.
2.
Enter the date and time you want to start acquiring data. Click the
down arrow in the Start at control to display a calendar you can use to
select dates.
3.
Place a checkmark in the Stop at checkbox.
8
ni.com
4.
Enter the date and time you want to stop acquiring data. Click the down
arrow in the Stop at control to display a calendar you can use to select
dates.
5.
Click the Save Task button to verify changes to the acquisition
settings.
6.
Click the Run Task button to start acquiring data.
Note When you set the acquisition start and stop conditions, you still must click the Run
task button to start the task. VI Logger waits for specified start conditions to begin
acquiring data and waits for specified stop conditions to complete data acquisition.
Setting Trigger Start Conditions
You can use a trigger to control when a VI Logger task starts acquiring
data. Complete the following steps to set a trigger start condition if you are
using an NI-DAQmx device.
1.
In the Acquisition Settings section of the Task Attributes view, click
the Edit task button. The DAQ Assistant opens and displays
NI-DAQmx task settings.
2.
From the NI-DAQmx Task window, click the Task Triggering tab.
The trigger settings appear.
3.
In the Start section, select the type of trigger type you want. Configure
the source and other settings that appear when you select the trigger
type.
4.
Click the OK button to close the DAQ Assistant.
5.
Click the Save Task button to verify changes to the acquisition
settings.
6.
Click the Run Task button to start acquiring data.
Setting Start Conditions for Datalogging
You can control the ways in which VI Logger logs data by changing default
settings in the Task Attributes view, using a trigger to start logging, or using
channel events to control logging conditions.
Logging occurs on channels in the DAQmx Channels view that contain a
checkmark in the Log Enabled? checkbox next to the channel name.
Remove the checkmark if you do not want to include a specific channel in
datalogging.
If you do not want logging to start at the same time acquisition starts,
remove the checkmark from the Begin logging when acquisition starts
checkbox in the Task Attributes view. When you run the task, click the
Start logging and Stop logging buttons to control logging.
© National Instruments Corporation
9
VI Logger User Guide
You can use a digital channel to control when logging begins. Place a
checkmark in the Control logging with digital channel checkbox in the
Task Attributes view to control logging for a task. Logging occurs while the
channel is high.
Turning logging on and off does not affect the VI Logger task, but it does create
additional task runs. Click the Stop task button if you want to end the task.
Note
You also can use channel events to control start and stop logging
conditions. This feature is available only in the Full package of VI Logger.
Refer to the VI Logger Help for more information about using channel
events for logging.
Viewing and Printing Data
You can view data in VI Logger while VI Logger acquires and logs the data
or after a task run is complete.
Viewing Data during Acquisition and Logging
Use the Real Time Data view to view data graphically while you run a task.
The Real Time Data view monitors data during acquisition, regardless of
whether datalogging occurs. VI Logger automatically displays this view
when logging begins. For high-speed datalogging, remove the checkmark
from the Jump to the Real Time Data view when task starts checkbox
in the Task Attributes view. This releases CPU time to use for logging,
which improves logging performance.
Viewing Data from Previous Task Runs
You can view summary data from previous VI Logger task runs in a table,
or view the full results in a graph. You can view information related to a
specific run, such as the start and stop time, engineering units measured,
minimum and maximum value set for the channel after scaling, and number
of scans.
Complete the following steps to view logged data from a specific
VI Logger task run.
VI Logger User Guide
1.
In the configuration tree under VI Logger Tasks, click a task name to
expand a list of data runs, named by the date and time of the run.
2.
Click the run you want to view.
3.
Click the Summary tab to display the Summary view, shown in the
following example.
10
ni.com
You can use the Summary view to see the following information about
the VI Logger task run:
4.
© National Instruments Corporation
•
Name—The name of the channel from which datalogging
occurred.
•
Units—The engineering units of measure used in the run, such as
voltage.
•
Minimum—The minimum value set for that channel after
scaling.
•
Maximum—The maximum value set for that channel after
scaling.
•
# of Scans—The number of scans VI Logger logged for the
channel during the run.
•
Scaled—Whether datalogging in the run was scaled or binary.
NI-DAQmx data is always logged as scaled.
Click the Historical Data tab to display the Historical Data view,
which contains a graph of the data from the task run, shown in the
following example.
11
VI Logger User Guide
Viewing Data in VI Logger Graphs
A red and green LED indicator appears on the upper left corner of the
Historical Data and the Real Time Data views while a task runs. The green
light indicates that the graph is displaying data that VI Logger is acquiring
while the task runs. The red light indicates that the graph is displaying data
that VI Logger already acquired, such as the beginning or end of logged
data.
VI Logger User Guide
•
Use the LED indicator, shown at left, to switch from viewing real-time
data to viewing historical data. Click the red light at the top of the
indicator to take a snapshot of data to view. Click the green light to
return to viewing real-time data. You can switch between data views
only when a task is running.
•
Click the home arrow button, shown at left, to view the beginning of
logged data.
•
Click the end arrow button, shown at left, to view the end of the logged
data.
12
ni.com
•
Click the scroll arrows, shown at left, to scroll through the logged data.
To scroll faster through the data, click a scroll arrow button and drag
the cursor right or left while holding the mouse button. The further
away you drag the cursor from the arrow, the faster the data scrolls.
•
Click the magnifying glasses at the top of the display view to zoom in
or zoom out on the current view. The view magnifies twice or
decreases by half on the x-axis.
You also can click and drag the display view to the right or left to
magnify data. Right-click the view, select Zoom/Pan Mode and the
specific axis on which you want to zoom from the shortcut menu. Click
the view and drag a square around the area you want to magnify. Use
the magnifying glass to zoom out again.
You can modify the appearance of the graphs and graph cursors. Refer to
the VI Logger Help for more information about modifying the graph
display.
Viewing Data in Other Applications
You can view data from a VI Logger task run in a text file, Microsoft Excel,
a Web browser, or DIAdem.
Before you run a task, place a checkmark in the View in Excel when task
stops checkbox in the Task Attributes view if you want VI Logger to
display the data in Microsoft Excel. You also can click the View in Excel
button that appears in the Real Time Data and Historical Data views after
the task runs. Microsoft Excel opens to display the data in a table. If you do
not have Microsoft Excel installed, the default text editor displays the data.
You can view up to 65,535 scans of data in Microsoft Excel.
If you have DIAdem installed, you can view data in DIAdem after the task
runs. Before you run a task, place a checkmark in the View in DIAdem
when task stops checkbox in the Task Attributes view. You also can click
the View in DIAdem button that appears in the Real Time Data and
Historical Data views after the task runs.
Complete the following steps to export data to a text or HTML file.
1.
From the configuration tree, right-click a VI Logger task run and select
Export Data from the shortcut menu to display the Export data
dialog box.
2.
Enter the start time and stop time of the data points you want to export.
The default values in the Start time and Stop time controls include the
entire VI Logger task run.
3.
Enter the location of the output file or click the Browse button to
navigate to an existing file. You also can specify a different filename.
© National Instruments Corporation
13
VI Logger User Guide
4.
Select the type of delimiter you want to organize the data in the file.
For example, you can separate data with a tab or with a comma.
5.
Select the contents of the text file. You can include data, data and
events, or information you specify in a custom text or HTML template.
If you select Custom template, click the Customize template button
to display the Advanced export settings dialog box. Refer to the
VI Logger Help for more information about customizing templates.
6.
If you want to export data to an HTML file, click the Load button in
the Advanced export settings dialog box, navigate to the html.vet
file in the VI Logger/Export directory, and select the file. Click the
OK button to close the Advanced export settings dialog box.
7.
Click the OK button. The dialog box closes. The Exporting text data
dialog box displays the status of the data export.
8.
Click the Close button to close the Exporting text data dialog box.
Printing Data
To print a VI Logger graph, right-click the graph in the Historical Data or
Real Time Data view and select Print from the shortcut menu. You can
print only what appears in the VI Logger window.
Using LabVIEW with VI Logger
You can use the VI Logger VIs in LabVIEW 7.1 or later to control tasks
programmatically, which gives you greater control over running tasks. You
can run tasks, read data and obtain status information from tasks that are
running, set multiple start and stop sequences for a task, and perform other
VI Logger operations.
Use the LabVIEW Example Finder to browse the VI Logger example VIs.
The example VIs, located in the Examples\VI Logger\Logging
Examples.llb directory, contain common solutions for data acquisition
and logging using the VI Logger VIs.
Refer to the LabVIEW Help for more information about specific
VI Logger VIs.
Generating Example VIs from VI Logger Tasks
You can generate an example VI in LabVIEW from a VI Logger task.
LabVIEW provides a number of options for analyzing and processing data
from a VI Logger task run.
You must have LabVIEW 7.1 or later to run a VI generated from a VI Logger task
in LabVIEW.
Note
VI Logger User Guide
14
ni.com
Complete the following steps to generate an example VI.
1.
From the configuration tree, click the VI Logger task you want to use.
2.
Select Tools»VI Logger»Generate example VI in LabVIEW.
VI Logger creates a VI with the same name as the VI Logger task you
selected. LabVIEW opens and displays the front panel of the new VI.
3.
From the front panel, click the Run button. The VI acquires and logs
data in the same way as the VI Logger task.
Refer to the LabVIEW Help for more information about performing
specific operations in LabVIEW.
Purchasing the Full Package of VI Logger
The Full package of VI Logger contains additional features that are not
available in the Lite package. The following table compares the features in
the Lite package and the Full package.
Feature
NI-DAQmx support
© National Instruments Corporation
Lite Package
Full Package
X
X
Traditional NI-DAQ support
X
FieldPoint support
X
Viewing real time and
historical data in graphs
X
X
Viewing data in Microsoft
Excel
X
X
Viewing data in DIAdem
X
X
Exporting data to text or
HTML files
X
X
Using calculated channels
X
Using events
X
Managing databases
X
Publishing data to remote
computers
X
Specifying a database to save
data for a particular VI Logger
task
X
15
VI Logger User Guide
Refer to the VI Logger Help for more information about specific features
available in the Full package of VI Logger. If you are using VI Logger Lite,
you must purchase and activate the Full package to use these features. Refer
to the VI Logger Web page at ni.com/vilogger for more information
about purchasing the Full package.
You can purchase and activate the Full package from VI Logger Lite. Select
Tools»VI Logger»Activate All VI Logger 2.0 Features to display the
Activate All VI Logger 2.0 Features dialog box.
Click the Purchase License button to display a Web page on ni.com
where you can purchase the software license.
Click the Activate License button to activate the software. You must have
a valid serial number to activate the Full package of VI Logger. The NI
Activation Wizard guides you through the process of entering the serial
number, obtaining and entering an activation code, and enabling the
software.
Where to Go from Here
The VI Logger Help includes procedures for using VI Logger Lite and
VI Logger 2.0. Access the VI Logger Help by selecting Help»VI Logger
Help.
From VI Logger or MAX, click the Show Help button to display
task-based help on the right side of the VI Logger window. To display help
on a particular control or indicator in the VI Logger window, right-click the
object and select What’s This? from the shortcut menu.
The LabVIEW Help includes reference help for using VI Logger VIs.
Access the LabVIEW Help by selecting Help»VI, Function, & How-To
Help.
Visit the VI Logger page of the NI Web site at ni.com/vilogger for
information about updates and support.
National Instruments, NI, ni.com, and LabVIEW are trademarks of National Instruments Corporation.
Refer to the Terms of Use section on ni.com/legal for more information about National
Instruments trademarks. Other product and company names mentioned herein are trademarks or trade
names of their respective companies. For patents covering National Instruments products, refer to the
appropriate location: Help»Patents in your software, the patents.txt file on your CD, or
ni.com/patents. For a listing of the copyrights, conditions, and disclaimers regarding
components used in USI (Xerces C++, ICU, and HDF5), refer to the USICopyrights.chm. In
regards to components that use Citadel 5, the following copyright applies. Copyright © 1994
Hewlett-Packard Company. Refer to the VI Logger Help for a listing of the conditions and disclaimers.
© 2004 National Instruments Corporation. All rights reserved.
371306A-01
Dec04