1
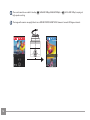
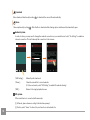
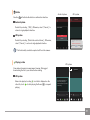
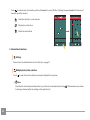
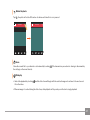
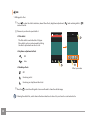
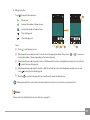
User Manual
PIXPRO Remote Viewer
For KODAK PIXPRO Digital Cameras and
KODAK PIXPRO SMART LENS Cameras
Models: S-1/SL10/SL25/AZ651/AZ526/AZ525/SL5
Ver. 2.1
Before You Start
Declaration of Conformity
Responsible Party:
JK Imaging Ltd.
Address:
JK Imaging Ltd. 17239 South Main Street, Gardena, CA 90248, USA
JK Imaging Europe, 71 Clarendon road, Watford, WD17 1DS, UK
Company Website:www.kodakpixpro.com
About this Manual
JK Imaging Ltd. reserves all rights of this document. No part of this published manual may be reproduced, transmitted,
transcribed, stored in a retrieval system or translated into any language or computer language, in any form, by any means,
without the prior written permission of JK Imaging Ltd..
All trademarks mentioned in this manual are used for identification purposes only and are properties of their respective owners.
This manual will instruct you on how to operate the PIXPRO Remote Viewer. JK Imaging Ltd. has tried its utmost to ensure the
correctness of the user manual contents, but reserves the right to modify as necessary.
Throughout this manual, the following symbols are used to help you locate information quickly and easily:
Indicates useful information.
Matters Needing Attention
Before use, please confirm that your smart device is a smart phone with Android 2.3 or 4.x system, a tablet computer with
Android 4.x or is an iOS 6/7 system. If not, please upgrade your smart device before using the APP.
Please do not use in places having high intensity magnetic field, electrostatic and electric wave interference (for example near a
microwave oven), which may cause failure in receiving signals.
To maintain a connection, please keep the camera within 10 meters (32.8 feet) without signal shielding interference.
Please do not use Wi-Fi connection functionality on a plane.
The camera and the smart device can only be connected one to one.
1
Contents
Before You Start........................................................................................................................................... 1
Contents........................................................................................................................................................ 2
Connect the Smart Device........................................................................................................................ 5
Download and Install APP.................................................................................................................................................................................................. 5
Establish a connection......................................................................................................................................................................................................... 5
APP Operating Method............................................................................................................................. 6
Position Service Function..................................................................................................................................................................................................6
Remote Viewfinder.............................................................................................................................................................................................................6
Description of screen icons in shooting mode...................................................................................................................................................6
In movie mode................................................................................................................................................................................................6
In photo shooting mode................................................................................................................................................................................7
Parameter settings...................................................................................................................................................................................................8
Zoom control..................................................................................................................................................................................................8
EV settings......................................................................................................................................................................................................8
2
Mode................................................................................................................................................................................................................. 9
White Balance................................................................................................................................................................................................11
Self-timer.........................................................................................................................................................................................................11
Shooting size...................................................................................................................................................................................................12
Flash..................................................................................................................................................................................................................13
Menu................................................................................................................................................................................................................13
Shooting method......................................................................................................................................................................................................15
Take a photo....................................................................................................................................................................................................15
Record a video................................................................................................................................................................................................15
Playback................................................................................................................................................................................................................................17
The playback interface of the camera.................................................................................................................................................................17
Single playback...............................................................................................................................................................................................17
Index playback................................................................................................................................................................................................21
The playback interface of the smart device........................................................................................................................................................23
Index playback................................................................................................................................................................................................23
Single playback...............................................................................................................................................................................................26
APP Home............................................................................................................................................................................................................................30
3
About.....................................................................................................................................................................................................................................30
Appendices................................................................................................................................................ 31
KODAK PIXPRO S-1 Compact System Camera............................................................................................................................................................31
KODAK PIXPRO SL10 SMART LENS Camera...............................................................................................................................................................32
KODAK PIXPRO SL25 SMART LENS Camera...............................................................................................................................................................33
KODAK PIXPRO AZ651 Digital Camera.........................................................................................................................................................................34
KODAK PIXPRO AZ526 Digital Camera........................................................................................................................................................................35
KODAK PIXPRO AZ525 Digital Camera........................................................................................................................................................................36
KODAK PIXPRO SL5 SMART LENS Camera.................................................................................................................................................................37
4
Connect the Smart Device
Download and Install APP
Please download APP installation package (APP name: PIXPRO Remote Viewer) to your smart device from the path below and
install it.
Android system
iOS system
For Android devices, search and download the App “PIXPRO
Remote Viewer” in Google play, and install it following the
instructions on the interface.
For Apple devices, search and download the App “PIXPRO
Remote Viewer” in App store, and install it following the
instructions on the interface.
https://play.google.com/store/apps/
details?id=com.jkimaging.pixproremoteviewer
https://itunes.apple.com/us/app/
pixpro-remote-viewer/id833154167?mt=8
Establish a connection
The different camera models may use different methods to connect with smart devices. Please refer to the User Manual for your camera
for specific instructions.
When the smart device judges the system to be out of memory, the APP will not be able to run normally. Please clean up the
memory of the smart device.
5
APP Operating Method
Position Service Function
When connected successfully, you can tap the App icon (
) to start it. Enable the GPS function on the smart device by following the
prompts on the interface, PIXPRO Remote Viewer can record GPS location on picture files. This function is not available for video files.
Remote Viewfinder
After finishing setting position service, the APP will enter the viewfinder interface. Camera functions can be accessed from this screen.
1 Description of screen icons in shooting mode
In movie mode
4
1. Zoom control
5
6
7
2. Exposure compensation
3. Zoom display bar
4. Enter the previous stage of interface or return to the APP home
3
00:00
1.2x
5. Video size
6.Self-timer
7. Movie mode
8. Battery state
2
9. Record time
1
10. Switch record mode to shooting mode
11. Start video recording (
)/Stop video recording (
EV-3.0
)
Photo
12.Menu
13.Playback
6
13 12
11
10
8
9
In photo shooting mode
1. Zoom control
2. ISO value
8
3. Exposure compensation
9
10 11 12
4. Aperture value
5. Shutter speed
6. Zoom display bar
7. Flash mode
8. Enter the previous stage of interface
or return to the APP home
9. Image size
10.Self-timer
11. White balance
7
6
5
4
3
2
1
16M
1.2x
12345
13
14
15
16
EV-3.0
ISO200
F3.5
1/2000
12.Mode
Movie
13. Available shots
14. Battery state
15. No SD card in camera
20 19
18
17
16. Touch focus display
17. Switch shooting mode to record mode
18. Shoot photos
19.Menu
20.Playback
7
2 Parameter settings
The cameras of different models can set different parameters. Please refer to the detailed instructions for “Appendices” on
page 31.
Zoom control
Touch zoom (
) adjust focus by touching W (amplifying) / T (zoom-out) of the screen. The screen displays focus display bar
(optical focus only) and zoom ratio.
By using the zoom lever on KODAK PIXPRO SMART LENS Camera to accelerate zoom in and zoom out.
The original lens of KODAK PIXPRO S-1 Compact System Camera cannot control focus by APP. The icon is gray (
APP does not support zoom function.
) if
EV settings
The EV function menu includes functions, such as EV adjustment, ISO adjustment, Shutter adjustment, and Aperture adjustment.
Using the appropriate function settings can improve your pictures.
Activate the wheel to adjust the values for EV, ISO, Aperture and Shutter.
16M
EV-3.0
ISO200
O200
200
F3.5
123456
1/2000
16M
EV-3.0
ISO12800
F12.3
123456
1/1234
ISO400
Movie
8
Movie
EV value (Exposure compensation)
Adjust the brightness of framing interface. It is applied to the circumstance where the contrast of shot subject and background
brightness is relatively large.
ISO value
ISO allows you to set the sensitivity of the camera sensor. Higher ISO value is suggested in dark environment while low ISO value is
suggested where it is relatively bright.
Aperture value
Adjust the dimension of aperture. The large aperture is to highlight the object focused through blurring the background, while the
small aperture is for clear focusing on both the background and the object.
Shutter speed
The definition of motion of the shot subject in the framing picture can be represented by adjusting the shutter speed.
High-speed shutter can catch the action of the subject that moves quickly very clearly while low-speed shutter can shoot the
dynamic image of the subject that moves very quickly.
Mode
Select the most suitable mode to capture the best pictures.
16M
16M
16M
12345
Mode
Program AE
Aperture priority
Shutter priority
EV-3.0
ISO200
F3.5
1/2000
Manual Mode
Face Beautifier
Movie
Movie
9
Program AE
For adjusting the EV and ISO values.
Aperture priority
For adjusting the aperture size, EV and ISO values. It is generally used to shoot inanimate object and
control the view depth.
Shutter priority
For adjusting the shutter speed, EV and ISO values. It is mostly used to shoot the moving object.
Manual Mode
Aperture, shutter speed and ISO value can be set manually to shoot static photos.
Face Beautifier
The camera is set to automatically adjust camera exposure for realistic portrayal of skin tones.
Auto Scene
The camera will automatically detect the most suitable scene (Auto, Landscape, Night and Macro) to
capture the best pictures.
AE Bracketing
It can take three photos continuously on an automatic basis by touching
brightness, relatively dark and bright photos.
Wide Dynamic
Range
When the camera detects that there is a big contrast in brightness between scenes and such scenes
are against the light, it will automatically adjust the brightness and saturation to capture an image that
better represents the scene.
HDR
Use this setting to control wide dynamic image range when taking static pictures. Photos with extreme
contrast of bright and dark areas will still maintain distinguishable detail and depth.
Continuous Shot
It can take several photos at a time.
Cont. Shot-Fast
For continuous shot with 4M pixels.
once: photos with original
There are 4 shooting scenes under Auto Scene mode:
Auto
The camera will automatically adjust the exposure and focus to ensure the best possible pictures.
Landscape
For landscapes, will automatically adjust the exposure to match the background.
Macro
To produce more detailed close-ups, will automatically engage the camera's Macro Mode and automatically focus
the lens.
Night
For night scenes, will automatically increase the ISO value to compensate for low light.
For KODAK PIXPRO AZ651 Digital Camera, the pixels in Cont. Shot-Fast mode is 2M.
10
White Balance
The WB function allows the user to adjust color temperatures under different light sources, so as to confirm that the color can be
presented properly.
AWB
For auto shooting based on lighting conditions.
Daylight
For shooting on a sunny day.
Cloudy
For shooting on a cloudy day.
Shadow
For shooting under shadow on a sunny day.
Fluorescent
For shooting under fluorescent lights.
Fluorescent H
For shooting under fluorescent H lights.
Incandescent
For shooting under incandescent lights.
Self-timer
Timing shooting is allowed by this function. There are only two options under Movie mode: Self-timer Off and Self-timer 10sec.
Self-timer Off
Disables the Self-timer.
Self-timer 2sec
A photo will be shot in 2s.
Self-timer 10sec
A photo will be shot or a piece of video will begin to record in 10s.
11
Shooting size
The setting value of shooting dimension is based on image pixel. The higher the pixel, the more the details contained in image and
the finer the image shot.
1. Image size
Pixel ratio
Icon
Image Pixel
Icon
Image Pixel
Icon
Image Pixel
5184 X 3888
4608 X 3456
3648 X 2736
2336 X 1752
2048 X 1536
640 X 480
16 : 9
5120 X 2880
4608 X 2592
1920 X 1080
3:2
5184 X 3456
4608 X 3072
4:3
The image pixel of
Icon
Image Pixel
2592 X 1944
for KODAK PIXPRO S-1 Compact System Camera is: 4640 X 3480.
2. Movie size
Icon
Meaning
Full high definition
High definition
Standard definition
Common definition
Movie Size
Recording Time Restraint
1920 X 1080 30fps
1280 X 720 60fps
1280 X 720 30fps
640 X 480 30fps
640 X 360 120fps
640 X 480 120fps
The maximum recordable time is 29 minutes.
848 X 480 120fps
The maximum recordable time is 60 seconds.
None
The maximum recordable time is 30 seconds.
When recording in higher pixel resolutions for extended periods of time, the camera may get warm. This is not a camera
malfunction.
Dynamic image can be shot with ultra-high speed video by
(640x480 120fps/640x360 120fps) or
(848 X 480
120fps) starting high-speed recording and it will be played back with normal 30fps speed in order to catch the moment that
is hard to distinguish by eyes.
12
Flash
The flash is mainly for supplementing light for the scene. The flash is usually used in shooting against the light to highlight the object
shot through lightening the object while darkening the background; it is also suitable for metering and shooting in darker scenes
through exposure.
Force Off
Flash is turned off.
Flash Auto
Camera flash goes off automatically based on existing light conditions.
Fill flash
For fill flash at the moment of taking a picture.
Menu
Such functions as resetting, formatting, password changing and power saving can be set by entering menu interface through
touching . Please set the functions according to the interface prompt and leave the menu after finishing setting by touching the
blank space beyond the menu.
16M
12345
16M
123456
Menu
Reset
Format
EV-3.0
ISO200
F3.5
1/2000
Change Password
EV-3.0
ISO12800
F12.3
1/1234
Power Saving
Movie
Movie
Reset
Use this setting to restore the camera to its original default settings.
13
Format
Formatting enables you to delete all contents in the memory card, and the data is unrecoverable after the memory card is formatted.
Change Password
Change Wi-Fi password by following the steps below:
1.Touch「Change Password」to enter password changing interface;
2. Input the old password and then the new one according to the interface prompt and confirm the new password (inputting new
password again), touch「Apply」to finish this operation;
3. As Wi-Fi connection has been interrupted, please reconnect it (see User Manual of camera for the connection method).
Please enter the new password on smart device after changing Wi-Fi password. Some models of smart device will remember
the Wi-Fi password previously entered, so please clear the old password on smart device manually before connection (For
different models, this operation may be varied, please subject to your user manual.)
iOS system
Android system
1
2
1
3
2
Power Saving
Set the time in which the APP will automatically timeout if there is no action.
There are 4 options: Off/ 3 min / 5 min / 10 min.
Only KODAK PIXPRO SMART LENS Cameras support the Power Saving function.
14
3 Shooting method
Take a photo
When using touch focus, a green box indicates a successful
focus. A red box indicates failure to focus properly on the
targeted location. The shooting button remains functional
and can be used to capture a photo even if the touch focus
was not successful.
1. Aim the camera at the subject and use the screen on
your smart device to view the image.
16M
1.2x
EV-3.0
ISO200
F3.5
12345
1/2000
16M
EV-3.0
ISO200
F3.5
12345
1/2000
2.Touch
to adjust the zoom and compose a photo
within the framing scope.
3.Select the other icons on the interface to set the
corresponding parameters.
Movie
Movie
4.Touch the screen in the area you wish to focus on. When
the focus frame turns green, touch
to take a photo.
Record a video
To enter the video recording interface, touch
photo interface.
in the
1.2x
00:00
1.Touch
to adjust the zoom and compose a photo
within the framing scope.
2.Touch the other icons on the interface to set the
corresponding parameters.
3.Touch
to start recording and then touch
EV-3.0
to stop.
Photo
15
The sound cannot be recorded if selecting
high-speed recording.
(640x480 120fps/640x360 120fps) or
(848 X 480 120fps) carrying out
The image will remain in an upright direction as KODAK PIXPRO SMART LENS Camera is turned at 90 degree intervals.
EV-3.0
ISO200
F3.5
1/2000
Movie
16
EV-3.0
ISO200
F3.5
1/2000
Playback
All files are saved on the memory card of the camera. The files can be viewed by entering playback mode (
).
There are two options in playback mode: •. Single playback (video/photo)
•. Index playback (camera/smart device)
1 The playback interface of the camera
The interface will default to the single playback screen for files saved on the camera.
Single playback
Browse files by swiping left or right. Touch the screen outside of the image area to enable the executable operations specified in the
next sections.
1. Introduction to the Icons
Enter index playback screen
XXXXXXXX
Enter photo or movie mode
Download the current file to the smart device
Share the current file to social networks
Delete the current file
2. Introduction to functions
Image zooming
1. Double tap a photo to enter 100% zoom picture, and double tap again to restore the original size.
2. Use a two finger pinch/separation to zoom in or out of the image.
17
Download
Enter download interface by touching
to download the current file automatically.
Share
Share a picture by touching
. After the file is downloaded the sharing options interface will automatically open.
Android system
In order to share, you may need to change the network connection on your smart device. Select “Go Setting” to enable an
internet connection. This will interrupt the connection to the camera.
XXXXXXXX
XXXXXXXX
XXXXXXXX
Downloading…
If your downloading is video file,
download time may be long. Please note.
While using sharing, you may need
to change network connection to
internet by Go Setting manually, and
the shooting device connection will be
interrupted.
12%
Cancel
GO setting
Share
No
「GO Setting」:
Manually switch network
「Share」:
Share the current file to social networks
(If it does not work, select "GO Setting" to enable 3G network sharing)
「NO」:
Return to the single playback screen
iOS system
If the smart device is connected with camera by:
① AP mode, please share according to the interface prompt;
② Station, select “share” to share it to your favorite social network site.
18
Delete
Android system
Selecting
iOS system
will activate the deletion confirmation interface.
Android system
Delete it by selecting 「OK」; Otherwise, select「Cancel」 to
return to single playback interface.
XXXXXXXX
XXXXXXXX
Confirm delete?
iOS system
OK
Cancel
Delete it by selecting「Delete the selected items」; Otherwise,
select「Cancel」 to return to single playback interface.
Are you sure to delete the selected
item(s)?
Delete the selected items
Cancel
This functionality can delete a protected file on the camera.
Playing a video
iOS system
Slow wireless transmission may impact viewing. We suggest
downloading the file to your device before viewing.
>>>>>>>>
iOS system
Enter video play by touching
icon that is displayed on the
video file; touch
to start playing the file and
to suspend
playing.
Slow wireless transmission may
impact viewing. We suggest
downloading the file to your device
before viewing.
19
Android system
The APP will utilize the video player that is set as the default on your smart device. The default video player will be
activated when you touch the
icon on the video file. The playing functionality is determined by the default video player.
To ensure proper playback of video files created with your camera, we suggest using the MX Player application.
1. Download and install MX Player to your Android smart devices.
Download link: https://play.google.com/store/apps/details?id=com.mxtech.videoplayer.ad
2. Run MX Player.
3. Choose “Decoder” under “Settings” and check the options as shown in the pictures.
The following video applications will also work: VPlayer, VLC for Android, BSPlayer Free.
20
Index playback
Touch
in single playback interface to enter index playback screen (
).
XXXXXXXX
1. Introduction to the Icons
Enter the previous stage of interface or return to the
APP home
28:01
Settings
Enter photo or movie mode
Enter the download mode to move the files in the
camera into the smart devices
Select multiple files to delete
Switch between camera and smart device index
playback screen
In the index playback interface of the camera, touch the small image to enter the playback interface; the single image playback
interface entered in this way has no sharing (
) function.
2. Introduction to functions
Settings
Touch
in the upper right corner to activate the settings interface.
The download size can be set and cache can be deleted.
There are two options for the download size:
• Original Size
• 2M
21
Download
Touch
to enter download interface, and select a file to begin
downloading. At most, there can be 20 files that are selected,
waiting for download, or in the process of being downloaded.
Download
20:01
Downloading
Waiting for download
28:01
20:01
28:01
The download is complete
Cancel download
Failure to download
Inaction
If you select
or
, you will be prompted to suspend downloading by selecting「Yes」or continue downloading by
selecting「Cancel」.
Delete
Enter the selection interface by touching
to delete and press
again.
, and then select the files
2 items selected
<
Android system
Delete them by selecting「OK 」; Otherwise, select
「Cancel」to return to selection interface of Delete.
iOS system
Delete them by selecting「Delete the selected items」;
Otherwise, select「Cancel」to return to selection interface
of Delete.
Files that are being downloaded or waiting for download cannot be deleted.
22
28:01
20:01
28:01
2 The playback interface of the smart device
Touch
to switch to the index playback interface of the smart device (
camera to smart device.
). This will display the files downloaded from
28:01
28:01
28:01
Index playback
1. Introduction to the Icons
Enter the previous stage of interface or return to the APP home
Settings
Return to photo or movie mode
Multiple photos/videos selection
23
Touch
to enter the selection interface, and touch thumbnails to select the files. Touching the same thumbnail for the second
time will cancel the selection.
4 items selected
Share files directly to social networks
Play back as a slide show
28:01
Delete the selected files
28:01
2. Introduction to functions
Settings
Please refer to the detailed instructions for this topic on page 21.
Multiple photos/videos selection
Touch
•
to enter the selection interface, and select multiple files to perform:
Share
Select the files to be shared, and share them to your favorite social network by touching
for sharing is determined by the settings on the smart device).
24
(The transmission procedure
•
Slide play
If no file is selected, directly touch
will be played.
so that all files
① Select the files to be played;
②Touch
to start slide play;
③ Touch photo during playback to suspend playing
back the slide and enter single playback interface;
④ Only the first frame of a movie is displayed during
the slide show; touch the movie frame to suspend
the slide show and enter the movie playback
interface.
•
Delete
Select the files to be deleted, and then enter the deletion
confirmation interface by touching .
Android system
4 items selected
iOS system
4 items selected
Android system
Delete them by selecting「OK 」; Otherwise,
select「Cancel」to return to the selection interface.
Confirm delete?
OK
iOS system
Delete them by selecting「Delete the selected
items」; Otherwise, select「Cancel」to return to
the selection interface.
Cancel
Are you sure to delete the selected
item(s)?
Delete the selected items
Cancel
25
Single playback
From the index playback interface, touch a thumbnail to enter single playback screen.
1. Introduction to the Icons
Enter index playback screen
Rotate the photo
Share the current file directly to social networks
Play back as a slide show
Apply special effects to a photo or trim a video file
Delete the current file
/
Start play / Pause play (In playing a video, iOS system
interface)
2. Introduction to functions
Image zooming
Please refer to the detailed instructions for this topic on page 17.
26
XXXXXXXX
Rotate the photo
Tap
, the photo will rotate 90 counter-clockwise each time this icon is pressed.
XXXXXXXX
XXXXXXXX
Share
Share the current file to your favorite social network by touching
the settings on the smart device).
(The transmission procedure for sharing is determined by
Slide play
• Enter slide playback by touching
file in the index.
and the slide show will begin with the selected image and continue to the most recent
• When an image is touched during the slide show, slide playback will stop and you will return to single playback.
27
Edit
1. Editing photo files:
①Touch
to enter the effects interface, where filter effects, brightness adjustment (
can be selected.
) and modeling effects (
② Please set your favorite special effect.
• Filter effect
The filter effects are divided into 23 types.
More effect options can be viewed by sliding
the effect option bar from side to side.
Effect
xxxxxxxx
3
• Brightness adjustment effects
Off
Auto
1
• Modeling effects
2
Effect option bar
Off
Centering on dot
Centering on strip (lateral direction)
③ Press the
to save the editing effect as a new file and to share the edited image.
If sharing the edited file, select share in the share interface to share it to your favorite social network site.
28
)
2. Editing movie files
Touch
to enter the trim interface.
Trim
Trim
00:00:00
00:00:08
5
Play movies
Increase the number of frames shown
Shorten the number of frames shown
Trim starting point
Trim finishing point
Steps:
① Touch
3
1
2
4
to start playing movies.
② Slide the quick browse bar from side to side to choose the appropriate frame. Then, choose
shorten the number of frames depending on the desired accuracy.
or
to increase or
③ Slide the quick browse bar from side to side so that the vertical line stays on thumbnails needing to be cut, and touch
to select the trim starting point.
④ Slide the quick browse bar again to the left so that the vertical line stays on the thumbnails needing to be cut, and
touch
to select the trim finishing point.
⑤ Press the
to save the trimming effect as a new file and to share the edited movie.
If sharing the edited file, select share in the share interface to share it to your favorite social network site.
Delete
Please refer to the detailed instructions for this topic on page 19.
29
APP Home
Touch
to enter the APP home.
「Playback」:
Enter playback state.
「Remote Viewfinder」:
Camera function is controlled
through intelligent device.
「About」:
Check the version of the APP.
Playback
Remote Viewfinder
About
About
•Touch「About」in the APP homepage to view APP version.
• Touch the link on screen to enter the website: http: //www.kodakpixpro.com .
30
Appendices
KODAK PIXPRO S-1 Compact System Camera
Menu that can be adjusted under each mode: ( O: Optional X: Not optional )
Mode
Menu items
Exposure compensation
O
O
O
X
X
X
O
X
X
X
X
ISO value
O
O
O
O
X
X
X
X
X
X
X
Aperture value
X
O
X
O
X
X
X
X
X
X
X
Shutter speed
X
X
O
O
X
X
X
X
X
X
X
White balance
O
O
O
O
X
X
X
O
X
X
X
Flash (Active)
O
O
O
O
O
X
X
X
X
X
X
Shoot size
O
O
O
O
O
O
O
O
O
O (8M and below)
X(4M)
Self-timer
O
O
O
O
O
O
O
X
O
X
X
Setup menu items
Menu items
Setting
Exposure compensation
-3~+3
ISO value
Auto/ 200/ 400/ 800/ 1600/ 3200/ 6400/ 12800
Aperture value
Depending on the lens parameters
Shutter speed
1/4000~30s
White balance
AWB / Daylight / Cloudy / Shadow / Fluorescent / Fluorescent H / Incandescent
Flash
Force Off / Flash Auto /Fill Flash
Shoot size
Self-timer
Image size
VGA / 2M-16:9 / 3M/ 4M / 10M / 12M-16:9 / 14M-3:2 / 16M
Movie size
640 X 480 30fps / 1280 X 720 30fps / 1920 X 1080 30fps
Photo shooting mode
Self-timer Off / Self-timer 2sec / Self-timer 10sec
Movie mode
Self-timer Off / Self-timer 10sec
31
KODAK PIXPRO SL10 SMART LENS Camera
Menu that can be adjusted under each mode: ( O: Optional X: Not optional )
Mode
Menu items
Exposure compensation
O
O
X
O
X
X
X
ISO value
O
O
X
X
X
X
X
White balance
O
X
X
X
X
X
X
Shoot size
O
O
O
O
O
O
O
Self-timer
O
O
O
O
O
O
O
Setup menu items
Menu items
Exposure compensation
-3~+3
ISO value
Auto/ 100/ 200/ 400/ 800/ 1600/ 3200
White balance
AWB / Daylight / Cloudy / Fluorescent / Fluorescent H / Incandescent
Shoot size
Self-timer
Power Saving
32
Setting
Image size
2M-16:9 / 10M / 12M-16:9 / 16M
Movie size
848 X 480 120fps / 1280 X 720 30fps / 1920 X 1080 30fps
Photo shooting mode
Self-timer Off / Self-timer 2sec / Self-timer 10sec
Movie mode
Self-timer Off / Self-timer 10sec
Off / 3 min / 5 min / 10 min
KODAK PIXPRO SL25 SMART LENS Camera
Menu that can be adjusted under each mode: ( O: Optional X: Not optional )
Mode
Menu items
Exposure compensation
O
O
O
X
O
X
X
X
ISO value
O
O
O
X
X
X
X
X
Shutter speed
X
O
X
X
X
X
X
X
White balance
O
O
X
X
X
X
X
X
Shoot size
O
O
O
O
O
O
O
O
Self-timer
O
O
O
O
O
O
X
O
Setup menu items
Menu items
Setting
Exposure compensation
-3~+3
ISO value
Auto/ 100/ 200/ 400/ 800/ 1600/ 3200
Shutter speed
1/1500~30s
White balance
AWB / Daylight / Cloudy / Fluorescent / Fluorescent H / Incandescent
Shoot size
Self-timer
Power Saving
Image size
2M-16:9 / 10M / 12M-16:9 / 14M-3:2 / 16M
Movie size
848 X 480 120fps / 1280 X 720 30fps / 1920 X 1080 30fps
Photo shooting mode
Self-timer Off / Self-timer 2sec / Self-timer 10sec
Movie mode
Self-timer Off / Self-timer 10sec
Off / 3 min / 5 min / 10 min
33
KODAK PIXPRO AZ651 Digital Camera
Menu that can be adjusted under each mode: ( O: Optional X: Not optional )
Mode
Menu items
Exposure compensation
O
O
O
X
X
X
O
X
X
X
X
ISO value
O
O
O
O
X
X
X
X
X
X
X
Aperture value
X
O
X
O
X
X
X
X
X
X
X
Shutter speed
X
X
O
O
X
X
X
X
X
X
X
White balance
O
O
O
O
X
X
X
O
X
X
X
Flash
O
O
O
O
O
X
X
X
X
X
X
Shoot size
O
O
O
O
O
O
O
O
O
O (8M and below)
X(2M)
Self-timer
O
O
O
O
O
O
O
X
O
X
X
Setup menu items
Menu items
Exposure compensation
-3~+3
ISO value
Auto/ 100/ 200/ 400/ 800/ 1600/ 3200
Aperture value
2.9~7.7
Shutter speed
1/2000~30s
White balance
AWB / Daylight / Cloudy / Fluorescent / Fluorescent H / Incandescent
Flash
Force Off/ Flash Auto/ Fill Flash
Shoot size
Self-timer
34
Setting
Image size
VGA / 2M-16:9 / 3M / 5M / 10M / 15M-16:9 / 18M-3:2 / 20M
Movie size
640 X 360 120fps / 640 X 480 30fps / 1280 X 720 30fps / 1280 X 720 60fps / 1920 X 1080 30fps
Photo shooting mode Self-timer Off / Self-timer 2sec / Self-timer 10sec
Movie mode
Self-timer Off / Self-timer 10sec
KODAK PIXPRO AZ526 Digital Camera
Menu that can be adjusted under each mode: ( O: Optional X: Not optional )
Mode
Menu items
Exposure compensation
O
O
O
X
O
X
O
X
X
ISO value
O
O
O
O
O
X
X
X
X
Aperture value
X
O
X
O
X
X
X
X
X
Shutter speed
X
X
O
O
X
X
X
X
X
White balance
O
O
O
O
X
X
X
X
X
Flash
O
O
O
O
O
X
X
X
X
Shoot size
O
O
O
O
O
O
O
O (8M and below)
X(4M)
Self-timer
O
O
O
O
O
O
O
X
X
Setup menu items
Menu items
Setting
Exposure compensation
-3~+3
ISO value
Auto/ 100/ 200/ 400/ 800/ 1600/ 3200
Aperture value
2.8~7.4
Shutter speed
1/2000~30s
White balance
AWB / Daylight / Cloudy / Fluorescent / Fluorescent H / Incandescent
Flash
Force Off/ Flash Auto/ Fill Flash
Shoot size
Self-timer
Image size
VGA / 2M-16:9 / 3M / 5M / 10M / 12M-16:9 / 14M-3:2 / 16M
Movie size
640 X 480 30fps / 640 X 480 120fps / 1280 X 720 30fps / 1280 X 720 60fps / 1920 X 1080 30fps
Photo shooting mode Self-timer Off / Self-timer 2sec / Self-timer 10sec
Movie mode
Self-timer Off / Self-timer 10sec
35
KODAK PIXPRO AZ525 Digital Camera
Menu that can be adjusted under each mode: ( O: Optional X: Not optional )
Mode
Menu items
Exposure compensation
O
O
O
X
O
X
O
X
X
ISO value
O
O
O
O
O
X
X
X
X
Aperture value
X
O
X
O
X
X
X
X
X
Shutter speed
X
X
O
O
X
X
X
X
X
White balance
O
O
O
O
X
X
X
X
X
Flash (Active)
O
O
O
O
O
X
X
X
X
Shoot size
O
O
O
O
O
O
O
O (8M and below)
X(4M)
Self-timer
O
O
O
O
O
O
O
X
X
Setup menu items
Menu items
Exposure compensation
-3~+3
ISO value
Auto/ 100/ 200/ 400/ 800/ 1600/ 3200
Aperture value
2.8~7.4
Shutter speed
1/2000~30s
White balance
AWB / Daylight / Cloudy / Fluorescent / Fluorescent H / Incandescent
Flash
Force Off/ Flash Auto/ Fill Flash
Shoot size
Self-timer
36
Setting
Image size
VGA / 2M-16:9 / 3M / 5M / 10M / 12M-16:9 / 14M-3:2 / 16M
Movie size
640 X 480 30fps / 640 X 480 120fps / 1280 X 720 30fps / 1280 X 720 60fps / 1920 X 1080 30fps
Photo shooting mode Self-timer Off / Self-timer 2sec / Self-timer 10sec
Movie mode
Self-timer Off / Self-timer 10sec
KODAK PIXPRO SL5 SMART LENS Camera
Menu that can be adjusted under each mode: ( O: Optional X: Not optional )
Mode
Menu items
Exposure compensation
O
X
O
X
X
ISO value
O
X
X
X
X
White balance
O
X
X
X
X
Flash
O
X
X
X
X
Shoot size
O
O
O
O
O
Self-timer
O
O
O
O
O
Setup menu items
Menu items
Setting
Exposure compensation
-3~+3
ISO value
Auto/ 100/ 200/ 400/ 800/ 1600/ 3200
White balance
AWB / Daylight / Cloudy / Fluorescent / Fluorescent H / Incandescent
Flash
Force Off/ Flash Auto/ Fill Flash
Shoot size
Self-timer
Power Saving
Image size
2M-16:9 / 10M / 12M-16:9 / 16M
Movie size
848 X 480 120fps / 1280 X 720 30fps / 1920 X 1080 30fps
Photo shooting mode
Self-timer Off / Self-timer 2sec / Self-timer 10sec
Movie mode
Self-timer Off / Self-timer 10sec
Off / 3 min / 5 min / 10 min
37
© 2014 by JK Imaging Ltd. All rights reserved.
JK Imaging Ltd. 17239 South Main Street, Gardena, CA 90248, USA
JK Imaging Europe, 71 Clarendon road, Watford, WD17 1DS, UK
www.kodakpixpro.com