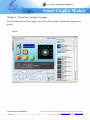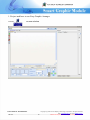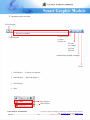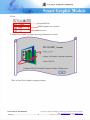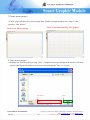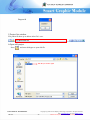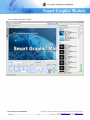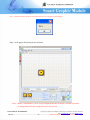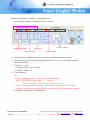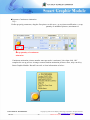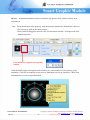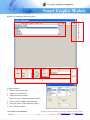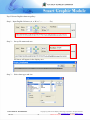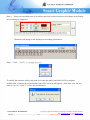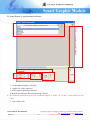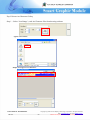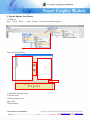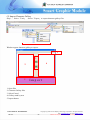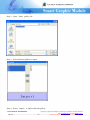
1
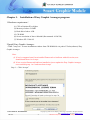
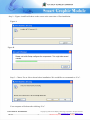
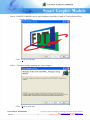
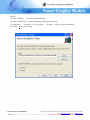
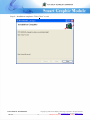
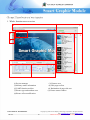
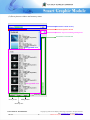
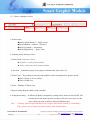
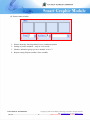
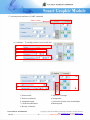
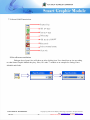
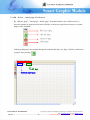
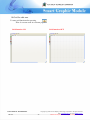
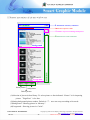
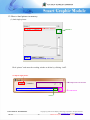
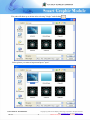
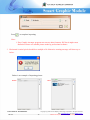
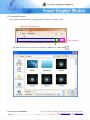
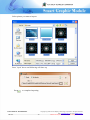
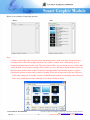
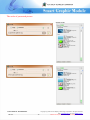
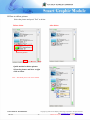
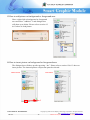
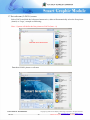
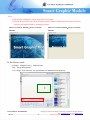
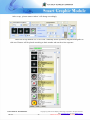
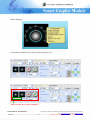
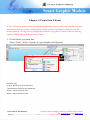
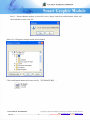
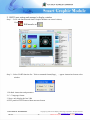
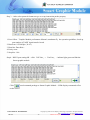
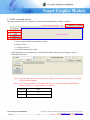
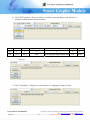
Easy Graphic Arranger
USER MANUAL
Introduction
In order to use the smart Graphic Module more easily for engineer, we provide
application program of Easy Graphic arranger. You can fix up the operation interface of
graphics on editor to save a lot of Try and Errors.
Easy Graphic Arranger provides the way for engineer’s different projects. It includes
loading and conversion of image, memory detection, layout of multiple-page graphic and
processing of dynamic & static graphic. Besides, it also can output Uart command and
data information and offers easy function to set up picture library by different langue. It
could increase effective efficiency from above function.
FLAT DISPLAY TECHNOLOGY
1.02.01.0
Copyright (c) 2009-12 Flat Display Technology Corporation. All rights reserved.
1
Web: www.fdt.com.tw, E-mail: [email protected]
This technical specification is subject to change without notice.
Contents.
Page
Chapter 1. Installation of Easy Graphic Arranger program……………………………
1. Requirement of hardware
2.
4
4
Installation
4~9
Chapter 2 Introduction of user interface………………………………………………
10
1. Whole function area overview
10
2. Introduction function for each area
11
(1) Project manager
11
(2) Show pictures window and memory status
12
(3) Edit page & UART function bar
13
(4) Bookmaker & page edit area
14
(5) Picture Attribute tool box
14
(6) Picture status window
15
(7) Switch picture attribute or UART command
16~17
Chapter 3 To use Easy Graphic Arranger …………………………………..……………
1. Project and how to use Easy Graphic Arranger
18
19
2. Operate project tools bar
20~21
3. Create a new project
22
4. Save a new project
22
5. Project list window
23
6. Open old project
23~24
7. Edit and UART function bar
25
8. Set edit area resolution
25
9. Add、delete、insert page of edit area
26
10. Grid for edit area
27
11. Memory information and picture windows area
28~29
12. How to load picture to memory
30~32
13. Load multi pictures
33~36
14. How to delete picture
37
15. How to add picture on background or foreground area
38
16. How to insert picture on background or foreground area
38~39
17. Set welcome (LOGO) screen
40~41
18. Set picture mode
41~58
FLAT DISPLAY TECHNOLOGY
1.02.01.0
Copyright (c) 2009-12 Flat Display Technology Corporation. All rights reserved.
2
Web: www.fdt.com.tw, E-mail: [email protected]
This technical specification is subject to change without notice.
Chapter 4 Create font library……………………………………………………
59
1. Create library by system font
59~62
2. Create library by professional software
63~65
3. Export/import font library
66~69
4. Edit Present words
70~73
Chapter 5 Easy Graphic Arranger simulation link test….…………………………………….
74
1. Export project picture library
74~75
2. RS232 port setting and Arranger’s display window
76~77
3. UART command tool bar
78~80
FLAT DISPLAY TECHNOLOGY
1.02.01.0
Copyright (c) 2009-12 Flat Display Technology Corporation. All rights reserved.
3
Web: www.fdt.com.tw, E-mail: [email protected]
This technical specification is subject to change without notice.
Chapter 1.
Installation of Easy Graphic Arranger program
1.Hardware requirement:
(1) CPU as Pentium III or higher
(2) Memory of above 512MB
(3) Hard disk of above 1GB
(5) CD-ROM
(6) Screen resolution of above 800x600 (Recommend: 1024x768)
(7) Windows XP 32 bit OS
2.Install Easy Graphic Arranger:
Click “setup.exe” to enter installation window from CD-ROM disk via path of \Tools(software)\Easy
Graphic Arranger
Note:
(1) If user’s computer hasn’t been installed Framework or had been with old version, user
should install from 1 to 9 steps.
(2) If new version Framework had been installed or just to update the Easy Graphic Arranger,
user could skip step 1 to 3 and start from 4 steps.
Step 1:Click “Accept”
FLAT DISPLAY TECHNOLOGY
1.02.01.0
Copyright (c) 2009-12 Flat Display Technology Corporation. All rights reserved.
4
Web: www.fdt.com.tw, E-mail: [email protected]
This technical specification is subject to change without notice.
Step 2:Figure A and B will show on the screen at the same time of first installation.
Figure A
Figure B
Step 3:Choose Yes or No to reboot before installation. We would like to recommend as “Yes”.
Your computer will reboot after clicking “Yes”.
FLAT DISPLAY TECHNOLOGY
1.02.01.0
Copyright (c) 2009-12 Flat Display Technology Corporation. All rights reserved.
5
Web: www.fdt.com.tw, E-mail: [email protected]
This technical specification is subject to change without notice.
Step 4: Click FDT-GRAPHIC.msi to start installation from disk via path of \Tools(software)\Easy
Graphic Arranger
Click“Next” to next step
Step 5:To install Arranger program into your computer
Click“Next” to next step
FLAT DISPLAY TECHNOLOGY
1.02.01.0
Copyright (c) 2009-12 Flat Display Technology Corporation. All rights reserved.
6
Web: www.fdt.com.tw, E-mail: [email protected]
This technical specification is subject to change without notice.
Step 6:
(1) click“Browse "to select installation path
(2) click“Disk Cost"to check remaining capacity of hard disk
(3) Authority:「Everyone」-for every user,「Just me」-only for you (recommend)
(4) Click“Next” to next step
FLAT DISPLAY TECHNOLOGY
1.02.01.0
Copyright (c) 2009-12 Flat Display Technology Corporation. All rights reserved.
7
Web: www.fdt.com.tw, E-mail: [email protected]
This technical specification is subject to change without notice.
Step 7:click“Next"start installation.
Step 8:Installing Easy Graphic Arranger
FLAT DISPLAY TECHNOLOGY
1.02.01.0
Copyright (c) 2009-12 Flat Display Technology Corporation. All rights reserved.
8
Web: www.fdt.com.tw, E-mail: [email protected]
This technical specification is subject to change without notice.
Step 9:Installation completes. Click “Close” to exit.
FLAT DISPLAY TECHNOLOGY
1.02.01.0
Copyright (c) 2009-12 Flat Display Technology Corporation. All rights reserved.
9
Web: www.fdt.com.tw, E-mail: [email protected]
This technical specification is subject to change without notice.
Chapter 2 Introduction of user interface
1. Whole function area overview
3
1
4
2
6
3
5
7
8
9
(1)Project manager
(3)Memory status information
(5)UART function tool bar
(7)Picture type and attribute area
(9)Picture effect modification
FLAT DISPLAY TECHNOLOGY
1.02.01.0
(2) Pictures area
(4) Edit page tool bar
(6) Bookmaker & page edit area
(8) Picture status window
Copyright (c) 2009-12 Flat Display Technology Corporation. All rights reserved.
10
Web: www.fdt.com.tw, E-mail: [email protected]
This technical specification is subject to change without notice.
2. Introduction of function for each area
(1) Project manager
1.Create a new Project
3. Choose Project list window
4. Save Project
(1) Save
(2) Save as
5.Tools
(1) Output
(2) Font
(3) Print
2. Open Project
6.About Easy Graphic Arranger
7. Exit
FLAT DISPLAY TECHNOLOGY
1.02.01.0
Copyright (c) 2009-12 Flat Display Technology Corporation. All rights reserved.
11
Web: www.fdt.com.tw, E-mail: [email protected]
This technical specification is subject to change without notice.
(2) Show pictures window and memory status
Estimation of flash memory
Selection of picture & font
Number of preserved background picture
Estimation of Cache RAM
Background area
Foreground area
Library tool
Insert picture
Add picture
Delete picture
FLAT DISPLAY TECHNOLOGY
1.02.01.0
Copyright (c) 2009-12 Flat Display Technology Corporation. All rights reserved.
12
Web: www.fdt.com.tw, E-mail: [email protected]
This technical specification is subject to change without notice.
(3) Edit and UART function bar
Set edit area resolution
Add page
Insert page
Delete page
Grid On/Off
Select Picture or command mode
Select command format
Copy commands code
(4) Bookmaker and page edit area
Bookmaker
Edit area
FLAT DISPLAY TECHNOLOGY
1.02.01.0
Copyright (c) 2009-12 Flat Display Technology Corporation. All rights reserved.
13
Web: www.fdt.com.tw, E-mail: [email protected]
This technical specification is subject to change without notice.
(5) Picture Attribute tool box
2
8
1
3
4
5
6
7
1.Picture mode
¡Mode1(Single Picture):Single picture
¡Mode2(Button):Button ( 2 pictures )
¡Mode3(Continue):Animation
¡Mode4(Digit/Font) :Digit / Font
2. Indicate picture memory source
3.Anime mode (Sequence/ Order):
¡ Sequence : serial pictures number
¡ Order : Order non-serial pictures number
4.Act item:4 animation group in one page are limited at the most. (No.0~3)
5.Timer/Class:The product of time unit and multiple is time consumption for picture switch.
¡Timer ClassA :1/20 sec (50ms)
¡Timer ClassB:1sec
6.Times:Multiple of Timer class
7.Repeat setting: Repeat (enable) /Once (unable)
8.Transparent setting::In Mode1 & Mode2, transparency setting can be started as All or Half.. The
column only works before picture moving to edit area. Once move to edit
area, it only can work on picture effect modification area.
Note: Currently ,Smart Graphic Module doesn’t support JPG format created by “PhotoShop”.
Thus, please convert format by ACD if picture made by PhotoShop.
FLAT DISPLAY TECHNOLOGY
1.02.01.0
Copyright (c) 2009-12 Flat Display Technology Corporation. All rights reserved.
14
Web: www.fdt.com.tw, E-mail: [email protected]
This technical specification is subject to change without notice.
(6) Picture status window
1
2
3
4
1. Picture showing: showing edited icon or continuous picture
2. Setting of picture numbers:only in Order mode.
3. Number animation group: preserve number is as 0~3
4. Repeat setting: Repeat (enable) /Once (unable)
FLAT DISPLAY TECHNOLOGY
1.02.01.0
Copyright (c) 2009-12 Flat Display Technology Corporation. All rights reserved.
15
Web: www.fdt.com.tw, E-mail: [email protected]
This technical specification is subject to change without notice.
(7) switch picture attribute or UART command
Click to switch
(1) Attribute:To modify picture or text in edit area
1
2
3
4
9
5
6
8
7
1.Picture mode
3.Picture coordinates
5.Anamation mode
7.Confirm modification
9.Hot key of motion
2.Selection of storage
4.Transparent
6. Selection of timer class and multiple
8.Motion pitch
FLAT DISPLAY TECHNOLOGY
1.02.01.0
Copyright (c) 2009-12 Flat Display Technology Corporation. All rights reserved.
16
Web: www.fdt.com.tw, E-mail: [email protected]
This technical specification is subject to change without notice.
(2)Command:showing UART command
Command area
Switch format
FLAT DISPLAY TECHNOLOGY
1.02.01.0
Copyright (c) 2009-12 Flat Display Technology Corporation. All rights reserved.
17
Web: www.fdt.com.tw, E-mail: [email protected]
This technical specification is subject to change without notice.
Chapter 3. To use Easy Graphic Arranger
After introduction from last chapter, here user will be guided to build and complete one
project.
Sample
FLAT DISPLAY TECHNOLOGY
1.02.01.0
Copyright (c) 2009-12 Flat Display Technology Corporation. All rights reserved.
18
Web: www.fdt.com.tw, E-mail: [email protected]
This technical specification is subject to change without notice.
1. Project and how to use Easy Graphic Arranger
execute
to start as below
FLAT DISPLAY TECHNOLOGY
1.02.01.0
Copyright (c) 2009-12 Flat Display Technology Corporation. All rights reserved.
19
Web: www.fdt.com.tw, E-mail: [email protected]
This technical specification is subject to change without notice.
2. Operation project tools bar
1.New Project
3. Project list window
4. Save Project
(1) Save
(2) Save as
5.Tools
(1) Output
(2) Font
(3) Print
2. Open Project
6.About Easy Graphic Arranger
7. Exit
1. New Project :Create a new project。
2. Open Project :Open one project。
3. Save Project
4. Save
Save Project
Save Project
FLAT DISPLAY TECHNOLOGY
1.02.01.0
Copyright (c) 2009-12 Flat Display Technology Corporation. All rights reserved.
20
Web: www.fdt.com.tw, E-mail: [email protected]
This technical specification is subject to change without notice.
5.Tools
Export BIN file.
Build Graphic Font ( System )
Print (none)
6. About Easy Graphic Arranger: showing information of version
7.Exit: to close Easy Graphic Arranger program
FLAT DISPLAY TECHNOLOGY
1.02.01.0
Copyright (c) 2009-12 Flat Display Technology Corporation. All rights reserved.
21
Web: www.fdt.com.tw, E-mail: [email protected]
This technical specification is subject to change without notice.
3.Create a new project
“LOGO” page will show first when entering Easy Graphic Arranger program and “ Page1” after
pressing “ New project”.
Later screen after pressing” New project”
First screen when entering
88
4. Save a new project
A dialogue box will show after pressing “Save”. Completion message as diagram B as below will show
up after entering the file name for new project and pressing the ”Save” to execute.
File Name
FLAT DISPLAY TECHNOLOGY
1.02.01.0
Save
Copyright (c) 2009-12 Flat Display Technology Corporation. All rights reserved.
22
Web: www.fdt.com.tw, E-mail: [email protected]
This technical specification is subject to change without notice.
Diagram B
5.Project list window
File path will show up as below after file’s save.
6.Open old project
Press
and enter dialogue to open old file.
The file you want to open
FLAT DISPLAY TECHNOLOGY
1.02.01.0
Copyright (c) 2009-12 Flat Display Technology Corporation. All rights reserved.
23
Web: www.fdt.com.tw, E-mail: [email protected]
This technical specification is subject to change without notice.
You could open the file clicked.
FLAT DISPLAY TECHNOLOGY
1.02.01.0
Copyright (c) 2009-12 Flat Display Technology Corporation. All rights reserved.
24
Web: www.fdt.com.tw, E-mail: [email protected]
This technical specification is subject to change without notice.
7. Edit and UART function bar
Set panel size
Add new page
Insert new page
Delete page
Grid function ON/OFF
Select mode
Select command format
Copy code
8.Set edit area resolution
Dialogue box of panel size will show up after clicking icon. User should set up size according
to what Smart Graphic Module they buy. Here, let’s take 7” module as an example for setting. Enter
800x480 and finish.
FLAT DISPLAY TECHNOLOGY
1.02.01.0
Copyright (c) 2009-12 Flat Display Technology Corporation. All rights reserved.
25
Web: www.fdt.com.tw, E-mail: [email protected]
This technical specification is subject to change without notice.
9. Add、delete、insert page of edit area
By “add new page”, ”insert page”, “delete page” from function bar, user could increase or
decrease number of pages based on need. Besides, to insert one page between any two existed
pages is also workable.
Panel size setting
Add new page
Insert new page
Delete page
Following diagram is an example that panel resolution has been set. Page 2 will be created next
to page1 after pressing
To add page
welcome (logo) page
FLAT DISPLAY TECHNOLOGY
1.02.01.0
Copyright (c) 2009-12 Flat Display Technology Corporation. All rights reserved.
26
Web: www.fdt.com.tw, E-mail: [email protected]
This technical specification is subject to change without notice.
10.Grid for edit area
To start grid function after pressing
Note. It can not work in welcome page.
Grid function OFF
Grid function ON
FLAT DISPLAY TECHNOLOGY
1.02.01.0
Copyright (c) 2009-12 Flat Display Technology Corporation. All rights reserved.
27
Web: www.fdt.com.tw, E-mail: [email protected]
This technical specification is subject to change without notice.
11.Memory information and pictures window area
Estimation of memory utilization
Selection of picture & font
Number of preserved background picture
Estimation of Cache utilization
Background
Foreground
Picture library edit
Insert picture Add picture
Delete picture
(1)Selection of picture & font library: To select picture or font indicated. “Picture” is for importing
picture.“Digit/Font"is for font.
(2)Setting background picture number. Default is “7”,user can set up according to his needs.
(3)Background:Showing picture in “Memory”.
(4)Foreground:Showing picture in “Cache”.
FLAT DISPLAY TECHNOLOGY
1.02.01.0
Copyright (c) 2009-12 Flat Display Technology Corporation. All rights reserved.
28
Web: www.fdt.com.tw, E-mail: [email protected]
This technical specification is subject to change without notice.
(5) Estimation of memory utilization:The estimation is sum of picture volume from
foreground and background. No more than 95%.“
Note.
1. In order to increase efficiency, background picture is recommended to save in Memory (flash ROM).
Picture with frequent use is recommended to save at Cache area (SDRAM). Pictures will be extracted
from Flash ROM and save in Cache after Smart Graphic module power on.
2. To avoid complicated working, be sure to arrange all pictures in order before importing them.
(6)Insert Picture: to insert new picture between picture.
(7)Delete Picture: to delete the picture that you don’t want.
(8)Add Picture: To add a new picture on the bottom of library.
FLAT DISPLAY TECHNOLOGY
1.02.01.0
Copyright (c) 2009-12 Flat Display Technology Corporation. All rights reserved.
29
Web: www.fdt.com.tw, E-mail: [email protected]
This technical specification is subject to change without notice.
12.How to load picture to memory
(1) load single picture
Select ”Picture”
Default :7
Select Add
Click “picture” and enter the working window as below by clicking “Add”.
To import single picture
Compression rate for JPC
The file you want to import
confirmation
browse
FLAT DISPLAY TECHNOLOGY
1.02.01.0
Copyright (c) 2009-12 Flat Display Technology Corporation. All rights reserved.
30
Web: www.fdt.com.tw, E-mail: [email protected]
This technical specification is subject to change without notice.
File path will show up as below after selecting” Single” and clicking
Select picture you want to import and press ”open”
FLAT DISPLAY TECHNOLOGY
1.02.01.0
Copyright (c) 2009-12 Flat Display Technology Corporation. All rights reserved.
31
Web: www.fdt.com.tw, E-mail: [email protected]
This technical specification is subject to change without notice.
Press
to complete importing
Note:
1. Easy Graphic Arranger program can convert other format to JPG but it might cause
distortion. Please use suitable picture made by professional software.
3. Horizontal /vertical pixels should be a multiple of 8. Otherwise warning message will show up as
below.
Below is an example of importing picture
Before
After
FLAT DISPLAY TECHNOLOGY
1.02.01.0
Copyright (c) 2009-12 Flat Display Technology Corporation. All rights reserved.
32
Web: www.fdt.com.tw, E-mail: [email protected]
This technical specification is subject to change without notice.
13.Load multi pictures
Click “picture” and enter the working window as below by clicking “Add”.
Selection of importing pictures
File list window
confirmation
File path will show up as below after selecting” Multiselect” and clicking
FLAT DISPLAY TECHNOLOGY
1.02.01.0
Copyright (c) 2009-12 Flat Display Technology Corporation. All rights reserved.
33
Web: www.fdt.com.tw, E-mail: [email protected]
This technical specification is subject to change without notice.
Select picture you want to import
Press ”open” above and following will show up
Press
to complete importing
FLAT DISPLAY TECHNOLOGY
1.02.01.0
Copyright (c) 2009-12 Flat Display Technology Corporation. All rights reserved.
34
Web: www.fdt.com.tw, E-mail: [email protected]
This technical specification is subject to change without notice.
Below is an example of importing pictures
Before
After
Note:
(1)Please caution the order of picture when importing pictures at the same time. From the first to
seventh picture will be the background picture by system’s default. User could change q’ty of
background picture based on his need. The first picture will be set as welcome screen (LOGO) that
can be deleted. If user need to change LOGO, please use “Ins” function to insert another picture on
the top or have double-click on the first picture in background to load another picture to replace.
(2)Normally, picture will present by order of clicking. First click will present on the last. However,
If file name composes of number, system will fall them into rank in an ascending order. Please to
Solve it by modifying the order manually in file name column as below.
FLAT DISPLAY TECHNOLOGY
1.02.01.0
Copyright (c) 2009-12 Flat Display Technology Corporation. All rights reserved.
35
Web: www.fdt.com.tw, E-mail: [email protected]
This technical specification is subject to change without notice.
The order of presented picture.
Present order
FLAT DISPLAY TECHNOLOGY
1.02.01.0
Copyright (c) 2009-12 Flat Display Technology Corporation. All rights reserved.
36
Web: www.fdt.com.tw, E-mail: [email protected]
This technical specification is subject to change without notice.
14.How to delete picture
Select the picture and press” Del” as below.
Before delete
After delete
Select the picture
Press “Del"
Quick method to delete picture.
Select the picture and have a right
click to delete.
Note:The edited picture can not be deleted.
FLAT DISPLAY TECHNOLOGY
1.02.01.0
Copyright (c) 2009-12 Flat Display Technology Corporation. All rights reserved.
37
Web: www.fdt.com.tw, E-mail: [email protected]
This technical specification is subject to change without notice.
15.How to add picture on background or foreground area.
Have a right click on background or foreground
area and select” Addition”. Load dialogue box
will show up as below. Please refer to section 12
& 13 above to load picture.
16.How to insert picture on background or foreground area
The dialogue box will show up after pressing “ Ins”. Please refer to section 12 & 13 above to
insert picture. The inserted picture will present upon the selected.
After Insert
Before Insert
按下“Ins"
FLAT DISPLAY TECHNOLOGY
1.02.01.0
Copyright (c) 2009-12 Flat Display Technology Corporation. All rights reserved.
38
Web: www.fdt.com.tw, E-mail: [email protected]
This technical specification is subject to change without notice.
Quick insert: Indicate the position and have a right click to insert by showing dialogue box. Please also
refer to section 12 & 13 above.
After Insert
Before Insert
FLAT DISPLAY TECHNOLOGY
1.02.01.0
Copyright (c) 2009-12 Flat Display Technology Corporation. All rights reserved.
39
Web: www.fdt.com.tw, E-mail: [email protected]
This technical specification is subject to change without notice.
17.Set welcome ( LOGO ) screen
Select LOGO and click the left mouse button twice, editor will automatically select the first picture
(item:0) as ‘Logo’, example as following:
Note:System will define the first picture as LOGO (Item:0)
Click left mouse button twice
Download LOGO picture to edit area
FLAT DISPLAY TECHNOLOGY
1.02.01.0
Copyright (c) 2009-12 Flat Display Technology Corporation. All rights reserved.
40
Web: www.fdt.com.tw, E-mail: [email protected]
This technical specification is subject to change without notice.
Note:
(1)No picture or characters can be placed on LOGO page
(2)Check the pixel between edit area and the picture intend to add must be the same otherwise
edit area will appear blank or incomplete picture.
Edit area resolution :800x480;picture resolution:
Edit area resolution:320x240;Picture resolution:
800x480
800x480
18. Set Picture mode
(1) Mode 1 (Single Picture):Single picture
Exp:Set up background
Select Page1 from edit area, set up parameter of attachment and property
1.2
1.1
FLAT DISPLAY TECHNOLOGY
1.02.01.0
Copyright (c) 2009-12 Flat Display Technology Corporation. All rights reserved.
41
Web: www.fdt.com.tw, E-mail: [email protected]
This technical specification is subject to change without notice.
1.1 Set up parameter content:
New: select“Mode1(Single Picture)";Select
‘Memory’
1.2 Click twice on left mouse button on edit area, appear ‘Background’ window, select the
number of the background picture and click V to complete the attachment process
Delete background picture:will erase
original background
Confirm set up correct
Set up Item:1 as
background
Set Up(Item:1)picture as background complete example:
FLAT DISPLAY TECHNOLOGY
1.02.01.0
Copyright (c) 2009-12 Flat Display Technology Corporation. All rights reserved.
42
Web: www.fdt.com.tw, E-mail: [email protected]
This technical specification is subject to change without notice.
Note:
Any picture already selected as background cannot change its definition number added to front
otherwise an error will appear as below:
Error will appear if change
background as 1
(2) Download one picture to edit area go to ‘Page’,
Select ‘model (single picture)’ and ‘cache’ on property
FLAT DISPLAY TECHNOLOGY
1.02.01.0
Copyright (c) 2009-12 Flat Display Technology Corporation. All rights reserved.
43
Web: www.fdt.com.tw, E-mail: [email protected]
This technical specification is subject to change without notice.
Select one picture from front drag to edit area to complete download
“picture status window“appear picture dragged
(3)How to move pictures already attached?
1. Use mouse drag the picture from in the edit area
2. Input cursor value to Location", click
To start moving picture
FLAT DISPLAY TECHNOLOGY
1.02.01.0
Copyright (c) 2009-12 Flat Display Technology Corporation. All rights reserved.
44
Web: www.fdt.com.tw, E-mail: [email protected]
This technical specification is subject to change without notice.
3. Use ‘cache’ button on the property area
Moving direction
Distance of one moving
(4) Delete pictures from edit area: select picture, click right mouse button, will appear ‘delete’,
click again to delete
FLAT DISPLAY TECHNOLOGY
1.02.01.0
Copyright (c) 2009-12 Flat Display Technology Corporation. All rights reserved.
45
Web: www.fdt.com.tw, E-mail: [email protected]
This technical specification is subject to change without notice.
(5)Picture information:pictures within the edit area will appear information when moving cursor
to it.
(6)Set up transparent: only valid on ‘Cache’
¡Set up Transparent: the bigger value set up from original picture will have clearer
background.
Note:Transparent effect could only perform from Smart Graphic Module, cannot simulate
from edit area.。
1.Select one picture>go to property set up>transparent value>drag to edit area> complete
Select picture intend to set up
transparent
FLAT DISPLAY TECHNOLOGY
1.02.01.0
Copyright (c) 2009-12 Flat Display Technology Corporation. All rights reserved.
46
Web: www.fdt.com.tw, E-mail: [email protected]
This technical specification is subject to change without notice.
Set up Transparent as 8
2. Modify transparent set up
Select picture from edit area > go to property > input transparent value > click ok >
modification completed.
Can recognize whether transparent set up ok by picture message。
Transparent set up as 8
Transparent set up as 15
FLAT DISPLAY TECHNOLOGY
1.02.01.0
Copyright (c) 2009-12 Flat Display Technology Corporation. All rights reserved.
47
Web: www.fdt.com.tw, E-mail: [email protected]
This technical specification is subject to change without notice.
1
3.Transparent Example:Make picture in Icon area transparent can see the 1background, total 16
levels (0 – 15 ),, The different transparent effect can be seen from below picture (0,1,2,3, 4……….15)
1
0
2
3
4
5
6
7
8
9
10
11
12
13
14
15
Note:this picture was photographed real article from real Smart Graphic Module。
FLAT DISPLAY TECHNOLOGY
1.02.01.0
Copyright (c) 2009-12 Flat Display Technology Corporation. All rights reserved.
48
Web: www.fdt.com.tw, E-mail: [email protected]
This technical specification is subject to change without notice.
¡Sieve :
Sieve can filter out the darker area of Icon pictures in order the background can be clearly
show up.
1.Sieve set up process can refer to transparent set up process
Set up Half
2.Sieve modification process refer to transparent modification set up。
Set up Half from here on picture edit
area
FLAT DISPLAY TECHNOLOGY
1.02.01.0
Copyright (c) 2009-12 Flat Display Technology Corporation. All rights reserved.
49
Web: www.fdt.com.tw, E-mail: [email protected]
This technical specification is subject to change without notice.
3. Sieve example:took out those pictures with certain brightness, the darker area will be
erased firstly, below pictures showing the transparent difference:
(0,1,2,3,………….15).
0
1
2
3
4
5
6
7
8
9
10
11
12
13
14
15
Note:this pictures was real article photographed from Smart Graphic Module。
FLAT DISPLAY TECHNOLOGY
1.02.01.0
Copyright (c) 2009-12 Flat Display Technology Corporation. All rights reserved.
50
Web: www.fdt.com.tw, E-mail: [email protected]
This technical specification is subject to change without notice.
(7)Mode2(Button) button set up:2 pictures selected at the same time is a must.
Set up property area: ‘Model(single picture), ‘Cache’.
The second picture use Ctrl+left mouse button to select, drag the picture to edit area
FLAT DISPLAY TECHNOLOGY
1.02.01.0
Copyright (c) 2009-12 Flat Display Technology Corporation. All rights reserved.
51
Web: www.fdt.com.tw, E-mail: [email protected]
This technical specification is subject to change without notice.
Note:without selecting 2 pictures at the same time an error will appear upon dragging
Page 1 will appear the button picture selected.
Note:Model 1 and Model 2 can be set up transparent but due to model 2 include 2 pictures
overlapped therefore the transparent effect is not clear。
FLAT DISPLAY TECHNOLOGY
1.02.01.0
Copyright (c) 2009-12 Flat Display Technology Corporation. All rights reserved.
52
Web: www.fdt.com.tw, E-mail: [email protected]
This technical specification is subject to change without notice.
(8)Mode3(Continue Icon)(Meter):Animation set up
Select “Model3(continue Icon)(Meter), Select “Cache”
Animation Type
Time Unit
Animation Repeat
Time Multiplier
Animation group
1. Animation Type: include Sequence (continuous) and Order(designated) 2 types.
2. Animation Group: One page only support 4 groups (No. 0-3), error will appear if group
number duplicated.
3. Time Unit:2 types
(1) Timer ClassA :1/20 sec (50ms)
(2) Timer ClassB:1 sec
4. Time Multiplier:
Note:
1.Time for changing picture = (Timer/Class) x Time Multiplier
Exp: Timer/Class: Timer ClassA
Times:10
Time for changing=Timer ClassA(1/20secx10)= 1/2sec
2. Time for changing pictures may cause error by Smart Graphic Module CPU load.。
3. Arranger cannot simulate animation effect, can only display by Smart Graphic Module.
5. Animation repeat function:Repeat/None.
FLAT DISPLAY TECHNOLOGY
1.02.01.0
Copyright (c) 2009-12 Flat Display Technology Corporation. All rights reserved.
53
Web: www.fdt.com.tw, E-mail: [email protected]
This technical specification is subject to change without notice.
¡Sequence:Continuous Animation
Exp:
Define properly parameters, drag the first picture to edit area > go to picture modification > set up
quantity of animation pictures, maximum 64.
Set up quantity of continuous
animation
Continuous animation pictures number must put under ‘continuous’ place then click ‘OK’
complete the set up process. Arranger cannot simulate animation pictures effect, only can do by
Smart Graphic Module. But still can refer to Icon information as below:
FLAT DISPLAY TECHNOLOGY
1.02.01.0
Copyright (c) 2009-12 Flat Display Technology Corporation. All rights reserved.
54
Web: www.fdt.com.tw, E-mail: [email protected]
This technical specification is subject to change without notice.
¡Order:designated animation picture can choose any picture from ‘picture memory area’,
maximum 4。
Exp:Set up parameters in the property, drag the pictures intend to be animation to edit area..
>Go to property pick up the other pictures.
>Select pictures dragged to deit area, the “Picture status window” will appear the first
animation picture.
Click blank area appear select picture
window
Click the blank square will appear small window (A), select number of each picture go for
animation. Click OK to complete set up process. Maximum can set up 4 pictures. Check Icon
information to review set up information.
FLAT DISPLAY TECHNOLOGY
1.02.01.0
Copyright (c) 2009-12 Flat Display Technology Corporation. All rights reserved.
55
Web: www.fdt.com.tw, E-mail: [email protected]
This technical specification is subject to change without notice.
After set up, ‘picture status window’ will change accordingly
Order fast set up method: use “Ctrl+Click” randomly select 4 pictures, drag them altogether to
edit area. Pictures will be placed according to their number and not the select sequence.
FLAT DISPLAY TECHNOLOGY
1.02.01.0
Copyright (c) 2009-12 Flat Display Technology Corporation. All rights reserved.
56
Web: www.fdt.com.tw, E-mail: [email protected]
This technical specification is subject to change without notice.
Picture Message
Can modify animation set up from ‘picture property area’.
Total can only be set up at Sequence
FLAT DISPLAY TECHNOLOGY
1.02.01.0
Copyright (c) 2009-12 Flat Display Technology Corporation. All rights reserved.
57
Web: www.fdt.com.tw, E-mail: [email protected]
This technical specification is subject to change without notice.
NOTE:
1.Different animation articles on the same page should not have same group number
(Actitem) otherwise the first proceed picture will be interrupted by the latter proceed
pictures.
2.When animation executive start with A1 command means proceed attached picture from
memory can also interrupt amination procedure.
FLAT DISPLAY TECHNOLOGY
1.02.01.0
Copyright (c) 2009-12 Flat Display Technology Corporation. All rights reserved.
58
Web: www.fdt.com.tw, E-mail: [email protected]
This technical specification is subject to change without notice.
Chapter 4 Create Font Library
※ Due to character gallery will be automatically download to Cache (not PC cache) together with Icon
and aalso the memory capacity is limited gallery should put those frequently use characters to avoid
memory shortage. We suggest to use English and Japanese set up gallery, Chinese should use drawing
software (MS PAINT) to build up character labels.
1. Create library by system font
Select ‘Tools’> Select ‘System’ to open Graphic font (System).
Function List:
System: Build up system characters
Customization: Build up Art characters
Export: export character files
Import: import character files
FLAT DISPLAY TECHNOLOGY
1.02.01.0
Copyright (c) 2009-12 Flat Display Technology Corporation. All rights reserved.
59
Web: www.fdt.com.tw, E-mail: [email protected]
This technical specification is subject to change without notice.
Window for setting up character gallery:
Switch to Art character
Character gallery select area
2
3
4
5
6
7
1
1. Input character
2. Select letter size and type
3. Adjust size of character
4. Adjust character location
Rest: recover to original character location
5. Select color for character/background
6. Set up file name of the character gallery
7. Save character gallery
FLAT DISPLAY TECHNOLOGY
1.02.01.0
Copyright (c) 2009-12 Flat Display Technology Corporation. All rights reserved.
60
Web: www.fdt.com.tw, E-mail: [email protected]
This technical specification is subject to change without notice.
Exp: Edit one English character gallery
Step1、Input English 26 letters (A, a, B, b, C, c ………….Z,z)
Step 2、 Set up file name and save
All letters will appear in the display area
Step 3、 Select letter type and size
FLAT DISPLAY TECHNOLOGY
1.02.01.0
Copyright (c) 2009-12 Flat Display Technology Corporation. All rights reserved.
61
Web: www.fdt.com.tw, E-mail: [email protected]
This technical specification is subject to change without notice.
Step 4、 Select color and adjust size of word box and word location characters will change in the display
area according to parameters
Characters will change in the display area according to parameters
Step 6、Click 「SAVE」to complete the set up
To modify the character gallery only need to re-name the gallery and click SAVE to complete
modification; or remain the original name click SAVE, message will appear: “Font Style exist. Do you
want to cover it?” Click ‘Y’ to save this modification.
FLAT DISPLAY TECHNOLOGY
1.02.01.0
Copyright (c) 2009-12 Flat Display Technology Corporation. All rights reserved.
62
Web: www.fdt.com.tw, E-mail: [email protected]
This technical specification is subject to change without notice.
2.Create library by professional software
Character Gallery Select area
Switch to system characteredit window
1
2
5
4
3
1. Set up character gallery file name
2. Adjust size of the word box
3. Select squares quantity of the box
4.Read in Art character files from drawing software
※ The character symbols set up by user, resolution range(L:1~4095;W:1~1024),value need to be 8*n
Value.
5. Save Gallery file
FLAT DISPLAY TECHNOLOGY
1.02.01.0
Copyright (c) 2009-12 Flat Display Technology Corporation. All rights reserved.
63
Web: www.fdt.com.tw, E-mail: [email protected]
This technical specification is subject to change without notice.
Exp: Edit one Art Character Gallery
Step 1、Select ‘Load Image’, read Art Character files from drawing software
Appear start window:
Display area appear Art Characters:
FLAT DISPLAY TECHNOLOGY
1.02.01.0
Copyright (c) 2009-12 Flat Display Technology Corporation. All rights reserved.
64
Web: www.fdt.com.tw, E-mail: [email protected]
This technical specification is subject to change without notice.
Step 2 : Adjust size of word box
Adjust word box to fit art character:
Step 3、Select squares of word box
Word box increase:
Step 4、Set up files names and click save to complete this edition
FLAT DISPLAY TECHNOLOGY
1.02.01.0
Copyright (c) 2009-12 Flat Display Technology Corporation. All rights reserved.
65
Web: www.fdt.com.tw, E-mail: [email protected]
This technical specification is subject to change without notice.
3. Export/Import font library
(1) Export
step 1、select「Tools」,select「Export」export file of character gallery
Jump out selected gallery:
2
3
1
4
5
1. All galleries already set up
2. Select/Cancel
3.Gallery stand by area
4.Save files
5.Export button
FLAT DISPLAY TECHNOLOGY
1.02.01.0
Copyright (c) 2009-12 Flat Display Technology Corporation. All rights reserved.
66
Web: www.fdt.com.tw, E-mail: [email protected]
This technical specification is subject to change without notice.
Step 2、select export character gallery
Step 3、Select location for saving files
Step 4、Click 「Export」to export files
Export file name 「FDTfontDB.dbm」
FLAT DISPLAY TECHNOLOGY
1.02.01.0
Copyright (c) 2009-12 Flat Display Technology Corporation. All rights reserved.
67
Web: www.fdt.com.tw, E-mail: [email protected]
This technical specification is subject to change without notice.
(2) Import Character Gallery
Step 1、 Select「Tools」,Select「Export」to export character gallery files
Window appear character gallery to export:
1
3
4
2
5
1. Open files
2. Character Gallery files
3. Select/Cancel
4. Gallery stand by area
5. Import button
FLAT DISPLAY TECHNOLOGY
1.02.01.0
Copyright (c) 2009-12 Flat Display Technology Corporation. All rights reserved.
68
Web: www.fdt.com.tw, E-mail: [email protected]
This technical specification is subject to change without notice.
Step 2、Open「.dbm」gallery file
Step 3、Select character gallery to import
Step 4、Select「Import」to import character gallery
FLAT DISPLAY TECHNOLOGY
1.02.01.0
Copyright (c) 2009-12 Flat Display Technology Corporation. All rights reserved.
69
Web: www.fdt.com.tw, E-mail: [email protected]
This technical specification is subject to change without notice.
4. Edit present words
After complete character edition, close character gallery window, go back to API editor home page,
select ‘Digit/Font’ to enter character memory area.
Word labels
Step 1、
Select one character gallery>select ‘ADD’, gallery area will appear
Character labels>select character labels, (select ‘DEL’ will delete).
※ Character labels cannot be deleted after dragged to edit area.
Step 2、
Go to Property, select ‘Mode4(Digit/Font)’
FLAT DISPLAY TECHNOLOGY
1.02.01.0
Copyright (c) 2009-12 Flat Display Technology Corporation. All rights reserved.
70
Web: www.fdt.com.tw, E-mail: [email protected]
This technical specification is subject to change without notice.
Step 3、
Go to character memory area, select and drag character to edit area, then will appear:。
‘Select Font’ window appear:
3
1
2
4
1. Gallery contents
2. Ins/Delete button
3. Adjust sequence of the words (from left to right)
4. Confirm export button
FLAT DISPLAY TECHNOLOGY
1.02.01.0
Copyright (c) 2009-12 Flat Display Technology Corporation. All rights reserved.
71
Web: www.fdt.com.tw, E-mail: [email protected]
This technical specification is subject to change without notice.
Step 4、Select characters to show on edit area (max. 16 letters)
Step 5、use 「up」and「down」to adjust words location。
FLAT DISPLAY TECHNOLOGY
1.02.01.0
Copyright (c) 2009-12 Flat Display Technology Corporation. All rights reserved.
72
Web: www.fdt.com.tw, E-mail: [email protected]
This technical specification is subject to change without notice.
Step 6、 Click 「OK」to complete,character now appear in edit area
FLAT DISPLAY TECHNOLOGY
1.02.01.0
Copyright (c) 2009-12 Flat Display Technology Corporation. All rights reserved.
73
Web: www.fdt.com.tw, E-mail: [email protected]
This technical specification is subject to change without notice.
Chapter 5 Easy Graphic Arranger Simulation link test
After completed Easy Graphic Arranger design, use Pc AND smart Graphic Module to proceed
connection simulate function act as control device, sending command packet to Smart Graphic Module
by which to check whether Easy Graphic Arranger running accurately.
1.Export project picture library
Step 1、After located picture, icons, select ‘Tools’, select ‘Output’ to export project files
Step 2、Go out from export project window
1. Mode:
「Image」: export picture gallery files (*.BIN)
「Protocol」:export character gallery addressing
programrevised file (*.Fbin)
「ALL」:export(*.BIN)and (*.Fbin)。
1
2
3
4
5
2. Protocol: open character gallery revised file
3. Verify: select whether proceed revision verification
4. Report Error Code: select whether report error
5. Retry: set up retry times
6.Read remark information(*.txt),appear in remark area
6
Remark Area
7.Confirmation button
7
FLAT DISPLAY TECHNOLOGY
1.02.01.0
Copyright (c) 2009-12 Flat Display Technology Corporation. All rights reserved.
74
Web: www.fdt.com.tw, E-mail: [email protected]
This technical specification is subject to change without notice.
Step 3、Export character gallery revision file, select “Image’ and click confirm button, editor will
check whether want to save file.
Select (Y) will appear saving location select window
Click confirmation button will come out file「FGCIMAGE.BIN」。
FLAT DISPLAY TECHNOLOGY
1.02.01.0
Copyright (c) 2009-12 Flat Display Technology Corporation. All rights reserved.
75
Web: www.fdt.com.tw, E-mail: [email protected]
This technical specification is subject to change without notice.
2. RS232 port setting and arranger’s display window
Step 1、Go to edit function and Smart Graphic Module test control column,
Click
Will transfer to
Step 2、Select UART function list「Select command format(Page)」,appear instruction format select
window
1. Default: instruction and parameter
2. C: C language format
3. None: only display the last 2 Bit
4. FDT protocol: FDT Protocol data structure format
FLAT DISPLAY TECHNOLOGY
1.02.01.0
Copyright (c) 2009-12 Flat Display Technology Corporation. All rights reserved.
76
Web: www.fdt.com.tw, E-mail: [email protected]
This technical specification is subject to change without notice.
Step 3、After select protocol format now go to set up instruction packet property
1. Port: follow「Graphic Module performance Manual, attachment D」the operation guideline, check up
port number of UART signal transfer board.
2. Baud rate: 115200 Bps ( N-8-1)
3. Data bits: Data 8bits。
4. Parity: none
5. Stop bits: 1 bit
Step4、RS232 port setting OK,click「Off-Line」>「On-Line」,indicate light green and link the
Smart graphic module.
Click
send command package to Smart Graphic Module,SGM display commands effect
on the screen.
FLAT DISPLAY TECHNOLOGY
1.02.01.0
Copyright (c) 2009-12 Flat Display Technology Corporation. All rights reserved.
77
Web: www.fdt.com.tw, E-mail: [email protected]
This technical specification is subject to change without notice.
3. UART command tool bar
Checking command: click ”Command” will switch command display window as below:
Switch command mode
A
B
C
D
Display window
A. Smart Graphic Module communication format。
B. Default format。
C. C language format。
D. Normal communication format。
Click the picture to be transferred to communication data, display area will appear related
information as below:
Note: Communication format explain as below, details of the instruction can refer to Graphic
Uart Command manual
Note: If user already installed ‘Command Pilot’ who can extract required command from
display window to ‘Command Pilot’ simulation.
Command
Data
1
N
0xA4
0x00 0x30 0x00 0x30 0x00 0x06
FLAT DISPLAY TECHNOLOGY
1.02.01.0
Copyright (c) 2009-12 Flat Display Technology Corporation. All rights reserved.
78
Web: www.fdt.com.tw, E-mail: [email protected]
This technical specification is subject to change without notice.
A. Click ”FDT protocol”, this area will turn to yellow color and display area transfer to a
complete communication format as below:
Name
Start Code Data Length Length checking Code
Command + data
checksum Stop Code
Byte
1
1
1
n
1
1
code
0xF1
0x0A
0xFB
0xA4 0x00 0x30 0x00 0x30 0x00 0x06
0x05
0xF4
B. Display area already switch to transform C mode, Click ‘Default’ can return to initial mode
as below:
C. Click” Transform C” display area will transfer to C language, format as below:
FLAT DISPLAY TECHNOLOGY
1.02.01.0
Copyright (c) 2009-12 Flat Display Technology Corporation. All rights reserved.
79
Web: www.fdt.com.tw, E-mail: [email protected]
This technical specification is subject to change without notice.
D. Click ” Transform none” will transfer to pure instruction format as below:
FLAT DISPLAY TECHNOLOGY
1.02.01.0
Copyright (c) 2009-12 Flat Display Technology Corporation. All rights reserved.
80
Web: www.fdt.com.tw, E-mail: [email protected]
This technical specification is subject to change without notice.