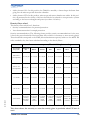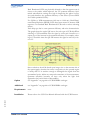
1
Part Number: 31 087 146
COPYRIGHT
Copyright © 2009 HORIBA Jobin Yvon. All rights reserved. No parts of this publication may be reproduced,
transmitted, transcribed, stored in a retrieval system, or translated into any language or computer language, in any
form or by any means, electronic, mechanical, magnetic, optical, chemical, manual or otherwise, without prior
written permission of HORIBA Jobin-Yvon (FRANCE).
NOTICE TO THE USER
This manual should not be construed as any representation or warranty with respect to the unit named herein.
Occasionally, changes or variations exist in the unit that are not reflected in the manual. Generally, should such
changes or variations exist and affect the product significantly, a release note would accompany the manual. In
such a case, be sure to read the release note before using the product.
Trademarks: LabSpec are registered trademarks of HORIBA Jobin Yvon, Windows NT/98/2000/XP/VISTA are
registered trademarks of Microsoft Corporation.
All Rights Reserved - Printed in France
NP/T64000.fm - 10/07/2009
HORIBA Jobin Yvon S.A.S.
Headquarters
16-18, rue du Canal
91165 LONGJUMEAU CEDEX (France)
Tel: +33 (0)1 64 54 13 00
Fax: +33 (0)1 69 09 93 19 - +33 (0)1 69 09 90 88
Internet site: http://www.horiba.com
HORIBA Jobin Yvon S.A.S.
Molecular & Microanalysis Division
231, rue de Lille
59650 - Villeneuve d’Ascq (France)
Tel: +33 (0)3 20 59 18 00 - Fax: +33 (0)3 20 59 18 08
Email: [email protected]
HORIBA Jobin Yvon Inc.
3880 Park Avenue, EDISON - New Jersey 08820 (USA)
Tel: +1 (732) 494 86 60 - Fax: +1 (732) 549 51 25
HORIBA Jobin Yvon GmbH
Neuhofstr. 9 - 64625 Bensheim
Tel +49(0)6251 8475-0 - Fax +49(0)6251 8475-20
Email: [email protected]
10/07/2009
Hauptstr. 1 - 82008 Unterhaching
Tel +49(0)89 462317-0 - Fax +49(0)89 462317-99
HORIBA Jobin Yvon Ltd
2 Dalston Gardens - STANMORE
Middlesex HA7 1BQ (Great Britain)
Tel: +44 (20) 8204 8142 - Fax: +44 (20) 8204 6142
HORIBA Jobin Yvon Srl
Via Cesare Pavese 35/AB - 20090 OPERA (Milano) (Italy)
Tel: +39 (2) 57 60 30 50 - Fax +39 (2) 57 60 08 76
HORIBA Jobin Yvon S.A.S. China
Room 1801, Capital Tower - No.6 Jia Jianguomenwai Avenue
Chaoyang District - Beijing 100022 - P R China
Tel: +86 (0) 10 8567 9966 - Fax: +86 (0) 10 8567 9066
HORIBA Jobin Yvon Japan
Higashi-kanka Daiji Building
1-7-8 Higashi-kanka, chiyoda-ku TOKYO, 101-0031 (Japan)
Tel: +81 (0) 3 3861 8231
HORIBA Jobin Yvon Korea
5, Yangjae-Dong - SEOCHO-GU - SEOUL 137-150 (Korea)
Tel: +82 (0) 2 753 7911
T64000 User Manual
2
Thank you for choosing HORIBA Scientific
HORIBA Scientific is the world leader in Raman spectroscopy, designing and manufacturing state
of the art dispersive Raman spectrometer systems for over four decades.
We have been at the forefront of Raman spectroscopy since its infancy, introducing ground breaking innovations such as the first Raman microscope and the world's first commercial remote Raman sampling probe.
HORIBA Jobin Yvon Raman Division today comprises of the combined expertise of the HORIBA Jobin Yvon, Dilor and SPEX companies and is proud of having more than 3000 Raman systems installed worldwide. Well equipped applications Labs and technical support enable HORIBA
Jobin Yvon to provide services right through from the earliest proof of principle investigations.
With a broad range of technologies available, HORIBA Jobin Yvon can uniquely provide solutions
in analytical, research and industrial measurements.
Following the established high performance Raman systems of the Jobin Yvon, Dilor, and SPEX
brands, the new T64000 series II triple spectrometer system is a versatile, high performance, research grade system.
• Three stage monochromator with optics, aperture and coupling optimized for perfor-
mance and stability,
• Multiple motorized switching mirrors for ease of operation Multiple entrance and exit
ports
• Directly coupled microscope options (and Macrochamber if required) rigidly coupled
to the spectrometer,
• A large choice of options and components to enable full customizing of the system e.g.
gratings, detectors and sampling optics enabling operation from the UV to the NIR.
The actual instrument may differ slightly in appearance from images and illustrations
shown in this manual depending upon which options are included within your chosen
system.
If you have any questions regarding the installation or the maintenance of your instrument, please
contact one of our representatives:
HORIBA Jobin Yvon SAS
Molecular & Microanalysis Division
231, rue de Lille
59650 Villeneuve d'Ascq
France
[email protected]
10/07/2009
Tel: +33 (0) 3 20 59 18 00
Fax: +33 (0) 3 20 59 18 08
or visit our website: www.horiba.com to find the local HORIBA Jobin Yvon office nearest to you.
T64000 User Manual
3
Warranty
HORIBA Jobin Yvon warranties each instrument for two years from the date on which the equipment leaves the plant. The warranty is limited to repair of operating or manufacturing defects
which come to light in that period. It shall apply in said period only if the equipment has been
used properly. It will determine inter alia in event of faulty maintenance or use, or of repairs by the
Buyer or a third party. The Seller's warranty does not cover «consumable parts» (such as filaments,
zeolite joints, electron multipliers, electronic components, membranes, diaphragms, crucibles,
glass, etc.).
In the case of components covered by the manufacturer's warranty, such as computers, the Seller
shall cooperate with the Buyer in enforcement of the manufacturer's warranty, but the Seller
assumes no obligation for such components.
The warranty is limited to replacement of parts found by the Seller to be defective. To be able to
claim the benefit of said warranty, the Buyer will have to advise the Seller by return-receipted registered mail within 28 days of discovery of the defects which come to light. The contractual warranty is limited, at the Seller's option, to reconditioning or replacement of parts found by it to be
defective, expenses of dismantling, reinstallation and technicians' travel excepted. All warranty
work shall be done by the Seller or a contractor of its choosing according to its instructions. All
shutdown-related expenses shall in any event be incumbent on the Buyer.
The warranty does not cover the following:
• Any malfunction attributable to improper operation
• Any malfunction attributable to repair or modification by any party not authorized by
HORIBA Jobin Yvon
• Any malfunction attributable to the use in an improper environment
• Any malfunction attributable to violation of the instructions in this manual
• Any malfunction attributable to operations in the manner not specified in this manual
• Any malfunction attributable to natural disasters, or accidents or mishaps not involving
HORIBA Jobin Yvon
• Any deterioration in appearance attributable to corrosion, rust, and so on.
• Consumables and replacement of consumables
• Products of other companies
10/07/2009
THE SELLER MAKES NO OTHER TACIT OR IMPLIED WARRANTY. IT SHALL HAVE
NO LIABILITY FOR INJURY TO THIRD PARTIES, DIRECT OR INDIRECT, COMMERCIAL OR FINANCIAL INJURY, CONSEQUENTIAL DAMAGES, OR FOR ANY OTHER
REASON.
Obligations
The products are for professional application, and the Seller's acceptance of an order is with the
understanding that only qualified individuals, trained and familiar with users' procedures, will handle them. If Buyer fails to observe this obligation, Buyer agrees to hold the Seller harmless from
any liability resulting from the operation of the products.
T64000 User Manual
4
General safety Instructions
S1
Summary
This User Manual contains the facilities design and equipment installation requirements for the
T64000 System.
S2
Purpose
The purpose of the document is to enable the facilities manager at the customer site, and HORIBA Jobin Yvon representatives and service engineers, to prepare for the installation of the
T64000 System and to determine the necessary requirements for the environment in which the
T64000 System is to be installed. It also provides a guidelines and directions for the correct use
and operation of the T64000 system.
S3
Intended Readers
This document is intended for customers, HORIBA Jobin Yvon representatives, sales and service
engineers.
S4
General instructions
10/07/2009
WARNING: The T64000 System must not be operated without prior reading of this document.
The user manual contains important information on how to operate the T64000 System correctly,
safely and most efficiently. Observing these instructions will enable safe operation of the equipment and will help to avoid accidental damage, to reduce repair costs and to increase the instrument lifetime and reliability.
HORIBA Jobin Yvon equipment is perfectly safe as long as it has been properly installed and is
operated according to the instructions which are given in this instruction manual.
The installation of the equipment is to be strictly carried out by properly trained personnel who
are designated by HORIBA Jobin Yvon and should not be attempted by the end user.
This manual must always be available whenever operating the equipment.
Any person working with the T64000 system, whether it is an engineer or an operator, must be
aware of the statements enclosed within this document and apply its contents. Tasks requiring
familiarity with the manual include; routine operation (including setting up), sample loading, and
instrument troubleshooting.
WARNING: Never make any modifications, additions or conversions to the equipment (especially those which might affect safety) without the supplier approval. This also
applies to the installation and adjustment of safety devices and accessories.
T64000 User Manual
5
In the event of safety relevant modifications or changes in the behavior of the T64000 during
operation, stop the equipment, and namely the laser source, immediately and report the malfunctioning to HORIBA Jobin Yvon or your authorized local representatives.
S5
Warnings
• Performance of any procedures not specified by the manufacturer may result a hazard-
ous radiation exposure. This includes removal of covers with laser power ON. There is
no user maintenance or service internal to the system with power ON.
• When covers or enclosures are removed for any reason extreme care must be taken to
prevent the beam being viewed directly by external optics or mirror.
• There are no user maintenance parts for the T64000 System. The System, including
peripherals, must never be opened with the exception of parts mentioned in this manual. Maintenance must only be performed by a designated members of HORIBA Jobin
Yvon Service Team or by authorized local representatives.
S6
Laser Radiation Safety
• The T64000 is class 3b or 4 and depends on the laser source's class the customer is
going to use with. It is important that the user understands which version of the system
he will be operating and familiarizes himself with the appropriate safety precautions.
• The maximum acceptable laser parameters for a laser included in the T64000 are:
- Beam diameter <5 mm
- Wavelengths range 200-1100nm
- Beam divergence <1 mrad
- Maximum laser power acceptable 10W (visible range) for class 2, 400mW (UV
range) for class 3R, 2.2W (near IR) for class1. These values correspond to the LEA
values for each range of wavelengths when safety position (red button) is commuted.
• During installation of T64000 System, be careful that the laser source installation com-
plies with all the legal safety requirements during operation, maintenance and service.
• Laser sources used with the T64000 constitutes a hazard to personnel during periods of
operating and servicing
• Lasers are high intensity light sources producing visible or invisible light at specific
10/07/2009
wavelengths. This concentrated energy in a narrow laser beam may cause damage to
biological tissues, especially to eyes. To use lasers safety, it is important to understand
that laser’s required final product safety classification is determined by essentially
three elements: the laser’s power, wavelength and housing.
Class 3B laser system: Laser beams and reflected beams could be dangerous. Diffused reflected
beams in most cases do not present any problem.
Class 4 laser system: Laser beam represents an acute hazard to the skin and eyes from direct and
scattered radiation. Fire hazard must be considered.
T64000 User Manual
6
• The T64000 System itself does not included the laser sources. On request the laser
sources can be ordered but are not integrated inside the T64000 System. The end-user
must comply the legal and safety requirements during the installation and the use of
the lasers. The beam path from the laser source to the T64000 must be secured by the
user with an adequate housing when installing the laser source. Additional safety labels
must be stick on the exposed parts.
• The various parts of the T64000 giving access to the laser beam have been secured by
the means of enclosures and tubes from the laser source input to the microscope.
These tubes are firmly tightened and prevent any exposure from the operator to any
laser radiation.
• To use the Instrument, it is necessary to access to the laser beam, particularly for the
microscope and the macro sample compartment to place and adjust the position of the
sample into the beam.
10/07/2009
• Some parts of the laser path between microscope or macro sample output to monochromator input are not housed (light diffused by the sample). See Figure 1-1, “Laser
path and label (upper view)”, page 14.
T64000 User Manual
7
The following precautions must be observed
• Refer to your laser source manual for specific safety requirements.
• In case of modification of the laser source, the T64000 labelling may be adapted to
conform the laser source class.
• Personnel must never look directly into the laser beam and should wear protective eye
wear at all times if protective covers are removed while the laser is switched on.
• All personnel in the vicinity of the laser should also be ordered to wear protective eyewear,
if protective covers are removed while the laser is switched on. Only qualified and trained
personnel should be permitted to operate the laser.
• Precautions must be taken to ensure that there are no reflecting objects in the path of the
laser beam, e.g. gold ring on the finger.
• Warning signs indicating the area in which the laser is enclosed should be clearly displayed.
• Local and national regulations governing the safe use of lasers should be adhered to at all
times.
• Ensure that the laser is properly ventilated using a suitable exhaust. Do not connect the
exhaust to breathing air systems (i.e. air conditioning or ventilation systems).
• Viewing laser beam with certain optical instruments (eye loupes, magnifiers, binoculars or
telescopes) within a distance of 100 mm may pose an eye hazard and must therefore be
avoided.
• The extracting fan located at the rear of the laser must not be blocked at any time.
• The laser warning labels affixed to the system according to the safety regulations (see
warning chapter) must not be removed.
• The laser can only be switched on with the key switch. This prevents inadvertent or unauthorised starting of the laser. It cannot be operated with the key in the OFF position and
the key cannot be removed in ON position.
• If mishandling of the instrument or of the safety devices results nevertheless in direct eye
exposure to the laser beam, the exposed operator should consult a doctor or a competent
eye testing institution.
• Caution: Use of controls or adjustments or performance of procedures, other than those
specified within this manual may result in hazardous radiation exposure.
• Caution: The laser exit is through the microscope objective. Before the System use, check
that all objectives or caps are mounted on the microscope as shown below.
Example: two objectives are mounted on a
5-location turret
White light shutter switch
10/07/2009
Three caps are mounted in
the unused objectives on the
microscope turret. These
block the laser from exiting
from these positions.
Mounted objectives
T64000 User Manual
8
S7
User visual indicators
The laser can only be switched ON with the key switch located on the laser source. When the key
is turned on, an indicator shows that the laser source is ON. The key prevents inadvertent or
unauthorised starting of the laser.
S8
Laser Safety Key and filters
Laser Safety Key
Laser Safety key main function is to cut off the laser incidence beam.
A laser shutter with filters have been mounted on the laser path just before the Micro/Macro
commutation. The Safety Laser key cuts the laser beam when the key is turned to ON. This prevents inadvertent or unauthorized activation of the laser. As further precaution, the key cannot be
removed in OFF position. Remove the control key when the laser or System is not in use.
This key belongs to the laboratory responsible or to the authorized person using the T64000, it is
strictly personal. Remove the control key when the laser or System is not in use.
Manual command
of density filters
wheel
10/07/2009
Laser Safety key
T64000 User Manual
9
• «Safety shutter ON»: In this position, the T64000 is unusable, a shutter keeps the beam from
going into the microscope and the macro chamber.
• «Safety shutter OFF»: In this position, microscope and macro chamber are usable. In this position, all personnel in the vicinity of the laser should also be ordered to wear protective eyewear
according to the laser wavelengths and power (see charts 1.0 below).
Density filters wheel
This density filters wheel has 2 functions:
• Security recommendations for personal protection
• Laser beam attenuation for sample protection
Security recommendations: The following charts provide security recommendations for the user,
it shows the power threshold of the laser beam above which it is necessary to wear security glasses.
These thresholds correspond to the EMP (allowed maximum exposure) relative to the 60825 EN
safety standards, they have been calculated according to the density filters:
10/07/2009
Laser source max power (Threshold for glass wearing)
Wavelengths
Range (nm)
Without any
DO
DO 0.3
DO 0.6
DO 1
DO 2
DO 3
DO 4
200 to302.5
(30s exposure)
If P>0.78 µW
P>1.57µW
P>3.14 µW
P>7.8 µW
P>78,5 µW
P>785 µW
P>7.8 mW
302.5 to 315
(30s exposure)
P>0.8 µW
P>1.6 µW
P>3.3 µW
P>8.3 µW
P>83 µW
P>830 µW
P>8.3 mW
315 to 400
P>78.5 µW
P>157µW
P>314µW
P>785 µW
P>7.85 mW
P>78.5 mW
P>785 mW
400 to 700
P>385 µW
P>770µW
P>1.5mW
P>3.8 mW
P>38.4 mW
P>384 mW
P>3.8 W
700 to 1100
P>384 µW
(700 nm);
P>2.98mw
(1100nm)
P>720 µW
(700nm);
6mW
(1100nm)
P>1.4mW
(700nm);
12mW
(1100nm)
P>3.84 mW
(700nm);
30mW
(1100nm)
P>38.4 mW
(700nm);
300mW
(1100nm)
P>384 mW
(700nm); 3W
(1100nm)
P>3.84 W
(700nm); 30
W (1100nm)
Chart 1.0 «Glass wearing recommendations as function of wavelengths ranges»
This chart shows the necessity to wear the security glass in particular when UV laser is
used.
T64000 User Manual
10
S9
List of safety labels
The following safety labels are affixed to the system and/or to the optional parts according to the
different options installed. Not all the labels will be present where a class 1 safety enclosure has
been included.
Labels 1 to 5 indicate a hazardous situation where there is a risk of serious injury due to possible
laser radiation.
Label 1
The T64000 System operates with laser source(s) emitting visible and/or invisible continuous laser
radiation typically below 500 mW. The class of the laser product is 3B or 4.
The laser class depends on the end user laser source and must be placed on the laser source. This
label will also be placed near to the «identification label» (see Figure 1-3, “Labels (lateral view)”,
page 15)
DANGER!
AVOID EXPOSURE OF
THE LASER BEAM TO THE EYES
Figure 1.1 Safety label 1
Label 2
DANGER! DURING OPERATION, THE LASER BEAM IS EMITTED IN THE T64000 SYSTEM
igure
1 : 1.2
SafetySafety
label 2label 2
Figure
10/07/2009
Label 3
LASER APERTURE
A laser beam is emitted through that aperture.
DANGER! AVOID EXPOSURE TO THE BEAM.
Figure 1.3 Safety label 3
T64000 User Manual
11
Label 4
The T64000 System has panels which is fixed in place and secured by screws. These panels must
not be opened or removed. Doing so may pose a risk to accidental exposure to the laser beam(s)
and will invalidate any warranty.
CAUTION
VISIBLE AND/OR INVISIBLE
LASER RADIATION WHEN OPEN
SWITCH OFF THE LASER
SOURCE BEFORE OPENNING
DANGER! the laser product class may
increase if covers or casings are removed.
Dangerous visible and/or invisible laser
beams may become accessible and pose a
possible risk to exposure.
Figure 1.4 Safety label 4
Label 5
Figure 1.5 Safety label 5
DANGER ! Microscope objectives
are designed to be removed or
switched over during normal operation and are not protected by any
safety interlocks. SWITCH off the
laser before changing or replacing
microscope objectives.
NOTICE: if one (or several) objectives are not mounted on the microscope turret, the empty
positions must be blocked with a suitable cap. Replacement or additional cap can be purchased
from HORIBA Jobin Yvon if required.
Label 6
CAUTION
Indicates a situation where equipment could be damaged; or there is a
risk of minor injury.
(Symbol depends on particular situation: see the additional Microscope
manual)
10/07/2009
Label 7
This symbol located on a device indicates that the device can be moved
and could caution should be taken to avoid a potential injury.
Location: on the motorized XY Stage
Never put your fingers on the XY Stage during the moving sequence.
T64000 User Manual
12
Label 8
Identifies any terminal which is intended for connection to an external
conductor for protection from electric shock in case of a fault, or the terminal of a protective earth (ground) electrode. Located on the SpectraLink.
Label 9
This symbol located ON A DEVICE shows that this
DEVICE HAS BEEN PLANNED FOR ECOLOGICAL
DESTRUCTION AT ITS END-OF-LIFE.
10/07/2009
Recycling
T64000 User Manual
13
S10 Labels location
CAUTION
VISIBLE AND/OR INVISIBLE
LASER RADIATION WHEN OPEN
SWITCH OFF THE LASER
SOURCE BEFORE OPENNING
Access to the filters
= Area without housing
= Laser path
= Raman beam path
Removable panels
CAUTION
CLASS 3B VISIBLE AND/OR INVISIBLE
LASER RADIATION WHEN OPEN
AVOID EXPOSURE TO THE BEAM
or
Laser source
entrance
10/07/2009
LASER APERTURE
Aperture labels
Figure 1-1 Laser path
and label (upper view)
T64000 User Manual
14
Figure 1-2 Labels
(front view)
Removable panels
CAUTION
CLASS 3B VISIBLE AND/OR INVISIBLE
LASER RADIATION WHEN OPEN
AVOID EXPOSURE TO THE BEAM
LASER APERTURE
and/or
CAUTION
VISIBLE AND/OR INVISIBLE
LASER RADIATION WHEN OPEN
SWITCH OFF THE LASER
SOURCE BEFORE OPENNING
CAUTION - VISIBLE OR INVISIBLE LASER
RADIATION WHEN REMOVING THE OBJECTIVE
SWITCH OFF THE LASER SOURCE BEFORE
CHANGING THE OBJECTIVE
Figure 1-3 Labels
(lateral view)
10/07/2009
or
Identification
number
T64000 User Manual
15
Contents
General safety Instructions . . . . . . . . . . . . . . . . . . . . . . . . . . . . . . . . . . . . . . . . . . . . . . . . . . 5
Summary . . . . . . . . . . . . . . . . . . . . . . . . . . . . . . . . . . . . . . . . . . . . . . . . . . . . . . . . . . . . . . . . . . 5
Purpose . . . . . . . . . . . . . . . . . . . . . . . . . . . . . . . . . . . . . . . . . . . . . . . . . . . . . . . . . . . . . . . . . . . 5
Intended Readers . . . . . . . . . . . . . . . . . . . . . . . . . . . . . . . . . . . . . . . . . . . . . . . . . . . . . . . . . . . 5
General instructions . . . . . . . . . . . . . . . . . . . . . . . . . . . . . . . . . . . . . . . . . . . . . . . . . . . . . . . . . 5
Warnings . . . . . . . . . . . . . . . . . . . . . . . . . . . . . . . . . . . . . . . . . . . . . . . . . . . . . . . . . . . . . . . . . 6
Laser Radiation Safety . . . . . . . . . . . . . . . . . . . . . . . . . . . . . . . . . . . . . . . . . . . . . . . . . . . . . . . 6
User visual indicators . . . . . . . . . . . . . . . . . . . . . . . . . . . . . . . . . . . . . . . . . . . . . . . . . . . . . . . 9
Laser Safety Key and filters . . . . . . . . . . . . . . . . . . . . . . . . . . . . . . . . . . . . . . . . . . . . . . . . . . . 9
List of safety labels . . . . . . . . . . . . . . . . . . . . . . . . . . . . . . . . . . . . . . . . . . . . . . . . . . . . . . . . . 11
Labels location . . . . . . . . . . . . . . . . . . . . . . . . . . . . . . . . . . . . . . . . . . . . . . . . . . . . . . . . . . . . 14
CHAPTER 1
T64000 System
. . . . . . . . . . . . . . . . . . . . . . . . . . . . . . . . .18
System Installation . . . . . . . . . . . . . . . . . . . . . . . . . . . . . . . . . . . . . . . . . . . . . . . . . . . . . . . . 18
Packaging . . . . . . . . . . . . . . . . . . . . . . . . . . . . . . . . . . . . . . . . . . . . . . . . . . . . . . . . . . .
Installation . . . . . . . . . . . . . . . . . . . . . . . . . . . . . . . . . . . . . . . . . . . . . . . . . . . . . . . . . .
Software Installation . . . . . . . . . . . . . . . . . . . . . . . . . . . . . . . . . . . . . . . . . . . . . . . . . .
Operating Defects . . . . . . . . . . . . . . . . . . . . . . . . . . . . . . . . . . . . . . . . . . . . . . . . . . . .
Composition of the equipment . . . . . . . . . . . . . . . . . . . . . . . . . . . . . . . . . . . . . . . . . . .
Requirements . . . . . . . . . . . . . . . . . . . . . . . . . . . . . . . . . . . . . . . . . . . . . . . . . . . . . . . .
18
19
19
19
19
19
Description . . . . . . . . . . . . . . . . . . . . . . . . . . . . . . . . . . . . . . . . . . . . . . . . . . . . . . . . . . . . . . 21
Monochromator/Spectrograph . . . . . . . . . . . . . . . . . . . . . . . . . . . . . . . . . . . . . . . . . . . 26
SpectraLink . . . . . . . . . . . . . . . . . . . . . . . . . . . . . . . . . . . . . . . . . . . . . . . . . . . . . . . . . 27
Interconnection . . . . . . . . . . . . . . . . . . . . . . . . . . . . . . . . . . . . . . . . . . . . . . . . . . . . . . . . . . . 27
10/07/2009
Specifications . . . . . . . . . . . . . . . . . . . . . . . . . . . . . . . . . . . . . . . . . . . . . . . . . . . . . . . . . . . . 29
Optical . . . . . . . . . . . . . . . . . . . . . . . . . . . . . . . . . . . . . . . . . . . . . . . . . . . . . . . . . . . . .
Electrical . . . . . . . . . . . . . . . . . . . . . . . . . . . . . . . . . . . . . . . . . . . . . . . . . . . . . . . . . . .
Overall Dimensions . . . . . . . . . . . . . . . . . . . . . . . . . . . . . . . . . . . . . . . . . . . . . . . . . . .
Environmental conditions . . . . . . . . . . . . . . . . . . . . . . . . . . . . . . . . . . . . . . . . . . . . . .
Storage . . . . . . . . . . . . . . . . . . . . . . . . . . . . . . . . . . . . . . . . . . . . . . . . . . . . . . . . . . . . .
Cleaning Instructions . . . . . . . . . . . . . . . . . . . . . . . . . . . . . . . . . . . . . . . . . . . . . . . . . .
29
32
33
34
34
34
Detailed Description . . . . . . . . . . . . . . . . . . . . . . . . . . . . . . . . . . . . . . . . . . . . . . . . . . . . . . . 34
1st Stage Lateral Entrance Slit . . . . . . . . . . . . . . . . . . . . . . . . . . . . . . . . . . . . . . . . . . . 35
T64000 User Manual
16
Intermediate Slit Motorization . . . . . . . . . . . . . . . . . . . . . . . . . . . . . . . . . . . . . . . . . . .
Spectrograph Lateral Entrance Slit . . . . . . . . . . . . . . . . . . . . . . . . . . . . . . . . . . . . . . .
Manual Axial Entrance Slit . . . . . . . . . . . . . . . . . . . . . . . . . . . . . . . . . . . . . . . . . . . . .
2nd Stage Manual Axial exit Slit . . . . . . . . . . . . . . . . . . . . . . . . . . . . . . . . . . . . . . . . .
Double Additive Adaptation . . . . . . . . . . . . . . . . . . . . . . . . . . . . . . . . . . . . . . . . . . . .
Spectrograph Axial Exit . . . . . . . . . . . . . . . . . . . . . . . . . . . . . . . . . . . . . . . . . . . . . . . .
Viewers . . . . . . . . . . . . . . . . . . . . . . . . . . . . . . . . . . . . . . . . . . . . . . . . . . . . . . . . . . . .
Micro/Macro/Single/Triple Entrance Commutation Wheel for Visible Range . . . . . .
Micro/Macro/Single/Triple Entrance Commutation for UV-VIS Range . . . . . . . . . .
Micro/Macro Mirror . . . . . . . . . . . . . . . . . . . . . . . . . . . . . . . . . . . . . . . . . . . . . . . . . .
Confocal Microanalysis System . . . . . . . . . . . . . . . . . . . . . . . . . . . . . . . . . . . . . . . . .
Macroanalysis System . . . . . . . . . . . . . . . . . . . . . . . . . . . . . . . . . . . . . . . . . . . . . . . . .
Stokes/Antistokes accessory . . . . . . . . . . . . . . . . . . . . . . . . . . . . . . . . . . . . . . . . . . . .
Two-Grating Turret Motorization . . . . . . . . . . . . . . . . . . . . . . . . . . . . . . . . . . . . . . . .
CCD Detector . . . . . . . . . . . . . . . . . . . . . . . . . . . . . . . . . . . . . . . . . . . . . . . . . . . . . . .
Monochannel Detection System . . . . . . . . . . . . . . . . . . . . . . . . . . . . . . . . . . . . . . . . .
CHAPTER 2
Getting Started
35
36
36
37
37
38
38
39
39
40
40
42
44
44
45
47
. . . . . . . . . . . . . . . . . . . . . . . . . . . . . . . . .51
Preparation . . . . . . . . . . . . . . . . . . . . . . . . . . . . . . . . . . . . . . . . . . . . . . . . . . . . . . . . . . . . . . 51
Safety . . . . . . . . . . . . . . . . . . . . . . . . . . . . . . . . . . . . . . . . . . . . . . . . . . . . . . . . . . . . . . 51
Hardware Foresights . . . . . . . . . . . . . . . . . . . . . . . . . . . . . . . . . . . . . . . . . . . . . . . . . . 51
Use . . . . . . . . . . . . . . . . . . . . . . . . . . . . . . . . . . . . . . . . . . . . . . . . . . . . . . . . . . . . . . . . 52
Using T64000 with the Microanalysis System . . . . . . . . . . . . . . . . . . . . . . . . . . . . . . . . . . 53
Preliminary . . . . . . . . . . . . . . . . . . . . . . . . . . . . . . . . . . . . . . . . . . . . . . . . . . . . . . . . . . 53
Procedure . . . . . . . . . . . . . . . . . . . . . . . . . . . . . . . . . . . . . . . . . . . . . . . . . . . . . . . . . . . 53
Using T64000 with the Macroanalysis System . . . . . . . . . . . . . . . . . . . . . . . . . . . . . . . . . 58
Preliminary . . . . . . . . . . . . . . . . . . . . . . . . . . . . . . . . . . . . . . . . . . . . . . . . . . . . . . . . . . 58
Procedure . . . . . . . . . . . . . . . . . . . . . . . . . . . . . . . . . . . . . . . . . . . . . . . . . . . . . . . . . . . 58
Using T64000 with the Back-scattering Macroanalysis System . . . . . . . . . . . . . . . . . . . . 62
10/07/2009
Preliminary . . . . . . . . . . . . . . . . . . . . . . . . . . . . . . . . . . . . . . . . . . . . . . . . . . . . . . . . . . 62
Procedure . . . . . . . . . . . . . . . . . . . . . . . . . . . . . . . . . . . . . . . . . . . . . . . . . . . . . . . . . . . 62
CHAPTER 3
Appendix
CHAPTER 4
Index
T64000 User Manual
. . . . . . . . . . . . . . . . . . . . . . . . . . . . . . . . . . . . .66
. . . . . . . . . . . . . . . . . . . . . . . . . . . . . . . . . . . . . . . .79
17
CHAPTER 1
T64000 System
The T64000 System Series II is a new generation, fully computerized, triple spectrograph/scanning spectrometer system. Unlike the current generation of Raman spectrograph in which spectrometer control and data acquisition are independent functions, requiring different software and
hardware, the T64000 System has an integrated software and hardware package which combines
all functions in a simplified, easy-to-use fashion. The package contains a large number of security
and validity tests, which are only possible with the complete integration of all functions. Conceived initially for the demanding performance of Raman spectroscopy, the T64000 is also superbly adapted to most other spectroscopic techniques. As the software allows the T64000
System to be used in wavelength and wavenumber units, other spectroscopic techniques such as
fluorescence, luminescence and absorption/transmission can also be easily performed on both
macro and micro samples. The ability to use the T64000 as a single or triple (with subtractive or
additive premonochromator stages) spectrometer with either standard scanning or multichannel
acquisition of data, permits the user to optimize the spectrometer to the spectral and sampling
requirements. This flexibility is achieved without having to disturb the sample under investigation
and is completely automated.
For industrial research or analytical laboratories the T64000 System is the safest, easiest to operate, and most flexible spectro-analytical system available.
1.1 System Installation
1.1.1 Packaging
10/07/2009
The T64000 System is delivered in packaging designed for protection during shipment.
However, if the packaging is damaged, or it appears after unpacking that the instrument has
defects, fill out the necessary forms with the shipper (the guarantee is limited to 3 days).
It is recommended that the original packaging materials be saved for possible storage or
transport of the instrument. Should it be necessary to send the instrument back to the factory, contact Jobin Yvon or your local representative for prior approval. Pack the instrument
in its original packaging if undamaged. Otherwise contact your local representative for new
T64000 User Manual
18
System Installation
packaging material. Once the «return» slip has been received, send the instrument to the
address that has been specified by your local representative.
1.1.2 Installation
The T64000 System must be installed and started by HORIBA Scientific or an approved
representative.
1.1.3 Software Installation
The Software has to be installed and started up by HORIBA Jobin Yvon or an approved
representative. Therefore, the installation procedure is detailed in the Software User Manual.
1.1.4 Operating Defects
If an operating defect exists, even after carefully reading this manual, contact HORIBA
Scientific or your local representative for prior return approval. If the instrument is returned
to the factory, the fault should be explained as clearly as possible.
1.1.5 Composition of the equipment
The T64000 System is composed of the following:
• Basic System,
• Optional Sub-units,
• Accessories.
1.1.6 Requirements
10/07/2009
See the «requirements list» delivered with the quotation.
Figure below shows a sample installation for the T64000 System.
T64000 User Manual
19
System Installation
1
2
3
4
5
6
7
8
9
1 T64000 unit
2 Water supply (Monochannel/Multichannel Detectors, Laser Source)
3 Nitrogen supply (specific experiments)
4 Water outlet
5 Line power distribution box + ground cable
6 SpectraLink controller
7 Computer and monitor
8 Window air conditioner
9 Storage (for software + accessories)
1.1.6.1
Water Supply
The water supply is necessary for cooling the PMT.
0.6 l/min (about 10 gal/hour).
• Water temperature:
Best result will be reached at 10°C.
A water supply is also necessary for the Laser Source; refer to the manufacturer user manual.
10/07/2009
• Water inlet/outlet flow:
T64000 User Manual
20
Description
1.1.6.2
Liquid Nitrogen (LN2) Supply
The Liquid Nitrogen is required for a CCD Detector which includes a Dewar recipient
mounted on the CCD chip. The Liquid Nitrogen is filled inside the Dewar and thus the
CCD detector can be cooled up to -196 °C (-320 °F).
1.1.6.3
Nitrogen (N2) Supply
The nitrogen supply is required for specific experiments. The nitrogen flow must be very
low, regulated by a control with gauge. The average flow rate must be approximately 0.5 l/
min.
The nitrogen supply can also be required for:
• Laser source: Protection of the windows from the dust,
• Experiments: Air free samples,
etc...
1.1.6.4
Liquid Nitrogen (LN2) Supply
The Liquid Nitrogen is required for a CCD Detector which includes a Dewar recipient
mounted on the CCD chip. The Liquid Nitrogen is filled inside the Dewar and thus the
CCD detector can be cooled up to -196 °C (-320 °F).
1.2 Description
The table “T64000 Options Concept” on page 23 shows the options and accessories for the
System.
All the options are organized around a Basic configuration which includes the following
sub-units:
Entrance double stage monochromator in a subtractive mount including:
• 1 manual axial entrance slit 0 - 2 mm with a height limiter,
• 1 manual intermediate slit 0 - 50 mm with a height limiter,
• 2 fixed mirrors on each side of the intermediate slit,
• 1 fixed mirror in front of the exit slit (lateral entrance slit of spectrograph stage),
• 1 horizontal shaft with 2 gratings cassette holders,
10/07/2009
• 1 set of aberration corrected holographic gratings 76 x 76 mm 1800 gr/mm.
Spectrograph stage including:
• 1 manual lateral entrance slit 0 - 25 mm with a height limiter,
• 1 horizontal shaft with a grating cassette holder,
T64000 User Manual
21
Description
• 1 aberration corrected holographic grating 76 x 76 mm 1800 gr/mm in a cassette,
• 1 top exit for a multichannel detector.
New SpectraLink Controller delivered with:
• 2 Motor Driver (MDR) boards for controlling the scanning of the 2 monochromators,
• 1 computer interface card.
LabSpec Software
10/07/2009
LabSpec Software developed for Windows, supplied with two computer package dongles,
permitting multichannel and monochannel detection, data acquisition, Raman mapping and
a wide range of data treatment and storage options. This software also includes macro programming capabilities.
T64000 User Manual
22
T64000 User Manual
Axial/Lateral Entrance
Single/Double/Triple
Monochromator
Capabilities
Output: printer/FTP
Control and
Data Processing System
Motorized selection
Manual/Motorized settings
10/07/2009
Manual/Motorized settings
Motorized selection
Top/Axial Exit
Table 1-1 T64000 Options Concept
Additive Configuration
Option
Basic T64000 Unit
Twin-Grating
Turret
Microscope+CMOS Camera
Manual/Motorized XYZ Stage
Macro Chamber
Fluorescence
Adaptation
PMT Detector
CCD Detector
Description
23
10/07/2009
Table 1-2 T64000 Optical Diagram
Description
T64000 User Manual
24
T64000 User Manual
Fi1/2 Slit Motorization
M2 Commutation Mirror
Fi1/2 50 mm Intermediate
Slit
F2
10 mm Additive Slit
F1 2 mm Axial
entrance slit
M1
Commutation Mirror
FL1 2mm Side
Entrance Slit
Periscope
+ Screen or Video
M4
Commutation Mirror
F4 2mm Exit Slit
F6 2mm Exit Slit
CCD Detector
M3 Commutation
Mirror
F3 10mm
Additive Slit
Right side
M5
Commutation
Mirror
F5 2mm
Entrance slit
M6 Exit Commutation Mirror
10/07/2009
Fi2/3 Slit
Motorization
Fi2/3 25mm
Intermediate Slit
Additive Mount
accessory
TE 104 PMT
Housing
CCD Vertical
Adaptation
CCD Shutter
on Entrance
Slit
NSPL1 card
Double Subtractive Stage
Gratings
Spectrometer Grating
Twin Grating Turret
CCD Vertical Adaptation
CCD with 1.5” CCD
Shutter
TE 104 Adaptation
DM 302 discrim.Amplif.
Table 1-3 T64000 Accessories Concept
Spectrograph
Entrance
Optics
Back side
Photomultiplier
Tube
Description
25
Description
1.2.1 Monochromator/Spectrograph
Subtractive configuration double stage monochromator includes the following
components (see figure 1-4):
• One manual axial entrance slit 0-2 mm with height limiter (No.1, figure 1-4),
• One manual intermediate slit 0-50 mm with height limiter (No.4, figure 1-4),
• Two fixed mirrors on each side of the intermediate slit (No.3 and 5, figure 1-4),
• One fixed mirror in front of the exit slit (No.7, figure 1-4),
• One set of aberration corrected holographic gratings (1800 gr/mm, 76 x 76 mm)
(No.2 and 6, figure 1-4).
Third stage in spectrograph configuration includes the following components
(see Figure 1):
• One manual intermediate slit 0-25 mm with height limiter (No.8, figure 1-4),
• One fixed mirror ensuing the intermediate slit (No.9, figure 1-4),
• One aberration corrected holographic grating (1800 gr/mm, 76 x 76 mm)(No.10,
figure 1-4),
• One top exit for the Multichannel Detector (CCD-Charge Coupled Device, LN2
cooled Linear InGaAs detector, etc...).
Exit
11
10
9
8
7
6
5
1
10/07/2009
2
4
Entrance
3
Figure 1-4 Basic configuration Optical Diagram
T64000 User Manual
26
Interconnection
1.2.2 SpectraLink
The new SpectraLink includes the cards which controls the motorized hardware of the
instrument. Without option, it includes 2 Motor drivers to control the scanning of the double monochromator and the scanning of the spectrograph. It also includes, of course, the
interface board for PC communication. On its basic state, it already includes all of the connectors (rear panel) for future options or accessories. Additional cards are plugged on the
front panel.
Figure 1-5 SpectraLink Rear Panel
1.3 Interconnection
10/07/2009
The T64000 System is a Raman diffusion spectrometry system. A wide variety of options are
available to allow users to perform analysis in minimal time, thanks to the modular options
and the specific Software developed by HORIBA Scientific, Jobin Yvon technology.
The figure 1-6 shows the T64000 Interconnection.
T64000 User Manual
27
Interconnection
PM1
PMT Detector option
Front
Panel
HV1
SpectraLink
Rear
Panel
J1
J2
J3
λ3
SCSI
Slit 2-3
Slit 1-2
PC Unit
SCSI Port
λ1-2
+5V
Shutter
+12V
Command T10A/250V
T1A/250V
-15V
T1A/250V
-5V
T2A/250V
+15V
T1A/250V
Laser Shutter
0 1
100-240V
2 FUSES
T2A 250V
250 VA
Mains Supply
10/07/2009
T64000
(rear panel)
INT.SLIT
COMMUTATIONS
J1
J2
J’1
J’2
1-2
SCAN
2-3
λ1-2
λ3
SECURITY
HV
Figure 1-6 T64000 System Interconnection
T64000 User Manual
28
Specifications
1.4 Specifications
1.4.1 Optical
Features:
• Three stage monochromator with optics, aperture and coupling optimized for performance and stability.
• Multiple motorized switching mirrors for ease of operation
• Multiple entrance and exit ports
• Directly coupled microscope options (and Macrochamber if required) rigidly coupled to
the spectrometer
• A large choice of options and components to enable full customizing of the system e.g.
gratings, detectors and sampling optics enabling operation from the UV to the NIR
Specifications:
• Focal length: 640 mm (single stage)
• 3 x 640 mm (triple additive)
< 100 cm-1 (single stage)
typically 2 – 5 cm-1 (double filter stage)
Stray light rejection: 10-14 at 20 cm-1 (514 nm laser)
Step size: 0.00066 nm (with 1800 gr/mm gratings)
Reproducibility: better than 1 pixel
Gratings: 100 to 3600 gr/mm (covering UV-NIR)
• Low frequency:
•
•
•
•
Tables of dispersions:
300 gr/mm grating
10/07/2009
Wavelength
Spectrograph stage
dispersion
Triple Additive
dispersion
nm
cm-1
nm/mm
cm-1/mm
nm/mm
cm-1/mm
200
50000
5.12
-1280.46
1.71
-426.82
300
33333.33
5.11
-567.25
1.70
-189.08
400
25000
5.09
-317.96
1.70
-105.99
500
20000
5.07
-202.74
1.69
-67.58
600
16666.67
5.05
-140.23
1.68
-46.74
700
14285.71
5.03
-102.59
1.68
-34.20
800
12500
5.00
-78.19
1.67
-26.06
900
11111.11
4.98
-61.49
1.66
-20.50
1000
10000
4.96
-49.56
1.65
-16.52
T64000 User Manual
29
Specifications
600 gr/mm grating
Wavelength
Spectrograph stage
dispersion
Triple Additive
dispersion
nm
cm-1
nm/mm
cm-1/mm
nm/mm
cm-1/mm
200
50000
2.54
-635.93
0.85
-211.98
300
33333.33
2.52
-280.46
0.84
-93.49
400
25000
2.50
-156.38
0.83
-52.13
500
20000
2.48
-99.10
0.83
-33.03
600
16666.67
2.45
-68.07
0.82
-22.69
700
14285.71
2.42
-49.41
0.81
-16.47
800
12500
2.39
-37.33
0.80
-12.44
900
11111.11
2.35
-29.07
0.78
-9.69
1000
10000
2.32
-23.17
0.77
-7.72
900 gr/mm grating
Wavelength
Spectrograph stage
dispersion
Triple Additive
dispersion
nm
cm-1
nm/mm
cm-1/mm
nm/mm
cm-1/mm
200
50000
1.68
-420.69
0.56
-140.23
300
33333.33
1.66
-184.46
0.55
-61.49
400
25000
1.63
-102.11
0.54
-34.04
500
20000
1.60
-64.15
0.53
-21.38
600
16666.67
1.57
-43.60
0.52
-14.53
700
14285.71
1.53
-31.26
0.51
-10.42
800
12500
1.49
-23.27
0.50
-7.76
900
11111.11
1.44
-17.81
0.48
-5.94
1000
10000
1.39
-13.91
0.46
-4.64
1200 gr/mm grating
10/07/2009
Wavelength
Spectrograph stage
dispersion
Triple Additive
dispersion
nm
cm-1
nm/mm
cm-1/mm
nm/mm
cm-1/mm
200
50000
1.25
-312.76
0.42
-104.25
300
33333.33
1.23
-136.15
0.41
-45.38
400
25000
1.19
-74.66
0.40
-24.89
500
20000
1.16
-46.35
0.39
-15.45
T64000 User Manual
30
Specifications
1200 gr/mm grating
600
16666.67
1.12
-31.03
0.37
-10.34
700
14285.71
1.07
-21.83
0.36
-7.28
800
12500
1.02
-15.87
0.34
-5.29
900
11111.11
0.95
-11.79
0.32
-3.93
1000
10000
0.89
-8.85
0.30
-2.95
1800 gr/mm grating
Wavelength
Spectrograph stage
dispersion
Triple Additive
dispersion
nm
cm-1
nm/mm
cm-1/mm
nm/mm
cm-1/mm
200
50000
0.82
-204.22
0.27
-68.07
300
33333.33
0.78
-87.21
0.26
-29.07
400
25000
0.74
-46.55
0.25
-15.52
500
20000
0.70
-27.83
0.23
-9.28
600
16666.67
0.64
-17.68
0.21
-5.89
700
14285.71
0.56
-11.53
0.19
-3.84
800
12500
0.48
-7.46
0.16
-2.49
900
11111.11
0.37
-4.52
0.12
-1.51
1000
10000
0.21
-2.13
0.07
-0.71
2400 gr/mm grating
Wavelength
Spectrograph stage
dispersion
Triple Additive
dispersion
cm-1
nm/mm
cm-1/mm
nm/mm
cm-1/mm
200
50000
0.597
-149.33
0.199
-49.78
300
33333.33
0.559
-62.06
0.186
-20.69
400
25000
0.508
-31.74
0.169
-10.58
500
20000
0.443
-17.71
0.148
-5.90
600
16666.67
0.358
-9.94
0.119
-3.31
700
14285.71
0.241
-4.92
0.080
-1.64
800
12500
0.036
-0.56
0.012
-0.19
10/07/2009
nm
T64000 User Manual
31
Specifications
3600 gr/mm grating
Spectrograph stage
dispersion
Wavelength
Triple Additive
dispersion
nm
cm-1
nm/mm
cm-1/mm
nm/mm
cm-1/mm
200
50000
0.372
-93.09
0.124
-31.03
300
33333.33
0.318
-35.36
0.106
-11.79
400
25000
0.239
-14.91
0.080
-4.97
500
20000
0.107
-4.26
0.036
-1.42
Fast Comparison table
Single Spectrometer dispersion nm/mm (cm-1/mm)
Triple additive dispersion nm/mm (cm-1/mm)
Grating
at 300nm
at 500nm
at 800nm
at 300nm
at 500nm
at 800nm
300
5.11 (567.3)
5.07 (202.7)
5.0 (78.2)
1.70 (189.1)
1.69 (67.6)
1.67 (26.1)
600
2.52 (280.5
2.48 (99.1)
2.39 (37.3)
0.84 (93.5)
0.83 (33.1)
0.80 (12.4)
1200
123 (136.2)
1.16 (46.4)
1.02 (15.9)
0.41 (45.4)
0.39 (15.5)
0.34 (5.3)
1800
0.78 (87.2)
0.70 (27.8)
0.48 (7.46)
0.26 (29.1)
0.23 (9.3)
0.16 (2.5)
2400
0.56 (62.1)
0.44 (17.7)
0.04 (0.56)
0.19 (20.7)
0.148 (5.9)
0.01 (0.19)
3600
0.318 (35.36)
0.107 (4.26)
-
0.106 (11.79)
0.036 (1.42)
-
1.4.2 Electrical
• The SpectraLink is connected to the main by a removable cord.
• Consult the laser source user manual for special electrical safety requirement.
10/07/2009
• A full electrical specification of the SpectraLink is detailed in the table below.
Electrical detail
Installation Category
Safety Class
Pollution degree
Mains supply:
Voltage variation
Phase
Frequency
Frequency variation
Nominal system power
consumption
T64000 User Manual
Data
II
1
2
115 / 230 VAC
± 10%
Single
50/60 Hz
± 2%
Remarks
The fuse must be
selected
following the
line voltage
250 VA
32
Specifications
115 Volts: T 2,5 A 250V
230 Volts: T 1 A 250V
T64000 is a class 1 instrument
and must be connected to the
ground.
Refer to local regulations
Mains unit fuse
Grounding
For safe servicing of the instrument, always remove the main cord before opening the rack.
1.4.3 Overall Dimensions
1091 mm
Laser Entrance
335 mm
635 mm
3 leveling feet
280 mm
Exit Slit
187 mm
Entrance
Slit
167 mm
350 mm
75 mm
40 - 70 mm
(Standard: 55 mm)
10/07/2009
• Weight: 162 kg
WEIGHT PRECAUTION: T64000 Unit weights 162 kg. According to the mover
staff, test the weight of the load to ensure it can be lifted securely; if not, make adjustments:
→ grip the load securely
→ protect hands against pinch points
T64000 User Manual
33
Detailed Description
1.4.4 Environmental conditions
Environmental
conditions
Indoor use
Operating temperature
Relative Humidity
Altitude
Conditions
Remarks
between +18°C and +25°C
in a ± 1°C range
Up to 80%
Max 2000 meters
air conditioning with air
regulation is required
No condensation
The room in which the instrument is installed must be properly ventilated.
1.4.5 Storage
If this unit has to be stored before it is installed, it must be kept in a store room where the
storage conditions are listed in the following table:
Storage
Temperature
Humidity
Packing
requirements
Conditions
+5 to +40°C
Up to 80% RH
Special packing
Remarks
No condensation
Must stay closed during storage to prevent
moisture and dust entering the unit
1.4.6 Cleaning Instructions
The outside part of the unit should be cleaned once a year to mainly get rid of dust. Use a
lint free cloth with 90° alcohol. Do not use any other chemical products.
No cleaning should be undertaken inside the optical parts of the instrument, and namely the
optical drawer and spectrograph.
Before cleaning the SpectraLink Unit, switch OFF the unit and remove the mains
cable. Never clean the inside of the SpectraLink Unit.
10/07/2009
1.5 Detailed Description
The Description chapter has explained the elements or sub-units of the T64000 Basic Configuration. Numerous options and accessories can be added to enlarge the use or improve
automation. This chapter will list and describe each of the most important options/accesso-
T64000 User Manual
34
Detailed Description
ries. The detailed and non exhausted list has been added and the end of this manual, in the
Appendix section.
1.5.1 1st Stage Lateral Entrance Slit
Destination
T64000 Double Stage Monochromator
Description
Used in System which required two
selectable entrances. 0-2mm width and 0,
1, 2.5, 15mm height limiter.
Option
1 SMA connector fiber adapter
2 FC fiber adapter
Additional
This option is delivered with a motorized commutation mirror
Requirements
Variable height
(0, 1, 2.5, 15 mm)
Variable width
Commutation card (T-COM)
100μ
1.5.2 Intermediate Slit Motorization
T64000 Double Stage Monochromator
Description
Computerizes the 0-50mm slit width
with manual 0-15 height.
Option
1 Stokes-Anti Stokes accessory
Additional
none
Requirements
delivered with MDR motor driver card
and cable.
width
height
10/07/2009
Destination
T64000 User Manual
35
Detailed Description
1.5.3 Spectrograph Lateral Entrance Slit
height
Destination
T64000 Spectrograph lateral entrance slit
(intermediate slit between the double
monochromator and the spectrograph)
Description
Computerizes the 0-25 mm slit width
with manual 0-15mm height. lateral
entrance slit of the spectrograph (intermediate slit between the Double Monochromator and the Spectrograph).
Option
none
Additional
delivered with MDR motor driver card
and cable.
Requirements
none
1.5.4 Manual Axial Entrance Slit
Destination
T64000 Spectrograph
Description
Used in System configuration which
requires a selectable third stage entrance.
0-2mm slit width and 0, 1, 2.5, 15mm
height limiter.
Option
none
Additional
This option is delivered with a motorized commutation mirror
Requirements
Commutation card (T-COM)
width
Variable height
(0, 1, 2.5, 15 mm)
Variable width
10/07/2009
100μ
T64000 User Manual
36
Detailed Description
1.5.5 2nd Stage Manual Axial exit Slit
Destination
T64000 Double Stage Monochromator
Description
Used in System requiring a second stage
axial exit. 0-2mm slit width with 0, 1, 2.5,
15mm height limiter.
Option
none
Additional
This option is delivered with a motorized commutation mirror
Requirements
Variable height
(0, 1, 2.5, 15 mm)
Variable width
Commutation card (T-COM)
100μ
1.5.6 Double Additive Adaptation
Destination
T64000 Double Stage Monochromator
Description
Used in System configuration which
requires a double additive stage optical
configuration.
Option
none
Additional
none
Requirements
- Commutation card (item T-COM)
- Double Additive mount accessory
15
2.5
Variable height
(0.5, 2.5, 15 mm)
0.5
Variable width
10/07/2009
100μ
T64000 User Manual
37
Detailed Description
1.5.7 Spectrograph Axial Exit
Variable height
(0, 1, 2.5, 15 mm)
Destination
T64000 third Stage
Description
Used in System configuration which
requires selectable third stage exits.
Option
1 0-2mm slit width with height limiter
2 Axial Multichannel Port
Additional
This option is delivered with a motorized commutation mirror
Requirements
Variable width
- Commutation card (T-COM)
- Recommended adaptation ref1 with
feet for reinforcing the stability of any
HJY LN2 CCD mounted on axial exit.
- Recommended adaptation ref2 with
feet for reinforcing the stability of any HJY LN2 CCD mounted on axial
exit when a fiber adapter is mounted on axial entrance slit of the Spectrograph Stage
100μ
1.5.8 Viewers
Destination
T64000 double monochromator
Description
Swing away periscope with
screen or video camera. This
device allows the user to monitor the alignment of the sample
image on the entrance slit.
10/07/2009
Option
1 Viewer for Visible range supplied with a viewing screen
2 Viewer for Visible range supplied with a C mount adapter
and density filters attachment
(Camera not included)
3 Viewer for UV-Visible range,
down to 240nm, supplied with a
C mount adapter and density filters attachment (Camera not
included).
Camera
or Viewing screen
screen focusing
knurled knob
ON/OFF knurled knob
OFF
ON
Additional
Color Camera 1280x1024 pixels with cable
Requirements
none
T64000 User Manual
From the Axial
Entrance Slit
38
Detailed Description
1.5.9 Micro/Macro/Single/Triple Entrance Commutation
Wheel for Visible Range
Destination
T64000 System
Description
The Micro/Macro/Triple/Single Commutation Sub-unit commutes the
analyzed beam to four different paths:
- From the microscope to the double premonochromator entrance,
- From the microscope to the third stage entrance,
- From the macro sample compartment to the double premonochromator entrance,
- From the macro sample compartment to the third stage entrance.
Option
1
2
3
Micro/Macro/Triple/Single Commutation wheel
For System equipped only with a Visible Microscope for selecting
either triple/single configuration
For System equipped only with a Visible Macrochamber for selecting
either triple/single configuration
Additional
none
Requirements
For Visible range only.
Required when using Visible Macrochamber and/or Visible Microscope.
10/07/2009
1.5.10 Micro/Macro/Single/Triple Entrance Commutation for
UV-VIS Range
Destination
Located on the Double Monochromator
Entrance.
Description
The Raman beam exiting from the
Microscope or the Macrochamber must
be redirected to the Double Monochromator Entrance Slit or the Entrance Slit
Spectrograph. A Collimation mirror is
used to focalize the beam.
Option
Additional
1 Micro only to Single/Triple for Visible
range,
2 Macro only to Single/Triple for Visible
range.
none
Requirements
see above
T64000 User Manual
39
Detailed Description
1.5.11 Micro/Macro Mirror
Destination
T64000 with Microscope
and Macrochamber
Description
Swing away mirror which
commutes the laser beam
to Microscope or Macrochamber
Option
none
Additional
none
Requirements
Microscope and Macrochamber
Focalization
Lens UV-Vis
Confocal
adjustment
Micro/Macro commutation
Push = Micro
Pull = Macro
10/07/2009
1.5.12 Confocal Microanalysis System
Destination
T64000 System
Description
This System added to the Basic T64000 allows to use micro samples for
Raman analysis. Due to numerous accessories, they are listed in the
Appendix Chapter.
Option
Many different microscope types are available:
- Visible Standard (as shown on the photo),
- Visible open microscope (free space below the objectives),
- Visible standard with line scan feature,
- UV-Visible,
- UV-Visible open version,
- Visible Inverted microscope,
- UV-Visible Inverted microscope
See detailed composition of each option in the “Appendix” on page 66
Additional
The Micro/Macro/Triple/Single Commutation sub-unit is required for
the signal which exits the microscope and enters the T64000 third stage
(see page 39).
Video Camera: neutral Density Filters are required. These filters are
located on the Laser Entrance path.
Microscope operation instructions: please refer to the manufacturer manual delivered
with each System.
T64000 User Manual
40
Detailed Description
Exchangeable beam splitter:
NUV, UVB, NIR
Video camera
White light Illuminator
(optical fiber) with Koehler
Half-wave plate:
UVB, NUV1, NUV2, Visible,
NIR1, NIR2
Analyzers:
UV, Visible/NIR
Scrambler
Coupling Optics:
Point illumination
Line scanning
U.V. coupling
Micro/Macro
Commutation
(option)
10/07/2009
Objectives:
10X, 50X, 100X
Options: UVB, NUV,
LWD, ULWD, NIR,
LWD NIR...
XY Stage
(manual)
Interferential filters
and λ/2 plates
Condenser
Safety filters wheel and
safety shutter with key
Figure 1-7 Microscope general presentation
(see the options in the “Appendix” on page 66)
T64000 User Manual
41
Detailed Description
1.5.13 Macroanalysis System
Destination
T64000 System
Description
This option is used to perform analysis on various
samples sizes and structures
which cannot be processed
by the Microanalysis System.
Option
There are different options according to your needs:
- Visible version,
- UV-Visible version,
- Laser periscope for lifting the beam of a laser installed at the front of
the system up to the level of the entrance axis of the Macrochamber,
- Macrochamber attachment with laser shutter, interference filter and half
wave plate holders. To be used at entrance of the Macrochamber when
no laser entry is on the system.
See detailed composition of each option in the “Appendix” on page 66.
Requirements
The overall configuration must be known to adapt the devices.
10/07/2009
Figure 1-8 Macrochamber overall
view
T64000 User Manual
42
Detailed Description
10
8
9
7
6
5
4
3
1 Step by step vertical adjustment
of the sample platform
2 Vertical fine-tune adjustment of
the sample platform
3 Knurled button to remove the
platform
4 XY fine-tune of the sample platform
5 Back collecting mirror
6 Platform
7 Optional focusing adaptor
8 Optical focusing input device
9 Fine-tune adjustment of the input device
10 Input mirror
2
1
slit-sample distance
8
7
6
5
4
To Entrance Slit
9 10
3
2
From Micro/Macro
Commutation Box
Right View
1 Step by step vertical adjustment
of the sample platform
2 Vertical fine-tune adjustment of
the sample platform
3 Knurled button to remove the
platform
4 XY fine-tune of the sample platform
5 Back collecting mirror
6 Platform
7 Exit focusing adaptor
8 Filters holder
9 Back scattering mirror
10 Three-directional sample orientation platform
Top View
10/07/2009
1
T64000 User Manual
43
Detailed Description
1.5.14 Stokes/Antistokes accessory
Destination
T64000
Description
The stokes and Antistokes simultaneous measurements can be performed
with the T64000 Instrument using a dedicated accessory. This accessory
replaces the standard height limiter on the intermediate slit by a special
height limiter (2, 3 and 4mm) with a central mask to eliminate the excitation beam.
Option
none
Additional
none
Requirements
none
1.5.15 Two-Grating Turret Motorization
T64000 Spectrograph
Description
With this option, the grating change will be controlled by the Software.
Option
None
Additional
None
Requirements
Commutation card (T-COM)
10/07/2009
Destination
T64000 User Manual
44
Detailed Description
1.5.16 CCD Detector
Destination
T64000 axial exit slit (third Stage)
Description
Most high end spectroscopic CCD sensors are two dimensional with rows and
columns of pixels. Sensors used in spectroscopy are typically between 25 mm
and 28 mm long and between 3 mm and
12.5 mm high, corresponding closely
with the size of the focal planes of modern spectrographs.The fabrication methods employed can be modified to
optimize sensitivity in the UV, VIS or
NIR regions of the spectrum.
HORIBA Scientific offers a wide variety
of sensors providing several alternatives
in balancing wavelength response, sensitivity and price. There are two main categories of CCD sensors: Front
Illuminated and Back Illuminated.
Front Illuminated CCDs are designed so
that the light is incident on the CCD, but
must pass through the CCDs silicon gate
before reaching the optically active silicon. Standard front illuminated CCDs
(FIVS) are best used for applications
where reduced UV response and high
full well potential (dynamic range) are
desirable.
Cryogenic LN2 cooling series
Thermoelectric cooling series
10/07/2009
Deep UV response of a front illuminated chip is enhanced by either adding a lumogen coating to the CCD (FIUV) or by etching a small opening
on the electrodes to allow UV light to pass to the silicon. The latter type
is known as (photoelectrons) an Open Electrode (OPEN) CCD. Front
illuminated chips are free from etaloning Front Illuminated CCD effects
due to their thickened substrate.
T64000 User Manual
45
Detailed Description
Back Illuminated CCDs are physically thinned so that the capture zone is
closer to the surface which improves the UV quantum efficiency. Optimized antireflection coatings also help in improving the photo conversion and therefore, the quantum efficiency of the sensor (Choose BIVS
for Visible optimized CCDs).
For Visible to NIR measurements (600 nm to 1000 nm), Back-Illuminated Deep Depletion (BIDD) CCDs have been created to increase NIR
response over standard Back Illuminated CCDs and to reduce etaloning
effects.
Each chip type has its own quantum efficiency and noise characteristics.
The graph shows the typical QE curves for each type of CCD chip.When
selecting a CCD remember that the signal to noise ratio increases as a
square root of the increase in the quantum efficiency. For example, selecting a CCD with 4 times the QE will increase the signal-to-noise by a factor of 2.
Additional
see “Appendix” on page 66 or CCD HORIBA catalogue.
Requirements
none
Installation
Please refer to the CCD User Manual delivered with the CCD Detector.
10/07/2009
Option
Sensor selection should be based upon image size on the entrance slit of
the spectrograph, whether the sensor is responsive in the spectral region
of study, and if it is sensitive enough to distinguish the signal from the
accumulated noise, within any temporal constraints of the measurement.
Quantum efficiency becomes an issue only when the light level
approaches the lowest limits of detectability.
see “Appendix” on page 66 or CCD HORIBA catalogue.
T64000 User Manual
46
Detailed Description
1.5.17 Monochannel Detection System
The system described below is the regular Photon Counting Detection System. Many other
different configurations are available according to the applications.
Destination
T64000 System
Description
A Photon Counting Detection System in the visible range usually incorporates the following devices:
-AsGa photocathode photomultiplier in a LCT50 housing. The housing
includes a Peltier effect cooling device.
-Discriminator amplifier with cable,
-PMT housing adaptor (axial exit slit only).
Option
none
Additional
none
Requirements
DM302 preamplifier/discriminator device
PCN01 photons counting and High Voltage card
(figure below shows the electronic devices)
CCD Shutter is required on each entrance slit (T-SHUTTER)
PCN01 photons counting and High Voltage Card
High voltage output
connector
10/07/2009
DM302 Preamplifier/
Discriminator Device
T64000 User Manual
47
Detailed Description
1.5.17.1 Detailed Description
• General
The detection occurs as follows: a group of lenses focuses the light beam from the exit slit
on the photosensitive element of the photomultiplier.
A discrimination amplifier amplifies the signal from the photomultiplier. The assembly is
powered by a separate power supply.
The Monochannel detector is housed in a parallelepiped metal box equipped with the following accesses:
• A coaxial connector marked «anode»,
• A coaxial connector marked «cathode»,
• A power supply connector for Peltier effect cooling system,
• Inlet/Outlet water circulation used for the Peltier effect cooling system.
The Monochannel Detection Unit will be mechanically and optically adapted using a LCT50
Housing adapter (see figure 1-9 and figure 1-10)
10/07/2009
Figure 1-9 LCT50 Optical Adaptation
Figure 1-9 LCT50 Optical Adaptation
T64000 User Manual
48
Detailed Description
Figure 1-10 LCT50 dimensions
• Photomultiplier Tube Principle
A photomultiplier tube is an electronic tube using photoemission effect to convert an incident radiation (ultraviolet to infrared) into an electrical signal, which is amplified to a usable
level by means secondary electron emission (See figure 1-11).
ANODE
CATHODE
LIGHT
BEAM
10/07/2009
GROUND
Figure 1-11 Photomultiplier Tube principle
• Amplification
T64000 User Manual
49
Detailed Description
The current provided by the photomultiplier is very small, and therefore must be amplified.
The amplifier is located in the photomultiplier in order to avoid connection losses. It provides the following functions:
• 100X amplification of the signal from the photomultiplier. This function is performed
by a discriminator amplifier.
• Power supply access
The power supply pack is housed in a metal parallelepiped box. The front panel includes the
following components:
• «ON-OFF» switch,
• 10A fuse,
• Peltier power supply failed LED indicator.
• Cooling system specifications
• Cooling temperature, depending on room temperature: - 35°C nominal,
• Maximum room temperature: + 52°C,
• Maximum water temperature: + 24°C,
10/07/2009
• Minimum water flow: 0.5 l/mn
T64000 User Manual
50
CHAPTER 2
Getting Started
2.1 Preparation
After the T64000 System has been installed and started up by HORIBA Jobin Yvon or an
approved representative, the user should follow certain rules and recommendations, listed
below.
2.1.1 Safety
Read carefully the Safety instructions described in the chapter “General safety Instructions”
on page 5.
2.1.2 Hardware Foresights
The CCD detectors must not be continuously exposed to bright light, especially in the ultraviolet wavelengths. This exposure will increase dark current. This damage can occur independent of power applied to the device. The camera head is supplied with a protection
cover.
Most of the electronic components utilized in the detector system are highly electrostatic
sensitive. Full ESD (ElectroStatic Discharge) handling procedures of the components of the
system are essential. Failure to comply will damage the system.
Improper use or grounding of the T64000 System could damage the system and/or present
the user with a potentially lethal hazard.
Do not connect or disconnect the cables while the System is on. The resulting power surges
may damage the Units.
10/07/2009
• Reliability
Electronic and electric circuits are subject to the following constraints whenever the unit is
turned on or off:
- a brief transient period subjecting certain components to a severe operating mode,
- a slow transient period (several hours) during which the electric and electronic circuits
will progressively reach a stable operating mode, from both electronic and thermal
viewpoints.
T64000 User Manual
51
Preparation
It is thus strongly advised to leave the unit turned on, with the exception of the light source,
the computer and monitor unit.
• Reproducibility
- Extreme temperature variations within a short period of time can influence measurement results.
- For example, measurement reproducibility will be optimal if a temperature regulation
of 1 °C is observed.
• Powered on the system
The first time the T64000 System is connected to a power supply, or after a long shutdown
period, the need for an electronic and thermal stabilization period should be taken into
account in order to obtain good results.
For example, the following minimum periods should be taken into account:
- Mechanical and optical part of the T64000 unit: approximately 24 hours in a climatecontrolled, regulated environment,
- SpectraLink: approximately 30 min,
2.1.3 Use
The T64000 System unit may be used after it has been installed by HORIBA Jobin Yvon or
an authorized representative.
10/07/2009
Only general guidelines for use will be given, since every element or sample analysis procedure has its own specific characteristics related to the nature of the element or sample.
T64000 User Manual
52
Using T64000 with the Microanalysis System
2.2 Using T64000 with the Microanalysis System
2.2.1 Preliminary
The T64000 System has been installed and implemented by HORIBA Jobin-Yvon/or an
authorized representative,
- Check to ensure that the T64000 Unit and its sub-assemblies are correctly connected
to the power, water (laser, PMT Housing..) and nitrogen (multichannel CCD detector),
- The use of specific accessories are detailed in the Description section.
2.2.2 Procedure
If the T64000 System is not powered ON, follow the following procedure:
1 Open the water circulation for PMT Detector housing and laser (if necessary)
2 Open the Nitrogen circulation (if needed)
3 If the System is equipped with the optional CCD Camera, the following steps must
4
5
1
6
7
be ensued:
Turn the power to ON on the CCD electronic unit,
Fill up the CCD Dewar vessel with the Nitrogen,
Wait for the decreasing of the CCD head temperature (up to 140°K or -133°C). This
temperature can be controlled using the Software (see Software User Manual). This
step should take up to 2 hours. Refer to the CCD User Manual to know how long the
CCD temperature will be kept,
NEVER CUT OFF THE POWER SUPPLY OF THE CCD ELECTRONIC
UNIT. In such case, it would be necessary to empty the Dewar vessel before restarting the electronic unit.
8 If the CCD camera is a UV coated version, never expose the CCD window to the
10/07/2009
sun or to fluorescent light source.
9 Power ON the PMT Detector (if applicable)
10 Power ON the SpectraLink,
T64000 User Manual
53
Using T64000 with the Microanalysis System
11 Power ON the Computer and the screen.
12 Switch the laser source ON: please refer to the Manual delivered with the unit.
13 Do not forget to wait for temperature stabilization. Estimation time for each sub-
1
unit is the following:
14 PMT Detector: Maximum cooling temperature will be reached in several hours. To
get the best performance in dark noise we recommend to keep the SpectraLink
turned on so that the PMT is kept powered and to never stop the water circulation in
the PMT housing.
15 SpectraLink: this unit must be powered for at least 30 minutes.
16 CCD Detector: please refer to the explanations detailed in the related User Manual.
17 Laser: please refer to the Manual delivered with the unit.
18
Load the LabSpec software. The software has been already installed and setup performed. Please refer to the LabSpec User Manual.
10/07/2009
2
T64000 User Manual
54
Using T64000 with the Microanalysis System
Push down the Micro/Macro selector (see “Micro/Macro Mirror” on page 40) and (6)
figure 2-2,
Position your sample on the Microscope Stage. Refer to the Microscope User Manual.
Confocal feature:
The T64000 Microanalysis System includes an integrated confocal microRaman system.
The confocal microscope is coupled to the Single/Triple stages spectrometer.
On the incoming path, the laser beam is reflected towards the microscope by the means
of a special filter (dielectric edge filter) used in injection/rejection mode.
On the return path to the spectrograph, the Raman back scattered light is fully transmitted through the filter towards the confocal slit-hole adjusted by a rotative button (7)
located on the Micro/Macro Commutation Box. If several laser wavelengths are used, a
focalization adjustment (chromatic aberration compensation) can be made with the button (8).
The Single/Triple spectrometer disperses the multichromatic Raman signal onto the
detector (PMT, CCD ..).
Once the confocal slit hole is set, the analysis point can be focused on a specific Z axis
value. The figure 2-1 shows how a confocal pinhole determines the optical slice thickness
of a sample. Thus, if the sample is located on a motorized XY stage it becomes easy to
make an analysis surface inside a sample using the mapping feature. Using a Z motorized
Sample Stage, this measure can be completely automated. A 3-D Raman image can be
then obtained.
3
Scattered
Light
Confocal
Pinhole
Figure 2-1 Confocal principle
Objective
Y
10/07/2009
Thickness of
optical slices
X
T64000 User Manual
Sample
Z
Stage positioning
55
Using T64000 with the Microanalysis System
From the LabSpec software, follow the standard acquisition procedure described below
(see the LabSpec User Manual for detailed explanation):
1 Select the appropriate 3rd stage grating:
- 1800 g/mm for a high resolution
- 300 or 600 g/mm to make a one shot spectrum
- 1200 g/mm which is infrared optimized. (only for NIR version)
2 Select the correct grating setting in the software. If you change the grating, do not
4
forget to go to the zero order position (in the software). This will give the correct
calibration for the particular grating you will use.
3 Set the spectrograph to the desired spectral position.
4 Select the size of the confocal hole and the slit aperture.
5 Select the acquisition time and the number of accumulations (this will improve the
signal/noise ratio).
Then you have 2 possibilities:
- The icon
: is a spectrum adjustment, so it can help you to maximize the signal (the new spectrum refreshes the old one and so on...). No repeated accumulations or extended spectral ranges are acquired.
it will make a spectrum accumulation and stop.
10/07/2009
- If you press the icon
T64000 User Manual
56
Using T64000 with the Microanalysis System
7
1
Premonochromator
Macrochamber
2
Micro/Macro
Commutation
Box
8
3
4
Microscope
Figure 2-2 Using Microanalysis System
Premonochromator Entrance Slit
Filter holder (scattered beam)
Beam splitter
Laser Filter wheel with 6 neutral density filters
Laser vertical entrance axis
6
6. Micro/Macro commutation button
7. Confocal hole adjustment
8. Lens focusing adjustment of the scattered
beam to the confocal hole. This is required
when several laser wavelengths are used (axial
chromatism aberration compensation)
10/07/2009
1.
2.
3.
4.
5.
5
T64000 User Manual
57
Using T64000 with the Macroanalysis System
2.3 Using T64000 with the Macroanalysis System
2.3.1 Preliminary
The T64000 System has been installed and implemented by HORIBA Jobin-Yvon/or an
authorized representative,
- Check to ensure that the T64000 Unit and its sub-assemblies are correctly connected
to the power, water (laser, PMT Housing..) and nitrogen (multichannel CCD detector),
- The use of specific accessories are detailed in the Description section.
2.3.2 Procedure
1
If the T64000 System is not powered ON, follow the following procedure:
1 Open the water circulation for PMT Detector housing and laser (if necessary)
2 Open the Nitrogen circulation (if needed)
3 If the System is equipped with the optional CCD Camera, the following steps must
be ensued:
4 Turn the power to ON on the CCD electronic unit,
5 Fill up the CCD Dewar vessel with the Nitrogen,
6 Wait for the decreasing of the CCD head temperature (up to 140°K or -133°C). This
temperature can be controlled using the Software (see Software User Manual). This
step should take up to 2 hours. Refer to the CCD User Manual to know how long the
CCD temperature will be kept,
7 NEVER CUT OFF THE POWER SUPPLY OF THE CCD ELECTRONIC
UNIT. In such case, it would be necessary to empty the Dewar vessel before restarting the electronic unit.
8 If the CCD camera is a UV coated version, never expose the CCD window to the
10/07/2009
sun or to fluorescent light source.
9 Power ON the PMT Detector (if applicable)
10 Power ON the SpectraLink,
11 Power ON the Computer and the screen.
12 Switch the laser source ON: please refer to the Manual delivered with the unit.
T64000 User Manual
58
Using T64000 with the Macroanalysis System
13 Do not forget to wait for temperature stabilization. Estimation time for each sub-
unit is the following:
PMT Detector: Maximum cooling temperature will be reached in several hours. To
get the best performance in dark noise we recommend to keep the SpectraLink
turned on so that the PMT is kept powered and to never stop the water circulation in
the PMT housing.
SpectraLink: this unit must be powered for at least 30 minutes.
CCD Detector: please refer to the explanations detailed in the related User Manual.
Laser: please refer to the Manual delivered with the unit.
2
Load the LabSpec software. The software has been already installed and setup performed. Please refer to the LabSpec User Manual.
1 Pull down the Micro/Macro selector (see “Micro/Macro Mirror” on page 40) and
(6) figure 2-2,
2 Open the Macro-sample compartment,
3 Place a sample on the sample holder (14) located in the macro-sample compartment,
4 Turn the XYZ adjustment screws as to perform a Raman-type light emission
3
through the collimator lens at the output of the macro-sample compartment. The
following devices can be fine tuned:
- Mirror orientation (11)
- Entrance beam focusing (12) or change the entrance focusing adapter (13) option- XYZ sample holder adjustment (14)
- collecting image focusing (16) or change the exit focusing adapter (15) -option- T64000 entrance slit focusing with the transfer optics (20)
NOTE: These adjustments would be easier using the Macro Camera Viewer or/and the
entrance slit Viewer (Screen or Camera).
5 Place an entrance filter (for example, an interferential laser filter) in the filter holder
(22) located on the T64000 front panel below the Micro/Macro Communication
box (useful to eliminate the plasma lines of the laser).
6 Insert the exit filters (for example: analyzer, polarizing, half-wave, quarter-wave plate)
10/07/2009
(21),
7 If the T64000 System is equipped with a Viewer sub-unit (optional), the settings can
be fine-tuned; the Viewer is located on the premonochromator entrance.
T64000 User Manual
59
Using T64000 with the Macroanalysis System
From the LabSpec software, follow the standard acquisition procedure described below
(see the LabSpec User Manual for detailed explanation):
1 Select the appropriate 3rd stage grating:
- 1800 g/mm for a high resolution
- 300 or 600 g/mm to make a one shot spectrum
- 1200 g/mm which is infrared optimized. (only for NIR version)
2 Select the correct grating setting in the software. If you change the grating, do not
4
forget to go to the zero order position (in the software). This will give the correct
calibration for the particular grating you will use.
3 Set the spectrograph to the desired spectral position,
4 Select the slit aperture,
5 Select the acquisition time and the number of accumulations (this will improve the
signal/noise ratio)
Then you have 2 possibilities:
- The icon
: is a spectrum adjustment, so it can help you to maximize the signal (the new spectrum refreshes the old one and so on...). No repeated accumulations or extended spectral ranges are acquired.
it will make a spectrum accumulation and stop.
10/07/2009
- If you press the icon
T64000 User Manual
60
Using T64000 with the Macroanalysis System
21
20
19
18
17
16
15
14
Macrochamber
Premonochromator
1
Micro/Macro
Commutation
Box
13
12
6
4
Microscope
5
page 57
10/07/2009
8
9 10
11
Figure 2-3 Using Macroanalysis System
1. Premonochromator Entrance Slit
2. Filter holder (scattered beam), see figure 2-2,
3. Beam splitter, see figure 2-2, page 57
4. Laser Filter wheel with 6 neutral density filters
5. Laser vertical entrance axis
6. Micro/Macro commutation knob
7. Confocal hole adjustment, see figure 2-2, page 57
8. Mirror sliding rail
9. Focusing lens sliding rail
10. Entrance optics XZ adjustments
11. Mirror
T64000 User Manual
22
12. Focusing lens adjustment
13. Focusing lens adaptor
14. XYZ sample holder adjustment
15. Collecting lens adaptor
16. Collection lens focusing adjustment
17. XY adjustment
18. Back-scattering mirror
19. Back-scattering selector with the fine tune knob
20. Transfer optics to entrance slit focusing adjustment
21. Holder for analyzer, half-wave or quarter wave
plates
22. Access to entrance filters holder
61
Using T64000 with the Back-scattering Macroanalysis System
2.4 Using T64000 with the Back-scattering Macroanalysis
System
2.4.1 Preliminary
The T64000 System has been installed and implemented by HORIBA Jobin-Yvon/or an
authorized representative,
- Check to ensure that the T64000 Unit and its sub-assemblies are correctly connected
to the power, water (laser, PMT Housing..) and nitrogen (multichannel CCD detector),
- The use of specific accessories are detailed in the Description section.
2.4.2 Procedure
1
2
Please follow the powered ON procedure described in the step 1, page 58.
Load the LabSpec software. The software has been already installed and setup performed. Please refer to the LabSpec User Manual.
1 Pull down the Micro/Macro selector (see “Micro/Macro Mirror” on page 40) and
2
3
4
5
3
6
(6) figure 2-2,
Open the Macro-sample compartment,
Place a sample on the sample holder (14) located in the macro-sample compartment,
Displace the mirror (11) along the sliding rail by slightly unscrewing the knurled
knob below the mirror holder,
Install the Back-Scattering mirror by sliding the (19) knob. This will perform a rough
adjustment by steps. Fine tune the position using the rotative part of the (19) knob
and the a and b screws located on the mirror holder (see figure 2-4, page 64).
Turn the XYZ adjustment screws as to perform a Raman-type light emission
through the collimator lens at the output of the macro-sample compartment. The
following devices can be fine tuned:
- Mirror orientation (11)
- XYZ sample holder adjustment (14)
- collecting image focusing (16) or change the exit focusing adapter (15) -option- T64000 entrance slit focusing with the transfer optics (20)
10/07/2009
NOTE: These adjustments would be easier using the Macro Camera Viewer or/and the
entrance slit Viewer (Screen or Camera).
T64000 User Manual
62
Using T64000 with the Back-scattering Macroanalysis System
7 Place an entrance filter (for example, an interferential laser filter) in the filter holder
(22) located on the T64000 front panel below the Micro/Macro Communication
box (useful to eliminate the plasma lines of the laser).
8 Insert the exit filters (for example: analyzer, polarizing, half-wave, quarter-wave plate)
(21),
9 If the T64000 System is equipped with a Viewer sub-unit (optional), the settings can
be fine-tuned; the Viewer is located on the premonochromator entrance.
From the LabSpec software, follow the standard acquisition procedure described below
(see the LabSpec User Manual for detailed explanation):
1 Select the appropriate 3rd stage grating:
- 1800 g/mm for a high resolution
- 300 or 600 g/mm to make a one shot spectrum
- 1200 g/mm which is infrared optimized. (only for NIR version)
2 Select the correct grating setting in the software. If you change the grating, do not
4
forget to go to the zero order position (in the software). This will give the correct
calibration for the particular grating you will use.
3 Set the spectrograph to the desired spectral position,
4 Select the slit aperture,
5 Select the acquisition time and the number of accumulations (this will improve the
signal/noise ratio)
Then you have 2 possibilities:
- The icon
: is a spectrum adjustment, so it can help you to maximize the signal (the new spectrum refreshes the old one and so on...). No repeated accumulations or extended spectral ranges are acquired.
it will make a spectrum accumulation and stop.
10/07/2009
- If you press the icon
T64000 User Manual
63
Using T64000 with the Back-scattering Macroanalysis System
21
20
19
17
18
15
16
14
Macrochamber
Premonochromator
1
Micro/Macro
Commutation
Box
8
11
6
22
4
Microscope
5
α
19
Mirror
10/07/2009
β
Figure 2-4 Macroanalysis System
using the back-scattering configuration
T64000 User Manual
β
α
Laser beam
α
64
Using T64000 with the Back-scattering Macroanalysis System
1. Premonochromator Entrance Slit
2. Filter holder (scattered beam), see figure 2-2,
page 57
ment
21. Holder for analyzer, half-wave or quarter wave
plates
22. Access to entrance filters holder
10/07/2009
3. Beam splitter, see figure 2-2, page 57
4. Laser Filter wheel with 6 neutral density filters
5. Laser vertical entrance axis
6. Micro/Macro commutation knob
7. Confocal hole adjustment, see figure 2-2, page 57
8. Mirror sliding rail
9. Focusing lens sliding rail
10. Entrance optics XZ adjustments
11. Mirror
12. Focusing lens adjustment
13. Focusing lens adaptor
14. XYZ sample holder adjustment
15. Collecting lens adaptor
16. Collection lens focusing adjustment
17. XY adjustment
18. Back-scattering mirror
19. Back-scattering selector with the fine tune knob
20. Transfer optics to entrance slit focusing adjust-
T64000 User Manual
65
Appendix
CHAPTER 3
This chapter lists the Options and Accessories available for T64000 System. This list is not exhaustive. Please ask us for an accessory you have not found here.
REFERENCE
DESCRIPTION
1-
BASIC INSTRUMENT
Basic T64000 configuration (see description below)
BASIC CONFIGURATION INCLUDING:
• Entrance double stage monochromator in a subtractive mount including:
• 1 manual axial entrance slit 0 - 2 mm with a height limiter
• 1 manual intermediate slit 0 - 50 mm with a height limiter
• 2 fixed mirrors on each side of the intermediate slit
• 1 fixed mirror in front of the exit slit (lateral entrance slit of spectrograph stage)
• 1 horizontal shaft with 2 gratings cassette holders
• 1 set of aberration corrected holographic gratings 76 x 76 mm 1800 gr/mm
T-64000
Spectrograph stage including:
• 1 manual lateral entrance slit 0 - 25 mm with a height limiter
• 1 horizontal shaft with a grating cassette holder
• 1 aberration corrected holographic grating 76 x 76 mm 1800 gr/mm in a cassette
• 1 top exit for a multichannel detector
New Spectra Link Controller delivered with:
• 2 Motor Driver (MDR) boards for controlling the scanning of the 2 monochromators
(Refer to 2.3.3. for electronics extensions)
• 1 computer interface card
LABSPEC Software
LabSpec Software developed for Windows, supplied with two computer package dongles,
permitting multichannel and monochannel detection, data acquisition, Raman mapping
and a wide range of data treatment and storage options. This software also includes macro
programming capabilities.
2-
OPTIONS
2.1 Entrance Double stage options
10/07/2009
2.1.1 Manual lateral entrance slit
T64000 User Manual
66
Manual lateral entrance slit. Includes a 0-2 mm slit with a height limiter and a motorized
T-LAT-ENT-SLIT-S1 commutation mirror. Requires the Commutation card (item T-COM)
Fiber adaptor to be mounted on any T64000 entrance slit.With SMA connector. Allows to
T-SMA-SLIT-ADAPT focus on a slit equipped or not with a CCD shutter with a 4X magnification visible optics
T-FC-SLIT-ADAPT
Fiber adaptor to be mounted on any T64000 entrance slit.With FC adaptor.Allows to focus
on a slit equipped or not with a CCD shutter with a 4X magnification visible optics
2.1.2 Intermediate slit 0 - 50 mm
T-INT-SLIT-S1S2
T-SAS
Motorization of the width of the slit including stepping motor adaptation supplied with
MDR motor driver board and cable.
Stokes-Anti Stokes accessory. Replaces height limiter with central masks 1, 2 and 4mm
wide for blocking the laser beam in the center of the range collected on the multichannel
detector
2.1.3 Sets of 2 gratings, delivered prealigned in cassettes
T-RG300-XXX-DS
300 gr/mm ruled gratings, XXX=blaze wavelength in nm [500, 600 or 1000]
T-RG600-XXX-DS
600 gr/mm ruled gratings, XXX=blaze wavelength in nm [300, 400, 500, 630, 750 or
1000]
600 gr/mm blazed aberration corrected holographic gratings, XXX= correction
T-ACHG600-XXX-DS wavelength in nm [500, 750]
T-BHG600-500-DS
600 gr/mm blazed holographic gratings (at 500 nm)
T-ACHG900-750-DS 900 gr/mm blazed aberration-corrected holographic gratings (at 750 nm)
1200 gr/mm blazed holographic gratings, XXX=blaze wavelength in nm [330, 500, 630,
T-BHG1200-XXX-DS 750 or 900]
T-HG1800-DS
1800 gr/mm standard holographic gratings (450 - 850 nm)
T-BHG1800-XXX-DS 1800 gr/mm blazed holographic gratings, XXX=blaze wavelength in nm [250,400, 500]
T-BHG2400-XXX-DS 2400 gr/mm blazed holographic gratings, XXX=blaze wavelength in nm [250, 330 or 400]
T-HG3600-DS
3600 gr/mm standard holographic gratings (200 - 450 nm)
2.1.4 Double Additive configuration adaptation
T-ADD-ADAPT
Includes 2 manual intermediate slits (0 -10 mm) and motorized commutation mirrors.
-Requires the Commutation card (item T-COM.)
-Requires the Double Additive mount for using the instrument in the triple additive
dispersion configuration (item T-ADDMOUNT)
2.1.5 Viewers
(Permit to check the image of the entrance slit to maximize the alignment of sample)
10/07/2009
T-SCR-VIEW
Viewer for Visible range supplied with a viewing screen
T-VIDEO-VIS-VIEW
Viewer for Visible range supplied with a C mount (adapted to most color or black and
white video cameras). Supplied with density filters attachment (camera not included)
T-VIDEO-UV-VIEW
Viewer for UV- Visible range, down to 240 nm supplied with a C mount (adapted to most
color or black and white video cameras). Supplied with density filters attachment (camera
not included)
USB CAMERA
Color camera 1280x1024 pixels with cable
2.1.6 Manual axial exit slit of the second stage
T-EX-SLIT-S2
Manual axial exit slit of the second stage. Includes a 0-2 mm slit with a height limiter and
a motorized commutation mirror. Requires the Commutation card (item T-COM.)
T64000 User Manual
67
2.2 Spectrograph stage options
2.2.1 Additional gratings, delivered prealigned in cassettes
T-RG300-XXX-SP
300 gr/mm ruled grating, XXX=blaze wavelength in nm [500, 600 or 1000]
T-RG600-XXX-SP
600 gr/mm ruled grating, XXX=blaze wavelength in nm [300, 400, 500, 630, 750 or 1000]
600 gr/mm blazed aberration corrected holographic grating, XXX= correction wavelength
T-ACHG600-XXX-SP in nm [500, 750]
T-BHG600-500-SP
600 gr/mm blazed holographic grating (at 500 nm)
T-ACHG900-750-SP 900 gr/mm blazed aberration corrected holographic grating (at 750 nm)
1200 gr/mm blazed aberration corrected holographic grating, XXX=blaze wavelength in
T-BHG1200-XXX-SP nm [330, 500, 630, 750 or 900]
T-HG1800-SP
1800 gr/mm standard holographic grating (450 - 850 nm)
T-BHG1800-XXX-SP 1800 gr/mm blazed holographic grating, XXX=blaze wavelength in nm [250,400, 500]
T-BHG2400-XXX-SP 2400 gr/mm blazed holographic grating, XXX=blaze wavelength in nm [250, 330 or 400]
T-HG3600-SP
3600 gr/mm holographic grating (200 - 450 nm)
2.2.2 Lateral entrance slit 0-25 mm
T-INT-SLIT-S2S3
Motorization of the width of the slit including stepping motor adaptation supplied with
MDR motor driver board and cable.
2.2.3 Manual axial entrance slit
T-ENT-SLIT-S3
Manual axial entrance slit. Includes a 0-2 mm slit with a height limiter and a motorized
commutation mirror. Requires the Commutation card (item T-COM.)
2.2.4 Motorized 2-gratings turret
T-TUR
Motorized 2-gratings turret. Includes the motor adaptation. Requires the Commutation
card (item T-COM.)
2.2.5 Axial exit
T-EX-SLIT-S3
T-MULTI-PORT
Manual axial exit slit. Includes a 0-2 mm slit with a height limiter and a motorized
commutation mirror. Requires the Commutation card (item T-COM.)
Axial Multichannel Port. Includes the multichannel detector port and a motorized
commutation mirror. Requires the Commutation card (item T-COM.)-Also see next 2 lines
Adaptation with feet for reinforcing the stability of any HJY LN2 CCD mounted on axial
T-ADAPT1-LN-CCD exit
Adaptation with feet for reinforcing the stability of any HJY LN2 CCD mounted on axial
T-ADAPT2-LN-CCD exit when a fibre adaptor is mounted on axial entrance slit of spectrograph stage
2.3 Accessories for the system
T-SILVCOAT
Special silvered coating on all reflective optics of the system for improving its throughput
in the visible-NIR range. Only for working above 380 nm.
2.3.1 Additive mount accessory
10/07/2009
T-ADD-MOUNT
Additive mount accessory. Requires the adaptation T-ADD-ADAPT
2.3.2 Sampling attachments
2.3.2.1. Laser entry items
T-BENCH-1LAS
Bench at back of T64000 holding coupling optics for making lasers enter the instrument.
Equipped with one fixed mirror for reflecting laser beam at 90°
T64000 User Manual
68
T-BENCH-2LAS
Bench at back of T64000 holding coupling optics for making lasers enter the instrument.
Equipped with one fixed and one swing-away mirrors
T-BENCH/FILT2LAS
Bench at back of T64000 holding coupling optics for making lasers enter the instrument.
Equipped with one fixed and one swing away mirrors together with a laser filtering
column
T-MACRO-LASENTRY
Laser entry attachment including laser shutter, interference filter and half-wave plate
holders. Necessary for a configuration with only a macrochamber when lasers are installed
at the back of the spectrometer. (Not required when the system is delivered with a
microscope as it is included in this attachment)
T-BPF-HOLD
Holder for ½ inch bandpass filter to be used on laser beam at entrance of system
equipped with a microscope or with a macro laser entry attachment (Item T-MAC-LASENTRY)
BPF1-XXX
Bandpass filter for eliminating the plasma lines of the laser (XXX= 488, 514, 532, 633,
661, 785 and 830 nm). Delivered mounted in T-BPF-HOLD
BPF2-XXX
Bandpass filter for eliminating the plasma lines of the laser (XXX=325, 355, 364, 442,
457, 568, 647 and 1064 nm). Delivered mounted in T-BPF-HOLD
Holder for ½ inch half wave plate to be used on laser beam at entrance of system
T-LAMBDA/2-HOLD equipped with a microscope or with a macro laser entry attachment (Item T-MAC-LASENTRY)
T-LAMBDA/2-UVB
½ inch Lambda/2 plate in holder for UVB range (250 nm) to be used on laser beam at
entrance of system equipped with a microscope or with a macro laser entry attachment
(Item T-MAC-LAS-ENTRY)
½ inch Lambda/2 plate in holder for NUV range (325 nm) to be used on beam at entrance
T-LAMBDA/2-NUV1 of system equipped with a microscope or with a macro laser entry attachment (Item TMAC-LAS-ENTRY)
½ inch Lambda/2 plate in holder for NUV range (350 nm) to be used on beam at entrance
T-LAMBDA/2-NUV2 of system equipped with a microscope or with a macro laser entry attachment (Item TMAC-LAS-ENTRY)
T-LAMBDA/2-VIS
½ inch Lambda/2 plate in holder for Visible range (400-700 nm) to be used on laser beam
at entrance of system equipped with a microscope or with a macro laser entry attachment
(Item T-MAC-LAS-ENTRY)
T-LAMBDA/2-NIR1
½ inch Lambda/2 plate in holder for NIR1 range (750 - 800 nm) to be used on laser beam
at entrance of system equipped with a microscope or with a macro laser entry attachment
(Item T-MAC-LAS-ENTRY)
T-LAMBDA/2-NIR2
½ inch Lambda/2 plate in holder for NIR2 range (800-900 nm) to be used on laser beam
at entrance of system equipped with a microscope or with a macro laser entry attachment
(Item T-MAC-LAS-ENTRY)
2.3.2.2. Manual Macro/Micro Mirror
T-MACMIC-MIR
Manual macro/micro entry swing away mirror. Required on the laser incidence beam for
commuting laser from Macrochamber to microscope when the system is equipped with
both attachments
2.3.2.3. Manual Macro/Micro/Single/Triple Commutations
10/07/2009
Manual Macro/Micro/Single/Triple commutation wheel for visible range. Required when
T-COM-VIS-WHEEL using both visible macrochamber and visible microscope.
T-COM-MICRO
Manual commutation device to be used when the system is equipped with only a visible
microscope for selecting either triple or single configuration
T-COM-MACRO
Manual commutation device to be used when the system is equipped with only a
macrochamber for selecting either triple or single configuration
T64000 User Manual
69
2.3.2.4. Single monochromator options
T-SINGLE-VIS
Single monochromator option for visible range. Permits to enter directly the 3rd stage.
Requires an axial entrance slit (item T-ENT-SLIT-S3) on the spectrograph stage and
either a commutation wheel (item T-COM-VIS-WHEEL) or a micro or macro
commutation device (T-COM-MICRO or T-COM-MACRO)
T-SINGLE-UV
Single monochromator option for UV-Visible range. Permits to enter directly the 3rd
stage. Requires an axial entrance slit (item T-ENT-SLIT-S3.) on the spectrograph stage
T-SINGLE-NIR
Single monochromator option for Visible-NIR range.(up to 1500 nm) Permits to enter
directly the 3rd stage. Requires an axial entrance slit (item T-ENT-SLIT-S3.) on the
spectrograph stage
T-RF-TILTER
Rayleigh rejection filter tilting holder
T-EDG-FILT1-XXX
Dielectric Edge filter XXX = wavelength in nm [Set of wavelengths: 229 nm, 244 nm,
257 nm, 266 nm]
T-EDG-FILT2-XXX
Dielectric Edge filter XXX = wavelength in nm [Set of wavelengths: 325 nm, 355 nm,
364 nm, 442 nm, 457 nm, 473 nm, 568 nm]
T-EDG-FILT3-XXX
Dielectric Edge filter XXX = wavelength in nm [Set of wavelengths: 488 nm, 514 nm,
532 nm, 632 nm, 752 nm, 785 nm, 830 nm]
T-SHN-FILT1-XXX
Super Notch+ filter for XXX = wavelength in nm [Set of wavelengths 473 nm, 568 nm,
752 nm, 830 nm, 860 nm, 1064 nm]
T-SHN-FILT2-XXX
Super Notch+ filter for XXX = wavelength in nm [Set of wavelengths: 442 nm, 633 nm,
647 nm, 785 nm]
T-SHN-FILT3-XXX
Super Notch+ filter for XXX = wavelength in nm [Set of wavelengths: 457 nm, 488 nm,
514 nm, 532 nm]
T- SMA-ADAPTSINGLE
Fiber adaptor on the single monochromator option mirror attachment.With SMA
connector. Allows to focus on the axial entrance slit of spectrograph stage with a 4X
magnification optics
T- FIB-ADAPTSINGLE
Fiber adaptor on the single monochromator option mirror attachment. With FC connector.
Allows to focus on the axial entrance slit of spectrograph stage with a 4X magnification
optics
2.3.2.5. Confocal microanalysis attachments and accessories/options
10/07/2009
2.3.2.5.1 Confocal microanalysis attachments
T64000 User Manual
70
T-VIS-MICRO
Visible confocal microanalysis attachment for punctual analysis delivered with:
- Laser entry attachment including laser shutter, and interference filter and half-wave plate
holders
- An XY manual mechanical stage
- A Koehler illumination for reflected white light over wide field
- An internal illumination for transmitted white light supplied with an Abbe condenser
- A revolver equipped with 3 plan achromatic objectives:
- 10X visible, NA = 0.25, WD = 10.6 mm
- 50X visible, NA = 0.75, WD = 0.37 mm
- 100X visible, NA = 0.9, WD = 0.21 mm
- White light illumination by transmission through Abbe condenser
- A high definition 1280x1024 pixels USB colour camera for simultaneously visualising the
sample under white light illumination and the laser spot
- A continuously manually adjustable confocal pinhole from several microns to 1.2 mm to
define with accuracy the size of the analysed volume.
- Coupling optics to focus the Raman beam on the entrance slit of the spectrograph (lens
system)
- A visible half wave plate and analyser on Raman beam
- A filter wheel with 6 neutral density filters (0.3, 0.6, 1, 2, 3 and 4)
T-VIS-OPEN-MICRO
Open Visible confocal microanalysis attachment for punctual analysis delivered without
any bottom frame for offering a totally free space below the objectives. Delivered with:
- Laser entry attachment including laser shutter, and interference filter and half-wave
plate holders
- An XY manual mechanical stage
- A Koehler illumination for reflected white light over wide field
- A revolver equipped with 3 plan achromatic objectives:
- 10X visible, NA = 0.25, WD = 10.6 mm
- 50X visible, NA = 0.75, WD = 0.37 mm
- 100X visible, NA = 0.9, WD = 0.21 mm
10/07/2009
- White light illumination by transmission through Abbe condenser
- A high definition 1280x1024 pixels USB colour camera for simultaneously visualising the
sample under white light illumination and the laser spot
- A continuously manually adjustable confocal pinhole from several microns to 1.2 mm to
define with accuracy the size of the analysed volume.
- Coupling optics to focus the Raman beam on the entrance slit of the spectrograph (lens
system)
- A visible half wave plate and analyser on Raman beam
- A filter wheel with 6 neutral density filters (0.3, 0.6, 1, 2, 3 and 4)
T64000 User Manual
71
T-LINE-SCANMICRO
T-UV/VIS-MICRO
Visible confocal microanalysis attachment for punctual and line scanning analysis.
Delivered with:
- Laser entry attachment including laser shutter, and interference filter and half-wave
plate holders
- Confocal Line scanning attachment including 2 scanners vibrating for illuminating a line on
sample and imaging it on the entrance slit of the spectrometer
- An XY manual mechanical stage
- A Koehler illumination for reflected white light over wide field
- An internal illumination for transmitted white light supplied with an Abbe condenser
- A revolver equipped with 3 plan achromatic objectives:
- 10X visible, NA = 0.25, WD = 10.6 mm
- 50X visible, NA = 0.75, WD = 0.37 mm
- 100X visible, NA = 0.9, WD = 0.21 mm
- White light illumination by transmission through Abbe condenser
- A high definition 1280x1024 pixels USB colour camera for simultaneously visualising the
sample under white light illumination and the laser spot
- A continuously manually adjustable confocal pinhole from several microns to 1.2 mm to
define with accuracy the size of the analysed volume.
- Coupling optics to focus the Raman beam on the entrance slit of the spectrograph (lens
system)
- A visible half wave plate and analyser on Raman beam
- A filter wheel with 6 neutral density filters (0.3, 0.6, 1, 2, 3 and 4)
UV-Visible confocal microanalysis attachment for punctual analysis. Delivered with:
- Laser entry attachment including laser shutter, and interference filter and half
- Laser entry attachment including laser shutter, and interference filter and half-wave plate
holders
- An XY manual mechanical stage
- A Koehler illumination for reflected white light over wide field
- An internal illumination for transmitted white light supplied with an Abbe condenser
- A revolver equipped with 3 plan achromatic objectives:
- 10X visible, NA = 0.25, WD = 10.6 mm
- 50X visible, NA = 0.75, WD = 0.37 mm
- 100X visible, NA = 0.9, WD = 0.21 mm
10/07/2009
- White light illumination by transmission through Abbe condenser
- A high definition 1280x1024 pixels USB colour camera for simultaneously
visualising the sample under white light illumination and the laser spot
- A continuously manually adjustable confocal pinhole from several microns to 1.2
mm to define with accuracy the size of the analysed volume.
- Achromatic coupling optics to focus the Raman beam on the entrance slit of the
spectrograph (mirror design)
- A visible half wave plate and analyser on Raman beam
- A filter wheel with 6 neutral density filters (0.3, 0.6, 1, 2, 3 and 4)
T64000 User Manual
72
T-UV/VIS-OPENMICRO
Open UV-Visible confocal microanalysis attachment for punctual analysis. Delivered
with:
- Laser entry attachment including laser shutter, and interference filter and half-wave
plate holders
- An XY manual mechanical stage
- A Koehler illumination for reflected white light over wide field An internal illumination for
transmitted white light supplied with an Abbe condenser
- A revolver equipped with 3 plan achromatic objectives:
- 10X visible, NA = 0.25, WD = 10.6 mm
- 50X visible, NA = 0.75, WD = 0.37 mm
- 100X visible, NA = 0.9, WD = 0.21 mm
- White light illumination by transmission through Abbe condenser
- A high definition 785x480 pixels USB colour camera for simultaneously visualising the
sample under white light illumination and the laser spot
- A continuously manually adjustable confocal pinhole from several microns to 1.2 mm to
define with accuracy the size of the analysed volume.
- Achromatic coupling optics to focus the Raman beam on the entrance slit of the spectrograph
(mirror design)
- A visible half wave plate and analyser on Raman beam
- A filter wheel with 6 neutral density filters (0.3, 0.6, 1, 2, 3 and 4)
T-ADAPT-MICROINV-VIS
Adaptation of an inverted IX71 inverted microscope replacing the standard BX41 model
on the spectrometer. The microscope is hardly coupled to the spectrograph on the same
work bench for maximum mechanical stability and ease of use. The standard version
includes: white light illumination by reflection and transmission, a binocular, one
condenser IX2-LWUCD/0.55 WD = 27 mm, one colour video camera on top of the
binocular, two objectives UPFL 20X/0.50 and UPFL 40X/0.75 corrected for viewing
through a slide. All standard options of IX71, including a large range of objectives, are
available on request.
T-ADAPT-MICROINV-UV
Adaptation of an inverted IX71 inverted microscope replacing the standard BX41 model
on the spectrometer. The microscope is hardly coupled to the spectrograph on the same
work bench for maximum mechanical stability and ease of use. The standard version
includes: white light illumination by reflection and transmission, a binocular, one
condenser IX2-LWUCD/0.55 WD = 27 mm, one colour video camera on top of the
binocular, two objectives UPFL 20X/0.50 and UPFL 40X/0.75 corrected for viewing
through a slide. All standard options of IX71, including a large range of objectives, are
available on request.
2.3.2.5.2 Microscope accessories
IL-TR-BXFM
White light device for illumination by transmission for BXFM microscope
IL-TR-KO-BXFM
White light Koehler device for illumination by transmission for BXFM microscope
MOT-OBJ-REV
Motorized objective revolver
2.3.2.5.3 Objectives
10/07/2009
Visible= 400-800 nm, NUV= 325-500 nm, UVB= 240-360 nm, NIR>800 nm, NA=
Numerical Aperture, WD= Working Distance, (LWD= Long Working Distance, ULWD=
Ultra Long Working Distance)
OBJ15XUVB
15X UVB objective, NA = 0.32, WD = 8.5 mm
OBJ40XUVB
40X UVB objective, NA = 0.50, WD = 1 mm
OBJ15XNUV
15X NUV objective, NA = 0.32, WD = 8.5 mm
OBJ40XNUV
40X NUV objective, NA = 0.50, WD = 1 mm
T64000 User Manual
73
OBJ60XNUVFL
60X objective, 350-950 nm, NA = 0.90, WD = 0.2 mm
OBJ5XVIS
5X visible objective, NA = 0.10, WD = 19.6 mm
OBJ10XVIS
10X visible objective, NA = 0.25, WD = 10.6 mm
OBJ50XVIS
50X visible objective, NA = 0.75, WD = 0.37 mm
OBJ100XVIS
100X visible objective, NA = 0.90, WD = 0.21 mm
OBJ50XLWDVIS
50X LWD visible objective, NA = 0.50 WD = 10.6 mm
OBJ50XULWDVIS
50X ULWD visible objective, NA = 0.45 WD = 17 mm
OBJ100XLWDVIS
100X LWD visible objective, NA = 0.80 WD = 3.4 mm
OBJ10XNIR
10X NIR objective, NA = 0.30, WD = 11 mm
OBJ50XNIR
50X NIR objective, NA = 0.80, WD = 0.5 mm
OBJ100XNIR
100X NIR objective, NA = 0.90, WD = 0.28 mm
OBJ50XLWLNIR
50X LWD NIR objective, NA = 0.55, WD = 8 mm
OBJ100XLWDNIR
100X LWD NIR objective, NA = 0.75, WD = 4.7 mm
MACRO/CH-VIS
Visible macro lens of 40 mm focal length on an horizontal exit equipped with a 10mm x
10mm cell holder for Visible range, provided with a spherical back mirror to get a
multipass effect. The signal intensity can be increased by more than a factor 3 with clear
liquids.
MACRO/CH-UV
UV macro lens of 40 mm focal length on an horizontal exit equipped with a 10mm x
10mm cell holder for UV range, provided with a spherical back mirror to get a multipass
effect. The signal intensity can be increased by more than a factor 3 with clear liquids.
2.3.2.5.4 Microscope Raman polarisation components
T-LAMBDA/2MICRO-UVB
T-LAMBDA/2MICRO-NUV
T-LAMBDA/2MICRO-VIS
T-LAMBDA/2MICRO-NIR1
T-LAMBDA/2MICRO-NIR2
T-LAMBDA/4MICRO-UVB
10/07/2009
T-LAMBDA/4MICRO-NUV
T-LAMBDA/4MICRO-VIS
T-LAMBDA/4MICRO-NIR1
T-LAMBDA/4MICRO-NIR2
T64000 User Manual
74
T-SCR-MICRO
T-POL-MICRO- UVB
T-POL-MICRO- NUV
T-POL-MICRO- VIS
T-POL-MICRO- NIR1
T-POL-MICRO- NIR2
2.3.2.5.5 Microscope Mapping Options
XY75x50
XY motorised stage, X = 75 mm - Y = 50 mm for BX41 and BXFM microscopes - step
size = 0.1 µm. Including positioning joystick, controller, computer interface card, drive
electronics and software. Allows automated positioning of samples and acquisition of
Raman maps.
T-AUTOFOC-VIS-P
Visible autofocus device (400 nm - 800 nm) to be used with a Piezo stage. Including the
necessary opto-mechanical attachment and detection system for controlling the focus at
the surface of the sample with accuracy and speed. Ideal for automated mapping analysis
of rough samples. Requires one of the piezo stages described hereafter.
10/07/2009
Visible autofocus device (400 nm - 800 nm) to be used with a motorized Z stage.
Including the necessary opto-mechanical attachment and detection system for controlling
T-AUTOFOC-VIS-M the focus at the surface of the sample with accuracy and speed. Ideal for automated
mapping analysis of rough samples. Only required when no autofocus for a piezo stage is
included. Requires a motorized Z stage.
T-AUTOFOC-UV-P
UV autofocus device (330 nm - 360 nm) to be used with a Piezo stage. Including the
necessary opto-mechanical attachment and detection system for controlling the focus at
the surface of the sample with accuracy and high speed. Ideal for automated mapping
analysis of rough samples. Requires one of the piezo stages described hereafter.
T-AUTOFOC-UV-M
UV autofocus device (330 nm - 360 nm) to be used with a motorized Z stage. Including
the necessary opto-mechanical attachment and detection system for controlling the focus
at the surface of the sample with accuracy and high speed. Ideal for automated mapping
analysis of rough samples. Only required when no autofocus for a piezo stage is included.
Requires a motorized Z stage
T-PIEZOZ100
Piezo Z stage. Maximum Z displacement = 80 µm (+/-40µm) including a servo control
loop for maximizing precision of positioning. The minimum step size and precision is 0.1
micron. The unit is screwed on the microscope objective revolver and is compatible with
all the objectives. Requires an IEEE card
T-PIEZOZ350
Piezo Z stage. Maximum Z displacement = 300 µm (+/-150µm) including a servo control
loop for maximizing precision of positioning. The minimum step size and precision is 0.1
micron. The unit is screwed on the microscope objective revolver and is compatible with
all the objectives. Requires an IEEE card
T-ZMOT
Micrometric motorised Z stage: the maximum distance of movement depends on the
objective working distance. The minimum step size is 0.5 micron. The movement is
controlled by software or by joystick. Requires a motorized XY stage
T-ZMOT-ELEC
Micrometric motorised Z stage: the maximum distance of movement depends on the
objective working distance. The minimum step size is 0.5 micron. The movement is
controlled by software or by joystick. To be ordered when no XY motorized stage is
included in the configuration
2.3.2.5.6- Microscope Off-Axis Option
T64000 User Manual
75
Off-axis Laser illumination system. Laser is directed onto the sample from the T64000 coupling
optics and not through the microscope objective allowing a higher rejection of the reflected laser
T-OFF AXIS-ILLUM
beam on sample. Angle is adjustable between approximately 90° and 65°. Signal collection via a
microscope objective 50XULWD and excitation via a lens of 15.8mm focal length
2.3.2.6. Macro sample attachment
Will not require the laser entry attachment (item T-LAS-ENTRY) and the macro/micro
entry swing away mirror (item T-MACMIC) when there is no microscope. The entry of
the laser will then be directed at level of the chamber axis and will only require the shutter
and filter attachment (item T-MACRO-ENTRY)
T-MACRO-VIS
Visible macro sample chamber. Permits to excite the sample under variable angle from
90° to back scattering.
- XYZ sample holder
- solid sample plattform
- analyser and half wave plate on collecting beam
- glass collection optics F = 80 mm and glass focusing optics F = 100 mm
- back scattering mirror
(does not include back collecting mirrors and Liquid cell with holder)
T-MACRO-UV
UV-Visible macro sample chamber. Permits to excite the sample under variable angle
from 90° to back scattering.
- XYZ sample holder
- solid sample plattform
- analyser and half wave plate on collecting beam
- silica collection optics F = 80 mm and silica focusing optics F = 100 mm
- back scattering mirror
(does not include back collecting mirrors and liquid cell with holder)
T-MACROPERISCOPE
Laser periscope for lifting the beam of a laser installed at the front of the system up to the
level of the entrance axis of the macrochamber
T- MACRO-ENTRY
Macrochamber attachment with laser shutter, interference filter and half wave plate
holders. To be used at entrance of the macrochamber when no laser entry (T-LASENTRY) is on the system
T-FOC-LENS-200
Macrochamber glass focusing optics F = 200 mm
T-FOC-LENS-150
Macrochamber glass focusing optics F = 150 mm
T-FOC-LENS-30
Macrochamber glass focusing optics F = 30 mm
T-COL-LENS-160
Macrochamber glass collection optics F = 160 mm
T-COL-LENS-30
Macrochamber glass collection optics F = 30 mm
T-BACK-COL-MIR
Macrochamber back collecting mirrors
T-CELL-HOLDER
Macrochamber liquid cell holder (liquid cell not included)
T-FURNACE
10/07/2009
T-GONIO
Macrochamber furnace for solid samples (up to 400°C)
Macrochamber goniometric head
T-CAPILLARY
Macrochamber capillaries holder (diameter below 2 mm) and tube holder (diameter 6 mm)
T-SCRAMBLER
Macrochamber scrambler in its holder
T-GAS CELL
Macrochamber gas cell (windows perpendicular to laser beam)
T-SPIN CELL
Macrochamber spinning cell for powers and liquids
T-METTLER TUBES Macrochamber package of 150 Mettler tubes
T64000 User Manual
76
T-LIQUID CELL
Macrochamber liquid cell 0.3 cc
2.3.3 Electronics extensions
T-COM CARD
T- MONO CARD
Commutation card with cables
Monochannel detection card and necessary cables including a high voltage power supply
programmable from 0 up to 2000 V and a photon counting acquisition module with cable
2.3.4 Monochannel detection system parts
T-PMTADAPT
Adaptor on axial exit slit of spectrograph stage for LCT50 PMT housing
T-AMPDISC
Amplifier discriminator and cable
T-ASGA PMT
AsGa photocathode PMT (noise below 10 cps) (PN 43.921.349)
T-PMT HOUSING
PMT cooled housing
2.3.5 Computerization of system
T-COMPUTER
T-PRINTER
Pentium Computer
Color printer with cable
10/07/2009
2.3.6 Multichannel/CCD detectors
T-TE-0E-1024x256
MPP (MultiPin Phase) air cooled open electrode 1024x256 pixels CCD. Working from
200 up to 1050 nm with a quantum efficiency > 30% between 500 nm and 800 nm. Pixel
size: 26 x 26 µm. Chip size: 26.6 x 6.7 mm. Typical read out noise: 4 ē/pixel. Dark noise:
< 0.002 ē/pixel/sec at -70°C
T-TE-BIUV2048x512
MPP air cooled UV-Visible Back Illuminated 2048x512 pixels CCD. Working from 220
up to 700 nm with a quantum efficiency > 40% between 220 and 400 nm and > 60%
above. Pixel size: 13,5 x 13,5 µm. Chip size: 27,65 x 6,91 mm. Typical read out noise: 3
ē/pixel. Dark noise: < 0.002 ē/pixel/sec at -70°C
T-LN-OE-1024x256
MPP LN2 cooled open electrode 1024x256 pixels CCD. Working from 200 nm to 1050
nm with a quantum efficiency > 40% between 200 nm and 900 nm. Pixel size: 26 x 26 µm.
Chip size: 26.6 x 6.7 mm. Typical read out noise: 4 ē/pixel. Typical dark noise: 0.5 ē/
pixel/hr at -133°C. Including a 3L LN2 Dewar for 72hr autonomy.
T-LN-BIDD1024x256
MPP LN2 cooled Back Illuminated Deep Depleted 1024x256 pixels CCD. Working from
300 nm to 1050 nm with a quantum efficiency of 90% at 800nm and > 60% between 500
nm and 900 nm. Pixel size: 26 x 26 µm,. Chip size: 26.6 x 6.7 mm. Typical read out noise:
4 ē/pixel. Typical dark noise: 2 ē/pixel/hr at -133°C. Including a 3L LN2 Dewar for 72hr
autonomy.
T-LN-BIUV1024x256
MPP LN2 cooled Back Illuminated 1024x256 pixels CCD. Working from 200 nm to 700
nm with a quantum efficiency > 50% between 250 nm and 700 nm. Pixel size: 26 x 26 µm.
Chip size: 26.6 x 6.7 mm. Typical read out noise: 5 ē/pixel. Typical dark noise: 0.3 ē/
pixel/hr at -133°C. Including a 3L LN2 Dewar for 72hr autonomy.
T-LN-BIUV2048x512
MPP LN2 cooled Back Illuminated 2048x512 pixels CCD. Working from 200 nm to 700
nm with a quantum efficiency >50% between 250 nm and 700 nm. Pixel size: 13.5 µm.
Chip size: 27.65 x 6.91 mm. Typical read out noise: 3 ē/pixel. Typical dark noise: 0.3 ē/
pixel/hr at -133°C. Including a 3l LN2 Dewar for 72hr autonomy.
T-LN-IGA512x1-50
LN2 cooled Linear InGaAs array detector of 512 pixels. Working from 800 nm to 1550
nm with a quantum efficiency of 80% between 1000 nm and 1500 nm. Pixel size: 50 µm x
500 µm. Array length: 25.60 mm. Read out noise: 900-1000 ē/pixel (High Sensitive Mode
(HiS)) or 9000-10000 ē rms (High Dynamic Range Mode (HiD)). Fixed pattern noise: <
1,5 kē /sec at 133 °C. Including a 3L LN2 Dewar for 72hr autonomy.
T64000 User Manual
77
T-SHUTTER
Additional CCD shutter (required on every other entrance slit)
10/07/2009
T-ADDSHUTTER
CCD shutter mounted on axial entrance slit supplied with electronics (23880142) and
cable (41195032)
T64000 User Manual
78
CHAPTER 4
Index
Numerics
1st Stage Lateral Entrance Slit 35
2nd Stage Manual Axial exit Slit 37
A
Accessories (table) 25
Accessories and options (list) 66
Appendix 66
Axial Entrance Slit 36
Axial Exit 38
Axial exit Slit 37
B
Back Illuminated CCD 46
Back-scattering Macroanalysis System (using) 62
C
caps for microscope 8
CCD Detector 45
CCD sensors 45
Cleaning Instructions 34
Commutation Wheel for Visible Range 39
Composition 19
Confocal feature 55
Confocal Microanalysis System 40
Confocal principle 55
Contents 16
D
10/07/2009
Density filters wheel 10
Description 21
Description (detailed) 34
Detailed Description 34
Dimensions 33
DM302 preamplifier/discriminator device 47
Double Additive Adaptation 37
E
Electrical specifications 32
EMP 10
T64000 User Manual
Entrance Commutation for UV-VIS Range 39
Entrance Slit 35
Environmental conditions 34
F
filters wheel 10
G
Getting Started 51
Glass wearing 10
Grounding 33
H
Hardware Foresights 51
High Voltage Card 47
I
indicators 9
Installation 19
Interconnection 27
Intermediate Slit Motorization 35
K
Key (laser safety) 9
L
labels (safety) 11
Labels location 14
LabSpec Software 22
Laser path 14
Laser Radiation Safety 6
Laser Safety Key 9
Laser source max power 10
Lateral Entrance Slit 36
LCT50 47
LCT50 dimensions 49
LCT50 housing adapter 48
LCT50 Optical Adaptation 48
79
M
Macroanalysis System 42
Macroanalysis System (using) 58
Macrochamber 42
Micro/Macro Mirror 40
Micro/Macro/Single/Triple 39
Microanalysis System (Using) 53
Microscope general presentation 41
microscope safety 8
Mirror 40
Monochannel Detection System 47
Monochromator 26
N
shutter (safety) 10
Software Installation 19
Specifications 29
SpectraLink 22, 27
Spectrograph 26
Spectrograph Axial Exit 38
Stokes/Antistokes accessory 44
Storage 34
Subtractive configuration 26
System Installation 18
System use 52
T
Nitrogen supply 21
temperature stability 52
temperature variation 52
Two-Grating Turret Motorization 44
O
V
Operating Defects 19
Operating temperature 34
Optical Diagram 26
Optical Diagram (table) 24
Optical specifications 29
Options and Accessories 66
Overall Dimensions 33
Viewers 38
W
Warranty 4
Water Supply 20
Weight 33
P
Packaging 18
PCN01 photons counting card 47
Photomultiplier Tube Principle 49
Photon 47
Photon Counting Detection System 47
R
Reliability 51
Reproducibility 52
Requirements 19
10/07/2009
S
safety 5
safety labels 11
safety requirements 8
Safety shutter 10
T64000 User Manual
80