1
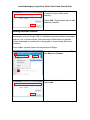
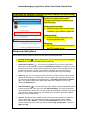
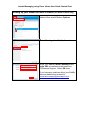
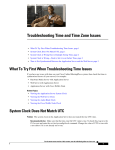
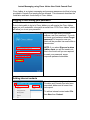
Instant Messaging using Cisco Jabber User Guide Canada Post Cisco Jabber is an instant messaging and presence awareness tool that is being provided to Canada Post employees on demand. This document describes the installation and basic functionality of Cisco Jabber. Logging in and setting your password Prior to being able to log in to Cisco Jabber you will receive the Cisco Jabber agent on your workstation, along with an email from “CPG Cisco Jabber” which will allow you to set your password. At your first login enter your email address, and your password. If you do not know your password select Forgot password? to request a new one, which will be provided via email within a few minutes. NOTE: If you select Sign me in when Jabber starts you will not need to do this in the future until you are required to reset your password, as per corporate password standards. Adding internal contacts Internal contacts include users from Purolator and Canada Post who have requested Jabber and all users from Innovapost. To add an internal contact select File then New then Contact. Instant Messaging using Cisco Jabber User Guide Canada Post Either add a contact by email address or search for the contact in the directory. Select Add. Repeat these steps to add additional contacts. Adding external contacts External contacts are those using either a public XMPP compliant instant messenger, such as Google Talk or a federated on premise instant messenger, such as Lync or Communicator (back end work to federate the on premise instant messenger is needed prior to being able to communicate with these contacts). Cisco Jabber currently does not interoperate with Skype. To add an external contact select File then New then Contact. Enter the contacts email address. Select Add. Instant Messaging using Cisco Jabber User Guide Canada Post Searching for contact (Contacts and recents, Address book and Directory) When you search for a contact up to 3 sections will appear with names (Contacts and recents, Address book and Directory). Contacts and recents: Includes recent email contacts and contacts in your Jabber contact list. Address book: Includes contacts that are in your Outlook address book. Directory: Will include contacts that are part of the CPG Jabber cloud. Advanced chat options Cisco Jabber offers a number of advanced chat options as described below. Desktop Sharing ( ) – Start a chat with one of your contacts and select the Desktop Sharing icon to share your desktop (peer to peer only). Send Screen Capture ( ) - You can send a snapshot of your screen to the person with whom you are chatting by clicking the Send Screen Capture icon (When you click this icon, you will see a screen capture selection tool appear. Click and drag to select a portion of your screen. The area you selected is added to your chat window as a picture. You can then send this picture to the person with whom you are chatting. Edit Font ( ) - You can change your font, text color, font size, and use other rich text options while chatting if you wish. Basic rich text options, such as italics and bold, can be used through standard keyboard shortcuts (i.e. Ctrl+B for bold, Ctrl+I for italitics, etc.). You can also select these options and make other changes to your font by clicking the Edit Font icon. Add Participants ( ) - You can add other Cisco Jabber users as participants thereby creating a group chat if you wish. Click the Add Participants. Then type the person's name and add them to the chat. The chat window is immediately converted into a group chat, but Cisco Jabber waits for the new participant to accept the chat before adding that person to the chat window. Sounds - By default, Cisco Jabber will play a sound to alert you when you receive a new incoming chat. You can change this setting, through the main Cisco Jabber window. Click File > Options... and then click Sounds/Alerts on the left. Turn off sounds, remove the check mark from the box labeled Play sounds when: Then click Apply and OK. Instant Messaging using Cisco Jabber User Guide Canada Post Setting up your WebEx account in Jabber (for WebEx users only) To setup your WebEx information within the Jabber client select File then Options. Select Meetings then Set Up Account. Enter your user ID, WebEx password and login URL as received via an email from Conference Support. Select OK twice. If you have any questions about your WebEx account please send an email to [email protected]