1
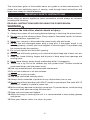
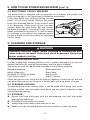
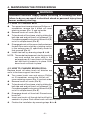
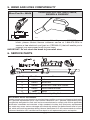
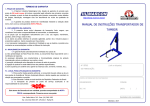
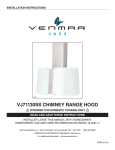
DELUXE ELECTRIC POWER BRUSH MODEL: 30635615 ! FOR HOUSEHOLD USE ONLY ! AB0008 HOMEOWNERS OPERATING INSTRUCTIONS READ AND SAVE THESE INSTRUCTIONS Venmar Ventilation ULC, Drummondville, Québec 1-844-670-2334 Register your product online at: www.venmar.ca 30042511A The instructions given in this booklet serve as a guide to routine maintenance. To obtain the most satisfying years of service, read through these instructions and keep them handy for future reference. IMPORTANT SAFETY INSTRUCTIONS When using an electric appliance, basic precautions should always be followed, including the following: READ ALL INSTRUCTIONS BEFORE USING THE POWER BRUSH. WARNING ! To reduce the risk of fire, electric shock or injury: 1. Always turn power off and unplug before cleaning or servicing the power brush. 2. Do not pick up the following items: Sharp objects, flammable liquids, hot ashes, burning matches, cigarettes, etc. 3. Never use, connect or disconnect the power brush with wet hands. 4. Do not use with damaged power plug or plug pins. If the power brush is not working properly, contact your local supplier or service agent. The problem may be covered under the warranty. 5. Do not put objects into the brush opening. 6. Do not use with brush opening or air channel blocked. Keep free of dust, hair, etc. 7. Keep hair, loose clothing, fingers and all parts of body away from openings and moving parts. 8. Never leave electric power brush unattended while it is plugged in. 9. This is not a toy. Do not let children play with power brush. Children should be supervised when near the power brush. 10. Use only manufacturer’s recommended attachments. 11. Do not use outdoors or on wet surfaces. 12. Do not use to pick up water. 13. Use extra care when cleaning stairs. 14. Always check underside of product for any obstructions prior to use. 15. Do not use without dust bag (with 500VF model) or permanent filter (with 600 VF and 650VF models) in place in power unit. 16. Motor shaft can become hot during normal use. To prevent burns, avoid touching the motor shaft when servicing the drive belt. 17. Keep your work area well lighted. 18. When servicing or cleaning the unit, it is recommended to wear safety glasses and gloves. 19. Store your cleaner indoor in a clean, dry area. -2- 1. HOW TO ASSEMBLE POWER BRUSH/WAND/HANDLE Read important safety instructions before installing power brush. Ensure hose is disconnected from power supply before installing power brush. Push wand into power brush neck so that the HOSE HANDLE lock button snaps in place. Connect hose handle into wand quick connector and ensure that the prongs are aligned with the receptacle holes. Push until lock button snaps in place. RECEPTACLE LOCK BUTTON WAND TO POWER BRUSH CONNECTION PRONGS QUICK CONNECTOR LOCK BUTTON POWER BRUSH NECK HEIGHT ADJUSTMENT PEDAL WAND RELEASE PEDAL WAND POWER BRUSH NECK RELEASE PEDAL WAND GRIP AO0078 HOSE HANDLE TO WAND CONNECTION HOSE HANDLE LOCK BUTTON RECEPTACLE LOCK BUTTON PRONGS POWER BRUSH HOSE HANDLE RELEASE BUTTON WAND AO0021 AO0019 WAND & HOSE COMPATIBILITY See Section 5 on page 7 for wand and hose compatibility table. ? AD0028 -3- 2. HOW TO USE POWER BRUSH/WAND CAUTION Always pick up hard or sharp objects by hand before using your power brush. Items such as pins, hairpins, tacks, crayons, etc., may damage the brush roll or may break the belt. 2.1 WAND RELEASE The power brush is not recommended for use on bare floors. Wand release pedal (A) on power brush allows you to quickly disconnect wand and switch to combination floor/rug tool for use on bare floors. A C 2.2 POWER BRUSH NECK RELEASE B CAUTION Always unlock brush neck before use. Push down power brush neck release pedal (B) to unlock brush neck. Return the neck to the upright position for storage. AO0020 2.3 POWER BRUSH HEIGHT ADJUSTMENT FLOOR HEIGHT The icons (D) refer to the carpet pile height. Select height by depressing height adjustment pedal (C) to desired position: (Extra-Low), (Low), (Medium) or (High). HEIGHT ADJUSTMENT LED INDICATORS The LEDs show the carpet pile covered by the selected height, e.g.: when (High) is selected, all LEDs will be lit, since this height covers all pile heights. So if (Extra-Low) is selected, only the lowest LED will be lit. D AD0022 E 2.4 WAND LENGTH ADJUSTMENT Extend (E) or shorten (F) the wand to comfortable work position by holding the wand grip (G) in one hand and sliding the upper section (the one with the prongs) with the other hand. F G AD0024 AD0023 2.5 EDGE CLEANER Brush extends full width for effective edge cleaning along both sides of nozzle. To operate, simply run cleaner along edge board. Rubber bumper protects furniture and baseboards. -4- 2. HOW TO USE POWER BRUSH/WAND (CONT’D) 2.6 ELECTRONIC CIRCUIT BREAKER The power brush is equipped with an electronic circuit breaker that protects the motor and the belt if a too large object is picked up accidentally. If the power brush stops while vacuuming, turn the power unit off using handle. Release the power brush from the wand and turn it over to see if there is an obstruction. When brush roll jam has been cleared, press the reset button (H) and connect the power brush back to the wand. Finally, turn the power unit/power brush back on. If it fails to restart or continues to trip without any apparent reason, AD0030 H the power brush must be serviced by an authorized service center. 3. CLEANING AND STORAGE ! WARNING Disconnect electrical supply before servicing or cleaning the unit. Failure to do so can result in electrical shock or personal injury from cleaner suddenly starting. 3.1 CLEANING BRUSH ROLL In order to keep high cleaning efficiency and to prevent damage to your vacuum cleaner, the brush roll must be cleaned every time the belt is changed. The brush roll must also be cleaned according to the following schedule: VACCUM CLEANER USE CLEAN BRUSH ROLL Heavy (used daily) Every week Moderate (2-3 times per week) Every month Light (once a week) Every 2 months Check and remove hair, string and lint build-up frequently in the brush roll and end cap areas. Remove any dirt or debris in the belt path and in the brush roll areas. 3.2 CLEANING HOUSING To keep the power brush housing clean, it can be wiped with a damp cloth and a mild soap solution, then thoroughly dried. Never use any type of chemical as they can damage the housing. 3.3 STORAGE Ensure that hose and power cord are disconnected from wall inlet before unplugging power brush. Disconnect hose handle from wand. Always keep hose neatly coiled when not in use. When not in use, the power brush should be stored in a clean, dry place. -5- 4. MAINTAINING THE POWER BRUSH ! WARNING Disconnect electrical supply before servicing or cleaning the unit. Failure to do so can result in electrical shock or personal injury from cleaner suddenly starting. 4.1 HOW TO CHANGE BELT Turn power brush over and using a Phillips no. 2 FIG. 1 screwdriver, remove the 3 brush roll cover retaining screws (FIG. 1) and set aside. Remove brush roll cover (FIG. 2). To free brush roll from base, start by sliding the belt side end and pull brush roll sideways (1). Once disengaged from housing, lift brush roll (2) AB0010 out of its compartment (FIG. 3). Disengage brush roll from worn belt and extract FIG. 2 the belt from motor shaft by a twisting motion in the enlarge area (I) specifically made for that purpose (FIG. 4). Install new belt by reversing steps to . NOTE: To ease belt replacement, start by inserting one end around the motor shaft in the enlarged area (I). Insert brush roll through AB0011 belt until belt is seated in its place. Push down brush roll back in place. RETAINING SCREWS BELT BRUSH ROLL FIG. 3 4.2 HOW TO CHANGE BRUSH ROLL Replace brush roll when brush roll brissles are 2 worn to the base support bars level. Turn power brush over and using a Phillips 1 no. 2 screwdriver, remove the 3 brush roll cover retaining screws (FIG. 1) and set aside. AB0012 Remove brush roll cover. (FIG. 2). To free brush roll from base, start by sliding the FIG. 4 belt side end and pull brush roll sideways (1). I Once disengaged from housing, lift brush roll (2) out of its compartment (FIG. 3). Disengage brush roll from belt. Discard worn brush roll. AB0013 Insert new brush roll through belt until belt is seated in its place. Push down brush roll back in place. Finalise the installation by reversing steps to . -6- 2 5. WAND AND HOSE COMPATIBILITY VACUUM HOSE PART NOS. 09007, 09008, BN32DV & 306330DV WAND PART NO. 08949 AD0037 AD0038 NOTE: If your dual voltage hose is not compatible with your new 30635615 power brush, please contact Venmar customer service at 1-844-670-2334 to receive a free electrical cord (part no. CRD400-01) that will enable you to connect your new power brush to your hose. IMPORTANT: Do not return the brush to your retail store. 6. SERVICE PARTS 3 1 4 2 5 AA0002 KEY NO. PART NO. 1 09234 Belt DESCRIPTION 2 09233 Brush Roll 3 09236 Brush Roll Cover with Screws 4 09235 Wand Release Pedal 5 18651 Wand Order Service Parts by “Part No.”, not by “Key No.” REPLACEMENT PARTS AND REPAIRS In order to ensure your unit remains in good working condition, you must use Venmar Ventilation ULC genuine replacement parts only. Venmar Ventilation ULC genuine replacement parts are specially designed for each unit and are manufactured to comply with all the applicable certification standards and maintain a high standard of safety. Any third party replacement part used may cause serious damage and drastically reduce the performance level of your unit, which will result in premature failing. Venmar Ventilation ULC also recommends to contact a Venmar Ventilation ULC certified service depot for all replacement parts and repairs. -7- 7. SERVICE INFORMATION To avoid unnecessary service calls, check the belt and brush roll often. Replace the belt if it is stretched or cracked. Clean the brush roll bristles when they are wrapped with thread and hairs. Build-up could cause the brush to rotate unevenly. The model number and serial number are indicated on the rating label located underneath the power brush. Always refer to these numbers when inquiring about service. NOTE: The motor is permanently lubricated and sealed. Do not oil the motor at any time. 8. WARRANTY VENMAR VENTILATION ULC ONE YEAR LIMITED WARRANTY Venmar Ventilation ULC warrants to the original consumer purchaser of its products that such products will be free from defects in materials and workmanship for a period of one (1) year from the date of original purchase. THERE ARE NO OTHER WARRANTIES, EXPRESSED OR IMPLIED, INCLUDING, BUT NOT LIMITED TO, IMPLIED WARRANTIES OF MERCHANTABILITY OR FITNESS FOR A PARTICULAR PURPOSE. During this one-year period, Venmar Ventilation ULC will, at its option, repair or replace, without charge, any product or part which is found to be defective under normal use and service. THIS WARRANTY DOES NOT APPLY TO CONSUMABLES SUCH AS BELT OR BRUSH ROLL. This warranty does not cover (a) normal maintenance and service or (b) any products or parts which have been subject to misuse, negligence, accident, improper maintenance or repair (other than by Venmar Ventilation ULC or an authorized representative), faulty installation or installation contrary to recommended installation instructions. The duration of any implied warranty is limited to the one-year period as specified for the express warranty. VENMAR VENTILATION’S OBLIGATION TO REPAIR OR REPLACE, AT VENMAR VENTILATION’S OPTION, SHALL BE THE PURCHASER’S SOLE AND EXCLUSIVE REMEDY UNDER THIS WARRANTY. VENMAR VENTILATION ULC SHALL NOT BE LIABLE FOR INCIDENTAL, CONSEQUENTIAL OR SPECIAL DAMAGES ARISING OUT OF OR IN CONNECTION WITH PRODUCT USE OR PERFORMANCE. This warranty supersedes all prior warranties. Warranty service is to be completed by an authorized Service Center designated by Venmar Ventilation ULC. Where applicable, in home service will be made available only in areas where a contracted service provider offers service. If in home service is not available, the product will be repaired or replaced, at Venmar Ventilation’s discretion, by the nearest authorized service provider.The unit removal and reinstallation works are under the customer responsibility, and Venmar Ventilation ULC cannot be charged for them. To qualify for warranty service, you must (a) notify Venmar Ventilation ULC at the address or telephone number stated below (b) give the model number and part identification and (c) describe the nature of any defect in the product or part. At the time of requesting warranty service, you must present evidence of the original purchase date. IF YOU NEED ASSISTANCE OR SERVICE: For the location of your nearest Venmar Ventilation ULC authorized Service Center: Dial Toll Free: 1-844-670-2334 Please be prepared to provide: Product model number • Date and proof of purchase • The nature of the difficulty Venmar Ventilation ULC, 550 Lemire Blvd., Drummondville, Québec J2C 7W9 www.venmar.ca Released March 2015 Product specifications subject to change without notice. -8-