1
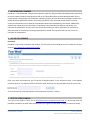
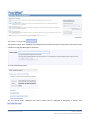
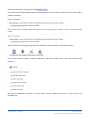
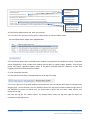
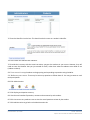
PeerWise Instructor User Guide
Updated: 2013 Oct-08 by Teaching & Learning Services
Contact: [email protected]
What’s Inside
1
Introducing PeerWise ................................................................................................................. 1
2
Access to PeerWise .................................................................................................................... 1
3
Step-by-Step Example ................................................................................................................ 1
1A. LOGIN TO THE UNB PEERWISE SITE ...................................................................................................................................... 1
2A. CREATE A COURSE. ............................................................................................................................................................. 2
3A. UPLOAD STUDENT IDENTIFIERS. ............................................................................................................................................ 3
4A. PROVIDE YOUR STUDENTS WITH INSTRUCTIONS FOR ACCESSING YOUR PEERWISE COURSE. ............................................................... 4
5A. CUSTOMIZE THE QUESTION EDITING PANE. .............................................................................................................................. 5
6A. CREATE A QUESTION TAG. ................................................................................................................................................... 5
7A. PROVIDE AN INSTRUCTOR WITH ADMINISTRATOR ACCESS TO YOUR COURSE. .................................................................................. 6
8A. YOUR COURSE IS SETUP. ...................................................................................................................................................... 7
9A. MODERATE YOUR COURSE. .................................................................................................................................................. 7
4
Quick Tips .................................................................................................................................. 8
This document complements 6 other components available through the Instructional Technology Lab at UNB.
They include: (1) a simple online Demo of PeerWise in use from a student perspective and (2) a guide for using
the demo (3) a checklist for integrating PeerWise into your course (4) instructions for formulating quality
questions (5) suggestions for assessment and frequency of use (6) rationale for using PeerWise.
Instructional Technologies Lab
Center for Enhanced Teaching and Learning
Room 249, Marshall d’Avray Hall
1 INTRODUCING PEERWISE
PeerWise is a free web-based, multiple choice question repository, where students develop questions pertaining
to course content. Students create questions with up to 5 plausible answers and provide explanations for the
correct answer. The questions can include text, equations, graphs, chemical formulae and images. Students also
answer questions submitted by others. Once they have done so, they see which answer option is listed as
correct, the distribution of the responses contributed to date and an explanation of the answer. Additionally,
students can request help from the author of a question, rate the question for difficulty and quality, and
comment on the question. Only the instructor can see the name of the author of questions or comments to
allow the option of intervening if anything inappropriate is posted. The instructor does not edit, correct or
comment on the questions.
2 ACCESS TO PEERWISE
Instructors
PeerWise is free to both instructors and students. The first time you use PeerWise you must create an instructor
account: http://peerwise.cs.auckland.ac.nz/join/
Enter your name and UNB email, and “University of New Brunswick” as the institution name. Press Request
Instructor Account. You will be emailed a verification code, which you can copy and paste onto the next screen.
Your account will be created and details will be emailed to you within 1-2 days.
3 STEP-BY-STEP EXAMPLE
1A. Login to the UNB PeerWise site at: http://peerwise.cs.auckland.ac.nz/at/?unb_ca. Use the username and
password provided in the email from PeerWise (after you register it takes about 1-2 days to receive the email).
PeerWise User Guide
printed 2013-Nov-13, 3:55 PM
page 1 of n
Created: 2013 Oct-01
Updated: 2013-Oct-82013 Oct-082013 Oct-082013 Oct-08
2A. Create a course. Click
.
2B. Choose a course name. PeerWise recommends that you include the term and semester in the name for easy
reference if using PeerWise again in the future.
2C. Click Preview new course.
2D. The course name, institution and course creator will be displayed. If everything is correct, click
.
PeerWise User Guide
printed 2013-Nov-13, 3:55 PM
page 2 of n
Created: 2013 Oct-01
Updated: 2013-Oct-82013 Oct-082013 Oct-082013 Oct-08
3A. Upload student identifiers.
Your course will be displayed as a pending course, until you setup the identifiers. When a student wishes to
access your course on PeerWise, they will first need to provide one of the "student identifier" values that you
have associated with the course. This will allow you to track the participation of your students. Students only
need to enter this identifier value one time - when they register a new PeerWise account (if they have never
used PeerWise before), or when they select "Join course" from the Home menu (if they have used PeerWise
before). These identifiers can be absolutely any values at all, provided that they allow you to uniquely identify
each student. Student IDs are recommended. To add identifiers. Click Upload identifier list.
Enter your identifiers (student
ids) here. 1 per line. Can copy
and paste.
Course ID Number: Students
will need this number to access
the course.
Customize the instructions you
would like students to see when
they join your PeerWise course.
Ex: Enter your student id.
3B. Click
.
3C. Confirmation that the identifiers have been added will be displayed. This should be the same as the number
of students in your course.
PeerWise User Guide
printed 2013-Nov-13, 3:55 PM
page 3 of n
Created: 2013 Oct-01
Updated: 2013-Oct-82013 Oct-082013 Oct-082013 Oct-08
3D. Scroll to the bottom of the page and click
.
Your course will now be displayed under the heading Active Courses. Note the Course ID that you will need to
provide to students.
4A. Provide your students with instructions for accessing your PeerWise course. Click your course
name.
4B. At the bottom of the page you will find links to different areas of PeerWise. Click Administration.
4C. You will see three columns: Students, Questions, and Course. Under Course, click View instructions for
students.
4D. Copy the displayed instructions to a place where all your students can access it (a class email or on
Desire2Learn).
PeerWise User Guide
printed 2013-Nov-13, 3:55 PM
page 4 of n
Created: 2013 Oct-01
Updated: 2013-Oct-82013 Oct-082013 Oct-082013 Oct-08
Link to PeerWise
Registration.
Course ID Number:
students will need
when registering.
Prompt: This will display
the customized prompt
asking for student ID’s.
4E. Click Back to Administration tab, when you are done.
5A. Customize the question editing pane. Under Courses, click Choose editor Profile.
5B. The different editors that are available when students create questions in PeerWise are shown. The default
option (highlighted in blue) includes basic editing and the ability to upload images. However, some subject
matter may require a graphical equation editor, or the ability to upload videos for a question, or both. Click
Complete to allow full functionality for students.
5C. Click Save profile selection.
5D. Click Administration from the breadcrumbs bar at the top of the page.
6A. Create a Question Tag. When students create questions, they can indicate which topics it is relevant to by
assigning tags. As the instructor, you can predefine some of the tags that you expect students might want to
use. Example: If a course has several units, you could create a tag for each unit name. Under Courses, click
Define Course Tags.
6B. Enter one tag per line, without spaces. The example below shows the tags that might be used in an
Introductory Psychology course.
PeerWise User Guide
printed 2013-Nov-13, 3:55 PM
page 5 of n
Created: 2013 Oct-01
Updated: 2013-Oct-82013 Oct-082013 Oct-082013 Oct-08
6C. Optional: Restrict students from creating their own tags by unchecking the box: Allow students to create
their own tags.
6D. Click Update tags for this course (to save your tags).
6E. Click Administration from the breadcrumbs bar at the top of the page.
7A. Provide an instructor with administrator access to your course. Make sure you are in the
Administration area. Under Students, click Display user list for this course.
7B. Students that have claimed an identifier, as well as current administrators and their identifiers will be
displayed. Click Edit administrator identifiers.
PeerWise User Guide
printed 2013-Nov-13, 3:55 PM
page 6 of n
Created: 2013 Oct-01
Updated: 2013-Oct-82013 Oct-082013 Oct-082013 Oct-08
7C. Enter the identifier into the box. This should not be the same as a student’s identifier.
7D. Click Create new administrator identifier.
7E. Provide the instructor with the same instructions you gave the students in your course. However, they will
need to enter the identifier that you just created for them, rather than what the students were asked to use
(student numbers).
8A. Your course is setup. Students can begin posing and responding to questions using PeerWise.
9A. Moderate your course. There may be too many questions to follow them all. You may just want to track
total participation.
9B. Click Administration.
9C. Click Display participation summary.
9D. View the total number of questions, answers and comments by each student.
9E. Click view next to any students name to view the actual questions written by the student.
9F. Click Administration to go back to the Administration tab.
PeerWise User Guide
printed 2013-Nov-13, 3:55 PM
page 7 of n
Created: 2013 Oct-01
Updated: 2013-Oct-82013 Oct-082013 Oct-082013 Oct-08
4 QUICK TIPS
Assessment
The PeerWise website suggests motivating your students to use the program by assigning a participation mark
between 2-5%. They suggest requiring students to author 1-2 questions and respond to 20 questions. Of course
this will depend on your class size. Requiring your students to author too many questions may result in lower
quality questions.
Badging
PeerWise has a badging system with three levels of badges basic, standard and elite. Students earn badges for
writing questions, responding to questions, commenting on questions, providing feedback, helping to improve
answers to questions among other things. Requiring students to acquire a number of badges from each of the
three levels, can also be included in a participation mark, but may also be intrinsically motivating to the student.
PeerWise User Guide
printed 2013-Nov-13, 3:55 PM
page 8 of n
Created: 2013 Oct-01
Updated: 2013-Oct-82013 Oct-082013 Oct-082013 Oct-08