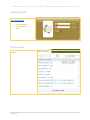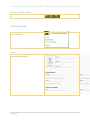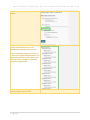
1
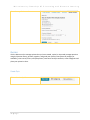
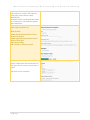
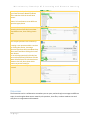
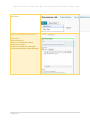
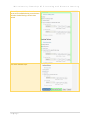
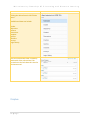
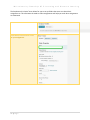
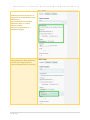
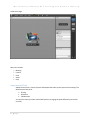
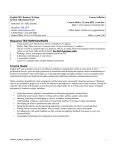
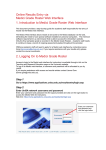
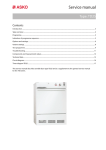
MU university Deanship Of E-Learning and Distance Learning USER MAUAL ///2/81/1 1|Page User manual for D8L MU university Deanship Of E-Learning and Distance Learning Contents Access to the D2L .......................................................................................................................................... 3 List of courses ............................................................................................................................................... 3 Communication tools .................................................................................................................................... 4 Personal settings ........................................................................................................................................... 4 Profile ........................................................................................................................................................ 4 Accounting setting .................................................................................................................................... 5 Notification ............................................................................................................................................... 5 Calendar ........................................................................................................................................................ 6 Add task to calendar ................................................................................................................................. 6 Add event to calendar................................................................................................................................... 7 Email.............................................................................................................................................................. 7 Content ......................................................................................................................................................... 7 Create module .......................................................................................................................................... 8 Create topic ............................................................................................................................................... 9 Import and export component ................................................................................................................. 9 Grades ......................................................................................................................................................... 11 Quizzes ........................................................................................................................................................ 13 Create Quiz.............................................................................................................................................. 13 Discussions .................................................................................................................................................. 17 User Progress .............................................................................................................................................. 21 Dropbox ...................................................................................................................................................... 22 Groups ......................................................................................................................................................... 27 Types of Enrollments .............................................................................................................................. 27 Groups of # - Self Enrollment .................................................................................................................. 28 Online rooms............................................................................................................................................... 29 Using Layouts & Pods .............................................................................................................................. 33 What are Pods? ....................................................................................................................................... 31 2|Page MU university Deanship Of E-Learning and Distance Learning Access to the D8L Browsing the D2L on http://el.mu.edu.sa 1. Insert username 2. Insert password 3. enter List of courses User can select from this list all course he have 3|Page MU university Deanship Of E-Learning and Distance Learning Communication tools We received the last notification on D2L Personal settings You can change the personal setting like picture , font and font size Profile you can change the personal setting like picture and communication types 4|Page MU university Deanship Of E-Learning and Distance Learning Accounting setting You can change the font , type of font and font size Notification You can chose the way you receive the notification 5|Page MU university Deanship Of E-Learning and Distance Learning Calendar Days with personal events will appear in blue on the calendar Days with non-personal events are displayed on a green background. Add task to calendar You can add task to calendar by write the name of your task and press enter 6|Page MU university Deanship Of E-Learning and Distance Learning Add event to calendar You can add event to calendar by press the create event on calendar and then fill the create event form and specify the date Email This feature allow the user to send and receive email through LMS You can reach the email form D2L home page Content You can reach the content from primary home page pf the course 7|Page MU university Deanship Of E-Learning and Distance Learning The Content tool is used to organize course materials, such as the syllabus, lecture notes, readings, etc. Create module In the New Module text box, enter the title of your new module. Hit enter when done typing your title If you would like to add a description to your module, click the Add a description... text box 8|Page MU university Deanship Of E-Learning and Distance Learning Create topic Select the module you want to place the new topic in. Then from the New dropdown menu select the type of topic you would like to create. The following will go through the process of Create a File. Import and export component Click on import and export component 9|Page MU university Deanship Of E-Learning and Distance Learning Select the Import Components radio button. Select which items you would like to import (if multiple files exist in the uploaded file) and then click Continue. *Note: If importing another D2L course, it is best not to import Navigation items. The importation will fail for this and the items after due to D2L's inability to overwrite the active navigation bar. You should then see a message detailing that the import was successful 11 | P a g e MU university Deanship Of E-Learning and Distance Learning Grades You can access grades when you want to check how you are doing academically. Here you will be able to see your marks on the individual assignments that you submit. If your evaluator makes any comments about your assignments, you will be able to view them here as well. By selecting 'view stats' for the individual assignment, you will be able to see the class average, and a graphical representation of your mark in comparison to others Access to the grades from the primary home page of the course Press on setup wizard 11 | P a g e MU university Deanship Of E-Learning and Distance Learning Choose the type of grade item you would like. Chose type of grade release Chose type of grade calculation Insert number of view display options 12 | P a g e MU university Deanship Of E-Learning and Distance Learning Chose the way of view student Quizzes Use the Quizzes tool to manage quizzes that you have created, copied, or imported; manage questions using the question library; preview, organize, and grade your quizzes; view quizzes by category or availability; view current, future, and past quizzes; view course and quiz statistics; create categories and place your quizzes in them. Create Quiz Click on the New Quiz button. 13 | P a g e MU university Deanship Of E-Learning and Distance Learning Type in your quiz name in the Name field. In the General section of the Properties tab there are many options: Category: If you have categories set up in your grade book, you can put your quiz into a category by selecting it from the Category: drop-down menu or create a category by clicking the [add category] link. Grade Item: Link your quiz with a grade item by selecting it from the Grade Item: drop-down menu or create a grade item by clicking the [add grade item] link. Auto Export to Grades: By checking this box you can have quiz scores automatically put in the grade book once graded. This is recommended for quizzes that are completely auto graded. Add Rubric: You can add a pre-existing 14 | P a g e MU university Deanship Of E-Learning and Distance Learning rubric to your quiz by clicking the Add Rubric button or create a new rubric by clicking the [Create Rubric in New Window] link. Automatic Grade: Checking this box allows for a submission to be marked as graded upon completion For the Option Advanced Properties section you may choose to: Allow for Hints Disable the Chat feature of D2L for the duration of the quiz Disable right-click mouse feature for the duration of the quiz Add a quiz message Add a header or a footer to a quiz In restriction tab Choose a Start Date: and an End Date: for your quiz. Also be sure to set your quiz as Active. And chose release condition 15 | P a g e MU university Deanship Of E-Learning and Distance Learning Choose your Timing Options: Time Limit: Set an amount of time students have to complete the quiz, and choose whether to show the clock. Grace Period: Choose the amount of time you will allow for a grace period before the quiz is late. Late Submissions: Choose what options you would like for your late submissions. Choose if you would like to allow for special access for a student or students to view/take the quiz early. In attempts tab Choose how many attempts you would like to allow. If you choose more than one, then define how you would like to evaluate the attempts: Highest Attempt, Lowest Attempt, and Average of all Attempts, First Attempt, and Last Attempt. Click on the Submission View and change your Default View or Add Additional View, if you so choose. For more information on adjusting the submission view, please visit the Set Quiz Submission View tutorial. Click on the Layout/Questions tab. Click on the Add/Edit Questions button. 16 | P a g e MU university Deanship Of E-Learning and Distance Learning Create a question by choosing a question type from the Create New drop-down menu and then click the Create New button. *Note: To learn how to create different question types please You can also create question sections by choosing Section from the Create New drop-down menu, then clicking Create New. You can put questions into sections by: Creating a new question within a section by clicking the section, choosing a question type from the Create New dropdown menu and then clicking the Create New button. For an existing question(s) click the box next to the question(s) and then click the Move Selected Items to a Section icon as shown to the left, then select which section to put the item(s) in. Click Save and Close and you quiz will be created. Discussions The Discussions tool is a collaboration area where you can post, read and reply to messages on different topics, share thoughts about course materials, ask questions, share files, or where students can work with peers on assignments and homework. 17 | P a g e MU university Deanship Of E-Learning and Distance Learning From the New drop-down menu, select New Forum. Under the New Forum Details section: Enter a Title Enter a Description Choose if you would like to Allow anonymous messages Choose if you would like to Messages must be approved before being displayed 18 | P a g e MU university Deanship Of E-Learning and Distance Learning Choose if you would like to have the forum to be available during a certain time period or locked during a certain time period Click Save and Add Topic. 19 | P a g e MU university Deanship Of E-Learning and Distance Learning STEP 6 Under the New Topic Details section: Enter a Title Enter a Description Choose if you would like to Allow anonymous messages Choose if you would like to Messages must be approved before being displayed Under the Restrictions tab choose if you would like to attach Release Conditions. 21 | P a g e MU university Deanship Of E-Learning and Distance Learning Under the Assessment tab, you can choose to have this discussion as a graded item. When finished setting your discussion settings click Save and Close User Progress The User Progress tool allows for an instructor to view a student or other user's course progress. This tool can be accessed by clicking on the User Progress icon within the Classlist or Enter Grades section of a course. Refer to the documentation below to learn how to view a student's course progress. Click on the drop-down menu to the right of the desired student and select View Progress. 21 | P a g e MU university Deanship Of E-Learning and Distance Learning Switch the different tool data, by first clicking the desired item in the left side menu. Available tool data sets include: Grades Objectives Content Discussions Dropbox Quizzes Checklist Surveys Login History Each tool selected will show a Summary and Details of the selected tool. The screenshot to the left shows this view for the Content tool. Dropbox 22 | P a g e MU university Deanship Of E-Learning and Distance Learning The Dropbox tool in Desire2Learn allows for you to set up folders that users can submit their assignments to. This eliminates the need to collect assignments and helps you track when assignments are submitted. Click on New Folder. In the Name: text field enter a title for your assignment. 23 | P a g e MU university Deanship Of E-Learning and Distance Learning Next choose if you would like to: Enable Plagiarism protection for an assignment (recommended for essay submissions) Have the folder be an Individual submission folder or a Group submission folder. Have your assignment be in a gradebook category If you would like for your assignment to be graded select which grade item to attach your assignment to, or create a new grade item, if necessary. 24 | P a g e MU university Deanship Of E-Learning and Distance Learning If you have attached a grade item to this assignment, enter in the same same assignment value in the Out of: text field that you have entered for the grade item. If you care to attach a file to the assignment, then click the Add a File button and then attach the desired file. You can also define how many submissions students are allowed, as well as how many files can be submitted. 25 | P a g e MU university Deanship Of E-Learning and Distance Learning Under the Restrictions tab, you have the ability to: Define the amount of time a dropbox folder is visible Attach Release Conditions Allow Special Access to an assignment When finished setting up your Dropbox assignment folder click Save. 26 | P a g e MU university Deanship Of E-Learning and Distance Learning Groups The Manage Groups tool is used to create group work areas for users. Groups can be used to organize users’ work on projects or assignments, or to create special work areas for users with different learning needs. Types of Enrollments # of Groups – No Auto Enrollments A specified number of groups are created, which you can add any number of users to through the Enroll Users page. Use this enrollment type when you know how many groups you want to create and which users you want in each group. This option could be used when you have a teaching model that divides course participants into specific learning levels or when you want to divide users by skill or interests. # of Groups A specified number of groups are created. If ‘Can be auto-enrolled’ is turned on, they are added using a brick laying algorithm, regardless of whether they enrolled before or after the groups were created. For example, if a class has 23 users and 5 groups, the first user is added to Group 1, the second to Group 2, etc. The sixth user returns the enrollment sequence to Group 1. Groups 1, 2, and 3 have 5 users and Groups 4 and 5 have 4 users. If a new user enrolls later, they are put in Group 4. If ‘Can be auto-enrolled’ is turned off, the specified number of groups are created with no users enrolled in them. You can enroll users using the Enroll Users page. Use this enrollment type when you know how many groups you want to create, but want the system to place users in groups for you. This option could be used when you want group membership to be indiscriminate, or when classroom, resource, or teaching assistant availability restricts the number of groups you can have. Groups of # The minimum number of groups needed to place users in groups of a specified maximum size are created. More groups are created when they are needed to accommodate users. If users are enrolled before groups are set up and ‘Can be auto-enrolled’ is turned on, users are added using a brick laying algorithm. For example, if a maximum group size of 5 users is chosen for a class of 23, than 5 groups are created. The first user is added to Group 1, the second to Group 2, etc. The sixth user returns the enrollment sequence to Group 1. Groups 1, 2 and 3 have 5 users and Groups 4 and 5 have 4 users. If a new user enrolls later, they are put in Group 4. 27 | P a g e MU university Deanship Of E-Learning and Distance Learning Note: If you have Auto Enroll New Users selected and all of the existing groups have reached their maximum size, new users are added to a new group. Because there is no way to know how many new users will join, all new users are added to the same group until it is full. This is called a bucket-filling algorithm because the limits of one group must be met before another group is started. If users are enrolled after groups are set up, users are added to groups using a bucket-filling algorithm because there is no way for the system to determine how many groups in total are needed. For example, if a maximum group size of 5 users is chosen for a class in which 23 users eventually enroll, the first five users are added to Group 1, the sixth through tenth user to Group 2, etc. After 23 users are enrolled, groups 1-4 have 5 users and Group 5 has 3 users. If ‘Can be auto-enrolled’ is turned off belong to, the minimum number of groups needed to create groups under the specified size are created with no users enrolled in them. If no users are enrolled in the course, one group is created. You can enroll users using the Enroll Users page. Use this enrollment type when you know how many users you want in each group. This option could be used when you have assignments that require work to be divided between a specific numbers of users, or when you can only accommodate a set number of users in a lab or work area at one time. Groups of # - Self Enrollment The minimum number of groups needed to accommodate users in groups of a specified maximum size are created automatically. Users choose the group they want to enroll in from their My Groups page, accessible from the classlist. Use this enrollment type when you know how many users you want in each group, but you want to allow users to choose their own groups. This option could be used when you want users to choose their groups based on friendship, learning style, schedules, or geographic location. *Note: If users are not already enrolled in your course, then only one group is initially created. You can use the Edit Category page to add additional groups. You might want to add additional groups even if users are already enrolled to ensure all users have options when forming groups. # of Groups – Self Enrollment A specified number of groups are created, which users enroll in from their My Groups page, accessible from the classlist. Use this enrollment type when you want to make a specific number of groups available for users to join. This option could be used for organizing groups on specific topics, which users could join based on 28 | P a g e MU university Deanship Of E-Learning and Distance Learning interest, or for creating groups that are responsible for specific aspects of a larger project, which users could join based on knowledge or task preferences. # of Groups of # - Self Enrollment A specified number of groups are created with a specified number of users, which users enroll in from their My Groups page, accessible from the classlist. Use this enrollment type when you know the exact number of groups and users per group needed, but would like for students to self-enroll in a group. Online rooms Is a web conferencing solution for web meetings and e-learning. 29 | P a g e MU university Deanship Of E-Learning and Distance Learning Inside room page Menu bar contains: 1. 2. 3. 4. 5. Meeting Layouts Pods Audio Help Using Layouts & Pods Adobe Connect uses a variety of panels called pods that make up the layout of the meeting. The default layouts are three: Sharing Discussion Collaboration You can also create your own customized layout by arranging the pods differently (see section on pods) 31 | P a g e MU university Deanship Of E-Learning and Distance Learning What are Pods? Pods are the panels that make up the layout for your meeting rooms. They are resources that can enhance your Adobe Connect meeting if selected wisely. A Pod can be used to create a specific type of communicative resource that might be useful for the participants of your meeting. 31 | P a g e