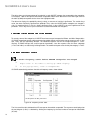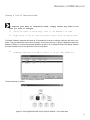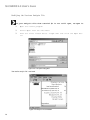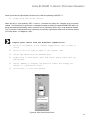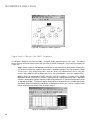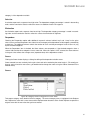
1
SI-CHAID® 4.0 USER’S GUIDE
Jay Magidson
Statistical
Innovations
Thinking outside the brackets! TM
For more information about Statistical Innovations Inc. please visit our website at
http://www.statisticalinnovations.com
or contact us at
Statistical Innovations Inc.
375 Concord Avenue, Suite 007
Belmont, MA 02478
e-mail: [email protected]
SI-CHAID® is a registered trademark of Statistical Innovations Inc.
Windows is a trademark of Microsoft Corporation.
SPSS is a trademark of SPSS, Inc.
Other product names mentioned herein are used for identification purposes only and may be trademarks of their respective companies.
SI-CHAID® 4.0 User's Guide.
Copyright © 2005 by Statistical Innovations Inc.
All rights reserved.
No part of this publication may be reproduced or transmitted, in any form or by any means, electronic, mechanical, photocopying, recording,
or otherwise, without the prior written permission from Statistical Innovations Inc.
We strongly encourage any feedback on this manual or the program. Please send you comments directly to Michael Denisenko at
[email protected].
This document should be cited as " J. Magidson (2005) SI-CHAID 4.0 User's Guide. Belmont, Massachusetts: Statistical Innovations Inc."
Compatibility
SI-CHAID® is designed for computers running Windows 95, Windows 98, Windows 2000, Windows XP,
Windows NT 4.0, or later
Customer Service
If you have any questions concerning your shipment or account, see Contacting Statistical Innovations. Please
have your invoice number ready for identification when calling.
Training Seminars
We provide public and onsite training seminars on SI-CHAID. We also offer online courses. For information or to
be placed on our mailing list, see Contacting Statistical Innovations or visit our website.
Tell Us Your Thoughts
Your comments are important to us. Please write or e-mail us about your experiences with SI-CHAID. We
especially like to hear about new and interesting applications using SI-CHAID. Consider submitting examples and
application ideas for inclusion on our website.
Contacting Statistical Innovations
To contact us or to be placed on our mailing list, visit our website at http://www.statisticalinnovations.com or write
us at Statistical Innovations Inc., 375 Concord Avenue, Belmont, MA 02478. You can also e-mail us at
[email protected].
Preface
I am pleased to present SI-CHAID 4.0, the next generation of CHAID (CHi-squared Automatic Interaction
Detection) analysis. SI-CHAID 4.0 features numerous improvements over our earlier programs, SPSS CHAID 6.0
for Windows and SI-CHAID 2.0, including the important extension to multiple dependent variables. That extension
becomes possible in conjunction with either of our sister products Latent GOLD 4.0 and Latent GOLD Choice 4.0.
In addition, the ability to save entire trees or tree branches allows additional applications such as the use of a
holdout sample for validation (see Tutorial #3).
I hope that you find this manual as easy-to-use as the program. It begins with a brief overview of the program and
new features, followed by four tutorials, which provide a step-by-step introduction to using the program. The
Command References section contains the detailed descriptions of all features and aspects of the program. It is
divided into the CHAID Define and the CHAID Explore sections, describing the Define and Explore modules of
the program, respectively.
The first tutorial, "Beginning a CHAID Analysis", uses a traditional database marketing application to develop a
response-based segmentation. It guides you through the major features of the program and is a good place to
start for those who are new to CHAID. The second tutorial, "Using SI-CHAID to Identify Profitable Segments",
shows how to develop a segmentation tree when the dependent variable is quantitative (measuring profitability).
Tutorial #3, "Using SI-CHAID with a Hold-Out Sample", illustrates the use of the program with a hold-out sample.
Tutorial #4, "Using CHAID with Multiple Correlated Dependent Variables", describes an extended CHAID analysis to develop a demographic segmentation that is predictive of 11 dependent variables. (See also Latent GOLD
tutorial #4 for another application of this extended CHAID capability).
The Appendix contains my article, "The CHAID Approach to Segmentation Modeling: CHi-squared Automatic
Interaction Detection", which provides technical details to supplement Tutorial #1. Reprints of 2 additional articles,
which supplement Tutorials #2 and #4, are included with your program CD. Please visit the Statistical Innovations'
website, http://www.statisticalinnovations.com, for up to date developments about SI-CHAID and our other
programs.
I hope you enjoy using SI-CHAID to explore your data.
I wish to thank the Polk Company for making the magazine subscription data available. This data set
accompanies the software and is used throughout this manual for purposes of illustration.
I also wish to thank J. Alexander Ahlstrom for his assistance in the design and development of the program and
Michael Denisenko for his valuable contribution in the production of this manual.
Jay Magidson
Belmont, Massachusetts
April 2005
SI-CHAID® 4.0 USER'S GUIDE
TABLE OF CONTENTS
SI-CHAID Overview .....................................1
New Features in SI-CHAID 4.0 . . . . . . . . . . . . . . . . . . . . . . . . . . . . . . . . . . . . . . .2
Tutorial 1: Beginning A CHAID Analysis .....................3
The Data . . . . . . . . . . . . . . . . . . . . . . . . . . . . . . . . . . . . . . . . . . . . . . . . . . . . . . . . .3
Setting up the Model . . . . . . . . . . . . . . . . . . . . . . . . . . . . . . . . . . . . . . . . . . . . . . .5
Opening the Data File . . . . . . . . . . . . . . . . . . . . . . . . . . . . . . . . . . . . . . . . . . . . .5
Assigning Variables . . . . . . . . . . . . . . . . . . . . . . . . . . . . . . . . . . . . . . . . . . . . . . .6
Scanning the Data . . . . . . . . . . . . . . . . . . . . . . . . . . . . . . . . . . . . . . . . . . . . . . .7
Setting Options . . . . . . . . . . . . . . . . . . . . . . . . . . . . . . . . . . . . . . . . . . . . . . . . . .7
Growing a Tree . . . . . . . . . . . . . . . . . . . . . . . . . . . . . . . . . . . . . . . . . . . . . . . . . . .8
Growing a Tree in Automatic Mode . . . . . . . . . . . . . . . . . . . . . . . . . . . . . . . . . .9
Gains Charts . . . . . . . . . . . . . . . . . . . . . . . . . . . . . . . . . . . . . . . . . . . . . . . . . . . .10
Detailed Gains Charts . . . . . . . . . . . . . . . . . . . . . . . . . . . . . . . . . . . . . . . . . . . .10
Summary Gains Chart . . . . . . . . . . . . . . . . . . . . . . . . . . . . . . . . . . . . . . . . . . .12
Scoring your file . . . . . . . . . . . . . . . . . . . . . . . . . . . . . . . . . . . . . . . . . . . . . . . . .13
Tables . . . . . . . . . . . . . . . . . . . . . . . . . . . . . . . . . . . . . . . . . . . . . . . . . . . . . . . . . .14
After-Merge Table . . . . . . . . . . . . . . . . . . . . . . . . . . . . . . . . . . . . . . . . . . . . . . .14
Before-Merge Table . . . . . . . . . . . . . . . . . . . . . . . . . . . . . . . . . . . . . . . . . . . . .15
Comparing Tables Before and After Merging . . . . . . . . . . . . . . . . . . . . . . . . . .16
Obtaining Frequency Counts . . . . . . . . . . . . . . . . . . . . . . . . . . . . . . . . . . . . . .16
Growing a Tree in Interactive Mode . . . . . . . . . . . . . . . . . . . . . . . . . . . . . . . . .17
Rearranging Categories . . . . . . . . . . . . . . . . . . . . . . . . . . . . . . . . . . . . . . . . . .18
TABLE OF CONTENTS
Tutorial 2: Using SI-CHAID to Identify
Profitable Segments ...................................19
The Data . . . . . . . . . . . . . . . . . . . . . . . . . . . . . . . . . . . . . . . . . . . . . . . . . . . . . . . .19
Modifying the Previous Analysis File . . . . . . . . . . . . . . . . . . . . . . . . . . . . . . . .20
Assigning Category Scores . . . . . . . . . . . . . . . . . . . . . . . . . . . . . . . . . . . . . . . .22
Nominal Method . . . . . . . . . . . . . . . . . . . . . . . . . . . . . . . . . . . . . . . . . . . . . . . .22
Ordinal Method . . . . . . . . . . . . . . . . . . . . . . . . . . . . . . . . . . . . . . . . . . . . . . . . .27
Tutorial 3: Using SI-CHAID with a Hold-out Sample ...........31
Tutorial 4: Using CHAID with Multiple Correlated Dependent Variables
....................................................38
The Data . . . . . . . . . . . . . . . . . . . . . . . . . . . . . . . . . . . . . . . . . . . . . . . . . . . . . . . .38
Steps Used to Obtain the CHAID Segments . . . . . . . . . . . . . . . . . . . . . . . . . . .40
Growing the CHAID Tree . . . . . . . . . . . . . . . . . . . . . . . . . . . . . . . . . . . . . . . . .41
Step 3: Show how the CHAID Segments Predict the
11 Dependent Variables . . . . . . . . . . . . . . . . . . . . . . . . . . . . . . . . . . . . . . . . . .47
Use of Correlated vs. Uncorrelated Dependent Variables . . . . . . . . . . . . . . . .55
SI-CHAID Define ......................................56
Define Menus . . . . . . . . . . . . . . . . . . . . . . . . . . . . . . . . . . . . . . . . . . . . . . . . . . . .56
File Menu . . . . . . . . . . . . . . . . . . . . . . . . . . . . . . . . . . . . . . . . . . . . . . . . . . . . .57
Edit Menu . . . . . . . . . . . . . . . . . . . . . . . . . . . . . . . . . . . . . . . . . . . . . . . . . . . . .58
View Menu . . . . . . . . . . . . . . . . . . . . . . . . . . . . . . . . . . . . . . . . . . . . . . . . . . . .58
Model Menu . . . . . . . . . . . . . . . . . . . . . . . . . . . . . . . . . . . . . . . . . . . . . . . . . . .58
Help Menu . . . . . . . . . . . . . . . . . . . . . . . . . . . . . . . . . . . . . . . . . . . . . . . . . . . . .60
Menu Shortcuts . . . . . . . . . . . . . . . . . . . . . . . . . . . . . . . . . . . . . . . . . . . . . . . . .60
Model Analysis Dialog Box . . . . . . . . . . . . . . . . . . . . . . . . . . . . . . . . . . . . .60
Variables Tab . . . . . . . . . . . . . . . . . . . . . . . . . . . . . . . . . . . . . . . . . . . . . . . . . .61
Scan . . . . . . . . . . . . . . . . . . . . . . . . . . . . . . . . . . . . . . . . . . . . . . . . . . . . . . . . .64
Details . . . . . . . . . . . . . . . . . . . . . . . . . . . . . . . . . . . . . . . . . . . . . . . . . . . . . . . .64
Groups . . . . . . . . . . . . . . . . . . . . . . . . . . . . . . . . . . . . . . . . . . . . . . . . . . . . . . .64
Options Tab . . . . . . . . . . . . . . . . . . . . . . . . . . . . . . . . . . . . . . . . . . . . . . . . . . . . .65
Technical Tab . . . . . . . . . . . . . . . . . . . . . . . . . . . . . . . . . . . . . . . . . . . . . . . . . . . .67
Predictor Options Tab . . . . . . . . . . . . . . . . . . . . . . . . . . . . . . . . . . . . . . . . . . . . .70
SI-CHAID Explore .....................................72
Tree Diagram View . . . . . . . . . . . . . . . . . . . . . . . . . . . . . . . . . . . . . . . . . . . . . . .73
5
SI-CHAID® 4.0 USER'S GUIDE
Select Dialog . . . . . . . . . . . . . . . . . . . . . . . . . . . . . . . . . . . . . . . . . . . . . . . . . . .74
Rearrange Dialog . . . . . . . . . . . . . . . . . . . . . . . . . . . . . . . . . . . . . . . . . . . . . . .75
Delete . . . . . . . . . . . . . . . . . . . . . . . . . . . . . . . . . . . . . . . . . . . . . . . . . . . . . . . .75
Hide . . . . . . . . . . . . . . . . . . . . . . . . . . . . . . . . . . . . . . . . . . . . . . . . . . . . . . . . . .76
Node Items . . . . . . . . . . . . . . . . . . . . . . . . . . . . . . . . . . . . . . . . . . . . . . . . . . . .76
Save . . . . . . . . . . . . . . . . . . . . . . . . . . . . . . . . . . . . . . . . . . . . . . . . . . . . . . . . .77
Restore . . . . . . . . . . . . . . . . . . . . . . . . . . . . . . . . . . . . . . . . . . . . . . . . . . . . . . .77
Tree Map View . . . . . . . . . . . . . . . . . . . . . . . . . . . . . . . . . . . . . . . . . . . . . . . . . . .78
Gains Chart View . . . . . . . . . . . . . . . . . . . . . . . . . . . . . . . . . . . . . . . . . . . . . . . . .79
Table View . . . . . . . . . . . . . . . . . . . . . . . . . . . . . . . . . . . . . . . . . . . . . . . . . . . . . .82
Cell Format Options . . . . . . . . . . . . . . . . . . . . . . . . . . . . . . . . . . . . . . . . . . . . .83
Contents Options . . . . . . . . . . . . . . . . . . . . . . . . . . . . . . . . . . . . . . . . . . . . . . .83
Predictors Options: . . . . . . . . . . . . . . . . . . . . . . . . . . . . . . . . . . . . . . . . . . . . . .84
Source Code View . . . . . . . . . . . . . . . . . . . . . . . . . . . . . . . . . . . . . . . . . . . . . . . .84
SI-CHAID Explore Menu Reference . . . . . . . . . . . . . . . . . . . . . . . . . . . . . . . . . .85
File Menu . . . . . . . . . . . . . . . . . . . . . . . . . . . . . . . . . . . . . . . . . . . . . . . . . . . . .85
Edit Menu . . . . . . . . . . . . . . . . . . . . . . . . . . . . . . . . . . . . . . . . . . . . . . . . . . . . .85
Tree Menu . . . . . . . . . . . . . . . . . . . . . . . . . . . . . . . . . . . . . . . . . . . . . . . . . . . . .86
View Menu . . . . . . . . . . . . . . . . . . . . . . . . . . . . . . . . . . . . . . . . . . . . . . . . . . . .87
Window Menu . . . . . . . . . . . . . . . . . . . . . . . . . . . . . . . . . . . . . . . . . . . . . . . . . .87
Help Menu . . . . . . . . . . . . . . . . . . . . . . . . . . . . . . . . . . . . . . . . . . . . . . . . . . . . .88
The CHAID Approach to Segmentation Modeling:
CHI-Squared Automatic Interaction Detection ................89
6
OVERVIEW
SI-CHAID Overview
SI-CHAID for Windows is a stand-alone program developed by
Statistical Innovations Inc for performing CHAID (CHi-squared
Automatic Interaction Detector) analyses. You can display your results
simultaneously in the form of an intuitive tree diagram, crosstabulations,
and a gains chart summary. Traditional CHAID analyses identify segments that are predictive of a single dependent variable which may be
specified to be nominal or ordinal, and you can combine categories of
a predictor variable in any way. For a detailed description of the
nominal and ordinal CHAID algorithms, see Magidson (1994) and
Magidson (1993) respectively.
The program accepts data directly from an ASCII data file. Alternatively,
data, variable names and value labels may be imported from any .sav
system file created by SPSS for Windows. SI-CHAID consists of two
separate programs that work together - ChaidDefine and ChaidExplore.
Either program may be launched from the Start Menu, or either can be
used to execute the other.
The Define program is used to set up a CHAID Definition (.chd) file with
the File g New command, or alter the specifications of an existing .chd
file with File g Open. The typical setup includes the selection of the
dependent variable, the predictor variables, the combine-type of the
predictors, and various options for growing the tree (stopping rule, significance levels, etc.). Define may also be used to enter or modify
scores for the categories of the dependent variable when the ordinal
algorithm is specified. The model specifications, which are saved with a
.chd extension, can be inspected with a text editor (Notepad, for
example).
The Explore program allows you to grow or alter a SI-CHAID Tree,
automatically or interactively, using the settings given in a previously
saved (.chd) file It can also be used to produce crosstabulations, gains
charts, and if-then-else source code statements that can assist in
scoring your data file.
1
SI-CHAID® 4.0 USER'S GUIDE
The application includes four tutorials. The first two tutorials introduce traditional uses of CHAID; the latter two
illustrate new features in SI-CHAID 4.0. Specifically, Tutorial #1 illustrates the steps involved in setting up an
analysis from scratch. Tutorial #2 builds on the analysis in Tutorial #1 and explores differences between the
Nominal and Ordinal algorithms.
SI-CHAID is designed to be an exploratory analysis tool. The only limitation built into the program is that all
variables are required to have at most 31 categories or levels. By default, continuous variables or other variables
containing more than 31 levels will automatically be grouped into 16 levels. Alternatively, the grouping feature
within SI-CHAID may be used to automatically reduce the number of categories to some specified number of
levels.
Note that usage of (optional) numeric scores in SI-CHAID may serve different purposes:
•
Category scores for an ordinal dependent variable provide a way to account for differential costs or
gains associated with the categories of a dependent variable. For example, tutorial #2 illustrates the
use of category scores to differentially weight the relative gains associated with paid responders,
unpaid responders, and nonresponders in a direct marketing promotion. This example demonstrates
the value of the ordinal algorithm in situations where the dependent variable contains more than 2
ordered categories and profitability (or other) scores are available.
•
Scores are used in conjunction with the grouping feature to reduce the number of levels of a
variable. Each reduced level is assigned a score equal to the mean score of the levels included in
the new (grouped) level. If the variable being grouped has one or more values treated as missing,
these missing variables are preserved in a separate last category of the grouped variable. In the
case of a predictor variable, the resulting grouped variable may be included in an analysis using the
FLOAT combine type.
•
Scores may be used for the purpose of gains charts produced in a SI-CHAID analysis. A special
SCORE option in the gains chart allows you to produce gains charts based on different sets of category scores without the need to create different .chd files.
The two major new features included in SI-CHAID 4.0 are the ability to produce segmentation trees that
are predictive of multiple dependent variables (in conjunction with Latent GOLD 4.0 and/or Latent
GOLD Choice 4.0), and the ability to save tree diagrams. For an example of the former, see Tutorial #4;
for the latter, see Tutorial #3, which involves the use of a holdout sample.
Other new features include expanded Tables and Gains Chart options. Predictor by Dependent variable
tables can now be obtained for all predictors (or all significant predictors) instead of just the current predictor) at any level of the tree. Gains Chart summaries now change interactively to reflect which tree
node is specified as the active base. To obtain a gains chart summary for the entire tree, simply click
on the root node of the tree to make it the active (current) node.
2
BEGINNING A CHAID ANALYSIS
Tutorial 1: Beginning A CHAID Analysis
In this Tutorial we illustrate the basic functions and uses of SI-CHAID.
We will show how to set up an analysis (.chd) file and grow a CHAID
tree by using the standard CHAID algorithm, which is designed for a
dichotomous or nominal dependent variable. In our example, we show
how to determine CHAID segments that differ on response rates, and
how gains charts can be used to predict the expected response from
mailing/ targeting the most responsive segments. Tutorial #2 illustrates
the use of the ordinal algorithm in SI-CHAID to identify segments best
upon a profitability criterion. Both tutorials follow the analyses described
in Magidson (1993).
The Data
In this tutorial, we will be using the SPSS file subscrib.sav, which contains information about a direct marketing promotion for a magazine
subscription. Based on their response to this promotion, households
were categorized as paid responders, unpaid responders, or nonresponders. Paid responders were households that returned a mail form,
checked off the item that they would like to subscribe to the magazine,
and later paid for the subscription. Unpaid responders were households
that returned the form and checked off the item that they would like to
subscribe to the magazine, but then cancelled their subscriptions prior
to paying. Nonresponders includes all others (that is, households that
did not request a subscription).
3
SI-CHAID® 4.0 USER'S GUIDE
Figure 1. Subscrib.sav file
The variables included in the file are:
AGE
age of head of household
GENDER
sex of head of household
KIDS
presence of children
INCOME
household income
BANKCARD presence of bankcard
HHSIZE
household size
OCCUP
occupational status of head of household
RESP3
coded 1 for paid, 2 for unpaid responders and 3 for nonresponders.
RESP2
coded 1 for (paid and unpaid) responders, and 2 for nonresponders – to be used as the
dependent variable in this tutorial
FREQ
number of cases (designated as a case weight in SPSS)
The purpose of our initial analysis is to identify household segments that are more likely to respond than other
segments.
4
BEGINNING A CHAID ANALYSIS
Setting up the Model
To open the file,
w
Open ChaidDefine.exe from the CHAID Directory
w
Go to the File Menu and click New
w
From the menu, select subscrib.sav
Figure 2. File New Dialog Box
Once you click on the file, the Model Analysis Dialog Box opens. It looks like this:
Figure 3. Model Analysis Dialog Box
5
SI-CHAID® 4.0 USER'S GUIDE
The variables in the data file subscrib.sav are included in the Variables List Box on the left, except for the variable FREQ. SI-CHAID automatically entered this variable in the frequency box because it was specified within
SPSS to be used as a case weight when creating the SPSS save file.)
To begin a CHAID analysis, we need to select one (or more) dependent variables and at least one predictor.
Optionally, one of two weight variables can be specified - a case weight (frequency) and a sampling weight
(weight).
For this analysis, the dichotomous variable RESP2 will be the single dependent variable. For an example of
multiple dependent variables, see Tutorial #3 in this manual.
To select the dependent variable:
w
Click on RESP2 in the Variables Box.
w
Click on “Dependent” to move RESP2 to the Dependent Variable Box
Next, we will select the predictor variables. The predictor variables for this analysis will be AGE, GENDER, KIDS,
INCOME, BANKCARD, HHSIZE, and OCCUP.
w
Highlight AGE, GENDER, KIDS, INCOME, BANKCARD, HHSIZE, and OCCUP.
w
Click on “Predictors” to move the above variables to the
Predictor Variable Box.
The completed Model Analysis Dialog Box should look like this:
Figure 4. Model Analysis Dialog Box with variables in place
6
BEGINNING A CHAID ANALYSIS
Now that you have set your analysis options, you are ready to scan the data file.
To scan the file,
w
Click on Scan
After the data scans, the default combine types appear next to each predictor. The combine type specifies how
the categories of the predictor are allowed to merge. You can change the combine type for a predictor from the
Predictor Options tab or by right clicking on the variable and selecting the desired combine type name from the
pop-up menu.
Figure 5. Predictor Options pop-up menu
w
Right-click on OCCUP and select “Free” to define OCCUP as a free
variable
You may view category labels by selecting Details… from this menu or by double-clicking on a predictor or the
dependent variable name. This action brings up the category-labels window.
Figure 6. Category Labels Window
The Options Tab controls the operation of the CHAID segmentation algorithm, including the stopping rule and the
minimum segment size.
7
SI-CHAID® 4.0 USER'S GUIDE
w
Click on the Options Tab to open the Options Dialog Box
w
Double-click on the Depth Limit text box and enter 2 to set the
analysis depth limit at 2. That tells SI-CHAID that the tree
should expand to no more than two levels deep.
w
Leave the other options, Merge Level and Eligibility Level, at
their default levels.
w
Select Auto in the Startup Mode Menu on the right. This tells SICHAID to run the analysis automatically.
Your Options Tab should now look like this:
Figure 7. Options Tab
Growing a Tree
After you have set all the options, you are now ready to grow a segmentation tree.
w
Click Explore
SI-CHAID automatically prompts you to save the new model with a Save As dialog box.
8
BEGINNING A CHAID ANALYSIS
Figure 8. Save As Dialog Box
In the File Name box, type resp2 to override the suggested filename and click on Save. That tells SI-CHAID to
save your analysis settings to an analysis file with the name resp2.chd. All printed and saved output will be prefixed by the name resp2.
After you click Save, SI-CHAID automatically opens the ChaidExplore program and grows the tree.
Figure 9. Tree Diagram
By default, SI-CHAID displays the tree diagram in local mode. The local mode displays detailed results within each
node, and numbers each terminal node. The results of the CHAID tree shows 6 segments, details for which are
displayed in each of the 6 terminal nodes. The highest response rate is obtained from segment 2, defined as
households of size 2 or 3 (HHSIZE = 2-3) and occupation = ‘white collar’ (OCCUP = 1). Terminal node #2 shows
9
SI-CHAID® 4.0 USER'S GUIDE
that there are a total of 1,758 cases in this segment and the response rate is 2.39%. The next best segment is
obtained from households containing 4 or more persons (terminal node #4), and the response rate for this
segment is 1.92%.
For large trees, all terminal nodes may not be visible at once. In this case, a global ‘Tree Map’ view is useful to
get a better feel for the entire tree. To switch to global mode,
w
Click on Window
w
Select New Tree Map
The Global Tree Window then appears
Figure 10. Global Tree Window
Gains Charts
The results of a CHAID analysis can also be displayed in the form of Gains Charts, which sort all or a subset of
the segments from best to worst and also provides cumulative results expected based on the best K of these segments (or best quantile). In our current analysis, best is defined based on the percentage of cases in the first category of the dependent variable (response rate).
If the root node is the current node, the gains charts include all segments. If some other node is current, the gains
charts are based on segments derived from the current node.
To produce a detailed gains chart corresponding to the entire CHAID
tree:
10
BEGINNING A CHAID ANALYSIS
w
Click on the root node of the tree diagram to make it the current
node
w
Click on Window to display the Window options
w
Select New Gains
SI-CHAID displays a detailed gains chart, where the segments are listed from best to worst.
Figure 11. Gains Chart
The column labeled Id contains segment numbers. The next column (size) contains the number of cases in this
segment, followed by a re-expression of segment size in terms of a percentage (% of all). The 4th column (resp)
contains the number of responders in the segment, followed by a re-expression of this quantity in terms of percentage. Thus, we see that segment 2 represents 2.2% of all cases, but accounts for 4.5% of all respondents.
The next column displays the response rate for the associated segment (score). Thus, we see that segment 2 has
the highest response rate (2.39%). The next highest response rate is 1.92% (segment 4).
The score represents the mean category score. By default, the category scores are ‘1’ for the first category, and
‘0’ for all others, so that the mean score corresponds to the % in the first category (responders in this example).
To change the category scores,
w
right click on the gains chart to bring up the gains chart control panel.
Figure 12. Gains Chart Control Panel
11
SI-CHAID® 4.0 USER'S GUIDE
Note that a check mark appears next to Responders to indicate that the default gains chart is presented.
w
Click the Scores button, to bring up the gains chart category
scores window.
w
Double click the score you wish to change, enter the replacement
score and click the Replace button.
w
Click OK after all the new scores have been entered.
To view the new gains chart based on the revised scores,
w
click Responders in the Gains Chart control to remove the check
mark for the default gains chart.
w
Now click Responders once again in the Gains Chart control panel
to restore the default gains chart.
The index column for a given segment measures the average response score for that segment relative to the
average score for the total sample. The index score for segment 2 is 208, which is computed as (2.39% / 1.15%)
x 100. This means that the response rate for this segment is 108% higher than average.
Columns 8 through 13 in the gains chart present cumulative statistics. From the columns labeled Cum: size, %
of all, and score, you can see that the three highest responding segments constitute 27.6% of the sample and
have a combined response rate of 1.63%. The final column, Cum: index, measures the cumulative average
response score for these segments relative to the average score for the total sample. For example, the index for
the three best segments is 142 (1.63% / 1.15%). Thus, the three best segments, taken together, responded at a
rate 42% higher than average.
If you know the break-even response rate (or if the category scores reflect profitability), you can use gains charts
to determine the segments to which you should mail future promotions. For example, suppose that when you take
into account the cost of mailing and the gain from responders, you need a response rate of 1.45% to break even.
Looking at the Gains chart above, (and assuming that this is your final segmentation), you would expect to make
a profit if you mailed only the top two segments, since the score for the remaining households falls below the
break-even level. Large savings could be gained by mailing only to segments with the highest response rates.
The summary gains chart summarizes the predicted response rate at various depths of the file. That is, the summary gains chart tells you the results that would be attained by targeting the best Q-percent of the file. This form
of the gains chart is especially useful for comparing the results of 2 or more different CHAID trees. By default, the
results are displayed in deciles.
12
BEGINNING A CHAID ANALYSIS
To obtain a summary gains chart,
w
click Summary on the (top) of the gains chart control panel.
The gains chart changes to the following:
Figure 13. Summary Gains Chart
The score column shows that, the predicted response rate would be 2.01% if the best decile were mailed.
Scoring your file
You can obtain source code, which will allow you to score your file with segment definitions.
w
Select New Source from the Windows menu
A window appears containing SPSS if-then-else statements which compute the variable chdsegmt containing the
CHAID segment number.
13
SI-CHAID® 4.0 USER'S GUIDE
Figure 14. Source File
Tables
The New Table Window option displays a table of the dependent variable (columns) by the current predictor variable (rows). You can control whether the table displays row percentages, column percentages, total percentages,
or cell frequencies, and whether the table shows merged or unmerged categories of the predictor.
To view a table showing row percentages for merged categories of HHSIZE
at the top of the tree:
w
Click the top (root) node of the tree diagram
w
Select Window
w
Click on New Table
Values in the Respondent column match the values displayed in each of the four HHSIZE nodes:
14
Figure 15. After Merge Table
BEGINNING A CHAID ANALYSIS
Notice that SI-CHAID merged categories 2 and 3, as well as categories 4 and 5.
The probability displayed in the bottom of the after-merge table, 2.7 x 10⁻¹⁵, is adjusted for the fact that categories
have been merged. The probability used by CHAID to rank predictors is the smaller of this adjusted probability
and the probability associated with the table computed before category merging.
To view a row percentage table of HHSIZE by RESP2 for unmerged HHSIZE
categories:
w
Right-click on the Table to bring up Table Display.
w
In the pop-up menu, click on Before Merge
Figure 16. Table Display Menu
SI-CHAID automatically produces a table of row percentages before HHSIZE categories are merged, as shown
below:
Figure 17. Before Merge Table
15
SI-CHAID® 4.0 USER'S GUIDE
The table shows you the percentage of households in each HHSIZE category that responded to the promotion.
For example, 1.09% of one-person households responded. Note that the total count in the lower right corner of
the table (81,040) corresponds to the size of the highlighted node.
The table also displays the probability value (p value), a measure of statistical significance. The smaller the p
value, the more statistically significant the predictor. The p value for HHSIZE before categories are merged is
4.4e- 14 (shorthand for 4.4 x 10⁻¹⁴, a highly significant result). In fact, HHSIZE is the most significant of all the
predictors. That is why the first split in the tree is based on household size categories.
To see why some of the categories of HHSIZE have been merged, compare the Before- and After- Merge tables.
SI-CHAID merged two-person and three-person households because their before-merge response rates (1.49%
and 1.59%) are not significantly different. The combined response rate for the merged categories is 1.52%.
Similarly, SI-CHAID merges four- and five-person households, since the response rates for these subgroups
(1.79% and 2.06%) are statistically indistinguishable. The combined response rate for the joint category is 1.92%.
To obtain frequency counts before HHSIZE categories are merged
w
Right-click on the Table to bring up Table Display.
w
In the pop-up menu, click on Frequencies.
SI-CHAID automatically produces the table of frequency counts shown below:
Figure 18. Frequency Count Table
The first row of the table indicated that 276 one-person households responded. The response rate displayed on
the tree diagram (1.09%) is obtained by dividing the frequency by the total number of one-person households
(25,384).
16
BEGINNING A CHAID ANALYSIS
Growing a Tree in Interactive Mode
To explore your data in interactive mode, simply select any node of the
tree you wish to analyze:
w
Using the mouse or arrow keys, move to the HHSIZE = 23 node
w
Right-click on the 23 node and select Select from the pop-up menu
The Select Predictors dialog box will come up. Three predictors show up as offering significant splits of this subgroup. They are ranked from most to least significant. At this point you may a) split the subgroup using the best
predictor (OCCUP), b) select one of the other predictors to split on, or c) change the Detail level display selection
to include variables that are not significant in the list of predictors.
w
Highlight AGE and click OK to select it as the next predictor
Figure 19. Selecting Predictor AGE
The tree now looks as follows:
Figure 20. Tree Diagram with AGE used to Split the HHSIZE = 2-3 Parent Node
17
SI-CHAID® 4.0 USER'S GUIDE
w
Right click and select Rearrange
w
Select the 5 age range categories between 18-64 as the 1st rearranged category
w
click the right arrow to move them to the right-most window
Figure 21. Rearranging Categories
w
Click Next
w
Select age 65+ as the 2nd re-arranged category
w
click the right arrow
w
click next
w
Select the missing age group
w
Click the right arrow
w
Click OK
The rearranged tree will now look as follows:
Figure 22. Rearranged Tree Diagram
SI-CHAID is designed as a useful tool to explore your data. There are no right or wrong trees. Feel free to explore
your data as you wish.
18
USING SI-CHAID
TO IDENTIFY
PROFITABLE SEGMENTS
Tutorial 2: Using SI-CHAID to Identify Profitable
Segments
This tutorial shows how to use the CHAID ordinal algorithm to segment
based on profitability scores. We will again use the magazine subscription data set, subscribe.sav, used previously in Tutorial 1. However, our
dependent variable will now be RESP3, coded 1 (paid responder), 2
(unpaid responder) and 3 (nonresponder). We’ll compare a default
nominal CHAID segmentation of RESP3 to the ordinal CHAID analysis
that takes into account the gain (or loss) associated with each response
group. For simplicity, we utilize the SI-CHAID option settings used in
Magidson (1993).
The Data
For this Tutorial, we will be using the same data file as for Tutorial 1:
Beginning a CHAID Analysis. The file subscribe.sav contains information about a direct marketing promotion used to encourage people to
subscribe to a magazine. Households that were sent the promotion
were categorized as paid responders, unpaid responders, or nonresponders. The data and analyses are described in more detail in
Magidson (1993).
19
SI-CHAID® 4.0 USER'S GUIDE
Modifying the Previous Analysis File
If your analysis file from tutorial #1 is not still open, re-open it:
w
Open the Define program
w
Select Open from the File Menu
w
From the files listed select ‘resp2.chd’ and click the Open button
Figure 23. File Open Dialog Box
Your earlier analysis file is retrieved:
Figure 24. Analysis File for Model1
20
USING SI-CHAID
TO IDENTIFY
PROFITABLE SEGMENTS
To enter the Variables tab of the Model Analysis Dialog Box:
w
Right-click on ‘Model1’ and select ‘Edit’
Or alternatively,
w
double-click on ‘Model1’
Figure 25. Model Analysis Dialog Box
To change the dependent variable from Resp2 to Resp3 and re-scan the
data file:
w
Click on Resp2
w
Click the Dependent button
w
Select Resp3 from the Variables box
w
Click the Dependent button
w
Click Scan
21
SI-CHAID® 4.0 USER'S GUIDE
The Model Analysis Dialog Box should now look like this:
Figure 26. Model Analysis Dialog Box after editing
Assigning Category Scores
Before growing the new tree, we will assign profitability scores to the categories of the dependent variable for
future use. Although the standard CHAID algorithm (the ‘nominal’ algorithm) does not utilize these scores to grow
the tree, the scores may still be used by the gains chart to identify which of the resulting segments are most profitable. Later we will compare results from the nominal segmentation to the segmentation obtained from the ordinal algorithm.
22
w
Right-click on RESP3 in the dependent box of the Model Analysis
Dialog Box
w
In the pop-menu, select Details
USING SI-CHAID
TO IDENTIFY
PROFITABLE SEGMENTS
Figure 27. Options pop-up menu
Clicking Details will bring up the Edit Scores Box
Figure 28. Edit Scores Box
(Alternatively, double-clicking on Resp3 would also get us to this screen)
The first category (Paid Respondent) is highlighted. The default scores correspond to the integer codes used in
the SPSS file – 1,2 and 3. To change the score for Paid Respondents,
w
Double-click on the ‘Paid Respondent’ label
The score ‘1’ is highlighted in the Edit Scores box
w
Replace the score ‘1’ with the score ‘35’ and click the Replace
button
Now repeat these steps for the other categories:
w
Double-click on the second category (‘Unpaid Respondent’).
w
Replace the score ‘2’ with the score ‘-7’ and click the Replace
button.
w
Double-click on the third category (‘Nonresponder’).
23
SI-CHAID® 4.0 USER'S GUIDE
w
Replace the score ‘3’ with the score ‘-0.15’ and click the
Replace
button.
Your screen should now look like this:
Figure 29. Edit Scores Box showing New Category Scores
w
Click OK to return to the Model Analysis Dialog Box
w
Now, go to the Options Tab
w
Change the “Before Merge Subgroup Size” to ‘4500’ and the “After
Merge Subgroup Size” to ‘1500’. These were the settings used in
the Magidson (1994) article.
The Options Tab should now look like this:
Figure 30. Options Tab after Editing
24
USING SI-CHAID
TO IDENTIFY
PROFITABLE SEGMENTS
To save the new analysis file and grow the tree:
w
Click Explore
w
In the File name box type RESP3nom.chd to override the suggested
filename
w
Click the Save button
This tells SI-CHAID to save your analysis settings to an analysis file with the name RESP3nom.chd. All printed
and saved output will be prefixed by the name RESP3nom. Later, we will create another analysis file with named
RESP3ord.chd corresponding to the ordinal algorithm.
After you click Save, SI-CHAID automatically opens ChaidExplore and generates the following 7-segment tree:
Figure 31. Tree Diagram showing 7 Segments
Notice that this RESP3nom solution differs from our earlier 6-segment RESP2 solution (recall Tutorial 1:
Beginning a CHAID Analysis). For example, while HHSIZE is still used for the first split, it is now merged into five
categories instead of four. In our earlier analysis, HHSIZE categories 2 and 3 were merged. Now category 2 is a
separate category and categories 3 and 4 are merged.
To obtain a gains chart for this segmentation,
w
Select ‘New Gains’ from the Windows menu.
25
SI-CHAID® 4.0 USER'S GUIDE
The gains chart appears as follows:
Figure 32. Gains Chart
The most profitable of these 7 segments (at the top of the list) is segment #3. The expected profit of $.16 from
mailing each household in this segment is computed by SI-CHAID as follows:
.0092 x ($35) + .0018 x (-$7) + .9889 x (-$.15) = $0.16
w
Click the X in the upper right of the gain-chart to close it
To display the expected profit in each node of the tree rather than the
percentages for paid, unpaid and non-responders:
w
Right click in any node of the tree diagram
w
Select ‘node items’ from the pop-up menu
w
Click the box to the left of ‘Score’
A check-mark appears in this box.
To remove the percentages from each node of the tree:
w
Click the box to the left of ‘Percents’
The check-mark disappears from this box.
w
26
Click ‘Close’
USING SI-CHAID
TO IDENTIFY
PROFITABLE SEGMENTS
The revised tree display is as follows:
Figure 33. Tree Diagram showing Average Scores
We will now reanalyze these data using the same category scores but we will use the ordinal method, which treats
the dependent variable as ordinal.
w
Return to ChaidDefine and double-click on “Model 1” in the left
pane.
The Model Analysis Dialog Box pops up
w
Right-click on RESP3 in the Dependent variable box and select
Ordinal from the pop-up menu
w
Click Explore
w
Enter the filename RESP3ord.chd so as to not replace our earlier
analysis file RESP3nom.chd
w
Click Save
27
SI-CHAID® 4.0 USER'S GUIDE
The following tree diagram is displayed:
Figure 34. Tree Diagram obtained using Ordinal Algorithm
To display the Nominal and Ordinal segmentation trees side-by-side:
w
Select ‘Tile Vertical’ from the Windows menu
Note that two-person households are now split based on whether they own a bankcard rather than based on Age,
and that the expected gain for two-person households that own a bankcard (0.36) is three times greater than the
expected gain for two-person households that do not own a bankcard (0.12).
Figure 35. Tree Diagrams for Nominal vs. Ordinal Algorithms side-by-side
28
USING SI-CHAID
TO IDENTIFY
PROFITABLE SEGMENTS
Return to the nominal segmentation and click on the node corresponding to HHSIZE =2
w
Right-click and choose ‘Select’
Notice that only a single predictor, AGE, is listed as a candidate for splitting this subgroup using the nominal
method. The nominal test of significance is not powerful enough to identify the important BANKCARD effect. By
taking into account the profitability scores, the ordinal test of significance utilizes only a single degree of freedom.
Thus, it provides a more powerful test of significance and a better segmentation model than the nominal method
(For further details, see Magidson, 1994).
To compare gains charts from the different segmentations:
w
Click in the Window of the nominal segmentation tree to make it
active
w
Click on the root node to make it the current node
w
Select New Gains from the Windows menu
w
Right-click on this gains chart and select Gains Items from the
pop-up menu
w
Select Summary to display the quantile format and change the
default to 5 percentile units
w
Click Close to close this Window
Figure 36. Gains Chart Control Panel
29
SI-CHAID® 4.0 USER'S GUIDE
Repeat these steps to obtain a corresponding gains chart for the ordinal segmentation tree:
w
Click in the Window of the ordinal segmentation tree to make it
active
w
Click on the root node to make it the current node
w
Select New Gains from the Windows menu
w
Right-click on this gains chart and select Gains Items from the
pop-up menu
w
Select Summary to display the quantile format and change the
default to 5 percentile units
w
Click Close to close this Window.
w
Rearrange the gains Windows to present them side-by-side:
Figure 37. Two Gains Charts side-by-side
Comparison of these gains charts show that the ordinal segmentation would be expected to outperform the nominal segmentation for mailings involving profitable segments (less than 50% of all cases). Hence, by taking into
account the profitability scores, the ordinal algorithm provides a more profitable segmentation.
Note: If the node corresponding to HHSIZE=2 is the current node for each tree as in Figure 35,
the gains charts comparison will be based on the parent node.
30
USING SI-CHAID
WITH A
HOLD-OUT SAMPLE
Tutorial 3: Using SI-CHAID with a
Hold-out Sample
Sometimes cases on the analysis file are randomly assigned to a ‘holdout’ sample and not used in the development of the segmentation tree.
Instead, such cases are reserved for the purpose of ‘validating’ the tree.
In this tutorial we utilize the data file holdout.sav to illustrate the use of
SI-CHAID in this way.
In particular, from each dependent category (‘paid respondents’, ‘unpaid
respondents’ and ‘non-responders’) we randomly assigned each case
in the ‘subscrib.sav’ file to one of two equally likely groups by
generating the variable SAMPLE (1=test, 2 = holdout).
31
SI-CHAID® 4.0 USER'S GUIDE
Figure 38. Holdout.sav file
In this tutorial we will use this data file to grow a segmentation tree on the test file and see how well it validates
on the holdout sample. This will be accomplished using the following steps:
•
Use the ‘First predictor’ option to force the variable SAMPLE (test vs. holdout) to yield the
first split
•
Use the ‘auto’ option to grow the tree only on the SAMPLE = test group
•
Save the resulting tree
•
Apply the saved tree to the SAMPLE = ‘holdout’ group
•
Compare gains-charts for the test and holdout samples
w
From the Define program, select File Open ‘holdout.chd’
Your display should now look like Figure 39. Note that the options shown in the Contents Pane indicate that the
tree will be grown using the file ‘holdout.sav’ with the First Predictor option and the Ordinal method.
Figure 39. Holdout.sav in Chaid Define
32
USING SI-CHAID
WITH A
HOLD-OUT SAMPLE
To open the analysis dialog box:
w
From the Model menu select ‘Edit’ (or double click on ‘Model1’)
w
Click Scan
Figure 40. Analysis Dialog Box for Holdout.sav
Note that the dependent, predictor variables and scale types are identical to that used in the ordinal model
developed in Tutorial #2, except that the new variable SAMPLE is used as the first predictor.
w
Click ‘Options’ to open the Options tab
Figure 41. Options Tab for Holdout.sav
33
SI-CHAID® 4.0 USER'S GUIDE
The ‘First Predictor’ option means that the categories of the first predictor variable SAMPLE will be used to define
the initial CHAID split. This is indicated in the Start-Up Mode box.
w
Click Explore
w
When prompted, enter the file name ‘holdout.chd’
w
Select Yes, to replace the current file of the same name
The Explore program opens and grows the tree to one level, using the 2 categories of SAMPLE as shown below.
Figure 42. Tree Diagram for SAMPLE
The contents of the nodes shows that both the SAMPLE = 1 (test group) and SAMPLE = 2 (holdout group) consist of exactly half of the cases (N=40,520), each having an average profit of $.019 per case.
To grow the tree within the test sample,
w
Click on node 1
w
From the Tree menu, select auto
Figure 43. Selecting Auto from the Tree menu
34
USING SI-CHAID
WITH A
HOLD-OUT SAMPLE
The resulting tree consists of 5 segments, numbered 1-5. Segment #2 shows the highest profit ($.467), followed
by segment # 4 ($.237), segment #3 ($.102), segment #1 ($.043) and segment #5 (-$.061).
Figure 44. 5 segment Tree Diagram
One way to apply this tree to the holdout sample is to
w
Select Edit g Copy
w
Click on node #6
w
Select Edit g Paste
An alternative approach is to save the tree to a file and then restore it to the holdout sample
To save the tree in Figure 44 corresponding to SAMPLE=1,
w
from the Tree menu, select Save
w
when prompted for a file name, enter ‘5segments.ctf
w
Click Save
The CHAID tree file ‘5segments.ctf’ is saved
To apply this tree to the holdout sample,
w
click on node #6
w
from the Tree menu, select Restore
w
When prompted for a file, select ‘5segments.ctf’
35
SI-CHAID® 4.0 USER'S GUIDE
w
Click Open
Regardless of which way you chose to apply the tree to the holdout sample, your display will now look like this:
Figure 45. Tree applied to the holdout sample
To compare gains charts for the test and hold-out samples:
w
First, click on the Parent node associated with SAMPLE =1.
w
From the Window menu, select ‘New Gains’
The following Detail view of the Gains Chart appears:
Figure 46. Gains Chart of the Holdout Sample
The segments are sorted from best to worst. The first segment corresponds to node #2, with a score of $0.47.
(Note that in the Tree Diagram, this is displayed to an additional decimal place — 0.467. To fix this gains chart
so it will not change when we make the node SAMPLE = 2 the current node:
w
36
Right click on the gains chart to retrieve the Gains Items
control panel
USING SI-CHAID
WITH A
HOLD-OUT SAMPLE
w
Select Fixed
w
Now, click on the Parent node associated with SAMPLE =2.
w
From the Window menu, select ‘New Gains’
w
Right-click on the new Gains Chart
w
Select Fixed
These gains charts may be used to validate the tree.
w
Rearrange the 2 Gains Charts so they appear side by side:
Figure 47. The two gains charts side-by-side
Notice first, that the rank ordering of the segments in the test sample is found to validate perfectly the holdout
sample. Thus, the best group to target would be segment #2 (which corresponds to node #7 in the holdout sample), next segment #4 (node #9 in the holdout sample), etc.
Note that the gain from mailing to the best segment is estimated to be $.28 (per mail piece) using the holdout
cases, which is lower than the gain of $.47 estimated using the test cases. Similarly, the loss estimated associated with mailing to the worst segment (segment #5) is estimated to be less extreme using the holdout cases ($.02 vs. -$.06). Such ‘regression to the mean’ is a natural phenomenon, which can be expected to occur in test
validation exercises such as this.
The estimates obtained from the holdout sample are unbiased estimates of what would be likely to occur in a rollout. The extent of the ‘regression to the mean’ falloff may be interpreted as a measure of the amount of ‘overfitting’ that is present in the original model developed on the test sample. The expected amount of falloff is in part
a function of the sample size. Thus, a CHAID tree developed on all n=81,040 cases as was done in Tutorial #3,
would be expected to result in less falloff than this CHAID tree. That is why many researchers do not use a holdout sample when estimating CHAID or other statistical models.
37
SI-CHAID® 4.0 USER'S GUIDE
Tutorial 4: Using CHAID with Multiple Correlated
Dependent Variables
Often a segmentation is desired that is predictive of not one but multiple
criteria. For example, in database marketing, dependent variables might
include 1) response to the most recent mailing (responder vs. nonresponder), 2) response to past mailings, 3) the amount spent, 4) profitability,
and possibly others. Magidson and Vermunt (2005) described an extended CHAID algorithm for such situations, which has been implemented in
SI-CHAID 4.0. A copy of that article, entitled An Extension of the CHAID
Tree-based Segmentation Algorithm to Multiple Dependent Variables, is
included with the SI-CHAID 4.0manual, and may also be obtained from
the www.statisticalinnovations.com website.
The Data (Source: 2000 Pre-Post National Election
Studies, U. of Michigan, Center for Political Studies)
The example in Magidson and Vermunt (2005) utilized several demographic variables as potential predictors of 10 attributes (dependent variables)
plus an 11th dependent variable which measured the candidate voted for
in the 2000 U.S. election. Only respondents who voted for Bush or Gore
were included in the analysis.
For this tutorial, the original file is US2000ELEC.sav. We show how to set
up and perform the hybrid CHAID analysis using the data file
US2000electPOST.sav (see Fig. 3) as input. For each case, this file contains the demographic variables as well as the posterior membership probabilities (clu#1, clu#2, clu#3).
Y1 – Y10: These attributes are measured using a 4-point scale in response
to the question “How well does [attribute] describe [candidate]” —
‘extremely well’, ‘quite well’, ‘not too well’, ‘not well at all’. For clarity in interpretation, these response categories were re-coded ‘4’, ‘3’, ‘2’, and ‘1’
respectively, so that higher scores correspond to more favorable opinions.
38
USING CHAID
WITH
MULTIPLE CORRELATED DEPENDENT VARIABLES
The first 5 attribute variables ratings for candidate Gore are:
Y1: MORALG — Morality
Y2: CARESG — Caring
Y3: KNOWG — Knowledgeable
Y4: LEADG — Strong Leader
Y5: HONESTG — Honest (reversed from ‘Dishonest’)
For candidate Bush, the corresponding attribute variables are:
Y6: MORALB
Y7: CARESB
Y8: KNOWB
Y9: LEADB
Y10: HONESTB
and
Y11: Vote: Vote for Bush or Gore during the 2000 U.S. Election
The demographics used as CHAID predictors were:
Z1: EDUC — education
Z2: OCCUP occupation
Z3: GENDER
Z4: AGER — recoded age
Z5: EMPSTAT — employment status
Z6: EDUCR — education
Z7: MARSTAT — marital status
The data file showing the first 6 cases is given below:
Figure 48. The Data File US2000ELEC.sav
As shown in the article, the extended CHAID approach resulted in the 6 demographic segments depicted in the
following CHAID Tree Map:
39
SI-CHAID® 4.0 USER'S GUIDE
Figure 49: Tree Map for 6 CHAID Segments
Steps Used to Obtain the CHAID Segments
As indicated in Magidson and Vermunt (2005), the hybrid CHAID algorithm consists of 3 steps. This tutorial
focuses on steps #2 and #3 which involves the use of the SI-CHAID 4.0 program. For this current example, the
3 steps are:
Step 1: Obtain a proxy for the dependent variables by using Latent GOLD 4.0 to perform a latent class
(LC) analysis based on the responses given to the 11 dependent variables. This step resulted in 3 latent
classes: class 1 (32%) clearly favors Gore – over 99% of this class voted for Gore, class 2 (39%) was
neutral – 50% voted for each candidate, and class 3 (29%) favored Bush – over 98% voted for Bush.
Step 2: Obtain the demographic CHAID segments using the 3-category LC variable as the CHAID
dependent variable. Since this LC variable is a proxy for and is highly predictive of the 11 dependent
variables, demographic segments found by CHAID to be predictive of it, should also be predictive of the
11 dependent variables. To reflect the degree of uncertainty associated with class membership for each
respondent, posterior membership probabilities for belonging to each of the 3 classes is obtained from
the LC model and used directly in the SI-CHAID analysis.
Figure 50: The Data File US2000elecPOST.sav
40
USING CHAID
WITH
MULTIPLE CORRELATED DEPENDENT VARIABLES
Note: Latent GOLD tutorial #4 illustrates a hybrid CHAID performed using a CHAID definition
(.chd) file generated directly by Latent GOLD 4.0. The default settings can be used directly
to produce a CHAID tree immediately or the .chd file can be edited using the CHAID Define
program prior to growing the tree.
Step 3. Obtain segment-level predictions for each of the 11 dependent variables using the segments
obtained from the hybrid CHAID analysis. The following table summarizes the predictive relationship
between these segments (columns) and the dependent variables (rows). The segments are ordered
from high to low on their percentage who voted for Bush. The p-value column shows that with the
single exception of the Bush ‘Knowledgeable’ attribute, the CHAID segments are found to be
statistically significant in predicting each dependent variable. The ‘Total’ column shows that the highest
overall ratings are for Gore on Knowledgeable and Bush on Honesty. Segments #1 and #2 tend to rate
Bush higher than Gore on all attributes, while the reverse is true for Segments #4, #5 and #6.
Figure 51: Table Summary
Comparing this result with segmentation trees obtained from separate CHAID analyses for each dependent
variable using the traditional CHAID algorithm, Magidson and Vermunt concluded:
“The results suggest that segments obtained from the hybrid CHAID may fall somewhat short of predictability of
any single dependent variable in comparison to the original algorithm, but makes up for this by providing a
single unique set of segments that are predictive of all the dependent variables”.
SI-CHAID consists of 2 programs, called ‘CHAID Define’ and ‘CHAID Explore’. Typically, the Define program is
used first to set the analysis options and then the Explore command is executed to perform the CHAID analysis.
w
Open the CHAID Define program
41
SI-CHAID® 4.0 USER'S GUIDE
w
From the File Menu g Select ‘New’
Figure 52: File New Dialog Box
The Analysis Dialog box opens.
Figure 53: The Analysis Dialog Box
w
42
Select the demographic variables as shown in Figure 53
USING CHAID
w
WITH
MULTIPLE CORRELATED DEPENDENT VARIABLES
Click ‘Predictors ->’
The demographic variables are now included in the SI-CHAID Predictors box
w
Select the sampling weight variable SAMPWGT
w
Click ‘Weight’ ->
This variable is now included in the Weight box.
Normally, only a single dependent variable is included in the Dependent box. To specify that the hybrid algorithm
is to be used:
w
Click on ‘Dep Prob’ box
A checkmark appears next to this box. SI-CHAID now knows that posterior membership probabilities will be used
to specify the categories of the dependent variable. To specify the dependent variable:
w
Select the variables CLU#1 – CLU#3
Your screen should now look like this:
Figure 54: The Analysis Dialog Box after editing
w
Click ‘Dependent ->’
The posterior membership probabilities are now moved to the Dependent box.
w
Click ‘Scan’
43
SI-CHAID® 4.0 USER'S GUIDE
SI-CHAID scans the data file and guesses as to the predictor scale types, which appear to the right of each predictor variable name. The scale type ‘Free’ means that CHAID is free to combine any of its categories that are
not significantly different with respect to the dependent variable, while ‘mono’ means that only adjacent categories
may be combined. The ‘float’ scale type setting means that the predictor is treated as ‘mono’ except for the last
(‘floating’) category (generally containing missing values) which is ‘free’ to combine with any category.
To change the setting of MARSTAT to Free:
w
Right click on MARSTAT to retrieve the scale-types pop-up menu
w
Select ‘Free’
Your screen now looks like this:
Figure 55: Analysis Dialog Box with Scale Types Pop-up Menu
To change some other default options:
w
Click ‘Options’
The Options tab opens:
w
Select ‘Auto’ as the Start up Mode
This change allows a tree to be generated automatically with up to 3 levels. Your screen now looks like this:
44
USING CHAID
WITH
MULTIPLE CORRELATED DEPENDENT VARIABLES
Figure 56: Options Tab
w
Change Before Merge Subgroup Size and After Merge Subgroup Size
to 0
To grow the tree:
w
Click ‘Explore’
CHAID prompts you to save the updated definition file named Model1.chd (the default name)
Figure 57. Save File Dialog Box
You may change the name of this file and the directory where it will be saved
45
SI-CHAID® 4.0 USER'S GUIDE
w
Change the name to ‘uselect.chd’
w
Click Save to save the definition file and open the CHAID Explore
program
CHAID Explore opens and displays the resulting segmentation tree.
Figure 58: Segmentation Tree Nodes
Showing the % in each Latent Class
A new feature in SI-CHAID 4.0 is the Save Tree Option.
To save this tree,
w
Make sure that the root node is the current (active) node
w
From the Tree menu, select Save
w
Specify the file name ‘6demosegs’
w
Select Save
The tree is saved in the form of a CHAID tree (.ctf) file named ‘6demosegs.ctf’
46
USING CHAID
WITH
MULTIPLE CORRELATED DEPENDENT VARIABLES
To display the score code for these 6 segments:
From the Window menu
w
Select ‘New Source’
Figure 59: Source Code View
The SPSS syntax code can be used to assign the cases to the appropriate CHAID segments. Once that is accomplished, a table such as shown in Figure 51 can be produced to see how well the segments predict each of the
original 11 dependent variables.
Alternatively, we may use SI-CHAID to see how each of the 11 dependent variables is predicted by the 6 demographic segments. In the remainder of this tutorial, we will show how to do this for the dependent variable VOTE,
and for one of the attribute variables.
w
Return to the CHAID Define program
To re-open the Analysis Dialog box
47
SI-CHAID® 4.0 USER'S GUIDE
w
Right click on ‘Model 1’ and select Edit from the pop-up menu or
double click on Model 1
w
Click to remove the check mark from the ‘Dep Prob’
To move ‘VOTE’ to the Dependent Box
w
Select ‘Vote’ from the Variable List box
w
Click ‘Dependent ->’
w
Click ‘Options’
w
In the ‘Start Up Mode’, select ‘No Action’
w
Click ‘Explore’
Figure 60. New Options Tab
To the request for a new file name:
w
48
Enter the file name ‘Vote.chd’
USING CHAID
w
WITH
MULTIPLE CORRELATED DEPENDENT VARIABLES
Select ‘Save’
The Explore program opens and displays the root node of the tree.
From the Tree menu
w
Select Restore
From the list of file names,
w
select the saved tree file ‘6demosegs’
w
Select OK
The saved segmentation is retrieved with the % voting for Gore displayed in the tree nodes.
To modify this to display to the % voting for Bush:
w
Select Node Items in the View Menu
Figure 61. Tree Node Display
The Tree Node Display panel appears
w
In the Individual Categories box, select Bush and de-select Gore
w
Click Close
The tree now displays the % voting for Bush
49
SI-CHAID® 4.0 USER'S GUIDE
Figure 62. Previously Saved Tree with %
Voting for Bush Displayed in each Node
A summary table is given by the Gains Chart
w
From the Windows menu, select New Gains to open a new gains chart
w
Right click on the gains chart to open the Gains Chart control
panel
w
Select Bush and De-select Gore (the default) and the percent
voting for Bush is now displayed as the ‘Score’
Figure 63. Gains Chart Control Box
50
USING CHAID
WITH
MULTIPLE CORRELATED DEPENDENT VARIABLES
For example, the Gains Chart in Figure 63 shows that segment 1 represents 25.3% of all respondents, and 31.0%
of respondents who voted for Bush. Under the Score column we see that 59.07% of this segment voted for Bush,
as displayed in the tree node. This also matches the corresponding quantity (57.1%) as reported in the table in
Figure 51.
w
Return once again to the CHAID Define program
w
Change the Dependent variable from VOTE to MORALG
w
Right click on ‘MORALG’ and select ‘Ordinal’
To the right of MORALG, ‘Nominal’ changes to ‘ord-fixed’ indicating that the category scores will be used
w
Click Scan
Figure 64. Analysis Dialog Box following a Scan
In the right-most portion of the Dependent box, the number 4 appears, indicating that there are 4 categories for
MORALG.
w
Double click in the dependent box to view the category
frequencies.
51
SI-CHAID® 4.0 USER'S GUIDE
Figure 65. Category Frequencies for MORALG
Note that CHAID automatically deletes cases that are missing on the dependent variable.
w
Click OK
w
Click Explore
w
In response to the request for a file name enter ‘MoralG’
w
Click Save
The Root Node will once again appear.
Figure 66. Root Node
The mean score for Gore on Morality is 2.92.
52
USING CHAID
WITH
MULTIPLE CORRELATED DEPENDENT VARIABLES
To restore the previously saved tree file with MORALG as the new dependent variable,
w
From the Tree menu, select Restore
w
From the list of file names, select the saved tree file
‘6demosegs’
w
Click Open
Figure 67. Previously Saved Tree with
Segment Means Displayed at each Node
Note that this matches the row for MORALG in Figure 51.
It may be of interest to compare the mean segment scores with the segment percentages associated with each
category of the MORALG. To compare these side by side, we will open a second tree window, and change the
node contents for this new tree.
w
From the Windows menu, select ‘New Tree’
w
From the View menu, select ‘Node Items’
w
Select ‘Percents’, and de-select ‘Score’
53
SI-CHAID® 4.0 USER'S GUIDE
Figure 68. Tree Node Display
The contents of the tree nodes in the new tree change from the average scores to the category percentages.
Figure 69. The two Trees side-by-side
Thus, for example, we see that the average MORALG score for segment #1 may be obtained from the percentages in the new tree as follows:
9.22%(1) + 24.31%(2) + 51.90%(3) + 14.57%(4) = 2.72.
54
USING CHAID
WITH
MULTIPLE CORRELATED DEPENDENT VARIABLES
One should not conclude from the results reported here that the hybrid CHAID algorithm will always yield good
predictions of all the dependent variables. It should be noted that the data analyzed in this tutorial consists of
dependent variables which are moderately correlated with each other. Therefore, the LC model used to analyze
these data yielded CHAID segments that were found to be predictive of all the dependent variables.
In contrast to this situation, Latent GOLD tutorial #4 addresses the situation where one of the dependent variables
(UNDERSTAND) is not correlated with two other dependent variables. That tutorial illustrates the use of a different kind of LC model – a model containing 2 discrete latent factors (DFactors) — UNDERSTAND loads on
DFactor #2, while some of the other dependent variables (PURPOSE and ACCURACY) load on DFactor #1. Not
surprisingly, different CHAIDsegmentations are obtained depending upon how the CHAID dependent variable is
defined (i.e., whether it is defined using the latent classes associated with DFactor 1 or DFactor 2). In this
‘uncorrelated’ setting the CHAID segments that are predictive of DFactor 2 turn out not at all to be predictive of
PURPOSE and ACCURACY.
55
SI-CHAID® 4.0 USER'S GUIDE
SI-CHAID Define
The SI-CHAID Define component is used to set up the specifications
for a new model, or to edit existing settings of existing models. The
application is launched with the Define shortcut of the SI-CHAID Start
Menu group. Upon completion of a Define session, the model specifications are saved in a CHAID definition (.chd) file, which provides the
rules used by the SI-CHAID Explore program in growing the tree.
For the purposes of this guide, we will call the left-hand portion of the
Define window the Outline Pane and the right-hand portion the
Contents Pane.
Outline Pane
Contents Pane
Figure 70. Outline and Contents Pane in Define Window
56
SI-CHAID DEFINE
The Outline Pane displays the name of the data file currently open and any of the Models associated with the data
set. SI-CHAID supplies default model names; they may be edited by a single click on the model name. The
Contents Pane displays the details of a specific selected model.
Define Menus
New
The New command is used to select a new data source to analyze. The command displays a standard file selection dialog, which is used to select either an ASCII text file or an SPSS system save file for exploration. If an ASCII
text file is used as input, the first row is required to contain variable names.
Figure 71. File New Dialog Box
After selecting a new data source, SI-CHAID immediately presents the Model Analysis Dialog. This dialog is
described in detail below.
Figure 72. Model Analysis Dialog Box
57
SI-CHAID® 4.0 USER'S GUIDE
Import
The Import command will be present only if you licensed the DBMS/Copy add-on option. DBMS/Copy enables
SI-CHAID to analyze data saved in formats other than ASCII text or SPSS. Most statistical analysis and database software formats are supported. The command displays a standard file open dialog with which the desired
data source can be selected.
Open
The Open command presents a standard file selection dialog with which a previously saved SI-CHAID model may
be re-opened for inspection and modification. Models are by default saved with a .chd extension.
Save
Used to save all model variable specifications and analysis options associated with the current, highlighted SICHAID model. A CHAID definition (.chd) file is created.
Close
The Close command, which is enabled only when a data source is highlighted, removes from view all models
associated with the data source.
Exit
The Exit command closes the Define application.
The Copy command in the Edit Menu may be used to copy text from the Content window pane, or to copy and
paste a tree definition from one parent node of a tree to another as illustrated in Tutorial #3. The Edit menu may
also be used to change the font.
The View Menu has menu items to hide and show the Toolbar and Status bar of the application. The Split menu
item allows the keyboard to be used to change the relative sizes of the Outline and Contents window panes.
Edit
Clicking Edit opens the Model Analysis Dialog Box. Alternatively, you can get to the Model Analysis Dialog Box
by double-clicking on the Model name (such as Model1) in the Outline Pane.
58
SI-CHAID DEFINE
New
New is used to create a new model from the same data file. Clicking New also opens the Model Analysis Dialog
Box which you can use to specify the model variables and analysis options for the new Model. The New Model
appears below the original model in the Outline Pane:
Figure 73. Model2 is the default name for the New Model
By default, the Model name is given as Model2. You can assign any name to a new Model by clicking on the Model
Name.
Explore
Clicking Explore allows you to explore the model in SI-CHAID Explore. When you click Explore, SI-CHAID Define
prompts you to save the Model to be explored. After naming the file, click Save: SI-CHAID Explore will then
launch.
Figure 74. Model Save Dialog Box
59
SI-CHAID® 4.0 USER'S GUIDE
The Help Topics command opens the Help document for SI-CHAID Define. The F1 function key provides, where
possible, more specific help about the current window or dialog. The Toolbar Help button switches the mouse cursor mode: clicking the cursor on a window or menu command will provide help appropriate to the clicked item..
The Toolbar in the SI-CHAID Define window contains shortcuts that duplicate some of the functions of the Menus.
File New
Edit Copy
File Open
Context Help
File Save
Model Analysis Dialog Box
The Model Analysis Dialog Box is used to specify the settings for a new model or change the settings of an existing model. The menu commands Model->New and Model->Edit opens the Variables tab of this dialog box.
Double-clicking a model name also opens it.
The Model Analysis Dialog Box has four sections or Tabs: Variables, Options, Technical, and Predictor Options.
The Variables Tab is the initial view.
Figure 75. Model Analysis Dialog Box
60
SI-CHAID DEFINE
At the bottom of each of these tabs, four buttons are present:
Close – Closes the Model Analysis Dialog box but retains all specifications made during the current session.
Cancel – Closes the Model Analysis Dialog box but any specifications made during the current session
will be lost.
Explore – Launches the Explore program with the current model specifications.
Help — displays help for the features of the current tab
At the bottom of the Options and Technical Tabs, 3 additional buttons are present:
Save as Default – saves the current settings as the new default settings
Default Settings – reverts back to the current default settings
Cancel Changes – cancels any changes made in the current session
All eligible variables that may be included in the analysis are listed in the leftmost list, or Variables list box.
Variables may be designated as one of four types: Dependent Variable, Predictors, Frequency Variable
or Weight Variable. A dependent and at least one predictor must be specified in order to begin an analysis. To select a variable, highlight the variable name (or several names), then click on the appropriate button to move the variable or variables into the corresponding box.
Lexical
Checking this item causes the Variables list to be sorted by variable name. When not checked the “natural” ordering of the data source is used.
Dependent : Assign one variable to be used as the dependent variable.
Latent Class/ Multiple Dependent Variable Options:
Dep Prob - Check this box to specify that a latent categorical variable containing K>1 categories (latent classes) will be used instead of a single observed variable as the dependent variable. Selecting this option allows as many as K variables to be included in the
Dependent box. When K variables are included in the Dependent box, these variables are
the posterior membership probabilities of belonging to each of the latent classes. For an
example involving K=3 latent classes where all 3 posterior membership probabilities are
included in the Dependent box, see Tutorial #4.
Since a typical use of latent class modeling is in data reduction, the resulting latent classes are often predictive of multiple (dependent) variables. In the example illustrated in
Tutorial #4, 3 latent classes are found that underlie 11 dependent variables. Thus, the 3category latent variable serves as a proxy for the 11 dependent variables by specifying it
to be the dependent variable in a CHAID analysis, and the resulting CHAID tree segments
will be predictive of all 11 dependent variables. For further details see Magidson and
Vermunt (2005).
61
SI-CHAID® 4.0 USER'S GUIDE
A typical use of the multiple dependent variable option is to include all K posterior membership probabilities (say variables clu#1, clu#2, and clu#3) in the Dependent box, as illustrated in Tutorial #4. When this is done, the columns of these variables are used as labels
for the dependent variable categories (columns) in the predictor by dependent tables. Note
that for each case, the posterior membership probabilities sum to 1 (e.g., clu#1 + clu#2 +
clu#3 = 1). Thus, an equivalent analysis can be conducted by including K-1 of the posterior membership probabilities in the Dependent box, and selecting the ‘Other’ option (see
‘Other’ below). The Other option provides additional options as well, such as profiling one
latent class vs. all others. For example, inclusion of only ‘clu#1’ in the Dependent box, and
selecting ‘Other’ would yield CHAID segments that are predictive of latent class 1.
When fewer than all K posterior membership probabilities are included in the Dependent
box, and ‘Other’ is not checked, SI-CHAID transforms the probabilities to conditional probabilities, so that they still sum to 1. For example, if K = 3 and clu#1 and clu#2 are included in the Dependent box, and the ‘Other’ box is not checked, SI-CHAID transforms clu#1
to clu#1/[clu#1 + clu#2] and clu#2 to clu#2/[ clu#1 + clu#2]. For example, in the example
in Tutorial #4, latent class 1 favors Gore, latent class 2 is neutral and class 3 favors Bush.
It may be of interest to profile class 1 vs. class 3 without regard to class 2; class 1 vs. class
2 without regard to class 3; or class 3 vs. class 2 without regard to class1. Any one of
these would be specified by including 2 of the posterior membership probability variables
in the Dependent box, and leaving the Other box unchecked.
Note:
If more than one variable is included in the Dependent box, you can
view all of them by clicking on the up/down button to the right of the
box.
Other – When the’ Dep Prob’ box is checked, selection of the ‘Other’ options cause SICHAID to create an additional dependent variable category (the ‘last’ category), having
posterior membership probability equal to 1 minus the sum of the others ( e.g., other = 1 clu#1 – clu#2).
Note:
Use of the ‘Other’ option has an effect only when the Dep Prob option
is also checked.
Case ID: For data files with multiple records per case, use of the Case ID option causes only the first
record per case to be used. By default, no variable is included in the Case ID box. This is indicated by
the box showing ‘<None>’. To include a variable as the Case ID, click on the triangle symbol to the right
of the box, and select the Case ID variable from the list.
Note: Generally the Case ID feature will not be used. If the CHAID output option is specified in
Latent GOLD 4.0 or Latent GOLD Choice 4.0 when estimating a regression model involving
repeated
measurements, the resulting output data file consists of multiple records per case, with the
posterior membership probabilities appended to each record. In such cases, the resulting
.chd file a
utomatically specifies the appropriate case ID to be used in the Case ID box.
Caution: When using the ID feature, records should be grouped by ID. If not grouped, the
program will use more than one record in the analysis for certain cases.
Predictors: Assign one or more variables to be used as predictors.
Frequency Variable: Assign one variable to be used as a frequency variable (optional). A frequency variable should have positive integer values and indicates that each data record should be considered to be replicated by the frequency value.
Weight Variable: Assign one variable to be used as a weight variable (optional). The Weight Variable
is a Sampling Weight and can be any positive value. It is distinct from the above mentioned Frequency
Variable.
62
SI-CHAID DEFINE
Average Weight: Check this option if both Frequency and Weight variables are present, and the
Weight variable is an average weight (to be multiplied by the Frequency).
To deselect a variable, highlight the variable name in either the dependent, predictors, frequency or weight box
and click on the button (now with a reverse pointer) to move the variable back into the Variables list.
Once you have moved the variables to their appropriate boxes, you may further modify their attributes by invoking context menus via a right click or by using the Menu key.
Scale Types
Scale types need to be set for the Dependent and Predictor variables. Following a file scan (see Scan below),
default scale types are set and appear to the right of the variable name.
Dependent Variable Scale Types
The scale type of the dependent variable specifies whether the Nominal or Ordinal CHAID algorithm will be used
in the analysis. The characters ‘nominal’ for Nominal, or ‘ord-fixed’ or ‘ord-unif’ for Ordinal are used. To change
the scale type, right-click on the dependent variable to retrieve the following pop-up menu, and select Nominal or
Ordinal.
Figure 76. Dependent Variable Scale Types pop-up Menu
Nominal – When specified as Nominal, the Nominal CHAID algorithm is used to grow the tree. Scores
for the categories of the dependent variable, if present, are ignored for the purpose of determining statistical significance and estimating p-values for the predictors. See Tutorial #1 for an example of the
Nominal algorithm.
Ordinal - Select Ordinal to use the Ordinal CHAID algorithm method to grow the tree. Category scores
are used for the purpose of determining statistical significance and estimating p-values for the predictors. By default, category scores are preset from numeric values in the data file. Category scores can
be changed using the Variable Detail Dialog box, which can be reached by double clicking the
Dependent variable. See Variable Detail below. See Tutorial #2 for an example of the Ordinal algorithm.
Note: Nominal is the default option except when the dependent variable is a latent categorical variable obtained from the latent GOLD DFactor module. For an example of this situation, see
Latent GOLD Tutorial #4 on the Statistical Innovations website.
Predictor Scale Types
Figure 77. Predictor Scale Types pop-up menu
The predictor scale type specifies how categories of a predictor may be combined. SI-CHAID predictors can be
classified as follows:
63
SI-CHAID® 4.0 USER'S GUIDE
Monotonic - Only adjacent categories may be combined. Used when the predictor categories are
known to be ordered.
Float - The same as monotonic except that the last category (often one which reflects a type of “missing” value) can be combined with any other category.
Free - Any categories may be combined whether or not they are adjacent to each other. Used when
predictor categories have no natural ordering.
Default - If no specific type has been filled in, the predictor will be treated by SI-CHAID as Monotonic
(unless one of the categories has an SPSS missing value setting, in which case it will be treated as
Float).
After assigning the Dependent and Predictor variables, clicking the Scan button causes the Define program to
scan the data file to obtain category counts and any labels associated with the model variables, and establish the
default scale types for the Dependent and Predictor variables. After scanning, the scale type and number of categories appears to the right of the name of the variable. By default, character (string) variables are set to Free,
and numeric variables are set to Monotonic or Float depending upon whether missing values are present on the
data file for that variable. You may double click model variables to open the Variable Detail dialog box to inspect
the results of the scan.
The Variable Detail dialog box contains category information on variables selected as Predictor or Dependent
variables in the Variables tab. It can be used to reduce the number of categories (see Groups), or to change category scores assigned to an ordinal dependent variable (see Scores). The variable detail can be viewed following a file Scan by a double-clicking on a Predictor or Dependent variable. This dialog box can also be reached
by selecting Details from the pop-up menu obtained by a right click on the variable.
For predictors and for the dependent variable, the number of categories can be reduced by entering a grouping
category value having a value of 31 or less. This can be especially useful for continuous numeric variables. The
algorithm used is the same as that of the SPSS rank command, and Proc Rank in SAS. Use the Group button
to see the results of a grouping request.
64
SI-CHAID DEFINE
Editing Scores (Ordinal Dependent Variable Only)
Figure 78. Variable Detail Dialog Box for Ordinal Dependent Variable
Replace
Double-clicking a category causes the score to be placed in the edit box for revision. Use the Replace button to
change the score. Note: The Replace button is active only for dependent variables whose scale type is specified
as Ordinal.
Uniform
Clicking the Uniform button causes evenly spaced scores valued between 0 and 1 to be used.
Fixed
Clicking the Fixed button causes the score values residing in the data file to be restored.
User
Clicking the User button causes any user entered scores to be restored.
Options Tab
Common model settings are set in the Options Tab.
65
SI-CHAID® 4.0 USER'S GUIDE
Figure 79. Options Tab
Depth Limit
Default: 3
Used to limit the size of your tree diagram (that is, how many levels down it goes in automatic mode) by automatically stopping growth after a specified tree level is reached.
This feature is typically set at 2 or 3 in an initial analysis with a large number of predictors. By limiting the analysis to this depth the program run will be completed sooner and the results may be used to eliminate some of the
predictors that do not appear significant during this initial run. A second analysis may then be performed with
fewer predictors, taking less time than the same analysis with many extraneous predictors.
A value of zero (0) implies no theoretical limit. In practice, SI-CHAID is limited to a maximum depth of 30.
To set the Depth Limit, type in a value from 0 - 30.
Before-Merge Subgroup Size
Default : 100
The minimum subgroup size required to allow splitting. SI-CHAID will not analyze any subgroup if the (unweighted) sample size associated with that subgroup falls below this setting. For example, with a setting of 100, any
subgroup that has a sample size of less than 100 will become a terminal node (segment) on the tree diagram.
The value entered must be an integer.
After-Merge Subgroup Size
Default: 50
The minimum final segment (terminal node) size. This option insures that final segments contain at least the specified minimum number of observations. If the number of observations for a potentially new subgroup falls below
this setting, SI-CHAID will automatically combine it with the most similar other category among those with which
it is eligible to be combined. For example, with the default setting of 50, all terminal nodes on the tree diagram
will contain at least 50 observations.
The value entered must be an integer.
66
SI-CHAID DEFINE
Merge Level
Default : 0.05
To control the level of difficulty of combining predictor categories. The higher this level, the more difficult it will be
for categories to be combined. If a level of 1.00 is specified, it is likely that no categories will be merged for any
predictor. To change the level for some, but not all predictors, use the predictor specific merge level available in
the Predictor Tab. Levels assigned in the predictor-specific merge level take precedence over those specified
here.
To set the merge level for all predictors, type in a value from 0-1.00.
Eligibility Level
Default: 0.05
The Eligibility Level specifies the alpha level (type I error rate) for a variable to be considered statistically significant. Only predictors having a p-value less than or equal to this level will be candidates which are eligible for splitting a subgroup.
A p-value of 0.05 for a predictor means that the observed sample relationship between that predictor and the
dependent variable would only occur 5% of the time if the two variables were in fact unrelated in the population.
The lower the p-value, the more significant the relationship.
To change the Eligibility Level, type in a value from 0-1.00.
Startup Mode
Select one of the following alternatives to determine the startup mode for the Explore program.
No Action. Only the root node appears with no analysis having taken place. You can then begin the
analysis any way you wish. This is the default option.
First Predictor. SI-CHAID uses the first variable included in the Predictors box (The ‘First Predictor’) to
perform the first split of your tree diagram based on its original categories (i.e., without attempting to
combine its categories). You can then continue the analysis interactively for any or all of these categories. Tutorial #3 illustrates this feature to split initially on the variable SAMPLE = (test vs. holdout),
and to perform the analysis on the test sample only.
Auto. SI-CHAID Explore performs the entire analysis according to your settings, and stops when the
analysis is complete (or interrupted by clicking on Cancel).
Technical Tab
Click on the Technical Tab to edit various technical parameters of your model. These include
67
SI-CHAID® 4.0 USER'S GUIDE
Figure 80. Technical Tab
Chi-square
Chi-square, applicable under Nominal analyses only, is used to choose between the Likelihood Ratio or Pearson
chi-square. Ordinal analyses always use the Likelihood Ratio chi-square.
The likelihood ratio statistic is denoted as “LR chi-square” in the tables, the Pearson chi-square as “chi-square”.
Bonferroni adjustment
Used to apply the Bonferroni Adjustment. The Bonferroni adjustment is used in the calculation of the p-value for
each predictor in order to take into account the fact that some categories of the predictor were merged together.
The amount of the adjustment depends upon the predictor combine type (Free, Monotonic or Float). In general,
we recommend using the Bonferroni adjustment.
WLM Method
This option allows you to use or not use the weighted log-linear modeling (WLM) algorithm for the computation
of chi-square statistics associated with each predictor. The weighted log-linear method may be turned always on,
always off or allowed to default according to the presence of a weight variable (present: WLM on; not present:
WLM off).
In the case that the weights assigned by a WEIGHT variable are a function of the dependent variable, the WLM
algorithm may be turned off without affecting the statistics, and will speed up the processing. For example, in
the case of a dichotomous dependent variable, where the weight variable is 1 for all observations in category
#1, and say 100 for all observations in category #2, WLM may be turned off.
If complex sampling weights are employed, it is necessary to employ the WLM algorithm to ensure that the analysis is performed correctly.
The Iteration and Epsilon limits may also be set.
Maximum iterations
68
SI-CHAID DEFINE
Set the limit on WLM iterations. If convergence is not achieved to the specified Epsilon level, a warning message
will be written to the Log file. The WLM algorithm almost always converges in 2 or 3 iterations.
Epsilon
Epsilon is used in conjunction with the Maximum Iterations parameter to determine how many iterations are performed. The default setting for Epsilon is zero. The zero is a special setting which causes a specific epsilon to be
calculated for each table according to the formula 0.00001 * (1000 + <table total>).
Command Log
Command Log produces debugging information on the execution of the Explore program. The messages appear
in the Log View of the Explore program.
WLM Iterations
Checking WLM iterations produces iteration information during the execution of the Explore program. The messages appear in the Log View of the Explore program.
Merge/split Report
Checking the Merge/Split Report produces technical information on category merging.
in the Log View of the Explore program.
The messages appear
Num. of est. scores
This setting is for future implementation.
Epsilon
Convergence is achieved if certain parameter values are all found to be within Epsilon of their theoretical
maximum likelihood values after performing at most the Maximum Iterations. Epsilon must be a positive number.
To change the epsilon setting, type in the Epsilon number you want. For example, type ‘1E-8’ for .00000001
The default setting for Epsilon is zero. The zero is a special setting which causes a specific epsilon to be calculated for each table according to the formula 0.00001 * (1000 + <table total>). This setting allows great precision
in the estimation of the p-value.
69
SI-CHAID® 4.0 USER'S GUIDE
Maximum iterations
If the ordinal algorithm does not meet the Epsilon criterion after the maximum number of iterations, the algorithm
stops and the current estimates are used for computing the p-value. The default setting is 100.
Note: If convergence is not achieved after Maximum specified iterations, a warning message is
written to the Log file. In such case, convergence can be achieved by reducing epsilon or
increasing Maximum iterations. However, when convergence is not achieved, the precision
of the p-value that is used is generally good enough for most applications, so no action is
required.
Nominal merge/split
Checking this option directs SI-CHAID to use the standard, and less computationally intensive, Nominal method
for Chi-square calculations during category merge and split.
Score smoothing
This setting is for future implementation.
Predictor Options Tab
Click on the Predictor Options Tab to specify predictor combine types and individual predictor merge levels.
Figure 81. Predictor Options Tab
70
SI-CHAID DEFINE
Combine Type
The predictor combine type specifies how categories of a predictor may be combined. SI-CHAID predictors can
be classified as follows:
Monotonic
Only adjacent categories may be combined. Used when the predictor categories are known to be ordered.
Float
The same as monotonic except that the last category (often one which reflects a “missing” value) can be combined with any other category.
Free
Any categories may be combined whether or not they are adjacent to each other. Used when predictor categories
have no natural ordering.
Default
If no specific type has been filled in, the predictor will be treated by SI-CHAID as Monotonic unless one of the categories has a missing value, in which case it will be treated as Float.
Merge Level
The user can control the level of difficulty of combining categories for a specific predictor by specifying a predictor-specific merge level. The higher the level, the more difficult it will be for categories of this predictor to be combined. If a level of 1.00 is specified, no categories will be merged for that predictor.
To set a predictor specific merge level, type in a number between 0 and 1 in the “Change M. Level” box, then
highlight a variable name and select Merge Level. The merge level will appear in the “Merge Level” column.
If no merge level is specified, the default merge level specified in Standard Options is used. Any predictor specific merge level overrides the merge level specified in Standard Options.
Auto Eligible
Automatic eligibility refers to whether or not a variable is to be considered for use in an analysis that is run in
Automatic start up mode (specified under Standard Options). The default value for all variables is “Yes”.
To exclude a variable from being used in the automatic analysis, highlight the variable name, then click on “No”
under the “Change Eligibility” box. The status of each variable is listed in the “Auto Eligible” column.
Lexical Sort
Checking this item causes the Variables list to be ordered by variable name. When not checked the “natural”
ordering of the data source is used.
71
SI-CHAID® 4.0 USER'S GUIDE
SI-CHAID Explore
Data exploration and analysis takes place in the Explore application of
the SI-CHAID system, where the segmentation tree is grown. The
Explore application can be reached from the Define application or from
the shortcut in the Start Menu. When launched from Define, Explore will
immediately start the analysis based on the specifications in the current
CHAID definition (.chd) file. When independently launched, the user
must select via the File g Open command, a previously saved CHAID
definition (.chd) file. The Explore application has 6 view types - Explore
initially opens a tree view; other views are open via the Window Menu.
Tree Diagram – main tree diagram. Tree nodes have detailed information which may be customized using the Tree Node Display panel.
Multiple Tree Diagram windows may be open, each displaying different
node contents or other customized views.
Tree Map – compact tree diagram, for which the tree nodes show only
an id number. As the Tree Diagrams, multiple Tree Map windows may
be open, each a customized view.
Gains Chart – various tabular representations of the terminal nodes
(segments) from the SI-CHAID tree which may be customized using
the Gains Items panel. Multiple Gains Chart windows may be open,
each with its unique customized appearance.
Table – tabulation of a single predictor by the dependent variable. The
cell entries can be customized using the Table Items panel. Only a single Table may be open.
Source Code – representation of the tree graph using SPSS IF-THEN
program code syntax (default). This may be changed to C-code using
the Code Items panel.
Message Log – informational and warning messages appear here
72
SI-CHAID EXPLORE
Figure 82 illustrates each of these 6 views.
Figure 82. The Various SI-CHAID Explore views
Tree Diagram View
Depending on the Startup option selected, Explore initially opens with a view of the root node of the Tree Diagram,
or a more fully grown Tree Diagram. From this view the SI-CHAID model may be modified by growing, pruning,
or restoring previously saved tree branches or by rearranging category groupings. Operations on the tree take
place on the “current” node which is the highlighted (active) node. Clicking on a node makes it the current node.
The keyboard arrow keys may also be used to change the current node.
Figure 83. Tree Diagram View
73
SI-CHAID® 4.0 USER'S GUIDE
The appearance of the SI-CHAID model as represented by the tree graph may be altered by commands in the
Tree menu obtained from the application’s menu bar. These menu commands may also be reached by performing a right click on the current node.
Figure 84. Tree Menu Commands
Select is used grow the tree by adding nodes corresponding to the (selected) predictor categories. Rearrange
allows the category groupings of an existing predictor to be changed. Delete is used to remove a predictor (and
all lower nodes). The Auto command fills in the tree completely starting at the current (and necessarily empty)
node.
Figure 85. Select Predictor Dialog Box
The information shown contains the predictor id’s, predictor names (variables), p-values (p-Level), corresponding
category symbols (“Categories”) and number of SI-CHAID defined levels (“Groups”). For example, 6->4 means
that after the SI-CHAID merging algorithm was performed, a 6 category variable now has only 4 categories. The
grouping of symbols shows you which categories have been merged.
To Select a predictor to split the current node, click on the predictor name to highlight it, then select OK or just
double click on a highlighted predictor name.
Detail Level
Select from one of the following alternatives to specify which predictors you want displayed in the Tree Select
window.
Significant. Used to list only the significant predictors. This is the default.
2+ categories. Lists only those predictors with 2 or more categories after category merging. This option
will list all significant predictors plus others.
All. Used to list all of the predictors.
74
SI-CHAID EXPLORE
Figure 86. Rearrange Categories Dialog Box
To rearrange predictor categories:
1)
Highlight a category (or categories) in the left-hand Categories box.
2)
Click on the arrow key to move this category (or categories) into the right-hand box. Continue this
process for all original categories you wish to merge together to form new category 1.
3)
When all original categories you wish to be in “new category 1” have been moved, click on Next.
4)
You will now be able to move categories into rearranged category 2 of 2. Continue this process for
as many new categories as you would like to create. Each original category must be selected for
inclusion into one new category.
Use the Prev and Next buttons to view the current rearrangements. Select OK when completed. Note: The
rearranged predictor will be listed with an “*” symbol following its name.
To deselect a category, highlight it in the left-hand box, then click on the reverse arrow key.
Rules regarding predictor combine types (Monotonic, Float or Free) must be followed when combining categories.
For example, if your predictor was classified as Monotonic, SI-CHAID will not allow you to attempt to combine
non-adjacent categories.
Select Current to set the categories to the form they were in before the current rearrange was selected (the
way they last looked within the tree diagram).
Select Split All to rearrange predictor categories so that each original category is separate from the other
categories (i.e., there will be one new category for each old “before merging” category.)
Select Default to revert to the SI-CHAID category arrangement of predictor categories.
Delete eliminates all nodes directly below the current node. This option allows you to prune the tree. Move to the
node immediately above the predictor you wish to delete before selecting Delete. SI-CHAID will delete all splits
directly below the current node. If more than one split exists directly under the current node, SI-CHAID requests
confirmation with a warning message.
75
SI-CHAID® 4.0 USER'S GUIDE
This window can also be reached by right-clicking on any tree node and choosing Hide. This option “hides” all
the nodes below the selected node, making them invisible in the tree. The nodes can be made visible by selecting Hide again.
Figure 87. Node Items Panel
This window can also be reached by right-clicking on any tree node and choosing Node Items. The Node Items
panel allows you to manipulate the way the tree diagram is presented on screen. Note: This option is only available when the Tree Diagram window is active.
Outline - Displays a border around each tree node
Lines - Displays lines between each tree node
Separator 1 - Horizontal line between Node Id and items below.
Separator 2 - Displays lines that separate the dependent variable percentages from the sample size
within each tree node.
Searched - Marks those tree nodes that have been searched.
Arranged – for future implementation.
Category Descriptor - Displays a category number over each tree node.
Node Id - Displays the node id of each Node.
Score - Displays the Node score of each Node.
Labels - Displays labels of dependent variable percentages in each Node.
Frequencies - Displays sample size of each dependent variable percentage in each Node.
76
SI-CHAID EXPLORE
Total - Displays total number of dependent variables in each Node.
Percents - Displays dependent variable percentages in each Node.
Segment Id - Displays the segment ID of each Node.
Variable Name - Displays the Variable Name under each Node.
This option saves the entire tree diagram or a portion of it depending upon whether the root node or some other
node is the current (active) node. Beginning with the current node as parent node, the definition of the tree is
saved to a CHAID Tree (.ctf) file in a way that it can be restored to another node in the current or some other tree
diagram where the same predictor variables are available.
To save the tree corresponding to a parent node and all related child
nodes of a tree diagram,
w
Make sure that the desired parent node is the current (active)
node
w
From the Tree menu, select Save
w
When prompted, specify a file name
w
Select OK
The tree is then saved in the form of a CHAID Tree File with the .ctf extension attached to the file name.
This option restores a previously saved tree beginning at the current (active) node of a tree diagram. This option
works the same as the Edit g Paste, if the tree has been saved to the Clipboard.
To restore a tree:
w
Make sure that the desired location is the current (active) node.
w
From the Tree menu, select Restore
w
When prompted, select the previously saved CHAID Tree (.ctf) file
w
Select OK
77
SI-CHAID® 4.0 USER'S GUIDE
Note: Any child nodes associated with the current (active) node will be overwritten by the saved
tree
Multiple Trees
Multiple Trees may be opened at the same time. Each one may contain the same nodes but the contents of the
nodes may be different. To change the contents for a given Tree Diagram, click on any node to make that Tree
Diagram active and select Node Items.
Tree Separation
These options govern the distance between each node in the tree diagram. These are dimensionless constants.
Node - Horizontal distance between each Node. The default is 3.
Branch - Horizontal distance between each sub-tree. The default is 3.
Vertical - Vertical distance between each Node. The default is 1.25.
Individual Categories
This option allows you to change what dependent variable categories appear in the tree diagram.
Tree Map View
Figure 88. Tree Map View
A tree map view is a tree view with nodes drawn only with node id numbers, thus allowing a greater proportion
of the tree to be visible. It is otherwise identical to the detailed tree view described above.
78
SI-CHAID EXPLORE
Gains Chart View
The Gains Chart View initially displays a tabular summary of the terminal nodes, or “leaves”) associated with the
current (active) parent node of the tree diagram. These terminal nodes represent segments. The gains chart
summary is based on the entire sample and includes all segments when the root node of the tree diagram is the
current node. Otherwise, it is based on the subset of the segments associated with the current parent node. The
view can be modified using a dialog box that can be reached with a right click in the view, or from the View ->
Gains Items menu command.
Figure 89. Gains Items Control Box
Fixed
By default, the contents of the gains chart are based on the segments associated with the current (active) node
in the tree diagram. When a different node becomes active, the contents of the Gains chart changes. Selecting
‘Fixed’ fixes the Gains chart so it will not change when a different node becomes the current parent node. This
option is especially useful in comparing 2 or more gains charts, such as the validation type of application
illustrated in Tutorial #3 where results from a test and holdout sample are compared.
Out-of-date warning message: If the Fixed option is selected, and the Tree diagram itself is modified, a
warning message appears alerting you to the fact that one or more ‘Fixed’ gains charts will be closed if the tree
is modified because such gains charts will become out-of-date. Selecting ‘Yes’ will cause the tree to be modified
and the affected gains charts to be closed.
Figure 90. Gains Chart Detail View
79
SI-CHAID® 4.0 USER'S GUIDE
Detail
A detail view of the gains chart contains a row for each terminal node, or segment, associated with a Parent node
of the tree diagram, and orders all of these segments from best to worst (or worst to best) based on the score
column. The detail gains chart contains an ID number that corresponds to a segment (terminal node) on the tree
diagram. For each segment (row), individual and cumulative information is provided for the number of cases,
(“size”), percentage of total sample (“% of all”), average score of the dependent variable (“score”), and index. The
index for a given segment measures the score for that segment relative to the average score for the total sample.
For Ordinal dependent variables, the default gains charts are based on the average category scores, where the
category scores are the same as those used in the ordinal analysis. The scores used can be changed by clicking the Scores button. For Nominal dependent variables,, by default a score of 100 is used for its first category
of the dependent variable and 0 for all other categories. Hence, the score column reflects the percent in the first
category of the dependent variable.
For both Nominal and Ordinal dependent variables, the quantities displayed in the score column can be changed
to represent the percent in any selected categories of the dependent variable. For details, see Responders option
below.
Note: Clicking on any segment (row) of the Detail Gains chart causes the associated node in the Tree Diagram
to be highlighted (i.e., it becomes the current or active node). This feature will not work, however, if the Gains
Chart becomes ‘out-of-date’ due to a change in the Tree Diagram itself.
Summary
Produces a Summary Gains Chart. The summary report shows cumulative results at fixed percentage points of
the running segment size total. It describes the results that would have been obtained based on the percentage
of cases having the highest (or lowest) average score.
The summary contains the quantile groupings (“tile”), cumulative segment size, cumulative average score and a
cumulative index, calculated as the average response score for that quantile relative to average score for the
entire sample.
Figure 91. Summary Gains Chart
If the average score for the entire sample is less than or equal to 0, the index is not meaningful. In this case, 0
is displayed for all segments.
For nominal dependent variables, a default score of 100 is used for the first category and default scores of 0
are used for all others. Hence, the score column on a summary chart reflects the percent distribution for
80
SI-CHAID EXPLORE
category 1 of the dependent variable.
Selection
A selection report ranks segments from high to low. The dependent category percentage is sorted in descending
order, and the cumulative statistics reflect the successive addition of each new segment.
Elimination
An elimination report ranks segments from low to high. The dependent category percentage is sorted in ascending order, and the cumulative statistics reflect the successive elimination of segments.
Responders
Checking the Responders option adds additional ‘response’ columns labeled “resp” and “%resp” to the gains
chart. In the associated Responders box, labels for each category of the dependent variable appear, preceded by
a check box. The additional columns contain the number of cases and the percentage of cases that are in (any
of) the checked categories.
When the Responders item is checked, the Score columns are computed as if the checked categories have a
score of 100, and the other categories have a score of 0. When this option is NOT selected, the Score columns
in the gains chart reflects the average score (expected value) of the dependent variable.
Scores
Clicking the Scores button displays a dialog for editing of the dependent variable scores.
Scores entered here are used only for the gains chart and not in conducting the actual analysis. (To actually perform an analysis based on new scores, you would need to change the scores using the Ordinal command in the
Method menu.)
Scores
Figure 92. Category Scores Dialog Box for Gains Chart
To change a category score, double click on a category. The current category score is highlighted in the Replace
box. Replace the score with a new score and the Replace button becomes active. Select Replace to replace the
original score with the new value that you have entered.
81
SI-CHAID® 4.0 USER'S GUIDE
Table View
Figure 93. Table View
The table view shows the cross tabulation of one or more predictors with the dependent variable. The dependent
variable categories form the columns and the predictor categories the rows of a table. If the active node is a terminal node, the resulting Table will be empty except for the message “No predictor”. Tables – only one table window can be opened, but this window can display multiple tables. The contents of the table changes depending
upon which tree node is active. For a selected (active) node, by default the table shows row percentages associated with the dependent variable for each (possibly merged) category of the current predictor used to split this
node. This default appearance may be altered by changing the Cell Format, Contents, and/or Predictors options
that appear on the Table Items panel. This panel is reachable by a right click in the table view, or by the View g
Table Items menu command.
Figure 94. Table Items Control Box
82
SI-CHAID EXPLORE
Frequencies
Table entries will be frequency counts
Row Percents (default)
Table entries for each row will be the conditional percentage distribution of the dependent variable. The percentage within each row sum to 100%. If Ordinal method is in use, the last column of the table will contain the average score and the individual dependent variable category scores will appear at the bottom of the table in a row
titled “Scores”.
Column Percents
Table entries for each column will be the percentage distribution of the predictor. The percentages within each column sum to 100%.
Total Percents
Table entries will be the percentage of the total subgroup corresponding to the current (active) node.
Scores
The Total column displays the averages score for the each row. Other columns display row percentages.
Before Merge
Use this option to produce a cross tabulation of the current predictor by the dependent variable BEFORE category merging has taken place for the predictor(s). Category labels for the predictor(s) will be used in this table.
After Merge (default)
This option produces a cross tabulation of the current predictor by the dependent variable AFTER category merging has taken place. If no categories were merged by SI-CHAID, this option will produce the same tables as the
Before option. For the predictor variable, category symbols (instead of labels) are displayed in order to conserve
space. These symbols are 1,2,…,9,a,b,…,z for the first through the last (up to 32) category. The symbol ‘-‘ is used
to indicate adjacent categories have been combined. For example, a row label of ‘1-5’ in an After Merge formatted table indicates that this ‘combined category’ consists of the original categories 1 through 5.
83
SI-CHAID® 4.0 USER'S GUIDE
Current (default)
A table is shown only for the current predictor used to split the active node.
Significant
Tables shown for all predictors that are significant at the active node.
2+ categories
Tables shown for all predictors that were significant (or almost significant) at the active node . Almost significant
means that not all of its categories were merged, but the p-value falls somewhat above the significance cut-off
levels.
All
Tables shown for all predictors.
Source Code View
Figure 95. Source Code View
The source code view shows a program source code that identifies the segments of the SI-CHAID model. The
code can be used to score other data according to the model. The syntax style is either SPSS code or a “C”-like
code. The style is selected via a dialog reached by a right click in the view, or by the View g Code Items menu
command.
84
SI-CHAID EXPLORE
After scoring your data file, the variable ‘chdsegmt’ contains the number of the segment to which the cases are
assigned. If the variable ‘chderror’ contains nonmissing values for any case, this indicates an error was encountered during the scoring process. For such cases, ‘chderror’ contains a missing value.
SI-CHAID Explore Menu Reference
Open
Use Open to select a previously saved CHAID Definition (.chd) file which specifies a data file, variable settings
and other analysis options.
Save
The Save commands the contents of individual Explore views. The Tree and Map views are saved as Windows
Meta Files. All other views are saved as ASCII text files.
Close
The Close command closes all views and ends the analysis of a particular model
Print
The Print command sends the current view to the printer.
Print Preview
The Print Preview command allows the current view to be previewed before actual printing.
Print Setup
Select Print Setup to change print options regarding the type of printer, orientation, paper (size and source) and
other options.
Copy
Selecting this option allows you to copy the selected results to the clipboard. For the tree diagrams, this is a
Windows Meta File picture; for other views, text is placed in the clipboard.
Font
The command allows you to change the font attributes for the Explore views. This is an application level setting,
and is preserved when the application is exited.
85
SI-CHAID® 4.0 USER'S GUIDE
Auto
The Auto command grows the tree automatically from the current node. In Auto mode, SI-CHAID chooses the
predictor with the lowest p-value at each level. SI-CHAID stops growing the tree either when there are no more
significant predictors to split on or when a user-defined limit is reached.
The Auto command will only grow the tree from an empty node. Use the Delete command to remove any existing branches.
Select
Select displays, in a dialog box, predictors available at the current node. Selection of a predictor with this dialog
will replace any existing tree branches.
Rearrange
The Rearrange command displays a dialog for the manipulation of category grouping of the predictor for current
node.
Save
This command creates a CHAID tree (.ctf) file containing the information necessary to reproduce this branch at
another location of the current tree or on some other tree. To use this command, click on a node to make it the
current node, and select Save to save the branch containing this node and all lower nodes connected to it.
Restore
This command restores a previously saved CHAID Tree (.ctf) file at the current tree node location.
Delete
The Delete command “prunes” the tree. The nodes associated with the predictor categories, and all lower nodes
are removed.
Hide
The Hide command removes from view all nodes associated with the predictor categories and all lower nodes.
A mark appears in the left of the node to indicate the hidden nodes.
Node Items
The Node Items command displays a dialog box which allows customization of the tree view.
86
SI-CHAID EXPLORE
Node Items
The Node Items command displays a dialog box which allows customization of the tree view.
Gain Items
The Gain Items command displays a dialog box which allows customization of the Gains Chart view.
Table Items
The Table Items command displays a dialog box which allows customization of the Table view.
Code Items
The Code Items command displays a dialog box which allows customization of the Source code view.
Toolbar
The Toolbar shows or hides the application toolbar.
Status Bar
The Status Bar shows or hides the application status bar.
New Tree
Opens a new Tree view with detailed node contents.
New Tree Map
Opens a new Tree Map view with only node id numbers drawn.
New Gains
Opens a new Gains Chart view.
New Table
Opens a Table view. Only one Table view is allowed.
87
SI-CHAID® 4.0 USER'S GUIDE
New Source
Opens a new Source Code view.
New Log
Opens a new Message Log view.
Contents
Displays the Help document for the application.
About
Displays the application About box with version information.
88