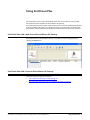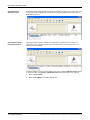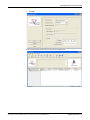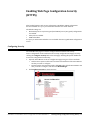
1
Secure Configuration User Guide
Trademark Notices
Comtrol, DeviceMaster, and PortVision are registered trademarks of Comtrol Corporation.
Other product names mentioned herein may be trademarks and/or registered trademarks of their respective owners.
First Edition, March 7, 2011
Copyright © 2010 - 2011. Comtrol Corporation.
All Rights Reserved.
Comtrol Corporation makes no representations or warranties with regard to the contents of this document or to the
suitability of the Comtrol product for any particular purpose. Specifications subject to change without notice. Some
software or features may not be available at the time of publication. Contact your reseller for current product
information.
Document Number: 2000549 Rev A
Table of Contents
Password Authentication, Setting, and Usage ........................................................................................ 5
Authentication Method ................................................................................................................................................................ 5
Setting/Clearing the Password with Telnet.......................................................................................................................... 6
Telnet Help....................................................................................................................................................................................... 7
Web Page Password Access........................................................................................................................................................ 7
Using PortVision Plus....................................................................................................................................... 9
PortVision Plus with a Non-Secured DeviceMaster UP Gateway ................................................................................... 9
PortVision Plus with a Secured DeviceMaster UP Gateway............................................................................................. 9
DeviceMaster UP Already Located ....................................................................................................................................................... 10
DeviceMaster UP Not Previously Located......................................................................................................................................... 10
Enabling Web Page Configuration Security (HTTPS) .........................................................................13
Configuring Security ...................................................................................................................................................................13
DeviceMaster and DeviceMaster UP Secure Configuration User Guide: 2000549 Rev. A
Table of Contents - 3
Table of Contents
This page was intentionally left blank to permit two-sided printing.
4 - Table of Contents
DeviceMaster Modbus Server User Guide: 2000549 Rev. A
Password Authentication, Setting, and Usage
This User Guide discusses secure web configuration for the DeviceMaster and
DeviceMaster UP.
This section discusses the following:
•
Authentication Method
•
Setting/Clearing the Password with Telnet on Page 6
•
Telnet Help on Page 7
•
Web Page Password Access on Page 7
Authentication Method
Before the Web page password access method can be enforced, the log-in authentication
must be set. The following steps must be performed in order for the password access to be
enforced:
1.
Telnet to the DeviceMaster UP by typing: telnet <ip_address> and press Enter.
2.
When prompted for the password, enter the password if one has been set; otherwise,
press Enter.
3.
To display the current authentication setting for the Web page log-in functionality,
type auth.
4.
To enable enforcing of the Web page log-in functionality, set the authentication to
basic. Type auth basic.
5.
To disable enforcing of the Web page log-in functionality, set the authentication to
none. Type auth none.
DeviceMaster and DeviceMaster UP Secure Configuration User Guide: 2000549 Rev. A
Password Authentication, Setting, and Usage - 5
Setting/Clearing the Password with Telnet
6.
Reset the DeviceMaster UP by typing reset and press Enter.
7.
Allow the system to start-up. By default, this typically takes about 15 seconds.
Setting/Clearing the Password with Telnet
The password can be set or cleared with Telnet. Perform the following procedure to set or
clear the password.
1.
Telnet to the DeviceMaster UP.
2.
When prompted for the password, enter the password if one has been set; otherwise,
press Enter.
3.
You can set the password by typing the following, where xxxxxx is the password,
and pressing Enter:
password xxxxxx
4.
Clear the password by typing the following and pressing Enter:
password
5.
Type quit to exit.
6 - Password Authentication, Setting, and Usage
DeviceMaster and DeviceMaster UP Secure Configuration User Guide: 2000549 Rev. A
Telnet Help
Telnet Help
To access the Telnet help, type help.
Type quit to exit.
Web Page Password Access
When the authentication is set to
require a password, such as basic, you
will need to log into each web server
session. To log in:
1.
Leave the User name blank.
2.
Type in your password. If there is
no password configured, leave the
Password blank.
3.
Click OK.
Once logged in, you will have full read/
write access to the web pages.
DeviceMaster and DeviceMaster UP Secure Configuration User Guide: 2000549 Rev. A
Password Authentication, Setting, and Usage - 7
Web Page Password Access
This page was intentionally left blank to permit two-sided printing.
8 - Password Authentication, Setting, and Usage
DeviceMaster and DeviceMaster UP Secure Configuration User Guide: 2000549 Rev. A
Using PortVision Plus
PortVision Plus can be used to automatically locate non-secured devices. Once located,
PortVision Plus will remember the DeviceMaster UP gateway.
PortVision Plus may not be able to automatically locate a secure DeviceMaster UP gateway.
If the DeviceMaster UP gateway is configured to enforce security before PortVision Plus
has located it, then you may have to add the DeviceMaster UP to the device list manually.
PortVision Plus with a Non-Secured DeviceMaster UP Gateway
PortVision Plus can automatically locate non-secured DeviceMaster UP gateways by
clicking the Scan button.
PortVision Plus with a Secured DeviceMaster UP Gateway
This subsection discusses two scenarios:
•
DeviceMaster UP Already Located on Page 10
•
PortVision Plus with a Secured DeviceMaster UP Gateway on Page 9
DeviceMaster and DeviceMaster UP Secure Configuration User Guide: 2000549 Rev. A
Using PortVision Plus - 9
DeviceMaster UP Already Located
DeviceMaster UP
Already Located
If PortVision Plus had located the DeviceMaster UP gateway before security was enforced,
it will keep the DeviceMaster UP in its device list. The DeviceMaster UP will now have a
lock symbol next to it.
DeviceMaster UP Not
Previously Located
If PortVision Plus had not located the DeviceMaster UP gateway before security was
enforced, it may not be able to locate the DeviceMaster UP. A screen similar to the one
shown below is displayed.
The DeviceMaster UP will need to be added to the list by using the Add New Device option.
In PortVision Plus, click Device->Add New Device and the following screen appears.
10 - Using PortVision Plus
1.
Enter a Device Name.
2.
Enter the IP Address of the DeviceMaster UP.
DeviceMaster and DeviceMaster UP Secure Configuration User Guide: 2000549 Rev. A
DeviceMaster UP Not Previously Located
3.
Click OK.
Now PortVision Plus will be able to locate the DeviceMaster UP.
DeviceMaster and DeviceMaster UP Secure Configuration User Guide: 2000549 Rev. A
Using PortVision Plus - 11
DeviceMaster UP Not Previously Located
This page was intentionally left blank to permit two-sided printing.
12 - Using PortVision Plus
DeviceMaster and DeviceMaster UP Secure Configuration User Guide: 2000549 Rev. A
Enabling Web Page Configuration Security
(HTTPS)
After loading firmware with secure configuration capabilities, HTTPS configuration
becomes available. It is up to you to determine which access will be allowed.
The default settings are:
•
Both HTTP (non-secure/unencrypted) and HTTPS (secure/encrypted) configurations
are enabled.
•
Telnet/ssh are enabled.
•
SNMP is disabled.
It is up to you to determine whether or not to disable the unencrypted HTTP configuration
access.
Configuring Security
The embedded web pages are used to configure the DeviceMaster UP security.
Secure configuration mode is enabled on the security configuration web page screen by
clicking the Configure Security link on the main page. Selecting this option disables the
non-secure configuration functionality.
1.
2.
Open the DeviceMaster UP Server Configuration page using one of these methods:
•
Web browser: Open a web browser and enter the IP address of the DeviceMaster
UP that you want to configure.
•
PortVision Plus: Start PortVision Plus, click Scan, right-click the DeviceMaster UP
that you want to configure, and then click Web Manager.
Click Configure Security on the home page.
DeviceMaster and DeviceMaster UP Secure Configuration User Guide: 2000549 Rev. A
Enabling Web Page Configuration Security (HTTPS) - 13
Configuring Security
3.
On the Edit Security Configuration page: click Enable Secure Config Mode if you want
to provide this level of security, which disables the following features:
•
Telnet access to administrative and diagnostic functions is disabled. If enabled,
SSH log ins are still allowed.
•
Unencrypted access to the web server via port 80 (http:// URLs) is disabled.
Encrypted access to the web server via port 443 (https:// URLs) is still allowed.
•
Administrative commands that change configuration or operating state and are
received using the Comtrol proprietary TCP driver protocol on TCP port 4606 are
ignored.
•
Administrative commands that change configuration or operating state and are
received using the Comtrol MAC mode proprietary Ethernet protocol number
0x11FE are ignored.
4.
If necessary, click Enable Telnet/ssh.
5.
If necessary, click Enable SNMP.
14 - Enabling Web Page Configuration Security (HTTPS)
DeviceMaster and DeviceMaster UP Secure Configuration User Guide: 2000549 Rev. A
Configuring Security
6.
If required, click Set on the Edit Security Configuration page to configure RSA key
pair used by SSL and SSH servers.
The RSA Key Pair is used to sign the Server RSA Certificate. This verifies that the
DeviceMaster UP is authorized to use the server RSA identity certificate. If the Server
RSA Key is to be replaced, a corresponding RSA identity certificate must also be
generated and uploaded. If this is not done, clients will not be able to verify the identity
certificate.
Note: Possession of the private portion of this key pair could allow someone to pose as
the DeviceMaster UP.
7.
a.
Click Browse to locate the server RSA key.
b.
Click Upload.
If required, click Set on the Edit Security Configuration page to configure the
RSAServer Certificate used by SSL servers.
This is the certificate that the DeviceMaster UP uses during SSL/TLS handshaking to
identify itself. It is used most frequently by the DeviceMaster UP SSL server firmware
when clients open connections to the DeviceMaster UP's secure web server or other
secure TCP ports. In order to function properly, this certificate must be signed using
the Server RSA Key. This means that the server RSA certificate and server RSA key
must be replaced as a pair.
a.
Click Browse to locate the RSA server certificate.
b.
Click Upload.
DeviceMaster and DeviceMaster UP Secure Configuration User Guide: 2000549 Rev. A
Enabling Web Page Configuration Security (HTTPS) - 15
Configuring Security
8.
If required, click Set to enter the DH Key Pair used by SSL servers on the Edit
Security Configuration page.
This is the private/public key pair that is used by some cipher suites to encrypt the
SSL/TLS handshaking messages.
Note: Possession of the private portion of the key pair can allow an eavesdropper to
decrypt traffic on SSL/TLS connections that use DH encryption during
handshaking.
a.
Click Browse to locate the private/public key pair.
b.
Click Upload.
16 - Enabling Web Page Configuration Security (HTTPS)
DeviceMaster and DeviceMaster UP Secure Configuration User Guide: 2000549 Rev. A
Configuring Security
9.
If required, click Set on the Edit Security Configuration page to upload the Client
Authentication Certificate used by SSL servers.
If a CA certificate is uploaded, the DeviceMaster UP only allows SSL/TLS connections
from client applications that provide to the DeviceMaster UP an identity certificate.
This identity certificate must have been signed by the CA certificate that was uploaded
to the DeviceMaster UP. The uploaded CA certificate is used to validate a client's
identity.
•
The uploaded CA certificate is sometimes referred to as a trusted root certificate,
a trusted authority certificate, or a trusted CA certificate.
•
The uploaded CA certificate might be that of a trusted commercial certificate
authority or it may be a privately generated certificate that an organization
creates internally to provide a mechanism to control access to resources that are
protected by the SSL/TLS protocols.
•
To control access to the DeviceMaster UP's SSL/TLS protected resources you
should create your own custom CA certificate and then configure authorized
client applications with identity certificates signed by the custom CA certificate.
a.
Click Browse to locate the Client Authentication Certificate.
b.
Click Upload.
10. After completing the key and certification management, click Save.
DeviceMaster and DeviceMaster UP Secure Configuration User Guide: 2000549 Rev. A
Enabling Web Page Configuration Security (HTTPS) - 17
Configuring Security
11. To allow the changes to become affective, click Reboot.
18 - Enabling Web Page Configuration Security (HTTPS)
DeviceMaster and DeviceMaster UP Secure Configuration User Guide: 2000549 Rev. A