1
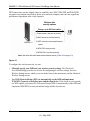
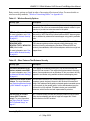
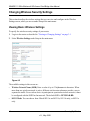
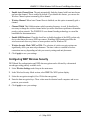
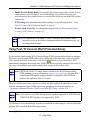
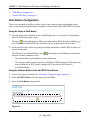
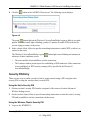
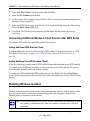
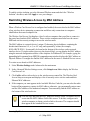
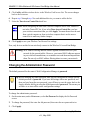
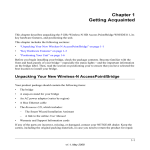
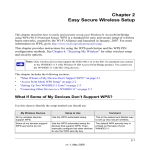
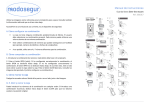
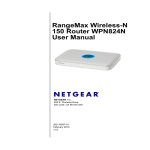
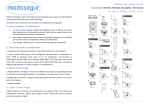
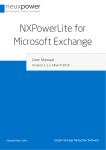
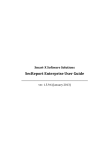
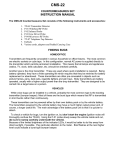
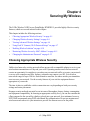
Chapter 4
Securing My Wireless
The 5 GHz Wireless-N HD Access Point/Bridge WNHDE111 provides highly effective security
features, which are covered in detail in this chapter.
This chapter includes the following sections:
• “Choosing Appropriate Wireless Security” on page 4-1
• “Changing Wireless Security Settings” on page 4-4
• “Viewing Advanced Wireless Settings” on page 4-6
• “Using Push 'N' Connect (Wi-Fi Protected Setup)” on page 4-7
• “Enabling Wireless Isolation” on page 4-10
• “Restricting Wireless Access by MAC Address” on page 4-11
• “Changing the Administrator Password” on page 4-12
Choosing Appropriate Wireless Security
Unlike wired networks, wireless networks allow anyone with a compatible adapter to receive your
wireless data transmissions well beyond your walls. Operating an unsecured wireless network
creates an opportunity for outsiders to eavesdrop on your network traffic or to enter your network
to access your computers and files. Indoors, computers can connect over 802.11n/a wireless
networks at ranges of up to 500 feet. Such distances can allow for others outside your immediate
area to access your network. Use the security features of your wireless equipment that are
appropriate to your needs.
The time it takes to establish a wireless connection can vary depending on both your security
settings and router placement.
Stronger security methods can entail a cost in terms of throughput, latency, battery consumption,
and equipment compatibility. In choosing an appropriate security level, you can also consider the
effort compared to the reward for a hacker to break into your network. As a minimum, however,
NETGEAR recommends using WEP with Shared Key authentication. Do not run an unsecured
wireless network unless it is your intention to provide free Internet access for the public.
4-1
v1.1, May 2008
WNHDE111 5GHz Wireless-N HD Access Point/Bridge User Manual
WEP connections can take slightly longer to establish. Also, WEP, WPA-PSK, and WPA2-PSK
encryption can consume more battery power on a notebook computer, and can cause significant
performance degradation with a slow computer.
Wireless data
security options
Range: up to 500 foot radius
1) Open system: easy but no security
2) MAC access list: no data security
WNHDE111
3) WEP: security but some performance
impact
4) WPA-PSK: strong security
5) WPA2-PSK: very strong security
Note: Use these with other features that enhance security (Table 4-2 on page 4-3).
Figure 4-1
To configure the wireless network, you can:
•
Manually specify your SSID and your wireless security settings. The Wireless-N
AccessPoint/Bridge provides two screens for configuring the wireless settings: the basic
Wireless Settings screen, which you access under Setup in the main menu, and the Advanced
Wireless Settings screen.
•
Use Wi-Fi Protected Setup (WPS) to automatically set the SSID and implement
WPA/WPA2 security on both the router and the client device. If the clients in your network
are WPS capable, you can use Wi-Fi Protected Setup (WPS) to automatically set the SSID and
implement WPA/WPA2 security on both the bridge and the client device.
4-2
Securing My Wireless
v1.1, May 2008
WNHDE111 5GHz Wireless-N HD Access Point/Bridge User Manual
Basic security options are listed in order of increasing effectiveness below. For more details on
wireless security methods, “Wireless Networking Basics” in Appendix B.
Table 4-1. Wireless Security Options
Security Type
Description
None.
No wireless security. Recommended only for troubleshooting wireless
connectivity. Do not run an unsecured wireless network unless it is your
intention to provide free Internet access for the public.
WEP. Wired Equivalent Privacy.
For more information, see “Configuring WEP Wireless Security”
on page 4-5.
Wired Equivalent Privacy (WEP) data encryption provides moderate
data security. WEP Shared Key authentication and WEP data encryption
can be defeated by a determined eavesdropper using publicly available
tools.
WPA-PSK (TKIP).
WPA2-PSK (AES).
WPA-PSK (TKIP) + WPA2-PSK
(AES). Mixed mode.
For more information, see “Configuring WPA Wireless Security”
on page 4-6.
Wi-Fi Protected Access with Pre-Shared Key (WPA-PSK and WPA2PSK) data encryption provides extremely strong data security, very
effectively blocking eavesdropping. Because WPA and WPA2 are
relatively new standards, older wireless adapters and devices might not
support them.
Table 4-2. Other Features That Enhance Security
Security Type
Description
Turn off the broadcast of the
wireless network name SSID.
For more information, see “Viewing Advanced Wireless Settings”
on page 4-6.
If you disable the broadcast of the SSID, only devices that know the
correct SSID can connect. This nullifies the wireless network discovery
feature of some products such as Windows XP, but your data is still fully
exposed to an intruder using available wireless eavesdropping tools.
Restrict access based on MAC
address. For more information,
see “Restricting Wireless Access
by MAC Address” on page 4-11.
You can restrict access to only trusted computers so that unknown
computers cannot wirelessly connect to the Wireless-N AccessPoint/
Bridge. MAC address filtering adds an obstacle against unwanted access
to your network by the general public, but the data broadcast over the
wireless link is fully exposed. This data includes your trusted MAC
addresses, which can be read and impersonated by a hacker.
Use the Push 'N' Connect
feature (Wi-Fi Protected
Setup). For more information,
see “Using Push 'N' Connect
(Wi-Fi Protected Setup)” on
page 4-7.
Wi-Fi Protected Setup provides easy setup by means of a push button.
Older wireless adapters and devices might not support this. Check
whether devices are WPS enabled.
Securing My Wireless
4-3
v1.1, May 2008
WNHDE111 5GHz Wireless-N HD Access Point/Bridge User Manual
Changing Wireless Security Settings
This section describes the wireless settings that you can view and configure in the Wireless
Settings screen, which you access under Setup in the main menu.
Viewing Basic Wireless Settings
To specify the wireless security settings of your router:
1. Log in to the router as described in “Viewing or Changing Settings” on page 3-1.
2. Select Wireless Settings under Setup in the main menu.
Figure 4-2
The available settings in this screen are:
•
Wireless Network Name (SSID). Enter a value of up to 32 alphanumeric characters. When
more than one wireless network is active, different wireless network names provide a way to
separate the traffic. For a wireless device to participate in a particular wireless network, it must
be configured with the SSID for that network. The default SSID is NETGEAR-HD.
•
802.11 Mode. You can choose from: Mixed 802.11n and 802.11a; 802.11n only; or 802.11a
only.
4-4
Securing My Wireless
v1.1, May 2008
WNHDE111 5GHz Wireless-N HD Access Point/Bridge User Manual
•
Enable Auto Channel Scan. The unit automatically finds the channel with least interference
and uses that channel. This is enabled by default. If you disable this feature, you can use the
Wireless Channel option to manually pick a channel.
•
Wireless Channel. When Auto Channel Scan is disabled, use this option to manually pick a
channel.
•
Channel Width. This field determines which operating frequency is used. It should not be
necessary to change the wireless channel unless you notice interference problems with another
nearby wireless network. The WNHDE111 uses channel bonding technology to extend the
bandwidth for data transmission.
•
Enable SSID Broadcast. Clear this check box to disable broadcast of the SSID, so that only
devices that know the correct SSID can connect. Disabling SSID broadcast nullifies the
wireless network discovery feature of some products such as Windows XP.
•
Wireless Security Mode: WEP or WPA. The selection of wireless security options can
significantly affect your network performance. The time it takes to establish a wireless
connection can vary depending on both your security settings and unit placement.
3. Click Apply to save your settings.
Configuring WEP Wireless Security
WEP Shared Key authentication and WEP data encryption can be defeated by a determined
eavesdropper using publicly available tools.
1. Select Wireless Settings under Setup in the main menu.
2. In the Wireless Security Mode section, select WEP. The WEP options display.
3. Select the encryption strength (64 or 128 bit data encryption).
4. Enter the data encryption keys. These values must be identical on all computers and access
points in your network.
5. Click Apply to save your settings.
Securing My Wireless
4-5
v1.1, May 2008
WNHDE111 5GHz Wireless-N HD Access Point/Bridge User Manual
Configuring WPA Wireless Security
Note: Not all wireless adapters support WPA. Furthermore, client software is also
required. Windows XP with Service Pack 2 does include WPA support.
Nevertheless, the wireless adapter hardware and driver must also support WPA.
For instructions on configuring wireless computers or PDAs (personal digital
assistants) for WPA-PSK security, consult the documentation for the product you
are using. Check whether newer drivers are available from the manufacturer.
Wi-Fi Protected Access with Pre-Shared Key (WPA-PSK and WPA2-PSK) provides extremely
strong security, very effectively blocking eavesdropping. Both methods dynamically change the
encryption keys making them nearly impossible to circumvent. WPA2 adds support for hardware
based AES, which adds improved performance and the strongest data encryption.
Mixed mode allows clients using either WPA-PSK (TKIP) or WPA2-PSK (AES). This provides
the most reliable security, and is easiest to implement, but it might not be compatible with older
adapters.
To configure WPA-PSK, WPA2-PSK, or WPA-PSK+WPA2-PSK:
1. Select Wireless Settings under Setup in the main menu.
2. Select one of the WPA-PSK or WPA2-PSK options for the security type. The WPA + WPA2
options the most flexible, since it allows clients using either one.
3. In the Passphrase field, enter a word or group of 8–63 printable characters. The passphrase is
case-sensitive.
4. Click Apply to save your settings.
Viewing Advanced Wireless Settings
This section describes the wireless settings that you can view and specify in the Advanced
Wireless Settings screen, which you access under Advanced in the main menu.
1. Log in to the unit.
2. Select Advanced Wireless under Advanced in the main menu.
The available settings in this screen are:
4-6
Securing My Wireless
v1.1, May 2008
WNHDE111 5GHz Wireless-N HD Access Point/Bridge User Manual
•
Enable Wireless Router Radio. If you disable the wireless router radio, wireless devices
cannot connect to the Wireless-N AccessPoint/Bridge. If you will not be using your
wireless network for a period of time, you can clear this check box and disable all wireless
connectivity.
•
WPS Settings. For information about these settings, see the following section, “Using
Push 'N' Connect (Wi-Fi Protected Setup)” on page 4-7.
•
Wireless Card Access List. For information about this list, see “Restricting Wireless
Access by MAC Address” on page 4-11.
.
Note: The Fragmentation Threshold, CTS/RTS Threshold, and Preamble Mode
options are reserved for wireless testing and advanced configuration only. Do
not change these settings.
Using Push 'N' Connect (Wi-Fi Protected Setup)
If your wireless clients support Wi-Fi Protected Setup (WPS), you can use this feature to configure
the router’s network name (SSID) and security settings and, at the same time, connect a wireless
client securely and easily to the router. Look for the
symbol on your client device. WPS
automatically configures the network name (SSID) and wireless security settings for the router (if
the router is in its default state) and broadcasts these settings to the wireless client.
Note: NETGEAR’s Push 'N' Connect feature is based on the Wi-Fi Protected Setup
(WPS) standard (for more information, see http://www.wi-fi.org). All other Wi-Ficertified and WPS-capable products should be compatible with NETGEAR
products that implement Push 'N' Connect.
When you add wireless clients, whether or not they are WPS enabled, the added devices must
share the same network name (SSID) and security passphrase. For more information, see
“Connecting Additional Wireless Client Devices after WPS Setup” on page 4-10.
Note: If you choose to use WPS, the only security methods supported are WPA-PSK and
WPA2-PSK. WEP security is not supported by WPS.
The Wireless-N AccessPoint/Bridge provides two methods for connecting to a wireless client that
supports WPS, described in the following sections:
Securing My Wireless
4-7
v1.1, May 2008
WNHDE111 5GHz Wireless-N HD Access Point/Bridge User Manual
•
•
“Push Button Configuration”
“Security PIN Entry” on page 4-9
Push Button Configuration
There are two methods to enable a wireless client to join a network using a push button on the
router: using the physical push button or using the software button in the Add WPS Client screen.
Using the Physical Push Button
1. Press the button on the Wireless-N AccessPoint/Bridge for over 5 seconds. For information
about the WPS button light, see the .
The green
button light begins to blink in a regular pattern. While the light is blinking, you
have 2 minutes to enable WPS on the client that you are trying to connect to the router.
2. On the wireless client, follow its specific networking instructions to enable WPS, to allow it to
connect to the router.
The Wireless-N AccessPoint/Bridge’s green
when one of these conditions occurs:
button light ceases blinking and remains on
•
The router and the client establish a wireless connection.
•
The 2-minute window period expires for establishing a WPS connection. If the connection
is not established, no WPS security settings will be specified in the Wireless-N
AccessPoint/Bridge.
Using the Software Button in the Add WPS Client Screen
1. Log in to the router as described in “Viewing or Changing Settings” on page 3-1.
2. Select Add WPS Client in the main menu, and click Next.
3. Select the Push Button setup method.
Figure 4-3
4-8
Securing My Wireless
v1.1, May 2008
WNHDE111 5GHz Wireless-N HD Access Point/Bridge User Manual
4. Click the
button in the Add WPS Client screen. The following screen displays:
Figure 4-4
The green
button light on the Wireless-N AccessPoint/Bridge begins to blink in a regular
pattern. While the button light is blinking, you have 2 minutes to enable WPS on the device
you are trying to connect to the router.
5. In the wireless client, follow its specific networking instructions to enable WPS, to allow it to
connect to the router.
The Wireless-N AccessPoint/Bridge’s green
when one of these conditions occurs:
button light ceases blinking and remains on
•
The router and the client establish a wireless connection.
•
The 2-minute window period expires for establishing a WPS connection. If the connection
is not established, no WPS security settings will be specified in the Wireless-N
AccessPoint/Bridge.
Security PIN Entry
There are two ways to enable a wireless client to join a network using a PIN: using the unit’s
security PIN or using the wireless client’s security PIN.
Using the Unit’s Security PIN
1. Obtain your unit’s security PIN from the rear panel of the router or from the Advanced
Wireless Settings screen.
2. On the wireless client, follow its specific networking instructions to enter the router’s security
PIN and to establish a wireless connection with the router.
Using the Wireless Client’s Security PIN
1. Log in to the WNHDE111.
Securing My Wireless
4-9
v1.1, May 2008
WNHDE111 5GHz Wireless-N HD Access Point/Bridge User Manual
2. Select Add WPS Client in the main menu, and click Next.
3. Select the PIN Number setup method.
4. On the wireless client, obtain its security PIN, or follow its specific networking instructions to
generate a client security PIN.
5. In the Add WPS Client screen of the Wireless-N AccessPoint/Bridge, enter the client security
PIN in the Enter Client’s PIN field.
6. Click Next. The following screen displays, and the Smart Wizard initiates the wireless
connection:
Connecting Additional Wireless Client Devices after WPS Setup
You can add WPS-enabled and non-WPS-enabled client devices.
Adding Additional WPS-Enabled Clients
To add an additional wireless client device that is WPS enabled, follow the procedures in “WPS
Push Button Client Setup” on page 2-3 or “WPS PIN Entry Setup of WIreless Clients” on
page 2-4.
Adding Additional Non-WPS-Enabled Clients
If you are connecting a combination of WPS-enabled clients and clients that are not WPS enabled,
you cannot use the WPS setup procedures to add clients that are not WPS enabled. You need to
record and then manually enter your security settings.
To connect non-WPS-enabled and WPS-enabled clients to the Wireless-N AccessPoint/Bridge,
use the default security key on the back label of the unit, and configure the client for WPA2 using
this key:
Enabling Wireless Isolation
Wireless isolation prevents wireless clients from communication with one another. However, this
does not prevent wireless clients from communicating with other computers connected via
Ethernet cables, or computers on the Internet.
Note: Do not use this feature if you will use wireless connections for such things as multiuser gaming, or transferring files from one computer to another over a wireless
connection.
4-10
Securing My Wireless
v1.1, May 2008
WNHDE111 5GHz Wireless-N HD Access Point/Bridge User Manual
To enable wireless isolation, go to the Advanced Wireless menu and check the “Wireless
Isolation” checkbox, and click Apply to save your changes.
Restricting Wireless Access by MAC Address
When a Wireless Card Access List is configured and enabled, the router checks the MAC address
of any wireless device attempting a connection and allows only connections to computers
identified on the trusted computers list.
The Wireless Card Access List displays a list of wireless computers that you allow to connect to
the router based on their MAC addresses. These wireless computers must also have the correct
SSID and wireless security settings to access the wireless router.
The MAC address is a network device’s unique 12-character physical address, containing the
hexadecimal characters 0–9, a–f, or A–F only, and separated by colons (for example,
00:09:AB:CD:EF:01). It can usually be found on the bottom of the wireless card or network
interface device. If you do not have access to the physical label, you can display the MAC address
using the network configuration utilities of the computer. In WindowsXP, for example, typing the
ipconfig/all command in an MSDOS command prompt window displays the MAC address as
Physical Address. You might also find the MAC addresses in the router’s Attached Devices screen.
To restrict access based on MAC addresses:
1. Select Wireless Settings under Advanced in the main menu.
2. In the Advanced Wireless Settings screen, click Setup Access List to display the Wireless
Card Access List.
3. Click Add to add a wireless device to the wireless access control list. The Wireless Card
Access Setup screen opens and displays a list of currently active wireless cards and their
Ethernet MAC addresses.
4. If the computer you want appears in the Available Wireless Cards list, you can select the radio
button of that computer to capture its MAC address; otherwise, you can manually enter a name
and the MAC address of the authorized computer. You can usually find the MAC address on
the bottom of the wireless device.
Tip: You can copy and paste the MAC addresses from the router’s Attached Devices
screen into the MAC Address field of this screen. To do this, configure each
wireless computer to obtain a wireless link to the router. The computer should
then appear in the Attached Devices screen.
Securing My Wireless
4-11
v1.1, May 2008
WNHDE111 5GHz Wireless-N HD Access Point/Bridge User Manual
5. Click Add to add this wireless device to the Wireless Card Access List. The screen changes
back to the list screen.
6. Repeat step 3 through step 5 for each additional device you want to add to the list.
7. Select the Turn Access Control On check box.
Note: When configuring the unit from a wireless computer whose MAC address is
not in the Trusted PC list, if you select Turn Access Control On, you lose
your wireless connection when you click Apply. You must then access the unit
from a wired computer or from a wireless computer that is on the access
control list to make any further changes.
8. Click Apply to save your Wireless Card Access List settings.
Now, only devices on this list can wirelessly connect to the Wireless-N AccessPoint/Bridge.
Warning: MAC address filtering adds an obstacle against unwanted access to your
network by the general public. However, your trusted MAC addresses appear
in your wireless transmissions, so an intruder can read them and impersonate
them. Do not rely on MAC address filtering alone to secure your network.
Changing the Administrator Password
The default password for the router’s Web Configuration Manager is password.
Tip: Before changing the router password, back up your configuration settings with the
default password of password. If you save the settings with a new password, and
then you later forget the new password, you will have to reset the router back to the
factory defaults, and log in using the default password of password. This means you
will have to re-enter all the router configuration settings.
To change the administrator password:
1. On the main menu, under Maintenance, select Set Password to display the Set Password
screen.
2. To change the password, first enter the old password, then enter the new password twice.
3. Click Apply.
4-12
Securing My Wireless
v1.1, May 2008