1
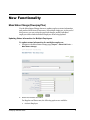
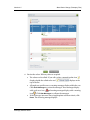
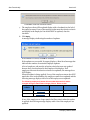
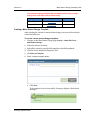
Release Notes
Powerpay
Version 4.2
New Functionality
Version 4.2
Purpose
Release Notes are created prior to the release of each new version of Powerpay
Web, and offer detailed information regarding new functionality, new screens,
enhancements and bug fixes within that version.
Version 4.2
Scheduled Release Date: July 2012
07/2012
2
Powerpay Release Notes
Contents
New Functionality ..........................................................................................................4
Mass Status Change (Powerpay Plus) ....................................................... 4
Updating Status Information for Multiple Employees ................................... 4
Creating a Mass Status Change Template.................................................. 9
Opening a Mass Status Change Template................................................ 10
Renaming a Mass Status Change Template ............................................. 10
Deleting a Mass Status Change Template ................................................ 10
New Earning Codes (Powerpay Plus)....................................................... 11
Enhancements ..............................................................................................................13
ROE-SAT................................................................................................... 13
Status Change Page .................................................................................. 13
Hire Profile Page and Employee Profile – Year-End Page ............................ 15
Government Numbers Page........................................................................ 15
Powerpay Release Notes
3
New Functionality
Mass Status Change (Powerpay Plus)
Use the Mass Status Change feature to update employee status information
and produce ROE forms (if necessary) for multiple employees. At the end of
this process, you can review the proposed changes, modify individual
employees and exclude individual employees from being updated.
Updating Status Information for Multiple Employees
To update status information for multiple employees:
1. Navigate to the Mass Status Change page (Payroll → Mass Edit Tools →
Mass Status Change).
2. Select the Action to be Taken.
For Regular and Extra runs, the following options are available:
•
Activate Employee
Powerpay Release Notes
4
Version 4.2
Mass Status Change (Powerpay Plus)
•
Process current pay; Produce ROE form; Employee remains active
•
Process current pay; Produce ROE form; Employee is then terminated
•
Process current pay; Produce ROE form; Employee is then put on leave
•
Process current pay; Do not produce ROE form; Employee is then
terminated
•
Do not process current pay; Do not produce ROE form; Employee is
then terminated
•
Do not process current pay; Produce ROE form; Employee is then put
on leave
•
Do not process current pay; Produce ROE form; Employee is then
terminated
•
Do not process current pay; Do not produce ROE form; Employee is
then put on leave
•
Activate employee; Process current pay; Produce ROE form; Then
terminate employee
•
Reverse Status
For ROE runs, the following options are available:
•
Do not process current pay; Produce ROE form; Employee is then put
on leave
•
Do not process current pay; Produce ROE form; Employee is then
terminated
•
Reverse Status
After an action is selected, the Update Method section displays the fields
relevant for the action.
3. Complete the fields in the Update Method section. Required fields display
with a red asterisk.
4. Select filter criteria to specify which employees should be updated. The
following filter criteria are available:
•
Employee Hire Date Range – select employees within a hire date range.
•
Employee Last Day Worked Range - select employees within a last day
Employees whose hire date is on, or following the start date and on or
before the end date are included. If only a start date is selected, all
employees with a start date on or after the selected date display in the
Employee List. If only an end date is selected, all employees with a hire
date on or prior to the selected date display in the Employee List.
worked range. Employees whose last day worked is on, or following the
start date and on or before the end date are included. If only a start date
is selected, all employees with a last day worked date on or after the
selected date display in the Employee List. If only an end date is
Powerpay Release Notes
5
New Functionality
Version 4.2
selected, all employees with a last day worked date on or prior to the
selected date display in the Employee List.
•
Distributions (ID X, ID Y, ID Z and ID Dept) – select the distributions to
•
Province of Employment – select the province of employment for the
•
Status – select the status of the employees to update.
include. Only the distributions set up for your payroll display. Only
employees with the distributions are included.
employees to update. Only employees in the selected province are
included.
5. Click Preview .
The Employee List displays all of the employees within the open pay period
that meet the filter criteria. It includes:
•
Select checkboxes
•
Employee Number
•
Employee Name
•
Status
•
Last Day Worked
•
Re-hire Date
•
Last Day for Which Paid (Box 11)
•
Final Pay Period Ending Date (Box 12)
•
Reason for Issuing the ROE (Box 16)
The columns are included in the table when the corresponding fields are
populated in the Update Method section.
For the Reverse Status action, the Employee List includes the additional
columns:
•
Status – the current employee status to be reversed.
•
Action to be reversed – the status change action to be reversed.
The list is sorted by Employee Number by default. To change the sort, click
on a column name.
Click on an employee name link to review of read-only version of the
Employee Profile for the selected employee.
The number of employees that meet the filter criteria and the number of
employees selected for update display below the Employee List.
6
Powerpay Release Notes
Version 4.2
Mass Status Change (Powerpay Plus)
6. Review the values. Edit any values as required.
•
The values can be edited. If you edit a value, a manual update icon
displays beside the edited value and
top of the list.
•
All employee specific error or warning messages display within the row.
Click Show Messages to review the messages. Error messages display
with a red error icon
icon
•
displays at the
and warning messages display with a warning
. Click Hide Messages to collapse the messages.
If the values are incorrect due to inappropriate selection criteria, click
Reset. The following message displays:
Powerpay Release Notes
7
New Functionality
Version 4.2
Click OK to reset the selection criteria.
7. The employees that will be updated display with a checkmark to the left of
the employee name. If any of the employees that meet the selection criteria
and display in the Employee List should NOT be updated, clear the
checkbox.
8. Click Apply.
A message displays indicating the number of updates.
If the number is correct, click OK to continue.
If the updates are successful, Powerpay displays a Data Saved message that
indicates the number of successful employee updates.
A list of employees who met the selection criteria but were not updated
because they were deselected in the Employee List displays. If all
employees who met the selection criteria were updated, this message does
NOT display.
When the update is being applied, if any of the employees status does NOT
match the value in the database, the employee status is not updated and the
following message displays with a list of the employees not updated:
The following employee(s) status did not update because their status
changed during the mass status change process. Please review.
Employee
Number
Employee Name
Current Status
Old Status
10100
Duke, Daisy
Terminated
Active
10150
Jones, James
On Leave
Active
If any of the employees no longer match the filter criteria when the update
is applied, the following message displays with a list of the employees not
updated:
8
Powerpay Release Notes
Version 4.2
Mass Status Change (Powerpay Plus)
The following employee(s) Status did not update because they no longer
belong to the same filter criteria. Please review.
Employee Number
Employee Name
Status
10100
Duke, Daisy
Terminated
10150
Jones, James
On Leave
Creating a Mass Status Change Template
After selecting the criteria for a mass status change you can save the selection
criteria for future use.
To create a mass status change template:
1. Navigate to the Mass Status Change page (Payroll → Mass Edit Tools →
Mass Status Change).
2. Select the action to be taken.
3. Select filter criteria to specify which employees should be updated.
4. Click Preview to display the Employee List.
5. Click Save as Template.
6. Enter a unique template name.
a. Click Save.
If the template is saved successfully, Powerpay displays a Data Saved
message.
Powerpay Release Notes
9
New Functionality
Version 4.2
If the template name entered already exists, Powerpay displays an error
message.
Repeat step 6 and enter a new template name.
Opening a Mass Status Change Template
To open a Mass Status Change template:
1. Navigate to the Mass Status Change page (Payroll → Mass Edit Tools →
Mass Status Change).
2. Click on the Template link.
A list of saved templates displays.
3. Select a template to open.
4. Click Open Template.
The template opens and displays all of the employees who meet the
selection criteria in the employee list.
Renaming a Mass Status Change Template
To rename a Mass Status Change template:
1. Navigate to the Mass Status Change page (Payroll → Mass Edit Tools →
Mass Status Change).
2. Click the Template link.
A list of saved templates displays.
3. Click Rename.
The Rename Template Name dialogue box opens.
4. Enter the new template name.
5. Click Rename. The new template name displays in the template list.
Deleting a Mass Status Change Template
To delete a Mass Status Change template:
1. Navigate to the Mass Status Change page (Payroll → Mass Edit Tools →
Mass Status Change).
10
Powerpay Release Notes
Version 4.2
New Earning Codes (Powerpay Plus)
2. Click the Template link.
A list of saved templates displays.
3. Click Delete.
4. Click OK. The template is deleted and no longer displays in the template list.
New Earning Codes (Powerpay Plus)
Powerpay 4.2 includes 80 new earning codes, for a total of 123. When the new
earning codes are enabled:
• Earning codes 01-09 are removed and 010-099 are available for Powerpay
Plus customers
• All earning code pay elements are included in the Gross to Net calculation
on the Company Totals page and Employee Details page.
• Pay elements hours and earnings are available for selection in the
Description drop-down lists on the following pages:
• Reversal
•
•
•
•
Manual
•
Employee Timesheet – Regular Payment
•
Employee Timesheet – Second Payment
•
Year-End Adjustments
Pay elements hours and earnings are included in data verification totals on
the Data Verification page.
Pay elements Rates, Factors Earnings are available on the Permanent Rates,
Factors, Earnings page.
Pay elements, hours and/or earnings, are available for selection:
• for the Second Payment – Regular Run page on the Rapid Entry Second Payment page.
•
for the Employee Timesheet – Regular Payment page and the Employee
Timesheet – Second Payment page on the Employee Timesheet
Defaults page.
•
for Regular Run – Regular Payment on the Rapid Entry Set Up –
Regular Run – Regular Payment page.
•
for Extra Run – Regular Payment on the Rapid Entry Set Up – Extra
Run – Regular Payment page.
•
for Regular Run – Second Payment on the Rapid Entry Set Up –
Regular Run – Second Payment page.
•
for Extra Run – Second Payment on the Rapid Entry Set Up – Extra
Run – Second Payment page.
Powerpay Release Notes
11
New Functionality
•
Version 4.2
Pay elements, hours and/or earnings are included on:
• The Rapid Entry – Regular Payment page based on the selections on
the Rapid Entry Set Up – Regular Run – Regular Payment page.
•
•
•
12
The Rapid Entry – Second Payment page based on the selections on the
Rapid Entry Set Up – Regular Run – Second Payment page.
Pay elements are available on the Permanent Earnings Cycle page.
Adjustment amounts can be entered for pay elements on the YTD
Adjustments page.
Powerpay Release Notes
Enhancements
ROE-SAT
Service Canada has updated the requirements for submitting electronic ROE’s.
The following enhancements are now available in Powerpay to comply with
Service Canada’s new requirements.
Status Change Page
•
All mandatory fields must be completed correctly before the ROE form
displays. If the required fields are invalid or incomplete, Powerpay displays
the error message:
The employee has invalid and/or incomplete information for the following
fields:
Field description
As these are mandatory fields in order to complete this ROE form, return to
the Employee Profile Screen and enter the appropriate values.
•
Box 2 – Serial Number or Replaced ROE: If not blank, the Serial Number
must begin with one of the following uppercase values: A, E, L, K, W or S
followed by 8 numbers. The Serial Number must be 9 alphanumeric
characters in total.
•
Box 10 – First Day Worked:
•
•
The date must be later than or equal to the current cheque date minus
50 years inclusively.
•
The First Day Worked or Last Day for Which Paid must NOT overlap
with the First Day Worked or Last Day for Which Paid for all previous
SAT ROEs issued by the same employer Canada Revenue Agency (CRA)
Payroll Account Number (Business Number) for the same Social
Insurance Number. If the Payroll reference Numbers on the ROEs are
different, then an overlap is allowed and the ROE will not fail
validation.
Box 11 – Last Day for Which Paid: The date must be before or equal to the
current date plus 14 days inclusively.
•
Box 12 – Final Pay Period Ending Date: Based on the Pay Period Type, the
following validation applies:
• Weekly: Cannot be more than 6 days after Last Day for Which Paid
(Box 11)
•
Bi-Weekly: Cannot be more than 13 days after Last Day for Which Paid
(Box 11)
Powerpay Release Notes
13
Enhancements
Version 4.2
•
•
•
Semi-Monthly: Cannot be more than 15 days after Last Day for Which
Paid (Box 11) and must be the 15th or the last day of the month.
•
Monthly: Cannot be more than 30 days after Last Day for Which Paid
(Box 11) and must be the last day of the month.
•
Non-Standard Semi-Monthly: Cannot be more than 15 days after Last
Day for Which Paid (Box 11) and cannot be the 15th or the last day of the
month (exception – the Final Pay Period Ending Date can be the 28th of
February when it is not a leap year and the 29th of February for a leap
year).
•
Non-Standard Monthly: Cannot be more than 30 days after Last Day
for Which Paid (Box 11) and cannot be the last day of the month
(exception – the Final Pay Period Ending Date can be the 28th of
February when it is not a leap year and the 29th of February for a leap
year).
Box 14 – Expected Date of Recall:
•
Accepted values are: Unknown, Not Returning and Date of Recall.
•
Defaults to ‘Unknown’
•
The date must be blank if ‘Not Returning’ or ‘Unknown’ are selected.
•
The date must be later than the Last Day for Which Paid (Box 11).
•
The Expected Date of Recall is not allowed when the Reason for Issuing
this ROE is Quit, Retirement or Dismissal.
Box 17A, B and C- Vacation Pay:
•
Field A – Vacation Pay
•
• If in use, amount must be between $0.01 and $999999.99.
• Must have 2 digits after the decimal.
Field B – Statutory Holiday Pay For
•
•
•
•
•
•
Must be unique for all Statutory Holiday payments
The amount must be between $0.01 and $999999.99.
Must have 2 digits after the decimal.
Must be later than the Last Day For Which Paid (Box 11)
Must not be greater than 12 months after the Last Day For Which
Paid (Box 11)
Field C – Other Monies
•
•
•
The amount must be between $0.01 and $999999.99.
Must have 2 digits after the decimal.
Box 18 – Comments: Must not exceed 160 characters.
•
Box 19 – Special Payment:
•
14
The amount must be between $0.01 and $999999.99.
Powerpay Release Notes
Version 4.2
ROE-SAT
•
•
Must have 2 digits after the decimal.
•
If completed, the Start Date must be later than or equal to the cheque
date minus 50 years inclusively.
•
If a Payment Start Date and Amount is entered, a period (Per Day or
Per Week) must be selected.
Box 21 – Issuer’s Phone Number: The Area Code must be 3 numeric
characters and the phone number must be 7 numeric characters.
Hire Profile Page and Employee Profile – Year-End Page
The S.I.N. number is validated to ensure that the first character is NOT a ‘0’ or
‘8’.
Government Numbers Page
The CRA Business Number is validated to ensure that it begins with a ‘1’, ‘7’ or
‘8’. Previously ‘7’ was not a valid first character.
Powerpay Release Notes
15