1
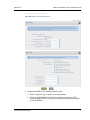
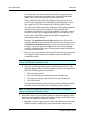
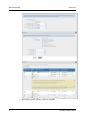
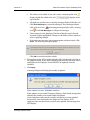
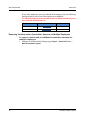
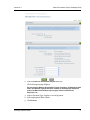
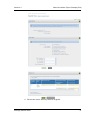
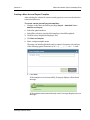
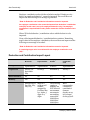
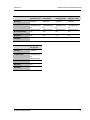
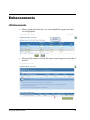
Release Notes
Powerpay
Version 4.3
New Functionality
Version 4.3
Purpose
Release Notes are created prior to the release of each new version of Powerpay
Web, and offer detailed information regarding new functionality, new screens,
enhancements and bug fixes within that version.
Version 4.3
Scheduled Release Date: October 2012
10/2012
2
Powerpay Release Notes
Contents
New Functionality ..........................................................................................................4
Mass Accumulator Payout (Powerpay Plus) .............................................. 4
Paying Out Vacation and/or Accumulator Amounts for Multiple Employees . 4
Removing Vacation and/or Accumulator Amounts for Multiple Employees 10
Creating a Mass Accrual Payout Template ............................................... 15
Opening a Mass Accrual Payout Template ............................................... 16
Renaming a Mass Accrual Payout Template............................................. 16
Deleting a Mass Accrual Payout Template................................................ 16
Deductions and Contributions Import...................................................... 17
Deduction and Contribution Import Layout ................................................... 18
Enhancements ..............................................................................................................20
UI Enhancements ..................................................................................... 20
Tax Form Processing ............................................................................... 21
Tax Exemptions ......................................................................................... 21
Statutory Deductions Page ....................................................................... 21
Hire/Profile Page ...................................................................................... 21
Postal / Zip Code Messaging .................................................................... 21
ROE-SAT................................................................................................... 22
Hire Profile Page ........................................................................................ 22
Powerpay Release Notes
3
New Functionality
Mass Accumulator Payout (Powerpay Plus)
Use the Mass Accumulator Payout feature to pay out vacation and/or
additional accumulator amounts for multiple employees, or to perform a mass
removal of mass accumulator payouts, eliminating the need to do them
individually. Accumulator payouts can be made on either Regular or Second
Payments.
At the end of this process, you can review the proposed changes, modify
individual employees and exclude individual employees from being included.
The Mass Accumulator Payout feature is available for Powerpay Plus
customers with:
• at least one accumulator plan setup, and/or
• a Vacation Accumulator option – Vacation Accumulator functionality is
required for both accruing vacation entitlement for employees and for
paying out hours/earnings, and/or
• an Additional Accumulator option – Additional Accumulator functionality
is required for paying out vacation from a previous year or for both
accruing additional entitlement for employees and for paying out
hours/earnings.
Paying Out Vacation and/or Accumulator Amounts for Multiple Employees
To pay out vacation and/or additional accumulator amounts for
multiple employees:
1. Navigate to the Mass Status Change page (Payroll → Mass Edit Tools →
Mass Accumulator Payout).
Note: This option is only available for Regular and Extra runs.
Powerpay Release Notes
4
Version 4.3
Mass Accumulator Payout (Powerpay Plus)
2. Complete the fields in the Update Method section.
a. Select a Payment Type, regular or second payment.
b. Select an Applicable Period of Time from the drop-down list. This
selection applies ONLY to employees without previously saved entries
on the Timesheet.
Powerpay Release Notes
5
New Functionality
Version 4.3
For regular runs, the default value in this field is your payroll’s pay
frequency. For extra runs, the default value in this field is No Time
Taken. This is the usual setting for an extra payroll run.
Select a different value only if the earnings you are paying are for a
period of time other than the standard pay period frequency. In that
case, apply the CPP/QPP exemption for a specific period of time.
The value in this field controls the calculation of CPP/QPP exemptions
and the amount of income tax deducted. The yearly CPP/QPP
exemption is calculated on a per-pay-period basis. This value controls
the portion of the yearly exemption allowable for the employee’s pay.
Set the value of this field to apply the CPP/QPP exemption the
appropriate number of times.
Example: The Applicable Period of Time setting has no effect on the
company deductions and contributions taken, and you may have to use
the Deductions & Contributions page to enter one-time overrides. For
example, you may be paying an employee for four weeks, including
vacation. A deduction that comes off every payroll must be doubled, or
a deduction will be missed.
c. Select a Pay out Accumulator option from the drop-down list (required
for companies with a vacation accumulator and/or an additional
accumulator set up).
Note: This field only displays for companies with a vacation accumulator
and/or an additional accumulator set up.
d. Select a For which pay period? option from the drop-down list. This
field only displays after a selection is made in the Pay out Accumulator
field. The following options are available:
• The current pay period
• Up to five future pay periods in the current calendar year.
• Up to five previous pay periods for the current calendar year.
• Last PPN worked.
The dates display based on the payroll’s pay period end dates from the
Calendar screen. If left blank, the current pay period is selected.
Note: This field only displays for companies with a vacation accumulator
and/or an additional accumulator set up.
3. Select filter criteria to specify which employees should be updated. Active
employees and employees with pending status changes are included in the
filter. The following filter criteria are available:
•
6
Pay Type – select the pay types to include. All Employees is selected by
default. All hourly employee pay types and all salary employee pay
Powerpay Release Notes
Version 4.3
Mass Accumulator Payout (Powerpay Plus)
types (that do not include paying out both Vacation and Additional
Accumulator together) display. Select or clear the options as
applicable. At least one check box must be selected.
•
Distributions (ID X, ID Y, ID Z and ID Dept) – select the distributions to
•
Province of Employment – select the province of employment for the
include. Only the distributions set up for your payroll display. Only
employees with the distributions are included.
employees to update. Only employees in the selected province are
included.
4. Click Preview .
The Employee List displays all of the employees within the open pay period
that meet the filter criteria. It includes:
•
Select checkboxes
•
Employee Number
•
Employee Name
•
Applicable Period of Time
•
Vacation Accumulator
•
For which pay period?
•
Additional Accumulator
•
For which pay period?
The list is sorted by Employee Number by default. To change the sort, click
on a column name.
Click on an employee name link to review a read-only version of the
Employee Profile for the selected employee.
The number of employees that meet the filter criteria and the number of
employees selected for update display below the Employee List.
Powerpay Release Notes
7
New Functionality
Version 4.3
5. Review the values. Edit any values as required.
8
Powerpay Release Notes
Version 4.3
Mass Accumulator Payout (Powerpay Plus)
•
The values can be edited. If you edit a value, a manual update icon
displays beside the edited value and
top of the list.
•
All employee specific error or warning messages display within the row.
Click Show Messages to review the messages. Error messages display
with a red error icon
icon
•
•
displays at the
and warning messages display with a warning
. Click Hide Messages to collapse the messages.
Values entered on the Employee Timesheet (Regular and/or Second
Payment) display highlighted. Changes can be made to these selections
prior to applying changes.
If the values are incorrect due to inappropriate selection criteria, click
Reset. The following message displays:
Click OK to reset the selection criteria.
6. The employees that will be updated display with a checkmark to the left of
the employee name. If any of the employees that meet the selection criteria
and display in the Employee List should NOT be updated, clear the
checkbox.
7. Click Apply.
A message displays indicating the number of updates.
If the number is correct, click OK to continue.
If the updates are successful, Powerpay displays a Data Saved message that
indicates the number of successful employee updates.
A list of employees who met the selection criteria but were not updated
because they were deselected in the Employee List displays. If all
employees who met the selection criteria were updated, this message does
NOT display.
Powerpay Release Notes
9
New Functionality
Version 4.3
If any of the employees were not selected in the employee list, the following
message displays with a list of the employees not updated:
The following employee(s) Accumulator(s) did not update because they were
not selected in the Employee List.
Employee Number
Employee Name
Status
10100
Duke, Daisy
Active
10150
Jones, James
Active
Removing Vacation and/or Accumulator Amounts for Multiple Employees
To remove vacation and/or additional accumulator amounts for
multiple employees:
1. Navigate to the Mass Status Change page (Payroll → Mass Edit Tools →
Mass Accumulator Payout).
10
Powerpay Release Notes
Version 4.3
Mass Accumulator Payout (Powerpay Plus)
2. Select the Remove Accumulator Payout check box.
The following message displays:
By selecting the Remove Accumulator Payout check box, all Employees with
entire accumulator payouts that were entered on the Employee Timesheet
and on the Mass Accumulator Payout pages will be included in the
Employee List.
3. Select a Payment Type, regular or second payment.
4. Select appropriate filter criteria.
5. Click Preview .
Powerpay Release Notes
11
New Functionality
Version 4.3
The Employee List displays all of the employees within the open pay period
that meet the filter criteria. It includes:
•
Select checkboxes
•
Employee Number
•
Employee Name
•
Applicable Period of Time
•
Vacation Accumulator
•
For which pay period?
•
Additional Accumulator
•
For which pay period?
The list is sorted by Employee Number by default. To change the sort, click
on a column name.
Click on an employee name link to review the read-only version of the
Employee Profile for the selected employee.
The number of employees that meet the filter criteria and the number of
employees selected for update display below the Employee List.
12
Powerpay Release Notes
Version 4.3
Mass Accumulator Payout (Powerpay Plus)
6. Review the values. Edit any values as required.
Powerpay Release Notes
13
New Functionality
Version 4.3
•
The values can be edited. If you edit a value, a manual update icon
displays beside the edited value and
top of the list.
•
All employee specific error or warning messages display within the row.
Click Show Messages to review the messages. Error messages display
with a red error icon
icon
•
displays at the
and warning messages display with a warning
. Click Hide Messages to collapse the messages.
If the values are incorrect due to inappropriate selection criteria, click
Reset. The following message displays:
Click OK to reset the selection criteria.
7. The employees that will be updated display with a checkmark to the left of
the employee name. If any of the employees that meet the selection criteria
and display in the Employee List should NOT be updated, clear the check
box.
8. Click Apply.
All payouts selected and recorded for that pay run for the selected
employees are removed. The applicable fields on the Regular and Second
Timesheet are changed to the following as applicable:
•
Vacation Accumulator – “No - Not Applicable this pay”.
•
Additional Accumulator – “No - Not Applicable this pay”.
•
For which time period? – blank.
A message displays indicating the number of updates.
If the number is correct, click OK to continue.
If the updates are successful, Powerpay displays a Data Saved message that
indicates the number of successful employee updates.
14
Powerpay Release Notes
Version 4.3
Mass Accumulator Payout (Powerpay Plus)
Creating a Mass Accrual Payout Template
After selecting the criteria for a mass accrual payout you can save the selection
criteria for future use.
To create a mass accrual payout template:
1. Navigate to the Mass Accrual Payout page (Payroll → Mass Edit Tools →
Mass Accrual Payout).
2. Select the update method.
3. Select filter criteria to specify which employees should be updated.
4. Click Preview to display the Employee List.
5. Click Save as Template.
6. Enter a unique template name.
The name can include alphabetic and/or numeric characters only and any
of the following special characters: $ % ! + () . , _ - / \ * : = & ; “ <> and ‘
a. Click Save.
If the template is saved successfully, Powerpay displays a Data Saved
message.
If the template name entered already exists, Powerpay displays an error
message.
Powerpay Release Notes
15
New Functionality
Version 4.3
Repeat step 6 and enter a new template name.
Opening a Mass Accrual Payout Template
To open a mass accrual payout template:
1. Navigate to the Mass Accrual Payout page (Payroll → Mass Edit Tools →
Mass Accrual Payout).
2. Click on the Template link.
A list of saved templates displays.
3. Select a template to open.
4. Click Open Template.
The template opens and displays all of the employees who meet the
selection criteria in the employee list.
Renaming a Mass Accrual Payout Template
To rename a Mass Accrual Payout template:
1. Navigate to the Mass Accrual Payout page (Payroll → Mass Edit Tools →
Mass Accrual Payout).
2. Click the Template link.
A list of saved templates displays.
3. Click Rename.
The Rename Template Name dialogue box opens.
4. Enter the new template name.
5. Click Rename. The new template name displays in the template list.
Deleting a Mass Accrual Payout Template
To delete a Mass Accrual Payout template:
1. Navigate to the Mass Accrual Payout page (Payroll → Mass Edit Tools →
Mass Accrual Payout).
2. Click the Template link.
A list of saved templates displays.
16
Powerpay Release Notes
Version 4.3
Deductions and Contributions Import
3. Click Delete.
4. Click OK. The template is deleted and no longer displays in the template list.
Deductions and Contributions Import
Employee deductions and employer contributions can now be imported for
employees in Powerpay. The data is imported into the Deduction and
Contribution – Regular Payment page.
Deduction and contribution amounts can now be imported into Powerpay for a
Regular or Extra payroll run. The imported data is imported into the Deduction
and Contribution – Regular Payment page for the pay period based on the pay
period end date (PPE date) indicated in the file name. Imported data is
processed in the following order:
• Employee Profile
• Employee Timesheet
• Direct Deposit
• Deductions and Contributions.
If an error occurs on a deduction/contribution element, only that element fails.
The elements for the deduction/contribution entries without errors for that
employee are still imported.
All of the imported deduction and contributions codes must be set up in
Powerpay before performing the import. If the codes are not set up in
Powerpay, the following error message is generated:
“Data for Deduction and Contribution information cannot be imported.
The deduction / contribution code (XX) does not exist in Powerpay. If a new
deduction / contribution code is required, please contact the Ceridian Customer
Care Team.”
Where XX is the deduction/contribution code to which the data is to be
exported.
Employee deduction codes with the calculation method “Employer only – there
is no employee deduction”, cannot be imported. The record does not import
and the following error message is generated:
“Data for Deduction and Contribution information cannot be imported.
An employee deduction value cannot be imported since code (XX) is set up for
employer contributions only. If an employee deduction is required for this code,
please contact the Ceridian Customer Care Team.”
Where XX is the deduction / contribution code to which the data is to be
imported.
Powerpay Release Notes
17
New Functionality
Version 4.3
Employer contribution codes with the calculation method “Employee only –
there is no employer deduction”, cannot be imported. The record does not
import and the following error message is generated:
“Data for Deduction and Contribution information cannot be imported.
An employer contribution value cannot be imported into deduction / contribution
code (XX) as this code is set up for employee deduction only. If an employer
contribution is required forthis code, please contact the Ceridian Customer Care
Team.”
Where XX is the deduction / contribution code to which the data is to be
imported.
If any of the imported deduction / contribution data contains a ‘Remaining
target’ value for the employer contribution, the record does not import and the
following error message is recorded:
“Data for Deduction and Contribution information cannot be imported.
A ‘remaining target’ value is not allowed for the employer contribution code
(XX).”
Deduction and Contribution Import Layout
Field Name
1. Ceridian
Branch No
2. Ceridian
Payroll Number
3. Employee
Number
4. Deduction /
Contribution
Code
Data Type
Alphanumeric
Alphanumeric
Numeric
Alphanumeric
Length/Format
Exactly 3 in
the format
PP9
Exactly 4
Maximum 9
Exactly 2
Special Characters
No
No
No
No
Mandatory
Yes
Yes
Yes
Yes
Data Rules
Must be one of
Pp1, PP2, PP4,
PP7, PP9
Must be a
valid payroll
number
assigned by
Ceridian. May
be 1-alpha, 3
digits or 4
digits.
The following
employee
numbers are
NOT allowed:
000000000,
000009961000009999,
999999901999999920,
999999961999999969
Must
correspond to
a deduction /
contribution
element
already set up
in Powerpay
for the payroll.
18
Powerpay Release Notes
Version 4.3
Deductions and Contributions Import
Field Name
5. Employee –
permanent value
6. Employee –
this pay only
7. Employee –
remaining target
8. Employer –
permanent value
Data Type
Numeric
Numeric
Numeric
Numeric
Length/Format
-9999999.999
to
9999999.999
-9999999.999
to
9999999.999
-9999999.999
to
9999999.999
-9999999.999
to
9999999.999
Special Characters
No
No
No
No
Mandatory
No
No
No
No
Data Rules
Field Name
9. Employer –
this pay only
Data Type
Numeric
Length/Format
-9999999.999
to
9999999.999
Special Characters
No
Mandatory
No
Data Rules
Powerpay Release Notes
19
Enhancements
UI Enhancements
•
When an element is clicked in a row on the Rapid Entry pages, the entire
row is highlighted.
•
When using Powerpay in French, the $ now correctly appears to the right of
the field.
Powerpay Release Notes
20
Version 4.3
Tax Form Processing
Tax Form Processing
All tax forms are now processed as tape-filer.
The option Col 48 = N (non-tape filer) is no longer an acceptable option of the
30 Record.
Tax Exemptions
Statutory Deductions Page
Powerpay now displays a warning message if a zero value “0” is entered in the
Specific dollar amount to be taken’ fields in the Tax Options – Permanent
Values section of the Statutory Deductions page.
“As the ‘Specific dollar amount to be taken’ has been changed to zero (0) in the
‘Tax Options – Permanent Value’ section, the employee will now be subject to
the normal tax calculated according to their personal tax exemptions. If this is
incorrect, and the employee is to be no longer taxed, select the appropriate
exemption option from the Tax Status menu on the Hire/Profile page.”
Hire/Profile Page
Powerpay now displays a warning message is a zero value “0” is entered in the
Federal and / or Provincial Tax Exemptions ‘Apply specific amount’ field on
the Hire / Profile page.
“As the XXX has been changed to zero (0) no exemptions will be applied and the
maximum tax will be deducted from the employee. If this is incorrect, and the
employee is to be no longer taxed, select the appropriate exemption option from
the Tax Status menu.”
Where XXX is either:
• Employees Federal Personal Tax Exemption
• Employees Provincial Personal Tax exemption
• Employees Federal and Provincial Personal Tax Exemptions.
Postal / Zip Code Messaging
If an incomplete Postal or zip code is entered on the Hire/Profile page or the
Company Profile page, the following error message displays after the page is
saved:
“Postal/Zip code is incomplete. Please review and re-save the screen.”
If a province is selected but a zip code entered or a state is selected and a postal
code entered in any of the address information sections on the Company
Powerpay Release Notes
21
Enhancements
Version 4.3
Profile page, Powerpay displays the following error message when the page is
saved:
“Invalid combination of Province/State and Postal/Zip Code in the XXXX section.
Please review.”
Where XXXX is the section where the invalid combination was entered:
General Information, Primary Delivery Address or Alternate Delivery Address.
ROE-SAT
Service Canada has updated the requirements for submitting electronic ROE’s.
The following enhancements are now available in Powerpay to comply with
Service Canada’s new requirements.
Hire Profile Page
The Postal Code is validated to ensure that:
• There is a maximum of 6 characters for Postal Code (uppercase letters –
alpha,numeric,alpha,space(optional),numeric,alpha,numeric).
• There is a maximum of 5 numeric characters for Zip Code.
22
Powerpay Release Notes