1
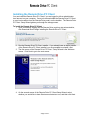
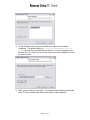
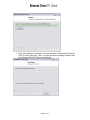
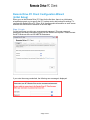
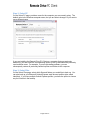
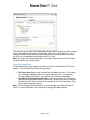
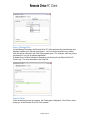
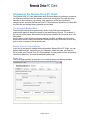
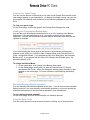
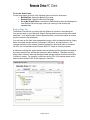
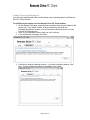
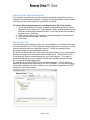
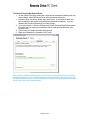
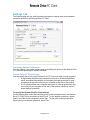
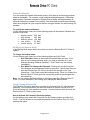
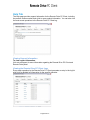
Remote Drive PC Client
software User Guide
-Page 1 of 27-
PRIVACY, SECURITY AND PROPRIETARY RIGHTS NOTICE: The Remote Drive PC Client
software is third party software that you can use to upload your files to the MTS Remote Drive
service. MTS did not develop and does not own the proprietary rights to the Remote Drive PC
Client software and you will need to enter into a software license agreement with the third party
before you can download and use the Remote Drive PC Client software. The files you upload to
the MTS Remote Drive service will be stored in a remote third party server within Canada and are
accessible by you with your username and password. MTS Allstream Inc. (“MTS”) does not have
direct access to your files as MTS operates the service, not the servers that your files are stored
in. MTS has contractual arrangements in place with the third party hosting the servers that your
files are stored in to guard against unauthorized use, access and disclosure of your files by the
third party.
For more information about the Remote Drive PC Client software offered by MTS Allstream Inc. please see
www.mts.ca/remotedrive
For more information about the third party software you can use to upload data to the MTS Remote
Drive service, please contact:
Casero Inc.
600-20 Toronto Street
Toronto, Ontario, Canada
M5C 2B8
[email protected]
www.casero.com
Casero Inc.
All contents except screenshots © MTS Allstream Inc. All rights reserved. Screen shots other than
references to the trade-marked name “MTS” are © Casero Inc.
Welcome ........................................................................................................................... 3
System Requirements .................................................................................................. 5
-Page 2 of 27-
Supported Operating Systems ............................................................................... 5
Supported Web Browsers........................................................................................ 5
Installing the Remote Drive PC Client ...................................................................... 6
Remote Drive PC Client Configuration Wizard (Initial Setup)............................ 9
Step 1: Login ............................................................................................................... 9
Step 2: Select PC...................................................................................................... 10
Step 3: Select Files .................................................................................................. 10
Step 4: Backup Mode .............................................................................................. 11
Step 5: Backup Files ............................................................................................... 12
Step 6: Finish ............................................................................................................ 12
Introducing the Remote Drive PC Client................................................................ 13
The Automatic Backup Mode................................................................................ 13
Remote Drive PC Client Window ......................................................................... 13
Home Tab ................................................................................................................... 13
Viewing Your Space Usage ................................................................................... 14
Viewing and Changing the Backup Mode ......................................................... 14
Manually Running a Backup Operation ............................................................. 14
Using the Quick Links............................................................................................. 14
Backup Files Tab...................................................................................................... 15
Adding Files to the Backup Set............................................................................ 16
Removing Files from the Backup Set ................................................................. 17
Restore Files Tab ..................................................................................................... 17
Delete Files Tab ............................................................................................................ 18
Settings Tab................................................................................................................... 19
Settings Tab................................................................................................................... 20
Optimizing System Performance ......................................................................... 20
Remote Drive PC Client Priority........................................................................... 20
Network Utilization................................................................................................... 21
Modifying the Backup Mode ................................................................................. 21
Using Password Protection .................................................................................. 21
Help Tab.......................................................................................................................... 22
Viewing Support Information................................................................................ 22
Viewing the Remote Drive PC Client Logs........................................................ 22
Log Examples ............................................................................................................... 24
Backup Operation – Success ............................................................................... 24
Backup Operation – Cancelled............................................................................. 24
Backup Operation– Activity .................................................................................. 25
Username and Password Management ................................................................. 26
Remote Drive PC Client Components .................................................................... 26
The Tray Applet ........................................................................................................ 26
Displaying the Remote Drive PC Client Applet Menu .................................... 26
Handling Notification Messages .......................................................................... 27
Welcome
-Page 3 of 27-
The MTS Remote Drive service operates using the Remote Drive PC Client software,
which is an automatic synchronization application that backs up your files online. The
Remote Drive software is Windows-based and it resides on your local computer. It can
be configured to quietly monitor and automatically back up any file or folder.
Alternatively, it can be configured to back up selected files or folders only when you tell it
to. See P.8 for details on configuring the software.
The MTS Remote Drive service offers an online portal environment where files,
directories, and folders that you’ve uploaded from your computer are stored. The
Remote Drive resides in a remote data warehouse that is monitored and designed for
high redundancy to provide industry standard security and reliability. Together, the
Remote Drive PC Client software and the MTS Remote Drive service portal provide a
reliable online backup solution. You can upload your files directly to the MTS Remote
Drive service, or you can use the third party Remote Drive PC Client software made
available from the MTS website. The software should be downloaded to and configured
on the computer that has the files the need to be backed up.
* The term “Remote Drive PC Client” used throughout this Setup Wizard is used to describe third party
software that can be used in connection with the MTS Remote Drive service.
-Page 4 of 27-
System Requirements
Supported Operating Systems
The Remote Drive PC Client requires one of the following operating systems to operate:
• Windows 2000 SP4 or later
• Windows XP SP2 or later (all versions)
• Windows Vista (all versions)
Supported Web Browsers
The Remote Drive PC Client uses Internet Explorer core components and, as such
requires Internet Explorer 6 or Internet Explorer 7.
JavaScript must be enabled for Internet Explorer. You may need to customize the
security level on the Tools >Internet Options >Security tab. In Security Settings,
enable active scripting under the Scripting section.
-Page 5 of 27-
Installing the Remote Drive PC Client
You can install the Remote Drive PC Client if you are logged in with an administrator
level account on your computer. Once you’ve downloaded the Remote Drive PC Client
to your local machine from the Remote Drive portal, run the installer. The Remote Drive
PC Client Setup Wizard guides you through the setup process.
To install the Remote Drive PC Client:
1. Upon successfully logging into the Remote Drive portal on mts.ca/remotedrive,
click Download Now to begin installing the Remote Drive PC Client
2. Run the Remote Drive PC Client Installer. If you already have an earlier version
of the Remote Drive PC Client installed, you are prompted to uninstall it first.
3. The first screen of the Remote Drive PC Client *Setup Wizard is the Welcome
screen. Click Next to go to the next screen.
4. On the second screen of the Remote Drive PC Client Setup Wizard, select
whether you would like to have Start menu shortcuts or not, and then click Next.
-Page 6 of 27-
5. On the following screen, specify the destination folder for the software
installation. The default location is C:\Program Files\Remote Drive PC
Client, which is the recommended root directory. If you are upgrading your
Remote Drive PC Client from a previous version, then the installation occurs in
the same location.
6. When you are finished, click Install. The installer begins installing the Remote
Drive PC Client software and shows the progress of the installation.
-Page 7 of 27-
7. Once the installation is complete, you have the option of launching the Remote
Drive PC Client right away. Also, you have the option of adding a shortcut icon
to the Remote Drive PC Client on the desktop.
-Page 8 of 27-
Remote Drive PC Client Configuration Wizard
(Initial Setup)
When you run the Remote Drive PC Client for the first time, there is an initial setup
wizard that prompts you to specify the PC, backup mode, and backup file settings, To
configure the Remote Drive PC Client, fill in the appropriate information on each screen
and click the Next button to advance to the next step.
Step 1: Login
On the Login page, provide your username and password. This user name and
password is the same used when logging into the Remote Drive portal. Please contact
the MTS Business office at 225-4BIZ for assistance.
If you enter the wrong credentials, the following error message is displayed:
-Page 9 of 27-
Step 2: Select PC
On the Select PC page, provide a name for the computer you are currently using. The
default value is the Windows computer name, but you are able to change it if you want to
use a different name.
If you are installing the Remote Drive PC Client on a computer that was previously
backed up, you can select the corresponding option to look up and select the previously
used machine name. For example, if you are reinstalling software, you can
subsequently restore all previously backed up files and folders to this computer.
Step 3: Select Files
On the Select Files page, select which files and folders you would like to back up. You
can also back up your Microsoft Outlook Express email account profiles (also called
identities). If you have multiple Outlook Express profiles, you have the option to choose
any for inclusion in the backup.
-Page 10 of 27-
You can back up files from local storage data sources, which includes hard drives, floppy
drives, removable storage devices (for example, USB keys), and optical drives. File
systems accessed over a network, whether mapped to a local drive letter or accessed
via URL, are not selectable by the Remote Drive PC Client.
Note: During the initial setup configuration, you need to select at least one file or folder
for backup before you can click Next.
Step 4: Backup Mode
On the Backup Mode page, specify how often you want the Remote Drive PC Client to
operate. You can select one of the following options:
•
Run Once Now- Backs up the selected files and folders just once. Of you want
to run a backup operation again, you need to manually run it. (see Manually
Running a Backup Operation). Click Next to run the backup immediately.
• Run When File Changes Are Detected- Continuously checks if any files have
changed and automatically backs up those files. Specify how often you want the
Remote Drive PC Client to check for file changes in the Time Interval box. Click
Next to start the backup process.
Note: You can change the Backup Mode on the Home page of the Remote Drive PC
Client. For more information, see Viewing and Changing the Backup Mode.
-Page 11 of 27-
Step 5: Backup Files
On the Backup Files page, the Remote Drive PC Client performs the actual backup and
displays a status bar to indicate its progress. If a file is not processed for any reason,
then this will be reflected in the Files Unprocessed count. For example, a file may not be
processed if it is in use by another application.
A detailed list of all files included in the backup can be found in the Remote Drive PC
Client Logs. For more information, see Help Tab.
Step 6: Finish
Once the backup process is complete, the Finish page is displayed. Click Finish, which
brings you to the Remote Drive PC Client window.
-Page 12 of 27-
Introducing the Remote Drive PC Client
The Remote Drive PC Client determines which files and folders to backup by comparing
the differences between the files already contained in the Remote Drive with the ones
selected for the backup set. In addition, time stamps for all files are checked for
changes before and after the Remote Drive PC Client performs operations to ensure that
any files that are changed during operation are included.
The Automatic Backup Mode
The automatic backup mode continuously checks if any files have changed and
automatically backs up those files based on the specified time interval. For example, if
the interval is 20 minutes, files marked for backup are uploaded no more than once very
20 minutes.
Any file that is in use during an automatic backup operation is added to a retry queue.
While the file remains open, the automatic backup continuously retired the file for a retry
period, which is based on the threshold value.
Remote Drive PC Client Window
Once you’ve successfully installed and configured the Remote Drive PC Client, you can
backup additional files, restore files to your computer, delete files from your Remote
Drive, modify your Remote Drive PC Client settings, find the product version information,
view the log summary, and read the detailed systems logs.
Home Tab
The Home page provides an overview of your backup usage and backup schedule.
-Page 13 of 27-
Viewing Your Space Usage
You can view the amount of space that you’ve used in your Remote Drive as well as the
total storage capacity of your subscription. If a backup is currently running, you can view
the progress of the backup and information on the files being uploaded to your Remote
Drive.
To view your space usage:
On the Home page, view the bar graph in the Remote Drive Storage Use area.
Viewing and Changing the Backup Mode
You can find out if the automatic backup mode is on or off by referring to the Backup
Status area. If the automatic backup is off, you need to manually run any backup
operations. You can also activate the automatic backup and modify how often files are
checked for changes.
If you are accessing the Home page for the first time, the automatic backup mode
depends on the option you selected in Step 4: Backup Mode of the Remote Drive PC
Client Configuration Wizard. If you selected the Run Once Now option, the Automatic
Backup is Off. If you selected the Run When File Changes Are Detected option, the
Automatic Backup is On.
To change the Backup Mode:
1. On the Home page, click Change in the Backup Status area.
2. On the Setting page, specify how you want the Remote Drive PC Client to
operate and click Finish. When you change the backup mode, the status is also
updated on the Home page. For more information, see Modifying the Backup
Mode.
Manually Running a Backup Operation
You can manually start a backup operation at any time. If you do not have the automatic
backup turned on, you must manually run all backup operations, or you can activate the
automatic backup mode so that the backup operations occur automatically.
To run a backup process manually:
On the Home page, click Run Now to manually run a backup process.
Using the Quick Links
You can quickly access the most common function by clicking one of the quick links.
-Page 14 of 27-
To use the Quick Links:
On the Home page, click one of the following links on the Quick Links area:
• Backup Files- Opens the Backup Files page.
• Restore Files- Opens the Restore Files page.
• Go to My Remote Drive- Launches the default web browser and displays the
main Remote Drive web page, where you can log in and access your
uploaded files.
Backup Files Tab
The Backup Files tab lets you select files and folders for inclusion in the backup set.
You can also back up your Microsoft Outlook Express email account profiles (also called
Identities). If you have multiple Outlook Express profiles, you have the option to choose
any for inclusion in the backup set.
You can back up files from local storage data sources, which includes hard drives, floppy
disks, removable storage devices (for example, USB keys), and optical drives. File
systems accessed over a network, whether mapped to a local drive letter or accessed
via URL, are not selectable by the Remote Drive PC Client for security purposes.
A status bar indicates the space already used for backing up files, the space required for
the newly selected files, and the total amount of space available. The space currently
being used in shown in blue and the approximate storage required for all new selections
is shown in orange. For example, a user has used up 33% of his storage space and is
about to back up about 36% of total capacity in new files.
-Page 15 of 27-
Adding Files to the Backup Set
You can easily add files and folders to the backup set by selecting them in the Remote
Drive PC Client Window.
To add files to the backup set in the Remote Drive PC Client window:
1. On the Backup Files page, select the files and folders that you want added to the
backup set. If you select a folder, all files contained in that folder are
automatically selected as well- you can deselect the files that you do not want
included in the backup set.
2. Once you’ve selected the files to back up, click Continue.
3. In the confirmation message, click Next.
4. Click Next to begin the backup process. If you want to stop the backup, click
Stop. Once the backup process has completed, click Finish.
-Page 16 of 27-
Removing Files from the Backup Set
If you deselect any files that have been previously backed up, these files will not be
included in the next backup procedure. However, the deselected files will be available
on the server if they were backed up successfully in the past.
To remove files from the backup set in the Remote Drive PC Client window:
1. On the Select/Backup Files page, deselect the files and folders that you want
removed from the backup set. If you deselect a folder, all files contained in that
folder are automatically deselected as well. If you want certain files included in
the backup set, select them.
2. When you are finished, click Continue to save the changes to the backup set.
3. In the confirmation message, click Next.
4. Click Finish.
Restore Files Tab
You can restore your backed up data to your local computer on the Restore Files page.
Since the Remote Drive PC Client supports multiple computers on an account, you can
restore backed up files from a specified computer. The file tree displays all files
previously backed up from the selected computer.
By default, the Remote Drive PC Client does not overwrite files on your local computer
that have the same name and location as the backed up file. The Remote Drive PC
Client skips any file that is already present on your local computer. If you want to
overwrite existing files on your computer with the ones available from your Remote
Drive, select the corresponding option.
For example, If you select TEST from the Computer Name box. The file tree then
displays all files previously backed up for the TEST computer. You can select exactly
which folders and files you want to restore, or you can restore all data from the TEST
computer to your local computer.
-Page 17 of 27-
To restore files to your computer:
1. On the Restore Files page, select the computer that was used to backup files
that you now want to add to your computer in the Computer Name box.
2. In the file tree, select which files and folders you want to restore to your local
computer. If you select a folder, all files contained in that folder are also
selected.
3. To overwrite files on your local computer that have the same name and location
as the backed up file, select the I Want to Overwrite Files/Folders On This
Computer option. By default, the Remote Drive PC Client does not overwrite
files.
Note: The Remote Drive PC Client skips any file that is already present on your
local computer.
4. Click Continue to start the restore files process. The progress of the restore
process is displayed. During the restore process, some options in the Remote
Drive PC Client are disabled since changes to the backup, delete, and
configuration cannot be performed while your computer is restoring files. If you
want to stop this process, click Stop.
5. Once the backup process is completed, click Finish.
Delete Files Tab
The Delete Files page lets you delete files from your Remote Drive. Since the Remote
Drive PC Client supports multiple computers on an account, you can delete files that
were previously backed up from a specific computer by selecting it in the Computer
Name box.
For example, you select TEST in the Computer Name box. The file tree displays all files
previously backed up from the TEST computer.
-Page 18 of 27-
To Delete Files from My Remote Drive:
1. On the Delete Files page, select the computer that contains the backup files you
want to delete from the Remote Drive in the Computer Name box.
2. Select the files you want to delete from the file tree. If you select a folder, the
files contained in that folder are automatically selected for deletion. You can
deselect the files and folders that you want to keep.
3. You must select the I Want to Permanently Delete Selected Files/Folders option
to confirm that you agree to permanently remove the selected files from your
Remote Drive.
4. Click Continue to begin the delete files process.
5. When the file deletion is complete, click Finish.
Note: Deletion is normally completed within 72 hours however circumstances may arise that cause
permanent deletion to occur on a different timeframe than targeted. Please note that once you have
activated the deletion process, the permanent deletion process will be underway and you will not be
able to retrieve any of your deleted materials.
-Page 19 of 27-
Settings Tab
The Settings page lets you specify system performance, backup mode, and password
protection options for the Remote Drive PC Client.
Optimizing System Performance
You can optimize your system performance by modifying the priority of the Remote Drive
PC Client and specifying the network utilization.
Remote Drive PC Client Priority
You can specify the priority of the Remote Drive PC Client over other running programs.
• A High setting dedicates more computer resources to the backup operation,
which decreases the possibility of interrupting the backup process by other
programs that may be running on your computer at the time of the backup.
• A Low setting utilizes more computer resources for other programs that may
be running on your computer at the time of the backup, which may result in
slower backup operations.
To specify the Remote Drive PC Client priority:
On the Settings page, select the computer priority of the backup process in the Remote
Drive PC Client Priority box and then click Finish. To give backup operations a higher
priority over other running programs, select High. To give other running programs a
higher priority over backup operations, select Low.
-Page 20 of 27-
Network Utilization
You can control the network data transfer priority of the backup and restore processes
based on bandwidth. For example, a high resolution digital photograph (1 MB) takes
approximately 2 seconds to transfer at Highest Priority setting, and approximately 40
seconds to transfer at Lowest Priority setting. Note that higher priorities may noticeably
affect other programs on your computer that are using the network for web browsing file
transfers.
To specify the network utilization:
On the Settings page, select one of the following options in the Network Utilization box
and then click Finish:
• Highest priority: 800 Kb/s
• High priority:
450 Kb/s
• Medium priority: 100 Kb/s
• Low priority:
65 Kb/s
• Lowest priority: 25 Kb/s
Modifying the Backup Mode
In the Backup Mode page, specify how often you want the Remote Drive PC Client to
operate.
To change the backup mode:
On the Settings page, select one of the following options and click Finish:
• Run Once Now- Backs up the selected files and folders just once. If you
want to run a backup operation again, you need to manually run it (see
Manually Running a Backup Operation). Click Finish to run the backup
immediately.
• Run When File Changes Are Detected- Continuously checks if any files
have changed and automatically backs up those files. Specify how often you
want the Remote Drive PC Client to check for file changes in the Time
Interval box. Click Finish to start the backup process. When it is finished, the
Remote Drive PC Client goes into a monitoring mode so that changed files
are backed up.
Note: You can change the Backup Mode on the Home page of the Remote Drive PC
Client. For more information, see Viewing and Changing the Backup Mode.
Using Password Protection
The Password Protection area lets you protect your Remote Drive PC Client with your
password. We recommend that you select this feature so that the Remote Drive PC
Client will prompt you for a password on startup. Use this feature to limit access to the
Remote Drive PC Client by other users.
How to Activate the Password Protection feature:
On the Settings page, select the Prompt Me For My Password option and then click
Finish. If you do not want to use password protection for the Remote Drive PC Client,
deselect this option.
-Page 21 of 27-
Help Tab
The Help page provides support information for the Remote Drive PC Client, including
the product version number and a link to more product information. You can also view
the most recent operations in the Remote Drive PC Client log.
Viewing Support Information
To view support information:
Visit mts.ca/support for more information regarding the Remote Drive PC Client and
Remote Drive portal.
Viewing the Remote Drive PC Client Logs
Every major operation by the Remote Drive PC Client generates an entry in the log list
with a link to detailed log information for the specific operation.
-Page 22 of 27-
To view the system logs:
1. On the Help page, click the View System Logs button. The most recent
operations, including backup, restore, and delete operations are listed by
type, status, and date and time.
2. In System Logs, do any of the following:
a. To view details for a particular action, click the corresponding
Status link. The log opens in a separate window and contains a
summary of the operation. Depending on the operation type,
this information includes the processed files that are backed up
or unprocessed as well as a breakdown of the actual files
transferred.
b. To delete all logs, click the Clear Logs button.
3. Click Cancel to go back to the main Help page.
-Page 23 of 27-
Log Examples
All backup operation contains the product version number, the operation type, and the
date of the operation.
Backup Operation – Success
The log for a successful backup operation contains a summary of the files that have
been processed, backed up, and unprocessed. The log also contains a list of each file
that have been backed up or not processed. For example, a log indicates that 1 out of 1
has been successfully processed and backed up, and no files have been unprocessed.
Backup Operation – Cancelled
The log for a cancelled backup operation contains a summary of the files that have been
processed, backed up, and not processed. The log also contains a list of each file that
has been backed up or not processed.
For example, a log indicates that a backup was cancelled after processing 5 files out of 6
in the selection set. In particular, 4 files were successfully backed up (Icons.bmp,
d4php_trial.exe, DemoWatcher.zip, DRTCPO21.exe) and 2 files were unprocessed
(EVE_Setup.exe, FileSpy.zip).
-Page 24 of 27-
Backup Operation– Activity
The log for an activity type backup operation contains a list of file events, results for each
file, and the file name and path.
For example, a log indicates that 3 file changes are detected at 11:35:11 AM, 11:35:17
AM, and 11:35:17 AM, and the changed files are immediately backed up. The
d4php_trial.exe file is changed again a few seconds later at 11:35:17 AM but since the
Time Interval value for this backup operation is set to 5 minutes, the file is not backed up
right away- instead, the file is added to the queue until the threshold period of 5 minutes
is met. In this way, the Remote Drive PC Client ensures that frequently changing files
do not cause continuous network traffic.
Not all file changes are a result of your own actions. For example, Windows operation
systems sometimes generate multiple file change events over simple actions like file
copy or file delete operations.
-Page 25 of 27-
Username and Password Management
If you change your MTS Remote Drive service password in the Remote Drive portal,
then you need to update your log in information for the next time the Remote Drive PC
Client attempts to communicate with the MTS Remote Drive service, such as during
startup or when navigation through the interface. In this instance, the PC Client displays
a password prompt before it allows further interaction with the MTS Remote Drive
service.
Remote Drive PC Client Components
When you close the Remote Drive PC Client window, the application continues to run in
the background. The application is composed of several components: user interface,
tray applet, and service. The user interface is the main window for the Remote Drive PC
Client. The service performs all backup, restore, and delete operations, as well as other
low level operations. The tray applet is a small application that provides menu access to
some functions, displays various messages about the internal state of the software, and
shows that the software is installed and running.
The Tray Applet
The Remote Drive PC Client tray applet is located in the notification area in the bottom
right corner of your desktop. The icon displayed in the tray applet depends on whether
the Remote Drive PC Client is online and idle, currently backing up, restoring, or deleting
(hover over the icon to view the progress by percent completed), or offline (due to
connection or authentication issue).
Displaying the Remote Drive PC Client Applet Menu
The Remote Drive PC Client menu in the tray applet lets you access some functions,
such as open and shutdown the application and pause or resume operations.
To display the Remote Drive PC Client menu:
Right click the Remote Drive PC Client icon to display the following menu:
• Open- Launches the Remote Drive PC Client window if it’s not already open.
-Page 26 of 27-
•
•
•
•
•
Shutdown- Closes the Remote Drive PC Client window and shuts down the
tray applet and background service.
Launch Every Time Windows Starts- Specifies whether you want the
Remote Drive PC Client to startup every time that Windows is started.
Pause- Pauses the current operation if a backup, restore, or delete operation
is active. This option is available if an operation is running.
Resume- Resumes a paused operation. This option is available if an
operation is paused.
Go to the MTS Remote Drive service online- Launches the default browser
and opens the Remote Drive portal.
Handling Notification Messages
The Remote Drive PC Client tray applet also displays notification messages.
The following messages may appear:
• No backups have run in 7 day(s)- If no backup occurs for 7 days or more,
the tray applet displays a message to inform you that the Remote Drive PC
Client has been running without performing a backup operation. To remove
this message, you can either manually start up a backup in the Remote Drive
PC Client window, or set up an automatic backup schedule. For more
information, see Manually Running a Backup Operation, and Manually
Modifying the Backup Mode.
• Loss of authentication- The user changes their password for the web based
Remote Drive but did not update their credentials for the Remote Drive PC
Client.
• Upgrade available- An upgrade is available on the server and an
administrator level user may perform the upgrade.
• Excessive retries- The automatic backup has attempted to backup a number
of files many times and will continue trying.
• Reboot required- The user has installed the software but has decided not to
reboot the PC. Please reboot the PC to complete the installation of the
software.
-Page 27 of 27-