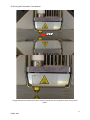
1
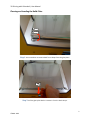
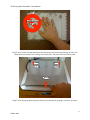
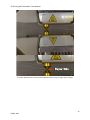
3D Printing with Ultimaker2, User Manual February 25, 2015 3D Printing with Ultimaker2, User Guide University of Victoria, (BDSL) Biomedical Systems Design Laboratory 1 © BDSL 2015 3D Printing with Ultimaker2, User Manual Cleaning and Leveling the Build-‐Plate Step 1: Use screwdriver to remove both front clamps from the glass plate. Step 2: Pull the glass plate back to remove it from the back clamps. 2 © BDSL 2015 3D Printing with Ultimaker2, User Manual Step 3: Use soap and water to wash the plate. Use paper towel to dry it. 3 © BDSL 2015 3D Printing with Ultimaker2, User Manual Step 4: Do not touch the glass build-‐plate with bare hands after cleaning and drying. Oil from your hands will prevent plastic from sticking to the build-‐plate. Use paper towel to hold the plate. Step 5: After drying the glass plate put it back on the Ultimaker by pushing it into the rear clamps. 4 © BDSL 2015 3D Printing with Ultimaker2, User Manual Step 6: Turn both of the front clamps to lock the glass build-‐plate onto the Ultimaker Step 7: Turn the wheel to go to ‘Maintenance ‘and push the wheel to make the selection 5 © BDSL 2015 3D Printing with Ultimaker2, User Manual Step 8: Go to ’Build-‐Plate’ and push the wheel to make the selection. Step 9: Click wheel to continue to the leveling process 6 © BDSL 2015 3D Printing with Ultimaker2, User Manual Step 10: Use an object which is 1 millimeter thick to test the leveling of the build-‐plate. In this step the wheel is rotated to change the distance between the nozzle and the build-‐plate. Raise or lower the build-‐plate platform until there is a small amount of resistance on the object. 7 © BDSL 2015 3D Printing with Ultimaker2, User Manual The gap between the build-‐plate and the nozzle should be like the image above when using a 1mm object. 8 © BDSL 2015 3D Printing with Ultimaker2, User Manual Step 11: Use the screw to change the distance between the nozzle and the build-‐plate. As before the distance should be 1 mm. 9 © BDSL 2015 3D Printing with Ultimaker2, User Manual Step 12: Use the screw to change the distance between the nozzle and the build-‐plate to be 1 mm. 10 © BDSL 2015 3D Printing with Ultimaker2, User Manual Step 13: Use a single piece of paper to test the levelling of the build-‐plate. Rotate the wheel until there is a small amount of resistance on the paper. Move the sheet of paper back and forth to feel when the nozzle is touching the paper. 11 © BDSL 2015 3D Printing with Ultimaker2, User Manual The space between the nozzle and the build-‐plate when using a single sheet of paper 12 © BDSL 2015 3D Printing with Ultimaker2, User Manual Step 14: Rotate the screw until there is a small amount of resistance on the piece of paper. 13 © BDSL 2015 3D Printing with Ultimaker2, User Manual Step 15: Rotate the screw until there is a small amount of resistance on the piece of paper. Following this the bed levelling process is complete. 14 © BDSL 2015 3D Printing with Ultimaker2, User Manual Preparation: MATERIALS DO NOT use ABS plastic Use only PLA Supplied by Mech Engineering Deptartment. The correct filament diameter is 2.85mm. DO NOT Use PLA from other sources! This will lead to clogging and downtime on the machine, preventing all users from using it! 15 © BDSL 2015 3D Printing with Ultimaker2, User Manual PREPARATION: USING THE CURA SOFTWARE https://ultimaker.com/en/products/software Step 1: Launch CURA softare. You must change to ‘Full Settings’ click ‘Expert’ at the top Step 2: Click ‘Switch to full settings’ to customize the print 16 © BDSL 2015 3D Printing with Ultimaker2, User Manual Step 3: To upload parts to print click the ‘Load’ icon at the top of the screen. Step 4: The file chosen must be in .STL format to be loaded into CURA. 17 © BDSL 2015 3D Printing with Ultimaker2, User Manual Step 5: If the part is not in the desired orientation click ‘Rotate’. Step 6: One of the three circles can be clicked on and dragged to the desired position. To restart the process of orientation position it was loaded in ‘Reset’ can be clicked. **Remember** parts are printed layer by layer, so if you can identify 2D-‐slices of your parts that require strength, those “slices” should be parallel to the build plate. 18 © BDSL 2015 3D Printing with Ultimaker2, User Manual Step 7: In this example, this part is best printed on its side. This can be done by clicking ‘Rotate’ and turning to part sideways, as shown in the previous step. Step 8: The Layer Height, Fill Density, Print Speed, and the Support Type should be changed. This will effect the print speed, resolution, and strength of the part. Support Type should be set to ‘Everywhere’ when printing parts. 19 © BDSL 2015 3D Printing with Ultimaker2, User Manual Add more parts Step 9: If more than one of the same part is desired right click on the part and click Multiply Object. Step 10 Enter the number of copies that are desired and press OK. This is the number of parts that are desired. For example if 3 of the same part is required enter 2 because there is already the part that was loaded previously. 20 © BDSL 2015 3D Printing with Ultimaker2, User Manual Step 11: Click Load to add different parts to the print Checking through the layers Step 12: Click icon in top right to access different view modes 21 © BDSL 2015 3D Printing with Ultimaker2, User Manual Step 13: Click Layers to view how the printer will lay down the layers of plastic Step 14: Click and drag the vertical bar on the right to pass through the different layers of the print. Supports will appear in light blue in this mode. Click the icon in the top right to switch back to its normal orientation 22 © BDSL 2015 3D Printing with Ultimaker2, User Manual Step 15: To print the parts add the Gcode to the SD card by clicking the ‘Toolpath to SD’ icon PRINTING PARTS: Step 16: Push the SD card into the proper “SD card” slot on 3D printer. 23 © BDSL 2015 3D Printing with Ultimaker2, User Manual Step 17: Select Print from the menu. Step 18: Scroll through the files by turning the wheel, to find the desired file to be printed, and select the file by pushing the wheel. DONE! The printer will begin automatically. Step 19: Watch/Observe the printer for 5 minutes to make sure the first 2-‐3 layers are printing well. If all is in order, you can leave the machine and return when the job is done. 24 © BDSL 2015 3D Printing with Ultimaker2, User Manual OPTIONAL SETTINGS: PRINT TEMPERATURE 1.Turn 2.Press Go to Tune OPTIONAL Step 20: After the print has started, adjust the nozzle temperature by turning the wheel. When Tune is highlighted the wheel can be pressed to make the selection. 1.Turn Go to ‘Temperature’ 2. Press OPTIONAL Step 21: Next, turn the wheel to move to go to the ‘Temperature’ setting. Press the wheel to make a selection. 25 © BDSL 2015 3D Printing with Ultimaker2, User Manual 1.Turn to change temperature 2.When at temperature Press OPTIONAL Step 22: The temperature can be increased or decreased by turning the wheel. Two temperatures are shown on screen (Temp / Temp) = (current temperature of the nozzle / desired temperature of nozzle). When the desired temperature is selected the wheel can be pressed à We recommend 220 C to 225 C, for PLA. OPTIONAL Step 23: After pressing the wheel the screen shown above will appear. To return to the print screen the wheel can be used to move to ‘Return’, and the wheel will be pressed to make the selection. 26 © BDSL 2015 3D Printing with Ultimaker2, User Manual GOOD EXAMPLE IMAGES OF PRINTING PROCESS: Support Structures Good Print J, showing what the print should look like Support Structures Good Print J, showing what the supports between surfaces will look like 27 © BDSL 2015 3D Printing with Ultimaker2, User Manual PROBLEM EXAMPLE IMAGES OF PRINTING PROCESS: Problem of Lift-‐off of parts Bad Print L, layer is lifting off/away from glass. Glass may be oily/dirty Bad Print L, the edges are not sticking, and the part may come off the glass plate. Glass may be oily/dirty. 28 © BDSL 2015 3D Printing with Ultimaker2, User Manual Bad Print. Under-‐extrusion Bad Print L, the printer is under-‐extruding plastic (too little plastic comes out). The part is full of holes/spaces. “Many possible causes”, such as plastic-‐feed problems, nozzle clogging, print temperature too low, or other issues. Consult with course TA. Full of Holes Bad Print L, the printer is under-‐extruding plastic (too little plastic comes out). The part is full of holes/spaces and will be weak. “Many possible causes”, such as plastic-‐feed problems, nozzle clogging, print temperature too low, or other issues. Consult with course TA. 29 © BDSL 2015