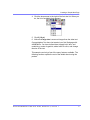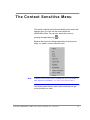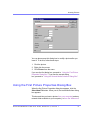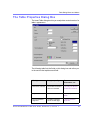
1
Content Editor User Guide
Release 3.0, revision 1
Table of Contents
Introduction to eWebEditPro ............................................. 1
Using eWebEditPro............................................................................................ 2
Organization of this Documentation ......................................................... 2
Creating a Simple Web Page ............................................. 3
Your Finished Web Page ......................................................................... 3
Creating the Sample Web Page............................................................... 4
Enter the First Two Sentences ......................................................... 4
Creating a Hyperlink ......................................................................... 4
Applying a Bullet to a Line of Text .................................................... 5
Changing the Size of Text ................................................................. 5
Toolbar Buttons .................................................................. 7
Selecting Text........................................................................................... 7
Applying Formatting Attributes to Text ..................................................... 8
Table of Toolbar Buttons and Drop-Down Lists ........................................ 8
Customizing Your Toolbar ............................................... 15
Restoring Toolbars ................................................................................. 16
Rearranging the Menus on a Toolbar.....................................................16
Creating a New Menu ............................................................................17
Moving a Menu Off the Toolbar .............................................................. 17
Changing the Menu’s Orientation........................................................... 18
The Context Sensitive Menu............................................19
Using eWebEditPro’s Advanced Features ..................... 22
Copying from Other Applications ............................................ 23
Finding Text............................................................................ . . 24
Specifying a Search Direction ................................................................ 25
Considering the Case of a Search Term ................................................ 25
Whole Word Match ................................................................................ 26
Checking Spelling...................................................................... 27
Disabling Script Blocking ....................................................................... 27
Checking Spelling as You Type.............................................................. 28
Fixing Spelling Errors ...................................................................... 28
Ektr on® eWeb Edit Pro +XML User Guide, R elease 3.0, revi si on 1
i
Checking Spelling Upon Demand .......................................................... 28
The Spelling Dialog Box ..................................................................29
Spell Checking Selected Text .......................................................... 30
Inserting Pictures ...................................................................... 3 0
Using the First Picture Properties Dialog Box ........................................ 32
Inserting a Picture from the Server..................................................
Deleting a Picture from the Server .................................................. 33
Inserting a Picture from Your Computer .......................................... 33
Using the Second Media Selection Dialog Box...................................... 35
The Picture Properties Dialog Box ................................................. 36
Adjusting a Picture........................................................................... 36
Pixels ............................................................................................... 37
Setting a Border............................................................................... 38
Aligning the Picture.......................................................................... 38
Resetting Width, Height, Border Thickness, and Alignment ............ 40
Adding Space around the Picture .................................................... 41
Editing the Picture’s Title ................................................................. 41
The Options Button.......................................................................... 42
Deleting a Picture................................................................................... 42
Introduction to Tables ............................................................... 43
Creating a Table..................................................................................... 44
Deleting a Table ..................................................................................... 45
Inserting a Table within a Table.............................................................. 46
Table Dialog Boxes and Menus ................................................ 47
The Insert Table Menu ........................................................................... 47
The Table Properties Dialog Box ........................................................... 49
The Cell Properties Dialog Box .............................................................. 51
The Table Context Sensitive Menu ........................................................ 53
Manipulating Your Table’s Format............................................ 56
Choosing the Number of Rows and Columns ........................................ 56
Placement of Inserted Row or Column ........................................... 57
Adding or Removing Rows and Columns ....................................... 57
Specifying Table Width........................................................................... 59
Specifying Table Width by Percentage ............................................ 59
Setting Table Width by Percentage ................................................. 60
Specifying Table Width by Pixels ..................................................... 61
Setting Table Width by Pixels .......................................................... 62
Specifying Horizontal Alignment ............................................................ 62
Table Backgrounds ................................................................................ 64
Specifying a Table’s Background Color ........................................... 64
Deleting a Table’s Background Color .............................................. 65
Specifying a Background Image for a Table .................................... 66
Deleting a Background Image ......................................................... 67
Setting Table Borders............................................................................. 67
Ektr on® eWeb Edit Pro +XML User Guide, R elease 3.0, revi si on 1
ii
Assigning Border Color.................................................................... 68
Assigning a Cell Border Color ......................................................... 68
Assigning Border Size ..................................................................... 69
Working with Table Cells........................................................... 71
Specifying the Width of a Cell ................................................................ 72
Inserting a Cell ....................................................................................... 73
Deleting a Cell........................................................................................ 74
Setting a Cell’s Border Color.................................................................. 75
Specifying a Cell’s Background Color .................................................... 77
Deleting a Cell’s Background Color ................................................ 78
Specifying a Background Image for a Cell ............................................. 79
Deleting a Background Image ........................................................ 80
Using the Color Box......................................................................... 81
Spanning Rows or Columns................................................................... 81
Spanning More than One Row or Column....................................... 82
Effect of Spanning a Cell ................................................................. 84
Aligning Text Within a Cell ..................................................................... 84
Setting Horizontal Alignment ........................................................... 85
Setting Vertical Alignment.............................................................. 87
Splitting a Cell ...................................................................................... 90
Merging Two Cells ............................................................................... 92
Word Wrap ........................................................................................... 92
Setting Cell Padding and Spacing........................................................ 94
Assigning Cell Padding ................................................................. 95
Assigning Cell Spacing ................................................................. 95
Using Bookmarks .................................................................... 96
Creating a Bookmark ........................................................................... 96
Changing the Destination Window........................................................98
Using Hyperlinks ..................................................................... 100
Creating a Hyperlink .............................................................................101
Using a Quick Link..........................................................................101
Entering a Hyperlink Manually........................................................102
Testing a Hyperlink................................................................................103
Creating a Hyperlink to a Location Within a Web Page ........................104
Editing a Hyperlink ................................................................................105
Removing a Hyperlink ...........................................................................105
Preventing a URL from Becoming a Hyperlink .....................................105
Working with HTML ................................................................. 106
Viewing and Editing HTML....................................................................106
Editing a Section of a Page .......................................................... 107
Inserting HTML .................................................................................... 107
Cleaning HTML .................................................................................... 108
Inserting Content from MS Office 2000................................................ 109
Ektr on® eWeb Edit Pro +XML User Guide, R elease 3.0, revi si on 1
iii
Introduction to eWebEditPro
eWebEditPro is a browser-based, Web content editor designed
for dynamic Web sites. It lets you create and publish your own
Web content in any language supported by the operating
system and your Web site.
More specifically, eWebEditPro lets you perform Web page
editing functions, such as
• copy content from any Windows-based application
• use Microsoft Word to edit Web content
• cut, copy, and paste
• search for text
• check spelling
• change font style, size, attributes (bold, italics, underline),
and color
• begin lines with bullets or numbers
• adjust indentation
• right, center, or left justify text and images
• apply specialized formatting such as superscripts,
subscripts and strikethrough
• add a bookmark, hyperlink, image, or table
• view your text as WYSIWYG or HTML code
• insert or clean HTML code
You gain access to these functions either from the toolbar at
the top of the editor window or from a menu that appears when
you right click the mouse inside the editor.
E kt ron ® eWebEdi tPr o+X ML U ser Guid e, R elea se 3.0 , r evision 1
1
Introduction to eWebEditPro
Using eWebEditPro
eWebEditPro is like many other word processing applications. You
type text and then use toolbar buttons (illustrated below) and menu
options to change the text’s appearance or perform functions on it,
such as spell checking.
Organization of this Documentation
The next section, “Creating a Simple Web Page” on page 3, walks
you through the steps required to create a simple Web page.
The following section, “Toolbar Buttons” on page 7, explains
• each toolbar button
• functions that appear when you right click the mouse
Many of these functions are simple and require only a brief
explanation.
The last section, “Using eWebEditPro’s Advanced Features”
, explains how to use the more advanced features.
Ektr on® eWeb Edit Pro +XML User Guide, R elease 3.0, revi si on 1
2
Creating a Simple Web Page
This section walks you through the process of creating a simple
Web page, using only a few of the many features available.
Later sections explain all of the features and how to use them.
Your Finished Web Page
When you finish this exercise, your simple Web page will look
like this.
Notice that this page has the following elements.
• The second sentence includes bold, italic and underlined
text.
• The third sentence includes a hyperlink, text that will jump
to another Web page when the user clicks on it.
• The fourth sentence begins with a bullet.
E kt ron ® eWebEdi tPr o+X ML U s er Guid e, R elea se 3.0 , r evision 1
3
Creating a Simple Web Page
• The last sentence has some very large (18 point) text.
Creating the Sample Web Page
To create this page, follow these steps.
Enter the First Two Sentences
1. Open eWebEditPro. (Your Webmaster installs eWebEditPro on
your computer and determines which fonts and sizes are
available. Your system may not match the example below.)
2. Type the first two sentences.
This is some sample content. You can make text bold,
italic and underlined with the push of a button.
3. Double click the word “bold” to select it. Then, click the Bold
button (
) to apply bold to the word.
4. Double click the word “italic.” Then, click the Italic button (
apply italic to the word.
) to
5. Double click the word “underlined.” Then, click the underline
button (
) to underline the word.
Creating a Hyperlink
1. Type You can also easily add hyperlinks.
2. Double click the word hyperlinks so that it becomes selected.
3. Click the Hyperlink button (
).
4. The hyperlink dialog box appears.
Ektr on® eWeb Edit Pro +XML Us er Guide, R elease 3.0, revi si on 1
4
Creating a Simple Web Page
5. In the Link field, after http://, enter www.ektron.com.
6. Click OK.
Notice that the word hyperlink now appears in a different color.
When you save this Web page and a user views it, if the user clicks
hyperlink, a new Web page will display Ektron’s home page.
NOTE
If your computer has an internet connection, you can double click the hyperlink to
test it.
Applying a Bullet to a Line of Text
1. Press <Enter> to move the cursor down to the next line.
2. Type You can begin a line with bullets.
3. Click the bullet button (
).
4. Notice that the line is indented and now begins with a bullet.
Changing the Size of Text
1. Press <Enter> to move the cursor down to the next line.
2. Type Finally, you can change the font to a large size.
3. Select the words large size.
Ektr on® eWeb Edit Pro +XML Us er Guide, R elease 3.0, revi si on 1
5
Creating a Simple Web Page
4. Click the down arrow to the right of the font size list. When you
do, the list of available fonts appears.
5. Click 5 (18 pt).
6. Notice that large size is now much larger than the other text.
Congratulations! You have just created your first Web page with
eWebEditPro. You have learned how to apply bold, italic, and
underlining, create a hyperlink, add a bullet to a line, and change
the size of the text.
This sample used only a few of the many features available. The
following sections explain the rest of the details about using the
product.
Ektr on® eWeb Edit Pro +XML Us er Guide, R elease 3.0, revi si on 1
6
Toolbar Buttons
This section explains how to use the buttons and drop-down
lists on the toolbar. (The toolbar is the row of buttons across the
top of the editor window, illustrated below.)
The buttons let you perform functions such as cutting and
pasting text, inserting images, and creating tables.
All buttons may not appear. Your Webmaster determines which
buttons appear on your toolbar. Also, you can customize your
toolbar so that it contains only the buttons you use (See
“Customizing Your Toolbar”.
This section explains
• Selecting Text
• Applying Formatting Attributes to Text
• Table of Toolbar Buttons and Drop-Down Lists
Selecting Text
You select text before performing an action on it, such as
copying it.
• To select all information on a page, press Ctrl+A.
• To select a portion of the information on a page, you have
two choices.
- Hold down the left mouse button and drag the cursor
across the data you want to select.
- Hold down the Shift key and the right arrow key (
)
until the desired data is selected.
E kt ron ® eWebEdi tPr o+X ML U ser Guid e, R elea se 3.0 , r evision 1
7
Toolbar Buttons
• To select a single word, place the cursor on the word and
double click the mouse.
Selected text has different background and foreground colors, as
illustrated below.
Applying Formatting Attributes to Text
Several buttons apply formatting attributes to text, such as bold
and italics. There are two ways to apply these attributes.
• Enter the text. Then, select the text and press the toolbar
button. The button is now in a “pressed in” condition, and the
text has the formatting attribute.
• Press the toolbar button. Then, begin typing the text. As you
type, the formatting is applied.
To stop applying the formatting, press the button again. This action
changes the button to a “pressed out” condition and terminates the
formatting.
Table of Toolbar Buttons and Drop-Down Lists
The following table explains each toolbar button and drop-down
list.
Ektr on® eWeb Edit Pro +XML Us er Guide, R elease 3.0, revi si on 1
8
Toolbar Buttons
Button
Equivalent
Keystroke
Function
For more
information, see
(Internet
Explorer only)
Cut
Ctrl+X
Remove selected text and graphics. Place
that data into temporary memory, also known
as the “clipboard.”
(If you later cut or copy more information onto
the clipboard, the new information overwrites
the original information.)
Copy
Ctrl+C
Copy selected text and graphics into
temporary memory. Leave selected data
where it is.
“Copying from Other
Applications”
(If you later cut or copy more information into
memory, the original information is lost.)
Paste
Find
Print
Undo
Redo
Spell Check
(manual)
Spell Check
(automatic)
Bookmark
Ctrl+V
Insert the most recently cut or copied text and
graphics at the current cursor location.
Ctrl+F
Search for text on the page.
Ctrl+P
Print the editor content.
Ctrl+Z
Reverse the most recent action, as if it never
occurred. You can undo as many actions as
you wish.
Ctrl+Y
Reverse the undo action.
“Finding Text”
Begin spell checker.
“Checking Spelling
Upon Demand”
Turn on or off spell check as-you-type feature.
“Checking Spelling
as You Type”
Create a bookmark.
“Using Bookmarks”
Ektr on® eWeb Edit Pro +XML User Guide, R elease 3.0, revi si on 1
9
Toolbar Buttons
Button
Equivalent
Keystroke
Function
For more
information, see
Create a hyperlink.
“Using Hyperlinks”
Change information about a hyperlink.
“Using Hyperlinks”
Remove a hyperlink.
“Removing a
Hyperlink”
(Internet
Explorer only)
New Hyperlink
Edit Hyperlink
Remove Hyperlink
Horizontal Line
Insert a horizontal line.
Insert a picture.
“Inserting Pictures”
Insert or edit a table.
“Introduction to
Tables”
Edit content in Microsoft Word.
”Editing in Microsoft
Word”
Table Borders
Display table borders while in edit mode if the
table’s border size is set to zero (0).
“Assigning Border
Size”
Show Invisible
Elements
Display some characters that do not appear
when the user views the page, such as end of
line characters.
Picture
Table
Edit in Microsoft
Word
Pressing this button does not display
characters that indicate a bookmark.
View as
WYSIWYG
View as HTML
Display the page content as WYSIWYG
(What You See Is What You Get).
WYSIWYG is the ability to see in the editor
what will appear when user views the Web
page.
Display the page content as HTML.
Ektr on® eWeb Edit Pro +XML User Guide, R elease 3.0, revi si on 1
“Viewing and Editing
HTML”
10
Toolbar Buttons
Button
Equivalent
Keystroke
Function
For more
information, see
Display a dialog box that lets you set default
values for font, color and size when viewing
as HTML. These settings are ignored when
you view as WYSIWYG or when the user
views your Web page.
“Viewing and Editing
HTML”
(Internet
Explorer only)
View Preferences
This button is active only when the View as
HTML button is pressed.
Number
Bullet
Indent
Begin the line on which the cursor rests with a
number. If the line above this line is
•
not numbered, assign this line 1
•
numbered, assign a number one more
than the line above
Begin the line on which the cursor rests (or all
selected lines) with a bullet ( ).
Increase or decrease the current line’s
distance from the left margin.
Align paragraph so that it is arranged
Left, Center, and Right
Justify
•
evenly on the left side (uneven on the
right)
•in the center of each line
•evenly on the right side (uneven on the
left)
•
About
eWebEditPro
evenly on right and left side
Display a dialog box that shows your version
of eWebEditPro and your license keys.
Ektr on® eWeb Edit Pro +XML User Guide, R elease 3.0, revi si on 1
11
Toolbar Buttons
Button
Equivalent
Keystroke
Function
For more
information, see
(Internet
Explorer only)
Remove Style
Remove all style information applied to
selected text. (You apply styles using the
Style dropdown list.) For example
Before
<P class=note>This is initial content.
</P>
After
<P>This is initial content.</P>
Style
Display a list of styles. Users can select from
the list to apply a style to selected text.
Note that the list can change depending on
the formatting of the selected line.
Your Webmaster determines which styles are
available.
Heading Size
Change the heading size. Your Webmaster
determines which heading sizes are
available.
Change the font style. Your Webmaster
determines which fonts are available.
Font Style
Note: If more than one font appears in a
selection, the browser on the reader’s PC
tries to display text using the first font. If the
browser cannot find that font, it tries to use
the second, etc.
Font
Change the font size. Your Webmaster
determines which font sizes are available.
Font
Change the font color. Your Webmaster
determines which colors are available.
Size
Color
Note: Your Web Master may disable one or
both of the font color toolbar options.
Ektr on® eWeb Edit Pro +XML Us er Guide, R elease 3.0, revi si on 1
12
Toolbar Buttons
Button
Equivalent
Keystroke
Function
For more
information, see
(Internet
Explorer only)
Change the font color.
Font Color
Change the background color of the text.
Background Color
Note: To remove background color from
selected text, click the Normal button (
Bold
Italic
Underline
Normal
Strikethrough
Superscript
Subscript
nbsp
Ctrl+B
Make the text bold.
Ctrl+I
Make the text italic.
Ctrl+U
Make the text underlined.
).
Remove all formatting from selected text.
Apply strikethrough to the text.
Make the text superscript.
Make the text subscript.
Insert a blank space character.
Although you can add spaces in the editor
using the <space> bar on the keyboard, those
spaces are ignored by a browser when it
displays a page.
Insert copyright symbol.
Copyright
Insert registered trademark symbol.
Registered
Trademark
TM
Insert trademark symbol.
Ektr on® eWeb Edit Pro +XML Us er Guide, R elease 3.0, revi si on 1
13
Toolbar Buttons
Button
Equivalent
Keystroke
Function
For more
information, see
(Internet
Explorer only)
Insert special characters (such as
from a drop down list.
and
Special Characters
)
To view the list, click the black down arrow.
.
Ektr on® eWeb Edit Pro +XML User Guide, R elease 3.0, revi si on 1
14
Customizing Your Toolbar
The eWebEditPro toolbar consists of one or more menus. Each
menu has one or more buttons.
You can recognize the beginning of a menu by the double
vertical bars (circled in the illustration).
This sample toolbar has five menus.
Your Webmaster determines
• which menus are available to you
• which buttons appear on each menu, and the sequence in
which they appear initially
• whether or not you are authorized to customize your
toolbar. If you are not authorized, your edits are not saved
when you leave the eWebEditPro screen.
If you are authorized to customize your toolbar, there are six
ways to do so. You can
• remove or add available menus
• remove or add toolbar buttons
• rearrange menus on a toolbar
• create a new menu
• move a menu off the toolbar
• rearrange the buttons on a menu
Each procedure is explained below.
E kt ron ® eWebEdi tPr o+X ML U s er Guid e, R elea se 3.0 , r evision 1
15
Customizing Your Toolbar
2. Click Move Up and Move Down to move the button up or
down one slot for each click.
Restoring Toolbars
If you remove all toolbars from your menu, and then want to
restore the menus but do not have the Customize menu option,
follow these steps.
1. Place the cursor in the editor.
2. Right click the mouse.
3. A menu appears with a Redisplay toolbars option.
4. Click this option to restore all menus.
Rearranging the Menus on a Toolbar
To move a menu to a different toolbar location, follow these steps.
1. Place the cursor on the double vertical bars that indicate the
beginning of the menu.
2. Click the mouse.
3. Hold down the mouse button and drag the menu to the new
location. You can move the menu anywhere else on the
toolbar.
Note that your Webmaster can define a menu so that it cannot
reside on the same row with another menu. If you move such a
menu, it will not remain on a row with another menu. Instead, it
will move down to the next row.
4. After you place the menu where you want it, release the mouse
button.
Creating a New Menu
1. Place the cursor on the toolbar.
2. Right click the mouse.
3. A dropdown list appears. Click Customize.
Ektr on® eWeb Edit Pro +XML Us er Guide, R elease 3.0, revi si on 1
16
Customizing Your Toolbar
NOTE
If you click outside the toolbar name field, you cannot later change the menu’s
name.
8. To have the menu appear on your toolbar, click in the small box
to the left of the menu name.
9. Click the Commands tab.
10. Add buttons to the menu, following the procedure described in
“Using the Customize Toolbar Dialog Box”
Moving a Menu Off the Toolbar
You can move a menu from the toolbar to anywhere else on the
screen, even if eWebEditPro does not occupy the entire screen.
You can also change the orientation of a menu that is not on the
toolbar from a horizontal to vertical.
To move a menu, follow these steps.
1. Place the cursor on the double vertical bars that indicate the
beginning of the menu.
2. Click the mouse.
3. Hold down the mouse button and drag the menu to the new
location. You can move the menu anywhere on the screen.
4. After you place the menu where you want it, release the mouse
button.
Changing the Menu’s Orientation
To change the menu’s orientation, follow these steps.
1. Drag the menu from the toolbar.
2. Move the cursor to the bottom of the menu until it becomes a
double-headed arrow (illustrated below).
Ektr on® eWeb Edit Pro +XML Us er Guide, R elease 3.0, revi si on 1
17
Customizing Your Toolbar
3. Drag the cursor to the lower left. As you do, the menu’s
orientation changes from horizontal to vertical (illustrated
below).
Ektr on® eWeb Edit Pro +XML Us er Guide, R elease 3.0, revi si on 1
18
T he Context Sen sitive Menu
This section explains the functions available on the menu that
appears when you right click the mouse within the
eWebEditPro editor. You can also access this menu by
pressing the application key (
).
Because this menu can change depending on what you are
doing, it is called a context-sensitive menu.
NOTE
A different context-sensitive menu is available when your cursor is within a
table. That menu is described in “The Table Context Sensitive Menu”
The following table lists the menu options and where to get
more information on each.
E kt ron ® eWebEdi tPr o+X ML U s er Guid e, R elea se 3.0 , r evision 1
19
The Context Sensitive Menu
Menu Option
Lets you
For more information,
see
Menus
View all toolbar menus.
“Using eWebEditPro
without a Mouse”
Cut
Remove selected text and graphics.
Place that data into temporary memory.
If you later cut or copy more information
into memory, the information in memory
is lost.
Copy
Copy selected text and graphics into
temporary memory. Leave selected data
where it is. (If you later cut or copy more
information into memory, the original
information is lost.)
Paste
Insert the most recently cut or copied text
and graphics at the current cursor
location.
Select All
Select all information on your page. After
you select it, you can cut it, copy it, etc.
Clean HTML
Remove unnecessary HTML tags
“Cleaning HTML”
Hyperlink
Create a link to another Web page or a
spot within the current page
“Using Hyperlinks”
Edit HTML
Edit your page’s HTML
“Editing a Section of a
Page”
Insert HTML
Insert HTML onto the page at the cursor
location.
“Inserting HTML”
Check Spelling
Compare words in the editor to Microsoft
WORD spelling list.
“Checking Spelling”
View as WYSIWYG/HTML
View and edit your page’s HTML
“Viewing and Editing
HTML”
Ektr on® eWeb Edit Pro +XML Us er Guide, R elease 3.0, revi si on 1
“Copying from Other
Applications”
20
The Context Sensitive Menu
Menu Option
Lets you
For more information,
see
Picture
Insert a picture
“Inserting Pictures”
These options only appear if
you site is using
eWebEditPro+XML:
Work with XML tags
Insert Custom tag, tag name tag
Attributes, tag name tag
Properties
Ektr on® eWeb Edit Pro +XML Us er Guide, R elease 3.0, revi si on 1
”Editing XML Web Pages”
only available
in the eWebEditPro+XML
User Guide
21
Usin g eWebEditPro’s Advanced
F eatu res
Most of eWebEditPro’s features are easy to learn. For example,
to make your text bold, you select the text, and click the bold
button (
).
However, some of eWebEditPro’s features are more complex.
For example, when creating a table, you must make several
decisions: the number of rows and columns, the size of the
border, the spacing between cells, etc.
E kt ron ® eWebEdi tPr o+X ML U s er Guid e, R elea se 3.0 , r evision 1
22
Copying from Other
Application s
You can copy information from most other Windows
applications into eWebEditPro and retain the formatting from
the original application. In general, copying from another
application involves these steps.
1. Sign on to the application in which the information resides.
2. Select the information to be copied.
3. Press <Ctrl>+<C>.
4. Go to eWebEditPro.
5. Press <Ctrl>+<V> to paste the selected information.
Here are some points to remember when copying from another
application.
• If you want to copy images, you must first upload them to
the server, using the image upload feature. (The Image
Upload feature is described in the eWebEditPro Installation/
Integration manual for the platform you are using.)
• You can only copy content, not background information that
generates content.
So, for example, you can copy the values in a spreadsheet
but not the formulas used to generate those values. Also,
copying dynamic fields from Microsoft WORD would
retrieve the current value of the fields but not the variables
that generate those values.
It’s a good idea to experiment with copying from different
sources to test the results.
Ektr on® eWeb Edit Pro +XML Us er Guide, R elease 3.0, revi si on 1
23
Finding Text
To find text on your Web page, click the Find button ( ) (or
<Ctrl>+<F>). When you do, the find dialog box appears.
Type the text that you want to find on the page and click Find
Next. The search stops at the next occurrence of that text.
The dialog box also lets you specify
• a search direction
• if the search considers the case (upper or lower) of the
search term
• whole word match
NOTE
If you click the mouse on the Web page outside of the editor and press
<Ctrl>+<F>, the find looks for matching words on the Web page.
Specifying a Search Direction
The search begins where the cursor is when you click Find
Next. To make sure you locate every occurrence of a term,
place the cursor at the beginning of the page before you begin
the search.
If you begin the search from somewhere other than the top of
the page, use the Direction field to search from the current
location to the top or bottom of the file.
Ektr on® eWeb Edit Pro +XML Us er Guide, R elease 3.0, revi si on 1
24
Finding Text
To search from the
cursor location to the
Click this option in the
Direction field
end of the page
Down
top of the page
Up
Considering the Case of a Search Term
By default, the search ignores the case (upper or lower) of a
search term. In other words, if you enter Bob in the Find What
field, the search finds bob, Bob, BOB, etc.
If you want the search to be case sensitive, use the Match case
check box on the Find window. If you enter Bob in the Find What
field and place a check in the Match case box, the search only
stops at Bob, not bob or BOB.
Whole Word Match
By default, the search finds any occurrence of the text that you
type into the Find what field. For example, if you enter the, the
Ektr on® eWeb Edit Pro +XML Us er Guide, R elease 3.0, revi si on 1
25
Finding Text
search finds the word the, as well as those letters embedded in
other words, such as others and theater.
If you want the search to find only whole word occurrences of the
text you type into the Find what field, click the Match whole
words only box in the Find dialog box.
Ektr on® eWeb Edit Pro +XML Us er Guide, R elease 3.0, revi si on 1
26
Checking Spelling
The eWebEditPro editor can check your spelling as you type
or whenever you want to check it. The rest of this section
explains
• Disabling Script Blocking
• Check Spelling as You Type
• Checking Spelling Upon Demand
• Spell Checking Selected Text
• Setting Spell Check Options
Disabling Script Blocking
If Norton Antivirus TM 2001 is installed on your computer, you
need to disable script blocking in order to use the spell checker.
If you do not disable script blocking, an error message will
appear whenever you check spelling.
To do this, follow these steps.
1. Launch Norton Antivirus TM 2001.
2. From the first window, click Options.
3. On the next window, click Script Blocking.
4. On the script blocking window, uncheck Enable Script
Blocking.
5. Press OK.
Checking Spelling as You Type
You can have the editor check spelling as you type. To turn on
the spell-check-as-you-type feature, click the automatic spell
check button(
).
E kt ron ® eWebEdi tPr o+X ML U s er Guid e, R elea se 3.0 , r evision 1
27
Checking Spelling
When you click the button, the spell checker reviews every word in
the file. A wavy red line (
) appears under any word whose
spelling is not found in the system’s dictionary.
The spell checker continues to review each word as you type it,
marking any words not in the dictionary.
NOTE
Depending on the speed of your computer, there may be a short delay between
the time you type an incorrect word and when the wavy red line appears. Also, the
spell check does not check a word until you enter a space character after the
word.
Fixing Spelling Errors
There are two ways to fix a spelling error (indicated by a wavy red
line).
• Click the misspelled word and then right click. A menu displays
words that are similar to the misspelled word. Click the correct
word.
• If you know the correct spelling, type the correction.
Checking Spelling Upon Demand
If you do not want to use the spell-check-as-you-type feature, you
can begin spell checking whenever you wish. To do this, click the
spell check button (
).
When you do, the system checks each word in the file. If the spell
check finds a word in none of the dictionaries, it displays the
Spelling dialog box.
Ektr on® eWeb Edit Pro +XML Us er Guide, R elease 3.0, revi si on 1
28
Checking Spelling
The Spelling Dialog Box
The Spelling dialog box displays
• the word not in the dictionary (in the Not in Dictionary field).
• suggested spellings for the word (in the Suggestions field).
The most likely replacement is selected at the top of the list.
• buttons that let you ignore the word, change the word, or exit.
If you want to
Do this
Replace the word with one of the suggestions and continue
spell checking the page.
1.
Click the suggested word.
2.
Click Change.
Replace every occurrence of the word with one of the
suggestions and continue spell checking the page.
1.
Click the suggested word.
2.
Click Change All.
Correct the spelling of the word by typing it and continue
spell checking the page.
1.
Click in the Not In Dictionary
field.
2.
Correct the spelling.
3.
Click Change.
Leave the word as is; continue spell checking the page.
Click Ignore.
You would normally do this if a word (such as a company
name) is spelled correctly even though it is not in the
dictionary.
Leave the word as is; continue spell checking the page,
ignoring all other occurrences of the word.
Click Ignore All.
Stop spell checking.
Click Cancel.
Spell Checking Selected Text
To check the spelling for a single word or a group of words, follow
these steps.
1. Select the text that you want to spell check.
2. Press the manual spell check button (
Ektr on® eWeb Edit Pro +XML Us er Guide, R elease 3.0, revi si on 1
).
29
Inserting Pictures
To insert a picture into the editor, place the cursor where you
want the image to appear and click the Insert Picture button
( ). When you click the button, one of the two Picture
Properties dialog boxes illustrated below appears, depending
on how your Webmaster has set up your system.
The dialog boxes are very similar, with the only difference being
• the Images field (circled in red on the image of the second
dialog box, below) does not appear on the first dialog box
• the Select New File button on the first dialog box is labeled
Local File on the second dialog box.
E kt ron ® eWebEdi tPr o+X ML U s er Guid e, R elea se 3.0 , r evision 1
30
Inserting Pictures
You can also access this dialog box to modify a picture after you
insert it. To do this, follow these steps.
1. Click the picture.
2. Right click the mouse.
3. Click Picture from the menu.
If you see the first dialog box, proceed to “Using the First Picture
Properties Dialog Box”. If you see the second dialog
box, proceed to “Using the Second Media Selection Dialog Box”
Using the First Picture Properties Dialog Box
When the first Picture Properties dialog box appears, click the
Select New File button. When you do, the Insert Media Item dialog
box appears.
This box and lets you insert a picture from your computer (and any
network folder available to your computer), or from the Web server
Ektr on® eWeb Edit Pro +XML Us er Guide, R elease 3.0, revi si on 1
31
Inserting Pictures
to which your computer is connected. Both choices are described
below.
Inserting a Picture from the Server
The top left corner of the dialog box (Illustrated below) lists the
pictures on the Web server.
Ektr on® eWeb Edit Pro +XML Us er Guide, R elease 3.0, revi si on 1
32
Inserting Pictures
Pictures that you previously inserted appear on this list, as do
pictures inserted by other users connected to that server.
To insert a picture from the server, follow these steps.
1. Click the picture from the To Select an Existing File field that
you want to insert.
2. Information about the picture’s file size, width and height
appears in the upper right corner of the dialog box.
3. If you want to view a picture before inserting it, click Preview
(on the right side of the dialog box).
4. Click OK.
5. The Picture Properties dialog box reappears. Here, you can
change the properties of the picture. For more information, see
• “Adjusting a Picture”
• “Setting a Border”
• “Aligning the Picture”
• “Adding Space around the Picture”
6. Click OK to insert the picture into the editor.
Deleting a Picture from the Server
To delete a picture from the server, select the picture and click the
Delete button.
Inserting a Picture from Your Computer
Use the lower left corner of the dialog box to insert pictures from
your computer (and any network folder available to your computer)
into the editor.
Ektr on® eWeb Edit Pro +XML Us er Guide, R elease 3.0, revi si on 1
33
Inserting Pictures
NOTE
You can only select files in the To Select a Local File: field if your computer has
permission to upload files to the server.
To insert a picture from your computer, follow these steps.
1. Click the Browse button.
2. Navigate to the file that you want to insert and press Open to
insert it.
Your Webmaster can set a maximum size (in kilobytes) for
images. If you select an image that exceeds the maximum, an
error message appears and you cannot insert it.
Your Webmaster can also restrict the type of image file you can
insert. For example, if your Webmaster does not authorize you
to insert bitmap (.bmp) files and you try to do so, an error
message lists valid file extensions, and you cannot insert the
image.
3. Click in the Enter a description for the file field. Enter a title
to describe the file.
4. After you insert the picture, the title appears in the dialog box’s
top left corner to identify the picture to you and all users
connected to the same Web server.
Ektr on® eWeb Edit Pro +XML Us er Guide, R elease 3.0, revi si on 1
34
Inserting Pictures
NOTE
The title is also the alt text for the image. The alt text appears in place of the
image on the Web page if the image itself cannot display for any reason.
5. Information about the picture’s file size, width and height
appears in the upper right corner of the dialog box.
6. If you want to view a picture before inserting it, click Preview
(on the right side of the dialog box).
7. Click OK.
8. The Picture Properties dialog box reappears. Here, you can
change the picture’s properties. For more information, see
• “Adjusting a Picture”
• “Setting a Border”
• “Aligning the Picture”
• “Adding Space around the Picture”
• “Editing the Picture’s Title”
9. Click OK to insert the picture into the editor.
Using the Second Media Selection Dialog Box
When using the second Media Selection dialog box, you can insert
a picture from any folder available to your computer (whether the
folder is on your computer or a remote computer) or from the Web
server. Your Webmaster determines which pictures are available
on the Web server.
To insert a picture from
• a folder available to your computer, click Local File, navigate
to the file of interest, and click OK.
• the Web server, click the down arrow to the right of the Images
field
the list.
and select an item from
If you want to view the picture before inserting it, click Click Here
to Preview (on the right side of the dialog box).
Next, you are prompted to enter a User Name and Password.
Your Webmaster will assign these codes to you, which are needed
Ektr on® eWeb Edit Pro +XML Us er Guide, R elease 3.0, revi si on 1
35
Inserting Pictures
to copy the file to the Web server. (Every picture must be copied to
the Web server before you can insert it.)
NOTE
The Login box includes an Advanced button. For documentation of the dialog box
that appears when you click this button, see “Uploading Images” in the
eWebEditPro Developer’s Reference Guide.
The Picture Properties Dialog Box
You can also use the Picture Properties dialog box to
• adjust the picture’s width, height, border thickness, and
alignment
• reset the image’s properties width, height, border thickness,
and alignment to their original specifications
• set spacing between the picture and surrounding information
on the page
• enter or edit the picture’s title
• view technical information about your connection
Adjusting a Picture
The layout area of the Picture Properties dialog box lets you adjust
a picture’s width, height, border thickness, and alignment.
You can use the following fields to adjust the picture before
inserting it into the editor.
Ektr on® eWeb Edit Pro +XML Us er Guide, R elease 3.0, revi si on 1
36
Inserting Pictures
To make this change
Use this field
The width of the picture, in pixels
Width
The height of the picture, in pixels
Height
Add a border around the picture
Border Thickness
For more information, see “Setting a Border”
Adjust the alignment of the picture
Alignment
For more information, see “Aligning the Picture”
WARNING!
If you substantially adjust the picture’s height and/or width, the picture may be
distorted when users view your Web page.
Pixels
A pixel is a single point in a graphic image.
Computer monitors display pictures by dividing the screen into
thousands of pixels, arranged in rows and columns. The pixels are
so close together that they appear connected.
Below is an image shown at regular size and then enlarged so you
can see the pixels that make up the picture.
regular size
enlarged to show pixels
Ektr on® eWeb Edit Pro +XML Us er Guide, R elease 3.0, revi si on 1
37
Inserting Pictures
Setting a Border
To add a border around a picture, enter the border’s thickness in
pixels in the Border Thickness field on the Picture Properties
dialog box.
Here is a picture with a 1 pixel border.
Here is the same picture with a 10 pixel border.
If the picture is not a hyperlink, its border is black. If the picture is
also a hyperlink, the border is the same color as a hyperlink (for
example, blue or purple if visited).
Aligning the Picture
To align a picture, use the Alignment field on the Picture
Properties dialog box.
Ektr on® eWeb Edit Pro +XML Us er Guide, R elease 3.0, revi si on 1
38
Inserting Pictures
When deciding how to align a picture, you need to become familiar
with these terms.
• baseline of text - the imaginary line on which the text lies.
Some letters (such as g, p and y) have descenders, segments
of letters that extend below the baseline
• bottom of text - the lowest section of a line to which a
descender extends
• top of text - the highest spot of a line to which any segment of a
letter extends
• vertical center - the midpoint between the top and bottom of the
line
The following table lists your alignment choices.
To align
Click this in the
Alignment field
The picture on the left margin, allowing
subsequent text to wrap around it
Left
The picture on the right margin, allowing
subsequent text to wrap around it
Right
The top of the picture with the top of the
text
Text Top, Top
The vertical center of the picture with the
baseline of the text
Middle
Ektr on® eWeb Edit Pro +XML Us er Guide, R elease 3.0, revi si on 1
Illustration
39
Inserting Pictures
To align
Click this in the
Alignment field
The vertical center of the picture with the
vertical center of the text
AbsMiddle
The bottom of the picture with the
baseline of the text (This is the default
alignment)
Bottom, Baseline
The bottom of the picture with the bottom
of the text
AbsBottom
Illustration
Resetting Width, Height, Border Thickness, and Alignment
If you adjust the picture’s width, height, border thickness, and/or
alignment and later want to restore all of those settings to their
original values, click the Reset button.
Note that you cannot selectively restore some settings -- the Reset
button automatically restores all of them.
Adding Space around the Picture
On the Picture Properties dialog box, you can use the Spacing
fields (Horizontal and Vertical) to add space around the picture.
You enter a number of pixels to determine spacing value.
Ektr on® eWeb Edit Pro +XML Us er Guide, R elease 3.0, revi si on 1
40
Inserting Pictures
The following graphic illustrates the effect of adding spacing to a
picture.
Editing the Picture’s Title
The title that you entered in the Insert Media Item dialog box
defaults into the Title field of the Media Selection dialog box. You
can edit the title in this field if desired.
NOTE
The title is also the alt text for the image. The alt text appears in place of the
image on the Web page if the image itself cannot display for any reason.
The Options Button
When you click the Options button on the File Properties dialog
box, the options dialog box appears. The box displays information
about your connection to the Web server.
Ektr on® eWeb Edit Pro +XML Us er Guide, R elease 3.0, revi si on 1
41
Inserting Pictures
For information about these settings, see “Uploading Images” in
the eWebEditPro Developer’s Reference Guide.
Deleting a Picture
If you want to delete a picture, follow these steps.
1. Move the cursor over the picture.
2. Click the mouse to select the picture.
3. Click the Cut button (
).
Ektr on® eWeb Edit Pro +XML Us er Guide, R elease 3.0, revi si on 1
42
Introductio n t o Tables
Sometimes, the information on your Web page looks better
when displayed on a table. Here is an example.
City
Baseball Team
Hockey Team
Boston
Red Sox
Bruins
New York
Yankees / Mets
Rangers
Chicago
White Sox / Cubs
Black Hawks
This section explains
• Creating a Table
• Deleting a Table
• Inserting a Table within a Table
See Also: “Table Dialog Boxes and Menus”
“Manipulating Your Table’s Format”, and “Working
with Table Cells”
E kt ron ® eWebEdi tPr o+X ML U s er Guid e, R elea se 3.0 , r evision 1
43
Introduction to Tables
Creating a Table
To create a table, click the table button ( ) then click Insert Table
from the menu. When you do, the Insert Table dialog box appears.
You can also access this dialog box after you insert it. You would
do this if you wanted to edit any of the information entered in the
dialog.
To access this dialog after insertion, follow these steps.
1. Click the table.
2. Right click the mouse.
3. Click Table Properties from the menu.
When creating a table, you can specify the
• number of rows and columns
Ektr on® eWeb Edit Pro +XML Us er Guide, R elease 3.0, revi si on 1
44
Introduction to Tables
• width
• horizontal alignment on the page
• background color or background picture
• border size and color
For more information about managing tables, see “Manipulating
Your Table’s Format”
For more information about managing individual cells within a
table, see “Working with Table Cells”
Deleting a Table
To delete a table, follow these steps
1. Move the cursor over the table until the cursor becomes a fourheaded arrow (
).
2. Click the mouse button. The table becomes selected (small
squares appear around it).
3. Press <Delete>.
Inserting a Table within a Table
You can insert a table within a table. You might want to do this to
arrange text in columns.
Ektr on® eWeb Edit Pro +XML Us er Guide, R elease 3.0, revi si on 1
45
Introduction to Tables
NOTE
HTML does not let you use tabs or spaces to align text in columns. You must use
a table to align columns. You can remove the table’s border, so that no lines
appear between the columns and rows.
To insert a table within a table, follow these steps.
1. Place the cursor in the cell into which you want to insert a table.
2. Click the Insert Table button (
).
3. Click Insert Table from the menu.
4. The Insert Table dialog box appears.
5. Edit the fields in the dialog box as needed. Then, click OK.
Ektr on® eWeb Edit Pro +XML Us er Guide, R elease 3.0, revi si on 1
46
Table Dialog Boxes an d Menus
This section explains the menu options and dialog boxes you
use to manipulate tables and cells. In most cases, you are
referred to another section that describes the feature in more
detail.
This section explains
• The Insert Table Menu
• The Table Properties Dialog Box
• The Cell Properties Dialog Box
• The Table Context Sensitive Menu
The Insert Table Menu
You access the Insert Table menu by clicking on the Insert
Table button ( ) when the cursor is inside a table. When you
do, the following menu appears.
E kt ron ® eWebEdi tPr o+X ML U s er Guid e, R elea se 3.0 , r evision 1
47
Table Dialog Boxes and Menus
The following table lists the menu options and where to get more
information on each.
Menu Option
Description
For more information, see
Insert Table
Inserts a new table where the
cursor is currently resting
“Creating a Table”
Insert Row
Creates a new table row above the
row in which the cursor is currently
resting
“Adding or Removing Rows and
Columns”
Insert Column
Creates a new table column next to
the column in which the cursor is
currently resting
“Adding or Removing Rows and
Columns”
Insert Cell
Inserts a cell to the left of the cursor
in a table
Delete Rows
Deletes table row in which the
cursor is currently resting
“Adding or Removing Rows and
Columns”
Delete Column
Deletes table column in which the
cursor is currently resting
“Adding or Removing Rows and
Columns”
Delete Cells
Deletes the selected cells
Merge Cells
Combines the contents of two or
more selected cells into one
“Merging Two Cells”
Split Cell
Divides a cell into two. Each cell
occupies one half the size of the
original cell.
“Splitting a Cell”
Table Properties
Displays and lets you edit table
properties, such as the number of
rows and columns, cell padding,
and borders.
“The Table Properties Dialog Box”
Cell Properties
Displays and lets you edit cell
properties, such as width and
alignment
“The Cell Properties Dialog Box”
Ektr on® eWeb Edit Pro +XML Us er Guide, R elease 3.0, revi si on 1
48
Table Dialog Boxes and Menus
The Table Properties Dialog Box
The Insert Table dialog box lets you manipulate most elements of a
table‘s appearance.
The following table lists the fields on this dialog box and refers you
to the section that explains each field.
Field(s)
Lets you specify
For more
information, see
Size: Rows, Columns
The number of rows and
columns in the table
“Choosing the Number
of Rows and Columns”
Layout: Width
Table width
“Specifying Table
Width”
Layout: Horizontal
Alignment
The table’s alignment
across the Web page
“Setting Horizontal
Alignment”
Ektr on® eWeb Edit Pro +XML Us er Guide, R elease 3.0, revi si on 1
49
Table Dialog Boxes and Menus
Field(s)
Lets you specify
For more
information, see
Background Color
The background color of
the table
“Specifying a Table’s
Background Color”
Background Image
A background image for
the table
“Specifying a
Background Image
for a Table”
Borders: Use Default
Color
Whether or not to use
the default color (gray)
for table borders
Border Color
If you do not use the
default, the color of the
table border
“Assigning Border
Color”
Border Size
The size of the table
border
“Assigning Border Size”
Cell Padding
The space (in pixels)
between the cell text
and a cell’s border
“Assigning Cell
Padding”
Cell Spacing
The space (in pixels)
between a cell and
surrounding cells
“Assigning Cell
Spacing”
Ektr on® eWeb Edit Pro +XML Us er Guide, R elease 3.0, revi si on 1
50
Table Dialog Boxes and Menus
The Cell Properties Dialog Box
The Cell Properties dialog box lets you manipulate most elements
of a cell‘s appearance.
The following table lists the fields on this dialog box and refers you
to the section that explains each field.
Field(s)
Lets you specify
For more
information, see
Rows Spanned
If the cell spans two or
more rows
“Spanning Rows or
Columns”
Columns Spanned
If the cell spans two or
more columns
“Spanning Rows or
Columns”
Width
The minimum cell width
“Specifying the Width of
a Cell”
Ektr on® eWeb Edit Pro +XML Us er Guide, R elease 3.0, revi si on 1
51
Table Dialog Boxes and Menus
Field(s)
Lets you specify
For more
information, see
Word Wrap
Whether text moves
down to the next line
when it reaches the
specified width of a cell
“Word Wrap”
Horizontal Alignment
The alignment of data
across a cell
“Setting Horizontal
Alignment”
Vertical Alignment
The alignment of data
up and down within a
cell
“Setting Vertical
Alignment”
Background Color
The cell’s background
color, if you want it to be
different from the table’s
background color
“Specifying a Cell’s
Background Color”
Background Image
A background image for
the cell
“Specifying a
Background Image for a
Cell”
Use Default Color
Apply the table border
color to this cell border
Border Color
Apply a color other than
the table border color to
this cell border
Ektr on® eWeb Edit Pro +XML Us er Guide, R elease 3.0, revi si on 1
“Setting a Cell’s Border
Color”
52
Table Dialog Boxes and Menus
The Table Context Sensitive Menu
The following menu appears when you right click the mouse while
the cursor is in a table.
The following table lists the menu options and where to get more
information on each.
Menu Option
Description
For more information, see
Menus
Displays toolbar menus. Click a menu to
display it options. Then, click a menu option
to perform its function, such a copying text.
“Using eWebEditPro without a
Mouse”
Ektr on® eWeb Edit Pro +XML Us er Guide, R elease 3.0, revi si on 1
53
Table Dialog Boxes and Menus
Menu Option
Description
Cut
Removes selected text and graphics. Places
that data into temporary memory, also known
as the “clipboard.”
For more information, see
(If you later cut or copy more information
onto the clipboard, the new information
overwrites the original information.)
Copy
Copies selected text and graphics into
temporary memory. Leaves selected data
where it is.
(If you later cut or copy more information into
memory, the original information is lost.)
Paste
Inserts the most recently cut or copied text
and graphics at the current cursor location.
Select All
Selects all information on your page. After
you select it, you can cut it, copy it, etc.
Clean HTML
Removes unnecessary HTML tags
“Cleaning HTML”
Hyperlink
Creates a link to another Web page or a spot
within the current page
“Using Hyperlinks”
Insert HTML
Inserts HTML onto the page at the cursor
location.
“Inserting HTML”
Edit HTML
Edits your page’s HTML
“Editing a Section of a Page”
Insert Table
Inserts a new table where the cursor is
currently resting
“Creating a Table”
Insert Row
Creates a new table row above the row in
which the cursor is currently resting
“Adding or Removing Rows
and Columns”
Insert Column
Creates a new table column next to the
column in which the cursor is currently
resting
“Adding or Removing Rows
and Columns”
Insert Cell
Inserts a cell to the left of the cursor in a table
“Inserting a Cell”
Delete Row
Deletes table row in which the cursor is
currently resting
“Adding or Removing Rows
and Columns”
Ektr on® eWeb Edit Pro +XML Us er Guide, R elease 3.0, revi si on 1
54
Table Dialog Boxes and Menus
Menu Option
Description
For more information, see
Delete Column
Deletes table column in which the cursor is
currently resting
“Adding or Removing Rows
and Columns”
Delete Cell
Deletes the selected cells
“Deleting a Cell”
Merge Cells
Combines the contents of two or more
selected cells into one
“Merging Two Cells”
Split Cell
Divides a cell into two. Each cell occupies
one half the size of the original cell.
“Splitting a Cell”
Table Properties
Displays and lets you edit table properties,
such as the number of rows and columns,
and their width
“The Table Properties Dialog
Box”
Ektr on® eWeb Edit Pro +XML Us er Guide, R elease 3.0, revi si on 1
55
M a n i p u l a t i n g You r Tab l e ’s
F o rm at
This section explains how to manipulate your table’s format by
specifying
• a number of rows and columns
• a width
• horizontal alignment
• a background color or image
• border color and size
NOTE
You can also apply most of these properties to individual cells within a table.
See “Working with Table Cells” for details.
Choosing the Number of Rows and Columns
Use the Size section of the Insert Table dialog box to specify
the number of rows and columns in the table.
E kt ron ® eWebEdi tPr o+X ML U s er Guid e, R elea se 3.0 , r evision 1
56
Manipulating Your Table’s Format
A row is a horizontal series of cells, while a column is a vertical
series.
If you know how many rows and columns the table will be, enter
those numbers. If you don’t know the number of rows and columns
you need when you create the table, estimate how many you need.
You can add or remove rows and columns later.
Placement of Inserted Row or Column
If you add a row, it appears above the row in which the cursor was
resting when you pressed Insert Row.
If you add a column, it appears on the left side of the table.
Adding or Removing Rows and Columns
To add or remove rows and columns after you create the table,
follow these steps.
1. Place the cursor in the cell from which you want to add or
delete.
Ektr on® eWeb Edit Pro +XML Us er Guide, R elease 3.0, revi si on 1
57
Manipulating Your Table’s Format
2. Right click the mouse. A menu appears.
3. Click the appropriate action from the menu. For example to add
a row, click Insert Row.
NOTE
If you are working with nested tables, and you add or remove a column then undo
that action and redo it, you must press the redo button once for each cell in the
row or column.
Specifying Table Width
When you create a table, you can set its width by specifying one of
the following:
• percentage of the window: the table’s width varies as a user
adjusts the browser size
• fixed number of pixels, the table’s width stays the same as a
user adjusts the browser size
You can also not set a width but instead let information you enter
into the table’s cells determine its width.
Ektr on® eWeb Edit Pro +XML Us er Guide, R elease 3.0, revi si on 1
58
Manipulating Your Table’s Format
NOTE
To set the width of a table column, adjust the width of one of the cells within the
column (as described in “Specifying the Width of a Cell”. Usually, this
change affects all other cells in the column.
Specifying Table Width by Percentage
Specify table width by percentage if you want the table to be
resized as the user resizes the browser.
NOTE
In order for the table to resize with the browser, the Word Wrap attribute must be
turned on in all of a table’s cells. For details, see “Word Wrap”
For example, if you specify that a table is 100% wide, and your
browser displays 14 inches across when it is maximized, the table
fills the screen (except for the browser border).
If you resize the browser to half the screen, the table will be about
7” wide. You still see both columns, but some of the data is moved
Ektr on® eWeb Edit Pro +XML Us er Guide, R elease 3.0, revi si on 1
59
Manipulating Your Table’s Format
down.
Setting Table Width by Percentage
To specify table width by percentage, choose Percent in the layout
section of the Insert Table dialog box. Then, specify the percentage
at the Width field.
Ektr on® eWeb Edit Pro +XML Us er Guide, R elease 3.0, revi si on 1
60
Manipulating Your Table’s Format
Specifying Table Width by Pixels
Specify table width by pixels if you want the table to remain the
same size if a user resizes the browser.
For example, if you specify that a table is 610 pixels wide, and the
user’s browser is set to low resolution (640 x 480 pixels), the table
occupies the full width of the browser when it is maximized.
If the user resizes the browser so that it only occupies the left half
of the screen, only the left half of the table appears. A scroll bar
appears at the bottom of the browser. The user must move the
scroll bar to see the rest of the table.
If you set table width by pixels, do not set it to more than 610
pixels. Otherwise, the table will not fully display on a monitor set to
low resolution (640 x 480).
Setting Table Width by Pixels
Ektr on® eWeb Edit Pro +XML Us er Guide, R elease 3.0, revi si on 1
61
Manipulating Your Table’s Format
To specify table width by pixels, choose Pixels in the layout section
of the Insert Table dialog box. Then, specify the number of pixels at
the Width field.
Specifying Horizontal Alignment
You can specify your table’s horizontal alignment (left, right, or
center) within the browser.
Alignment
Example
left
right
Ektr on® eWeb Edit Pro +XML Us er Guide, R elease 3.0, revi si on 1
62
Manipulating Your Table’s Format
Alignment
Example
center
If you specify right or left justify, you can wrap text around the table.
To do this, move the cursor to the right or left of the table and begin
typing.
Specify the table alignment at the Horizontal Alignment field on
the Layout area of the Insert Table dialog box.
Ektr on® eWeb Edit Pro +XML Us er Guide, R elease 3.0, revi si on 1
63
Manipulating Your Table’s Format
Table Backgrounds
You can specify a background color or image for your table.
Specifying a Table’s Background Color
You can assign a background color to a table to make it more
pleasing to the eye. Here is an example.
NOTE
If you apply a dark background color to a table, you may want to apply a light
foreground color to the text. Use the font color button (
color.
) to change the text
To assign a background color to your table, click the Background
Color field on the Insert Table dialog box.
When you click that field, a color dialog box appears. Click the
color that you want to apply to the background of the table.
Follow these steps to get help on how to use the color box.
1. Click the question mark in the top right corner.
Ektr on® eWeb Edit Pro +XML Us er Guide, R elease 3.0, revi si on 1
64
Manipulating Your Table’s Format
2. A large question mark appears next to your cursor.
3. Drag the question mark to the area of the dialog box that you
want to learn about.
4. Click the mouse button. A box appears with instructions for that
area.
Deleting a Table’s Background Color
To delete a table’s background color, click the Unassigned box in
the Custom Background area of the Insert Table dialog box.
Specifying a Background Image for a Table
If you want a background image to appear in all table cells, use the
Background Image field of the Insert Table dialog box.
Ektr on® eWeb Edit Pro +XML Us er Guide, R elease 3.0, revi si on 1
65
Manipulating Your Table’s Format
Your Webmaster determines which images are available to you.
To insert a background image
1. Click the down arrow to the right of (Select Image). A list of
background images appears.
2. Click the image of your choice.
3. Click OK.
Note that when you apply a background image to a table
• it applies to the entire table, including the borders.
• if the table is larger than the image, the image repeats until it
fills the table.
• if the image is larger than the table, the top left corner of the
image aligns with the top left corner of the table. The rest of the
image fills as much of the table as possible.
• you can also apply an image to individual cells (see
“Specifying a Background Image for a Cell”).
• make sure that the image does not obscure user’s ability to
read the table text.
Deleting a Background Image
1. Move the cursor to any cell on the table and right click the
mouse.
Ektr on® eWeb Edit Pro +XML Us er Guide, R elease 3.0, revi si on 1
66
Manipulating Your Table’s Format
2. Click Table Properties from the menu.
3. Select the value in the Background Image field and press
<Backspace>.
4. Click OK.
Setting Table Borders
You can specify a border color or size for your table.
Assigning Border Color
A table border is the line that separates the table from the rest of
your Web page. By default, table borders are gray. You can change
the color of table borders.
Ektr on® eWeb Edit Pro +XML Us er Guide, R elease 3.0, revi si on 1
67
Manipulating Your Table’s Format
If you want a table’s border to “disappear,” set it to the same color
as the page’s background color. This technique is often used to
format text on a Web page.
Assigning a Cell Border Color
Each cell also has a border that separates it from the other cells
and the table border. By default, a cell’s border color matches the
table border. However, you can individually change a cell border
color (see “Setting a Cell’s Border Color”
To assign a color to your table’s border, click the Border Color
field on the Insert Table dialog box.
When you click that field, a color selection box appears. Click the
color that you want to apply to the table’s border. Follow these
steps to get help on how to use the color box.
1. Click the question mark in the top right corner.
Ektr on® eWeb Edit Pro +XML Us er Guide, R elease 3.0, revi si on 1
68
Manipulating Your Table’s Format
2. A large question mark appears next to your cursor.
3. Drag the question mark to the area of the dialog box that you
want to learn about.
4. Click the mouse button. A box appears with instructions for that
area.
Assigning Border Size
You can also adjust the size of a table border. Size is measured in
pixels.
To assign a border size to your table, enter a number of pixels into
the Border Size field on the Insert Table dialog box.
Ektr on® eWeb Edit Pro +XML Us er Guide, R elease 3.0, revi si on 1
69
Manipulating Your Table’s Format
If you set a table’s border size to zero (0) but wish to view the
table’s boundary lines while you are editing it, select the table and
click the border button ( ). Boundary lines will appear while you
are editing but disappear when a user views the page.
Ektr on® eWeb Edit Pro +XML Us er Guide, R elease 3.0, revi si on 1
70
Work ing with Table C ells
Along with functions for managing tables (described in
“Introduction to Tables” and “Manipulating Your
Table’s Format”), eWebEditPro also lets you
perform actions on individual cells within a table.
You can perform the following actions on individual table cells.
• Specify a width.
• Insert or delete cells.
• Specify a border color.
• Specify a background color or image.
• Have a cell span two or more columns or rows.
• Specify horizontal and vertical alignment of the data within
the cell.
• Split a cell into two cells.
• Merge two cells into one.
• Turn word wrap on or off.
• Set cell padding and spacing.
NOTE
HTML does not allow you to adjust the width of a cell’s border.
You can also select several cells or a row of cells and change
them as described above. However, you cannot select and
change a column of cells.
Specifying the Width of a Cell
As described in “Specifying Table Width”, there are
several ways to set the width of a table. Within a table, you can
also specify the width of an individual cell.
E kt ron ® eWebEdi tPr o+X ML U s er Guid e, R elea se 3.0 , r evision 1
71
Working with Table Cells
When you set a cell width, there is no guarantee that the cell will
occupy that width when displayed in a browser. This is because the
cell is part of a column, and changes to other cells in the column
can affect the cell whose width you set. Setting cell width only
guarantees that the cell will not be less than the width you specify.
If you want to ensure that a cell’s size does not change, set all cells
in a column to that width.
To specify a cell’s width, follow these steps.
1. Place the cursor in the cell whose width you want to set.
2. Right click the mouse.
3. Click Cell Properties from the menu.
Ektr on® eWeb Edit Pro +XML Us er Guide, R elease 3.0, revi si on 1
72
Working with Table Cells
4. The Cell Properties dialog box appears.
5. In the layout section of the dialog box, enter the cell width at
the Width field. You can enter the width in pixels or percentage.
These choices are explained in “Specifying Table Width”
6. Click OK.
Inserting a Cell
To insert a cell, follow these steps.
1. Move the cursor to the right of where you want the new cell to
appear.
2. Right click the mouse.
3. Click Insert Cell from the menu.
The new cell appears to the left of the cell in which the cursor
resides when you click Insert Cell. The cursor cell and all cells to
its right shift right to make room for the new cell.
In this example, the cursor was in cell “b” when the user clicked
Insert Cell.
Ektr on® eWeb Edit Pro +XML Us er Guide, R elease 3.0, revi si on 1
73
Working with Table Cells
Before
After
Deleting a Cell
To delete one or more cells, follow these steps.
1. Move the cursor to the first cell you want to delete.
2. To delete only that cell, proceed to the next step. To delete
several contiguous cells, select them. Contiguous cells can
cross rows.
3. Right click the mouse.
4. Click Delete Cells from the menu.
Any cells to the right of the deleted cells shift left to occupy the
vacant space.
In this example, the cursor was in cell “b” when the user clicked on
Delete Cells.
Before
Ektr on® eWeb Edit Pro +XML Us er Guide, R elease 3.0, revi si on 1
74
Working with Table Cells
After
Setting a Cell’s Border Color
A cell border is the line that separates it from other cells.
By default, the color of a cell’s border matches the color of the
table border. However, you can change the color of any cell border
individually.
NOTE
When viewed in Netscape Navigator, cell borders are gray, regardless of any
change you make on the Cell Properties dialog box.
This example illustrates the effect of different cell border colors
within a table.
If you want a cell’s border to “disappear,” set it to the same color as
the table’s background color.
To change the color of a cell’s border, follow these steps.
1. Move the cursor to the cell and right click the mouse.
2. Click Cell Properties from the menu.
Ektr on® eWeb Edit Pro +XML Us er Guide, R elease 3.0, revi si on 1
75
Working with Table Cells
3. Click the Border Color field on the Cell Properties dialog box.
4. When you click that field, a Windows Color selection box
appears. Click the color that you want to apply to the cell
border.
See Also: “Using the Color Box”
Ektr on® eWeb Edit Pro +XML Us er Guide, R elease 3.0, revi si on 1
76
Working with Table Cells
Specifying a Cell’s Background Color
“Specifying a Table’s Background Color” explains how
to apply a background color to a table. You can also apply a
background color to a cell.
To apply a background color to a cell, follow these steps.
1. Move the cursor to the cell and right click the mouse.
2. Click Cell Properties from the menu.
3. Click the Background Color field on the Cell Properties dialog
box.
4. When you click that field, a Windows Color selection box
appears.
See Also: “Using the Color Box”
Ektr on® eWeb Edit Pro +XML Us er Guide, R elease 3.0, revi si on 1
77
Working with Table Cells
5. Click a color to apply to the background of the cell.
Deleting a Cell’s Background Color
To delete a cell’s background color, click the Unassigned box in
the Custom Background area of the Cell Properties dialog box.
Specifying a Background Image for a Cell
“Specifying a Background Image for a Table”explains
how to apply a background image to a table. You can also apply a
background image to a cell.
Your Webmaster determines which images are available.
Ektr on® eWeb Edit Pro +XML Us er Guide, R elease 3.0, revi si on 1
78
Working with Table Cells
To insert an image into a cell, follow these steps.
1. Move the cursor to the cell and right click the mouse.
2. Click Cell Properties from the menu.
3. Move the cursor to the Background Image field of the Cell
Properties dialog box.
4. Click the down arrow to the right of (Select Image). A list of
background images appears.
5. Click the image of your choice.
6. Click OK.
Note that when you apply a background image to a cell
• If the cell is larger than the image, the image repeats until it fills
the cell.
• If the cell is smaller than the image, the top left corner of the
image appears in the top left corner of the cell. The rest of the
image fills as much of the cell as possible.
• Make sure the image does not obscure a user’s ability to read
the cell text (if any exists).
Deleting a Background Image
1. Move the cursor to the cell and right click the mouse.
2. Click Cell Properties from the menu.
Ektr on® eWeb Edit Pro +XML Us er Guide, R elease 3.0, revi si on 1
79
Working with Table Cells
3. Select the value in the Background Image field and press
<Backspace>.
Using the Color Box
Follow these steps to get help on how to use the color box.
1. Click the question mark in the top right corner.
Ektr on® eWeb Edit Pro +XML Us er Guide, R elease 3.0, revi si on 1
80
Working with Table Cells
2. A large question mark appears next to your cursor.
3. Drag the question mark to the area of the dialog box that you
want to learn about.
4. Click the mouse button. A box appears with instructions for that
area.
Spanning Rows or Columns
You can create a table cell that stretches across more than one
row or column. In the following table, notice how the row that
contains “Sports Teams” spans three columns.
Sports Teams
City
Baseball Team
Hockey Team
Boston
Red Sox
Bruins
Ektr on® eWeb Edit Pro +XML Us er Guide, R elease 3.0, revi si on 1
81
Working with Table Cells
Sports Teams
City
Baseball Team
Hockey Team
New York
Yankees
Rangers
Chicago
White Sox
Black Hawks
You can also create a column that spans several rows, as
illustrated below. Notice that Boston spans three rows.
Colleges
City
Name
Boston
Boston College
Northeastern University
Boston University
New York
Columbia University
Spanning More than One Row or Column
To have a table cell span more than one row or column, follow
these steps.
1. Place the cursor in the cell that will span rows or columns.
2. Right click the mouse.
3. Click Cell Properties from the menu.
Ektr on® eWeb Edit Pro +XML Us er Guide, R elease 3.0, revi si on 1
82
Working with Table Cells
4. The Cell Properties dialog box appears. In the Rows Spanned
or Columns Spanned field, enter the number of rows or
columns that you want this cell to span.
5. Click OK.
Ektr on® eWeb Edit Pro +XML Us er Guide, R elease 3.0, revi si on 1
83
Working with Table Cells
Effect of Spanning a Cell
When you set a cell to span rows or columns, the editor does not
remove the cells that are in the way. Instead, it moves those cells
across or down to the next available position.
For example, the following table has two rows and two columns.
If you set cell A to span two rows, note that cell C moves across to
make room for cell A. This action pushes cell D to the next column.
Aligning Text Within a Cell
Within a cell, you can specify how your text aligns horizontally and
vertically.
Setting Horizontal Alignment
In the Cell Properties dialog box, you can specify the horizontal
alignment of a cell. You have set the alignment to left, center, or
right, or
• left
• center
• right
Ektr on® eWeb Edit Pro +XML Us er Guide, R elease 3.0, revi si on 1
84
Working with Table Cells
• justify - the text is justified down both left and right edges. Many
books use this alignment style. (This alignment is not
supported by all browsers.)
This example illustrates these choices.
To set horizontal justification of a table cell, follow these steps.
1. Place the cursor in the cell that you want to edit.
2. Right click the mouse.
3. Click Cell Properties from the menu
Ektr on® eWeb Edit Pro +XML Us er Guide, R elease 3.0, revi si on 1
85
Working with Table Cells
4. The Cell Properties dialog box appears. Click the down arrow
to the right of the Horizontal Alignment field.
Ektr on® eWeb Edit Pro +XML Us er Guide, R elease 3.0, revi si on 1
86
Working with Table Cells
5. Click your choice from the list and click OK.
Setting Vertical Alignment
In the Cell Properties dialog box, you can specify the vertical
alignment of a cell. You have four choices.
• top
• middle
• bottom
• along the baseline of the first line of text (the term “baseline” is
defined in “Aligning the Picture”
Ektr on® eWeb Edit Pro +XML Us er Guide, R elease 3.0, revi si on 1
87
Working with Table Cells
This example illustrates the choices.
To set vertical justification for a table cell, follow these steps.
1. Place the cursor in the cell that you want to edit.
2. Right click the mouse.
3. Click Cell Properties from the menu.
Ektr on® eWeb Edit Pro +XML Us er Guide, R elease 3.0, revi si on 1
88
Working with Table Cells
4. The Cell Properties dialog box appears. Click the down arrow
to the right of the Vertical Alignment field.
Ektr on® eWeb Edit Pro +XML Us er Guide, R elease 3.0, revi si on 1
89
Working with Table Cells
5. Click your choice from the list and click OK.
Splitting a Cell
You can divide a cell into two. If you split a cell, each cell occupies
one half the size of the original cell.
Row before split
Row after split
To split a table cell into two cells, follow these steps.
1. Place the cursor in the cell that you want to split.
Ektr on® eWeb Edit Pro +XML Us er Guide, R elease 3.0, revi si on 1
90
Working with Table Cells
2. Right click the mouse.
3. Click Split Cell from the menu.
4. Two cells now appear where only one appeared before.
Merging Two Cells
You can merge two cells into one. If you merge two cells, the new
cell contains all of the information from both. The new cell’s width
equals the sum of the two cells that were merged.
Cells Before Merge
Ektr on® eWeb Edit Pro +XML Us er Guide, R elease 3.0, revi si on 1
91
Working with Table Cells
Cell After Merge
To merge two or more cells, follow these steps.
1. Select the cells that you want to merge.
2. Click the Insert Table button (
).
3. Click Merge Cells from the menu.
Word Wrap
Word Wrap is a text formatting feature of tables. It causes text to
move down to the next line when the width of the characters on a
line equals the column width. For example, if you set column width
to 50%, with word wrap turned on, a table looks like this.
If you turn Word Wrap off for the same table, you get this result.
If Word Wrap is turned off, text stays on one line until the user
entering table text presses <Enter>. That keystroke causes text to
move down to the next line.
By default, all cells have the Word Wrap feature turned on.
Ektr on® eWeb Edit Pro +XML Us er Guide, R elease 3.0, revi si on 1
92
Working with Table Cells
To turn Word Wrap on or off for a cell, follow these steps.
1. Place the cursor in the cell that you want to edit.
2. Right click the mouse.
3. Click Cell Properties from the menu.
4. The Cell Properties dialog box appears. Click or off the Word
Wrap checkbox and click OK.
Ektr on® eWeb Edit Pro +XML Us er Guide, R elease 3.0, revi si on 1
93
Working with Table Cells
Setting Cell Padding and Spacing
Cell padding is the space between a cell’s data and its border.
Cell spacing is the space between a cell and surrounding cells.
Assigning Cell Padding
To assign cell padding to your table, click the Cell Padding field on
the Insert Table dialog box. Enter the number of pixels.
Ektr on® eWeb Edit Pro +XML Us er Guide, R elease 3.0, revi si on 1
94
Working with Table Cells
Assigning Cell Spacing
To assign cell spacing to your table, click the Cell Spacing field on
the Insert Table dialog box. Enter the number of pixels.
Ektr on® eWeb Edit Pro +XML Us er Guide, R elease 3.0, revi si on 1
95
Using Bookmarks
Use a bookmark to let a user “jump” from any word, phrase, or
image to another place in a file. On your Web page, text
appears in a different color to indicate that additional
information is available at the bookmark’s location.
For example, if your Web page includes meeting minutes, the
top of the page could list the meeting dates. You could then
assign a hyperlink to each date and a bookmark to each set of
minutes.
The user sees that a date is in a different color, so clicks the
date to “jump” to the bookmark that marks the location of the
meeting minutes.
“Creating a Bookmark”describes how to set up a
hyperlink to a bookmark within a file. You can also set up
hyperlink to
• another Web page. This procedure is described in “Using
Hyperlinks”.
• a bookmark within another Web page. This procedure is
described in “Creating a Hyperlink to a Location Within a
Web Page”.
This section explains
• Creating a Bookmark
• Changing the Destination Window
Creating a Bookmark
When creating a bookmark, you must specify a
• source, the text or image that the user clicks to move to the
bookmark
E kt ron ® eWebEdi tPr o+X ML U s er Guid e, R elea se 3.0 , r evision 1
96
Using Bookmarks
• bookmark, the place to which the cursor jumps when the user
clicks the source
To continue with the above example, a meeting date is the source,
and the meeting minutes are the bookmark.
To create a bookmark, follow these steps.
1. Select the bookmark text or image.
2. Click the Bookmark button (
).
3. The Bookmark dialog box appears. Enter the name of the
bookmark.
4. Click Add.
5. The editor screen returns. (The bookmark does not appear on
the page.) Select the source text or image.
6. Click the Hyperlink button (
).
7. The Hyperlink dialog box appears.
8. Click the down arrow to the right of the Quick Link field and
click the bookmark you created in Step 3.
Ektr on® eWeb Edit Pro +XML Us er Guide, R elease 3.0, revi si on 1
97
Using Bookmarks
9. If desired, you can use the Target Frame field to change the
window in which the destination text appears. For details, see
“Changing the Destination Window”.
If you leave the Target Frame field blank, the new window
replaces the current window.
10. Click OK.
Changing the Destination Window
While defining hypertext, you can use the Target Frame field on
the Hyperlink dialog box to change the window in which the
destination page appears.
Ektr on® eWeb Edit Pro +XML Us er Guide, R elease 3.0, revi si on 1
98
Using Bookmarks
The possible values that you can enter into the Target Frame field
are explained below.
If you want the destination page to appear
Click this in the Target Frame
field
In a new browser window, on top of the current
browser.
New Window(_blank)
In the same position within the browser window.
The new window replaces the current one.
Same Window(_self)
If your page contains frames, in the frame that
contains the frame with the hyperlink.
Parent Window(_parent)
If your page contains frames, in the full display
area, replacing the frames.
Browser Window(_top)
If your page contains frames, in the frame with the
specified name.
Enter the name of the frame.
Ektr on® eWeb Edit Pro +XML Us er Guide, R elease 3.0, revi si on 1
Note: this is the default.
99
U s in g H y p e r li n k s
Use hyperlinks to let a user “jump” from any word, phrase or
image to another Web page. The page can be within your
network (that is, on an intranet) or anywhere on the internet.
NOTE
If you want to create jumps within a file, see “Using Bookmarks”
.
For example, if your Web page includes a jump to the Ektron
Web site, you would enter the text to indicate the jump (for
example Ektron Web Site), then create a hyperlink to
www.ektron.com. When users see Ektron Web Site in a
different color, they can click the text to “jump” to the site.
Although most jumps go to the top of another Web page, you
can also jump to a bookmark within a Web page.
This section explains
• Creating a Hyperlink
• Testing a Hyperlink
• Creating a Hyperlink to a Location within a Web Page
• Editing a Hyperlink
• Removing a Hyperlink
• Preventing a URL from Becoming a Hyperlink
Creating a Hyperlink
When creating a hyperlink, you must specify a
• source, the text or image the user clicks to move to the
destination
• destination, the Web page to which the display moves when
the user clicks the source
E kt ron ® eWebEdi tPr o+X ML U s er Guid e, R elea se 3.0 , r evision 1
100
Using Hyperlinks
To continue with the above example, Ektron Web Site is the
source, and the Web page available at www.ektron.com is the
destination.
To create a hyperlink, click the Hyperlink button ( ). When you do,
the Hyperlink dialog box appears. From there, you can select from
a list of Web pages (also known as Quick Links). Or, if the page
you are jumping to is not on the list, enter the url address of the
destination Web page. Each choice is described below.
Using a Quick Link
Your Web master can add to the Hyperlink dialog box any number
of Quick Links, that is, Web addresses that you can link to simply
by selecting an item from a drop down menu.
Quick links are “quick” because you do not need to enter or know
the url of the destination Web page -- your Web master has already
stored that information for you.
To apply a Quick Link, follow these steps.
1. Select the source text or image.
Ektr on® eWeb Edit Pro +XML Us er Guide, R elease 3.0, revi si on 1
101
Using Hyperlinks
2. Click the Hyperlink button (
appears.
). The Hyperlink dialog box
3. Click the down arrow to the right of the Quick Links field. A list
of Web pages that your Web master has pre-loaded appears.
4. Click an item from the list to select it.
5. If desired, you can use the Target Frame field to change the
window in which the destination text appears. For details, see
“Changing the Destination Window”.
If you leave the Target Frame field blank, the new window
replaces the current window
6. Click OK.
Entering a Hyperlink Manually
To create a hyperlink, follow these steps.
1. Select the source text or image.
Ektr on® eWeb Edit Pro +XML Us er Guide, R elease 3.0, revi si on 1
102
Using Hyperlinks
2. Click the New Hyperlink button (
appears.
). The Hyperlink dialog box
3. Click in the Link field after http://. Then, enter the address
of the destination Web page. For example, to enter a hyperlink
to the ektron Web site, enter www.ektron.com.
4. If desired, you can use the Target Frame field to change the
window in which the destination text appears. For details, see
“Changing the Destination Window”.
If you leave the Target Frame field blank, the new window
replaces the current window
5. Click OK.
Testing a Hyperlink
Within the eWebEditPro editor, you can test a hyperlink. To do this,
double click it. That action launches the Web page assigned to the
hyperlink.
Creating a Hyperlink to a Location Within a Web
Page
Sometimes, the destination Web page contains bookmarks, and
you want to jump from your page to a bookmark on another page.
(Bookmarks are described in “Using Bookmarks”.)
Ektr on® eWeb Edit Pro +XML Us er Guide, R elease 3.0, revi si on 1
103
Using Hyperlinks
To create a hyperlink that jumps to another page’s bookmark,
follow these steps.
1. Go to the destination Web page.
2. Click the bookmark that you want to jump to. For example, on
the illustration below, the text Benefits to Partners jumps to a
bookmark further down on the page.
3. When you click the bookmark, its full address appears in your
browser’s address bar. This bookmark’s address looks like this.
http://www.ektron.com/single.cfm?doc_id=35#Benefits2
4. Click the address bar. The address is selected. Press
<Ctrl>+<C> to copy the address into the Windows clipboard.
5. Go to eWebEditPro.
6. Select the text or image from which you want to jump to the
bookmark.
7. Click the Hyperlink button (
appears.
). The hyperlink dialog box
8. Move the cursor to the Link field.
9. Press <Ctrl>+<V> to paste the address you copied in Step 4
into the Link field.
10. Click OK.
Ektr on® eWeb Edit Pro +XML Us er Guide, R elease 3.0, revi si on 1
104
Using Hyperlinks
Editing a Hyperlink
If you need to change a hyperlink’s destination Web page or target
frame, follow these steps.
1. Click the Hyperlink button (
appears.
). The hyperlink dialog box
2. Edit the Link or Target Frame field as needed.
3. Press OK.
Removing a Hyperlink
If you want to remove the hyperlink from text or an image, select
the text or image and press the Remove Hyperlink button (
).
Preventing a URL from Becoming a Hyperlink
If you enter a URL or an email address into eWebEditPro, it
automatically becomes a hyperlink. To prevent this, enter an extra
space in the URL or address.
For example, instead of entering [email protected], enter
sales<blank>@ektron.com.
Ektr on® eWeb Edit Pro +XML Us er Guide, R elease 3.0, revi si on 1
105
Work ing with H TML
eWebEditPro creates pages for display on the World Wide Web
or an intranet. These pages use HTML (hypertext markup
language) to format text and images for display in a browser.
You do not need to know HTML to use eWebEditPro.
However, if you know HTML, you can view, insert or edit your
Web page’s HTML code.
Viewing and Editing HTML
When you choose to view your page as HTML, the editor
cleans the content using a method determined by your
Webmaster. (For more information, see “Cleaning HTML” in the
eWebEditPro Developer’s Reference Guide.)
To view your page’s HTML, follow these steps.
1. Click the View as HTML button ( ), or right click the mouse
and click View as HTML from the menu.
2. The HTML code appears. While viewing the code, you can
edit it using editor functions such as Cut, Copy, Paste and
Find. To select all content, press <Ctrl>+<A>.
You can also set default values for the style, size and color
in which the HTML appears. To do this, click the View
Preferences button(
). When you do, a dialog box appears
E kt ron ® eWebEdi tPr o+X ML U s er Guid e, R elea se 3.0 , r evision 1
106
Working with HTML
in which you can enter formatting information about the HTML
code.
These settings will be used whenever you view as HTML.
The settings are ignored when you view the page in WYSIWYG
mode and when the user views the page.
3. To return to normal view, click the View as WYSIWYG button
(
) or right
click the mouse and click View WYSIWYG.
Editing a Section of a Page
If you want to edit only a section of the HTML on your Web page,
follow these steps.
1. Select the portion of your Web page that you want to edit.
2. Right click the mouse.
3. Click Edit HTML from the menu. The HTML code appears.
4. Edit the HTML code as desired.
5. Click OK.
Inserting HTML
If you want to insert HTML code into your Web page, follow these
steps.
1. Place the cursor at the spot on the page where you want to
insert the HTML.
2. Right click the mouse.
Ektr on® eWeb Edit Pro +XML Us er Guide, R elease 3.0, revi si on 1
107
Working with HTML
3. Click Insert HTML from the menu.
4. The Insert HTML dialog box appears. Paste or type your HTML
code.
5. Click OK.
Cleaning HTML
eWebEditPro lets you “clean” the HTML code for your Web page.
You would typically use this feature after entering HTML text or
pasting HTML code into eWebEditPro from another application.
The Clean HTML option removes unnecessary HTML tags,
ensures that all tags begin and end properly, and maximizes the
page for efficiency. As a result, the page should be error-free and
load more quickly in a browser. Also, the appearance of clean
HTML is more consistent when viewed in different browsers.
To clean your HTML, follow these steps.
1. Right click the mouse.
Ektr on® eWeb Edit Pro +XML Us er Guide, R elease 3.0, revi si on 1
108
Working with HTML
2. Click Clean HTML code from the menu.
3. eWebEditPro cleans your Web page’s HTML content.
Inserting Content from MS Office 2000
If you paste text into eWebEditPro from a Microsoft Office 2000
application, such as Microsoft Word, the following window appears.
For best results, click Yes.
Ektr on® eWeb Edit Pro +XML Us er Guide, R elease 3.0, revi si on 1
109