1
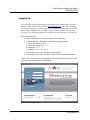
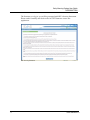
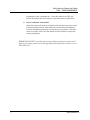
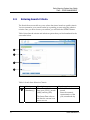
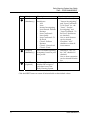
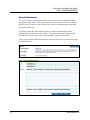
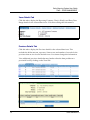
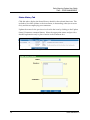
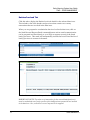
 Early Warning System User Guide Version 1.0 March 2010 Early Warning System User Guide
Revision History
Date
January 2010
Document
Version
PROD 1.0
Section Modified
--
Modification
--
This material is intended to provide orientation and guidance to insurers
accessing the Early Warning System (EWS) production system. Due to
ongoing enhancements, the depictions of the online applications in this
document may not be exact representations.
All rights reserved. No part of this material may be reproduced in any
material form or transmitted without the prior written permission of
Insurance Bureau of Canada.
ii
PROD RELEASE 1.0
Early Warning System User Guide
Table of Contents
1.
INTRODUCTION _____________________________________________________ 1
1.1.
Overview of IBC’s New Early Warning System ___________________________________ 1
1.2.
Getting Started _______________________________________________________________ 2
Browser Requirements ____________________________________________________________ 2
Application Availability____________________________________________________________ 2
Obtaining Access _________________________________________________________________ 2
Logging In _______________________________________________________________________ 3
2.
EWS – ISSUE MANAGEMENT ____________________________________________ 5
EWS – Issue Management Overview __________________________________________________ 5
2.1.
Search Issues Process ________________________________________________________ 6
2.2.
Entering Search Criteria _______________________________________________________ 8
2.3.
Viewing and Selecting from Search Results ____________________________________ 10
2.4.
Viewing Issue Details ________________________________________________________ 12
General Information _____________________________________________________________ 14
Issue Details Tab ________________________________________________________________ 15
Province Details Tab _____________________________________________________________ 15
Status History Tab _______________________________________________________________ 16
Batches Involved Tab ____________________________________________________________ 17
Related Issues Tab _______________________________________________________________ 18
3.
EWS –MANAGEMENT AND STATUS REPORTS ______________________________ 19
EWS – Management and Status Reports ______________________________________________ 19
3.1.
Common Report Features ____________________________________________________ 20
Portal Menu _____________________________________________________________________ 21
Main Menu ______________________________________________________________________ 21
Report Window __________________________________________________________________ 22
Navigating Within a Report _______________________________________________________ 24
Navigating Back to a Parent Report _______________________________________________ 25
Changing the Report Display _____________________________________________________ 25
Searching Within a Report ________________________________________________________ 25
Exporting and Printing a Report __________________________________________________ 26
Refreshing a Report______________________________________________________________ 26
3.2.
Issue Summary Reports ______________________________________________________ 27
About the Report ________________________________________________________________ 27
Entering Selection Criteria________________________________________________________ 27
iii
PROD RELEASE 1.0
Early Warning System User Guide
Viewing Report Details – Issue Volume Summary Report ___________________________ 29
Viewing Report Details – Issue Response Summary Report _________________________ 31
Viewing Report Details – Issue Escalation Summary Report _________________________ 33
4.
CONTACTING IBC FOR SUPPORT________________________________________ 35
APPENDIX A – Issue Status Descriptions _____________________________________ 36
iv
PROD RELEASE 1.0
Early Warning System User Guide
INTRODUCTION
1. INTRODUCTION
1.1.
Overview of IBC’s New Early Warning System
Insurance Bureau of Canada’s (IBC’s) new Early Warning System application
provides reporting companies with information and tools to help them
collaborate with IBC in resolving data issues related to the automobile data
submissions. By using the application, your company will be able to monitor,
analyze and resolve data issues in a timely manner thereby avoiding
unnecessary deficiency fees.
The Early Warning System application includes access to EWS – Issue
Management and EWS – Management and Status Reports modules.
EWS – Issue Management
Displays all the data issues which have been analyzed and determined
by the Data Quality Analyst to be a problem that the company needs to
investigate.
o Displays detailed information regarding data issues, including the
applicable province(s) and the reported batches related to the particular
issue.
o Displays information on the Status of the issue and provides the
capability to update the status and communicate with the IBC Data
Quality Analyst regarding the issue.
o Provides the company with supporting files to help with their analysis
in determining how to fix the data and resolve the issue.
o For more information, please see EWS - ISSUE MANAGEMENT.
o
EWS – Management and Status Reports
Provides the company with reports to monitor the responses to issues,
including:
1. Issue Volume Summary Report to monitor the volume of workload
2. Issue Response Summary Report to monitor the response to issues,
and
3. Issue Escalation Summary Report to monitor escalation of
unresolved issues.
o For more information, please see EWS –MANAGEMENT AND
STATUS REPORTS.
o
1
PROD RELEASE 1.0
Early Warning System User Guide
INTRODUCTION
1.2.
Getting Started
Browser Requirements
The Early Warning System application is available through IBC’s Infosource
Portal. To access IBC’s Infosource Portal you must use a browser that supports
128-bit encryption.
The IBC Infosource Portal and the Early Warning System application are
compatible with Microsoft Internet Explorer 7.0 and greater. Earlier versions of
Explorer and other browsers are not supported.
Application Availability
The Early Warning System application is available 24 hours a day, 7 days a
week. However, the system may occasionally be unavailable for very brief
periods of time when IBC conducts routine maintenance and/or implements
application enhancements.
Notification will be provided in advance.
Obtaining Access
Access to all IBC’s web-based applications is managed through IBC’s Member
Services. This department is responsible for assigning and terminating user
IDs, changing access privileges (such as giving users access to application
modules and company information), resetting passwords, and providing and
tracking access request forms to enable IBC to manage a user’s profile.
IBC’s Member Services can be reached by phone at 416-362-2031, ext 4605
or 1-800-761-6703, ext 4371 or by e-mail at [email protected].
2
PROD RELEASE 1.0
Early Warning System User Guide
INTRODUCTION
Logging In
You can access the Early Warning System application via Insurance Bureau of
Canada’s (IBC’s) Infosource Portal at www.portal.ibc.ca. This URL will bring
you to the Portal log-in screen. Log in to the Portal by entering the user ID and
password provided by IBC, and click on the LOG ON button. The first time
you log in, you will be prompted to change the password given to you by IBC.
New passwords must:
• Have a minimum of 7 and a maximum of 32 characters
• Contain characters from three of the following four groups:
• uppercase letters (A, B, C…)
• lowercase letters (a, b, c…)
• numerals (1, 2, 3…)
• symbols (! @, #, $, %, etc.)
• Not be the same as your five previous passwords
• Not contain your name, user ID, or either of these spelled backwards
Users will be locked out after attempting to log in three consecutive times with
incorrect username/password combinations.
Infosource Portal Log-in Screen
3
PROD RELEASE 1.0
Early Warning System User Guide
INTRODUCTION
The first time you log in, you will be presented with IBC’s Security Statement.
Please read it carefully and click on the ACCEPT button to access the
application.
IBC Security Statement
4
PROD RELEASE 1.0
Early Warning System User Guide
EWS – ISSUE MANAGEMENT
2. EWS – ISSUE MANAGEMENT
EWS – Issue Management Overview
The Issue Management module allows reporting companies to view the details and
communicate with IBC on the data issues that have been identified by IBC’s Early
Warning System. The Early Warning System (EWS) automates the verification of
data accuracy and reasonability, in order to proactively identify issues in the
reported Plan 8 (Automobile) and Plan 9 (Facility Association) data.
IBC first investigates the data issues that are detected by the Early Warning System
and will communicate with the reporting company if further investigation is
required.
The data issues are communicated through a weekly email notification, called the
Weekly Issue List, which will be sent to the designated EWS Company Issue
Coordinator. The Weekly Issue List will contain all new data issues that have been
detected, as well as any existing data issues that are awaiting a response.
Log in to the EWS application in order to track and respond to the data issues.
Weekly Issue List – Email Notification
To obtain access to the EWS – Issue Management module, please see Obtaining
Access.
5
PROD RELEASE 1.0
Early Warning System User Guide
EWS – ISSUE MANAGEMENT
2.1.
Search Issues Process
After successfully logging into IBC’s Infosource Portal, you can access the Issue
Management module via the Main Menu. Once you select Search Issue within
Issue Management, the Search Issue screen will be displayed.
In order to respond to data issues using Issue Management, you must follow the
steps below. All data communication is completely secure; only authorized
insurer personnel can access data and information belonging to their particular
companies.
1. Enter the criteria you wish to search for in the Search Issues screen. For more
information, please see section 2.2. Entering Search Criteria.
2. View the search results and select an issue from the results list. For more
information, please see section 2.3. Viewing and Selecting from Search Results.
3. View the issue details and update the status of the issue to “Insurer
Investigating”. The change to the issue status will indicate that investigation of
the data issue is underway. For more information, please see section 2.4
Viewing Issue Details.
4. Using the provided details, determine the source of the data issue within your
systems.
5. Return to the EWS – Issue Management application and update the issue with
the results of your investigation. There are three possible statuses available
(please see APPENDIX A – Issue Status Descriptions for the complete list):
i. Issue Confirmed – To Be Fixed
Apply this status when the investigation into the data issue uncovered
a system problem that will be fixed and the ASP data will be
resubmitted. Once this status is set, IBC will monitor to ensure the
timely receipt of the data resubmission. Use the reversal option to
request the reversal of the existing batches when the data resubmission
is ready (please see Batches Involved Tab for further information on
requesting a reversal).
ii. Issue Denied – Reflects Business
Set this status when the investigation into the data issue determined
that the data does in fact reflect your business and provide a detailed
6
PROD RELEASE 1.0
Early Warning System User Guide
EWS – ISSUE MANAGEMENT
explanation in the comments box. Once this status is set, IBC will
review the details and will confirm or reject the status/explanation.
iii. Issue Confirmed - Irresolvable
Apply this status when the investigation into the data issue uncovered
a system problem but the data cannot be corrected and resubmitted.
Provide a detailed explanation for why this is not possible. Once this
status is set, IBC will review the details and will confirm or reject the
status/explanation.
IMPORTANT NOTE: To avoid the unnecessary escalation of data issues and to avoid
deficiency fee charges, please ensure that appropriate and timely action is taken to correct
EWS data issues.
7
PROD RELEASE 1.0
Early Warning System User Guide
EWS – ISSUE MANAGEMENT
2.2.
Entering Search Criteria
The Search Issue screen allows you to select data issues based on specific criteria.
You can customize your search results by expanding or narrowing the selection
criteria. Once you have chosen your criteria, you will click the SUBMIT button.
Table 1 describes the criteria and selection options that you find numbered in the
screenshot below.
1
2
3
4
Search Issue – Selection Criteria
Table 1: Search Issue Selection Criteria
No.
1
Criteria
Status Date
(Mandatory)
Description
“From” and “To” Status
Date year (CCYY), month
(MM), and day (DD)
The Status Date refers to
the date the current issue
status was set
8
Selection options
- Defaults to the latest
month
- Enter the numeric
representation of the
year, month and day
PROD RELEASE 1.0
Early Warning System User Guide
EWS – ISSUE MANAGEMENT
No.
2
Criteria
Issue Status
(Mandatory)
3
Company
(Mandatory)
4
Issue ID
(Optional)
Description
Select one or more of nine
checkboxes:
- ALL
- Issue
- Insurer Investigating
- Issue Denied –Reflects
Business
- Issue Confirmed –
Irresolvable
- Issue Confirmed – To
Be Fixed
- Closed – Reflects
Business
- Closed – Unresolved
- Closed – Fixed
List of available reporting
companies, based on your
user profile
The Issue ID is the unique
number IBC assigns to
each data issue in the
Early Warning System
Selection options
- Defaults to “Issue”,
“Insurer Investigating”
and “Issue Confirmed –
To Be Fixed” (i.e., the
“Issue”, “Insurer
Investigating” and
“Issue Confirmed – To
Be Fixed” checkboxes
are checked)
- One or more Statuses
can be selected
- Check the “ALL”
checkbox to select all
issue statuses
- Defaults to “All” (i.e.,
the “All” checkbox is
checked)
- One or more companies
can be selected from the
list
- No default
Click the RESET button to return all criteria fields to their default values.
9
PROD RELEASE 1.0
Early Warning System User Guide
EWS – ISSUE MANAGEMENT
2.3.
Viewing and Selecting from Search Results
After you submit the “Search Issue” information, the Issue List screen will be
displayed. The Issue List screen provides a list of all Early Warning System data
issues that met your search criteria.
When the list is initially displayed, it will be sequenced by ID (Issue ID). However,
you can change the order of the list by clicking any of the underlined column
headings. A second click on a column heading will reverse the sequence.
Navigate through multiple pages by clicking the desired page number link at the
bottom of the list.
Table 2 describes the information that you find numbered in the screenshot below.
1
2
9
3
8
4
7
5
6
Issue List Search Results Screen
10
PROD RELEASE 1.0
Early Warning System User Guide
EWS – ISSUE MANAGEMENT
Table 2: Issue List – Search Results Screen
No.
Content
Search
Criteria
Description
A summary of the
selection criteria is
displayed in the top
portion of the screen for
your reference
Links
- Display only
ID
The Issue ID is the unique
number IBC assigns to
each data issue in the
Early Warning System
-
3
Anomaly
Rule ID
-
4
Current
Status
The unique ID of the
anomaly rule for which
the data issue was
detected
The current status of the
data issue
The ID listed in the
search results, links to
the Issue Details screen
where the issue details
can be viewed and issue
status can be updated
Display only
-
Display only
The date that the current
status was set for the data
issue
The reporting company
number that the data
issue was detected for
The statistical plan of the
reporting company
number that the data
issue was detected for
The kind codes that the
data issue was detected
for
The entry date range that
the data issue was
detected for
-
Display only
-
Display only
-
Display only
-
Display only
-
Display only
1
2
5
Issue Date
6
Company
7
Plan(s)
8
Kind(s)
9
Entry Date
Range
At any point, click the RETURN button to return to the Search Issue screen and
revise your selected criteria.
11
PROD RELEASE 1.0
Early Warning System User Guide
EWS – ISSUE MANAGEMENT
2.4.
Viewing Issue Details
After you select an ID (Issue ID) from the Issue List, the Issue Detail screen will be
displayed. This is where all of the data issue details are accessible and where
updates to the issue statues are made.
Table 3 describes the information that you find numbered in the screenshot below.
1
2
3
4
5
6
Issue Detail Screen
Table 3: Issue Detail Screen
No.
1
12
Content
General
Information
Description
General information
regarding the data issue is
displayed here, along
with current issue status
information, for your
reference.
Links
- Display only
PROD RELEASE 1.0
Early Warning System User Guide
EWS – ISSUE MANAGEMENT
No.
2
Content
Issue Details
tab
3
Province
Details tab
4
Status History
tab
5
Batches
Involved tab
6
Related Issues
tab
Description
Displays the Reporting
Company, Plan(s),
Kind(s) and Entry Date
Range details for the
selected data issue
Displays the Province
details for the selected
data issue and provide
access to view additional
province details that may
further refine the data
problem at a provincial
level.
Displays the Status
History details for the
selected data issue and
provide access to change
the current issue status
and add user comments
Displays the
Batch/Provinces details
for the selected data issue
and provide access to
send an email request to
the appropriate IBC Data
Quality Analyst for
reversal of the listed
Batch/Provinces
Displays a list of other
EWS data issues which
have been related to the
issue currently being
viewed. Clicking on a
related Issue ID will open
a separate window with
the details of the selected
related issue
Links
- For a more detailed
description, please see
Issue Details Tab
-
For a more detailed
description, please see
Province Details Tab
-
For a more detailed
description, please see
Status History Tab
-
For a more detailed
description, please see
Batches Involved Tab
-
For a more detailed
description, please see
Related Issues Tab
A more detailed description of each of these Issue Detail screen areas is provided
below.
13
PROD RELEASE 1.0
Early Warning System User Guide
EWS – ISSUE MANAGEMENT
General Information
For your reference, general information about the data issue is displayed in the
top portion of the screen. You cannot change this information. Here you will find
the IBC Issue ID, which can be recorded and used in communications regarding
the specific data issue.
By clicking on the IBC Data Analyst name, an email communication can be
prepared and sent directly to your DQA. This email will automatically include
the Issue ID currently being viewed as the subject content of the email.
At any point, click the RETURN button to return to the Issue List screen and select
another data issue.
Issue Detail Screen – General Information
Issue Detail Screen – Email Analyst
14
PROD RELEASE 1.0
Early Warning System User Guide
EWS – ISSUE MANAGEMENT
Issue Details Tab
Click this tab to display the Reporting Company, Plan(s), Kind(s) and Entry Date
Range details for the selected data issue. You cannot change this information.
Issue Detail Screen – Issue Details
Province Details Tab
Click this tab to display the Province details for the selected data issue. This
includes the dollar amount, exposure/ claim count, and number of records for the
provinces that are involved in the data issue. You cannot change this information.
View additional province details that may further refine the data problem at a
provincial level by clicking on the View link.
Issue Detail Screen – Province Details
Issue Detail Screen – Province Details – View Details Link
15
PROD RELEASE 1.0
Early Warning System User Guide
EWS – ISSUE MANAGEMENT
Status History Tab
Click this tab to display the Status History details for the selected data issue. This
includes a list of the updates to the issue status, in descending order (most recent
first), and the accompanying user comments.
Update the status for the provinces involved in the issue by clicking on the Update
Status/Comments command button. Select the appropriate status and provide a
detailed explanation and/or plan of action in the comments box.
Issue Detail Screen – Status History
Issue Detail Screen – Status History – Update Status/Comments Command Button
16
PROD RELEASE 1.0
Early Warning System User Guide
EWS – ISSUE MANAGEMENT
Batches Involved Tab
Click this tab to display the Batches Involved details for the selected data issue.
This includes a list of the batches and provinces that contain one or many
transactions that are involved in the data issue.
When you are prepared to resubmit the data involved in the data issue, click on
the Send Reversal Request Email command button and an email communication
can be prepared and sent directly to your DQA to request reversal of the listed
batch/provinces. This email will automatically include the Issue ID and the list of
batch/provinces in content of the email.
Issue Detail Screen – Batches Involved
Issue Detail Screen – Send Reversal Request Email
IMPORTANT NOTE: The entire set of transactions for the reversed batch/province(s)
must be resubmitted even if only a portion of the batch/province transactions are involved
in the data issue. Also, corrections to errors may need to be reapplied.
17
PROD RELEASE 1.0
Early Warning System User Guide
EWS – ISSUE MANAGEMENT
Related Issues Tab
Click this tab to display the Related Issue details for the selected data issue.
Clicking on a related Issue ID will open a separate window where the details of
the selected related issue can be viewed.
Issue Detail Screen – Related Issues
18
PROD RELEASE 1.0
Early Warning System User Guide
EWS –MANAGEMENT AND STATUS REPORTS
3. EWS –MANAGEMENT AND STATUS REPORTS
EWS – Management and Status Reports
Users can generate the following reports using EWS – Managements and Status
Reports:
Issue Volume Summary Report
Issue Response Summary Report
Issue Escalation Summary Report
These reports provide summarized information that will assist in monitoring the
volume, the response and the escalation of data issues that have been
communicated through the Early Warning System.
After successfully logging in to the application, you can access the Management
and Status Reports module via the Main Menu. Once you select a report, the
corresponding report criteria will be displayed.
To view a report, you must follow these steps:
1. Choose a report type.
2. Select the desired criteria.
3. Generate the report.
To obtain access to the EWS – Management and Status Reports module, please see
Obtaining Access.
19
PROD RELEASE 1.0
Early Warning System User Guide
EWS –MANAGEMENT AND STATUS REPORTS
3.1.
Common Report Features
The report screens are organized as follows (the numbers in the following list
correspond to the numbers in the figure below):
1
Portal Menu
The Portal Menu provides access to general
application features. For example, this is
where you can select a language preference
and change your password.
2
Main Menu
The Main Menu provides access to the
modules within the Early Warning System
application. Your ability to access specific
modules is based on your individual user
profile.
3
Report Window
The Report Window is the area where you
select report criteria and where reports are
displayed.
4
Messages Window
The Messages Window is where notices from
IBC will be communicated, and where
system messages and warnings will be
displayed.
1
2
3
4
Areas of the Portal Screen
20
PROD RELEASE 1.0
Early Warning System User Guide
EWS –MANAGEMENT AND STATUS REPORTS
Portal Menu
The Portal Menu provides access to general application features. For example,
this is where you can select a language preference and change your password.
The following table describes each menu option:
Option
Infosource - Information
Resource Site
My IBC Portal
Contact IBC
Description
Provides access to Infosource, IBC’s secure
website.
Provides access to features that allow you to:
- change your password;
- set an answer to a question that IBC
will use to verify your identity if you
forget your password; and
- view IBC’s Security Statement.
Enables you to switch your application
language preference.
Provides access to the Early Warning System
User Guide.
Provides IBC’s contact information.
Logout
Enables you to log out of the application.
Français
Help
Main Menu
The Main Menu is located in the left portion of the screen. The Main Menu
provides access to the modules (e.g., EWS – Issue Management, etc.) within the
Early Warning System application. Your ability to access specific modules is
based on your individual user profile.
To select a report from the Main Menu,
expand the module you wish to use by
icon. You
clicking on the corresponding
will then be able to view all of the available
reports and select the report you wish to
access.
21
PROD RELEASE 1.0
Early Warning System User Guide
EWS –MANAGEMENT AND STATUS REPORTS
Report Window
The Report Window occupies the main portion of the screen. This is the area
where you select report criteria and where reports are displayed.
Request Report Screens
There is a custom Request Report screen for each report. When you select a
report from the Main Menu, the corresponding report criteria will be displayed
in a Request Report screen.
(Note that clicking the RESET button will return the criteria fields to their
default values.)
Request Report Screen
To generate a report, select the criteria you wish to include in the report and
click the GET REPORT button.
The criteria you specify will be validated when you click the GET REPORT
button. Any error messages will be displayed at the top of the Request Report
screen. If you get an error message, you must revise and resubmit the criteria
you selected. See a sample error message in the figure below.
22
PROD RELEASE 1.0
Early Warning System User Guide
EWS –MANAGEMENT AND STATUS REPORTS
Error Message Appearing at the Top of the Request Report Screen
View Report Screens
After you submit your criteria, the report will be generated based on that
criteria and the Report screen will replace the Request Report screen.
To generate a different report, choose the appropriate report name from the
Main Menu.
View Report Screen
23
PROD RELEASE 1.0
Early Warning System User Guide
EWS –MANAGEMENT AND STATUS REPORTS
All of the reports have a standard View Report toolbar with the following
capabilities (the numbers in the following list correspond to the numbers in the
figure below):
1
Navigating within a report
2
Navigating back to a parent report (Not applicable to EWS)
3
Changing the report display
4
Searching within a report
5
Exporting and printing a report
6
Refreshing a report
1
2
3
4
5
6
Navigating Within a Report
The View Report toolbar (pictured above) includes a variety of page navigation
functions. You can navigate to a specific page by entering a page number and
hitting the ENTER button on your keyboard, or navigate directly to the first or
last page of a multi-page report using the arrow buttons on the View Report
toolbar. (Note that page breaks are explicitly defined by the report itself and
cannot be changed.)
When navigating multi-page reports, you must use the “back” arrow button on
the View Report toolbar to view previous pages. Do not use the “back” button
on the Internet Explorer toolbar. If you use the “back” button on the Explorer
toolbar, the navigation is unpredictable and an error may occur.
24
PROD RELEASE 1.0
Early Warning System User Guide
EWS –MANAGEMENT AND STATUS REPORTS
Navigating Back to a Parent Report
To get back to a parent report, use the button pictured above, located on the
View Report toolbar. (Not applicable to EWS.)
Changing the Report Display
The View Report toolbar provides a standard zoom functionality (pictured
above) that lets users zoom in on or out of a report, making the text larger or
smaller.
Searching Within a Report
The View Report toolbar includes a search field (pictured above) to help you
find specific text within a report. Search for content in a report by typing a
word or phrase and clicking FIND. To search for subsequent occurrences of the
same word or phrase, click NEXT.
Note that the search is not case-sensitive and begins at the top of the page or
section that is currently selected. Wildcards and Boolean search operators are
not supported.
25
PROD RELEASE 1.0
Early Warning System User Guide
EWS –MANAGEMENT AND STATUS REPORTS
Exporting and Printing a Report
Exporting
The View Report toolbar also allows you to export a report as a PDF file
(pictured above). An XML export format is also available to support future
technology capabilities.
Be aware that, depending on how the items in a report are aligned, the report
layout in the PDF might include extra pages or white space that you did not
expect.
Printing
To print a report, export it to a PDF file and then print the report by selecting
“Print” from the “File” menu.
Refreshing a Report
To refresh a report, click the REFRESH button (pictured above). The report
server will then reprocess the report using the most recent data.
26
PROD RELEASE 1.0
Early Warning System User Guide
EWS –MANAGEMENT AND STATUS REPORTS
3.2.
Issue Summary Reports
About the Report
The Issue Summary Report provides access to the three reports that provide
summarized information regarding the volume, response and escalation of data
issues that have been communicated through the Early Warning System.
You can access these reports by selecting the Issue Summary Report option under
EWS – Management and Status Reports in the Main Menu.
Entering Selection Criteria
You can customize the report results by expanding or narrowing the selection
criteria and clicking the GET REPORT button.
In the Report Type section near the top of the Report Criteria screen for this
report, you must choose from one of three report types. The report type options
are:
1. Volume
2. Response
3. Escalation
Table 4 describes the criteria and selection options that you find numbered in the
screenshot below.
27
PROD RELEASE 1.0
Early Warning System User Guide
EWS –MANAGEMENT AND STATUS REPORTS
1
2
3
Issue Summary Report – Entering Selection Criteria
Table 4: Issue Summary Report – Entering Selection Criteria
No.
1
2
Criteria
Report Type
(Mandatory)
Company
(Mandatory)
Description
Choose from three report
types:
1. Volume
2. Response
3. Escalation
List of available reporting
companies based on
user’s profile
Selection options
- Defaults to “Volume”
-
-
3
Report Date
(Mandatory)
“From” and “To” Status
Date year (CCYY), month
(MM), and day (DD)
Report date refers to the
desired time frame for the
report information
-
No default value
At least one company
number must be
selected
Check the “All”
checkbox to select all
companies in the list
Defaults to the latest
month
Enter the numeric
representation of the
year, month and day
Click the RESET button to return all criteria fields to their default values.
28
PROD RELEASE 1.0
Early Warning System User Guide
EWS –MANAGEMENT AND STATUS REPORTS
Viewing Report Details – Issue Volume Summary Report
After you submit the criteria you have selected for the Volume report type, the
Issue Volume Summary Report will be displayed. The Issue Volume Summary
Report shows the weekly volume of issues by individual issue statues. This report
is useful in monitoring the changes to the volume of issues from week to week.
Table 5 describes the headings you find numbered in the screenshot below.
1
2
3
4
5
Issue Volume Summary Report – Viewing Report Details
Table 5: Issue Volume Summary Report – Viewing Report Details
No.
1
2
3
29
Content
Company
Issue Contact
Company
Report Date
Range
Description
The designated Company
Issue Coordinator for
Early Warning System
issues
As selected
Links
Display only
-
Display only
As selected
-
Display only
PROD RELEASE 1.0
Early Warning System User Guide
EWS –MANAGEMENT AND STATUS REPORTS
No.
4
5
Content
Numbers as
of Calendar
Date
Number of
Outstanding
Issues by
Status
Description
Monthly summary can be
expanded to show the
number of outstanding
issues at the end of each
week (week ending
Sunday) by clicking on
the corresponding
icon.
Summarized count of the
issues by status at the end
of each month and at the
end of each week (week
ending Sunday)
Links
Display only
-
Display only
See Also:
Navigating within a report
Navigating back to a parent report
Changing the report display
Searching within a report
Exporting and printing a report
Refreshing a report
30
PROD RELEASE 1.0
Early Warning System User Guide
EWS –MANAGEMENT AND STATUS REPORTS
Viewing Report Details – Issue Response Summary Report
After you submit the criteria you have selected for the Response report type, the
Issue Response Summary Report will be displayed. The Issue Response Summary
Report shows the duration of issue statuses. This report is useful in monitoring
the response time received on issues.
Table 6 describes the headings you find numbered in the screenshot below.
1
2
3
4
5
Issue Response Summary Report – Viewing Report Details
Table 6: Issue Response Summary Report – Viewing Report Details
No.
1
2
3
31
Content
Company
Issue Contact
Company
Report Date
Range
Description
The designated Company
Issue Coordinator for
Early Warning System
issues
As selected
Links
Display only
-
Display only
As selected
-
Display only
PROD RELEASE 1.0
Early Warning System User Guide
EWS –MANAGEMENT AND STATUS REPORTS
No.
4
5
Content
Average Total
Anomaly
Lifecycle
Status
Duration by
Issue Status
Description
The average lifecycle for
the resolved issues that
existed for the selected
report date range
The count of issues
summarized by the
duration of the individual
issue statuses that existed
for the selected report
date range
Links
Display only
-
Display only
See Also:
Navigating within a report
Navigating back to a parent report
Changing the report display
Searching within a report
Exporting and printing a report
Refreshing a report
32
PROD RELEASE 1.0
Early Warning System User Guide
EWS –MANAGEMENT AND STATUS REPORTS
Viewing Report Details – Issue Escalation Summary Report
After you submit the criteria you have selected for the Escalation report type, the
Issue Escalation Summary Report will be displayed. The Issue Escalation
Summary Report shows the number of issues that have been escalated, by status
and escalation level.
IMPORTANT NOTE: To avoid the unnecessary escalation of data issues and to avoid
deficiency fees charges, please ensure that appropriate and timely action is taken to correct
EWS data issues.
Table 7 describes the headings you find numbered in the screenshot below.
1
2
3
4
5
Issue Escalation Summary Report – Viewing Report Details
Table 7: Issue Escalation Summary Report – Viewing Report Details
No.
1
2
33
Content
Company
Issue Contact
Company
Description
The designated contact
for Early Warning System
issues
As selected
Links
Display only
-
Display only
PROD RELEASE 1.0
Early Warning System User Guide
EWS –MANAGEMENT AND STATUS REPORTS
No.
3
4
5
Content
Report Date
Range
Description
As selected
Level x
Threshold by
Issue Status
The number of days after which an issue will be
escalated if no action has
been taken
The number of issues that have been escalated, by
issue status and escalation
level
Level x
Esclations by
Issue Status
Links
Display only
Display only
Display only
See Also:
Navigating within a report
Navigating back to a parent report
Changing the report display
Searching within a report
Exporting and printing a report
Refreshing a report
34
PROD RELEASE 1.0
Early Warning System User Guide
CONTACTING IBC SUPPORT
4. CONTACTING IBC FOR SUPPORT
IBC is committed to providing superior customer service. We provide full support to
our clients through our various support teams:
• Data Quality Management
• Helpdesk
• Member Services
Your primary point of contact is the Data Quality Management Team, through your
Data Quality Analyst (DQA) who can be reached by phone at 416-362-2031, ext 4605
or 1-800-761-6703, ext 4371 or by e-mail to [email protected].
For further information, visit IBC’s website at www.IBC.ca.
35
PROD RELEASE 1.0
Early Warning System User Guide
APPENDIX A – ISSUE STATUS DESCRIPTIONS
APPENDIX A – ISSUE STATUS DESCRIPTIONS
The following are the descriptions of the possible issue statuses:
36
Status
Issue
Description of Status
Issue status is set by IBC when a detected data problem
requires investigation by the reporting company.
Insurer
Investigating
Set this status to indicate that investigation of the data issue is
underway.
Issue Denied –
Reflects Business
Set this status when the investigation into the data issue
determined that the data does in fact reflect your business and
provide a detailed explanation in the comments box. Once
this status is set, IBC will review the details and will confirm
or reject the status/explanation.
Issue Confirmed –
Irresolvable
Apply this status when the investigation into the data issue
uncovered a system problem but the data cannot be corrected
and resubmitted. Provide a detailed explanation for why this
is not possible. Once this status is set, IBC will review the
details and will confirm or reject the status/explanation.
Issue Confirmed –
To Be Fixed
Apply this status when the investigation into the data issue
uncovered a system problem that will be fixed and the ASP
data will be resubmitted. Once this status is set, IBC will
monitor to ensure the timely receipt of the data resubmission.
Use the reversal option to request the reversal of the existing
batches when the data resubmission is ready (please see
Batches Involved Tab for further information on requesting a
reversal).
Closed – Reflects
Business
This status is set by IBC to confirm the status/explanation
provided, when the investigation into the data issue
determined that the data does in fact reflect your business.
PROD RELEASE 1.0
Early Warning System User Guide
APPENDIX A – ISSUE STATUS DESCRIPTIONS
37
Status
Closed –
Unresolved
Description of Status
This status is set by IBC to confirm the status/explanation
provided, when the investigation into the data issue
uncovered a system problem but the data cannot be corrected
and resubmitted.
Closed – Fixed
This status is set by IBC to confirm that the data issue has been
resolved, when the investigation into the data issue uncovered
a system problem that was fixed and the corrected ASP data
has been resubmitted and processed by IBC.
PROD RELEASE 1.0