1
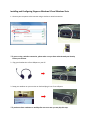
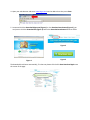
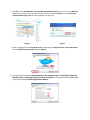
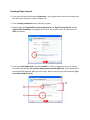
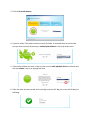
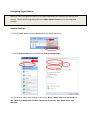
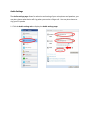
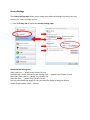
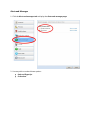
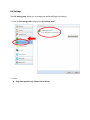
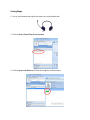
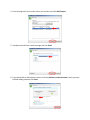
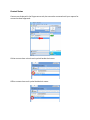
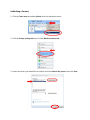
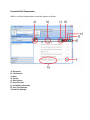
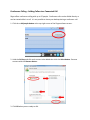
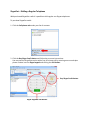
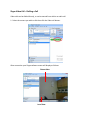
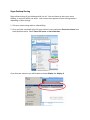
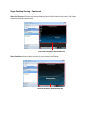
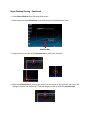
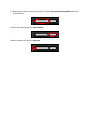
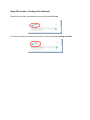
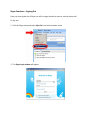
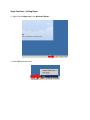
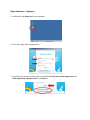
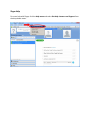
University Systems
Client Technologies
Skype User Guide for Windows XP and Windows Vista
Created By: Scott Thorpe
Created On: April 2nd, 2008
Last Modified By: Scott Thorpe
Last Modified On: August 7th, 2009
Introduction to Skype
Skype software allows for free audio and video calls to personal computers and is available for both
Windows and Macintosh platforms.
Free calls require all users to have Skype software and a functional account.
Skype also allows for video chat between Skype users.
Skype can also dial regular (land line) telephones using purchased SkypeOut credit.
Skype does have a few limitations you should be aware of:
No emergency services are offered, you will have to use the regular phone service for all emergency
calls.
A headset will give you the best sound quality for your Skype calls. A USB headset is recommended.
Paid Skype accounts remain active/valid for 180 days after each successfully connected phone call. After
180 days any remaining Skype credit expires. You can keep your Skype account active by:
Using Skypeout to make calls to land-line phones
Download a ringtone or image
Sending an SMS text message
Setting Up Your Headset
We recommend the use of a USB-based headset for Skype communications. Some of the vendors that
offer fully compatible devices include Platronics, Logitech, Apple, HP, and many others. Always consult
your device’s manual to ensure you have correctly set-up your headset.
Note:
Please check with your local desktop support person before you install and run Skype.
Installing and Configuring Skype on Windows XP and Windows Vista
1. Connect your computer to the Internet using a wireless or wired connection:
**If you are using a wireless connection, please make sure you have authenticated your identity
before you continue.
2. Plug your headset into a free USB port on your PC:
3. Setup your webcam on your monitor or desk and plug it into a free USB port:
**If you do not have a webcam or would prefer not to use one you may skip this step.
4. Open your web browser and enter www.Skype.com into the address bar then press Enter:
5. Locate and click the Download Skype now (Figure 1) or the Download now button (Figure 2), you
may have to click the Download tab (Figure 3) before the Download now button becomes visible:
Figure 3
Figure 1
Figure 2
The download should start automatically, if it does not please click the link Start Download Again near
the center of the page:
6. Click Run on the File Download – Security Warning Window (Figure 4), if you are running Windows
Vista you may have to enter the Administrator password and click Continue on the User Account
Control window (Figure 5) before the installation can proceed:
Figure 4
Figure 5
7. Select a language from the drop-down menu, read through the Skype End User License Agreement
and the Skype Privacy Statement and click Options:
8. You may wish to uncheck: Start Skype when the computer starts, Install Skype Plug-in for
Mozilla Firefox, Install Skype Plug-in for Internet Explorer. If you will not be using any plugins you may uncheck Install Skype Extras Manger.
9. Read through the Skype End User License Agreement and the Skype Privacy Statement and
if you agree to the terms click I agree – install.
10. Once Skype has finished installing, the Thank you for Installing Skype dialog box will
display, click Start Skype to continue:
Creating a Skype Account
1. Enter your full name and choose a Skype name – your Skype name is what your contacts will
see and is the name that is used to contact you.
2. Enter a unique password that won’t be easy to guess.
3. Read through the Skype End User License Agreement, the Skype Terms of Service and the
Skype Privacy Statement, if you agree to the terms put a check-mark in the box and click
Next to continue.
4. Enter your email address (a) and select Canada for Country / Region (a), you may remove
the check-mark beside; Yes, send me Skype news and special offers (b). If you would like to
be automatically signed in when you start Skype, place a check-mark in the box beside; Sign
me in when Skype starts (c).
Configuring Skype
After your Skype account has been successfully created the following screen will display:
1. Click the microphone icon to continue.
The Skype – Welcome screen will display:
2. Click Test Speakers:
3. Click the Press Me button:
4. Listen for audio; if the audio worked correctly click Yes. If the audio does not work make
sure you have correctly selected your audio playback device in the drop-down menu:
5. If the audio still does not work, make sure the correct audio playback device is selected and
that the volume is set to an appropriate level:
6. After the audio has been tested and is working correctly click Yes, the screen will display the
following:
7. Click Test microphone:
8. Speak into the mic, if the microphone worked correctly the green bar in the middle will
move accordingly, click Yes. If the microphone did not work correctly make sure the correct
audio recording device is selected in the drop-down menu on the right and try again:
9. After successful configuration of your speakers and microphone the screen will display the
following:
10. If you have a webcam click Test Video:
A properly configured webcam will display as follows:
An example of your webcam’s video will show here
If you do not have a webcam, or it is not working correctly, please check the webcam’s USB is
properly connected or consult your user manual:
11. Click Done or Exit this guide to continue:
Configuring Skype Options
Skype has many configuration options that require adjustment for maximum functionality and
security. Please follow along tab-by-tab in the Skype Options Screen for the recommended
settings.
General Settings:
1. Click the Tools menu and select Options from the drop-down menu:
2. Click the General tab which will display the General Settings page:
You may wish to adjust these settings to your taste; When I double-click on a contact start a
call, Show me as Away when I’ve been inactive for XX minutes, Start Skype when I start
Windows.
Audio Settings
The Audio settings page allows for selection and testing of your microphone and speakers, you
may also choose what device will ring when you receive a Skype call. You may also choose to
ring your PC speaker
1. Click the Audio settings tab to display the Audio settings page:
Video Settings
The Video settings page allows you to change your webcam preferences and shows you a
preview of what your webcam sees.
1. Click the Video settings tab to display the Video settings page:
Recommended settings are:
Automatically receive video and screen sharing from... – people in my Contact list only
Show that I have video – people in my Contact list
Privacy Settings
The Privacy settings page allows you to change your preferred settings for privacy, who may
contact you, instant message you etc.
1. Click the Privacy tab to display the Privacy settings page:
Recommended settings are:
Allow calls from... – people in my Contact list only
Automatically receive video and screen sharing from... – people in my Contact list only
Show that I have video to – people in my Contact list
Allow IMs from... – people in my Contact list only
You may also choose the length of time you would like Skype to keep your History.
Accept Skype browser cookie - uncheck
Notification Settings
The Notification settings page allows you to change your preferred settings for Skype Windows
System Tray notifications.
1. Click the Notifications tab to display the Notifications settings page:
You may check or uncheck these options to suit your taste:
Comes online
Goes offline
Starts an IM with me
Sends me a file
Requests my contact details
Leaves me a voicemail
Has a birthday
Sends me contacts
Alerts and Messages
1. Click the Alerts and messages tab to display the Alerts and messages page:
2. You may wish to uncheck these options:
Help and Skype tips
Promotions
Call Settings
The Call settings page allows you to change your preferred Skype call settings.
1. Click the Call settings tab to display the Call settings page:
2. Select:
Only allow people in my Contact list to call me
IM Settings
The IM & SMS settings page allows you to change your preferred settings for the Skype instant
messaging & short messaging system.
1. Click the IM & SMS tab to display the IM settings page:
2. It is recommended that you select:
Only allow people in my Contact list to send me instant messages
Advanced Settings
The Advanced settings page allows you to change your preferred Skype call settings.
1. Click the Advanced tab to display the Advanced settings page:
2. You may put a check-mark in the box beside:
When a new version of Skype is available...
Notify me
Automatically download and install it
Testing Skype
1. Put on your headset and adjust the volume to a comfortable level
2. Click the Echo / Sound Test Service contact:
3. Click the green call button and follow thorough the audio prompts:
Adding a Contact
Before you can contact someone using Skype you must find and enter them as a contact. You
are required to introduce yourself with a brief text message and your contact must approve of
your request before you will be able to speak with them.
1. Click the New button and select New Contact from the drop-down menu:
2. Enter a name or email address and click Find:
4. Scroll through the list of results, select your contact and click Add Contact:
5. Introduce yourself with a brief message and click Send:
6. If you would like to add another contact, click the Add more contacts button, when you have
finished adding contacts click Close.
Contact Status
Contacts are displayed in the Skype contact tab, but cannot be contacted until your request for
contact has been approved:
Online contacts have a check-mark symbol beside their name:
Offline contacts have an X symbol beside their name:
Removing a Contact
1. Right-click on the contact’s name and select Remove from Contacts from the drop-down list:
2. Click Remove:
Blocking a Contact
1. Right-click the contact’s name and select Block This Person from the drop-down menu:
2. Place a check-mark in the box beside Remove from your Contact list, if you would like to
report abuse, place a check-mark in the box beside Report abuse from this person:
3. Click Block
Unblocking a Contact
1. Click the Tools menu and select Options from the drop-down menu:
2. Click the Privacy settings tab then click the Blocked contacts tab:
3. Select the contact you would like to unblock and click Unblock this person, then click Save:
Making a Skype Call
Before you make your first Skype call, make sure you have properly setup your headset and
webcam.
1. Click your contact’s name then click the green call button:
After the distant party has answered you can chat back and forth just like a regular telephone.
2. To disconnect the call, press the red hang-up button:
Connected Call Components
While in a call the Skype software screen will appear as follows:
a) Disconnect
b) Call Duration
c) Mute
d) Volume
e) Misc Options
f) Start Video Call
g) Call Quality Information
h) Enter Text Message
I) Send Text Message
Conference Calling – Adding Callers to a Connected Call
Skype offers conference calling with up to 25 people. Conference calls can be dialled directly or
can be started while in a call. It is not possible to share your desktop during a conference call.
1. Click the + Add people button at the top-right corner of the Skype software screen:
2. Hold the Ctrl key and click each contact to be added then click the Select button. Remove
contacts with the Remove button:
3. Click OK when you are ready to dial.
Conference Calling – Dialling Directly
Skype offers conference calling with up to 25 people. Conference calls can be dialled directly or
can be started while in a call. It is not possible to share your desktop during a conference call.
1. Hold the Ctrl key and click each contact in your contact list you would like to include in the
conference call, selected contacts will highlight as in the example bellow:
2. Click Call Group when you are ready to dial.
Receiving a Skype Call
When you receive a Skype call your screen will appear as bellow, if you have powered speakers
you will also hear a musical passage.
You may choose to: Answer, Answer with video or Decline the call.
Answer with video is only available if you have a webcam.
SkypeOut – Dialling a Regular Telephone
With purchased SkypeOut credit it is possible to dial regular non-Skype telephones.
To purchase SkypeOut credit:
1. Click the Call phones tab under your list of contacts:
2. Click the Buy Skype Credit button and follow the onscreen instructions.
You may test the SkypeOut service with a free 10-minute call by entering an area-code plus
phone number into the Skype keypad and clicking the Call button:
Buy Skype Credit button
Skype keypad & Call Button
Skype Functions – Online Status
Skype allows you to change your online status; i.e. Do Not Disturb, Invisible, Offline, etc.
1. Click the top-left corner of the Skype window beside your Skype name:
2. Select your choice from the drop-down menu:
Skype Functions – The History Tab
Skype History is a list of all recent Skype activity; calls, file transfers, chat sessions etc.
1. Click the View menu and select History from the drop-down menu:
2. Click the All events button and choose what to display from the drop-down menu; i.e. all
events, all calls, missed calls, outgoing calls etc:
Skype Video Call – Receiving a Call
Skype offers video calling with the use of a webcam and microphone. For two-way video
communication both parties require a webcam and microphone.
When you receive a video call you have the option of; Answer, Answer with video, or Decline.
Choosing Answer will ignore the video request and start a standard audio call:
Skype Video Call – Dialling a Call
Video calls can be dialled directly, or can be started from within an audio call.
1. Select the contact you wish to dial then click the Video call button:
After connection your Skype software screen will display as follows:
Distant View
Local View
Skype Desktop Sharing
Skype allows sharing of your desktop while in a call. You can choose to share your entire
desktop, or a portion which you select. Your contact must approve of your sharing request –
depending on their settings.
1. Dial your contact using audio or video dialling.
2. Once you have connected right-click your contact’s name and select Share Your Screen from
the drop-down menu. Select Share Full Screen or Share Selection:
If you have two monitors you will be able to choose Display 1 or Display 2:
Skype Desktop Sharing – Continued
Share Full Screen will share your entire desktop, but will be limited in size even if the Skype
software window is maximized:
Full screen desktop from distant site
Share Selection allows a select portion of your screen to be shared:
Zoomed selection from distant site
Skype Desktop Sharing – Continued
1. Select Share Selection from the drop-down menu.
2. Move and resize the selection box to enclose the area you would like to share:
Selection Box
3. Drag the corners or sides of the selection box to refine your selection:
4. Move the selection box by moving the cursor into the top bar of the selection, the cursor will
change to show a four-way arrow. Click and drag the arrow to move the selection box:
5. When you are ready to share your selection, click the Start screen sharing button at the top
of the selection:
Cancel screen sharing with the Cancel button:
Hide the selection bar with the up-arrow:
Skype File Transfer – Sending a File
Skype can transmit files of any size to people on your contact list.
1. Right-click your chosen contact and select Send File... from the drop-down menu:
2. Navigate to the file, select it and click Open:
The screen will display Waiting:
Your contact may now accept or decline the file. Cancel the transfer with the Cancel button.
Skype File Transfer – Sending a File Continued
After the file has been transferred the screen will display File sent:
If the file was declined or failed the transfer the screen will display Sending cancelled:
Skype File Transfer – Receiving a File
If the Skype software window is not currently onscreen a notification window will display from
the Windows System Tray:
To accept or reject the file:
1. Click the notification window or bring up the Skype software screen and click Save as or
Cancel:
2. Save as will display the Accept file screen, choose to accept (OK) or reject (Cancel) the file.
You may put a check-mark in the box beside Do not ask me again:
3. Accepting a file transfer (OK) will display the Windows save menu. Choose where to save
the file and click Save:
Skype Functions – Signing Out
Once you have signed out of Skype you will no longer be able to make or receive phone calls.
To sign out:
1. Click the Skype menu and select Sign Out from the drop-down menu:
2. The Skype login window will appear:
Skype Functions – Exiting Skype
1. Right-click the Skype icon in the Windows Taskbar:
2. Select Quit from the menu:
Skype Functions – Signing In
1. Double-click the Skype icon on your desktop:
2. Enter your login name and password:
3. If you like, you may put a check mark in the box beside Sign me in when Skype starts and
Start Skype when computer starts. Click Sign in:
Skype Help
For more help with Skype, click the Help menu and select Get Help: Answers and Support from
the drop-down menu: