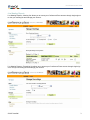
1
InterCall Online User Guide Company Management © 2007 InterCall 1 InterCall Online User Guide Table of Contents Welcome to InterCall Online .................................................................................................................................. 4 User Type Overview .............................................................................................................................................. 4 Feature Overview................................................................................................................................................... 4 Welcome/Login ...................................................................................................................................................... 4 Scheduling Meetings.............................................................................................................................................. 5 Manage Upcoming Meetings ................................................................................................................................. 5 Starting Meetings ................................................................................................................................................... 5 Library .................................................................................................................................................................... 5 Account Management ............................................................................................................................................ 5 Reports................................................................................................................................................................... 6 Review Invoices ..................................................................................................................................................... 6 Customer Support.................................................................................................................................................. 6 Section 2: Getting Help.............................................................................................................................................. 7 Using this Guide..................................................................................................................................................... 7 Customer Support.................................................................................................................................................. 7 Section 3: Getting Started ......................................................................................................................................... 8 The Welcome Page................................................................................................................................................ 8 Logging In the First Time ....................................................................................................................................... 8 Basic Scheduling.................................................................................................................................................. 14 Optional Features................................................................................................................................................. 16 Call Templates ..................................................................................................................................................... 30 Section 5: Manage Upcoming Meetings.................................................................................................................. 32 Section 6: Start a Meeting ....................................................................................................................................... 33 Section 7: My Library ............................................................................................................................................... 34 My Archives.......................................................................................................................................................... 34 My Address Book ................................................................................................................................................. 36 My Templates....................................................................................................................................................... 37 Change Your Administrator Password................................................................................................................. 39 Owner: Set Up New Owner.................................................................................................................................. 40 Operator Assisted Calls ....................................................................................................................................... 43 Reservationless–Plus .......................................................................................................................................... 45 Direct Event.......................................................................................................................................................... 47 Automated............................................................................................................................................................ 47 Web Conferencing ............................................................................................................................................... 48 Other Call Type Options ...................................................................................................................................... 48 Owner: View/Edit Owner Information................................................................................................................... 48 Owner: Manage Owner Activity ........................................................................................................................... 51 Owner: Manage Delegates .................................................................................................................................. 53 Delegate Assignment for Yourself ....................................................................................................................... 54 Account: Set Up New Billing Account Profile....................................................................................................... 56 Account: View/Edit Account Information.............................................................................................................. 59 Company: View/Edit Company Information ......................................................................................................... 61 User Role: Administer Roles................................................................................................................................ 63 Owner Requests: Approve New Owner Requests............................................................................................... 64 Section 9: Reports ................................................................................................................................................... 66 View Reports........................................................................................................................................................ 66 Greatest Attributes Report ................................................................................................................................... 66 Audio Activity Reports.......................................................................................................................................... 67 Web Activity Reports............................................................................................................................................ 68 Stewardship Report.............................................................................................................................................. 68 Minute Report....................................................................................................................................................... 70 Online Reports ..................................................................................................................................................... 72 Mshow Reports .................................................................................................................................................... 72 Live Meeting Reports ........................................................................................................................................... 73 Meeting Center Reports....................................................................................................................................... 74 Section 10: View Invoices........................................................................................................................................ 75 © 2007 InterCall 2 InterCall Online User Guide Section 11: Customer Support ................................................................................................................................ 76 Online Support: Frequently Asked Questions (FAQs) ......................................................................................... 76 Online Support: Ask a Question........................................................................................................................... 77 Online Support: Provide Feedback ...................................................................................................................... 78 Section 12: Appendix............................................................................................................................................... 79 Glossary ............................................................................................................................................................... 79 © 2007 InterCall 3 InterCall Online User Guide Section 1: Overview Welcome to InterCall Online You know that InterCall’s complete range of conferencing solutions makes you more productive. But with user names and passcodes for multiple services to keep track of, it’s sometimes a challenge just remembering your logins. That’s where InterCall Online comes in—with a single login and a few mouse clicks, you’ll have access to all of your online InterCall conferencing services. InterCall Online is a free service provided by InterCall that makes it quicker and more convenient for you to access all of your online InterCall services. From a single point of entry you’ll be able to reach web conferencing services like Conference PlaceSM, provided by Microsoft Office Live Meeting, MeetingCenter™, powered by WebEx, and Mshow®, audio call add-ons like Reservationless-Plus.com and Leader-ViewSM, and even InterCall’s Online Reservation system. Once you’ve registered for InterCall Online, your InterCall tools are just a click away. Upon logging into InterCall Online, you’ll have one-click access to host a web conference, make an audio conference reservation, manage your Reservationless-Plus® account and more. In addition to giving you direct access to InterCall conferencing services, InterCall Online also provides self-guided product demonstrations, basic service information and support contact information. This user guide provides information on the tools available to you and how to navigate InterCall Online. User Type Overview InterCall Online supports three types of users – Company Administrators, Account Administrators and Owners: Company Administrator: Company Administrators have the highest level of authority within InterCall Online to manage conference accounts. The Company Administrator is able to manage the company site, provision billing accounts and set up new owners within the company. Account Administrator: Account Administrators have access to various billing, account and individual profile management tools. These capabilities ensure the Account Administrator can provide appropriate access to the tools and services the owners under their hierarchy need and can also help the Account Administrator monitor conferencing usage and invoicing. Owner: An Owner is the end-user and “owner” of an individual account. The Owner can access tools to schedule and manage meetings, initiate meetings and manage account information using InterCall Online. This user guide will summarize the functionality available to the Owner. Feature Overview Welcome/Login InterCall Online security has been architected to be flexible enough to allow different access levels depending on the user’s needs and responsibilities. Start at the Welcome screen to securely access your unique set of tools and features, create a new owner account, request forgotten password and/or usernames or join a meeting being hosted by another owner. Once logged in, your InterCall Online home page may include your company’s branding, special announcements from InterCall regarding new services and features, as well as a list of the services activated for your user profile. From the Home page, you can access the tools to schedule meetings, manage meetings, initiate meetings and manage account information. A personal library of reservationless resources and various user support tools is also available on the Home page. © 2007 InterCall 4 InterCall Online User Guide Scheduling Meetings InterCall Online allows owners to reserve conference calls online rather than calling into InterCall’s customer care center. Our online scheduling interface tools are updated real-time within InterCall’s provisioning system to register your call preferences and schedule operator resources automatically. You simply enter meeting date and time information, project accounting codes and conference leader information to schedule resources. • • • • • • Basic Scheduling Features: InterCall scheduling allows you to choose from a broad range of tools and features to enhance the conferencing experience. Basic features include the ability to pre-define participant lists to control conference access, distribute meeting details and set the frequency and term of recurring meetings. Pre-Meeting Features: InterCall offers a set of pre-meeting features that give you additional flexibility in how to communicate with participants prior to a conference. These include pre-registration options (email, fax and voice broadcast services), customized enunciator, operator scripts and promotional playback messages. Enhanced Services: InterCall also offers several enhanced conference features including Participant Report, Call Transcription, Communications Line, Leader-ViewSM, Voice Talent, Q&A, Polling, Call Monitoring and Call Playback. Check with your company administrator or meeting consultant to understand the additional costs for these services. Recording Services: Reserve EncoreSM recording services through InterCall Online for Operator Assisted calls. Options include the ability to pre-establish the parameters concerning how long the conference recording will be available, whether the recording requires a password for playback and custom prompts to be played before and after the recording playback. You can also use InterCall Online the order CDs and tapes of your recordings. Web/Video Features: Through single sign on security, owners can also reserve web and video conferencing services. Users are linked seamlessly to the web and video reservations systems and are prompted in InterCall Online to enter the meeting IDs for these services. This ensures that web and video meeting IDs are included in reservation confirmations and communicated to participants. Confirmation Messages: InterCall Online provides multiple ways to confirm and communicate meeting details. Online messages provide you assurances that the system has registered your meeting preferences. Manage Upcoming Meetings Owners can also review and make changes to meeting reservations any time prior to the start time of a conference by selecting Manage Upcoming Meetings. Meeting management tools allow you to filter, sort, update and delete meetings. Starting Meetings When it is time for your meeting, InterCall Online lets you select the meeting from an online menu and launches InterCall’s Conference Moderator tools. If the conference you are hosting is an Operator Assisted call with Leader-View enabled, the Leader-View tool can also be accessed through the online tools. A MeetingCenter link is available to allow users to start a One-Click Meeting. InterCall Online also provides the ability to start an ondemand or unscheduled meeting. Library InterCall Online provides you the capability to store commonly used information that can be accessed from any computer. This includes archived recordings of previously held conferences, uploaded presentations, contact details for customers or co-workers who are frequent participants on your reservationless conferences and a listing of stored call templates. Account Management Managing your personal and company information and product selections is easy when using InterCall Online. Depending on your administrator profile, you may have some or all of the Manage Your Account options. These include Owner, Account, Company, User Role and Owner Requests. • Owner Profile Management: An owner is the end-user of the portal. InterCall Online’s Account Management functions can vary for each owner’s profile based on the authority set up by your account administrator. Account Management tools allow owners to view company and billing account information, © 2007 InterCall 5 InterCall Online User Guide owner address, phone and email contact information, Project Accounting Codes and marketing settings. An owner cannot make any changes to the site except to her profile. • Owner Product Details: InterCall Online gives users the view of all of the features available to them as a user of conferencing services. Default options and preferences for each of the services can be managed from a single web page. Product details include call types, dial-in numbers, service features and web conferencing services. • Account Profile Management: InterCall Online allows a company administrator to set up various billing groups or invoice points. Account administrators are allowed to set up owner accounts or approve new owners under their account as necessary and view information for those owners within the account. You also have the ability to view billing account usage reports and invoices. • Company Profile Management: Company level is the highest level of authority within InterCall Online to manage conference accounts. Company Administrators are able to manage their company site, provision billing accounts, set up new owners and approve new owners within their company. • Administer User Roles: Settings within the Administer Roles tool allow the Company or Account Administrator to define views or ‘roles’ within InterCall Online for the users below them. Each role can have access to different features of the online system, as well as the functionality to administer to the levels underneath their access level, view reports and invoices. Reports InterCall Online reporting tools give you the ability to view usage for audio and web conferencing activity. The Reports menu allows administrators to customize audio and web usage reports, set date parameters, filter information and provides options for exporting the data to HTML or Excel format for further analysis and sharing. • Audio Activity Reports: Company and Billing Account Administrators can choose from a broad selection of data fields stored by the customer information systems in order to customize usage reports for audio conferencing. Administrators have the ability to set date and account parameters for the reports and select several report fields to analyze details or to filter information to summarize the data as needed. • Web Activity Reports: Company and Billing Account Administrators can also select date ranges, customize data fields and filter web usage stored by the customer information systems for web conferencing within the Reservationless-Plus moderator tool. • Greatest Attributes Report: Company Administrators are provided with information concerning the 50 owners or conferences with the highest number of dial out calls, port overbooking charges, noncancellation charges and/or other valuable metrics to help manage conference users and conferencing budgets. • Online Reports: If your company has subscribed to InterCall’s Online Reports, administrators are able to access the Online Reports system through InterCall Online. Simply click Online Reports to access even more information about your company or billing account’s activity. Contact your meeting consultant for more information about these robust reporting tools. Review Invoices InterCall Online’s invoicing viewing tools allow administrators to view previous company and billing account invoices. Administrators enter in the company name or company account number and the account name or account number to view available invoice history. Customer Support With InterCall Online, you have quick access to overviews of InterCall’s products and features, online customer support and direct customer service phone numbers or emails. There are links to product overview documents, customer service tools, online demos, customer training tools, help sites and other useful information. © 2007 InterCall 6 InterCall Online User Guide Section 2: Getting Help Using this Guide This user guide introduces you to InterCall Online and guides you through the features of the application and how to use them. Each of the sections that follow will focus on the various areas of functionality and provide how to information, definitions, screen shots* and helpful hints. *Please note that the screenshots used throughout this user guide are generically branded. Your screen may look different depending on your company’s preferences, but the functionality is the same. Customer Support Should you have problems with a task while using InterCall Online, select Customer Support located at the bottom of the left navigation pane throughout the application. You have quick access to Online Support, direct customer support phone numbers and links to overviews and support for the various products and services. o p q r n s n Customer Support: Link located at the bottom of the left navigation pane throughout InterCall Online that will take you to this help screen. o Online Support: Online Support provides frequently asked questions (FAQs) about the online conferencing tool and other conferencing services, as well as the capability to submit a question to the technical support staff who will reply to you by email, the ability to monitor the status of your questions and a way to provide feedback concerning InterCall Online. For more information on the functionality available in Online Support, see Section 9 of this user guide. p Direct Customer Support Phone Numbers q Meeting Coach: Meeting Coach provides links to conferencing tips, tools, questions and answers and other helpful information about InterCall’s services. r Contact Us: The Contact Us link provides yet another way to contact an account representative, or you can access a more comprehensive list of contact phone numbers for the many arms of customer service in the U.S. and for other global regions. s Conferencing Service links: Select one of the Conferencing Service links to find more information on the various services offered by InterCall. © 2007 InterCall 7 InterCall Online User Guide Section 3: Getting Started The Welcome Page When you access www.intercallonline.com, the Welcome page is the first screen you will see and is where you will log in when you want to use the online tool. n o p Also accessible from the Welcome page: n Forgot Your Password: Owners can submit a request for their passwords and/or usernames to be delivered to them should they ever be forgotten. o Signup Now: InterCall Online allows individuals, if their companies have accounts, to use the online tool to register for an owner account by completing a Quick Owner implementation form. Users must contact their corporate administrators to get the account login and password. p Join a Meeting: Users can join other owners’ meetings quickly from the InterCall Online Welcome/Login screen by providing the conference code assigned to the meeting. Logging In the First Time The Owner Number and Web PIN that you will need in order to log in for the first time will be listed in your welcome kit (or fulfillment package). (Company and Account Administrators must have an existing profile in order to be granted administrative rights. “Signup Now!” provisions owner accounts only.) As an administrator, you will be able to provide an account specific Username and Password to allow new users to create owner accounts for themselves through the “Signup Now!” function. © 2007 InterCall 8 InterCall Online User Guide Welcome Kit Following are the instructions for logging in: We are delighted to introduce you to the difference that reliable, easy-to-use conferencing solutions from InterCall can make in your business communications. Here's everything you need to kick-start your conference communications today: your personalized account details, "how to" instructions and other information. Read on for the details! n General Information: Owner Name: Sample John Heeney Company Name: InterCall Owner Number: 2873289 Web PIN: 4666 Your Sales Contact: House House, , [email protected] Customer Service: (800) 374-2441 or (706) 645-6800 n First, locate your owner number and web PIN. For most owners, your welcome kit is delivered in the form of an email. If you cannot locate your web PIN, please contact customer service at the phone number located on your wallet card. o © 2007 InterCall 9 InterCall Online User Guide o The first time you log in, you will be prompted to enter your owner number in the Username field, and your web PIN into the Password field. Then click Login to advance to the next screen. r p p In the appropriate fields, create your unique user name and password. Â Helpful hint: Your new user name: • Needs to be at least six characters long, • May be made up of letters, numbers, special characters (@, $, %, &, +, -, ., _) or any combination of these, • But unlike your password, your user name does not require a capital letter and the inclusion of a number or symbol. Your new password needs to be: • At least eight characters long, • Contain at least one capital letter • And contain at least one number or one special symbol. You will also be prompted to provide a question and answer that will be used should you ever forget your password. Click Add User to complete this step. q q You will receive this confirmation on the screen when you have successfully created your new user name and password. r You will receive this confirmation on the screen when you have successfully created your new user name and password. Company Administrator If you have provided an account username and password to a new user, the user would follow these instructions: © 2007 InterCall 10 InterCall Online User Guide n n Go to the Signup Now! area of the Welcome page and click where indicated. Provide the account username and password provided by your company administrator and click Login. © 2007 InterCall 11 InterCall Online User Guide Existing User If you are an existing user, Click Here will take you back to the Home page so that you may enter your user name and password. (If you are a first time user, please enter your owner number as your username and your web PIN as your password.) New Account If you need to set up an account, simply fill out the fields provided on this page and select Continue at the bottom. (All fields designated with a red asterisk (*) are required.) You will then receive a Confirmation page. Please review your information carefully. If your information is correct, select Continue to complete your account creation. If your company administrator has chosen Automatic Owner Setup, you will receive an email notification that includes your owner number and web PIN. If your company administrator has chosen Manual Owner Setup, you will receive an email notification after your account has been approved. If your information is not correct, you may select Back to make corrections. © 2007 InterCall 12 InterCall Online User Guide Section 4: Scheduling Meetings InterCall Online provides you the ability to reserve conferences online rather than calling customer service. This tool interacts directly with the conferencing provisioning system to register your call preferences and to schedule operator resources for your conference calls when needed. After logging in, you will access your individual Home page. Your Home page is where you’ll find a summary of all the available features and tools that are allowed by your owner profile. If it is selected by your company, this page may include your company’s own branding*, as well as special announcements regarding new services and features. This section of the user guide will provide instruction on scheduling meetings and identify and define the features available on the type of meeting you select. *Please note that the screenshots used throughout this user guide are generically branded. Your screen may look different depending on your company’s preferences, but the functionality is the same. © 2007 InterCall 13 InterCall Online User Guide Basic Scheduling Select Your Meeting Type Step 1: From your Home page, click Schedule A Meeting to reach this screen. Click on the type of meeting you want to schedule and click Continue. Meeting Information n o r t s p q Step 2: Complete the Meeting Information section n Select your Dial-In Numbers. (Please note that this screen includes the dial-in sumbers for an Operator Assisted call, but would show Reservationless-Plus, etc. depending on the type of call selected.) o Select the Date for your meeting by clicking the calendar icon for a drop down calendar. p Select a Time for your meeting—don’t forget to specify AM or PM. q Select the Time Zone for your meeting from the drop down menu. r Specify the Number of Participants for your meeting. s Specify the Duration of your meeting in minutes. t While not required, it is helpful to include a Conference Topic to distinguish this meeting from others. (Meeting Information sections may vary depending upon the type of meeting that was selected.) © 2007 InterCall 14 InterCall Online User Guide PAC Code Step 3: Provide a PAC Code if needed. PAC Codes, or Project Accounting Codes, provide a method to identify conference calls. These PAC Codes are individual accounting codes that may be used to bill the appropriate department/cost center or just to track departmental conference calls. (The label preceding this field can be customized to show the verbiage that your company uses for this purpose.) Scheduler/Call Organizer Step 4: If you are the Scheduler/Call Organizer for this meeting, simply choose Same as Owner and provide any additional required information that does not pre-populate. If you are scheduling this call on the behalf of someone else, provide your information in this area so a conference coordinator can call to confirm your conference or so they have a point of contact should there be any questions. Leader Step 5: If you are the Leader for this meeting, simply choose Same as Owner and provide any additional required information that does not pre-populate. If you are not the meeting leader, provide the required information in this area. Entry Modes n o p q Step 6: Select your Entry Modes. Entry Modes are options available to meeting organizers for the various ways participants and leaders can be joined to a call. © 2007 InterCall 15 InterCall Online User Guide n Participants can either be placed on hold with music until the leader joins the conference (Music Hold) or they can be placed directly into a call by an operator (Direct Entry). o Conference organizers also have the option to have the conference leaders join before participants enter (Leader First) or after all participants have been placed into the meeting (Leader Last) at the request of the Leader or at the conference's scheduled start time. p The Conference organizer can also choose to have a tone sounded into the conference when participants/leaders enter and/or exit the meeting (Entry Tone/Exit Tone). q This section also allows conference organizers to instruct the operator to announce participants’ names as they are joined to the call (Name Announce) or the operator recites the names of participants who are in the conference (Roll Call). Confirmation Options Step 7: If not already pre-populated, provide an email address for email confirmation details for your meeting. You may also choose an optional fax confirmation or dial-out confirmation. If you want to make any optional meeting feature selections, click Next. Otherwise, you may click Submit from this or any of the optional feature tabs to reserve your call. Optional Features There are many optional meeting features that can also be scheduled using InterCall Online. These features include Participant Lists, Recurring Options, Pre-Meeting Features, Enhanced Features and Recording Features. Following are more detailed explanations and directions for each category. Participant List Participant List is a commonly used security feature that ensures only invited participants are allowed into the conference by the conference operator. You can choose to have the conference operator dial out to the participant or indicate that the participant will be dialing into the call. This feature can also be used to communicate the meeting details to participants. Step 1: Set the parameters for your Participant List. n Select how many new participants from the drop down menu and click Add. Your screen will refresh. © 2007 InterCall 16 InterCall Online User Guide o You may also select participants from a stored list (see My Library/My Address Book) and click Add Selected Participants to Meeting. Your screen will refresh with this addition as well. n o p Step 2: Confirm your Participant List. n Information for the leader will pre-populate; however, you have the option of changing the leader’s confirmation email status and call type. o This participant is a new participant added in the previous menu and will need to have all of her information added and confirmation Email and Call Type selections made at this point. p This participant is one from the leader’s stored list. The information for this participant will pre-populate according to what is stored in their contact file. Any information missing from the contact file that is needed for the Participant List will need to be added at this point. Confirmation Email and Call Type selections need to be made as well. Step 3: Create a custom email message to send to your participants. This is a good place to include web addresses for web conferences and other pertinent meeting information. You may also select the number of minutes prior to your call that you want your reminder sent. (This is only available when scheduling Resrevationless-Plus conferences.) © 2007 InterCall 17 InterCall Online User Guide If you want to make any additional optional meeting feature selections, click Next. Otherwise, you may click Submit to reserve your call. Recurring Options If the meeting you are scheduling is a recurring meeting, the Recurring Options tab allows you to select the frequency of the meetings: daily, weekly or monthly and for how long you would like the recurring meeting to be scheduled in advance. Step 1: Check the box in the upper left hand corner indicating you would like for this to be a recurring call. Step 2: Determine the frequency of the call: Daily, Weekly or Monthly. Your screen will refresh based on your selection and provide options for you to further define the frequency of your call. Step 3: Determine when you want the series of conference calls to end. You may schedule the meeting indefinitely, end after a number of occurrences or end on a certain date. Step 4: Determine any changes you may want made if the call should fall on weekend. Step 5: Click Preview Conference Dates for a summary of your recurring call. Your screen will refresh and the preview will appear at the bottom of the screen. If you want to make any additional optional meeting feature selections, click Next. Otherwise, you may click Submit to reserve your call. © 2007 InterCall 18 InterCall Online User Guide Pre-Meeting Features The online conferencing tool also offers a set of pre-meeting features that give you additional flexibility in how to communicate to participants in advance of a conference. These include user registration options, email, fax and voice broadcast services, customized enunciator and operator scripts and promotional playback messages. Registration Options Step 1: Check the box in the upper left hand corner indicating you would like to add Registration Options to your meeting. Step 2: Click the drop down box to select from the following: • None • Phone: participants register for your meeting by dialing into a branded toll-free number and leave an RSVP for your meeting according to the parameters you define. • Web – Single Event: participants register for your meeting by visiting an Event Registration web site branded especially for you. • Web – Multi Event: participants register for multiple events by visiting an Event Registration web site branded especially for you. • Phone/Web – Single Event: participants register for your meeting by dialing into a branded toll-free number or by visiting an Event Registration web site branded especially for you. • Phone/Web – Multi Event: participants register for multiple events by dialing into a branded toll-free number or by visiting an Event Registration web site branded especially for you. Step 3: Provide the Number of Registrants you want to have access to you phone and/or web registration. Step 4: Check the Registration ID Required box if you would like this option. Step 5: Provide a Contact Name and Contact Phone number. Additional charges may be applied for this service. Please check with your company administrator for details. © 2007 InterCall 19 InterCall Online User Guide Broadcast Services Send pre- or post-event documents or messages to all your guests simultaneously. Step 1: Check the box in the upper left hand corner indicating you would like to add Broadcast Services to your meeting. Step 2: Select one or more of the delivery methods to send documents or messages: • E-Mail: Supports text and HTML files. • Fax: Supports paper copy or electronic files (MS Word or Adobe file formats). • Voice: Supports audio messages up to 45 seconds in duration. Step 3: Click the calendar icon to select your Broadcast Date. Step 4: Provide or edit Contact Name, Contact Phone and Email. Voice Broadcast Service is free; however, additional charges may be applied for E-mail and Fax Broadcast Services. Please check with your company administrator for details. Enunciator You may have your participants greeted with a branded recording when they dial in for your conference call. For example, "Welcome to the designated conferencing provider for ABC Company. A conference coordinator will be with you shortly." Step 1: Check the box in the upper left hand corner indicating you would like to add Enunciator to your meeting. Step 2: Provide your Enunciator script where indicated. Special Script Craft a special message for a welcome statement, Q&A session and/or closing comments. Your script is read by the operator during your meeting, adding another way to personalize your call. Step 1: Check the box in the upper left hand corner indicating you would like to add Special Script to your meeting. Step 2: Provide your special script where indicated. © 2007 InterCall 20 InterCall Online User Guide Promotional Playback Provide a promotional message or announcement for your participants to listen to while they wait for your meeting to begin. Step 1: Check the box in the upper left hand corner indicating you would like to add Promotional Playback to your meeting. Step 2: From the drop down menu, select the format for which the message or announcement will be provided: CD, cassette, Encore, Micro Cassette or DAT. Additional charges may be applied for this service. Please check with your company administrator for details. If you want to make any additional optional meeting feature selections, click Next. Otherwise, you may click Submit to reserve your call. Enhanced Features A complete range of enhancements are available to make the most of your event, and your conference will be more professional, interactive and engaging. It's easy to customize your conference with one or more of the Enhanced Features listed below. Polling Determine questions prior to your meeting and have participants respond using their telephone keypads. Polling allows you to collect instant feedback and increases participant involvement in the call. You will receive a report with all the responses organized by question and participant. Step 1: Check the box in the upper left hand corner indicating you would like to add Polling to your meeting. Step 2: Determine who will conduct the poll: the Operator or the Conference Leader or Speaker. Step 3: Identify who will receive Polling results and provide Recipient Name, Email address and/or Fax number. © 2007 InterCall 21 InterCall Online User Guide Step 4: In the specified areas, provide your question and up to 10 possible answers. Click Add Question. The screen will refresh, and you may add more questions or delete any you have already submitted. Participant Report Collect information about your participants as they join your conference. The information will be sent to you by fax or email along with the on-the-line times for each participant. Step 1: Check the box in the upper left hand corner indicating you would like to add Participant Report to your meeting. Step 2: Select which Participant Report Option you would like: • Standard: Requests the participant’s first and last name. • Enhanced: Requests the participant’s first and last name, a phone number, and two additional pieces of information of your choice. If selected, add the additional requested information you desire to fields 3 and 4. • Premium: Requests the participant’s first and last name, a phone number and four additional pieces of information of your choice. If selected, add the additional requested information you desire to fields 3 - 6. Step 3: Indicate who you would like the Participant Report delivered to and provide Recipient Name, Email and/or Fax number. Click Add Recipient. Your screen will refresh and you may add more recipients if you wish. Additional charges may be applied for this service. Please check with your company administrator for details. . © 2007 InterCall 22 InterCall Online User Guide Call Transcription Transcription provides an accurate, verbatim account of a conference in a typewritten format in Microsoft Word. Step 1: Check the box in the upper left hand corner indicating you would like to add Call Transcription to your meeting. Step 2: Select your preferred Service Option: Standard Service, Priority Service, Express Service or Rush Service. Step 3: Determine whether you would like your Entire Call transcribed or the Q&A Session Only. Step 4: Select how you would like your transcription delivered: Email, Fax, or Hard Copy w/Diskette. Provide the requested contact information. Click Add. Your screen will refresh and if you choose to do so, you may add more recipients or delete recipients you’ve already submitted. Additional charges may be applied for this service. Please check with your company administrator for details. © 2007 InterCall 23 InterCall Online User Guide Additional Enhanced Features Choose from the following Enhanced Features to make your meeting experience even more productive. Improve your meeting with any of the following Enhanced Features: n Communication Line: Speak with an operator outside the main conference to convey behind-the-scenes information, orchestrate guest speakers or give timing cues. A Communication Line makes it easier to manage a large conference. o Leader-View: View participant information and Q&A queue lists via the Internet. With this secure, real-time tool, you’ll be able to see when key guests arrive and who’s in queue to ask questions. p Lecture Mode: All guests’ lines are muted during the presentation to reduce background noise, allowing you to deliver your message uninterrupted. q Voice Talent: Use screened and trained operators to provide voice-over quality talent, lending a professional touch to high-profile conferences. English and Spanish speaking operators are available. r Q&A: Give your participants the opportunity to ask questions during the conference. Participants indicate they have a question using their telephone keypad, while the operator manages the question queue in a professional and orderly fashion. s Call Monitor: Have your conference call monitored for clarity, but not content, ensuring that your participants will experience the highest level of quality. t Password Protection: Require participants to provide the operator with a pre-determined word or code to join the conference. Password Protection restricts attendance and heightens security. u Conference Playback: Replay a previously recorded conference or message at one or more scheduled times. The recorded conference or message can be provided in the following formats: CD, cassette, Encore, micro cassette or DAT. If you want to make any additional optional meeting feature selections, click Next. Otherwise, you may click Submit to reserve your call. Recording Features © 2007 InterCall 24 InterCall Online User Guide Encore Encore digitally records your call for those who were unable to attend it live or would like to listen again. Accessible by dialing a toll-free number for easy 24/7 access, Encore is convenient and time saving. Step 1: Check the box in the upper left hand corner indicating you would like to add Encore to your meeting. Step 2: Click on the calendar icons to select a Start Date and an End Date for your Encore digital recording to be available. Step 3: Provide a Start Time and End Time for your Encore digital recording to be available. Step 4: If desired, select the Password option and provide the password you would like in the specified area. Step 5: If you have Before Playback Prompt information you would like to capture about your caller, type it into the smaller box on the left hand side of the screen and click Add. Prompts might include “Please state and spell your full name,” or “Please provide your email address.” Your screen will refresh with each prompt you add and be displayed in the larger box in the middle of the screen. At this point, you can change the order of the prompts by highlighting a prompt and clicking Move Up or Move Down. You may also highlight a prompt and click Remove if you no longer want the prompt to be included. Step 6: After Playback Prompt functionality is the same as Before Playback Prompt. Encore Report Step 1: Check the box in the upper left hand corner indicating you would like to request an Encore Report. Step 2: Provide Report Recipient information in the specified fields and click Add Recipient. The screen will refresh and you may add more recipients or delete recipients you have already submitted. © 2007 InterCall 25 InterCall Online User Guide Order a Copy Step 1: Check the box in the upper left hand corner indicating you would like to Order a Copy of your Encore recording. Step 2: Select your Recording Type from: CD-Indexed, CD-MP3, CD-WAV, CD-CDA or Cassette. Step 3: Designate the Quantity for recordings you would like to receive. Step 4: Select your Media Shipping Method from Domestic Standard, Domestic Overnight, International Standard or International Overnight. Step 5: Provide the Ship To recipient, Address, City, State/Province, ZIP/Postal Code and Country for whom the Encore recordings are to be delivered. Click Add Recipient. Your screen will refresh and you may designate additional recipients or delete recipients who have already been submitted. If you want to make any additional optional meeting feature selections, click Previous. Otherwise, you may click Submit to reserve your call. © 2007 InterCall 26 InterCall Online User Guide Scheduling a Web Conference Mshow When selecting to schedule an Mshow conference, you will be linked directly to your Mshow account through single sign on and will be able to not only schedule, but manage all facets of your web conferencing account. Conference Place When selecting to schedule an Conference Place conference, you will linked directly to your Conference Place account through single sign on and will be able to not only schedule, but manage all facets of your web conferencing account. © 2007 InterCall 27 InterCall Online User Guide MeetingCenter Step 1: Complete the Meeting Information section. n Select the Date for your meeting by clicking on the calendar icon for a drop down calendar. o Select a Time for your meeting—don’t forget to specify AM or PM. p Select the Time Zone for your meeting from the drop down menu. q Specify the Duration of your meeting in minutes. r Specify the Topic to distinguish this meeting from others. If you want to make any additional optional meeting feature selections, click Continue. Otherwise, you may click Submit to reserve your conference. Step 2: Set the parameters for your participant list. n Select how many new participants from the drop down menu and click Add. Your screen will refresh. o You may also select participants from a stored list (see My Library/My Address Book) and click Add Selected Participants to Meeting. Your screen will refresh with this addition as well. If you want to make any additional optional meeting feature selections, click Continue. Otherwise, you may click Submit to reserve your conference. © 2007 InterCall 28 InterCall Online User Guide Step 3: Set the parameters for web/video features. n Select the Meeting Type: Meeting Center Pro or Meeting Center Pro + MVP. o Select a Web Meeting Password, if needed. You can specify a meeting password, which attendees must provide to join the meeting. p Select the Attendance Setting, which allows attendees to join the meeting 0, 5, 10 or 15 minutes prior to meeting start time. q Select the Leader Meeting Reminders, which is the number of minutes prior to meeting start time that the email reminders should be sent. r Select Web Meeting Enrollment if you need to obtain the attendees’ first name, last name and email. s Select Meeting Options: • Chat: Let meeting participants communicate by sending instant text messages to each other. • Video: Select Single Point or Multi-Point to incorporate real-time video conferencing into your meeting from up to four desktop video cameras. • Notes: Choose All Attendees or Single Note Taker, which let meeting participants take notes directly in the Meeting window. You can either let all participants take personal notes or designate a participant as a single note taker for the group. • Closed Captioning: Let one participant (the closed captionist) transcribe notes during the meeting. • File Transfer: Allow attendees to download specific files that reside on your computer during a meeting. • Recording: Record all on-screen actions and audio during a meeting. Using WebEx Player, you and others can play back a recorded meeting. • Send feedback form to host email: Send all feedback forms that any participants fill out to the your email address. The feedback form automatically appears on each participant's screen after the meeting ends. • Enable UCF rich media for Attendees: Use the Universal Communications Format (UCF), a portable document format, to: o Display animations and slide transitions in shared Microsoft PowerPoint® presentations. o Play rich media files—such as audio and video files— in shared Microsoft PowerPoint presentations or as stand-alone files in the content viewer. © 2007 InterCall 29 InterCall Online User Guide tSelect Attendee Privileges: • Save • Print • Annotate • View Participant List • View Thumbnails • Controls applications, web browser or desktop remotely • View any document • View any page • Private chat – with host, presenter or all attendees uSelect Delete Meeting after completion. Choose to automatically delete the meeting from your list of meetings once both of the following occur: • You start and end the meeting. • The scheduled time for the meeting has passed. Step 4: Click Submit to reserve your web conference. Call Templates Once you have submitted the information to reserve an audio conference call, you will be asked if you would like to make this a Call Template. By selecting Yes, you will be allowed name and save the template. Every aspect of the conference call will be saved, with the exception of the date, time and time zone, to be used in scheduling future conferences. You will receive a confirmation that the template was saved. The template name can be changed by accessing My Library. You may also delete the template or delete all templates from My Library. When scheduling audio conference calls in the future, you will have the ability to choose the Call Template that you have saved in addition to scheduling a brand new conference. © 2007 InterCall 30 InterCall Online User Guide © 2007 InterCall 31 InterCall Online User Guide Section 5: Manage Upcoming Meetings Review or make changes to a meeting reservation any time prior to the start time of your conference by selecting Manage Upcoming Meetings. Meeting management tools allow you to filter, sort, update or delete meetings. Step 1: From your Home page, select Manage Upcoming Meetings from the left navigation pane. That will bring you to this screen where you will see the audio, web and video meeting options available for viewing or editing. Select View All to view and edit any of your upcoming audio conferences or select the specific type of meeting you want to view. no p q n To delete a meeting, click the minus (-) sign to the left of meeting you want to cancel. If it is a recurring meeting, you will have the option to cancel the series of meetings or just the occurrence selected. o To revise a meeting, click the plus (+) sign, or letter R if it is a recurring call, to return to the scheduling screens where you may change your selections. p You can sort the conferences by date, leader name, call type, conference ID, topic or conference duration. If you have many scheduled meetings, you will find the filter helpful in locating a specific meeting. q You can download the conference to your Outlook calendar by selecting either .vcs or .ics at the far right side of the conference. © 2007 InterCall 32 InterCall Online User Guide Section 6: Start a Meeting n o p q r Step 1: From your Home page, select Start A Meeting from the left navigation pane to access this screen. n Select + for the meeting that is about to begin. This action will launch the online conference moderator. o You can also start an on-demand or unscheduled meeting by clicking Start an Unscheduled Meeting. p If the conference you are hosting is a scheduled MeetingCenter conference, it can be accessed through the Start Meeting link. q You can also start an on-demand or unscheduled MeetingCenter conference by clicking Start a One-Click Meeting. r If the conference you are hosting is an Operator Assisted call with Leader-View enabled, the Leader-View tool can be accessed through this link. © 2007 InterCall 33 InterCall Online User Guide Section 7: My Library The online conferencing tool also provides the capability for you to store commonly used information in “My Library” that can be accessed from any computer. Select My Library from the left navigation pane on your home page to access your Owner Library. My Archives Step 1: Click My Archives to access archived recordings of previously held conferences that you can review at any time. Step 2: Click Playback ID to select the particular recording you would like to access. You can also select Usage to review the usage report for a particular recorded conference or select View Usage to review the usage on more than one recorded conference. © 2007 InterCall 34 InterCall Online User Guide Click Options to extend the playback duration, purchase a CD of the recording or download an audio file. My Presentations Step 1: Click My Presentations to access saved presentations or upload new presentations. Step 2: If you have a large library of presentations, you may want to use the up and down arrow buttons to sort your presentations by Topic, Date Uploaded or Time Uploaded. If you have presentations you no longer need saved to your My Presentations archive, click the square to the left of the topic name and click Delete Checked Presentations to remove one or more documents. Step 3: To add new presentations to your library, click Upload Presentations. To Upload Presentations n o p q n To upload the presentation file, click Browse to find the file. o In the Name Presentation field, name your file to identify it on your list of presentations. © 2007 InterCall 35 InterCall Online User Guide p Define the Slide Size. q Click Load Now to complete your upload. You will return to your presentation library page. Simply Refresh List to view your newly added presentations. My Address Book Step 1: Click My Address Book to create and manage prospective conference participants and distribution lists for those you consistently invite to your meetings. When scheduling meetings using the online conferencing tool, you can use these contacts and distribution lists to populate your participant lists. Step 2: Select Add Contact to add individuals to your Address Book. The Add Contact screen captures the contact name, company and job title, email addresses, phone numbers, addresses and up to three pieces of personal information you would like saved to your Address Book about your contact. You can also indicate whether or not to add the individual to Distribution Lists. Or if you prefer, select Upload Contacts for direction on how to export your Microsoft Outlook contacts. Step 3: Select Add/Edit Distribution List for direction on how to create new distribution lists or edit the name of an existing list. Step 4: Sort your contact information by clicking on the up and down arrows for the various field of information. If you don’t see the field of information you want to sort by, select Customize Address Book to select the fields of information shown on the screen. Step 5: Use the buttons at the bottom of the page to Delete Checked Contacts, Email Selected Contacts, Print your Address Book and Customize your Address Book. © 2007 InterCall 36 InterCall Online User Guide My Templates Step 1: Click My Templates to manage audio conference template names and to delete call templates that are no longer needed. When scheduling audio conferences, you may use these templates to shorten the reservations process. Step 2: Select any of the templates that you wish to delete or choose Select All. By clicking Delete Checked Templates, you will remove the templates from your profile and they will no longer appear in My Templates or be selectable when scheduling a meeting. Step 3: By selecting Call Template Name, a window opens which allows you to enter a new template name. By clicking Change, the call template name will update. Cancel will close the template name change window. © 2007 InterCall 37 InterCall Online User Guide Step 4: By selecting Share, a window opens which allows you to share the template with another user. You may select Lock Template for all Shared Users so the template can not be modified with the exception of the date, time and time zone. Step 5: Select Manage Usernames to query users with whom to share your template. You may unshare your template with users or delete the users from your Shared Template list. © 2007 InterCall 38 InterCall Online User Guide Section 8: Manage Your Account Depending on the level of access you have as an administrator, you have the ability to add, change and delete owner accounts, set up various billing groups or invoice points and manage your company site. To access the administrator tools, log in using your administrator username and password. On your Welcome screen, when you log in using your administrator username and password you will notice that, as an administrator, there are additional options in your left navigation pane. Reports provides you the ability to view usage information for audio and web conferencing, and View Invoices lets you access previous company and billing account invoices. As an administrator, you also have additional functionality within the Manage Your Account option. Depending on your administrator profile, you may be able to set up billing account profiles, view and edit company profile information, create new administrator accounts, set up and manage individual owner accounts and approve new owner account requests. (Owners will only have the option to view/edit owner information.) Change Your Administrator Password Step 1: If you need to change your administrator password, choose Change Your Password & Security Settings to make changes to your password or your secret question and answer. © 2007 InterCall 39 InterCall Online User Guide Step 2: Provide your Current Password. Then create and provide a New Password and enter the new password again to Confirm Password. Click Change Password. To change your secret question and answer, provide your New Secret Question, your New Answer and then enter your New Answer again to Confirm New Answer. You will receive a confirmation screen verifying that you have successfully changed your password and/or secret question and answer. Owner: Set Up New Owner When logged into InterCall Online with your administrator password, select Set Up New Owner to create a new owner account for a user who is under the hierarchy of your responsibility. Step 1: After you select Set Up New Owner from the Manage Your Account screen, you will be taken to this screen. In the appropriate field, provide the Account Number you want the new user added to, then click Continue. © 2007 InterCall 40 InterCall Online User Guide Step 2: The Company and Billing Account where Owner Profile Is to Be Added section will be pre-populated with your company name, company number, account name and account number. Next, in the Owner Information section, provide the information for the new user in the required fields as indicated by the red asterisks (*). Step 3: If the new user wants her owner information sent to an assistant, check Check box to send Assistant Info. Your screen will refresh to the view above with fields for the assistant’s details. At a minimum, provide the required assistant information as indicated by the red asterisks (*). Step 4: Provide a PAC Label if needed. PAC Codes, or Project Accounting Codes, provide a method to identify conference calls. These PAC Codes are individual accounting codes that may be used to bill the appropriate department/cost center or just to track departmental conference calls. © 2007 InterCall 41 InterCall Online User Guide Step 5: Select marketing settings for the new user from the drop down menus and check Copy Assistant if the assistant should receive the new user’s marketing information as well. Step 6: If there are others that should receive the new user’s marketing materials, check Check box to send marketing materials to alternate recipients. Provide the required fields of information as indicated by the red asterisks (*). When complete, click Continue to proceed to the next screen to select services for the new user. Step 7: From this screen, you will select Call Type and Web Conferencing options. Please note: When you select a call type, your screen will refresh to include additional fields that allow you to make feature selections associated with the call type. As you proceed through this section of the user guide, each © 2007 InterCall 42 InterCall Online User Guide call type will be reviewed individually with explanation of the screens that appear when the call type is selected. Keep in mind that your actual screen will vary depending upon the combination of call types you choose. Operator Assisted Calls Operator Assisted calls (Toll-Free and/or Toll) are a reservation-based service that offer audio conferencing service with the personal assistance of an operator and support personnel who manage high-touch features. Step 1: For Operator Assisted functionality, select Operator Assisted/Toll-Free (the call host pays for the conference charges) and/or Operator Assisted/Toll (participants pay for their participation in the call). Your screen will refresh to include the following areas that allow you to select additional features associated with an Operator Assisted conference. Step 2: Choose from the following Operator Assisted Default Options for the new user you are creating an owner account for: • Direct Entry: place parcipants directly into a call by an operator. • Music Hold: allow participants to hear music prior to the conference until the leader joins. • Polling: ask participants a series of questions, which they respond to by pressing a key on their touch-tone phone. • Q&A: conduct a formal question and answer session facilitated by an operator. • Fax Confirmation: double-check the specifics of your conference by receiving a fax confirmation of your conference details. • Roll Call: request to have the operator recite the names of the participants in the conference. • International Link: connect international participants to your conference call using links through international call centers, toll and toll-free access numbers and dial-out options. • Announce: request to have the operator announce participants’ names as they are joined to the call. • Exit Tone: sound a tone or beep into the conference when participants/leaders exit a meeting. • Email Confirmation: double-check the specifics of your conference by receiving an email confirmation of your conference details. • Leader-View: use a web application that displays a private, real-time view of participant information. • Entry Tone: sound a tone or beep into the conference when participants/leaders enter a meeting. © 2007 InterCall 43 InterCall Online User Guide • • • • • • • • • • • • • Broadcast: send messages using the phone email or fax. Voice Broadcast supports audio messages up to 45 seconds in length; Email Broadcast supports text and HTML files; Fax Broadcast supports paper copy or electronic files (MS Word or Adobe file formats). Security: prevent additional participants, even the operator, from joining the conference by pressing a command on your telephone keypad. Conference Lock gives you the freedom to discuss confidential information in a secure environment. Selecting this feature will alert the operator to review the Conference Lock function with the conference leader prior to being placed into conference. Voice Talent: use screened and trained operators to provide voice-over quality talent, lending a professional touch to the conference. Special Script: script a special message for a welcome statement, Q&A session and/or closing comments to be read by the operator during the conference. Lecture: mute all participants’ lines during the presentation to reduce background noise, allowing the leader to deliver the message uninterrupted. Approved Participant List: indicate which participants are scheduled to be on the conference and at what time during the call. Only those on the list will be joined to the conference. English/Spanish: select which language your operator needs to speak from the drop down box. Password: require participants to provide the operator with the pre-determined word or code you provide in the Password field to join the conference. Call Transcription: get a typewritten copy of a recorded audio conference. Determine whether you want the entire conference transcribed, or just the Q&A session. You also select a default delivery option: Standard (48-hour business day turnaround), Priority (24-hour business day turnaround), Express (12-hour business day turnaround) or Rush (3-hour business day turnaround). Leader Entry: choose from three different entry options: Normal Entry (leader joins call in order of arrival), Leader First (leader joins the conference before the participants are joined to the call) or Leader Last (after all the participants have joined the call, the leader joins). Event Topic: select one of the following event topics: Corporate Event, FinanceConnect, HealthConnect, LegalConnect, MedConnect, Medical, Sales or Training. Promotional Playback: provide a promotional message or announcement for participants to listen to while they wait for the meeting to begin. Select from CD Playback, Cassette Playback, DAT Playback, Encore Playback or Micro-Cassette Playback to indicate in which format the Promotional Playback message will be provided. Conference Playback: replay a previously recorded conference or message at one or more scheduled times. Select from CD Playback, Cassette Playback, DAT Playback, Encore Playback or Micro-Cassette Playback to indicate in which format the Conference Playback will be delivered. © 2007 InterCall 44 InterCall Online User Guide Step 3: Choose default selections for your new users’ Enhanced Features: • Special Annunciator: Customize the recording that is heard initially when dialing in for a conference call. • UK/HK Com Line: Allow contacts from Europe or Asia Pacific to speak with an operator outside the main conference to convey behind-the-scenes information, orchestrate guest speakers or give timing cues. • Tape: Capture your event on a CD, cassette, microcassette or DAT to provide you with a high-quality recording of the call for your archives. For easy navigation through your recorded conference, we also provide CD indexing. • Com Line: Speak with an operator outside the main conference to convey behind-the-scenes information, orchestrate guest speakers or give timing cues. • Encore: Digitally record a call for those who were unable to attend it live or would like to listen again. The recording is accessible 24/7 by dialing a toll-free number. • Encore Security: Require guests to enter the Encore Security Code that has been entered in the field provided to access the Encore recording. • Participant Report: Select to capture participants’ names, on-the-line times, phone numbers and up to four additional pieces of information as they dial into the conference. This list is faxed or emailed to the recipient following the call. Choose a Participant Report default type from the following: o Standard: Requests the participant’s first and last name. o Enhanced: Requests the participant’s first and last name, a phone number and two additional pieces of information of your choice. If selected, add the additional requested information you desire to fields 3 and 4. o Premium: Requests the participant’s first and last name, a phone number and four additional pieces of information of your choice. If selected, add the additional requested information you desire to fields 3 - 6. Finally, provide a Recipient Name and an Email and/or Fax number for the Participant Report to be delivered. Reservationless–Plus The Reservationless-Plus (Toll-free and/or Toll) service is on-demand conferencing allowing the user to initiate a conference 24 hours a day, 7 days a week—without the need to make a reservation or rely on an operator. © 2007 InterCall 45 InterCall Online User Guide Step 1: For Reservationless-Plus, select Reservationless-Plus/Toll-Free and/or Reservationless-Plus/Toll. Your screen will refresh to include the following area that will allow you to select features associated with Reservationless-Plus conferences. Step 2: Define the functionality of the Reservationless-Plus service by making selections in this area. • Conference Passcode: Require a user to provide a unique passcode to participants so they may enter the users’ Reservationless-Plus conference. You may provide a custom passcode in this field or leave it blank and the Conference Passcode will default to the owner’s phone number. • Leader Pin: Enter this code or PIN using the phone keypad to initiate Reservationless-Plus conferences. You may provide a custom leader PIN or leave the field blank and the system will create the leader PIN. • Dial Out Permission: Select ON or OFF to determine whether or not participants can be dialed out to or if dial-in is the only option. • Monthly Port Selection: Select the number of ports (or lines needed for each participant) that this owner account can accommodate on Reservationless-Plus calls. • Entry Option: Choose how you want participants joining a call to be announced: by a tone, name announce, silence or tone and name. • Exit Option: Select how you want participants who disconnect from a call is to be announced: by a tone, name announce, silence or tone and name. • Security Passcode: Add an extra level of security that requires participants provide a passcode before entering a Reservationless-Plus call. This option can be turned on or off. Per the screen note, this feature must be off if Quick Start is enabled. • Auto Continuation: Allow a Reservationless-Plus conference to continue if the leader disconnects. This option can be turned on or off. • Phone PAC: Prompt the leader of a Reservationless-Plus conference to enter a Project Accounting Code prior to being placed into conference. This option can be turned on or off. • Recorder Dial Out: Allow the Leader of a Reservationless-Plus conference to have the conference recorded through DTMF tones. This option can be turned on or off. • Prompt Set Language: Select which language this user’s call prompts will be spoken in: English, Spanish, Portuguese, Italian, French (US/Canada or EMEA) or German. • Quick Start: Allow a Reservationless-Plus conference to start prior to the leader joining. This option can be turned on or off. Per the screen note, this feature must be on or off if Security Passcode is enabled. • Conference Continuation: Enable the leader to use DTMF tones on a Reservationless-Plus conference to continue the call if she disconnects. (The conference will not automatically continue. The leader needs to utilize DTMF tones to allow the conference to continue.) This option can be turned on or off. © 2007 InterCall 46 InterCall Online User Guide Direct Event Direct Event (Toll-Free and/or Toll) provides streamlined conference entry on event calls by allowing participants to join in an automated manner while continuing to offer conference leaders the high touch experience provided by an operator. Step 1: For Direct Event, select Direct Event/Toll-Free and/or Direct Event/Toll. Your screen will refresh to include the same Default Options and Enhanced Features areas as an Operator Assisted call (please refer to that section if you need directions and definitions for these areas.) The new area that will appear after your refresh that is specific to Direct Event follows. Step 2: Because participants join a Direct Event call through an automated process, users will need to have a Leader PassCode and a Participant PassCode added to their profiles. Automated Automated (Toll-Free and/or Toll) is a reservations-based service that offers users audio conferencing service 24/7 without the assistance of an operator. Step 1: For Automated conferencing, select Automated/Toll-Free and/or Automated/Toll. Your screen will refresh to include the same Default Options and Enhanced Features areas as an Operator Assisted call (please refer to that section if you need directions and definitions for these areas.) The new area that will appear after your refresh that is specific to Automated follows. Step 2: Select the Entry and Exit Options for the Automated call user. • Entry Option: Select how you want a participant being added to a call to be announced: by a tone, name announce, silence or tone and name. • Exit Option: Select how you want a participant who disconnects from a call is to be announced: by a tone, name announce, silence or tone and name. © 2007 InterCall 47 InterCall Online User Guide Because participants join an Automated conference through an automated process, users will need to have a Leader PassCode and a Participant PassCode added to their profiles. Web Conferencing Select web conferencing default options for the new user. • • • Mshow: Mshow is specifically designed for event conferences. Unlike other web conferencing services, Mshow integrates streaming and interactive broadcasting to extend the reach of the event to as many as 10,000 locations. If selecting Mshow as a default web conferencing option for your new user, select from the following: o Slides Only: Deliver a multimedia presentation to your audience including animation, embedded video and audio as well as Flash media. As guests join the show, your slides will automatically precache on their systems ensuring a smooth presentation regardless of computer or Internet speed. o Streaming Audio Archive: Record your show for future replay at any time. Archiving is ideal for those who missed the live meeting. They can see and hear the synchronized presentation, including audio, slides, application sharing sessions and web tours. Playback is available in Real Player® and Windows Media®. CDs are available upon request. o Streaming Audio Only: Stream and synchronize live audio with the leader’s presentation. Streaming allows you to broadcast your message to the largest audience possible via the Internet. o Streaming Audio w/Slides: Combine Slides and Streaming Audio. Conference Place: Use this virtual meeting place, optimized with easy-to-use tools and features, to present and/or collaborate. MeetingCenter: Host business meetings on the Internet and facilitates presentations and collaboration. Other Call Type Options From the Call Type area, you can also select Dial-Out (DO) as an option and Set Automated As Reservationless for the new user. Owner: View/Edit Owner Information As an administrator, you have the capability to view and edit your owner information and owners who fall under your hierarchal order. Select View/Edit Owner Information to initiate the process. © 2007 InterCall 48 InterCall Online User Guide Step 1: To view or edit your own profile, click View Edit Your Owner Profile. To view or edit the profile for a user listed under you, you can search for the user(s) by selecting Owner Number, Account Number or Owner Last Name from the drop down menu. Step 2: The screen will refresh with the Owner Search Results. Select the owner whose profile you would like to view/edit. © 2007 InterCall 49 InterCall Online User Guide Step 3: This next screen provides the owner profile information including the company, account and owner information related to the owner profile. To change any of this information, simply update the appropriate fields. Click View Product details to make any updates to the owner’s product profile. When finished, from either profile summary, scroll to the bottom of the screen and click Save Changes. (You may also edit the owner product details by selecting View Product details.) You will receive a confirmation page where you need to confirm your owner profile details. This will be followed up with an email confirmation from the system verifying that your account information has been updated. © 2007 InterCall 50 InterCall Online User Guide Owner: Manage Owner Activity As an administrator, you have the capability to manage owner activity for owners who fall under your hierarchal order. This would allows you to terminate or disable the owner’s profile. Select View/Edit Owner Information to initiate the process. Step 1: To view or edit the profile for a user listed under you, you can search for the user by selecting Owner Number, Account Number or Owner Last Name from the drop down menu. Step 2: The screen will refresh with the owner search results. Select the owner whose activity you would like to manage. © 2007 InterCall 51 InterCall Online User Guide Step 3: Select Manage Activity at the bottom of the owner’s profile. Step 4: You may now choose to Terminate or Disable the owner’s profile. • Terminate Profile: Allows you to permanently remove all products, services, dial-in numbers and passcodes or PINs associated with the profile and save a note regarding the reason for termination. • Disable/Enable Profile: Allows you to temporarily disable the ability to use the owner’s products, service and access to InterCall Online. However, the products, services, dial-in numbers and passcodes or PINs remain on the profile. Once the profile has been disabled, the selection button will then read Enable Profile. With one click, the profile and associated products and services can be reactivated. © 2007 InterCall 52 InterCall Online User Guide Owner: Manage Delegates n Step 1: To add, edit or delete delegates who have access to your InterCall Online account, choose Manage Delegates when accessing Manage Your Account. r o p q Step 2: All delegates that have already been selected will be listed on this page, including each delegate’s role assignment and expiration date. Step 3: By selecting the checkbox beside a delegate’s name, you may select or deselect role assignment or expiration date for that user. Selecting Refresh will show the changes that you have made. Step 4: If one or more delegates have been selected, you may also apply the following changes to all selected delegates at once: o Delete selected delegates o Change expiration date for all selected delegates o Print selected delegates Step 5: If you would like to add a new delegate, click Click Here. © 2007 InterCall 53 InterCall Online User Guide Step 6: You will be provided with a list of users from which to select a delegate or you may use the Name Search field above to filter the search for a specific user. Step 7: Select the checkbox beside the user(s) for whom you would like to apply delegation and press Continue. Step 8: You will then be allowed to set the roles and expiration date for those delegates. Step 9: Select Submit to save. Delegate Assignment for Yourself All administrators who have the role of CRM Management will automatically be assigned as a delegate for any owners under your level of access for that role. You will receive a search screen whenever accessing the following functions (Schedule A Meeting, Manage Upcoming Meetings, Start A Meeting or My Library). © 2007 InterCall 54 InterCall Online User Guide Step 1: When accessing a function for which you have been assigned as a delegate for another owner, you will receive a screen that will show you a listing of all users for whom you are a delegate. The list will include My Self which allows you to manage your own account. You may also use the Search For Owner field above to filter the search for a specific user. Step 2: Select the checkbox beside the user whose account you would like to manage and press Continue. © 2007 InterCall 55 InterCall Online User Guide Account: Set Up New Billing Account Profile Establishing a new billing account profile will allow you to have usage combined on a single invoice for multiple owners or you may establish a new billing account profile to be used by a single owner. The billing account profile will contain the contact and address information to be used for invoice delivery for this billing account. Step 1: To set up a new billing account profile, provide the company number in the appropriate field and click Continue. Step 2: The Company Name and Company Number fields are pre-populated. If you choose, you may provide an account name for the new profile in the appropriate field. In the Billing Contact area, provide the required information as noted by the red asterisks (*). © 2007 InterCall 56 InterCall Online User Guide Step 3: In the Account Contact area, provide the required information as noted by the red asterisks (*). Step 4: Should you want to include credit card information for the new billing account, click Check to Enter Credit Card Information. The screen will refresh to include the fields of required information as noted by the red asterisks (*). If credit card information has been provided, monthly usage for the account will be automatically billed to the credit card. Step 5: From this area, you can enable and determine the username and password for Sign Up Now! functionality. Sign Up Now! allows new users associated with this billing account to sign up for an owner account by simply providing the username and password determined by you. You may recall Sign Up Now! is located on the Welcome/Login screen when a user first accesses InterCall Online. Select Enabled from the Owner Setup drop down menu to activate Sign Up Now!. Next, in the appropriate fields, provide a username, password and re-type the password to Confirm Password. Last, select Owner Setup Type: Manual (you will need to approve the new owner) or Automated (the new owner’s account is automatically approved in the provisioning system). © 2007 InterCall 57 InterCall Online User Guide Step 6: Provide the additional information required to set up the new billing account. Select a SIC Code (Standard Industrial Classification Code) from the drop down menu. This allows us to determine the industries in which our customers reside and to meet the specific needs of those industries. Then, select Yes or No from the drop down menu to determine whether or not a PAC (Project Accounting Code) is required for all owners. If Yes, provide the PAC label (cost center, department number, etc.) in the appropriate field. Click Continue. Step 7: Determine the marketing materials options for the new billing account profile: • Mail Welcome Packets: Select Yes or No from the drop down menu to indicate if you want welcome packets mailed. • Email Welcome Info: Select Yes or No from the drop down menu to indicate if you want welcome information to be delivered by email. • Email Systems Messages: Select Yes or No from the drop down menu to indicate whether or not you want owners for this billing account to receive system messages delivered by email. • Marketing Messages & Promotions: Select Yes or No from the drop down menu to indicate if you want owners for this billing account to receive marketing messages and promotions from InterCall. • Protect From Reset: Select Yes or No from the drop down menu to indicate if you want owners for this billing account to have their marketing materials options changed if updates are made to the account level settings. • Language Preference: Select English or Spanish from the drop down menu to indicate what language should be used for communications to the users in this billing account. Click Continue. You will receive a confirmation page where you need to confirm your billing account profile details, which will be followed up with an email confirmation from the system verifying that your billing account has been set up. © 2007 InterCall 58 InterCall Online User Guide Account: View/Edit Account Information You have the capability to view and edit account information for billing accounts that fall under you hierarchal order. Select View/Edit Account Information to initiate the process. Step 1: To view or edit the profile for a billing account listed under you, you can search for the account(s) by selecting Account Name, Account Number or Company Number. Step 2: The screen will refresh with the account information search results. Select the account name you would like to view/edit. © 2007 InterCall 59 InterCall Online User Guide Step 3: This next screen provides the account profile information. Click View Marketing Information to view details and make any updates to the account’s marketing settings. When finished, from either profile summary, scroll to the bottom of the screen and click Save Changes. You will receive a confirmation page where you need to confirm your billing account profile details. This is next followed up with an email confirmation from the system verifying that your account information has been updated. © 2007 InterCall 60 InterCall Online User Guide Company: View/Edit Company Information Company Administrators have the capability to view and edit company information. Select View/Edit Company Information to initiate the process. Step 1: To view or edit the profile for a company listed under you, you can search by selecting Company Name or Company Number. Step 2: The screen will refresh with the account information search results. Select the company name you would like to view/edit. © 2007 InterCall 61 InterCall Online User Guide Step 3: This next screen provides the company profile information. Click View Marketing Materials Info and Rate Details to make any updates to the company’s marketing settings. When finished, from either profile summary, scroll to the bottom of the screen and Save Changes. Step 4: If View Marketing Materials Info and Rate Details was selected, you will be presented with this screen to edit as necessary. When finished, click Save Changes. You will receive a confirmation page where you need to confirm your company profile details. This is next followed up with an email confirmation from the system verifying that your company information has been updated. Step 5: If Set Delegate Options was selected, you will be presented with this screen to edit as necessary. Delegation can be set at either the company or account levels. It can also be deselected for all levels. Check Allow Override of these settings at the Account Level to allow a specific account to make their own delegate selections regardless of the settings at the company level. When finished, click Save Delegates Options. © 2007 InterCall 62 InterCall Online User Guide Step 6: If Set LockOut Options was selected, you will be presented with this screen to edit as necessary. This function will lock users out of their InterCall Online accounts after a specified number of invalid attempts. The number of attempts can be set at 3, 4 or 5. The duration lists the amount of minutes that the user will be locked out. The number of invalid secret question attempts can be set at 3, 4 or 5. If the lock-out function is deselected, the following warning message will be appear: When finished, click Save New Lock-Out Options. User Role: Administer Roles Select Administrator Roles for functionality that allows the company or billing account administrator to define roles within the online conferencing tool for the users below them. From here you can manage access to different features of the online system for the users under your hierarchy. Step 1a: If you are unsure of the exact user name, you may search for a user. (You may insert an asterisk (*) for use as a wildcard.) You would then click Search. If you know the user name of the owner for whom you would like to view/edit roles, you may enter the user name in the User Role section. You would then click Get user role(s). © 2007 InterCall 63 InterCall Online User Guide Step 1b: If you used the search function, you will receive the search results of your query and can then click the username that you would like to view/edit. Step 2: When you have accessed the owner’s roles, you may add or delete multiple roles for multiple company numbers or account numbers. The role groups are as follows: • • • • Admin Invoice Viewing: This role allows the owner to view invoices or generate reports for the company number or account number to which they have been assigned. C3 Administrator: This role is not currently available. CRM Management: This role allows the owner to create new owners and/or view/edit owner information for the company number or account number to which they have been assigned. Invoice and Report Access Management: This role is not currently available. The Main Access button denotes the main company or account to which the owner is associated and determines the branding that appears when the owner logs in. Owner Requests: Approve New Owner Requests Select Approve New Owner Requests. This will display the new requests for owner accounts that have been submitted through the Sign Up Now! owner setup and provides you the ability to view the requests and accept or reject these new owner requests. Upon approving the request, accounts will be automatically provisioned and welcome materials will be sent to the owner. © 2007 InterCall 64 InterCall Online User Guide You may select one or more users by checking the boxes to the left of each owner name. You may then either select Approve Checked Owners or Reject Checked Owners. You will receive a confirmation that the selected owners have been approved or rejected. © 2007 InterCall 65 InterCall Online User Guide Section 9: Reports View Reports You also have access to the Reports feature. There are numerous reports available when you select Reports from the online conferencing tool. Step 1: Select the Report type you want to retrieve: Greatest Attributes Report, Audio Activity Reports, Web Activity Reports, Stewardship Reports, Minute Report, Online Reports, Mshow Reports, Live Meeting Reports or Meeting Center Reports. Greatest Attributes Report The Greatest Attributes Report provides information concerning the 50 owners or conferences with the highest number of dial out calls, port overbooking charges, non-cancellation charges and/or other valuable metrics to help you manage your conference users and your conferencing budgets. Step 1: Select From and To dates from the calendar icons to narrow the scope of your Greatest Attribute Report search. Next, Pick A Report: © 2007 InterCall 66 InterCall Online User Guide • • • • • • • Greatest Number of Conferences Most Non-Cancellation Charges Greatest Number of Domestic Conference Dial Out’s Greatest Number of International Conference Dial Out’s Greatest Number of International Toll-Free Dial In’s Greatest Conference Cost Greatest Port Overbooking Make your choice and click Submit to retrieve the report. Audio Activity Reports Audio Activity Reports summarize audio conferencing activity. You can customize your report by selecting the date or range of dates for which you want to analyze conferencing activity. Further customize your report by selecting from the many categories of information available, for example owner number, total audio minutes, conference charges and more. You also have the option to receive your report as an Excel spreadsheet or in HTML. Step 1: Select the Start Date and End Date for the report you want to retrieve. Next select your Output As an Excel spreadsheet or HTML document. Then click the appropriate boxes to select the conference detail you want to analyze. Click View Report to retrieve your report. © 2007 InterCall 67 InterCall Online User Guide Web Activity Reports Web Activity Reports summarize web conferencing activity. You can customize your report by selecting the date or range of dates for which you want to analyze conferencing activity. Further customize your report by selecting from the many categories of information available. Step 1: Select the Start Date and End Date for the report you want to retrieve. Next select your Output As an Excel spreadsheet or HTML document. Then click the appropriate boxes to select the conference detail you want to analyze. Click View Report to retrieve your report. Stewardship Report The Stewardship Report is a comprehensive report that provides information on all products, including usage in minutes, costs, conferences and participants for the past year. The report can be run at the company, account or owner levels. Step 1: Select the level for which you would like the Stewardship Report run (company, account or owner). Next select your Output As an Excel spreadsheet or HTML document. Click View Report to retrieve your report. © 2007 InterCall 68 InterCall Online User Guide © 2007 InterCall 69 InterCall Online User Guide Minute Report The Minute Report provides information on all products, including usage in minutes and sales for a specified month. The report can be run at the company, account or owner levels. Step 1: Select the Month (the last 12 billed months will be available) for which you would like your Minute Report run and the level for which you would like the report run (company, account or owner). Next select your Output As an Excel spreadsheet or HTML document. Click View Report to retrieve your report. © 2007 InterCall 70 InterCall Online User Guide © 2007 InterCall 71 InterCall Online User Guide Online Reports If your company subscribes to Online Reports, you can access them through the online conferencing tool. Simply choose Online Reports to access even more information about your company or billing account’s activity. Contact your account representative if you’re interested in becoming a subscriber. Mshow Reports Mshow Reports allow you to connect to your Mshow account through single sign on to view your Show List, Audience Lists and more. © 2007 InterCall 72 InterCall Online User Guide Live Meeting Reports Live Meeting Reports – Meeting List allows you to access your Conference Place account through single sign on to view your meeting list and manage your account. Live Meeting Reports – Recording List allows you to access your Conference Place account through single sign on to view your recording list and manage your account. © 2007 InterCall 73 InterCall Online User Guide Meeting Center Reports Meeting Center allows you to access your MeetingCenter account through single sign on to view your meetings and to manage your account. © 2007 InterCall 74 InterCall Online User Guide Section 10: View Invoices When using the online conferencing tool, you can view previous company and billing account invoices. To search for invoices, enter your company name or company account number and the account name or account number to search on available invoices. Invoices will be presented in PDF for viewing. Step 1: To view an invoice, you can Search for the account(s) by selecting to filter by Company Name, Company Number, Account Name or Account Number after selecting one of these categories from the drop down menu. You will then enter the corresponding information for that category in the Search field and click on Filter Search. (You will only be allowed to filter by companies or accounts to which you have access.) Step 2: Select the invoice that you would like to view. © 2007 InterCall 75 InterCall Online User Guide Section 11: Customer Support As reviewed in Section 2: Getting Help, within InterCall Online the Customer Support link provides you easy access to online support, toll and toll-free customer support phone numbers and direct links to overviews and support for the various products and services. This section of the user guide will provide a more in depth explanation of Online Support. Online Support: Frequently Asked Questions (FAQs) When you select Online Support, the screen will open to Answers to FAQs about the online conferencing tool and other conferencing services. Step 1: Type a key word or your question into the Search Text field and click Search to find what you’re looking for quickly and easily. © 2007 InterCall 76 InterCall Online User Guide When you select a question, you’ll be provided an answer, the opportunity to rate the answer to your question and links to related answers. Online Support: Ask a Question Can’t find the question and answer you’re looking for in the FAQs? Submit your question to customer support. n o p q r s Step 1: Select the Ask a Question tab to submit your question. Provide the following information appropriate fields: n User ID o Subject line p The question that you would like to have answered q Product feature (a drop-down menu) r The opportunity to attach a document to the question (optional) When you are done, click sSubmit Question. You will receive an email confirming that your question has been received. © 2007 InterCall 77 InterCall Online User Guide Online Support: Provide Feedback Have you found things you like or dislike about the conferencing tool? Do you have suggestions that might help improve the tool in a future release? You’ll need to know how to provide feedback. Step 1: Select the Support Home tab to access this screen. Step 2: Select Provide Feedback. n o p Step 3: Provide n your email address, o your comments or suggestion, then click p Submit Feedback. By doing so, your feedback provides valuable guidance for the development of new features and identifies features that can be improved upon to make the online conferencing tool even more effective. © 2007 InterCall 78 InterCall Online User Guide Section 12: Appendix Glossary Account Administrator Call Monitor Call Transcription Communication Line Company Administrator Conference Leader(s) Conference Playback Encore Entry Modes Enunciator Event Call Event Registration Participant Report Leader-View Lecture Mode Meeting Coach Owner Owner Number Owner Profile Participant List Password Protection Polling Project Accounting Code (PAC) © 2007 InterCall InterCall Online role to allow access to various billing, account and individual profile management tools. Allows your call to be monitored for clarity, but not content, ensuring that your participants will experience the highest level of quality. Provides an accurate, verbatim account of a conference in a typewritten format in Microsoft Word. Allows you to speak with an operator outside the main conference to convey behind-the-scenes information, orchestrate guest speakers or give timing cues. InterCall Online role with highest level of authority to manage and provision accounts and to set up new owners within the company. The individual(s) who will be leading the conference. Allows you to replay a previously recorded conference or message at one or more scheduled times. Digitally records your call for those who were unable to attend it live or would like to listen again. Options that determine the way in which participants are added to a conference, including tones or announcements and music on hold or direct entry. The recording that is heard initially when dialing in for a conference call. Any conference call that requires extra care because of its importance. Helps you manage your large conferences and keep track of participants. You decide what information you would like to gather from each registrant and choose from handy options such as Email Reminders and custom-scripted messages. Collects information about your participants as they join your conference. Choose between our Standard, Enhanced or Premium options, depending upon the amount of information you'd like to collect. The information will be sent to you by fax or email along with the on-the-line times for each participant. Allows you to view participant information and Q&A queue lists via the Internet. With this secure real-time tool, you'll be able to see when key guests arrive and who's in the queue to ask a question. Guests’ lines are muted during the presentation to reduce background noise. An InterCall Online tool that provides links to InterCall conferencing tips, tools, questions and answers and other helpful information. The end user and owner of an individual account. The unique identifier for an owner’s profile. Contains all information specific to a user, including the user’s company and account numbers, contact information and product details. A commonly used security feature that ensures only invited participants are allowed into the conference by the conference operator. Participants must provide the operator with a pre-determined word or code to join the conference. Allows you to collect instant feedback using telephone keypads to questions that have been determined prior to your meeting. A code that is applied to an owner’s profile and/or conferences that allows you to track costs for groups of users, including departments, cost centers or locations. 79 InterCall Online User Guide Promotional Playback Question & Answer (Q&A) Roll Call Scheduler / Call Organizer Voice Talent Web Conferencing © 2007 InterCall A promotional message or announcement for your participants to listen to while they wait for your meeting to begin. Gives participants the opportunity to ask questions during the conference. The operator recites the names of participants who are in the conference. The individual who has scheduled the meeting and the point of contact should there be any questions. Screened and trained operators provide voice-over quality talent, lending a professional touch to high-profile conferences. Allows you to show a slide presentation, take guests on a virtual web tour and share applications and documents. 80