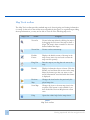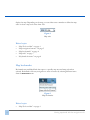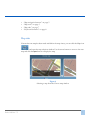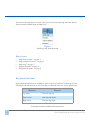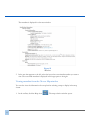
1
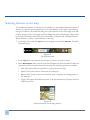
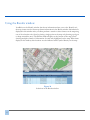
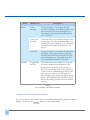
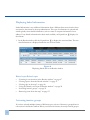
Web User Guide
Copyright notice
Copyright © 2012 by Rolta India Limited, Rolta Canada Limited, and Rolta International, Inc. All
rights reserved.
Important notice
Handle this document carefully as it contains material protected by international copyright law. Any
reproduction, full or in part, of this material is prohibited, without the express written permission of
the company. Any reproduction with permission shall contain the above-mentioned copyright notice.
Product changes
Rolta India Limited reserves the rights to change, update, or make obsolete the name of the manual at
any time and without notice.
Rolta India Limited warranty
Rolta India Limited hereby represents and warrants to Licensee that Rolta India Limited is the owner
of the Software or otherwise has the right to grant to Licensee the rights to use this software.
Trademarks
Microsoft and Windows are registered trademarks of Microsoft Corporation worldwide. Other
brands and their products are trademarks or registered trademarks of their respective companies and
should be noted as such.
Sales and account management
If you need to contact sales and account management, send an e-mail message to
[email protected].
Product management
For current release information or a listing of ongoing product management activities, send an e-mail
message to [email protected].
Technical support
If you need to contact customer support, send an e-mail message to [email protected].
7.5.0.139
Contents
Getting Started..................................................................................................... 1
Using the Welcome shortcut page .............................................................. 1
Getting acquainted with the navigation tools ........................................... 3
Map Tools toolbar .......................................................................................................4
Map navigation buttons ..............................................................................................5
Map scale.......................................................................................................................5
Map bookmarks ...........................................................................................................6
Map tabs ........................................................................................................................7
Keyboard shortcuts .....................................................................................................8
Using the map viewer ................................................................................... 9
Viewing different maps...............................................................................................10
Turning on and off map features ..............................................................................12
Using the right-click menu from the Map Content window.................................15
Setting map transparency............................................................................................17
Rotating the map..........................................................................................................18
Saving an image of the map .......................................................................................19
Changing theme and language options.....................................................................19
Viewing information about a map feature ...............................................................21
Copying map information ..........................................................................................24
Displaying the overview map.....................................................................................25
Printing maps................................................................................................................26
Logging on ....................................................................................................................29
Signing up for a user account.....................................................................................31
Searching............................................................................................................... 33
Searching......................................................................................................... 33
Map Tools ............................................................................................................ 39
Selecting features on the map ....................................................................................40
Rolta OnPoint 7.5
iii
Using the Results window.......................................................................................... 42
Zooming in on selections in the Results window .................................................. 47
Viewing reports from the Results window.............................................................. 47
Viewing additional information from results.......................................................... 48
Viewing tips on the map ............................................................................................ 48
Using the Identify tool from the Results window.................................................. 50
Displaying linked information................................................................................... 52
Activating inactive groups.......................................................................................... 52
Removing items from the map ................................................................................. 53
Posting selections to social networking sites .......................................................... 55
Using the Measure tool .............................................................................................. 56
Viewing metadata ........................................................................................................ 59
Viewing reports ........................................................................................................... 61
Marking up the map (redlining) ................................................................................ 64
iv
Rolta OnPoint 7.5
Getting Started
Overview
Maps are an intuitive way to view geographic information. Viewing maps as a web application
and examining data in the context of those maps make up some of OnPoint’s core functionality. Depending on how OnPoint has been configured, OnPoint also enables you to carry out
several map operations, including measuring distances, selecting features and performing
searches. Since OnPoint is a flexible application that is highly configurable, your map administrator may not have enabled all map features—some information outlined in this guide may
not be visible in the map viewer.
Using the Welcome shortcut page
The Welcome shortcut page displays when the map viewer is opened and offers shortcuts to
frequently-used map viewer tools and maps in a central location.
Figure 1
The Welcome shortcut page
Rolta OnPoint 7.5
1
1. Click one of the sections to view all tools related to that item. If you select the Searches
section, all available searches are displayed. Similarly if you click the Selections section, all
selection tools are displayed.
Figure 2
Click the Selection section to open the selection tools
2. Click the selection tool name to open the interactive map screen with the tool selected.
Turning off/on the Welcome shortcut page
•
•
If you want to not display the Welcome shortcut page when you first open the map
viewer, clear the Run at startup check box in the lower-right corner of the window.
To open the Welcome shortcut page after it has been closed, click the Home button
in the map toolbar.
2
Using the Welcome shortcut page
Related topics
•
•
“Getting acquainted with the navigation tools” on page 3
“Using the map viewer” on page 9
Getting acquainted with the navigation tools
The OnPoint map viewer provides several tools to perform various tasks, such as changing
the map size and scale, viewing additional information for a feature or turning features on and
off. This section outlines all navigation tools needed to change how the map is displayed or
how to access more information about a feature.
Related topics
•
•
•
•
•
•
Rolta OnPoint 7.5
“Map Tools toolbar” on page 4
“Map navigation buttons” on page 5
“Map scale” on page 5
“Map bookmarks” on page 6
“Map tabs” on page 7
“Keyboard shortcuts” on page 8
3
Map Tools toolbar
The Map Tools toolbar provides standard map tools for navigating and viewing information
on a map. As the tools in the toolbar are configurable by the agency or organization providing
the map information, you may not be able to view all of the following map tools.
Map Tool
Name
Purpose
Zoom In
Zooms in the map either by clicking the map or
by dragging the tool across the map to draw a
shape. The map is then zoomed in to the area
defined within that shape.
Zoom Out
Zooms out the current map.
Default
Extent
Displays the default extent of the map in the
map viewer (same size and scale as when the
map was first opened).
Drag Pan
Pans the map as you drag the tool across the
map.
Identify
Displays information about a feature. Click the
Identify tool and then click an area on the map.
Select the feature type that you want to view
and all information associated with that feature
is displayed.
Previous
Map
Changes the view back to the previously-displayed map view.
Next Map
Changes the view to the next map view in the
sequence. This button is only available if you
have clicked the Previous Map button at least
once.
Help
Opens the online help for the map viewer.
Table 1
Map Tools toolbar
4
Getting acquainted with the navigation tools
Related topics
•
•
•
•
•
“Map navigation buttons” on page 5
“Map scale” on page 5
“Map bookmarks” on page 6
“Map tabs” on page 7
“Keyboard shortcuts” on page 8
Map navigation buttons
When viewing a map, several buttons display in the lower-left corner of the map that allow
you to quickly pan or display the full extent of the map.
Figure 3
Map navigation buttons
Related topics
•
•
•
•
•
“Map Tools toolbar” on page 4
“Map scale” on page 5
“Map bookmarks” on page 6
“Map tabs” on page 7
“Keyboard shortcuts” on page 8
Map scale
The map scale represents the ratio of a distance on the map to the actual distance on the
ground. Being able to change the map scale lets you define how large or small you want to
Rolta OnPoint 7.5
5
display the map. Depending on the map, you can either enter a number to define the map
scale or select a map scale value from a list.
Figure 4
Map scale
Related topics
•
•
•
•
•
“Map Tools toolbar” on page 4
“Map navigation buttons” on page 5
“Map bookmarks” on page 6
“Map tabs” on page 7
“Keyboard shortcuts” on page 8
Map bookmarks
Bookmarks are predefined links that open to a specific map area and map scale when
selected. Bookmarks offer easy navigation to areas of interest by selecting different items
from the Bookmarks menu.
Figure 5
Map bookmarks
Related topics
•
6
“Map Tools toolbar” on page 4
Getting acquainted with the navigation tools
•
•
•
•
“Map navigation buttons” on page 5
“Map scale” on page 5
“Map tabs” on page 7
“Keyboard shortcuts” on page 8
Map tabs
If more than one map has been made available in the map viewer, you can click the Maps icon
and open the map selection window. Use the arrow buttons to move to the next
map and click the Open button to display the map.
Figure 6
Selecting a map from the Choose map window
Rolta OnPoint 7.5
7
If you know the map that you want to view, you can also select the map tab name directly
from the menu available from the Maps icon.
Figure 7
Selecting a map from the menu
Related topics
•
•
•
•
•
“Map Tools toolbar” on page 4
“Map navigation buttons” on page 5
“Map scale” on page 5
“Map bookmarks” on page 6
“Keyboard shortcuts” on page 8
Keyboard shortcuts
Several keyboard shortcuts are available to pan, zoom in or zoom out on the map. Use the
following keyboard shortcuts to move the map to a desired scale or to view a specific area.
Shortcut
Purpose
Up arrow
Pans the map up
Down arrow
Pans the map down
Right arrow
Pans the map right
Table 2
Keyboard shortcuts available in the map viewer
8
Getting acquainted with the navigation tools
Shortcut
Purpose
Left arrow
Pans the map left
Plus
Zooms the map in
Minus
Zooms the map out
Table 2
Keyboard shortcuts available in the map viewer
NOTE:
You can also zoom in or out from the map using the scroll wheel on
your mouse.
Related topics
•
•
•
•
•
“Map Tools toolbar” on page 4
“Map navigation buttons” on page 5
“Map scale” on page 5
“Map bookmarks” on page 6
“Map tabs” on page 7
Using the map viewer
The map viewer is an interactive tool that allows you to manipulate a map to display an area
of interest, to access information associated with that area as well as to print and email the
map to other individuals. The following section shows you how to use the tools available in
the map viewer.
Related topics
•
•
•
•
Rolta OnPoint 7.5
“Viewing different maps” on page 10
“Turning on and off map features” on page 12
“Using the right-click menu from the Map Content window” on page 15
“Setting map transparency” on page 17
9
•
•
•
•
•
•
•
•
“Rotating the map” on page 18
“Changing theme and language options” on page 19
“Viewing information about a map feature” on page 21
“Copying map information” on page 24
“Displaying the overview map” on page 25
“Printing maps” on page 26
“Logging on” on page 29
“Signing up for a user account” on page 31
Viewing different maps
If more than one map has been made available, you can select the map you want to display in
the map viewer from the Choose map window, from the Maps menu or from the Welcome
shortcut page.
Viewing a preview of available maps
1. In the toolbar, click the Maps icon
. The map selection window opens. The red
indicator shows the map that is currently displayed.
Figure 8
Maps tabs in the map viewer
2. Select the Open button for the map you want to view. Click the arrow buttons to scroll to
the right or left to see a preview of all available maps.
10
Using the map viewer
Selecting maps directly
•
In the toolbar, click the arrow next to the Maps icon
want to view. This opens the map directly.
and select the map that you
Selecting maps from the Welcome shortcut page
•
In the Welcome shortcut page, click the map name at the top.
Figure 9
Selecting a map from the Welcome shortcut page
Related topics
•
•
•
Rolta OnPoint 7.5
“Turning on and off map features” on page 12
“Using the right-click menu from the Map Content window” on page 15
“Setting map transparency” on page 17
11
•
•
•
•
•
•
•
•
“Rotating the map” on page 18
“Changing theme and language options” on page 19
“Viewing information about a map feature” on page 21
“Copying map information” on page 24
“Displaying the overview map” on page 25
“Printing maps” on page 26
“Logging on” on page 29
“Signing up for a user account” on page 31
Turning on and off map features
Each set of map features can be turned on and off to reduce clutter and let you view only the
areas or features that interest you. Each set of features has a layering effect and are not always
visible at all map scales—if you cannot see a set of features, you may not have zoomed in the
map enough to view them.
12
Using the map viewer
1. In the toolbar, click the Map Content icon
. The Map Content window opens.
Figure 10
Features in the Map Content window
2. Select the check boxes for the features you want to view or clear the check boxes for the
features you want to turn off. You can expand each feature group and select individual
features within the group.
Rolta OnPoint 7.5
13
The main check box for the map service needs to be selected to display features in that
map. If you cannot see any features in the map, ensure that this check box is selected.
Figure 11
Selecting the main map service check box
3. Click the Show Visible Layers Only check box to only show the feature types that have been
selected for display on the map.
NOTE:
Use the Ctrl key to clear or to select multiple check boxes for map
features. When you release the Ctrl key, the map is refreshed to show
your selections.
Different symbols and symbol colors indicate what has been selected on the map:
•
double arrows that are both black indicate that all features in this group have been
selected.
•
double arrows that show one black arrow and one gray arrow indicate that one or
more features within this group have been selected.
•
double arrows that are both gray indicate that no features in this group have been
selected.
Switching Bing map types
If using a Bing map, you can change the map type in the Map Content window.
14
Using the map viewer
1. In the toolbar, click the Map Content icon
. The Map Content window opens.
Figure 12
Bing Map types in the Map Content window
2. Select an option for the type of map you want to view:
•
Roads. This option shows a map with roads and landmarks labelled.
•
Satellite. This option shows a map made up of satellite imagery.
•
Hybrid. This option shows road labels on satellite imagery.
Related topics
•
•
•
•
•
•
•
•
•
•
•
“Viewing different maps” on page 10
“Using the right-click menu from the Map Content window” on page 15
“Setting map transparency” on page 17
“Rotating the map” on page 18
“Changing theme and language options” on page 19
“Viewing information about a map feature” on page 21
“Copying map information” on page 24
“Displaying the overview map” on page 25
“Printing maps” on page 26
“Logging on” on page 29
“Signing up for a user account” on page 31
Using the right-click menu from the Map Content window
The Map Content window provides a right-click menu for each feature type for convenient
access to those features on the map.
Rolta OnPoint 7.5
15
1. In the toolbar, click the Map Content icon
. The Map Content window opens.
2. Right-click a feature type and select a menu option,
Figure 13
Right-click menu from a layer in the Map Content window
The options are the following:
•
Zoom to Full Layer Extent. This option zooms in or out the map to a level where all
features of this type can be viewed.
•
Zoom to Visible Scale. This option zooms in on the map to a level that this layer can
be viewed.
Related topics
•
•
•
•
•
•
•
•
•
•
•
16
“Viewing different maps” on page 10
“Turning on and off map features” on page 12
“Setting map transparency” on page 17
“Rotating the map” on page 18
“Changing theme and language options” on page 19
“Viewing information about a map feature” on page 21
“Copying map information” on page 24
“Displaying the overview map” on page 25
“Printing maps” on page 26
“Logging on” on page 29
“Signing up for a user account” on page 31
Using the map viewer
Setting map transparency
Map transparency can be set from the Map Content window by moving the slider bar from
side to side.
1. In the toolbar, click the Map Content icon
to expand the window.
2. In the Map Content window, click the Map Content Menu icon
corner.
in the upper-right
3. Slide the arrow to the right or left to set the transparency/opacity level for the map. The
further the slider is moved to the left, the more transparent the map.
Figure 14
Map transparency slider
Related topics
•
•
•
•
•
•
•
•
•
•
•
Rolta OnPoint 7.5
“Viewing different maps” on page 10
“Turning on and off map features” on page 12
“Using the right-click menu from the Map Content window” on page 15
“Rotating the map” on page 18
“Changing theme and language options” on page 19
“Viewing information about a map feature” on page 21
“Copying map information” on page 24
“Displaying the overview map” on page 25
“Printing maps” on page 26
“Logging on” on page 29
“Signing up for a user account” on page 31
17
Rotating the map
Using the main map navigation button, you can rotate the map in any direction.
1. On the main map navigation button, click and hold the outer rim of the button.
Figure 15
Using the outer rim of the Navigation button to rotate the map
2. Drag the button clockwise or counterclockwise to rotate the map in that direction.
After rotating the map, click the Reset button to reset the map to its original position.
Figure 16
Reset button
Related topics
•
•
•
•
•
•
•
•
•
•
•
18
“Viewing different maps” on page 10
“Turning on and off map features” on page 12
“Using the right-click menu from the Map Content window” on page 15
“Setting map transparency” on page 17
“Changing theme and language options” on page 19
“Viewing information about a map feature” on page 21
“Copying map information” on page 24
“Displaying the overview map” on page 25
“Printing maps” on page 26
“Logging on” on page 29
“Signing up for a user account” on page 31
Using the map viewer
Saving an image of the map
You can save the currently displayed map as an image by clicking the Map Snapshot icon,
selecting an image format and then a location on your local computer where you want to
store the map image.
1. In the upper right corner of the map viewer, click the Map Snapshot icon.
Figure 17
Clicking the Map Snapshot icon
2. Browse for the location where you want to save the image.
3. Select an image format. You can choose .png, .jpg or .bmp.
4. Save the image.
NOTE:
If map data is overlaid on a Bing Maps base map, the Bing Maps base
map will not be exported to the image.
Changing theme and language options
You can change the language and theme for the map viewer using the Options button at the
right side of the toolbar.
Changing themes
A theme is the set of graphical elements that gives the map viewer interface a unique look and
feel. Each theme has a set of custom buttons, colors and menus. The map viewer provides
standard themes that can be changed at any time if they have been made available to you. The
theme that uses Microsoft Silverlight technology is called InSwing.
Rolta OnPoint 7.5
19
•
If multiple themes have been configured to display, a theme list is available on the left side
of the toolbar. Click the Themes icon
from the list.
and select the theme you want to view
Figure 18
Selecting a theme for the map viewer
Changing languages
If more than one language has been configured for the map viewer, a language list displays in
the upper-right corner of the map viewer.
•
At the right side of the toolbar, click the language field and select a different language.
Figure 19
Changing the map viewer language
The map viewer updates to reflect the language you have selected.
NOTE:
You can also change the displayed language by selecting from the
language list in the Welcome shortcut page.
Related topics
•
20
“Viewing different maps” on page 10
Using the map viewer
•
•
•
•
•
•
•
•
•
•
“Turning on and off map features” on page 12
“Using the right-click menu from the Map Content window” on page 15
“Setting map transparency” on page 17
“Rotating the map” on page 18
“Viewing information about a map feature” on page 21
“Copying map information” on page 24
“Displaying the overview map” on page 25
“Printing maps” on page 26
“Logging on” on page 29
“Signing up for a user account” on page 31
Viewing information about a map feature
The Identify tool displays additional information associated with a map feature.
1. In the toolbar, click the Identify button
and click a feature on the map. The Identify
window opens showing additional information for all features that are part of the identified area.
Rolta OnPoint 7.5
21
2. Expand the section for the feature to view attribute information for.
Figure 20
Using the Identify tool on the map
NOTE:
22
You can also open the Identify window from a selection in the
Results window.
Using the map viewer
Viewing reports from the Identify window
If any reports have been set up for one of the features you have selected, a report icon is displayed. Click the Report icon
and select the report you want to view from the list.
Figure 21
Selecting reports from the Identify window
Resizing the Identify window
The Identify window, which opens to show information related to a map feature after you use
the Identify tool, can be resized to better view information in the window.
•
In the bottom-right corner of the Feature window, click and drag the arrow in the
direction you want to resize the window.
Figure 22
Resizing the Feature window
The window is resized to the desired extent.
Rolta OnPoint 7.5
23
Related topics
•
•
•
•
•
•
•
•
•
•
•
“Viewing different maps” on page 10
“Turning on and off map features” on page 12
“Using the right-click menu from the Map Content window” on page 15
“Setting map transparency” on page 17
“Rotating the map” on page 18
“Changing theme and language options” on page 19
“Copying map information” on page 24
“Displaying the overview map” on page 25
“Printing maps” on page 26
“Logging on” on page 29
“Signing up for a user account” on page 31
Copying map information
You can copy any text that is displayed from the Identify window, Results window, Measure
window and selection and result tips windows.
1. Highlight the text you want to copy.
2. Right-click and select Copy.
Figure 23
Copying text from the Identify window
3. Paste the text in the required application.
24
Using the map viewer
Displaying the overview map
An overview map is the full map that opens in a smaller window to indicate the area you are
currently viewing within the context of the whole map.
1. In the upper-right corner, click the Open Overview Map icon
. The overview map
displays showing a larger extent of the map and a rectangle to indicate the map area you
currently have displayed.
Figure 24
Viewing the overview map
2. To close the Overview Map window, click the Close Overview Map icon
.
Related topicsRelated topics
•
•
Rolta OnPoint 7.5
“Viewing different maps” on page 10
“Turning on and off map features” on page 12
25
•
•
•
•
•
•
•
•
•
“Using the right-click menu from the Map Content window” on page 15
“Setting map transparency” on page 17
“Rotating the map” on page 18
“Changing theme and language options” on page 19
“Viewing information about a map feature” on page 21
“Copying map information” on page 24
“Printing maps” on page 26
“Logging on” on page 29
“Signing up for a user account” on page 31
Printing maps
You can print the map area with or without selections you make on the map either in a portrait or landscape orientation. For more information about selections, see “Using the Results
window” on page 42.
NOTE:
The map viewer cannot control the orientation settings for your
printer. If you normally have the paper orientation set to portrait and
you select a landscape template in the map viewer, you must also
select the landscape orientation in your printer preferences.
1. Adjust the map viewer to display only the area you want to print.
26
Using the map viewer
2. In the upper-right corner, click the Print icon
. The Print window opens.
Figure 25
Select an option for printing the map
3. Clear the check boxes for the options you do not want to display in the printout. Move
the mouse over each option in the list and that section will be outlined on the map. The
following print options are selected by default:
Rolta OnPoint 7.5
•
Border
•
Title
•
Subtitle
•
Comments
•
Page Numbers
•
Date
•
Time
27
•
Map
•
Scale Bar
•
Scale
•
Legend
If you have selected features on the map, an additional option is available:
•
Fit all columns on one page
4. Click a zoom button to define a scale at which the map will be printed:
•
Zoom to Map Scale. This option adjusts the print window to be the same scale as the
main map.
•
Zoom to Map Extent. This option adjusts the print window to show the same map
area as the main map
5. In the Print Preview window, edit the text as required for the Title, Subtitle and Comments options.
Figure 26
Entering a title for a map printout
6. In the Print Template field, select a print template.
7. Click Print.
28
Using the map viewer
Related topics
•
•
•
•
•
•
•
•
•
•
•
“Viewing different maps” on page 10
“Turning on and off map features” on page 12
“Using the right-click menu from the Map Content window” on page 15
“Setting map transparency” on page 17
“Rotating the map” on page 18
“Changing theme and language options” on page 19
“Viewing information about a map feature” on page 21
“Copying map information” on page 24
“Displaying the overview map” on page 25
“Logging on” on page 29
“Signing up for a user account” on page 31
Logging on
If security has been enabled for the map, you must log in to display the map. To log in to the
web site, you must have a user ID and password. If you do not, create an account by clicking
the Sign Up button in the Sign in to OnPoint area. For more information, see “Signing up for
a user account” on page 31.
1. In upper-right corner of the map viewer, click the Login link. The Welcome to OnPoint
screen displays.
2. In the User ID field, type your user name.
Rolta OnPoint 7.5
29
3. In the Password field, type your password and click Log in.
Figure 27
Logging in to the map viewer
After you have logged in correctly, your user ID displays in the upper-right corner of the
window.
4. When finished viewing the map, log out by clicking Logout beside your user ID.
Related topics
•
•
•
•
•
•
•
•
•
•
•
30
“Viewing different maps” on page 10
“Turning on and off map features” on page 12
“Using the right-click menu from the Map Content window” on page 15
“Setting map transparency” on page 17
“Rotating the map” on page 18
“Changing theme and language options” on page 19
“Viewing information about a map feature” on page 21
“Copying map information” on page 24
“Displaying the overview map” on page 25
“Printing maps” on page 26
“Signing up for a user account” on page 31
Using the map viewer
Signing up for a user account
If you do not have a user ID and password to log in to the map viewer, you can create an
account by clicking the Sign up button in the Login screen.
1. In upper-right corner of the map viewer, click the Login link.
2. In the Sign In to OnPoint area, click Sign up. The Sign Up For OnPoint screen displays.
3. In the User Name field, type your user name.
4. In the Password field, type your password. In the Confirm Password field, type the password again.
Related topics
•
•
•
•
•
•
•
•
•
•
•
Rolta OnPoint 7.5
“Viewing different maps” on page 10
“Turning on and off map features” on page 12
“Using the right-click menu from the Map Content window” on page 15
“Setting map transparency” on page 17
“Rotating the map” on page 18
“Changing theme and language options” on page 19
“Viewing information about a map feature” on page 21
“Copying map information” on page 24
“Displaying the overview map” on page 25
“Printing maps” on page 26
“Logging on” on page 29
31
32
Using the map viewer
Searching
Overview
The OnPoint map viewer is a web-based application that allows you to view map and associated data that has been made available by a municipality or an organization. Many online
maps are provided with searches to help you locate a feature on the map or perform a specific
task.
Related topics
•
“Searching” on page 33
Searching
Map-based searching allows you to search for an address or map feature and then display its
location on the map. A search can help you locate map features, such as an address, intersection, building, closest community center or an empty lot for development.
1. On the toolbar, click the Search icon
and select the search you want to use.
2. In the search window, enter the required information based on the type of field:
•
Rolta OnPoint 7.5
For text fields, type the required information in each field and click Search.
33
•
The results are shown in the bottom window and displayed on the map.
Figure 28
A landmark search displayed on the map
34
Searching
•
For list fields, select the information in each field from the provided list.
Figure 29
List fields in a search
•
For date fields, either enter the date directly using the required date format or click the
Calendar icon
and select the date from the calendar.
Figure 30
Using the calendar to enter a date
Rolta OnPoint 7.5
35
•
For lookup fields, type a few characters of the search item and click Look Up. The field
then lists all items that match the information you entered. Select the correct item
from the list.
Figure 31
Lookup fields in a search
3. In the Result options field, select the option that defines how items are added or removed
from the results when you use the search. The options are the following:
36
•
Add. This option adds new search results to existing results of the same type.
•
Delete. This option removes search results from existing results.
•
Replace. This option shows new search results or replaces existing results of the same
type.
Searching
•
Toggle. This option both adds new items to the search result and removes previously
searched results from the list..
Figure 32
Result options for a search
4. After you enter the required information, click Search. The results are shown in the
Results window and displayed on the map.
Figure 33
Selected items will also display on the map
5. In the list window, click the number for the item to view additional information.
For more information on using the Results window, see “Using the Results window” on
page 42.
Rolta OnPoint 7.5
37
38
Searching
Map Tools
Overview
Information in the following sections shows tools available in the map viewer. These tools are
added and configured by the map administrator based on the requirements of the organization providing the mapping service; therefore, not all tools may be available to you and the
labels on the tools may be different.
Related topics
•
•
•
•
•
•
•
•
Rolta OnPoint 7.5
“Selecting features on the map” on page 40
“Using the Results window” on page 42
“Viewing additional information from results” on page 48
“Posting selections to social networking sites” on page 55
“Using the Measure tool” on page 56
“Viewing metadata” on page 59
“Viewing reports” on page 61
“Marking up the map (redlining)” on page 64
39
Selecting features on the map
You would select features on the map if you wanted to see the number and exact location of
features of a specific type in a general area. You select features on the map by first selecting
the type of feature to select and then using one of the selection tools, such a single point, line,
polyline, polygon, circle or rectangle, and then adding that point or drawing that shape or line
on the map. All features within that area are included as a selection and are displayed in the
Results window as well as a symbol directly on the map.
1. In the map viewer, click the Tools button in the upper left and select Selection. The Selection panel opens.
Figure 34
The Selection panel
2. In the Layer field, select from the list the type of features you want to select.
3. In the Result Options field, select the option that defines how items are added or removed
from the list when you select features on the map. The following options are available:
•
Add. This option adds new selections to a group of the same type.
•
Delete. This option removes items from an existing list.
•
Replace. This option creates a new selection group or replaces an existing group of
the same type.
•
Toggle. This option both adds new items to the list and removes previously selected
items from the list.
Figure 35
Advanced options for selecting features
40
NOTE:
The Result Options field does not display when you are selecting
features on the map for the first time.
4. Click one of the following icons to either select a specific area or draw a shape on the
map:
Icon
Name
Description
Select by
point
Allows you to select a single item on the map
for the selected group (layer).
Add Line
Allows you to add a line on the map.
Select by
polyline
Allows you to click points on the map to draw
multiple connected lines that includes all features from the selected layer if touched by the
line (double-click to complete the line).
Select by
polygon
Allows you click several points on the map to
create a polygon (double-click to complete the
shape). All items for the selected layer within
the polygon will be included in the list.
Select by circle
Draws a circle that will include all items within
the circle for the selected layer.
Select by
rectangle
Draws a rectangle that will include all items
within the rectangle for the selected layer.
Table 3
Icons used to make selections on the map
Use the tool to draw the required shape. All items of the selected type within that area are
shown on the map and in the Results window. For more information on the Results window,
see “Using the Results window” on page 42.
Rolta OnPoint 7.5
41
Using the Results window
In addition to the Identify window that shows information when you use the Identify tool,
the map viewer can also show map feature information in the Results window. Information is
displayed in this window after you either perform a search or select features on the map using
one of the selection tools (done by placing a single point on the map or by drawing a polygon
or shape around the area). The Results window displays at the bottom of the map viewer
showing multiple columns of information for each item highlighted on the map. When items
display in this window, their locations are also indicated with a symbol directly on the map.
Figure 36
Selections in the Results window
42
At the top of the Results window, you have icons that allow you to perform additional actions.
All icons/tools available in the Results window are described in the following table:
Menu
Menu Item
Description
Selections
Toggle on
Current Page
Clears the check box for currently selected features and selects the check box for features not
selected for the current page only.
Toggle
Across All
Pages
Clears the check box for currently selected features and selects the check box for features not
selected across all pages.
Delete
Removes only selected items from the list and
from the map.
Table 4
Tools available in the Results window
Rolta OnPoint 7.5
43
Menu
Zoom
Options
Menu Item
Description
Zoom
Selected
Zooms the map to a level where all items
selected on all pages of the Results window display on the map. For more information, see
“Zooming in on selections in the Results window” on page 47.
Zoom Current Page
Zooms the map to a level where all items on the
current page of the Results window display on
the map. For more information, see “Zooming
in on selections in the Results window” on
page 47.
Zoom All
Zooms the map to a level where all items in the
list display on the map regardless of whether
they have their check box selected or not. For
more information, see “Zooming in on selections in the Results window” on page 47.
Toggle Index
On/Off
Selected features on the map have a map symbol with a number that corresponds to the
number shown in the list. If the number of
selected items exceeds what can be shown currently on the list, additional pages will be available and as you move to the next page, the
index labeling on the map will change to match
the list. This numbering can be turned off and
back on by clicking the Turn On/Off Numbering icon.
Table 4
Tools available in the Results window
Sorting results in the Results window
You can sort data by each column of data in ascending or descending order in the Results
window if an arrow icon
displays in the column header.
44
•
In the Results window, click the column header whose data you want to sort. The data is
then rearranged in alphabetical/numerical/chronological order depending on the type of
data in the column. Click the column header again to reverse the order.
Reordering columns in the Results window
Columns in the Results window can be moved to the position where you want them to display.
1. In the Results window, click and hold the column you want to move.
2. Drag it across the header to the desired position and release.
Resizing columns in the Results window
The width of each column in the Results window can be resized to better show data in a column.
1. In the Results window, hover over the column header boundary.
2. When the double-sided arrow displays, click and drag the boundary left or right.
Figure 37
Resizing columns in the Results window
Viewing results on different pages
Since the Results window can only display a certain number of records on a single page, additional results are displayed on following pages.
•
Rolta OnPoint 7.5
To move to additional pages of the Results window, either click a page number to move to
that page or click one of the arrow icons on either side of the page numbers to move back
or ahead.
45
Only the items on the currently-displayed page correspond to a number on the map.
Figure 38
Selecting different pages in the Results window
Minimizing the Results window
You can minimize the Results window to better view the selections on the map.
•
In the Results window toolbar, click the down arrow to minimize the Results window.
Click the arrow again to expand the window.
Figure 39
Collapsing the Results window
Related topicsRelated topics
•
•
•
•
•
•
•
•
46
“Selecting features on the map” on page 40
“Zooming in on selections in the Results window” on page 47
“Viewing tips on the map” on page 48
“Viewing reports from the Results window” on page 47
“Using the Identify tool from the Results window” on page 50
“Displaying linked information” on page 52
“Activating inactive groups” on page 52
“Removing items from the map” on page 53
Zooming in on selections in the Results window
When results are displayed in the Results window, you can zoom in on specific items using
one of the zoom options from the Zoom menu.
Zoom Selected
This option zooms in on items selected in the Results window. Select the check box for the
items you want to view and select the Zoom Selected option.
Zoom Current Page
This option zooms in on all items in that page of the Results window. Select the Zoom Current
Page option to move the map to the scale where all items on that page in the Results window
are displayed.
Zoom All
This option zooms in on all items across all pages in the Results window. Select the Zoom All
option to zoom in to a level where all items in the Results window are displayed.
Viewing reports from the Results window
If any reports have been made available for the features in the Results window, a Reports
menu displays in the Results window toolbar.
1. After making a selection or performing a search, click the Reports menu in the Results
window toolbar.
2. Select the report name from the menu.
Figure 40
Reports from the Results window
Rolta OnPoint 7.5
47
Related topics
•
•
•
•
•
•
•
“Selecting features on the map” on page 40
“Zooming in on selections in the Results window” on page 47
“Viewing tips on the map” on page 48
“Using the Identify tool from the Results window” on page 50
“Displaying linked information” on page 52
“Activating inactive groups” on page 52
“Removing items from the map” on page 53
Viewing additional information from results
After selections or search results are displayed in the Results window, additional information
can be viewed for those items, including tips, linked information and the Identify window.
•
•
•
For more information about result and selection tips, see “Viewing tips on the map” on
page 48.
For more information about using the Identify window from the Results window, see
“Using the Identify tool from the Results window” on page 50.
For more information about viewing any associated information, see “Displaying linked
information” on page 52.
Viewing tips on the map
After items have been selected or are included as search results, those selections are shown
both on the map and in the Results window. Tips are used to display essential information or
images about those selections, and they can be viewed when you move the mouse over a feature on the map or click one of the tip icons in the Results window. Tips can show any infor-
48
mation about a property or location, such as the area or price, and can include an image or
link to a website.
Figure 41
Links to view more information
1. In the Results window, do one of the following:
•
Click the Result Tip on Map icon
location of the selection.
•
Click the Result Tip icon
. This opens the tip on the map showing the
. This opens the tip in the Results window.
Figure 42
Viewing result tips by hovering over a selected item on the map
Rolta OnPoint 7.5
49
Related topics
•
•
•
•
•
•
“Zooming in on selections in the Results window” on page 47
“Viewing reports from the Results window” on page 47
“Using the Identify tool from the Results window” on page 50
“Displaying linked information” on page 52
“Activating inactive groups” on page 52
“Removing items from the map” on page 53
Using the Identify tool from the Results window
50
At the left side of the Results window, click the Identify icon
in the row for the feature
you want to view information for. The Identify window opens showing any additional information for that feature.
Figure 43
Opening the Identify window from the Results window
1. Expand the feature section to show all information for this feature.
2. If any reports are available for this feature, a Report icon
will be displayed at the right
side of the section. For more information on viewing reports from the Identify window,
see “Viewing information about a map feature” on page 21.
Related topics
•
•
Rolta OnPoint 7.5
“Viewing tips on the map” on page 48
“Displaying linked information” on page 52
51
Displaying linked information
Linked information is any additional information from a different data source that has been
associated to the feature by the map administrator. This type of information is optional and
would typically show related information, such as owner or occupant information for an
address. If any linked information has been made available, an Expand icon
displays for
that feature.
1. In the Results window, click the Expand icon
to display the associated data. The associated information is displayed under the row for that feature.
Figure 44
Displaying linked data in the Results window
Related topicsRelated topics
•
•
•
•
•
•
“Zooming in on selections in the Results window” on page 47
“Viewing reports from the Results window” on page 47
“Viewing tips on the map” on page 48
“Using the Identify tool from the Results window” on page 50
“Activating inactive groups” on page 52
“Removing items from the map” on page 53
Activating inactive groups
If you have selected multiple features of different types, each set of features is grouped into its
own section in the Results window. When you select new features, the newly-selected group is
52
automatically the active selection group. All previous groups are now considered inactive and
display behind the new active group in a different tab. Any inactive group can be reactivated
at any time, but only one group can be active at one time.
•
In the Results window, click the tab for an inactive selection group. All features in this
group are displayed in the Results window.
Figure 45
Making a selection group active in the Results window
Related topics
•
•
•
•
•
•
“Zooming in on selections in the Results window” on page 47
“Viewing reports from the Results window” on page 47
“Viewing tips on the map” on page 48
“Using the Identify tool from the Results window” on page 50
“Displaying linked information” on page 52
“Removing items from the map” on page 53
Removing items from the map
As data in the Results window can be categorized into separate groups, you have three delete
options for some or all items in the window:
•
•
•
Remove only selected items within a single group
Remove a single results group
Remove all results groups (and close Results window)
When items are removed from the Results window, they are also cleared from the map.
Rolta OnPoint 7.5
53
Removing all features from a single group and clearing the corresponding
symbols from the map
a. In the heading bar for that group, click the Clear Results icon
b. In the confirmation window, click Yes.
.
Figure 46
Removing all items in a Results window group
Removing items with selected check boxes in a group and clearing their
corresponding symbols from the map
When selecting Delete from the Selections menu in the Results window, all items that have
check boxes selected across all pages will be removed from the Results window and map.
a. In the heading bar for that group, click the Selections menu and select Delete.
b. In the confirmation window, click Yes.
Figure 47
Removing only selected items in a Results window group
54
Remove the Results window (including all results) and clearing all selected
symbols from the map
1. At the right side of the Results window, click the Close icon
.
2. In the confirmation window, click Yes.
Figure 48
Removing all items in the Results window
The Results window closes and all selections are removed from the map.
Related topics
•
•
•
•
•
•
“Zooming in on selections in the Results window” on page 47
“Viewing reports from the Results window” on page 47
“Viewing tips on the map” on page 48
“Using the Identify tool from the Results window” on page 50
“Displaying linked information” on page 52
“Activating inactive groups” on page 52
Posting selections to social networking sites
If social networking sites have been enabled for the map, you can post links to the map to
those sites to share with individuals in your social network. Map links can include selections,
search results or redlining.
Rolta OnPoint 7.5
55
By default, links are active for seven days. After the expiry date, the map links are still valid
but any selections or redlining will not be displayed on the map.
1. In the map viewer, display the map area with or without selected features or redlining as
desired.
2. Click the Share button and select the site where you want to post. The login window for
the site you have selected is displayed.
Figure 49
Social networking sites in the map viewer
3. Log on to the social networking site if you have not already done so.
4. Depending on the site, enter the required information such as a description of the map
information before sharing the link.
Using the Measure tool
The Measure tool lets you determine coordinates, distance or area by placing a point or drawing a line, polygon, circle or rectangle on the map.
1. In the toolbar, click the Tools button and select Measure. The Measure panel opens.
Figure 50
The Measure panel
2. In the Distance Unit field, select the unit for measuring distance from the list.
56
3. In the Area Unit field, select the unit for measuring area from the list.
4. Select one of the following drawing tools:
Icon
Name
Description
View Coordinates
Allows you to click a point on the map
to view the coordinates.
Line
Draws a line on the map to measure distance.
Polyline
Draws multiple connected lines to measure distance.
Polygon
Draws a polygon to measure area and
perimeter.
Circle
Draws a circle to measure area and
perimeter.
Rectangle
Draws a rectangle to measure area and
perimeter.
Clear
Clears all measurements from the map
and Measure window.
Table 5
Icons used for measuring on the map
5. Using the tool, draw or select an area on the map. The measurement information displays
on the map.
Rolta OnPoint 7.5
57
To delete the shape after you have drawn it on the map, use the Clear icon
. To stop
drawing a shape before it is finished, click the Esc key or right-click and select Cancel
Drawing.
Figure 51
The Measure window shows coordinates, distance or area on a map.
6. To print the map with the displayed measure information, click the Print icon
and
select the print options you want. Add the details, such as the title or comments, before
clicking the Print button.
Related topics
•
•
•
•
•
•
•
58
“Selecting features on the map” on page 40
“Using the Results window” on page 42
“Viewing additional information from results” on page 48
“Posting selections to social networking sites” on page 55
“Viewing metadata” on page 59
“Viewing reports” on page 61
“Marking up the map (redlining)” on page 64
Viewing metadata
Metadata is information about the map data that is made available in a structured format.
Metadata can provide information that you can use to analyze the quality of the map data,
such as coordinate and projection systems. You can view metadata from both the Map Content window and the Chose Map window.
Viewing metadata from the Map Content window
1. At the right side of the map viewer, click the Map Content icon
Content window opens.
. The Map
2. In the Map Content window, click the Map Content Menu icon
corner and select View Metadata from the menu.
in the upper-right
Figure 52
Metadata from the Map Content window
Rolta OnPoint 7.5
59
The metadata is displayed in a browser window.
Figure 53
Metadata
3. In the tree that appears to the left, select the layer whose associated metadata you want to
view. The associated metadata is displayed in the larger pane to the right.
Viewing metadata from the Choose Map window
You can also view the information for a map before selecting a map to display in the map
viewer.
1. In the toolbar, click the Maps icon
60
. The map selection window opens.
2. In the map window, click the View metadata link in the lower-left corner.
Figure 54
View metadata link from Choose Map window
Related topics
•
•
•
•
•
“Selecting features on the map” on page 40
“Using the Results window” on page 42
“Using the Measure tool” on page 56
“Viewing reports” on page 61
“Marking up the map (redlining)” on page 64
Viewing reports
You can view reports for data associated with locations on the map. Reports can be viewed
from the following locations:
•
•
Rolta OnPoint 7.5
the Identify window (using the Identify tool)
Results window
61
Viewing reports using the Identify tool
1. In the Map Tools toolbar, select the Identify tool and click a location on the map to view
any associated data. The Identify window appears and displays data that is associated with
that location.
NOTE:
The Identify window is blank if no information is associated with the
location that you clicked on the map.
2. In the Identify window, expand the category to view information about the feature. If any
reports are available, a Report icon appears.
3. Click the Report icon
and select the report you want to view.
Figure 55
Selecting reports from the Identify window
62
The report information opens in the report viewer. The format of the report will vary
depending on how the report was designed.
Figure 56
Report information in the report viewer window
Viewing reports from the Results window
You can either create a report for all items in the Results window or create a report for individual items.
1. Make a selection for a layer on the map. See “Selecting features on the map” on page 40
for more information on making selections.
2. In the Results window toolbar, click the Report icon
Rolta OnPoint 7.5
.
63
3. Click the report name from the menu.
Figure 57
Reports from the Results window
NOTE:
If you want to view a report for a single item in the Results window,
click the Identify icon beside the selection to open the Identify
window. Click the Report icon and select the report type.
Related topics
•
•
•
•
•
•
•
“Selecting features on the map” on page 40
“Using the Results window” on page 42
“Viewing additional information from results” on page 48
“Posting selections to social networking sites” on page 55
“Using the Measure tool” on page 56
“Viewing metadata” on page 59
“Marking up the map (redlining)” on page 64
Marking up the map (redlining)
The map markup feature allows you to draw points, lines, polygons, circles and labels directly
on the map for custom notes and illustrations.
1. In the map viewer, click the Tools button in the upper left and select Markup. The Markup
panel opens.
64
The Markup panel opens containing all tools needed to mark up the map.
Icon
Name
Description
Select by
point
Allows you to add a point on the map
Select by line
Allows you to draw a line on the map
Select by
polyline
Allows you to click points on the map to draw
multiple connecting lines
Select by
polygon
Allows you to click several points on the map
to create a polygon (double-click to complete
the shape)
Select by circle
Draws a circle
Select by
rectangle
Draws a rectangle
Add Label
Adds the label you define to the area on the
map that you select
Add My
Point
Allows you enter a custom label and display
that label as a point on the map
Erase
Removes only the selected shapes, lines and
labels from the map
Clear
Removes all shapes, lines and labels from the
map
Table 6
Icons used to make selections on the map
Rolta OnPoint 7.5
65
2. Select a markup tool. If multiple symbols or label styles are available, select the type or
color that you want to use on the map.
Figure 58
If multiple symbols are available, you can select the symbol you want to use.
3. Draw the shape on the map.
To delete the shape after you have drawn it on the map, use the Clear icon
. To stop
drawing a shape before it is finished, click the Esc key or right-click and select Cancel
Drawing.
Related topics
•
•
•
•
•
•
•
66
“Selecting features on the map” on page 40
“Using the Results window” on page 42\
“Viewing additional information from results” on page 48
“Posting selections to social networking sites” on page 55
“Using the Measure tool” on page 56
“Viewing metadata” on page 59
“Viewing reports” on page 61
Index
A
activating
selection lists 52
area
measuring on map 56
B
Bing Maps
switching in InSwing theme 14
bookmarks
selecting 6
C
changing
languages 20
map scale 5
maps 7
user interface themes 19
clipboard
copying map text 24
collapsing
Results window 46
columns
reordering in Results window 45
resizing in Results window 45
copying
map text 24
D
data
reordering columns in Results window 45
resizing columns in Results window 45
sorting in Results window 44
deleting
results 53
displaying
overview map 25
displaying features on map 12
distance
measuring on map 56
Rolta OnPoint 7.5
drawing on the map 64
F
features
selecting on map 40
turning on/off 12
I
Identify icon
in Results window 50
Identify tool
using 21
Identify window
viewing reports 23
information
viewing for features 21
InSwing
switching Bing Maps 14
K
keyboard shortcuts 8
L
languages
changing 20
linked data
Results window 52
links
posting to social media 55
logging on 29
M
Map Content window
right-click menu 15
turning features on/off 12
map data sources
viewing 59
map features
selecting 40
viewing additional information 21
67
map links
posting to social media 55
map markup 64
map scale 5
map tabs
selecting 7
map text
copying 24
Map Tools toolbar
using 4
map transparency
setting 17
map views 6
maps
overview map 25
printing 26
rotating 18
switching 10
viewing 7
measuring
distance, area 56
metadata
viewing 59
minimizing 46
Results window 46
moving through pages
in Results window 45
N
navigation buttons
rotating the map 18
O
opacity
setting for maps 17
opening
overview map 25
overview map
displaying 25
68
P
printing
maps 26
R
redlining 64
posting to social media 55
reordering columns
in Results window 45
reports
More Information dialog box 62
viewing 61
viewing from Identify window 23
viewing from Results window 63
viewing with Identify tool 62
resizing columns
in Results window 45
Results window 46
active selection groups 52
deleting 53
Identify icon 50
moving through pages 45
reordering columns 45
resizing columns 45
showing linked data 52
sorting columns 44
viewing 42
viewing additional information 50
zooming in 47
right-click menu
Map Content window 15
rotating the map 18
S
search results
zooming in 47
searches
from Welcome window 1
security
logging on 29
Rolta OnPoint 7.5
selecting
bookmarks 6
map views 6
maps to view 7
selection lists
activating 52
selections
deleting 53
posting to social media 55
selecting on map 40
zooming in 47
setting map transparency 17
shortcuts (keyboard) 8
signing up for user accounts 31
slider
for map transparency 17
social networking
posting map links 55
sorting
in Results window 44
sources
viewing for map data 59
T
text
copying from map 24
themes
changing 19
transparency
setting for maps 17
using
Map Tools toolbar 4
right-click menu in Map Content window 15
Welcome window 1
using the Identify tool 21
V
viewing
bookmarks 6
different maps 7
linked data in Results window 52
map views 6
metadata 59
reports 61
reports from Results window 63
reports in Identify window 23
reports with Identify tool 62
selections or search results 42
viewing different maps 10
W
Welcome shortcut page
using 1
Z
zooming in
selections 47
zooming in/out
map scale 5
U
URLs
posting to social media 55
user accounts
logging on 29
signing up 31
user interface
changing languages 20
changing themes 19
Rolta OnPoint 7.5
69
Rolta OnPointTM is a full-featured spatial integration web application with the ability to
be configured to support business processes across unlimited business functions
industries. Rolta OnPointTM supports cross-platform spatial and business system integration. In terms of spatial solution interoperability, it can consume spatial content
from Rolta Map Server and all other industry standard GIS map servers.
Rolta is a leading provider of state-of-the-art and field-proven Enterprise Geospatial
solutions. Rolta, with its rich repository of IP, has successfully developed numerous
geospatial products and solutions for core segments, such as infrastructure, telecom,
electric, airports, urban development, town planning, environmental protection,
defense and homeland security for clients worldwide. Rolta has successfully executed
multimillion-dollar projects in these segments in over 40 countries. Rolta, headquartered in Mumbai, employs over 3500 professionals with countrywide infrastructure
and international subsidiaries across the globe.
Innovative technology for insightful impact.
Rolta India Limited
Rolta Canada Limited
Rolta Tower A, Rolta Technology Park, MIDC,
Andheri (East), Mumbai - 400093, India
Tel. +91 (22) 2926 6666/ 3087 6543
140 Allstate Parkway, Suite 503
Markham, Ontario, Canada
L3R 5Y8
Tel. +1 905.754.8100
www.rolta.com/product_onpoint.html