1
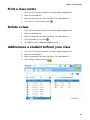
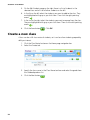
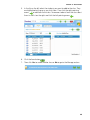
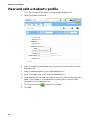
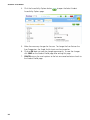
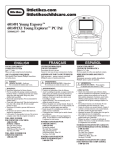
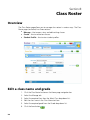
Section 8:
Class Roster
Overview
The Class Roster page allows you to manage class rosters in various ways. The Class
Roster page (see below) has three sections:
■
■
■
Manage – Use to open, view, and edit existing classes.
Create – Use to create new classes.
Student Profile – Use to view student profiles.
Edit a class name and grade
1.
2.
3.
4.
5.
Click the Class Roster button on the Home page navigation bar.
Select the Manage tab.
Select the required class from the Select Class drop-down list.
Edit the class name in the Class Name text box.
Select the required grade from the Grade drop-down list.
6. Click the Save button
20
.
Section 8: Class Roster
Print a class roster
1. Click the Class Roster button on the Home page navigation bar.
2. Select the Manage tab.
3. Select the required class from the Select Class drop-down list.
4. Click the Print Class Roster button
.
Delete a class
1. Click the Class Roster button on the Home page navigation bar.
2. Select the Manage tab.
3. Select the required class from the Select Class drop-down list.
4. Click the Delete Class button
.
5. Click Yes to confirm deletion or No to cancel.
Add/remove a student to/from your class
1.
2.
3.
4.
Click the Class Roster button on the Home page navigation bar.
Select the Manage tab.
Select the required class from the Select Class drop-down list.
Click the Edit Students button
.
21
Section 8: Class Roster
5. On the Edit Students page on the right there is a list of students in the
selected class and a list of all other students on the left.
6. In the list on the left select the students you want to add to the class. They
are highlighted with gray as you click them. Then click the right-pointing
arrow
.
7. In the list on the right select the students you want to remove from the class.
They are highlighted with gray as you click them. Then click the left-pointing
arrow
.
8. Click the Save button
. Click OK.
Create a new class
A class can be a full class roster of students, or it can be a few students grouped by
ability or interest.
1. Click the Class Roster button on the Home page navigation bar.
2. Select the Create tab.
3. Specify the class name in the Class Name text box and select the grade from
the Grade drop-down list.
4. Click the Next button
22
.
Section 8: Class Roster
5. In the list on the left select the students you want to add to the class. They
are highlighted with gray as you click them. Then click the right-pointing
arrow
to add them to the class. To remove students from the class select
them in the list on the right and click the left-pointing arrow
.
6. Click the Save button
.
7. Then click Yes to create another class or No to go to the Manage section.
23
Section 8: Class Roster
View and edit a student's profile
1. Click the Class Roster button on the Home page navigation bar.
2. Select the Student Profile tab.
3. Select the student whose profile you want to view from the Select Student
drop-down list.
4. Select the required grade in the Grade drop-down list.
5. Select the student type in the User Type drop-down list.
6. Depending on the user type the student may or may not have Password text
boxes. If the student is a Standard Menu student you can specify his/her
password in the Password text box.
7. Click the Save button
8. Click OK.
24
to apply the changes.
Section 8: Class Roster
Print a student profile
1. Click the Class Roster button on the Home page navigation bar.
2. Select the Student Profile tab.
3. Select the required student from the Select Student drop-down list.
4. Click the Print Details button
.
Change student accessibility settings for
Edmark House Series content
Note: This feature applies only to users with the Edmark House Series
installed.
1. Click the Class Roster button on the Home page navigation bar.
2. Select the Student Profile Tab.
Note: When any accessibility option is turned on the Accessibility Options
will read: “One or more Accessibility Options for this student are currently
ON.”
3. Select the required Student from the Select Student drop-down list.
25
Section 8: Class Roster
4. Click the Accessibility Options button
Accessibility Options page.
to open the Select Student
5. Make the necessary changes for the user. To change the Scan Rate or the
Scan Progression, the Single Switch Input must be turned on.
6. Clicking OK does not save the changes permanently. To save the changes
click SAVE on the Student Profile page after exiting this page.
7. CANCEL returns the user’s options to the last one saved and returns back to
the Student Profile page.
26