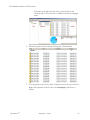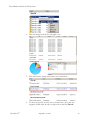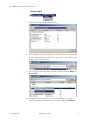
1
September 19, 2013
User Guide
Release 3.5
PowerBroker Auditor for File System User Guide
Revision/Update Information: September 19, 2013
Software Version: PowerBroker Auditor for File System 3.5
Revision Number: 0
COPYRIGHT NOTICE
Copyright © 2013 BeyondTrust Software, Inc. All rights reserved. Use of this software and/or document, as and when applicable, is
also subject to the terms and conditions of the license between the licensee and BeyondTrust Software, Inc. (“BeyondTrust”) or
BeyondTrust’s authorized remarketer, if and when applicable.
TRADE SECRET NOTICE
This software and/or documentation, as and when applicable, and the information and know-how they contain constitute the
proprietary, confidential and valuable trade secret information of BeyondTrust and/or of the respective manufacturer or author, and
may not be disclosed to others without the prior written permission of BeyondTrust. This software and/or documentation, as and when
applicable, have been provided pursuant to an agreement that contains prohibitions against and/or restrictions on copying,
modification and use.
DISCLAIMER
BeyondTrust makes no representations or warranties with respect to the contents hereof. Other than, any limited warranties expressly
provided pursuant to a license agreement, NO OTHER WARRANTY IS EXPRESSED AND NONE SHALL BE IMPLIED,
INCLUDING WITHOUT LIMITATION THE WARRANTIES OF MERCHANTABILITY AND FITNESS FOR USE OR FOR A
PARTICULAR PURPOSE.
LIMITED RIGHTS FARS NOTICE (If Applicable)
If provided pursuant to FARS, this software and/or documentation, as and when applicable, are submitted with limited rights. This
software and/or documentation, as and when applicable, may be reproduced and used by the Government with the express limitation
that it will not, without the permission of BeyondTrust, be used outside the Government for the following purposes: manufacture,
duplication, distribution or disclosure. (FAR 52.227.14(g)(2)(Alternate II))
LIMITED RIGHTS DFARS NOTICE (If Applicable)
If provided pursuant to DFARS, use, duplication, or disclosure of this software and/or documentation by the Government is subject to
limited rights and other restrictions, as set forth in the Rights in Technical Data – Noncommercial Items clause at DFARS 252.2277013.
TRADEMARK NOTICES
PowerBroker, PowerPassword, and PowerKeeper are registered trademarks of BeyondTrust. PowerSeries, PowerADvantage,
PowerBroker Password Safe, PowerBroker Directory Integrator, PowerBroker Management Console, PowerBroker Desktops,
PowerBroker Virtualization, PowerBroker Express, PowerBroker Databases, PowerBroker Windows Servers, PowerBroker Windows
Desktops, and PowerBroker Identity Services are trademarks of BeyondTrust.
ssh® is a registered trademark of SSH Communications Security Corp in the United States and in certain other jurisdictions. The SSH
logo, Tectia and tectia logo are trademarks of SSH Communications Security Corp and may be registered in certain jurisdictions.
This application contains software powered by PKAIP®, the leading solution for enabling efficient and secure data storage and
transmission. PKAIP® is provided by PKWARE, the inventor and continuing innovator of the ZIP file format. Used with permission.
FICTITIOUS USE OF NAMES
All names of persons mentioned in this document are used fictitiously. Any resemblance to actual persons, living or dead is entirely
coincidental.
BeyondTrust®
September 19, 2013
2
PowerBroker Auditor for File System User Guide
Contents
Contents
Introduction
Support for PowerBroker Auditor for File System
Contacting Support
5
5
5
Product Overview
Features of Auditor For File System
6
6
Requirements
PowerBroker Auditor for File System Enhancements
7
7
Using Agents
About Agents
Creating a Filter
General Information Dialog
Accounts
Objects
Events
Exclusions
Modifying a Filter
Deleting a Filter
Creating an Agent
Deploy
Filters
Alerts
Removing an Agent
Modifying Filters for an Agent
Viewing File System Audit Activity at a Glance
8
8
8
9
10
11
15
15
17
18
19
20
22
23
24
25
28
Working with Alerts
Creating Alerts
General Page
Account
Objects
Events
Exclusions
Actions
Modifying Alerts
Suppressing Duplicate Alerts
Deleting Alerts
Setting Up E-mail Notification
Troubleshooting Email Notifications
31
31
32
32
33
36
37
39
40
41
43
44
46
BeyondTrust®
September 19, 2013
3
PowerBroker Auditor for File System User Guide
Contents
Using Audit Views
Creating an Audit View
General
Account
Computers
Objects
Events Page
Time Range Page
Opening an Audit View
Using an Audit View
Using the Main Toolbar
Modifying an Audit View
Deleting an Audit View
47
47
48
48
49
50
51
53
53
54
58
59
61
Working with Reports
Deploying Reports
Viewing Reports
Built-In Reports
Managing Reports
Using Report Features
On-The-Fly Reporting
Reporting Toolbar
Setting Report Parameters
63
63
66
67
67
68
68
69
70
BeyondTrust®
September 19, 2013
4
PowerBroker Auditor for File System
Introduction
This guide shows system administrators and security administrators how to
configure and use BeyondTrust PowerBroker Auditor for File System. This
guide provides instructions for Auditor for File System configuration and
use.
Support for PowerBroker Auditor for File System
BeyondTrust provides telephone and web-based support. In addition, when
working with any PowerBroker Auditor for File System item, you can click
the Help button to view detailed information about available options.
Contacting Support
If you encounter problems that are not covered in the documentation,
contact BeyondTrust technical support.
When contacting technical support, provide the following information:
l
l
l
Your company name
Telephone and email address where you can be contacted
Description of the problem and the steps you have taken to resolve it
You can contact BeyondTrust technical support by email, through the
BeyondTrust website, or by telephone.
Telephone
+1-800-234-9072
Email
[email protected]
Web
To log on to the customer portal:
1. Go to http://www.beyondtrust.com/Resources/Support and click on
your product.
Support Forums
Go to http://www.beyondtrust.com/Resources/Support and click on your
product, login to the portal then click Forums.
BeyondTrust®
September 19, 2013
5
PowerBroker Auditor for File System
Product Overview
REAL-TIME AUDITING AND SECURITY COMPLIANCE FOR FILE
SYSTEM
Your company's file systems contains critical business resources, intellectual
property, and other sensitive information. A single unintended change or
case of inappropriate access can put your entire organization at risk, affecting
productivity with service interruptions and risking the loss of corporate
secrets, costly security breaches, and non-compliance. Yet, native auditing
tools place unnecessary overhead on the server and are cumbersome,
requiring enormous resources to search through vast amounts of audit
entries. The lack of centralized auditing and reporting prevent you from
seeing the full scope of your file system activity.
PowerBroker Auditor for Windows File System enables tighter security and
control over File System resources across the enterprise. It provides realtime tracking, interactive analysis, and flexible reporting on all key share, file,
and folder changes. Administrators can instantly know the "WHO, WHAT,
WHERE, WHEN" for every access and change event, and schedule reports
for data owners to show them who is accessing and modifying their data.
Features of Auditor For File System
BeyondTrust®
•
Share, Folder and File activity and change monitoring in real-time
•
An extensive library of security and compliance reports
•
Intuitive wizards for custom views and reports
•
Complete and comprehensive tracking for each file system access and
change event
•
Provides the originating IP address for each file system change
•
Provides more granularity of events over competitive and native logs
•
Enables plain English filtering, searching and reporting at Server, Owner,
Object Event Type and attribute level
•
Includes interactive analysis of audit events
•
Integrates seamlessly with the PowerBroker Management Suite for
before /after comparison on security changes
•
Integrates seamlessly with the PowerBroker Management Suite for
single-click forensics into group membership changes that impact access
September 19, 2013
6
PowerBroker Auditor for File System
Requirements
The PowerBroker Auditor for File System package supports the following
Microsoft file system environments:
Windows XP SP2 (32-bit and 64-bit)
Windows Server 2003 SP1 (32-bit and 64-bit)
Windows Server 2003 R2 (32-bit and 64-bit)
Windows Vista SP1 (32-bit and 64-bit)
Windows 7 (32-bit and 64-bit)
Windows 8 (32-bit and 64-bit)
Windows Server 2008 (32-bit and 64-bit)
Windows Server 2008 R2 (64-bit)
Windows Server 2012 (64-bit)
PowerBroker Auditor for File System Enhancements
BeyondTrust®
•
SNMP alerting option
•
Write to Event Log alerting option
•
File System Agents: option to remotely restart / update configuration
•
Audit Views: double-clicking an audit view now opens the view instead
of Properties
September 19, 2013
7
PowerBroker Auditor for File System
Using Agents
About Agents
You must install an agent to each machine that you want to record file
system audit data on. You can then assign one or more filters to each agent
to specify what file system activity to audit, in terms of location and events.
When configuring an agent, you must decide on the target resources that you
want to gather. As best practice, we suggest using filters to focus on targeted
file structures and shares where meaningful or sensitive information is
stored, rather than creating monitors with a broad scope.
You can create as many filters as you like. You can then organize the
gathered information based on the agents that you are deploying.
Packages I Need to Use This Feature
Module
Description
Server/Console
The Server/Console module
provides fundamental setup features
such as configuring e-mail accounts
and creating schedules to associate
with policies and auditing.
PowerBroker Auditor PowerBroker Auditor for File System
for File System
enables a centralized view of activity
tracking, so administrators easily know
what access changes were made to
files and folders, as well as who made
those changes and when they were
made.
License
Required?
ü
ü
Creating a Filter
1. Start the PowerBroker Management Suite.
2. Expand the Auditor for File System node.
3. Right-click Filters, click New, and click Filter.
BeyondTrust®
September 19, 2013
8
PowerBroker Auditor for File System
4. You will see the New Filter dialog. Each of its options are outlined on
the following pages.
– General Page
–
Objects Page
–
Events Page
–
Exclusions Page
General Information Dialog
1. In the General Information dialog box, enter a name for the filter.
Optionally, provide a description.
BeyondTrust®
September 19, 2013
9
PowerBroker Auditor for File System
Accounts
Note: Exclusions take precedence over an inclusion of users. For example,
you can have all users on the Accounts tab and Domain
Administrators on the Exclusions tab. The result will be that the
Domain Administrators won't have their file activity logged.
1. The Accounts allows you to monitor the activity of specific users. To
add users to the filter click Add.
2. This will launch the Select User screen where you can enter as many
users as required.
3. Simply click OK and the users will appear in the Account Filter screen.
BeyondTrust®
September 19, 2013
10
PowerBroker Auditor for File System
Objects
Note: Only objects within the Active Directory forest where the
PowerBroker server is implemented can be monitored. Organizations
that have multiple forest requirements can implement separate
installations of PowerBroker Management Suite and Auditor for File
System, depending on their licensing agreements.
1. The Objects allows you to choose the objects to audit for any file system
activity. To watch NTFS objects, select Files/Folders. Click Add.
BeyondTrust®
September 19, 2013
11
PowerBroker Auditor for File System
This will launch the Add NTFS Resource dialog.
BeyondTrust®
–
The Folder/File field specifies the folder structure to monitor. The
path can be entered in the field. Or, click the Browse button
( ) and use the Select Folder or File dialog to find the desired file,
folder, share, volume, and computer.
–
The Recursive option is used to control the scope of the agent.
There are three options to choose from in the drop down menu.
–
This folder only – limits the agent to the selected folder
–
All folders – will monitor all the folders below the selected
folder
–
Recursive – will monitor the specified number of levels below
the selected folder
–
An Exclude folders option is available if either All Folders or
Recursive has been selected. You can enter a semicolon delimited
list of folders and their subfolders next to this option. If this option
is checked, Auditor for File System will not audit activity from these
resources.
–
The Include file types check box, if selected, will also audit activity
for files of a type based on the semicolon delimited list of file
extensions. For example, *.xls; *.xlsx will collect Microsoft Excel
spreadsheets only. The default (*.*) will audit all file types.
–
The Exclude file types check box, if selected, will not audit activity
for files of a type based on the semicolon delimited list of file
extensions. For example,*.tmp will exclude these files from the
agent.
September 19, 2013
12
PowerBroker Auditor for File System
Note: Auditor for File System will not audit activity from *.mdf or *.ldf
(SQL Server database and log files), even if they would otherwise
be included based on the folder and file type settings in the New
Filter dialog.
–
Click OK when you have finished specifying your NTFS Resources.
This will return you to the Objects page.
2. To use a share as the entry point into monitoring a file system, select
Shares from the Objects. The Collect drop-down menu has three
options.
– Do not monitor any shares (default)
–
Monitor all shares
–
Monitor the following shares
3. The “Monitor the following shares” option will show an Add button.
Click it to open the Share Selection dialog.
BeyondTrust®
September 19, 2013
13
PowerBroker Auditor for File System
4. Click to select the shares that you want to add to the filter. Note that
you can choose different computers with this dialog.
5. Click OK when you have finished specifying shares. This will return you
to the Objects.
6. If you need to edit an NTFS object, click the object in the list and then
click Edit.
Note: Only NTFS objects can be edited.
BeyondTrust®
September 19, 2013
14
PowerBroker Auditor for File System
Events
1. Here you can filter file system information based on specified events.
2. Simply check the events to include.
Note: If you check “Open files or folders” and/or “Read data from
files” you will receive a warning like the following.
Including these events in your filter may impact system
performance. Click Yes if you want to include these events or
click No to exclude these events.
Exclusions
1. Here, you can specify accounts to exclude. There are three accounts
excluded by default.
BeyondTrust®
–
Local Service
–
Network
–
Network Service
September 19, 2013
15
PowerBroker Auditor for File System
2. To remove an account from the exclusions list, select it in the list and
click Remove.
3. To exclude an account, click Add.
4. This will open the Select User or Group dialog box. Add one or more
users or groups to filter the view output. Click OK to return to the New
Filter dialog.
BeyondTrust®
September 19, 2013
16
PowerBroker Auditor for File System
Modifying a Filter
1. Start the PowerBroker Management Suite console.
2. Expand the Auditor for File System node.
3. Click the Filters node.
4. Right-click the filter to modify and click Properties.
BeyondTrust®
September 19, 2013
17
PowerBroker Auditor for File System
5. Change the options in each page as necessary. Click OK when you are
finished.
See Creating a Filter for more information.
Deleting a Filter
1. Start the PowerBroker Management Suite.
2. Expand the Auditor for File System node.
3. Click the Filters node.
BeyondTrust®
September 19, 2013
18
PowerBroker Auditor for File System
4. Right-click the filter to modify and click Delete.
5. When prompted, click Yes to confirm the action.
Creating an Agent
1. Start PowerBroker Management Suite.
2. Expand the Auditor for File System node.
3. Right-click Servers and click Deploy Agent.
BeyondTrust®
September 19, 2013
19
PowerBroker Auditor for File System
4. You will see the Deploy Agent dialog. Each of its options are outlined in
the following pages.
– Deploy Page
–
Filters Page
–
Alerts Page
Deploy
1. In Deploy, you can choose what computers to monitor.
2. Click the Add button to open the Select Computers dialog box.
BeyondTrust®
September 19, 2013
20
PowerBroker Auditor for File System
3. Next, use the Select Computers dialog to add one or more computers for
the collection. Click OK to close the dialog and return to the Deploy
Agent dialog.
Note: Click the Examples link in this dialog for help with entering
object names.
4. Next, enter the account name and password in the Deploy Agent dialog.
You can also click the Browse button ( ) to select an account.
Note: This account must have administrative privileges for the machine
selected in the Server Selection list.
BeyondTrust®
September 19, 2013
21
PowerBroker Auditor for File System
5. To remove a server, select it in the list in Deploy and click Remove.
Filters
1. The Filters allows you to choose what events and objects to audit. To
start, click Add. At least one filter must be included.
2. Choose the filter to add. Click OK to return to the Deploy Agents
dialog.
BeyondTrust®
September 19, 2013
22
PowerBroker Auditor for File System
Note: To create a filter, click New Filter. For more information, see
Creating a Filter.
Alerts
1. The Alerts allow you to choose from existing alerts or you can create a
new custom alert directly through this portal.
2. To create a new alert through this portal simply click Add. A new screen
will appear where you can select a pre-existing alert or create a custom
alert by selecting New Alert.
BeyondTrust®
September 19, 2013
23
PowerBroker Auditor for File System
3. For instructions on creating a new alert please refer to the section on
Working with Alerts.
Removing an Agent
1. Start PowerBroker Management Suite.
2. Expand the Auditor for File System node and click Servers.
3. Right-click an agent and click Remove.
BeyondTrust®
September 19, 2013
24
PowerBroker Auditor for File System
4. When prompted, click Yes to confirm the action.
Modifying Filters for an Agent
1. Start PowerBroker Management Suite.
2. Expand the Auditor for File System node and click Servers.
BeyondTrust®
September 19, 2013
25
PowerBroker Auditor for File System
3. Right-click an agent and click Properties.
4. The File System Filters dialog will open to the Filters page. To add a
new filter, click Add. To remove a filter, select it in the list and click
Remove.
BeyondTrust®
September 19, 2013
26
PowerBroker Auditor for File System
Note: Each agent must have at least one filter.
5. On the Alerts page, you can add a new alert or remove existing alerts.
6. Click OK to save your changes.
Note: It may take up to ten minutes for the agent to process any changes to
its filters.
BeyondTrust®
September 19, 2013
27
PowerBroker Auditor for File System
Viewing File System Audit Activity at a Glance
1. File system audit activity can be viewed by clicking the Auditor for File
System node.
2. You will see the Activity Dashboard.
3. The Events by Computer tab, shown above, gives a high-level database
overview with the number of monitored events per computer.
Note: Any underlined value can be clicked to edit a value. For example,
in this tab, click the <days> value to choose a different time
range.
BeyondTrust®
September 19, 2013
28
PowerBroker Auditor for File System
4. The Events by Type tab breaks down the type of event for all computers
monitored. Remember, the underlined value can be clicked to define a
different time range.
5. The Event History tab shows the frequency of different events for a
particular time range. Remember, the underlined values can be clicked to
define a different time range and/or event.
Note: If you have chosen to read and open events, you may wish to
exclude these events from the graph to ensure that data is
displayed clearly.
6. The Database History tab shows the growth of the database for a
particular time range. Remember, the underlined value can be clicked to
define a different time range.
BeyondTrust®
September 19, 2013
29
PowerBroker Auditor for File System
BeyondTrust®
September 19, 2013
30
PowerBroker Auditor for File System
Working with Alerts
PowerBroker Auditor for File System can alert users via e-mail when certain
events are logged. The event details will then be sent via e-mail to the
specified account(s) in plain text format. Note that Auditor for File System
uses the global e-mail settings for sending e-mail alerts. See the Setting Up
E-Mail Notification section for more information.
Creating Alerts
1. Start PowerBroker Management Suite.
2. Expand the Auditor for File System node.
3. Right-click Alerts, click New, and click Alert.
4. You will see the New Alert dialog. Each of its options are outlined on
the following pages.
– General
BeyondTrust®
–
Account
–
Objects
–
Events
–
Exclusions
–
Action
September 19, 2013
31
PowerBroker Auditor for File System
General Page
1. On the General page, provide a name and description for the alert.
Account
1. The Account Filer allows you to choose what account to generate alerts
for. To begin, click Add.
2. The Select User dialog will open. Add one or more users to alert on.
Click OK to return to the New Alert dialog.
BeyondTrust®
September 19, 2013
32
PowerBroker Auditor for File System
3. Once the list has been created, you can remove users by selecting the
appropriate entry and clicking Remove.
Objects
1. The Objects allow you to choose the objects to alert on. To watch
NTFS objects, select Files/Folders. Click Add.
2. This will launch the Add NTFS Resource dialog.
BeyondTrust®
September 19, 2013
33
PowerBroker Auditor for File System
–
The Folder/File field specifies the folder structure to alert on. The
path can be entered in the field. Or, click the Browse button
( ) and use the Select Folder or File dialog to find the desired file,
folder, share, volume, and computer.
–
The Recursive option is used to control the scope of the alert. There
are three options to choose from in the drop-down menu.
–
This folder only – limits the alert to the selected folder
–
All folders – will alert on all the folders below the selected folder
–
Recursive – will alert on the specified number of levels below the
selected folder
–
An Exclude folders option is available if either All Folders or
Recursive has been selected. You can enter a semicolon delimited
list of folders and their subfolders next to this option. If this option
is checked, Auditor for File System will not alert on activity from
these resources.
–
The Include file types check box, if selected, will also alert on
activity for files of a type based on the semicolon delimited list of
file extensions. For example, *.xls; *.xlsx will collect Microsoft Excel
spreadsheets only. *.* (the default) will alert on all file types.
–
The Exclude file types check box, if selected, will not alert on
activity for files of a type based on the semicolon delimited list of
file extensions. For example,*.tmp will exclude these files from the
alert.
–
Click OK when you have finished specifying your NTFS Resources.
This will return you to the Objects page.
3. To be alerted on a share, select Shares from the Objects page. The
Collect drop-down menu has three options.
BeyondTrust®
September 19, 2013
34
PowerBroker Auditor for File System
–
Do not monitor (alert on) any shares (default)
–
Monitor (alert on) all shares
–
Monitor (alert on) the following shares
4. The “Monitor the following shares” option will show an Add button.
Click it to open the Share Selection dialog.
5. Click to select the shares that you want to add to the alert. Note that you
can choose different computers with this dialog. This allows you to
choose specific shares.
BeyondTrust®
September 19, 2013
35
PowerBroker Auditor for File System
6. Click OK when you have finished specifying shares. This will return you
to the Objects page.
7. If you need to edit an NTFS object, click the object in the list and then
click Edit.
Note: Only NTFS objects can be edited.
Events
1. Here you can alert based on specified events.
2. Simply check the events to include.
BeyondTrust®
September 19, 2013
36
PowerBroker Auditor for File System
Exclusions
1. Here, you can specify accounts to exclude. There are three accounts
excluded by default.
–
Local Service
–
Network
–
Network Service
2. To remove an account from the exclusions list, select it in the list and
click Remove.
3. To exclude an account, click Add.
BeyondTrust®
September 19, 2013
37
PowerBroker Auditor for File System
4. This will open the Select User or Group dialog box. Add one or more
users or groups to exclude from alerting on. Click OK to return to the
New Alert dialog.
BeyondTrust®
September 19, 2013
38
PowerBroker Auditor for File System
Actions
1. The Actions allow you to configure how you would like to receive the
alert.
2. Select from the following alert types:
– Write to event log- will write an event to the event log on the
machine that the component is running on. Auditor for File System
event log alert would get written to the event log on the file server.
–
Send an alert to: (an email address)
–
Send SNMP message- Auditor for File System will send out a
network message with the alert details, and any SNMP monitoring
application would receive it.
3. Enter more than one email by separating the addresses with a semi colon.
You may also choose to receive the alerts using all the available options.
BeyondTrust®
September 19, 2013
39
PowerBroker Auditor for File System
4. When you have finished setting alert options, click OK in the New Alert
dialog to commit your changes.
Modifying Alerts
1. Start PowerBroker Management Suite.
2. Expand the Auditor for File System node.
3. Click the Alerts node.
4. Right-click the alert to modify and click Properties.
BeyondTrust®
September 19, 2013
40
PowerBroker Auditor for File System
5. Make your changes and click OK in the dialog.
Suppressing Duplicate Alerts
Some actions will generate multiple events. (For example, opening a large
Excel spreadsheet will generate multiple read events.) Auditor for File
System can suppress alerts for duplicate events that occur on the same file
on the same computer. You can change the time range that identical alerts
will be suppressed for.
BeyondTrust®
September 19, 2013
41
PowerBroker Auditor for File System
1. To start, click the main Auditor for File System node.
2. To change the suppression time range, click the blue link.
3. Enter the new time desired for suppression and click OK.
4. The new value will be shown in the Auditor for File System dashboard.
BeyondTrust®
September 19, 2013
42
PowerBroker Auditor for File System
Deleting Alerts
1. Start PowerBroker Management Suite.
2. Expand the Auditor for File System node.
3. Click the Alerts node.
4. Right-click the alert to modify and click Delete.
BeyondTrust®
September 19, 2013
43
PowerBroker Auditor for File System
5. Click Yes to confirm your action.
Setting Up E-mail Notification
In order for e-mail alerts to be sent, you must configure the SMTP settings
for PowerBroker Management Suite.
1. Start PowerBroker Management Suite.
2. Expand the PowerBroker Management Console node.
3. Expand the Configuration node.
4. Select the General Settings node.
5. Select the “Enable e-mail settings” check box in the main portion of
the window.
a. Enter a name in the Display Name box.
b. Type an e-mail address in the E-mail Address box. This is the e-mail
address that alerts will be sent from.
c. Type the name or the IP address of the SMTP server.
BeyondTrust®
September 19, 2013
44
PowerBroker Auditor for File System
d. If necessary, select the “Use logon information” box and enter
credentials for the SMTP server.
6. After you enter this information, click Test to ensure the settings are
working correctly. A test message will be sent to the e-mail address
provided.
7. Click Save to complete the operation.
Note: To turn off e-mail notifications for the PowerBroker Management
Console, uncheck “Enable e-mail settings” and click Save.
BeyondTrust®
September 19, 2013
45
PowerBroker Auditor for File System
Troubleshooting Email Notifications
If you are having trouble receiving your email notifications, please note the
following:
BeyondTrust®
•
Both agents and PowerBroker Management Server need permission to
send.
•
The agents must be on the allowed list for the SMTP server to accept an
email from them.
•
The agents has to be able to communicate with the SQL Server to pick
up SMTP settings.
•
The agents has to be able to communicate with the SMTP server to send
the notification.
•
On the Email Configuration Page, ensure that you have tested the
settings.
September 19, 2013
46
PowerBroker Auditor for File System
Using Audit Views
PowerBroker Auditor for File System audit views provide a way to filter and
interactively view collected file information. A best practice approach is to
segment the permission information into multiple audit views based on
meaningful criteria, such as location and event type.
Under the Audit Views node you will the folder labeled My Audit Views.
This is a private user account folder. Any views or subfolders created under
this folder are only accessible to the user who created them.
Creating an Audit View
1. Start the PowerBroker Management Suite.
2. Expand the Auditor for File System node.
3. Right-click Audit Views, click New, and click Audit View.
4. You will see the New View dialog. Each of its options are outlined on
the following pages.
– General Page
BeyondTrust®
–
Account Page
–
Computers Page
–
Objects Page
–
Events Page
–
Time Range Page
September 19, 2013
47
PowerBroker Auditor for File System
Note: If you do not configure any settings for the Account, Computers,
Objects, and Events pages, all of the collected file system audit
information will be available in the console launched by the audit
view. Depending on the amount of information being collected, this
may result in slow enumeration of the trees in the console due to the
potentially large amount of data gathered.
General
1. In General , enter a name for the audit view. Optionally, provide a
description.
Account
1. Here, you can filter file system activity based on users.
2. To add users, click the Add button.
BeyondTrust®
September 19, 2013
48
PowerBroker Auditor for File System
3. This will open the Select User dialog box. Add one or more users to
filter the audit view output. Click OK to return to the New View dialog.
Note: If you do not configure any settings for the Account filter, audit
activity for all users will be included in the audit view.
Computers
1. Here, you can filter file system activity by machine.
2. Click the Add button to open the Select Computers dialog box.
BeyondTrust®
September 19, 2013
49
PowerBroker Auditor for File System
3. Add one or more computers for the audit view. Click OK to close the
dialog box and return to the New View window.
Note: If you do not configure any settings for the Computer filter,
audit activity for all computers will be included in the audit view.
Objects
1. Here you can filter file system information based on specified files and
folders.
2. The Scope drop down menu has three options.
– Return all objects (default)
BeyondTrust®
–
Return specified objects
–
Return objects with activity in the last…
September 19, 2013
50
PowerBroker Auditor for File System
3. The Return specified objects option will enable the Add button. Click it
to launch the file/folder browser.
4. Choose the files and folders that you want to add. Click OK to return to
the New View window.
5. The Return objects with activity in the last… option will enable a text
field. Type the number of days that you want to see activity for.
Events Page
1. Here you can filter file system information based on specified events.
2. To begin, check the events to include. If you do not check any events,
all will be included.
BeyondTrust®
September 19, 2013
51
PowerBroker Auditor for File System
3. To include or exclude processes, check the appropriate box. Then, click
the Browse button ( ) to select a process. Choose the process that you
want to include or exclude. Then, click OK to return to the Events
page.
Note: By default, all processes are included. However, if you were to
specify ‘explorer.exe’ in the Include processes list, then the view
would only show audit entries from explorer.exe; all other
processes would be excluded.
Alternatively, if you left the Include process box unchecked, and
added 'notepad.exe' to the Excluded processes list", then audit
entries performed by any process except notepad.exe would be
included in the audit view.
BeyondTrust®
September 19, 2013
52
PowerBroker Auditor for File System
Time Range Page
1. Here, you can specify a date or range of the information to show file
system activity over time.
2. There are three options.
– Return all logged events
–
Return all events between: Dates can be entered or selected from
the drop down calendar.
–
Return events that occurred in the last x days: Specify the
number of hours, days, weeks or months to be shown in the console.
3. When you have finished setting your options, click OK to create your
audit view.
Opening an Audit View
PowerBroker Auditor for File System audit views provide a way to filter and
interactively view the collected file system activity information. When an
audit view is opened it will display the results in the PowerBroker Auditor
for File System window.
1. Start the PowerBroker Management Suite.
2. Expand the Auditor for File System node.
3. Click the Audits Views node.
BeyondTrust®
September 19, 2013
53
PowerBroker Auditor for File System
4. Right-click the desired audit view and click Open.
Note: Keep in mind that if there has been any filtering defined in the
audit view, you will only see a subset of the data in the console.
Using an Audit View
1. The layout of the console is divided into three sections.
BeyondTrust®
–
The pane on the left is the object hierarchy (tree).
–
The middle pane shows the contents of the selected object. This
section will be empty if the selected object from the tree
contains no subfolders or files, or if file activity was not gathered
by the agent.
September 19, 2013
54
PowerBroker Auditor for File System
–
The pane on the right lists the activity associated with the
selected object. Note that this is available in both list and graph
form.
2. The activity pane can be sorted by clicking any column header.
3. You can group events by any of the columns shown at the top of the list.
Right-click anywhere in the list area, click Group By, and choose a
criteria.
BeyondTrust®
September 19, 2013
55
PowerBroker Auditor for File System
4. This will change both the list and graph view.
5. Note that security change audit entries are colored blue.
6. To show the specific security Access Control List (ACL) that was
assigned, double-click an entry or right-click it and click Details.
BeyondTrust®
September 19, 2013
56
PowerBroker Auditor for File System
7. This will open the Security Details dialog.
8. If PowerBroker Privilege Explorer is installed and licensed, additional
security functionality is available. To start, switch to the “All security
changes for this object” view.
9. You can right-click any permission entry in black and click Remove
Permission.
10. Or, right-click any permission entry in red (meaning it has been
removed) or green (meaning it has been added) and click Rollback.
BeyondTrust®
September 19, 2013
57
PowerBroker Auditor for File System
11. When you have finished working with the Security Details dialog, click
OK to return to the Management Console.
Using the Main Toolbar
The toolbar across the top of the PowerBroker Auditor for File System
console lets you filter the information in the console. Any modifications will
cause the tree to refresh based on the new filter settings.
Here is an overview of the commands.
Command Icon
Description
Will update all panes in the console.
Launches a View Details window showing the view’s
settings, just as when you created the view. Click
Refine to temporarily change any aspect of the audit
view’s filters.
BeyondTrust®
September 19, 2013
58
PowerBroker Auditor for File System
Command Icon
Description
Any changes to the audit view’s filters are not saved and
are only in effect for the current Auditor for File System
console instance. Click the Reset button to undo any
modifications.
To apply a permanent change to the audit view, you
must modify the audit view from the PowerBroker
Management Console.
See the Modifying a View section.
When first selected, this command deploys the built-in
MS SQL Server Reporting Services (SSRS) reports to
the server.
After deployment, this command will launch the default
browser to the defined SSRS Report Manager URL. See
the Working with Reports section for details.
Modifying an Audit View
1. Start the PowerBroker Management Suite
2. Expand the Auditor for File System node.
BeyondTrust®
September 19, 2013
59
PowerBroker Auditor for File System
3. Click the Audit View node.
4. Right-click the audit view to modify and click Properties.
5. Change the options in each page as necessary. Click OK when you are
finished.
BeyondTrust®
September 19, 2013
60
PowerBroker Auditor for File System
Note: See Creating a View for more information.
Deleting an Audit View
1. Start the PowerBroker Management Suite.
2. Expand the Auditor for File System node.
3. Click the Audit View node.
4. Right-click the audit view to modify and click Delete.
BeyondTrust®
September 19, 2013
61
PowerBroker Auditor for File System
5. When prompted, click Yes to confirm the action.
BeyondTrust®
September 19, 2013
62
PowerBroker Auditor for File System
Working with Reports
Deploying Reports
PowerBroker Auditor for File System reporting is provided through
Microsoft SQL Server Reporting Services (SSRS). SSRS needs to be
implemented and configured prior to use. (See Microsoft’s SSRS
documentation for installation and configuration procedures.)
1. Open any PowerBroker Auditor for File System view.
2. In the console, click the Reports icon.
3. If reports have not been deployed, the following screen will appear.
BeyondTrust®
September 19, 2013
63
PowerBroker Auditor for File System
4. Enter the Web Service and Report Manager URLs.
Note: The Web Service URL & Report Manager URL can be found in
the SQL Reporting Services Configuration Manager console.
BeyondTrust®
September 19, 2013
64
PowerBroker Auditor for File System
5. After entering the URLs, click the Connect button.
6. Click OK when a successful connection is made.
7. Now the version string will be visible.
8. The Folder field defines where the reports will be deployed on the
server. Click the Browse button to change the location if desired.
9. Finally, click Deploy to upload the reports.
10. Click OK in the Success dialog.
BeyondTrust®
September 19, 2013
65
PowerBroker Auditor for File System
Viewing Reports
1. Open any PowerBroker Auditor for File System audit view.
2. In the console, click the Reports icon.
3. The default browser will open and show the Report Manager URL. Click
the desired report.
Note: This is a static URL for all PowerBroker Auditor for File System
reports. Bookmark it for quick reference in the future.
4. Set the report parameters and click View Report.
5. The report will load.
BeyondTrust®
September 19, 2013
66
PowerBroker Auditor for File System
Built-In Reports
The following PowerBroker Auditor for File System reports are available.
Activity by Event
View file system activity grouped by event.
Activity by Object
View file system activity grouped by object.
Activity by User
View file system activity grouped by user.
Inactivity by Object
View the objects that have not had a particular event (which is configurable)
in the last x months (where x is configurable).
Objects not Accessed
View objects that have not been accessed in the last x months (where x is
configurable).
Objects not Modified
View objects that have not been modified in the last x months (where x is
configurable).
Managing Reports
SQL Server Reporting Services management features are available for
PowerBroker Auditor for File System reports.
BeyondTrust®
September 19, 2013
67
PowerBroker Auditor for File System
1. To manage reports, move your mouse over the title of the report and
click the arrow.
2. Then, choose an option from the menu.
Using Report Features
On-The-Fly Reporting
In any report, you can change the parameters at the top to filter your view.
Click View Report after changing parameters to refresh the data.
To hide the parameters area, click the small gray arrow below the pane.
BeyondTrust®
September 19, 2013
68
PowerBroker Auditor for File System
Reporting Toolbar
Between the parameter area and the report data, you will see a toolbar.
Here is an overview of the toolbar’s commands.
Command
Function
Move to the first page or the last page (outer
arrows) or ahead or back one page (inner
arrows). You can also type a page number in
the text box to view.
Change the zoom level of the report.
Type a search term (here we have used
ALTER) and click Find to view the first
instance. Click Next to view the next instance.
Export report data into a variety of formats,
including PDF, Excel, and Word.
BeyondTrust®
September 19, 2013
69
PowerBroker Auditor for File System
Refresh the report.
Print the report.
Export this report to a data feed.
Setting Report Parameters
A best practice approach is to narrowly scope the report for execution.
Otherwise, a significant amount of data can be generated. This may exceed
the timeout configuration for SSRS. This may exceed the query timeout
configured for the report (default: 30 seconds).
1. To begin, open the PowerBroker Auditor for File System URL. (See
Viewing Reports for more information.)
2. Click the options arrow for any report and click Manage.
3. Click the Processing Options category. Modify the options in the
Report Timeout section as desired. Click Apply to commit your
changes.
BeyondTrust®
September 19, 2013
70
PowerBroker Auditor for File System
Note: Options on the left navigation menu may vary depending on the
version of SQL Reporting Services installed.
BeyondTrust®
September 19, 2013
71