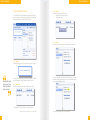
1
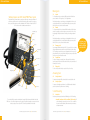
WTC Hosted PBX Guide
WTC Communications
Hosted PBX
User Guide
Version 7.13.1
WTC Business Support: 613-507-9222 • [email protected]
WTC Hosted PBX Guide
SectionSubject
WTC Hosted PBX Guide
Page
3
Making Calls............................................................................................................................................5
3.1
Internal......................................................................................................................................................5
3.2
External.....................................................................................................................................................5
3.3
Emergency Calls.......................................................................................................................................5
3.4
Speaker Phone.........................................................................................................................................5
3.5
Ending Calls..............................................................................................................................................5
4
Answering Calls
4.1
Using the Handset...................................................................................................................................5
4.2
Using the Speaker....................................................................................................................................5
5
Call Forwarding........................................................................................................................................5
5.1
Introduction..............................................................................................................................................5
5.2
Immediate, Busy and No Answer Call Forwarding using the Handset..................................................6
5.2.1
Enabling....................................................................................................................................................6
5.2.2
Disabling...................................................................................................................................................6
5.2.3
Access Codes...........................................................................................................................................6
5.3
Selective Call Forwarding using the Handset..........................................................................................6
5.4
Remote Access to Call Forwarding..........................................................................................................6
6
Advanced Call Handling.........................................................................................................................7
6.1
Putting a call on hold................................................................................................................................7
6.2
Call Waiting...............................................................................................................................................7
6.3
Transferring a call.....................................................................................................................................7
6.4
Three Way Conferencing..........................................................................................................................7
6.5
Parking a call............................................................................................................................................7
6.6
Retrieving a parked call............................................................................................................................8
6.7
Do Not Disturb..........................................................................................................................................8
7Voicemail..................................................................................................................................................8
7.1
Accessing Voicemail.................................................................................................................................8
7.2
Using the Voicemail system.....................................................................................................................8
8
Access Codes...........................................................................................................................................9
9CommPortal.............................................................................................................................................9
9.1
Accessing.................................................................................................................................................9
9.2
Logging In.............................................................................................................................................. 10
9.3
Using CommPortal................................................................................................................................ 10
9.4
Getting Help........................................................................................................................................... 11
9.5
Refreshing a Page................................................................................................................................. 11
9.6
Logging Out........................................................................................................................................... 11
10
CommPortal Dashboard....................................................................................................................... 12
10.1
Messages............................................................................................................................................... 12
10.2
Missed Calls........................................................................................................................................... 12
10.2.1
Call Back................................................................................................................................................ 13
10.3
Contacts................................................................................................................................................. 13
10.3.1
Calling a Contact.................................................................................................................................... 14
10.4
Settings.................................................................................................................................................. 14
11
Messages & Calls.................................................................................................................................. 15
11.1
Messages............................................................................................................................................... 15
11.1.1
Listen To a Message.............................................................................................................................. 16
11.1.2
Deleting a Message............................................................................................................................... 16
11.1.3
Marking a Message as Heard............................................................................................................... 17
11.1.4
Marking a Message as New.................................................................................................................. 17
11.1.5
Call Back................................................................................................................................................ 18
11.1.6
Add Caller to Contacts........................................................................................................................... 18
11.2
Missed................................................................................................................................................... 18
11.2.1
Add Caller to Contacts........................................................................................................................... 19
11.3
Dialed..................................................................................................................................................... 19
11.3.1
Add Dialed Number to Contacts........................................................................................................... 20
11.4
Received................................................................................................................................................ 20
11.4.1
Add Number to Contacts...................................................................................................................... 20
WTC Business Support: 613-507-9222 • [email protected]
2
SectionSubject
Page
12Contacts................................................................................................................................................ 21
12.1
Contact List............................................................................................................................................ 21
12.1.1
Searching............................................................................................................................................... 22
12.1.2
Add a New Contact............................................................................................................................... 22
12.1.3
Editing a Contact................................................................................................................................... 24
12.1.4
Deleting a Contact................................................................................................................................. 24
12.1.5
Calling a Contact.................................................................................................................................... 24
12.1.6
Groups................................................................................................................................................... 25
12.2
Speed Dials............................................................................................................................................ 26
12.2.1
Adding a Speed Dial.............................................................................................................................. 27
12.2.2
Deleting a Speed Dial............................................................................................................................ 27
12.3
Extensions.............................................................................................................................................. 28
12.4
Short Codes........................................................................................................................................... 29
13
Incoming Call Manager (ICM)............................................................................................................. 29
13.1
Summary............................................................................................................................................... 29
13.2
Rules Based Routing............................................................................................................................ 30
13.3
Schedule Based Routing...................................................................................................................... 33
13.4
Special Days (Holidays)......................................................................................................................... 35
14Reminders............................................................................................................................................. 36
14.1
Adding Reminders................................................................................................................................ 36
14.2
Deleting Reminders............................................................................................................................... 37
15Groups................................................................................................................................................... 38
15.1
Multi Line Hunt Groups......................................................................................................................... 39
15.1.1
Viewing Multi Line Hunt Groups........................................................................................................... 39
15.1.2
Using Multi Line Hunt Groups.............................................................................................................. 39
15.2
Call Pickup Groups................................................................................................................................ 40
15.2.2
Using Call Pickup.................................................................................................................................. 40
15.3
Multiple Appearance Directory Numbers............................................................................................. 41
16Settings................................................................................................................................................. 42
16.1
Security.................................................................................................................................................. 42
16.1.1
Changing Your CommPortal Password................................................................................................ 42
16.1.2
Unblocking Remote Access to Call Forwarding................................................................................... 43
16.1.3
Changing your PINs.............................................................................................................................. 43
16.1.4
Unblocking Account Codes.................................................................................................................. 43
16.2
Account Codes...................................................................................................................................... 44
16.2.1
Account Code Options.......................................................................................................................... 44
16.2.2
Business Account Codes...................................................................................................................... 45
16.2.3
Personal Account Codes....................................................................................................................... 45
16.3
Blocking................................................................................................................................................. 47
16.4
Preferences........................................................................................................................................... 47
16.4.1
Forwarding Preferences........................................................................................................................ 48
16.4.2
Line Information.................................................................................................................................... 48
16.4.3
Voicemail Preferences........................................................................................................................... 48
16.4.4
Click To Dial........................................................................................................................................... 49
16.4.5
Caller ID Preferences............................................................................................................................. 49
16.5
Messaging............................................................................................................................................. 50
16.5.1
Settings.................................................................................................................................................. 50
16.5.2
Mailbox.................................................................................................................................................. 51
16.5.2
MWI Notification.................................................................................................................................... 53
16.5.4
Email Notification................................................................................................................................... 54
17
Click To Dial.......................................................................................................................................... 55
17.1
Calling from your Regular Phone.......................................................................................................... 55
17.2
Calling from Another Number............................................................................................................... 56
18
Access Codes........................................................................................................................................ 57
WTC Business Support: 613-507-9222 • [email protected]
3
WTC Hosted PBX Guide
WTC Hosted PBX Guide
Making Calls
3.1Internal
To call another person in your business lift the handset and dial the other
person’s extension. This is typically a 3, 4 or 5 digit number.
Welcome to your new WTC Hosted PBX Phone System
This guide will help you learn how to use your phone and its most commonly used features. If
you have any questions or need a more detailed description of the operation of your phone or
service, please either contact your office administrator or WTC Business Solutions at 613-5079222 or send an email to [email protected]
Note that depending on your phone type and configuration the call may not
complete automatically once you have finished dialing and you may need to
hit the Send key once you have dialed the number.
3.2External
To call a number outside of your business lift the handset and dial the phone
number. Depending on your phone system you may need to dial a code at
the beginning of the phone number to indicate you are making an external
call.
Power & Message
Indicator
Note that depending on your phone type and configuration the call may not
complete automatically once you have finished dialing and you may need to
hit the “Send” key once you have dialed the number.
Line Keys
Hot Keys
Programmable
Keys
Voicemail Access
Headset
Hold Key
Navigation Keys
3.3
Emergency Calls
In an emergency lift the handset and dial 911. If you need to dial a code when
calling an external number you will also need to dial that code before calling
911. Depending on your phone type and configuration, the call may not complete automatically once you have finished dialing and you may need to hit the
Send key once you have dialed the number.
If you use a code
to dial out, you’ll
need to enter that
code to dial 911.
3.4
Speaker Phone
To make a call using your speaker phone, either press the Speaker key or
leave the handset on-hook and dial the number of the person you want to call,
followed by the Send key.
3.5
Ending Calls
To end a call replace the handset, or press the Drop or Cancel key.
Answering Calls
Volume
Transfer Key
4.1
Using the Handset
To answer an incoming call, lift your handset to be connected to the caller.
4.2
3-Way
Conference
Hands Free
Mute
Redial
Using the Speaker
To answer a call using the speakerphone, do not lift the handset but instead
press the Speaker or key (whichever one is flashing).
5. Call Forwarding
5.1Introduction
Your phone system supports a number of different types of Call Forwarding.
The contents of this document cover instructions for using all of the features available with our Hosted
PBX Service. Some of these features may not be enabled or available depending on your service level and
selected packages. Please ask your WTC Technical Representative for more details.
WTC Business Support: 613-507-9222 • [email protected]
4
• Immediate (sometimes called Unconditional) Call Forwarding: All
calls are forwarded to a number of your choice. This can either be
to your voicemail (the default), another extension in your business,
or an external number.
WTC Business Support: 613-507-9222 • [email protected]
5
WTC Hosted PBX Guide
WTC Hosted PBX Guide
• Busy Call Forwarding forwards all calls that are received when you
are already on the phone.
• No Answer (sometimes called Delay) Call Forwarding forwards all
calls when you do not answer them after a specified delay.
• Selective Call Forwarding forwards calls from certain numbers to
another number.
Your system allows
you to set up call
forwarding remotely,
from anywhere.
The following instructions show how to set up Call Forwarding using your
handset, however the easiest and most flexible way of configuring your calling
options is to use our online interface, WTC CommPortal. See Section 14.2 for
instructions on doing this.
Setting up Call Forwarding using your Handset
5.2.1Enabling
To use your handset to enable Immediate, Busy or No Answer Call Forwarding
dial the access code for the type of call forwarding you want to enable followed
by the number you wish to forward calls to.
For example, to use Immediate Call Forwarding to forward all calls to extension
1004, you would dial *721004. Depending on the configuration of
your phone system, this may generate a courtesy call to the number you are
forwarding calls to. The system may enable call forwarding only if this courtesy
call is answered.
5.2.2Disabling
To disable call forwarding, dial the disable code for that type of call forwarding.
5.2.3 Access Codes
Type of forwarding
Immediate/Unconditional
Busy
No Answer/Delay
Enable Code
Disable Code
*72
*90
*92
*73
*91
*93
5.3
Selective Call Forwarding using the Handset
The Selective Call Forwarding feature can be configured by dialing *63.
This feature provides voice prompts to help you with set up.
Remote Access to Call Forwarding
Your phone system also supports setting up Call Forwarding remotely using
any phone. To use this feature, follow these steps:
• Dial the remote access to call forwarding number
• Enter your full 10-digit phone number followed by #
• Enter your remote access to call forwarding PIN followed by #. Note that
this PIN is different from your CommPortal password.
• Enter the access code of the call forwarding service to configure.
• If you are enabling call forwarding the system will then provide a broken
dialtone. Enter the number you would like calls forwarded to.
WTC Business Support: 613-507-9222 • [email protected]
6
6. Advanced Call Handling
6.1
Putting a call on hold
You can put a call on hold by pressing the Hold key. You may now replace
the handset without cutting the caller off. You can also now make another call
while the first call is on hold.
To retrieve the call, press the Pickup key. If you’ve made another call since you
put the first call on hold, you’ll need to put that call or put it on hold before you
can retrieve the first one, using the arrow keys to select the call to retrieve.
6.2
Call Waiting
If a second call comes in when you are already on the phone, you will hear a
tone and the phone screen will display the details of the second caller.
To answer this second call you should either select the Answer, or press the
line key which is flashing. Answering the second call will automatically put the
first call on hold. You can toggle between the calls by placing the current one
on hold and retrieving the other call.
6.3
Transferring a call
To transfer a call, follow these steps:
• Press the Transfer key – this places the current call on hold.
• Dial the number of the person you want to transfer the call to.
If you want to transfer the call before the other person answers, press the
Transfer key. Or, wait until the person has answered before completing the
transfer by pressing the Transfer key.
6.4
Three Way Conferencing
To include a third party into a regular two-way phone call, follow these steps:
• During a two-party call, press the Conference key.
• Dial the person you want to join your call.
• Once this person has answered press the Conf key again to set up
the three way call.
6.5
Parking a call
Parking a call places the call on hold in a “park orbit” so that the call can be
retrieved from another phone. Depending on your phone type, there are two
ways of parking a call.
If you have keys on your phone for parking calls, when in a call press the key of
the park orbit where you want the call parked. The call will now be parked and
you may now replace the handset.
If your phone doesn’t have dedicated call park keys, follow these steps:
• Initiate call transfer by pressing the Transfer key.
• Dial the Call Park access code *53.
• Listen to the park orbit number where the call will be parked.
• Complete the call transfer by pressing Transfer again.
If you have keys on your phone for parking calls these keys will indicate via a
light or icon when a call is parked against that orbit.
?
“Parking” a call
allows it to be
picked up on any
phone in your
network, a handy
feature when
you’re not always
at your desk.
WTC Business Support: 613-507-9222 • [email protected]
7
WTC Hosted PBX Guide
WTC Hosted PBX Guide
6.6
Retrieving a parked call
Depending on your phone type, there are two ways of retrieving a parked call.
If you have keys on your phone for parked calls, pick up the handset and
press the key of the park orbit where the call is parked.
6.7
Do Not Disturb
If you don’t want any calls to ring your phone, but instead go straight through to
your voicemail, you can enable Do Not Disturb.
Press the key marked DND to toggle Do Not Disturb on and off.
If you don’t have a DND key then you can dial *78 to turn Do Not Disturb on,
and *79 to turn it off.
7. Voicemail
7.1
Accessing Voicemail
When you have one or more unheard voice messages waiting, your phone will
display a flashing light.
To listen to your messages log in, either by dialing the voicemail access code
*98, or press the Messages or Voicemail key if your phone has one.
The first time you access you voicemail box you will be asked to set up your
mailbox, and record your name and a greeting to be played for callers.
7.2
Using the Voicemail system
The voicemail system is menu-driven, so listen to the voice prompts and then
press the keys on your phone to select which option you would like.
Once you become familiar with the system there is no need to wait until the
voice prompts have played before pressing a key—you can interrupt the announcements to speed up your experience.
The most commonly used mailbox commands are as follows:
1
Listen to other messages from the main menu..................................... 11
Save messages............................................................................................. 2
Delete messages........................................................................................... 3
Change mailbox settings from the main menu........................................... 4
Cancel the current operation........................................................................ *
Go back to the previous menu..................................................................... *
Finish entering digits or confirm announcement recording........................ #
Listen to voice messages from the main menu...........................................
8. Access Codes
This section lists your phone system’s most commonly used access codes
*72 + number to forward to
Immediate Call Forwarding Deactivation......................................... *73
Busy Call Forwarding Activation....................................................... *90
Busy Call Forwarding Deactivation............ *91 + number to forward to
No Answer Call Forwarding Activation............................................. *92
No Answer Call Forwarding Deactivation.. *93 + number to forward to
Park Call............................................................................................ *53
Retrieve Parked Call......................................................................... *54
Do Not Disturb Activation................................................................. *79
Do Not Disturb Deactivation............................................................. *78
Automatic Recall............................................................................... *69
Group Call Pickup....................................................................... *311
Voicemail........................................................................................... *98
Immediate Call Forwarding Activation......
9. CommPortal Overview
CommPortal provides a web interface to your phone settings and allows you to
view recent calls, view and listen to your voicemails, set up your contacts, and
change your phone and phone system settings.
9.1Accessing
To access CommPortal go to https://commportal.wtccommunications.ca
CommPortal is supported on Windows 2000, Windows XP, Windows 2003,
Windows Vista, 7 and 8 using the following browsers:
• Internet Explorer 6
• Internet Explorer 7+
• Mozilla Firefox 2.0+
JavaScript must be enabled on your browser.
CommPortal gives
you online access to
many of your phone
system’s features.
Please see the Voicemail Quick Reference Guide for further information.
WTC Business Support: 613-507-9222 • [email protected]
8
WTC Business Support: 613-507-9222 • [email protected]
9
WTC Hosted PBX Guide
WTC Hosted PBX Guide
9.2
Logging In
The following shows a sample CommPortal login page.
Reminders: This page allows you to set up reminder calls.
Groups: View groups your line is part of in your business, such as hunt groups.
You can also login and logout of groups here.
Settings: Access to numerous other options, such as changing your passwords and PINs, and configuring the keys on your phone.
Using the functions in each of these pages is described in more detail in the
rest of this document.
9.4
Getting Help
If you need assistance with CommPortal, you can click on the Help icon:
This will cause another browser window to pop-up with help for the page you
are currently using. Below is a sample of a typical Help pop-up window:
To log into CommPortal enter your phone number and your password, and
click on Login.
9.3
Using CommPortal
Once you have logged in, you will see the CommPortal Dashboard. This gives
you a quick at-a-glance summary of your messages, missed calls, contacts
and phone settings.
9.5
Refreshing a Page
If you want to refresh a page, for example to check whether you’ve received
any new voicemails since you last looked, click on the Refresh icon:
9.6
Logging Out
If you haven’t used CommPortal for 30 minutes you will be automatically
logged out. However, if you wish to manually log out, for example because
you’ve been accessing CommPortal using a shared computer, you can do this
by clicking the Logout icon:
Along the top of the window are a series of tabs which you can select to take
you to the different pages within CommPortal.
Dashboard: At-a-glance summary when you first log into CommPortal.
Messages & Calls: Voice and fax messages, and calls you’ve made, answered
or missed.
Contacts: Add and view your contacts and their phone numbers in this tab.
Call Manager: The Call Manager page lets you configure the services on your
phone line, like Call Forwarding and Selective Call Rejection.
WTC Business Support: 613-507-9222 • [email protected]
10
WTC Business Support: 613-507-9222 • [email protected]
11
WTC Hosted PBX Guide
WTC Hosted PBX Guide
10. CommPortal Dashboard
The CommPortal Dashboard is shown when you log into CommPortal and
gives you an at-a-glance summary of your phone activity. In this section we’ll
examine the Dashboard in more detail. A typical Dashboard:
10.2.1 Call Back
To return a call you missed using Click To Dial:
• Right click on the number of the caller.
• Select the Dial option.
10.3Contacts
The Contacts section displays all of your contacts and allows you to search:
10.1Messages
In the top left hand corner you can see if you have any new voice messages:
CommPortal logs all
calls received, even
if the caller did not
leave a message.
To view and listen to new messages, click on the voicemail link. This will take
you to the Messages & Calls page, which is described in Section 12.
To search, enter the letters you want to search for in the text box. CommPortal
will narrow down the contacts displayed as you type, and the text that matches
your search will be highlighted in yellow:
10.2 Missed Calls
This section shows you the most recent calls which you have missed:
To see other types of calls, see Messages & Calls page in Section 12
WTC Business Support: 613-507-9222 • [email protected]
12
WTC Business Support: 613-507-9222 • [email protected]
13
WTC Hosted PBX Guide
WTC Hosted PBX Guide
To cancel the search and view all of your contacts, delete the search text you
entered. To add, modify or delete Contacts, see Section 13.
10.3.1 Calling a Contact
To call a contact using Click To Dial, follow these steps:
• Right click on the number of the contact you wish to call.
• Select the Dial option.
10.4Settings
Your main settings will be shown at the bottom right of CommPortal. This
shows you the current status of your main phone line settings:
11. Messages & Calls
The Messages & Calls page has a number of sections which you can select by
clicking on the tab:
Messages shows you all of your new and stored voice messages.
Faxes shows you any new and stored fax messages.
Missed displays the recent calls you have received and not answered.
Dialed displays the recent calls you have made, including those made by Click
To Dial as described in Section 18.
Received shows the recent calls you have answered.
Each of these sections is described in more detail on the next page.
11.1Messages
This shows all stored voice messages, both those you have listened to and
those you haven’t. Unheard messages are indicated in bold:
In the example above Call Forwarding Immediate, the Follow Me service and
Anonymous Call Rejection are all inactive (disabled).
To change one of these settings you can either click on the link for that setting,
or select the Call Manager page, described in Section 14.
11.1.1 Listen To a Message
To listen to a message click the loudspeaker icon
WTC Business Support: 613-507-9222 • [email protected]
14
to the left of the message.
WTC Business Support: 613-507-9222 • [email protected]
15
WTC Hosted PBX Guide
WTC Hosted PBX Guide
This will launch a Voicemail player which loads and plays the message.
With this player you can:
• See when the message was received and how long it is.
• Pause, rewind and fast forward the message.
• Mute the player or change the volume.
• Delete the message, or Save it to disk.
11.1.2 Deleting a Message
To delete a voice message, follow these steps:
Select the voice message (or messages) to delete by selecting the checkbox to
the left of the message:
11.1.3 Marking a Message as Heard
Listening to a voice message automatically marks it as heard. If you want to
mark a message as heard without listening to it, follow these steps:
Select the voice message (or messages) to mark as heard by selecting the
checkbox to the left of the message:
Click on Mark As Heard.
11.1.4 Marking a Message as New
To mark a message as new, follow these steps:
Select the voice message (or messages) to mark as new by selecting the
checkbox to the left of the message:
?
Marking a message
as “new” returns it
to its unheard state
in your mailbox.
Click on Delete.
Click on Mark As New.
WTC Business Support: 613-507-9222 • [email protected]
16
WTC Business Support: 613-507-9222 • [email protected]
17
WTC Hosted PBX Guide
WTC Hosted PBX Guide
11.1.5 Call Back
To call back a caller who left you a voice message, follow these steps:
• Right click on the number of the caller.
• Select the Dial option.
11.1.6 Add Caller to Contacts
To add the number of someone who left you a voicemail to your Contacts:
• Click on the Add to Contacts icon
.to the right of the voicemail.
• This will take you to the Contacts page. Enter the details for your
new contact and click on Save.
See Section 13 for more information on using the Contacts page.
11.2Missed
The Missed section shows you the recent calls that you have received but did
not answer:
WTC Business Support: 613-507-9222 • [email protected]
18
If a caller is in your Contacts list, their name will be shown instead of their
number, and an icon indicating which of that Contact’s numbers they used to
call you:
11.2.1 Add Caller to Contacts
To add the number of someone who called you to your Contacts:
• Click on the Add to Contacts
icon to the right of the call info.
• This will now take you to the Contacts page. Enter the details for
your new contact and click on Save.
See Section 13 for more information on handling Contacts.
11.3Dialed
This page shows you all of the recent calls you have made, including those
which you made using Click To Dial (described in Section 18):
WTC Business Support: 613-507-9222 • [email protected]
19
WTC Hosted PBX Guide
WTC Hosted PBX Guide
11.3.1 Add Dialed Number to Contacts
To add the number of someone you called to you to your Contacts:
• Click the Add to Contacts icon
to the right of the call info.
• This will now take you to the Contacts page. Enter the details for
your new contact and click on Save.
12. Contacts
The Contacts page consists of a number of different sections, which you can
select by clicking on the tabs:
See Section 13 for more information on using the Contacts page.
11.4Received
This page shows you all of the recent calls you have answered:
Contact List allows you to manage your personal contact list.
Speed Dials is where you configure your numeric speed dials.
Extensions shows you the extensions within your business.
Short Codes shows you your business’s numeric speed dials.
Each of these sections is described in more detail on the next pages.
11.4.1 Add Number to Contacts
To add the number of someone who called you to your to your Contacts:
• Click the Add to Contacts icon
to the right of the call info.
• This will now take you to the Contacts page. Enter the details for
your new contact and click on Save.
12.1 Contact List
The Contact List shows you all of your contacts:
See Section 13 for more information on using the Contacts page.
WTC Business Support: 613-507-9222 • [email protected]
20
WTC Business Support: 613-507-9222 • [email protected]
21
WTC Hosted PBX Guide
WTC Hosted PBX Guide
12.1.1Searching
To search, enter the letters you want to search for in the text box. CommPortal
will narrow down the contacts displayed as you type, and the text that matches
your search will be highlighted:
To cancel the search and view all of your contacts, delete the search text you
entered.
Enter the details for your new contact in the text boxes provided.
Enter any phone numbers for your contact in the text boxes provided. You
can select the radio button to the right of a number to indicate that it is the
preferred number for this Contact. Enter any addresses for your contact in the
text boxes provided and click Save.
12.1.2 Add a New Contact
To add a new Contact, follow these steps:
Click on New Contact.
WTC Business Support: 613-507-9222 • [email protected]
22
WTC Business Support: 613-507-9222 • [email protected]
23
WTC Hosted PBX Guide
WTC Hosted PBX Guide
Your new contact has now been added.
12.1.3 Editing a Contact
To edit a contact, follow these steps:
• Select the contact you wish to edit from the list.
• Click Edit, then modify or add any details.
• Click Save.
12.1.4 Deleting a Contact
To delete a contact, select the contact you wish to delete from the list on the left
hand side of the screen, then click Delete.
12.1.6Groups
You can manage your contacts by assigning them to groups. For example you
might have a group for “Work” contacts and another group for “Personal” contacts. To add a new group, follow these steps:
Click on New Group.
Enter a name for the group in Group Name.Enter an ID for the group in Telephone ID. Select any contacts you want to be in the group from the list on the
right hand side.
12.1.5 Calling a Contact
To call a contact using Click To Dial, right click on the number of the contact
you wish to call, then select the Dial option.
Click on Save.
The new group will now appear in the Contacts & Groups section:
WTC Business Support: 613-507-9222 • [email protected]
24
WTC Business Support: 613-507-9222 • [email protected]
25
WTC Hosted PBX Guide
WTC Hosted PBX Guide
You use these speed dials by dialing the one or two digit speed dial number
from your phone. They are different from speed dials which are assigned to
particular keys on your phone. For more information on setting up speed dials
on your phone’s keys, see Section 19.
12.2.1 Adding a Speed Dial
To add a speed dial, follow these steps:
• Select the number for the speed dial you’d like to set up from the
Speed Dial drop down list.
• Enter the number this speed dial should call, as you would dial
it. For example, if you dial 9 before a number, enter 9 and the
number here.
• Click on Add.
• Repeat steps 1-3 for any other speed dials you want to set up.
• Click on Apply to save your changes.
By selecting a group you can search within it for individual group members, by
using the Search for box on the right hand side of CommPortal.
To edit a group, follow these steps:
• Select the group on the left hand side.
• Click on Edit.
• Change the group settings, or members.
• Click on Save.
To delete a group, follow these steps:
Select the group on the left hand side. Click on Delete.
12.2 Speed Dials
The Speed Dials section allows you to configure numeric speed dials:
12.2.2 Deleting a Speed Dial
To delete a Speed Dial, follow these steps:
Click on the Trash Can icon
to the right of the speed dial number list, then
click Apply.
Alternatively to delete all of your speed dials, follow these steps:
Click on Clear List.
Click on Apply.
WTC Business Support: 613-507-9222 • [email protected]
26
WTC Business Support: 613-507-9222 • [email protected]
27
WTC Hosted PBX Guide
WTC Hosted PBX Guide
12.3Extensions
The Extensions section lists of all the extensions in your business:
To use Click To Dial to call any of these extensions, follow these steps:
• Right click on the number of the extension you wish to call.
• Select the Dial option.
12.4 Short Codes
The Short Codes section shows you all of the speed dials set up for all the
phones in your business:
You can dial these short codes from any phone in the business to reach the
destination. Your WTC Technical Representative sets up these Short Codes.
13. Incoming Call Manager (ICM)
Incoming Call Manager provides end-users with a powerful rules-based routing
services allowing them to configure when, where, and which calls are delivered to them. Subscribers use the advanced rules-based routing to configure
an advanced Sets of Rules for their incoming calls. For example, a subscriber
might want to forward calls from family and friends to a home phone, while
forwarding calls from the office directly to voicemail, or to screen calls from a
particular number.
To configure Incoming Call Manager follow the steps defined in this section.
Summary gives you a description of what will happen to incoming calls.
Rules allows you to view and change your Call Forwarding settings.
Follow Me lets you view and set up an advanced Find Me Follow Me service.
Screening lets you screen different types of incoming calls.
Each of these sections is described in more detail on the following pages.
Your WTC Technical Representative sets up these Extensions.
WTC Business Support: 613-507-9222 • [email protected]
28
WTC Business Support: 613-507-9222 • [email protected]
29
WTC Hosted PBX Guide
WTC Hosted PBX Guide
13.1Summary
The ICM summary page provides you with a single view of how your calls
are currently routing and is the CommPortal interface for changing your ICM
forwarding setting. From this page you can quickly change your forwarding
settings by selecting a radio button under the “When I Receive a Call” section.
13.2 Rules-Based Routing
Rules-based routing allow the user to configure how calls are routed based
on a set of pre-configured rules. Rules-based routing is configured by selecting the rules tab from the Incoming Call Manager page. If setting up rules for
the first time, a short description of rules-based routing is displayed along with
a link to “Get Started with some Typical Sets of Rules.” By selecting this link,
three rules will be created: “Normal”, “Reject Calls and “Screen Calls”.
In order to define a new rule for Normal calls, select the click on the Normal
call rule and click the “Add New Rule” button.
For each rule, there will be type of routing, match the call to a rule, and route
calls not matching a rule. To modify how your “Normal” calls will be handled
with no rules defined or when an inbound call does not match a rule, click on
the “Normal Calls” rule, then click on the link contained in the text under the
“Normal” rule section.
This set of rules does not contain any rules for specific callers so when it is
active, all calls will ring your phone using the standard ringtone. To override this
behavior for specific callers, click the “Add New Rule” button below.
From this page, you can select you can configure the following
• Ring your phone with a standard or distinctive ringtone
• Send the call to voicemail
• Inform the caller that you are unavailable and reject the call
• Prompt the caller to record their name then prompt you to accept or
reject the call
• Ring more than one phone simultaneously or in sequence
• Prompt the caller to record their name then ring more than one
phone and prompt you to accept or reject the call.
WTC Business Support: 613-507-9222 • [email protected]
30
WTC Business Support: 613-507-9222 • [email protected]
31
WTC Hosted PBX Guide
WTC Hosted PBX Guide
Begin configuring your rule by selecting which caller or callers the rule will apply to. The options are:
• This individual contact - Apply to individual contact (in your contact
directory)
• This group of contacts - Apply group of contacts as defined in my
contact directory.
• Anyone in my contact list – Apply to all callers for which you have a
contact defined.
• Anyone in my business group – Apply to all other members of your
business, with the hosted PBX service.
• This phone number – Apply to a specific phone number. Can be
any number.
• A withheld number – Apply to any caller that have restricted their
calling number.
Select the individual or group of callers that this rule will apply to and click
“Next”
To have the system route calls to one or more phones, select the appropriate
option, click the “Next” button and follow the steps below.
• Add the first phone number to ring by entering a number in the
Phone Number Field
• Enter the start ring time and end ring time for the phone (one ring
cycle is 6 seconds, however for mobile phones, you may have to
allow more time depending on the mobile networks post dial delay)
• Click the “Add” button.
• Continue to add numbers as defined in steps 1-3 until all numbers
have been added.
• Select the preferred ringtone for your desk phone.
• Select the number to transfer calls to in the event the lines are
all busy or not answered. Options are voicemail or any Dialable
number.
• Click Finish
Next, select how the system will route your calls when you receive a call from a
selected user or group. The available routing options are:
• Ring your phone with a standard or distinctive ringtone
• Send the call to voicemail
• Inform the caller that you are unavailable and reject the call
• Prompt the caller to record their name then prompt you to accept or
reject the call
• Ring more than one phone simultaneously or in sequence
• Prompt the caller to record their name then ring more than one
phone and prompt you to accept or reject the call.
WTC Business Support: 613-507-9222 • [email protected]
32
13.3 Schedule-Based Routing
The Weekly Schedule functionality of Incoming Call Manager allows you to apply different routing rules based on time of day and day of week. For instance,
you may want all calls to ring your desk phone during working hours and ring
your mobile phone during lunch or after business hours. When first configuring your weekly schedule, you will be presented with two options.
• Begin with a blank schedule that you can set up from scratch.
• Begin with a typical weekly schedule that you can fine tune.
For ease of use, select option 2 - Begin with a typical weekly schedule that you
can fine tune, and use the following steps to configure:
WTC Business Support: 613-507-9222 • [email protected]
33
WTC Hosted PBX Guide
WTC Hosted PBX Guide
13.4 Special Days (Holidays)
You can define special days such as holidays or days when you are away from
the office and would like special call treatments. To configure special days,
select the Special Days tab and follow the steps below:
Select the period that you want to modify.
Using your mouse, point to the day and time you want to change and click the
mouse. To change multiple time periods, left-click, hold the mouse button and
drag across the days and time periods you wish to change.
To rename a period, click the rename button and enter the new name.
Click Apply.
WTC Business Support: 613-507-9222 • [email protected]
34
To select individual special days:
• Select the month using the
key and the year using the
Key
• Click on an individual day, or click and drag to select multiple days
• Click Apply
To have the system automatically define public holidays:
• Click on the “Add Public Holidays” button
• Select the holidays you wish to add (US Public Holidays)
• Click Apply
WTC Business Support: 613-507-9222 • [email protected]
35
WTC Hosted PBX Guide
WTC Hosted PBX Guide
14. Reminders
The Reminders page lets you set up reminder calls:
Use the Time boxes and dropdown list. Click Add then Apply.
14.2 Deleting Reminders
To delete a reminder, use the Reminders list:
14.1 Adding Reminders
To add a new reminder, use the New Reminder section:
To add a new reminder, follow these steps:
Select when you want the reminder call to happen from the dropdown list.
You can either choose for it to happen once in the next 24 hours, or for it to
happen weekly on a certain day of the week:
WTC Business Support: 613-507-9222 • [email protected]
36
To delete a reminder, follow these steps:
• Click on the Trash Can icon
to the right of the reminder in the
list: .
• Click on Apply.
Alternatively to delete all of your reminders, click on Clear List, then Click Apply.
WTC Business Support: 613-507-9222 • [email protected]
37
WTC Hosted PBX Guide
WTC Hosted PBX Guide
15. Groups
The Groups page shows you all of the groups that your phone line is in:
?
There are a number of different types of groups:
Multi Line Hunt Group: When a call comes in to a Multi Line Hunt Group,
each line in the group is rung in turn until someone answers the call. Depending on how your WTC Technical Representative has set up your Multi Line
Hunt Group you may be able to log in and out of the Multi Line Hunt Group.
When you’re logged in calls to that Multi Line Hunt Group will ring your phone.
When you’re logged out they won’t.
Call Pickup Group: If your phone line is in a Call Pickup Group then you can
pick calls that are ringing on any other lines in that group by picking up your
phone and dialing the Group Call Pickup code.
Multiple Appearance Directory Number: This is a special phone number
that, when called, will ring all of the phones within the Multiple Appearance
Directory Number group. The first person to answer their phone will take the
call, at which point all the other phones will stop ringing.
The following information is shown:
What department this Multi Line Hunt Group is in, if any. If your business
does not use departments then this will say None.
How many lines are in the group, and how many are logged in.
Whether you are currently logged in.
The lines which are in this group and whether each line is currently logged in.
Your line will be in this list.
15.1.2 Using Multi Line Hunt Groups
Calls that come into your phone line from a Multi Line Hunt Group will ring
your phone as normal, and you can answer the calls as you usually would.
If you have permissions to log in and out of the Multi Line Hunt Group you can
either use CommPortal to log in and out, or you can use your phone.
To log into a Multi Line Hunt Group using your phone, follow these steps:
• Pick up your phone handset.
• Dial the Multi line Hunt Group login access code: *321 followed by
the number of the Multi Line Hunt Group.
Need someone
added to or removed
from a calling group?
WTC Business Support can do this for
you.
To log out of a Multi Line Hunt Group using your phone, follow these steps:
• Pick up your phone handset.
• Dial the Multi line Hunt Group logout access code: *322.
To log into a Multi Line Hunt Group using CommPortal click on Login. This
icon will show beside your line
To log out of a Multi Line Hunt Group using CommPortal click on Logout.
This icon will show beside your line
WTC Business Support: 613-507-9222 • [email protected]
38
15.1.1 Viewing Multi Line Hunt Groups
If your phone line is in a Multi Line Hunt Group then there will be an entry in
the Group Membership section for it called MLHG. Click on this entry to view
that Multi Line Hunt Group:
WTC Business Support: 613-507-9222 • [email protected]
39
WTC Hosted PBX Guide
WTC Hosted PBX Guide
15.2 Call Pickup Groups
If your phone line is in a Call Pickup Group, there will be an entry in the Group
Membership section called CPUG. Click on this entry to view that Call Pickup
Group:
15.3 Multiple Appearance Directory Numbers
If your phone line is in a Multiple Appearance Directory Number group then
there will be an entry in the Group Membership section for it called MADN ….
Click on this entry to view that Multiple Appearance Directory Number.
The following information is shown:
The department this Call Pickup Group is in, if any. If your business does not
use departments, this will say None.
The number of lines in this Call Pickup Group.
The lines which are members of this Call Pickup Group. Your line will be in
this list.
The following information is shown:
What department this Multiple Appearance Directory Number is in, if any. If
your business does not use departments then this will say None.
How many lines are in the group.
The lines which are in this group. Your line will be in this list.
15.2.2 Using Call Pickup
To pick up for a call that is ringing on another phone in your Call Pickup Group,
follow these steps:
• Pick up your phone handset.
• Dial the Call Pickup access code: *311.
Only your WTC Technical Representative can make changes to a Multiple Appearance Directory Number group.
Alternatively, if two or more phones are ringing and you want to pick up the call
that is ringing on a particular extension number, follow these steps:
• Pick up your phone handset.
• Dial the Directed Pickup access code: *312.
• Dial the extension number on which the call is ringing.
WTC Business Support: 613-507-9222 • [email protected]
40
WTC Business Support: 613-507-9222 • [email protected]
41
WTC Hosted PBX Guide
WTC Hosted PBX Guide
16. Settings
The Settings page consists of a series of tabs allowing you to configure the
phone system:
16.1.2 Unblocking Remote Access to Call Forwarding
If you make too many unsuccessful attempts to access Remote Access to Call
Forwarding using an incorrect PIN, the service will be blocked. To unblock this
service, click on Unblock Forwarding.
16.1.3 Changing your PINs
You have two different PINs.
Your Call Services PIN, which you use to access Remote Access to Call
Forwarding.
Your Voicemail PIN, which you use to access your Voicemail.
To change either of these PINs, follow these steps:
Enter the new PIN in either the Call Services PIN or Voicemail PIN text box.
Click on Change to the right of your new PIN.
Security lets you change your passwords and PINs.
Account Codes allows set up of account codes, with appropriate permissions.
Blocking lets you set up blocking for different types of outgoing calls.
Preferences lets you configure a number of properties which apply to your
phone calls.
Messaging allows you to configure your voice mailbox.
Phones lets you configure your phone keys, with a compatible phone model.
Toolbar lets you install the CommPortal Assistant Toolbar which provides quick
easy access to your CommPortal settings on your PC.
16.1Security
The Security tab lets you set up the security options for your phone account.
16.1.1 Changing Your CommPortal Password
The Change Password section lets you change you CommPortal password:
To change your CommPortal password, enter your new password in the Password text box. and again in the Confirm password text box. Click on Change
Password.
WTC Business Support: 613-507-9222 • [email protected]
42
WARNING!
Due in part to globalization, international toll fraud is on the rise. We strongly
urge you to only choose a complex PIN that does not follow a pattern. WTC is
not responsible for any long distance toll charges that may result from a PIN
that has been compromised.
16.1.4 Unblocking Account Codes
If your phone line is configured to use account codes, and an incorrect account code is entered too many times when making calls, your service will be
blocked. To unblock this service, click on Unblock Account Codes.
!
Your PIN should
never be shared
with anyone, and
should not be easy
to guess.
For more details on Account Codes, see Sections 9.4 and 17.2 or speak to
your WTC Technical Representative.
WTC Business Support: 613-507-9222 • [email protected]
43
WTC Hosted PBX Guide
WTC Hosted PBX Guide
16.2 Account Codes
The Account Codes tab lets you configure your Account Codes service.
Exactly what is configurable within this section will depend on the permissions
that your WTC Technical Representative has given you, based on your subscribed services.
Call types requiring an account code show you the types of calls which will
require you to enter a code once you have dialed the number. In the example
on the previous page, account codes are only required for International calls.
Use validated account codes specifies whether your system uses validated or
non-validated account codes.
Account code length specifies the length of account codes you must enter.
Max incorrect attempts before account is blocked specifies how many
incorrect attempts to enter account codes are allowed in a row, before all calls
requiring account codes are blocked.
16.2.2 Business Account Codes
To view the list of valid account codes for your business, click on the Business
Group link:
For more details on the Account Codes services, see Section 9.4 or speak to
your WTC Technical Representative.
16.2.3 Personal Account Codes
To view and edit your personal list of valid account codes, click on the Personal
link:
16.2.1 Account Code Options
The Account Code Options window shows you the settings which your WTC
Technical Representative has set up for the Account Code service.
To edit your list of valid account codes, click on Edit Personal Account Codes.
WTC Business Support: 613-507-9222 • [email protected]
44
WTC Business Support: 613-507-9222 • [email protected]
45
WTC Hosted PBX Guide
WTC Hosted PBX Guide
16.3Blocking
The Blocking tab lets you configure what types of outgoing calls should be
blocked from your line:
To add an account code, follow these steps:
• Enter an account code in the Account Code text box.
• Enter a description for the Description text box.
• Click on Add.
• Click on OK.
• Click on Apply.
To block certain types of call, follow these steps:
• Check the type of call you want to block.
• Hit Apply.
To unblock a type of call, follow these steps:
• Uncheck the type of call you want to allow.
• Click on Apply.
16.4Preferences
The Preferences tab lets you view and change some general settings for your
phone line which you are unlikely to want to change often.
To delete an account code, follow these steps:
Click on the Trash Can icon to the right of the account code:
Click on OK, then click on Apply.
Alternatively, you can also click on Clear List, click on OK, then click on Apply.
WTC Business Support: 613-507-9222 • [email protected]
46
WTC Business Support: 613-507-9222 • [email protected]
47
WTC Hosted PBX Guide
WTC Hosted PBX Guide
16.4.1 Forwarding Preferences
The Forwarding Preferences section lets you configure whether, when you dial
the Call Forwarding access codes to enable Call Forwarding, you need to enter
a phone number. If you don’t want to enter a phone number then your Call
Forwarding service will use the number you last configured through CommPortal.
To change whether you need to enter a number when enabling Call Forwarding from your handset, follow these steps:
• Check (to require a number to be entered) or uncheck (to mean
a number is not required) the type of Call Forwarding you want to
change.
• Click on Apply.
16.4.2 Line Information
The Line Information section shows you information about your line:
Line name shows the name this line is configured as. Your WTC Technical
Representative can change this if it is incorrect.
Member of Departments shows whether your line is in a department, and if
so the name of the department. If departments are not used in your business,
this will say None.
Admin for Department shows if you are an administrator, and if so, for which
department.
16.4.4 Click To Dial
This section lets you configure settings for your Click To Dial service:
For more information on using Click To Dial, see Section 18.
If you want to use your regular phone for your calls using Click To Dial, select
“Use my subscriber line,” then Click Apply.
To use another phone as the phone for your calls using Click To Dial, select
“Use remote telephone” then enter the number of the phone line you want to
use in the text box. Click on Apply.
When using your regular phone for your calls using Click To Dial, if you want
this phone to automatically answer, follow these steps:
Check Answer my telephone automatically when used to place click to dial
calls. Click on Apply.
16.4.5 Caller ID Preferences
The Caller ID Preferences section lets you configure your caller ID service.
16.4.3 Voicemail Preferences
The Voicemail Preferences section lets you configure how quickly calls should
forward to voicemail if you don’t answer:
Check the boxes of the options you would like to enable, and click Apply.
Note that not all models of phone will display the caller’s name and number.
To change the time after which calls should forward to voicemail, enter a new
value in the text box and click on Apply.
WTC Business Support: 613-507-9222 • [email protected]
48
WTC Business Support: 613-507-9222 • [email protected]
49
WTC Hosted PBX Guide
WTC Hosted PBX Guide
16.5Messaging
The Messaging tab lets you change the operation of your Voice and Fax messaging service, and has a series of sections:
Settings lets you configure some general Messaging settings.
Mailbox lets you configure your Voice mailbox.
MWI lets you configure whether your phone notifies you when you have messages waiting.
Email Notification lets you configure whether you are alerted via email when
messages arrive.
Voice and Fax Forwarding
This section lets you enter an email address to which all your voice and fax
messages should be sent when they are left in your mailbox:
To set up forwarding of your messages to your email, follow these steps:
Check Auto-forward all voicemail messages and faxes to this email address.
Enter your email address in the text box.
If you want to also leave a copy of the message in your mailbox (so you can
view them in CommPortal), check Leave a copy of forwarded voicemail messages and faxes in the inbox.
If you would like to be able to include action links such as delete in the email
copies of your voice messages, select the Include action links in forwarded
voicemail messages and faxes.
Click on Apply.
16.5.2Mailbox
The Mailbox section lets you configure your mailbox settings:
16.5.1 Settings: Timezone
To change the timezone that you are in, select the new timezone from the drop
down list in the Subscriber Timezone section.
Click on Apply.
WTC Business Support: 613-507-9222 • [email protected]
50
WTC Business Support: 613-507-9222 • [email protected]
51
WTC Hosted PBX Guide
WTC Hosted PBX Guide
Greetings
To configure a greeting which should be played during business hours, follow
these steps:
• Select the greeting you have recorded from the drop-down list.
• Click on the business hours link:
Live Message Screening
Live Message Screening lets you listen to callers who are leaving voice messages while they are doing so. If you have Live Message Screening enabled,
your phone will ring with a distinctive ringtone when someone is leaving you a
message. If you answer your phone you will be able to hear the caller leaving
the message.
Check to activate, uncheck to deactivate. Save Settings with each choice.
MWI Notification
You can use the MWI Notification section to configure whether your phone
should indicate to you when you have new messages.
Define your business’s hours of operation, by selecting the days you operate,
and the times you operate between. Then click on OK. Click on Save Settings.
Mailbox Settings
To configure your mailbox so that it does not require you to enter a PIN, check
Skip PIN, then Save Settings. To disable, uncheck Skip PIN.
To have your phone’s messages light lit when any new faxes are waiting, check
“All Faxes.”
If there is a red X on the screen:
click it to become a green check: .
Click on Apply.
Fast Login allows you to go directly into your mailbox when you collect your
messages. Auto-Play will automatically play your new messages when you’ve
logged in. Check to activate, uncheck to deactivate.
WTC Business Support: 613-507-9222 • [email protected]
52
WTC Business Support: 613-507-9222 • [email protected]
53
WTC Hosted PBX Guide
WTC Hosted PBX Guide
To have all new voice messages light your phone’s messages light, check “All
Voicemail.”
If there is a red X on the screen:
click it so that it becomes a green tick:
Click on Apply.
17. Click To Dial
You can make a phone call from within CommPortal by clicking on the Click
To Dial icon:
This pops up a window in which you can enter the number you want to dial:
To have only urgent new voice messages light your phone’s messages light,
check “Urgent Voicemail.”
If there is a red X on the screen:
click it so that it becomes a green tick:
Click on Apply.
16.5.4 Email Notification
Email notification lets you notify different email accounts when different sorts of
messages are waiting. This will override any settings you have in the Settings
section, described in Section 17.5.1.
17.1 Calling from your Regular Phone
To make a call from your regular desk phone, enter the phone number you
want to call in the space provided and click Dial. Your phone will now ring.
To add an email address to be notified, follow these steps:
Click on New Entry. Enter the email address where indicated. Click on Add.
Check whether you want All Faxes, Urgent Voicemail, or All Voicemail sent to
this address.
If there is a red X on the screen:
click it so that it becomes a green tick:
Click on Apply.
Dial directly from
your computer—
without using the
phone—using Click
to Dial
When you answer it the number you entered will be called.
To delete an email address from this list, follow these steps:
Click on the Trash Can icon
to the right of the email address.
Click on Apply.
To delete all email addresses from this list, follow these steps:
Click on Clear List, then click on Apply.
WTC Business Support: 613-507-9222 • [email protected]
54
WTC Business Support: 613-507-9222 • [email protected]
55
WTC Hosted PBX Guide
WTC Hosted PBX Guide
Once the person you called has answered this will be displayed on your
screen:
18. Access Codes
This section lists your phone system’s most commonly used access codes:
*72 + number to forward to
Immediate Call Forwarding Deactivation......................................... *73
Busy Call Forwarding Activation....................................................... *90
Busy Call Forwarding Deactivation............ *91 + number to forward to
No Answer Call Forwarding Activation............................................. *92
No Answer Call Forwarding Deactivation.. *93 + number to forward to
Park Call............................................................................................ *53
Retrieve Parked Call......................................................................... *54
Do Not Disturb Activation................................................................. *79
Do Not Disturb Deactivation............................................................. *78
Automatic Recall............................................................................... *69
Group Call Pickup....................................................................... *311
Voicemail........................................................................................... *98
Immediate Call Forwarding Activation......
17.2 Calling from Another Number
Click To Dial also allows you to make calls, from any phone with a direct dial
number, so that they appear to come from your business line. This could be
your cell phone, a payphone, or your home number.
Once you’ve selected a Click To Dial call, select Configure.
This takes you to the Preferences section of the Settings page. Under Click To
Dial select “Use remote telephone” and enter the number of the phone you
want to use to make your call.
Thank you for choosing WTC Communications.
900 Portsmouth Ave., Kingston, On • 613-547-6939
28 Main Street, Westport, On • 613-273-2121
94 Gore Street East, Perth, On • 613-201-1111
1-866-547-6939 • [email protected]
If you have a remote telephone number configured the Click To Dial icon
changes to:
.
WTC Business Support: 613-507-9222 • [email protected]
56
WTC Business Support: 613-507-9222 • [email protected]
57