1
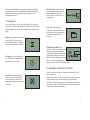
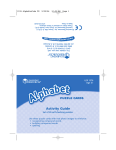
LER 6910
Also from Learning Resources®:
• LER 6920
Radius CD Card Set - Alphabet Awareness
• LER 6921
Radius CD Card Set - Short Vowels
• LER 6922
Radius CD Card Set - Long Vowels
• LER 6923
Radius CD Card Set - Rhyming Word Families
• LER 6924
Radius CD Card Set - Blends & Diagraphs
• LER 6925
Radius CD Card Set - Building Fluency
• LER 6926
Radius CD Card Set - Reading Comprehension
• LER 6927
Radius CD Card Set - ELL Picture Vocabulary
• LER 6928
Radius CD Card Set - ELL Language Patterns & Vocabulary
• LER 6929
Radius CD Card Set - Conversations & Vocabulary
• LER 6930
Radius CD Card Set - Math Concepts & Vocabulary
• LER 6931
Radius CD Card Set - Science Concepts & Vocabulary
• LER 6991
Stereo Headphones with Microphone
• LER 6992
Multimedia Speaker System
™
Interactive
learning puts
a world of
educational
content
at your
fingertips!
For a dealer near you, call:
(847) 573-8400 (U.S. & Int’l)
(800) 222-3909 (U.S. & Canada)
+44 (0)1553 762276 (U.K. & Europe)
© Learning Resources, Inc., Vernon Hills, IL (U.S.A.)
Learning Resources Ltd., King’s Lynn, Norfolk (U.K.)
Please retain our address for future reference.
Patent Pending.
Made in China.
LRM6910-GUD
User Guide
What is Radius™?
Thank you for purchasing the Radius™ Audio Learning System. With its
interactive CD-based technology, Radius™ and Radius™ Interactive CD
card sets provide vital teaching tools at the touch of a button.
Radius™ is a dynamic teacher resource that brings printed material alive,
engaging and interacting with students of all ages. Radius™ is perfect
for independent learning or center-based instruction. Using Radius™ is
easy, but before you begin, we recommend that you read all sections of
this user guide to familiarize yourself with all of its features.
Operating the Radius™
Audio Learning System
1. Getting Started
To get started, you’ll need to either use the included power adapter, or
install 4 C batteries (see page 4).
1
How Does It Work?
9
The unique technology inside Radius™ matches up special activity cards
and other printed material with audio CDs to create dynamic, interactive
learning experiences. Its easy to use Radius™
1. Insert a Radius™ Interactive CD
2
8
3
7a
4
7b
5
6
1. Card scanning slot
6. Color-coded buttons
2. Scan a Radius™ Activity card
2. Playback/Repeat button
3. Listen as Radius™ guides you through activities,
lessons, interactive stories and more
3. Record button
7. Menu Navigation buttons
7a. Up/Down
7b. Enter
4. Microphone
5. Display screen
8. CD cover release
9. CD cover
1
2
2. Using The Power adapter
14
13
12
11
10
10. Headphone jack 1
13. Power button
11. Microphone jack
14. Volume dial
For optimal performance, and when using Radius™ for extended periods
of time, we suggest that you use the power adapter included with the
Radius™. This adapter has been designed especially for use with
Radius™ and is not to be substituted with any other adapter. The Radius™
power adapter is designed to protect the unit from fluctuations in power
that could adversely effect performance. Using a different adapter could
damage the unit.
To use the power adapter, first make sure that the ON/OFF switch is
turned to the OFF position. Plug the adapter into the adapter jack at the
back of the unit before plugging it into an electrical outlet. Plugging the
adapter into the electrical outlet before plugging it into the unit could
result in a damaging power surge to the unit. When you are ready to
disconnect the adapter from the unit, turn the unit off and unplug the
adapter from the unit before unplugging the cord from the electrical
outlet.
12. Headphone jack 2
3. Battery Installation
You will need to have a Phillips-head screwdriver and 4 C batteries. To
open up the battery compartment, carefully turn the Radius™ upside
down. Use the screwdriver to remove the screws securing the battery
door. Remove the battery door. Insert the batteries one at a time, paying
attention to the diagram in the battery compartment showing the proper
position of the positive and negative ends of each battery.
15
16
17
18
4. Headphones
Radius™ allows you to connect up to four sets of headphones into the
headphone jacks. Plugging headphones into the first headphone jack
(10) will disable the main speaker on the unit. This allows Radius™ to be
used in a classroom without disturbing other activities.
19
20
21
15. Stop
19. Forward
16. Play
20. Headphone 4
17. Pause
21. Headphone 3
Radius™ also allows the use of Learning Resources’ Stereo
Headphones with Microphone (LER6991 – sold separately). These
special headphones work just as a standard pair of headphones do, with
the added functionality of a microphone for use with Radius™ activities
that involve the voice recording feature.
18. Back
3
4
When using these headphones, always be sure that they are plugged
into headphone jack 1 only, with the headphone plug inserted into the
headphone jack, and the microphone mini plug inserted into the
microphone jack next to it.
CD Cover Open – Anytime the cover
is opened while the power is ON, this
image will appear on the display
screen. When you close the cover, it
will disappear.
5. Powering Up
To turn on the Radius™ unit, slide the POWER button (13) on the right
side of the unit forward. When you first power up Radius™, you’ll see the
following images on the screen. Use this helpful key as a guide to each
image.
Powering up – When you first switch the
power from OFF to ON, you should
see this image displayed. This means
the system has power and is working.
CD Loading – If you’ve inserted a CD,
you should see this image flashing on
the screen while the CD loads.
Scan Card – When this image
appears, you may scan a card in the
card scanning slot. (You can also scan
a card during normal Radius™ CD
playback.)
CD/CARD Do Not Match – Each
Radius™ CD Card set comes with a set of
cards and a companion interactive cd.
These CDs and cards should always be
used together. Scanning a card while a
Radius™ CD from a different card set is in
the unit will cause the image above to
appear. Locate the correct CD/Card and try again.
6. Using Radius™ Interactive CD Card Sets
No CD in unit – When this image
appears, check the inside of the CD
tray to be sure that a Radius™ CD is
present and is loaded properly onto the
CD spindle.
5
Radius™ comes alive with Radius™ Interactive CD card sets. The card
sets are easy to use.
Simply insert a Radius™ CD into the CD tray on the front face of the unit,
and then close the cover. After the CD loads, you’ll hear an audio
confirmation, and will be prompted to scan a card. Before scanning, be
sure that your Radius™ CD is placed correctly in the CD tray, the cover is
closed, and the CD and card set match.
6
7. Using The Card Menu
10. Helpful Hints
If your Radius™ cards become damaged, or the barcode on the card
becomes unreadable, you can still access all of the content on the CD.
To use the card menu and select individual cards, press and hold the
Menu Navigation/Enter button (7b) to the right of the display screen.
When you release the button, you will be directed to use the Up/Down
switch (7a) to scroll through a list of cards. To select a card, highlight that
card and press the Menu Navigation/Enter button (7b) again to begin
activities. Note– To EXIT a card activity at any time, press and hold the
Menu Navigation/Enter button.
Tips for handling and use of the Radius™ Audio Learning System and
CD card sets
8. Using The Voice Record Feature
Some Radius™ CD card sets allow you to record up to 2 minutes of
speech for review. To use this feature, when prompted, press and hold
the Record button (3). After you hear a confirmation tone, speak clearly
into the microphone located just below the Record button or into the
microphone on your headset. When you are done recording, release the
button. Your recorded audio will play back automatically. To play it back
again, press the Playback button (2).
You can also record speech with the Learning Resources Stereo
Headphones with Microphone (LER6991 – sold separately).
9. Playing A Standard Audio CD
Your Radius™ Audio Learning System can also play standard audio CDs.
To play an audio CD, simply load the CD into the CD tray, and use the
CD access controls on the left side of the unit. The current track status
will be displayed on the screen.
1. As with a standard CD player, the Radius™ and all CDs should
be handled carefully. When handling Radius™ CDs, hold them
by the edges, being sure not to scratch or scuff any areas on
the top or bottom surface.
2. When loading any CD, be sure to press it gently but firmly
onto the center spindle, and that the top lid is securely closed.
3. Always scan cards in the scanning slot from left to right.
4. Scan cards in one smooth even swipe. Stopping or jerking the
card in the scanning slot may result in a negative scan.
5. A successful card scan will always result in a confirmation
tone. If the card doesn’t scan, check to see that the barcode
area on the bottom of the card is clean and free from marks or
scratches.
6. Always use compatible Radius™ CDs and cards. A card from
one set will not work when a CD from a different set is loaded
in the unit.
7. When prompted, press the color-coded buttons firmly. If a
button does not give a response after 2-3 seconds, press it
again.
8. To save power, Radius™ will go into “sleep” mode after 5
minutes of non-activity. Press any button to restart the unit.
• Stop (15) - to stop the current audio track during playback
• Play (16) - to play a selected audio track
• Pause (17) - to pause an audio track during playback
• Back (18) - to skip back to the previous audio track
• Forward (19) - to skip forward to the next audio track
7
8
11. Frequently Asked Questions
12. Battery Care and Maintenance Tips
Does Radius™ Audio Learning System include CDs or cards?
• Use 4 C batteries only
Radius™ CD card sets may be purchased separately, thereby allowing
you to target card sets specific to your classroom needs.
• Be sure to insert batteries correctly (with adult supervision) and
always follow the unit and battery manufacturer’s
instructions.
How many students can use Radius™ at one time?
Radius™ has been designed for up to 4 students using headphones.
• Do not mix alkaline, standard (carbon-zinc), or
rechargeable (nickel-cadmium) batteries.
What if the headphones are plugged in but there is still sound
coming from the speakers?
• Insert batteries with the correct polarity.
To disable (mute) the speaker, make sure one set of headphones is
plugged into the first headphone jack(10), which mutes the speaker.
• Do not recharge non-rechargeable batteries.
• Only change rechargeable batteries under adult supervision
What if the sound is unclear or the scanning is incorrect?
• Remove rechargeable batteries from the unit before charging.
Check the power supply: Make sure the power supply to the unit is
sufficient. Either the adapter plug must be plugged in properly, or fresh
batteries must be correctly installed.
• Use only batteries of the same or equivalent type.
Check the volume levels: If the sound is distorted, lower the volume
level. If increased volume is needed, you can use any standard
computer speakers for amplification.
Check the card: The card may be damaged. Check to see that the
barcode area on the bottom of the card is clean and free from marks or
scratches.
• Do not short-circuit the supply terminals.
• Always remove weak or dead batteries from the product.
• Remove batteries if Radius™ will be stored for an extended
period of time.
• Store at room temperature.
• Do not mix new and used batteries.
• Please retain these instructions for future reference.
Please visit us at
www.learningresources.com
9
10