1
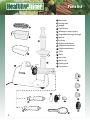
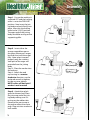
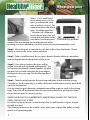
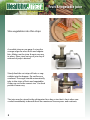
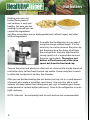
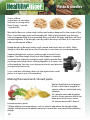
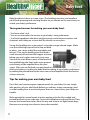
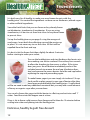
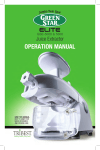
Electric
Multipurpose Juice Extractor
User Guide & Recipes
For your safety
Electric
IMPORTANT SAFEGUARD
1 .Read all instructions.
2. To protect against risk of electrical shock do not put the appliance in water or other liquid.
3. Close supervision is necessary when any appliance is used by or near children.
4. Unplug from outlet when not in use, before putting on or taking off parts, and before cleaning.
5. Switch off the appliance before changing accessories or approaching parts which move in use.
6. Avoid contacting moving parts. Never feed food by hand. Always use food pusher.
7. Do not operate any appliance with a damaged cord or plug or after the appliance malfunctions,
or is dropped or damaged in any manner. Return appliance to the nearest authorized service facility for examination, repair or electrical or mechanical adjustment.
9. If the supply cord is damaged, it must be replaced by the manufacturer or its service agent or a
similarly qualified person in order to avoid hazard.
8. The use of attachments not recommended or sold by the manufacturer may cause electric
shock or injury.
9. Do not use outdoors.
10. Do not let cord hang over edge of table or counter.
11. The appliance should not operate for more than 1 hour continuously. After each cycle of operation it should rest for at least 30 minutes.
12. This appliance is for household use only.
13. Check if the rated voltage of the appliance is compatible with the local power system. Confirm
if all the attachments are included in the package. Otherwise contact the responsible vendor.
14. Overload protector is incorporated in this appliance. The automatic resettable type thermal
protector will operate when the appliance is blocked for more than 30 seconds. Switch off the appliance when it is blocked. Then reverse it and make sure the food is loosened before switching on
and further operation.
15. To avoid damage do not use water over 105 degrees when cleaning. Use a soft material such as
sponge, brush or cotton cloth etc. for cleaning.
16. SAVE THESE INSTRUCTIONS
1
Table of contents
Electric
Contents
2
Welcome
3
Parts List
4
Assembly
5
Disassembly & Cleaning
6
Making Wheat Grass Juice
7
Making Vegetable Juice
8
Making Nut Butters
9
Making Pasta and Noodles
10
Making Frozen Yogurt & Sorbet
11
Making Baby Food
12
Juicing Recipes
2
13-15
Welcome
Electric
Congratulations on your purchase of the electric Healthyjuicer, one of the most
versatile and unique juicers available today. Unlike most juicers available on the
market, the Healthyjuicer extracts juice using a low rpm auger that “crushes” fruits
and vegetables. Other juicers use a very high speed metal mesh that creates friction and heat, which destroys many of the vital enzymes and nutrients that are so
important in live juicing.
In addition to these benefits, the healthyjuicer also has many functions a centrifugal juicer simply cannot do such as juice wheatgrass, make frozen yogurt and
fruit sorbet. You can also make nut butters, baby food, hummus and soy milk.
We hope you enjoy using your healthyjuicer electric and have a healthy day!
The Healthyjuicer limited 8 year Warranty
At Lexen products, we go out of our way to produce products that have
superior design, quality & value. We warranty the motor for a full 8 years of
service and all other parts are covered for a full year under normal household use. Please contact [email protected] or service@lexenproducts.
com for instructions on how to service your unit.
Lexen products warrants that the electric juicer is free from defects in materials and workmanship for one year of
purchase. The electric motor is warranted for 8 years. This warranty only applies with the accordance of the conditions set forth below.
1. The warranty is non transferable and is only extended to the original consumer. Please save your original sales
receipt for proof of purchase and date unit was purchased. This warranty is void if the product has been subject to
misuse, abuse, accident, improper maintenance or repair and or modification of original appliance in any way.
2. This limited warranty is the only written or express warranty provided by Lexen Products. Any implied warranties
including but not limited to any implied warranties of merchantability or fitness for a particular purpose are limited
in duration to the duration of this warranty.
3. The limitations and extent of this warranty may vary from state to state.
4.Repair or replacement of a particular part or the whole unit will be made at the discretion of the local service
center.
5. This warranty applies to consumer use only and is void if the unit is used by a commercial or institutional establishment. This warranty does not cover normal wear and tear.
www.lexenproducts.com
3
Parts list
Electric
���������
������������
������
3
�����������
������������������������
������������������������������
4
������
�������
�������������������
��������������������
�������������������
������
5
3 �����
4 ���������
5 ���������
����
�������
6 �����������
7 ����������
6
7
4
Assembly
Electric
Step 1 - Ensure the machine is
switched OFF and the Locking
collar is set to the “RELEASE”
position. Now insert the juicing body and push firmly into
place, then turn the locking
collar to the “LOCK” position.
The open end of the juicing
body should be resting on the
supporting pillar.
Step 2 - Insert either the
orange vegetable auger or
the green wheat grass auger,
be careful to insert the auger
fully. Note: when inserted
properly only the stainless
steel part of the auger will
protrude from the juicing
body.
Step 3 - Place the washer into
the end cap.
Step 4 - Attach the end
cap turning in a counter
clockwise direction, use the
enclosed wrench to tighten,
but do not over tighten.
NOTE: collar will not lock if
washer is not inserted!
Step 5 - Attach the splash
guard to the end cap. Place
the juice cup under the juicing body making sure it is
resting on the rubber tabs.
Place and the waste cup at
the end to collect the waste
pulp. Plug unit into an electric
wall socket.
5
����
�������
����
�������
����������������
�����������������������
����
�������
Disassemble & cleaning
Electric
When juicing is complete press the reverse button a few times to ensure that any
excess juice still remaining in the juicing body is expelled to the juice cup.
Step 1 - Turn the machine off and unplug from the wall outlet.
Step 2 - Use the included wrench to loosen the end cap by turning in a clockwise
direction, then remove the end cap and washer.
Step 3 - Turn the locking collar to the release position and remove the juicing body.
The auger and juicing body will come away together.
Step 4 - Press the end of the auger on the back of the juicing body gently, to allow
the easy removal of the auger from the front of the juicing body.
Step 5 - Simply immerse the juicing body and parts in a bowl of warm soapy water
then rinse off thoroughly under a running tap. When the juicer has been used to
make nut butters, baby food or sorbet it may be necessary to use a soft bristle dish
brush to remove any remaining food pieces from the juicing body, auger and cap.
Step 6 - Wipe the main body with a damp cloth - NEVER IMMERSE THE MAIN BODY
IN WATER OR WASH UNDER A TAP.
TIP: When disassembling use the included wrench to loosen the end cap before attempting to separate the parts for cleaning.
Cleaning the parts immediately after use ensures a faster clean up time, and this will
prolong the life of your juicer and reduce staining on the plastic parts.
The use of harsh abrasives is not recommended. Simply rinse the parts in warm
soapy water.
6
Wheatgrass juice
Electric
Step 1 - Cut a small handful of wheat grass (cut the
grass just above the seed
with a knife or scissors). For
optimal nutrition the wheat
grass should be between 7
- 10 inches tall. Although
much shorter grass can still
be cut and juiced the yields
may be less and more grass The healthysprouter
needed. We recommend the healthysprouter kit for
growing your own wheatgrass (to learn more visit www.lexenproducts.com)
Step 2 - Rinse the grass to remove any soil, dirt or dust from the blades. Shake
lightly to remove the excess water and drain.
Step 3 - Take a small bunch of the cut grass about a thumbs thickness and place
into the hopper and feeding chute of the juicer.
Step 4 - Press the on button, the grass will be
pulled through and squeezed automatically. You
will need to put though several handfuls to allow
the pressure to build up before the juice begins
flowing into the juice cup. Use the food pusher if
necessary.
Step 5 - Take the pulp from the first pressing and place it back into the juicing
Chamber as the first pressing is usually a bit moist until the pressure has been built
up in the mechanism.
If at any time the grass becomes wrapped around the auger or stuck in the juicing
body. Press the off button and then use the reverse button to unclog, then press
the on button again to resume juicing.
NEVER OVERLOAD THE CHAMBER WITH WHEATGRASS, ALWAYS PUT THROUGH
SMALL AMOUNTS AT A TIME.
It is often not necessary to use the food pusher if small bunches of grass are put
though at a time.
The same procedure can be used for other leafy types of grass like barley, or leafy
greens and sprouted grains.
7
Fruit & vegetable juice
Electric
Slice vegetables into thin strips
Assemble juicer as per page 5 using the
orange auger for most fruits and vegetables. Make sure the juice & waste cup are
in place. Place sieve on top of juice cup if
removal of pulp is desired
Slowly feed the cut strips of fruits or vegetables into the hopper. Do not force or
overload. The auger should automatically
take in the strips of fruits and vegetables
if they are cut in the correct size. Use food
pusher if necessary
The juice may be stored in the refrigerator for a day or two but is best when consumed immediately to benefit from the maximum live enzymes and nutrients.
8
Nut butters
Electric
Making your own nut
butters from peanuts
and cashews is easy and
healthy. Because you are
making it yourself you can
control the ingredients
and thus insure there are no hydrogenated oils, refined sugars and other
artificial ingredients.
Assemble the Healthyjuicer as per page 5
using the orange colored auger. It is not
necessary to use the sieve on the juice cup
but there may be a few drops of oil from
the crushed nuts that may drip from the
juicing spout, so it is a good idea to insert
the juice cup in place. The nuts or nut
butters will not come out of the juice
spout, but from the front end cap.
Turn on the juicer and place just a few nuts at a time until a steady stream of
nut butter starts to flow from the end cap nozzle. Pause every few seconds
to allow the crushed nuts to clear the chamber.
After you are finished making the nut butter you may stir in a small amount
of peanut oil to make a smoother consistency. You may also add a small
amount of honey (about two tablespoons per cup) to sweeten your homemade peanut or cashew butter (delicious!). Store in the refrigerator in an air
tight container.
NOTE: Almonds are extremely hard to crush and are not recommended.
9
Pasta & noodles
Electric
3 cups of flour
(equal parts of semolina
& durum or strong white
flour) 3 eggs, 1 tsp salt
1 tsp olive oil
Mound the flour on a clean work surface and make a deep well in the center of the
flour. Crack the eggs in the well and add salt. With a fork gradually mix the eggs
and salt together with the surrounding flour until all of the eggs and flour are incorporated together. If the dough is too dry add a few drops of water, if it is too moist
add a small amount of flour.
Knead dough on floured surface until smooth and elastic but not sticky. Wrap
dough in clear film and let rest for 20 minutes to one hour at room temperature.
Separate dough into sections small enough to easily fit into
hopper. Feed the dough slowly into the hopper to maintain
a smooth flow of pasta coming through. Lightly sprinkle flour
on the pasta to keep it from sticking together as it comes out
of the machine. You may use a drying rack to dry and preserve
your pasta for future use.
Use a small pair of kitchen shears to clip rigatoni into small
pieces as it comes out of the machine.
Making flavoured and colored pasta
Add crushed back or red pepper
& chili or fresh basil, oregano or
sage to make a colorful and tasty
variation.
For spinach pasta add chopped
fresh or frozen spinach after it has
been pressed of excess water.
For tomato pasta add 2 tbsp of
tomato puree or paste.
* When adding moist ingredients such as spinach and puree, the dough will be
slightly stickier due to the added moisture so more flour may need to be added to
dough.
10
Baby food
Electric
Baby food doesn’t have to come in jars. The healthyjuicer does and excellent
job of both pureeing and mashing food to let you decide on the consistency to
match your baby’s preference.
Three good reasons for making your own baby food:
• You know what’s in it
• You can custom-tailor the texture to your baby’s taste preferences
• Use fresh ingredients that have not been processed with preservatives and
chemicals and sitting on a store shelf for months or even years.
Set up the Healthyjuicer as per page 5 using the orange colored auger. Make
sure the collecting cup and waste cup are both
in place. pre-steam or boil the vegetables and
let cool. Turn on the healthyjuicer and feed a
small amount of food into the hopper at a time,
taking care not to place too much in at once.
Some of the more fibrous parts of the food will
be expelled from the front and a more pureed
consistency will be expelled from the juice
spout. After you are finished you may decide on
what consistency to make your baby food according to your baby’s preference
by adding the pureed food to the more course food expelled from the front in
various amounts.
Tips for making your own baby food
Don’t feel you have to prepare separate meals for your baby. You can simply
take portions of your adult food (before you add any strong seasonings) and
use the healthyjuicer to mash and puree them to a consistency your baby can
handle.
Make enough for several meals at a time and pour the freshly-cooked and
pureed food into an ice cube tray. Cover with cellophane wrap and freeze. Then,
remove the frozen food cubes from the tray and store in air-tight freezer bags.
Remove one serving-size cube at a time when needed.
11
Frozen desserts
Electric
It is both easy, fun & healthy to make your own frozen desserts with the
healthyjuicer. You control the ingredients so there are no thickeners, refined sugars
or other artificial ingredients.
Some the fresh fruits that you can freeze or buy already frozen
are blueberries, strawberries & raspberries. If you are using
strawberries, it is best to cut them into slices or buy them frozen
in pre-cut slices.
Set up the healthyjuicer as per page 5 using the orange colored auger. Insert both the collecting cup and the waste cup
in place. It is not necessary to use the sieve. All fruit will be
expelled from the front end cap.
It is best to let the frozen fruit thaw slightly for about 5 minutes
before starting to make your sorbet.
Turn on the healthyjuicer and start feeding a few berries at a
time making sure not to overload. Pause every few seconds
to allow the chamber to clear every so often. If the juicer
does jam, press the off button immediately and use the
included wrench to remove the end cap (clockwise direction) and remove the excess berries from the end cap before
replacing the cap and proceeding again.
To make frozen yogurt you can simply stir in about 1/4 cup
fresh vanilla or plain yogurt to one cup of berries after they
have been pureed through the Healthyjuicer. Usually there
will be no need to add any additional sweetener but you may add a small amount
of honey or organic sugar after you are done.
You can also freeze the yogurt with the berries in a flat tray and cut into small 1”
cubes. Feed these into the hopper one at a time.
If tray is let to freeze solid, remove from freezer and let thaw for 15 minutes before
cutting into cubes and placing into the Healthyjuicer.
Delicious, healthy & guilt free dessert!
12
Juicing recipes
Electric
Detoxification Drink
A great drink to rid yourself of unwanted toxins and heavy metals that you can
accumulate through poor eating habits and breathing in toxic city air. This can be
taken for several days after the holidays when you have strayed off your healthy
diet and need to get back to your regular self. Combine this drink daily along with a
clean diet of brown rice and vegetables for several weeks.
3 carrots (cut into strips)
1 bunch of wheatgrass
hand full of parsley
1 apple
1 stalk of celery
1/2 cucumber
Bladder cleansing drink
Cranberries are great for detoxifying the blader. The cranberries are a little bitter so
the carrots and apple balance the drink with natural
sweetness.
1 cup cranberries
1 orange peeled and separated
1 apple cut into wedges
2 carrots cut into thin strips
Morning drink
A delicious way to start the day
1/2 cup fresh strawberries
1 apple
1 orange peeled and separated into quarters
13
Juicing recipes
Electric
Enzyme booster
This is a great drink to start the morning and will raise the alkalinity in your system
as the body tends to be more acidic in the morning
one orange peeled and separated
1/2 medium papaya sliced
1/8 pineapple peeled, cored and sliced
The power house
With many green vegetables, this drink is loaded with iron and will keep you going
the whole day. For the serious juicing enthusiast
3 carrots (cut into strips)
1 bunch of wheatgrass
1 bunch of spinach
1 apple
1 stalk of celery
1/2 green bell pepper
1 small tomato cut into wedges.
A delicious drink
A tasty drink that is also good for you
1 cup strawberries
1 orange peeled and separated
1/4 cantaloupe peel and seeds removed
Carrot and orange
One of the simplest and most popular drinks around.
3 medium carrots (cut into strips)
2 oranges peeled and quartered
14
Electric
Please visit www.lexenproducts.com for other quality health related products
Electric
The healthysprouter kit is a convenient & fun way to grow your own
wheatgrass and sprouts. Modular
design means you can purchase additional kits to increase your yield. Includes seed soaking cup and instructions on how to grow wheatgrass and
sprouts.
& Pasta Maker
The healthyjuicer manual juicer is small,
light weight and compact. Perfect for
just a single shot of wheatgrass or to
take with you when are traveling. Suction and clamp base attaches to almost
any surface.
www.lexenproducts.com