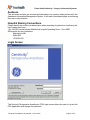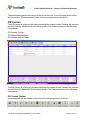
1
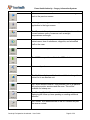
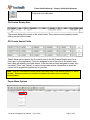
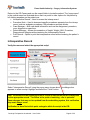
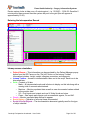
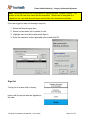
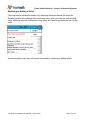
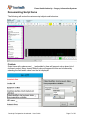
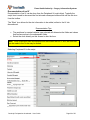
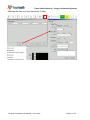
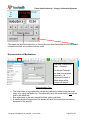
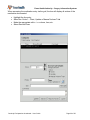
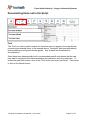
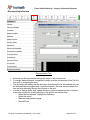
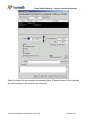
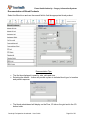
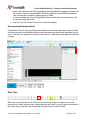
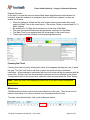
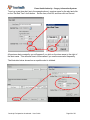
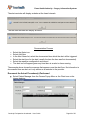
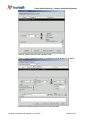
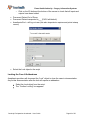
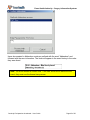
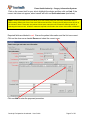
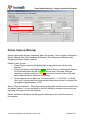
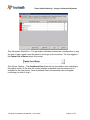
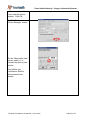
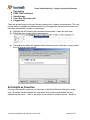
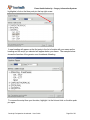
Anesthesia Information Management System (AIMS) Centricity Perioperative Anaesthesia (CPA) User Guide Version 8 Surgery Information Systems Fraser Health Authority December 2013 Fraser Health Authority – Surgery Information Systems Contents Audience............................................................................................................................... 4 Hospital Naming Conventions .............................................................................................. 4 Login Screen ........................................................................................................................ 4 OR Census ........................................................................................................................... 5 OR Census Toolbar ....................................................................................................... 5 OR Census Display Area ............................................................................................... 7 OR Census Search Fields .............................................................................................. 7 Popup Menu Options ..................................................................................................... 7 Intraoperative Record ........................................................................................................... 8 Patient Banner ............................................................................................................... 9 Understanding Device Capture (Moncap) ...................................................................... 9 Entering the Intraoperative Record .............................................................................. 10 Intraop screen orientation: ........................................................................................... 10 Intraop Toolbar ............................................................................................................. 11 Sign-In.......................................................................................................................... 13 Sign Out ....................................................................................................................... 14 Patient Information ....................................................................................................... 15 Switching or Adding a Script ........................................................................................ 16 Picklists ........................................................................................................................ 17 Ellipsis Function ........................................................................................................... 18 Event History ................................................................................................................ 19 Documentation of an IV................................................................................................ 19 Documentation of Fluids .............................................................................................. 22 Milestones .................................................................................................................... 23 Documentation of Medications ..................................................................................... 25 Documenting Items not in the Script ................................................................................... 27 Find .............................................................................................................................. 27 Centricity Perioperative Anesthesia – User Guide Page 2 of 56 Fraser Health Authority – Surgery Information Systems Documenting Infusions................................................................................................. 29 Documentation of Output ............................................................................................. 31 Altering Grid/Graph Contents ....................................................................................... 33 Documenting Retrospectively ...................................................................................... 34 Mark Time .................................................................................................................... 34 Freezing the Clock ....................................................................................................... 35 Milestones .................................................................................................................... 35 Documenting a Clinical Event ...................................................................................... 37 Use of Timers and Alerts.............................................................................................. 38 Document the Actual Procedure(s) Performed ............................................................ 40 The End of the Case .................................................................................................... 41 Locking the Case & Addendums .................................................................................. 43 Adding a New Case ............................................................................................................ 46 Device Capture (Moncap) ................................................................................................... 49 Altering the Data from the Device Capture................................................................... 54 Marking Artifact: ........................................................................................................... 54 Manually entering data: ................................................................................................ 54 Set Scripts as Favorites ...................................................................................................... 55 Centricity Perioperative Anesthesia – User Guide Page 3 of 56 Fraser Health Authority – Surgery Information Systems Audience This document contains an overview and descriptions for common tasks performed in the Anesthesia Information Management System. It will assist Anesthesiologists in performing their day-to-day activities. Hospital Naming Conventions Please identify the correct site abbreviation when searching for patients or confirming the right location and room (e.g. AB.OR1 would indicate Abbottsford Hospital Operating Room 1) for AIMS. Site specific first two characters Abbottsford=AB SMH=SM JPOCSC=SU Login Screen The Centricity Perioperative Anesthesia (CPA) login screen allows the user to log into the CPA Application and change the password. Centricity Perioperative Anesthesia – User Guide Page 4 of 56 Fraser Health Authority – Surgery Information Systems The permissions granted are based on the role of the user. In the following screen shots and instructions, all users based on their role may not perform some actions. OR Census The OR Census is a listing of all patients meeting the search criteria. Patients will populate primarily from the Meditech OR scheduling system. The Census consists of the following components: OR Census Toolbar OR Census Display Area OR Census Search Fields The OR Census is a listing of all patients meeting the search criteria. Patients will populate primarily from the Meditech OR scheduling system. The Census consists of the following components: OR Census Toolbar Icons displayed will vary based on the role and privileges granted to that role. Centricity Perioperative Anesthesia – User Guide Page 5 of 56 Fraser Health Authority – Surgery Information Systems Icon Specified Function to be performed The “Back” icon is used to close the current screen and go back to the previous screen. The “Logout” icon logs off of the application and returns application to the logon screen. The “Conversion” icon is a conversion tool that can be used to convert between units of measure such as weight, temperatures and length. The “New Case” icon starts a case for a patient including patient name, time of admittance, diagnosis, and scheduled staff on the case. The “Meditech” icon provides a link to the Meditech system. The “MSP” icon provides a link to the MSP website. Not currently active. The “Unit” icon displays a list of units available to change the patient list to an alternate unit. The “Active Monitor Session” icon provides a list of all patients with active monitor sessions and the room. This will be available for Intraop use. The “Pending Worklist” icon sends the user to another census displaying the follow up items pending or needing additional attention. The “Printer” icon when selected on the OR Census will print the census content. Centricity Perioperative Anesthesia – User Guide Page 6 of 56 Fraser Health Authority – Surgery Information Systems The “Refresh” icon provides a refresh or update to the screen of the most up-to-date data. OR Census Display Area The census displays the results of the search fields. The columns can be sorted by double clicking on the column header. OR Census Search Fields Search fields can be used to limit the results seen in the OR Census Display area. As a user logs in to the application, if they are assigned to one of the roles in the search area, their name will default in the initial search. If the user has not been assigned to cases, they can select “Clear” and “Search” to remove the provider criteria. Remember to select the correct unit to populate the patient list for your site. Note: Red font indicates the similar patient last name exist in the search criteria (i.e. Smith repeats). Exercise caution and confirm the patient information prior to initiating documentation. Popup Menu Options Centricity Perioperative Anesthesia – User Guide Page 7 of 56 Fraser Health Authority – Surgery Information Systems Return to the OR Census and use the search fields to locate the patient. The “popup menu” is the vertical menu bar illustrated above that is a portal to other options for the patient by left clicking anywhere on the patient row: Intraoperative Record – Used to access the intraop record. Procedure Note – Used to document specific procedures separate from the intraop record, such as analgesic procedures, OB procedures and pain blocks. Case Manager – Alter case detail information such as the assignment, procedure, room, diagnosis or case time. Patient Manager – Allows documentation of Height, Weight, ASA, Procedure, Diagnosis and Allergies without entering the Intraoperative Record. Print Record – Option to print the intraoperative record without entering the patient’s record. Intraoperative Record Verify the room and select the appropriate script Select “Intraoperative Record” using the popup menu shown above, the dialogue box appears to select a script. Highlight and select the “Finish” button. Note: Verification of the Operating Room is crucial to ensure the patient’s data posts on the appropriate record. The Room is the point of matching - due to potential Room changes that may not be updated from the scheduling system, this verification step must always occur. Verification is done first at this point and again within the script in the OR. Centricity Perioperative Anesthesia – User Guide Page 8 of 56 Fraser Health Authority – Surgery Information Systems Patient Banner The patient banner contains important information on the selected patient that can be seen with higher visibility at the top of the form. Information is populated from documentation from scheduled case information. Information displayed includes: DOB Name MRN# Account# Unit Room Age Gender Weight Height ASA Allergies Timers I/O Total Note: Red Exclamation is a list-view of the banner data and will show information that has exceeded the field space available in the header. Understanding Device Capture (Moncap) Device Capture is the mechanism that posts patient data to the intraoperative record from the physiologic monitors and Anesthesia machine. What you need to know… Device Capture matches the patient data to the patient record by the room selected – Verifying the room prior to starting device capture is very important! The monitor button must display a green “Active” (there is a brief period of about 30-60 seconds where this will be yellow and read “Unknown” while the connection is being confirmed). If it is red and reads “Inactive” there is NO data being captured and the session is not running. Moncap starting is triggered on the “Anesthesia Start” script object. Prompt documentation of this object will start device capture (and values posting to the patient record) at the appropriate time. “Anesthesia End” stops posting the data to the patient record. Centricity Perioperative Anesthesia – User Guide Page 9 of 56 Fraser Health Authority – Surgery Information Systems Device capture looks at data over a 5 minute period – i.e. 12:50:00 – 12:54:59. Once this 5 minute period has occurred then the system will post to the grid (this will appear at approximately 12:56). Entering the Intraoperative Record Intraop screen orientation: Patient Banner – This information can be populated by the Patient Manager popup button from the OR Census or the “Pat Info” button on the Intraop Toolbar. Information includes: height, weight, allergies, procedure, and diagnosis. Intraop Toolbar – Access to documentation items not in the script. Each icon to be discussed later. Grid – Consists of 4 tabs o Meds – All documented meds and infusions to display on this tab along with a running total of amounts administered. o Monitors – Monitor populated data as well as user documented values related to the monitor data. o I/O – Fluid inputs and outputs such as IV fluids, blood and urine. o Flows – Gas inputs and outputs such as anesthetic agents, O2 and N20. Graph – Monitor populated data defined to appear. Event History – Narrative of all script items documented. Script & Script Objects – The documentation elements typically used for the type of script selected. Centricity Perioperative Anesthesia – User Guide Page 10 of 56 Fraser Health Authority – Surgery Information Systems Intraop Toolbar Icon Specified Function to be performed The “Script” icon is used to reset the script list display and will return to the script after other functions are completed The “Find” icon is used to search for available documentation items that are not on the script. (e.g. blocks) The “Other” icon displays a window for free text to be documented. The “Medications” icon is used to search medications to add to the medications tab. The “Infusions” icon is used to search infusions to add to the current document. The “Fluids” icon is used to search fluids. The “Outputs” icon is used to search outputs. The “Blood” icon is used to search blood products. The “Sites” icon allows for documentation for vascular or arterial access. The “Mark Time” icon sends the user to another census displaying the follow up items pending or needing additional attention. Centricity Perioperative Anesthesia – User Guide Page 11 of 56 Fraser Health Authority – Surgery Information Systems The “All Time Events” icon displays critical time events in sequence. The “Alerts” icon displays the Timer and Alert Manager window. The “Patient Info” icon displays the Patient Manager window, which allows for documentation of patient, Note: This button is yellow when the Procedure and Diagnosis fields have not been charted. Not currently active. The “Chart” icon provides a pop-up menu for navigation to other areas of the application. The “Meditech” icon provides a link to the Meditech system. The “MSP” icon provides a link to the MSP website. The “Edit/Addendum” icon allows edits to be made to documentation. Addendum will be displayed only if case has been locked. The “Sign-In” icon displays a list of anesthesia providers assigned to the case or have previously signed into a case, search option access and history access. The “Logout” icon logs off of the application and returns application to the logon screen. Centricity Perioperative Anesthesia – User Guide Page 12 of 56 Fraser Health Authority – Surgery Information Systems The “Close” icon returns user to the OR Census screen. Sign-In Sign-in using the sign-in icon from the intraop toolbar the popup menu displays. If resources were assigned to the case (in Case Manager) and display on the OR Census, these users will automatically appear in the list. The first process below will illustrate how to sign in when the users in the popup are in the case. We will then illustrate how to sign in when the user is not on the popup menu. In the example above, the generic system user “Attending, Anesthesia” has been assigned to the case on the slate. If the user logged into the application is “Attending, Anesthesia”, the password field will show active when he(she) clicks on the box with his(her) name. This will display inactive for any other user who is already logged into the application. Also, the first user to sign into the case will default to assuming the audit role. The time of signing in can be altered by selecting the clock and adjusting. Centricity Perioperative Anesthesia – User Guide Page 13 of 56 Fraser Health Authority – Surgery Information Systems Note: Assuming the audit role is equivalent to “owning the pen” in paper charting. The auditor is truly the user who owns the documentation. Others can be assigned to or signed into the case and the audit report would reflect who charted the activities. If the user logged in was not showing in any box: 1. Select the Search popup item 2. Search on last name (full or partial) or role. 3. Highlight user from the list and select Sign-In. 4. Enter the password, select applicable options and click OK. Sign Out To sign out of a case click on history History will list anyone who has signed into the case. Centricity Perioperative Anesthesia – User Guide Page 14 of 56 Fraser Health Authority – Surgery Information Systems To sign-out, click on the name to highlight it, then click sign-out. Patient Information The next step in the workflow is to verify the patient information is completed by using the Pat Info icon. The icon directs the user to the same screen accessed via the Patient Manager icon from the OR Census. If the information was capture in the Anesthesia Assessment form, it will be displayed. Allergies can be entered in the Pat Info icon or by selecting the space directly on the patient banner allocated for allergies. Allergies entered into Meditech will also display from the OR scheduling system. Enter the weight, height and ASA Status The procedure and diagnosis should appear from the OR scheduling system. The Pat Info button will be yellow if the procedure and diagnosis are blank. Note: It is important to document the weight at the beginning of the case so the information is available for use when documenting weight-based infusions and medications during the case. Centricity Perioperative Anesthesia – User Guide Page 15 of 56 Fraser Health Authority – Surgery Information Systems Switching or Adding a Script The script can be switched or added to by selecting the ellipsis beside the script title. Switching scripts will exchange the current script items with ones from the new selected script. Adding a script will combine the script items and remove any duplicate items in the script. Any documented script items will remain untouched by switching or adding scripts. Centricity Perioperative Anesthesia – User Guide Page 16 of 56 Fraser Health Authority – Surgery Information Systems Documenting Script Items The following will review the various script objects and behaviors. Picklists Script items with underscores (__) embedded in them will present a drop down list of choices to select. Many times a default value will appear but this can be altered by selecting the field and a value from the list displayed. Centricity Perioperative Anesthesia – User Guide Page 17 of 56 Fraser Health Authority – Surgery Information Systems Note: There will be no arrow on the drop down field though a list of choices will appear if clicked. Ellipsis Function Selecting the ellipsis button (…) will appear on the right. When the end-user clicks on it, it will display a small horizontal menu of choices. Edit will allow the user to edit hard coded defaulted values (no underscores). The item may be “removed” from the script if it is not needed for this particular case. Time can be altered in –1, -5, and –10 increments (later we will discuss more options to alter the time beyond these increments). The “Other” option presents a list of other choices related to the script item. In the screen shot below Rocuronium was the original medication and the “other” related choices are presented in a list where the script typically displays. Centricity Perioperative Anesthesia – User Guide Page 18 of 56 Fraser Health Authority – Surgery Information Systems Event History All documented script items appear in the event history. By clicking on the event history box at the bottom right of the screen, the information expands to the box on the left as illustrated below. Select the Event History and it will expand to display chronologically on the right. Select the X to return to a closed state. Centricity Perioperative Anesthesia – User Guide Page 19 of 56 Fraser Health Authority – Surgery Information Systems Documentation of an IV Documentation of an IV can be done from the Peripheral IV script object. Typically the script item is used to document the first site and subsequent sites would use the site icon from the toolbar. The “Sites” icon allows for the site information to be added, edited or the IV site discontinued. Documentation Tips The peripheral or central catheter type selected will determine the fields and values that become active in the subsequent fields. Select the clock directly on this screen to alter the time. Note: Once fluids have been documented and associated with an IV site, the edits that can be made to the IV site may be limited. Selecting Peripheral IV in the script Centricity Perioperative Anesthesia – User Guide Page 20 of 56 Fraser Health Authority – Surgery Information Systems Selecting the Sites icon from the Intraop Toolbar Centricity Perioperative Anesthesia – User Guide Page 21 of 56 Fraser Health Authority – Surgery Information Systems Documentation of Fluids IV fluids such as Lactated Ringers are documented in the script by selecting the script item. The Fluids icon presents another option to select additional fluids. A new site can also be added from the Chart Fluid screen. Documentation Tips The volume field should represent the volume of the IV bag being hung. For example: If the patient comes into the room with 400 ml remaining in an existing bag, then document 400 in the volume field. When you have to document the next bag of fluids, the software remembers that you have set the volume to 400 so you will have to change it back to 1000 if you are hanging that volume. The Flow Type defaults to Maintenance – a maintenance flow type does not give credit for volume infused until the user documents the volume. This is a drop down field that also allows such options as rate-based that would document as a ratebased volume throughout the case. The IV site field and time can be altered within this dialogue box but will default to the IV site documented in the previous step. Once an IV bag has been completely infused the software will automatically document the next bag being hung. Note: Once a fluid such as Lactated Ringers has been documented, subsequent documentation on this fluid should be initiated on the grid – I/O tab. If a second bag of Lactated Ringers is being administered and maintained in a separate IV site the Fluids icon should be used to maintain two separate grid entries. A warning message will appear to confirm this action but accepting the message will allow the Centricity Perioperative Anesthesia – User Guide Page 22 of 56 Lactated Ringers in the separate sites to be maintained separately. Fraser Health Authority – Surgery Information Systems Documenting the infused volume of fluids is done by clicking on the fluid name in the I/O tab. The default shows the infused volume as the total volume started. Clicking on Record/Close will show this total volume infused and will show another bag hung. To discard an amount remaining in the bag and hang a new bag, reduce the Infused Volume to the correct amount and click on New Bag/Syringe/Unit and then click Record/Close. You will be prompted to infuse or discard the remaining volume. To record only the partial volume infused, click on Update and then Record/Close. Milestones The Milestone time button will show the next milestone in the case. This can be used to create a time stamp for a series of events to be documented after the fact. Centricity Perioperative Anesthesia – User Guide Page 23 of 56 Fraser Health Authority – Surgery Information Systems To create a time place-holder, click on the milestones button. The button will create a time stamp for that milestone in your documentation and then show the next milestone. Milestones are shown in blue on the script. When time permits you can go to the clock and click on the Times button to display the list of milestones which have been documented. Only the times which have been documented will appear in the drop down, so depending on where you are in the script, the list of milestones will be different. Click on the appropriate milestone and the clock will then freeze to the time that the button was clicked on for that milestone. This allows the user to document items from the script with that time stamp. Centricity Perioperative Anesthesia – User Guide Page 24 of 56 Fraser Health Authority – Surgery Information Systems Click again on the milestone button to choose the next time placeholder or click on Now to unfreeze the clock and continue with the script. Documentation of Medications First dose charted from script – Fentanyl. On the grid Cefazolin has been documented previously – all subsequent doses of either drugs will be charted on the grid. Documentation Tips The initial dose of any medication can be documented by either using the script entry or by using the Meds icon. The dose will post in the event history and on the grid on the Meds tab. Any edits made to the entry should be done via the grid entry. A starting dose will appear and the arrows will allow for incremental increase or decrease of the amount. Centricity Perioperative Anesthesia – User Guide Page 25 of 56 Fraser Health Authority – Surgery Information Systems When accessing the medication entry via the grid, the box will display all entries of the medication documented. Highlight the line entry. Select the “Action” – Chart, Update or Manual Volume Total Make the appropriate edits – i.e. volume, time, etc. Select Record/Close Centricity Perioperative Anesthesia – User Guide Page 26 of 56 Fraser Health Authority – Surgery Information Systems Documenting Items not in the Script Find The “Find” icon can be used to search for items that may not appear in the script but are commonly documented items. In the example above, “tourniquet” has been entered and three possible pre-configured choices appear. Any of these can be selected for documentation. Some items have been specially built to accommodate specific procedures that the user may want to incorporate into the intraoperative documentation such as a pain block. To access the pain block screen, click on the “Find” button and enter “pain block”. Press enter or click on the Search button. Centricity Perioperative Anesthesia – User Guide Page 27 of 56 Fraser Health Authority – Surgery Information Systems Select the box on the left to produce the procedure screen shown on the right for documenting the selected procedure within the script. If the search is unsuccessful, a free text note can be documented. Select the “Other” icon and type the details in the box. Note: The items documented with the “Other” icon, as well as all comment fields will display in the event history of the printed record as bold. Centricity Perioperative Anesthesia – User Guide Page 28 of 56 Fraser Health Authority – Surgery Information Systems Documenting Infusions Documentation Tips Infusions can be documented through the script or the infusion icon. For weight-based infusions, the patient’s weight must be documented in the Pat Info icon prior to accepting the entry. The grid entry will display the rate and when Anesthesia End is documented the rate will automatically be stopped and a total documented. The user can also adjust the rate and stop manually through the infusion on the grid. In order to change dose, stop, update the entry or post a manual volume of infusion, access the infusion by clicking directly on the grid for the infusion item. o When the box appears, highlight the line entry. o Select the action o Make the appropriate change o Record/Close. Centricity Perioperative Anesthesia – User Guide Page 29 of 56 Fraser Health Authority – Surgery Information Systems Select the action first and complete the remaining fields. If Manual Volume Total is selected the total is entered in the field at the top of the box. Centricity Perioperative Anesthesia – User Guide Page 30 of 56 Fraser Health Authority – Surgery Information Systems Documentation of Output EBL and Urine are defaulted on the grid for documentation directly on the I/O tab. For all other outputs, select the Output icon. The initial entry is documented using the script or icon and subsequent entries are documented on the grid at any time throughout the case. A running I/O total will be displayed in the banner. More detail on the I/O can be seen using the I/O icon above the Event History. Centricity Perioperative Anesthesia – User Guide Page 31 of 56 Fraser Health Authority – Surgery Information Systems Documentation of Blood Products Select the Blood icon and use the search field to find the appropriate blood product. Documentation Tips The first box displayed is used for rate, units and time. Selecting the details… button will provide a place to indicate blood type, lot number and patient response. The blood administered will display on the Flow, I/O tab on the grid and in the I/O button totals. Centricity Perioperative Anesthesia – User Guide Page 32 of 56 Fraser Health Authority – Surgery Information Systems Altering Grid/Graph Contents The “Config” icon allows the user the ability to re-order the grid or graph monitor contents, remove items or add items not already displayed. Documentation Tips To add items to the grid highlight the choice in the left column and add to the right using the arrow button (Blue arrow). The screen shot illustrates the grid tab. When the grid tab is displayed the appropriate tab should be selected first (Monitors or Flows). Centricity Perioperative Anesthesia – User Guide Page 33 of 56 Fraser Health Authority – Surgery Information Systems Items on the Monitor tab will be populated automatically with mapped items sent via the monitor. Items on the variables tab will be available for manual documentation only. Groups tab can add a common group of items. To remove items from the grid highlight the item on the right column and move the left column using the arrow. Use the “Up” and “Down” buttons to re-order the display. Documenting Retrospectively The patient is the first priority and the documentation will still be there when ready to chart. As users become more familiar with the scripts retrospective charting will decrease but will occur. The next two screen shots will discuss options to facilitate the retrospective charting process. Mark Time Mark time is a bookmark for the time an event occurred. If the user does not have the opportunity to chart an entire task, simply selecting the “Mark” icon will place a bookmark in the event history until the user does have the opportunity to chart the task. Centricity Perioperative Anesthesia – User Guide Page 34 of 56 Fraser Health Authority – Surgery Information Systems Example Scenario: At the start of a case the user may select Mark when medications are administered for induction, when the intubation is completed, when the NG tube is placed, or when an arterial line is place. When the patient is settled and the user begins charting these tasks they would select the Mark Time in the event history – the buttons “delete, comment and Go To Mark” Appear. By selecting Go To Mark the clock backs up to the time of the Mark. The user now selects/documents the appropriate script item for that Mark. The Mark Time is now replaced with the actual event in the event history. These steps would be followed for the remaining Mark events. Freezing the Clock Freezing the clock occurs by selecting the clock. A box appears allowing the user to adjust the time. The “Set Indef” button will stop or freeze the clock at the time indicated indefinitely. All documentation performed with the clock frozen will be documented with the frozen time. Monitor and flow documentation continues and is not affected by the freeze. To restore the clock to the current time, select the clock icon and select the “Now” button. Note: When the clock is not displaying current time it will have a black background and red font. Milestones The Milestone time button will show the next milestone in the case. This can be used to create a time stamp for a series of events to be documented after the fact. To create a time place-holder, click on the milestones button. Centricity Perioperative Anesthesia – User Guide Page 35 of 56 Fraser Health Authority – Surgery Information Systems The button will create a time stamp for that milestone in your documentation and then show the next milestone. Milestones are shown in blue on the script. When time permits you can go to the clock and click on the Times button to display the list of milestones which have been documented. Only the times which have been documented will appear in the drop down, so depending on where you are in the script, the list of milestones will be different. The arrows to the left and right of the milestone can also be clicked to advance to the next milestone or go back to a previous milestone. Click on the appropriate milestone and the clock will then freeze to the time that the button was clicked for that milestone. This allows the user to document several items from the script with that time stamp. Click again on the milestone button to choose the next time placeholder or click on Now to unfreeze the clock and continue with the script. Centricity Perioperative Anesthesia – User Guide Page 36 of 56 Fraser Health Authority – Surgery Information Systems Documenting a Clinical Event If it is necessary to document a clinical event (e.g. dental injury, hypothermia, laryngospasm, etc.) use the Find feature Enter “clinical event” and click search. Click on the Clinical Event object and then enter the type of event from the list provided. Enter the treatment details in free text and click on record. Centricity Perioperative Anesthesia – User Guide Page 37 of 56 Fraser Health Authority – Surgery Information Systems Use of Timers and Alerts The application has paired events that when documented will note the start time, stop time and elapsed time between the two. For example, a tourniquet being applied, a tourniquet being removed and the total tourniquet time during a case. Alerts can be set up as a pre-configured option when an item is documented or can be manually initiated when the item is documented. If there are existing alerts the toolbar button will be Green. To View or Create an alert, click on the Alerts button on the toolbar. Existing alerts will show in the window. To create a new alert, click on Add Alert. Centricity Perioperative Anesthesia – User Guide Page 38 of 56 Fraser Health Authority – Surgery Information Systems To set up a one-time alert (as in the example above), create a name for the alert and click on the “Set End Time” clock button. Set the time, click OK, and then click on Record. All previous alerts created by you will appear if you click on the down arrow to the right of the alert name. This will save time in future cases if you use the same alert frequently. The illustration below shows how a repetitive alert is initiated. Centricity Perioperative Anesthesia – User Guide Page 39 of 56 Fraser Health Authority – Surgery Information Systems The alert reminder will display as below at the timed intervals. The last alert reminder will display as below. Documentation Process Select the Alerts icon. Select Add New In the Alert Name list, select the documented item which the alert will be triggered. Select the start time for the alert (usually the time the item was first documented). Select the repetitive configuration and record. The alert icon will appear green any time there is an alert or timer running. The example above shows the message that appears once the alert fires. No information is documented from an alert as it only serves as a reminder to the provider. Document the Actual Procedure(s) Performed Select Patient Manager from the Census Popup Menu or the Chart icon on the intraop desktop Centricity Perioperative Anesthesia – User Guide Page 40 of 56 Fraser Health Authority – Surgery Information Systems Compare the Procedure Description to the actual procedure performed o If they are the same, do nothing further and the existing Procedure Description will appear on the intraoperative record o If they are different Delete existing Procedure Description if it was not done (highlight and click delete) Click Add and then click the Procedure Description box and type a partial description (e.g. knee) and press enter. Click on the appropriate description and then click ok Repeat if more than one procedure was performed Click on Record/Close when you are finished The End of the Case When the patient is leaving the OR, there are still several objects that remain to be documented. At the end of the case the user will: Total Inputs and Outputs o Click on the I/O tab at the right side of the screen o Click on each outstanding output to produce the detail screen (e.g. Estimated blood loss) Centricity Perioperative Anesthesia – User Guide Page 41 of 56 Fraser Health Authority – Surgery Information Systems o Enter a volume and click on Record/Close o Click on each outstanding input to produce the detail screen (e.g. NaCl) o Enter the infused volume and click on Record/Close Centricity Perioperative Anesthesia – User Guide Page 42 of 56 Fraser Health Authority – Surgery Information Systems o Click on the I/O button at the bottom of the screen to check that all inputs and outputs have been totaled Document Patient Out of Room Document Patient transported to___ (PACU will default) Anesthesia End – will log out user (this also stops device capture and prints intraop record) Select the Lock object in the script Locking the Case & Addendums Anesthesia providers will document the “Lock” object to close the case to documentation. Any further documentation after the lock will require an addendum. Select the Lock object from the script. The “Confirm Locking” box appears Centricity Perioperative Anesthesia – User Guide Page 43 of 56 Fraser Health Authority – Surgery Information Systems . Highlight the name, enter password and select “Proceed with Lock”. If there are required items not completed the user will be alerted to this. All buttons will become inactive and clock freezes. Any further documentation performed on the case will require the Addendum Mode object to be selected from the script first. What was previously an inactive Edit icon on the toolbar now becomes an active Addendum icon. Confirm Addendum box appears – highlight name and enter password. Centricity Perioperative Anesthesia – User Guide Page 44 of 56 Fraser Health Authority – Surgery Information Systems Items documented in Addendum mode are prefixed with the word “Addendum” and followed with the user information. The items will appear in the event history in the order they were timed. Note: The clock restarts at current time. If the user would like to back time the event, they must use the freeze time process. Centricity Perioperative Anesthesia – User Guide Page 45 of 56 Fraser Health Authority – Surgery Information Systems Adding a New Case Select New Case from the OR Census toolbar In the create case screen, select Manual admit with link and click on Link In the Existing Visits screen, enter the MRN (Unit #) or the patient name. Click Search. MRN Centricity Perioperative Anesthesia – User Guide PATIENT NAME Page 46 of 56 Fraser Health Authority – Surgery Information Systems Click on the correct visit for your site to highlight the choice and then click on Link. If the correct visit does not appear, select cancel and click on Quick-start case (see below). Note: Entering the MRN (Unit #) will allow you to see existing visits from the facility associated with the MRN making selecting the correct visit more efficient and accurate. Entering the full patient name will pull up all visits but if there is more than one patient with the same name this will increase the difficulty and risk of selecting the incorrect visit. All add on cases are required to be linked to the correct visit number in Meditech. Required fields are labeled in red. Ensure the patient information and the Unit are correct. Click on the down arrow beside Room and select the correct room. Click on Add to enter the proposed procedure. Centricity Perioperative Anesthesia – User Guide Page 47 of 56 Fraser Health Authority – Surgery Information Systems Enter a partial description of the procedure and press <enter> A list of procedures containing the partial description will be presented. Click on the slider on the left side of the box to peruse the list and double click on your choice, then click on OK. More than one procedure can be selected. To add another procedure click on Add again and repeat the previous step if necessary. Enter a Diagnosis and click on Record. The case will now appear on the census and can be selected for documentation. NOTE: If the interface is not working and there are no visits displayed in the Manual Admit with Link selection, click on Quick-start case. Enter the patients First and Last Name and their Visit Number (Account Number) from their chart or their arm-band. Enter the OR Room that will be used for the monitor capture and the Procedure Description as explained in the previous section. The visit number will be used later to reconcile this case with the Meditech electronic record to ensure that the documentation is entered on the electronic record for legal requirements and future reference. Click on Record when finished. Centricity Perioperative Anesthesia – User Guide Page 48 of 56 Fraser Health Authority – Surgery Information Systems Device Capture (Moncap) Device capture has several components within the process: Device Capture Verification, Device Capture Start, Start Parameter Notification, Stop Parameter Notification and Stopping the Device Capture session. Details to keep in mind: Device Capture matches the patient data to the patient record by the room selected. The monitor button must display a green “Active” (there is a brief period of about 30-60 seconds where this will be yellow and will read “Unknown” while the connection is being confirmed. If it is red and reads “Inactive” there is NO data being captured and the session is not running. Device capture looks at data over a 5 minute period – i.e. 12:50:00 – 12:54:59. Once this 5 minute period has occurred then the system will post to the grid (this will appear at approximately 12:56). Device Capture verification – Physiologic data populating the patient record is matched on the patient location. It is very important to use the verification process to ensure you are capturing vital signs on the correct patient. Device verification will display the dialogue box below when the script item below is documented. Centricity Perioperative Anesthesia – User Guide Page 49 of 56 Fraser Health Authority – Surgery Information Systems Device Capture Start – Starting of device capture is when the data from the monitor will begin posting to the patient chart. When Anesthesia Start is documented the device capture is kicked off. Start Device Notification – The parameter notification feature was developed to alert users when the documentation is not collecting data. (The start parameter notification is set to begin when the Patient In Room object is documented.) Some reasons for this may be: Patient not connected to monitors Connections from physiological monitors are not secure (no data being sent). Below is the Parameter notification box that will display to alert when data is not being captured. The box will alert when any of the listed items is not being captured. Centricity Perioperative Anesthesia – User Guide Page 50 of 56 Fraser Health Authority – Surgery Information Systems Stop Parameter Notification – The parameter notification feature has a configuration to stop the alert of data (usually once the patient is no longer on the monitors). The stop trigger is the Patient Out of Room object in the script. Stop Device Capture – The Anesthesia End object will stop the session from collecting to the patient record. At this time the monitor session is released from this patient and is available for the next patient. Once Anesthesia End is documented a box will appear confirming you wish to stop it. Centricity Perioperative Anesthesia – User Guide Page 51 of 56 Fraser Health Authority – Surgery Information Systems If another patient is receiving vitals from the room you are in you will get the following message: 1.. This message may indicate that the room showing on the screen is not the room you are in and another patient is currently connected to the monitor in the room you have selected. Change the room if this is the case. This may also indicate that the previous patient’s documentation has not been completed and the monitor capture is continuing. Go to step 2 below in this case. 2.. Go to the Census and click on the Monitor button to see which case is active for the monitor capture. Select the case and click End Monitor Session. Return to the intraoperative documentation for your case and start the monitor session. 3.. In order to start a monitor session in a room where you have just ended one you must increase the time by one minute. When you click start, you will receive the following message informing you that there Centricity Perioperative Anesthesia – User Guide Page 52 of 56 Fraser Health Authority – Surgery Information Systems will be an overlap of time if you start the monitor session. Click OK. 4.. Click Start on the ‘Device Manager’ screen. On the ‘Observation time’ screen, select +1 to increase the time by one minute. You will then get confirmation that the device session has started. Centricity Perioperative Anesthesia – User Guide Page 53 of 56 Fraser Health Authority – Surgery Information Systems Altering the Data from the Device Capture The monitor automatically captures data throughout the case. If there is a point where the user does not agree with the data or the data is deemed artifact, the users can remove the data from the calculations. Marking Artifact: Select the grid cell for the appropriate time period. Highlight the value to be discarded. Select the Mark as Artifact button. The calculation will now reflect the data without the discarded entry. Manually entering data: If there is a need for a user to manually enter data that is typically populated from the monitor, the user can access the cell screen above. Enter the desired data in the Value field and select the Record button. Manually entering data onto the grid is mandatory for all sites except for ARH. The following fields will have to be entered manually: TOF Centricity Perioperative Anesthesia – User Guide Page 54 of 56 Fraser Health Authority – Surgery Information Systems Rate Setting PEEP CPAP monitored State Entropy Fresh Gas Flow l/min (x10) Oxygen l/min There are several items on the grid that are configured for manual documentation. The user has the ability to expedite the documentation by carrying similar values forward to the next cell when the patient’s condition is unchanged. Highlight the cell following the timeframe documented – select the time itself. Select the copy forward recent assessments. The display box below will appear, select those items you would like to copy forward from the previous time period. Set Scripts as Favorites You can mark specific scripts as your favorites in the Script Selection dialog box at any time. All scripts remain available for other users, but Favorite script folders are only viewable by the owner. Click on the script you would like to make a favorite. Once it is Centricity Perioperative Anesthesia – User Guide Page 55 of 56 Fraser Health Authority – Surgery Information Systems highlighted, click on the blue push pin the top right corner. A new heading will appear as the first entry in the list of scripts with your name as the heading and the script you selected will appear below your name. The example below shows the favorites of the generic user Anesthesia Attending. To remove the script from your favorites, highlight it in the list and click on the blue push pin again. Centricity Perioperative Anesthesia – User Guide Page 56 of 56