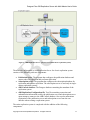
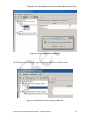
1
Postgres Plus xDB Replication Server with Multi-Master User’s Guide Postgres Plus xDB Replication Server with Multi-Master build 57 August 22, 2012 Postgres Plus xDB Replication Server with Multi-Master User’s Guide, Version 5.0 by EnterpriseDB Corporation Copyright © 2012 EnterpriseDB Corporation. All rights reserved. EnterpriseDB Corporation, 34 Crosby Drive, Suite 100, Bedford, MA 01730, USA T +1 781 357 3390 F +1 978 589 5701 E [email protected] www.enterprisedb.com Copyright © 2012 EnterpriseDB Corporation. All rights reserved. 2 Postgres Plus xDB Replication Server with Multi-Master User’s Guide Table of Contents 1 2 Introduction ................................................................................................................. 9 1.1 Typographical Conventions Used in this Guide ............................................... 10 1.2 Other Conventions Used in this Guide ............................................................. 11 1.3 How to Use This Guide..................................................................................... 11 Overview ................................................................................................................... 13 2.1 Why Use Replication ........................................................................................ 13 2.1.1 Offloading Reporting and Business Intelligence Queries ............................. 13 2.1.2 Using Warm Standby Servers ....................................................................... 13 2.1.3 Testing Systems in Parallel ........................................................................... 13 2.1.4 Migrating Data .............................................................................................. 14 2.1.5 Write Availability ......................................................................................... 14 2.1.6 Write Scalability ........................................................................................... 14 2.1.7 Localized Data Access .................................................................................. 14 2.2 Replication Concepts and Definitions .............................................................. 14 2.2.1 Comparison of Single-Master and Multi-Master Replication ...................... 15 2.2.2 Publications and Subscriptions ..................................................................... 15 2.2.3 Single-Master (Master-to-Slave) Replication ............................................... 19 2.2.4 Multi-Master Replication .............................................................................. 20 2.2.5 Asynchronous ............................................................................................... 22 2.2.6 Snapshot and Synchronization ...................................................................... 22 2.2.7 Snapshot-Only Publications .......................................................................... 23 2.2.8 Filters ............................................................................................................ 23 2.3 xDB Replication Server Components and Architecture ................................... 24 2.3.1 Physical Components .................................................................................... 24 2.3.2 Logical Components ..................................................................................... 33 2.3.3 xDB Replication System Examples .............................................................. 37 2.4 Designing a Replication System ....................................................................... 50 2.4.1 General Steps ................................................................................................ 50 2.4.2 Design Considerations .................................................................................. 51 2.4.3 Restrictions on Replicated Database Objects ............................................... 53 2.4.4 Performance Considerations ......................................................................... 55 2.4.5 Distributed Replication ................................................................................. 58 Copyright © 2012 EnterpriseDB Corporation. All rights reserved. 3 Postgres Plus xDB Replication Server with Multi-Master User’s Guide 3 4 Installation................................................................................................................. 63 3.1 Installing With Stack Builder or StackBuilder Plus ......................................... 63 3.2 Post-Installation Host Environment .................................................................. 86 3.3 Registering Your xDB Replication Server Product .......................................... 87 Introduction to the xDB Replication Console ........................................................... 92 4.1 4.1.1 Refresh .......................................................................................................... 93 4.1.2 Create Publication ......................................................................................... 93 4.1.3 Publication Management .............................................................................. 94 4.1.4 Create Subscription ....................................................................................... 94 4.1.5 Subscription Management ............................................................................ 95 4.2 5 xDB Replication Console Tool Bar .................................................................. 93 Saving Server Login Information ..................................................................... 95 4.2.1 Server Login File .......................................................................................... 96 4.2.2 Security Risks of Saved Server Login Information ...................................... 98 Single-Master Replication Operation ....................................................................... 99 5.1 Prerequisite Steps .............................................................................................. 99 5.1.1 Enabling Access to the Database Servers ..................................................... 99 5.1.2 Preparing the Publication Database ............................................................ 101 5.1.3 Preparing the Subscription Database .......................................................... 107 5.1.4 Verifying Host Accessibility....................................................................... 110 5.2 Creating a Publication ..................................................................................... 116 5.2.1 Registering a Publication Server ................................................................. 116 5.2.2 Adding a Publication Database ................................................................... 120 5.2.3 Adding a Publication................................................................................... 123 5.2.4 Metadata Created for a Publication............................................................. 127 5.3 Creating a Subscription ................................................................................... 130 5.3.1 Registering a Subscription Server ............................................................... 131 5.3.2 Adding a Subscription Database ................................................................. 133 5.3.3 Adding a Subscription................................................................................. 137 5.3.4 Metadata Created for a Subscription........................................................... 140 5.4 On Demand Replication .................................................................................. 141 5.4.1 Performing Snapshot Replication ............................................................... 142 5.4.2 Performing Synchronization Replication .................................................... 145 5.5 Managing a Subscription ................................................................................ 148 Copyright © 2012 EnterpriseDB Corporation. All rights reserved. 4 Postgres Plus xDB Replication Server with Multi-Master User’s Guide 5.5.1 Updating a Subscription Server .................................................................. 148 5.5.2 Updating a Subscription Database .............................................................. 151 5.5.3 Updating a Subscription .............................................................................. 155 5.5.4 Removing a Subscription ............................................................................ 157 5.5.5 Removing a Subscription Database ............................................................ 160 5.6 6 Performing Controlled Switchover ................................................................. 163 5.6.1 Controlled Switchover Overview ............................................................... 163 5.6.2 Controlled Switchover Steps....................................................................... 164 5.7 Performing Failover ........................................................................................ 166 5.8 Optimizing Performance ................................................................................. 167 5.8.1 Optimizing Snapshot Replication ............................................................... 167 5.8.2 Optimizing Synchronization Replication .................................................... 170 Multi-Master Replication Operation ....................................................................... 178 6.1 Prerequisite Steps ............................................................................................ 178 6.1.1 Preparing the Master Definition Node ........................................................ 178 6.1.2 Preparing Additional Master Nodes............................................................ 179 6.1.3 Verifying Host Accessibility....................................................................... 180 6.2 Creating a Publication ..................................................................................... 182 6.2.1 Registering a Publication Server ................................................................. 182 6.2.2 Adding the Master Definition Node ........................................................... 183 6.2.3 Adding a Publication................................................................................... 186 6.3 Creating Additional Master Nodes ................................................................. 190 6.4 Metadata Created in Master Nodes ................................................................. 195 6.5 On Demand Replication .................................................................................. 196 6.5.1 Performing Snapshot Replication ............................................................... 196 6.5.2 Performing Synchronization Replication .................................................... 200 6.6 Conflict Resolution ......................................................................................... 203 6.6.1 Conflict Types ............................................................................................. 203 6.6.2 Conflict Detection ....................................................................................... 205 6.6.3 Conflict Resolution Strategies .................................................................... 207 6.6.4 Conflict Prevention – Uniqueness Case ...................................................... 208 6.6.5 Example Conflict Resolution ...................................................................... 208 6.7 Viewing Conflict History................................................................................ 209 6.8 Updating the Conflict Resolution Options ...................................................... 212 Copyright © 2012 EnterpriseDB Corporation. All rights reserved. 5 Postgres Plus xDB Replication Server with Multi-Master User’s Guide 7 6.9 Switching the Master Definition Node ........................................................... 216 6.10 Optimizing Performance ................................................................................. 219 Common Operations ............................................................................................... 221 7.1 Creating a Schedule ........................................................................................ 221 7.2 Managing a Schedule ...................................................................................... 228 7.2.1 Updating a Schedule ................................................................................... 228 7.2.2 Removing a Schedule ................................................................................. 231 7.3 7.3.1 All Replication History ............................................................................... 235 7.3.2 Hiding Synchronizations With Zero Transaction Counts ........................... 238 7.3.3 Shadow Table History................................................................................. 240 7.4 Managing History ........................................................................................... 242 7.4.1 Scheduling Shadow Table History Cleanup ............................................... 243 7.4.2 Cleaning Up Shadow Table History ........................................................... 247 7.4.3 Cleaning Up Replication History ................................................................ 252 7.5 Managing a Publication .................................................................................. 256 7.5.1 Updating a Publication Server .................................................................... 256 7.5.2 Updating a Publication Database ................................................................ 262 7.5.3 Updating a Publication ................................................................................ 266 7.5.4 Validating a Publication .............................................................................. 288 7.5.5 Removing a Publication .............................................................................. 295 7.5.6 Removing a Publication Database .............................................................. 299 7.6 Replicating DDL Changes .............................................................................. 302 7.6.1 DDL Change Replication Process .............................................................. 304 7.6.2 DDL Change Replication Using the xDB Replication Console ................. 305 7.7 8 Viewing Replication History .......................................................................... 235 Loading Tables From an External Data Source (Offline Snapshot) ............... 307 7.7.1 Non-Batch Mode Synchronization ............................................................. 308 7.7.2 Offline Snapshot Configuration Options .................................................... 309 7.7.3 Single-Master Replication Offline Snapshot .............................................. 310 7.7.4 Multi-Master Replication Offline Snapshot................................................ 311 xDB Replication Server Command Line Interface ................................................. 313 8.1 Prerequisite Steps ............................................................................................ 313 8.2 General Usage ................................................................................................. 314 8.2.1 Running xDB Replication Server CLI ........................................................ 314 Copyright © 2012 EnterpriseDB Corporation. All rights reserved. 6 Postgres Plus xDB Replication Server with Multi-Master User’s Guide 8.2.2 Getting Help ................................................................................................ 315 8.2.3 Supplying the Publication or Subscription Server Login Information ....... 315 8.2.4 Using Encrypted Passwords in Text Files .................................................. 317 8.2.5 Running xDB Replication Server CLI Using a Parameter File .................. 317 8.3 xDB Replication Server CLI Commands ....................................................... 319 8.3.1 Getting Help (help) ..................................................................................... 319 8.3.2 Printing the Version Number (version)....................................................... 320 8.3.3 Printing the xDB Replication Server Version Number (repversion) .......... 320 8.3.4 Encrypting Passwords (encrypt) ................................................................. 321 8.3.5 Adding a Publication Database (addpubdb) ............................................... 321 8.3.6 Printing Publication Database IDs (printpubdbids) .................................... 325 8.3.7 Printing Publication Database Details (printpubdbidsdetails) .................... 325 8.3.8 Updating a Publication Database (updatepubdb) ........................................ 326 8.3.9 Removing a Publication Database (removepubdb)..................................... 328 8.3.10 Get Tables for a New Publication (gettablesfornewpub) ............................ 329 8.3.11 Creating a Publication (createpub).............................................................. 329 8.3.12 Printing a Publication List (printpublist) .................................................... 333 8.3.13 Printing a List of Tables in a Publication (printpublishedtables) ............... 334 8.3.14 Adding Tables to a Publication (addtablesintopub) .................................... 334 8.3.15 Removing Tables From a Publication (removetablesfrompub) .................. 337 8.3.16 Printing a Filter Clause (printfilterclause) .................................................. 338 8.3.17 Updating a Filter Clause (updatefilterclause) ............................................. 339 8.3.18 Removing a Filter Clause (removefilterclause) .......................................... 341 8.3.19 Printing the Conflict Resolution Strategy (printconfresolutionstrategy) .... 342 8.3.20 Updating the Conflict Resolution Strategy (updateconfresolutionstrategy) 343 8.3.21 Setting the Master Definition Node (setasmdn).......................................... 344 8.3.22 Validating a Publication (validatepub) ....................................................... 345 8.3.23 Validating All Publications (validatepubs) ................................................. 346 8.3.24 Removing a Publication (removepub) ........................................................ 347 8.3.25 Replicating DDL Changes (replicateddl).................................................... 348 8.3.26 Adding a Subscription Database (addsubdb) .............................................. 349 8.3.27 Printing Subscription Database IDs (printsubdbids)................................... 351 8.3.28 Printing Subscription Database Details (printsubdbidsdetails)................... 351 8.3.29 Updating a Subscription Database (updatesubdb) ...................................... 352 Copyright © 2012 EnterpriseDB Corporation. All rights reserved. 7 Postgres Plus xDB Replication Server with Multi-Master User’s Guide 8.3.30 Removing a Subscription Database (removesubdb) ................................... 354 8.3.31 Creating a Subscription (createsub) ............................................................ 355 8.3.32 Printing a Subscription List (printsublist) ................................................... 356 8.3.33 Taking a Single-Master Snapshot (dosnapshot) ......................................... 357 8.3.34 Take a Multi-Master Snapshot (dommrsnapshot)....................................... 358 8.3.35 Performing a Synchronization (dosynchronize) ......................................... 359 8.3.36 Configuring a Single-Master Schedule (confschedule) .............................. 361 8.3.37 Configuring a Multi-Master Schedule (confschedulemmr) ........................ 363 8.3.38 Print Schedule (printschedule) .................................................................... 365 8.3.39 Updating a Subscription (updatesub) .......................................................... 367 8.3.40 Removing a Subscription (removesub) ....................................................... 369 8.3.41 Scheduling Shadow Table History Cleanup (confcleanupjob) ................... 369 8.3.42 Cleaning Up Shadow Table History (cleanshadowhistforpub) .................. 371 8.3.43 Cleaning Up Replication History (cleanrephistoryforpub) ......................... 372 8.3.44 Cleaning Up All Replication History (cleanrephistory) ............................. 373 9 Appendix ................................................................................................................. 374 9.1 Source and Target Database Server Configurations ....................................... 374 9.1.1 Advanced Server Compatibility Configuration Modes .............................. 374 9.1.2 Permitted Source and Target Configurations .............................................. 374 9.2 Resolving Problems ........................................................................................ 375 9.2.1 Error Messages............................................................................................ 375 9.2.2 Where to Look for Errors ............................................................................ 380 9.2.3 Common Problem Checklist ....................................................................... 382 9.2.4 Troubleshooting Areas ................................................................................ 384 9.3 Miscellaneous xDB Replication Server Processing Topics ............................ 395 9.3.1 Publication and Subscription Server Configuration Options ...................... 395 9.3.2 Encrypting the Password in the xDB Replication Configuration File ........ 403 9.3.3 Writing a Cron Expression.......................................................................... 404 9.3.4 Disabling Foreign Key Constraints for Snapshot Replications .................. 406 9.3.5 Quoted Identifiers and Default Case Translation........................................ 407 9.3.6 Replicating the SQL Server SQL_VARIANT Data Type .......................... 408 9.3.7 Restricted Mode Operation ......................................................................... 410 Copyright © 2012 EnterpriseDB Corporation. All rights reserved. 8 Postgres Plus xDB Replication Server with Multi-Master User’s Guide 1 Introduction This document describes the installation, configuration, architecture, and operation of the Postgres Plus xDB Replication Server with Multi-Master. Postgres Plus xDB (cross database) Replication Server with Multi-Master (referred to hereafter as xDB Replication Server) is an asynchronous replication system available for PostgreSQL® as part of EnterpriseDB’s Postgres Plus Solution Pack, and for EnterpriseDB’s Postgres Plus Advanced Server database product. xDB Replication Server can be used to implement replication systems based on either of two different replication models – single-master (master-to-slave) replication or multimaster replication. Regardless of the chosen replication model, xDB Replication Server is extremely flexible and easy to use. For single-master replication, PostgreSQL, Postgres Plus Advanced Server, Oracle®, and Microsoft® SQL Server® are supported in an assortment of configurations (including cascading replication) allowing organizations to utilize it in multiple use cases with a variety of benefits. The following are some combinations of cross database replications that xDB Replication Server supports for single-master replication: From Oracle to PostgreSQL From Oracle to Postgres Plus Advanced Server From SQL Server to PostgreSQL From SQL Server to Postgres Plus Advanced Server From Postgres Plus Advanced Server to Oracle From PostgreSQL to SQL Server From Postgres Plus Advanced Server to SQL Server Between PostgreSQL and Postgres Plus Advanced Server For multi-master replication, xDB Replication Server supports the following configurations: Between PostgreSQL database servers Between PostgreSQL database servers and Postgres Plus Advanced Servers in PostgreSQL compatible mode Between Postgres Plus Advanced Servers in PostgreSQL compatible mode Between Postgres Plus Advanced Servers in Oracle compatible mode Note: See Section 9.1 for detailed information on supported source and target database server configurations. Copyright © 2012 EnterpriseDB Corporation. All rights reserved. 9 Postgres Plus xDB Replication Server with Multi-Master User’s Guide The reader is assumed to have basic SQL knowledge and basic Oracle, SQL Server, or PostgreSQL database administration skills (whichever are applicable) so that databases, users, schemas, and tables can be created and database object privileges assigned. This document is organized as follows: The remainder of Chapter 1 describes conventions used throughout this user’s guide along with suggested sections to read based upon your purpose for using this guide. Chapter 2 provides an overview of xDB Replication Server including basic replication concepts and definitions, architecture and components of xDB Replication Server, and design guidelines for setting up a replication system. Chapter 3 gives instructions for installing xDB Replication Server. Chapter 4 provides an overview of the xDB Replication Console, the graphical user interface for using xDB Replication Server. Chapter 5 gives instructions for the configuration and operation of xDB Replication Server for single-master replication systems. Chapter 6 gives instructions for the configuration and operation of xDB Replication Server for multi-master replication systems. Chapter 7 describes operations that are common to both single-master and multimaster replication systems. Chapter 8 describes the xDB Replication Server Command Line Interface, an alternative to the graphical user interface for xDB Replication Server configuration and management. Chapter 9 is an appendix containing troubleshooting tips, a list of error messages, their causes and resolutions, and miscellaneous technical information. 1.1 Typographical Conventions Used in this Guide Certain typographical conventions are used in this manual to clarify the meaning and usage of various commands, statements, programs, examples, etc. This section provides a summary of these conventions. In the following descriptions a term refers to any word or group of words that are language keywords, user-supplied values, literals, etc. A term’s exact meaning depends upon the context in which it is used. Italic font introduces a new term, typically, in the sentence that defines it for the first time. Fixed-width (mono-spaced) font is used for terms that must be given literally such as SQL commands, specific table and column names used in the examples, programming language keywords, etc. For example, SELECT * FROM emp; Italic fixed-width font is used for terms for which the user must substitute values in actual usage. For example, DELETE FROM table_name; Copyright © 2012 EnterpriseDB Corporation. All rights reserved. 10 Postgres Plus xDB Replication Server with Multi-Master User’s Guide A vertical pipe | denotes a choice between the terms on either side of the pipe. A vertical pipe is used to separate two or more alternative terms within square brackets (optional choices) or braces (one mandatory choice). Square brackets [ ] denote that one or none of the enclosed terms may be substituted. For example, [ a | b ] means choose one of “a” or “b” or neither of the two. Braces {} denote that exactly one of the enclosed alternatives must be specified. For example, { a | b } means exactly one of “a” or “b” must be specified. Ellipses ... denote that the preceding term may be repeated. For example, [ a | b ] ... means that you may have the sequence, “b a a b a”. 1.2 Other Conventions Used in this Guide The following is a list of other conventions used throughout this document. This guide applies to both Linux and Windows systems. Directory paths are presented in the Linux format with forward slashes. When working on Windows systems, start the directory path with the drive letter followed by a colon and substitute back slashes for forward slashes. Much of the information in this document applies interchangeably to the PostgreSQL and Postgres Plus Advanced Server database systems. The term Postgres is used to generically refer to both PostgreSQL and Postgres Plus Advanced Server. When a distinction needs to be made between these two database systems, the specific names, PostgreSQL or Advanced Server are used. The installation directory path of the PostgreSQL or Postgres Plus Advanced Server products is referred to as POSTGRES_INSTALL_HOME. For PostgreSQL Linux installations, this defaults to /opt/PostgreSQL/version_no. For PostgreSQL Windows installations, this defaults to C:\Program Files\PostgreSQL\version_no. For Advanced Server Linux installations, this defaults to /opt/PostgresPlus/version_no. For Advanced Server Windows installations, this defaults to C:\Program Files\PostgresPlus\version_no. The product version number is represented by version_no. 1.3 How to Use This Guide The following is a list of suggested sections to read based upon your purpose for using this guide. If you are interested in a general overview of xDB Replication Server, read sections 2.1, 2.2, and 2.3. If you are planning on implementing a replication system using xDB Replication Server, read sections 2.1, 2.2, 2.3, and 2.4. If you are ready to install, configure, and begin using xDB Replication Server for single-master replication, read chapters 3, 4, 5, and 7. Copyright © 2012 EnterpriseDB Corporation. All rights reserved. 11 Postgres Plus xDB Replication Server with Multi-Master User’s Guide If you are ready to install, configure, and begin using xDB Replication Server for multi-master replication, read chapters 3, 4, 6, and 7. If you need help finding a solution to a problem, see Section 9.2. Copyright © 2012 EnterpriseDB Corporation. All rights reserved. 12 Postgres Plus xDB Replication Server with Multi-Master User’s Guide 2 Overview This chapter defines basic replication terms and concepts, and presents an overview of the components and architecture of xDB Replication Server. The chapter concludes with design guidelines and directions for implementing a replication system using xDB Replication Server. 2.1 Why Use Replication Replication of data can be employed in a variety of use cases in organizations where it is important to use the same data in multiple settings. This allows users to work with ‘real’ data that will yield ‘real’ results that are reliable in more than one setting. Support of both single-master and multi-master replication gives xDB Replication Server a broad range of supported use cases. Some of the more popular uses of single-master replication include the following: 2.1.1 Offloading Reporting and Business Intelligence Queries In this use case, users take all or just a subset of data from a production OLTP system and replicate it to another database whose sole purpose is to support reporting queries. This can have multiple benefits: a) reporting loads are removed from the OLTP system improving transaction processing performance, b) query performance improves as well without being subordinated to transactions on the system, and c) in Oracle installations, the reporting server duties can be handled by a product like Postgres Plus Advanced Server reducing licensing costs for a reporting server. 2.1.2 Using Warm Standby Servers When many organizations wish to improve the availability of their data, a cost effective solution is often the use of warm standby servers. These are database servers kept up to date with the online system through replication that can be brought online quickly in the event of a failure in the production system. Warm standby servers can also be used for regular maintenance by gracefully switching over to the standby server so that the production server can be brought offline for regular maintenance. 2.1.3 Testing Systems in Parallel Often times, upgrading or moving to a new database system requires that the old and new systems be up and running in parallel to allow for testing and comparing results in real time. Replication can be employed in this use case and is frequently used in development and testing environments. Copyright © 2012 EnterpriseDB Corporation. All rights reserved. 13 Postgres Plus xDB Replication Server with Multi-Master User’s Guide 2.1.4 Migrating Data Similar to running in parallel, is the situation where data may be migrated from one system to another in a sort of ‘seeding’ operation. Replication can be very effective in this situation by quickly copying data. Some reasons to consider multi-master replication include the following: 2.1.5 Write Availability In single-master replication, only the master database is available for writes. The slave databases are read-only for applications. If the replicated target databases must be available for write access as well, multi-master replication can be employed for the same use cases as outlined for single-master replication, but with the additional advantage of write access to the slaves. 2.1.6 Write Scalability In write-intensive applications, multi-master replication allows you to utilize multiple database servers on separate hosts to process write transactions independently of each other on their own master databases. Changes can then be reconciled across master databases according to your chosen schedule. 2.1.7 Localized Data Access In a geographically dispersed application, local access to the database can be provided to regions of clients. Having the database servers physically close to clients can reduce latency with the database. Multi-master replication allows you to employ a WAN connected network of master databases that can be geographically close to groups of clients, yet maintain data consistency across master databases. 2.2 Replication Concepts and Definitions xDB Replication Server is a software product that enables the implementation of a replication system. A replication system is software and hardware whose purpose is to make a copy of data from one location to another and to ensure the copied data is the same as the original over time. xDB Replication Server applies the replication system concept to tables of Oracle, SQL Server, PostgreSQL, and Postgres Plus Advanced Server database management systems. The following sections present specific terms and concepts used when discussing xDB Replication Server. Copyright © 2012 EnterpriseDB Corporation. All rights reserved. 14 Postgres Plus xDB Replication Server with Multi-Master User’s Guide 2.2.1 Comparison of Single-Master and Multi-Master Replication There are two models of replication systems supported by xDB Replication Server: Single-Master Replication (SMR). Changes (inserts, updates, and deletions) to table rows are allowed to occur in a designated master database. These changes are replicated to tables in a slave database. The replicated tables in the slave database are not permitted to accept any changes except from its designated master database. (This is also known as master-to-slave replication.) Multi-Master Replication (MMR). Two or more databases are designated in which tables with the same table definitions and initial row sets are created. Changes (inserts, updates, and deletions) to table rows are allowed to occur in any database. Changes to table rows in any given database are replicated to their counterpart tables in every other database. For a single-master replication system, a variety of configurations are supported including: Replication between PostgreSQL and Postgres Plus Advanced Server databases (between products in either direction) Replication from Oracle to PostgreSQL Replication in either direction between Oracle and Postgres Plus Advanced Server Replication in either direction between SQL Server and PostgreSQL Replication in either direction between SQL Server and Postgres Plus Advanced Server For multi-master replication, the participating database servers in a given multi-master replication system must be of the same type: PostgreSQL database servers PostgreSQL database servers and Postgres Plus Advanced Servers operating in PostgreSQL compatible mode Postgres Plus Advanced Servers operating in PostgreSQL compatible mode Postgres Plus Advanced Servers operating in Oracle compatible mode Note: A given database cannot simultaneously participate in both a single-master replication system and a multi-master replication system. 2.2.2 Publications and Subscriptions xDB Replication Server uses an architecture called publish and subscribe. The data to be made available for copying by a replication system is defined as a publication. To get a copy of that data, you must “subscribe” to that publication. The manner in which you subscribe is slightly different for single-master and multi-master replication systems. Copyright © 2012 EnterpriseDB Corporation. All rights reserved. 15 Postgres Plus xDB Replication Server with Multi-Master User’s Guide In xDB Replication Server a publication is defined as a named set of tables and views within a database. The database that contains the publication is called the publication database of that publication. In a single-master replication system, to get a copy of an xDB Replication Server publication, you must create a subscription. An xDB Replication Server subscription is a named association of a publication to a database to which the publication is to be copied. This database is called the subscription database. Similar to a single-master replication system, when creating a multi-master replication system, you first define a publication in the publication database. You then add one or more additional databases that you want to participate in this multi-master replication system. As you add each database, it is associated with this replication system. You do not create an explicit, named subscription in a multi-master replication system. In a single-master replication system, replication is said to occur when xDB Replication Server initiates and completes either of the following processes: 1) applies changes that have been made to rows in the publication since the last replication occurred, to rows in tables of the subscription database (called synchronization); or 2) copies rows of the publication to empty tables of the subscription database (called a snapshot). See Section 2.2.6 for further discussion on snapshots and synchronization. The subscription tables are the tables in the subscription database created from corresponding tables or views in the publication. Note: In a single-master replication system xDB Replication Server creates a table in the subscription database for each view contained in the publication. In a multi-master replication system, the concept and definition of replication is nearly identical to a single-master replication system with the following modifications: 1) synchronization can occur between any pair of databases (referred to as master nodes) participating in the replication system; and 2) a snapshot can occur from the publication database (a master node designated as the master definition node) to any of the other master nodes. The following diagrams illustrate some basic single-master replication system examples. Copyright © 2012 EnterpriseDB Corporation. All rights reserved. 16 Postgres Plus xDB Replication Server with Multi-Master User’s Guide Figure 1 - Publications in one database replicating to subscriptions in another database Figure 2 - Publications replicating to two subscription databases Copyright © 2012 EnterpriseDB Corporation. All rights reserved. 17 Postgres Plus xDB Replication Server with Multi-Master User’s Guide Figure 3 - Publications in two databases replicating to one subscription database Figure 4 – Cascading Replication: Tables used in both a subscription and a publication The preceding diagram illustrates that a table that has been created as a member of a subscription can be used in a publication replicating to another subscription. This scenario is called cascading replication. Copyright © 2012 EnterpriseDB Corporation. All rights reserved. 18 Postgres Plus xDB Replication Server with Multi-Master User’s Guide The following diagram illustrates a multi-master replication system with three master nodes. Figure 5 – Multi-master replication system 2.2.3 Single-Master (Master-to-Slave) Replication xDB Replication Server performs master-to-slave replication when a single-master replication system is implemented. The publication is the master and the subscription is the slave. In a master-to-slave relationship, changes are propagated in one direction only, from the master to the slave. Copyright © 2012 EnterpriseDB Corporation. All rights reserved. 19 Postgres Plus xDB Replication Server with Multi-Master User’s Guide Figure 6 – Single-Master (Master-to-Slave) replication Generally, changes must not be made to the definitions of the publication tables or the subscription tables. If such changes are made to the publication tables, they are not propagated to the subscription and vice versa unless the DDL change replication feature is used as described in Section 7.6. If changes are made to the table definitions without using the DDL change replication feature, there is a risk that future replication attempts may fail. Changes must not be made to the rows of the subscription tables. If such changes are made, they are not propagated back to the publication. If changes are made to the subscription table rows, it is fairly likely that the rows will no longer match their publication counterparts. There is also a risk that future replication attempts may fail. 2.2.4 Multi-Master Replication As an alternative to the single-master (master-to-slave) replication model, xDB Replication Server supports multi-master replication. The following definitions are used when referring to multi-master replication systems. A master node is a database participating in a multi-master replication system. The database (master node) in which the publication is initially defined is specially designated as the master definition node. There can be only one master definition node at any given time, however, it is possible to change which master node is the master definition node. The master definition node has the following significance: Copyright © 2012 EnterpriseDB Corporation. All rights reserved. 20 Postgres Plus xDB Replication Server with Multi-Master User’s Guide The publication is initially created in the master definition node, and the tables comprising the publication must exist in the database to be designated as the master definition node at the time the publication is defined. The publication can be initially replicated to other master nodes by means of a snapshot from the master definition node. Each subsequent master node added to the replication system must either: 1) contain no tables with the same schema-qualified names as the publication tables in the master definition node; or 2) contain all publication table definitions as they exist in the master definition node with the same schema-qualified names. In the first case, when you add the master node, you select the option to replicate the publication schema from the master definition node. In the second case, you do not select this option. The table rows in a master node can be reloaded from the master definition node. The master node tables are truncated and the rows reloaded by a snapshot from the master definition node. Once the multi-master replication system is defined, changes (inserts, updates, and deletions) to rows of the publication tables on any master node are synchronized to all other master nodes on either an on demand or scheduled basis. Generally, changes must not be made to the table definitions in any of the master nodes including the master definition node. If such changes are made, they are not propagated to other nodes in the multi-master replication system unless they are made using the DDL change replication feature described in Section 7.6. If changes are made to tables without using the DDL change replication feature, there is a risk that future replication attempts may fail. Copyright © 2012 EnterpriseDB Corporation. All rights reserved. 21 Postgres Plus xDB Replication Server with Multi-Master User’s Guide Figure 7 - In a multi-master replication system, table rows can be updated at any master node 2.2.5 Asynchronous xDB Replication Server performs replications asynchronously. The systems hosting the databases do not always have to be running continuously in order for successful replication to occur. If one system goes offline, replication resumes when it comes back online if there is still pending data to replicate. In addition you can create a schedule for your replication system. xDB Replication Server initiates and performs replications regularly according to the assigned schedule. This allows you to run the replication system unattended. See Section 7.1 for directions on creating a schedule. 2.2.6 Snapshot and Synchronization xDB Replication Server performs replications using two different methods. These methods are called snapshot replication and synchronization replication. In either method, the source tables refer to the tables from which the replication data is originating (the publication in a single-master replication system, or the master node whose changes are being replicated to another master node in a multi-master replication system). Copyright © 2012 EnterpriseDB Corporation. All rights reserved. 22 Postgres Plus xDB Replication Server with Multi-Master User’s Guide The target tables are the tables that are receiving the replication data from the source tables (the subscription tables in a single-master replication system, or the master node receiving changes from another master node in a multi-master replication system). In snapshot replication, all existing rows in the target tables are deleted using the database system’s TRUNCATE command. The tables are then completely reloaded from the source tables of the publication. In synchronization replication, only the changes (inserts, updates, and deletions) to the rows in the source tables since the last replication are applied to the target tables. In a single-master replication system, the very first replication to a newly created subscription must always be done by a snapshot. Subsequent replications can be done by snapshot or by synchronization provided that the publication is not defined as a snapshotonly publication as discussed in Section 2.2.7. In a multi-master replication system, the very first replication from the master definition node to a newly added master node is done by a snapshot. Subsequent replications between master nodes occur by synchronization. However, it is possible to perform subsequent snapshots from the master definition node to any other master node. See Section 2.4.4 for a discussion of the advantages and disadvantages of each method. 2.2.7 Snapshot-Only Publications When a publication is created in a single-master replication system, the publication can be defined as a snapshot-only publication. Replication from a snapshot-only publication can only be done using the snapshot replication method. Synchronization replication is not permitted on a snapshot-only publication. A snapshot-only publication cannot be created in a multi-master replication system. See Section 2.4.4 for a discussion of the advantages of using a snapshot-only publication. 2.2.8 Filters A filter specifies a subset of rows in a publication table or view that is to be included during replication. All other rows are excluded from the replication. A filter is expressed as a text string called a filter clause. A filter clause is equivalent to the WHERE clause of a SQL SELECT statement. See Section 7.5.3.3 for information on the filter clause. Copyright © 2012 EnterpriseDB Corporation. All rights reserved. 23 Postgres Plus xDB Replication Server with Multi-Master User’s Guide 2.3 xDB Replication Server Components and Architecture This section describes the components and architecture of xDB Replication Server. Section 2.3.1 describes the executable programs, files, and databases that comprise xDB Replication Server. Section 2.3.2 defines the logical components of a replication system and how they correspond to the programs and databases. Section 2.3.3 illustrates some examples of replication systems. 2.3.1 Physical Components xDB Replication Server is not a single executable program, but rather a set of programs along with datastores containing configuration information and metadata that work together to form a replication system. The following diagram illustrates the components of xDB Replication Server and how they are used to form a complete, basic, single-master replication system. Copyright © 2012 EnterpriseDB Corporation. All rights reserved. 24 Postgres Plus xDB Replication Server with Multi-Master User’s Guide Figure 8 - xDB Replication Server - physical view (single-master replication system) The following diagram illustrates the components of xDB Replication Server and how they are used to form a complete, basic, multi-master replication system. Copyright © 2012 EnterpriseDB Corporation. All rights reserved. 25 Postgres Plus xDB Replication Server with Multi-Master User’s Guide Figure 9 - xDB Replication Server - physical view (multi-master replication system) The minimal configuration of xDB Replication Server for a basic replication system consists of the following software components: Publication server. The program that configures the publication database and master nodes for replication and performs replication. Subscription server. The program that configures the subscription database for replication and initiates replication. The subscription server is used only in singlemaster replication systems. xDB Control database. The Postgres database containing the metadata of the replication system. xDB Replication Configuration file. Text file containing connection and authentication information used by the publication server and subscription server upon startup to connect to the xDB Control database. Also used to authenticate registration of the publication server and subscription server from the user interface when creating a replication system. The entire replication system is completed with the addition of the following components: Copyright © 2012 EnterpriseDB Corporation. All rights reserved. 26 Postgres Plus xDB Replication Server with Multi-Master User’s Guide User interfaces for configuring and maintaining the replication system One or more publication databases for a single-master replication system One or more subscription databases for a single-master replication system One master definition node for a multi-master replication system One or more additional master nodes for a multi-master replication system The user interface, publication server, subscription server, xDB Control database, publication database, subscription database, and master nodes can all run on the same host or on separate, networked hosts. Any number of user interfaces can be used at any time to access any number of publication servers and subscription servers on the network as long as the network locations, user names, and passwords of the publication and subscription servers are known. Any number of publication and subscription databases can participate in a single-master replication system. Any number of master nodes can participate in a multi-master replication system. The following sections describe each component in more detail. 2.3.1.1 Publication Server The publication server creates and manages the metadata for publications. When a publication is created, the publication server creates database objects in the xDB Control database and in the publication database to record metadata about the publication. Whenever a master node is added to a multi-master replication system, the publication server creates database objects in the master node for recording metadata. For master nodes other than the master definition node, the publication server also calls EnterpriseDB’s Migration Toolkit to create the publication table definitions if so chosen at master node creation time. The publication server is also responsible for performing a replication. For snapshot replications, the publication server calls EnterpriseDB’s Migration Toolkit to perform the snapshot. For single-master synchronization replications, the publication server uses the Java Database Connectivity (JDBC) interface to apply changes to the subscription table rows based on changes that have been recorded in metadata tables in the publication database. For multi-master synchronization replications, the publication server performs the same process as for single-master synchronizations, but does so for each master node pair combination in the multi-master replication system. Copyright © 2012 EnterpriseDB Corporation. All rights reserved. 27 Postgres Plus xDB Replication Server with Multi-Master User’s Guide The publication server may run on the same host as the other xDB Replication Server components, or it may run on a separate, networked host. When the publication server is started, it uses the information in the xDB Replication Configuration file found on its host to connect to the xDB Control database. 2.3.1.2 Subscription Server Note: The subscription server is required only for single-master replication systems. The subscription server does not need to be running, nor even installed if only multi-master replication systems are in use. The subscription server creates and manages the metadata for subscriptions. When a subscription is created, the subscription server creates database objects in the xDB Control database to record metadata about the subscription. When a subscription is created, the subscription server calls EnterpriseDB’s Migration Toolkit to create the subscription table definitions in the subscription database. The rows in the subscription tables are not populated until a replication occurs. Rows are populated by actions of the publication server. The subscription server is also responsible for initiating a replication as a result of manual user action through the user interface, or a schedule created for the subscription. The subscription server initiates a call to the publication server that manages the associated publication. The publication server then performs the actual replication. The subscription server may run on the same host as the other xDB Replication Server components, or it may run on a separate, networked host. When the subscription server is started, it uses the information in the xDB Replication Configuration file found on its host to connect to the xDB Control database. 2.3.1.3 xDB Control Database The xDB Control database is the main metadata repository of replication systems. Almost all information needed to control all aspects of the replication process is stored in the xDB Control database. The following points should be noted about the xDB Control database: Each publication server uses one xDB Control database determined by the connection information in the xDB Replication Configuration file found on the publication server’s host. Each subscription server uses one xDB Control database determined by the connection information in the xDB Replication Configuration file found on the subscription server’s host. Copyright © 2012 EnterpriseDB Corporation. All rights reserved. 28 Postgres Plus xDB Replication Server with Multi-Master User’s Guide If the publication server and subscription server are running on the same host, they share the same xDB Control database. If the publication server and subscription server are running on different hosts, they may use the same, or they may use different xDB Control databases determined by connection information in the xDB Replication Configuration files found on their respective hosts. The metadata and configuration information gathered by or related to a given publication server or subscription server is stored in its respective xDB Control database. Note: Once a publication server or subscription server is used in a replication system, do not change the xDB Control database referenced within the publication or subscription server’s respective xDB Replication Configuration file, otherwise the replication system metadata will not be accessible to the publication server or subscription server thereafter. The metadata stored in the xDB Control database includes information such as type of replication system (single-master or multi-master), network location, database type, and connection information for publication databases, subscription databases, and master nodes, names of publications and the tables and views they contain, names of subscriptions and the publications subscribed to, and replication history. Each publication database in a single-master replication system also contains metadata regarding the changes that have been made to rows in the publication and the status of whether or not those changes have been applied to the subscription tables. Similarly, for a multi-master replication system, each master node contains metadata regarding the changes that have been made to rows in the publication residing on that master node, and the statuses of whether or not those changes have been applied to the other master nodes in the multi-master replication system. 2.3.1.4 xDB Replication Configuration File The xDB Replication Configuration file contains the connection and authentication information used by any publication server or subscription server running on the host containing the file. Specifically, the xDB Replication Configuration file is accessed in the following circumstances: When a publication server or subscription server is started on the host. When a publication server or subscription server is registered during the process of creating a replication system. Registration of a publication server or subscription server is done using the xDB Replication Console or the xDB Replication Server Command Line Interface. Copyright © 2012 EnterpriseDB Corporation. All rights reserved. 29 Postgres Plus xDB Replication Server with Multi-Master User’s Guide The xDB Replication Configuration file and its initial content are created when you install a publication server or subscription server on a host during the xDB Replication Server installation process. The following is an example of the content of an xDB Replication Configuration file: user=enterprisedb port=5444 password=ygJ9AxoJEX854elcVIJPTw\=\= type=enterprisedb host=localhost database=xdb Note: The password for the database user name is encrypted. Should you change this user name’s password in the Postgres database server, you must modify the password entry in the xDB Replication Configuration file to contain the encrypted form of the new password. See Section 9.3.2 for directions on how to generate the encrypted form of a password. See Chapter 3 for information on how the initial content of the xDB Replication Configuration file is determined. See Section 3.2 for the file system location of the xDB Replication Configuration file. 2.3.1.5 xDB Replication Console The xDB Replication Console is the graphical user interface program you can use to create and control all aspects of a replication system. Through a single xDB Replication Console, you can configure and operate a replication system running on the same host on which the xDB Replication Console is installed, or you can configure and operate replication systems where the xDB Replication Server components are distributed on different hosts in a networked environment. Copyright © 2012 EnterpriseDB Corporation. All rights reserved. 30 Postgres Plus xDB Replication Server with Multi-Master User’s Guide Figure 10 - xDB Replication Consoles accessing multiple hosts In the preceding figure, there are two Postgres installations running on two networked hosts, each with its own xDB Replication Server installation. Each host is running a publication server and a subscription server, and contains an xDB Control database. The xDB Replication Console on each host can access and manage the replication systems on the other host if given the network IP address, port number, user name, and password with which the publication server and subscription server were installed with on the remote host. See Chapter 4 for information on the user interface of the xDB Replication Console. 2.3.1.6 xDB Replication Server Command Line Interface xDB Replication Server Command Line Interface (CLI) is a command line driven alternative to the xDB Replication Console graphical user interface, providing equivalent functionality for creating and controlling all aspects of a replication system. Automation of replication system operations can be done by embedding xDB Replication Server CLI commands in scripts such as Bash for Linux. xDB Replication Server CLI is installed whenever you choose to install the xDB Replication Console. Chapter 8 provides directions for using xDB Replication Server CLI. Copyright © 2012 EnterpriseDB Corporation. All rights reserved. 31 Postgres Plus xDB Replication Server with Multi-Master User’s Guide 2.3.1.7 Publication Database The publication database contains the tables and views used in a publication. The publication database may be running on the same host or on a different host than where the publication server is running as long as the hosts are accessible to each other by a network. In a multi-master replication system, the publication database is also referred to as the master definition node. A database plays the roles of both a publication database and a subscription database if it contains publications and subscriptions. 2.3.1.8 Subscription Database Note: The subscription database applies only to single-master replication systems. The subscription database contains the tables created from a subscription. The subscription database may be running on the same host or on a different host than where the subscription server is running as long as the hosts are accessible to each other by a network. A subscription database can also serve as a publication source for replicating to a third server if desired. This configuration is referred to as cascading replication. A database plays the roles of both a publication database and a subscription database if it contains publications and subscriptions such as in the cascaded replication scenario. 2.3.1.9 Master Node In a multi-master replication system, the databases containing the set of tables (the publication) for which row changes are to be replicated are called master nodes. The master nodes may be running on the same host or on different hosts than where the publication server is running as long as the hosts are accessible to each other by a network. The master nodes may be running under the same, or under multiple database server instances (Postgres database clusters). 2.3.1.10 Master Definition Node The first node added to create a multi-master replication system is initially designated the master definition node. This node must contain the table definitions (and optionally, the initial set of rows) that are to be included in the publication. Copyright © 2012 EnterpriseDB Corporation. All rights reserved. 32 Postgres Plus xDB Replication Server with Multi-Master User’s Guide As subsequent databases are added as master nodes to the replication system, the table definitions and initial row sets can optionally be propagated from the master definition node to the newly added master nodes. After the multi-master replication system is defined, it is possible to reassign the role of the master definition node to another master node in the multi-master replication system. The significance of this reassignment is that snapshots can be taken from the newly appointed master definition node to other master nodes. This could be beneficial if the data in the old master definition node becomes corrupt or out-of-sync with the other master nodes and needs to be completely refreshed by a snapshot from another master node. 2.3.2 Logical Components This section discusses the logical components of a replication system, how they are related to each other, and how they correspond to the programs and databases in a replication system. The logical components are created when you build a replication system using the xDB Replication Console or the xDB Replication Server CLI. The logical components are stored as part of the replication system metadata in one or more xDB Control databases. Creating a replication system requires the following steps: Register a publication server Create a publication database definition Create a publication For a single-master replication system, you then perform the following: Register a subscription server Create a subscription database definition Create a subscription For a multi-master replication system, you create additional master nodes by creating additional publication database definitions. Each of these steps creates a logical component that is represented by a node in the replication tree of the xDB Replication Console. See Chapter 4 for a description of the xDB Replication Console. A brief description of these components is given in the following sections. 2.3.2.1 Publication Server When you install a publication server on a host, the publication server program is installed, started, and establishes a session with the xDB Control database that you Copyright © 2012 EnterpriseDB Corporation. All rights reserved. 33 Postgres Plus xDB Replication Server with Multi-Master User’s Guide designated during the installation process. The connection information for the xDB Control database is stored in the xDB Replication Configuration file created and stored on the host’s file system during publication server installation. The first step in creating a publication is to identify the publication server that is to be used to manage the publication. This process is called registering the publication server. Using the xDB Replication Console or the xDB Replication Server CLI, a publication server is registered by giving the IP address and port number of the host on which the publication server is running, along with the user name and password stored in the xDB Replication Configuration file located on the host running the publication server. (This information is determined during the publication server installation process.) When viewed in the xDB Replication Console, a registered publication server appears under the top level Replication Servers node in the replication tree. All publication related logical components are created subordinate to a registered publication server and appear underneath it in the replication tree. Section 5.2.1 gives directions for registering a publication server for a single-master replication system. See Section 6.2.1 for a multi-master replication system. 2.3.2.2 Replication System Type (SMR/MMR) Subordinate to a registered publication server, two nodes representing the replication system type appear. One is identified by the label SMR for single-master replication and the other has the label MMR for multi-master replication. If you are creating a single-master replication system, you proceed to add logical components under the SMR type node. If you are creating a multi-master replication system, you proceed to add logical components under the MMR type node. 2.3.2.3 Publication Database Definition Subordinate to one of the Replication System Type nodes under a registered publication server, one or more publication database definitions can be created. A publication database definition identifies a database whose tables and views are to be used in a publication. The identify information consists of the database server IP address, port number, a database user name and password, and the database identifier. The publication server uses this information to connect to the publication database in order to create the replication system metadata in the publication database and perform the replications. Copyright © 2012 EnterpriseDB Corporation. All rights reserved. 34 Postgres Plus xDB Replication Server with Multi-Master User’s Guide Though the process of creating a publication database definition is similar for singlemaster and multi-master replication systems, their usage within the replication system is somewhat different. In a single-master replication system, a publication database definition identifies the storage area of one or more publications, each of which is eventually associated with its own subscription in a master-to-slave relationship. In a multi-master replication system, each publication database definition subordinate to the MMR type node of a given publication server identifies a master node in a single multi-master replication system. Note: Currently, there can only be one multi-master replication system per publication server. Section 5.2.2 discusses creating a publication database definition for a single-master replication system. See sections 6.2.2 and 6.3 for a multi-master replication system. 2.3.2.4 Publication Subordinate to a publication database definition in a single-master replication system, one or more publications can be defined. A publication contains a list of tables and views that are to be replicated to a subscription database. In a single-master replication system, the database user name specified in the publication database definition of the publication’s parent, as viewed in the replication tree, must have the SELECT object privilege on any table or view that is to be included in the publication. Subordinate to a publication database definition in a multi-master replication system, one and only one publication can be defined. The publication contains the list of tables that are to be replicated and kept synchronized in the master nodes of the multi-master replication system. In a multi-master replication system, the database user name specified in the publication database definition of the publication’s parent, as viewed in the replication tree, must have superuser privileges and be the owner of all tables to be included in the publication. Section 5.2.3 discusses creating a publication for a single-master replication system. See Section 6.2.3 for a multi-master replication system. 2.3.2.5 Subscription Server Note: The subscription server applies only to single-master replication systems. You do not register a subscription server when creating a multi-master replication system. Copyright © 2012 EnterpriseDB Corporation. All rights reserved. 35 Postgres Plus xDB Replication Server with Multi-Master User’s Guide When you install a subscription server on a host, the subscription server program is installed, started, and establishes a session with the xDB Control database that you designated during the installation process. The connection information for the xDB Control database is stored in the xDB Replication Configuration file created and stored on the host’s file system during subscription server installation. The first step in creating a subscription is to identify the subscription server that is to be used to manage the subscription. This process is called registering the subscription server. Using the xDB Replication Console or the xDB Replication Server CLI, a subscription server is registered by giving the IP address and port number of the host on which the subscription server is running, along with the user name and password stored in the xDB Replication Configuration file located on the host running the subscription server. (This information is determined during the subscription server installation process.) When viewed in the xDB Replication Console, a registered subscription server appears under the top level Replication Servers node in the replication tree. All subscription related logical components are created subordinate to a registered subscription server and appear underneath it in the replication tree. Section 5.3.1 gives directions for registering a subscription server. 2.3.2.6 Subscription Database Definition Note: The subscription database definition applies only to single-master replication systems. You do not create a subscription database definition when creating a multimaster replication system. Subordinate to a registered subscription server, one or more subscription database definitions can be created. A subscription database definition identifies a database to which a publication’s tables and views are to be replicated. The identify information consists of the database server IP address, port number, a database user name and password, and the database identifier. The subscription server uses this information to connect to the subscription database to create the table definitions. The publication server also uses this information to connect to the subscription database when it performs replications. Section 5.3.2 discusses creating a subscription database definition. Copyright © 2012 EnterpriseDB Corporation. All rights reserved. 36 Postgres Plus xDB Replication Server with Multi-Master User’s Guide 2.3.2.7 Subscription Note: The subscription applies only to single-master replication systems. You do not create a subscription when creating a multi-master replication system. Subordinate to a subscription database definition, one or more subscriptions can be defined. A subscription associates a publication to a subscription database to which the publication’s tables and views are to be replicated. Each subscription can be associated with one and only one publication. Section 5.3.3 discusses creating a subscription. 2.3.3 xDB Replication System Examples This section contains examples of replication systems and how the logical components are used to define them. In the accompanying diagrams, the logical components, represented by nodes in the replication tree of the xDB Replication Console, are superimposed on physical component diagrams. The logical components are shaded in yellow to aid in identifying them in the diagrams. 2.3.3.1 Oracle to PostgreSQL or Advanced Server Replication The following is an illustration of a basic Oracle to PostgreSQL or Advanced Server single-master replication system. A single publication in Oracle contains tables from two schemas that are replicated to a database residing in either PostgreSQL or Postgres Plus Advanced Server. Copyright © 2012 EnterpriseDB Corporation. All rights reserved. 37 Postgres Plus xDB Replication Server with Multi-Master User’s Guide Figure 11 - Oracle to PostgreSQL or Advanced Server replication The following describes the logical components in the preceding diagram: The publication server to be used is identified by registering its network location, user name, and password. A publication database definition is created subordinate to the SMR type node under the publication server. The Oracle database user name pubuser is specified in the definition along with the database network location and database identifier. When you create a user named pubuser in Oracle, a schema named pubuser is automatically created by Oracle at the same time. The publication server creates database objects in the pubuser schema for the replication system’s metadata when you create the publication database definition. Copyright © 2012 EnterpriseDB Corporation. All rights reserved. 38 Postgres Plus xDB Replication Server with Multi-Master User’s Guide A publication named pub is created subordinate to the publication database definition. The publication consists of table A in schema S1 and tables B and C in schema S2. The subscription server to be used is identified by registering its network location, user name, and password. A subscription database definition is created subordinate to the subscription server. The Postgres database user name subuser is specified in the definition along with the database network location and database identifier. A subscription named sub is created subordinate to the subscription database definition. When the subscription is created, the subscription server creates schemas named S1 and S2 in the subscription database. The table definitions for tables A, B, and C are also created at this time. When replication occurs, the publication server populates these tables with rows from the publication. The following screen capture shows how the logical components of this replication system appear in the xDB Replication Console replication tree. Figure 12 - Oracle to Postgres replication tree Copyright © 2012 EnterpriseDB Corporation. All rights reserved. 39 Postgres Plus xDB Replication Server with Multi-Master User’s Guide See Chapter 4 for an introduction to the xDB Replication Console. 2.3.3.2 SQL Server to PostgreSQL or Advanced Server Replication The following is an illustration of a basic SQL Server to PostgreSQL or Advanced Server single-master replication system. A single publication in SQL Server contains tables from two schemas that are replicated to a database residing in either PostgreSQL or Postgres Plus Advanced Server. Figure 13 - SQL Server to PostgreSQL or Advanced Server replication The following describes the logical components in the preceding diagram: Copyright © 2012 EnterpriseDB Corporation. All rights reserved. 40 Postgres Plus xDB Replication Server with Multi-Master User’s Guide The publication server to be used is identified by registering its network location, user name, and password. A publication database definition is created subordinate to the SMR type node under the publication server. The SQL Server login pubuser is specified in the definition along with the database network location and database identifier. The schema pubuser was created during the publication database preparation step as described in Section 5.1.2.2. It is populated with database objects for the replication system’s metadata when you create the publication database definition. A publication named pub is created subordinate to the publication database definition. The publication consists of table A in schema S1 and tables B and C in schema S2. The subscription server to be used is identified by registering its network location, user name, and password. A subscription database definition is created subordinate to the subscription server. The Postgres database user name subuser is specified in the definition along with the database network location and database identifier. A subscription named sub is created subordinate to the subscription database definition. When the subscription is created, the subscription server creates schemas named S1 and S2 in the subscription database. The table definitions for tables A, B, and C are also created at this time. When replication occurs, the publication server populates these tables with rows from the publication. The following screen capture shows how the logical components of this replication system appear in the xDB Replication Console replication tree. Copyright © 2012 EnterpriseDB Corporation. All rights reserved. 41 Postgres Plus xDB Replication Server with Multi-Master User’s Guide Figure 14 - SQL Server to Postgres replication tree See Chapter 4 for an introduction to the xDB Replication Console. 2.3.3.3 Postgres Plus Advanced Server to Oracle Replication The following is an illustration of a basic Postgres Plus Advanced Server to Oracle single-master replication system. A single publication in a Postgres Plus Advanced Server database contains tables from two schemas that are replicated to an Oracle database. Copyright © 2012 EnterpriseDB Corporation. All rights reserved. 42 Postgres Plus xDB Replication Server with Multi-Master User’s Guide Figure 15 - Postgres Plus Advanced Server to Oracle replication The following describes the logical components in the preceding diagram: The publication server to be used is identified by registering its network location, user name, and password. A publication database definition is created subordinate to the SMR type node under the publication server. The Postgres database user name pubuser is specified in the definition along with the database network location and database identifier. The publication server creates schema _edb_replicator_pub and populates it with database objects for the replication system’s metadata when you create the publication database definition. Copyright © 2012 EnterpriseDB Corporation. All rights reserved. 43 Postgres Plus xDB Replication Server with Multi-Master User’s Guide A publication named pub is created subordinate to the publication database definition. The publication consists of table A in schema S1 and tables B and C in schema S2. The subscription server to be used is identified by registering its network location, user name, and password. A subscription database definition is created subordinate to the subscription server. The Oracle database user name subuser is specified in the definition along with the database network location and database identifier. A subscription named sub is created subordinate to the subscription database definition. When you create a user named subuser in Oracle, a schema named subuser is automatically created by Oracle at the same time. The table definitions for tables A, B, and C are created in schema subuser when you create subscription sub. When replication occurs, the publication server populates these tables with rows from the publication. The following screen capture shows how the logical components of this replication system appear in the xDB Replication Console replication tree. Figure 16 - Postgres Plus Advanced Server to Oracle replication tree Copyright © 2012 EnterpriseDB Corporation. All rights reserved. 44 Postgres Plus xDB Replication Server with Multi-Master User’s Guide See Chapter 4 for an introduction to the xDB Replication Console. 2.3.3.4 PostgreSQL or Advanced Server to SQL Server Replication The following is an illustration of a basic PostgreSQL or Advanced Server to SQL Server single-master replication system. A single publication in a PostgreSQL or Advanced Server database contains tables from two schemas that are replicated to a SQL Server database. Figure 17 - PostgreSQL or Advanced Server to SQL Server replication The following describes the logical components in the preceding diagram: Copyright © 2012 EnterpriseDB Corporation. All rights reserved. 45 Postgres Plus xDB Replication Server with Multi-Master User’s Guide The publication server to be used is identified by registering its network location, user name, and password. A publication database definition is created subordinate to the SMR type node under the publication server. The Postgres database user name pubuser is specified in the definition along with the database network location and database identifier. The publication server creates schema _edb_replicator_pub and populates it with database objects for the replication system’s metadata when you create the publication database definition. A publication named pub is created subordinate to the publication database definition. The publication consists of table A in schema S1 and tables B and C in schema S2. The subscription server to be used is identified by registering its network location, user name, and password. A subscription database definition is created subordinate to the subscription server. The SQL Server login subuser is specified in the definition along with the database network location and database identifier. A subscription named sub is created subordinate to the subscription database definition. When the subscription is created, the subscription server creates schemas named S1 and S2 in the subscription database. The table definitions for tables A, B, and C are also created at this time. When replication occurs, the publication server populates these tables with rows from the publication. The following screen capture shows how the logical components of this replication system appear in the xDB Replication Console replication tree. Copyright © 2012 EnterpriseDB Corporation. All rights reserved. 46 Postgres Plus xDB Replication Server with Multi-Master User’s Guide Figure 18 - Postgres to SQL Server replication tree See Chapter 4 for an introduction to the xDB Replication Console. 2.3.3.5 Postgres Multi-Master Replication The following is an illustration of a basic Postgres multi-master replication system. A publication in a Postgres master definition node contains tables from two schemas that are initially replicated to two other Postgres master nodes. The tables in all three master nodes can then be updated and synchronized with each other. Copyright © 2012 EnterpriseDB Corporation. All rights reserved. 47 Postgres Plus xDB Replication Server with Multi-Master User’s Guide Figure 19 - Postgres multi-master replication system The following describes the logical components in the preceding diagram: The publication server to be used is identified by registering its network location, user name, and password. A publication database definition is created subordinate to the MMR type node under the publication server. This first publication database definition identifies the master definition node. The Postgres database user name mmruser_a is specified in the definition along with the database network location and database identifier. The publication server creates schema _edb_replicator_pub and populates it with database objects for the replication system’s metadata when you create the publication database definition. Copyright © 2012 EnterpriseDB Corporation. All rights reserved. 48 Postgres Plus xDB Replication Server with Multi-Master User’s Guide A publication named pub is created subordinate to the publication database definition. The publication consists of table A in schema S1 and tables B and C in schema S2. A second master node is added by creating another publication database definition subordinate to the MMR type node of the publication server under which the master definition node resides. The Postgres database user name mmruser_b is specified in the definition along with the database network location and database identifier to create the second master node. When you add the second master node, you can choose to have the publication server create schemas S1 and S2 and the table definitions for A, B, and C for you, or you could have manually created the schemas and table definitions beforehand. The publication server creates schema _edb_replicator_pub under which it creates the database objects to store the master node’s metadata. When defining the master node, you can choose to have the publication server populate these tables with rows from the publication at this time, or you can defer table loading to a later point in time. A third master node is added in a similar manner using the Postgres database user name mmruser_c. The following screen capture shows how the logical components of this replication system appear in the xDB Replication Console replication tree. Copyright © 2012 EnterpriseDB Corporation. All rights reserved. 49 Postgres Plus xDB Replication Server with Multi-Master User’s Guide Figure 20 - Postgres multi-master replication tree See Chapter 4 for an introduction to the xDB Replication Console. 2.4 Designing a Replication System This section presents the general steps, design considerations, and best practices for designing a replication system before you begin the actual implementation. 2.4.1 General Steps The following steps provide a general guideline for implementing a replication system. Step 1: Determine if xDB Replication Server is the right solution for your requirements and you have chosen the best solution for your particular needs. xDB Replication Server can be used to implement single-master or multi-master replication systems. For singlemaster replication systems, the distinguishing characteristic of xDB Replication Server is its ability to replicate from an Oracle database to a PostgreSQL or Advanced Server database, from a SQL Server database to a PostgreSQL or Advanced Server database, Copyright © 2012 EnterpriseDB Corporation. All rights reserved. 50 Postgres Plus xDB Replication Server with Multi-Master User’s Guide from a Postgres Plus Advanced Server database to an Oracle database, or from a PostgreSQL or Advanced Server database to a SQL Server database. Step 2: Plan the general strategy of how you will use xDB Replication Server. Will the single-master or multi-master model best suit your needs? (See Section 2.1 for use case examples of single-master and multi-master replication systems.) Will you be replicating from Oracle to Postgres, from SQL Server to Postgres, from Advanced Server to Oracle, or from Postgres to SQL Server? Will you be replicating between PostgreSQL and/or Advanced Server databases? How often will you need to replicate the data? Will replication be done on an ad hoc basis or does it need to occur regularly according to a schedule? Step 3: Plan the logistics of your replication system. How many tables do you expect to replicate and what are their sizes in total number of bytes and number of rows? What percentage of rows do you expect to have been changed on each table between each replication? Are your database servers required to run on dedicated machines? Step 4: Design your replication system. Determine whether your replication system will be distributed or will run on a single host. Determine the publications and subscriptions you will need and their tables and views. Make sure your publication tables meet the requirements for an xDB Replication Server publication. See sections 2.4.2 and 2.4.3 for details. Step 5: Implement and test your replication system in a test environment. Try out your replication system on a subset of your publication data to ensure the replication process works as expected. Make sure the resulting replicated tables can be used as expected in your application. Establish preliminary metrics on how long the replication process will be expected to take in your full production environment. Step 6: Implement and test your replication system in your production environment. 2.4.2 Design Considerations Keep the following points in mind when designing a replication system: Multi-master replication is supported only on Postgres databases. In addition, Advanced Server databases must be running in the same compatibility mode – either all Oracle or all PostgreSQL. An Oracle table can be a member of at most one publication if all publications are subordinate to one publication database definition. However, an Oracle table can be a member of multiple publications if each publication is subordinate to a different publication database definition. A Postgres table can be a member of at most one publication. Each table used in a publication must have a primary key with the exception of tables in snapshot-only publications, which do not require a primary key. Copyright © 2012 EnterpriseDB Corporation. All rights reserved. 51 Postgres Plus xDB Replication Server with Multi-Master User’s Guide Make sure table definitions are well established before creating publications. Unless the DDL change replication feature is used as described in Section 7.6, if a table definition is changed, any publication containing the table along with its associated subscription must be deleted and recreated, otherwise replication may fail. The same applies for the table definitions in a master definition node and its associated master nodes. Replication failures can be seen in the replication history. Views can be members of snapshot-only publications. In the subscription database, a view is replicated as a table. A publication may have multiple subscriptions. A subscription can be associated with at most one publication. A database can contain both publications and subscriptions. A given publication server can support only one multi-master replication system. All master nodes created subordinate to a given publication server are assumed to be part of the same multi-master replication system. A table that is created as a result of a subscription can be used in another publication. Thus, a publication can replicate data to a subscription which in turn, can be used in a publication to replicate to another subscription, thus creating a cascaded replication architecture. There are restrictions on the combinations and configurations of database servers that can be used for a publication and its subscription. See Section 9.1 for details on these restrictions. All replication system components must be running in order for replication to occur, or before performing any configuration, operation, or modification in the replication system. (The xDB Replication Console is used for the configuration and modification of a replication system. The xDB Replication Console does not need to be running in order for replication to occur.) In general, the order of creation of a replication system is as follows: 1) Create the required physical databases, database user names, tables, and views to be used in the replication system. 2) Define the replication system logical components using the xDB Replication Console or xDB Replication Server CLI. 3) Perform replication. In general, the order of removal of a single-master replication system is as follows: 1) Remove the replication system logical components using the xDB Replication Console or xDB Replication Server CLI starting with the subscriptions (Subscription nodes) and then their parent components (Subscription Database nodes). 2) Unregister the subscription server if you no longer have any need for it. 3) Repeat the same process for the publications. 4) After all replication system logical components have been removed (except for possibly the publication server and subscription server) you can drop any of the physical database objects in Oracle, SQL Server, or Postgres. Do not drop the metadata database objects manually, for example by using an SQL command line utility. Doing so may cause the xDB Replication Console and xDB Replication Server CLI to become inoperable. (See Section 9.2.4.2 if this problem occurs.) Deleting the replication system logical components using the Copyright © 2012 EnterpriseDB Corporation. All rights reserved. 52 Postgres Plus xDB Replication Server with Multi-Master User’s Guide xDB Replication Console or xDB Replication Server CLI automatically drops the metadata database objects from the physical database. The order of removal of a multi-master replication system is as follows: 1) Remove the replication system logical components using the xDB Replication Console or xDB Replication Server CLI starting with the publication database definitions of the master nodes other than the master definition node. 2) Remove the publication from under the master definition node. 3) Remove the publication database definition of the master definition node. 4) After all replication system logical components have been removed (except for possibly the publication server) you can drop any of the physical database objects in Postgres. Do not drop the metadata database objects manually, for example by using an SQL command line utility. Doing so may cause the xDB Replication Console and xDB Replication Server CLI to become inoperable. 2.4.3 Restrictions on Replicated Database Objects When a subscription is created in a single-master replication system, the table definitions and most database objects and attributes associated with the publication tables are created in the subscription database by the subscription server. If you so choose, the same process can automatically occur when a master node is added to a multi-master replication system. The table definitions and most database objects and attributes associated with the publication tables can be created in the newly added master node by the publication server. The following is a list of database objects and table attributes that are replicated from the publication in either a single-master or multi-master replication system. Tables Views (for snapshot-only publications) created as tables in the subscription database Primary keys Not null constraints Unique constraints Check constraints Indexes Note: Foreign key constraints are not replicated by the publication or subscription server in a single-master replication system. However, in a multi-master replication system, foreign key constraints are replicated from the master definition node to other master nodes. xDB Replication Server does have some restrictions on the types of tables it can replicate. Copyright © 2012 EnterpriseDB Corporation. All rights reserved. 53 Postgres Plus xDB Replication Server with Multi-Master User’s Guide Certain types of Oracle partitioned tables can be replicated. See Section 9.3.1.4 for details. Oracle tables that include the following data types cannot be replicated: BFILE BINARY_DOUBLE BINARY_FLOAT MLSLABEL XMLTYPE Oracle tables with the following data types can be used in snapshot-only publications, but cannot be used in synchronization replications: BLOB CLOB LONG LONG RAW NCLOB RAW SQL Server tables that include the following data types cannot be replicated: GEOGRAPHY GEOMETRY SQL_VARIANT Note: See Section 9.3.6 for a method to replicate tables containing the SQL_VARIANT data type under certain conditions. SQL Server tables with the following data types can be used in snapshot-only publications, but cannot be used in synchronization replications: BINARY IMAGE NTEXT NVARCHAR(max) TEXT TIMESTAMP VARBINARY VARBINARY(max) Postgres tables with the line geometric data type cannot be replicated. Copyright © 2012 EnterpriseDB Corporation. All rights reserved. 54 Postgres Plus xDB Replication Server with Multi-Master User’s Guide 2.4.4 Performance Considerations This section discusses the processing differences between snapshot and synchronization replications and provides some general guidelines on which method to use. 2.4.4.1 What Happens During Snapshot Replication In snapshot replication, the target tables are completely reloaded from the source tables. The database system’s truncate operation is used to delete all rows from the target tables. For Oracle and SQL Server only: Oracle and SQL Server target tables are loaded using JDBC batches of INSERT statements. For Postgres only: In general, Postgres target tables are loaded using the JDBC COPY command since using truncation and COPY is generally faster than if you were to execute an SQL DELETE statement against the entire table and then add the rows using JDBC batches of INSERT statements. If the COPY command fails, the publication server retries the snapshot using JDBC batches of INSERT statements. If the target table (regardless of database type) contains a large object data type such as BYTEA, BLOB, or CLOB then rows are loaded one at a time per batch using an INSERT statement. This is to avoid a heap space error resulting from potentially large rows. Loading time can be decreased by allowing multiple inserts per batch, which is done by adjusting the configuration option lobBatchSize described in Section 5.8.1. Note: Advanced Server supports a number of aliases for data types. Such aliases that translate to BYTEA are treated as large object data types. See the Oracle Compatibility Developer’s Guide for a listing of Advanced Server data types. Under certain circumstances, the corresponding Postgres target table created for certain types of Oracle partitioned tables is a set of inherited tables. In these cases, the SQL DELETE statement is used on the inherited child tables instead of truncation. See Section 9.3.1.4 for additional information on replicating Oracle partitioned tables. A server configuration option is available that forces the snapshot replication process to use the Oracle database link utility instead of JDBC COPY to populate the Postgres target tables from an Oracle publication. Oracle database link provides an additional performance improvement over JDBC COPY. See Section 5.8.1 for information on using the Oracle database link option. See Section 5.8.1 for information on various configuration options to optimize snapshot replication. Copyright © 2012 EnterpriseDB Corporation. All rights reserved. 55 Postgres Plus xDB Replication Server with Multi-Master User’s Guide 2.4.4.2 What Happens During Synchronization Replication In synchronization replication, changes made to the source tables since the last replication occurred are applied to the target tables using SQL INSERT, UPDATE, and DELETE statements. However, the SQL statements run against the target tables are not the same SQL statements that were run against the source tables. If a publication in a single-master replication system is created that will be used in synchronization replications, the publication server installs an insert trigger, an update trigger, and a delete trigger on each publication table. In a multi-master replication system, each replicated table in every master node has an insert trigger, an update trigger, and a delete trigger. The publication server also creates a shadow table for each source table. A shadow table is a table used by xDB Replication Server to record the changes (inserts, updates, and deletions) made to a given source table. A shadow table records three types of record images: For each row inserted into the source table, the shadow table records the image of the inserted row. For each existing row that is updated in the source table, the shadow table records the after image of the updated row. For each row deleted from the source table, the shadow table records the primary key value of the deleted row. Note: In a multi-master replication system, the before image of an updated row is also stored in the shadow table in order to perform update conflict detection. See Section 6.6 for information on conflict detection in a multi-master replication system. After each change on the source table, one of the insert, update, or delete triggers is executed. These are row triggers, so for each row affected by the change, the trigger executes. Each execution of the trigger records a row of the appropriate type (insert, update, or deletion) in the shadow table of the corresponding source table. When synchronization replication occurs, the publication server executes JDBC batches of SQL statements (also referred to as transaction sets) against the target tables. The batches contain an INSERT statement for each shadow table row recording an insert operation, an UPDATE statement for each shadow table row recording an update operation, and a DELETE statement for each shadow table row recording a delete operation. Each batch is executed in one transaction. Shadow table rows that were applied to target tables can be viewed as shadow table history in the xDB Replication Console (see Section 7.3.3). Note: A single SQL statement executed against a source table may result in many rows recorded in a shadow table, and therefore, many SQL statements executed against the target table. For example, if a single UPDATE statement affects 10 rows in the source table, 10 rows will be inserted into the shadow table – one for each row in the source table that was updated. When the publication server applies the changes to the target table, 10 UPDATE statements will be executed. Copyright © 2012 EnterpriseDB Corporation. All rights reserved. 56 Postgres Plus xDB Replication Server with Multi-Master User’s Guide Note: For greater efficiency, when changes to the source tables consist of SQL statements that each affect a large number of rows, the publication server may employ the use of prepared SQL statements. See Section 5.8.2 for directions on how to control the usage of prepared SQL statements as well as information on various other configuration options to optimize synchronization replication. 2.4.4.3 When to Use Snapshot or Synchronization Generally, synchronization would be the quickest replication method since it only applies changes to the target tables since the last replication occurred. However, if a large percentage of rows are changed between each replication, there may be a point where it would be faster to completely reload the target tables using a snapshot than to execute individual SQL statements on a large percentage of rows as would be done for synchronization replication. Experimentation may be necessary to determine if, and at what point a snapshot would be faster. Snapshot replication may be an option for tables with the following characteristics: Tables are relatively small in size A large percentage of rows are changed between replications Synchronization replication is the better option for tables with the following characteristics: Tables are large in size A small percentage of rows are changed between replications In a single-master replication system, if you find that one group of tables consistently replicates faster using snapshot replication, then these tables can be made part of a snapshot-only publication while the remaining tables can be members of a publication that uses synchronization replication. 2.4.4.4 When to Use On Demand Replication The xDB Replication Console and xDB Replication Server CLI both give you the capability to immediately start a replication. This is called an on demand replication. On demand replication can be performed at any time regardless of whether or not there is an existing schedule. An on demand replication does not change the date and time when the next replication is scheduled to occur according to an existing schedule. If a publication is a snapshot-only publication, then the only type of on demand replication that can be performed on this publication is a snapshot. Copyright © 2012 EnterpriseDB Corporation. All rights reserved. 57 Postgres Plus xDB Replication Server with Multi-Master User’s Guide If a publication is not a snapshot-only publication, you can perform an on demand replication using either the snapshot method or the synchronization method. When you are in the development and testing phases of your replication system, you would typically use on demand replication so that you can immediately force the replication to occur and analyze the results. When your replication system is ready for production, a schedule would typically be used so that replications can occur unattended at regular time intervals. See Section 7.1 for directions on creating a schedule. There may be other situations where you would want to force a replication to take place ahead of its normal schedule. Reasons for performing an on demand replication may include the following: The number of changes to the source tables is growing at a faster rate than usual, and you do not want to wait for the regularly scheduled synchronization time to replicate all of the accumulated changes. You have set up your replication system to perform synchronizations, but on this occasion there have been an unusually large number of changes made to the source tables, and you would rather perform a snapshot of all source tables rather than execute a large number of SQL statements against the target tables. Changes have been made directly to the rows of the target tables so that they no longer have the same content as their source table counterparts. You can perform an on demand snapshot replication to reload all rows of the target tables from your current set of source tables. Note: In a multi-master replication system, on demand snapshots can only be made from the master definition node to another master node. See Section 5.4 for directions on performing an on demand replication for a single-master replication system. See Section 6.5 for a multi-master replication system. 2.4.5 Distributed Replication xDB Replication Server provides the flexibility of allowing you to run the replication system’s components on separate machines on a network. In fact xDB Replication Server is designed so that it is possible to set up replication systems where each of the components (publication server, subscription server, xDB Control database, publication database, subscription database, and master nodes) may all run on the same host, each component may run on its own separate host, or any combination of components may run on any number of hosts. However, for practical purposes, there are two basic scenarios. The simplest case is where all components are on the same host. The other case is where you have the Oracle Copyright © 2012 EnterpriseDB Corporation. All rights reserved. 58 Postgres Plus xDB Replication Server with Multi-Master User’s Guide or SQL Server database server running on a host separate from the rest of the replication system components. This section discusses the advantages and disadvantages of each scenario. 2.4.5.1 Single Host The simplest implementation of a replication system is when all replication components run on a single host. This means that the PostgreSQL or Advanced Server installation, the complete xDB Replication Server installation (publication server, subscription server, and xDB Control database), and the Oracle or SQL Server database server reside on the same machine. The Postgres publication or subscription database as the case may be, can reside in the initial database cluster that is created when Postgres is installed on the host. Figure 21 - Single host replication system Copyright © 2012 EnterpriseDB Corporation. All rights reserved. 59 Postgres Plus xDB Replication Server with Multi-Master User’s Guide The advantages of a single host replication system are the following: There is a performance advantage since there is no network over which to push replication data, especially if large snapshots are involved. Configuration is much simpler. When creating the replication system logical components, the IP addresses of all components are the same. The disadvantages of a single host replication system are the following: The replication system and the database servers all consume the resources of one machine, which can adversely affect database application performance. The publication and subscription databases may be in different geographic locations, thereby requiring multiple networked hosts. Your site may require the use of a dedicated host for the Oracle or SQL Server database server so xDB Replication Server could not reside on the same machine. 2.4.5.2 Single-Master Replication Distributed Hosts xDB Replication Server allows you to build a replication system with either or both of the publication database and the subscription database on separate hosts. This is illustrated in the following diagram: Copyright © 2012 EnterpriseDB Corporation. All rights reserved. 60 Postgres Plus xDB Replication Server with Multi-Master User’s Guide Figure 22 - Oracle database server on distributed host The same remote distribution can be used for the subscription database instead of, or in addition to the publication database. The advantages of a distributed host replication system are the following: The replication system and the database servers can each consume the resources of their own machines, which can be individually selected and tuned. The publication and subscription databases can be in different geographic locations. You can enforce stronger database security if only the database server is allowed to run on a host. The disadvantages of a distributed host replication system are the following: There may be a performance disadvantage since there is a network over which to push replication data, especially if large snapshots are involved. Installation is more complex if the Postgres database must run on a different host than xDB Replication Server. This involves installing Postgres on two separate hosts. Copyright © 2012 EnterpriseDB Corporation. All rights reserved. 61 Postgres Plus xDB Replication Server with Multi-Master User’s Guide Configuration is more complex. The network and firewalls must be properly configured to allow the distributed components to communicate. When creating the replication system logical components, the correct IP addresses of all components must be used. In addition, the correct IP addresses must be kept upto-date in the replication system metadata should they change in the networked environment. 2.4.5.3 Multi-Master Replication Distributed Hosts In a multi-master replication system, the Postgres database servers running the master nodes can be running on a single or multiple hosts. The following example illustrates two master nodes running on database servers on separate hosts as well as a master node running on the same database server as the publication server. Figure 23 - Multi-master replication on distributed hosts Copyright © 2012 EnterpriseDB Corporation. All rights reserved. 62 Postgres Plus xDB Replication Server with Multi-Master User’s Guide 3 Installation This chapter describes how to install xDB Replication Server. Installation of xDB Replication Server is done with Stack Builder or StackBuilder Plus depending upon whether you are using PostgreSQL or Postgres Plus Advanced Server. For PostgreSQL. Install xDB Replication Server from the Postgres Plus Solution Pack using Stack Builder after you have installed PostgreSQL. For Postgres Plus Advanced Server. Install xDB Replication Server using StackBuilder Plus after you have installed Postgres Plus Advanced Server. The following section describes the installation of xDB Replication Server. 3.1 Installing With Stack Builder or StackBuilder Plus Stack Builder and StackBuilder Plus are programs used to download and install add-on products and updates to PostgreSQL and Postgres Plus Advanced Server. Stack Builder is used for PostgreSQL. StackBuilder Plus is used for Postgres Plus Advanced Server. Stack Builder and StackBuilder Plus are very similar in functionality and look-and-feel, differing primarily in the list of products offered. This section demonstrates the installation of xDB Replication Server using StackBuilder Plus for Advanced Server. Steps are noted where the installation process differs for installation on PostgreSQL using Stack Builder. Step 1 (For PostgreSQL only): You must have Java runtime version 1.5 or later installed on the hosts where you intend to install any xDB Replication Server component (xDB Replication Console, publication server, or subscription server). Note: The Oracle Java (formerly known as Sun Java) runtime product must be used. Follow the directions for your host operating system to install Java runtime. (For Advanced Server, a Java runtime is supplied and installed as part of the Advanced Server installation process.) Step 2: From the host’s application menu, open the Postgres menu and choose Stack Builder or StackBuilder Plus. Copyright © 2012 EnterpriseDB Corporation. All rights reserved. 63 Postgres Plus xDB Replication Server with Multi-Master User’s Guide Figure 24 - Postgres application menu Step 3 (For Linux only): Depending upon your Linux host, a dialog box or a prompt appears requesting the root account’s password. Enter the root password and click the OK button. Copyright © 2012 EnterpriseDB Corporation. All rights reserved. 64 Postgres Plus xDB Replication Server with Multi-Master User’s Guide Figure 25 - Enter root account password Step 4: The StackBuilder Plus welcome screen appears. Select your Postgres installation from the drop-down list and click the Next button. Copyright © 2012 EnterpriseDB Corporation. All rights reserved. 65 Postgres Plus xDB Replication Server with Multi-Master User’s Guide Figure 26 - StackBuilder Plus welcome screen Step 5 (For Advanced Server): Expand the Replication Solutions node and check the box for xDB Replication Server. Click the Next button. Copyright © 2012 EnterpriseDB Corporation. All rights reserved. 66 Postgres Plus xDB Replication Server with Multi-Master User’s Guide Figure 27 - StackBuilder Plus applications Step 5 (For PostgreSQL): Expand the Registration-Required and Trial Products node, and then expand the Solution Pack node. Check the box for xDB Replication Server under the Solution Pack list and click the Next button. Copyright © 2012 EnterpriseDB Corporation. All rights reserved. 67 Postgres Plus xDB Replication Server with Multi-Master User’s Guide Figure 28 - Stack Builder applications Copyright © 2012 EnterpriseDB Corporation. All rights reserved. 68 Postgres Plus xDB Replication Server with Multi-Master User’s Guide Figure 29 - Solution Pack for PostgreSQL Step 6 (For Advanced Server only): In the Account Registration screen, either enter your email address and password for your EnterpriseDB user account if you have one, or click the link in which case you will be directed to the registration page of the EnterpriseDB website where you can create an account. Click the Next button. Note (For PostgreSQL only): Proceed to Step 7. If you are using PostgreSQL, account registration occurs later in the process. Copyright © 2012 EnterpriseDB Corporation. All rights reserved. 69 Postgres Plus xDB Replication Server with Multi-Master User’s Guide Figure 30 - EnterpriseDB account registration Step 7: Verify that xDB Replication Server appears in the list of selected packages. Click the Next button. Copyright © 2012 EnterpriseDB Corporation. All rights reserved. 70 Postgres Plus xDB Replication Server with Multi-Master User’s Guide Figure 31 - Selected packages An information box appears showing the download progress of the xDB Replication Server package. This may take a few minutes. Figure 32 - Downloading progress Copyright © 2012 EnterpriseDB Corporation. All rights reserved. 71 Postgres Plus xDB Replication Server with Multi-Master User’s Guide Step 8: When downloading of the xDB Replication Server package completes, the following screen appears that starts the installation of xDB Replication Server. Click the Next button. Note: You can check the Skip Installation box if you wish to install xDB Replication Server some other time. Figure 33 – Start installation Step 9: Select the installation language and click the OK button. Copyright © 2012 EnterpriseDB Corporation. All rights reserved. 72 Postgres Plus xDB Replication Server with Multi-Master User’s Guide Figure 34 - Installation language Step 10: In the Setup xDB Replication Server screen, click the Next button. Figure 35 – Setup xDB Replication Server Copyright © 2012 EnterpriseDB Corporation. All rights reserved. 73 Postgres Plus xDB Replication Server with Multi-Master User’s Guide Step 11: Read the license agreement. If you accept the agreement, select the accept radio button and click the Next button. Figure 36 - License agreement Step 12: Browse to a directory where you want the xDB Replication Server components installed, or allow it to install the components in the default location shown. Click the Next button. Copyright © 2012 EnterpriseDB Corporation. All rights reserved. 74 Postgres Plus xDB Replication Server with Multi-Master User’s Guide Figure 37 - Installation directory Step 13: If you do not want a particular xDB Replication Server component installed on this particular host, uncheck the box next to the component name. Click the Next button. Copyright © 2012 EnterpriseDB Corporation. All rights reserved. 75 Postgres Plus xDB Replication Server with Multi-Master User’s Guide Figure 38 - Select components Step 14 (For PostgreSQL only): In the Account Registration screen select the radio button that applies to you. Click the Next button. Note (For Advanced Server only): Proceed to Step 15. Copyright © 2012 EnterpriseDB Corporation. All rights reserved. 76 Postgres Plus xDB Replication Server with Multi-Master User’s Guide Figure 39 - Account registration If you do not have an EnterpriseDB user account, you will be directed to the registration page of the EnterpriseDB website. If you already have an EnterpriseDB user account, enter the email address and password for your EnterpriseDB user account as shown in the following screen. Click the Next button. Copyright © 2012 EnterpriseDB Corporation. All rights reserved. 77 Postgres Plus xDB Replication Server with Multi-Master User’s Guide Figure 40 - My EnterpriseDB account Step 15: Enter the Postgres database connection information for the database server in which the xDB Control database is to run. Note: From this point on, it is suggested that you record the values you enter on these screens as they will be needed during the publication and subscription server registration process. Enter values for the following fields: Host. Network address of the Postgres database server that is to host the xDB Control database. (localhost is acceptable if the xDB Control database is to reside on the same machine where you are running this installation process.) Port. Port number on which the Postgres database server is listening for connections. User Name. The database superuser name to authenticate connections to the xDB Control database by the publication server or subscription server running on this host. You must also use this superuser name and password when you register a publication server or a subscription server running on this host. Default superuser Copyright © 2012 EnterpriseDB Corporation. All rights reserved. 78 Postgres Plus xDB Replication Server with Multi-Master User’s Guide is postgres (enterprisedb for Advanced Server installed in Oracle compatible configuration mode). Password. Password of the database user given in the User Name field. Control Database. The database name of the xDB Control database. If the database does not already exist, it will be created. Default database name is postgres (edb for Advanced Server installed in Oracle compatible configuration mode). Figure 41 - xDB Control database information Note: The database specified as the xDB Control database cannot be used as a publication database or a master node in a replication system. Therefore it is suggested to choose a database name other than the given default. Note: For purposes of this example, xdb is chosen as the xDB Control database name. Note: The information that you enter on this screen is saved to the xDB Replication Configuration file named /etc/edb-repl.conf (XDB_HOME\etc\edb-repl.conf Copyright © 2012 EnterpriseDB Corporation. All rights reserved. 79 Postgres Plus xDB Replication Server with Multi-Master User’s Guide on Windows hosts). Whenever a publication server or subscription server on this host is started, it obtains the connection information to the xDB Control database from this file. After you have completed the Postgres Installation Details screen, click the Next button. Step 16 (Only if publication server is a selected component): Enter an available port on which the publication server will run. Default port number is 9051. Click the Next button. Figure 42 - Publication server details Step 17 (Only if subscription server is a selected component): Enter an available port on which the subscription server will run. Default port number is 9052. Click the Next button. Copyright © 2012 EnterpriseDB Corporation. All rights reserved. 80 Postgres Plus xDB Replication Server with Multi-Master User’s Guide Figure 43 - Subscription server details Step 18: For the operating system account under which the publication server or subscription server is to run, enter postgres (enterprisedb if you are using Advanced Server installed in Oracle compatible configuration mode). Copyright © 2012 EnterpriseDB Corporation. All rights reserved. 81 Postgres Plus xDB Replication Server with Multi-Master User’s Guide Figure 44 - Publication/subscription server operating system account Step 19: On the Ready to Install screen, click the Next button. Copyright © 2012 EnterpriseDB Corporation. All rights reserved. 82 Postgres Plus xDB Replication Server with Multi-Master User’s Guide Figure 45 - Ready to install An information box appears showing the installation progress of the xDB Replication Server selected components. This may take a few minutes. Copyright © 2012 EnterpriseDB Corporation. All rights reserved. 83 Postgres Plus xDB Replication Server with Multi-Master User’s Guide Figure 46 - Installation progress Step 20: When installation has completed the following screen appears. Click the Finish button. Copyright © 2012 EnterpriseDB Corporation. All rights reserved. 84 Postgres Plus xDB Replication Server with Multi-Master User’s Guide Figure 47 – xDB Replication Server installation completion Step 21: On the StackBuilder Plus Installation Complete screen, click the Finish button. Copyright © 2012 EnterpriseDB Corporation. All rights reserved. 85 Postgres Plus xDB Replication Server with Multi-Master User’s Guide Figure 48 - StackBuilder Plus installation complete Successful installation of xDB Replication Server affects your host environment as described in Section 3.2. 3.2 Post-Installation Host Environment On Linux hosts you should now have a publication server daemon and a subscription server daemon running on your computer assuming you chose to install the publication server and subscription server components. On Windows systems, the publication server and subscription server run as services named Publication Service and Subscription Service. An xDB Control database will have been created if it did not already exist. The Postgres application menu contains a new item for the xDB Replication Console. Note: On some Linux systems, you may have to restart the server before you can see the xDB Replication Console choice in the application menu. Copyright © 2012 EnterpriseDB Corporation. All rights reserved. 86 Postgres Plus xDB Replication Server with Multi-Master User’s Guide The following files are created that you may need during the configuration process. Table 1 – Post-Installation Files File Name Location edb-repl.conf (Linux) /etc edb-repl.conf (Windows) XDB_HOME\etc edb-xdbpubserver (Linux) /etc/init.d edb-xdbsubserver (Linux) /etc/init.d Description xDB Replication Configuration file xDB Replication Configuration file Start, stop, or restart the publication server Start, stop, or restart the subscription server Publication server configuration file Subscription server configuration file Publication server log file xdb_pubserver.conf XDB_HOME/etc xdb_subserver.conf XDB_HOME/etc pubserver.log (Linux) /var/log/xdb-rep/buildnn pubserver.log (Windows) POSTGRES_HOME\.enterprisedb Publication server log file \edb_replicator\buildnn subserver.log (Linux) /var/log/xdb-rep/buildnn subserver.log (Windows) servers.xml Subscription server log file POSTGRES_HOME\.enterprisedb Subscription server log file \edb_replicator\buildnn USER_HOME/.enterprisedb/edb Server login file _replicator/buildnn Note: XDB_HOME is the directory where xDB Replication Server is installed. This is the same as the PostgreSQL or Advanced Server home directory if the default directory location was chosen during xDB Replication Server installation. Note: POSTGRES_HOME is the home directory of the postgres operating system account (enterprisedb for Advanced Server installed in Oracle compatible configuration mode). In the buildnn subdirectory, nn is the xDB Replication Server build number. Note: USER_HOME is the home directory of the operating system account in use. In the buildnn subdirectory, nn is the xDB Replication Server build number. 3.3 Registering Your xDB Replication Server Product Certain features of xDB Replication Server require you to register your xDB Replication Server product. Currently, full usage of the multi-master replication feature following a trial period requires product registration. Note: Following expiration of the trial period, xDB Replication Server operates in restricted mode, which limits certain operations. See Section 9.3.7 for details on restricted mode operation. The current status of your trial period can be seen in the bottom right-hand corner of the xDB Replication Console by selecting a publication server running under the instance of the xDB Replication Server product for which you want to see the status. Copyright © 2012 EnterpriseDB Corporation. All rights reserved. 87 Postgres Plus xDB Replication Server with Multi-Master User’s Guide Figure 49 - Product registration status Register your xDB Replication Server product by entering your Enterprise DB product license key at any time before or after the trial period ends. Enter the license key by using the xDB Replication Console. After you enter your license key, the registration status of your xDB Replication Server product is updated. The following are the steps to enter your license key. Step 1: A publication server must be registered and running under the xDB Replication Server installation for which you want to supply the license key. See steps 1 through 3 of Section 5.2.1 for directions on starting and registering a publication server if you have not already done so. Step 2: Select the Publication Server node. From the Help menu, choose Register xDB (MMR). The Product Registration dialog box appears. Copyright © 2012 EnterpriseDB Corporation. All rights reserved. 88 Postgres Plus xDB Replication Server with Multi-Master User’s Guide Figure 50 - Opening the Product Registration dialog box Step 3: Enter your license key in the Product Registration dialog box and click the OK button. Figure 51 - Product Registration dialog box Copyright © 2012 EnterpriseDB Corporation. All rights reserved. 89 Postgres Plus xDB Replication Server with Multi-Master User’s Guide Step 4: If Registered Successfully appears, click the OK button, otherwise verify you have entered the correct information. Contact EnterpriseDB if you are still having difficulty. Figure 52 - Successful product registration The updated status of your product appears in the bottom right-hand corner of the xDB Replication Console. Figure 53 - Updated registration status Copyright © 2012 EnterpriseDB Corporation. All rights reserved. 90 Postgres Plus xDB Replication Server with Multi-Master User’s Guide Copyright © 2012 EnterpriseDB Corporation. All rights reserved. 91 Postgres Plus xDB Replication Server with Multi-Master User’s Guide 4 Introduction to the xDB Replication Console The xDB Replication Console is the graphical user interface that you use to configure and manage the replication system. The equivalent functionality can also be done using the xDB Replication Server CLI utility. See Chapter 8 for information on the xDB Replication Server CLI. The xDB Replication Console window consists of the following main areas: Menu Bar. Menus for the replication system components Tool Bar. Icons for quick access to dialog boxes Replication Tree. Replication system components represented as nodes in an inverted tree Information Window. Tabbed window with information about a highlighted node in the replication tree Figure 54 - xDB Replication Console window The options that are available on the menu bar and tool bar are dependent upon the node highlighted in the replication tree. Only those options relevant to the highlighted node are available in the menu bar and tool bar. The content of the information window applies to the highlighted node as well. Copyright © 2012 EnterpriseDB Corporation. All rights reserved. 92 Postgres Plus xDB Replication Server with Multi-Master User’s Guide 4.1 xDB Replication Console Tool Bar This section describes when the various tool bar icons are activated. The operations associated with the tool bar are described in sections 5.2 and 5.3 for single-master replication. For multi-master replication see Section 6.2. Note: The publication server must be running in order to use tools relevant to publications. Similarly, the subscription server must be running in order to use tools relevant to subscriptions. 4.1.1 Refresh The Refresh icon is always activated. Click the Refresh icon if the replication tree or information window does not appear to display the latest information after performing an operation. Clicking the Refresh icon ensures that the latest information is shown in the replication tree and in the information window. Figure 55 - Refresh icon 4.1.2 Create Publication The Create Publication icon is activated when a Publication Database node is highlighted in the replication tree. Copyright © 2012 EnterpriseDB Corporation. All rights reserved. 93 Postgres Plus xDB Replication Server with Multi-Master User’s Guide Figure 56 - Create Publication icon 4.1.3 Publication Management The Remove Publication icon, Add Publication Tables icon, and Remove Publication Tables icon are activated when a Publication node is highlighted in the replication tree. Figure 57 - Remove Publication, Add Publication Tables, and Remove Publication Tables icons 4.1.4 Create Subscription The Create Subscription icon is activated when a Subscription Database node is highlighted in the replication tree. Copyright © 2012 EnterpriseDB Corporation. All rights reserved. 94 Postgres Plus xDB Replication Server with Multi-Master User’s Guide Figure 58 - Create Subscription icon 4.1.5 Subscription Management The Remove Subscription icon, Snapshot icon, Synchronize icon, Configure Schedule icon, and Remove Schedule icon are activated when a Subscription node is highlighted in the replication tree. Figure 59 - Remove Subscription, Snapshot, Synchronize, Configure Schedule, and Remove Schedule icons 4.2 Saving Server Login Information When you use the xDB Replication Console to create a replication system, you will need to register a publication server and a subscription server. During this process you are Copyright © 2012 EnterpriseDB Corporation. All rights reserved. 95 Postgres Plus xDB Replication Server with Multi-Master User’s Guide given the option to save the server’s login information. This section describes what happens if you select this option. The following discussion applies to both publication servers and subscription servers. These are generically referred to as “servers” in this discussion. 4.2.1 Server Login File If you choose to save the login information, the server’s network location (IP address and port number), user name, and password are stored in a server login file in a hidden location under the home directory of the operating system account with which you have opened the xDB Replication Console. See Section 3.2 for the location of this file. The following shows the Register Publication Server dialog box where the option to save login information is presented as a check box. In this example 192.168.2.7 entered in the Host field, 9051 entered in the Port field, enterprisedb entered in the User Name field, and an encrypted form of the password entered in the Password field are saved in the server login file for this publication server if user name and password validation are successful. The values for User Name and Password that you enter are validated against the user name and password in the xDB Replication Configuration file residing on host 192.168.2.7, in this case. The user name and password must successfully authenticate before registration of the publication server and saving of the publication server’s login information in the server login file occur. See Section 2.3.1.4 for information on the xDB Replication Configuration file. Figure 60 - Save login information option for a publication server See Section 5.2.1 for more information on the purpose of these fields and the process of registering a publication server. Copyright © 2012 EnterpriseDB Corporation. All rights reserved. 96 Postgres Plus xDB Replication Server with Multi-Master User’s Guide The following shows the Register Subscription Server dialog box. In this example 192.168.2.7 entered in the Host field, 9052 entered in the Port field, enterprisedb entered in the User Name field, and an encrypted form of the password entered in the Password field are saved in the server login file for this subscription server if user name and password validation are successful. Figure 61 - Save login information option for a subscription server See Section 5.3.1 for more information on the purpose of these fields and the process of registering a subscription server. Saving server login information gives you the convenience of immediate access to the publication server and any of its subordinate publications, or access to the subscription server and any of its subordinate subscriptions. That is, when you open the xDB Replication Console, the Publication Server nodes of saved publication servers immediately appear in the replication tree allowing you to perform administrative tasks on its subordinate publications. Similarly, the Subscription Server nodes of saved subscription servers immediately appear in the replication tree allowing you to perform administrative tasks on its subordinate subscriptions. If you did not save server login information, the server nodes would not be visible in the replication tree. You would have to re-enter the server’s network location, user name, and password. In other words, you would have to register the server each time you open the xDB Replication Console. Note: Each operating system account on a given host has its own server login file. Thus, the servers that are saved and appear in the xDB Replication Console when opened is independently determined for each operating system account. Copyright © 2012 EnterpriseDB Corporation. All rights reserved. 97 Postgres Plus xDB Replication Server with Multi-Master User’s Guide 4.2.2 Security Risks of Saved Server Login Information The preceding section discussed the benefits of saving server login information. The security risk associated with it is if unauthorized persons gain access to your operating system account, they could then potentially open the xDB Replication Console on your host using your operating system account. If the login information of publication servers or subscription servers is saved, the corresponding Publication Server nodes or Subscription Server nodes immediately appear in the xDB Replication Console with no request for authentication information. This allows an unauthorized person to perform any operation on the exposed publications and subscriptions including the potential to completely delete the replication system. Note: The publication database and subscription database cannot be deleted, but unauthorized replications could be forced to occur. Thus, it is important that operating system accounts are secure on hosts that have access to an xDB Replication Console and a replication system. Copyright © 2012 EnterpriseDB Corporation. All rights reserved. 98 Postgres Plus xDB Replication Server with Multi-Master User’s Guide 5 Single-Master Replication Operation This chapter describes how to configure and run xDB Replication Server for singlemaster replication systems. For configuration and management of your replication system, the xDB Replication Console graphical user interface is used to illustrate the steps and examples in this chapter. The same steps can be performed from the operating system command line using the xDB Replication Server Command Line Interface (CLI). The commands of the xDB Replication Server CLI utility are described in Chapter 8. 5.1 Prerequisite Steps Certain steps must be taken to prepare the host environments as well as the publication and subscription database servers before beginning the process of building a singlemaster replication system. This section describes these steps. 5.1.1 Enabling Access to the Database Servers The following sections describe configuration steps required to use xDB Replication Server on various types of database servers. The following section describes the steps to enable access to Oracle. See Section 5.1.1.2 for enabling access to SQL Server. No special steps are required to enable access to a Postgres database server. 5.1.1.1 Enabling Access to Oracle Note: The directions in this section apply only if Oracle will be used as the publication or subscription database. The JDBC driver for Oracle, ojdbc14.jar, must be accessible to the Java virtual machine (JVM) on the host running the publication server and the subscription server. If the publication server and subscription server are running on separate hosts, an ojdbc14.jar file must be accessible to the JVM on each host. Step 1: Download the Oracle JDBC driver, ojdbc14.jar, from the Oracle download site to the host that will be running the publication server. Step 2: Copy file ojdbc14.jar to the directory XDB_HOME/lib/jdbc. Copyright © 2012 EnterpriseDB Corporation. All rights reserved. 99 Postgres Plus xDB Replication Server with Multi-Master User’s Guide The following is an example when xDB Replication Server is installed in the same directory where Postgres is installed (that is, XDB_HOME is equivalent to POSTGRES_INSTALL_HOME): $ su root Password: $ cd /opt/PostgresPlus/9.1AS/lib/jdbc $ cp /home/user/Downloads/ojdbc14.jar $ ls -l total 2868 -rw-r--r-- 1 root daemon 554871 Nov -rw-r--r-- 1 root daemon 285638 Nov -rw-r--r-- 1 root root 1569316 Nov -rw-r--r-- 1 root daemon 502118 Nov . 2 2 7 2 07:23 07:23 20:21 07:23 edb-jdbc14.jar jtds-1.2.jar ojdbc14.jar postgresql-8.4-702.jdbc3.jar Note: If you installed xDB Replication Server to a location other than the Postgres installation directory, copy the ojdbc14.jar file to the lib/jdbc subdirectory of the location where you installed xDB Replication Server. Step 3: If the subscription server is running on a different host than the publication server, repeat steps 1 and 2 for the subscription server host. 5.1.1.2 Enabling Access to SQL Server Note: The directions in this section apply only if SQL Server will be used as the publication or subscription database. Step 1: Be sure SQL Server Authentication mode is enabled on your SQL Server database engine. SQL Server Authentication mode allows the use of SQL Server logins such as the built-in system administrator login, sa. Using the default settings for SQL Server installation, only Windows Authentication mode is enabled, which utilizes the accounts of the Windows operating system for authentication. In order to permit SQL Server Authentication mode, you must change the authentication mode to Mixed Mode Authentication, which permits both Windows Authentication and SQL Server Authentication. This can be done using SQL Server Management Studio. Refer to the appropriate SQL Server documentation for using SQL Server Management Studio. Step 2 (Required only for a SQL Server publication database): Be sure SQL Server Agent is enabled and running. SQL Server Agent is a Windows service that controls job scheduling and execution with SQL Server. xDB Replication Server uses SQL Server Agent for certain operations such as for scheduled shadow table history cleanup (see Section 7.4.1). Copyright © 2012 EnterpriseDB Corporation. All rights reserved. 100 Postgres Plus xDB Replication Server with Multi-Master User’s Guide SQL Server Agent can be started by using SQL Server Configuration Manager. Refer to the appropriate SQL Server documentation for using SQL Server Configuration Manager. 5.1.2 Preparing the Publication Database This section discusses the preparation of a database that contains tables and views that will become members of publications. The tables and views to be used for any given publication must all reside in the same database. This database becomes the publication database of that publication. A publication database user name must be created or already exist with the following characteristics: The publication database user can connect to the publication database. The publication database user has the privileges to create database objects to store metadata used for controlling and tracking the replication process. The publication database user can read the tables and views that are to become members of publications. For publications that will use synchronization replication, the publication database user can create triggers on the publication tables. (For Oracle, the publication database user must have trigger creation privilege regardless of the replication method used, though triggers will only be created for publications using synchronization replication.) The examples used throughout the rest of this user’s guide are based on the following: The publication database user name is pubuser. The tables and view used in publications reside in a schema named edb. Three tables named dept, emp, and jobhist are members of schema edb. One view named salesemp is a member of schema edb. This view is a SELECT statement over the emp table. The Oracle system identifier (SID) of the publication database is xe. The SQL Server publication database name is edb. The Postgres publication database name is edb. (The cases of Oracle as the publication database, SQL Server as the publication database, and Postgres as the publication database are presented with examples in this section.) For preparing an Oracle publication database, see the next section. For preparing a SQL Server publication database, see Section 5.1.2.2. For preparing a Postgres publication database, see Section 5.1.2.3. 5.1.2.1 Oracle Publication Database Step 1: Create a database user name for the publication database user. The publication database user name must have a password, and it must have the ability to create a Copyright © 2012 EnterpriseDB Corporation. All rights reserved. 101 Postgres Plus xDB Replication Server with Multi-Master User’s Guide database session. The publication database user becomes the owner of xDB Replication Server metadata database objects that will be created in the publication database to track, control, and record the replication process and history. When creating the publication database definition, the publication database user name is entered in the Publication Service – Add Database dialog box (see Section 5.2.2). CREATE USER pubuser IDENTIFIED BY password; GRANT CONNECT TO pubuser; Step 2: Grant the privileges needed to create the xDB Replication Server metadata database objects. The xDB Replication Server metadata database objects are created in the schema owned by, and with the same name as the publication database user. GRANT RESOURCE TO pubuser; Step 3: Grant the privileges required to create triggers on the publication tables. The CREATE ANY TRIGGER privilege must be granted to the publication database user. GRANT CREATE ANY TRIGGER TO pubuser; Step 4: The publication database user must be able to read the tables and views that are to be included in publications. GRANT GRANT GRANT GRANT SELECT SELECT SELECT SELECT ON ON ON ON edb.dept TO pubuser; edb.emp TO pubuser; edb.jobhist TO pubuser; edb.salesemp TO pubuser; 5.1.2.2 SQL Server Publication Database In SQL Server, an application gains access to the database server by supplying a SQL Server login and its associated password. When an application connects to a particular database, the application assumes the identity and privileges of a database user that has been defined in that database. The database users in any given database are independent of database users in other databases with respect to their properties such as their role memberships and privileges. In fact, the same database user name can be defined in more than one database, each with its own distinct properties. In each database, a database user can be mapped to a SQL Server login. When an application connects to a database using a SQL Server login to which a database user has been mapped, the application assumes the identity and privileges of that database user. Copyright © 2012 EnterpriseDB Corporation. All rights reserved. 102 Postgres Plus xDB Replication Server with Multi-Master User’s Guide When using a SQL Server database as the publication database, a number of database users must be defined and mapped to a SQL Server login according to the following rules: A SQL Server login must exist that is to be used by the publication server to connect to SQL Server. The SQL Server login and password are specified when creating the publication database definition. In the publication database, a database user must exist that is to be the creator and owner of the xDB Replication Server metadata database objects. This database user must be mapped to the SQL Server login used by the publication server. A schema must exist to contain the xDB Replication Server metadata database objects. The database user, described in the preceding bullet point, must either own this schema or have certain privileges on this schema so that the database user can create and update the metadata database objects in this schema. This schema must also be defined as the default schema of that database user. The SQL Server database users that update the data in the application tables that are to be replicated must have certain privileges on the xDB Replication Server metadata database objects. When an update on a replicated table occurs, a trigger fires that updates certain metadata database objects using the privileges associated with the application user performing the update. These privileges are granted to existing SQL Server database users, however, if new SQL Server database users are added who require update access to the application tables, then privileges must be granted to these users on the xDB Replication Server metadata database objects. A database user must exist in the msdb database that is mapped to the SQL Server login used by the publication server. This database user must have certain privileges to execute jobs in the dbo schema of the msdb database. (The msdb database is used by SQL Server Agent to schedule alerts and jobs. SQL Server Agent runs as a Windows service.) This example uses the following SQL Server login, database users, and mappings to comply with the aforementioned rules: The publication tables reside in database edb. The database user owning the schema containing the publication tables and the publication tables, themselves, is edb. The SQL Server login used by the publication server to connect to SQL Server is pubuser. The database user owning the xDB Replication Server metadata database objects and mapped to SQL Server login pubuser in database edb is pubuser. The schema used to contain the metadata database objects created by the publication server is pubuser. The database user mapped to SQL Server login pubuser in database msdb is pubuser_msdb. Copyright © 2012 EnterpriseDB Corporation. All rights reserved. 103 Postgres Plus xDB Replication Server with Multi-Master User’s Guide Note: The sqlcmd utility program is used to execute the SQL statements in these examples. The USE command establishes the database to which the subsequent statements are to apply. The GO command executes the preceding SQL statements as a batch. Placement of the GO command within a stream of SQL statements sometimes has significance depending upon the particular SQL statements. Step 1: Create a SQL Server login for the xDB Replication Server publication database user. The login must have a password. When creating the publication database definition, the SQL Server login is entered in the Publication Service – Add Database dialog box (see Section 5.2.2). USE master; GO CREATE LOGIN pubuser WITH PASSWORD = 'password'; GO Step 2: Create the database user and its required privileges for job scheduling in database msdb: USE msdb; GO CREATE USER pubuser_msdb FOR LOGIN pubuser; GO GRANT EXECUTE ON SCHEMA :: dbo TO pubuser_msdb; GRANT SELECT ON SCHEMA :: dbo TO pubuser_msdb; GO Step 3: Create the database user for xDB Replication Server metadata database object creation and ownership. The metadata database objects are created in the publication database to track, control, and record the replication process and history. This example assumes the metadata database objects are to be created in a schema named pubuser. USE edb; GO CREATE USER pubuser FOR LOGIN pubuser WITH DEFAULT_SCHEMA = pubuser; GO Note: The remaining steps assume that the commands are given in the publication database (that is, the USE edb command has been previously given to establish the publication database edb as the current database.) Step 4: Grant the database level privileges needed by the publication database user to create the xDB Replication Server metadata database objects. GRANT CREATE TABLE TO pubuser; GRANT CREATE PROCEDURE TO pubuser; GO Step 5: Choose the schema where the xDB Replication Server metadata database objects are to reside. Copyright © 2012 EnterpriseDB Corporation. All rights reserved. 104 Postgres Plus xDB Replication Server with Multi-Master User’s Guide To create the metadata database objects in a new schema owned by the publication database user and created exclusively for this purpose (recommended approach) issue the following command: CREATE SCHEMA pubuser AUTHORIZATION pubuser; GO Alternatively, to create the metadata database objects in an existing schema such as in the same schema containing the publication tables use the following commands: GRANT GRANT GRANT GRANT GRANT GRANT GO ALTER EXECUTE SELECT INSERT UPDATE DELETE ON ON ON ON ON ON SCHEMA SCHEMA SCHEMA SCHEMA SCHEMA SCHEMA :: :: :: :: :: :: edb edb edb edb edb edb TO TO TO TO TO TO pubuser; pubuser; pubuser; pubuser; pubuser; pubuser; Step 6: Grant the privileges required to create triggers on the publication tables. The publication database user must have the ALTER privilege on the publication tables. GRANT ALTER ON edb.dept TO pubuser; GRANT ALTER ON edb.emp TO pubuser; GRANT ALTER ON edb.jobhist TO pubuser; GO Step 7: The publication database user must be able to read the tables and views that are to be included in publications. GRANT GRANT GRANT GRANT GO SELECT SELECT SELECT SELECT ON ON ON ON edb.dept TO pubuser; edb.emp TO pubuser; edb.jobhist TO pubuser; edb.salesemp TO pubuser; Step 8 (For application database users added after the publication has been created): For each application database user that is to modify the data in any of the application tables to be replicated (by SQL INSERT, UPDATE, or DELETE statements), privileges must be granted on the xDB Replication Server metadata database objects to these users. In the following example, new_user is a new database user that will be updating the application tables. GRANT EXECUTE ON SCHEMA :: pubuser TO new_user; GRANT SELECT ON SCHEMA :: pubuser TO new_user; GRANT INSERT ON SCHEMA :: pubuser TO new_user; GO Note: Instead of using the preceding statements, which grant privileges at the schema level, a more granular level of privileges can be issued at the database object level using the following statements: GRANT EXECUTE ON pubuser.nextval to new_user; Copyright © 2012 EnterpriseDB Corporation. All rights reserved. 105 Postgres Plus xDB Replication Server with Multi-Master User’s Guide GRANT GRANT GRANT GRANT GRANT GO SELECT INSERT INSERT INSERT INSERT ON ON ON ON ON pubuser.rrep_tx_seq TO new_user; pubuser.rrep_tx_seq TO new_user; pubuser.RRST_edb_dept TO new_user; pubuser.RRST_edb_emp TO new_user; pubuser.RRST_edb_jobhist TO new_user; Using this approach, however, requires you to issue additional privileges for each application table that is added to a publication. 5.1.2.3 Postgres Publication Database The following steps assume you wish to use a non-superuser as the publication database user. These steps can be omitted if you choose to use a superuser as the publication database user. Alternatively, most if not all of these steps can probably be omitted if you use the publication database owner as the publication database user. You will need to check that the publication database user you choose has all of the privileges described in these steps. Step 1: Create a database user name for the publication database user. The publication database user name must have a password, and it must have the ability to create a database session. The publication database user becomes the owner of xDB Replication Server metadata database objects that will be created in the publication database to track, control, and record the replication process and history. When creating the publication database definition, the publication database user name is entered in the Publication Service – Add Database dialog box (see Section 5.2.2). CREATE ROLE pubuser WITH LOGIN PASSWORD 'password'; Step 2: Grant the privileges needed to create the xDB Replication Server metadata database objects. The xDB Replication Server metadata database objects are created in a schema named _edb_replicator_pub. In order to create this schema, the publication database user must have the CREATE ON DATABASE privilege on the publication database. GRANT CREATE ON DATABASE edb TO pubuser; Step 3: Grant the privileges required to create triggers on the publication tables. The publication database user must be the owner of the publication tables and must have the CREATE and USAGE privileges on the schema containing the publication tables. GRANT ALTER ALTER ALTER CREATE, USAGE ON SCHEMA edb TO pubuser; TABLE edb.dept OWNER TO pubuser; TABLE edb.emp OWNER TO pubuser; TABLE edb.jobhist OWNER TO pubuser; Copyright © 2012 EnterpriseDB Corporation. All rights reserved. 106 Postgres Plus xDB Replication Server with Multi-Master User’s Guide Step 4: The publication database user must be able to read the tables and views that are to be included in publications. GRANT GRANT GRANT GRANT SELECT SELECT SELECT SELECT ON ON ON ON edb.dept TO pubuser; edb.emp TO pubuser; edb.jobhist TO pubuser; edb.salesemp TO pubuser; Step 5: The publication database user must have the USAGE privilege on the schemas in which the tables and views reside that are to be included in publications. GRANT USAGE ON SCHEMA edb TO pubuser; 5.1.3 Preparing the Subscription Database This section discusses the preparation of a database that will be used as a subscription database. The tables and views in a given publication must all be replicated to the same database. This database is called the subscription database. A subscription database user name must be created with the following characteristics: The subscription database user can connect to the subscription database. The subscription database user has the privileges to create database objects for the replicated tables and views from publications. The subscription database user has the privileges necessary to execute the TRUNCATE command on the replicated tables. See Section 5.1.3.1 for preparation of a Postgres subscription database. See Section 5.1.3.2 for preparation of an Oracle subscription database. See Section 5.1.3.3 for preparation of a SQL Server subscription database. 5.1.3.1 Postgres Subscription Database A database user name must be chosen or created to serve as the subscription database user. The user name must have a password. The subscription database user becomes the owner of the replicated database objects. When creating the subscription database definition, the subscription database user name is entered in the Subscription Service – Add Database dialog box (see Section 5.3.2). The subscription database user must also have the ability to run the TRUNCATE command on the subscription tables. This requires the following: The subscription database user must have superuser privileges. Copyright © 2012 EnterpriseDB Corporation. All rights reserved. 107 Postgres Plus xDB Replication Server with Multi-Master User’s Guide The subscription database user must have the ability to modify the system catalog tables in order to disable foreign key constraints on subscription tables. (See appendix Section 9.3.4 for more information on this requirement.) You have the following two choices for choosing the subscription database user name: Use the Postgres user name postgres created upon installation of PostgreSQL (enterprisedb for Advanced Server installed in Oracle compatible configuration mode) for the subscription database user name. If you choose this option, skip Step 1 and proceed to Step 2. Create a new subscription database user name. For this option, proceed to Step 1. Step 1: Create a superuser as the subscription database user. CREATE ROLE subuser WITH LOGIN SUPERUSER PASSWORD 'password'; Step 2: Create or choose the subscription database. The names of the schemas containing the publication tables and views become the names of the Postgres schemas for the subscription tables. The subscription server creates these schemas in the subscription database when the subscription is created. If schemas with these names already exist in the subscription database, the existing schemas will be used to store the subscription tables. For a SQL Server publication database: If the schema containing the publication tables and views in SQL Server is named dbo, then the subscription server creates a schema named dbo_sql in the Postgres subscription database for the subscription tables. (Schema dbo is a special reserved schema in Postgres.) The existing schemas must not contain any tables or views with the same names as the publication tables and views. The subscription server returns an error if there are already identically named tables or views. You must delete or rename these tables and views before the subscription can be created. A new subscription database owned by the subscription database user subuser can be created with the following: CREATE DATABASE subdb OWNER subuser; 5.1.3.2 Oracle Subscription Database Step 1 (Optional): If you do not have an existing database that you want to use as your subscription database, create a new database. This step can be fairly complicated. Refer to the appropriate Oracle documentation for performing this task. Copyright © 2012 EnterpriseDB Corporation. All rights reserved. 108 Postgres Plus xDB Replication Server with Multi-Master User’s Guide Step 2: Create a database user name for the subscription database user. The subscription database user name must have a password, and it must have the ability to create a database session. The subscription database user becomes the owner of the replicated database objects. When creating the subscription database definition, the subscription database user name is entered in the Subscription Service – Add Database dialog box (see Section 5.3.2). CREATE USER subuser IDENTIFIED BY password; GRANT CONNECT TO subuser; Step 3: Grant the privileges needed to create the replicated database objects. The replicated database objects are created in the schema owned by, and with the same name as the subscription database user. GRANT RESOURCE TO subuser; 5.1.3.3 SQL Server Subscription Database Step 1: Create or choose the subscription database. The names of the schemas containing the publication tables and views become the names of the SQL Server schemas for the subscription tables. The subscription server creates these schemas in the subscription database when the subscription is created. If schemas with these names already exist in the subscription database, the existing schemas will be used to store the subscription tables. Note: If the schema containing the publication tables and views is named public, then the subscription server creates a schema named public_sql in the SQL Server subscription database for the subscription tables. The existing schemas must not contain any tables or views with the same names as the publication tables and views. The subscription server returns an error if there are already identically named tables or views. You must delete or rename these tables and views before the subscription can be created. A new subscription database can be created as shown by the following: USE master; GO CREATE DATABASE subdb; GO Step 2: Create a SQL Server login for the subscription database user. The login must have a password. Copyright © 2012 EnterpriseDB Corporation. All rights reserved. 109 Postgres Plus xDB Replication Server with Multi-Master User’s Guide When creating the subscription database definition, the SQL Server login is entered in the Subscription Service – Add Database dialog box (see Section 5.3.2). CREATE LOGIN subuser WITH PASSWORD = 'password'; GO Step 3: In the subscription database, a database user must exist that is to be the creator and owner of the subscription tables. This database user must be mapped to the SQL Server login created in Step 2. In this example, the database user is given the same name as the SQL Server login subuser. USE subdb; GO CREATE USER subuser FOR LOGIN subuser; GO Step 4: Grant the database level privileges needed by the subscription database user to create the schema and tables for the subscription. GRANT CREATE SCHEMA TO subuser; GRANT CREATE TABLE TO subuser; GO 5.1.4 Verifying Host Accessibility If more than one computer is used to host the components of the replication system, each computer must be able to communicate with the others on a network. There are a number of different aspects of this topic as discussed in the following sections. 5.1.4.1 Firewalls Verify that the firewalls on the hosts allow access from the other hosts running replication system components. Refer to the directions for your host’s operating system to enable accessibility. 5.1.4.2 Network IP Addresses When configuring a replication system, you must supply the network location of various components such as the publication server, subscription server, publication database server, and subscription database server. This information, consisting of the component’s IP address and port number, is stored as part of the replication system’s metadata. When one component needs to access another, it refers to the network location in the metadata that you supply during configuration. Copyright © 2012 EnterpriseDB Corporation. All rights reserved. 110 Postgres Plus xDB Replication Server with Multi-Master User’s Guide During replication system configuration it is strongly suggested that you supply the actual network IP address of each component and avoid the usage of the loopback address, localhost or 127.x.x.x, even if all components are running on the same host. You can obtain the network IP address using the following command: For Linux only: Use the /sbin/ifconfig command. For Windows only: Open a Command Prompt window and use the ipconfig command. The loopback address works as long as the communicating components are on the same host, but if at some future point, you decide to move a component to a different host on the network, the loopback address stored as the component’s network address in the metadata will no longer work for the component trying to make the connection. For Linux only: You may need to modify the /etc/hosts file so that a host’s network IP address is associated with the host’s name. Note: For an alternative to modifying the /etc/hosts file see Section 9.3.1.6. The default configuration on Linux systems associates the host name with the loopback address in the /etc/hosts file as shown by the following example: 127.0.0.2 opensuse-vm.vmplanet.net opensuse-vm This is also verified by using the hostname -i command, which returns the IP address associated with the host name: $ hostname -i 127.0.0.2 In these circumstances, certain xDB Replication Server components will have trouble locating its other components on the network as in the following cases: When the user interface attempts to connect to the publication server or subscription server When the subscription server attempts to connect to the publication server If the loopback address 127.x.x.x is returned such as in the preceding example, edit the /etc/hosts file so that the network IP address is associated with the host name instead. The following example shows the modified /etc/hosts file so that the host name opensuse-vm is now associated with the network IP address 192.168.2.7 instead of the loopback address 127.0.0.2: 192.168.2.7 opensuse-vm.vmplanet.net opensuse-vm Copyright © 2012 EnterpriseDB Corporation. All rights reserved. 111 Postgres Plus xDB Replication Server with Multi-Master User’s Guide #127.0.0.2 opensuse-vm.vmplanet.net opensuse-vm On some Linux systems, you may need to restart the network service after you have modified the /etc/hosts file. This may be done a number of different ways depending upon the Linux system you are using as shown by the following variations: service network restart /etc/init.d/networking restart sudo /etc/init.d/networking restart The following example illustrates the service network command: $ su root Password: $ service network restart The hostname -i command now returns the network IP address of the host: $ hostname -i 192.168.2.7 5.1.4.3 Postgres Server Authentication A Postgres database server uses the host-based authentication file, pg_hba.conf, to control access to the databases in the database server. You need to modify the pg_hba.conf file in the following locations: On each Postgres database server that contains an xDB Control database On each Postgres database server that contains a Postgres subscription database On each Postgres database server that contains a Postgres publication database In a default Postgres installation, this file is located in the directory POSTGRES_INSTALL_HOME/data. The modifications needed to the pg_hba.conf file for each of the three aforementioned cases are discussed in the following sections. xDB Control Database On a database server on which an xDB Control database resides, the following entries must be added to allow access to the xDB Control database: host control_dbname control_dbuser host control_dbname control_dbuser Copyright © 2012 EnterpriseDB Corporation. All rights reserved. pub_ipaddr/32 sub_ipaddr/32 md5 md5 112 Postgres Plus xDB Replication Server with Multi-Master User’s Guide The values you substitute for control_dbname and control_dbuser are the entries for fields database and user in the xDB Replication Configuration file found on the hosts running the publication server and subscription server. The following is an example of the content of an xDB Replication Configuration file: user=enterprisedb port=5444 password=ygJ9AxoJEX854elcVIJPTw\=\= type=enterprisedb host=localhost database=xdb The values you substitute for pub_ipaddr and sub_ipaddr are the network IP addresses where the publication server and the subscription server are running. Note: The network IP addresses you substitute for pub_ipaddr and sub_ipaddr must not be the loopback address 127.0.0.1. However, the publication and subscription servers do require access to the xDB Control database using the loopback address as well. This access is already granted in the default pg_hba.conf file by the following entry: host all all 127.0.0.1/32 md5 The following example shows the pg_hba.conf file for a configuration where the publication server and subscription server are running on the same host, using the same xDB Control database on the host: # TYPE DATABASE USER CIDR-ADDRESS # "local" is for Unix domain socket connections only local all all # IPv4 local connections: host xdb enterprisedb 192.168.2.7/32 host all all 127.0.0.1/32 # IPv6 local connections: host all all ::1/128 METHOD md5 md5 md5 md5 If the publication server and subscription server are running on separate hosts, each with their own xDB Control database, then modifications must be made to the pg_hba.conf file on each database server running an xDB Control database as shown by the following example where xdbpub is the xDB Control database on the publication server and xdbsub is the xDB Control database on the subscription server. On the publication server (192.168.2.7): # TYPE DATABASE USER CIDR-ADDRESS # "local" is for Unix domain socket connections only local all all # IPv4 local connections: host xdbpub enterprisedb 192.168.2.7/32 host all all 127.0.0.1/32 Copyright © 2012 EnterpriseDB Corporation. All rights reserved. METHOD md5 md5 md5 113 Postgres Plus xDB Replication Server with Multi-Master User’s Guide # IPv6 local connections: host all all ::1/128 md5 Note: For a database server whose xDB Control database is accessed only by the publication server, the entry permitting access from sub_ipaddr is not necessary as shown by the preceding example. On the subscription server (192.168.2.8): # TYPE DATABASE USER CIDR-ADDRESS # "local" is for Unix domain socket connections only local all all # IPv4 local connections: host xdbsub enterprisedb 192.168.2.7/32 host xdbsub enterprisedb 192.168.2.8/32 host all all 127.0.0.1/32 # IPv6 local connections: host all all ::1/128 METHOD md5 md5 md5 md5 md5 Postgres Subscription Database For a Postgres subscription database, the following entries are needed to allow access to the subscription database: host sub_dbname host sub_dbname sub_dbuser sub_dbuser pub_ipaddr/32 sub_ipaddr/32 md5 md5 The values you substitute for sub_dbuser and sub_dbname are the subscription database user name and the subscription database name you created in steps 1 and 2 of Section 5.1.3.1. For a Postgres subscription database, the resulting pg_hba.conf file appears as follows: # TYPE DATABASE USER CIDR-ADDRESS METHOD # "local" is for Unix domain socket connections only local all all md5 # IPv4 local connections: host xdb enterprisedb 192.168.2.7/32 md5 host subdb subuser 192.168.2.7/32 md5 host all all 127.0.0.1/32 md5 # IPv6 local connections: host all all ::1/128 md5 Note: The preceding example assumes that the publication server and the subscription server are running on the same host hence, only one entry is needed for database subdb. If the publication server and subscription server are running on separate hosts with their own xDB Control database on each host, then the pg_hba.conf file on the subscription database server looks like the following: # TYPE DATABASE USER CIDR-ADDRESS Copyright © 2012 EnterpriseDB Corporation. All rights reserved. METHOD 114 Postgres Plus xDB Replication Server with Multi-Master User’s Guide # "local" is for Unix domain socket connections only local all all # IPv4 local connections: host xdbsub enterprisedb 192.168.2.7/32 host xdbsub enterprisedb 192.168.2.8/32 host subdb subuser 192.168.2.7/32 host subdb subuser 192.168.2.8/32 host all all 127.0.0.1/32 # IPv6 local connections: host all all ::1/128 md5 md5 md5 md5 md5 md5 md5 Reload the configuration file after making the modifications. Choose Reload Configuration (Expert Configuration, then Reload Configuration on Advanced Server) from the Postgres application menu. This will put the modified pg_hba.conf file into effect. Postgres Publication Database For a Postgres publication database, the following is needed to allow access to the publication database: host pub_dbname host pub_dbname pub_dbuser pub_dbuser pub_ipaddr/32 sub_ipaddr/32 md5 md5 The value you substitute for pub_dbname is the name of the Postgres publication database you intend to use. The value you substitute for pub_dbuser is the publication database user name you created in Step 1 of Section 5.1.2.3. For a Postgres publication database named edb, the resulting pg_hba.conf file appears as follows: # TYPE DATABASE USER CIDR-ADDRESS # "local" is for Unix domain socket connections only local all all # IPv4 local connections: host xdb enterprisedb 192.168.2.7/32 host edb pubuser 192.168.2.7/32 host all all 127.0.0.1/32 # IPv6 local connections: host all all ::1/128 METHOD md5 md5 md5 md5 md5 Note: The preceding example assumes the publication server and the subscription server are running on the same host, hence the single entry for database edb. If the publication server and subscription server are running on separate hosts, each with its own xDB Control database, then the pg_hba.conf file on the publication database server would look like the following: # TYPE DATABASE USER CIDR-ADDRESS Copyright © 2012 EnterpriseDB Corporation. All rights reserved. METHOD 115 Postgres Plus xDB Replication Server with Multi-Master User’s Guide # "local" is for Unix domain socket connections only local all all # IPv4 local connections: host xdbpub enterprisedb 192.168.2.7/32 host edb pubuser 192.168.2.7/32 host edb pubuser 192.168.2.8/32 host all all 127.0.0.1/32 # IPv6 local connections: host all all ::1/128 md5 md5 md5 md5 md5 md5 Reload the configuration file after making the modifications. Choose Reload Configuration (Expert Configuration, then Reload Configuration on Advanced Server) from the Postgres application menu. This will put the modified pg_hba.conf file into effect. 5.2 Creating a Publication Creating your first publication requires the following steps: Registering the publication server Adding the publication database Creating a publication by choosing the tables and views for the publication along with creating any optional filter clauses Once the publication database has been added, as many publications can be created as there are available tables and views that are readable by the publication database user and that meet the criteria outlined in sections 2.4.2 and 2.4.3. 5.2.1 Registering a Publication Server When you register a publication server, you are identifying the network location, user name, and password of a specific, running, publication server instance that you want to use to manage all aspects of the publications you will be creating subordinate to it. It is important that you record the login information for the publication server as you must always use this same publication server instance to manage all publications created subordinate to it as represented in the xDB Replication Console replication tree. Step 1: Start the publication server if it is not already running. Note: If you are using Oracle publication or subscription databases, and the publication server has not been restarted since copying the Oracle JDBC driver, ojdbc14.jar, to the lib/jdbc subdirectory of your xDB Replication Server installation, you must restart the publication server. For Linux only: You can verify the publication server is running by using the following command: Copyright © 2012 EnterpriseDB Corporation. All rights reserved. 116 Postgres Plus xDB Replication Server with Multi-Master User’s Guide ps aux | grep pubserver This is shown by the following: $ ps aux | grep pubserver 502 5221 0.8 2.9 395196 32192 ? Sl 17:38 0:01 /opt/PostgresPlus/9.1AS/jre/bin/java -Djava.awt.headless=true -jar edbrepserver.jar pubserver 9051 user 5847 0.0 0.0 3996 688 pts/1 R+ 17:41 0:00 grep pubserver If the publication server is running and you wish to restart it, run script /etc/init.d/edb-xdbpubserver with the restart option. Run the script as the operating system user that you chose during installation in the Publication/Subscription Service Account screen in Step 18 of Section 3.1. (For an xDB Replication Server installation done at the time of Advanced Server installation, use operating system user enterprisedb for Oracle compatible configuration mode and use postgres for PostgreSQL compatible configuration mode.) $ su enterprisedb Password: $ /etc/init.d/edb-xdbpubserver restart Publication Service stopped Password: Publication Service started Enter the password for the operating system user name when prompted. If the publication server is not running, run the edb-xdbpubserver script with the start option as shown by the following: $ su enterprisedb Password: $ /etc/init.d/edb-xdbpubserver start Password: Publication Service started For Windows only: Open Control Panel, Administrative Tools, and then Services. The publication server runs as a service named Publication Service. Copyright © 2012 EnterpriseDB Corporation. All rights reserved. 117 Postgres Plus xDB Replication Server with Multi-Master User’s Guide Figure 62 - Windows publication service Use the Start or Restart link for the service. Step 2: Register the publication server. Open the xDB Replication Console from the system’s application menu. Figure 63 - xDB Replication Console menu option Copyright © 2012 EnterpriseDB Corporation. All rights reserved. 118 Postgres Plus xDB Replication Server with Multi-Master User’s Guide Figure 64 - xDB Replication Console Step 3: Select the top level Replication Servers node. From the File menu, choose Publication Server, and then choose Register Server. Alternatively, click the secondary mouse button on the Replication Servers node and choose Register Publication Server. The Register Publication Server dialog box appears. Enter the values you supplied during the installation of xDB Replication Server unless otherwise specified. Host. Network IP address of the host running the publication server. This is the network IP address used for pub_ipaddr in the pg_hba.conf file in Section 5.1.4.3. (Do not use localhost for this field.) Port. Port number the publication server is using. This is the port number you specified on the Publication Server Details screen in Step 16 of Section 3.1. User Name. Database superuser name that the publication server uses to connect to the xDB Control database. This is the user name you specified on the Postgres Installation Details screen in Step 15 of Section 3.1. Password. Password of the database superuser given in the User Name field. Save login information. Check this box if you do not want to re-register the publication server each time you open the xDB Replication Console. See Section 4.2 for additional information on the advantages and disadvantages of saving server login information. Note: The user name and password combination you enter is authenticated against the user name and password in the xDB Replication Configuration file residing on the host with the IP address you enter in the Host field. Copyright © 2012 EnterpriseDB Corporation. All rights reserved. 119 Postgres Plus xDB Replication Server with Multi-Master User’s Guide Figure 65 - Register Publication Server dialog box Click the Register button after you have filled in the fields. A Publication Server node appears in the replication tree of the xDB Replication Console. Expand the Publication Server node to expose the SMR and MMR type nodes. Figure 66 – Replication tree after registering a publication server Continue to build the single-master replication system under the SMR type node. 5.2.2 Adding a Publication Database The database in which publications are to reside must be identified to xDB Replication Server. This is done by creating a publication database definition. After the publication database definition is created, a Publication Database node representing that publication database definition appears in the replication tree of the Copyright © 2012 EnterpriseDB Corporation. All rights reserved. 120 Postgres Plus xDB Replication Server with Multi-Master User’s Guide xDB Replication Console. Publications that are to contain tables and views residing within this database can then be created under the Publication Database node. You must enter database connection information such as the database server network address, database identifier, and database login user name and password when you create the publication database definition. The connection information is used by the publication server to access the publication tables and views when it performs replication. Step 1: Make sure the database server in which the publication database resides is running and accepting client connections. Step 2: Select the SMR type node under the Publication Server node. From the Publication menu, choose Publication Database, and then choose Add Database. Alternatively, click the secondary mouse button on the SMR type node and choose Add Database. The Publication Service – Add Database dialog box appears. Step 3: Fill in the following fields: Database Type. Select Oracle, SQL Server, PostgreSQL, or Postgres Plus Advanced Server for the type of publication database. For an Advanced Server Oracle compatible installation, select the Postgres Plus Advanced Server option. For an Advanced Server PostgreSQL compatible installation, select the PostgreSQL option. Host. IP address of the host on which the publication database server is running. Port. Port on which the publication database server is listening for connections. User. The publication database user name created in Step 1 of Section 5.1.2. Password. Password of the database user. Service ID (For Oracle). Enter the Oracle System Identifier (SID) of the Oracle instance running the publication database if the SID radio button is selected. Enter the net service name of a connect descriptor as defined in the TNSNAMES.ORA file if the Service Name radio button is selected. Database (For Postgres or SQL Server). Enter the Postgres or SQL Server database name. Copyright © 2012 EnterpriseDB Corporation. All rights reserved. 121 Postgres Plus xDB Replication Server with Multi-Master User’s Guide Figure 67 - Publication Service - Add Database dialog box Step 4: Click the Test button. If Test Result: Success appears, click the OK button, then click the Save button. Figure 68 - Successful publication database test Copyright © 2012 EnterpriseDB Corporation. All rights reserved. 122 Postgres Plus xDB Replication Server with Multi-Master User’s Guide If an error message appears investigate the cause of the error, correct the problem, and repeat steps 1 through 4. When the publication database definition is successfully saved, a Publication Database node is added to the replication tree under the Publication Server node. Figure 69 – Replication tree after adding a publication database For Oracle only: Multiple Oracle databases can be added as publication databases by completing the Add Database dialog box for each database. It is also permissible to add the same Oracle database as two or more distinct publication database definitions if you use different publication database user names for each publication database definition. For Postgres or SQL Server: Multiple Postgres or SQL Server databases can be added as publication databases by completing the Add Database dialog box for each database. However, unlike Oracle, a given Postgres or SQL Server database can only be added once as a publication database definition. 5.2.3 Adding a Publication Subordinate to a publication database definition, you create publications that contain tables and views of the database identified in the publication database definition. Step 1: Select the Publication Database node. From the Publication menu, choose Create Publication. Alternatively, click the secondary mouse button on the Publication Database node and choose Create Publication. The Create Publication dialog box appears. Step 2: Fill in the following fields under the Create Publication tab: Publication Name. Enter a name that is unique amongst all publications. Copyright © 2012 EnterpriseDB Corporation. All rights reserved. 123 Postgres Plus xDB Replication Server with Multi-Master User’s Guide Snapshot-only replication. Check the box if replication is to be done by snapshot only. Tables included in a snapshot-only publication do not require a primary key. Tables included in publications on which synchronization replication is to be used must have primary keys. Publish. Check the boxes next to the tables that are to be included in the publication. If the Snapshot-Only Replication box is checked, then views appear in the Publish list as well. Select All. Check this box if you want to include all tables and views in the Available Tables list in the publication. Figure 70 - Create Publication dialog box If you wish to omit certain rows of the publication tables or views from being replicated follow the directions in the next step to create a filter, otherwise go on to Step 4. Step 3 (Optional): If you want to filter the rows of the publication tables or views, click the Filter Clause tab. Enter an appropriate SQL WHERE clause in the text box next to a table or view to select the rows you want to replicate. Copyright © 2012 EnterpriseDB Corporation. All rights reserved. 124 Postgres Plus xDB Replication Server with Multi-Master User’s Guide In the following example, only rows where the deptno column contains 30 are included in replications. All other rows are excluded from replication. Figure 71 - Adding a filter clause Step 4: Click the Create button. If Publication Created Successfully appears, click the OK button, otherwise investigate the error and make the necessary corrections. Copyright © 2012 EnterpriseDB Corporation. All rights reserved. 125 Postgres Plus xDB Replication Server with Multi-Master User’s Guide Figure 72 - Publication created successfully Upon successful publication creation, a Publication node is added to the replication tree. Figure 73 – Replication tree after adding a publication Copyright © 2012 EnterpriseDB Corporation. All rights reserved. 126 Postgres Plus xDB Replication Server with Multi-Master User’s Guide 5.2.4 Metadata Created for a Publication After you have added a publication database definition and publications you will find the following database objects have been created: A schema named _edb_replicator_pub is created in the xDB Control database with metadata database objects that are used to manage the publication. In the publication database, several metadata database objects are created to control and manage the publication. If the publication is not a snapshot-only publication, that is synchronization replication is permitted, then three triggers and one shadow table are created for each publication table. For Oracle only: The metadata database objects are created in the publication database user’s schema as shown in the following output: SQL> CONNECT pubuser/password Connected. SQL> SET PAGESIZE 9999 SQL> SELECT table_name FROM user_tables; TABLE_NAME -----------------------------RREP_TABLES RREP_PUBLICATION_TABLES RREP_TXSET RREP_MMR_TXSET RREP_PUBLICATION_SUBSCRIPTIONS RREP_TXSET_LOG RREP_LOCK RREP_MMR_PUB_GROUP RREP_PROPERTIES RREP_TXSET_HEALTH RRST_EDB_DEPT RRST_EDB_EMP 12 rows selected. SQL> SELECT sequence_name FROM user_sequences; SEQUENCE_NAME -----------------------------RREP_TX_SEQ RREP_TXSET_SEQ RREP_COMMON_SEQ SQL> SELECT DISTINCT name FROM user_source WHERE type = 'PACKAGE'; NAME -----------------------------RREP_PKG SQL> SELECT trigger_name FROM user_triggers; Copyright © 2012 EnterpriseDB Corporation. All rights reserved. 127 Postgres Plus xDB Replication Server with Multi-Master User’s Guide TRIGGER_NAME -----------------------------RRPI_EDB_DEPT RRPU_EDB_DEPT RRPD_EDB_DEPT RRPI_EDB_EMP RRPU_EDB_EMP RRPD_EDB_EMP 6 rows selected. For SQL Server only: Most of the metadata database objects are created in the schema you chose in Step 5 of Section 5.1.2.2 as shown by the following: 1> USE edb; 2> GO Changed database context to 'edb'. 1> 2> SELECT s.name + '.' + o.name "Object Name", o.type_desc "Object Type" 3> FROM sys.objects o, 4> sys.schemas s 5> WHERE s.name = 'pubuser' 6> AND o.type IN ('U','P') 7> AND o.schema_id = s.schema_id 8> ORDER BY 2, 1; 9> GO Object Name Object Type -------------------------------------- -------------------------------------pubuser.CleanupShadowTables SQL_STORED_PROCEDURE pubuser.ConfigureCleanUpJob SQL_STORED_PROCEDURE pubuser.ConfigureCreateTxSetJob SQL_STORED_PROCEDURE pubuser.CreateMultiTxSet SQL_STORED_PROCEDURE pubuser.CreateTableLogTrigger SQL_STORED_PROCEDURE pubuser.CreateTxSet SQL_STORED_PROCEDURE pubuser.CreateUniTxSet SQL_STORED_PROCEDURE pubuser.GetNewTxsCount SQL_STORED_PROCEDURE pubuser.JobCleanup SQL_STORED_PROCEDURE pubuser.JobCreateTxSet SQL_STORED_PROCEDURE pubuser.LoadPubTableList SQL_STORED_PROCEDURE pubuser.nextval SQL_STORED_PROCEDURE pubuser.RemoveCleanupJob SQL_STORED_PROCEDURE pubuser.RemoveCreateTxSetJob SQL_STORED_PROCEDURE pubuser.sp_createsequence SQL_STORED_PROCEDURE pubuser.sp_dropsequence SQL_STORED_PROCEDURE pubuser.rrep_common_seq USER_TABLE pubuser.rrep_lock USER_TABLE pubuser.rrep_mmr_pub_group USER_TABLE pubuser.rrep_mmr_txset USER_TABLE pubuser.rrep_properties USER_TABLE pubuser.rrep_publication_subscriptions USER_TABLE pubuser.rrep_publication_tables USER_TABLE pubuser.rrep_tables USER_TABLE pubuser.rrep_tx_seq USER_TABLE pubuser.rrep_txset USER_TABLE pubuser.rrep_txset_health USER_TABLE pubuser.rrep_txset_log USER_TABLE pubuser.rrep_txset_seq USER_TABLE pubuser.rrst_edb_dept USER_TABLE pubuser.rrst_edb_emp USER_TABLE (31 rows affected) Copyright © 2012 EnterpriseDB Corporation. All rights reserved. 128 Postgres Plus xDB Replication Server with Multi-Master User’s Guide For non-snapshot only publication tables, triggers are created that reside in the schema containing the publication tables as shown by the following: 1> USE edb; 2> GO Changed database context to 'edb'. 1> 2> SELECT s.name + '.' + o.name "Trigger Name" 3> FROM sys.objects o, 4> sys.schemas s 5> WHERE s.name = 'edb' 6> AND o.type = 'TR' 7> AND o.name LIKE 'rr%' 8> AND o.schema_id = s.schema_id 9> ORDER BY 1; 10> GO Trigger Name -------------------------------------edb.rrpd_edb_dept edb.rrpd_edb_emp edb.rrpi_edb_dept edb.rrpi_edb_emp edb.rrpu_edb_dept edb.rrpu_edb_emp (6 rows affected) Finally, some jobs are created in the msdb database as shown by the following: 1> USE msdb; 2> GO Changed database context to 'msdb'. 1> 2> SELECT j.name "Job Name" 3> FROM msdb.dbo.sysjobs j, 4> master.dbo.syslogins l 5> WHERE l.name = 'pubuser' 6> AND j.name LIKE 'rrep%' 7> AND j.owner_sid = l.sid 8> ORDER BY 1; 9> GO Job Name ----------------------------------rrep_cleanup_job_edb rrep_txset_job_edb (2 rows affected) For Postgres only: The metadata database objects are created in the schema _edb_replicator_pub as shown in the following: Copyright © 2012 EnterpriseDB Corporation. All rights reserved. 129 Postgres Plus xDB Replication Server with Multi-Master User’s Guide Figure 74 - Postgres metadata database objects in the publication database Do not delete any of these database objects as the replication system metadata will become corrupted. When you remove publications and publication database definitions using the xDB Replication Console or xDB Replication Server CLI, these database objects are deleted during this process. 5.3 Creating a Subscription Creating your first subscription requires the following steps: Registering the subscription server Adding the subscription database Creating a subscription by choosing the publication to which to subscribe Copyright © 2012 EnterpriseDB Corporation. All rights reserved. 130 Postgres Plus xDB Replication Server with Multi-Master User’s Guide As many subscriptions can be created in the subscription database as there are available publications that have not already been subscribed to. 5.3.1 Registering a Subscription Server When you register a subscription server, you are identifying the network location, user name, and password of a specific, running, subscription server instance that you want to use to manage all aspects of the subscriptions you will be creating subordinate to it. It is important that you record the login information for the subscription server as you must always use this same subscription server instance to manage all subscriptions created subordinate to it as represented in the xDB Replication Console replication tree. Step 1: Start the subscription server if it is not already running. Repeat the same process as in Step 1 of Section 5.2.1. Note: If you are using Oracle publication or subscription databases, and the subscription server has not been restarted since copying the Oracle JDBC driver, ojdbc14.jar, to the lib/jdbc subdirectory of your xDB Replication Server installation, you must restart the subscription server. For Linux only: Use script /etc/init.d/edb-xdbsubserver to restart or start the subscription server. Run the script as the operating system user that you chose during installation in the Publication/Subscription Service Account screen in Step 18 of Section 3.1. This is illustrated by the following: $ ps aux | grep subserver 502 5290 0.1 2.8 394932 31176 ? Sl 17:39 0:01 /opt/PostgresPlus/9.1AS/jre/bin/java -Djava.awt.headless=true -jar edbrepserver.jar subserver 9052 user 6692 0.0 0.0 3996 684 pts/1 R+ 17:55 0:00 grep subserver $ su enterprisedb Password: $ /etc/init.d/edb-xdbsubserver restart Subscription Service stopped Password: Subscription Service started For Windows only: Open Control Panel, Administrative Tools, and then Services. Use the Start or Restart link for the service named Subscription Service. Copyright © 2012 EnterpriseDB Corporation. All rights reserved. 131 Postgres Plus xDB Replication Server with Multi-Master User’s Guide Figure 75 - Windows subscription service Step 2: Register the subscription server. Open the xDB Replication Console from the system’s application menu. Step 3: Select the top level Replication Servers node. From the File menu, choose Subscription Server, and then choose Register Server. Alternatively, click the secondary mouse button on the Replication Servers node and choose Register Subscription Server. The Register Subscription Server dialog box appears. Enter the values you supplied during the installation of xDB Replication Server unless otherwise specified. Host. Network IP address of the host running the subscription server. This is the network IP address used for sub_ipaddr in the pg_hba.conf file in Section 5.1.4.3. (Do not use localhost for this field.) Port. Port number the subscription server is using. This is the port number you specified on the Subscription Server Details screen in Step 17 of Section 3.1. User Name. Database superuser name that the subscription server uses to connect to the xDB Control database. This is the user name you specified on the Postgres Installation Details screen in Step 15 of Section 3.1. Password. Password of the database superuser given in the User Name field. Save login information. Check this box if you do not want to re-register the subscription server each time you open the xDB Replication Console. See Section 4.2 for additional information on the advantages and disadvantages of saving server login information. Note: The user name and password combination you enter is authenticated against the user name and password in the xDB Replication Configuration file residing on the host with the IP address you enter in the Host field. Copyright © 2012 EnterpriseDB Corporation. All rights reserved. 132 Postgres Plus xDB Replication Server with Multi-Master User’s Guide Figure 76 - Register Subscription Server dialog box Click the Register button after you have filled in the fields. A Subscription Server node appears in the replication tree of the xDB Replication Console. Figure 77 – Replication tree after registering a subscription server 5.3.2 Adding a Subscription Database The database in which subscriptions are to reside must be identified to xDB Replication Server. This is done by creating a subscription database definition. After the subscription database definition is created, a Subscription Database node representing that subscription database definition appears in the replication tree of the xDB Replication Console. Subscriptions created subordinate to this subscription database Copyright © 2012 EnterpriseDB Corporation. All rights reserved. 133 Postgres Plus xDB Replication Server with Multi-Master User’s Guide definition will have their publications replicated to the database identified by the subscription database definition. You must enter database connection information such as the database server network address, database identifier, and database login user name and password when you create the subscription database definition. The connection information is used by the subscription server to create the subscription table definitions and by the publication server to perform replications. Note the following restriction on the subscription database: For Oracle only. There must be no existing tables or views owned by the Oracle subscription database user that has the same name as a table or view in a publication that will be replicated to this database. For example, if the Oracle subscription database user name is subuser, and if a Postgres publication contains a table with the name dept, then the Oracle subscription database must not have an existing table or view with the schema-qualified name subuser.dept at the time you create the subscription. For Postgres only. There must be no existing tables or views with the same schema-qualified name as a table or view in a publication that will be replicated to this database. For example, if the publication contains a table with the schemaqualified name edb.dept, then the Postgres subscription database must not have an existing table or view with the schema-qualified name edb.dept at the time you create the subscription. Note: If the SQL Server publication schema name is dbo, the subscription tables are created under a schema named dbo_sql in Postgres. For SQL Server only. There must be no existing tables or views with the same schema-qualified name as a table or view in a publication that will be replicated to this database. For example, if the publication contains a table with the schemaqualified name edb.dept, then the SQL Server subscription database must not have an existing table or view with the schema-qualified name edb.dept at the time you create the subscription. Note: If the Postgres publication schema name is public, the subscription tables are created under a schema named public_sql in SQL Server. Note: A database that has been added as a publication database can also be used as a subscription database. Step 1: Make sure the database server in which the subscription database resides is running and accepting client connections. Step 2: Select the Subscription Server node. From the Subscription menu, choose Subscription Database, and then choose Add Database. Alternatively, click the secondary mouse button on the Subscription Server node and choose Add Database. The Subscription Service – Add Database dialog box appears. Copyright © 2012 EnterpriseDB Corporation. All rights reserved. 134 Postgres Plus xDB Replication Server with Multi-Master User’s Guide Step 3: Fill in the following fields: Database Type. Select Oracle, SQL Server, PostgreSQL, or Postgres Plus Advanced Server for the type of subscription database. For an Advanced Server Oracle compatible installation, select the Postgres Plus Advanced Server option. For an Advanced Server PostgreSQL compatible installation, select the PostgreSQL option. Host. IP address of the host on which the subscription database server is running. Port. Port on which the subscription database server is listening for connections. User. The subscription database user name chosen in Section 5.1.3.1 for a Postgres subscription database or the database user name created in Step 2 of Section 5.1.3.2 for an Oracle subscription database or the database user name created in Step 2 of Section 5.1.3.3 for a SQL Server subscription database. Password. Password of the database user. Service ID (For Oracle). Enter the Oracle System Identifier (SID) of the Oracle instance running the subscription database if the SID radio button is selected. Enter the net service name of a connect descriptor as defined in the TNSNAMES.ORA file if the Service Name radio button is selected. Database (For Postgres or SQL Server). Enter the Postgres or SQL Server database name. Figure 78 - Subscription Service - Add Database dialog box Step 4: Click the Test button. If Test Result: Success appears, click the OK button, then click the Save button. Copyright © 2012 EnterpriseDB Corporation. All rights reserved. 135 Postgres Plus xDB Replication Server with Multi-Master User’s Guide Figure 79 - Successful subscription database test If an error message appears investigate the cause of the error, correct the problem, and repeat steps 1 through 4. When the subscription database definition is successfully saved, a Subscription Database node is added to the replication tree under the Subscription Server node. Figure 80 – Replication tree after adding a subscription database Copyright © 2012 EnterpriseDB Corporation. All rights reserved. 136 Postgres Plus xDB Replication Server with Multi-Master User’s Guide 5.3.3 Adding a Subscription Subordinate to a subscription database definition, you create subscriptions. A subscription assigns the publication that is to be replicated to the database identified by the subscription database definition. Step 1: Select the Subscription Database node. From the Subscription menu, choose Create Subscription. Alternatively, click the secondary mouse button on the Subscription Database node and choose Create Subscription. The Create Subscription dialog box appears. Step 2: Fill in the following fields: Subscription Name. Enter a name for the subscription that is unique amongst all subscription names. Host. Network IP address of the publication server that is the parent node of the publication to be subscribed to. This is the same value entered in the Host field in Step 3 of Section 5.2.1. Port. Port used by the publication server. This is the same value entered in the Port field in Step 3 of Section 5.2.1. User Name. User name of the publication server. This is the same value entered in the User Name field in Step 3 of Section 5.2.1. Password. Password of the user. This is the same value entered in the Password field in Step 3 of Section 5.2.1. Publication Name. Click the Load button to get a list of available publications. Select the publication to which to subscribe. Copyright © 2012 EnterpriseDB Corporation. All rights reserved. 137 Postgres Plus xDB Replication Server with Multi-Master User’s Guide Figure 81 - Create Subscription dialog box Step 3: Click the Create button. If Subscription Created Successfully appears, click the OK button, otherwise investigate the error and make the necessary corrections. Copyright © 2012 EnterpriseDB Corporation. All rights reserved. 138 Postgres Plus xDB Replication Server with Multi-Master User’s Guide Figure 82 - Subscription created successfully Upon successful subscription creation, a Subscription node is added to the replication tree. Figure 83 – Replication tree after adding a subscription Copyright © 2012 EnterpriseDB Corporation. All rights reserved. 139 Postgres Plus xDB Replication Server with Multi-Master User’s Guide The tables and views from the publication are created in the subscription database, but without any rows. Rows are populated into the subscription tables when the first snapshot replication occurs. Figure 84 - Table definitions in the subscription database 5.3.4 Metadata Created for a Subscription You will notice schemas _edb_replicator_pub and _edb_replicator_sub in the xDB Control database. Schema _edb_replicator_pub and its database objects were created when the first publication database definition was added. Schema _edb_replicator_sub and its database objects were created when the first subscription database definition was added. Copyright © 2012 EnterpriseDB Corporation. All rights reserved. 140 Postgres Plus xDB Replication Server with Multi-Master User’s Guide Figure 85 – Schemas containing metadata database objects in the xDB Control database Do not delete any of these database objects as the replication system metadata will become corrupted. When you remove all subscriptions and subscription database definitions using the xDB Replication Console or xDB Replication Server CLI, schema _edb_replicator_sub and all of its database objects are deleted from the xDB Control database. When you remove all publications and publication database definitions using the xDB Replication Console or xDB Replication Server CLI, schema _edb_replicator_pub and all of its database objects are deleted from the xDB Control database. 5.4 On Demand Replication After a publication and subscription are created, there are a couple of choices for starting the replication process. Replication can be done immediately by taking an on demand snapshot. Replication can be scheduled to start at a later date and time by creating a schedule. Copyright © 2012 EnterpriseDB Corporation. All rights reserved. 141 Postgres Plus xDB Replication Server with Multi-Master User’s Guide This section discusses the procedure for initiating a replication on demand. Section 7.1 discusses how to create a schedule. 5.4.1 Performing Snapshot Replication The very first replication must be performed using snapshot replication. After the first snapshot replication, subsequent replications can be done using either the synchronization method (if the publication was not initially defined as a snapshot-only publication) or the snapshot method. Step 1: Select the Subscription node of the subscription for which you wish to perform snapshot replication. Figure 86 - Selecting a subscription for an on demand snapshot Step 2: Open the Snapshot dialog box in any of the following ways: From the Subscription menu, choose Snapshot. Click the secondary mouse button on the Subscription node and choose Snapshot. Click the primary mouse button on the Snapshot icon. Copyright © 2012 EnterpriseDB Corporation. All rights reserved. 142 Postgres Plus xDB Replication Server with Multi-Master User’s Guide Figure 87 - Opening the Snapshot dialog box Step 3: Click the Snapshot button to start snapshot replication. Copyright © 2012 EnterpriseDB Corporation. All rights reserved. 143 Postgres Plus xDB Replication Server with Multi-Master User’s Guide Figure 88 - Snapshot dialog box Step 4: Snapshot Taken Successfully appears if the snapshot was successful. Click the OK button. If the snapshot was not successful, scroll through the messages in the Snapshot dialog box window. The status messages of each snapshot are also saved in the Migration Toolkit log files named mtk_yyyymmddhhmiss.log in the following directories: For Linux: /var/log/xdb-rep/buildnn For Windows: POSTGRES_HOME\.enterprisedb\edb_replicator\buildnn POSTGRES_HOME is the home directory of the Windows postgres account (enterprisedb account for Advanced Server installed in Oracle compatible configuration mode). In the buildnn subdirectory, nn is the xDB Replication Server Copyright © 2012 EnterpriseDB Corporation. All rights reserved. 144 Postgres Plus xDB Replication Server with Multi-Master User’s Guide build number. The specific location of POSTGRES_HOME is dependent upon your version of Windows. Figure 89 - Successful on demand snapshot The publication has now been replicated to the subscription database. A record of the snapshot is maintained in the replication history. See Section 7.3 for information on how to view replication history. 5.4.2 Performing Synchronization Replication After the first snapshot replication, subsequent replications can be performed using synchronization replication if the publication was not created as a snapshot-only publication. Step 1: Select the Subscription node of the subscription for which you wish to perform synchronization replication. Copyright © 2012 EnterpriseDB Corporation. All rights reserved. 145 Postgres Plus xDB Replication Server with Multi-Master User’s Guide Figure 90 - Selecting a subscription for an on demand synchronization Step 2: Open the Synchronize dialog box in any of the following ways: From the Subscription menu, choose Synchronize. Click the secondary mouse button on the Subscription node and choose Synchronize. Click the primary mouse button on the Synchronize icon. Figure 91 - Opening the Synchronize dialog box Copyright © 2012 EnterpriseDB Corporation. All rights reserved. 146 Postgres Plus xDB Replication Server with Multi-Master User’s Guide Step 3: Click the Synchronize button to start synchronization replication. Figure 92 - Synchronize dialog box Step 4: Subscription Synchronized Successfully appears if the synchronization was successful. Click the OK button. If the synchronization was not successful, scroll through the messages in the Synchronize dialog box window. Figure 93 - Successful on demand synchronization Copyright © 2012 EnterpriseDB Corporation. All rights reserved. 147 Postgres Plus xDB Replication Server with Multi-Master User’s Guide The operations that were applied to the subscription tables can be seen in the replication history. See Section 7.3 for information on how to view replication history. 5.5 Managing a Subscription Note: This section discusses various aspects of managing a subscription of a replication system. For a similar discussion on managing a publication of a replication system, see Section 7.5. After a subscription has been created, certain aspects of the underlying replication system environment might be subsequently altered for any number of reasons. Attributes that might change include the network location of the subscription database server, the network location of the host running the subscription server, database or operating system user names and passwords, and so forth. The aforementioned information is saved in the replication system metadata when a subscription is created. Changes to these attributes result in inaccurate replication system metadata, which in turn may result in errors during subsequent replication attempts or replication system administration. This section describes how to update the metadata stored for the subscription server, the subscription database definition, and subscriptions in order to keep the information consistent with the actual replication system environment. 5.5.1 Updating a Subscription Server When you register a subscription server in the xDB Replication Console, you may choose to save the subscription server’s network location (IP address and port number), user name, and encrypted password in a server login file on the computer on which you are running the xDB Replication Console. See Section 4.2 for information on saving the login information. The steps described in this section show you how to update the subscription server’s login information in the server login file. It is assumed that the xDB Replication Console is open on your computer and the subscription server whose login information you wish to alter in the server login file, appears as a Subscription Server node in the xDB Replication Console’s replication tree. Copyright © 2012 EnterpriseDB Corporation. All rights reserved. 148 Postgres Plus xDB Replication Server with Multi-Master User’s Guide Figure 94 - Subscription Server node You can perform the following actions on the server login file: Change the subscription server’s login information (host IP address, port number, user name, and password) that you last saved in the server login file. Delete the subscription server’s login information that is currently saved in the server login file. This is the default action, which will require you to register the subscription server again the next time you open the xDB Replication Console. Resave the subscription server’s login information in the server login file. Each time you open the Update Subscription Server dialog box, you must choose to save the login information if you want it recorded in the server login file. The following steps change only the content of the server login file residing on the host under the current xDB Replication Console user’s home directory. These changes do not alter any characteristic of the actual subscription server daemon (on Linux) or service (on Windows). These changes affect only how a subscription server is viewed through the xDB Replication Console on this host by this user. Step 1: The subscription server whose login information you want to save, change, or delete in the server login file must be running before you can make any changes to the file. See Step 1 of Section 5.3.1 for directions on starting the subscription server. Step 2: Click the secondary mouse button on the Subscription Server node and choose Update. The Update Subscription Server dialog box appears. Copyright © 2012 EnterpriseDB Corporation. All rights reserved. 149 Postgres Plus xDB Replication Server with Multi-Master User’s Guide Figure 95 - Update Subscription Server dialog box Step 3: Complete the fields in the dialog box according to your purpose for updating the server login file: If the subscription server now runs on a host with a different IP address or port number than what is shown in the dialog box, enter the correct information. You must also enter the user name and password saved in the xDB Replication Configuration file that resides on the host identified by the IP address you entered in the Host field. Check the Save Login Information box if you want the new login information saved in the server login file, otherwise leave the box unchecked in which case, access to the subscription server is available for the current session, but subsequent sessions will require you to register the subscription server again. If you want to delete previously saved login information, make sure the network location shown in the dialog box is still correct. Re-enter the user name and password saved in the xDB Replication Configuration file that resides on the host identified by the IP address in the Host field. Leave the Save Login Information box unchecked. Access to the subscription server is available for this session, but subsequent sessions will require you to register the subscription server again. If you want to save the current login information shown in the dialog box, make sure the network location shown in the dialog box is correct. Re-enter the user name and password saved in the xDB Replication Configuration file that resides on the host identified by the IP address in the Host field. Check the Save Login Information box. Copyright © 2012 EnterpriseDB Corporation. All rights reserved. 150 Postgres Plus xDB Replication Server with Multi-Master User’s Guide Figure 96 - Updated subscription server location Step 4: Click the Update button. If the dialog box closes, then the update to the server login file was successful. Click the Refresh icon in the xDB Replication Console tool bar to show the updated Subscription Server node. If an error message appears after clicking the Update button, the server login file is not modified. Investigate and correct the cause of the error. Repeat steps 1 through 4. 5.5.2 Updating a Subscription Database When you create a subscription database definition, you save the subscription database server’s network location (IP address and port number), the database identifier, a database login user name, and the user’s password in the xDB Control database used by the subscription server. This login information is used whenever a session needs to be established with the subscription database. See Section 5.3.2 for information on creating a subscription database definition. The steps described in this section show you how to update the subscription database login information stored in the xDB Control database should any of these attributes of the actual, physical database change. Note: Depending upon the database type (Oracle, SQL Server, or Postgres), certain attributes must not be changed. If you have already added subscriptions, you must not change any attribute that alters access to the schema where the subscription tables were created. Attributes you must not change if there are existing subscriptions include the following: The Oracle login user name as the subscription tables already reside in this Oracle user’s schema Copyright © 2012 EnterpriseDB Corporation. All rights reserved. 151 Postgres Plus xDB Replication Server with Multi-Master User’s Guide The database server network location if the new network location references a database server that does not access the database that already contains the subscription tables The database identifier if the new database identifier references a different physical database than where the subscription tables already reside Attributes you may change include the following: The login user name’s password to match a changed database user password The database server network location if the corresponding location change was made to the database server that accesses the subscription database The database identifier such as the Oracle service name, SQL Server database name, or Postgres database name if the corresponding name change was made on the database server All attributes may be changed if there are no existing subscriptions Step 1: Make sure the database server that you ultimately wish to save as the subscription database definition is running and accepting client connections. Step 2: Make sure the subscription server whose node is the parent of the subscription database definition you wish to change is running and has been registered in the xDB Replication Console you are using. See Section 5.3.1 for directions on starting and registering a subscription server. Step 3: Select the Subscription Database node corresponding to the subscription database definition that you wish to update. Figure 97 - Selecting a subscription database definition for update Copyright © 2012 EnterpriseDB Corporation. All rights reserved. 152 Postgres Plus xDB Replication Server with Multi-Master User’s Guide Step 4: From the Subscription menu, choose Subscription Database, and then choose Update Database. Alternatively, click the secondary mouse button on the Subscription Database node and choose Update Database. The Update Database Source dialog box appears. Step 5: Enter the desired changes. See Step 3 of Section 5.3.2 for the precise meanings of the fields. Figure 98 - Update Database Source dialog box Step 6: Click the Test button. If Test Result: Success appears, click the OK button, then click the Save button. Copyright © 2012 EnterpriseDB Corporation. All rights reserved. 153 Postgres Plus xDB Replication Server with Multi-Master User’s Guide Figure 99 - Successful subscription database test If an error message appears investigate the cause of the error, correct the problem, and repeat steps 1 through 6. Step 7: Click the Refresh icon in the xDB Replication Console tool bar to show the updated Subscription Database node and any of its subscriptions. Figure 100 - Updated subscription database Copyright © 2012 EnterpriseDB Corporation. All rights reserved. 154 Postgres Plus xDB Replication Server with Multi-Master User’s Guide 5.5.3 Updating a Subscription When a subscription is created, certain attributes of the subscribed publication are stored as part of the metadata for the subscription in the xDB Control database. These include the following: The network IP address of the host running the publication server that is the parent of the subscribed publication The port number of the publication server If the preceding attributes of the publication server change in the replication system environment, then the corresponding subscription metadata must also be changed so the subscription server can communicate with the correct publication server. The following directions show how to update the publication server network IP address and port number within the subscription server’s metadata. Step 1: Make sure the subscription server whose node is the parent of the subscription you wish to change is running and has been registered in the xDB Replication Console you are using. See Section 5.3.1 for directions on starting and registering a subscription server. Step 2: Select the Subscription node whose attributes you wish to update. Figure 101 - Selecting a subscription to update Step 3: From the Subscription menu, choose Update Subscription. Alternatively, click the secondary mouse button on the Subscription node and choose Update Subscription. The Update Subscription dialog box appears. Copyright © 2012 EnterpriseDB Corporation. All rights reserved. 155 Postgres Plus xDB Replication Server with Multi-Master User’s Guide Figure 102 - Update Subscription dialog box Step 4: If the publication server now runs on a host with a different IP address or port number than what is shown in the dialog box, enter the correct information. You must also enter the user name and password saved in the xDB Replication Configuration file that resides on the host on which the publication server is running. Click the Update button. Copyright © 2012 EnterpriseDB Corporation. All rights reserved. 156 Postgres Plus xDB Replication Server with Multi-Master User’s Guide Figure 103 - Subscription successfully updated Step 5: If Subscription Updated Successfully appears, click the OK button, otherwise investigate the error and make the necessary corrections. Step 6: If the publication server with the new network location manages publications subscribed to by other subscriptions, repeat steps 1 through 5 for these other subscriptions. 5.5.4 Removing a Subscription After a subscription is removed, replication can no longer occur for the publication that was associated with it until the publication is subscribed to with a new subscription. Removing a subscription does not delete the subscription tables in the subscription database. It removes the identity and association of these tables to xDB Replication Server so the tables remain in the database until the DBA deletes them with DROP TABLE SQL statements. Step 1: Make sure the subscription server whose node is the parent of the subscription you wish to remove is running and has been registered in the xDB Replication Console you are using. See Section 5.3.1 for directions on starting and registering a subscription server. Step 2: Select the Subscription node of the subscription that you wish to remove. Copyright © 2012 EnterpriseDB Corporation. All rights reserved. 157 Postgres Plus xDB Replication Server with Multi-Master User’s Guide Figure 104 - Selecting a subscription to remove Step 3: Remove the subscription in any of the following ways: Choose Remove Subscription from the Subscription menu. Click the secondary mouse button on the Subscription node and choose Remove Subscription. Click the primary mouse button on the Remove Subscription icon. Figure 105 - Removing the subscription using the toolbar Copyright © 2012 EnterpriseDB Corporation. All rights reserved. 158 Postgres Plus xDB Replication Server with Multi-Master User’s Guide Step 4: In the Remove Subscription confirmation box, click the Yes button. Figure 106 - Remove Subscription confirmation The Subscription node no longer appears under the Subscription Database node. Copyright © 2012 EnterpriseDB Corporation. All rights reserved. 159 Postgres Plus xDB Replication Server with Multi-Master User’s Guide Figure 107 - Replication tree after removing a subscription 5.5.5 Removing a Subscription Database Deleting a subscription database definition from xDB Replication Server is equivalent to removing its Subscription Database node. Before a Subscription Database node can be removed, all subscriptions under that Subscription Database node must be removed. See Section 5.5.4 for removing a subscription. Removing a Subscription Database node does not delete the physical database from the database server. It removes the identity and association of the database to xDB Replication Server so no further replications can create or update tables in the database unless there are other subscription database definitions in xDB Replication Server with the same host and database identifier. The physical database can only be removed using the database management system’s database removal procedures. Step 1: Make sure the subscription server whose node is the parent of the subscription database definition you wish to remove is running and has been registered in the xDB Replication Console you are using. See Section 5.3.1 for directions on starting and registering a subscription server. Step 2: Select the Subscription Database node that you wish to remove. Copyright © 2012 EnterpriseDB Corporation. All rights reserved. 160 Postgres Plus xDB Replication Server with Multi-Master User’s Guide Figure 108 - Selecting a subscription database definition for removal Step 3: From the Subscription menu, choose Subscription Database, then Remove Database. Alternatively, click the secondary mouse button on the Subscription Database node and choose Remove Subscription. The Remove Subscription Database confirmation box appears. Step 4: In the Remove Subscription Database confirmation box, click the Yes button. Copyright © 2012 EnterpriseDB Corporation. All rights reserved. 161 Postgres Plus xDB Replication Server with Multi-Master User’s Guide Figure 109 - Remove Subscription Database confirmation The Subscription Database node no longer appears under the Subscription Server node. Figure 110 - Replication tree after removal of a subscription database Copyright © 2012 EnterpriseDB Corporation. All rights reserved. 162 Postgres Plus xDB Replication Server with Multi-Master User’s Guide 5.6 Performing Controlled Switchover Controlled switchover is the exchanging of roles between a publication database and a subscription database. That is, the tables that were formerly publications become the subscription tables. The former subscription tables now become the publications. Controlled switchover is useful for situations where the publication database must be taken offline such as for periodic maintenance. After the switchover, applications connect to the former subscription database to perform their queries and updates, while the former publication database is kept synchronized by replication. Updates for replication are accumulated in shadow tables that are created on the former subscription tables during the controlled switchover procedure. When the former publication database is online, it is synchronized as the target of replication. When you determine that you want to reverse the roles again so that the original publication database directly receives queries and updates from applications, and the original subscription database receives updates by replication, you perform the controlled switchover procedure once again, switching the roles back. 5.6.1 Controlled Switchover Overview When you perform controlled switchover, you are modifying the replication system so that the database identified and referenced in the replication system metadata as the publication database is the physical database that was originally defined as the subscription database. Similarly, the database identified and referenced in the replication system metadata as the subscription database is changed to the physical database on which the publication was originally defined. You must also create the database objects on the former subscription database that xDB Replication Server uses to capture and store updates for replication. In order to accomplish the controlled switchover, the following tasks must be performed: Optionally, move the xDB Control database containing the metadata of the replication system to another host, especially if the current xDB Control database host is expected to be taken offline. Modify the xDB Replication Configuration file to reference the new location of the xDB Control database if it is moved. Copy the metadata database objects stored in the publication database (shadow tables, sequences, triggers, and a package) to the subscription database. Update the replication system metadata in the xDB Control database so as to exchange the connection information for the publication database and subscription database. Copyright © 2012 EnterpriseDB Corporation. All rights reserved. 163 Postgres Plus xDB Replication Server with Multi-Master User’s Guide If a different publication server or subscription server is to be used, modify the server locations in the xDB Control database. 5.6.2 Controlled Switchover Steps This section describes the steps for performing a controlled switchover. The following assumptions are made about the replication system environment: “Node 1” is the server where the publication database originally resides. Its network IP address is 192.168.10.102. “Node 2” is the server where the subscription database originally resides. Its network IP address is 192.168.10.103. The xDB Control database is named xdb. The publication and subscription databases have the same name. You use the publication database user for the role of the subscription database user and the subscription database user for the role of the publication database user in the switched environment. The publication server and subscription server are running on the same host (node 1). Step 1: Stop all transaction processing against the publication database. Step 2: Perform an on demand synchronization replication or a snapshot replication (for snapshot-only publications) in order to replicate any pending updates in the publication database shadow tables to the subscription database. Step 3: Stop the publication server and the subscription server. Step 4: Review the prerequisites in Section 5.1 to ensure that the subscription database and its host can be used in the role of a publication database, and the publication database and its host can be used in the role of a subscription database. For practical purposes, the following items are the most likely to be affected: The publication database user must be a superuser with system catalog modification privileges to allow it to act as the new subscription database user. Additional entries may be needed in the pg_hba.conf files. Step 5: If it is necessary to relocate the xDB Control database to another host, proceed with this step, otherwise go on to Step 7. Create a backup of the xDB Control database and restore it to the Postgres database server on the new host. Copyright © 2012 EnterpriseDB Corporation. All rights reserved. 164 Postgres Plus xDB Replication Server with Multi-Master User’s Guide Update the pg_hba.conf file of the database server to allow access to the xDB Control database in accordance with Section 5.1.4.3. Step 6: If you have relocated the xDB Control database in Step 5, update the xDB Replication Configuration file on the hosts where the publication server and subscription server will run to reference the new network location. If necessary, update the database name, user name, and password as well. For example, the following is the original xDB Replication Configuration file: user=enterprisedb port=5444 password=SJ70z8Gk0zY\= type=enterprisedb host=10.90.1.124 database=xdb The following is the modified xDB Replication Configuration file with the new network location and authentication information of the xDB Control database. user=enterprisedb port=5444 password=SJ70z8Gk0zY\= type=enterprisedb host=10.90.1.45 database=xdb_sw Step 7: Create a backup of schema _edb_replicator_pub from the publication database on node 1. Restore this backup to the subscription database on node 2 that is to become the new publication database. Step 8: Create a backup of the replication triggers on the publication tables on node 1. (These triggers are named with prefixes of rrpd_, rrpi_ and rrpu_.) Restore these triggers to the new publication database on node 2. Delete or disable these triggers on node 1. Step 9: Update the metadata in the xDB Control database so that the publication database definition references the new publication database (that is, the former subscription database) on node 2 and the subscription database definition references the new subscription database (that is, the former publication database) on node 1. The connection information that may require updating includes the following: Host IP address Port number User name Password Copyright © 2012 EnterpriseDB Corporation. All rights reserved. 165 Postgres Plus xDB Replication Server with Multi-Master User’s Guide The following shows the update to the publication database definition so that its network IP address is now node 2 (192.168.10.103). UPDATE _edb_replicator_pub.erep_pub_database SET db_host = '192.168.10.103'; The following shows the update to the subscription database definition so that its network IP address is now node 1 (192.168.10.102). UPDATE _edb_replicator_sub.erep_sub_database SET db_host = '192.168.10.102'; Step 10: If you decide to use a publication server or subscription server on a new host, perform the following step, otherwise go to Step 11. The following example assumes you decide to use the publication server and subscription server running on node 2. Update the subscription metadata to the new location of the publication server managing its associated publication. UPDATE _edb_replicator_sub.rrep_subscriptions set pub_server_ip = '192.168.10.103'; Update the publication metadata to the new location of the subscription server managing its associated subscription. UPDATE _edb_replicator_pub.erep_sub_servers SET sub_server_ip = '192.168.10.103'; Verify that the xDB Replication Configuration files on the publication server and subscription server contain the correct information in accordance with Step 6. Step 11: The controlled switchover is now complete. Start the publication server and the subscription server. 5.7 Performing Failover Failover is the replacement of the publication database by the subscription database should a failure occur on the publication database or its host. Failover is considered an irreversible action so the subscription database permanently takes over the role of the publication database. Generally, the same steps must be followed to perform a failover as was discussed for a controlled switchover in Section 5.6, however, the following points must also be taken into consideration: If the xDB Control database was running on the node where the failure occurred and the xDB Control database cannot be salvaged from that node or restored from Copyright © 2012 EnterpriseDB Corporation. All rights reserved. 166 Postgres Plus xDB Replication Server with Multi-Master User’s Guide a backup, then performing a failover is not possible. A reconfiguration is necessary using the subscription database as the new publication database. For this reason, it is strongly urged to take periodic backups of the xDB Control database. If the metadata database objects on the publication database (that is, schema _edb_replicator_pub and its objects) cannot be salvaged or restored from a backup, then performing a failover may be possible with the assistance of EnterpriseDB Technical Support Services. Pending updates not yet applied to the subscription may have been lost. The chances of this are greater if the interval between synchronizations is long. If you determine that a failover is possible, follow the steps for a controlled switchover. 5.8 Optimizing Performance Once you have become familiar with setting up and managing your replication system, you will often look for ways to optimize the performance of replications. This section discusses various publication server and subscription server configuration options available to improve the performance of snapshot and synchronization replications. The publication server and subscription server configuration options are set in the publication server and subscription server configuration files, respectively. See Section 9.3.1 for a detailed explanation of how to set the configuration options in these files. Note: Most of these configuration options are applicable to multi-master replication systems as well. Options applicable to multi-master replication systems are those that apply to the publication server and are not specific to a database product other than Postgres (such as an Oracle feature). 5.8.1 Optimizing Snapshot Replication This section discusses configuration options for improving snapshot replication performance. Note: The options described in this section apply to the publication server only and are set in the publication server configuration file unless otherwise specified. copyViaDBLinkOra When the copyViaDBLinkOra option is set to true, the Oracle database link API, dblink_ora, is used instead of JDBC COPY to populate the Postgres subscription tables from an Oracle publication during snapshot replication. Oracle database link provides an additional performance improvement over JDBC COPY. copyViaDBLinkOra={true | false} Copyright © 2012 EnterpriseDB Corporation. All rights reserved. 167 Postgres Plus xDB Replication Server with Multi-Master User’s Guide The default value is false. useFastCopy Set the useFastCopy option to true to skip Write-Ahead Log (WAL) logging during COPY operations in order to optimize data transfer speed. The archive_mode configuration parameter in the postgresql.conf file of the target Postgres database server must be off (thereby disabling archiving of WAL data) in order to use the useFastCopy option. useFastCopy={true | false} The default value is false. cpBatchSize Use the cpBatchSize option to set the batch size (in Megabytes) that is used in the JDBC COPY operation during a snapshot. Increase the value of this option for large publication tables. This option is influential when Postgres is the subscription database since the JDBC COPY operation is used to load Postgres subscription tables. This option has no effect when Oracle or SQL Server is the subscription database. To tune loading of Oracle or SQL Server tables alter the batchSize option. cpBatchSize=n The default value for n is 8. batchSize The batchSize option controls the number of INSERT statements in a JDBC batch. This option is particularly significant when Oracle or SQL Server is the subscription database since tables of these database types are loaded using JDBC batches of INSERT statements. For a Postgres subscription database, tables are loaded using JDBC COPY, however, if the COPY operation fails for some reason, then table loading is retried using JDBC batches of INSERT statements as in the case of Oracle and SQL Server. batchSize=n The default value for n is 100. Copyright © 2012 EnterpriseDB Corporation. All rights reserved. 168 Postgres Plus xDB Replication Server with Multi-Master User’s Guide skipAnalyze Set the skipAnalyze option to true if you want to skip execution of the ANALYZE command after loading Postgres subscription tables. The ANALYZE command gathers statistical information on the table contents. These statistics are used by the query planner. skipAnalyze={true | false} The default value is false. snapshotParallelLoadCount Note: This option applies to the subscription server only. The snapshotParallelLoadCount option controls the number of threads used to perform snapshot data replication in parallel mode. The default behavior is to use a single thread. However, if the target system architecture contains multi CPUs/cores you can specify a value greater than 1, normally equal to the CPU/core count, to fully utilize the system resources. snapshotParallelLoadCount=n The default value is 1. lobBatchSize If a table contains a column with a data type typically used for large objects such as BYTEA, BLOB, or CLOB, there is a greater possibility that a heap space error may occur because of a potentially large amount of data (hundreds of megabytes) brought into memory. In order to minimize the possibility of this error, a snapshot replication loads tables containing a large object data type, one row at a time using a single INSERT statement per batch. If however, the large object data type column is known to contain relatively small amounts of data, you can increase the speed of a snapshot replication by increasing the value of the lobBatchSize option to allow a greater number of rows (specified by n) in each batch. lobBatchSize=n The default value is 1. Copyright © 2012 EnterpriseDB Corporation. All rights reserved. 169 Postgres Plus xDB Replication Server with Multi-Master User’s Guide 5.8.2 Optimizing Synchronization Replication This section discusses configuration options for improving synchronization replication performance. Note: The options described in this section apply to the publication server only and are set in the publication server configuration file. 5.8.2.1 Using Prepared SQL Statements When synchronization replication occurs, the changes recorded in the shadow tables are applied to the subscription tables in JDBC batch updates. Within each batch, changes may be applied using either an individual SQL statement for each change; or a set of changes may be applied using a single, prepared SQL statement. A prepared SQL statement is parsed and compiled only once, but it can be executed multiple times using different values for certain components of the SQL statement in each execution. A SQL statement that is not prepared is parsed, compiled, and executed only once. Prepared statements are useful only if the same type of SQL statement (INSERT, UPDATE or DELETE) is executed repeatedly and consecutively with the same target table, but with different values. If there is a sequence of consecutive changes that occur to the same table using the same operation such as inserting a set of rows into the same table populating the same columns, the publication server may apply these changes using a prepared statement. Otherwise, each change is applied with its own individual SQL statement. There are a number of server configuration options that control the characteristics of the JDBC batch along with if, when, and how often prepared statements are used. These are discussed in the following sections. defaultBatchUpdateMode The defaultBatchUpdateMode option controls whether the default mode is to use individual SQL statements in the JDBC batch update (this mode of operation is referred to as BUS) or to use prepared SQL statements in the JDBC batch update (this mode of operation is referred to as BUP). defaultBatchUpdateMode={BUS | BUP} The default value is BUS. switchBatchUpdateMode The switchBatchUpdateMode option controls whether or not the publication server dynamically switches between BUS mode and BUP mode during the replication process depending upon the type and sequence of updates it encounters in the shadow tables. Copyright © 2012 EnterpriseDB Corporation. All rights reserved. 170 Postgres Plus xDB Replication Server with Multi-Master User’s Guide switchBatchUpdateMode={true | false} The default value is true. This means using the default settings of defaultBatchUpdateMode=BUS and switchBatchUpdateMode=true, the publication server starts out by applying updates with individual SQL statements. When it encounters a stream of consecutive changes that can all be processed in a single prepared statement, it will switch to using prepared SQL statements. Note: If you want a certain batch update mode used throughout all synchronization replications applied by a given publication server without switching update modes, set the defaultBatchUpdateMode option to the desired mode in combination with switchBatchUpdateMode=false. For example, if you only want prepared statements used, set the following options: defaultBatchUpdateMode=BUP switchBatchUpdateMode=false Note: When Oracle is the subscription database, synchronization replication always occurs in BUP mode as if the preceding two options were always set. The reason for this is so large columns of TEXT data type from Postgres publications can successfully replicate to Oracle CLOB columns. In BUS mode an individual Oracle SQL statement has a string literal maximum length of 4000 characters. This limitation does not occur for prepared SQL statements that are used in BUP mode. busBatchThresholdCount The busBatchThresholdCount option sets the number of consecutive updates of the same type that must be encountered in the shadow tables before the publication server switches from BUS mode to BUP mode if dynamic switching is permitted (that is switchBatchUpdateMode=true). busBatchThresholdCount=n The default value for n is 50. The number of consecutive changes using the same table and SQL statement type must exceed the specified value n before a prepared statement is used. Setting this threshold to a low value will encourage higher use of prepared statements while setting it to a high value will limit the use of prepared statements. If changes to the publication were made using many SQL statements where each statement affected more than one row, then it may be beneficial to lower Copyright © 2012 EnterpriseDB Corporation. All rights reserved. 171 Postgres Plus xDB Replication Server with Multi-Master User’s Guide busBatchThresholdCount to encourage the use of prepared statements on the multiple shadow table rows resulting from each individual change on the publication. bupBatchThresholdCount and bupBatchThresholdRepeatLimit If BUP mode is employed, but the number of updates using the same prepared statement is low causing frequent switches to a new prepared statement, it may be more beneficial to use individual SQL statements (BUS mode). For example, the following sequence of updates would be better processed in BUS mode: INSERT INSERT INSERT INSERT DELETE UPDATE UPDATE INSERT INSERT DELETE INSERT DELETE INSERT INTO INTO INTO INTO FROM emp dept INTO INTO FROM INTO FROM INTO emp dept emp dept emp emp dept dept emp emp dept However, in the following sequence, it is better to use BUP mode. Updates 1 thru 3 are batched in one prepared statement, 4 thru 7 in another prepared statement, 8 in its own prepared statement, and then 9 thru 15 in one prepared statement. 1. INSERT INTO emp 2. INSERT INTO emp 3. INSERT INTO emp 4. UPDATE dept 5. UPDATE dept 6. UPDATE dept 7. UPDATE dept 8. INSERT INTO emp 9. INSERT INTO dept 10. INSERT INTO dept 11. INSERT INTO dept 12. INSERT INTO dept 13. INSERT INTO dept 14. INSERT INTO dept 15. INSERT INTO dept The bupBatchThresholdCount option is used in combination with the bupBatchThresholdRepeatLimit option to control the frequency of mode switches based on the volatility of expected update types to the publication. bupBatchThresholdCount=m The default value for m is 5. bupBatchThresholdRepeatLimit=n Copyright © 2012 EnterpriseDB Corporation. All rights reserved. 172 Postgres Plus xDB Replication Server with Multi-Master User’s Guide The default value for n is 10. Each time the same prepared SQL statement is consecutively executed, an internal “batch” counter is incremented. If this batch count falls below bupBatchThresholdCount for the number of executions of a given prepared statement, then a second internal “repeat” counter is incremented by one. If the repeat counter eventually reaches bupBatchThresholdRepeatLimit, the update mode is switched from BUP to BUS. Thus, if there are frequent, consecutive changes of prepared SQL statements (as measured against bupBatchThresholdRepeatLimit), each of which is executed a small number of times (as measured against bupBatchThresholdCount), then the mode of execution changes back to individual SQL statements instead of prepared statements. Note: The publication server changes back to prepared statements when the threshold set by busBatchThresholdCount is met. The following example illustrates the processing of updates when bupBatchThresholdCount is set to 3 and bupBatchThresholdRepeatLimit is set to 4. A change to the “query domain” referred to in this example means a different statement type (INSERT, UPDATE, or DELETE) or a different target table are encountered in the next update, thus requiring the use of a different prepared SQL statement. 1. INSERT INTO emp 2. INSERT INTO emp 3. INSERT INTO dept At this point the query domain is changed after the first two updates (change from table emp to dept) and the number of executions of the prior prepared statement (2) is less than bupBatchThresholdCount, so the repeat counter is set to 1. 4. 5. 6. 7. INSERT INSERT INSERT INSERT INTO INTO INTO INTO dept dept dept emp The query domain is changed again (change from table dept to emp), but this time the number of executions (4) for the same query domain (updates 3 thru 6) exceeds bupBatchThresholdCount so the repeat counter is reset to 0. 8. INSERT INTO emp 9. UPDATE emp The query domain is changed again (INSERT statement to UPDATE statement) and the number of executions (2) is less than bupBatchThresholdCount, so the repeat counter is incremented to 1. Copyright © 2012 EnterpriseDB Corporation. All rights reserved. 173 Postgres Plus xDB Replication Server with Multi-Master User’s Guide 10. UPDATE 11. INSERT 12. DELETE 13. INSERT emp INTO dept FROM dept INTO emp The query domain is changed between updates 10 and 11, between updates 11 and 12, and between updates 12 and 13. At this point, the repeat counter has been incremented 3 more times to a value of 4. This now equals bupBatchThresholdRepeatLimit, so processing is changed from BUP mode to BUS mode. 5.8.2.2 Parallel Synchronization Parallel synchronization takes advantage of multi CPUs or cores in the system architecture by using multiple threads to apply transaction sets in parallel. Parallel synchronization is applied in two ways: Multiple threads are used to load data for multiple tables in parallel from the source database. Each thread opens a separate connection therefore you will observe multiple connections with the source database. The pooling framework is used to cache the connections. After the threads are finished with the data load, the idle connections are returned to the pool and remain there for a period of 3 minutes before being removed from the pool (as long as these are not reused). Changes are applied to multiple target databases in parallel. A transaction set from the source database is loaded only once. The target databases are updated in parallel from this loaded transaction set. When this transaction set has been applied to all targets (either successfully, or with failures on some targets), the next transaction set is loaded and applied in parallel. This aspect of parallel synchronization is particularly relevant to multi-master replication systems. The following configuration options affect the usage of parallel synchronization. syncLoadThreadLimit The syncLoadThreadLimit option controls the maximum number of threads used to load data from source publication tables during parallel synchronization. The default count is 4. However, depending on the target system architecture (specifically, multi CPUs/cores) you can choose to specify a custom count, normally equal to the CPU/core count, to fully utilize the system resources. syncLoadThreadLimit=n The default value is 4. targetDBQueryTimeout Copyright © 2012 EnterpriseDB Corporation. All rights reserved. 174 Postgres Plus xDB Replication Server with Multi-Master User’s Guide The targetDBQueryTimeout option controls the timeout interval (in milliseconds) before an attempt by the publication server to apply a transaction set on a target database is aborted by the database server (typically due to a lock acquired by another application on one or more of the target tables). The targetDBQueryTimeout option changes the Postgres default lock timeout value of 15 minutes to 2 minutes. Change the 2 minute default value to a higher value if you want to allow a longer wait time before the transaction is aborted. However, a higher value also delays processing of subsequent transaction sets on other target databases because if a transaction set is blocked, the next transaction set cannot be loaded until: 1) the lock is released and the blocked transaction set can then be applied to completion, or 2) the targetDBQueryTimeout interval is exceeded. If a timeout occurs, the waiting transaction set is marked as aborted for the particular blocked target database. The remaining pending transaction sets in this synchronization session are skipped for this target database, but are applied to all other target databases once the timeout interval has been exceeded. The aborted and skipped transaction sets are tried again when the next synchronization replication event occurs. So for example, in a 3-node cluster with ten pending transaction sets, assume transaction set 1 is loaded and begins replicating to nodes 2 and node 3. Now, another application acquires a lock on one or more tables in node 2, putting the updates to these tables in a wait state. Replication of transaction set 1 can run to completion on node 3, but if the wait time exceeds the targetDBQueryTimeout interval, the database server cancels transaction set 1 on node 2. Replication of this transaction set to node 2 is marked as aborted in the xDB Replication Server metadata. Transaction set 2 can now be loaded and run against node 3. Execution of transaction set 2 against node 2 is skipped since transaction sets must be applied in order and transaction set 1 was not successfully applied to node 2. Transaction sets 3 thru 10 are loaded and applied in order against node 3, but skipped for node 2. In the next synchronization replication, transaction set 2 is tried again on node 2. If the lock has been released and the transaction set is applied successfully, the remaining transaction sets 3 thru 10 are applied to node 2. Finally, synchronization replication continues with any new transaction sets. targetDBQueryTimeout=n The default value is 120000. 5.8.2.3 Other Synchronization Configuration Options The following are other configuration options affecting synchronization replication. Copyright © 2012 EnterpriseDB Corporation. All rights reserved. 175 Postgres Plus xDB Replication Server with Multi-Master User’s Guide syncBatchSize The syncBatchSize option controls the number of statements in a synchronization replication JDBC batch. syncBatchSize=n The default value for n is 100. syncFetchSize The syncFetchSize option controls how many rows are fetched from the publication database in one network round-trip. For example, if there are 1000 row changes available in the shadow tables, the default fetch size requires 5 database round-trips. Using a fetch size of 500 retrieves all changes in 2 round trips. Fine tune the performance by using a fetch size that conforms to the average data volume consumed by rows fetched in one round trip. syncFetchSize=n The default value for n is 200. txSetMaxSize The txSetMaxSize option defines the maximum number of transactional rows that can be grouped in a single transaction set. The publication server loads and processes the changes by fetching as many rows in memory as grouped in a single transaction set. A higher value is expected to boost performance. However a very large value might result in an out of memory error. Increase/decrease the value in accordance with the average row size (low/high). txSetMaxSize=n The default value for n is 10000. enablePerformanceStats Set enablePerformanceStats option to true only if you need to conduct performance testing and analyze the replication statistics. When enabled, the publication server creates additional triggers on the publication tables in each master node. The triggers produce transaction statistics that are recorded in the mmr_transaction_history table in the control schema. This option should be disabled in a production environment to avoid performance overhead. Copyright © 2012 EnterpriseDB Corporation. All rights reserved. 176 Postgres Plus xDB Replication Server with Multi-Master User’s Guide enablePerformanceStats={true | false} The default value is false. Copyright © 2012 EnterpriseDB Corporation. All rights reserved. 177 Postgres Plus xDB Replication Server with Multi-Master User’s Guide 6 Multi-Master Replication Operation This chapter describes how to configure and run xDB Replication Server for multi-master replication systems. For configuration and management of your replication system, the xDB Replication Console graphical user interface is used to illustrate the steps and examples in this chapter. The same steps can be performed from the operating system command line using the xDB Replication Server Command Line Interface (CLI). The commands of the xDB Replication Server CLI utility are described in Chapter 8. 6.1 Prerequisite Steps Certain steps must be taken to prepare the host environments as well as the database servers used as master nodes before beginning the process of building a multi-master replication system. This section describes these steps. 6.1.1 Preparing the Master Definition Node This section discusses the preparation of a database to be used as the master definition node. When creating the publication database definition for the master definition node, a database user name must be specified that has the following characteristics: The database user can connect to the master definition node. The database user has superuser privileges. The database user must have the ability to modify the system catalog tables in order to disable foreign key constraints on the publication tables. (See appendix Section 9.3.4 for more information on this requirement.) The examples used throughout the rest of this user’s guide are based on the following master definition node: The database user name for the master definition node is pubuser. The tables used in the publication reside in a schema named edb. Three tables named dept, emp, and jobhist are members of schema edb. The database name of the master definition node is edb. The following steps illustrate the preparation of the master definition node database user. Step 1: Create a user name with login and superuser privileges for the master definition node. This user becomes the owner of xDB Replication Server metadata database objects that will be created in the master definition node to track, control, and record the Copyright © 2012 EnterpriseDB Corporation. All rights reserved. 178 Postgres Plus xDB Replication Server with Multi-Master User’s Guide replication process and history. The xDB Replication Server metadata database objects are created in a schema named _edb_replicator_pub. When creating the publication database definition, the database user name is entered in the Publication Service – Add Database dialog box (see Section 6.2.2). CREATE ROLE pubuser WITH LOGIN SUPERUSER PASSWORD 'password'; 6.1.2 Preparing Additional Master Nodes The following steps illustrate the creation of a database user and a database for an additional master node. When creating the publication database definition for an additional master node, a database user name must be specified that has the following characteristics: The database user can connect to the master node. The database user has superuser privileges. The database user must have the ability to modify the system catalog tables in order to disable foreign key constraints on the publication tables. (See appendix Section 9.3.4 for more information on this requirement.) There are also two possible options available with respect to how the publication tables are to be created in the master node: Allow the publication server to create the publication table definitions in the master node by copying the definitions from the master definition node at the time you add the publication database definition for the master node. Define the publication tables in the master node beforehand by running SQL DDL statements in the PSQL command line utility program or by using Postgres Enterprise Manager Client to create the tables. If you create the table definitions “manually” as described in the second bullet point, be sure the publication tables are defined identically to the tables in the master definition node including schema names, table names, number of columns, column names, column data types, column lengths, primary key definitions, unique constraints, foreign key constraints, etc. The examples used throughout the rest of this user’s guide are based on the following: The database user name of the second master node is mmruser. The database name of the second master node is mmrnode. Step 1: Create a database user name for the master node. This user becomes the owner of xDB Replication Server metadata database objects that will be created in the master node to track, control, and record the replication process and history. The xDB Replication Copyright © 2012 EnterpriseDB Corporation. All rights reserved. 179 Postgres Plus xDB Replication Server with Multi-Master User’s Guide Server metadata database objects are created in a schema named _edb_replicator_pub. When creating the publication database definition for the master node, the database user name is entered in the Publication Service – Add Database dialog box (see Section 6.3). CREATE ROLE mmruser WITH LOGIN SUPERUSER PASSWORD 'password'; Step 2: Create a database that will be used as the master node if such a database does not already exist. CREATE DATABASE mmrnode; 6.1.3 Verifying Host Accessibility If more than one computer is used to host the components of the replication system, each computer must be able to communicate with the others on a network. There are a number of different aspects to this topic. For a discussion of firewalls see Section 5.1.4.1. For a discussion of network IP addresses see Section 5.1.4.2. A Postgres database server uses the host-based authentication file, pg_hba.conf, to control access to the databases in the database server. You need to modify the pg_hba.conf file in the following locations: On the Postgres database server that contains the xDB Control database On each Postgres database server that contains a master node In a default Postgres installation, this file is located in the directory POSTGRES_INSTALL_HOME/data. The modifications needed to the pg_hba.conf file for each of the aforementioned cases are discussed in the following sections. xDB Control Database On the database server on which the xDB Control database resides, the following entry must be added to allow access to the xDB Control database: host control_dbname control_dbuser Copyright © 2012 EnterpriseDB Corporation. All rights reserved. pub_ipaddr/32 md5 180 Postgres Plus xDB Replication Server with Multi-Master User’s Guide The values you substitute for control_dbname and control_dbuser are the entries for fields database and user in the xDB Replication Configuration file found on the host running the publication server. The following is an example of the content of an xDB Replication Configuration file: user=enterprisedb port=5444 password=ygJ9AxoJEX854elcVIJPTw\=\= type=enterprisedb host=localhost database=xdb The value you substitute for pub_ipaddr is the network IP address where the publication server is running. Note: The network IP address you substitute for pub_ipaddr must not be the loopback address 127.0.0.1. However, the publication server does require access to the xDB Control database using the loopback address as well. This access is already granted in the default pg_hba.conf file by the following entry: host all all 127.0.0.1/32 md5 The following shows an example of the pg_hba.conf file: # TYPE DATABASE USER CIDR-ADDRESS METHOD # "local" is for Unix domain socket connections only local all all # IPv4 local connections: host xdb enterprisedb 192.168.10.102/32 host all all 127.0.0.1/32 # IPv6 local connections: host all all ::1/128 md5 md5 md5 md5 Master Nodes On each database server running a master node, the following is needed to allow access to the database: host masternode_db masternode_user pub_ipaddr/32 md5 The value you substitute for masternode_db is the name of the database you intend to use as the master node. The value you substitute for masternode_user is the database user name you created in Step 1 of Section 6.1.1 or Step 1 of Section 6.1.2. For a database named edb, the resulting pg_hba.conf file appears as follows: # TYPE DATABASE USER CIDR-ADDRESS METHOD # "local" is for Unix domain socket connections only Copyright © 2012 EnterpriseDB Corporation. All rights reserved. 181 Postgres Plus xDB Replication Server with Multi-Master User’s Guide local all all # IPv4 local connections: host xdb enterprisedb host edb pubuser host all all # IPv6 local connections: host all all md5 192.168.10.102/32 192.168.10.102/32 127.0.0.1/32 md5 md5 md5 ::1/128 md5 In the preceding example, the xDB Control database xdb and a master node database edb are running on the same database server. For a master node using database name mmrnode with database user name mmruser running on a separate host than where the xDB Control database is running, the pg_hba.conf file on this database server would look like the following: # TYPE DATABASE USER CIDR-ADDRESS # "local" is for Unix domain socket connections only local all all # IPv4 local connections: host mmrnode mmruser 192.168.10.102/32 host all all 127.0.0.1/32 # IPv6 local connections: host all all ::1/128 METHOD md5 md5 md5 md5 Reload the configuration file after making the modifications. Choose Reload Configuration (Expert Configuration, then Reload Configuration on Advanced Server) from the Postgres application menu. This will put the modified pg_hba.conf file into effect. 6.2 Creating a Publication Creating a publication requires the following steps: Registering the publication server Adding the master definition node Creating a publication by choosing the tables for the publication along with the conflict resolution options 6.2.1 Registering a Publication Server Registering a publication server is done in a manner identical to single-master replication. See Section 5.2.1 for directions on registering a publication server. Copyright © 2012 EnterpriseDB Corporation. All rights reserved. 182 Postgres Plus xDB Replication Server with Multi-Master User’s Guide Figure 111 - Replication tree after registering a publication server After you have successfully registered a publication server, the replication tree of the xDB Replication Console displays a Publication Server node under which are the SMR and MMR type nodes. Continue to build the multi-master replication system under the MMR type node. 6.2.2 Adding the Master Definition Node The first database to be identified to xDB Replication Server is the master definition node. This is done by creating a publication database definition subordinate to the MMR type node under the Publication Server node. After the publication database definition is created, a Publication Database node representing the master definition node appears in the replication tree of the xDB Replication Console. A publication containing tables residing within this database can then be created under the Publication Database node. You must enter database connection information such as the database server network address, database identifier, and database login user name and password when you create the publication database definition. The connection information is used by the publication server to access the publication tables when it performs replication. Step 1: Make sure the database server for the master definition node is running and accepting client connections. Step 2: Select the MMR type node under the Publication Server node. From the Publication menu, choose Publication Database, and then choose Add Database. Alternatively, click the secondary mouse button on the MMR type node and choose Add Database. The Publication Service – Add Database dialog box appears. Step 3: Fill in the following fields: Copyright © 2012 EnterpriseDB Corporation. All rights reserved. 183 Postgres Plus xDB Replication Server with Multi-Master User’s Guide Database Type. Currently Postgres Plus Advanced Server is the only available option. Host. IP address of the host on which the master definition node is running. Port. Port on which the master definition node is listening for connections. User. The database user name for the master definition node created in Step 1 of Section 6.1.1. Password. Password of the database user. Database. Enter the database name of the master definition node. Node Priority Level. An integer from 1 to 10, which is the priority level assigned to this master node for conflict resolution based on node priority. The highest priority is 1 while the lowest is 10. See Section 6.6.3 for information on conflict resolution strategies. The default is 1 for the master definition node. Figure 112 - Publication Service - Add Database dialog box for the master definition node Step 4: Click the Test button. If Test Result: Success appears, click the OK button, then click the Save button. Copyright © 2012 EnterpriseDB Corporation. All rights reserved. 184 Postgres Plus xDB Replication Server with Multi-Master User’s Guide Figure 113 - Successful master definition node test If an error message appears investigate the cause of the error, correct the problem, and repeat steps 1 through 4. When the publication database definition is successfully saved, a Publication Database node is added to the replication tree under the MMR type node of the Publication Server node. Copyright © 2012 EnterpriseDB Corporation. All rights reserved. 185 Postgres Plus xDB Replication Server with Multi-Master User’s Guide Figure 114 - Replication tree after adding the master definition node The label MDN appears at the end of the node in the replication tree and in addition, the MDN field is set to Yes in the Property window to indicate this is the master definition node. 6.2.3 Adding a Publication Subordinate to the master definition node, you create a publication that contains tables of the database. Step 1: Select the Publication Database node. From the Publication menu, choose Create Publication. Alternatively, click the secondary mouse button on the Publication Database node and choose Create Publication. The Create Publication dialog box appears. Step 2: Fill in the following fields under the Create Publication tab: Publication Name. Enter a name that is unique amongst all publications. Publish. Check the boxes next to the tables that are to be included in the publication. Select All. Check this box if you want to include all tables in the Available Tables list in the publication. Copyright © 2012 EnterpriseDB Corporation. All rights reserved. 186 Postgres Plus xDB Replication Server with Multi-Master User’s Guide Figure 115 - Create Publication dialog box If you wish to change the conflict resolution options from their default settings, follow the directions in the next step, otherwise go on to Step 4. Step 3 (Optional): If you want to modify or see the current conflict resolution options, click the Conflict Resolution Options tab. For each table, you can select the primary conflict resolution strategy and a standby strategy by clicking the primary mouse button over the appropriate box to expose a drop-down list of choices. Copyright © 2012 EnterpriseDB Corporation. All rights reserved. 187 Postgres Plus xDB Replication Server with Multi-Master User’s Guide Figure 116 - Conflict Resolution Options tab If during synchronization replication, conflicting changes are pending against the same row from different master nodes, the conflict resolution strategy determines which of the conflicting changes is accepted and replicated to all master nodes. The conflicting changes that are not accepted are discarded. If the selection from the Conflict Resolution Strategy column does not resolve the conflict, the selection from the Standby Conflict Resolution Strategy column is applied. If neither strategy resolves the conflict, the event is marked as Pending in the Conflict History tab. See Section 6.7 for information on viewing conflict history. An example of a conflict is when the same column of the same row is changed by transactions in two different master nodes. Depending upon the conflict resolution strategy in effect for the table, one of the transactions is accepted and replicated to all master nodes. The other transaction is discarded and not replicated to any master node. The following is a brief summary of each conflict resolution strategy: Earliest Timestamp. The conflicting change with the earliest timestamp is accepted and replicated to all other master nodes. All other conflicting changes are discarded. Copyright © 2012 EnterpriseDB Corporation. All rights reserved. 188 Postgres Plus xDB Replication Server with Multi-Master User’s Guide Latest Timestamp. The conflicting change with the latest timestamp is accepted and replicated to all other master nodes. All other conflicting changes are discarded. Node Priority. The conflicting change occurring on the master node with the highest priority level is accepted and replicated to all other master nodes. All other conflicting changes are discarded. Manual. The conflict remains unresolved. Conflicting changes remain applied in each master node where they originated, but are not replicated to other master nodes. The proper adjustments must be manually applied in each master node. See Section 6.6.3 for more information on conflict resolution strategies. Step 4: Click the Create button. If Publication Created Successfully appears, click the OK button, otherwise investigate the error and make the necessary corrections. Figure 117 - Publication created successfully Upon successful publication creation, a Publication node is added to the replication tree. Copyright © 2012 EnterpriseDB Corporation. All rights reserved. 189 Postgres Plus xDB Replication Server with Multi-Master User’s Guide Figure 118 - Replication tree after adding a publication 6.3 Creating Additional Master Nodes Once you have created the master definition node, you add additional databases to the multi-master replication system by defining additional master nodes. This is done by creating additional publication database definitions subordinate to the MMR type node under the Publication Server node that contains the master definition node. After the publication database definition is created, a Publication Database node representing the master node appears in the replication tree of the xDB Replication Console. The publication that was defined under the master definition node appears under the Publication Database node. You must enter database connection information such as the database server network address, database identifier, and database login user name and password when you create the publication database definition. The connection information is used by the publication server to access the publication tables when it performs replication. Step 1: Make sure the database server for the master definition node is running and accepting client connections. Step 2: Select the MMR type node under the same Publication Server node that contains the master definition node. From the Publication menu, choose Publication Database, and then choose Add Database. Alternatively, click the secondary mouse button on the MMR type node and choose Add Database. The Publication Service – Add Database dialog box appears. Step 3: Fill in the following fields: Copyright © 2012 EnterpriseDB Corporation. All rights reserved. 190 Postgres Plus xDB Replication Server with Multi-Master User’s Guide Database Type. Currently Postgres Plus Advanced Server is the only available option. Host. IP address of the host on which the master node is running. Port. Port on which the master node is listening for connections. User. The database user name for the master node created in Step 1 of Section 6.1.2. Password. Password of the database user. Database. Enter the database name of the master node. Node Priority Level. An integer from 1 to 10, which is the priority level assigned to this master node for conflict resolution based on node priority. The highest priority is 1 while the lowest is 10. See Section 6.6.3 for information on conflict resolution strategies. As each additional master node is added, the default priority level number increases assigning a lower priority level to each additional node. Replicate Publication Schema. Check this box if you want the publication server to create the publication table definitions in the new master node by copying the definitions from the master definition node. If you do not check this box, it is assumed that you have already created the table definitions in the master node. Perform Initial Snapshot. Check this box if you want the publication server to perform a snapshot from the master definition node to this master node when you click the Save button. If you do not check this box, the tables on the master node will not be loaded until you perform a replication at some later time. Copyright © 2012 EnterpriseDB Corporation. All rights reserved. 191 Postgres Plus xDB Replication Server with Multi-Master User’s Guide Figure 119 - Publication Service - Add Database dialog box for an additional master node Step 4: Click the Test button. If Test Result: Success appears, click the OK button, then click the Save button. Copyright © 2012 EnterpriseDB Corporation. All rights reserved. 192 Postgres Plus xDB Replication Server with Multi-Master User’s Guide Figure 120 - Successful master node test If an error message appears investigate the cause of the error, correct the problem, and repeat steps 1 through 4. When the publication database definition is successfully saved, a Publication Database node is added to the replication tree under the MMR type node of the Publication Server node. Copyright © 2012 EnterpriseDB Corporation. All rights reserved. 193 Postgres Plus xDB Replication Server with Multi-Master User’s Guide Figure 121 - Replication tree after adding an additional master node Unlike the master definition node, the label MDN does not appear at the end of the node in the replication tree. The MDN field is set to No in the Property window to indicate this is not the master definition node. In addition, a Publication node appears under the newly added master node. This Publication node represents the publication in the master definition node, which is replicated to the master node. If in Step 3, you checked the Perform Initial Snapshot check box, an initial snapshot replication is performed and the log of the snapshot is displayed. Copyright © 2012 EnterpriseDB Corporation. All rights reserved. 194 Postgres Plus xDB Replication Server with Multi-Master User’s Guide Figure 122 - Adding a master node with an initial snapshot If the snapshot is successful, the replicated tables in the master node are loaded with the rows from the publication tables of the master definition node. 6.4 Metadata Created in Master Nodes Creation of master nodes results in the creation of xDB Replication Server metadata database objects in each master node database. Figure 74 of Section 5.2.4 shows the metadata database objects created in each master node. You will also notice schema _edb_replicator_pub in the xDB Control database. Schema _edb_replicator_pub and its database objects were created when the master definition node was added. Copyright © 2012 EnterpriseDB Corporation. All rights reserved. 195 Postgres Plus xDB Replication Server with Multi-Master User’s Guide Do not delete any of these database objects as the replication system metadata will become corrupted. When you remove all master nodes and the master definition node using the xDB Replication Console or xDB Replication Server CLI, schema _edb_replicator_pub and all of its database objects are deleted from the xDB Control database. 6.5 On Demand Replication After a master definition node, its publication, and additional master nodes are created, there are a couple of choices for starting the replication process. Replication can be done immediately by performing an on demand snapshot or synchronization replication. Replication can be scheduled to start at a later date and time by creating a schedule. This section discusses the procedure for initiating a replication on demand. Section 7.1 discusses how to create a schedule. 6.5.1 Performing Snapshot Replication A snapshot replication occurs from the master definition node to a selected master node. When you create a master node for the first time, you have the option of performing an initial snapshot (see Step 3 of Section 6.3). You can perform snapshots to this master node at any later point in time according to the following steps. Step 1: Select the Publication node under the master node for which you wish to perform snapshot replication. Copyright © 2012 EnterpriseDB Corporation. All rights reserved. 196 Postgres Plus xDB Replication Server with Multi-Master User’s Guide Figure 123 - Selecting a master node publication for an on demand snapshot Step 2: Open the Snapshot dialog box in any of the following ways: Click the secondary mouse button on the Publication node and choose Snapshot. Click the primary mouse button on the Snapshot icon. Copyright © 2012 EnterpriseDB Corporation. All rights reserved. 197 Postgres Plus xDB Replication Server with Multi-Master User’s Guide Figure 124 - Opening the Snapshot dialog box Step 3: Click the Snapshot button to start snapshot replication. Copyright © 2012 EnterpriseDB Corporation. All rights reserved. 198 Postgres Plus xDB Replication Server with Multi-Master User’s Guide Figure 125 - Snapshot dialog box Step 4: Snapshot Taken Successfully appears if the snapshot was successful. Click the OK button. If the snapshot was not successful, scroll through the messages in the Snapshot dialog box window. The status messages of each snapshot are also saved in the Migration Toolkit log files named mtk_yyyymmddhhmiss.log in the following directories: For Linux: /var/log/xdb-rep/buildnn For Windows: POSTGRES_HOME\.enterprisedb\edb_replicator\buildnn POSTGRES_HOME is the home directory of the Windows postgres account (enterprisedb account for Advanced Server installed in Oracle compatible configuration mode). In the buildnn subdirectory, nn is the xDB Replication Server Copyright © 2012 EnterpriseDB Corporation. All rights reserved. 199 Postgres Plus xDB Replication Server with Multi-Master User’s Guide build number. The specific location of POSTGRES_HOME is dependent upon your version of Windows. Figure 126 - Successful on demand snapshot The publication has now been replicated from the master definition node to the selected master node. A record of the snapshot is maintained in the replication history. See Section 7.3 for information on how to view replication history. 6.5.2 Performing Synchronization Replication When synchronization replication is performed in a multi-master replication system, a series of synchronization operations occur between every master node pair in the replication system. For example, if a replication system consists of master nodes A, B, and C, synchronization is applied to the following node pairs whenever synchronization replication is initiated: Copyright © 2012 EnterpriseDB Corporation. All rights reserved. 200 Postgres Plus xDB Replication Server with Multi-Master User’s Guide Changes on node A are applied to node B. Changes on node A are applied to node C. Changes on node B are applied to node A. Changes on node B are applied to node C. Changes on node C are applied to node A. Changes on node C are applied to node B. There may be circumstances where changes made on different nodes result in conflicts. Section 6.6 discusses the types of conflicts that may occur and how they can be resolved. The following steps describe how to initiate on demand synchronization replication. Step 1: Select the Publication node under any master node. Regardless of the master node chosen, synchronization is applied to every master node pair in the replication system. Figure 127 - Selecting a master node publication for an on demand synchronization Step 2: Open the Synchronize dialog box in any of the following ways: Click the secondary mouse button on the Publication node and choose Synchronize. Click the primary mouse button on the Synchronize icon. Copyright © 2012 EnterpriseDB Corporation. All rights reserved. 201 Postgres Plus xDB Replication Server with Multi-Master User’s Guide Figure 128 - Opening the Synchronize dialog box Step 3: Click the Synchronize button to start synchronization replication. Figure 129 - Synchronize dialog box Copyright © 2012 EnterpriseDB Corporation. All rights reserved. 202 Postgres Plus xDB Replication Server with Multi-Master User’s Guide Step 4: Publication Synchronized Successfully appears if the synchronization was successful. Click the OK button. If the synchronization was not successful, an error message is displayed. Figure 130 - Successful on demand synchronization The operations that were applied to the publication tables can be seen in the replication history. See Section 7.3 for information on how to view replication history. Conflicting changes that were encountered can be seen in the conflict history. See Section 6.7 for information on how to view conflict history. 6.6 Conflict Resolution There are certain situations where synchronization replication may result in data conflicts arising from the row changes that took place on different master nodes. Conflict resolution deals with the topic of the types of conflicts that might occur, the strategies for dealing with conflicts, and the options available for automatically resolving such conflicts. 6.6.1 Conflict Types The types of conflicts can be summarized as follows: Uniqueness Conflict. A uniqueness conflict occurs when the same value is used for a primary key or unique column in an insert transaction on two or more master nodes. This is also referred to as an insert/insert conflict. Copyright © 2012 EnterpriseDB Corporation. All rights reserved. 203 Postgres Plus xDB Replication Server with Multi-Master User’s Guide Update Conflict. An update transaction modifies a column value in the same row on two or more master nodes. For example, an employee address column is updated on master node A, and another user updates the address column for the same employee on master node B. The timestamps of when the transactions occur on each node could be different, but both transactions occur in a time interval during which synchronization has not yet occurred. Thus when synchronization does take place, both conflicting transactions are to be applied. This is also referred to as an update/update conflict. Delete Conflict. The row corresponding to an update transaction on the source node is not found on the target node as the row has already been deleted on the target node. This is referred to as an update/delete conflict. Conversely, if there is a delete transaction on the source node and an update transaction for the same row on the target node, this case is referred to as a delete/update conflict. Finally, in the case where the row corresponding to a delete transaction on the source node is not found on the target node as the row has already been deleted on the target node is referred to as a delete/delete conflict. The following table definition is used to illustrate conflict resolution examples: CREATE TABLE addrbook ( id SERIAL PRIMARY KEY, name VARCHAR(20), address VARCHAR(50) ); The following table illustrates an example of a uniqueness conflict. Table 2 - Uniqueness Conflict Timestamp t1 t2 t3 Action Node A: INSERT INTO Master Node A id = 1, name = 'A', addrbook (name, address) address = 'ADDR A' VALUES ('A', 'ADDR A'); id = 2, name = 'B', Node A: INSERT INTO address = 'ADDR B' addrbook (name, address) VALUES ('B', 'ADDR B'); id = 1, name = 'A', Node B: INSERT INTO address = 'ADDR A' addrbook (name, address) id = 2, name = 'B', VALUES ('C', 'ADDR C'); address = 'ADDR B' Synchronization pushes Node A changes to Node B Master Node B id = 1, name = 'C', address = 'ADDR C' Row change for INSERT tx id = 1 on Node A results in unique key conflict on Node B id = 1, name = 'C', address = 'ADDR C' id = 1, name = 'A', address = 'ADDR A' The following table illustrates an example of an update conflict. Copyright © 2012 EnterpriseDB Corporation. All rights reserved. 204 Postgres Plus xDB Replication Server with Multi-Master User’s Guide Table 3 - Update Conflict Timestamp Action t0 Node A: UPDATE addrbook t1 SET address = 'ADDR B1' WHERE id = 2; Node B: UPDATE addrbook t2 SET address = 'ADDR B2' WHERE id = 2; Master Node A Master Node B id = 2, address = 'ADDR B' id = 2, address = 'ADDR B' id = 2, address = 'ADDR B1' id = 2, address = 'ADDR B' id = 2, address = 'ADDR B1' id = 2, address = 'ADDR B2' Current value of address on Node B not equal old value on Node A ('ADDR B2' <> 'ADDR B') Synchronization pushes Node A changes to Node B t3 The following table illustrates an example of a delete conflict. Table 4 - Delete Conflict Timestamp Action t0 t1 Node A: UPDATE addrbook SET address = 'ADDR B1' WHERE id = 2; t2 Node B: DELETE FROM t3 Synchronization pushes Node A changes to Node B addrbook WHERE id = 2; Master Node A Master Node B id = 2, address = 'ADDR B' id = 2, address = 'ADDR B' id = 2, address = 'ADDR B1' id = 2, address = 'ADDR B' id = 2, address = 'ADDR B1' Row with id = 2 deleted The row with id = 2 is already deleted on target Node B, hence update from Node A fails. 6.6.2 Conflict Detection This section discusses the synchronization process and conflict detection. When synchronization replication occurs, either on demand or on a scheduled basis, each of the master node changes is pushed to the other master nodes in the following sequence: Pending transactions recorded in the shadow tables of the master definition node are replicated to the other master nodes. Depending upon the host architecture and the setting of parallel synchronization options, replication to the other master nodes may occur in parallel or serially. See Section 5.8.2.2 for information on parallel synchronization. After the pending transactions have been pushed from the master definition node to all other master nodes, the master node is selected that has the lowest publication database ID amongst the master nodes excluding the master definition Copyright © 2012 EnterpriseDB Corporation. All rights reserved. 205 Postgres Plus xDB Replication Server with Multi-Master User’s Guide node. (The publication database ID is an internally generated positive integer assigned when the master node’s publication database definition is created.) Pending transactions recorded in the shadow tables of this master node are pushed to all other master nodes including the master definition node in the same manner as described in the first bullet point. The process described in the second bullet point is repeated for each remaining master node in ascending order of publication database ID. Note: For clarity of the explanations and examples that follow, it is assumed that parallel synchronization is not in use (that is, each replication process occurs serially). For example, in a 3-node replication system where node A is the master definition node along with additional master nodes B and C, the pending transactions available on node A are replicated to node B and then to node C. Node B’s pending transactions are then replicated to Node A and Node C. Finally, Node C’s pending transactions are replicated to Node A and Node B. Using this 3-node example the following describes the conflict detection process in more detail. The replication server loads the first set of pending transactions from master node A. Transactions are processed on a transaction set basis. (The same process is used for single-master replication.) All pending transactions are grouped in one or more transaction sets to avoid loading a very large chunk of rows in memory that may result in an out of heap space issue. For an update transaction, the replication server queries the first target master node B to load the related row. If the old column value on the source master node A is different than the current column value on target master node B, the transaction is marked as an update conflict. If a related row is not found on the target master node, it is marked as an update/delete conflict. For a delete transaction, the replication server queries the target master node to load the related row. If a related row is not found on the target master node, the transaction is marked as a delete/delete conflict. When a conflict is detected, the conflict information such as the transaction ID, conflict type, and conflict detection timestamp are logged in the conflict table on the target master node. For a conflicting transaction, the replication server checks if any conflict resolution strategy has been selected for the specific table. If a strategy is found, it is applied accordingly and the conflict status is marked as resolved. If a strategy cannot be applied, the conflict status is marked as unresolved (also called pending). If no conflict is detected, the transactional change is replicated to the target master node and the transaction status for that target node is marked as completed in the source master node control schema. A transaction status mapping for each target Copyright © 2012 EnterpriseDB Corporation. All rights reserved. 206 Postgres Plus xDB Replication Server with Multi-Master User’s Guide master node is maintained on all master nodes. For example node A contains two mappings of status – one for node B and another for node C. All of these prior steps are repeated to process and replicate all pending transaction sets available on master node A to master node B. Next, the publication server proceeds to replicate master node A pending transactional changes to the next target master node, C. Once the master node A changes are replicated to nodes B and C, the publication server replicates the pending changes available on master node B to nodes A and C. Finally, the master node C changes are replicated to nodes A and B. 6.6.3 Conflict Resolution Strategies A number of built-in conflict resolution options are available to support automatic conflict resolution. The conflict resolution options are applicable to update/update and delete/delete conflicts. Uniqueness, update/delete, and delete/update conflicts are marked unresolved and must be manually reconciled. The following are the built-in conflict resolution options. Earliest Timestamp. When the earliest timestamp option is selected, the relevant rows involved in an update conflict from the source and target master nodes are compared based on the timestamp of when the update occurred on that particular node. The row change that occurred earliest is applied. The row changes with the later timestamps are discarded. Latest Timestamp. Same approach as earliest timestamp except the row change with the latest timestamp is accepted. The row changes with earlier timestamps are discarded. Node Priority. The row change of the master node with the highest node priority level is applied while the lower priority level master node changes are discarded. The node priority level is an integer in the range of 1 to 10, inclusive where 1 is the highest priority level and 10 is the lowest priority level. The delete/delete conflict is always resolved implicitly regardless of the conflict resolution option in effect. The net impact of a delete/delete conflict is the removal of a given row, and the row in question has already been removed the from the source and target nodes. For the earliest timestamp and latest timestamp conflict resolution strategies, the transaction timestamp is tracked in a column with data type TIMESTAMP in the shadow table. Once selected, the conflict resolution strategy for a given table can later be changed to a different strategy (see Section 6.8). Copyright © 2012 EnterpriseDB Corporation. All rights reserved. 207 Postgres Plus xDB Replication Server with Multi-Master User’s Guide 6.6.4 Conflict Prevention – Uniqueness Case Since there is no automatic built-in resolution strategy for the uniqueness conflict, this section discusses strategies to avoid this problem that would be implemented by the DBA. This discussion is based on a realm of numeric values generated by a sequence such as for a unique primary key. The following are possible strategies: Node specific sequence range. A sequence range is reserved for each master node. For example, master node A would have MINVALUE = 1 and MAXVALUE = 1000, master node B would have MINVALUE = 1001 and MAXVALUE = 2000, and so on for other nodes. This ensures that a unique ID is always generated across all master nodes. Start value variation. Each node is assigned a different start value. For example, master node A would have a START value of 1, node B would have 2, and node C would have 3. An increment greater than or equal to the number of nodes guarantees unique IDs as shown in Table 5. Common sequence. All nodes share a common sequence object, however this has the major disadvantage of slowing down transaction processing due to network round-trips associated with each ID generation. Table 5 - Sequence With Start Value Variation Sequence Clause START WITH INCREMENT BY Generated IDs Master Node A Master Node B Master Node C 1 5 1, 6, 11, 16, … 2 5 2, 7, 12, 17, … 3 5 3, 8, 13, 18, … 6.6.5 Example Conflict Resolution This example illustrates a scenario where a transaction change originating from the first master node is successfully applied to the second master node, but conflicts with the third master node. The conflict resolution option is set to latest timestamp. Table 6 - Conflict Resolution Example Timestamp Action t0 t1 Master Node A Master Node B Master Node C id = 2, address = id = 2, address = id = 2, address = 'ADDR' 'ADDR' 'ADDR' Node A: UPDATE addrbook SET id = 2, address = id = 2, address = id = 2, address = 'ADDR A' 'ADDR' 'ADDR' Copyright © 2012 EnterpriseDB Corporation. All rights reserved. 208 Postgres Plus xDB Replication Server with Multi-Master User’s Guide Timestamp Action Master Node A Master Node B Master Node C address = 'ADDR A' WHERE id = 2; Node C: UPDATE t2 t3 t4 t5 t6 id = 2, address = id = 2, address = id = 2, address = addrbook SET 'ADDR C' 'ADDR' address = 'ADDR C' 'ADDR A' WHERE id = 2; Synchronization pushes id = 2, address Node A changes to 'ADDR A' Node B. Changes successfully applied. Synchronization pushes Node A changes to Node C. Current address on Node C <> old value on Node A id = 2, address ('ADDR C' <> 'ADDR A' 'ADDR') hence conflict detected. Latest change on Node C accepted and Node A change discarded. No changes on Node B. Node C changes pushed to Node A that is id = 2, address successfully applied (Node A change already 'ADDR C' marked as discarded and hence is overwritten.) Node C changes pushed to Node B that is id = 2, address successfully applied. All nodes are in sync 'ADDR C' and have consistent state. = id = 2, address = id = 2, address = 'ADDR A' 'ADDR C' = id = 2, address = id = 2, address = 'ADDR C' 'ADDR A' = id = 2, address = id = 2, address = 'ADDR A' 'ADDR C' = id = 2, address = id = 2, address = 'ADDR C' 'ADDR C' 6.7 Viewing Conflict History Conflict history shows the following types of events that occurred during synchronization replication: Uniqueness conflicts where two or more master nodes attempted to insert a row with the same primary key value or unique column value. Update/update conflicts where two or more master nodes attempted to update the same column of the same row Update/delete and delete/update conflicts where one master node attempted to update a row that was deleted by another master node. Copyright © 2012 EnterpriseDB Corporation. All rights reserved. 209 Postgres Plus xDB Replication Server with Multi-Master User’s Guide See Section 6.6 for more information on conflict resolution. Note: The conflict history can be viewed from the Publication node under any master node in the multi-master replication system. The history shows conflicts on all publication tables of all master nodes that occurred during synchronization, and hence, the history appears the same regardless of the master node under which it is viewed. The following steps describe how to view the conflict history. Step 1: Select any Publication node under a Database node representing a master node. Tabs labeled General, Realtime Monitor, Replication History, and Conflict History appear. Figure 131 - Selecting a publication on which to view conflict history Step 2: Click the Conflict History tab to show conflict history. Click the Refresh button to ensure all conflicts are listed. Copyright © 2012 EnterpriseDB Corporation. All rights reserved. 210 Postgres Plus xDB Replication Server with Multi-Master User’s Guide Figure 132 - Conflict History tab Step 3: Use the Conflict Display Criteria drop-down list to display only conflicts of the chosen status. Figure 133 - Selecting conflict history by status Step 4: Click the View Data link to show the details of a particular conflict. Copyright © 2012 EnterpriseDB Corporation. All rights reserved. 211 Postgres Plus xDB Replication Server with Multi-Master User’s Guide Figure 134 - Conflict Details window 6.8 Updating the Conflict Resolution Options A current conflict resolution option on a publication table can be changed. See Section 6.6 for information on conflict resolution. Step 1: Make sure the publication server whose node is the parent of the publication you wish to change is running and has been registered in the xDB Replication Console you are using. See Section 5.2.1 for directions on starting and registering a publication server. Step 2: Select the Publication node under the Publication Database node representing the master definition node. Copyright © 2012 EnterpriseDB Corporation. All rights reserved. 212 Postgres Plus xDB Replication Server with Multi-Master User’s Guide Figure 135 - Selecting a publication in which to update conflict resolution options Step 3: Open the Conflict Resolution Options dialog box in any of the following ways: From the Publication menu, choose Update Publication, then Conflict Resolution Options. Click the secondary mouse button on the Publication node, choose Update Publication, and then choose Conflict Resolution Options. Copyright © 2012 EnterpriseDB Corporation. All rights reserved. 213 Postgres Plus xDB Replication Server with Multi-Master User’s Guide Figure 136 - Opening the Conflict Resolution Options dialog box Step 4: For each table, you can select the primary conflict resolution strategy and a standby strategy by clicking the primary mouse button over the appropriate box to expose a drop-down list of choices. Copyright © 2012 EnterpriseDB Corporation. All rights reserved. 214 Postgres Plus xDB Replication Server with Multi-Master User’s Guide Figure 137 - Updating conflict resolution strategies Step 5: Click the Update button, and then click OK in response to Conflict Resolution Options Updated Successfully. Copyright © 2012 EnterpriseDB Corporation. All rights reserved. 215 Postgres Plus xDB Replication Server with Multi-Master User’s Guide Figure 138 - Successfully updated conflict resolution options 6.9 Switching the Master Definition Node After the multi-master replication system is created, you can switch the role of the master definition node with another master node. Step 1: Make sure the publication server whose node is the parent of the master nodes of the replication system is running and has been registered in the xDB Replication Console you are using. See Section 5.2.1 for directions on starting and registering a publication server. Step 2: Select the Publication Database node corresponding to the master node that you wish to set as the master definition node. Copyright © 2012 EnterpriseDB Corporation. All rights reserved. 216 Postgres Plus xDB Replication Server with Multi-Master User’s Guide Figure 139 - Selecting the master node to set as the master definition node Step 3: Click the secondary mouse button on the Publication Database node and choose Set as MDN. Figure 140 - Setting the master definition node Copyright © 2012 EnterpriseDB Corporation. All rights reserved. 217 Postgres Plus xDB Replication Server with Multi-Master User’s Guide Step 4: In the Set as MDN confirmation box, click the Yes button. Figure 141 - Set as MDN confirmation Step 5: The selected master node is now the master definition node as can be verified by the value Yes in the MDN field of the Property window. Note: The new master definition node is moved to the top of the replication tree in the xDB Replication Console. Copyright © 2012 EnterpriseDB Corporation. All rights reserved. 218 Postgres Plus xDB Replication Server with Multi-Master User’s Guide Figure 142 - Selected master node set as new master definition node Note: You should now perform a synchronization replication to ensure that the new master definition node is synchronized with the other master nodes. See Section 6.5.2 for directions on performing a synchronization replication. 6.10 Optimizing Performance Various publication server configuration options are available to optimize the performance of multi-master replication systems. Almost all publication server performance related configuration options for single-master replication systems are equally applicable to multi-master replication systems (except when they are database produce specific, such as for Oracle). See Section 5.8 for a discussion of these options. The publication server configuration options are set in the publication server configuration file. See Section 9.3.1 for a detailed explanation of how to set the configuration options in this file. The following are some additional configuration options applicable to multi-master replication systems only. uniquenessConflictDetection The uniquenessConflictDetection option determines if uniqueness conflict needs to be detected at data load time or should be deferred to when data is applied against a target master node. Possible values are EAGER and LAZY. Set it to EAGER if there is a high probability of duplicate inserts across master nodes. uniquenessConflictDetection={EAGER | LAZY} Copyright © 2012 EnterpriseDB Corporation. All rights reserved. 219 Postgres Plus xDB Replication Server with Multi-Master User’s Guide The default value is LAZY. skipConflictDetection The skipConflictDetection option controls whether or not to skip conflict detection during synchronization replication. The default is false and should be changed only when the probability of data conflict across master nodes is zero. For example if each master node operates on an independent set of data then turning on this option improves the replication time. skipConflictDetection={true | false} The default value is false. Copyright © 2012 EnterpriseDB Corporation. All rights reserved. 220 Postgres Plus xDB Replication Server with Multi-Master User’s Guide 7 Common Operations This chapter describes configuration and maintenance operations of xDB Replication Server that are common to both single-master and multi-master replication systems. For configuration and management of your replication system, the xDB Replication Console graphical user interface is used to illustrate the steps and examples in this chapter. The same steps can be performed from the operating system command line using the xDB Replication Server Command Line Interface (CLI). The commands of the xDB Replication Server CLI utility are described in Chapter 8. Note: Though most steps described in this chapter apply to both single-master and multimaster replication systems, those steps that apply only to single-master replication systems are noted with For SMR only. Those steps that apply only to multi-master replication systems are noted with For MMR only 7.1 Creating a Schedule A schedule establishes recurring points in time when replication is to occur. In a single-master replication system, once a schedule is created the subscription server initiates replications according to the schedule until either the schedule is changed or removed. In a multi-master replication system, the publication server handles this process. See Section 7.2 for changing or removing a schedule. When a scheduled replication is to take place, all components of the replication system must be running: Publication database server Subscription database server (applies only to single-master replication systems) xDB Control database server Publication server Subscription server (applies only to single-master replication systems) If any of the preceding components are not running at the time of a scheduled replication, then replication does not occur at that point in time. The replication occurs at the next scheduled replication time when all applicable replication system components are running. For synchronization replications, changes that have occurred on the source tables that were not replicated due to a skipped, scheduled replication are maintained as pending transactions in the shadow tables of the source database. All changes since the last Copyright © 2012 EnterpriseDB Corporation. All rights reserved. 221 Postgres Plus xDB Replication Server with Multi-Master User’s Guide successful replication are applied whenever the next scheduled replication occurs. Thus, accumulated changes are never lost due to a missed replication. For snapshot replications, skipped, scheduled replications present no problem since a snapshot replication replaces all of the data in the target tables with the current source data. Step 1 (For SMR only): Select the Subscription node of the subscription for which you wish to create a schedule. Figure 143 - Selecting a subscription on which to set a schedule Step 1 (For MMR only): Select the Publication Database node representing the master definition node. (The MDN field in the Property window is set to Yes for the master definition node.) Copyright © 2012 EnterpriseDB Corporation. All rights reserved. 222 Postgres Plus xDB Replication Server with Multi-Master User’s Guide Figure 144 - Selecting the master definition node on which to set a schedule Step 2 (For SMR only): Open the Scheduled Task Wizard dialog box in any of the following ways: From the Subscription menu, choose Schedule, then Configure Schedule. Click the secondary mouse button on the Subscription node and choose Configure Schedule. Click the primary mouse button on the Configure Schedule icon. Figure 145 - Opening the Scheduled Task Wizard dialog box on a subscription Copyright © 2012 EnterpriseDB Corporation. All rights reserved. 223 Postgres Plus xDB Replication Server with Multi-Master User’s Guide Step 2 (For MMR only): Open the Scheduled Task Wizard dialog box in any of the following ways: Click the secondary mouse button on the Publication Database node and choose Configure Schedule. Click the primary mouse button on the Configure Schedule icon. Figure 146 - Opening the Scheduled Task Wizard dialog box on a master definition node Step 3: In the Scheduled Task Wizard dialog box, select the radio button for either synchronization replication or snapshot replication. Note: If the publication associated with this subscription is a snapshot-only publication, then only Snapshot may be chosen. Note: In a multi-master replication system, only Synchronize may be chosen. Copyright © 2012 EnterpriseDB Corporation. All rights reserved. 224 Postgres Plus xDB Replication Server with Multi-Master User’s Guide Figure 147 - Scheduled Task Wizard dialog box Step 4: Select the radio button for the scheduled replication frequency, or select Cron Expression to write your own cron expression. The frequency choices have the following meanings: Continuously. Schedules replication to run continuously at an interval in seconds that you specify. Select this option if the source tables change frequently during the day and the target tables must be kept up-to-date throughout the course of the day. Daily. Schedules replication to run once a day at the time you choose. Select this option if the target tables need to be refreshed daily. Weekly. Schedules replication to run once a day at the time you choose, but only on the specific days of the week you choose. Select this option if you need more flexibility than a daily schedule, and the target tables do not have to be refreshed every day. Monthly. Schedules replication to run one day per month on the day of the month and time you choose, but only on the specific months you choose. Select this option if updates to the source tables are not very frequent, and the target tables can be out-of-date by a month or more. The Monthly option allows you to schedule replication for as frequently as once a month or infrequently as once a year. Cron Expression. Provides additional flexibility for specifying a schedule beyond the four preceding radio button choices. See appendix Section 9.3.3 for directions on writing a cron expression. Copyright © 2012 EnterpriseDB Corporation. All rights reserved. 225 Postgres Plus xDB Replication Server with Multi-Master User’s Guide The following example shows the selection of a weekly schedule. Figure 148 - Selecting a weekly schedule Step 5: After completing the Scheduled Task Wizard dialog box, click the Next button. Step 6: Your selected schedule will appear. Click the Finish button to accept the schedule. Copyright © 2012 EnterpriseDB Corporation. All rights reserved. 226 Postgres Plus xDB Replication Server with Multi-Master User’s Guide Figure 149 - Scheduled Task Wizard summary If you click the Refresh icon, you will see the schedule properties in the General tab. Figure 150 - Information window with the replication schedule Copyright © 2012 EnterpriseDB Corporation. All rights reserved. 227 Postgres Plus xDB Replication Server with Multi-Master User’s Guide 7.2 Managing a Schedule Once a schedule has been created, xDB Replication Server performs replications according to the schedule until the schedule is updated or removed. The updating or removal of a schedule has no effect on a replication that has already been started. If a replication is in progress when the schedule is updated or removed, the in progress replication continues until completion. 7.2.1 Updating a Schedule The following steps illustrate how to change an existing schedule. Step 1 (For SMR only): Make sure the subscription server whose node is the parent of the subscription you wish to change is running and has been registered in the xDB Replication Console you are using. See Section 5.3.1 for directions on starting and registering a subscription server. Step 1 (For MMR only): Make sure the publication server whose node is the parent of the master definition node you wish to change is running and has been registered in the xDB Replication Console you are using. See Section 5.2.1 for directions on starting and registering a publication server. Step 2 (For SMR only): Select the Subscription node of the subscription for which you wish to update the schedule. Figure 151 - Selecting a subscription whose schedule is to be updated Copyright © 2012 EnterpriseDB Corporation. All rights reserved. 228 Postgres Plus xDB Replication Server with Multi-Master User’s Guide Step 2 (For MMR only): Select the Publication Database node representing the master definition node for which you wish to update the schedule. Figure 152 - Selecting a master definition node whose schedule is to be updated Step 3 (For SMR only): Open the Scheduled Task Wizard dialog box in any of the following ways: From the subscription menu, choose Schedule, then Configure Schedule. Click the secondary mouse button on the Subscription node and choose Configure Schedule. Click the primary mouse button on the Configure Schedule icon. Step 3 (For MMR only): Open the Scheduled Task Wizard dialog box in any of the following ways: Click the secondary mouse button on the Publication Database node and choose Configure Schedule. Click the primary mouse button on the Configure Schedule icon. Copyright © 2012 EnterpriseDB Corporation. All rights reserved. 229 Postgres Plus xDB Replication Server with Multi-Master User’s Guide Figure 153 - Opening the Scheduled Task Wizard dialog box from the tool bar Step 4: The Configure Scheduler confirmation box appears. Click the Yes button. Figure 154 - Configure Scheduler confirmation Copyright © 2012 EnterpriseDB Corporation. All rights reserved. 230 Postgres Plus xDB Replication Server with Multi-Master User’s Guide Step 5: In the Scheduled Task Wizard dialog box, create the new schedule. See Step 3 of Section 7.1 for details on how to create a new schedule. Figure 155 - Scheduled Task Wizard dialog box 7.2.2 Removing a Schedule If you no longer wish replication to take place automatically, you must remove the schedule. You can always re-add a schedule or perform on demand replication. Step 1 (For SMR only): Make sure the subscription server whose node is the parent of the subscription you wish to change is running and has been registered in the xDB Replication Console you are using. See Section 5.3.1 for directions on starting and registering a subscription server. Step 1 (For MMR only): Make sure the publication server whose node is the parent of the master definition node you wish to change is running and has been registered in the xDB Replication Console you are using. See Section 5.2.1 for directions on starting and registering a publication server. Step 2 (For SMR only): Select the Subscription node of the subscription for which you wish to remove the schedule. Copyright © 2012 EnterpriseDB Corporation. All rights reserved. 231 Postgres Plus xDB Replication Server with Multi-Master User’s Guide Figure 156 - Selecting a subscription for removal of a schedule Step 2 (For MMR only): Select the Publication Database node representing the master definition node for which you wish to remove the schedule. Figure 157 - Selecting a master definition node for removal of a schedule Copyright © 2012 EnterpriseDB Corporation. All rights reserved. 232 Postgres Plus xDB Replication Server with Multi-Master User’s Guide Step 3 (For SMR only): Remove the schedule in any of the following ways: From the Subscription menu, choose Schedule, then Remove Schedule. Click the secondary mouse button on the Subscription node and choose Remove Schedule. Click the primary mouse button on the Remove Schedule icon. Step 3 (For MMR only): Remove the schedule in any of the following ways: Click the secondary mouse button on the Publication Database node and choose Remove Schedule. Click the primary mouse button on the Remove Schedule icon. Figure 158 - Removing the schedule Step 4: In the Removing Schedule confirmation box, click the Yes button. Copyright © 2012 EnterpriseDB Corporation. All rights reserved. 233 Postgres Plus xDB Replication Server with Multi-Master User’s Guide Figure 159 - Removing Schedule confirmation If you click the Refresh icon in the tool bar, you will notice that schedule information no longer appears in the information window. Figure 160 - Information window after schedule removal Copyright © 2012 EnterpriseDB Corporation. All rights reserved. 234 Postgres Plus xDB Replication Server with Multi-Master User’s Guide 7.3 Viewing Replication History A summary of replications performed on each subscription or master node can be viewed in the xDB Replication Console. A detailed replication history showing each insert, update, and deletion made against each target table can be viewed as well. See Section 2.4.4.2 for a discussion on how changes are applied to target tables. Note (For SMR Only): The replication history can be viewed from the Publication node as well as from the Subscription node. The history shown for a Publication node is actually the exact same set of inserts, updates, and deletions made on the subscription tables by the publication server during synchronization. The history shown for a Publication node does not show the actual SQL statements processed on the publication tables that originated from user applications. Note (For MMR only): The replication history can be viewed from the Publication node under any master node in the multi-master replication system. The history shown includes inserts, updates, and deletions made on all publication tables of all master nodes by the publication server during synchronization, and hence, the history appears the same regardless of the master node under which the history is viewed. 7.3.1 All Replication History Replication history shows the following types of events that occur on a given subscription or master node: Snapshot replications Synchronization replications where at least one change (insert, update, or deletion) was applied to a target table Synchronization replications where no updates were applied to any of the target tables since the last restart of the publication server The following steps describe how to view the replication history of the events in the preceding list. Step 1 (For SMR only): Select the node beneath the Subscription node. Tabs labeled General, Realtime Monitor, and Replication History appear. Copyright © 2012 EnterpriseDB Corporation. All rights reserved. 235 Postgres Plus xDB Replication Server with Multi-Master User’s Guide Figure 161 - Selecting a subscription on which to view replication history Step 1 (For MMR only): Select any Publication node under a Database node representing a master node. Tabs labeled General, Realtime Monitor, Replication History, and Conflict History appear. Copyright © 2012 EnterpriseDB Corporation. All rights reserved. 236 Postgres Plus xDB Replication Server with Multi-Master User’s Guide Figure 162 - Selecting a publication on which to view replication history Step 2: Click the Replication History tab to show a history of replications. Figure 163 - Replication History tab Note: Every snapshot replication and each synchronization replication with at least one update produces a history record that is maintained in replication history tables in the _edb_replication_pub schema of the xDB Control database. Over time the size of Copyright © 2012 EnterpriseDB Corporation. All rights reserved. 237 Postgres Plus xDB Replication Server with Multi-Master User’s Guide the replication history tables will grow. Replication history records can be periodically deleted. See Section 7.4.3 for information on cleaning up replication history. 7.3.2 Hiding Synchronizations With Zero Transaction Counts You may notice synchronization replications with transaction counts of zero. These records indicate that there were no changes to synchronize at the time the replication occurred. For scheduled replications that occur frequently, this may result in a large number of lines in the Replication History tab, thus obscuring the more meaningful replications with non-zero transaction counts as shown below. Figure 164 - Replication history with zero transaction counts While viewing the Replication History tab, you can hide the records with zero transaction counts as follows: Copyright © 2012 EnterpriseDB Corporation. All rights reserved. 238 Postgres Plus xDB Replication Server with Multi-Master User’s Guide Step 1: Check the Show History With Transactions Count > 0 check box located at the bottom of the Replication History tab. Figure 165 - Setting replication history to hide zero transaction count records Step 2: The next time the Replication History tab refreshes, only the replications with non-zero transaction counts appear in the Replication History. Note: Hiding of zero transaction count replication records stays in effect only while viewing the Replication History tab after checking the Show History With Transactions Count > 0 check box. If you change the focus in the replication tree Copyright © 2012 EnterpriseDB Corporation. All rights reserved. 239 Postgres Plus xDB Replication Server with Multi-Master User’s Guide to another node, zero transaction count records reappear on the Replication History tab when you come back to it. Zero transaction count replication records are maintained in the publication server memory. They are not permanently stored on disk. Therefore when the publication server is shut down, the in-memory zero transaction count replication records are no longer available. When the publication server starts running again, zero transaction count replication records will appear on the Replication History tab as zero transaction count replications occur. 7.3.3 Shadow Table History Expanding the nodes under the Subscription node of a single-master replication system, or the Publication node of a multi-master replication system provides more information about the subscription or publication. Step 1: Select a table to reveal tabs that contain general information about the table and the replication history of the table. Expand a Table node to reveal the columns in the table. Figure 166 - Table properties and columns Step 2: Click the Replication History tab to show a history of replications for this table. Copyright © 2012 EnterpriseDB Corporation. All rights reserved. 240 Postgres Plus xDB Replication Server with Multi-Master User’s Guide Figure 167 - Table replication history tab Step 3: Click the View Data link to show a list of each change made to the table during the synchronization replication. The Synchronize History window shows two update operations followed by one insert operation against the emp target table that correspond to the following set of SQL statements executed on the emp source table: UPDATE emp SET hiredate = TO_DATE('07-JUN-12'), mgr = 7698 WHERE empno IN (9001, 9002); INSERT INTO emp (empno, ename, job, mgr, deptno) VALUES (9003, 'JOHNSON', 'SALESMAN', 7698, 30); Copyright © 2012 EnterpriseDB Corporation. All rights reserved. 241 Postgres Plus xDB Replication Server with Multi-Master User’s Guide Figure 168 - Synchronize History window Note: Since all insert, update, and delete operations on all source tables are recorded in shadow tables, the size of the shadow tables may grow considerably over time for volatile source tables. The rows shown in the Synchronize History window are obtained from these shadow tables. Rows in the shadow tables can be periodically deleted. See Section 7.4.2 for information on cleaning up the shadow tables. 7.4 Managing History xDB Replication Server maintains two types of history: Replication history is a summary record of each replication. Shadow table history is a record of each change (insert, update, or delete) that was applied to each target table during synchronization replications. Copyright © 2012 EnterpriseDB Corporation. All rights reserved. 242 Postgres Plus xDB Replication Server with Multi-Master User’s Guide 7.4.1 Scheduling Shadow Table History Cleanup A preference can be set for each publication database definition to determine if and when shadow table history cleanup should be scheduled for all publications appearing under its corresponding Publication Database node. Shadow table history cleanup has no benefit for snapshot-only publications so if all of your publications under a Publication Database node are snapshot-only publications, then scheduled shadow table history cleanup should be disabled following steps 1 through 4. Replication history is not deleted by scheduling shadow table history cleanup. Whenever a new publication database definition is created, there is a scheduled default setting of every Sunday at 12:00 AM midnight for shadow table history cleanup. Note: A configuration option is available to force shadow table history cleanup after every synchronization replication. See Section 9.3.1.8 for information on this option. For Oracle only: For scheduling of shadow table history cleanup on an Oracle publication database, the Oracle DBMS_JOB package on the Oracle database server is used. The time you specify in the schedule for cleanup is passed and stored in DBMS_JOB without time zone translation. For example, assume the publication server is running on a host in New York and the Oracle publication database is on a server in California, which has a 3-hour time difference. If you set shadow table history cleanup to run at 12:00 AM midnight according to the New York based publication server, the cleanup job on the California based Oracle database will start at 12:00 AM midnight Pacific Time (in California), which would be 3:00 AM Eastern Time (in New York). For SQL Server only: For scheduling of shadow table history cleanup on a SQL Server publication database, SQL Server Agent is used on the host running SQL Server. The time you specify in the schedule for cleanup is passed to SQL Server Agent without time zone translation. The effect is the same as described for Oracle in the preceding example. For Postgres only: For scheduling of shadow table history cleanup on a Postgres publication database, the Quartz scheduler is used on the host running the publication server. For example, assume the publication server is running on a host in New York and the Postgres publication database is on a host in California. If you set shadow table history cleanup to run at 12:00 AM midnight according to the New York based publication server, the cleanup job on the California based Postgres database will start at 12:00 AM midnight Eastern Time (in New York), which would be 9:00 PM Pacific Time (in California). Copyright © 2012 EnterpriseDB Corporation. All rights reserved. 243 Postgres Plus xDB Replication Server with Multi-Master User’s Guide For Oracle only: The cleanup job on an Oracle publication database runs independently of the publication server, so the cleanup job will run regardless of whether or not the publication server is running. For Postgres only: The publication server must be running in order for the cleanup job to run on a Postgres publication database. Note: An alternative to using the Quartz scheduler when Postgres is the publication database, is to use pgAgent job scheduling instead. See Section 9.3.1.7 for information on how to use pgAgent job scheduling and the advantages, thereof. The following steps show how to alter the default setting. Step 1: Make sure the publication server whose node is the parent of the publication database definition whose cleanup scheduling preference you want to set is running and has been registered in the xDB Replication Console you are using. See Section 5.2.1 for directions on starting and registering a publication server. Step 2: Select the Publication Database node for which you want to set the cleanup scheduling preference. Figure 169 - Selecting the publication database for cleanup scheduling Step 3: From the Publication menu, choose Preferences. Alternatively, click the secondary mouse button on the Publication Database node and choose Preferences. The Publication Server Preferences dialog box appears. Copyright © 2012 EnterpriseDB Corporation. All rights reserved. 244 Postgres Plus xDB Replication Server with Multi-Master User’s Guide Figure 170 - Publication Server Preferences dialog box Step 4: In the Publication Server Preferences dialog box, uncheck the box if you do not want to run a scheduled shadow table history cleanup job. Click the OK button and skip the remaining steps. Copyright © 2012 EnterpriseDB Corporation. All rights reserved. 245 Postgres Plus xDB Replication Server with Multi-Master User’s Guide Figure 171 - Disabled schedule for shadow table history cleanup Step 5: If you want to schedule shadow table history cleanup, make sure the Run Cleanup Job check box is selected. Select the radio button for the cleanup frequency. The frequency choices have the following meanings: After Every number of hours. Schedules shadow table history cleanup to run continuously at an interval in hours that you specify. Select this option if there are huge volumes of updates to the publication tables during the course of the day, every day. Every Day at hour of day. Schedules shadow table history cleanup to run once a day on the hour you choose. Select this option if updates to the publication tables are frequent enough to require more than once a week cleanup, but not needed more than once a day. Every selected day of week at hour of day. Schedules shadow table history cleanup to run once a week on the day and at the hour you choose. Select this option if updates to the publication tables are infrequent and you do not want to run cleanup manually. Note: A configuration option is available to force shadow table history cleanup after every synchronization replication. See Section 9.3.1.8 for information on this option. Copyright © 2012 EnterpriseDB Corporation. All rights reserved. 246 Postgres Plus xDB Replication Server with Multi-Master User’s Guide Figure 172 - Cleanup Job dialog box Step 6: Click the OK button to accept the schedule. 7.4.2 Cleaning Up Shadow Table History Non snapshot-only publications (that is, publications on which synchronization replications occur) whose tables experience frequent changes should have their shadow table history cleaned up periodically, otherwise the amount of disk space consumed by the shadow tables in the publication database may grow too rapidly. When shadow table history is cleaned up, the rows in the following xDB Replication Server metadata tables are deleted: RREP_TXSET RREP_TXSET_LOG RRST_schema_table For Oracle only: When Oracle is the publication database, these tables are located in the publication database in the schema of the publication database user. For SQL Server only: When SQL Server is the publication database, these tables are located in the publication database in the schema you chose during Step 5 of Section 5.1.2.2. Copyright © 2012 EnterpriseDB Corporation. All rights reserved. 247 Postgres Plus xDB Replication Server with Multi-Master User’s Guide For Postgres only: When Postgres is the publication database, these tables are located in the publication database in schema _edb_replicator_pub. Shadow table history cleanup can be scheduled to run periodically (see Section 7.4.1) or it can be run on demand. The following are the steps to run shadow table history cleanup on demand for a chosen publication. Step 1: Make sure the publication server whose node is the parent of the publication whose shadow table history you wish to clean up is running and has been registered in the xDB Replication Console you are using. See Section 5.2.1 for directions on starting and registering a publication server. Step 2: Select the Publication node of the publication for which you want to clean up the shadow table history. Figure 173 - Selecting a publication for shadow table history cleanup Step 3: From the Publication menu, choose Cleanup Shadow Table History. Alternatively, click the secondary mouse button on the Publication node and choose Cleanup Shadow Table History. The Cleanup Synchronization History confirmation box appears. Copyright © 2012 EnterpriseDB Corporation. All rights reserved. 248 Postgres Plus xDB Replication Server with Multi-Master User’s Guide Figure 174 - Cleaning up shadow table history Step 4: Click the Yes button in the Cleanup Synchronization History confirmation box. Copyright © 2012 EnterpriseDB Corporation. All rights reserved. 249 Postgres Plus xDB Replication Server with Multi-Master User’s Guide Figure 175 - Cleanup Synchronization History confirmation Step 5: Click the Yes button in response to Shadow Table’s Transaction History Removed Successfully. Copyright © 2012 EnterpriseDB Corporation. All rights reserved. 250 Postgres Plus xDB Replication Server with Multi-Master User’s Guide Figure 176 - Successful cleanup of shadow table history After shadow table history cleanup, if you click the View Data link of the Replication History tab, an information message appears stating that there is no synchronization history to view. Figure 177 - View Data link after shadow table history cleanup Copyright © 2012 EnterpriseDB Corporation. All rights reserved. 251 Postgres Plus xDB Replication Server with Multi-Master User’s Guide 7.4.3 Cleaning Up Replication History Cleaning up replication history deletes rows from the following metadata tables in the _edb_replicator_pub schema of the xDB Control database: erep_pub_replog erep_pub_table_replog The following are the steps to run replication history cleanup for a chosen publication. Step 1: Make sure the publication server whose node is the parent of the publication whose replication history you wish to cleanup is running and has been registered in the xDB Replication Console you are using. See Section 5.2.1 for directions on starting and registering a publication server. Step 2: Select the Publication node of the publication for which you want to clean up replication history. Figure 178 - Selecting a publication for replication history cleanup Step 3: From the Publication menu, choose Cleanup Replication History. Alternatively, click the secondary mouse button on the Publication node and choose Cleanup Replication History. The Cleanup Replication History confirmation box appears. Copyright © 2012 EnterpriseDB Corporation. All rights reserved. 252 Postgres Plus xDB Replication Server with Multi-Master User’s Guide Figure 179 - Cleaning up replication history Step 4: Click the Yes button in the Cleanup Replication History confirmation box. Copyright © 2012 EnterpriseDB Corporation. All rights reserved. 253 Postgres Plus xDB Replication Server with Multi-Master User’s Guide Figure 180 - Cleanup Replication History confirmation Step 5: Click the Yes button in response to Replication History Has Been Removed. Copyright © 2012 EnterpriseDB Corporation. All rights reserved. 254 Postgres Plus xDB Replication Server with Multi-Master User’s Guide Figure 181 - Successful cleanup of replication history After replication history cleanup, if you click the Replication History tab, no history records appear. Figure 182 - Replication History tab after replication history cleanup Copyright © 2012 EnterpriseDB Corporation. All rights reserved. 255 Postgres Plus xDB Replication Server with Multi-Master User’s Guide 7.5 Managing a Publication After a publication has been created, certain aspects of the underlying replication system environment might be subsequently altered for any number of reasons. Attributes that might change include the network location of the publication database server, the network location of the host running the publication server, database or operating system user names and passwords, and so forth. The aforementioned information is saved in the replication system metadata when a publication is created. Changes to these attributes result in inaccurate replication system metadata, which in turn may result in errors during subsequent replication attempts or replication system administration. This section describes how to update the metadata stored for the publication server, the publication database definition, and publications in order to keep the information consistent with the actual replication system environment. 7.5.1 Updating a Publication Server There are two aspects of metadata related to the publication server that may need to be updated depending upon the change in the host environment: If the network location (IP address or port number), user name, or password of the publication server changes, and if you have saved this information in the server login file, you need to update the server login file with the new information. If the network location (IP address or port number) of a subscription server changes, then for each publication server managing a publication associated with a subscription of the changed subscription server, you must update the publication server’s metadata with the subscription server’s new network location. This type of update applies only to single-master replication systems. The first type of update is discussed in the following section. The second type of update is discussed in Section 7.5.1.2. 7.5.1.1 Publication Server Login File When you register a publication server in the xDB Replication Console, you may choose to save the publication server’s network location, user name, and encrypted password in a server login file on the computer on which you are running the xDB Replication Console. See Section 4.2 for information on saving the login information. The steps described in this section show you how to update the publication server’s login information in the server login file. Copyright © 2012 EnterpriseDB Corporation. All rights reserved. 256 Postgres Plus xDB Replication Server with Multi-Master User’s Guide It is assumed that the xDB Replication Console is open on your computer and the publication server whose login information you wish to alter in the server login file, appears as a Publication Server node in the xDB Replication Console’s replication tree. Figure 183 - Publication Server node You can perform the following actions on the server login file: Change the publication server’s login information (host IP address, port number, user name, and password) that you last saved in the server login file. Delete the publication server’s login information that is currently saved in the server login file. This is the default action, which will require you to register the publication server again the next time you open the xDB Replication Console. Resave the publication server’s login information in the server login file. Each time you open the Update Publication Server dialog box, you must choose to save the login information if you want it recorded in the server login file. The following steps change only the content of the server login file residing on the host under the current xDB Replication Console user’s home directory. These changes do not alter any characteristic of the actual publication server daemon (on Linux) or service (on Windows). These changes affect only how a publication server is viewed through the xDB Replication Console on this host by this user. Step 1: The publication server whose login information you want to save, change, or delete in the server login file must be running before you can make any changes to the file. See Step 1 of Section 5.2.1 for directions on starting the publication server. Step 2: Click the secondary mouse button on the Publication Server node and choose Update. The Update Publication Server dialog box appears. Copyright © 2012 EnterpriseDB Corporation. All rights reserved. 257 Postgres Plus xDB Replication Server with Multi-Master User’s Guide Figure 184 - Update Publication Server dialog box Step 3: Complete the fields in the dialog box according to your purpose for updating the server login file: If the publication server now runs on a host with a different IP address or port number than what is shown in the dialog box, enter the correct information. You must also enter the user name and password saved in the xDB Replication Configuration file that resides on the host identified by the IP address you entered in the Host field. Check the Save Login Information box if you want the new login information saved in the server login file, otherwise leave the box unchecked in which case, access to the publication server is available for the current session, but subsequent sessions will require you to register the publication server again. If you want to delete previously saved login information, make sure the network location shown in the dialog box is still correct. Re-enter the user name and password saved in the xDB Replication Configuration file that resides on the host identified by the IP address in the Host field. Leave the Save Login Information box unchecked. Access to the publication server is available for this session, but subsequent sessions will require you to register the publication server again. If you want to save the current login information shown in the dialog box, make sure the network location shown in the dialog box is correct. Re-enter the user name and password saved in the xDB Replication Configuration file that resides on the host identified by the IP address in the Host field. Check the Save Login Information box. Copyright © 2012 EnterpriseDB Corporation. All rights reserved. 258 Postgres Plus xDB Replication Server with Multi-Master User’s Guide Figure 185 - Updated publication server location Step 4: Click the Update button. If the dialog box closes, then the update to the server login file was successful. Click the Refresh icon in the xDB Replication Console tool bar to show the updated Publication Server node. If an error message appears after clicking the Update button, the server login file is not modified. Investigate and correct the cause of the error. Repeat steps 1 through 4. 7.5.1.2 Subscription Server Network Location Note: This section applies only to single-master replication systems. Part of the metadata stored for each publication server is the network location of subscription servers that manage subscriptions associated with the publication server’s publications. This network information enables the publication server to communicate with the subscription server. If the network location of a subscription server changes after subscriptions have been created, the publication server metadata must be updated with the new network location, otherwise a communication failure occurs between the publication server and the subscription server that is made apparent by the following message that appears when you open the xDB Replication Console. Copyright © 2012 EnterpriseDB Corporation. All rights reserved. 259 Postgres Plus xDB Replication Server with Multi-Master User’s Guide Figure 186 - Subscription server connection failure The following are the steps to update the subscription server network location within a publication server’s metadata. Step 1: The publication server whose metadata you want to change must be running. See Step 1 of Section 5.2.1 for directions on starting the publication server. Step 2: Click the secondary mouse button on the Publication Server node and choose Update Subscription Servers. The Update Subscription Servers dialog box appears. Note: If the error message box reappears, click the OK button and repeat Step 2. Copyright © 2012 EnterpriseDB Corporation. All rights reserved. 260 Postgres Plus xDB Replication Server with Multi-Master User’s Guide Figure 187 - Update Subscription Servers dialog box Step 3: Enter the new network location for each subscription server in the list whose network location has changed. Copyright © 2012 EnterpriseDB Corporation. All rights reserved. 261 Postgres Plus xDB Replication Server with Multi-Master User’s Guide Figure 188 - Updated subscription server location Step 4: Click the Update button. If the dialog box closes, then the update to the publication server’s metadata was successful. If an error message appears, investigate and correct the cause of the error. Repeat steps 1 through 4. Step 5: If the subscription server with the new network location manages subscriptions associated with publications in other publication servers, repeat steps 1 through 4 for these other publication servers. 7.5.2 Updating a Publication Database When you create a publication database definition, you save the publication database server’s network location (IP address and port number), the database identifier, a database login user name, and the user’s password in the xDB Control database used by the publication server. This login information is used whenever a session needs to be established with the publication database. See Section 5.2.2 for information on creating a publication database definition for a single-master replication system. See sections 6.2.2 and 6.3 for a multi-master replication system. Copyright © 2012 EnterpriseDB Corporation. All rights reserved. 262 Postgres Plus xDB Replication Server with Multi-Master User’s Guide The steps described in this section show you how to update the publication database login information stored in the xDB Control database should any of these attributes of the actual, physical database change. Note: Depending upon the database type (Oracle, SQL Server, or Postgres), certain attributes must not be changed. You must not change any attribute that alters access to the schema where the metadata database objects were created when you originally added this publication database definition. See Section 5.2.4 for the location of the metadata database objects. Attributes you must not change include the following: The Oracle login user name of an Oracle publication database as the metadata already resides in this Oracle user’s schema The database server network location if the new network location references a database server that does not access the publication database where the metadata database objects are stored The database identifier if the new database identifier references a different physical database than where the metadata database objects are stored Attributes you may change include the following: The login user name’s password to match a changed database user password The database server network location if the corresponding location change was made to the database server that accesses the publication database The database identifier such as the Oracle service name, SQL Server database name, or Postgres database name if the corresponding name change was made on the database server Step 1: Make sure the database server that you ultimately wish to save as the publication database definition is running and accepting client connections. Step 2: Make sure the publication server whose node is the parent of the publication database definition you wish to change is running and has been registered in the xDB Replication Console you are using. See Section 5.2.1 for directions on starting and registering a publication server. Step 3: Select the Publication Database node corresponding to the publication database definition that you wish to update. Copyright © 2012 EnterpriseDB Corporation. All rights reserved. 263 Postgres Plus xDB Replication Server with Multi-Master User’s Guide Figure 189 - Selecting a publication database definition for update Step 4: From the Publication menu, choose Publication Database, and then choose Update Database. Alternatively, click the secondary mouse button on the Publication Database node and choose Update Database. The Update Database Source dialog box appears. Step 5: Enter the desired changes. See Step 3 of Section 5.2.2 for the precise meanings of the fields for a single-master replication system. See sections 6.2.2 and 6.3 for a multimaster replication system. Figure 190 - Update Database Source dialog box for a single-master replication system Copyright © 2012 EnterpriseDB Corporation. All rights reserved. 264 Postgres Plus xDB Replication Server with Multi-Master User’s Guide Step 6: Click the Test button. If Test Result: Success appears, click the OK button, then click the Save button. Figure 191 - Successful publication database test If an error message appears investigate the cause of the error, correct the problem, and repeat steps 1 through 6. Step 7: Restart the publication server. See Section 5.2.1 for directions on restarting the publication server. Step 8: Click the Refresh icon in the xDB Replication Console tool bar to show the updated Publication Database node and any of its publications. Copyright © 2012 EnterpriseDB Corporation. All rights reserved. 265 Postgres Plus xDB Replication Server with Multi-Master User’s Guide Figure 192 - Updated publication database 7.5.3 Updating a Publication Existing publications can be updated in the following ways: Tables can be added to the publication Tables can be removed from the publication Filter clauses can be viewed, updated, or removed from publication tables 7.5.3.1 Adding Tables to a Publication For a single-master replication system, you can add tables to a publication, but only if there is no subscription associated with the publication. If there is an existing subscription, you have the following two choices – update the original publication by adding the additional tables or create a new publication and subscription to replicate the additional tables. For a multi-master replication system, you can add tables to a publication, even while there are additional master nodes in the replication system. Note: The following discussion applies only to single-master replication systems. To update the original publication by adding the additional tables, you must perform the following steps: Remove the subscription that is associated with the publication. See Section 5.5.4 for directions to remove a subscription. Remove the subscription tables from the subscription database. This is done with the SQL DROP TABLE statement in the database system. Add the tables to the publication. See the following steps in this section. Re-add the subscription. See Section 5.3.3 for directions to add a subscription. Copyright © 2012 EnterpriseDB Corporation. All rights reserved. 266 Postgres Plus xDB Replication Server with Multi-Master User’s Guide In the aforementioned method, the entire publication must be replicated after the new tables are added to the publication. If there are large subscription tables associated with the original publication that you do not want to delete and replicate again in their entirety, create a new publication and subscription containing only the additional tables that you want to replicate. Adding a second publication and subscription leaves your original publication and its subscription intact and unchanged. Perform the following to create a new publication and subscription for the additional tables. Add a new publication containing the additional tables under the same Publication Database node as the original publication. See Section 5.2.3 for directions to add a publication. Add a new subscription under the same Subscription Database node as the existing subscription that you do not want to remove. Associate the new subscription with the new publication. See Section 5.3.3 for directions to add a subscription. If your original publication and subscription use scheduled replication, you would probably want to add a schedule to the new publication and subscription. See Section 7.1 for directions to add a schedule. If you choose the method of adding the tables to the original publication, the following are the steps to add tables to an existing publication. Note: The following steps apply to multi-master replication systems as well. Step 1: Make sure the publication server whose node is the parent of the publication you wish to change is running and has been registered in the xDB Replication Console you are using. See Section 5.2.1 for directions on starting and registering a publication server. Step 2 (For SMR only): Select the Publication node of the publication to which you wish to add tables. Step 2 (For MMR only): Select the Publication node under the Publication Database node representing the master definition node. Copyright © 2012 EnterpriseDB Corporation. All rights reserved. 267 Postgres Plus xDB Replication Server with Multi-Master User’s Guide Figure 193 - Selecting a publication to which to add tables Step 3: Open the Add Tables dialog box in any of the following ways: From the Publication menu, choose Update Publication, then Add Tables. Click the secondary mouse button on the Publication node, choose Update Publication, and then choose Add Tables. Click the primary mouse button on the Add Publication Tables icon. Copyright © 2012 EnterpriseDB Corporation. All rights reserved. 268 Postgres Plus xDB Replication Server with Multi-Master User’s Guide Figure 194 - Opening the Add Tables dialog box Step 4: Fill in the following fields in the Add Tables tab of the Add Tables dialog box: Add. Check the boxes next to the table names from the Available Tables list that are to be added to the publication. If the publication is a snapshot-only publication, then views would appear in the Available Tables list as well. The Available Tables list contains only tables and views that are not already members of other publications under the same Publication Database node. Select All. Check this box if you want to include all tables and views in the Available Tables list in the publication. Copyright © 2012 EnterpriseDB Corporation. All rights reserved. 269 Postgres Plus xDB Replication Server with Multi-Master User’s Guide Figure 195 - Add Tables dialog box If you wish to omit certain rows of the publication tables or views from being replicated follow the directions in the next step to create a filter, otherwise go on to Step 6. Step 5 (For SMR only): If you want to filter the rows of the publication tables or views, click the Filter Clause tab. Enter an appropriate SQL WHERE clause in the text box next to a table or view to select the rows you want to replicate. In the following example, only rows where the deptno column contains 30 are included in replications. All other rows are excluded from replication. Copyright © 2012 EnterpriseDB Corporation. All rights reserved. 270 Postgres Plus xDB Replication Server with Multi-Master User’s Guide Figure 196 - Adding a filter clause Step 6 (For SMR only): Click the Add Tables button. If Publication Updated Successfully appears, click the OK button, otherwise investigate the error and make the necessary corrections. Copyright © 2012 EnterpriseDB Corporation. All rights reserved. 271 Postgres Plus xDB Replication Server with Multi-Master User’s Guide Figure 197 - Successfully added tables to publication Step 6 (For MMR only): Click the Add Tables button. The Data Sync Check dialog box appears warning you that synchronization replication is performed before the table is added. If you wish to perform synchronization at some later point in time then add the table, click the No button. If you wish to proceed, click the Yes button. If Publication Updated Successfully appears, click the OK button, otherwise investigate the error and make the necessary corrections. Copyright © 2012 EnterpriseDB Corporation. All rights reserved. 272 Postgres Plus xDB Replication Server with Multi-Master User’s Guide Figure 198 - Data Sync Check dialog box Step 7: The replication tree appears as follows with the newly added table under the Publication node. Figure 199 - Publication with added table Copyright © 2012 EnterpriseDB Corporation. All rights reserved. 273 Postgres Plus xDB Replication Server with Multi-Master User’s Guide 7.5.3.2 Removing Tables From a Publication You can remove one or more tables from a publication, but only if the following conditions are both true: There is no subscription associated with the publication. The tables to be removed are not parent tables referenced by foreign key constraints of child tables that are not selected for removal as well. Figure 200 - Entity relationship diagram of tables with foreign key constraints Copyright © 2012 EnterpriseDB Corporation. All rights reserved. 274 Postgres Plus xDB Replication Server with Multi-Master User’s Guide In the preceding entity relationship diagram, the emp table has a foreign key constraint referencing the dept table, and the jobhist table has two foreign key constraints. One constraint references the emp table and the other references the dept table. If all three tables are in the publication, then you can remove the following combinations of tables: Remove the jobhist table only. Remove both the jobhist table and the emp table. Step 1: Make sure the publication server whose node is the parent of the publication you wish to change is running and has been registered in the xDB Replication Console you are using. See Section 5.2.1 for directions on starting and registering a publication server. Step 2 (For SMR only): Select the Publication node of the publication from which you wish to remove tables. Step 2 (For MMR only): Select the Publication node under the Publication Database node representing the master definition node. Figure 201 - Selecting a publication from which to remove tables Step 3: Open the Remove Tables dialog box in any of the following ways: From the Publication menu, choose Update Publication, then Remove Tables. Copyright © 2012 EnterpriseDB Corporation. All rights reserved. 275 Postgres Plus xDB Replication Server with Multi-Master User’s Guide Click the secondary mouse button on the Publication node, choose Update Publication, and then choose Remove Tables. Click the primary mouse button on the Remove Publication Tables icon. Figure 202 - Opening the Remove Tables dialog box by clicking the toolbar icon Step 4: Check the boxes next to the table and view names from the Available Tables list that are to be removed from the publication. Copyright © 2012 EnterpriseDB Corporation. All rights reserved. 276 Postgres Plus xDB Replication Server with Multi-Master User’s Guide Figure 203 - Remove Tables dialog box Step 5: Click the Remove button, then click the Yes button of the confirmation box. Copyright © 2012 EnterpriseDB Corporation. All rights reserved. 277 Postgres Plus xDB Replication Server with Multi-Master User’s Guide Figure 204 - Remove Tables confirmation Step 6: Click the OK button in response to Tables Removed Successfully. Copyright © 2012 EnterpriseDB Corporation. All rights reserved. 278 Postgres Plus xDB Replication Server with Multi-Master User’s Guide Figure 205 - Successfully removed tables from publication The replication tree appears as follows without the removed table under the Publication node. Copyright © 2012 EnterpriseDB Corporation. All rights reserved. 279 Postgres Plus xDB Replication Server with Multi-Master User’s Guide Figure 206 - Publication minus removed table 7.5.3.3 Viewing the Filter Clause For SMR only: The filter clause on a publication table can be seen a couple of different ways. Step 1: Make sure the publication server whose node is the parent of the publication you wish to view is running and has been registered in the xDB Replication Console you are using. See Section 5.2.1 for directions on starting and registering a publication server. Step 2: Select the table whose filter clause you want to view. The filter clause appears in the General tab of the information window. Copyright © 2012 EnterpriseDB Corporation. All rights reserved. 280 Postgres Plus xDB Replication Server with Multi-Master User’s Guide Figure 207 - Selected table's filter clause displayed in the information window Alternate Step 2: Click the secondary mouse button on the Table node of the table whose filter clause you want to view and choose View Filter Clause. The Table Filter Clause window appears. Click the Close button when you have finished viewing. Copyright © 2012 EnterpriseDB Corporation. All rights reserved. 281 Postgres Plus xDB Replication Server with Multi-Master User’s Guide Figure 208 - Table Filter Clause window 7.5.3.4 Updating the Filter Clause For SMR only: A filter clause on a publication table can be added or modified. Step 1: Make sure the publication server whose node is the parent of the publication you wish to change is running and has been registered in the xDB Replication Console you are using. See Section 5.2.1 for directions on starting and registering a publication server. Step 2: Click the secondary mouse button on the Table node of the table whose filter clause you want to update and choose Update Filter Clause. The Table Filter Clause window appears. Step 3: Enter the text of a SQL WHERE clause to select the rows you want to replicate. Omit the WHERE keyword. Click the Validate button. Copyright © 2012 EnterpriseDB Corporation. All rights reserved. 282 Postgres Plus xDB Replication Server with Multi-Master User’s Guide Figure 209 - Validating a filter clause Step 4: If Validation Result: Passed appears, click the OK button. If Validation Result: Passed does not appear, investigate the error and make the necessary corrections. Copyright © 2012 EnterpriseDB Corporation. All rights reserved. 283 Postgres Plus xDB Replication Server with Multi-Master User’s Guide Figure 210 - Successful validation of filter clause Step 5: Click the Update button, and then click OK in response to Filter Clause Has Been Updated Successfully. Copyright © 2012 EnterpriseDB Corporation. All rights reserved. 284 Postgres Plus xDB Replication Server with Multi-Master User’s Guide Figure 211 - Successful update of filter clause Step 6: Close the Table Filter Clause dialog box. The updated filter clause appears in the General tab of the information window. Copyright © 2012 EnterpriseDB Corporation. All rights reserved. 285 Postgres Plus xDB Replication Server with Multi-Master User’s Guide Figure 212 - Updated filter clause 7.5.3.5 Removing a Filter Clause For SMR only: A filter clause on a publication table can be removed. Step 1: Make sure the publication server whose node is the parent of the publication you wish to change is running and has been registered in the xDB Replication Console you are using. See Section 5.2.1 for directions on starting and registering a publication server. Step 2: Click the secondary mouse button on the Table node of the table whose filter clause you want to remove and choose Remove Filter Clause. Copyright © 2012 EnterpriseDB Corporation. All rights reserved. 286 Postgres Plus xDB Replication Server with Multi-Master User’s Guide Figure 213 - Removing the filter clause from the selected table Step 3: Click the OK button in response to Filter Clause Has Been Removed Successfully. The filter clause no longer appears on the General tab of the information window. Copyright © 2012 EnterpriseDB Corporation. All rights reserved. 287 Postgres Plus xDB Replication Server with Multi-Master User’s Guide Figure 214 - Successful removal of the filter clause 7.5.4 Validating a Publication Once a publication is created, do not directly change the definitions of the tables belonging to the publication. Doing so may cause a failure during the replication process. Examples of table definitions that must not be altered include: Adding or removing columns to a table Renaming columns Changing the data types of columns Changing the lengths of columns Changing a not nullable column to nullable or a nullable column to not nullable Adding or removing uniqueness constraints Adding or removing check constraints In a single-master replication system, xDB Replication Server does not propagate table definition changes to the subscription tables once the subscription tables are created. Rows that may be allowed in an altered publication table may be illegal in the unaltered subscription table and will cause an error during replication. Similarly, in a multi-master replication system, table definition changes are not propagated from one master node to another except when a new master node is added, and you choose to replicate the schema definition from the master definition node. Copyright © 2012 EnterpriseDB Corporation. All rights reserved. 288 Postgres Plus xDB Replication Server with Multi-Master User’s Guide In addition, for synchronization replication, triggers are generated on the publication tables that use certain attributes of these tables. If the table definition is changed, the trigger may no longer function properly. Note: Do not change the triggers generated by xDB Replication Server. If it becomes necessary to regenerate the triggers, you must remove the associated publication and then recreate the publication. Note: Certain table definition changes can be made and propagated by xDB Replication Server by using the DDL change replication feature. See Section 7.6 for information on the DDL change replication feature. If you do not use the DDL change replication feature, then the following general steps must be taken if table definition changes are made. In a single-master replication system, if changes were made to the definitions of one or more publication tables, the resolution to the problem must be handled on a case by case basis as it depends upon the type of changes that were made. In the worst case scenario, the subscription and publication must be removed and recreated as follows: Remove the subscription that is associated with the publication. See Section 5.5.4 for directions to remove a subscription. Remove the subscription tables from the subscription database. This is done with SQL DROP TABLE statements in the database system. Remove the publication. See Section 7.5.5 for directions to remove a publication. Re-add the publication. See Section 5.2.3 for directions to add a publication. Re-add the subscription. See Section 5.3.3 for directions to add a subscription. In a multi-master replication system, if changes were made to the definitions of one or more publication tables on one or more master nodes, the resolution to the problem involves: Making sure the table definitions are updated on all master nodes so that they are identical, or updating the table definition on the master definition node so it can be replicated to the other master nodes. Recreating the publication database definitions of the master nodes. The general steps are the following: Remove the publication database definitions of all master nodes except for the master definition node. See Section 7.5.6 for directions to remove a publication database definition. Remove the publication. See Section 7.5.5 for directions to remove a publication. Remove the publication database definition of the master definition node. See Section 7.5.6 for directions to remove a publication database definition. Copyright © 2012 EnterpriseDB Corporation. All rights reserved. 289 Postgres Plus xDB Replication Server with Multi-Master User’s Guide At this point all of the triggers, shadow tables, and metadata have been removed from the master nodes. With respect to the publication table definitions, you can either: 1) update the table definitions on all master nodes so that they are identical, or 2) assume the table definitions on the master definition node are up-to-date, and delete the outof-date table definitions on all other master nodes. Re-add the publication database definition for the master definition node. See Section 6.2.2 for directions to add the master definition node. Re-add the publication. See Section 6.2.3 for directions to add a publication. Re-add additional master nodes. See Section 6.3 for directions to add an additional master node. When creating a master node, uncheck the Replicate Publication Schema check box if you have already created the table definitions on all master nodes. Check the Replicate Publication Schema check box if you want to propagate the table definitions from the master definition node to all other master nodes. A snapshot reloads the master node tables from the master definition node. 7.5.4.1 Validating a Single Publication xDB Replication Server provides a way to verify that certain characteristics of publication tables have not been altered since the publication was created. The validation operation described here and in Section 7.5.4.2 can check for the following types of table modifications: Addition of columns to a table Removal of columns from a table Renaming of columns Note: In a multi-master replication system, publication tables in only the master definition node are validated. The validation operation does not check if table definitions have changed in other master nodes. The following steps show how to validate a single publication: Step 1: Make sure the publication server whose node is the parent of the publication you wish to validate is running and has been registered in the xDB Replication Console you are using. See Section 5.2.1 for directions on starting and registering a publication server. Step 2 (For SMR only): Select the Publication node of the publication you want to validate. Step 2 (For MMR only): Select the Publication node under the Publication Database node representing the master definition node. Copyright © 2012 EnterpriseDB Corporation. All rights reserved. 290 Postgres Plus xDB Replication Server with Multi-Master User’s Guide Step 3: From the Publication menu, choose Validate Publication. Alternatively, click the secondary mouse button on the Publication node and choose Validate Publication. Figure 215 - Validating a selected publication Step 4: If All Schema of Published Tables in Publication 'publication_name' Are UpTo-Date appears, click the OK button. If an error appears, determine which tables were changed and what changes were made to the table definitions. These issues need to be resolved on a case by case basis as discussed earlier in this section. Copyright © 2012 EnterpriseDB Corporation. All rights reserved. 291 Postgres Plus xDB Replication Server with Multi-Master User’s Guide Figure 216 - Successful validation of all tables in the selected publication 7.5.4.2 Validating All Publications All publications under a single Publication Database node can be validated in one operation. Note: In a multi-master replication system, publication tables in only the master definition node are validated. The validation operation does not check if table definitions have changed in other master nodes. Step 1: Make sure the publication server whose node is the parent of the publications you wish to validate is running and has been registered in the xDB Replication Console you are using. See Section 5.2.1 for directions on starting and registering a publication server. Step 2 (For SMR only): Select the Publication Database node under which you want to validate all publications. Step 2 (For MMR only): Select the Publication Database node representing the master definition node. Step 3: From the Publication menu, choose Validate All Publications. Alternatively, click the secondary mouse button on the Publication Database node and choose Validate All Publications. Copyright © 2012 EnterpriseDB Corporation. All rights reserved. 292 Postgres Plus xDB Replication Server with Multi-Master User’s Guide Figure 217 - Validating all publications subordinate to a selected publication database Step 4: If there were no modified tables, click the OK button. Copyright © 2012 EnterpriseDB Corporation. All rights reserved. 293 Postgres Plus xDB Replication Server with Multi-Master User’s Guide Figure 218 - Successful validation of all tables in all publications subordinate to a selected publication database If there were modified tables, a list of publications that contain the modified tables is displayed. Determine which tables were changed and what changes were made to the table definitions. These issues need to be resolved on a case by case basis as discussed earlier in this section. Copyright © 2012 EnterpriseDB Corporation. All rights reserved. 294 Postgres Plus xDB Replication Server with Multi-Master User’s Guide Figure 219 - List of publications with modified tables 7.5.5 Removing a Publication In a single-master replication system, before a publication can be removed, its associated subscription must be removed first. See Section 5.5.4 for directions to remove a subscription. In a multi-master replication system, the publication is removed from under the Publication Database node representing the master definition node. Before a publication can be removed, all master nodes other than the master definition node must be removed. See Section 7.5.6 for directions to remove a publication database definition of a master node. Removing a publication does not delete the publication tables in the publication database. It removes the identity and association of these tables to xDB Replication Server so the tables remain in the database until the DBA deletes them with the DROP TABLE SQL statement. The publication database user name is also left intact along with some of the xDB Replication Server metadata database objects. Shadow tables and triggers associated with the publication tables that were created by the publication server are deleted when the publication is removed. The remaining metadata database objects are deleted when the publication database definition is removed. Copyright © 2012 EnterpriseDB Corporation. All rights reserved. 295 Postgres Plus xDB Replication Server with Multi-Master User’s Guide Step 1: Make sure the publication server whose node is the parent of the publication you wish to remove is running and has been registered in the xDB Replication Console you are using. See Section 5.2.1 for directions on starting and registering a publication server. Step 2 (For SMR only): Select the Publication node of the publication that you wish to remove. Step 2 (For MMR only): Select the Publication node under the Publication Database node representing the master definition node. Figure 220 - Selecting a publication to remove Step 3: Remove the publication in any of the following ways: Choose Remove Publication from the Publication menu. Click the secondary mouse button on the Publication node and choose Remove Publication. Click the primary mouse button on the Remove Publication icon. Copyright © 2012 EnterpriseDB Corporation. All rights reserved. 296 Postgres Plus xDB Replication Server with Multi-Master User’s Guide Figure 221 - Removing the publication using the menu bar Step 4: In the Remove Publication confirmation box, click the Yes button. Copyright © 2012 EnterpriseDB Corporation. All rights reserved. 297 Postgres Plus xDB Replication Server with Multi-Master User’s Guide Figure 222 - Remove Publication confirmation The Publication node no longer appears under the Publication Database node. Figure 223 - Replication tree after removing a publication Copyright © 2012 EnterpriseDB Corporation. All rights reserved. 298 Postgres Plus xDB Replication Server with Multi-Master User’s Guide 7.5.6 Removing a Publication Database Deleting a publication database definition from xDB Replication Server is equivalent to removing its Publication Database node. In a single-master replication system, before a Publication Database node can be removed, all publications under that Publication Database node must be removed. See Section 7.5.5 for directions on removing a publication. In a multi-master replication system, removing a Publication Database node representing a master node (other than the master definition node), eliminates that node’s future participation in the replication system. Synchronization replications no longer involve tables in the removed master node. In a multi-master replication system, removing the Publication Database node representing the master definition node removes the remaining metadata database objects of that particular multi-master replication system, effectively removing the multi-master replication system (except for the database objects comprising the publication tables). Removing the Publication Database node representing the master definition node entails the following steps: All Publication Database nodes representing master nodes other than the master definition node must be removed. Repeat the process described in this section for each such master node. The publication under the Publication Database node representing the master definition node must be removed. See Section 7.5.5 for directions on removing a publication. Remove the Publication Database node representing the master definition node using the process described in this section. Removing a Publication Database node does not delete the physical database from the database server. It removes the identity and association of the database to xDB Replication Server so no further replications can originate from tables in the database unless there are other publication database definitions in xDB Replication Server with the same host and database identifier. The physical database can only be removed using the database management system’s database removal procedures. The publication database user name is also left intact. All xDB Replication Server metadata database objects created for that publication database definition are deleted. For Oracle and SQL Server: All metadata database objects under the publication database user’s schema are deleted. Copyright © 2012 EnterpriseDB Corporation. All rights reserved. 299 Postgres Plus xDB Replication Server with Multi-Master User’s Guide For Postgres only: The schema _edb_replicator_pub and all of its database objects are deleted from the publication database. The following are the steps to remove the Publication Database node and equivalently, the publication database definition: Step 1: Make sure the publication server whose node is the parent of the publication database definition you wish to remove is running and has been registered in the xDB Replication Console you are using. See Section 5.2.1 for directions on starting and registering a publication server. Step 2: Select the Publication Database node that you wish to remove. Figure 224 - Selecting a publication database definition for removal Step 3: From the Publication menu, choose Publication Database, then Remove Database. Alternatively, click the secondary mouse button on the Publication Database node and choose Remove Database. The Remove Publication Database confirmation box appears. Step 4: In the Remove Publication Database confirmation box, click the Yes button. Copyright © 2012 EnterpriseDB Corporation. All rights reserved. 300 Postgres Plus xDB Replication Server with Multi-Master User’s Guide Figure 225 - Remove Publication Database confirmation The Publication Database node no longer appears under the Publication Server node. Figure 226 - Replication tree after removing a publication database Copyright © 2012 EnterpriseDB Corporation. All rights reserved. 301 Postgres Plus xDB Replication Server with Multi-Master User’s Guide 7.6 Replicating DDL Changes Once a replication system has been created and is in operation, there may be occasions where it is necessary to make changes to the publication table definitions. These data definition language (DDL) changes may include the following: Adding new columns to a table Renaming existing columns Modifying a column data type Modifying a column constraint Removing columns The changes described are generally accomplished using the SQL ALTER TABLE statement, which is issued in an SQL command line utility program such as PSQL. The DDL change replication feature accepts a text file containing one or more ALTER TABLE statements. The DDL change replication feature then performs the following actions: Applies the ALTER TABLE statements to the appropriate target table in the publication and subscription databases of a single-master replication system, or in all master nodes (including the master definition node) of a multi-master replication system. Modifies the insert/update/delete triggers that add data into the shadow table whenever a transaction occurs on the target table. Modifies the shadow table to properly accommodate the target table changes. Note: Currently, the DDL change replication feature supports only the addition of new columns to a table. The syntax of the ALTER TABLE statement that can be used is as follows: ALTER TABLE schema.table_name ADD COLUMN column_name data_type [ DEFAULT dflt_expr ] [ column_constraint_1 [ column_constraint_2 ] ...] The following restrictions apply to the ALTER TABLE statements contained in the text file. Each ALTER TABLE statement in the text file must be terminated by a semicolon and begin on a separate line. There may be only one ADD COLUMN clause per ALTER TABLE statement. Within a given text file, the target table of all ALTER TABLE statements must be the same. Copyright © 2012 EnterpriseDB Corporation. All rights reserved. 302 Postgres Plus xDB Replication Server with Multi-Master User’s Guide Parameters schema The name of the schema containing table_name. This value is case-sensitive. table_name The name of the table to which the column is to be added. This value is casesensitive. column_name The name of the column to be added. data_type The data type of the new column. dflt_expr An expression for the default value of the column. column_constraint_n A column constraint such as a UNIQUE or CHECK constraint. Examples The following are examples of ALTER TABLE statements that can be used by the DDL change replication feature. The following example adds a column named title to the edb.emp table. ALTER TABLE edb.emp ADD COLUMN title VARCHAR2(20); The following example adds a column named gender with a CHECK constraint. ALTER TABLE edb.emp ADD COLUMN gender CHAR(1) CHECK(gender IN ('M', 'F')); The DDL change replication feature can be invoked from either the xDB Replication Console (see Section 7.6.2) or the xDB Replication Server CLI (see Section 8.3.25). The next section describes the process that occurs during DDL change replication. Copyright © 2012 EnterpriseDB Corporation. All rights reserved. 303 Postgres Plus xDB Replication Server with Multi-Master User’s Guide 7.6.1 DDL Change Replication Process The DDL statement is executed in a controlled manner such that the target table is exclusively locked (by the default setting of configuration option ddlChangeTableLock) during the course of the operation. This is done to avoid loss of any transactions while the replication triggers and shadow table are modified by the DDL change replication process. Only one target table is locked at a time while DDL change replication takes place on that table, its triggers, and shadow table. If there is a backlog of pending transactions, it is recommended to perform an explicit synchronization replication before performing DDL change replication to avoid prolonging the DDL change replication process for a longer period of time. DDL change replication should be performed when the OLTP rate is very low (near zero). Note: Exclusive acquisition of each target table during the DDL change replication process can be turned off by setting ddlChangeTableLock to false. However, this should be done only when there are no write transactions taking place against the target table, otherwise transactions may not be recorded by the replication system. See Section 9.3.1.9 for addition information on the ddlChangeTableLock configuration option. The following is the series of steps that occur during the DDL change replication process. The publication server performs a health check across all databases in the replication system to ensure they can be accessed. If any database is not available the DDL change replication process is aborted with a notification to the user. If the publication server configuration option ddlChangeTableLock is set to its default value of true, an exclusive table lock is requested on the table to which the DDL change is to be applied. If another application already has a lock on the table, there is a wait time of 2 minutes after which the DDL change replication process is aborted if the lock is not released before then. If ddlChangeTableLock is set to false, an exclusive table lock is not requested. The DDL statement is executed against the target table. The replication triggers and shadow table are modified accordingly. If an error occurs, the user is informed and the operation is aborted. If ddlChangeTableLock is set to true, the exclusive lock is released. The preceding two bullet points are repeated on the target table for each database in the replication system. The in-memory table metadata definition is refreshed to reflect the DDL change. The user is informed of successful completion of the operation. If an error occurs during the prior steps, any changes up to that point are rolled back so that the publication table, replication triggers, and shadow table are reverted back to their original state prior to the start of this operation. If one or more databases goes down before completion of the operation, the publication is marked as dirty to avoid further replication events. Copyright © 2012 EnterpriseDB Corporation. All rights reserved. 304 Postgres Plus xDB Replication Server with Multi-Master User’s Guide The following section describes how to initiate DDL change replication using the xDB Replication Console. 7.6.2 DDL Change Replication Using the xDB Replication Console DDL change replication can be applied using the xDB Replication Console as follows. Step 1: Prepare the text file containing the ALTER TABLE statements you wish to apply to a publication table. Make sure this text file is accessible by the operating system account with which you will open the xDB Replication Console. Step 2: Make sure the publication server whose node is the parent of the publication containing the table you wish to change is running and has been registered in the xDB Replication Console you are using. See Section 5.2.1 for directions on starting and registering a publication server. Step 3: Open the Alter Publication Table dialog box by clicking the secondary mouse button on the Table node of the table to be modified and choose Alter Table. Figure 227 - Selecting a table to alter Step 4: In the Alter Publication Table dialog box, browse for the text file containing the ALTER TABLE statements and click the OK button. Copyright © 2012 EnterpriseDB Corporation. All rights reserved. 305 Postgres Plus xDB Replication Server with Multi-Master User’s Guide Figure 228 - Alter Publication Table dialog box Step 5: If the DDL replicated successfully message box appears, the DDL change was successful across all databases. Click the OK button. Figure 229 - DDL replicated successfully If DDL replication was not successful, the problem must be investigated and resolved on a case by case basis. Factors to look for include the following: Were the modifications in the ALTER TABLE statements successfully applied to the target table in each database of the replication system? Copyright © 2012 EnterpriseDB Corporation. All rights reserved. 306 Postgres Plus xDB Replication Server with Multi-Master User’s Guide Were the replication triggers on the target table modified to account for the ALTER TABLE statements? Was the shadow table RRST_schema_table located in the _edb_replicator_pub schema in each database of the replication system modified to account for the ALTER TABLE statements? If it is apparent that the replication system is not in a consistent state regarding the table definitions, see the beginning of Section 7.5.4 for guidance on how to deal with such issues. 7.7 Loading Tables From an External Data Source (Offline Snapshot) There may be circumstances when you want to initially load your target tables (subscription tables of a single-master replication system, or master nodes other than the master definition node of a multi-master replication system) using a method other than the snapshot replication functionality of xDB Replication Server. This is referred to as using an offline snapshot. For example, you might initially load the tables by running the Migration Toolkit from the command line or by using a backup from an external data source. When you load the target tables using an offline snapshot, special preparations must be taken to account for the following deviations from the default target table creation and loading process: In the typical, default scenario xDB Replication Server creates the target table definitions when you define the subscription in a single-master replication system, or add an additional master node in a multi-master replication system. When using an offline snapshot, creation of the target table definitions is expected to be your responsibility. You must therefore prevent xDB Replication Server from creating the target table definitions. In the typical, default scenario xDB Replication Server performs synchronization replication using batches of SQL statements. If any statement in a batch results in an error, all statements in the batch are rolled back. When using an offline snapshot, if there is the possibility that the external data source used to load the target tables already has transactions applied to it that are also recorded in the shadow tables of the source tables, then you must perform the first synchronization replication in non-batch mode. This is because the batch of synchronization transactions may include SQL statements that have already been applied to the target, which may result in a statement failure in certain cases. This section discusses how to deal with the preceding two points for both a single-master and a multi-master replication system. Copyright © 2012 EnterpriseDB Corporation. All rights reserved. 307 Postgres Plus xDB Replication Server with Multi-Master User’s Guide First, non-batch mode synchronization and why it must be used in certain cases is explained in more detail in the following section. 7.7.1 Non-Batch Mode Synchronization Synchronization replications are done in batches of updates, each batch committed in a separate transaction. Therefore if any single update in a batch fails, all the updates in the batch are rolled back. This process has the following implications. Prior to and during the time when the offline snapshot is in progress, there may be updates to the source tables, which are recorded in the source tables’ shadow tables. After the offline snapshot completes, there may be additional updates to the source tables that are also recorded in the shadow tables. Since xDB Replication Server has no knowledge of the external data source used to load the target tables, it is unknown to xDB Replication Server whether or not any of the updates made to the source tables during or after the offline snapshot, have already been included in the data used to load the target tables. As a result, the shadow tables may include a mixture of duplicate updates that have already been applied to the target tables, as well as new updates that have not been applied to the target tables. If you then perform synchronization replication, the publication server attempts to apply all updates recorded in the shadow tables in batches. If one of the updates had been an insertion of a new row, and this new row is already in the target table loaded from the offline snapshot, a duplicate key error results when the publication server attempts to apply the batch containing the INSERT statement for this row. The duplicate key error forces the rollback of the entire batch. This causes the exclusion of updates in the batch that may not yet have been carried over to the target tables. The source tables and target tables are now inconsistent since there were updates to the source tables that have not been applied to the target tables. Note: The effects of applying UPDATE and DELETE statements in the batch to a target table that already has been changed by these updates does not cause the same problem as repeated application of INSERT statements. The UPDATE statement would just change the row to the same values a second time. When a DELETE statement affects no rows, this is not considered an error by the database server, and therefore, no rollback of the batch occurs. The solution to the potential rollback of a batch is to apply the shadow table updates in non-batch mode. That is, each SQL statement is individually committed. In that way, if an insertion of a row fails due to a duplicate key error, that statement alone is rolled back. Copyright © 2012 EnterpriseDB Corporation. All rights reserved. 308 Postgres Plus xDB Replication Server with Multi-Master User’s Guide The error does not affect the other shadow table updates that must be applied since all updates are enclosed within their own, individual transactions. The batchInitialSync configuration option controls whether the first synchronization replication occurs in batch or non-batch mode. If you are using an offline snapshot to add a subscription or an additional master mode in an active replication system where updates are occurring to the source tables and transactions are thus accumulating in the shadow tables, it is advisable to set batchInitialSync to false to perform the first synchronization replication in nonbatch mode. If you are using offline snapshots to initially create the entire replication system that has yet to be activated, and the content of the offline snapshots are all assumed to be consistent for the source and target tables, then batchInitialSync can be left with its default setting of true since it is assumed that the first synchronization replication will not apply any duplicate updates. 7.7.2 Offline Snapshot Configuration Options The following are the configuration options that you need to modify when using an offline snapshot. Note: These options apply to the publication server only. offlineSnapshot The offlineSnapshot option must be set to true before creating the subscription for a single-master replication system, or before adding the master node for a multi-master replication system. offlineSnapshot={true | false} The default value is false. When set to true, the offlineSnapshot option prevents the usual creation of the subscription schema and table definitions when the subscription is defined in a singlemaster replication system since it is assumed that you are creating the subscription table definitions and loading them from an external source other than the publication. When adding the master node in a multi-master replication system, leave the Replicate Publication Schema and Perform Initial Snapshot boxes unchecked (see Section 6.3). When offlineSnapshot is set to true, this has the direct effect within the xDB Control database in schema _edb_replicator_pub, of setting column has_initial_snapshot to a value of O indicating an offline snapshot is used for the Copyright © 2012 EnterpriseDB Corporation. All rights reserved. 309 Postgres Plus xDB Replication Server with Multi-Master User’s Guide target subscription or master node represented by the row. Column has_initial_snapshot is set in table erep_publication_subscriptions for a single-master replication system and in table erep_mmr_pub_group for a multi-master replication system. The setting of has_initial_snapshot influences the behavior of the batchInitialSync option as explained in the following section. After the first replication completes to the target subscription or master node, has_initial_snapshot is changed to Y by xDB Replication Server. batchInitialSync The batchInitialSync option is used to control whether the first synchronization after loading the target tables from an offline snapshot is done in batch mode (the default) or non-batch mode. Set the batchInitialSync option to false to perform synchronization replication in non-batch mode. The offlineSnapshot configuration option must have first been set to true prior to creating the subscription or adding the additional master node. A non-batch mode synchronization occurs only if batchInitialSync is false and the has_initial_snapshot column in the xDB Control database is set to a value of O as described for the offlineSnapshot option. batchInitialSync={true | false} The default value is true. 7.7.3 Single-Master Replication Offline Snapshot An offline snapshot can be used to initially load the subscription tables of a single-master replication system. For a publication that is intended to have multiple subscriptions, it is possible to create some of the subscriptions using the default xDB Replication Server snapshot replication process as described in Section 5.4.1, while other subscriptions can be created from an offline snapshot. The following steps describe how to create a subscription from an offline snapshot. Step 1: Register the publication server, add the publication database definition, and create the publication as described in Section 5.2. Step 2: Register the subscription server and add the subscription database definition as described in sections 5.3.1 and 5.3.2, respectively. Copyright © 2012 EnterpriseDB Corporation. All rights reserved. 310 Postgres Plus xDB Replication Server with Multi-Master User’s Guide Note: Steps 3 and 4 must be performed before creating the subscription. Steps 3 through 9 can be repeated each time you wish to create an additional subscription from an offline snapshot. Step 3: Modify the publication server configuration file if these options are not already set as described by the following: Change the offlineSnapshot option to true. When the publication server is restarted, offlineSnapshot set to true has the effect that: 1) creating a subscription does not create the schema and subscription table definitions in the subscription database as is done with the default setting, and 2) creating a subscription sets a column in the xDB Control database indicating an offline snapshot is used to load this subscription. Set the batchInitialSync option to the appropriate setting for your particular situation as discussed at the end of Section 7.7.1. Step 4: Restart the publication server if the publication server configuration file was modified in Step 3. See Section 5.2.1 for directions on restarting a publication server. Step 5: In the subscription database, create the schema, the subscription table definitions, and load the subscription tables from your offline data source. The subscription database user name used in Section 5.3.2 must have full privileges over the database objects created in this step. Also review the beginning of Section 5.3.2 regarding the rules as to how xDB Replication Server creates the subscription definitions from the publication for each database type as you must follow these same conventions when you create the target definitions manually. Step 6: Add the subscription as described in Section 5.3.3. Step 7: Perform an on demand synchronization replication. See Section 5.4.2 for directions on performing an on demand synchronization replication. Step 8: If you are not planning to load any other subscriptions using an offline snapshot at this time, change the offlineSnapshot option back to false and the batchInitialSync option to true in the publication server configuration file. Step 9: Restart the publication server if you modified the publication server configuration file in Step 8. 7.7.4 Multi-Master Replication Offline Snapshot An offline snapshot can be used to initially load the master nodes of a multi-master replication system. It is possible to load some of the master nodes using the xDB Replication Server snapshot replication functionality when defining the master node as described in Section 6.3 or by using an on demand snapshot as described in Section 6.5.1, while other master nodes can be loaded from an offline snapshot. Copyright © 2012 EnterpriseDB Corporation. All rights reserved. 311 Postgres Plus xDB Replication Server with Multi-Master User’s Guide The following steps describe how to create a master node from an offline snapshot. Step 1: Register the publication server, add the master definition node, and create the publication as described in Section 6.2. Note: The following steps must be performed before adding a master node that is to be loaded by an offline snapshot. Steps 2 through 10 can be repeated each time you wish to create an additional master node from an offline snapshot. Step 2: If you are adding a master node to an active replication system with an enabled schedule, remove the schedule for the duration of the following steps. See Section 7.2.2 for directions on removing a schedule. Step 3: Modify the publication server configuration file if these options are not already set as described by the following: Change the offlineSnapshot option to true. When the publication server is restarted, offlineSnapshot set to true has the effect that adding a master node sets a column in the xDB Control database indicating an offline snapshot is used to load this master node. Set the batchInitialSync option to the appropriate setting for your particular situation as discussed at the end of Section 7.7.1. Step 4: Restart the publication server if the publication server configuration file was modified in Step 3. See Section 5.2.1 for directions on restarting a publication server. Step 5: In the database to be used as the new master node, create the schema, the table definitions, and load the tables from your offline data source. Step 6: Add the master node as described in Section 6.3 with options Replicate Publication Schema and Perform Initial Snapshot unchecked. Step 7: Perform an initial on demand synchronization. See Section 6.5.2 for directions on performing an on demand synchronization. Step 8: If you are not planning to load any other master nodes using an offline snapshot at this time, change the offlineSnapshot option back to false and the batchInitialSync option to true in the publication server configuration file. Step 9: Restart the publication server if you modified the publication server configuration file in Step 8. Step 10: Re-add the schedule if one had been removed in Step 2. See Section 7.1 for directions on creating a schedule. Copyright © 2012 EnterpriseDB Corporation. All rights reserved. 312 Postgres Plus xDB Replication Server with Multi-Master User’s Guide 8 xDB Replication Server Command Line Interface This chapter discusses the syntax and usage of the xDB Replication Server Command Line Interface (CLI). This utility program is a command line driven alternative to the xDB Replication Console. The steps for creating a replication system using the xDB Replication Server CLI are no different than those required when using the xDB Replication Console. The logical components of the replication system must be created in the same order, with the same sets of attributes as when creating the replication system with the xDB Replication Console. You should understand the concepts and steps presented in chapters 2, and 5 (for singlemaster replication) or 6 (for multi-master replication) before building a replication system using the xDB Replication Server CLI. There are no restrictions on using both the xDB Replication Console and the xDB Replication Server CLI to build and manage the same replication system. In this chapter, the syntax and examples are given for each xDB Replication Server CLI command. Where applicable, the discussion of a command contains a reference back to its xDB Replication Console counterpart where a detailed description of the affected component and its attributes can be found. 8.1 Prerequisite Steps This section describes the installation and setup required prior to using the xDB Replication Server CLI. The xDB Replication Server CLI is included if the xDB Replication Console component is chosen when installing xDB Replication Server. The xDB Replication Server CLI is a Java application found in directory XDB_HOME/bin. Step 1: Follow the installation steps given in Chapter 3 to install xDB Replication Server. Step 2: Follow the prerequisite steps given in Section 5.1 for single-master replication systems or Section 6.1 for multi-master replication systems. Step 3: Set the Java Runtime Environment as described by the following discussion. On the host from which you intend to run the xDB Replication Server CLI, the Java Runtime Environment (JRE) must be present and the Java runtime bin directory must be Copyright © 2012 EnterpriseDB Corporation. All rights reserved. 313 Postgres Plus xDB Replication Server with Multi-Master User’s Guide included in the path of the operating system user name that will be used to run xDB Replication Server CLI. A Java Runtime Environment is provided with each installation of Advanced Server. The Java Runtime Environment is located in directory POSTGRES_INSTALL_HOME/jre, so can you include POSTGRES_INSTALL_HOME/jre/bin in your path. For example, on Linux systems enter the following on the command line or add it to your profile: export PATH=/opt/PostgresPlus/9.1AS/jre/bin:$PATH On Windows systems, open the Properties dialog box of My Computer, choose Advanced System Settings, and then click on Environment Variables. Edit the Path system environment variable to include the Java Runtime Environment bin directory. Alternatively, you can set the path for just the current session when you open the Command Prompt window as in the following example: SET Path=C:\Program Files\PostgresPlus\9.1AS\jre\bin;%Path% Note: For a PostgreSQL installation, you must perform the same process as previously described, but using the location of where you installed the Java Runtime Environment. 8.2 General Usage This section explains the general usage rules for the xDB Replication Server CLI. 8.2.1 Running xDB Replication Server CLI You can run the xDB Replication Server CLI from any host on which you can run the xDB Replication Console. The xDB Replication Server CLI is run by executing the java runtime program and specifying the following arguments to the java program: The path to the xDB Replication Server CLI jar file edb-repcli.jar An xDB Replication Server CLI command One or more publication names or subscription names if the command acts on a publication or subscription Parameters and their values that are applicable to the command The Java jar file edb-repcli.jar is located in directory XDB_HOME/bin. Each xDB Replication Server CLI command has the following general syntax: -command [ { pubname | subname } ...] [ -parameter [ value ] ...] ... In the preceding syntax diagram, command is the name of an xDB Replication Server CLI command. The command name must be prefixed by a hyphen character (-). If the Copyright © 2012 EnterpriseDB Corporation. All rights reserved. 314 Postgres Plus xDB Replication Server with Multi-Master User’s Guide command acts on a publication, the name of the publication represented by pubname is specified. If the command acts on a subscription, the subscription name represented by subname is specified. Certain commands may allow the specification of more than one publication name or more than one subscription name. Depending upon the command, one or more parameters may follow. Each parameter name must have a hyphen prefix. You may need to specify one or more values for each given parameter. If a command takes more than one parameter, the order in which the parameters are specified makes no difference. Each parameter must be followed only by the values that pertain to it. Command names and parameter names are all case sensitive and must be given as shown in Section 8.3. The general, complete, execution syntax that you enter at the command line prompt has the following format: java -jar XDB_HOME/bin/edb-repcli.jar -command [ { pubname | subname } ...] [ -parameter [ value ] ...] ... The preceding syntax must be entered as one logical line on the command line. It is broken up into multiple lines in the preceding syntax diagram for the purpose of clarity. Note: You can continue a command onto the next physical line if you enter the operating system’s continuation character (for example, the backslash character (\) in Linux or the caret character (^) in Windows) before pressing the Enter key. 8.2.2 Getting Help If you execute the xDB Replication Server CLI with the help command, xDB Replication Server CLI will list a syntax summary of all commands. See Section 8.3.1 for details on the help command. 8.2.3 Supplying the Publication or Subscription Server Login Information This section discusses the syntax and usage of an xDB Replication Server CLI parameter, required by many commands, named repsvrfile. Using parameter repsvrfile is the xDB Replication Server CLI equivalent for the process of registering the publication server or the subscription server in the xDB Replication Console. Copyright © 2012 EnterpriseDB Corporation. All rights reserved. 315 Postgres Plus xDB Replication Server with Multi-Master User’s Guide Section 5.2.1 discusses how the first step in building a replication system is to register the publication server. In the xDB Replication Console, the registered publication server appears as a node in the replication tree. The Publication Server node provides a context to which you can add other logical components of the replication system. When using the xDB Replication Server CLI, there is no replication tree image available with which to relate the other logical components of the replication system. Instead, whenever you execute an xDB Replication Server CLI command that requires the context of a publication server or subscription server, you must specify the publication server’s login information or the subscription server’s login information by means of the repsvrfile parameter. The repsvrfile parameter takes as its value, the path to a text file that contains the login information of either the publication server instance or the subscription server instance that you want to use. The general xDB Replication Server CLI command syntax including the repsvrfile parameter is shown in the following diagram: -command [ [ [ [ { pubname | subname } ...] -parameter [ value ] ...] ... -repsvrfile repsvrfile ] -parameter [ value ] ...] ... The xDB Replication Server CLI command to be executed is represented by command. If required, publication names represented by pubname or subscription names represented by subname are specified next. The path to the text file containing either the publication server or subscription server login information is represented by repsvrfile. The parameters and their values that are used with command are denoted by parameter and value. The order on the command line in which -repsvrfile repsvrfile and -parameter and its values are given does not matter. For example, -repsvrfile repsvrfile can be given as the first parameter on the command line, the last parameter on the command line, or somewhere in between other parameters. The following is an example of repsvrfile for a publication server: host=localhost port=9051 user=enterprisedb # Password is in encrypted form. password=ygJ9AxoJEX854elcVIJPTw== The following is an example of repsvrfile for a subscription server: host=localhost port=9052 user=enterprisedb # Password is in encrypted form. password=ygJ9AxoJEX854elcVIJPTw== Copyright © 2012 EnterpriseDB Corporation. All rights reserved. 316 Postgres Plus xDB Replication Server with Multi-Master User’s Guide These files can be located in any directory as long as they can be read by the operating system user running the xDB Replication Server CLI. In your file, be sure to replace the values of the following fields with the values for your publication server or subscription server: Host Port User Password This is the same information with which you would need to register the publication server or subscription server if you were using the xDB Replication Console. See Section 5.2.1 for additional information on registering the publication server. See Section 5.3.1 for information on registering the subscription server. The following example illustrates how the repsvrfile parameter is used along with the printpublist command. $ java -jar edb-repcli.jar -printpublist -repsvrfile ~/pubsvrfile.prop Printing publications ... analysts_managers dept_emp emp_pub 8.2.4 Using Encrypted Passwords in Text Files When using the xDB Replication Server CLI, text files are used to store certain information, which may include user names and passwords. An example is the files containing publication server and subscription server login information used with the repsvrfile parameter. In the file specified with parameter repsvrfile, the password field must be set to a password in encrypted form. Using an encrypted password prevents unauthorized personnel from accessing the publication server or subscription server using the values of user and password if the file was somehow compromised. (The encrypted password cannot be used to access the publication server or subscription server from its dialog box in the xDB Replication Console.) See Section 8.3.4 for directions on generating an encrypted password using the encrypt command. 8.2.5 Running xDB Replication Server CLI Using a Parameter File The paramfile command allows you to run an xDB Replication Server CLI command and its parameters that have been coded into a text file. This technique is useful if you want to save the command and its parameters for repeated executions. Copyright © 2012 EnterpriseDB Corporation. All rights reserved. 317 Postgres Plus xDB Replication Server with Multi-Master User’s Guide The syntax for executing paramfile is shown by the following: java -jar XDB_HOME/bin/edb-repcli.jar -paramfile cmdparamfile The syntax of the xDB Replication Server CLI command and its parameters coded into text file cmdparamfile is the same as if given at the command line prompt as shown by the following: -command [ [ [ [ { pubname | subname } ...] -parameter [ value ] ...] ... -repsvrfile repsvrfile ] -parameter [ value ] ...] ... Using the paramfile command has the following restrictions: Only one xDB Replication Server CLI command can be coded into the parameter file cmdparamfile. The parameters to be used with the xDB Replication Server CLI command must all be included in cmdparamfile. You cannot code some of the parameters into cmdparamfile and give other parameters on the command line. The following example creates an Advanced Server publication database definition using a parameter file named addpubdb_advsvr. The following is the content of parameter file addpubdb_advsvr: -addpubdb -repsvrfile /home/user/pubsvrfile.prop -dbtype enterprisedb -dbhost 192.168.2.4 -dbport 5444 -dbuser pubuser -dbpassword ygJ9AxoJEX854elcVIJPTw== -database edb -repgrouptype s Note: Unlike entering the xDB Replication Server CLI command and its parameters directly at the command line prompt, when coded into a text file, no continuation characters are needed to continue onto the following lines. The following shows the execution of the paramfile command: $ java -jar edb-repcli.jar -paramfile ~/addpubdb_advsvr Adding Publication Database... Publication database added successfully. Publication Database id:1 Copyright © 2012 EnterpriseDB Corporation. All rights reserved. 318 Postgres Plus xDB Replication Server with Multi-Master User’s Guide 8.3 xDB Replication Server CLI Commands This section provides a description, syntax diagram, and examples of each xDB Replication Server CLI command. Commands are presented in the order in which they will typically be used, following the order in which xDB Replication Console operations are performed. Note: Though most commands described in this section apply to both single-master and multi-master replication systems, those commands that apply only to single-master replication systems are noted with For SMR only. Those commands that apply only to multi-master replication systems are noted with For MMR only. The same notation is used for command parameters that may apply only to single-master replication systems or multi-master replication systems. For the examples used in this section, it is assumed that the xDB Replication Server CLI commands are executed after you have made XDB_HOME/bin your current working directory, thereby eliminating the need to specify the full path of XDB_HOME/bin for each execution of the edb-repcli.jar file. For example, assuming xDB Replication Server is installed in your Postgres installation directory (that is, XDB_HOME is the same directory as POSTGRES_INSTALL_HOME) you have issued the following command in Linux: cd /opt/PostgresPlus/9.1AS/bin In Windows, the equivalent is the following: cd C:\Program Files\PostgresPlus\9.1AS\bin Whenever the repsvrfile parameter appears in the examples, file ~/pubsvrfile contains the publication server login information and is located in the user’s home directory while ~/subsvrfile contains the subscription server login information. The examples in this section were run on Linux so you will see use of the Linux continuation character, which is a backslash (\), to show how an xDB Replication Server CLI command can be continued onto the next line if you do not want to wrap the text in your terminal window. For Windows, use the Windows continuation character, which is a caret (^). 8.3.1 Getting Help (help) The help command provides a syntax summary of all xDB Replication Server CLI commands. Synopsis Copyright © 2012 EnterpriseDB Corporation. All rights reserved. 319 Postgres Plus xDB Replication Server with Multi-Master User’s Guide -help Examples $ java -jar edb-repcli.jar -help Usage: java -jar edb-repcli.jar [OPTIONS] Where OPTIONS include: -help Prints out Replication CLI command-line usage -version Prints out Replication CLI version -encrypt -input <file> -output <file> Encrypts input file to output file -repversion -repsvrfile <file> Prints Replication Server version . . . 8.3.2 Printing the Version Number (version) The version command provides the xDB Replication Server CLI’s version number. Synopsis -version Examples $ java -jar edb-repcli.jar -version Version: 1.1 8.3.3 Printing the xDB Replication Server Version Number (repversion) The repversion command provides the xDB Replication Server’s version number. Synopsis -repversion -repsvrfile pubsvrfile Parameters pubsvrfile The file containing the publication server login information. Examples $ java -jar edb-repcli.jar -repversion -repsvrfile ~/pubsvrfile.prop Build 57l Copyright © 2012 EnterpriseDB Corporation. All rights reserved. 320 Postgres Plus xDB Replication Server with Multi-Master User’s Guide 8.3.4 Encrypting Passwords (encrypt) The encrypt command encrypts the text supplied in an input file and writes the encrypted result to a specified output file. Use the encrypt command to generate an encrypted password that can be copied into a text file that will be referenced by an xDB Replication Server CLI command that requires a user name and the user’s password. Synopsis -encrypt –input infile –output pwdfile The text in infile is processed using the MD5 encryption algorithm, and the encrypted text is written to file pwdfile. Make sure that infile contains only the text that you want to encrypt and that there are no extraneous characters or empty lines before the text or after the text that you want to encrypt. Parameters infile The file containing the text to be encrypted. pwdfile The file containing the encrypted form of the text from infile. Examples The file infile contains the word “password”. password The encrypt command is then executed producing a file named pwdfile. $ java -jar edb-repcli.jar -encrypt -input ~/infile -output ~/pwdfile The content of file pwdfile contains the encrypted form of “password”. ygJ9AxoJEX854elcVIJPTw== 8.3.5 Adding a Publication Database (addpubdb) The addpubdb command adds a publication database definition. Synopsis -addpubdb Copyright © 2012 EnterpriseDB Corporation. All rights reserved. 321 Postgres Plus xDB Replication Server with Multi-Master User’s Guide { [ [ [ [ [ -repsvrfile pubsvrfile -dbtype { oracle | enterprisedb | postgresql | sqlserver } -dbhost host -dbport port -dbuser user -dbpassword encrypted_pwd | -dbpassfile pwdfile } -oraconnectiontype { sid | servicename } ] -database dbname -repgrouptype { m | s } ] -replicatepubschema { true | false } ] -initialsnapshot ] -nodepriority priority_level ] The addpubdb command creates a new publication database definition. The addpubdb command displays a unique publication database ID that is assigned to the newly created publication database definition. The publication database ID is used to identify the publication database definition on which to operate when running other xDB Replication Server CLI commands. See Section 5.2.2 for details on the database connection information that must be supplied when adding a publication database definition for a single-master replication system. See sections 6.2.2 and 6.3 for a multi-master replication system. Parameters pubsvrfile The file containing the publication server login information. -dbtype Specify oracle if the database is an Oracle database. Specify enterprisedb if the database is an Advanced Server database in Oracle compatible configuration mode. Specify postgresql if the database is a PostgreSQL database or an Advanced Server database in PostgreSQL compatible configuration mode. Specify sqlserver if the database is a Microsoft SQL Server database. host The IP address of the host on which the publication database server is running. port The port number on which the database server is listening for connections. user The publication database user name. Copyright © 2012 EnterpriseDB Corporation. All rights reserved. 322 Postgres Plus xDB Replication Server with Multi-Master User’s Guide encrypted_pwd The encrypted password of the publication database user. See Section 8.3.4 for directions on using the encrypt command to generate an encrypted password. pwdfile The file containing the encrypted password of the publication database user. -oraconnectiontype Specify sid if the Oracle system ID (SID) is used to identify the publication database in the database parameter. Specify servicename if the Oracle service name is used to identify the publication database in the database parameter. dbname The Postgres or SQL Server database name, the Oracle SID, or the Oracle service name of the publication database. -repgrouptype Specify s if this command applies to a single-master replication system. Specify m if this command applies to a multi-master replication system. If omitted, the default is s. -replicatepubschema For MMR only: Applies to master nodes other than the master definition node. Set this option to true if you want the publication table definitions replicated from the master definition node when creating a new master node. Set this option to false if you have already created the table definitions in the new master node. If omitted, the default is true. Do not specify this parameter when creating the master definition node. -initialsnapshot For MMR only: Applies to master nodes other than the master definition node. Specify this option if you want an initial snapshot replication to be performed when creating the master node. priority_level For MMR only: Integer value from 1 through 10 assigning the priority level to a master node with 1 having the highest priority and 10 having the lowest priority. Copyright © 2012 EnterpriseDB Corporation. All rights reserved. 323 Postgres Plus xDB Replication Server with Multi-Master User’s Guide Examples The following example adds a publication database definition for an Oracle database. The encrypted password is given on the command line with the dbpassword parameter. A publication database ID of 1 is assigned to the database by the publication service. $ java -jar edb-repcli.jar -addpubdb -repsvrfile ~/pubsvrfile.prop \ > -dbtype oracle -dbhost 192.168.2.6 -dbport 1521 \ > -dbuser pubuser -dbpassword ygJ9AxoJEX854elcVIJPTw== \ > -oraconnectiontype sid \ > -database xe \ > -repgrouptype s Adding Publication Database... Publication database added successfully. Publication Database id:1 The following example adds a publication database definition for an Advanced Server database. The encrypted password is read from a file named pwdfile with the dbpassfile parameter. A publication database ID of 2 is assigned to the database by the publication service. $ java -jar edb-repcli.jar -addpubdb -repsvrfile ~/pubsvrfile.prop \ > -dbtype enterprisedb -dbhost 192.168.2.7 -dbport 5444 \ > -dbuser pubuser -dbpassfile ~/pwdfile \ > -database edb \ > -repgrouptype s Adding Publication Database... Publication database added successfully. Publication Database id:2 The following example adds a publication database definition for a master definition node in a multi-master replication system. $ java -jar edb-repcli.jar -addpubdb -repsvrfile ~/pubsvrfile.prop \ > -dbtype enterprisedb -dbhost 192.168.2.6 -dbport 5444 \ > -dbuser pubuser -dbpassword ygJ9AxoJEX854elcVIJPTw== \ > -database edb \ > -repgrouptype m \ > -nodepriority 1 Adding Publication Database... Replicating publication schema... Publication database added successfully. Publication Database id:6 The following example adds a publication database definition for a master node (other than the master definition node) in a multi-master replication system where an initial snapshot is not invoked (the initialsnapshot parameter is omitted) and a node priority level of 3 is assigned to the master node. Note: A publication must be created in the master definition node before creating additional master nodes. See Section 8.3.11 for the command to create a publication. $ java -jar edb-repcli.jar -addpubdb -repsvrfile ~/pubsvrfile.prop \ > -dbtype enterprisedb -dbhost 192.168.2.7 -dbport 5444 \ > -dbuser mmruser -dbpassword ygJ9AxoJEX854elcVIJPTw== \ > -database mmrnode \ > -repgrouptype m \ Copyright © 2012 EnterpriseDB Corporation. All rights reserved. 324 Postgres Plus xDB Replication Server with Multi-Master User’s Guide > -nodepriority 3 Adding Publication Database... Replicating publication schema... Publication database added successfully. Publication Database id:9 8.3.6 Printing Publication Database IDs (printpubdbids) The printpubdbids command prints the publication database IDs of the publication database definitions. Synopsis -printpubdbids -repsvrfile pubsvrfile Parameters pubsvrfile The file containing the publication server login information. Examples The following example lists the publication database IDs of the publication database definitions. $ java -jar edb-repcli.jar -printpubdbids -repsvrfile ~/pubsvrfile.prop Printing publication database ids... 6 9 2 1 8.3.7 Printing Publication Database Details (printpubdbidsdetails) The printpubdbidsdetails command prints the connection information for each publication database definition. Synopsis -printpubdbidsdetails –repsvrfile pubsvrfile The output has the following components: dbid:host:port:dbname:user Note: The database user’s password is not displayed. Parameters Copyright © 2012 EnterpriseDB Corporation. All rights reserved. 325 Postgres Plus xDB Replication Server with Multi-Master User’s Guide pubsvrfile The file containing the publication server login information. dbid The publication database ID assigned to the publication database definition. host The IP address of the host on which the publication database server is running. port The port number on which the database server is listening for connections. dbname The Postgres or SQL Server database name, the Oracle SID, or the Oracle service name of the publication database. user The publication database user name. Examples There are four publication database definitions subordinate to the publication server identified by the content of file pubsvrfile.prop. $ java -jar edb-repcli.jar -printpubdbidsdetails \ > -repsvrfile ~/pubsvrfile.prop Printing publication database ids with details... id:host:port:database|sid:user 6:192.168.2.6:5444:edb:pubuser 9:192.168.2.7:5444:mmrnode:mmruser 2:192.168.2.7:5444:edb:pubuser 1:192.168.2.6:1521:xe:pubuser 8.3.8 Updating a Publication Database (updatepubdb) The updatepubdb command provides the ability to change the connection information for an existing publication database definition identified by its publication database ID. Synopsis -updatepubdb -repsvrfile pubsvrfile -pubdbid dbid Copyright © 2012 EnterpriseDB Corporation. All rights reserved. 326 Postgres Plus xDB Replication Server with Multi-Master User’s Guide -dbhost host -dbport port -dbuser user { -dbpassword encrypted_pwd | -dbpassfile pwdfile } [ -oraconnectiontype { sid | servicename } ] -database dbname [ -nodepriority priority_level ] The publication database definition to be updated is identified by the pubdbid parameter. See Section 5.2.2 for details on the database connection information that must be supplied for a publication database definition for a single-master replication system. See sections 6.2.2 and 6.3 for a multi-master replication system. Parameters pubsvrfile The file containing the publication server login information. dbid The publication database ID of the publication database definition to be updated. host The IP address of the host on which the publication database server is running. port The port number on which the database server is listening for connections. user The publication database user name. encrypted_pwd The password of the database user in encrypted form. See Section 8.3.4 for directions on using the encrypt command to generate an encrypted password. pwdfile The file containing the password of the database user in encrypted form. -oraconnectiontype Copyright © 2012 EnterpriseDB Corporation. All rights reserved. 327 Postgres Plus xDB Replication Server with Multi-Master User’s Guide Specify sid if the Oracle system ID (SID) is used to identify the publication database in the database parameter. Specify servicename if the Oracle service name is used to identify the publication database in the database parameter. dbname The Postgres or SQL Server database name, the Oracle SID, or the Oracle service name of the publication database. priority_level For MMR only: Integer value from 1 through 10 assigning the priority level to a master node with 1 having the highest priority and 10 having the lowest priority. Examples In the following example, an existing publication database definition with publication database ID 1 is updated. $ java -jar edb-repcli.jar -updatepubdb -repsvrfile ~/pubsvrfile.prop \ > -pubdbid 1 \ > -dbhost 192.168.2.6 -dbport 1521 \ > -dbuser pubuser -dbpassfile ~/pwdfile \ > -oraconnectiontype sid \ > -database xe Updating publication database ... Publication database with ID 1 is updated successfully. 8.3.9 Removing a Publication Database (removepubdb) The removepubdb command removes a publication database definition. Synopsis -removepubdb –repsvrfile pubsvrfile –pubdbid dbid The publication database definition to be removed is identified by the pubdbid parameter. See Section 7.5.6 for additional information on removing a publication database. Parameters pubsvrfile The file containing the publication server login information. Copyright © 2012 EnterpriseDB Corporation. All rights reserved. 328 Postgres Plus xDB Replication Server with Multi-Master User’s Guide dbid The publication database ID of the publication database definition to be removed. Examples The publication database definition identified by publication database ID 1 is removed. $ java -jar edb-repcli.jar -removepubdb -repsvrfile ~/pubsvrfile.prop \ > -pubdbid 1 Removing Publication Database... Publication Database removed. 8.3.10 Get Tables for a New Publication (gettablesfornewpub) The gettablesfornewpub command lists the tables and views that are available for inclusion in a new publication from a given publication database definition. Synopsis -gettablesfornewpub –repsvrfile repsvrfile –pubdbid dbid Parameters pubsvrfile The file containing the publication server login information. dbid The publication database ID of the publication database definition whose available tables and views are to be listed. Examples For the publication database definition identified by publication database ID 1, the tables available for inclusion in a publication are EDB.DEPT, EDB.EMP, and EDB.JOBHIST. The view available for inclusion in a publication is EDB.SALESEMP. $ java -jar edb-repcli.jar -gettablesfornewpub \ > -repsvrfile ~/pubsvrfile.prop -pubdbid 1 Fetching tables/views list ... [[EDB.DEPT, TABLE], [EDB.EMP, TABLE], [EDB.JOBHIST, TABLE], [EDB.SALESEMP, VIEW]] 8.3.11 Creating a Publication (createpub) The createpub command creates a new publication. Copyright © 2012 EnterpriseDB Corporation. All rights reserved. 329 Postgres Plus xDB Replication Server with Multi-Master User’s Guide Synopsis -createpub pubname -repsvrfile pubsvrfile -pubdbid dbid -reptype { s | t } -tables schema_t1.table_1 [ schema_t2.table_2 ] ... [ -views schema_v1.view_1 [ schema_v2.view_2 ] ...] [ -tablesfilterclause "ordinal_t1:filter_t1" [ "ordinal_t2:filter_t2" ] ...] [ -viewsfilterclause "ordinal_v1:filter_v1" [ "ordinal_v2:filter_v2" ] ...] [ -conflictresolution ordinal_t1:{ E | L | N | M } [ ordinal_t2:{ E | L } N | M } ] ...] [ -standbyconflictresolution ordinal_t1:{ E | L | N | M } [ ordinal_t2:{ E | L } N | M } ] ...] [ -repgrouptype { m | s } ] The createpub command adds a new publication subordinate to the publication database definition with the publication database ID given by parameter pubdbid. If the publication is designated as snapshot-only by setting parameter reptype to s, then any views listed after the views parameter are ignored. See Section 5.2.3 for additional information on creating a publication for a single-master replication system. See Section 6.2.3 for a multi-master replication system. Note: The schema names, table names, and view names that you supply as values for the tables and views parameters are case-sensitive. Unless quoted identifiers were used to build the database objects, Oracle names must be entered using uppercase letters (for example, EDB.DEPT), and Advanced Server names must be entered in lowercase letters (for example edb.dept). See Section 9.3.5 for additional information on quoted identifiers and case translation. Parameters pubname The publication name to be given to the new publication. pubsvrfile The file containing the publication server login information. dbid The publication database ID of the publication database definition subordinate to which the new publication is to be added. Copyright © 2012 EnterpriseDB Corporation. All rights reserved. 330 Postgres Plus xDB Replication Server with Multi-Master User’s Guide -reptype Specify s if the publication is to be a snapshot-only publication. Specify t if the publication is to allow synchronization replications. schema_tn The name of the schema containing the nth table of the tables parameter list. This value is case-sensitive. table_n The table name of the nth table in the tables parameter list. This value is casesensitive. schema_vn For SMR only: The name of the schema containing the nth view of the views parameter list. This value is case-sensitive. view_n For SMR only: View name of the nth view in the views parameter list. This value is case-sensitive. ordinal_tn For SMR only: The ordinal number (that is, the position in the list counting from left to right starting with 1) of a table in the tables parameter list to which filter clause filter_tn is to be applied. filter_tn For SMR only: The filter clause to be applied to the table in the tables parameter list at the position indicated by ordinal_tn. ordinal_vn For SMR only: The ordinal number (that is, the position in the list counting from left to right starting with 1) of a view in the views parameter list to which filter clause filter_vn is to be applied. filter_vn For SMR only: The filter clause to be applied to the view in the views parameter list at the position indicated by ordinal_vn. Copyright © 2012 EnterpriseDB Corporation. All rights reserved. 331 Postgres Plus xDB Replication Server with Multi-Master User’s Guide -conflictresolution For MMR only: For the conflict resolution option, specify E for earliest timestamp conflict resolution, L for latest timestamp conflict resolution, N for node priority conflict resolution, or M for manual conflict resolution. The specified conflict resolution applies to the table in the position given by ordinal_tn counting from left to right in the tables parameter list. If omitted the default is E. -standbyconflictresolution For MMR only: For the standby conflict resolution option, specify E for earliest timestamp conflict resolution, L for latest timestamp conflict resolution, N for node priority conflict resolution, or M for manual conflict resolution. The specified conflict resolution applies to the table in the position given by ordinal_tn counting from left to right in the tables parameter list. If omitted the default is M. -repgrouptype Specify s if this command applies to a single-master replication system. Specify m if this command applies to a multi-master replication system. If omitted, the default is s. Examples In the following example, a publication named dept_emp is created that contains the EDB.DEPT and EDB.EMP tables of an Oracle database. The replication method is synchronization. $ java -jar edb-repcli.jar -createpub dept_emp \ > -repsvrfile ~/pubsvrfile.prop \ > -pubdbid 1 \ > -reptype t \ > -tables EDB.DEPT EDB.EMP Creating publication... Tables:[[EDB.DEPT, TABLE], [EDB.EMP, TABLE]] Filter clause:[null, null] Publication created. In the following example, a publication named salesemp is created that contains the EDB.SALESEMP view of an Oracle database. The replication method is snapshot-only. $ java -jar edb-repcli.jar -createpub salesemp \ > -repsvrfile ~/pubsvrfile.prop \ > -pubdbid 1 \ > -reptype s \ > -views EDB.SALESEMP Creating publication... Tables:[[EDB.SALESEMP, VIEW]] Copyright © 2012 EnterpriseDB Corporation. All rights reserved. 332 Postgres Plus xDB Replication Server with Multi-Master User’s Guide Filter clause:[null] Publication created. In the following example, a publication named analysts_managers is created that contains the edb.dept table and employees from the edb.emp table who are analysts or managers. The tables are in an Advanced Server database. The replication method is snapshot-only. $ java -jar edb-repcli.jar -createpub analysts_managers \ > -repsvrfile ~/pubsvrfile.prop \ > -pubdbid 2 \ > -reptype s \ > -tables edb.dept edb.emp \ > -tablesfilterclause "2:job IN ('ANALYST', 'MANAGER')" Creating publication... Tables:[[edb.dept, TABLE], [edb.emp, TABLE]] Filter clause:[null, job IN ('ANALYST', 'MANAGER')] Publication created. The following example creates a publication for a multi-master replication system where table edb.dept is assigned node priority conflict resolution and latest timestamp as the standby conflict resolution strategy. Table edb.emp is assigned earliest timestamp conflict resolution and manual resolution (the default) as its standby strategy. $ java -jar edb-repcli.jar -createpub emp_pub \ > -repsvrfile ~/pubsvrfile.prop \ > -pubdbid 6 \ > -reptype t \ > -tables edb.dept edb.emp \ > -conflictresolution 1:N 2:E \ > -standbyconflictresolution 1:L 2:M \ > -repgrouptype m Creating publication... Tables:[[edb.dept, TABLE], [edb.emp, TABLE]] Filter clause:[null, null] Conflict Resolution Option:[ Node Priority, Earliest Timestamp ] Standby Conflict Resolution Option:[ Latest Timestamp, Manual ] Publication created. 8.3.12 Printing a Publication List (printpublist) The printpublist command prints a list of publication names. Synopsis -printpublist -repsvrfile pubsvrfile [ -pubdbid dbid ] Parameters pubsvrfile The file containing the publication server login information. Copyright © 2012 EnterpriseDB Corporation. All rights reserved. 333 Postgres Plus xDB Replication Server with Multi-Master User’s Guide dbid If the pubdbid parameter is specified, only the publication names subordinate to the publication database definition specified by dbid are printed. If the pubdbid parameter is omitted, all publication names subordinate to the publication server are printed. Examples $ java -jar edb-repcli.jar -printpublist -repsvrfile ~/pubsvrfile.prop Printing publications ... analysts_managers dept_emp emp_pub salesemp 8.3.13 Printing a List of Tables in a Publication (printpublishedtables) The printpublishedtables command prints a list of tables and views that belong to the given publication. Synopsis -printpublishedtables pubname -repsvrfile pubsvrfile Parameters pubname The name of the publication whose tables and views are to be printed. pubsvrfile The file containing the publication server login information. Examples The tables belonging to publication dept_emp are printed. $ java -jar edb-repcli.jar -printpublishedtables dept_emp \ > -repsvrfile ~/pubsvrfile.prop Printing tables under publication: dept_emp EDB.DEPT EDB.EMP 8.3.14 Adding Tables to a Publication (addtablesintopub) The addtablesintopub command adds tables or views into an existing publication. Copyright © 2012 EnterpriseDB Corporation. All rights reserved. 334 Postgres Plus xDB Replication Server with Multi-Master User’s Guide Synopsis -addtablesintopub pubname -repsvrfile pubsvrfile [ -tables schema_t1.table_1 [ schema_t2.table_2 ] ...] [ -views schema_v1.view_1 [ schema_v2.view_2 ] ...] [ -tablesfilterclause "ordinal_t1:filter_t1" [ "ordinal_t2:filter_t2" ] ...] [ -viewsfilterclause "ordinal_v1:filter_v1" [ "ordinal_v2:filter_v2" ] ...] [ -repgrouptype { m | s } ] The addtablesintopub command updates an existing publication identified by pubname. If the publication is snapshot-only, then any views listed after the views parameter are ignored. See Section 7.5.3.1 for additional information on adding tables to a publication. Note: The schema names, table names, and view names that you supply as values for the tables and views parameters are case-sensitive. Unless quoted identifiers were used to build the database objects, Oracle names must be entered using uppercase letters (for example, EDB.DEPT), and Advanced Server names must be entered in lowercase letters (for example edb.dept). See Section 9.3.5 for additional information on quoted identifiers and case translation. Parameters pubname The name of the publication to which tables or views are to be added. pubsvrfile The file containing the publication server login information. schema_tn The name of the schema containing the nth table of the tables parameter list. This value is case-sensitive. table_n The name of the nth table in the tables parameter list. This value is casesensitive. schema_vn Copyright © 2012 EnterpriseDB Corporation. All rights reserved. 335 Postgres Plus xDB Replication Server with Multi-Master User’s Guide For SMR only: The name of the schema containing the nth view of the views parameter list. This value is case-sensitive. view_n For SMR only: The name of the nth view in the views parameter list. This value is case-sensitive. ordinal_tn For SMR only: The ordinal number (that is, the position in the list counting from left to right starting with 1) of a table in the tables parameter list to which filter clause filter_tn is to be applied. filter_tn For SMR only: The filter clause to be applied to the table in the tables parameter list at the position indicated by ordinal_tn. ordinal_vn For SMR only: The ordinal number (that is, the position in the list counting from left to right starting with 1) of a view in the views parameter list to which filter clause filter_vn is to be applied. filter_vn For SMR only: The filter clause to be applied to the view in the views parameter list at the position indicated by ordinal_vn. -repgrouptype Specify s if this command applies to a single-master replication system. Specify m if this command applies to a multi-master replication system. If omitted, the default is s. Examples In the following example, table edb.jobhist and view edb.salesemp are added to an existing publication named analysts_managers. $ java -jar edb-repcli.jar -addtablesintopub analysts_managers \ > -repsvrfile ~/pubsvrfile.prop \ > -tables edb.jobhist \ > -views edb.salesemp Adding tables to publication analysts_managers ... Tables:[[edb.jobhist, TABLE], [edb.salesemp, VIEW]] Copyright © 2012 EnterpriseDB Corporation. All rights reserved. 336 Postgres Plus xDB Replication Server with Multi-Master User’s Guide Filter clause:[null, null] Publication updated successfully 8.3.15 Removing Tables From a Publication (removetablesfrompub) Synopsis -removetablesfrompub pubname -repsvrfile pubsvrfile -tables { schema_t1.table_1 | schema_v1.view_1 } [ { schema_t2.table_2 | schema_v2.view_2 } ] ... See Section 7.5.3.2 for additional information on removing tables from a publication. Note: The schema names, table names, and view names that you supply as values for the tables parameter are case-sensitive. Unless quoted identifiers were used to build the database objects, Oracle names must be entered using uppercase letters (for example, EDB.DEPT), and Advanced Server names must be entered in lowercase letters (for example edb.dept). See Section 9.3.5 for additional information on quoted identifiers and case translation. Parameters pubname The name of the publication from which tables or views are to be removed. pubsvrfile The file containing the publication server login information. schema_tn The name of the schema containing the nth table of the tables parameter list. This value is case-sensitive. table_n The name of the nth table in the tables parameter list. This value is casesensitive. schema_vn The name of the schema containing the nth view of the tables parameter list. This value is case-sensitive. Copyright © 2012 EnterpriseDB Corporation. All rights reserved. 337 Postgres Plus xDB Replication Server with Multi-Master User’s Guide view_n The name of the nth view in the tables parameter list. This value is casesensitive. Examples In the following example, table edb.jobhist and view edb.salesemp are removed from the analysts_managers publication. $ java -jar edb-repcli.jar -removetablesfrompub analysts_managers \ > -repsvrfile ~/pubsvrfile.prop \ > -tables edb.jobhist edb.salesemp Removing tables from publication analysts_managers ... Tables removed successfully 8.3.16 Printing a Filter Clause (printfilterclause) For SMR only: The printfilterclause command prints the filter clause of the specified table or view. Synopsis -printfilterclause pubname –repsvrfile pubsvrfile -table { schema_t.table_name | schema_v.view_name } See Section 7.5.3.3 for additional information on viewing a filter clause. Note: The schema name and table or view name that you supply as values for the table parameter are case-sensitive. Unless quoted identifiers were used to build the database objects, Oracle names must be entered using uppercase letters (for example, EDB.DEPT), and Advanced Server names must be entered in lowercase letters (for example edb.dept). See Section 9.3.5 for additional information on quoted identifiers and case translation. Parameters pubname The name of the publication containing the table or view whose filter clause is to be printed. pubsvrfile The file containing the publication server login information. Copyright © 2012 EnterpriseDB Corporation. All rights reserved. 338 Postgres Plus xDB Replication Server with Multi-Master User’s Guide schema_t The name of the schema containing table_name. This value is case-sensitive. table_name The name of the table whose filter clause is to be printed. This value is casesensitive. schema_v The name of the schema containing view_name. This value is case-sensitive. view_name The name of the view whose filter clause is to be printed. This value is casesensitive. Examples In the following example, the filter clause on Advanced Server table edb.emp in publication analysts_managers is printed. $ java -jar edb-repcli.jar -printfilterclause analysts_managers \ > -repsvrfile ~/pubsvrfile.prop \ > -table edb.emp Filter clause for table edb.emp: job IN ('ANALYST', 'MANAGER') 8.3.17 Updating a Filter Clause (updatefilterclause) For SMR only: The updatefilterclause command changes the filter clause of the specified table or view. Synopsis -updatefilterclause pubname –repsvrfile pubsvrfile -table { schema_t.table_name | schema_v.view_name } -filterclause "filter_clause" See Section 7.5.3.4 for additional information on updating a filter clause. Note: The schema name and table or view name that you supply as values for the table parameter are case-sensitive. Unless quoted identifiers were used to build the database objects, Oracle names must be entered using uppercase letters (for example, EDB.DEPT), and Advanced Server names must be entered in lowercase letters (for example Copyright © 2012 EnterpriseDB Corporation. All rights reserved. 339 Postgres Plus xDB Replication Server with Multi-Master User’s Guide edb.dept). See Section 9.3.5 for additional information on quoted identifiers and case translation. Parameters pubname The name of the publication containing the table or view whose filter clause is to be updated. pubsvrfile The file containing the publication server login information. schema_t The name of the schema containing table_name. This value is case-sensitive. table_name The name of the table whose filter clause is to be updated. This value is casesensitive. schema_v The name of the schema containing view_name. This value is case-sensitive. view_name The name of the view whose filter clause is to be updated. This value is casesensitive. filter_clause The new filter clause to be used. Examples The filter clause on Advanced Server table edb.emp in publication analysts_managers is modified to use the condition job IN ('ANALYST', 'MANAGER') AND sal > 2500. $ java -jar edb-repcli.jar -updatefilterclause analysts_managers \ > -repsvrfile ~/pubsvrfile.prop \ > -table edb.emp \ > -filterclause "job IN ('ANALYST', 'MANAGER') AND sal > 2500" Updating table filter clause ... Filter clause has been updated successfully Copyright © 2012 EnterpriseDB Corporation. All rights reserved. 340 Postgres Plus xDB Replication Server with Multi-Master User’s Guide 8.3.18 Removing a Filter Clause (removefilterclause) For SMR only: The removefilterclause command deletes the filter clause from the specified table or view. Synopsis -removefilterclause pubname –repsvrfile pubsvrfile -table { schema_t.table_name | schema_v.view_name } See Section 7.5.3.5 for additional information on removing a filter clause. Note: The schema name and table or view name that you supply as values for the table parameter are case-sensitive. Unless quoted identifiers were used to build the database objects, Oracle names must be entered using uppercase letters (for example, EDB.DEPT), and Advanced Server names must be entered in lowercase letters (for example edb.dept). See Section 9.3.5 for additional information on quoted identifiers and case translation. Parameters pubname The name of the publication containing the table or view whose filter clause is to be removed. pubsvrfile The file containing the publication server login information. schema_t The name of the schema containing table_name. This value is case-sensitive. table_name The name of the table whose filter clause is to be removed. This value is casesensitive. schema_v The name of the schema containing view_name. This value is case-sensitive. view_name Copyright © 2012 EnterpriseDB Corporation. All rights reserved. 341 Postgres Plus xDB Replication Server with Multi-Master User’s Guide The name of the view whose filter clause is to be removed. This value is casesensitive. Examples In the following example, the filter clause is removed from Advanced Server table edb.emp in publication analysts_managers. $ java -jar edb-repcli.jar -removefilterclause analysts_managers \ > -repsvrfile ~/pubsvrfile.prop \ > -table edb.emp Removing table filter clause ... Filter clause has been removed successfully 8.3.19 Printing the Conflict Resolution Strategy (printconfresolutionstrategy) For MMR only: The printconfresolutionstrategy command prints the conflict resolution strategy and the standby conflict resolution strategy of the specified table. Synopsis -printconfresolutionstrategy pubname –repsvrfile pubsvrfile -table schema_t.table_name See Section 6.6 for additional information on conflict resolution. Note: The schema name and table or view name that you supply as values for the table parameter are case-sensitive. Unless quoted identifiers were used to build the database objects, Oracle names must be entered using uppercase letters (for example, EDB.DEPT), and Advanced Server names must be entered in lowercase letters (for example edb.dept). See Section 9.3.5 for additional information on quoted identifiers and case translation. Parameters pubname The name of the publication containing the table whose conflict resolution strategy is to be printed. pubsvrfile The file containing the publication server login information. schema_t Copyright © 2012 EnterpriseDB Corporation. All rights reserved. 342 Postgres Plus xDB Replication Server with Multi-Master User’s Guide The name of the schema containing table_name. This value is case-sensitive. table_name The name of the table whose conflict resolution strategy is to be printed. This value is case-sensitive. Examples In the following example, the conflict resolution strategy on Advanced Server table edb.emp in publication emp_pub is printed. $ java -jar edb-repcli.jar -printconfresolutionstrategy emp_pub \ > -repsvrfile ~/pubsvrfile.prop \ > -table edb.emp Primary/Standby Conflict Resolution Strategy... Conflict Resolution Option:[ Earliest Timestamp ] Standby Conflict Resolution Option:[ Manual ] 8.3.20 Updating the Conflict Resolution Strategy (updateconfresolutionstrategy) For MMR only: The updateconfresolutionstrategy command changes the conflict resolution strategy or standby conflict resolution strategy of the specified table. Synopsis -updateconfresolutionstrategy pubname –repsvrfile pubsvrfile -table schema_t.table_name -conflictresolution { E | L | N | M } -standbyconflictresolution { E | L | N | M } See Section 6.8 for additional information on updating the conflict resolution strategy. Note: The schema name and table or view name that you supply as values for the table parameter are case-sensitive. Unless quoted identifiers were used to build the database objects, Oracle names must be entered using uppercase letters (for example, EDB.DEPT), and Advanced Server names must be entered in lowercase letters (for example edb.dept). See Section 9.3.5 for additional information on quoted identifiers and case translation. Parameters pubname The name of the publication containing the table whose conflict resolution strategy is to be updated. Copyright © 2012 EnterpriseDB Corporation. All rights reserved. 343 Postgres Plus xDB Replication Server with Multi-Master User’s Guide pubsvrfile The file containing the publication server login information. schema_t The name of the schema containing table_name. This value is case-sensitive. table_name The name of the table whose conflict resolution strategy is to be updated. This value is case-sensitive. -conflictresolution For the conflict resolution option, specify E for earliest timestamp conflict resolution, L for latest timestamp conflict resolution, N for node priority conflict resolution, or M for manual conflict resolution. -standbyconflictresolution For the standby conflict resolution option, specify E for earliest timestamp conflict resolution, L for latest timestamp conflict resolution, N for node priority conflict resolution, or M for manual conflict resolution. Examples The conflict resolution strategy on Advanced Server table edb.emp in publication emp_pub is modified to use latest timestamp conflict resolution with a standby strategy of node priority conflict resolution. $ java -jar edb-repcli.jar -updateconfresolutionstrategy emp_pub \ > -repsvrfile ~/pubsvrfile.prop \ > -table edb.emp \ > -conflictresolution L \ > -standbyconflictresolution N Updating Primary/Standby Conflict Resolution Strategy... The Primary/Standby conflict resolution strategies were updated successfully. 8.3.21 Setting the Master Definition Node (setasmdn) For MMR only: The setasmdn command sets a master node to the role of master definition node. Synopsis -setasmdn pubdbid –repsvrfile pubsvrfile Copyright © 2012 EnterpriseDB Corporation. All rights reserved. 344 Postgres Plus xDB Replication Server with Multi-Master User’s Guide See Section 6.9 for additional information on setting the master definition node. Parameters pubdbid The publication database ID of the master node to be given the role of master definition node. pubsvrfile The file containing the publication server login information. Examples The following example sets the master node with publication database ID 9 as the master definition node. $ java -jar edb-repcli.jar -setasmdn 9 -repsvrfile ~/pubsvrfile.prop Updating the database node to be promoted as the new MDN node. The database has been successfully promoted as the new MDN node. 8.3.22 Validating a Publication (validatepub) The validatepub command checks if any of the definitions of the tables in the given publication have changed since the publication was created. Synopsis -validatepub pubname –repsvrfile pubsvrfile -repgrouptype { m | s } See Section 7.5.4 for additional information on validating publications. Parameters pubname The name of the publication whose tables are to be validated. pubsvrfile The file containing the publication server login information. -repgrouptype Copyright © 2012 EnterpriseDB Corporation. All rights reserved. 345 Postgres Plus xDB Replication Server with Multi-Master User’s Guide Specify s if this command applies to a single-master replication system. Specify m if this command applies to a multi-master replication system. Examples In the following example, publication dept_emp is validated. $ java -jar edb-repcli.jar -validatepub dept_emp \ > -repsvrfile ~/pubsvrfile.prop -repgrouptype s Validating publication dept_emp ... All schema of published tables in Publication {0} are up-to-date 8.3.23 Validating All Publications (validatepubs) The validatepubs command checks if any of the definitions of the tables subordinate to the given publication database definition have changed since the publication was created. Synopsis -validatepubs –repsvrfile pubsvrfile -pubdbid dbid -repgrouptype { m | s } See Section 7.5.4 for additional information on validating publications. Parameters pubsvrfile The file containing the publication server login information. dbid The publication database ID of the publication database definition under which all publication tables are to be validated. -repgrouptype Specify s if this command applies to a single-master replication system. Specify m if this command applies to a multi-master replication system. Examples In the following example, the Oracle publication database definition identified by publication database ID 1 is validated. Copyright © 2012 EnterpriseDB Corporation. All rights reserved. 346 Postgres Plus xDB Replication Server with Multi-Master User’s Guide $ java -jar edb-repcli.jar -validatepubs \ > -repsvrfile ~/pubsvrfile.prop \ > -pubdbid 1 -repgrouptype s Validating all available publications ... The schema definitions for all the non snapshot-only publications tables are in sync with the source. The "validatepubs" feature is not available for the following snapshot-only publications: - salesemp 8.3.24 Removing a Publication (removepub) The removepub command removes one or more publications. Synopsis -removepub pubname_1 [ pubname_2 ] ... –repsvrfile pubsvrfile -repgrouptype { m | s } See Section 7.5.5 for additional information on removing a publication. Parameters pubname_n The name of a publication to be removed. pubsvrfile The file containing the publication server login information. -repgrouptype Specify s if this command applies to a single-master replication system. Specify m if this command applies to a multi-master replication system. Examples A publication named dept_emp is removed from a single-master replication system. $ java -jar edb-repcli.jar -removepub dept_emp \ > -repsvrfile ~/pubsvrfile.prop -repgrouptype s Removing publication... Publication dept_emp unpublished successfully. Copyright © 2012 EnterpriseDB Corporation. All rights reserved. 347 Postgres Plus xDB Replication Server with Multi-Master User’s Guide 8.3.25 Replicating DDL Changes (replicateddl) The replicateddl command applies an ALTER TABLE statement to a publication table in all databases of a replication system as well as updates the xDB Replication Server insert/update/delete triggers and shadow table associated with that publication table. Synopsis -replicateddl pubname –repsvrfile pubsvrfile -table schema_t.table_name -ddlscriptfile script_file See Section 7.6 for additional information on DDL change replication. Parameters pubname The name of the publication containing the table to which the ALTER TABLE statement is to be applied. pubsvrfile The file containing the publication server login information. schema_t The name of the schema containing table_name. This value is case-sensitive. table_name The name of the table in the ALTER TABLE statement whose definition is to be modified. This value is case-sensitive. script_file Path to the file containing the ALTER TABLE statement. Examples The following example shows the addition of a column named title to table edb.emp. The ALTER TABLE statement is in the text file addcolumn.sql as shown by the following: ALTER TABLE edb.emp ADD COLUMN title VARCHAR(20); Copyright © 2012 EnterpriseDB Corporation. All rights reserved. 348 Postgres Plus xDB Replication Server with Multi-Master User’s Guide The replicateddl command is executed using the addcolumn.sql file to update the triggers and shadow tables on the master nodes: $ java -jar edb-repcli.jar -replicateddl emp_pub \ > -repsvrfile ~/pubsvrfile.prop \ > -table edb.emp \ > -ddlscriptfile ~/addcolumn.sql DDL changes successfully replicated to all master nodes. 8.3.26 Adding a Subscription Database (addsubdb) For SMR only: The addsubdb command adds a subscription database definition. Synopsis -addsubdb -repsvrfile subsvrfile -dbtype { oracle | enterprisedb | postgresql | sqlserver } -dbhost host -dbport port -dbuser user { -dbpassword encrypted_pwd | -dbpassfile pwdfile } [ -oraconnectiontype { sid | servicename } ] -database dbname The addsubdb command creates a new subscription database definition. The addsubdb command displays a unique subscription database ID that is assigned to the newly created subscription database definition. The subscription database ID is used to identify the subscription database definition on which to operate when running other xDB Replication Server CLI commands. See Section 5.3.2 for details on the database connection information that must be supplied when adding a subscription database definition. Parameters subsvrfile The file containing the subscription server login information. -dbtype Specify oracle if the database is an Oracle database. Specify enterprisedb if the database is an Advanced Server database in Oracle compatible configuration mode. Specify postgresql if the database is a PostgreSQL database or an Advanced Server database in PostgreSQL compatible configuration mode. Specify sqlserver if the database is a Microsoft SQL Server database. Copyright © 2012 EnterpriseDB Corporation. All rights reserved. 349 Postgres Plus xDB Replication Server with Multi-Master User’s Guide host The IP address of the host on which the subscription database server is running. port The port number on which the database server is listening for connections. user The subscription database user name. encrypted_pwd The encrypted password of the subscription database user. See Section 8.3.4 for directions on using the encrypt command to generate an encrypted password. pwdfile The file containing the encrypted password of the subscription database user. -oraconnectiontype Specify sid if the Oracle system ID (SID) is used to identify the subscription database in the database parameter. Specify servicename if the Oracle service name is used to identify the subscription database in the database parameter. dbname The Postgres or SQL Server database name, the Oracle SID, or the Oracle service name of the subscription database. Examples The following example adds a subscription database definition for an Oracle database. The encrypted password is given on the command line with the dbpassword parameter. A subscription database ID of 1 is assigned to the database by the subscription server. $ java -jar edb-repcli.jar -addsubdb -repsvrfile ~/subsvrfile.prop \ > -dbtype oracle -dbhost 192.168.2.6 -dbport 1521 \ > -dbuser subuser -dbpassword ygJ9AxoJEX854elcVIJPTw== \ > -oraconnectiontype sid \ > -database xe Adding Subscription Database... Subscription database added successfully. Subscription Database id:1 Copyright © 2012 EnterpriseDB Corporation. All rights reserved. 350 Postgres Plus xDB Replication Server with Multi-Master User’s Guide The following example adds a subscription database definition for an Advanced Server database. The encrypted password is read from a file named pwdfile with the dbpassfile parameter. A subscription database ID of 2 is assigned to the database by the subscription server. $ java -jar edb-repcli.jar -addsubdb -repsvrfile ~/subsvrfile.prop \ > -dbtype enterprisedb -dbhost 192.168.2.7 -dbport 5444 \ > -dbuser subuser -dbpassfile ~/pwdfile \ > -database subdb Adding Subscription Database... Subscription database added successfully. Subscription Database id:2 8.3.27 Printing Subscription Database IDs (printsubdbids) For SMR only: The printsubdbids command prints the subscription database IDs of the subscription database definitions. Synopsis -printsubdbids -repsvrfile subsvrfile Parameters subsvrfile The file containing the subscription server login information. Examples The following example lists the subscription database IDs of the subscription database definitions. $ java -jar edb-repcli.jar -printsubdbids -repsvrfile ~/subsvrfile.prop Printing subscription database ids... 1 2 8.3.28 Printing Subscription Database Details (printsubdbidsdetails) For SMR only: The printsubdbidsdetails command prints the connection information for each subscription database definition. Synopsis -printsubdbidsdetails –repsvrfile subsvrfile The output has the following components: Copyright © 2012 EnterpriseDB Corporation. All rights reserved. 351 Postgres Plus xDB Replication Server with Multi-Master User’s Guide dbid:host:port:dbname:user Note: The database user’s password is not displayed. Parameters subsvrfile The file containing the subscription server login information. dbid The subscription database ID assigned to the subscription database definition. host The IP address of the host on which the subscription database server is running. port The port number on which the database server is listening for connections. dbname The Postgres or SQL Server database name, the Oracle SID, or the Oracle service name of the subscription database. user The subscription database user name. Examples The following are the subscription database definitions subordinate to the subscription server identified by the content of file subsvrfile.prop. $ java -jar edb-repcli.jar -printsubdbidsdetails \ > -repsvrfile ~/subsvrfile.prop Printing subscription database ids with details... id:host:port:database|sid:user 1:192.168.2.6:1521:xe:subuser 2:192.168.2.7:5444:subdb:subuser 8.3.29 Updating a Subscription Database (updatesubdb) For SMR only: The updatesubdb command provides the ability to change the connection information for an existing subscription database definition identified by its subscription database ID. Copyright © 2012 EnterpriseDB Corporation. All rights reserved. 352 Postgres Plus xDB Replication Server with Multi-Master User’s Guide Synopsis -updatesubdb -repsvrfile subsvrfile -subdbid dbid -dbhost host -dbport port -dbuser user { -dbpassword encrypted_pwd | -dbpassfile pwdfile } [ -oraconnectiontype { sid | servicename } ] -database dbname The subscription database definition to be updated is identified by the subdbid parameter. See Section 5.3.2 for details on the database connection information that must be supplied for a subscription database definition. Parameters subsvrfile The file containing the subscription server login information. dbid The subscription database ID of the subscription database definition to be updated. host The IP address of the host on which the subscription database server is running. port The port number on which the database server is listening for connections. user The subscription database user name. encrypted_pwd The password of the database user in encrypted form. See Section 8.3.4 for directions on using the encrypt command to generate an encrypted password. pwdfile Copyright © 2012 EnterpriseDB Corporation. All rights reserved. 353 Postgres Plus xDB Replication Server with Multi-Master User’s Guide The file containing the password of the database user in encrypted form. -oraconnectiontype Specify sid if the Oracle system ID (SID) is used to identify the subscription database in the database parameter. Specify servicename if the Oracle service name is used to identify the subscription database in the database parameter. dbname The Postgres or SQL Server database name, the Oracle SID, or the Oracle service name of the subscription database. Examples In the following example, an existing subscription database definition with subscription database ID 2 is updated. $ java -jar edb-repcli.jar -updatesubdb -repsvrfile ~/subsvrfile.prop \ > -subdbid 2 \ > -dbhost 192.168.2.7 -dbport 5444 \ > -dbuser subuser -dbpassfile ~/pwdfile \ > -database subdb Updating subscription database ... Subscription database with ID 2 is updated successfully. 8.3.30 Removing a Subscription Database (removesubdb) For SMR only: The removesubdb command removes a subscription database definition. Synopsis -removesubdb –repsvrfile subsvrfile –subdbid dbid The subscription database definition to be removed is identified by the subdbid parameter. See Section 5.5.5 for additional information on removing a subscription database. Parameters subsvrfile The file containing the subscription server login information. dbid Copyright © 2012 EnterpriseDB Corporation. All rights reserved. 354 Postgres Plus xDB Replication Server with Multi-Master User’s Guide The subscription database ID of the subscription database definition to be removed. Examples The subscription database definition identified by subscription database ID 2 is removed. $ java -jar edb-repcli.jar -removesubdb -repsvrfile ~/subsvrfile.prop \ > -subdbid 2 Removing Subscription Database... Subscription Database removed. 8.3.31 Creating a Subscription (createsub) For SMR only: The createsub command creates a new subscription. Synopsis -createsub subname -subsvrfile subsvrfile -subdbid dbid -pubsvrfile pubsvrfile -pubname pubname The createsub command adds a new subscription subordinate to the subscription database definition with the subscription database ID given by parameter subdbid. See Section 5.3.3 for additional information on creating a subscription. Parameters subname The subscription name to be given to the new subscription. subsvrfile The file containing the subscription server login information of the subscription server under which the new subscription is subordinate. dbid The subscription database ID of the subscription database definition subordinate to which the new subscription is to be added. pubsvrfile Copyright © 2012 EnterpriseDB Corporation. All rights reserved. 355 Postgres Plus xDB Replication Server with Multi-Master User’s Guide The file containing the publication server login information of the publication server under which the publication is subordinate to which the new subscription is to be associated. pubname The publication to which the new subscription is to be associated. Examples In the following example, a subscription named dept_emp_sub is created in the Advanced Server subscription database identified by subscription database ID 2. The subscription is associated with a publication named dept_emp. $ java -jar edb-repcli.jar -createsub dept_emp_sub \ > -subsvrfile ~/subsvrfile.prop \ > -subdbid 2 \ > -pubsvrfile ~/pubsvrfile.prop \ > -pubname dept_emp Creating subscription... Subscription created successfully 8.3.32 Printing a Subscription List (printsublist) For SMR only: The printsublist command prints a list of subscription names. Synopsis -printsublist -repsvrfile subsvrfile -subdbid dbid Parameters subsvrfile The file containing the subscription server login information. dbid The subscription names subordinate to the subscription database definition specified by dbid are printed. Examples $ java -jar edb-repcli.jar -printsublist -repsvrfile ~/subsvrfile.prop \ > -subdbid 2 Printing subscriptions ... dept_emp_sub Copyright © 2012 EnterpriseDB Corporation. All rights reserved. 356 Postgres Plus xDB Replication Server with Multi-Master User’s Guide 8.3.33 Taking a Single-Master Snapshot (dosnapshot) For SMR only: The dosnapshot command performs snapshot synchronization on the specified subscription in a single-master replication system. Synopsis -dosnapshot subname -repsvrfile subsvrfile See Section 5.4.1 for additional information on performing snapshot replication. Parameters subname The name of the subscription for which the snapshot is to be taken. subsvrfile The file containing the subscription server login information. Examples In the following example snapshot replication is performed on subscription dept_emp_sub. $ java -jar edb-repcli.jar -dosnapshot dept_emp_sub \ > -repsvrfile ~/subsvrfile.prop Performing snapshot... Source database connectivity info... conn =jdbc:oracle:thin:@192.168.2.6:1521:xe user =pubuser password=****** Target database connectivity info... conn =jdbc:edb://192.168.2.7:5444/subdb user =subuser password=****** Connecting with source Oracle database server... Connecting with target EnterpriseDB database server... Importing redwood schema EDB... Table List: 'DEPT','EMP' Loading Table Data in 8 MB batches... Disabling FK constraints & triggers on edb.dept before truncate... Truncating table DEPT before data load... Disabling indexes on edb.dept before data load... Loading Table: DEPT ... [DEPT] Migrated 4 rows. [DEPT] Table Data Load Summary: Total Time(s): 0.182 Total Rows: 4 Disabling FK constraints & triggers on edb.emp before truncate... Truncating table EMP before data load... Disabling indexes on edb.emp before data load... Loading Table: EMP ... [EMP] Migrated 14 rows. [EMP] Table Data Load Summary: Total Time(s): 0.178 Total Rows: 14 Copyright © 2012 EnterpriseDB Corporation. All rights reserved. 357 Postgres Plus xDB Replication Server with Multi-Master User’s Guide Enabling FK constraints & triggers on edb.dept... Enabling indexes on edb.dept after data load... Enabling FK constraints & triggers on edb.emp... Enabling indexes on edb.emp after data load... Performing ANALYZE on EnterpriseDB database... Data Load Summary: Total Time (sec): 1.866 Total Rows: 18 Total Size(MB): 0.0 Schema EDB imported successfully. Migration process completed successfully. Migration logs have been saved to /var/log/xdb-rep/build57l ******************** Migration Summary ******************** Tables: 2 out of 2 Constraints: 4 out of 4 Total objects: 6 Successful count: 6 Failure count: 0 ************************************************************* Snapshot taken successfully. 8.3.34 Take a Multi-Master Snapshot (dommrsnapshot) For MMR only: The dommrsnapshot command performs snapshot synchronization on the specified master node in a multi-master replication system. -dommrsnapshot pubname –repsvrfile pubsvrfile -pubhostdbid dbid Parameters pubname The name of the publication for which the snapshot is to be taken. pubsvrfile The file containing the publication server login information. dbid The publication database ID of the target master node for the snapshot replication. Examples In the following example snapshot replication is performed on publication emp_pub to the target master node identified by publication database ID 9. Copyright © 2012 EnterpriseDB Corporation. All rights reserved. 358 Postgres Plus xDB Replication Server with Multi-Master User’s Guide $ java -jar edb-repcli.jar -dommrsnapshot emp_pub \ > -pubhostdbid 9 \ > -repsvrfile ~/pubsvrfile.prop Performing snapshot... Source database connectivity info... conn =jdbc:edb://192.168.2.6:5444/edb user =pubuser password=****** Target database connectivity info... conn =jdbc:edb://192.168.2.7:5444/mmrnode user =mmruser password=****** Connecting with source EnterpriseDB database server... Connecting with target EnterpriseDB database server... Importing enterprisedb schema edb... Table List: 'dept','emp' Loading Table Data in 8 MB batches... Disabling FK constraints & triggers on edb.dept before truncate... Truncating table dept before data load... Disabling indexes on edb.dept before data load... Loading Table: dept ... [dept] Migrated 5 rows. [dept] Table Data Load Summary: Total Time(s): 0.247 Total Rows: 5 Disabling FK constraints & triggers on edb.emp before truncate... Truncating table emp before data load... Disabling indexes on edb.emp before data load... Loading Table: emp ... [emp] Migrated 14 rows. [emp] Table Data Load Summary: Total Time(s): 0.163 Total Rows: 14 Enabling FK constraints & triggers on edb.dept... Enabling indexes on edb.dept after data load... Enabling FK constraints & triggers on edb.emp... Enabling indexes on edb.emp after data load... Performing ANALYZE on EnterpriseDB database... Data Load Summary: Total Time (sec): 0.8 Total Rows: 19 Total Size(MB): 0.0 Schema edb imported successfully. Migration process completed successfully. Migration logs have been saved to /var/log/xdb-rep/build57l ******************** Migration Summary ******************** Tables: 2 out of 2 Constraints: 4 out of 4 Total objects: 6 Successful count: 6 Failure count: 0 ************************************************************* Snapshot taken successfully. 8.3.35 Performing a Synchronization (dosynchronize) The dosynchronize command performs synchronization replication on the specified subscription for a single-master replication system, or for an entire multi-master replication system. Copyright © 2012 EnterpriseDB Corporation. All rights reserved. 359 Postgres Plus xDB Replication Server with Multi-Master User’s Guide Synopsis -dosynchronize { subname | pubname } -repsvrfile { subsvrfile | pubsvrfile } [ -repgrouptype { s | m } ] For a single-master replication system use: -dosynchronize subname –repsvrfile subsvrfile For a multi-master replication system use: -dosynchronize pubname -repsvrfile pubsvrfile -repgrouptype m Note: The dosynchronize command can be used on a subscription without first having to perform a snapshot using the dosnapshot command. The dosynchronize command automatically performs the first required snapshot. See Section 5.4.2 for additional information on performing synchronization replication for a single-master replication system. See Section 6.5.2 for a multi-master replication system. Parameters subname For SMR only: The name of the subscription for which synchronization replication is to be performed. pubname For MMR only: The name of the publication for which synchronization replication is to be performed. subsvrfile For SMR only: The file containing the subscription server login information. pubsvrfile For MMR only: The file containing the publication server login information. -repgrouptype Specify s if this command applies to a single-master replication system. Specify m if this command applies to a multi-master replication system. If omitted, the default is s. Copyright © 2012 EnterpriseDB Corporation. All rights reserved. 360 Postgres Plus xDB Replication Server with Multi-Master User’s Guide Examples In the following example, synchronization replication is performed on subscription dept_emp_sub of a single-master replication system. $ java -jar edb-repcli.jar -dosynchronize dept_emp_sub \ > -repsvrfile ~/subsvrfile.prop Performing synchronize... Synchronize done successfully. In the following example, synchronization replication is performed on publication emp_pub of a multi-master replication system. Note that the -repgrouptype m parameter is required in this case. $ java -jar edb-repcli.jar -dosynchronize emp_pub \ > -repsvrfile ~/pubsvrfile.prop -repgrouptype m Performing synchronize... Publication synchronized successfully. 8.3.36 Configuring a Single-Master Schedule (confschedule) For SMR only: The confschedule command creates a schedule as to when recurring replications are to be initiated for a single-master replication system. Synopsis -confschedule subname –repsvrfile subsvrfile { -remove | -jobtype { s | t } { -realtime no_of_sec | -daily hour minute | -weekly day_of_week hour minute | -monthly month day_of_month hour minute | -cronexpr "cron_expression" } } If the remove parameter is specified, then the schedule is deleted from the subscription. No other parameters other than subname and repsvrfile can be specified in this case. If the remove parameter is omitted, then the jobtype parameter and one of parameters realtime, daily, weekly, monthly, or cronexpr must be specified along with the subname and repsvrfile parameters. If there is an existing schedule for subscription subname, it will be replaced by the new schedule. See Section 7.1 for additional information on creating a schedule. Parameters subname Copyright © 2012 EnterpriseDB Corporation. All rights reserved. 361 Postgres Plus xDB Replication Server with Multi-Master User’s Guide The name of the subscription for which a replication schedule is to be created. subsvrfile The file containing the subscription server login information. -remove If the remove parameter is specified, then any existing schedule is removed from the subscription. If the remove parameter is not specified, then a schedule is created for the subscription. -jobtype Specify s if the scheduled replication is to be done by snapshot. Specify t if the scheduled replication is to be done by synchronization. If the associated publication is a snapshot-only publication, then -jobtype s must be used. no_of_sec The number of seconds between scheduled replications. This can be any integer greater than 0. hour The hour of the day based on a 24-hour clock. This can be any integer from 0 to 23. minute The minute of the hour. This can be any integer from 0 to 59. day_of_week The day of the week. This can be any of the following values: SUN, MON, TUE, WED, THU, FRI, or SAT. This value is case insensitive so Sun and sun will work as well as SUN. month The month of the year. This can be any of the following values: JAN, FEB, MAR, APR, MAY, JUN, JUL, AUG, SEP, OCT, NOV, or DEC. This value is case insensitive so Jan and jan will work as well as JAN. day_of_month Copyright © 2012 EnterpriseDB Corporation. All rights reserved. 362 Postgres Plus xDB Replication Server with Multi-Master User’s Guide The day of the month. This can be any integer greater than or equal to 1, and less than or equal to the number of days in month. cron_expression A cron expression. See appendix Section 9.3.3 for information on writing a cron expression. Examples In the following example, a schedule is created to perform synchronization replication on subscription dept_emp_sub once every 5 minutes. $ java -jar edb-repcli.jar -confschedule dept_emp_sub \ > -repsvrfile ~/subsvrfile.prop \ > -jobtype t \ > -realtime 300 Configuring scheduler ... Job is successfully scheduled. In the following example, the schedule is removed from subscription dept_emp_sub. $ java -jar edb-repcli.jar -confschedule dept_emp_sub \ > -repsvrfile ~/subsvrfile.prop \ > -remove Configuring scheduler ... Scheduled job is removed. 8.3.37 Configuring a Multi-Master Schedule (confschedulemmr) For MMR only: The confschedulemmr command creates a schedule as to when recurring replications are to be initiated for a multi-master replication system. Synopsis -confschedulemmr pubdbid -pubname pubname –repsvrfile pubsvrfile { -remove | { -realtime no_of_sec | -daily hour minute | -weekly day_of_week hour minute | -monthly month day_of_month hour minute | -cronexpr "cron_expression" } } If the remove parameter is specified, then the schedule is deleted from the publication. No other parameters other than pubdbid, pubname, and repsvrfile can be specified in this case. Copyright © 2012 EnterpriseDB Corporation. All rights reserved. 363 Postgres Plus xDB Replication Server with Multi-Master User’s Guide If the remove parameter is omitted, then one of parameters realtime, daily, weekly, monthly, or cronexpr must be specified along with the pubdbid, pubname, and repsvrfile parameters. If there is an existing schedule for publication pubname, it will be replaced by the new schedule. See Section 7.1 for additional information on creating a schedule. Parameters pubdbid The publication database ID of the publication database definition representing the master definition node on which to configure the schedule. pubname The name of the publication for which a replication schedule is to be created. pubsvrfile The file containing the publication server login information. -remove If the remove parameter is specified, then any existing schedule is removed from the publication. If the remove parameter is not specified, then a schedule is created for the publication. no_of_sec The number of seconds between scheduled replications. This can be any integer greater than 0. hour The hour of the day based on a 24-hour clock. This can be any integer from 0 to 23. minute The minute of the hour. This can be any integer from 0 to 59. day_of_week Copyright © 2012 EnterpriseDB Corporation. All rights reserved. 364 Postgres Plus xDB Replication Server with Multi-Master User’s Guide The day of the week. This can be any of the following values: SUN, MON, TUE, WED, THU, FRI, or SAT. This value is case insensitive so Sun and sun will work as well as SUN. month The month of the year. This can be any of the following values: JAN, FEB, MAR, APR, MAY, JUN, JUL, AUG, SEP, OCT, NOV, or DEC. This value is case insensitive so Jan and jan will work as well as JAN. day_of_month The day of the month. This can be any integer greater than or equal to 1, and less than or equal to the number of days in month. cron_expression A cron expression. See appendix Section 9.3.3 for information on writing a cron expression. Examples In the following example, a schedule is created to perform synchronization replication on publication emp_pub subordinate to the master definition node whose publication database ID is 6. Replication is to occur daily at 8:00 AM. $ java -jar edb-repcli.jar -confschedulemmr 6 -pubname emp_pub \ > -repsvrfile ~/pubsvrfile.prop \ > -daily 8 00 Configuring scheduler ... Job is successfully scheduled. In the following example, the schedule is removed from publication emp_pub. $ java -jar edb-repcli.jar -confschedulemmr 6 -pubname emp_pub \ > -repsvrfile ~/pubsvrfile.prop \ > -remove Configuring scheduler ... Scheduled job is removed. 8.3.38 Print Schedule (printschedule) The printschedule command prints a recurring replication schedule. Synopsis -printschedule { subname | pubname } -repsvrfile { subsvrfile | pubsvrfile } [ -repgrouptype { s | m } ] Copyright © 2012 EnterpriseDB Corporation. All rights reserved. 365 Postgres Plus xDB Replication Server with Multi-Master User’s Guide For a single-master replication system use: -printschedule subname –repsvrfile subsvrfile For a multi-master replication system use: -printschedule pubname -repsvrfile pubsvrfile -repgrouptype m Parameters subname For SMR only: The name of the subscription for which the schedule is to be printed. pubname For MMR only: The name of the publication for which the schedule is to be printed. subsvrfile For SMR only: The file containing the subscription server login information. pubsvrfile For MMR only: The file containing the publication server login information. -repgrouptype Specify s if this command applies to a single-master replication system. Specify m if this command applies to a multi-master replication system. If omitted, the default is s. Examples In the following example the schedule is printed for a subscription in a single-master replication system. $ java -jar edb-repcli.jar -printschedule dept_emp_sub \ > -repsvrfile ~/subsvrfile.prop Printing subscription schedule ... Job type Synchronize Scheduled time 2012-06-19 13:27:20 Previous fire time 2012-06-19 13:27:20 Next fire time 2012-06-19 13:32:20 Copyright © 2012 EnterpriseDB Corporation. All rights reserved. 366 Postgres Plus xDB Replication Server with Multi-Master User’s Guide In the following example the schedule is printed for a publication in a multi-master replication system. Note that the -repgrouptype m parameter is required in this case. $ java -jar edb-repcli.jar -printschedule emp_pub \ > -repsvrfile ~/pubsvrfile.prop \ > -repgrouptype m Printing subscription schedule ... Job type Synchronize Scheduled time 2012-06-19 13:27:55 Previous fire time Not available Next fire time 2012-06-20 08:00:00 Cron expression 0 0 8 * * ? 8.3.39 Updating a Subscription (updatesub) For SMR only: The updatesub command allows you to update certain metadata of a given subscription. This metadata allows the subscription server to find the host running the publication server that manages the publication associated with the subscription. Synopsis -updatesub subname -subsvrfile subsvrfile -pubsvrfile pubsvrfile -host newpubsvr_ipaddress -port newpubsvr_port The updatesub command allows you to update the subscription metadata consisting of the IP address and port number identifying the publication server that is the parent of the publication associated with the subscription. This metadata is essential to the proper operation of the replication system since it is the means by which subscription server locates the publication server whenever a replication needs to be performed on a given subscription. The replication process is always carried out by the publication server that manages the publication associated with the subscription. You would use the updatesub command in the scenario where you have built your replication system using IP addresses that are valid at that point in time. At some later point, the IP address assigned to the host running the publication server has changed. You use the host and port parameters of the updatesub command to supply the new network address identifying the publication server. See Section 5.5.3 for additional information on updating a subscription. Copyright © 2012 EnterpriseDB Corporation. All rights reserved. 367 Postgres Plus xDB Replication Server with Multi-Master User’s Guide Parameters subname The name of the subscription whose metadata is to be updated. subsvrfile The file containing the subscription server login information for the subscription server in which subscription subname was created. pubsvrfile The file containing publication server login information for the publication server that manages the publication associated with subscription subname. Note that the values that you supply for newpubsvr_ipaddress and newpubsvc_port must be the same as the values set in fields host and port in file pubsvrfile. newpubsvr_ipaddress The new IP address for the publication server that manages the publication associated with subscription subname. This value must be the same as the IP address specified for field host in file pubsvrfile. newpubsvr_port The new port number for the publication server that manages the publication associated with subscription subname. This value must be the same as the port number specified for field port in file pubsvrfile. Examples If the publication server host IP address has been changed to 192.168.2.7, then make sure the publication server login information in file pubsvrfile.prop contains the new IP address as shown by the following: host=192.168.2.7 port=9051 user=enterprisedb # Password is in encrypted form. password=ygJ9AxoJEX854elcVIJPTw== To update the metadata for subscription dept_emp_sub so that its subscription server can find the new publication server host, run the following command: $ java -jar edb-repcli.jar -updatesub dept_emp_sub \ > -subsvrfile ~/subsvrfile.prop \ > -pubsvrfile ~/pubsvrfile.prop \ > -host 192.168.2.7 \ Copyright © 2012 EnterpriseDB Corporation. All rights reserved. 368 Postgres Plus xDB Replication Server with Multi-Master User’s Guide > -port 9051 Updating subscription dept_emp_sub... Subscription is updated successfully 8.3.40 Removing a Subscription (removesub) For SMR only: The removesub command removes a subscription. Synopsis -removesub subname –repsvrfile subsvrfile See Section 5.5.4 for additional information on removing a subscription. Parameters subname The name of the subscription to be removed. subsvrfile The file containing the subscription server login information. Examples A subscription named dept_emp_sub is removed. $ java -jar edb-repcli.jar -removesub dept_emp_sub \ > -repsvrfile ~/subsvrfile.prop Removing subscription... Subscription removed successfully. 8.3.41 Scheduling Shadow Table History Cleanup (confcleanupjob) The confcleanupjob command creates a schedule as to when shadow table history is to be deleted. Synopsis -confcleanupjob pubdbid –repsvrfile pubsvrfile { -disable | -enable { -hourly no_of_hours | -daily hour | -weekly day_of_week hour } } Copyright © 2012 EnterpriseDB Corporation. All rights reserved. 369 Postgres Plus xDB Replication Server with Multi-Master User’s Guide If the disable parameter is specified, then the schedule is deleted. No other parameters other than pubdbid and pubsvrfile can be specified in this case. If the disable parameter is omitted, then the enable parameter and one of parameters hourly, daily, or weekly must be specified along with the pubdbid and pubsvrfile parameters. See Section 7.4.1 for additional information on creating a schedule for shadow table history cleanup. Parameters pubdbid Publication database ID of the publication database definition for which a schedule is to be enabled or disabled for deleting shadow table history. pubsvrfile The file containing the publication server login information. -disable If the disable parameter is specified, then any existing shadow table history cleanup schedule is removed from the publication database definition. If the disable parameter is not specified, then enable must be specified. -enable Establish a schedule for shadow table history cleanup. no_of_hours The number of hours between scheduled shadow table history cleanup jobs. This can be any integer between 1 and 12 inclusive. hour The hour of the day based on a 24-hour clock. This can be any integer from 0 to 23. day_of_week The day of the week. This can be any of the following values: SUNDAY, MONDAY, TUESDAY, WEDNESDAY, THURSDAY, FRIDAY, or SATURDAY. This value is case insensitive so Sunday and sunday will work as well as SUNDAY. Copyright © 2012 EnterpriseDB Corporation. All rights reserved. 370 Postgres Plus xDB Replication Server with Multi-Master User’s Guide Examples In the following example shadow table history cleanup is scheduled to run once every 3 hours on the shadow tables created within the publication database definition identified by publication database ID 1. $ java -jar edb-repcli.jar -confcleanupjob 1 \ > -repsvrfile ~/pubsvrfile.prop \ > -enable -hourly 3 Configuring cleanup job ... Cleanup job configured. In the following example shadow table history cleanup is scheduled to run once a day at 6:00 PM on the shadow tables created within the publication database definition identified by publication database ID 1. $ java -jar edb-repcli.jar -confcleanupjob 1 \ > -repsvrfile ~/pubsvrfile.prop \ > -enable -daily 18 Configuring cleanup job ... Cleanup job configured. In the following example shadow table history cleanup is scheduled to run every Wednesday at 8:00 AM on the shadow tables created within the publication database definition identified by publication database ID 1. $ java -jar edb-repcli.jar -confcleanupjob 1 \ > -repsvrfile ~/pubsvrfile.prop \ > -enable –weekly WEDNESDAY 8 Configuring cleanup job ... Cleanup job configured. In the following example the shadow table history cleanup job is disabled on the publication database definition identified by publication database ID 1. $ java -jar edb-repcli.jar -confcleanupjob 1 \ > -repsvrfile ~/pubsvrfile.prop -disable Configuring cleanup job ... Cleanup job removed. 8.3.42 Cleaning Up Shadow Table History (cleanshadowhistforpub) The cleanshadowhistforpub command deletes the shadow table history for the specified publication. Synopsis -cleanshadowhistforpub pubname –repsvrfile pubsvrfile See Section 7.4.2 for additional information on cleaning up shadow table history. Copyright © 2012 EnterpriseDB Corporation. All rights reserved. 371 Postgres Plus xDB Replication Server with Multi-Master User’s Guide Parameters pubname The name of the publication for which the shadow table history is to be deleted. pubsvrfile The file containing the publication server login information. Examples In the following example shadow table history is deleted for publication dept_emp. $ java -jar edb-repcli.jar -cleanshadowhistforpub dept_emp \ > -repsvrfile ~/pubsvrfile.prop Removing shadow table's transaction history ... Shadow table's transaction history removed successfully. 8.3.43 Cleaning Up Replication History (cleanrephistoryforpub) The cleanrephistoryforpub command deletes the replication history for the specified publication. Synopsis -cleanrephistoryforpub pubname –repsvrfile pubsvrfile See Section 7.4.3 for additional information on cleaning up replication history. Parameters pubname The name of the publication for which replication history is to be deleted. pubsvrfile The file containing the publication server login information. Examples In the following example replication history is deleted for publication dept_emp. $ java -jar edb-repcli.jar -cleanrephistoryforpub dept_emp \ > -repsvrfile ~/pubsvrfile.prop Removing publication's replication history ... Copyright © 2012 EnterpriseDB Corporation. All rights reserved. 372 Postgres Plus xDB Replication Server with Multi-Master User’s Guide Replication history has been removed. 8.3.44 Cleaning Up All Replication History (cleanrephistory) The cleanrephistory command deletes the replication history for all publications in the specified publication server. Synopsis -cleanrephistory –repsvrfile pubsvrfile See Section 7.4.3 for additional information on cleaning up replication history. Parameters pubsvrfile The file containing the publication server login information. Examples In the following example, replication history is deleted for all publications in the publication server identified by the content of file pubsvrfile.prop. $ java -jar edb-repcli.jar -cleanrephistory -repsvrfile ~/pubsvrfile.prop Removing all publication's replication history ... Replication history has been removed. Copyright © 2012 EnterpriseDB Corporation. All rights reserved. 373 Postgres Plus xDB Replication Server with Multi-Master User’s Guide 9 Appendix This chapter discusses various miscellaneous topics. 9.1 Source and Target Database Server Configurations Depending upon the database products you are using with xDB Replication Server (Oracle, SQL Server, PostgreSQL, or Postgres Plus Advanced Server) along with the compatibility configuration mode if you are using Advanced Server, certain combinations of a source database server and a target database server are not permitted for a publication and its associated subscription in a single-master replication system. The source refers to the database server of the publication database. The target refers to the database server of the subscription database. This section presents the specific combinations of database server configurations that can be used for a publication and its associated subscription. 9.1.1 Advanced Server Compatibility Configuration Modes Postgres Plus Advanced Server supports two compatibility configuration modes of operation, which are the following: Oracle compatible configuration mode. Operations are performed using Oracle syntax and semantics for data types, functions, database object creation, and so forth. This mode is useful when your applications are migrated from Oracle, or you want your applications built in an Oracle compatible fashion. PostgreSQL compatible configuration mode. Operations are performed using native PostgreSQL syntax and semantics. This mode is useful when your applications are migrated from PostgreSQL, or you want your applications built in a PostgreSQL compatible fashion. For more information on features supported in Oracle compatible configuration mode, see the Oracle Compatibility Developer’s Guide located on the Postgres Plus Documentation web page (http://www.enterprisedb.com/learning/documentation.do) The compatibility configuration mode is selected at the time you install Postgres Plus Advanced Server. 9.1.2 Permitted Source and Target Configurations The following table shows the combinations of source and target database server products and Advanced Server compatibility configuration modes permitted by xDB Replication Server: Copyright © 2012 EnterpriseDB Corporation. All rights reserved. 374 Postgres Plus xDB Replication Server with Multi-Master User’s Guide Table 7 – Permitted Source and Target Configurations Source \ Target Oracle Microsoft SQL Server PostgreSQL Postgres Plus Advanced Server (Oracle compatible) Postgres Plus Advanced Server (PostgreSQL compatible) Oracle No Postgres Plus Postgres Plus Microsoft Advanced Advanced SQL PostgreSQL Server Server (Oracle Server (PostgreSQL compatible) compatible) No Yes Yes Yes No No Yes Yes Yes No Yes Yes Yes Yes Yes Yes No Yes No No Yes Yes Yes Yes In the preceding table, the left hand column lists the possible source database server products including the possible Advanced Server compatibility configuration modes. The top row lists the same set of possible target database server products and Advanced Server compatibility configuration modes. ‘Yes’ at the intersection of a source and target indicates that xDB Replication Server permits replication using that combination of database server configurations for a publication and its associated subscription. ‘No’ indicates replication is not permitted for that combination. 9.2 Resolving Problems This section contains tips for locating and correcting various problems that may occur. 9.2.1 Error Messages The following table is a list of error messages that can appear from the xDB Replication Console. The messages are listed in alphabetical order based on the first word in the message following “a”, “an”, or “the”. When an error message is displayed by the xDB Replication Console, it may be followed by a specific reason as denoted by Reason: reason_for_failure as in the following example: Authentication failed. Reason: Invalid user name/password. The various specific reasons are not listed for all messages in the table. Table 8 - xDB Replication Server Error Messages Error Messages and Resolutions Authentication failed. Reason: Invalid user name/password. Resolution: Occurs when registering a publication server or subscription server. Verify the user name Copyright © 2012 EnterpriseDB Corporation. All rights reserved. 375 Postgres Plus xDB Replication Server with Multi-Master User’s Guide Error Messages and Resolutions and password you enter matches the user name and password in the xDB Replication Configuration file on the host you are running the publication server or subscription server. The connection could not be established with the server. Verify that the server is running and accepting connections. Resolution: Occurs whenever a Java RMI connection cannot be made to the publication server, the subscription server, or a database server. Can occur when registering a publication or subscription server, adding a publication database or a subscription database, or identifying the publication server for a new subscription. Verify you have entered the correct host IP address and port number of the server. Verify the server is running (see Section 9.2.4.1). If the server is running on Linux, verify that in the /etc/hosts file, the host name is mapped to the correct network IP address, which matches the IP address returned by the Linux /sbin/ifconfig command, and also matches the IP address you entered in the Host field of the dialog box. Alternatively, instead of modifying the /etc/hosts file, set configuration option java.rmi.server.hostname to the IP address of the publication or subscription server (see Section 9.3.1.6). Do not use the loopback address 127.x.x.x for this entry. The database cannot be registered because a partial schema already exists. A manual cleanup is required to proceed. Resolution: The metadata database objects from a prior publication already exist in the schema under which the publication server is attempting to create new metadata database objects. Perform the operation described in Section 9.2.4.2. Database cannot be removed. Reason: Publication database connection cannot be removed as one or more publications are defined against it. Resolution: Make sure all publications subordinate to the publication database definition have been removed. If no publications appear under the Publication Database node in the xDB Replication Console replication tree and the error persists, there may be a problem with the replication system metadata. Perform the operation described in Section 9.2.4.2. Database cannot be removed. Reason: Publication service failed to clean up replication control schema tables. Resolution: The metadata database objects under the Oracle publication database user schema or under the Postgres schema _edb_replicator_pub cannot be deleted by the publication server. The metadata database objects or schema may have already been deleted. The publication database definition cannot be removed using the xDB Replication Console. Perform the operation described in Section 9.2.4.2. Database connection cannot be added. Cannot register database because it is already registered by a publication service. Resolution: A given Oracle database can be specified in a publication database definition only once with a given network location and user name. An Oracle database can be used multiple times if different Oracle user names are used for each publication database definition. A given Postgres database can be specified in a publication database definition only once with a given network location. Database connection cannot be added. Publication database connection registration failed. Reason: IO exception: The Network Adapter could not establish the connection. Resolution: Verify that the database server is running. For Oracle, verify that the Oracle listener program lsnrctl is running. Database connection cannot be added. The user has insufficient privileges to manage publications. Grant required privileges as listed below and then proceed with operation. Resolution: An Oracle publication database user must have CONNECT, RESOURCE, and CREATE ANY TRIGGER privileges. Copyright © 2012 EnterpriseDB Corporation. All rights reserved. 376 Postgres Plus xDB Replication Server with Multi-Master User’s Guide Error Messages and Resolutions The initial snapshot is not performed for this publication. Please take the snapshot first and then proceed with the synchronize operation. Resolution: A snapshot replication must be performed before the first synchronization replication. Perform an on demand snapshot replication. It is recommended to use a network IP address, the loopback address may result in connectivity issues. Resolution: This warning is given when localhost or 127.0.0.1 is specified as the host address of a replication system component. If is strongly recommended that all replication system components are identified by their specific IP address on the network. The log triggers creation failed for one or more publication tables. Make sure the database is in valid state and user is granted the required privileges. Resolution: Either the user does not have the trigger creation privilege or there is a database server problem. The database server message is displayed as part of the error. No JDBC Client driver is configured for the Oracle data source. Resolution: Occurs when creating an Oracle publication or subscription database definition. Copy the Oracle JDBC driver file ojdbc14.jar to subdirectory lib/jdbc of where the publication server or subscription server is installed on the host running the publication server or subscription server. Restart the publication server or subscription server. One or more subscriptions are defined against this publication. Removing the publication will invalidate the subscription. Resolution: Warning issued when you attempt to remove a publication with subscriptions associated with it. You can remove the publication, but the subscriptions are no longer usable and should be removed as well. Only subscription which has subscribed against a publication with transactional replication type, can be synchronized. Resolution: You cannot perform synchronization replication on a snapshot-only publication. Perform snapshot replication instead. Parent table table_name is not selected when its child tables are part of the publication list. Resolution: Table selected for a publication has a foreign key referencing a parent table that has not been chosen for the publication. This is only a warning that the parent table will not be part of the subscription. Problem occurred in publish process. Reason: ERROR: permission denied for schema _edb_replicator_pub Resolution: For a Postgres publication, verify that the publication database user has CREATE ON DATABASE privilege on the publication database, or the database user is a superuser. Publication cannot be created. One or more tables have no attributes defined and cannot be published. Unselect the specific tables and retry. Resolution: In Postgres, it is possible to create a table with no columns. A publication is not allowed to include a Postgres table with no columns since the corresponding subscription table cannot be created in Oracle. Publication cannot be created. Publication publication_name already exists on the publisher server. Please choose a different name and then proceed. Resolution: Publication names must be unique within a publication server. Enter a different publication Copyright © 2012 EnterpriseDB Corporation. All rights reserved. 377 Postgres Plus xDB Replication Server with Multi-Master User’s Guide Error Messages and Resolutions name. Publication cannot be created. Table table_name does not contain a primary key. Transactional replication is not supported for a non-pk table. Resolution: All tables used for synchronization replication must have primary keys. Create a primary key on the table or add the table to a snapshot-only publication. Publication cannot be created. The publication creation process timed out as one or more tables may be locked by another session. Please retry later. Resolution: For a Postgres publication that is not for snapshot-only, the publication database user must be able to create triggers on the publication tables. In order to do this, the publication database user must have the privilege to execute the ALTER TABLE statement on the publication tables and the publication database user must have CREATE and USAGE privileges on the schema containing the publication tables. Verify that one of the following is true: 1) All the tables in the publication are owned by the publication database user and the user has CREATE and USAGE privileges on the publication tables’ schemas, or 2) the publication database user is a superuser. Publication cannot be updated. Reason: The parent table schema.table_name is selected for removal while it has one or more child tables in the publication list. Make sure that parent-child dependency holds in the publication tables. Resolution: Choose the child tables for removal as well as the parent table. Publication does not exist on the publication server. It might have been removed. Resolution: The publication does not exist for a given subscription. The subscription is no longer usable and must be removed. Publication having subscription against it, cannot be updated by adding tables into (or removing tables from) it. Resolution: Remove the subscription, add tables to, or remove tables from the publication, then add the subscription. Publication Service connection failure. Resolution: Verify that the publication server is running. See Section 9.2.4.1. The replication control database cannot be registered as the publication database. Resolution: Occurs when adding a publication database. Publications cannot be created in the xDB Control database so you cannot register the xDB Control database as a publication database. The replication process could not be completed due to a database failure. Check the database state and retry. Resolution: May be caused by characters in the publication data that are illegal for the character set of the subscription database. Check the snapshot replication failure log file or the database server log file. See Section 9.3.1.2. Replication server does not support Oracle to Oracle replication. Resolution: See Section 9.1 for supported database server configurations. Use Oracle products for Oracle to Oracle replication. Subscription subscription_name already exists on the subscriber server. Please choose a different name and then proceed. Resolution: Subscription names must be unique within a subscription server. Enter a different subscription name. Copyright © 2012 EnterpriseDB Corporation. All rights reserved. 378 Postgres Plus xDB Replication Server with Multi-Master User’s Guide Error Messages and Resolutions Subscription subscription_name cannot be removed. Reason: Publication does not exist on the publication server. Resolution: Warning issued if the subscription you are attempting to remove does not have an associated publication. You can still remove the subscription. Subscription database connection cannot be removed as one or more subscriptions are defined against it. Resolution: You cannot remove a subscription database definition if there are subordinate subscriptions. Remove the subscriptions first. Subscription does not exist on the subscription service. It might have been removed by some other user. Resolution: The Subscription node you are trying to select no longer represents an existing subscription. The subscription may have been removed by a concurrent xDB Replication Console or xDB Replication Server CLI session. Click the Refresh icon in the xDB Replication Console toolbar to display the current replication tree. Subscription Service connection failure. Resolution: Verify that the subscription server is running. See Section 9.2.4.1 A table with large object type PK attribute cannot be published for (synchronize) incremental replication. Resolution: Oracle doesn’t log changes for a large object column. Such a column cannot be referenced in the triggers that log changes to the shadow tables. Use snapshot-only replication instead. Test result: Failure Database connection information test failed. Reason: Connection refused. Check that the hostname and port are correct and that the postmaster is accepting TCP/IP connections. Resolution: Occurs when testing the connection of a publication or subscription database definition. The publication or subscription server cannot connect to the database server network location given in the Add Database dialog box. Verify that the correct IP address and port for the database server are given. Verify that the database server is running and is accessible from the host running the publication or subscription server. Test result: Failure Database connection information test failed. Reason: FATAL: no pg_hba.conf entry for host "xxx.xxx.xx.xxx", user "user_name", database "db_name", SSL off Resolution: Occurs when testing the connection of a publication or subscription database definition. Verify that the database host IP address, port number, database user name, password, and database identifier are correct. Verify that the database server is running. For a Postgres database, verify there is an entry in the pg_hba.conf file permitting access to the database by the given user name originating from the IP address where the publication server or subscription server is running. Unable to create Subscription subscription_name. Reason: Connection rejected: FATAL: no pg_hba.conf entry for host "xxx.xxx.xx.xxx" user "user_name", database "db_name", SSL off Resolution: Occurs when creating a subscription. The subscription server running on host xxx.xxx.xx.xxx could not access the xDB Control database. Verify that the pg_hba.conf file on the xDB Control database server permits access from the subscription server host Unable to create subscription schema tables. Org.postgresql.util.PSQLException: FATAL: no pg_hba.conf entry for host "xxx.xxx.xx.xxx" user "user_name", database "db_name", SSL off Copyright © 2012 EnterpriseDB Corporation. All rights reserved. 379 Postgres Plus xDB Replication Server with Multi-Master User’s Guide Error Messages and Resolutions Resolution: Occurs when creating a subscription. The subscription server running on host xxx.xxx.xx.xxx could not access the publication database. Verify that the pg_hba.conf file on the publication database server permits access from the subscription server host. Unable to create subscription schema tables. The database type is not supported. Resolution: The subscription database type is not supported for the intended publication database type. See Section 9.1.2 for a list of permitted source and target database server configurations. Unable to create subscription schema tables. The table "table_name" could not be created in EnterpriseDB database. Resolution: The subscription server was unable to create a subscription table definition in the intended target schema. The error returned by the database server is displayed. Typically, the reason is that a table with the same name already exists in the target schema of the subscription database. Unable to perform snapshot for subscription sub_name. Reason: org.postgresql.util.PSQLException: FATAL: no pg_hba.conf entry for host "xxx.xxx.xx.xxx", user "user_name", database "db_name", SSL off Resolution: Occurs when attempting a snapshot replication. The publication server running on host xxx.xxx.xx.xxx could not access the subscription database. Verify that the pg_hba.conf file on the subscription database server permits access from the publication server host. Unable to synchronize. Reason: FATAL: no pg_hba.conf entry for host "xxx.xxx.xx.xxx", user "user_name", database "db_name", SSL off Reason: Occurs during an implicit synchronization following snapshot replication. The publication server running on host xxx.xxx.xx.xxx could not access the subscription server’s xDB Control database. Verify that the pg_hba.conf file on the subscription server permits access from the publication server host using network address xxx.xxx.xx.xxx. Unable to update publication database information. Reason: Publication control schema does not exist on target database. Resolution: The metadata database objects in the publication database may have been deleted or corrupted. For an Oracle publication database the metadata database objects are located in the publication database user’s schema. For a Postgres publication database the metadata database objects are located in schema _edb_replicator_pub. See Section 9.2.4.2. 9.2.2 Where to Look for Errors There are a number of places to look to find more detailed information about a replication error that may have occurred. This section provides a guide as to where to look for various types of errors. 9.2.2.1 General Replication Status In the xDB Replication Console, view the replication history. See Section 7.3. Copyright © 2012 EnterpriseDB Corporation. All rights reserved. 380 Postgres Plus xDB Replication Server with Multi-Master User’s Guide 9.2.2.2 Snapshot Replication Failures View the log file found in the following path: For Linux: /var/log/xdb-rep/buildnn/mtk_yyyymmddhhmiss.log For Windows: POSTGRES_HOME\.enterprisedb\edb_replicator\buildnn\mtk_yyyymm ddhhmiss.log POSTGRES_HOME is the home directory of the Windows postgres account (enterprisedb account for Advanced Server installed in Oracle compatible configuration mode). In the buildnn subdirectory, nn is the xDB Replication Server build number. The specific location of POSTGRES_HOME is dependent upon your version of Windows. 9.2.2.3 Synchronization Replication Failures Check the database server log file. The typical default location of these files is: POSTGRES_INSTALL_HOME/data/pg_log 9.2.2.4 Publication and Subscription Server Startup Failures View the log files pubserver.log and subserver.log in the following directory: For Linux: /var/log/xdb-rep/buildnn For Windows: POSTGRES_HOME\.enterprisedb\edb_replicator\buildnn POSTGRES_HOME is the home directory of the Windows postgres account (enterprisedb account for Advanced Server installed in Oracle compatible configuration mode). In the buildnn subdirectory, nn is the xDB Replication Server build number. The specific location of POSTGRES_HOME is dependent upon your version of Windows. Copyright © 2012 EnterpriseDB Corporation. All rights reserved. 381 Postgres Plus xDB Replication Server with Multi-Master User’s Guide Note: The severity level of messages logged in these files can be controlled by a configuration option. See Section 9.3.1.1. Also check the database server log file. 9.2.2.5 Database Server Errors Check the database server log file. The typical default location of these files is: POSTGRES_INSTALL_HOME/data/pg_log 9.2.2.6 Oracle Errors For problems in Oracle, first find the directory locations of the log files by issuing the following commands in SQL*Plus: SQL> SHOW PARAMETER USER_DUMP_DEST; NAME TYPE VALUE ------------------------------------ ----------- -----------------------------user_dump_dest string /usr/lib/oracle/xe/app/oracle/ admin/XE/udump The directory given by parameter USER_DUMP_DEST contains errors given by user processes. SQL> CONNECT system/password Connected. SQL> SHOW PARAMETER BACKGROUND_DUMP_DEST; NAME TYPE VALUE ------------------------------------ ----------- -----------------------------background_dump_dest string /usr/lib/oracle/xe/app/oracle/ admin/XE/bdump The directory given by parameter BACKGROUND_DUMP_DEST contains errors given by the Oracle background processes. Find the latest log file in the preceding directories to investigate the problem. 9.2.3 Common Problem Checklist Use the following checklist to verify that the proper configuration steps have been followed. Omission of one or more of these steps is a common source of errors. Step 1: Verify that the database server of the publication database, the database server of the subscription database (for single-master replication systems), the database servers of the master nodes (for multi-master replication systems), and the database server of the xDB Control database are all running. Copyright © 2012 EnterpriseDB Corporation. All rights reserved. 382 Postgres Plus xDB Replication Server with Multi-Master User’s Guide Step 2: When viewing information in the xDB Replication Console, click the Refresh icon in the toolbar to ensure you are viewing the most current information, especially after making a configuration change to your replication system. Step 3: Verify that the publication server and the subscription server (for single-master replication systems) are running. If they are not running and cannot be started see Section 9.2.4.1. Step 4: If you are using an Oracle publication or subscription database, verify that the Oracle JDBC driver file, ojdbc14.jar has been copied to the XDB_HOME/lib/jdbc directory. XDB_HOME is the location where you installed xDB Replication Server. This directory is typically the Postgres installation home directory. See Section 5.1.1.1. Step 5: Verify that the necessary privileges have been granted to the publication database user. For an Oracle publication database, verify that the publication database user has CONNECT, RESOURCE, and CREATE ANY TRIGGER privileges. See Section 5.1.2.1. For a SQL Server publication database, verify the following: In the msdb database, verify that the database user mapped to the SQL Server login given in the publication database definition has EXECUTE and SELECT privileges on schema dbo. In the publication database, verify that the database user mapped to the SQL Server login given in the publication database definition has its default schema set to the schema containing the xDB Replication Server metadata database objects. For the same database user discussed in the prior paragraph, verify that this database user is either the owner of the schema containing the xDB Replication Server metadata database objects, or has the following privileges on this schema: ALTER, EXECUTE, SELECT, INSERT, UPDATE, and DELETE. For the same database user discussed in the prior paragraph, verify that this database user has CREATE TABLE and CREATE PROCEDURE privileges. For the same database user discussed in the prior paragraph, verify that this database user has ALTER privilege on the publication tables. For any database user that will be updating the publication tables, verify that these database users have EXECUTE, SELECT, and INSERT privileges on the schema containing the xDB Replication Server metadata database objects. See Section 5.1.2.2. Copyright © 2012 EnterpriseDB Corporation. All rights reserved. 383 Postgres Plus xDB Replication Server with Multi-Master User’s Guide For a Postgres publication database in a single-master replication system, verify that the publication database user has the CREATE ON DATABASE privilege on the publication database, the CREATE and USAGE privileges on the schema containing the publication tables and views, and is the owner of the publication tables. Alternatively, use a superuser for a Postgres publication database user name. See Section 5.1.2.3. For the master definition node in a multi-master replication system, verify that the publication database user is a superuser, has the privilege to modify pg_catalog tables, and is the owner of the publication tables. See Section 6.1.1. For a master node other than the master definition node in a multi-master replication system, verify that the master node database user is a superuser and has the privilege to modify pg_catalog tables. See Section 6.1.2. Step 6: Verify that the necessary privileges have been granted to the subscription database user. For an Oracle subscription database, verify that the subscription database user has CONNECT and RESOURCE privileges. For a Postgres subscription database, verify that the subscription database user is a superuser and has the privilege to modify pg_catalog tables. See Section 5.1.3. Step 7 (For Linux only): Verify that the network IP address returned by the /sbin/ifconfig command either matches the IP address associated with the host name in the /etc/hosts file (see Section 5.1.4.2), or matches the IP address specified with the java.rmi.server.hostname configuration option in the publication and subscription server configuration files (see Section 9.3.1.6). 9.2.4 Troubleshooting Areas The following topics provide information on specific problem areas you may encounter. 9.2.4.1 Starting the Publication Server or Subscription Server Note: The subscription server only applies to single-master replication systems. Copyright © 2012 EnterpriseDB Corporation. All rights reserved. 384 Postgres Plus xDB Replication Server with Multi-Master User’s Guide If you cannot start the publication server or the subscription server perform the following steps: Step 1: Check the pubserver.log and subserver.log files for errors. Step 2: Check the log file of the Postgres database server running the xDB Control database for errors. Step 3: Verify that the user name and password in the xDB Replication Configuration file on the hosts running the publication server and subscription server match a superuser name and password in the Postgres database server running the xDB Control database that the publication server and subscription server are attempting to access. Step 4: Verify that the pg_hba.conf file of the Postgres database server running the xDB Control database has an entry that allows access to the xDB Control database from the loopback address (127.0.0.1) by the user name in the xDB Replication Configuration file. 9.2.4.2 Deleting the xDB Replication Server Metadata The xDB Replication Server metadata completely describes the replication system. This metadata must be complete and correct in order for replication to occur properly. In addition, the configuration and maintenance operations performed through the xDB Replication Console or the xDB Replication Server CLI cannot be accomplished properly unless the metadata is complete and correct. There may be occasions where the metadata becomes corrupted. Either one or more tables containing metadata are inadvertently deleted, or the data within the metadata tables becomes corrupted. Typically, corruption occurs in the form of the first case – one or more metadata tables were deleted, or the entire schema and its contents were deleted manually using an SQL utility rather than through the operation of the xDB Replication Console or xDB Replication Server CLI. In these situations, there is usually no other choice than to remove all of the remaining metadata database objects using the database management system’s deletion functions, which effectively deletes all replication systems that use the publication server and subscription server that access the xDB Control database where the metadata database objects are to be deleted. All replication systems running subordinate to the publication server and subscription server must then be recreated following the directions in sections 5.2 onward. Warning: Do not attempt this if any replication systems are running in production. All replication systems using the affected publication server and subscription server will become inoperable. Copyright © 2012 EnterpriseDB Corporation. All rights reserved. 385 Postgres Plus xDB Replication Server with Multi-Master User’s Guide This section describes what to look for in order to tell if the metadata is not complete, and if so, what must be deleted to completely remove the replication system. This section does not discuss the internal contents of the metadata tables. If all of the database objects comprising the metadata are present, then review the checklist in Section 9.2.3 before proceeding with deletion of the metadata as it is fairly unlikely that the content of a metadata table becomes corrupted. If you decide that you must delete all of the metadata database objects, follow the steps as discussed in the following: Step 1: Stop the publication server. Step 2: Stop the subscription server. Step 3: Look for the metadata database objects contained within a publication database. In the example used in this section, pubuser is the publication database user name. The publication consists of two tables – dept and emp. For Oracle only: The metadata database objects to manage the publication are created in the publication database user’s schema as shown in the following output: SQL> CONNECT pubuser/password Connected. SQL> SET PAGESIZE 9999 SQL> SELECT table_name FROM user_tables; TABLE_NAME -----------------------------RREP_TABLES RREP_PUBLICATION_TABLES RREP_TXSET RREP_MMR_TXSET RREP_PUBLICATION_SUBSCRIPTIONS RREP_TXSET_LOG RREP_LOCK RREP_MMR_PUB_GROUP RREP_PROPERTIES RREP_TXSET_HEALTH RRST_EDB_DEPT RRST_EDB_EMP 12 rows selected. SQL> SELECT sequence_name FROM user_sequences; SEQUENCE_NAME -----------------------------RREP_TX_SEQ RREP_TXSET_SEQ RREP_COMMON_SEQ SQL> SELECT DISTINCT name FROM user_source WHERE type = 'PACKAGE'; NAME ------------------------------ Copyright © 2012 EnterpriseDB Corporation. All rights reserved. 386 Postgres Plus xDB Replication Server with Multi-Master User’s Guide RREP_PKG SQL> SELECT trigger_name FROM user_triggers; TRIGGER_NAME -----------------------------RRPI_EDB_DEPT RRPU_EDB_DEPT RRPD_EDB_DEPT RRPI_EDB_EMP RRPU_EDB_EMP RRPD_EDB_EMP 6 rows selected. Note the following in the preceding output. The tables named according to the convention RRST_schema_table from the SELECT statement on user_tables are found only for synchronization publications. In this example, these tables are RRST_EDB_DEPT and RRST_EDB_EMP. The triggers named according to the convention RRPD_schema_table, RRPI_schema_table, and RRPU_schema_table from the SELECT statement on user_triggers are found only for synchronization publications. In this example, these triggers are RRPU_EDB_DEPT, RRPI_EDB_DEPT, RRPD_EDB_DEPT, RRPI_EDB_EMP, RRPU_EDB_EMP, and RRPD_EDB_EMP. The following example shows what the same set of queries would look like if the publication was a snapshot-only publication: SQL> CONNECT pubuser/password Connected. SQL> SET PAGESIZE 9999 SQL> SELECT table_name FROM user_tables; TABLE_NAME -----------------------------RREP_TABLES RREP_PUBLICATION_TABLES RREP_TXSET RREP_MMR_TXSET RREP_PUBLICATION_SUBSCRIPTIONS RREP_TXSET_LOG RREP_LOCK RREP_MMR_PUB_GROUP RREP_PROPERTIES RREP_TXSET_HEALTH 10 rows selected. SQL> SELECT sequence_name FROM user_sequences; SEQUENCE_NAME -----------------------------RREP_TX_SEQ RREP_TXSET_SEQ RREP_COMMON_SEQ Copyright © 2012 EnterpriseDB Corporation. All rights reserved. 387 Postgres Plus xDB Replication Server with Multi-Master User’s Guide SQL> SELECT DISTINCT name FROM user_source WHERE type = 'PACKAGE'; NAME -----------------------------RREP_PKG SQL> SELECT trigger_name FROM user_triggers; no rows selected For SQL Server only: Most of the metadata database objects to manage the publication are created in the schema of your choosing when the publication database is prepared as described in Section 5.1.2.2. The following examples assume the metadata database objects are in schema pubuser. The publication tables are dept and emp located in the edb schema. The following query lists the metadata database objects located in the pubuser schema: 1> USE edb; 2> GO Changed database context to 'edb'. 1> 2> SELECT s.name + '.' + o.name "Object Name", o.type_desc "Object Type" 3> FROM sys.objects o, 4> sys.schemas s 5> WHERE s.name = 'pubuser' 6> AND o.type IN ('U','P') 7> AND o.schema_id = s.schema_id 8> ORDER BY 2, 1; 9> GO Object Name Object Type -------------------------------------- -------------------------------------pubuser.CleanupShadowTables SQL_STORED_PROCEDURE pubuser.ConfigureCleanUpJob SQL_STORED_PROCEDURE pubuser.ConfigureCreateTxSetJob SQL_STORED_PROCEDURE pubuser.CreateMultiTxSet SQL_STORED_PROCEDURE pubuser.CreateTableLogTrigger SQL_STORED_PROCEDURE pubuser.CreateTxSet SQL_STORED_PROCEDURE pubuser.CreateUniTxSet SQL_STORED_PROCEDURE pubuser.GetNewTxsCount SQL_STORED_PROCEDURE pubuser.JobCleanup SQL_STORED_PROCEDURE pubuser.JobCreateTxSet SQL_STORED_PROCEDURE pubuser.LoadPubTableList SQL_STORED_PROCEDURE pubuser.nextval SQL_STORED_PROCEDURE pubuser.RemoveCleanupJob SQL_STORED_PROCEDURE pubuser.RemoveCreateTxSetJob SQL_STORED_PROCEDURE pubuser.sp_createsequence SQL_STORED_PROCEDURE pubuser.sp_dropsequence SQL_STORED_PROCEDURE pubuser.rrep_common_seq USER_TABLE pubuser.rrep_lock USER_TABLE pubuser.rrep_mmr_pub_group USER_TABLE pubuser.rrep_mmr_txset USER_TABLE pubuser.rrep_properties USER_TABLE pubuser.rrep_publication_subscriptions USER_TABLE pubuser.rrep_publication_tables USER_TABLE pubuser.rrep_tables USER_TABLE pubuser.rrep_tx_seq USER_TABLE pubuser.rrep_txset USER_TABLE pubuser.rrep_txset_health USER_TABLE Copyright © 2012 EnterpriseDB Corporation. All rights reserved. 388 Postgres Plus xDB Replication Server with Multi-Master User’s Guide pubuser.rrep_txset_log pubuser.rrep_txset_seq pubuser.rrst_edb_dept pubuser.rrst_edb_emp USER_TABLE USER_TABLE USER_TABLE USER_TABLE (31 rows affected) For non-snapshot only publication tables, triggers are created as well that reside in the schema containing the publication tables as shown by the following query: 1> USE edb; 2> GO Changed database context to 'edb'. 1> 2> SELECT s.name + '.' + o.name "Trigger Name" 3> FROM sys.objects o, 4> sys.schemas s 5> WHERE s.name = 'edb' 6> AND o.type = 'TR' 7> AND o.name LIKE 'rr%' 8> AND o.schema_id = s.schema_id 9> ORDER BY 1; 10> GO Trigger Name -------------------------------------edb.rrpd_edb_dept edb.rrpd_edb_emp edb.rrpi_edb_dept edb.rrpi_edb_emp edb.rrpu_edb_dept edb.rrpu_edb_emp (6 rows affected) Finally, some jobs are created in the msdb database as shown by the following: 1> USE msdb; 2> GO Changed database context to 'msdb'. 1> 2> SELECT j.name "Job Name" 3> FROM msdb.dbo.sysjobs j, 4> master.dbo.syslogins l 5> WHERE l.name = 'pubuser' 6> AND j.name LIKE 'rrep%' 7> AND j.owner_sid = l.sid 8> ORDER BY 1; 9> GO Job Name ----------------------------------rrep_cleanup_job_edb rrep_txset_job_edb (2 rows affected) Postgres only: The metadata database objects to manage the publication are created in the schema _edb_replicator_pub as shown in the following: Copyright © 2012 EnterpriseDB Corporation. All rights reserved. 389 Postgres Plus xDB Replication Server with Multi-Master User’s Guide Figure 230 - Metadata database objects in a Postgres publication database Note: The triggers used for synchronization replication do not appear under the Trigger Functions node in pgAdmin (Postgres Enterprise Manager Client in Advanced Server) because the replication triggers are in Oracle syntax. The pgAdmin Trigger Functions node displays only trigger functions, which are in PostgreSQL syntax. In pgAdmin, Oracle triggers appear under the specific table nodes on which the triggers are called. Step 4: If the schema that is supposed to contain the metadata database objects (the publication database user name for Oracle, or _edb_replicator_pub for Postgres) is missing, or there are no database objects under the metadata schema, then you must complete the process of removing all remaining metadata database objects. If the metadata database objects look intact, go on to Step 5. For Oracle only: If the publication user name still exists, then log onto SQL*Plus or any other Oracle database administration utility and drop all objects owned by the publication Copyright © 2012 EnterpriseDB Corporation. All rights reserved. 390 Postgres Plus xDB Replication Server with Multi-Master User’s Guide user. Alternatively, you can drop the publication database user along with its database objects using the cascade option, but the publication database user must be recreated and privileges reassigned if you intend to rebuild your replication systems. See Section 5.1.2 for directions on creating the publication database user. The following example illustrates use of the cascade option: SQL> CONNECT system/password Connected. SQL> DROP USER pubuser CASCADE; User dropped. For SQL Server only: If any of the metadata database objects listed in Step 3 still exist, then log onto the SQL Server command line program, sqlcmd, or SQL Server Management Studio and drop these objects. The following example assumes the metadata database objects were created under schema pubuser. The publication tables are dept and emp located in schema edb. The following example shows how to delete the jobs in the msdb database: 1> USE msdb; 2> GO Changed database context to 'msdb'. 1> EXEC sp_delete_job @job_name = 'rrep_cleanup_job_edb'; 2> GO 1> EXEC sp_delete_job @job_name = 'rrep_txset_job_edb'; 2> GO The next example shows the deletion of the triggers on the non-snapshot only publication tables: 1> USE edb; 2> GO Changed database context to 'edb'. 1> 2> DROP TRIGGER edb.rrpd_edb_dept; 3> DROP TRIGGER edb.rrpi_edb_dept; 4> DROP TRIGGER edb.rrpu_edb_dept; 5> DROP TRIGGER edb.rrpd_edb_emp; 6> DROP TRIGGER edb.rrpi_edb_emp; 7> DROP TRIGGER edb.rrpu_edb_emp; 8> GO The metadata database objects under the pubuser schema are dropped as shown by the following: 1> USE edb; 2> GO Changed database context to 'edb'. 1> 2> DROP PROCEDURE pubuser.CleanupShadowTables; 3> DROP PROCEDURE pubuser.ConfigureCleanUpJob; 4> DROP PROCEDURE pubuser.ConfigureCreateTxSetJob; 5> DROP PROCEDURE pubuser.CreateMultiTxSet; Copyright © 2012 EnterpriseDB Corporation. All rights reserved. 391 Postgres Plus xDB Replication Server with Multi-Master User’s Guide 6> DROP PROCEDURE pubuser.CreateTableLogTrigger; 7> DROP PROCEDURE pubuser.CreateTxSet; 8> DROP PROCEDURE pubuser.CreateUniTxSet; 9> DROP PROCEDURE pubuser.GetNewTxsCount; 10> DROP PROCEDURE pubuser.JobCleanup; 11> DROP PROCEDURE pubuser.JobCreateTxSet; 12> DROP PROCEDURE pubuser.LoadPubTableList; 13> DROP PROCEDURE pubuser.nextval; 14> DROP PROCEDURE pubuser.RemoveCleanupJob; 15> DROP PROCEDURE pubuser.RemoveCreateTxSetJob; 16> DROP PROCEDURE pubuser.sp_createsequence; 17> DROP PROCEDURE pubuser.sp_dropsequence; 18> GO 1> 2> DROP TABLE pubuser.rrep_common_seq; 3> DROP TABLE pubuser.rrep_lock; 4> DROP TABLE pubuser.rrep_mmr_pub_group; 5> DROP TABLE pubuser.rrep_mmr_txset; 6> DROP TABLE pubuser.rrep_properties; 7> DROP TABLE pubuser.rrep_publication_subscriptions; 8> DROP TABLE pubuser.rrep_publication_tables; 9> DROP TABLE pubuser.rrep_tables; 10> DROP TABLE pubuser.rrep_tx_seq; 11> DROP TABLE pubuser.rrep_txset; 12> DROP TABLE pubuser.rrep_txset_health; 13> DROP TABLE pubuser.rrep_txset_log; 14> DROP TABLE pubuser.rrep_txset_seq; 15> DROP TABLE pubuser.RRST_edb_dept; 16> DROP TABLE pubuser.RRST_edb_emp; 17> GO For Postgres only: If the schema _edb_replicator_pub still exists in the publication database, drop the schema and all of its database objects. The following example shows a connection established in psql to the publication database edb. The DROP SCHEMA CASCADE statement is then used to drop the metadata schema _edb_replicator_pub. edb=# \c edb enterprisedb You are now connected to database "edb" as user "enterprisedb". edb=# DROP SCHEMA _edb_replicator_pub CASCADE; NOTICE: drop cascades to 16 other objects DETAIL: drop cascades to sequence _edb_replicator_pub.rrep_common_seq drop cascades to sequence _edb_replicator_pub.rrep_tx_seq drop cascades to sequence _edb_replicator_pub.rrep_txset_seq drop cascades to table _edb_replicator_pub.rrep_tables drop cascades to table _edb_replicator_pub.rrep_publication_tables drop cascades to table _edb_replicator_pub.rrep_txset drop cascades to table _edb_replicator_pub.rrep_mmr_txset drop cascades to table _edb_replicator_pub.rrep_publication_subscriptions drop cascades to table _edb_replicator_pub.rrep_txset_log drop cascades to table _edb_replicator_pub.rrep_lock drop cascades to table _edb_replicator_pub.rrep_mmr_pub_group drop cascades to table _edb_replicator_pub.rrep_properties drop cascades to table _edb_replicator_pub.rrep_txset_health drop cascades to schema rrep_pkg drop cascades to table _edb_replicator_pub.rrst_edb_dept drop cascades to table _edb_replicator_pub.rrst_edb_emp DROP SCHEMA Step 5: Repeat steps 3 and 4 for each publication database definition subordinate to the publication server. If all of the metadata schemas and their database objects are intact for Copyright © 2012 EnterpriseDB Corporation. All rights reserved. 392 Postgres Plus xDB Replication Server with Multi-Master User’s Guide all publication database definitions, then chances are that the problem lies elsewhere. Recheck the checklist in Section 9.2.3. Step 6: Locate the metadata of the publication and subscription servers. The database objects for the main metadata are located in the xDB Control database in schemas _edb_replicator_pub and _edb_replicator_sub. These schemas are shown in the following: Figure 231 - Metadata database objects in the xDB Control database Note: If the publication server and subscription server are running on separate hosts, each with their own xDB Control database, then the database on the publication server’s host contains only the _edb_replicator_pub schema and the database on the subscription server’s host contains only the _edb_replicator_sub schema. Note: If all of your replication systems are multi-master, the xDB Control database used by the publication server contains only the _edb_replicator_pub schema. Step 7: Delete schemas _edb_replicator_pub and _edb_replicator_sub and all their database objects from the xDB Control database. The following psql session shows this process: edb=# \c xdb enterprisedb Copyright © 2012 EnterpriseDB Corporation. All rights reserved. 393 Postgres Plus xDB Replication Server with Multi-Master User’s Guide You are now connected to database "xdb" as user "enterprisedb". xdb=# DROP SCHEMA _edb_replicator_pub CASCADE; NOTICE: drop cascades to 14 other objects DETAIL: drop cascades to sequence _edb_replicator_pub.rrep_common_seq drop cascades to table _edb_replicator_pub.erep_pub_database drop cascades to table _edb_replicator_pub.erep_mmr_pub_group drop cascades to table _edb_replicator_pub.erep_publications drop cascades to table _edb_replicator_pub.erep_pubtables_ignoredcols drop cascades to table _edb_replicator_pub.erep_publication_subscriptions drop cascades to table _edb_replicator_pub.erep_events drop cascades to table _edb_replicator_pub.erep_events_status drop cascades to table _edb_replicator_pub.erep_conflicts drop cascades to table _edb_replicator_pub.erep_conflicts_options drop cascades to table _edb_replicator_pub.erep_cleanup_conf drop cascades to table _edb_replicator_pub.erep_pub_replog drop cascades to table _edb_replicator_pub.erep_pub_table_replog drop cascades to table _edb_replicator_pub.erep_sub_servers DROP SCHEMA xdb=# xdb=# DROP SCHEMA _edb_replicator_sub CASCADE; NOTICE: drop cascades to 7 other objects DETAIL: drop cascades to sequence _edb_replicator_sub.rrep_common_seq drop cascades to table _edb_replicator_sub.erep_sub_database drop cascades to table _edb_replicator_sub.rrep_tables drop cascades to table _edb_replicator_sub.rrep_subscriptions drop cascades to table _edb_replicator_sub.rrep_subscription_tables drop cascades to table _edb_replicator_sub.rrep_txset drop cascades to table _edb_replicator_sub.erep_publication_subscriptions DROP SCHEMA Note: If the publication server and the subscription server are running on separate hosts with their own xDB Control database, the first DROP SCHEMA statement of Step 7 is performed on the xDB Control database of the publication server. The second DROP SCHEMA statement of Step 7 is performed on the xDB Control database of the subscription server. Step 8: Start the publication server. Step 9: Start the subscription server. Step 10: In the replication tree you should see the following: Copyright © 2012 EnterpriseDB Corporation. All rights reserved. 394 Postgres Plus xDB Replication Server with Multi-Master User’s Guide Figure 232 - Replication tree after removal of all metadata database objects All the nodes under the SMR and MMR type nodes beneath the Publication Server node, and under the Subscription Server node no longer appear as the metadata has been deleted. Step 11: You will need to recreate the replication system as described in sections 5.2 onward for a single-master replication system. See sections 6.2 onward for a multi-master replication system. 9.3 Miscellaneous xDB Replication Server Processing Topics This section contains various topics covering the following: Handling special characters in replication data Replicating Oracle partitioned tables Performing an offline snapshot and subsequent synchronization Generating an encrypted password Writing cron expressions 9.3.1 Publication and Subscription Server Configuration Options The publication server and the subscription server support various configuration options for purposes such as the following: Optimize synchronization performance based on the types of transactions affecting the publication. (See Section 5.8.2 for details on these particular options.) Utilize alternate loading methods in snapshot replications. (See Section 5.8.1 for details on these particular options.) Copyright © 2012 EnterpriseDB Corporation. All rights reserved. 395 Postgres Plus xDB Replication Server with Multi-Master User’s Guide Special configuration options for multi-master replication. (See Section 6.10 for details on these particular options.) Adjust memory usage and transaction size for replications. Replicate certain Oracle partitioned table types. Replicate special characters found in publication data. Most options apply to the publication server only, although a few are used by the subscription server. The configuration options for the publication server are set and passed in a text file called the publication server configuration file with file name xdb_pubserver.conf. The configuration options for the subscription server are set and passed in a text file called the subscription server configuration file with file name xdb_subserver.conf. See Section 3.2 for the directory locations of these files. Modified publication server configuration options take effect after the publication server is restarted. Similarly, modified subscription server configuration options take effect after the subscription server is restarted. The configuration options that have been explicitly put into effect by overriding their defaults in the configuration files are logged in the publication server log file and the subscription server log file. Section 3.2 contains the directory locations of these log files. The following is a description of how to set the configuration options. This is followed by sections describing the purpose of each option. Step 1: The publication and subscription server configuration files are created during xDB Replication Server installation and already contain all of the configuration options as comments with their default settings. To change the setting of a configuration option, edit the publication server or subscription server configuration file by removing the comment symbol (#) from the option and substituting the desired value in place of the currently coded value. The following example shows a portion of the publication server configuration file where replacement of null characters in the publication data has been activated and the replacement character has been set to the question mark character. replaceNullChar = true #Null Replacement Character nullReplacementChar = ? Step 2: Restart the publication or subscription server. Copyright © 2012 EnterpriseDB Corporation. All rights reserved. 396 Postgres Plus xDB Replication Server with Multi-Master User’s Guide $ su enterprisedb Password: $ /etc/init.d/edb-xdbpubserver restart Publication Service stopped Password: Publication Service started The following sections provide additional detail on the server configuration options. 9.3.1.1 Controlling Logging Level Note: The option described in this section applies to the publication server and the subscription server. Set the logging.level option to control the severity of messages written to the publication server log file and the subscription server log file (see Section 9.2.2.4). logging.level={OFF | SEVERE | WARNING | INFO | CONFIG | FINE | FINER | FINEST | ALL} The default value is SEVERE. 9.3.1.2 Replacing Null Characters Note: The options described in this section apply to the publication server only. A character consisting of binary zeros (also called the null character string) and represented as 000 in octal or 0x00 in hexadecimal can result in errors when attempting to load such data into a Postgres character column. You may get the following error in the Migration Toolkit log file when performing a snapshot replication of an Oracle table that contains the null character string: Loading Table Data in 8 MB batches... Disabling FK constraints & triggers on edb.null_test before truncate... Truncating table NULL_TEST before data load... Disabling indexes on edb.null_test before data load... Loading Table: NULL_TEST ... Error Loading Data into Table: NULL_TEST: ERROR: invalid byte sequence for encoding "UTF8": 0x00 Where: COPY null_test, line 2 The same circumstance may also produce the following error in the Migration Toolkit log file: Loading Table Data in 8 MB batches... Disabling FK constraints & triggers on edb.null_clob before truncate... Disabling indexes on edb.null_clob before data load... Loading Large Objects into table: NULL_CLOB ... [NULL_CLOB] Migrated 1 rows. com.edb.util.PSQLException: Zero bytes may not occur in string parameters., Skipping Batch Copyright © 2012 EnterpriseDB Corporation. All rights reserved. 397 Postgres Plus xDB Replication Server with Multi-Master User’s Guide If any of these errors occur, you can set an option that will convert each null character encountered in character columns of the source tables to a space character, or to any other character of your choice, before loading the target tables. Note: This option does not alter null characters encountered in columns with binary data types such as Oracle RAW and BLOB data types. Set the following option: replaceNullChar=true This option results in the substitution of a space character for each null character encountered in the source character data. If you want to use a character other than a space character to replace each null character, use the following option in addition to replaceNullChar=true. nullReplacementChar=char char is a single character you want to substitute for the null character. For example, the following combination will replace each null character with the hash symbol #. replaceNullChar=true nullReplacementChar=# 9.3.1.3 Schema Migration Options Note: The option described in this section applies to the subscription server only. The option in this section controls how certain aspects of the publication database schema are migrated to the subscription database. skipCheckConst By default, column CHECK constraints from publication tables are migrated to the subscription table definitions when the subscription is created. Set this option to true if you do not want CHECK constraints as part of the subscription table definitions. Setting this option to true is useful if the CHECK constraint is based on a built-in function supported by the publication database server, and this built-in function does not exist in the subscription database server. skipCheckConst={true | false} The default value is false. Copyright © 2012 EnterpriseDB Corporation. All rights reserved. 398 Postgres Plus xDB Replication Server with Multi-Master User’s Guide 9.3.1.4 Replicating Oracle Partitioned Tables Note: The option described in this section must be set to the same value for both the publication server and the subscription server. In Oracle, table partitioning provides the capability to store table rows in different physical locations (tablespaces) according to a rule defined on the table. The most common types of Oracle table partitioning are the following: Range Partitioning. Ranges of values defined on a column determine which tablespace a row is stored. List Partitioning. A list of values defined on a column determines which tablespace a row is stored. Hash Partitioning. An algorithm on a column generates a hash key, which determines which tablespace a row is stored. Postgres does not support table partitioning in the same manner as Oracle. However, Oracle table partitioning can be implemented in Postgres using the two Postgres features called table inheritance and rules. Postgres table inheritance allows you to create a parent table from which you can create one or more child tables that inherit the columns of the parent. Each child is an independent table in its own right except that it includes the column definitions of its parent. Rules can be defined on the parent table to direct which child table an inserted row is to be stored. Since each child table can be stored in a different physical location, the behavior associated with range or list partitioning can be reproduced. The importPartitionAsTable option controls what happens when an Oracle partitioned table is part of the publication. importPartitionAsTable={true | false} The default value is false. Depending upon the Oracle partitioned table type and the setting of the importPartitionAsTable option one of the following may occur: A set of inherited tables is created in Postgres to which the Oracle partitioned table is replicated. The rows can be stored in different physical locations. A plain, single table with no inheritance is created in Postgres to which the Oracle partitioned table is replicated. All rows are stored in one physical location. No table is created in Postgres for the Oracle partitioned table, and an error message is written to the Migration Toolkit log file. Copyright © 2012 EnterpriseDB Corporation. All rights reserved. 399 Postgres Plus xDB Replication Server with Multi-Master User’s Guide When importPartitionAsTable=false (the default setting), the following occurs: A list partitioned table is replicated as a set of inherited Postgres tables. A range partitioned table is replicated as a set of inherited Postgres tables. A hash partitioned table is not replicated to Postgres, and an error message is written to the Migration Toolkit log file. Note: If there are subscription tables created as sets of Postgres inherited tables, then you must also set the enableConstBeforeDataLoad option in the publication server configuration file to true. See Section 9.3.1.5 for information on the enableConstBeforeDataLoad option. When importPartitionAsTable=true, the following occurs: A list partitioned table is replicated as a single Postgres table with no inheritance. A range partitioned table is replicated as a single Postgres table with no inheritance. A hash partitioned table is replicated as a single Postgres table with no inheritance. Setting the importPartitionAsTable option to true allows you to replicate a broader range of Oracle partitioned table types, but as normal Postgres tables without simulating partitions by using inheritance. 9.3.1.5 Snapshot Replication Options Note: The options described in this section apply to the publication server only unless otherwise specified. The server configuration options discussed in this section apply to snapshot replications. escapeTabDelimiter When JDBC COPY is used in snapshot replication, the data delimiter between column values is an escaped tab character (\t). Set this option to false if you do not want to escape the tab delimiter character. escapeTabDelimiter={true | false} The default value is true. mtkCopyDelimiter Copyright © 2012 EnterpriseDB Corporation. All rights reserved. 400 Postgres Plus xDB Replication Server with Multi-Master User’s Guide When JDBC COPY is used in snapshot replication, the data delimiter between column values is an escaped tab character (\t). Set this option to change the data delimiter character. mtkCopyDelimiter=c c denotes the single replacement character for the data delimiter. The default value is \t. enableConstBeforeDataLoad The enableConstBeforeDataLoad option controls whether or not table constraints, including triggers, are re-enabled before loading data into target tables. The default process is that the tables are loaded first, and then the constraints are enabled afterwards. Activate this option if there are triggers that affect how data is loaded into the target tables. If there are target tables created as sets of Postgres inherited tables resulting from partitioned Oracle source tables, then this option must be enabled. enableConstBeforeDataLoad={true | false} The default value is false. 9.3.1.6 Assigning an IP Address for Remote Method Invocation Note: The option described in this section applies to the publication server and the subscription server. For Linux only: An alternative method to modifying the /etc/hosts file so that the host name is associated with a non-loopback IP address as discussed in Section 5.1.4.2 is to specify the network IP address using the java.rmi.server.hostname option. In the publication server configuration file, set this option to the network IP address of the host running the publication server. In the subscription server configuration file, set this option to the network IP address of the host running the subscription server. java.rmi.server.hostname=xxx.xxx.xx.xxx Copyright © 2012 EnterpriseDB Corporation. All rights reserved. 401 Postgres Plus xDB Replication Server with Multi-Master User’s Guide For example, instead of modifying the /etc/hosts file to look like the following for a publication or subscription server running on host 192.168.10.102: 192.168.10.102 #127.0.0.2 opensuse-vm.vmplanet.net opensuse-vm opensuse-vm.vmplanet.net opensuse-vm You can set the IP address in the server configuration file as shown by the following: #On Linux machines, the localhost to real IP may not give correct results. Hence #users are advised to override the following property with server IP address java.rmi.server.hostname=192.168.10.102 9.3.1.7 Using pgAgent Job Scheduling Note: The option described in this section applies to the publication server only. Note: Using pgAgent job scheduling has significance only if Postgres is the publication database. Note: You must have pgAgent installed and running on the host where the publication database resides. When the pgdbschedule option is set to true, xDB Replication Server uses the pgAgent job scheduler instead of the default Quartz job scheduler. When activated, pgAgent takes over the following scheduling tasks from Quartz: Scheduling shadow table history cleanup in the publication database. See Section 7.4.1 for information on scheduling shadow table history cleanup. Scheduling transaction set creation. A transaction set creation job is scheduled to run every hour to create transaction sets from the updates on the source tables. Transaction sets are applied to the target tables. Unlike the Quartz scheduler, pgAgent can still run and perform its tasks even if the publication server is not running. pgdbschedule={true | false} The default value is false. 9.3.1.8 Forcing Immediate Shadow Table Cleanup Note: The option described in this section applies to the publication server only. A cleanup job is provided that can be run on demand or on a schedule to remove dead (processed) tuples from the shadow tables (see Section 7.4). Copyright © 2012 EnterpriseDB Corporation. All rights reserved. 402 Postgres Plus xDB Replication Server with Multi-Master User’s Guide However, to perform even quicker cleanup scheduling, turn on this option to force the cleanup of shadow tables after every synchronization replication. postSyncShadowTableCleanup={true | false} The default value is false. 9.3.1.9 DDL Change Replication Table Locking Note: The option described in this section applies to the publication server only. When the DDL change replication process is invoked, each affected table in the replication system is acquired in turn with an exclusive lock before the DDL change is applied to the table. Set ddlChangeTableLock to false if you do not want an exclusive lock placed on the table before applying the DDL change. This option should be set to false only if there are no write transactions expected on the target table. If write transactions do occur, they may not be recorded by the replication system. See Section 7.6 for information on DDL change replication. ddlChangeTableLock={true | false} The default value is true. 9.3.2 Encrypting the Password in the xDB Replication Configuration File If you need to change the password in the xDB Replication Configuration file, you must first encrypt the password. Use the encrypt command of the xDB Replication Server CLI to generate the encrypted form of the password from its plain text form given in an input file. Step 1: Create a text file with the password you wish to encrypt. Do not leave any white space before or after the password. The following example shows the text newpassword in the input file passfile: $ cat passfile newpassword $ Step 2: Use the edb-repcli.jar file to execute the xDB Replication Server CLI with the encrypt command as shown by the following: $ export PATH=/opt/PostgresPlus/9.1AS/jre/bin:$PATH Copyright © 2012 EnterpriseDB Corporation. All rights reserved. 403 Postgres Plus xDB Replication Server with Multi-Master User’s Guide $ cd /opt/PostgresPlus/9.1AS/bin $ java -jar edb-repcli.jar -encrypt -input ~/passfile -output ~/encrypted The following shows the encrypted form of the password in the output file encrypted: $ cat ~/encrypted 4mKq/4jQQoV2IypCSmPpTQ== $ Step 3: Copy and paste the encrypted password into the xDB Replication Configuration file. user=enterprisedb port=5444 password=4mKq/4jQQoV2IypCSmPpTQ== type=enterprisedb host=localhost database=xdb 9.3.3 Writing a Cron Expression A cron expression is a text string used to express a schedule of dates and times. The Linux cron tool uses a cron expression to schedule the execution of a job. xDB Replication Server uses the Quartz job scheduling system for scheduling replications. When creating a schedule for an xDB Replication Server replication system, a cron expression can be specified. There are a number of formats for cron expressions. You must use the cron expression format supported by Quartz. The remainder of this section provides an overview of most of the types of cron expressions that can be used for an xDB Replication Server schedule. For a more comprehensive treatment of cron expressions, refer to the Quartz documentation. A Quartz cron expression consists of six mandatory fields, followed by one optional field. Each field is separated from its neighbors by one or more consecutive space characters. The fields are order dependent and are listed as they must appear below: ss mi hr dd mm dow [ yyyy ] Table 9 - Cron Expression Fields Field ss mi hr dd mm dow yyyy Values 0 - 59 0 - 59 0 - 23 1 - 31 or ? 1 - 12 or JAN - DEC Description Second of the minute Minute of the hour Hour of the day Day of the month – if dow is given, then dd must be specified as ? Month of the year (3-letter month abbreviations are not case sensitive) Day of the week – if dd is given, then dow must be specified as ? (31 – 7 or SUN – SAT or ? letter day of the week abbreviations are not case sensitive) 1970 - 2099 Year – if omitted, then any year applies Copyright © 2012 EnterpriseDB Corporation. All rights reserved. 404 Postgres Plus xDB Replication Server with Multi-Master User’s Guide There are a number of characters that have special meaning that can be utilized in all fields unless noted. Table 10 - Cron Expression Special Characters Character Meaning Example Separates a list of values MON,WED,FRI – Every Monday, Wednesday, and Friday Separates the low and high MON-FRI – Every Monday through Friday end of a range of values Allows all legal values for 0 10 14 * * ? – Every day of every month at 2:10 PM the field Specifies an increment, i, 0 0/10 * * * ? – Every 10 minutes starting on the hour for every day of every month (e.g., 8:00:00, 8:10:00, 8:20:00) starting with x When used in the day of the month (dd) field, means the 0 30 15 L 8 ? – Every August 31st at 3:30 PM last day of the month When used by itself in the 30 0 12 ? AUG L – The next Saturday in August at 30 day of the week field (dow), seconds past 12:00 noon means Saturday When used in the day of the week field (dow) following 30 0 12 ? AUG 6L – The last Friday in August at 30 a day of the week, means seconds past 12:00 noon the last xxx day of the month Used in the day of the st st 1W – The weekday closest to the 1 of the month. If the 1 is a month field (dd) following a st st Wednesday, the result is Wednesday the 1 . If the 1 is a day of the month, x, to Sunday, the result is Monday the 2nd. If the 1st is a Saturday, specify the weekday closest the result is Monday the 3rd because the result does not go into to x without going over into the previous or following month. the next or previous month. Used in the day of the week 2#3 – The third Monday of the month (2 = Monday, 3 = third field (dow) to specify the occurrence) nth xxx day of the month , * x/i L L xxxL xW xxx#n The following illustrates some examples of cron expressions. Table 11 - Cron Expression Examples Cron Expression 0 0 12 20 AUG ? 2009 0 15 13 ? AUG WED 30 30 8 ? * MON,WED,FRI 0 0 8 ? * 2-6 0 0/30 8,9,10 15,L * ? 0 0 9 ? 9 L 0 0 1 ? * MonL 0 30 16 15W sep ? Meaning 12:00:00 noon on August 20, 2009 1:15:00 PM every Wednesday in August 8:30:30 AM every Monday, Wednesday, and Friday of every month 8:00:00 AM Monday thru Friday of every month 8:00:00 AM, 8:30:00 AM, 9:00:00 AM, 9:30:00 AM, 10:00:00 AM, 10:30:00 AM on the 15th and the last day of the month of every month 9:00:00 AM each Saturday in September 1:00:00 AM on the last Monday of the month of every month 4:30:00 PM on the weekday of September closest to the 15 th Copyright © 2012 EnterpriseDB Corporation. All rights reserved. 405 Postgres Plus xDB Replication Server with Multi-Master User’s Guide Cron Expression 0 30 16 ? * WED#2 Meaning 4:30:00 PM on the second Wednesday of every month 9.3.4 Disabling Foreign Key Constraints for Snapshot Replications In a snapshot replication, the publication server calls EnterpriseDB’s Migration Toolkit, which disables foreign key constraints on tables so it can truncate the target tables before loading rows. In Postgres, foreign key constraints are implemented using triggers, so in actuality, the Migration Toolkit disables triggers on the target tables by setting column reltriggers of pg_catalog.pg_class to zero for each target table. No user (not even a superuser) is allowed to directly modify the data in a Postgres system catalog table unless the following conditions are satisfied: The database user attempting to modify the rows of a system catalog table is a superuser. In the Postgres system catalog table pg_catalog.pg_authid, the column rolcatupdate is set to true for the row identifying the superuser attempting to update a system catalog table. To verify that a user has the privilege to update the system catalog tables, select the user name under the Login Roles node in pgAdmin (Postgres Enterprise Manager Client in Advanced Server). The Update Catalogs property should be set to Yes. Figure 233 - User with privilege to update system catalogs Copyright © 2012 EnterpriseDB Corporation. All rights reserved. 406 Postgres Plus xDB Replication Server with Multi-Master User’s Guide If the Update Catalogs property is set to No, click the secondary mouse button on the user name in the Object Browser and choose Properties from the menu. Select the Role Privileges tab, check the Can Modify Catalog Directly box, and click the OK button. Figure 234 - Granting system catalog update privilege 9.3.5 Quoted Identifiers and Default Case Translation A quoted identifier is an identifier created with its name enclosed within double quote characters ("). The text enclosed within double quotes is stored as the object identifier name exactly as given with no default case translation of alphabetic characters. Quoted identifiers occur in both Oracle and Postgres. Copyright © 2012 EnterpriseDB Corporation. All rights reserved. 407 Postgres Plus xDB Replication Server with Multi-Master User’s Guide For example, CREATE TABLE "MyTable" … produces a table name that is stored in the database system’s data dictionary as MyTable. References to this table must be made using an uppercase M, an uppercase T, and lowercase letters for the rest of the name. If a database object is created without the double quotes surrounding its identifier name, default case translation of alphabetic characters occurs. In Oracle, the default case translation is to uppercase. For example, CREATE TABLE MyTable … would result in an object identifier name of MYTABLE. In Postgres, the default case translation is to lowercase. For example, CREATE TABLE MyTable … would result in an object identifier name of mytable. 9.3.6 Replicating the SQL Server SQL_VARIANT Data Type This section discusses how to replicate a table containing the SQL Server SQL_VARIANT data type. The SQL_VARIANT data type defines a column so that the individual values in that column may be of different data types. For example, the same SQL_VARIANT column can store values that have been explicitly cast as character, integer, numeric, and date/time. However, if a table containing a SQL_VARIANT column is to be replicated to a Postgres database, the usage of the column in Postgres is restricted to a single data type to which all the values in the SQL_VARIANT column are implicitly convertible (that is, without the use of explicit casting). For example, an integer value is implicitly convertible to a FLOAT data type, but a floating point value is not implicitly convertible to an INTEGER data type. The following restrictions apply in order to use replication on tables with the SQL_VARIANT data type: The values stored within the SQL_VARIANT columns of the table to be replicated must be implicitly convertible to the same data type in Postgres. If there is more than one table with SQL_VARIANT columns to be replicated to the same Postgres database, then all such SQL_VARIANT columns must contain values that are implicitly convertible to the same data type in Postgres. In the Postgres subscription database, you define a domain named sql_variant that maps to an underlying data type to which all values in the SQL_VARIANT columns are implicitly convertible. The following example shows how to set up replication for a table containing a SQL_VARIANT data type used to store numeric values, but of different data types. Copyright © 2012 EnterpriseDB Corporation. All rights reserved. 408 Postgres Plus xDB Replication Server with Multi-Master User’s Guide The SQL Server table definition is the following: CREATE TABLE variant_tbl ( f1 INTEGER PRIMARY KEY, f2 SQL_VARIANT ); INSERT INTO variant_tbl VALUES (1, CAST(1423.23 AS NUMERIC(6,2))); INSERT INTO variant_tbl VALUES (2, CAST(8001 AS INTEGER)); INSERT INTO variant_tbl VALUES (3, CAST('4321' AS CHAR(4))); GO The following query uses a function named SQL_VARIANT_PROPERTY to show the values stored in column f2 and their data types. 1> SELECT *, 2> SQL_VARIANT_PROPERTY(f2,'BaseType') AS basetype, 3> SQL_VARIANT_PROPERTY(f2,'Precision') AS precision, 4> SQL_VARIANT_PROPERTY(f2,'Scale') AS scale 5> FROM variant_tbl; 6> GO f1 f2 basetype precision scale ----------- ---------- ---------- ---------- ---------1 1423.23 numeric 6 2 2 8001 int 10 0 3 4321 char 0 0 (3 rows affected) In the Postgres subscription database, create a domain named sql_variant with an underlying data type that is compatible with the values that are stored in the SQL Server SQL_VARIANT column: CREATE DOMAIN sql_variant AS NUMERIC(6, 2); After replication occurs, the subscription table is created using the sql_variant domain in place of the SQL_VARIANT data type of the publication table. At the bottom of the following Object Browser window, note the presence of the sql_variant domain under the Domains node of the public schema. Copyright © 2012 EnterpriseDB Corporation. All rights reserved. 409 Postgres Plus xDB Replication Server with Multi-Master User’s Guide Figure 235 - Subscription table with sql_variant column 9.3.7 Restricted Mode Operation Restricted mode refers to limitations on certain xDB Replication Server operations after your trial period expires. Restricted mode can be lifted by registering your xDB Replication Server product as described in Section 3.3. Restricted mode currently affects multi-master replication systems. Creation and usage of single-master replication systems are not affected. The following multi-master replication operations are restricted: New master definition nodes or master nodes cannot be created (see sections 6.2.2 and 6.3). However, existing master nodes and master definition nodes remain operational. New publications cannot be created (see Section 6.2.3). Tables cannot be added nor removed from existing publications (see sections 7.5.3.1 and 7.5.3.2). Copyright © 2012 EnterpriseDB Corporation. All rights reserved. 410 Postgres Plus xDB Replication Server with Multi-Master User’s Guide A publication table definition cannot be modified using the DDL change replication feature (see Section 7.6). A new replication schedule cannot be created, nor can an existing replication schedule be modified (see sections 7.1 and 7.2.1). A snapshot replication cannot be performed (see Section 6.5.1). The role of the master definition node cannot be switched to another master node (see Section 6.9). The conflict resolution options for a publication table cannot be changed (see Section 6.8). A dialog box similar to the following appears if you attempt a restricted operation: Figure 236 – Disallowed restricted mode operation You must register your xDB Replication Server product by entering a valid license key to re-enable restricted operations. See Section 3.3 for instructions on performing this operation. Copyright © 2012 EnterpriseDB Corporation. All rights reserved. 411