1
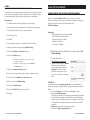
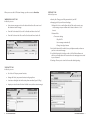
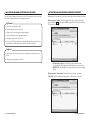
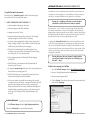
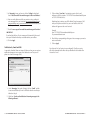
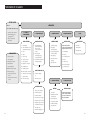
table of contents
Configuration of your new services
2
2
6
Step 1 – Initializing your Voicemail
Step 2 – Configuring rapid access to your message
Call Feature Manager
7
What you will find in the Call Feature Manager
Call Feature Manager by Internet and by phone
Activating and deactivating services by Internet
Help & Data Refresh
7
10
11
12
Voicemail to E-mail
(including Voicemail)
Call Management Services – How to use them 13
13
15
USER GUIDE
November 2009 Version
Voicemail and Message Waiting Indicator
Voicemail to E-mail (configured by Internet only)
- Redirect message to e-mail
- Notification by e-mail and SMS
Ring Control
Need help?
19
19
19
Forgot your password
Technical Assistance & Customer Service
Voicemail at-a-glance
What is Télébec
Advanced Phone Service
1-800-360-8555
northerntel.ca/telephony
18
20
configuration of your new services
Before you can use the Voicemail to E-mail, you must first configure certain
functions.
Please follow the steps below in the right order:
1) Initializing your Voicemail (mandatory)
2) Configuring rapid access to your message (recommended)
- Automatic reading and backup of your messages
- Remove the header message
- Skip NIP
step 1 initializing your voicemail
5. Choose option 1 for Personal greeting. The other possible options are:
1 Personal greeting
2 System generated greeting that includes your name
3 System generated greeting that includes your telephone number
4 System generated greeting that includes neither your name nor your
telephone number
6. Record your Personal greeting (maximum 30 seconds).
Begin recording at the tone:
The first thing you must do is initialize the new Voicemail feature, which is
required for Voicemail to E-mail.
• Press # at the end of your message.
IMPORTANT:
This step must be done by phone, from your home or your office.
or
To initialize your Voicemail, follow these steps:
1. Pick up your telephone receiver and dial *98.
2. Enter your temporary password (which consists of your 10-digit
telephone number).
3. Change your temporary password (PIN):
•Choose a password with 6 to 15 digits.
• Dial it on your telephone keypad, then press #.
Write your personal password here:
(The new PIN must be different from the old one)
• Press 1 to change it
• Press # a second time to save it.
Sample message:
“Hello, you have reached XXX-XXX-XXXX. We can’t take your call right
now. Leave a message and we will call you back as soon as possible.
Thank you!”
7. Press * (star) to exit; or follow the voice prompts to access your voicemail. Your Voicemail is now initialized. Voicemail is now ready to answer your calls
automatically. You will not have to repeat this operation unless you want to review
your greeting.
IMPORTANT:
The new password you just defined can also be used as the password for
accessing the Call Feature Manager, which you will be defining later in this guide.
4. Record your name.
• Press # at the end of your message.
• Press 1 to change it.
or
• Press # a second time to save it.
2 configuration of your new services
configuration of your new services 3
Remote Access to Voicemail when you’re away
To change your Personal greeting, follow the instructions below:
1. Pick up the receiver.
Once you have initialized your Voicemail, you can access it any time, even
when you are away from your home or your office, in order to listen to, save
or delete your voice messages.
2. Dial *98.
To access your messages from the outside:
To record a new Personal greeting:
3. When prompted, enter your voicemail box PIN, followed by #.
1. Dial your phone number.
4. When you hear the menu, press 3 for Greetings menu.
2. When you hear the Voicemail greeting, press * (star).
5. Press 1 to select personal greeting.
3. The system will ask you for your PIN. (the same as Voicemail)
6. Press 1 to record your greeting.
4. You will then be able to access your messages, as well as all
the Voicemail features.
7. At the tone, record your greeting, then press #.
8. You will hear the greeting you just recorded.
9. Press 1 to confirm it, press 2 to change this greeting or press 3
to exit without saving the recording.
Alternate Remote Access Number (direct dial)
If Call Forwarding has been activated on your line, you will have to dial the
Remote Access phone number that you were given when you subscribed.
Because you might not hear your greeting when this service is activated, this
phone number gives you direct access to the Voicemail instructions. After
you input your 10-digit telephone number and your password, just follow the
voice prompts as usual.
10. Press * (star) to exit.
11. Hang up.
Even more, your new Voicemail service allows you to create a Busy Greeting
which will play to callers when your phone is already in use by you or
another family member. This greeting is not mandatory. If you decide to not
configure it, personal greeting that you defined previously will be used.
Remote access phone number:
(write in the number that you were given when you subscribed)
Record Busy greeting:
1. Pick up the receiver.
2. Dial *98.
3. When prompted, enter your voicemail box PIN, followed by #.
4. When you hear the menu, press 3 for Greetings menu.
5. Press 5 to record your Busy greeting.
Using the Voicemail system menus
Please refer to the “Voicemail at-a-glance” table at the end of this guide for
an outline of all the Voicemail system menus.
The table is available online on our website at www.northerntel.ca/telephony,
in the “User Guide” section.
6. At the tone, record your greeting, then press #.
7. You will hear the greeting you just recorded.
8. Press 1 to confirm it, press 2 to change this greeting or press 3
to exit without saving the recording.
9. Press * (star) to exit.
10. Hang up.
4 configuration of your new services
configuration of your new services 5
step 2 configuring rapid access to your message
This step allows you to configure your voicemailbox which will give you a faster
access your voice messages. It includes 3 sub-steps that can be made in whole
or in part depending on what you want to keep as service configuration.
We suggest you:
• To enable automatic reading and backup of your messages.
• To remove the header message (name, time and source of the message).
• To skip PIN entry when you access from your phone.
1. Pick up the receiver.
2. Dial *98.
3. When prompted, enter your voicemailbox PIN, followed by #.
call feature manager
what you will find in the call feature manager
Include with your Voicemail to E-Mail, you have access to an Internet
Web site on which you can retreive your voicemail messages or manage your
Voicemail to E-mail. The name of this Internet Web site is
Call Feature Manager.
Prerequisite:
High Speed Internet access (recommended)
One of the following Web browser :
• Internet Explorer 6.0 or higher
• Firefox 2.0 or higher
• Netscape 7.0 or higher
4. When you hear the menu, press 4 for Mailbox settings.
5. Press 2 for Handsfree and Time saver options.
6. Press 1 for Autoplay setting.
a. If Autoplay is not activated, press 1 to activate it and
press 1 again to confirm.
b. If Autoplay is activated, press * to return to Handsfree
and Time saver menu.
7. Press 3 for Voicemail preferences options.
8. Press 1 for removing message header and press 1 again to confirm.
9. Press * to return to Handsfree and Time saver menu.
10. Press * to return to Mailbox settings.
11. Press 3 for Security options.
12. Press 3 for Skip PIN and press 1 to activate it. 13. Hang up.
6 configuration of your new services
The following instructions will help you on how to access Call
Feature Manager.
• Go to the Web address
http://telephony.northerntel.ca.
• To open a session, enter your Number.
This means your 10-digit phone
number, without spaces, and your
password, then click on “Login”
(consult the Configuration of your
new services section if it’s not already
done).
Important:
As indicated earlier, your temporary password is your 10 digit telephone
number. We strongly recommend that you change this temporary password as
follows:
• Go to the “Settings” tab, and click on the “Security” sub tab.
• Enter your new Web password.
(Note: This new password can be the same password that you defined
for your PIN, however keep in mind that there is no synchronization
between the two. Therefore, whenever you change one, you will need
to change the other manually in order to use your PIN as your WEB
password.)
• Confirm this password by entering it a second time
• Click on the “Apply new password” button.
call feature manager 7
When you access the Call Feature Manager, you have access to three tabs:
“MESSAGES & CALLS” TAB
In this tab, you can:
“SETTINGS” TAB
In this tab, you can:
• Security tab: Change your Web password and your NIP.
• Messaging tab: Set your Voicemail settings.
◊ Settings tab: Set an e-mail address that will be used to receive your
voice messages in your mailbox and to listen to them in a “.wav”
format.
• Listen to new messages, and see the date and time the calls came in and
the duration of each message.
• View the list of missed calls, as well as the date and time of each call.
◊ Voicemail tab:
• View the list of received calls as well as the date and time of each call.
> Time saver settings
- Skip the PIN
- Save messages automatically
- Change Auto-play features
◊ Voice Notification tab: Be notified, at any telephone number, whenever
you have a voicemail message.
◊ E-mail Notification tab: Set other e-mail or SMS (cellular) addresses to which e-mail notifications will be sent when voice messages are received
in your Voicemail.
◊ Greetings: Allows you to set and to choose the desired greeting.
“CONTACTS” TAB
In this tab, you can:
• See a list of all of your personal contacts.
• Manage the list of your personal contacts and group them.
• Associate an abridged code with certain phone numbers (Speed Calling).
• Import your actual contact list from Outlook (or any other contact manager)
8
call feature manager
call feature manager 9
call feature manager by internet and by phone
The Call Feature Manager allows some of the Call Management Services on your
phone line to be customized and managed by Internet.
By Internet
•See missed and answered calls
activating and deactivating services by internet:
Remember that Voicemail to E-mail can be activated and desactivated by Internet.
When a service is “Active” in the Call Feature Manager, a “green checkmark”
icon is displayed
and the word “Active” appears at the end of the sentence
“This service is currently”.
•View the date and time of each call
•Listen to your voice messages on your computer
•Create and edit your list of personal contacts
•Change your password and your PIN
•Access the Call Feature Manager web-tool from any Internet connection
(from home, from the office, from a friend’s, or while traveling)
By phone
•Access your Voicemail, even when you’re away from your home or your
office.
•Change your password and your PIN
• To deactivate a service, click on the “green checkmark” icon;
The checkmark will disappear to indicate that the service is inactive.
• IMPORTANT: The change will not apply until you click on the “Apply”
button.
When a service is “Deactivated” in the Call Feature Manager, the word
“INACTIVE” appears at the end of the sentence “This service is currently”.
10 call feature manager
call feature manager 11
• To activate a service, click in the empty box. A “green checkmark”
will appear to indicate that the service is active and the word “ACTIVE”
will appear at the end of the sentence “This service is currently”.
• IMPORTANT: The change will not apply until you click on the “Apply”
button.
Conflict between two services:
In the Call Feature Manager, when you activate a service, you may occasionally
see a
(exclamation mark) icon. This generally means that the service is
interacting with or has been superseded by another service and that it cannot,
consequently, be configured the way you wish. You can hover your mouse over
this icon for more information about the conflict.
help:
An online “Help” menu is available at all times in Call Feature Manager. Please
refer to it for a description of the Call Management Services and to understand
how to enable and disable the services.
data refresh:
If your browser window has been open but inactive for a few minutes, new calls
will not be visible in your window. You will need to “refresh” the web page to
update the data and see your new voice messages.
end of session:
call management services:
how to use them
voicemail and message waiting indicator
Allows your callers to leave a message in a voice mailbox. If your phone is
equipped with a Message Waiting Indicator, an indicator light will blink. When
you pick up the receiver, an audible signal will let you know that a message is
waiting in the voice mailbox.
With Voicemail, all of your calls will be answered with a personal greeting, even
when you are already on the phone or unable to answer. An intermittent dial tone
or indicator light will tell you when you have messages.
Your messages are saved so that you can listen to them whenever you like, day or
night, from any Touch-tone phone or cell phone.
You can listen to your messages from your home, your office or anywhere else.
Voicemail is easy to use thanks to the voice prompts that tell you what to do step
by step. Your Voicemail password ensures security and privacy.
To access your voice mailbox:
1. Dial *98 from your phone (if you are calling from a different phone
number, dial the Voicemail remote access number that was supplied
with your subscription. Once you have entered your 10-digit telephone
number and your password, follow the voice prompts).
2. Follow the Voicemail prompts to listen to your messages, save them, or
delete them, and to change your greeting and your password.
(connection idle) It is recommended that you quit your Web session when you
have finished. For security reasons, your Call Feature Manager session will
automatically end after 15 minutes of inactivity (when no changes are applied or
no pages are clicked or refreshed for 15 minutes).
12 call feature manager
call management services – how to use them 13
voicemail to E-mail (configured by internet only)
Using the Voicemail system menus
Please refer to the “Voicemail at-a-glance” table at the end of this guide,
for an outline of all the Voicemail system menus.
* * * USEFUL INFORMATION ABOUT VOICEMAIL * * *
• Maximum length of the greeting: 30 seconds.
• Unheard messages are saved for: indefinitely.
• Messages are saved for: 10 days.
• Maximum number of messages that can be saved: 150 (including
archived messages) each no more than 1 minute long.
• If you have a phone equipped with a display screen, the screen will
display “Message waiting” or “Voice mailbox” and the indicator light
will blink to let you know that you have messages.
• The distinctive (intermittent) dial tone, indicating that you have
a message in your voice mailbox, will not prevent you from making
or receiving calls. Call as you would normally.
• Lost or forgotten password: call NorthernTel Technical Support
by dialing 611.
• With Call Waiting, your unanswered calls will automatically be
redirected to your Voicemail.
Voicemail to E-mail is a complement to the Voicemail. This service allows you
to redirect your voice messages to an e-mail address, for instance at home, at
the office, to a web-based address such as Hotmail or to a cell phone.
Warning: For a cell phone redirection, you must already be subscribed to a cellular Data service from your provider.
This means that a “*.wav” file of the voicemail message will be redirected to
your defined e-mail address on which you will be able to click and listen the
message without connecting remotely to your Mailbox. However, take note that
Message Waiting Indicator (light on the phone and stutter dial tone) will not be
removed when you listen to your message through your e-mail.
In addition, the Voicemail to E-mail service could send a notification e-mail
and/or SMS (Short Message Service) notification to any addresses other than
the one on which Mailbox redirection is defined. Those notifications are Text
only format and will inform you that someone left you a voice message. Unlike
redirect, you will need to connect remotely to your Voicemail to listen to the
message left by the caller.
Warning: Make sure that your Voicemail is initialized before
you use the Voicemail to E-mail option (see “Initializing your
Voicemail” - Step 1).
Redirect voice messages to a Mailbox:
• To change the number of rings before your callers are redirected to your
Voicemail to leave a message, press *94.
1. Access the Call Feature Manager web-tool at http://telephony.northerntel.ca.
• With Call Forwarding, you can automatically forward your calls to
Voicemail when you don’t want to be disturbed.
3. Enter your personal password (PIN).
• In the service options, it is possible for an incoming caller to record
a message even if your line is busy. A message will indicate to the caller
that you are on the phone and they may leave a message for you.
Please note that when the line is busy (a combination of the phone off
the hook without conversation or placing of a call) the incoming call
will not go to Call Waiting but will be forwarded directly to your
Voicemail.
2. Enter your 10-digit telephone number (without spaces).
4. Click on “Settings” tab on the top right corner of the menu window and
on the sub-tab “Messaging”.
Activation by Internet
1. The Call Feature Manager web-tool at http://telephony.northerntel.ca.
Refer to the Online Help for a more detailed explanation.
14 call management services – how to use them
call management services – how to use them 15
5. In “Messaging” menu, you have to click on “Settings” sub-tab and
check “Auto-forward all voicemail messages to this e-mail address:”.
6. Enter an e-mail address on which you want to receive a redirect of
voice messages left in your Voicemail (ex: [email protected] or
[email protected] or yourname@email address (associated to your
Blackberry or other cell phone).
7. Check “Leave a copy of forwarded voicemail messages in the inbox”:
Important:
By unchecking this box, all voice messages will automatically be erased
from your Voicemail when they are transferred into your mailbox.
8. Click on Apply.
3. Click on button “New Entry” for starting to create a list of e-mail addresses or SMS (for instance: [email protected]
or [email protected]).
Wondering how to retrieve your SMS address? Simply compose a SMS
with your cell phone and send it to your e-mail address. Your SMS
address will appear on the e-mail received.
Example:
From: [email protected]
To: [email protected]
4. Check the box corresponding to the types of voice messages you want to
receive notification.
5. Click on Apply.
Notification by E-mail and SMS
As previously identified, these next steps will show you how you can receive a
notification message to one or more e-mail addresses as well as your cell
phone via a short text message (SMS).
Your Voicemail to E-mail service is now configured! All calls you receive
will also be forwarded to the Inbox that you identified in the website of the
Voicemail to E-mail.
1. At the “Messaging” tab (under “Settings”) click on “E-mail” sub-tab
(to receive notification by E-mail or SMS other than the one that you
defined on Step 6).
2. Check box “Send e-mail notification of incoming messages to the
following addresses”.
16 call management services – how to use them
call management services – how to use them 17
need help?
Ring Control
With ring control, you can program the number of times the phone rings before
Voice Mail picks up. You can choose any number of rings from zero to nine, and
you can change this number as often as you like.
Remember, your caller will hear one ring more then the number you select.
When you subscribe to Voicemail, the number of rings is set at three. This means
you hear three rings but your caller hears four.
How to programm Ring control:
• Pick up the receiver and wait for a dial tone.
Forgot your password
If you forgot your password, please call the technical assistance below.
Technical assistance
For technical assistance, please contact us during business week hours by
dialing 611 (in the prompt menu, choose Repair or Technical Support for your
telephone service).
Customer Service
If you have any questions about your telephone service, such as billling, adding
or removing other services, please contact us during business week hours:
• Dial *94.
• Dial 1-800-360-8555;
• Listen for three beeps followed by the dial tone.
• Enter your phone number, including the area code;
• Enter the number of rings:
• Press 1 for Telephone service, then;
0 for no ring
1 for one ring
2 for two rings
3 for three rings 4 for four rings
5 for five rings
6 for six rings
7 for seven rings
8 for eight rings 9 for nine rings
need help?
• Press 1 for Telephone service, then:
- For billing, press 1;
- For a change to your customer file, press 2;
- To order or for more information on our products and services,
press 3.
• Listen for two beeps to confirm the system has registered your request.
18 call management services – how to use them
need help? 19
voicemail at-a-glance
System Access
MAin Menu
Dial *98.
From outside, follow these steps:
• Dial your phone number.
• While listening to your
greeting, press *.
• E nter your password,
then press #.
1 - Listen to
your messages
2 - Send a message
3 - GREETINGS MENU
6 - ERASED MESSAGES
0 - HELP
When listening
Create a message
GREETINGS MENU
HELPFUL HINTS
HELPFUL HINTS
1 Hear/Repeat
2 Save / Marked as new on listening save messages
Common keys
1Enter the telephone
number followed by
the (#) (repeat the
operation for each phone
number).
3 Erase
4 Reply
2 P
ress # to go to
recording or press *
to cancel all entries.
6 Increase volume
5 Send a copy
7 Slow playback
6 Increase volume
77 Skip back 5 seconds
7 Slow playback
8 Pause/Resume
77 Skip back 5 seconds
9 Speeds playback
8 Pause/Resume
99 Skip forward 5 seconds
9 Speeds playback
11 Previous message
99 Skip forward 5 seconds
*
# Marked as new message
# Send the message
* Quit this menu
11 Previous message
1 Delivery options
Cancel input / Move up
a level
# E nd input /Move forward
in a list
3 A
fter the tone, record your
message and press #.
1 Personal greeting
2 Prolonged
absence greeting
3 S ys-Gen greetings and
Name recording
5 Busy greeting
6 O
ut of hour office
greeting
*
Quit this menu
These are the possible
options on an erased message
(keep in memory 10 days):
1 Hear/Repeat
# Next hint
1 Previous hint
*
Quit this menu
2 Restore
3 Permanently erase
4 Reply
5 Send a copy
11 Previous message
*
Quit this menu
Send the message
or
Delivery Options
4 - MAILBOX SETTING
7 – SWITCH ACCOUNT
SETTINGS
SWITCH ACCOUNT
1 Review your message
2 Marked as Urgent
3 Marked as Private
4 Re-record your message
5 Request a report on send
6 Request a report on read
7 Add / Delete a recipient
*
Quit this menu
1 Group list
2 H
andsfree and Time
Saver Options
3 Security Options
Enter the phone number
of the account on which
you want to switch and
the associated PIN
5 Notification Options
6 Additional Settings
*
Quit this menu
# Send the message as it is
20
21
2009-11
1-800-360-8555
northerntel.ca/telephony