1
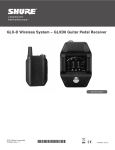
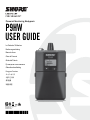
Personal Monitoring Bodypack P9HW USER GUIDE Le Guide de l’Utilisateur Bedienungsanleitung Manuale d’uso Guia del Usuario Guida dell’Utente Руководство пользователя Gebruikershandleiding Pengguna Panduan ユーザーガイド 사용자 안내서 用户指南 取扱説明書 © 2014 Shure Incorporated 27A23052 (rev. 1) Printed in China IMPORTANT SAFETY INSTRUCTIONS SAFETY PRECAUTIONS 1. READ these instructions. 2. KEEP these instructions. The possible results of incorrect use are marked by one of the two symbols—"WARNING" and "CAUTION"—depending on the imminence of the danger and the severity of the damage. 3. HEED all warnings. 4. FOLLOW all instructions. WARNING: Ignoring these warnings may cause severe injury or death as a result of incorrect operation. 5. DO NOT use this apparatus near water. 6. CLEAN ONLY with dry cloth. CAUTION: Ignoring these cautions may cause moderate injury or property damage as a result of incorrect operation. 7. DO NOT block any ventilation openings. Allow sufficient distances for adequate ventilation and install in accordance with the manufacturer’s instructions. CAUTION 8. DO NOT install near any heat sources such as open flames, radiators, heat registers, stoves, or other apparatus (including amplifiers) that produce heat. Do not place any open flame sources on the product. • Never disassemble or modify the device, as failures may result. • Do not subject to extreme force and do not pull on the cable or failures may result. 9. DO NOT defeat the safety purpose of the polarized or groundingtype plug. A polarized plug has two blades with one wider than the other. A grounding type plug has two blades and a third grounding prong. The wider blade or the third prong are provided for your safety. If the provided plug does not fit into your outlet, consult an electrician for replacement of the obsolete outlet. • Keep the product dry and avoid exposure to extreme temperatures and humidity. WARNING 10.PROTECT the power cord from being walked on or pinched, particularly at plugs, convenience receptacles, and the point where they exit from the apparatus. • If water or other foreign objects enter the inside of the device, fire or electric shock may result. • Do not attempt to modify this product. Doing so could result in personal injury and/or product failure. 11.ONLY USE attachments/accessories specified by the manufacturer. 12.USE only with a cart, stand, tripod, bracket, or table specified by the manufacturer, or sold with the apparatus. When a cart is used, use caution when moving the cart/apparatus combination to avoid injury from tip-over. This device is able to produce sound volume higher than 85 dB SPL. Please check your maximum allowed continuous noise exposure level based on your national employment protection requirements. 13.UNPLUG this apparatus during lightning storms or when unused for long periods of time. WARNING: This product contains a chemical known to the State of California to cause cancer and birth defects or other reproductive harm. 14.REFER all servicing to qualified service personnel. Servicing is required when the apparatus has been damaged in any way, such as power supply cord or plug is damaged, liquid has been spilled or objects have fallen into the apparatus, the apparatus has been exposed to rain or moisture, does not operate normally, or has been dropped. WARNING LISTENING TO AUDIO AT EXCESSIVE VOLUMES CAN CAUSE PERMANENT HEARING DAMAGE. USE AS LOW A VOLUME AS POSSIBLE. Over exposure to excessive sound levels can damage your ears resulting in permanent noise-induced hearing loss (NIHL). Please use the following guidelines established by the Occupational Safety Health Administration (OSHA) on maximum time exposure to sound pressure levels before hearing damage occurs. 15.DO NOT expose the apparatus to dripping and splashing. DO NOT put objects filled with liquids, such as vases, on the apparatus. 16.The MAINS plug or an appliance coupler shall remain readily operable. 17.The airborne noise of the Apparatus does not exceed 70dB (A). 18.Apparatus with CLASS I construction shall be connected to a MAINS socket outlet with a protective earthing connection. 90 dB SPL 95 dB SPL 100 dB SPL 110 dB SPL 115 dB SPL 120 dB SPL at 8 hours 19.To reduce the risk of fire or electric shock, do not expose this apparatus to rain or moisture. at ½ hour 20.Do not attempt to modify this product. Doing so could result in personal injury and/or product failure. 21.Operate this product within its specified operating temperature range. 1 at 4 hours at 15 minutes at 2 hours 105 dB SPL at 1 hour Avoid or damage may occur General Description Setup The Shure P9HW is a wired, two-channel stereo bodypack system designed to replace loudspeakers used for onstage monitoring. The portable, lightweight P9HW has several advantages over onstage monitor loudspeakers: it is less visible, offers improved clarity and control of sound, reduces the chances of feedback, and reduces stage clutter. It is a versatile system, designed for use in sound reinforcement applications including public address, live music, studio recording, broadcast, and theater. ① Insert batteries Use the Shure SB900 rechargeable battery pack or two AA batteries. ② Connect the bodypack to an audio source using the supplied Y-splitter cable Connect the 5-pin LEMO connector to the bodypack, with the red dot on the cable aligned with the notch inside the bodypack connector. Route the two XLR connectors on the cable to the appropriate mixer outputs. See the system overview diagram for a signal routing example. P9HW Bodypack Note: the bodypack can connect either directly to the mixer or through a patch bay on stage. ③ Put on the earphones and connect them to the headphone output The P9HW is designed to perform best with Shure earphones, but works with any headphones or in-ear monitors that have a standard 1/8-inch (3.5 mm) stereo plug. ④ Battery LED Indicates battery health Note: see the battery life table for specific runtime values ④ Turn the power on Turn the volume knob clockwise until it clicks to turn on the power. ⑤ Headphone Output Use earphones or headphones with a 3.5 mm (1/8-inch) plug ௦ ௧ ௨ ௩ Caution: do not turn the volume knob all the way up when turning the power on. ⑥ Display Shows settings and menu navigation ⑤ Slowly increase the volume until it reaches a comfortable level for listening To set a maximum volume limit, use the VLIMIT function. See the utilities section of this guide for more information. ⑦ Navigation buttons (▲▼) Use to scroll through menu and adjust settings ⑧ Exit button Press to return to previous screen ௪ ⑨ Enter button Press to enter a menu screen or to confirm a setting ① Audio Input Use the supplied Y-splitter cable to connect up to two sources. Important: Align the red dot on the cable with the notch inside the bodypack input. ② Clip Indicator Illuminates when the input is overloaded. Turn the volume down at the mixer until the light remains off. ③ Volume Knob / Power Switch Turn to power on/off and adjust headphone volume ⑩ Factory Service Window Used for importing firmware onto the bodypack at the factory (not user-serviceable) ⑪ Battery Compartment Uses a Shure SB900 rechargeable battery or two AA batteries ⑫ Removable AA Adapter Remove to use with a Shure SB900 rechargeable battery Instrument mix Note: To remove, open the door and slide the adapter out. To reinstall, press the adapter into place—there is an audible click when seated. System Overview 2 Vocal mix Audio Settings Utilities MODE STEREO: Audio from channel 1 is heard on the left earphone; audio from channel 2 is on the right earphone. CONTRAST Customize the display screen contrast by selecting a setting between low and high MIXMODE: Both channels are heard on the left and right earphones. The blend between mixes is adjustable. EQ LOCK PANEL Locks all controls except the volume knob to prevent accidental changes to settings Lock: Select UTILITIES > LOCK PANEL The parametric equalizer is divided into four frequency bands: LOW, LOW MID, HIGHMID, and HIGH. When the equalizer is enabled, the following parameters are adjustable: Unlock: Press the exit button and select OFF when the lock setting screen appears. Press enter to confirm. FREQUENCY: Select the center frequency of the band to boost/cut Q: Adjusts the width and slope of the frequency band (measured in octaves) BATTERY Displays remaining battery runtime (hours:minutes), health, temperature, status, cycle count, and voltage. Note: HIGH and LOW are shelf filters, and therefore do not have adjustable Q widths. The HIGH shelf is fixed at 10 kHz; the LOW shelf is fixed at 100 Hz. RESTORE Restores bodypack to factory default settings GAIN: Adjustable in 2 dB increments from -6 dB (cut) to +6 dB (boost) LOW 15 LOW-MID HIGH-MID HIGH AUTO OFF Automatically turns off the bodypack after a selectable amount of time (5, 30, or 60 min.) while it is in power-save mode or when connected to a charger with the power on. To restore power to the bodypack, the power switch must be turned off and then on again. 10 dB 5 +6 dB 0 GAIN Q -6 dB -5 Note: SB900 batteries charge fastest when the bodypack is off -10 -15 20 100 1k FREQUENCY (Hz) 10k 20k MixMode and Stereo Monitoring = Selectable frequencies VLIMIT (Maximum Volume) Set a value (-3 to -21 dB) to attenuate the highest possible volume level. Turning the volume knob through its entire range of motion still affects volume; the limit simply narrows the range of dB adjustment. The bodypack can operate in either of the following listening modes: Stereo (default) Note: The VLIMIT does not compress the audio. To operate in stereo mode, enter the menu and select AUDIO > MODE > STEREO . BAL MX / BAL ST (Balance) The behavior of the balance control depends on which mode the bodypack is set to: In stereo mode, audio from channel 1 is heard on the left earphone, while audio from channel 2 is heard on the right earphone. Listening in stereo increases clarity and separation between the sources on each channel. STEREO: Adjusts the left/right balance MIXMODE: Adjusts the blend between channel one and channel two INPUT Line (+4 dBu): Use with mixers and other professional devices that send a line-level signal AUX (-10 dBV): Use with consumer electronic devices, such as MP3 players or computers. Left (Channel 1) Right (Channel 2) Adjusting Balance To adjust the left/right balance, select AUDIO > BAL ST. Use the ▲▼ buttons to change the setting. 3 MixMode Shure SB900 Rechargeable Battery In MixMode, the blend between two monitoring mixes (an instrumental mix and a vocal mix, for example) is adjustable. The signal is mono, which means each mix is heard through both the left and right earphones. Shure SB900 lithium-ion batteries offer a rechargeable option for powering the bodypack. Batteries quickly charge to 50% capacity in one hour and reach full charge within three hours. To operate in MixMode, enter the menu and select AUDIO > MODE > MIXMODE. Single chargers and multiple bay chargers are available to recharge the Shure batteries. Adjusting mix blend Caution: Only charge Shure rechargeable batteries with a Shure battery charger. To adjust the blend between channel 1 and channel 2, enter the menu and select AUDIO > BAL MX. Use the arrow buttons (▲▼) to make adjustments. In this scenario, an instrumental mix is on channel 1 (left) and a vocal mix is on channel 2 (right): Single Bay Charger The SBC-100 single bay charger offers a compact charging solution. 1. Plug the charger into an AC power source or USB port. MIXMODE 10L 2. Insert a battery into the charging bay. Instruments 3. Monitor the charging status LEDs until charging is complete. Charging Status LED Instruments Vocals Vocals To hear more of channel one (instruments), shift the balance towards the left. MIXMODE 10R Instruments Vocals Color Status Red Charging Green Charging Complete Amber Flashing Fault: check connections and battery Off No battery in bay LED Vocals Multiple Bay Chargers Instruments Shure offers three models of multiple bay chargers: • SBC200 two bay charger To hear more of channel two (vocals), shift the balance towards the right. • SBC210 two bay charger • SBC800 eight bay charger Multiple bay chargers can charge individual batteries or batteries installed in bodypacks. Balance and Mix Adjustments from the Home Screen To make quick adjustments to the stereo balance or mixmode blend, use the arrow buttons (▲▼) while in the home screen. If necessary, use the lock feature to prevent any accidental adjustments. 1. Plug the charger into an AC power source. 2. Insert batteries or transmitters into the charging bay. 3. Monitor the charging status LEDs until charging is complete. 4 Charging Status LED Optional Accessories and Replacement Parts Color Status Green Charging Complete Green/Red Charge level above 90% Red Charging Dual-XLR to 5-pin LEMO cable PA720 Amber Flashing Fault: check connections and battery Shure Lithium-Ion Rechargeable Battery SB900 Off No battery in bay AA battery adapter Important Tips for Care and Storage of Shure Rechargeable Batteries Proper care and storage of Shure batteries results in reliable performance and ensures a long lifetime. • Always store batteries and bodypacks at room temperature • Ideally, batteries should be charged to approximately 40% of capacity for long-term storage • During storage, check batteries every 6 months and recharge to 40% of capacity as needed Battery Life Battery Indicator Total Battery Life Tri-Color Battery LED Approximate Hours Remaining (h:mm) Alkaline Shure SB900 Rechargeable Battery Green 9:00 to 7:10 9:50 to 7:50 Green 7:10 to 5:25 7:50 to 5:55 Green 5:25 to 3:35 5:55 to 3:55 Green 3:35 to 1:45 3:55 to 2:00 Amber 1:45 to 0:50 2:00 to 1:00 Red < 0:50 < 1:00 9:00 9:50 Note: Battery life using Energizer™ brand AA Alkaline batteries and the following conditions: • Receiver audio set to EQ = OFF, V LIMIT = OFF • Audio output at bodypack: Pink noise at 100 dB SPL in ear with SE425 earphones (impedence at 20 Ω) Power-save mode: When there are no earphones plugged in for 5 minutes, the receiver enters power-save mode to preserve battery life. The LED slowly fades on/off in this mode and continues to display the color that represents the remaining battery life. 5 65A15224 Dynamic MicroDriver earphones SE112 Dynamic MicroDriver earphones SE215 High-definition MicroDriver earphones with tuned bass port SE315 High-definition earphones with dual MicroDrivers SE425 High-definition earphones with triple MicroDrivers SE535 High-definition earphones with quad MicroDrivers SE846 Pin Assignments Certifications 1 This product meets the Essential Requirements of all relevant European directives and is eligible for CE marking. 1 Meets essential requirements of the following European Directives: • Low Voltage Directive 2006/95/EC 2 5 5 3 4 4 2 • EMC Directive 2004/108/EC • WEEE Directive 2002/96/EC, as amended by 2008/34/EC 3 • RoHS Directive 2002/95/EC, as amended by 2008/35/EC Note: Please follow your regional recycling scheme for batteries and electronic waste Bodypack 5-pin connector (female) Industry Canada ICES-003 Compliance Label: Cable 5-pin connector (male) Pin Signal Right XLR Left XLR 1 Shield 1 1 2 + 2 -- 3 - -- 3 4 + 3 -- 5 - -- 2 CAN ICES-3 (B)/NMB-3(B) The CE Declaration of Conformity can be obtained from Shure Incorporated or any of its European representatives. For contact information please visit www.shure.com The CE Declaration of Conformity can be obtained from: www.shure.com/ europe/compliance Authorized European representative: Shure Europe GmbH Headquarters Europe, Middle East & Africa Department: EMEA Approval Jakob-Dieffenbacher-Str. 12 75031 Eppingen, Germany Phone: 49-7262-92 49 0 Fax: 49-7262-92 49 11 4 Email: [email protected] Red dot = Pin 1 Note: EMC conformance testing is based on the use of supplied and recommended cable types. The use of other cable types may degrade EMC performance. Please follow your regional recycling scheme for batteries, packaging, and electronic waste. XLR connectors marked: L= Left / R=Right 6 Specifications Audio Frequency Response 20 Hz–20 kHz (±3 dB) Signal-To-Noise Ratio A-Weighted 98 dB (typical) Total Harmonic Distortion @ 1 kHz, typical <0.2% Channel Separation @ 1 kHz >55 dB Operating Temperature -18°C to +63°C Minimum Load Impedance 9.5 Ω Dimensions 99 x 66 x 23 mm (3.9 in. x 2.6 in. x 0.9 in.) H x W x D Net Weight 196 g (6.6 oz) (with batteries) Battery Life 9 hours (continuous use) AA batteries Audio Input Connector Type LEMO Configuration Electronically balanced Input Impedance Line 45 kΩ Aux 66 kΩ Nominal Input Level switchable: +4 dBu(Line), –10 dBV(Aux) Maximum Input Level +4 dBu(Line) +20 dBu -10 dBV(Aux) +8 dBu Phantom Power Protection Up to 60 V DC Audio Output Connector Type 3.5 mm (1/8") 7 Europe, Middle East, Africa: PT. GOSHEN SWARA INDONESIA Kompleks Harco Mangga Dua Blok L No. 35 Jakarta Pusat I.16.GSI31.00501.0211