1
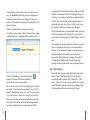
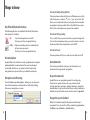
SpeakQ User Guide Contents 3 Getting started Please read this section to get started using SpeakQ quickly................................. 3 SpeakQ features.................................................................................................. 4 What you need to get started.............................................................................. 5 Install SpeakQ..................................................................................................... 6 Register software................................................................................................ 6 7 Using SpeakQ What can I do with SpeakQ?................................................................................ 7 8 Training SpeakQ 14 Things to know New WordQ Buttonbar buttons......................................................................... 14 Dictation Options............................................................................................... 14 Microphone on/off settings................................................................................ 14 Immediate undo................................................................................................ 15 No speech commands........................................................................................ 15 Recognition speech feedback............................................................................. 15 16 Speak and select 19 Speak continuously 23 Backing up and restoring Backing up a recognition profile......................................................................... 23 Restoring a recognition profile........................................................................... 24 1 Getting started 25 Appendix A: Taking care of your voice 27 Appendix B: Creating training texts 28 Appendix C: Punctuation marks 29 Service and support 30 Acknowledgements Thank you for purchasing SpeakQ. Please read this section to get started using SpeakQ quickly. Speak Q is a speech recognition software which works with WordQ to provide you with a writing tool that is sophisticated and powerful, yet clear and easy to use. SpeakQ was researched and developed at the Bloorview Kids Rehab, one of the largest children’s rehabilitation hospitals in North America, in partnership with the Education Development Centre (Newton, MA) under a US Department of Education grant. Your WordQ with SpeakQ combination offers several unique features: simplified training with speech prompting, speech feedback of recognized words and phrases, seamless integration with word prediction, a choice of discrete or continuous dictation and no voice commands (just text and punctuation). It benefits a wide range of users, from those with severe spelling and writing difficulties to those who simply have to write a lot. For some people it is a way of finally being able to communicate in writing, for others it is a simple tool for a busy life. Please become familiar using WordQ before using SpeakQ. 2 3 SpeakQ features What you need to get started SpeakQ is a simple-to-use speech recognition plug-in to WordQ Writing Software. With SpeakQ you can: To install and use the SpeakQ plug-in, you need: • Enjoy all of the existing benefits of WordQ • Train speech recognition using training text of your choice • Train using speech prompting if you have difficulty reading the training text • Work directly within any standard application (e.g. Microsoft Word, Wordpad, Outlook) • Dictate either continuously into a document or discretely into the word prediction box • Dictate in phrases or individual words • Hear what the computer recognizes • Type, use word prediction, or speak-to-write at any point in your writing • Make corrections using speech-enabled word prediction • Back-up and restore your speech profile • Use speech recognition without having to learn and memorize speech commands • WordQ 2 software pre-installed • A Windows PC with 1 GHz or higher processor speed (2+ GHz preferred) • Windows® NT (SP 6+), 2000, XP, or Vista • Sound card, noise-canceling microphone (headset or desktop), and headset or desktop speakers. WordQ with SpeakQ plug-in software has been designed for individual PCs. Only one user may run a single copy at a time. However, that copy may be used by more than one user, each with a different user vocabulary file. Make sure that your Windows user account has administrator privileges before proceeding with the installation. WordQ software must be installed directly on an individual PC. However, if you are connected to a network and the user has a login account, then it is possible to configure the PC to store and retrieve WordQ user files from the user’s network directory. For detailed information on configuring such network installations please refer to the Support page on www.wordq.com. Note If you have a current WordQ 2 with SpeakQ demonstration version installed, you can simply register it with the serial number provided. There will be no SpeakQ icon on your desktop – you will access the features of SpeakQ from within WordQ 2. 4 5 Using SpeakQ Install SpeakQ 1. Put the SpeakQ software CD in your computer. 2. If the CD Autoplay feature is turned on, you will be asked to install SpeakQ. If the CD Autoplay feature is turned off, open the CD from My Computer then double-click on Install.exe. 3. Follow the onscreen instructions. 4. The following software will be installed: • SpeakQ™ plug-in for Windows NT/2000/XP/Vista • Microsoft® Speech 5.1 Drivers • Microsoft® English (U.S.) v6.1 Recognizer (except Vista) Register software 1. Double-click the WordQ 2 desktop icon to run WordQ 2. You will be prompted to register the SpeakQ plug-in. Type in your name, your organization (optional) and the serial number that is provided on the back cover of your SpeakQ CD case. This serial number is in three groups – 3, 6 and 3 numbers. The WordQ buttonbar will then appear with two new buttons as shown below: What can I do with SpeakQ? You can do everything that WordQ does, plus you can write by speaking. At any time you have the choice of typing with the keyboard, using word prediction, or speaking straight into your text. Speech recognition and word prediction are integrated to enhance the effectiveness of each other. You can train SpeakQ to recognize your speech using texts provided that match your reading level or you can write your own training texts. Once you have finished training, you can dictate words or phrases directly into your documents similar to other speech recognition software. You can also use SpeakQ’s unique speech-enabled word prediction. Here, spoken words are displayed as a list of choices enhanced by word prediction. You then choose from the prediction box using the keyboard or mouse, or type letters to further refine the suggestions. Recognized words and phrases are immediately read aloud to help you identify mis-recognitions. To help you make any corrections, highly accurate word predictions are suggested by combining speech with predictive information. As a result, the desired word can be selected with a minimum number of keystrokes. It may take you some time to work out for yourself how to balance typing with speaking. Everyone is different. 6 7 Training SpeakQ It’s a good idea to read the whole of this section before you start the training – that way you will know what to expect and your training will be more successful. Note Please review the vocal hygiene recommendations provided in Appendix A at this time. Before using SpeakQ you must create a speech recognition profile and train it so that SpeakQ recognizes your speech. You will read several training texts aloud. Each involves speaking for about 2 – 5 minutes. You will need to do several of these, with breaks in between, so that SpeakQ can work more accurately. (You need to train at least 800 – 1,000 words, or about 15 minutes of your speech for best results.) If you find that recognition is poor when you come to dictating, then do some further training, preferably with text that is similar to what you want to write (see Appendix B: Custom training text). Note The SpeakQ speech training interface described below has been designed for a user who has difficulty with reading. If this is not your case, you can use the standard Microsoft speech training wizard located under Start>Control Panel>Speech. This wizard allows somewhat faster training without speech prompting. microphone with earphones that allows you to hear the speech feedback privately without disturbing others. You may also use a directional desktop microphone and desktop speakers if you are using the computer in a quiet environment. (In a classroom, it is suggested that you sit at the back facing the front of the class so that the microphone does not pick up sounds from the teacher or other students.) You should not change your microphone once you have trained SpeakQ with it. If you do change microphones, or change places where you use SpeakQ, then you should create a new speech profile for each situation and repeat training in each. There are no limits on the number of speech profiles that you may create. Step 2: Do a quick test of your microphone. Choose Speech recognition...> from the Options menu. Speak a phrase. You should see a moving horizontal green bar displayed in the microphone section. If you do not see this moving bar while speaking, make sure that your microphone is connected and that the correct microphone is selected from the drop-down list in this section. (You may have several possible microphones listed.) Step 1: Connect your microphone You must connect to your computer a quality noise canceling microphone (certified for speech recognition). A USB microphone is often best. Consider using a headset 8 9 Step 3: Choose the recognition engine Ensure that only a Microsoft English Recognizer is chosen. • NT/2000/XP: choose Microsoft English (U.S.) v6.1 Recognizer • Vista: choose Microsoft Speech Recognizer 8.0 for Windows SpeakQ will not work with any non-Microsoft recognition engine that may be displayed. Step 4: Create a speech recognition profile Click the New button in the Speech recognition dialog to create a new recognition profile. When you are ready, speak a sentence. (You can read the sentence shown, or you can make up your own.) Speak normally. The system will automatically adjust the volume of the microphone as you now speak. Pause after you speak and the Next> button should become available which you should now click. If it is not available, speak another sentence and pause. The next step in the wizard tests your speakers/headset. Enter a name for your profile, such as your personal name (e.g., Tom) and click OK. This name will now appear in the list of recognition profiles. Step 5: Adjust the microphone/speaker volume 10 In this step, speak a sentence and then pause. You should hear whatever you said through the speakers/headset. If you don’t hear anything, check to make sure they are plugged in, powered and turned on (if necessary), and the volume adjusted. Click Next> when satisfied. Step 6: Train your speech A microphone wizard will then be displayed to adjust the volume of your microphone. Click the Train... button in the Speech recognition dialog to begin training your recognition profile. Click Next> on the first page to display the page below. You will first be prompted to choose a training text. Choose a text that is at an appropriate level (beginner, 11 intermediate, or advanced) and in an area of interest to you. (See Appendix B for creating your own training texts.) A training window will now be displayed. The upper portion of the window will display the training text, one phrase at a time. Click on the Train button to begin your training. You will see a short piece of text at the top of your screen. It will be read to you and highlighted word-by-word. prompted with the next phrase. After a while you should find that you develop a rhythm of reading/listening and speaking – your training should then go quite smoothly. If you do not say everything or the computer does not recognize your voice, do not worry. After a short pause, the computer will say any remaining words again. Take a break whenever you need one by clicking on Pause. Click Train to continue with training. If you get stuck on a word and it is not recognized, just click on Skip to skip that word. If you happen to say the wrong word, and the computer thinks it is correct, do not stop. Just continue with the training. You do not have to make any corrections now. Along the bottom of the window you will notice a progress bar that indicates your progress through the training. When all of the text is trained the SpeakQ training window will close and save your trained profile. Step 7: Repeat training When the highlighting stops and the ‘go’ icon appears at the top of the training window, say the phrase into your microphone. Note It is necessary to wait for the highlighting to stop before you speak – the microphone automatically turns off while SpeakQ is highlighting the text so it won’t ‘hear’ you. Speak in your normal voice – not too fast, slowly, loud, or quietly. Repeat this training procedure with more training texts. At least three of the full training texts (i.e., all parts) provided should be trained. This is about 800 – 1,000 words, or about 15 minutes of your speech. You can take a break between trainings or do them on different days. The recognition will improve with more training. After you speak, the computer will write down what you have said in the bottom section of the training window. Once the complete phrase is recognized, you will be 12 13 Things to know Turn mic off: while editing (default) New WordQ Buttonbar buttons The microphone automatically turns off whenever you: click with the mouse; use the , or keys; or press Esc. This allows you to make edit without worrying about unwanted recognitions being inserted. Click on the Mic button or press F8 to turn the microphone on again when needed. The following buttons are added to the WordQ buttonbar after SpeakQ is installed: Turn mic off: after speaking Mic Turn the microphone on and off. Click or press F8 (or assigned hot key). RePlay Replay a recording of your (selected) text to hear your own voice. Click or press F6 (or assigned hot key). Dictation Options SpeakQ offers two dictations modes, Speak and select and Speak continuously which are described in the next two chapters. Associated with these is an option to limit single-word recognition to only words from your WordQ vocabulary. Microphone on/off settings From the Options>Speech Recognition... dialog you can choose to have the microphone automatically turn off while editing, after every recognition, or never. This is useful when you occasionally use speech recognition. Turn on the microphone when you want to insert a word or phrase and then the microphone turns itself off. Turn mic off: never The microphone will stay on until you manually turn it off. Immediate undo Press Esc to immediately undo any text entered in your document through speech recognition. No speech commands SpeakQ focuses on recognizing words for writing only. There are no speech commands (e.g., command and control, selection, correction, editing, selection, navigation, capitalization) to get confused with your writing. However, a limited set of punctuation marks can be used (see Appendix C). Recognition speech feedback When first installed SpeakQ will speak back whatever is recognized. You can turn this off by unchecking Speak words in the Options>Speech Feedback...>Feedback dialog. 14 15 Speak and select If you speak a single word, you may see several similar sounding words. If you speak a short phrase, you may only see a single recognized phrase. It is suggested that you speak in short phrases (3 – 5 words). Speak and select is one of two available speech recognition modes with SpeakQ. Here, spoken words are displayed as a list of choices enhanced by word predictions. You then select from the list of words or phrases (using the keyboard or mouse), or type letters to further refine the suggestions. When SpeakQ is first installed, Speak and select mode is automatically chosen. You can manually choose this mode by choosing Speech Recognition... from the Options menu and then select it under Dictation. This dialog also includes an option to limit single-word recognitions to only words from your vocabulary. Step 1: Start a writing application Start a writing application such as Microsoft Word. The prediction box will appear as you normally have it set. Step 2: Turn on microphone Turn on the microphone by clicking the Mic button or by pressing F8. Step 3: Speak a word or phrase. Speak a word or short phrase. Notice that while the computer is recognizing your voice, an ellipsis (...) is shown in the prediction box. After you pause, your recognized text is displayed and the most likely recognition will be spoken. 16 At this point, it is suggested that you simply practice speaking and reviewing the recognized words or phrases. You can hear each word or phrase in the prediction box by using the usual WordQ method of pressing the key or mousing over the words. When listening to the words, you can select them with the Enter key or by clicking them. Note Only words contained within your WordQ user vocabulary are suggested in the Speak and select mode. You can increase the accuracy of recognition by typing a single letter to limit the suggested recognized words to those beginning with that letter. Step 4: Select a word or phrase If the word or phrase that you want is in the prediction box, you can select it as you would with any predicted word. If your word or phrase is not shown, speak again. As soon as you select a word or phrase, it will be typed into your application. It will also be spoken aloud. Step 5: Correcting within a recognized phrase SpeakQ temporarily remembers whatever you just said and makes those words available for you to use as word predictions. You can then quickly re-create the original phrase in a few keystrokes when changing/adding/ deleting one or two words. 17 Speak continuously For example, consider having to change the word “is” to “was” if the phrase “this is going to be difficult” is shown in the prediction box. Instead of selecting the phrase in the prediction box, begin typing, i.e., start with the letter “t.” The word “this” will be at the top of the predicted list. Select it and “is” will be at the top of the next predicted list. At this point, select “was” from the list instead of “is.” (If your desired new word is not shown, type one or more letters until it is shown and select it.) Then the words “going; to; be; difficult” will be at or near the top of each subsequent list. Step 6: Adding punctuation In the Speak and Select mode, you must type punctuation marks rather than speak them. Step 7: Additional training At first, you may be disappointed with recognition in comparison to the training where the training text is known in advance and your recognition appears perfect. In actual use, the computer does not know what you are saying in advance. With practice, the recognition will improve. You will also learn how to dictate more comfortably leading to better recognition. Additional training may be required if you are not satisfied with the recognition, preferably with text that is similar to what you want to write (see Appendix B: Custom training text). Further, with time, you will work out your own strategy for combining speech with typing and word prediction. 18 Speak continuously is the second of two available speech recognition modes with SpeakQ. Here, your spoken words are typed directly into your document as you say them. You can manually choose Speak continuously by choosing it under the Dictation section of the Options>Speech Recognition... dialog. This dialog also includes an option to limit singleword recognitions to only words from your vocabulary. Step 1: Start a writing application Start a writing application such as Microsoft Word. The prediction box will appear as you normally have it set. Step 2: Turn on microphone Turn on the microphone by clicking the Mic button or by pressing F8. Step 3: Speak a phrase It is recommended that you speak in short phrases. While you can speak individual words, recognition accuracy is better with short phrases. Notice that while the computer is recognizing your voice, an ellipsis (...) is shown in the prediction box (if visible) and in WordQ’s titlebar. After you pause your recognized text is immediately written down in your document and spoken out. 19 Step 4: Correcting within a recognized phrase There are three ways to make corrections: • use the keyboard and type over any errors; • press Esc to quickly undo the recognized phrase and speak the phrase again; or Step 6: Correcting within your document • press Esc to quickly undo the recognized phrase and use Begin by taking advantage of WordQ’s proofreading features to review your document for any errors. Exit proofreading to make corrections. In this last method, SpeakQ temporarily remembers whatever you just said and makes those words available for you to use as word predictions. You can then quickly re-create the original phrase in a few keystrokes when changing/adding/deleting one or two words. You can review a small phrase by highlighting it and pressing the Read button to hear it spoken. You can also hear what you actually said in your own voice (if you used speech recognition for that phrase) by pressing the RePlay button. This voice replay feature is available as long as your document has not been closed. speech-enabled word prediction. For example, consider having to change the word “is” to “was” if the phrase “this is going to be difficult” has been recognized and typed out. After pressing Esc to quickly undo the recognized phrase you will notice that the word “this” is immediately at the top of the predicted list. Select it and “is” will be at the top of the next predicted list. At this point, select “was” from the list instead of “is.” (If your desired new word is not shown, type one or more letters until it is shown and select it.) Then the words “going; to; be; difficult” will be at or near the top of each subsequent list. Step 5: Inserting punctuation You may speak common punctuation marks rather than type them (see Appendix C). It is generally easier to type punctuation on the keyboard. WordQ then automatically adjusts spacing around 20 punctuation marks and capitalizes the first word in a sentence if this option is checked under Options>Prediction... >Prediction. Note The quality of your own voice recording is limited. You then have a choice of typing over or inserting new text by voice or by keyboard with the help of speechenabled word prediction. Whenever speech information is available, it will be combined with word prediction when editing individual words. Step 7: Training new words You can add new words with unusual spelling and/or pronunciation, such as proper names. Choose Train Word.... from the Options menu. Type in your word. Click the Record Pronunciation button and speak the word clearly. Once recorded, the word will be added to the Dictionary list. You may add as many new words as you wish now or at a later time. Close this dialog when done. 21 Backing up and restoring Note Training new words does not add those words to your prediction vocabulary if they are not already included. Manually add them to your vocabulary through the Options>My Words... dialog if necessary. Step 8: Additional training At first, you may be disappointed with recognition in comparison to the training where the training text is known in advance and your recognition appears perfect. In actual use, the computer does not know what you are saying in advance. With practice, the recognition will improve. You will also learn how to dictate more comfortably leading to better recognition. Additional training may be required if you are not satisfied with the recognition, preferably with text that is similar to what you want to write (see Appendix B: Custom training text). Further, with time, you will work out your own strategy for combining speech with typing and word prediction. Hint It is always a good idea to make sure that you know exactly what you want to say before you start speaking. It is helpful to say a phrase in your head first before speaking out loud. It is recommended that you back up your recognition profile immediately after you have completed training it. This profile is separate from your user vocabulary, although the name of your current profile is recorded with your vocabulary. You should also back up your recognition profile on a regular basis. Hint Consider using a different file name each time that you back up your recognition profile ( e.g., Tom1, Tom2, Tom3). Then, if something goes wrong with your recognition profile, you can then recover to a time when it was working without having to redo all of your training. Backing up a recognition profile 1. Select Speech Recognition... from the Options menu. 2. Choose the recognition profile that you wish to back up. 3. Then click the Back-up button. A Save As dialog will be displayed. 4. Enter a name for the back-up file. It will then be saved in a compressed format with a “.pfr” extension under ...(My) Documents\WordQ 2 Users. You can transfer a back-up file to another computer by copying it to a USB “thumbdrive” or by burning it onto a CD. 22 23 Appendix A: Taking care of your voice Restoring a recognition profile 1. Select Speech Recognition... from the Options menu. 2. Choose the recognition profile that you wish to back up. Then click the Restore button. An Open dialog will be displayed. 4. Locate and select the desired back-up file (with a “.pfr” extension). You will then be prompted to enter a name for the profile to restore. 5. You can: It is very important to take care of your voice when you are using speech recognition. If you have frequent hoarseness, loss of speech, sore throats, pain or discomfort when speaking, or if speaking starts to require significant effort, do not use speech recognition. If these problems persist and are not associated with a cold or other illness, please contact a speech-language pathologist or an ear, nose and throat specialist. • accept the default name which is the same as the file name We recommend the following when using speech recognition: • type an existing name in the recognition profile list; or • Speak in your natural speech. Speak the same way you would to a person sitting right in front of you. Do not whisper, speak extra loudly or put extra emphasis on words. • type a new name Note Be aware every computer is different and that a recognition profile may not work as well if restored on a different computer than the one on which it was created. • Relax. Stay relaxed when using the system. Make sure that you are sitting comfortably and able to maintain good posture. • Breathe in through your nose. This helps prevent dryness. Do not breathe too shallowly or exaggerate your breathing. Keep your shoulders down. • Take frequent breaks. Take a break of at least 10 minutes every 30 to 60 minutes, or more often if required. During your breaks drink water, and relax. 24 25 Appendix B: Creating training texts • Drink water frequently. Drink water throughout use of speech recognition, not just during breaks. Small sips of water help prevent dryness. • Speak with varied intonation. Using intonation (i.e., a singsong pattern in your voice) will help you vary your pitch and avoid speaking in a monotone, which can stress your voice. • Humidify the room. Ensure that the environment in which you are speaking is not too dry. Use a humidifier if necessary. • Keep dust to a minimum. Dust can irritate your throat. • Limit use when feeling ill. Don’t do too much speech recognition if you have a cold or are feeling ill. Pay extra attention to how your speech sounds and how your throat feels. Take more breaks and drink more frequently. Try not to speak as much as usual. AVOID • Smoking. Speech recognition should be used in a room that is free of smoke. Smoking is not recommended for speech recognition users. • Throat clearing. Many people are not aware that they frequently clear their throat when talking. When you feel the need to clear your throat, take a drink of water and swallow hard instead. • Excessive coughing. If coughing is unavoidable, do this as gently as possible. You can create your own training text files from samples of your own writing or from any other source. Training texts are simply text files, created in the word processor of your choice, using text characters only ( i.e., no numbers) and simple punctuation. These are then saved in text-only format with a “.txt” extension. 1. Find or write your piece of text. Press Enter after each sentence to separate it from the next. 2. Break each sentence into ‘chunks’ (5 or 6 words per chunk is a good average but you can choose how many or how few you have). 3. Type out your text, inserting the # symbol after each chunk. This is an example of how a training text file might look: Introduction to Speech Recognition Please repeat what the computer says. Speak clearly in your normal voice. Do not talk too fast,# or too slowly. After you speak,# the computer will write down# what you have said. If you do not speak everything,# do not worry. The computer will speak# any remaining words again. This speech training# will help the computer# better recognize your voice. 4. Save your training text in a text-only format in a folder such as ...(My) Documents\WordQ2 Users. 26 27 28 Appendix C: Punctuation marks Service and support To write Say Whichever way you use SpeakQ and WordQ, we hope you enjoy it. . Period , Comma : Colon ; Semi-colon ? Question mark ! Exclamation point & Ampersand @ At sign or at \ Backslash / Slash - Hyphen -- Dash = Equals + Plus sign # Pound sign % Percent sign $ Dollar sign “ Quote If there’s any way we can help you with any questions, please feel free to get in touch, by phone, fax, email or regular mail. Quillsoft Ltd. 2416 Queen Street East Toronto, Ontario CANADA M1N 1A2 Tel: Fax: Web site: Support: Sales: (001) 416-698-0111 or 1-866-629-6737 (001) 416-698-1555 http://www.wordq.com [email protected] [email protected] (001) 905-726-2853 • 1-800-726-7784 29 Acknowledgements The following people are thanked for their contributions to the development of SpeakQ: Shae Birch, Teresa Brown, Olivia Date, Bob Follansbee, Colin Laine, Tom Nantais, Rose Nishiyama, Fraser Shein, Cynthia Tam, Chen Wang Original training texts were authored by Olivia Date. We also wish to thank the many beta testers, end-users, educators, and clinicians who have contributed valuable ideas and feedback. The following are thanked for the financial support provided for the development of SpeakQ: • Ontario Rehabilitation Technology Consortium • Education Development Center (Newton, MA) with funding from the National Institute of Disability and Rehabilitation Research, US Department of Education Grant No. H133G000204-02 • Quillsoft Ltd. 30